Soft Romantic Makeup using UD Naked 3

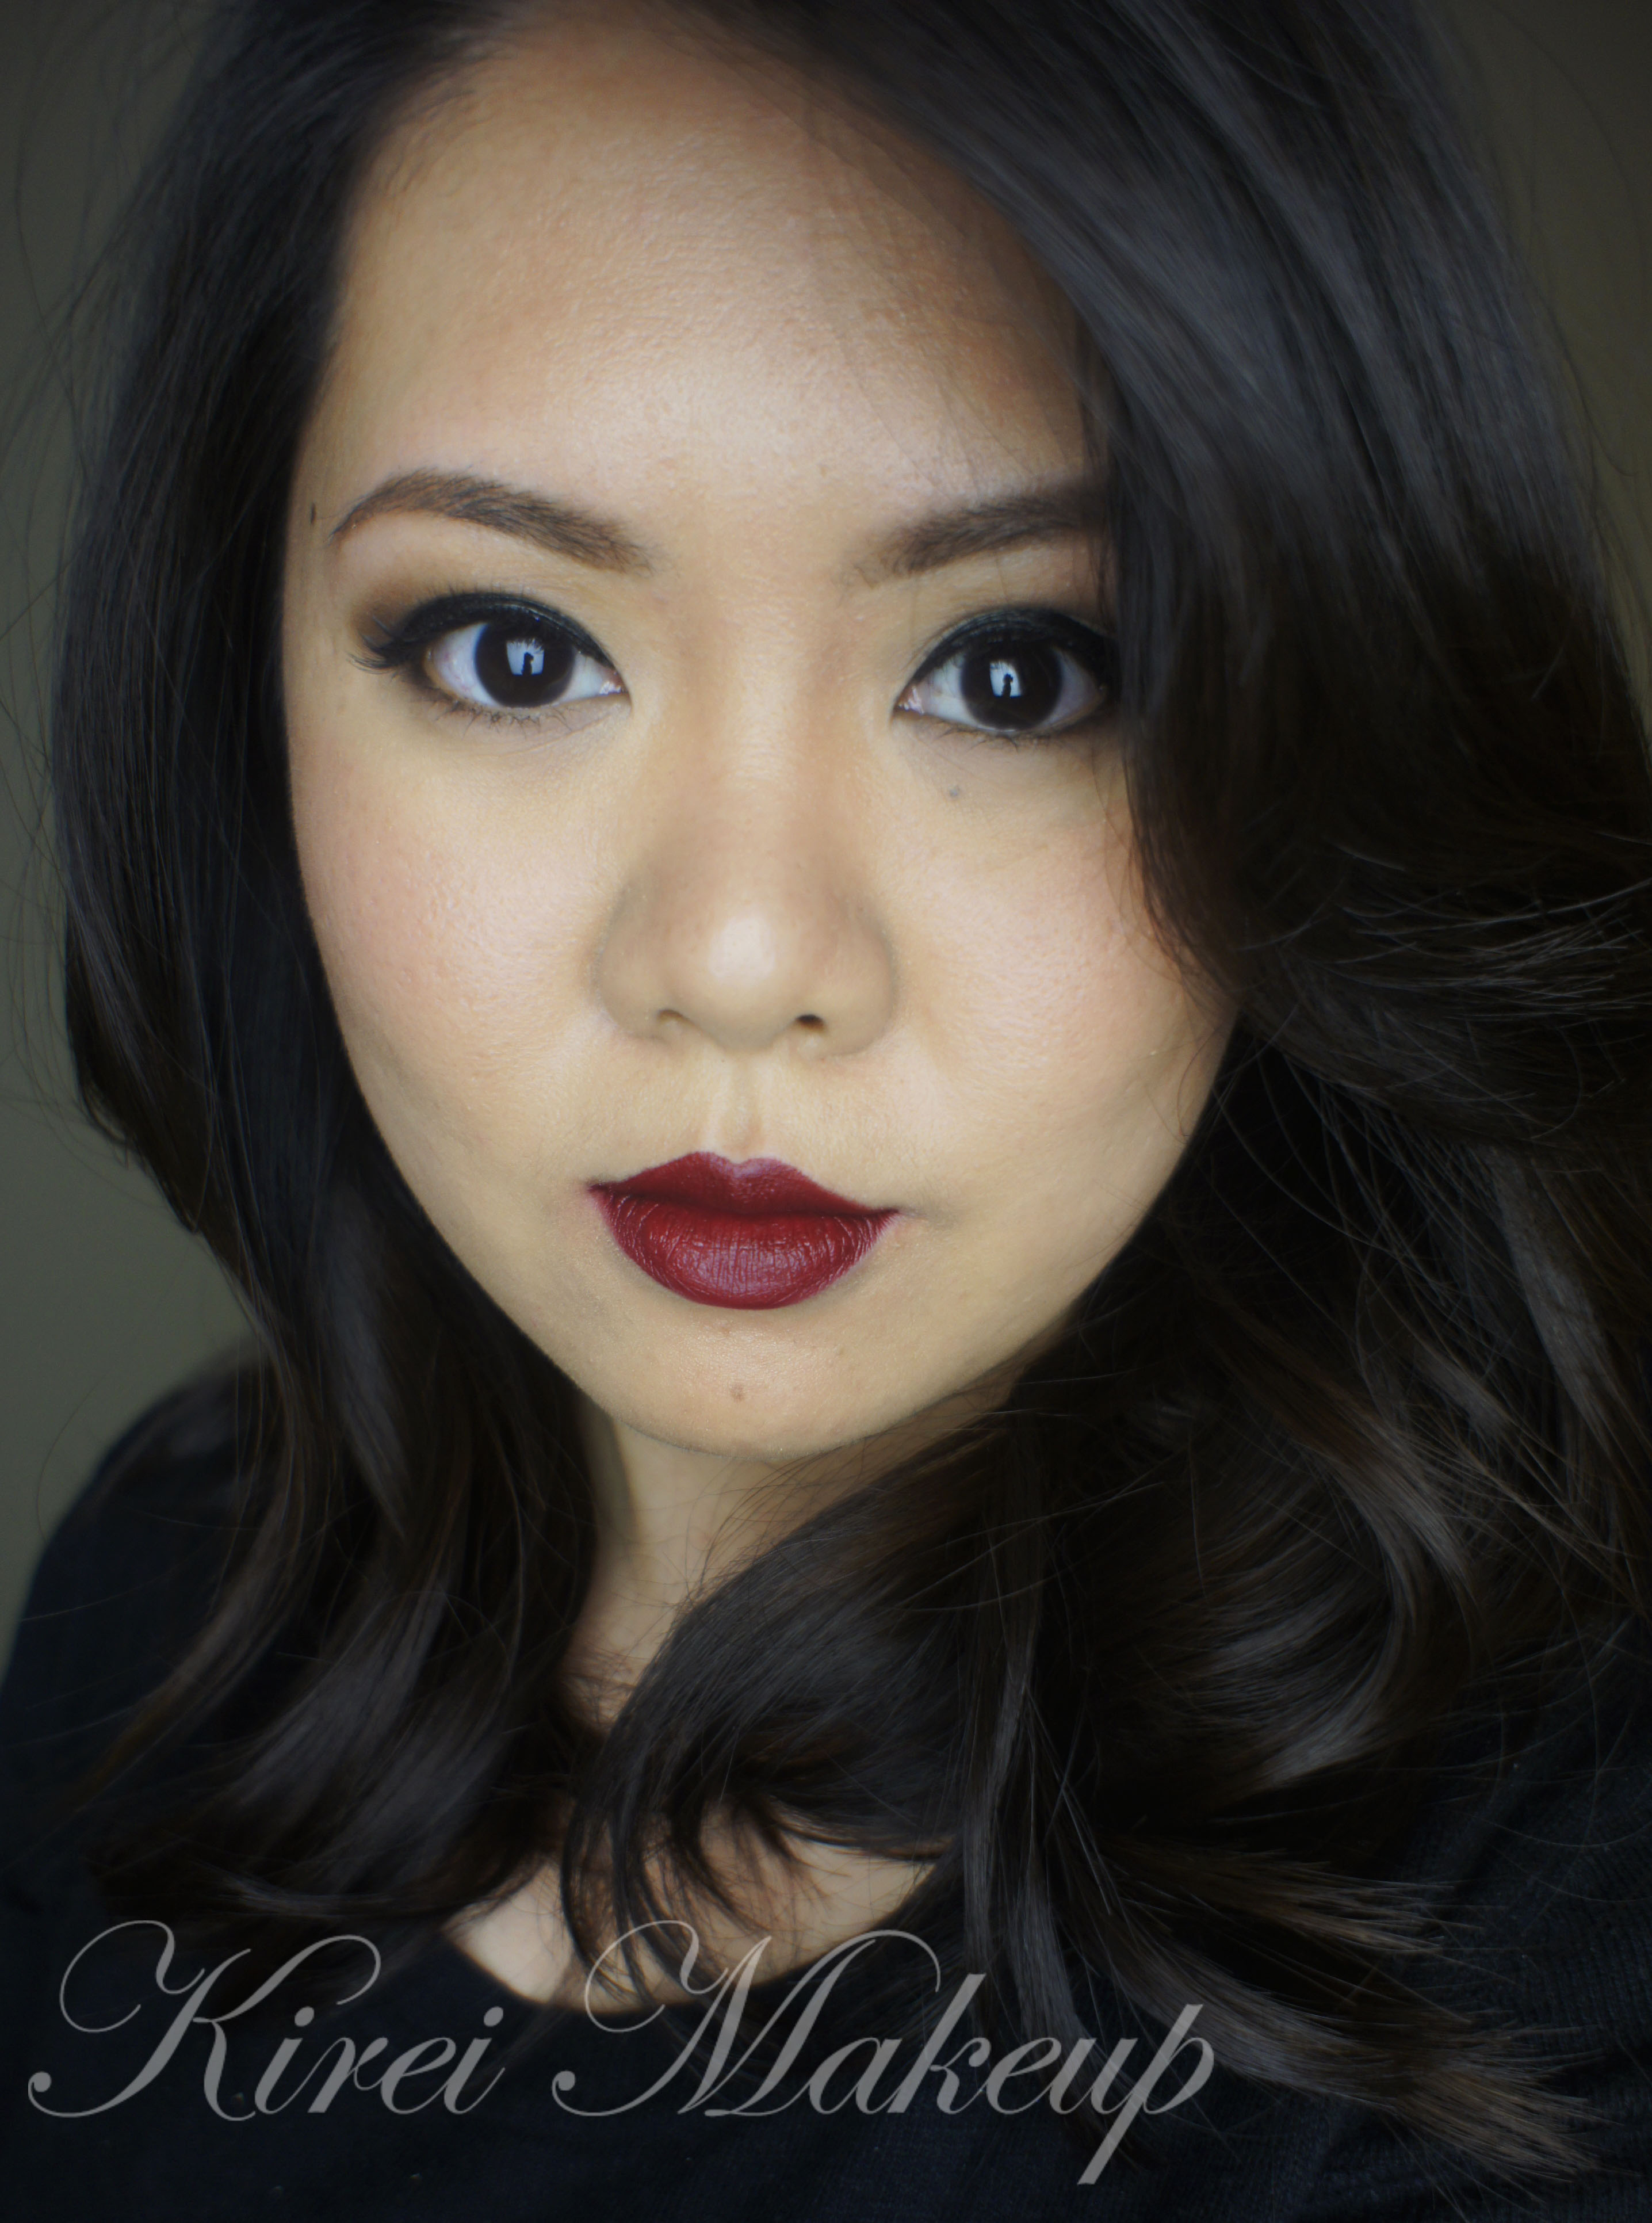
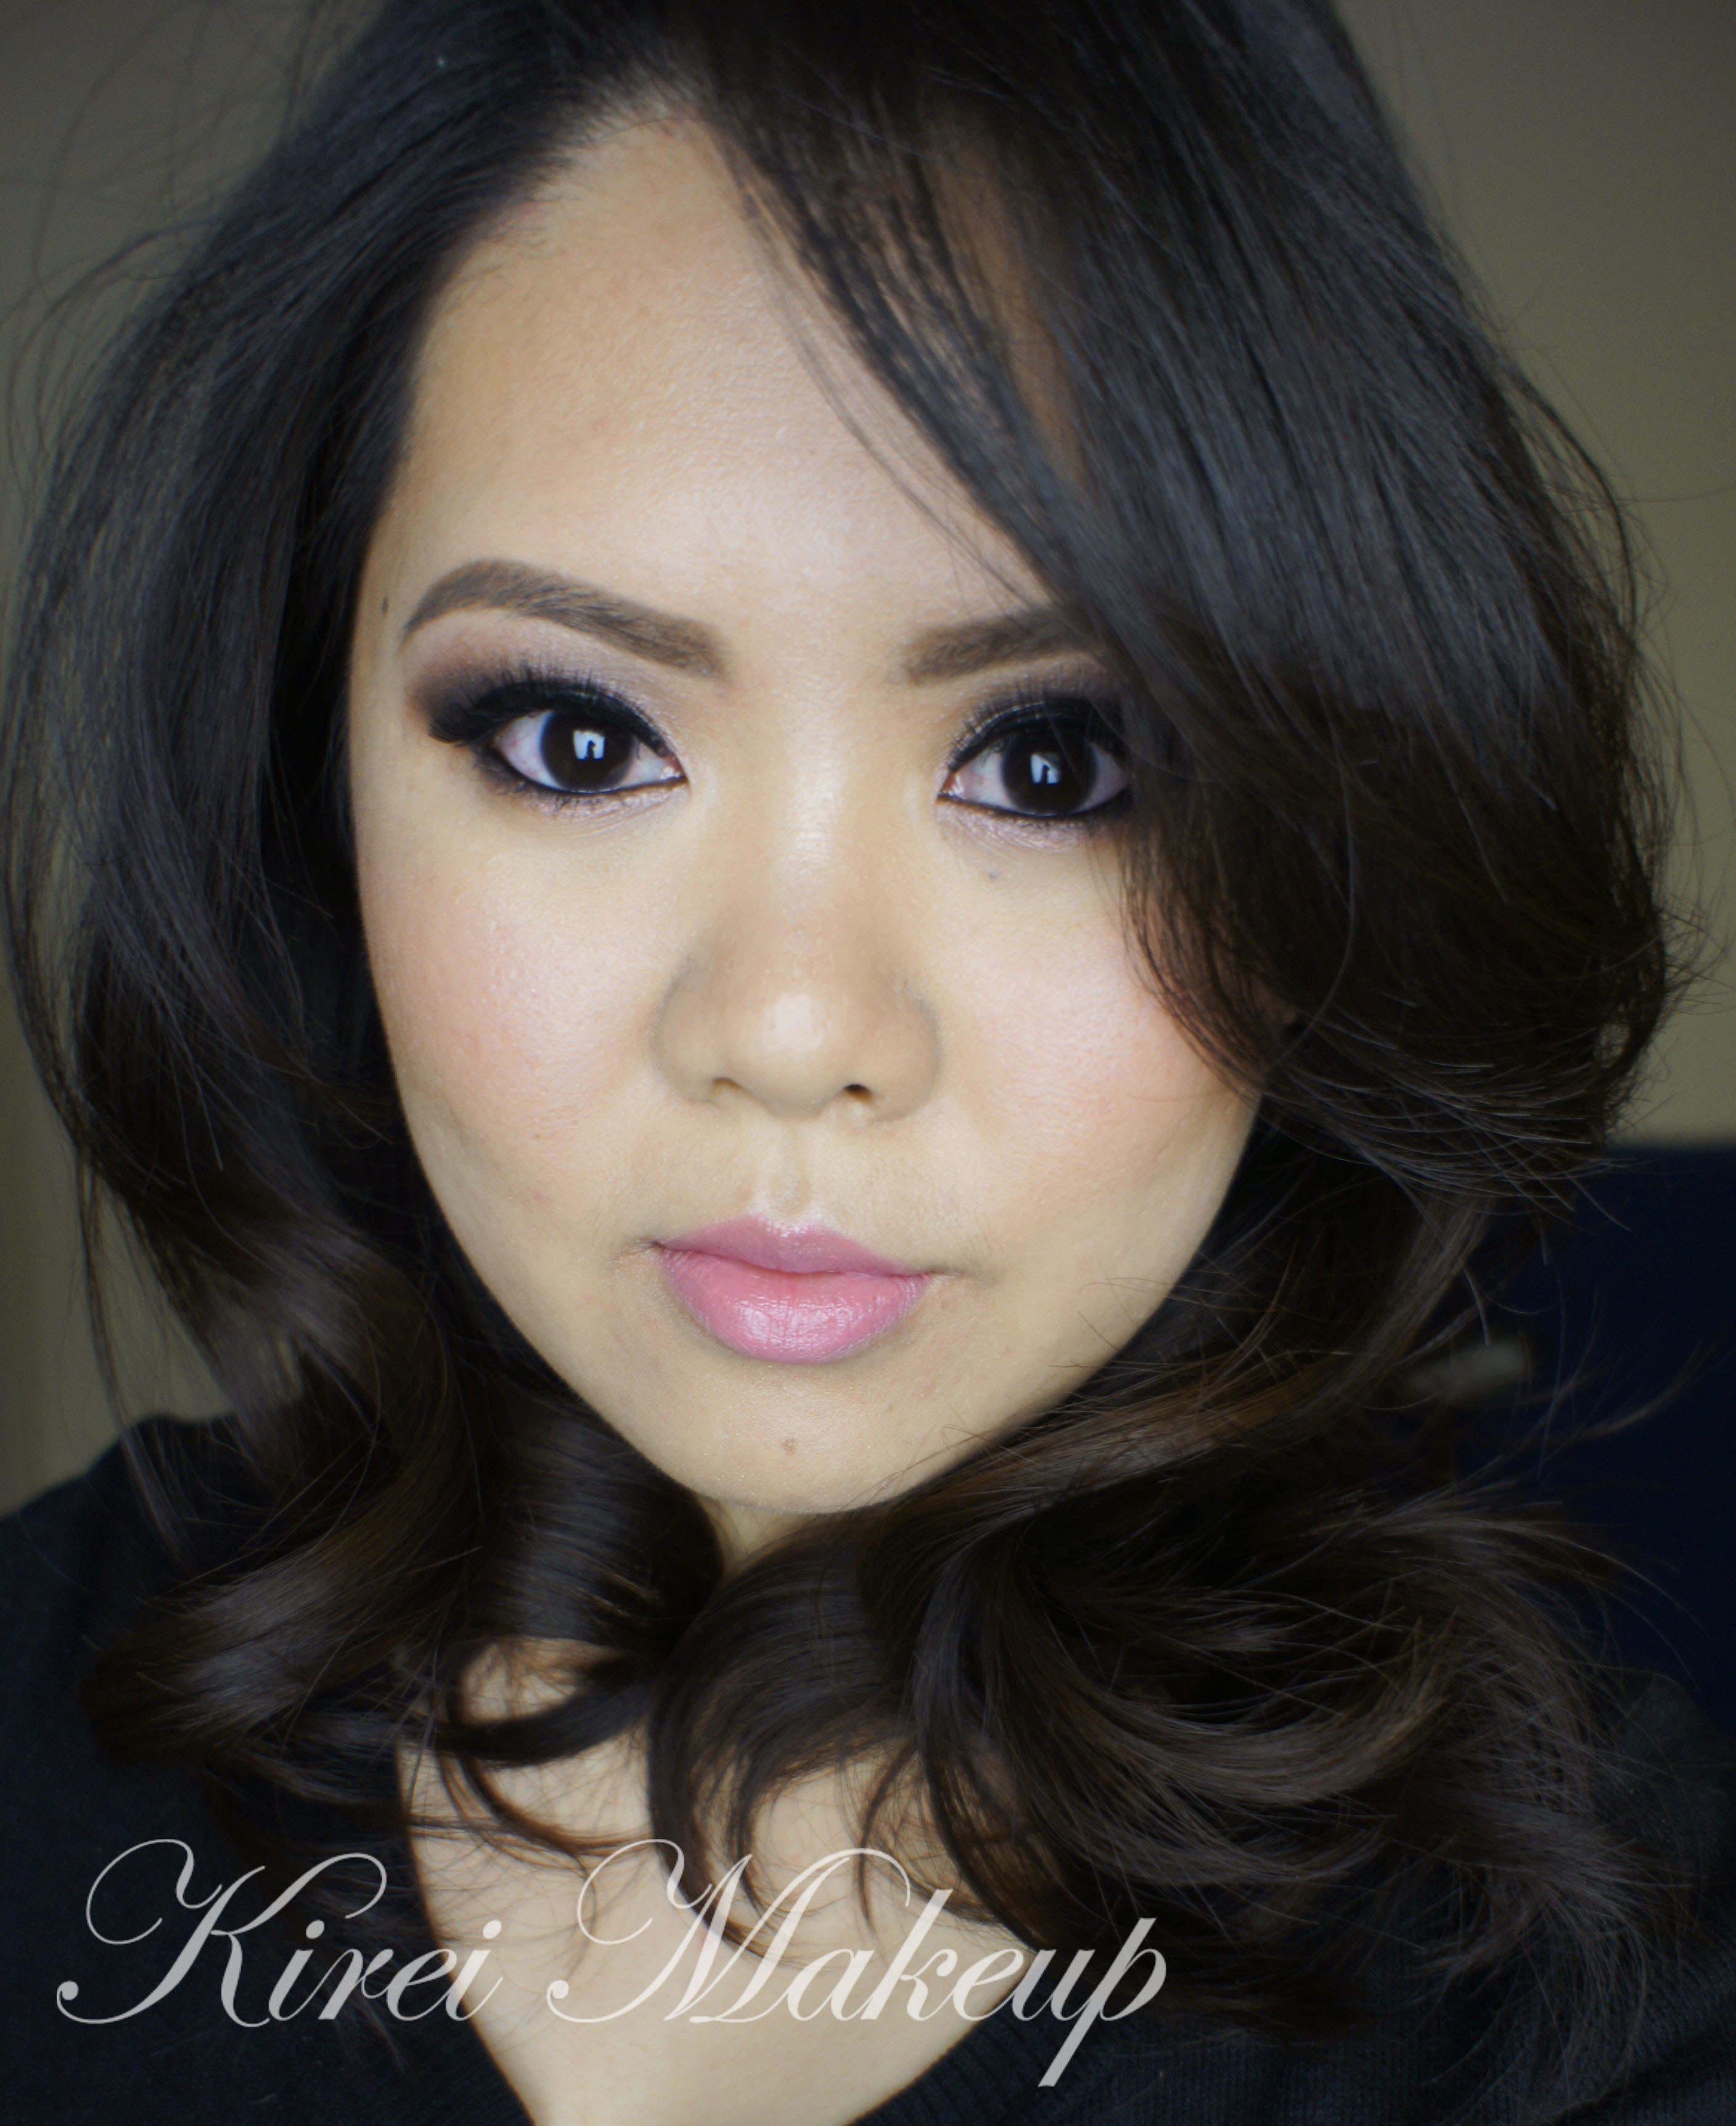
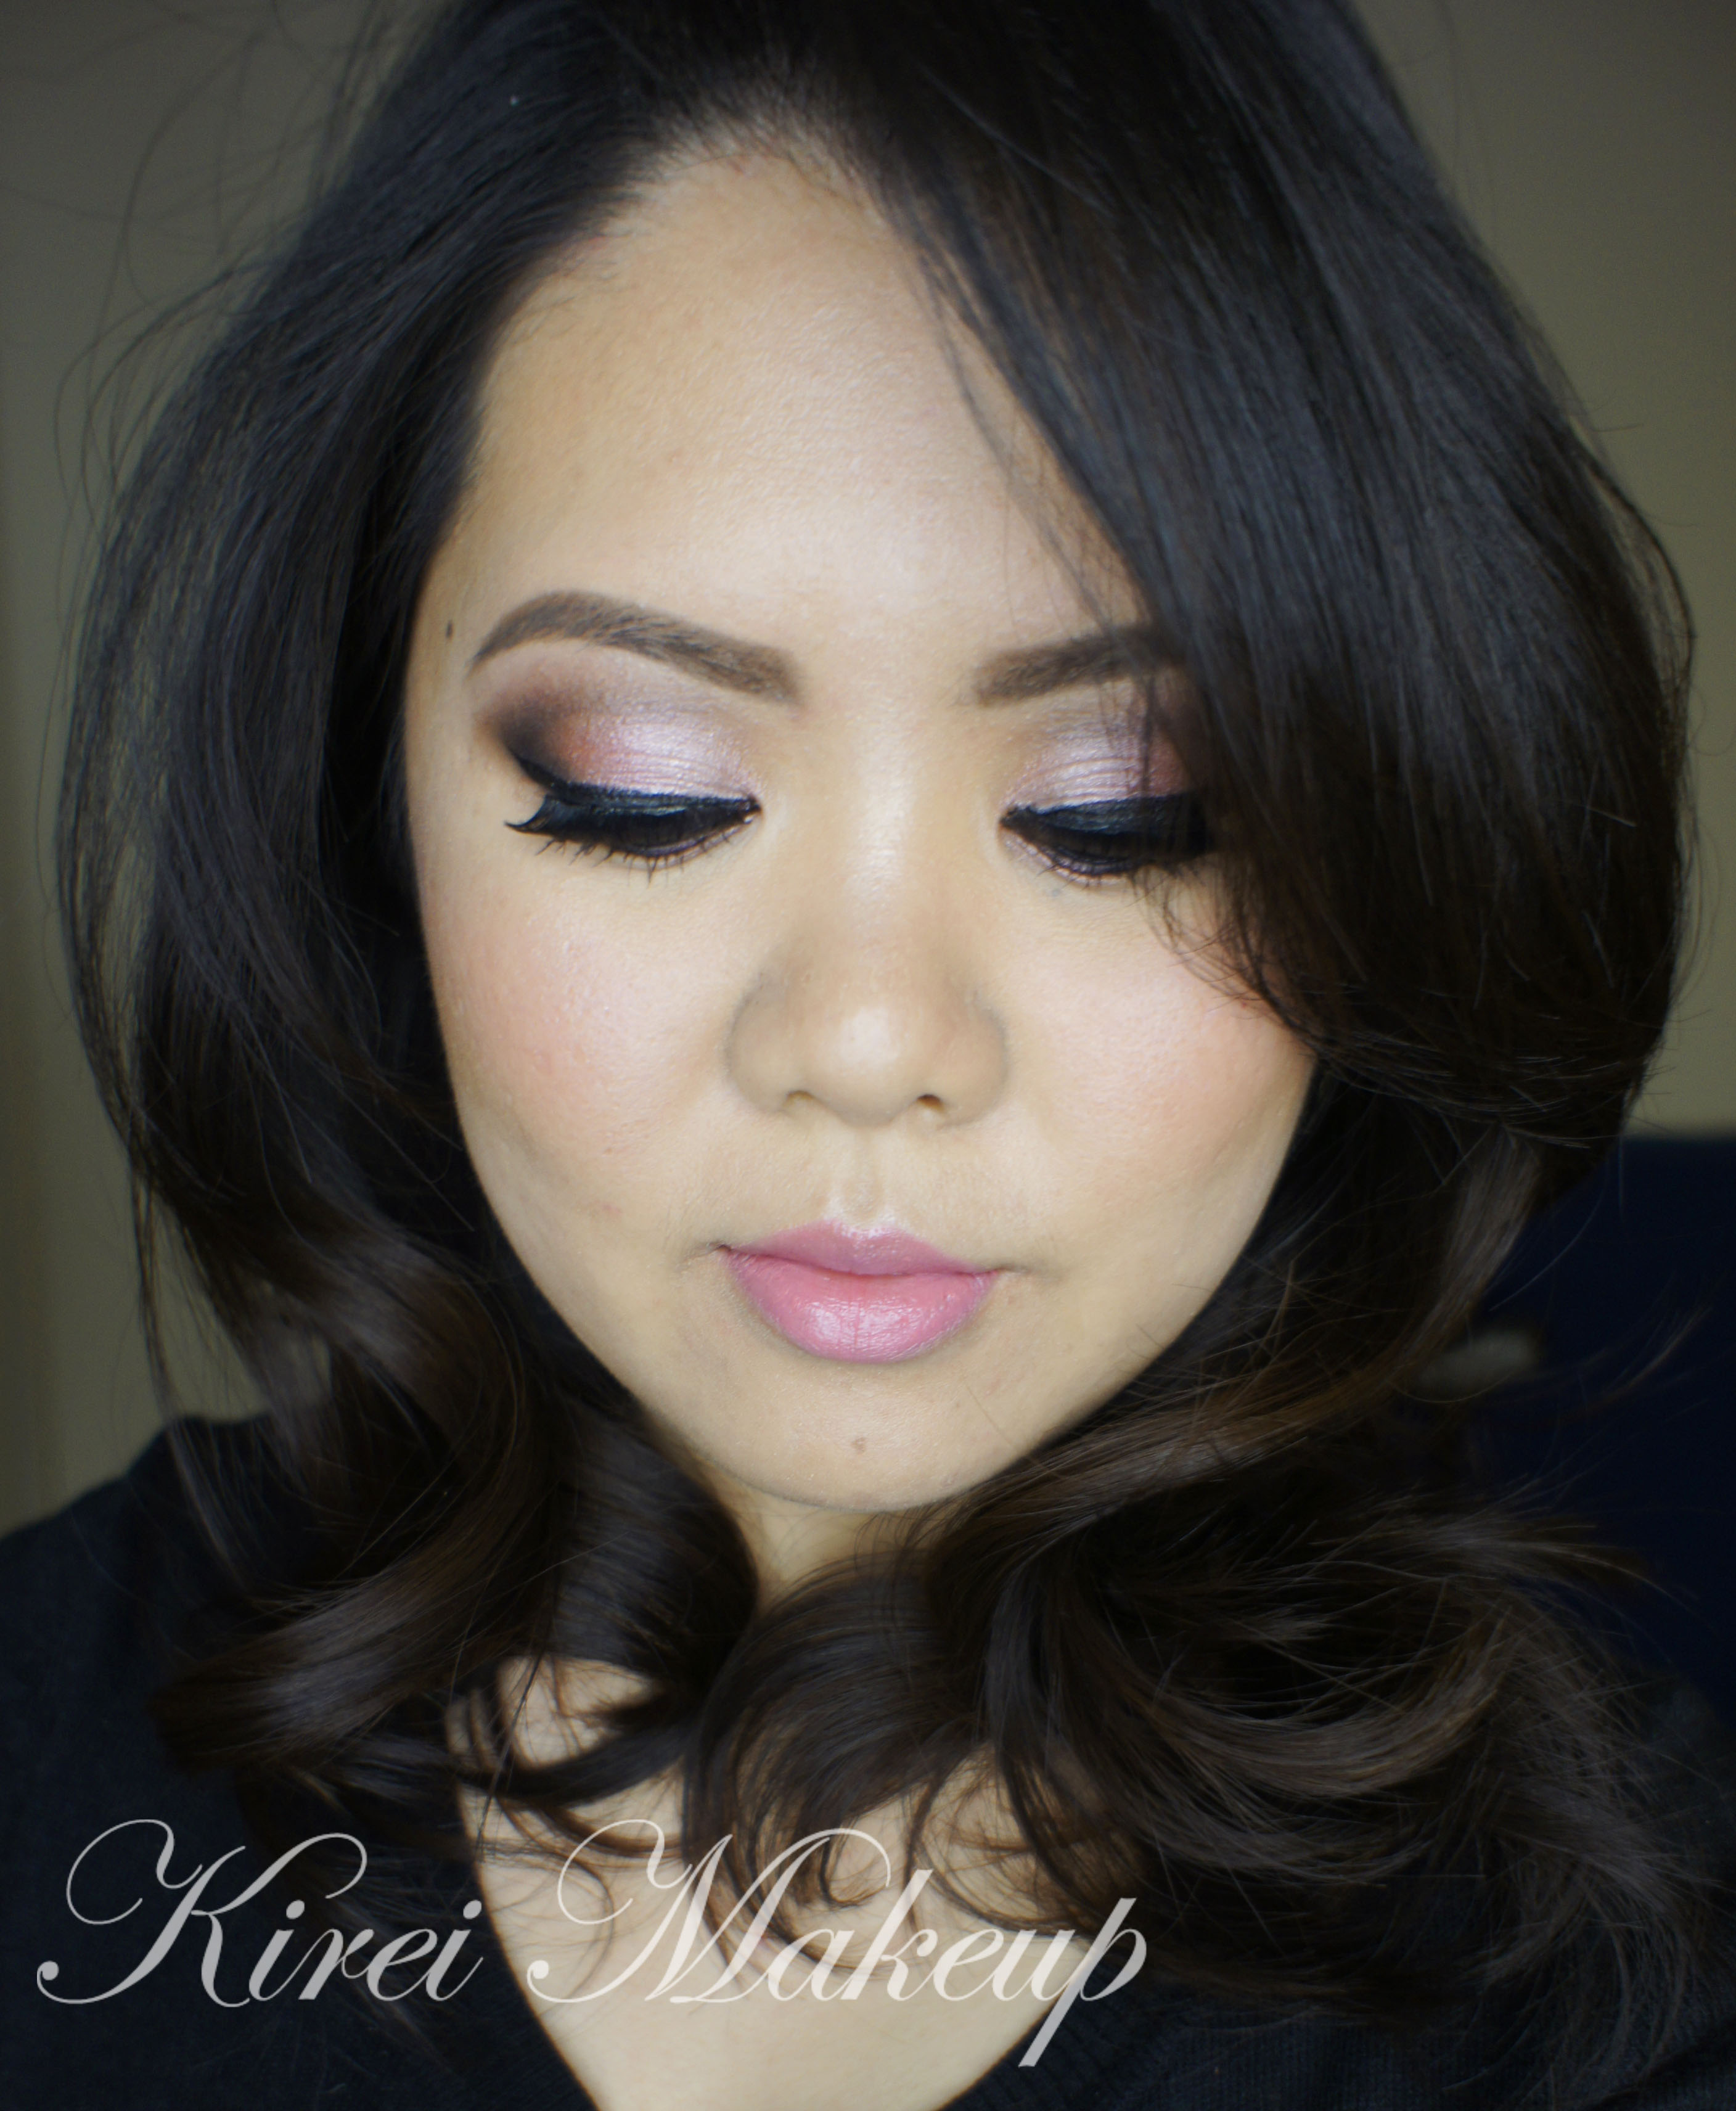
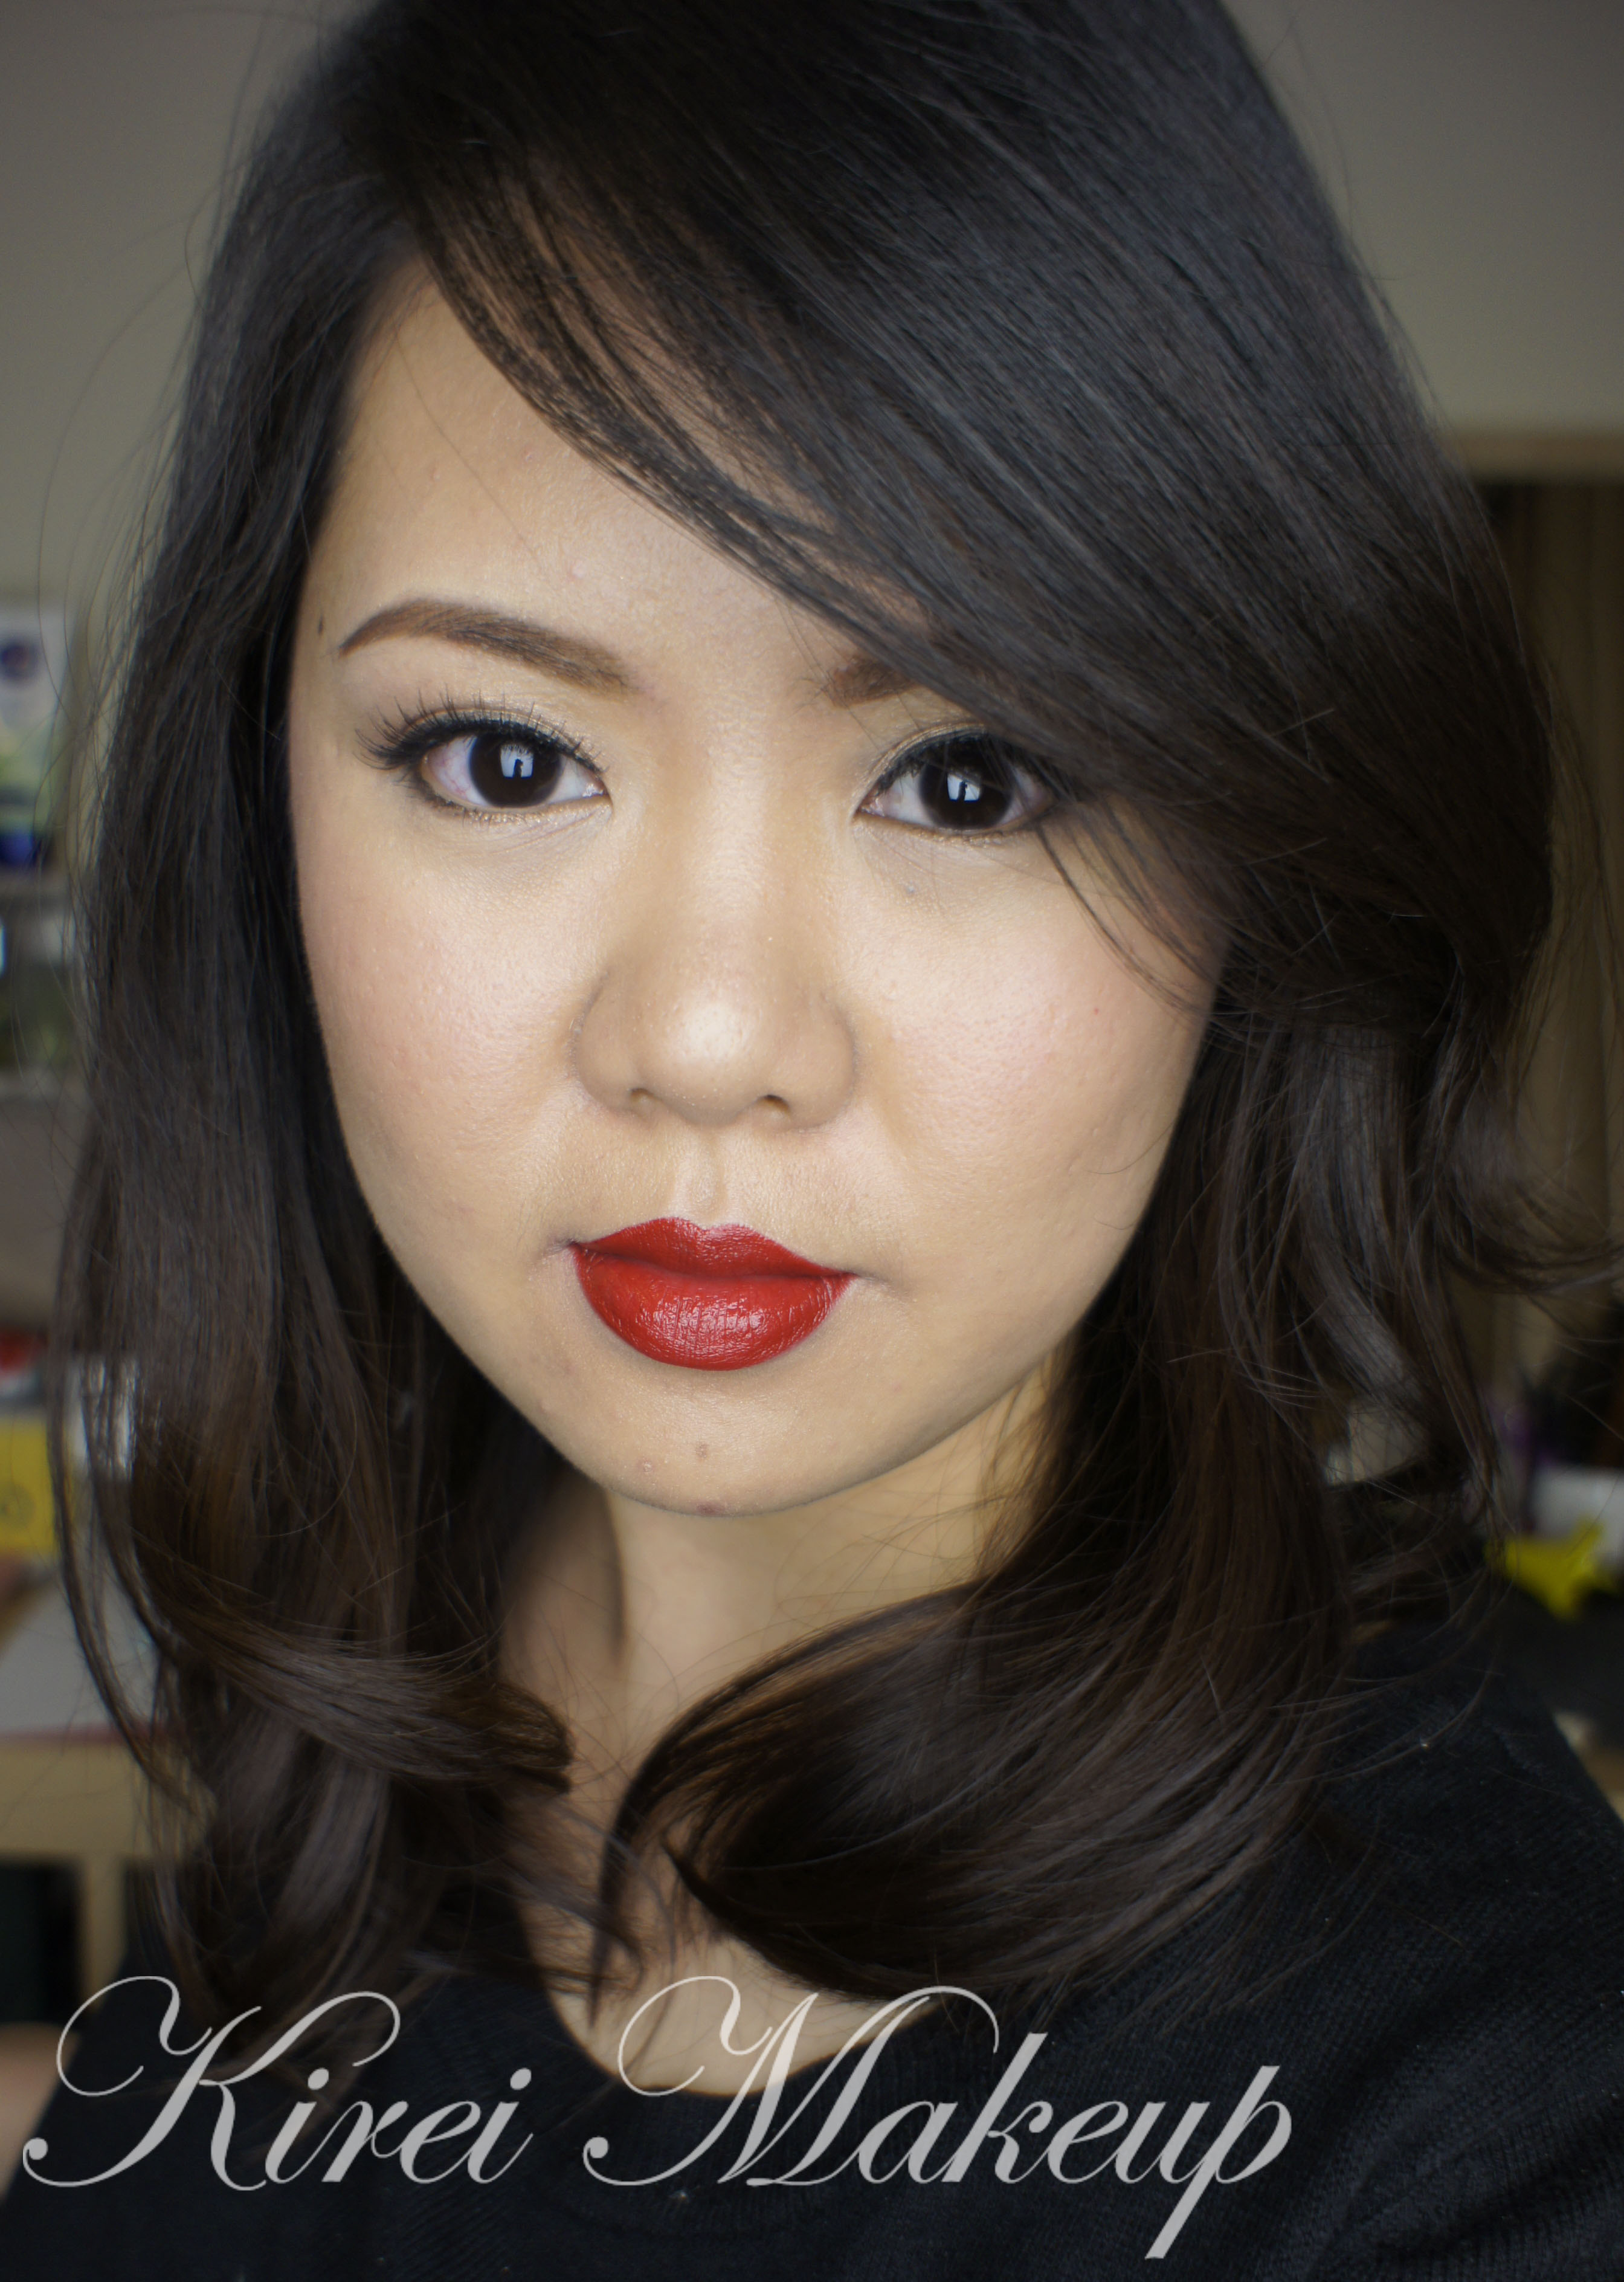
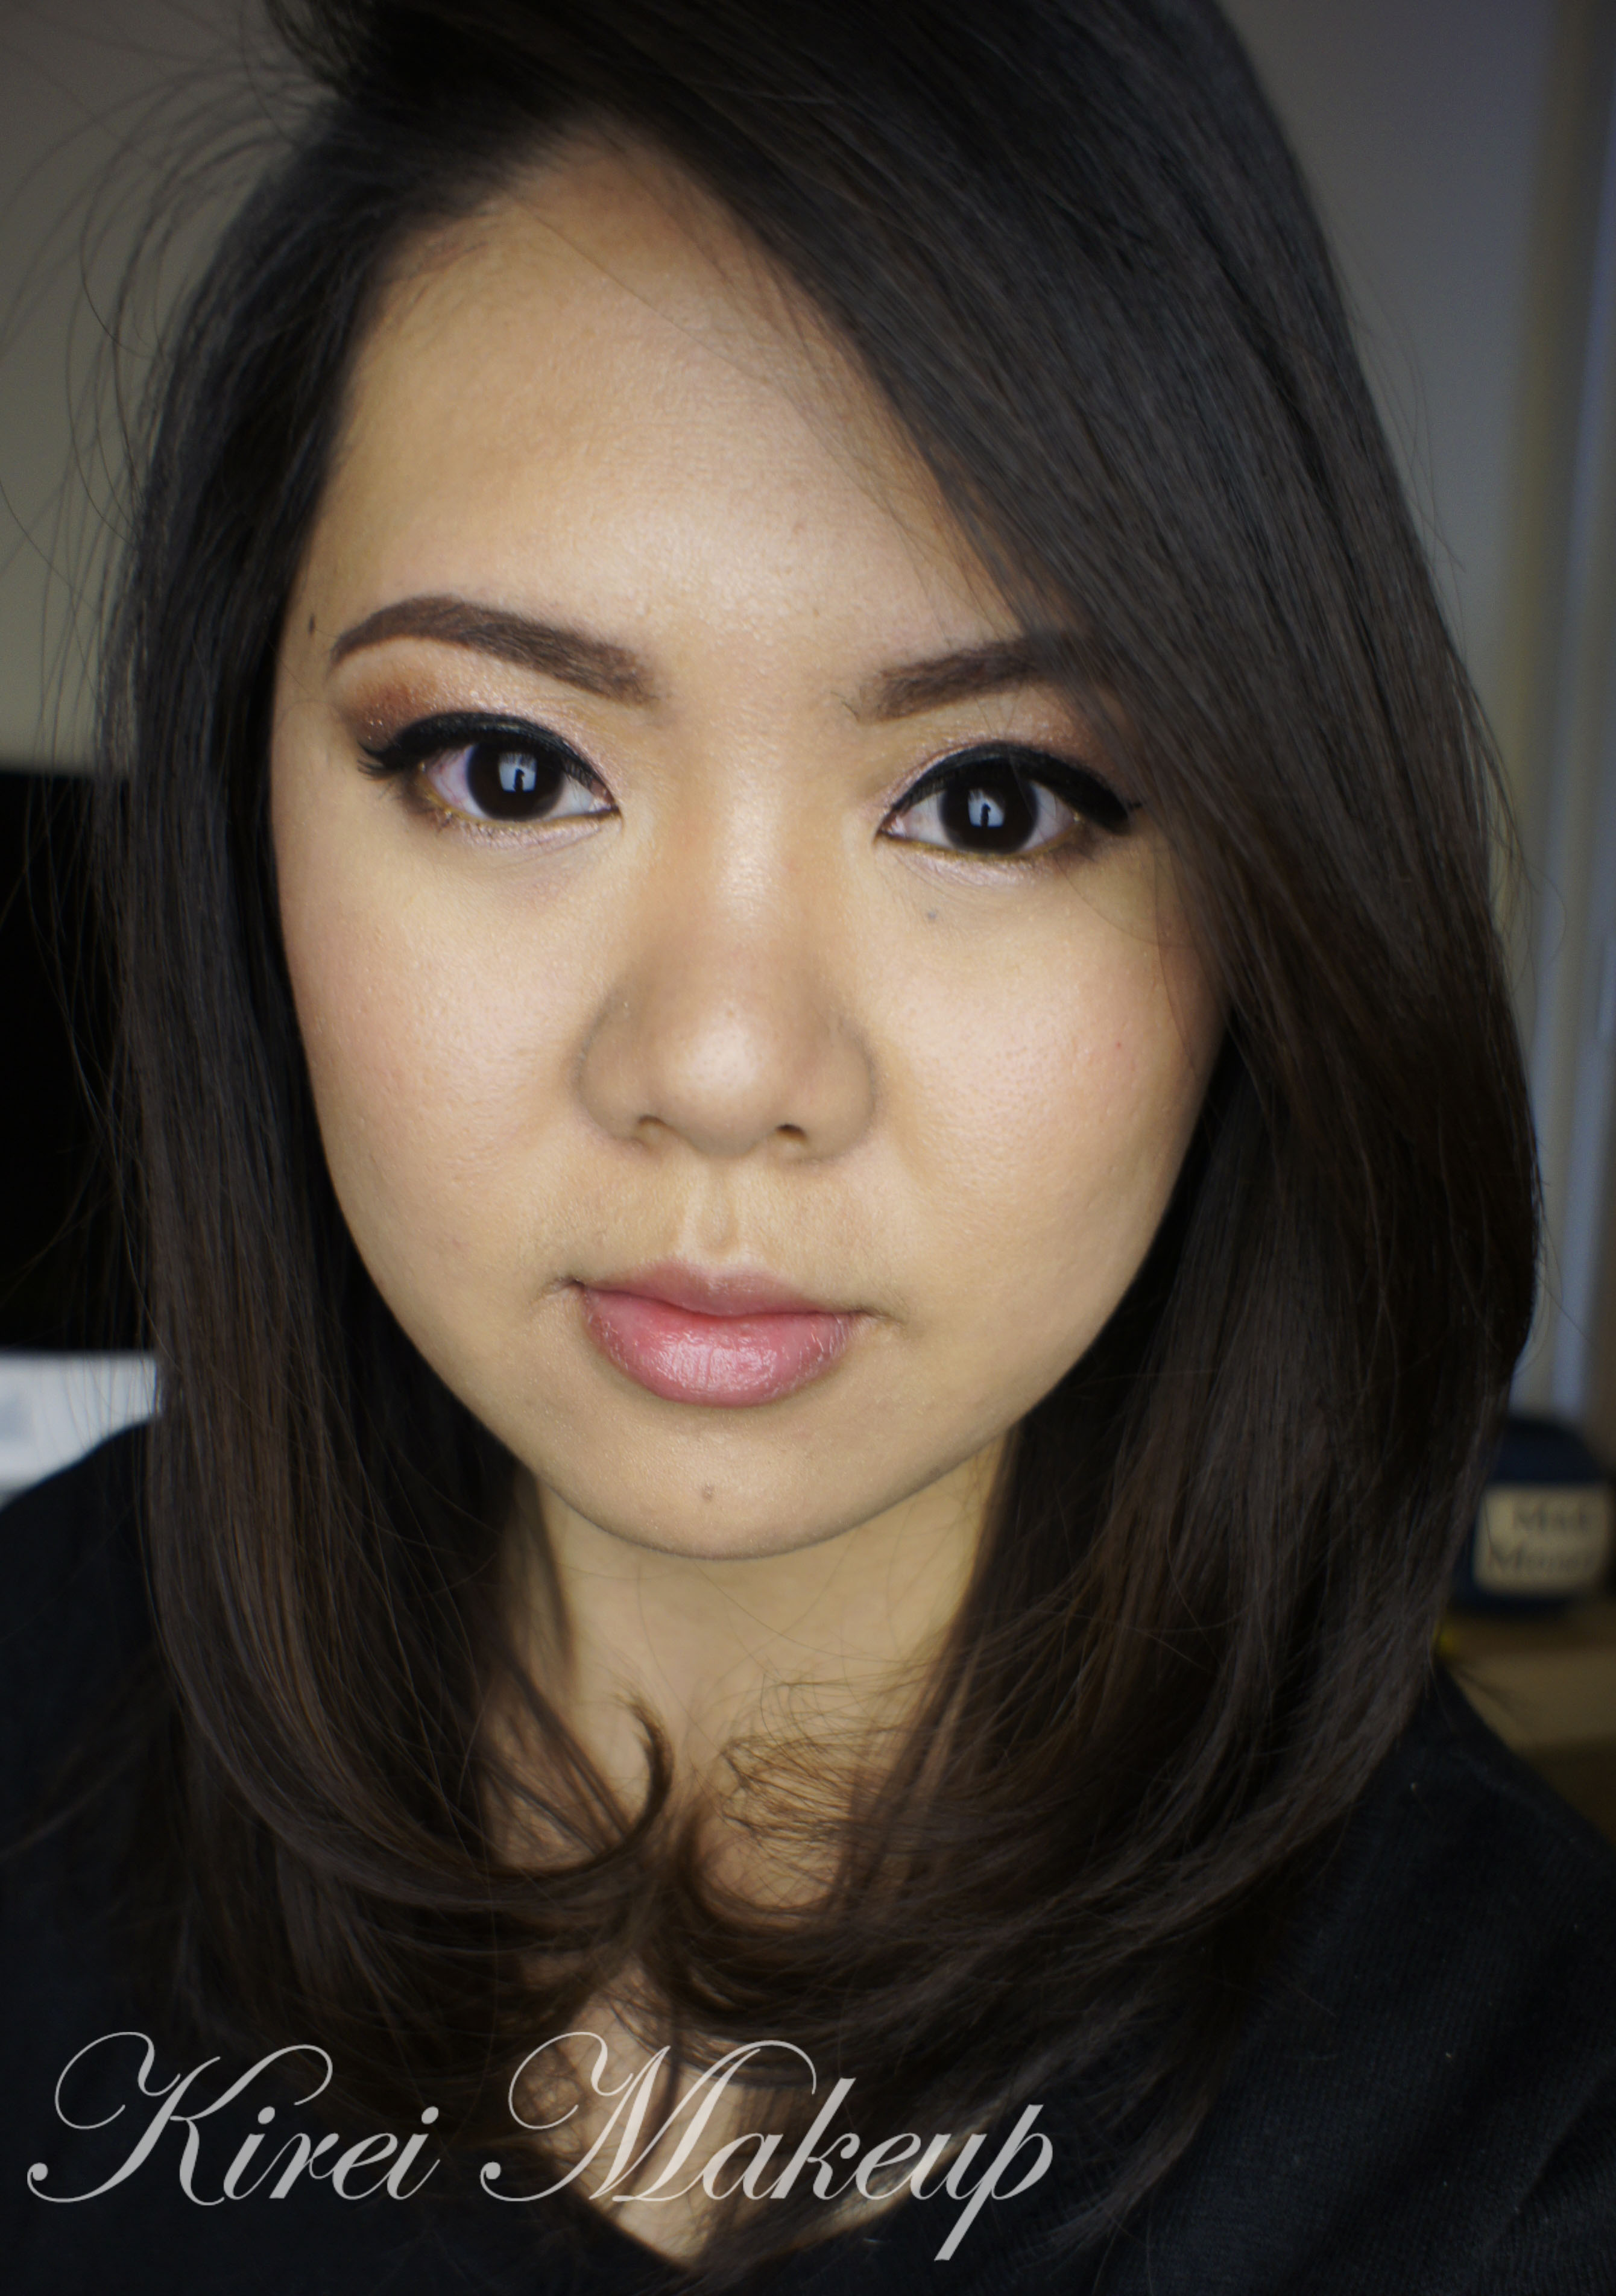
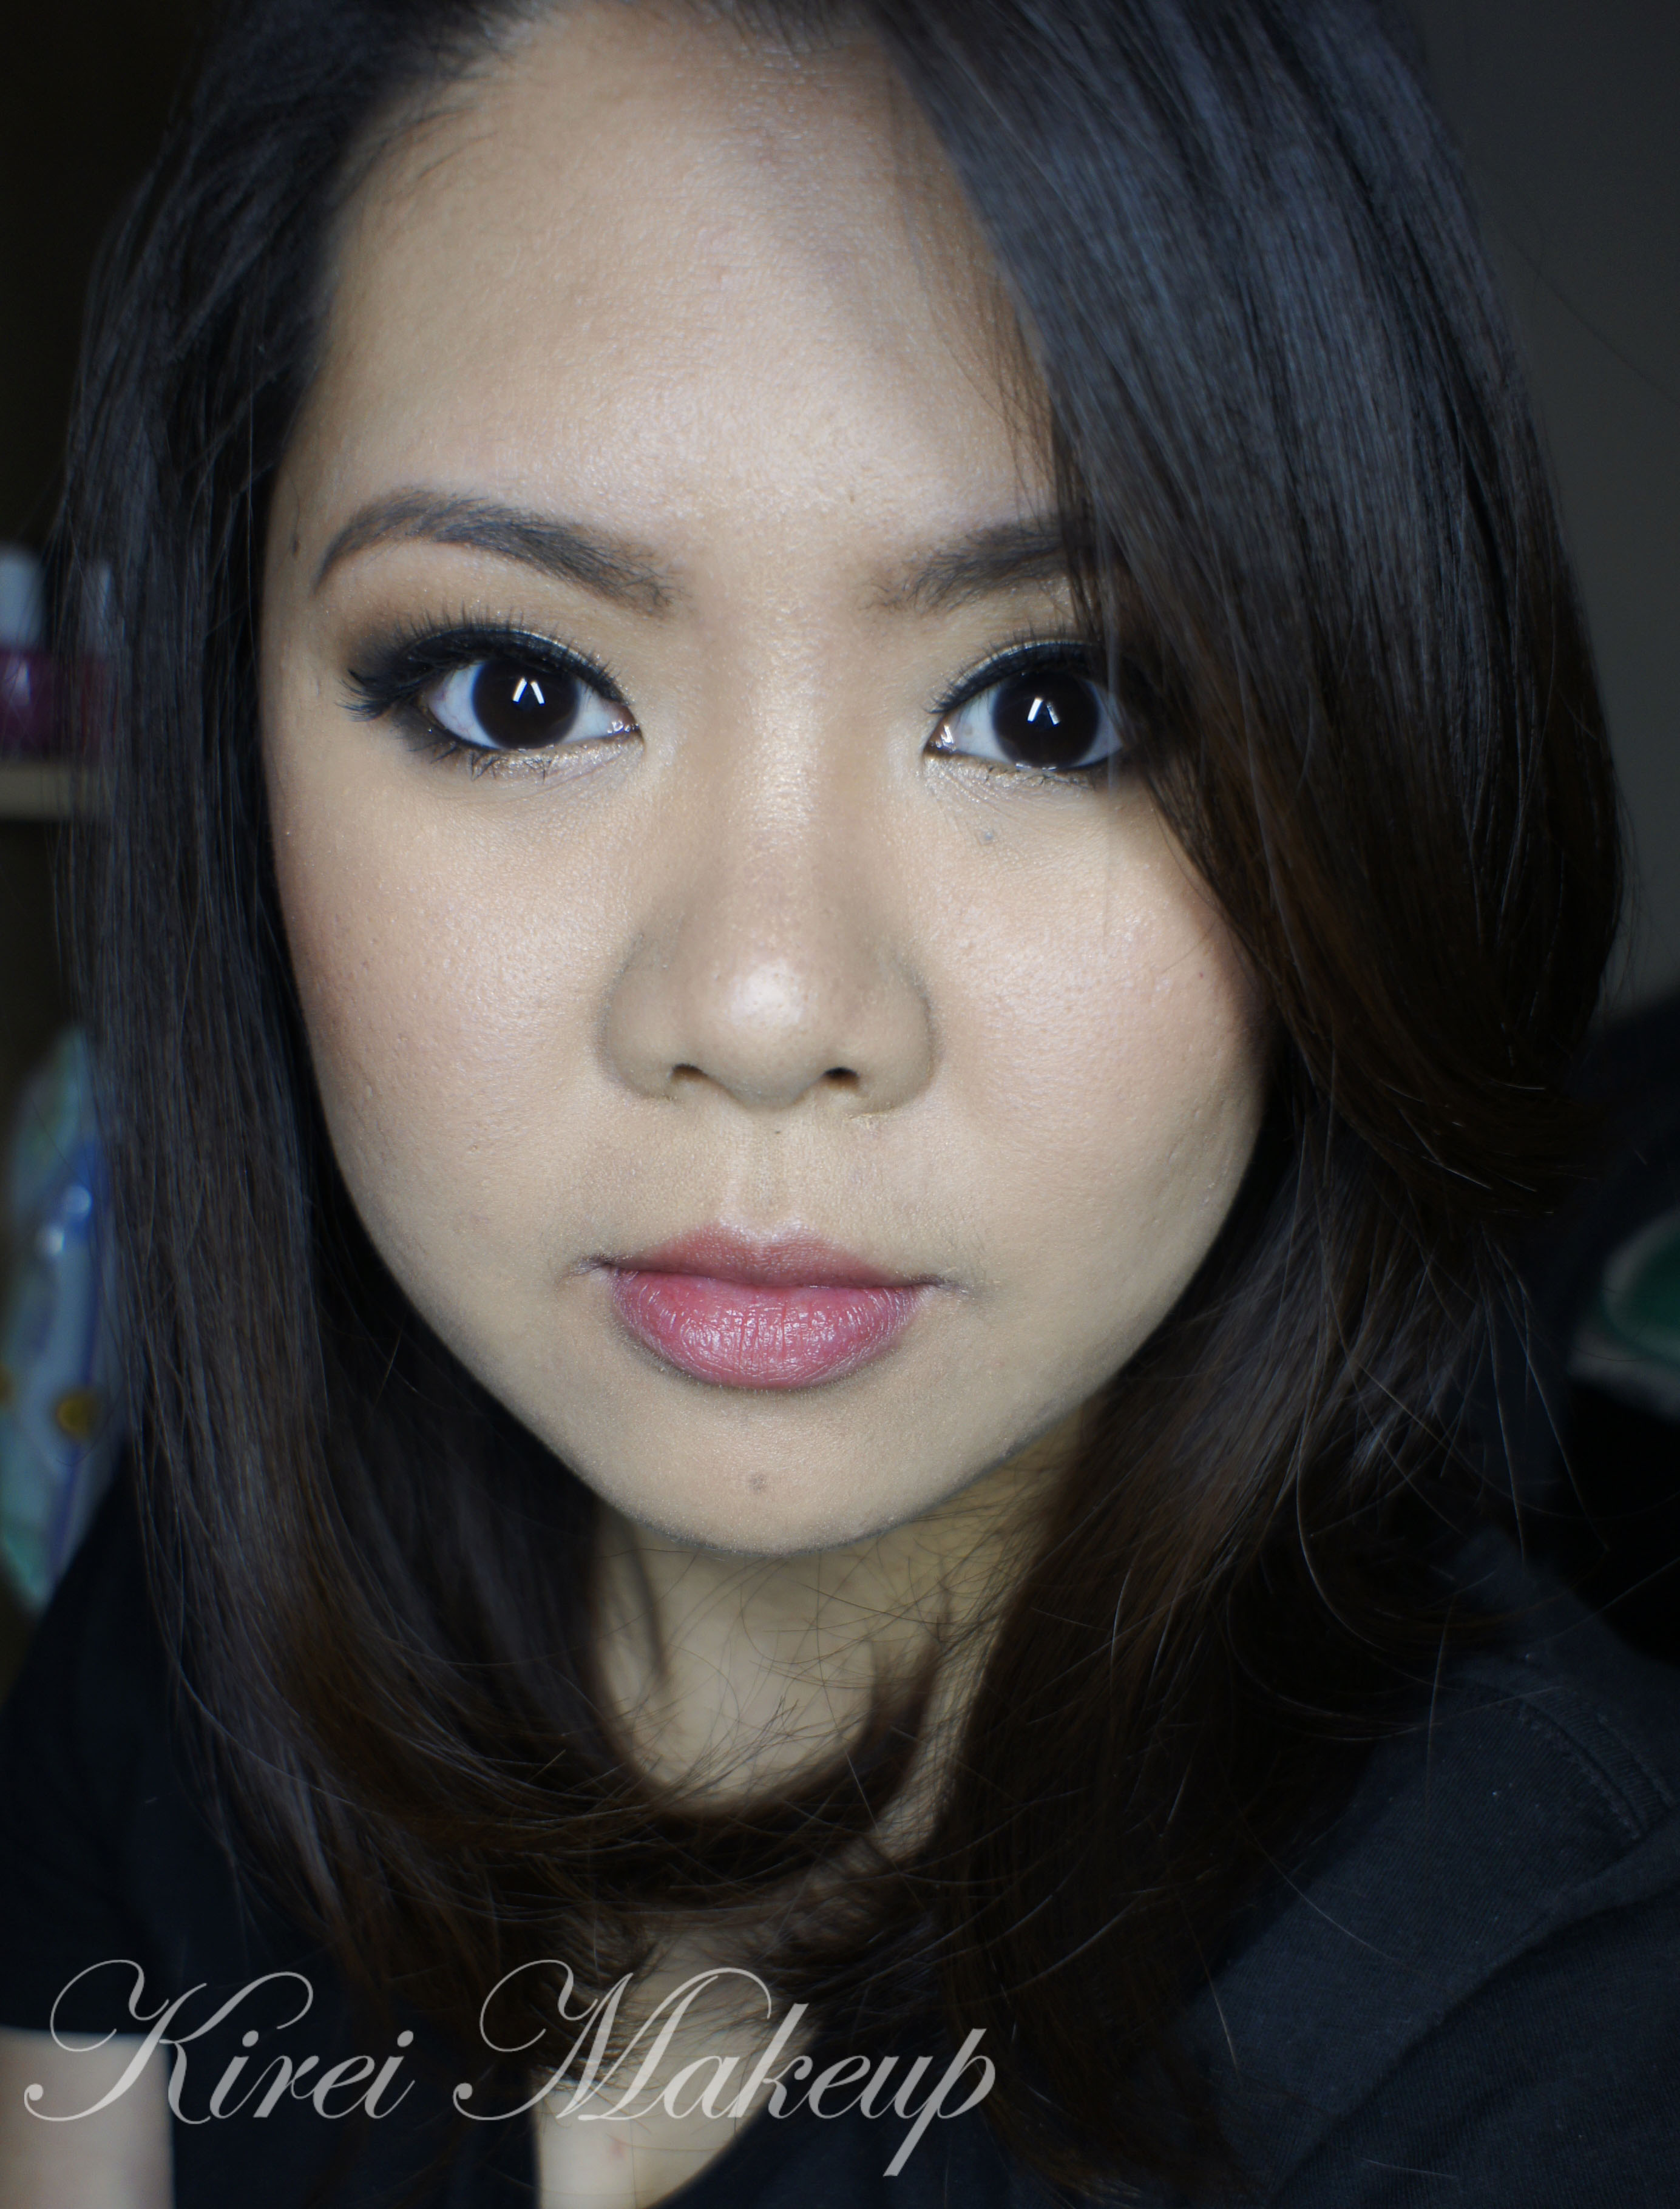
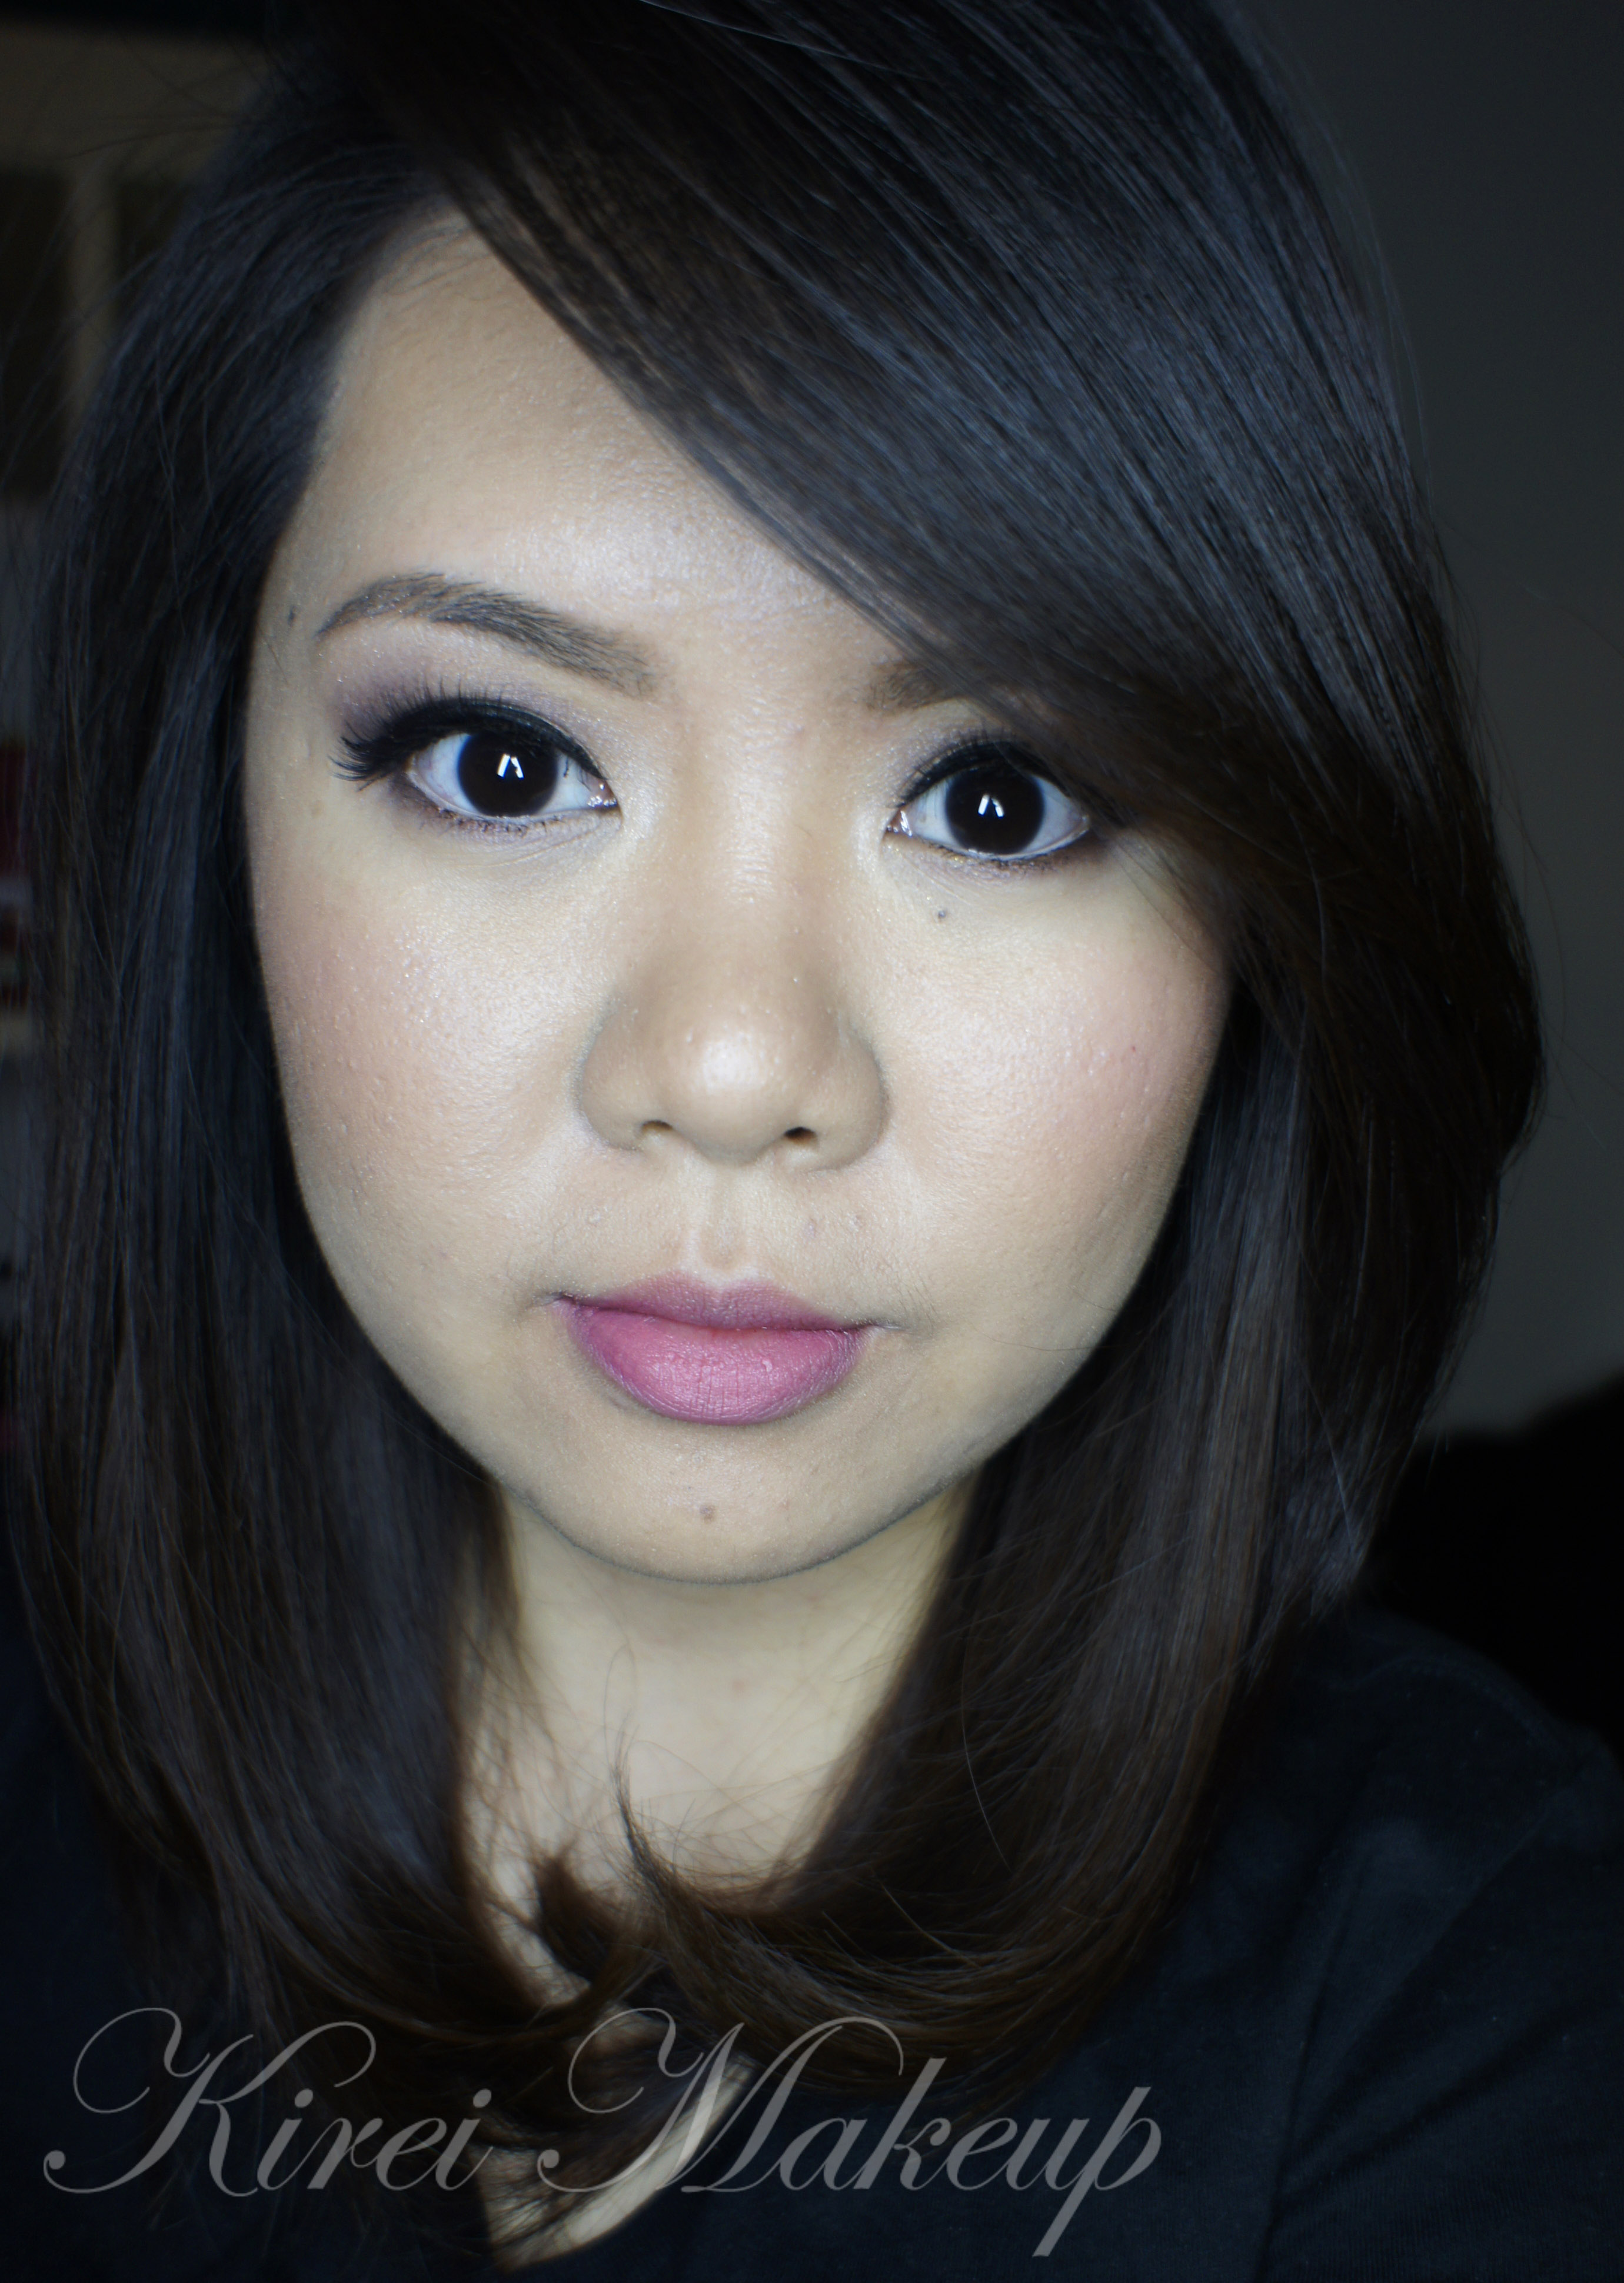
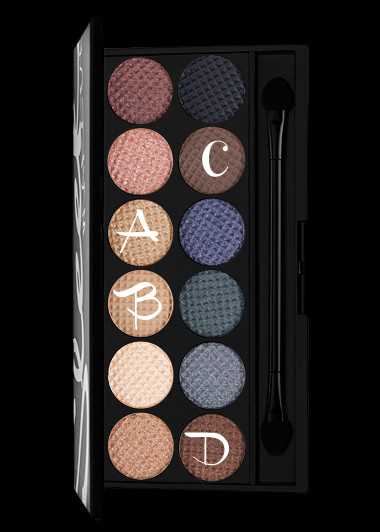
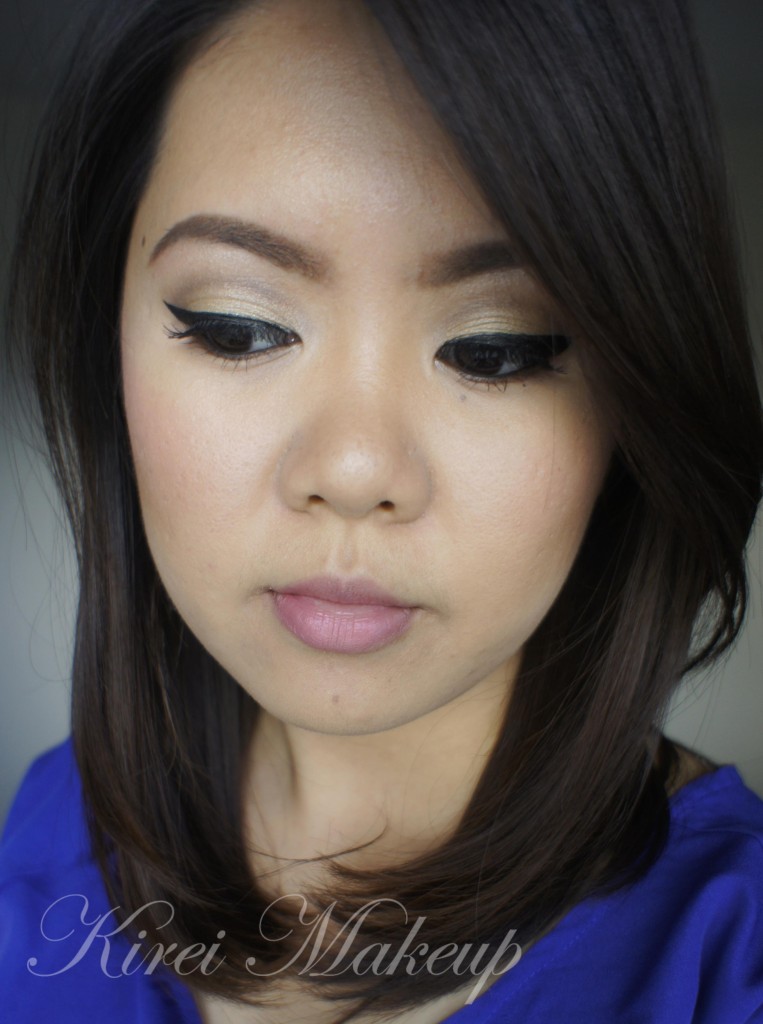
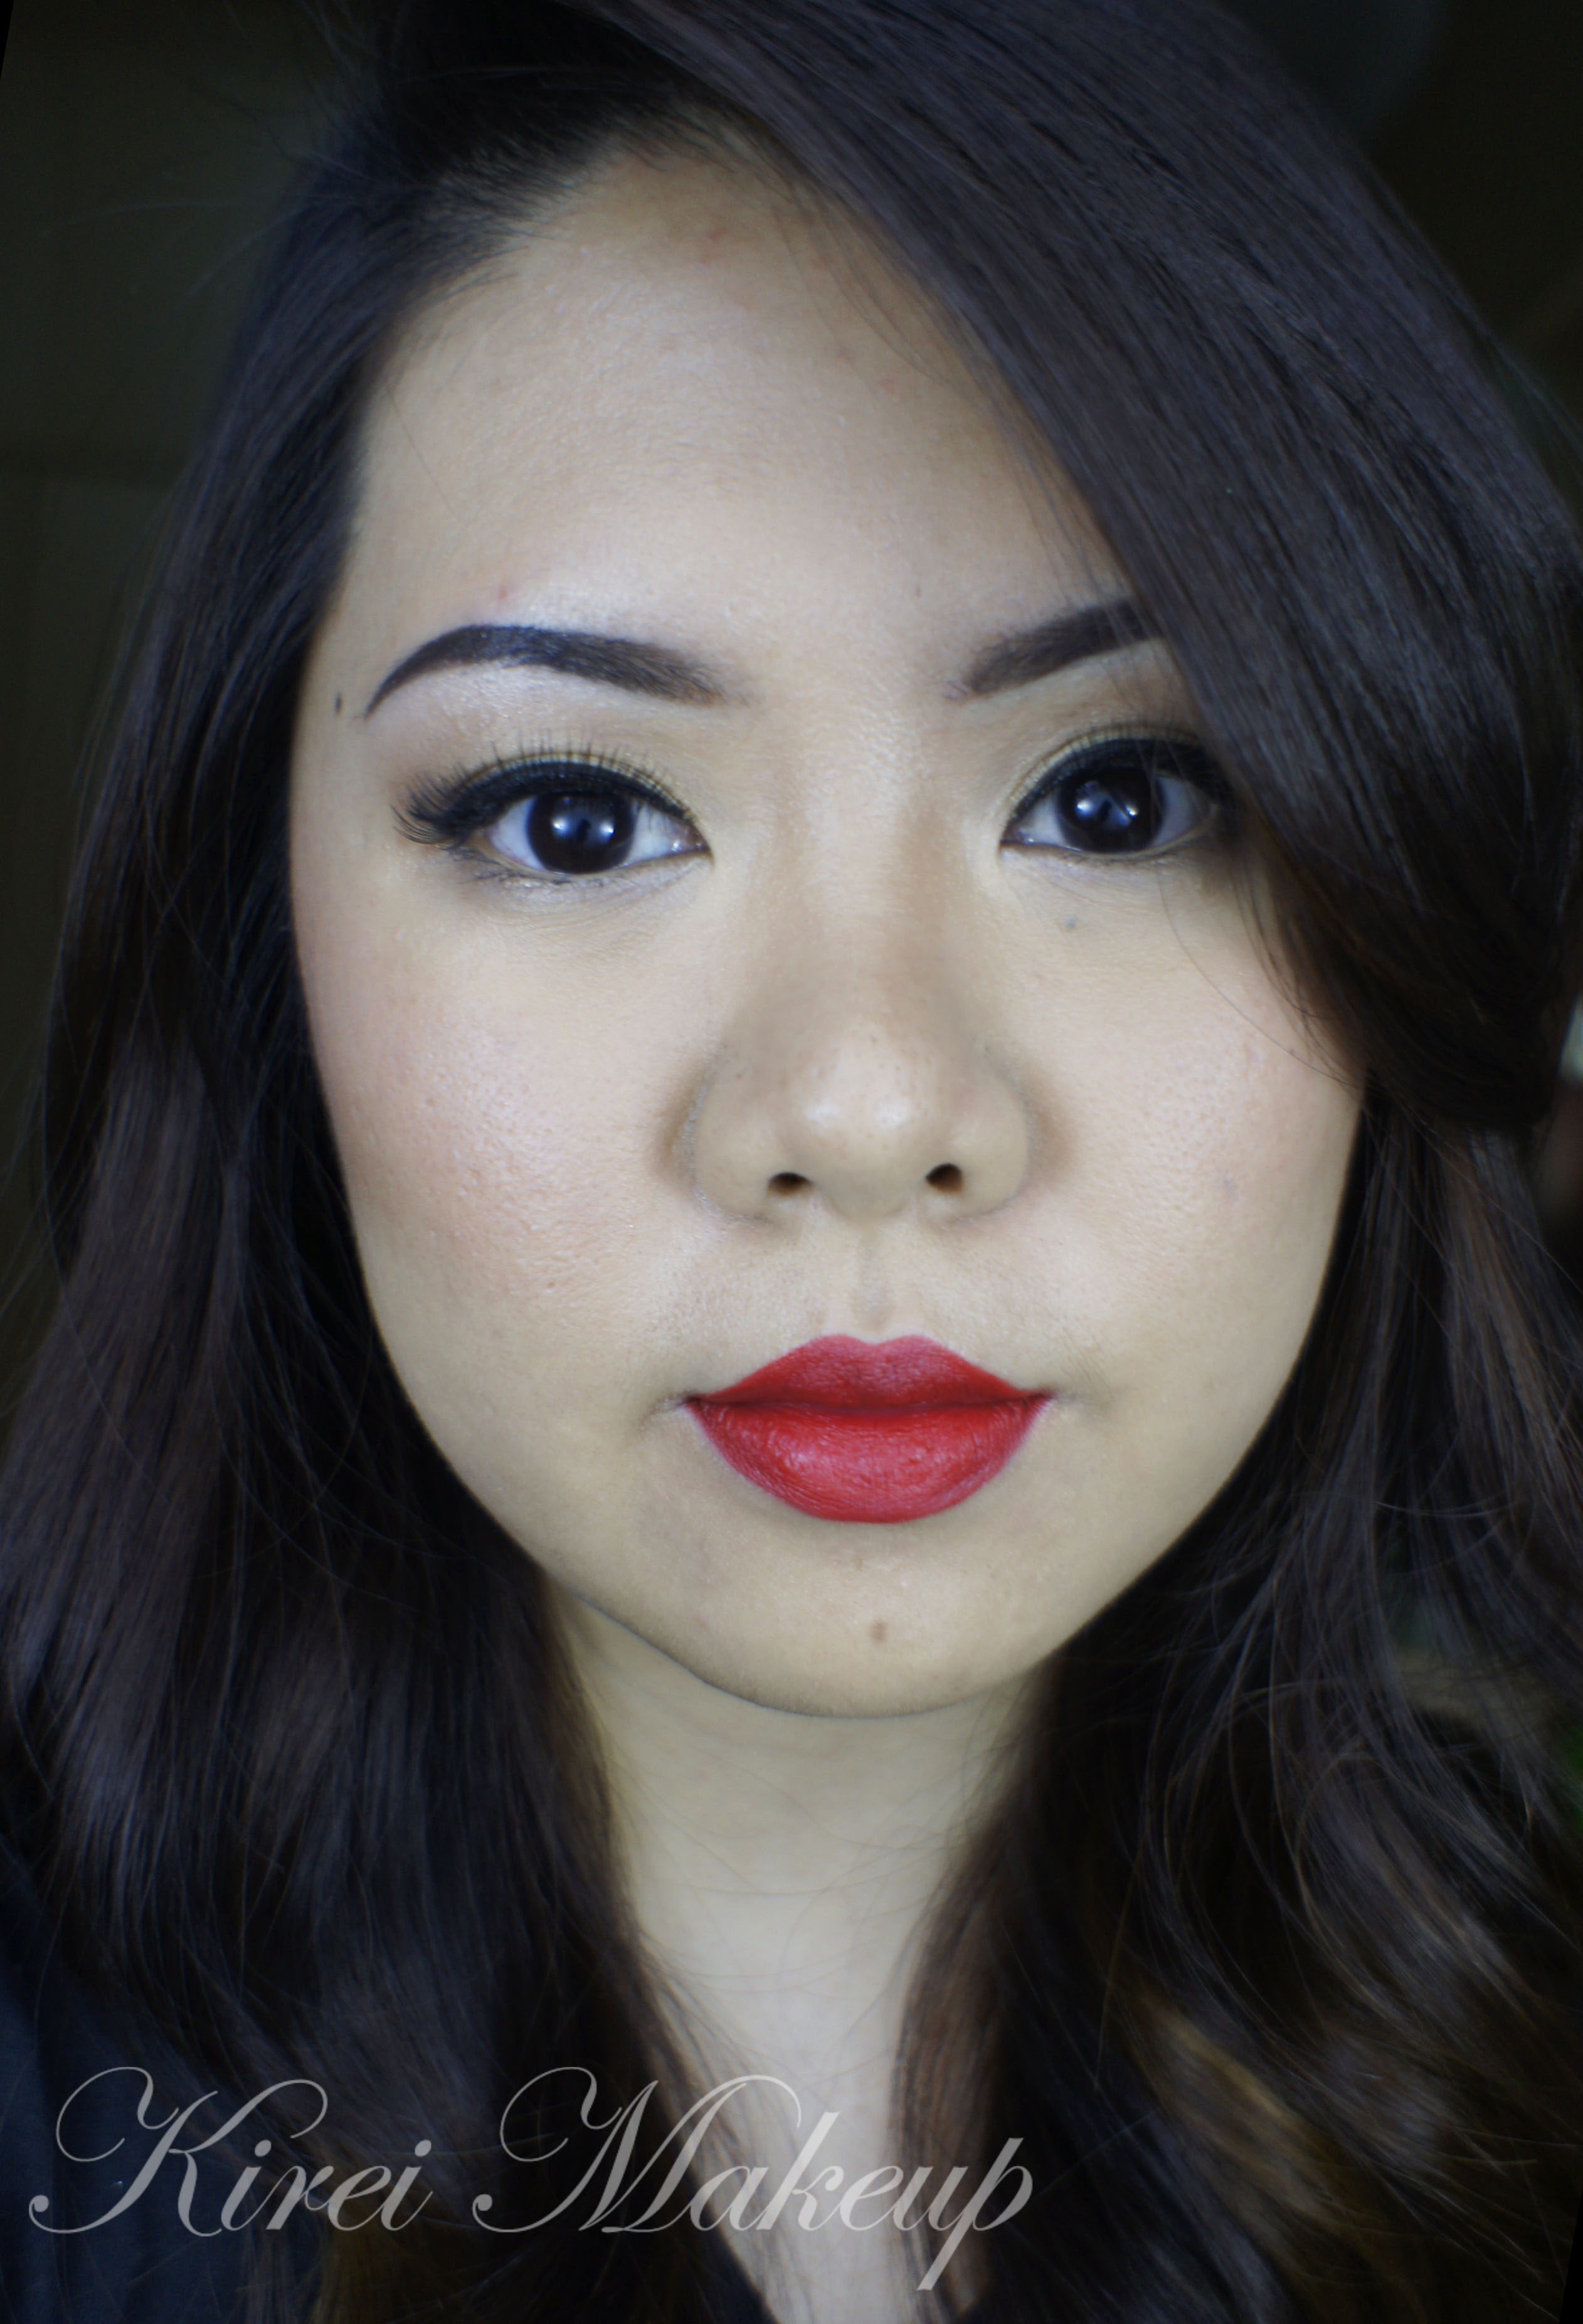
I’m sure you guys are getting tired of my UD Naked 3 obsession, but I have to share this look with you just to show how versatile this palette is. Today tutorial, I’m using UD Naked 3 to create a soft romantic makeup which can be used for daily makeup, date makeup, and even bridal makeup.

This look is very pretty and natural looking. The eyes are made to look brighter and bigger looking, while the rest of the face is kept fresh and slightly flushed. I also skip the glossy lips, and opt for a natural looking lip color. Everything about this makeup is about keeping everything to the minimal.

I’ve done something similar to this look in my Chanel Kaska Beige re-visited post. If you prefer a stronger, more intense eye look, please do check my other tutorials using the UD Naked 3 palette

I’ve also added a Youtube Video tutorial using UD Naked 3 palette!

urban decay naked 3

My eyes are prepped using UD Primer Potion, and my face is prepped using Smashbox foundation primer.
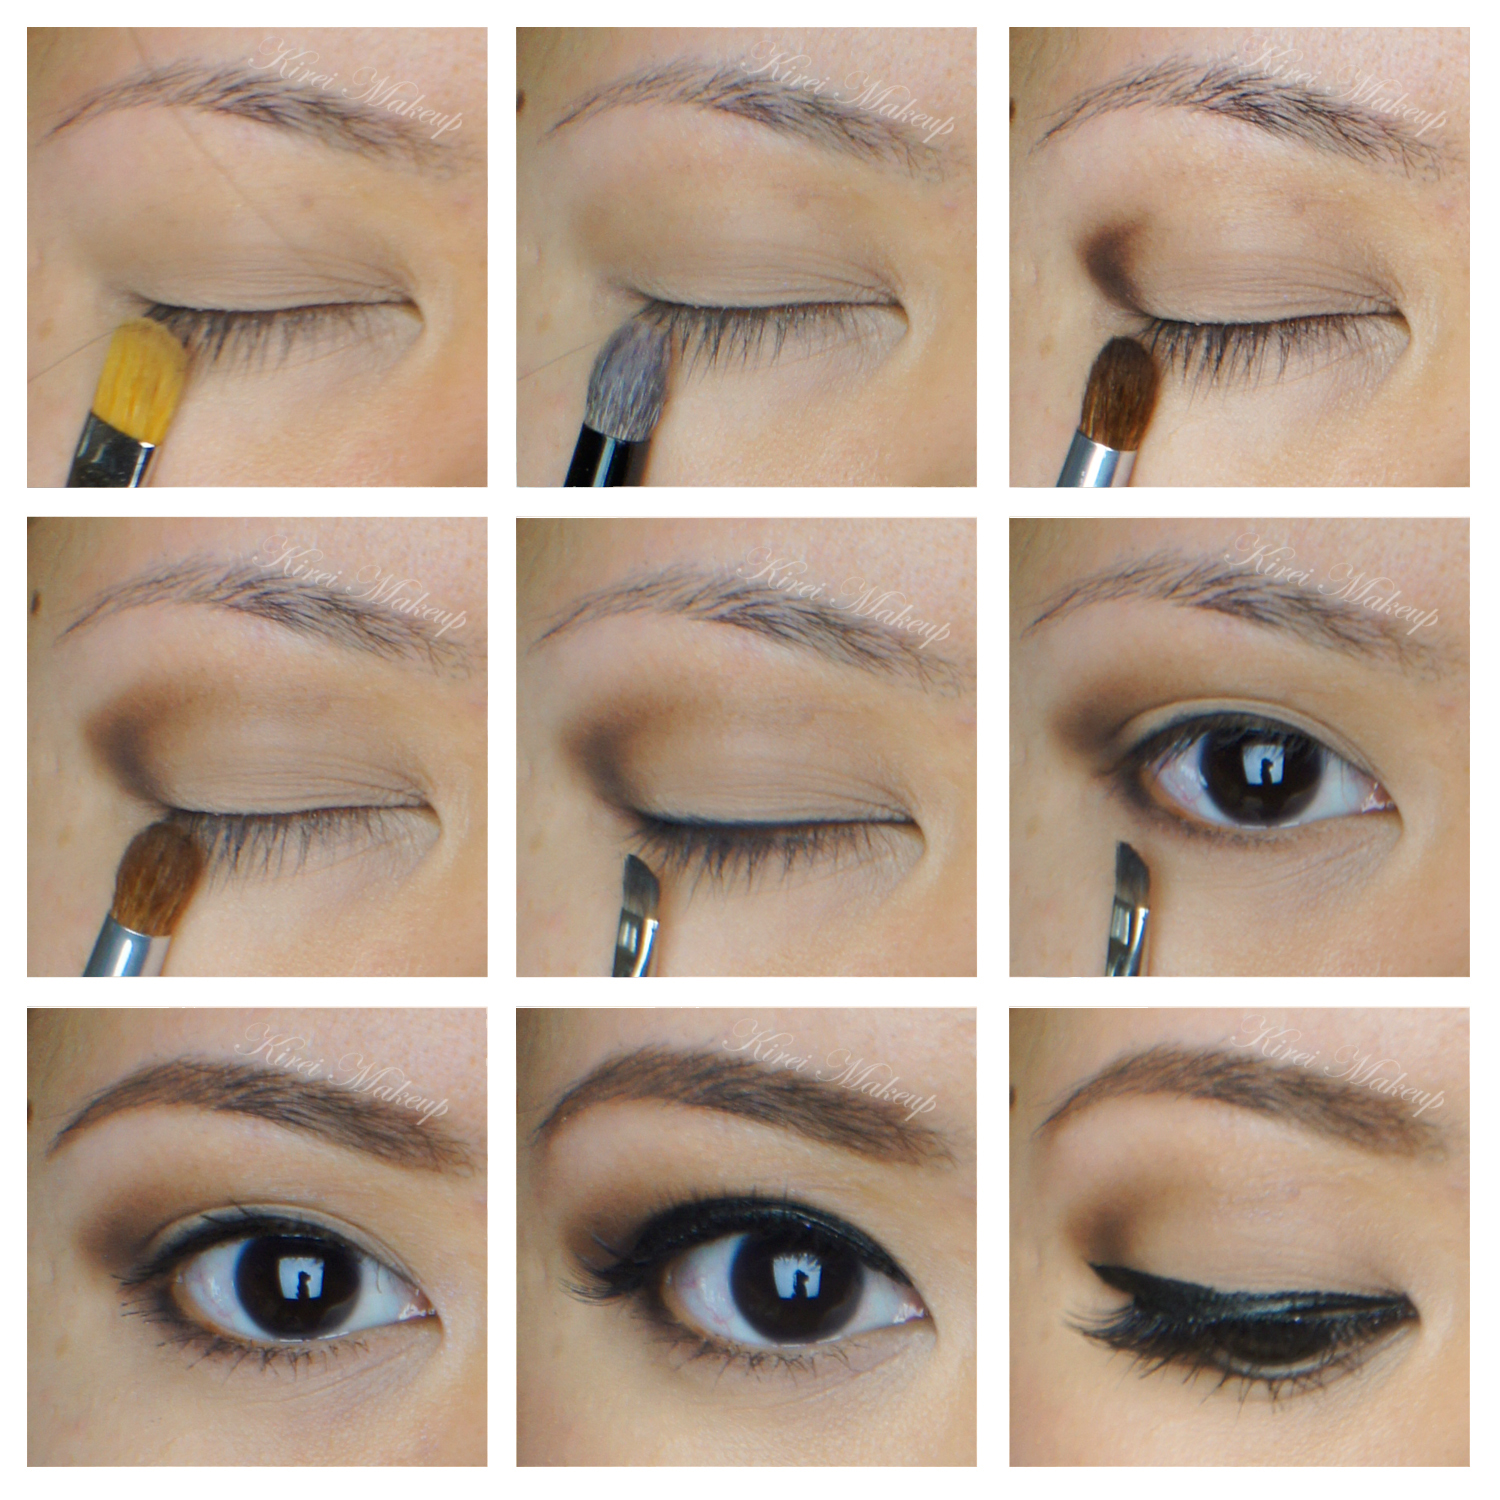
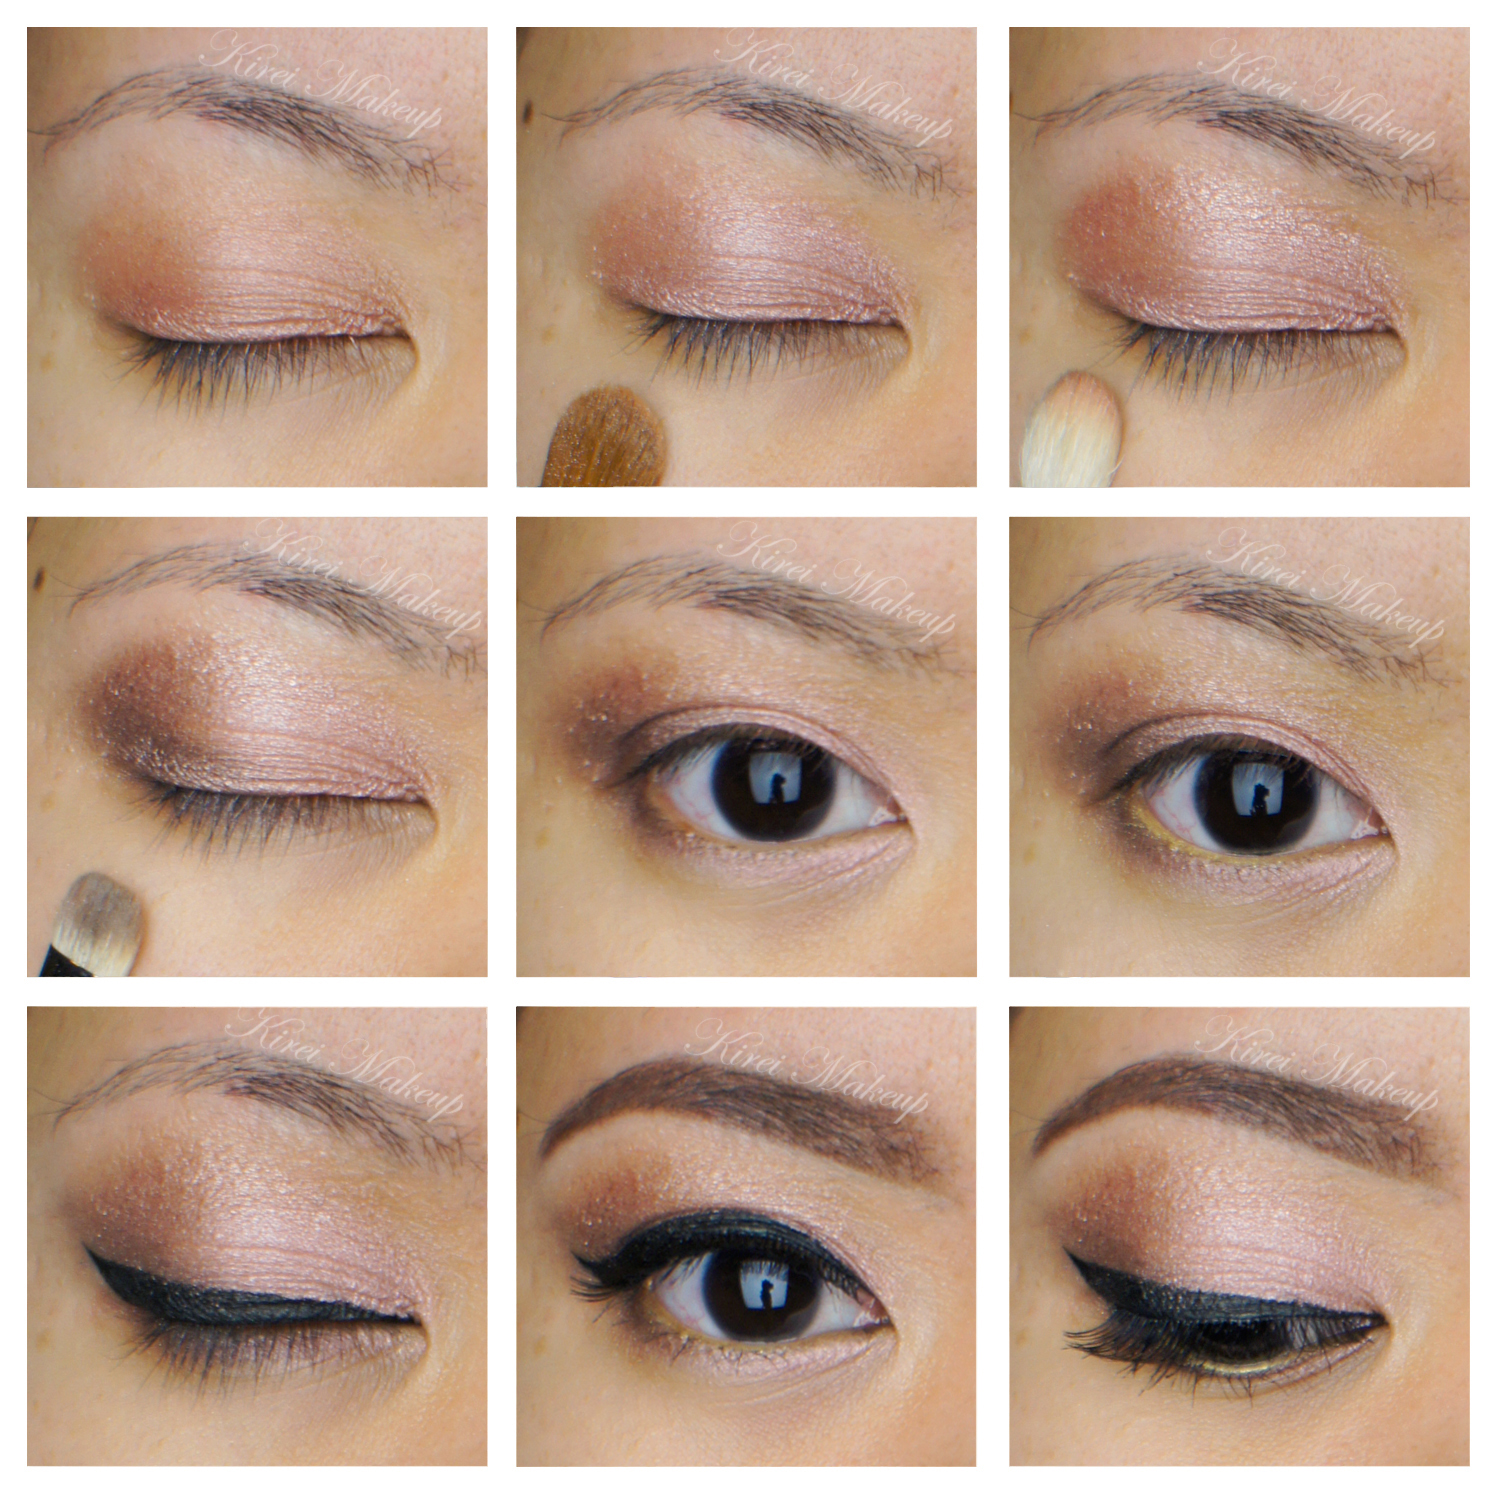
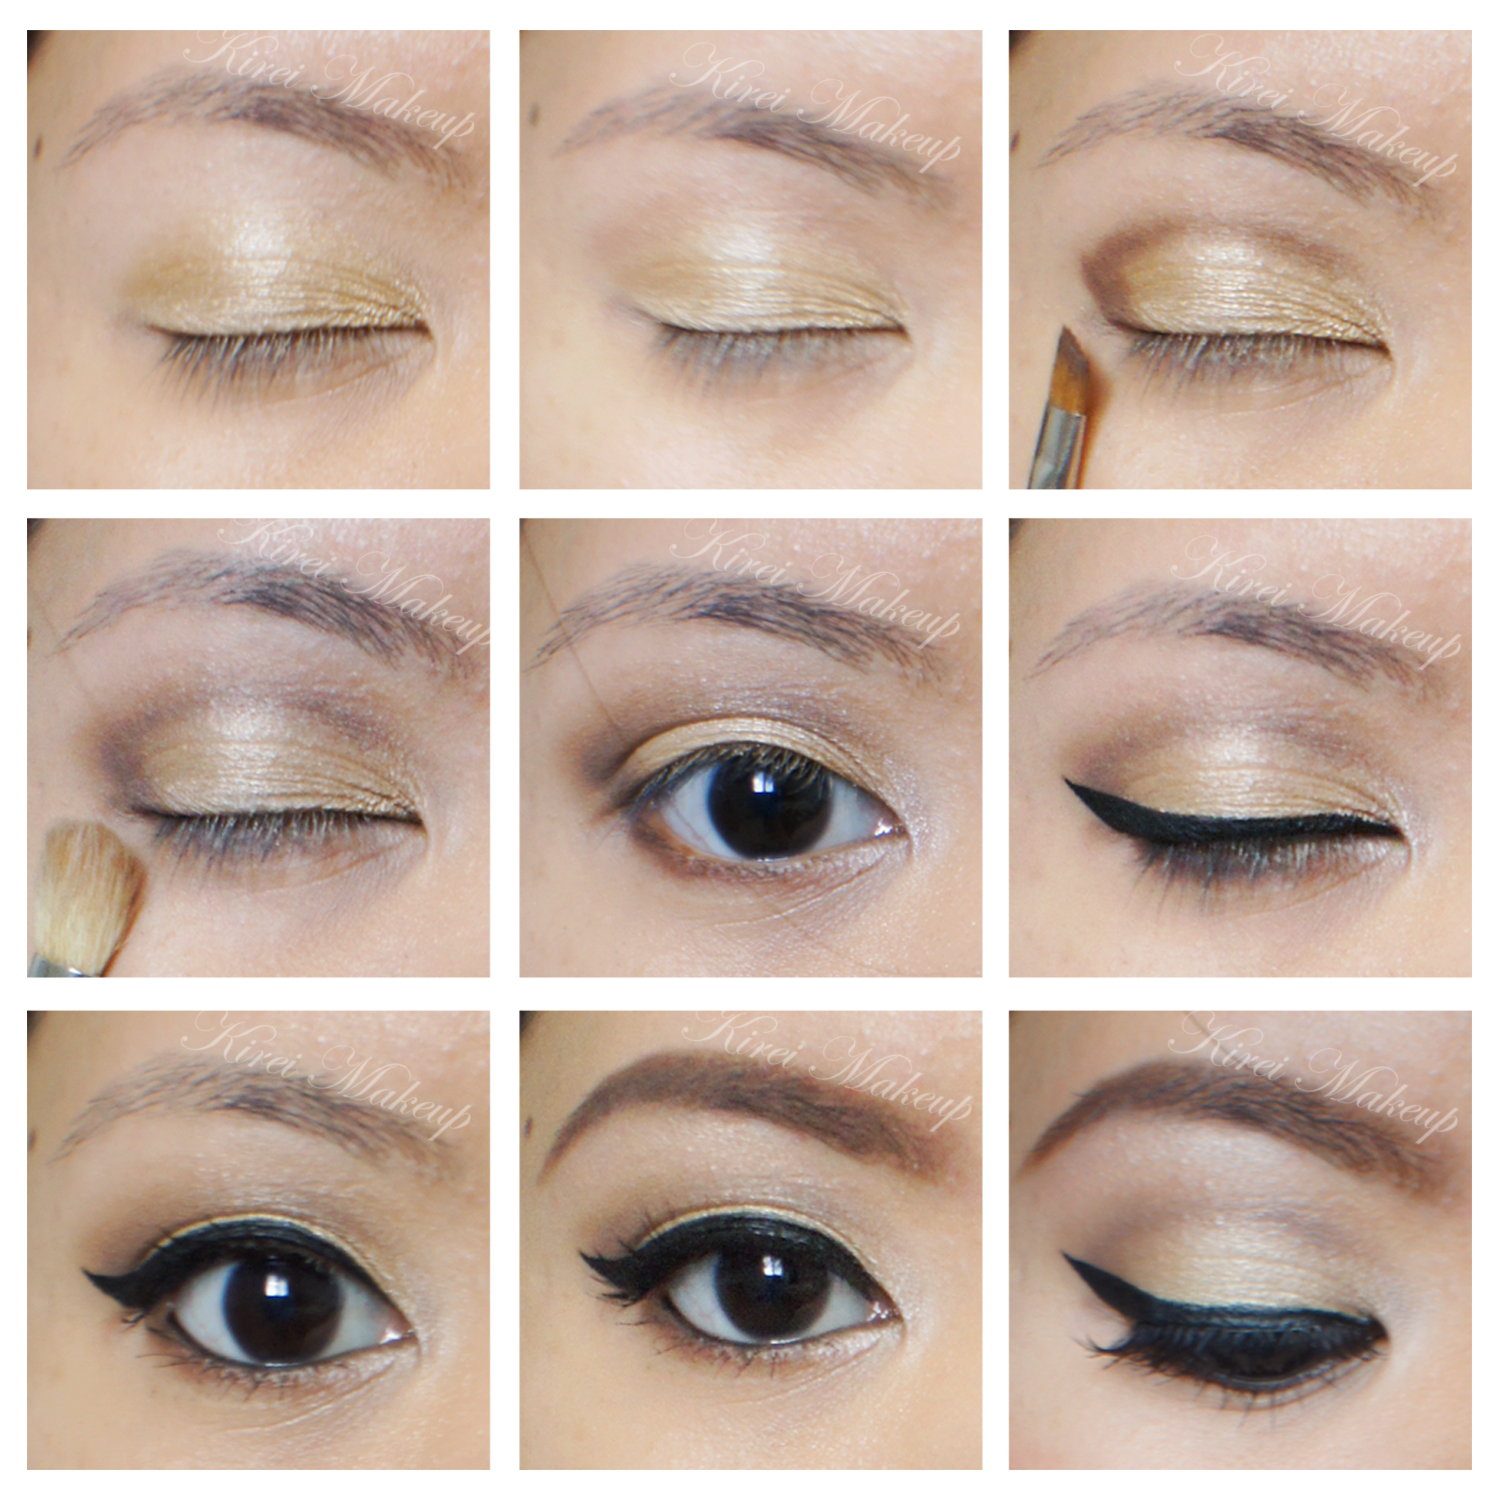
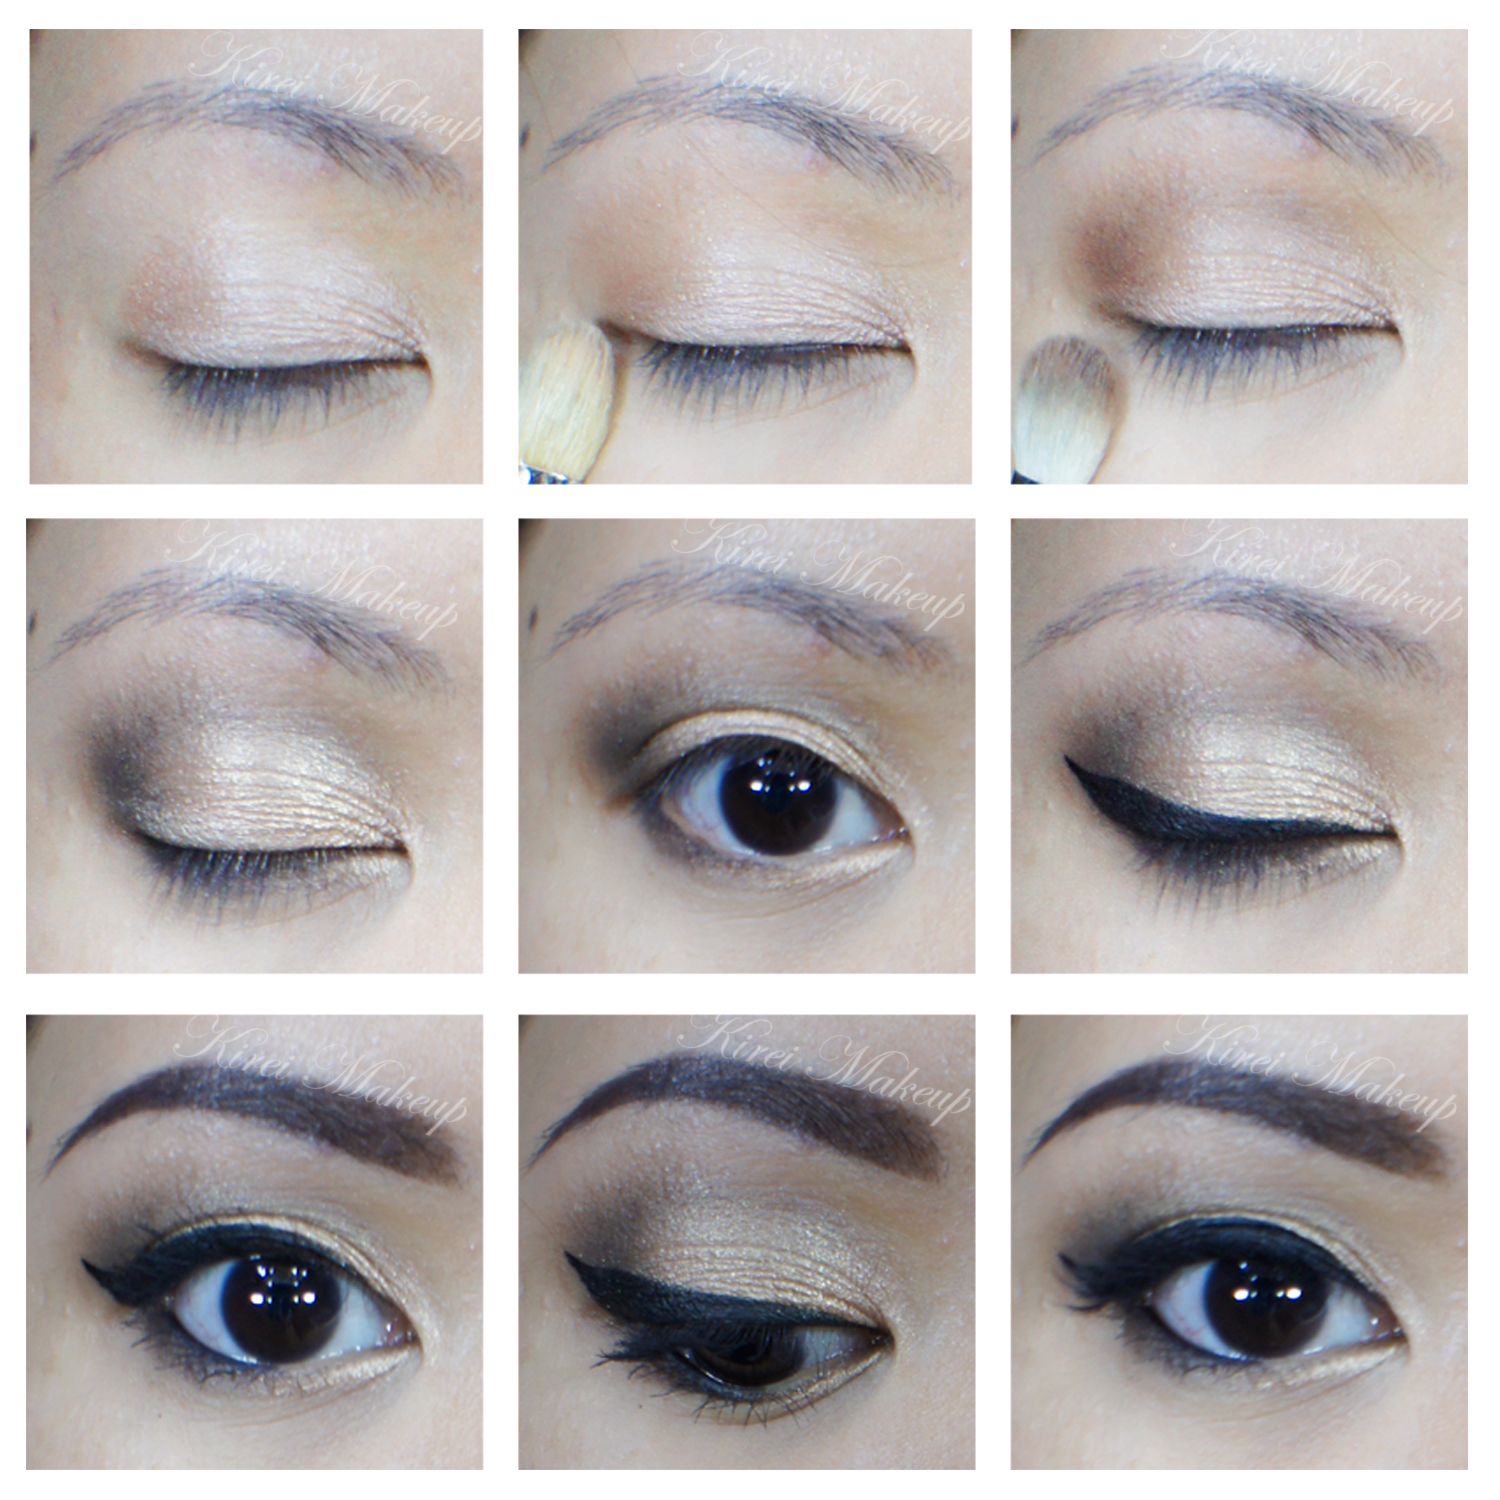
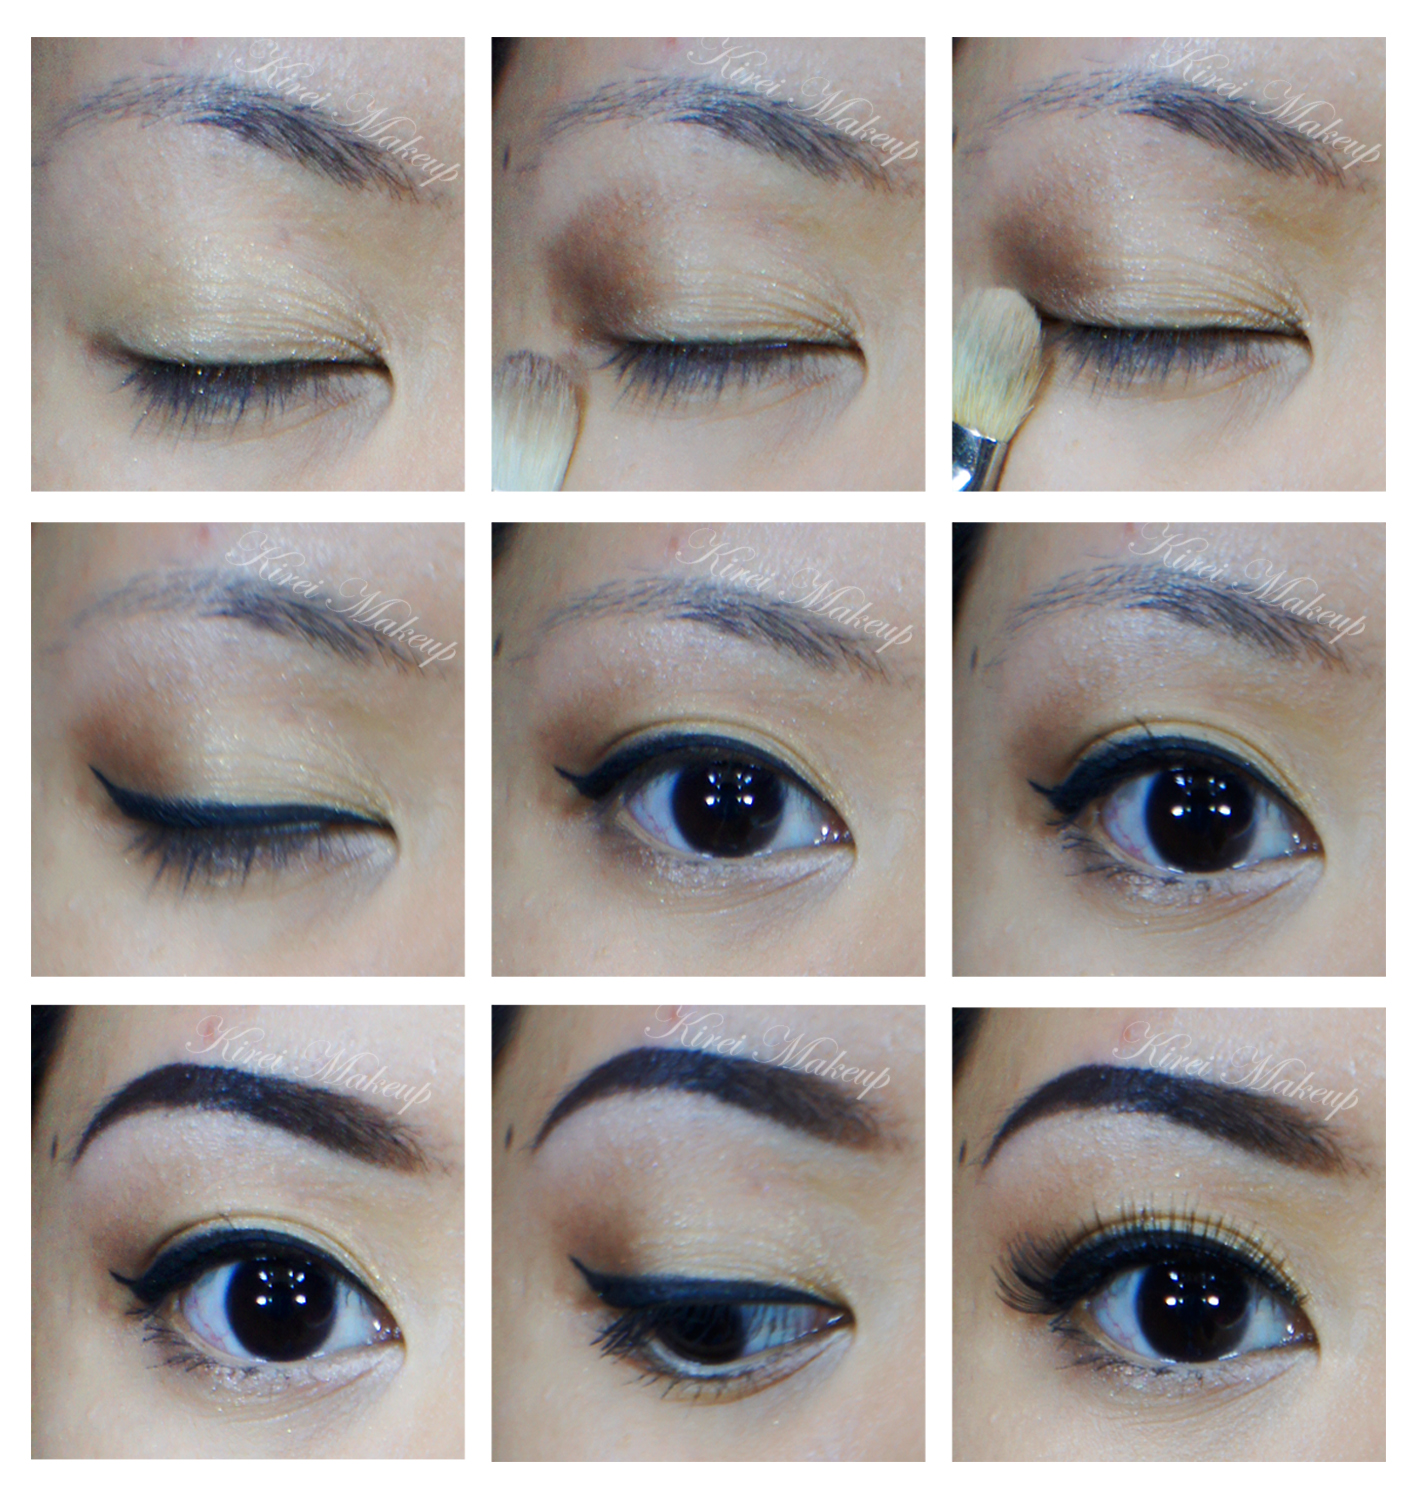
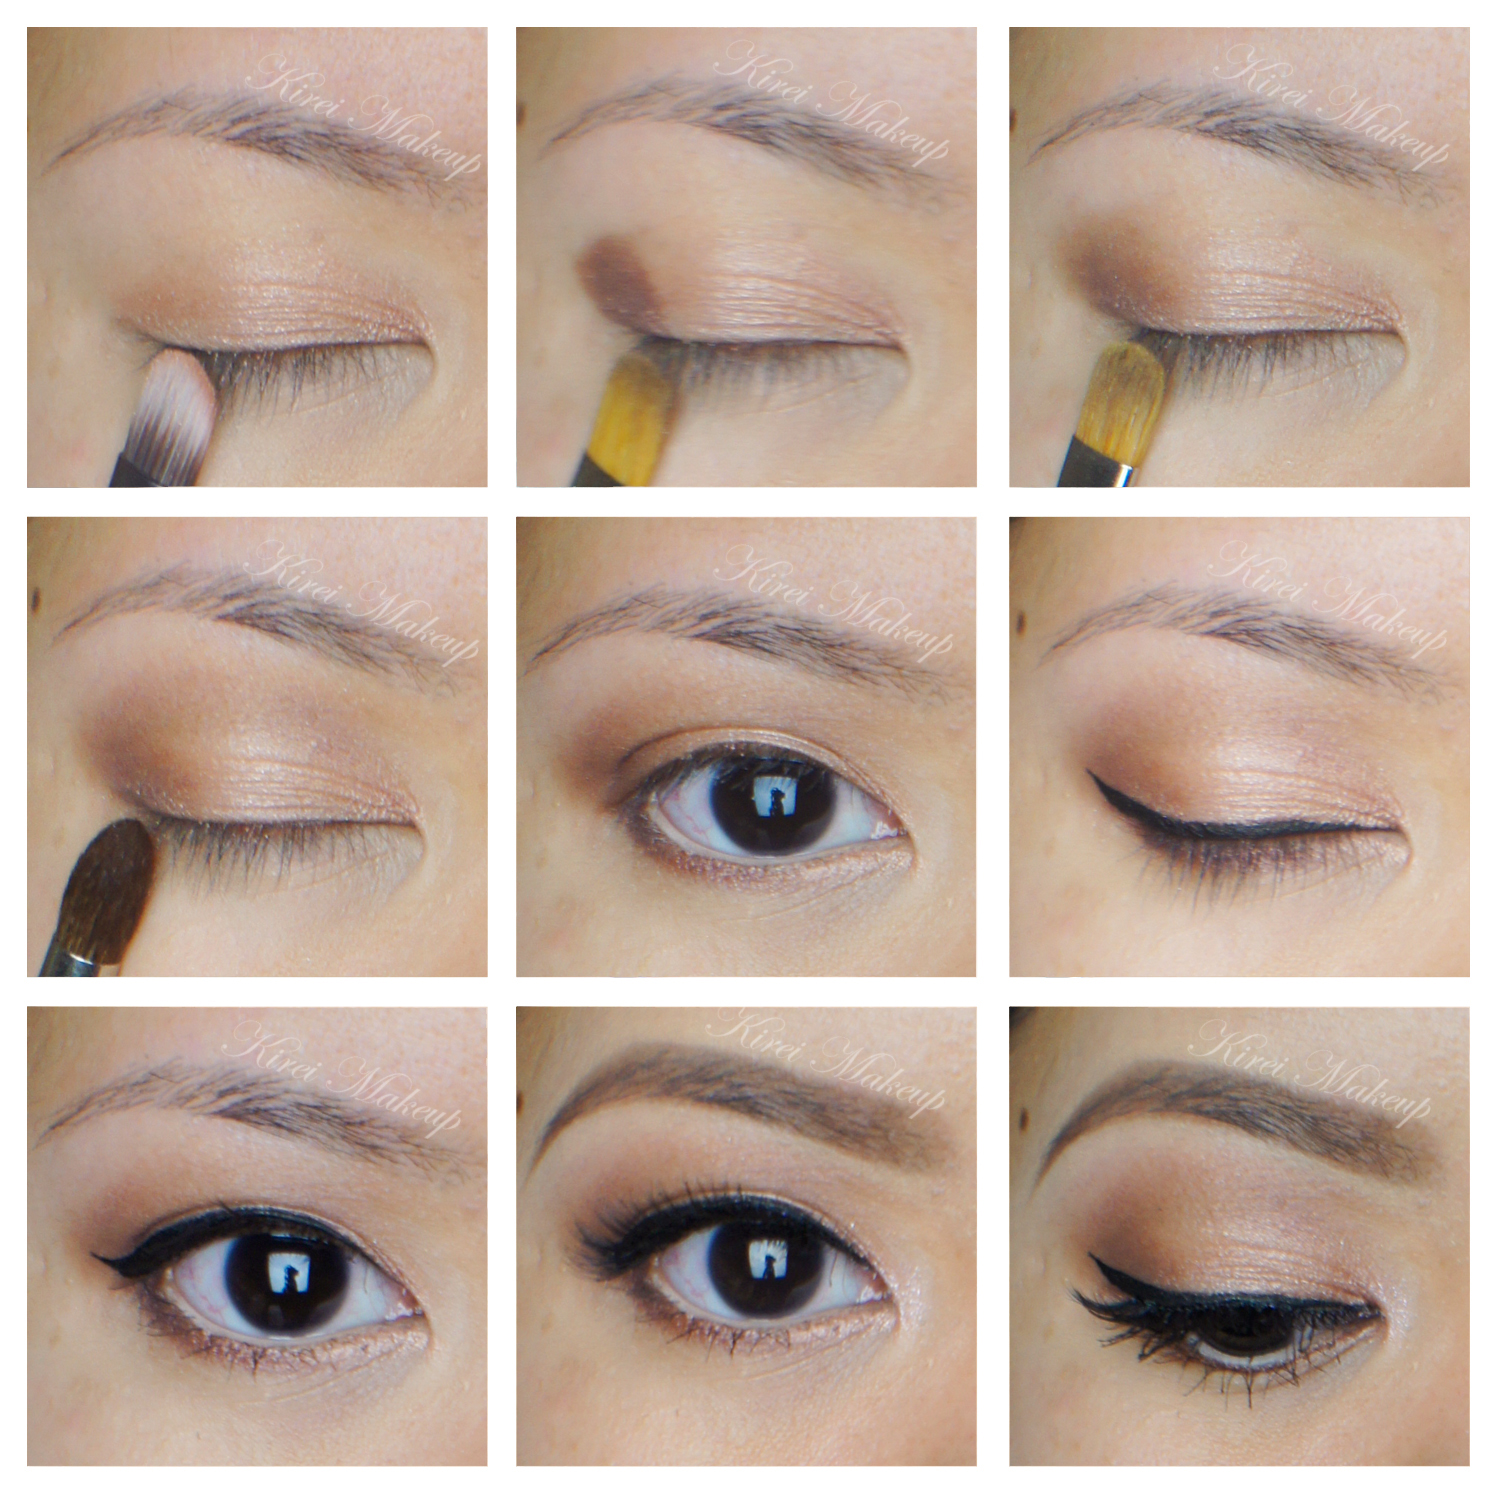
How-to:

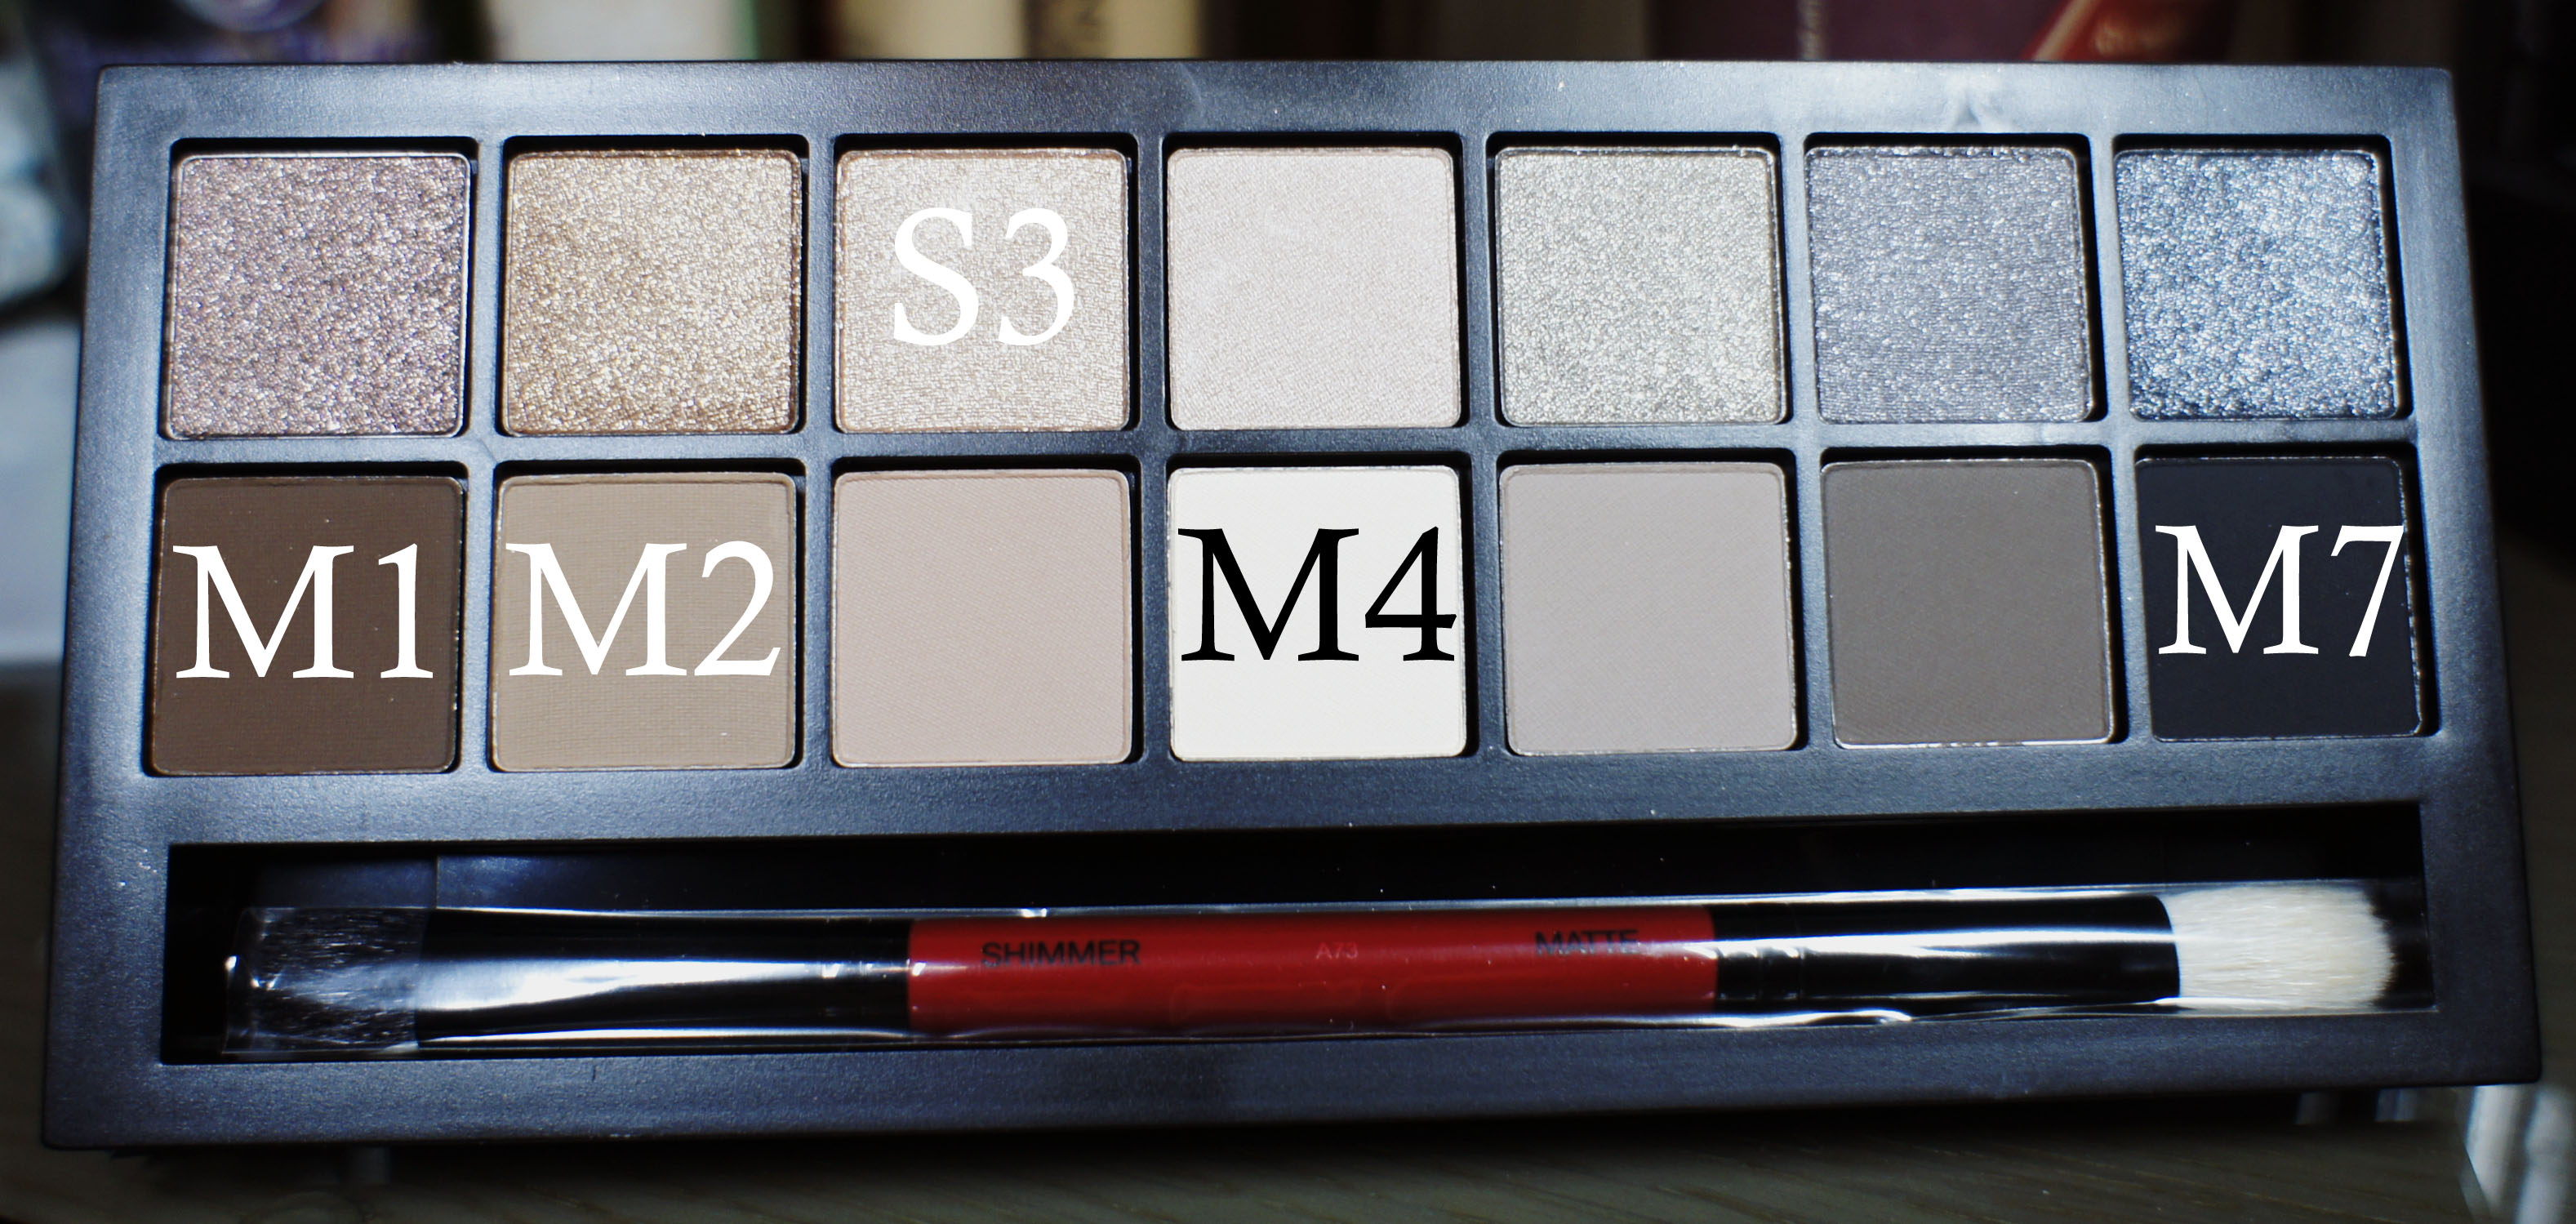
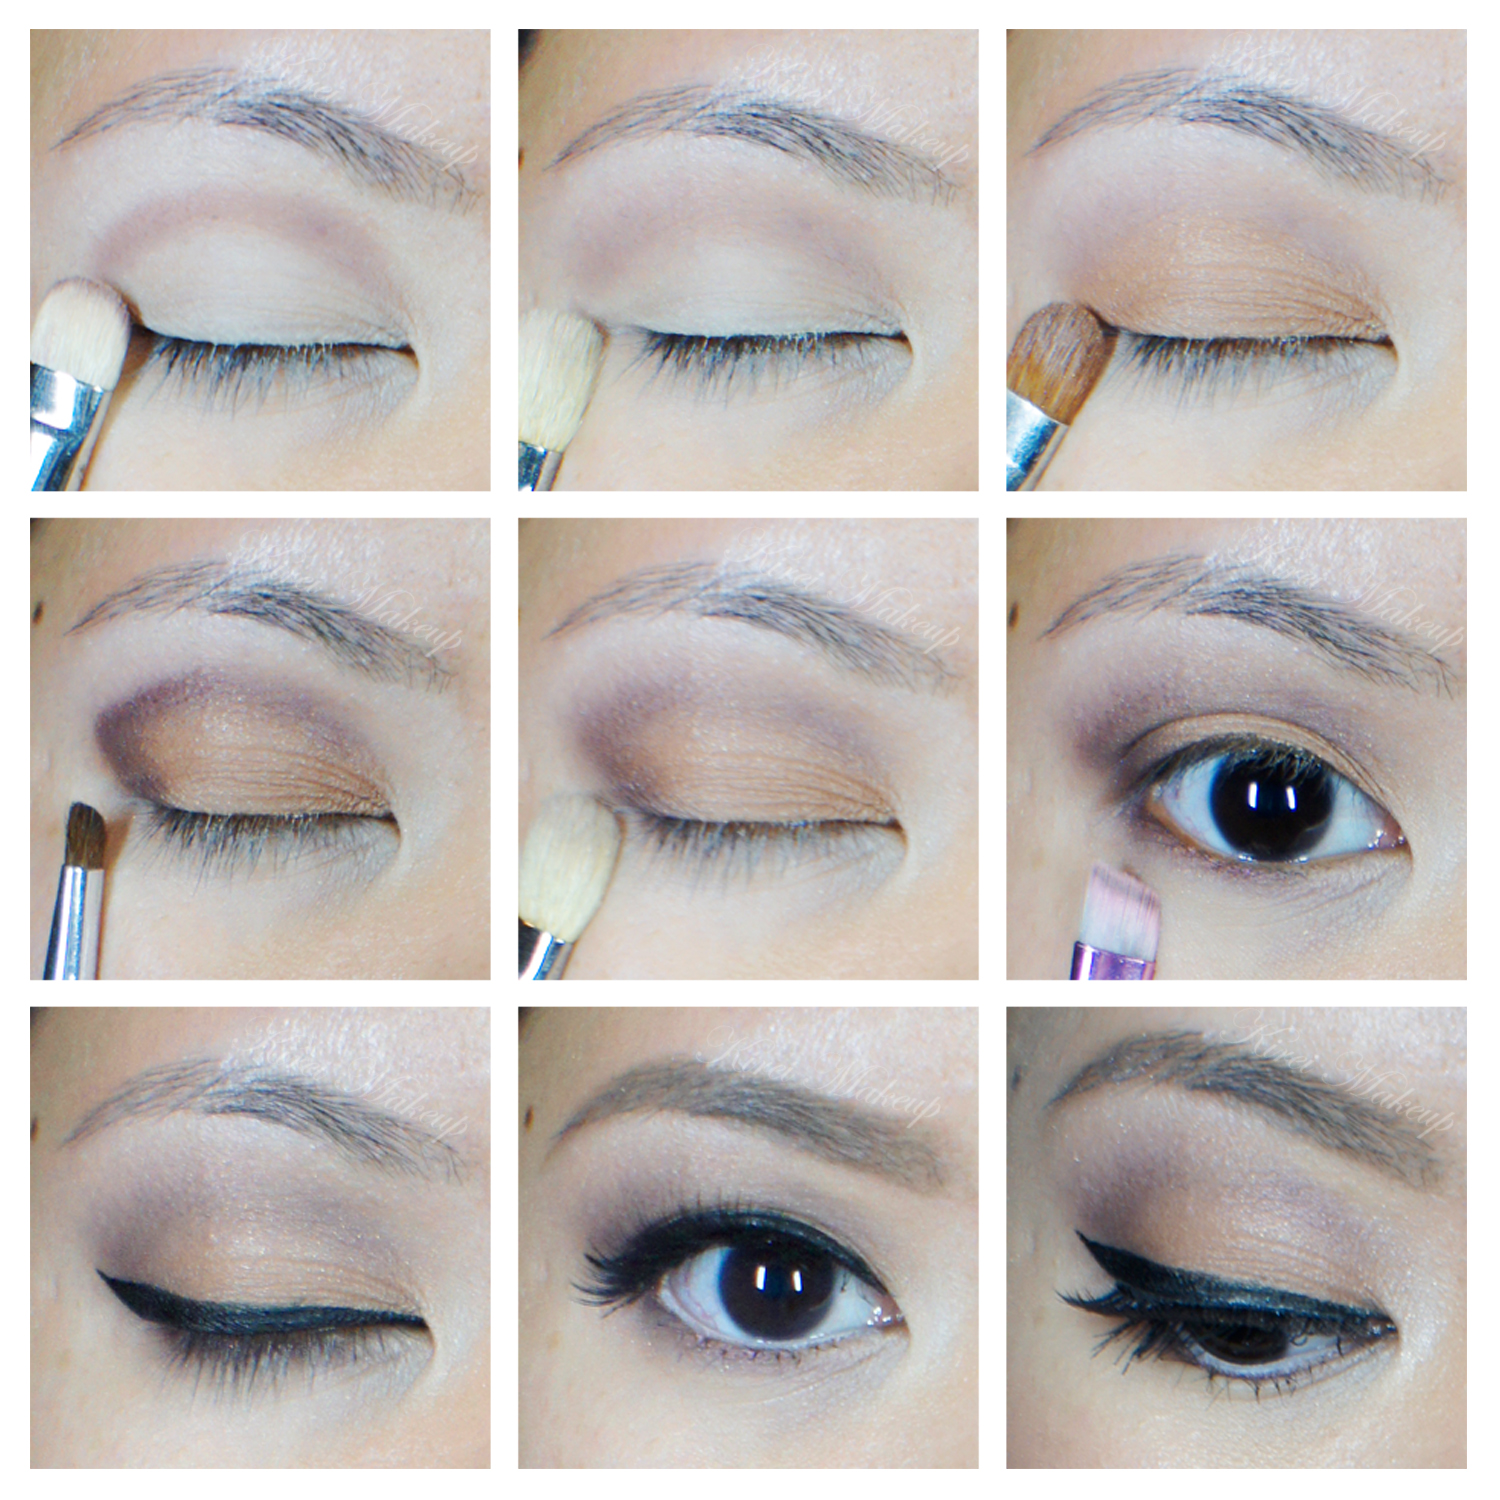
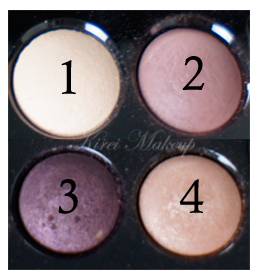
1. I applied Trick all over my eyelid using a flat eyeshadow brush.

2. Using another clean flat eyeshadow brush, I patted Factory on the outer third of my eyes.

3. I removed excess from the flat eyeshadow brush I used on step 2, and blended Factory towards the center part of the eyes.

4. Using a clean blending brush, I applied Nooner on the crease.

5.  I applied Factory along the lower lash line using an angled eyeliner brush.

6. I also applied Dust on the inner corner of the lower lash line using an angled eyeliner brush.

7. I lined my waterline using MAC Chromagraphic pencil eyeliner in NC 15.

8. On my upper lash line, I created a winged eyeliner using Kanebo Kate Super Sharp eyeliner.

9. I curled my lashes and applied Maybelline Great Lash mascara on both upper and lower lashes.

10. I added false eyelashes on the upper lashes to make my eyes appear open and larger.

11. I filled my brows using Anastasia Brow Wiz in a mix of Ash Blonde and Brunette.

ud naked 3

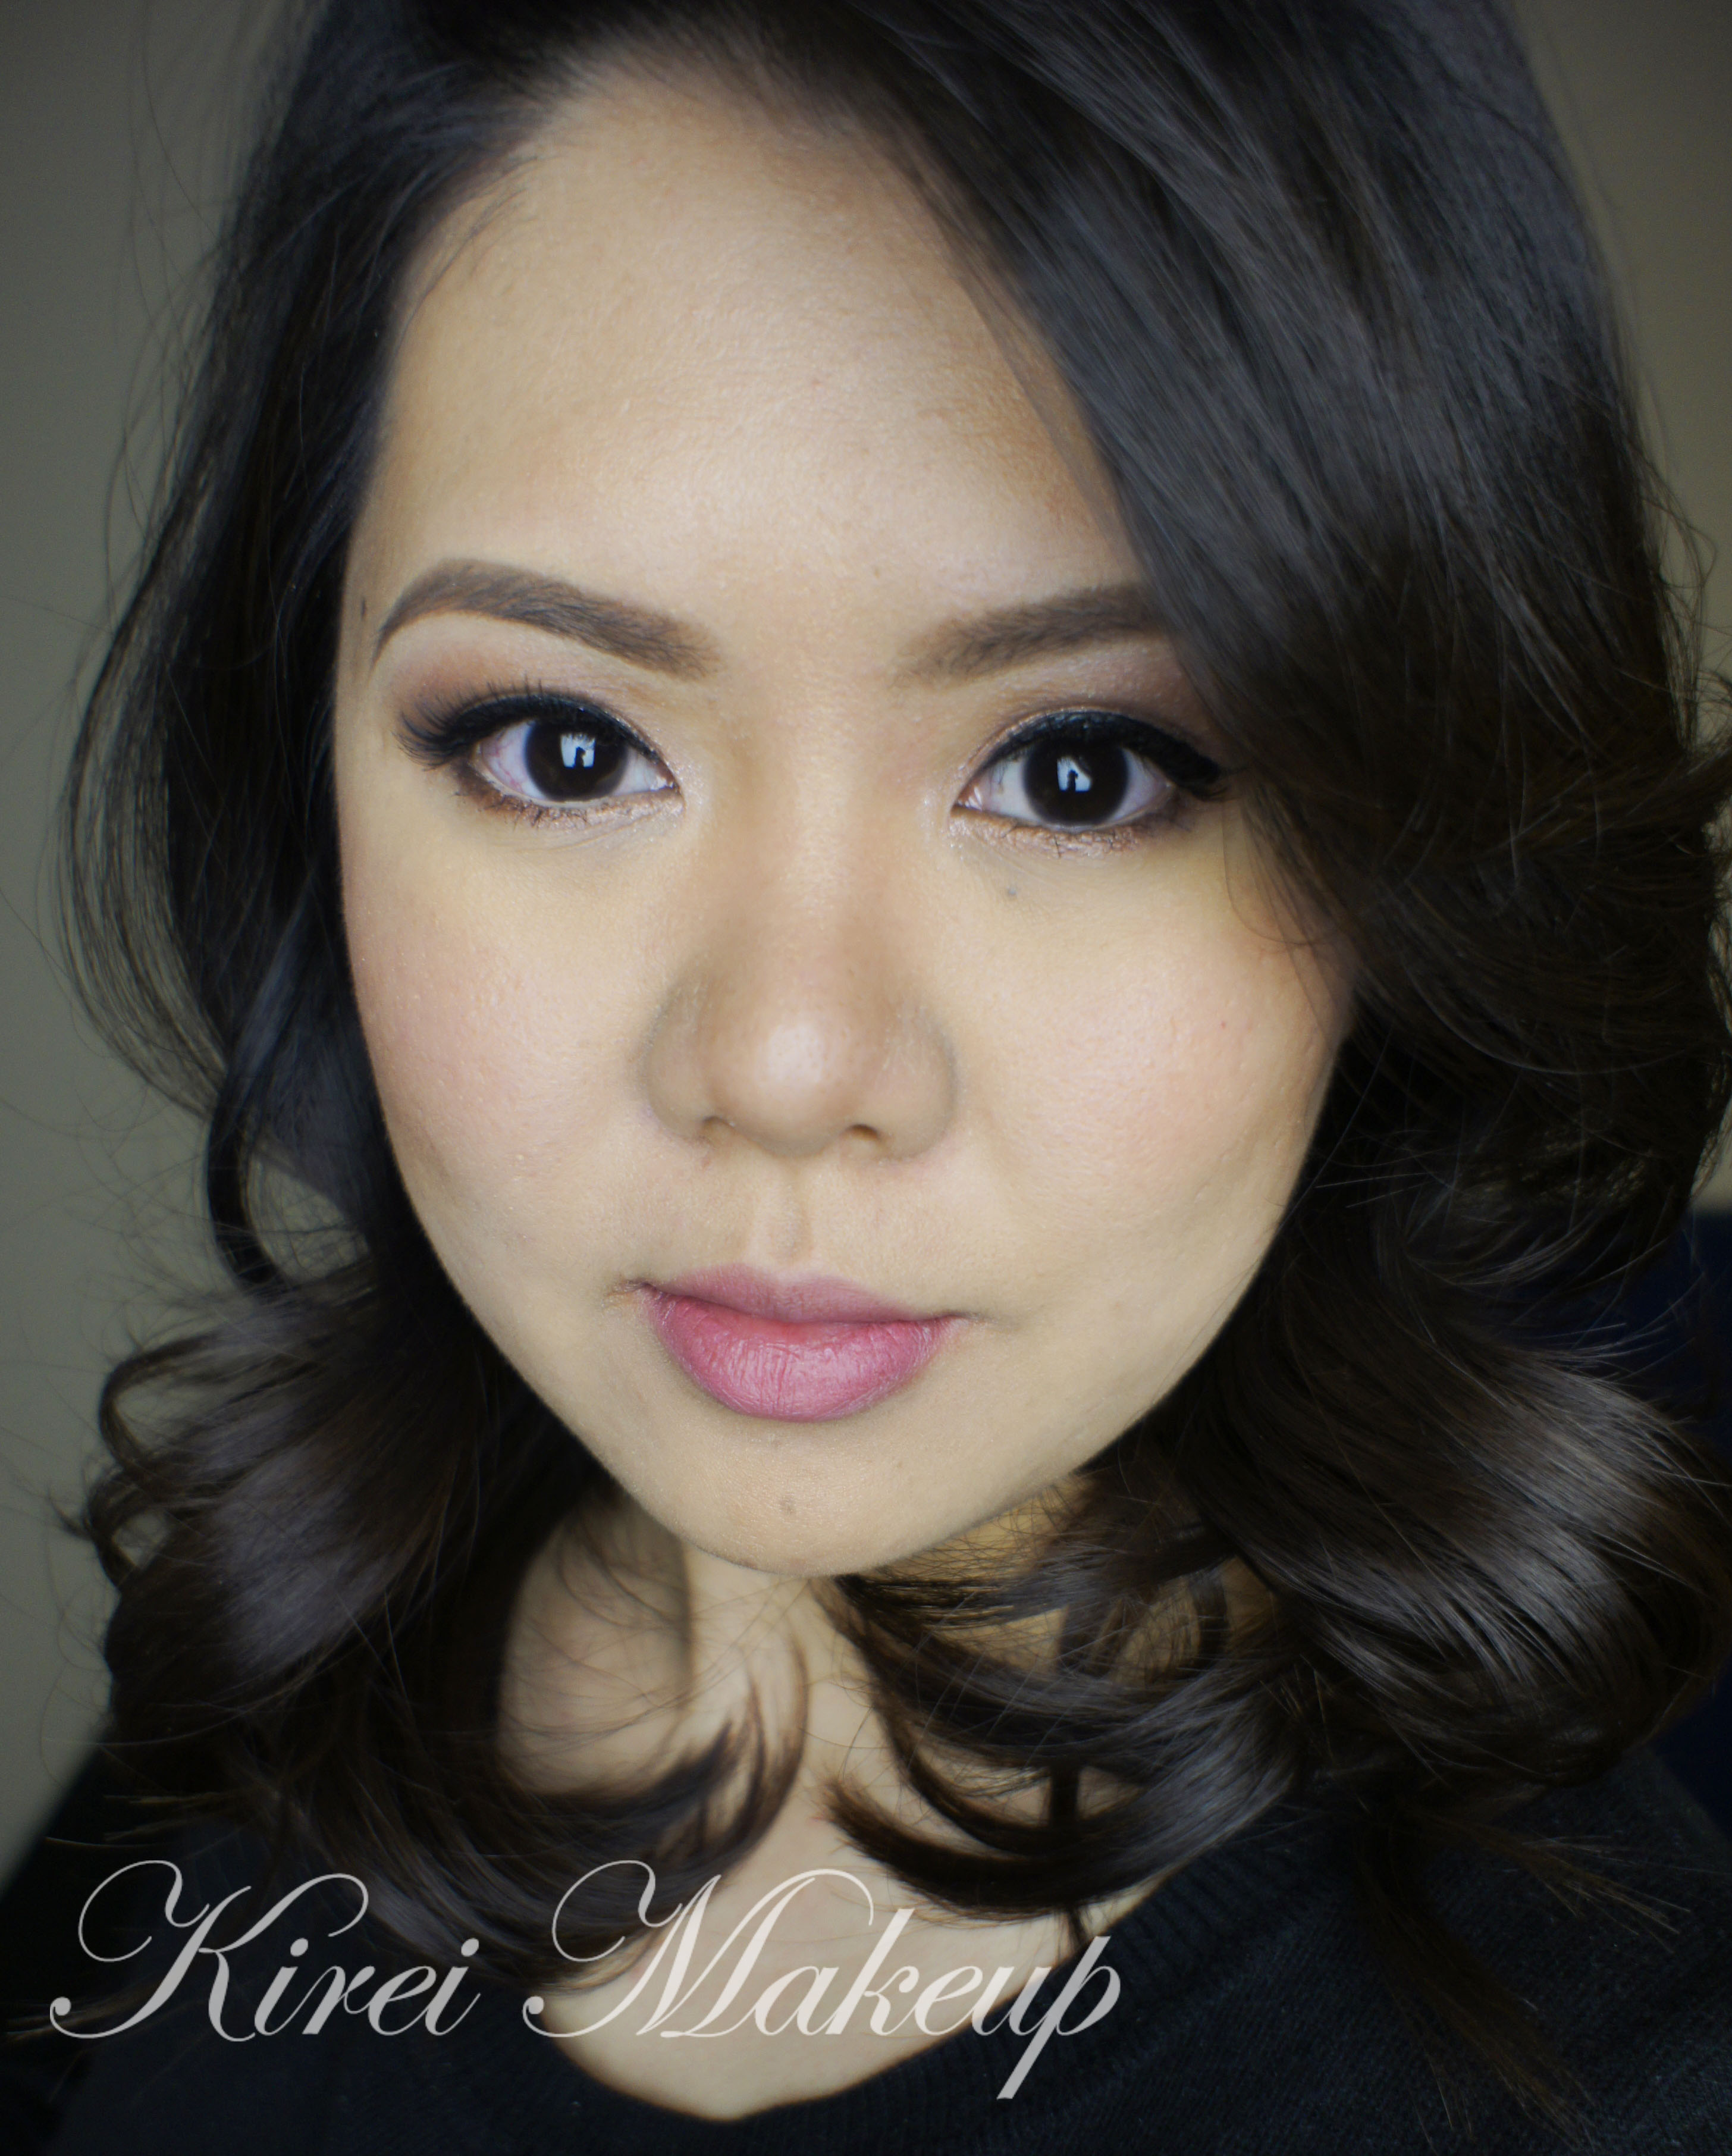
12. On my face, I applied Giorgio Armani Maestro foundation and blended it using my fingers.

13. I lightly contoured my face using MAC Shadowy powder.

14. On my cheeks, I applied MAC Well Dressed blush.

15. I added Smashbox Halo wand highlighter in Gold as highlighter.

16. On my lips, I applied Revlon Colorstay Ultimate Suede Lipstick in Socialite.

bridal romantic makeup

Neutral Eyes & MAC Diva Lipstick

I was asked to do a “Bella Twilight” inspired tutorial. I don’t watch Twilight since I don’t like it, so I had to google up some images of Bella. Her makeup is mostly very natural, with very little blush. I decided to use Bella’s eye makeup as an inspiration for the eyes.

However, I changed the lips since I like more colors on my face. I added extra eyeliner as well just to define my eyes, but you can skip the step altogether. I don’t think the overall look is too inspired by Bella, but the eyes are quite close to how she has it on the Breaking Dawn poster.

Anyhow, I’ve decided to go with MAC Diva lipstick for the lips since I like this lipstick, and I want to wear it more for tutorials. I absolutely love MAC Diva! It’s not too dark, not too light, and it’s perfect for winter. I have done another post using MAC Diva lipstick but with a glitter cat eyeliner in “Holiday Makeup using MAC Diva”. If you’re not used in creating cat eyeliner, this is a good alternative.

I added the liquid liner after I applied my falsies since I didn’t decide to apply the liner after I completed the whole look. You can skip the liquid liner altogether if you want.

smashbox filter trio eyeshadow

How-to:

1. I applied MAC Omega eyeshadow all over my eyelid using a flat eyeshadow brush.

2. Using Smashbox bullet brush, I applied Sable from Smashbox Filter photo-op trio.

3. I applied Sumatra from Smashbox Filter photo-op trio on the outer V using a crease brush.

4. I blended Sumatra out to remove any harsh lines.

5. Using an angled eyeliner brush, I applied UD Blackout eyeshadow along my upper and lower lash lines.

6. I curled my lashes and applied Maybelline Great Lash mascara on both upper and lower lashes.

7. I filled my brows using a mixture of MAC Omega and MAC Brun.

8. I applied falsies, and then lined it using Kanebo Kate Super Sharp Liner.

9. I applied Vanilla from Smashbox Filter photo-op trio under the brows.

natural look using mac diva

10. On my face, I applied Smashbox Halo foundation using a Sigma Flat Kabuki Brush.

11. On my cheeks, I applied Maybelline Face Studio Master Glaze in Make a Mauve, blending out using my finger.

12. I contoured my face using MAC Shadowy powder and NARS Ita kabuki brush.

13. I also applied Smashbox Halo Highlighting Wand in Gold as highlighter.

14. On my lips, I lined it using L’oreal Colour Riche in Truly Burgundy and then applied MAC Diva lipstick on top.

If you want to know how to apply lipstick to make it last, please check my How-to apply red lips post.

Rose Smokey Eyes III with UD Naked 3

I think I’ve made my obsession with UD Naked 3 palette pretty clear – I’m in love with it! The colors are wonderful, the pigments are so easy to blend, the double-ended brush is pretty amazing. What’s not to love?! So, to show another appreciation for this palette, I’ve decided to do another the third Rose Smoky Eyes tutorial. This look is far more intense and darker than the first rose smokey eyes that I did. I also think this one is prettier than the 2nd smoky eyes that I did with Naked 3. If you prefer a more natural looking one, I do have a post for you in my Berry Lips post.

I’ve also added a Youtube Video tutorial using UD Naked 3 palette!

This look is perfect for those who’re not afraid to play with the darker color, and already feel comfortable with blending. You can make it even darker and more intense if you’d like by adding a matte black eyeshadow (i.e. MAC Carbon) on the outer V. I like doing it this way since I want to showcase the Rose eyeshadow.

I hope you enjoy this look! I know a lot of people on Pinterest enjoyed my first tutorial! I’m so grateful that it’s getting 700+ repins on Pinterest.

I know I’ve said I was going to do a review, I’ll try to do it soon. It’s just so cold in Canada right now, it caused me to go on hibernation mode..hahaha..In all seriousness, though, -40 deg. Celsius is not a joke!

rose smoky eyes

How-to:

1. I prepped my eyelids using Urban Decay Primer Potion in Sin.

2. I applied Burnout on the inner third of my eyelid using the flat-end of the brush.

(I wiped away excess shadow on the brush on a clean towel before step 3)

3. Using the same brush, I applied Liar on the middle of the eyelid.

(I wiped away excess shadow on the brush on a clean towel before step 4 )

4. Again, using the same brush, I applied Mugshot on the outer third of my eyelid.

5. Using the blending-end of the brush, I blended the edge of the eyeshadow.

6. I applied Blackheart using a small crease brush on the outer V.

7. After wiping excess eyeshadow from the crease brush I used on step 6, I dragged Blackheart on to my crease, and blended it out.

urban decay naked 3

8. Using a fluffy brush, I applied Limit right at the edge where Blackheart meets with my skin. This helps to blend out Blackheart, and make a nice transition to my skin.

9. I lined my waterline and tightline using L’oreal Voluminous Smoldering eyeliner. On the lower lid, I applied Mugshot using an angled eyeliner brush, then Blackheart very close to the roots of the lower lashes.

10. Then, I created a winged eyeliner on the upper lash line using L’oreal Super Liner Ultra Sharp Tip.

11. I curled my lashes and applied Buxom Lash mascara on both top and bottom lashes.

12. For extra drama, I added false lashes for extra length and volume. These falsies were samples from my friend, which is currently in production.

13. I filled my brows using a mix of Anastasia Brow Wiz in Ash Blonde and Brunette.

rose smoky eyes

14. I applied Giorgio Armani Maestro foundation on my face, blending it using my fingers.

15. On my cheeks, I applied Revlon Cream Blush in Charmed Enchantment using a foundation brush.

16. Then, I applied MAC cream base in Pearl on top of my cheekbones, bridge of my nose, and cupid’s bow using my finger.

17. I applied MAC Please Me lipstick on my lips using a lip brush. Then, I added a little bit of L’occitane lip balm just to keep my lips moist since it’s so cold here in Canada!!!

18. My hair was set using a velcro rollers set and 1.5in Chi curling iron.

Easy Red Lips Holiday Makeup

Hi ya’ll!!!! As the holiday is fast approaching, I want to do at least 1 red lips tutorial before Christmas comes around. This is such easy red lips holiday makeup look! The eyes are very simple, and the lips are in a shade of a beautiful red. Not too bright, not too dark. This is a very nice makeup for brides who are going for the red lips look.

I added an extra touch of false eyelashes just because I want the eyes to look even bigger and more dolled-up. After all, it is a holiday makeup!

if you want to find out how I apply and create long-lasting lips, please check my “How-to apply [red] lipstick” tutorial. On the full-face picture, the lips look a bit bright, but that’s because of the light that I use for this tutorial. The lips are actually slightly darker than the picture. It’s a very nice warm brown-red.

How-to:

1. I applied MAC Patina eyeshadow all over my eyelid using a flat eyeshadow brush.

2. Using another clean flat eyeshadow brush, I applied MAC Woodwinked  on the center of the lid.

3. I applied MAC Patina eyeshadow on the outer half of my lower lid, and MAC Woodwinked on the inner half using an angled eyeliner brush.

4. I created a very small feline flick using a black eyeshadow and an angled eyeliner brush.

5. Using the same eyeshadow and brush as step 4, I lightly lined the outer corner of my lower lash line.

6. I applied MAC Chromagraphic eyeliner pencil in NC30 on the waterline.

7. I applied Anastasia Brow Duo Powder in Brunette on my eyebrows.

8. Next, I curled and applied Clinique High Impact mascara on both top and bottom lashes.

9. Then, I applied Ardell false eyelashes in 109 on the upper lash line.

bronze christmas makeup

10. I applied L’oreal Magique Lumi foundation in W3 all over my face using CoverFX cream foundation brush.

11. Using a small concealer brush, I applied a very light coat of foundation on my lips.

12. Then, I lined and filled my lips using MAC Brick lip liner.

13. I also filled my lips using MAC Dare You lipstick using a rounded lip brush.

*for futher tutorial on how I make the lipstick last, please check my how-to apply [red] lipstick tutorial*

14. Using MUFE HD concealer, I concealed my dark under eyes.

15. I powdered my face using CoverFX translucent powder.

16. I slightly contoured and highlight my face using Smashbox contour/highlight trio palette.

17. I applied NARS Mata Hari blush on my cheeks.

18. My hair was set using Caruso Steam Rollers.

red lips holiday makeup

Rose Gold Holiday Makeup

I’ve done gold/brown makeup, a silver smoky eyes makeup, natural looking makeup, as well as bold lips holiday makeup. Today, I wanted to do another more wearable, soft and easy holiday makeup. I used Rose Gold since I think it’s fun and feminine. This tutorial is for those of you who are girly, and want to look more on the natural low-key for the holiday. I also feel that this look will be good for those with deep set eyes.

The idea is similar to the Fresh Dewy makeup tutorial post couple days a go. The eyes are simple and high in shimmer, the face is semi-matte and natural finish. This look suits those who don’t like to wear heavy makeup. Everything is very simple and light. You can skip the eyeliner altogether, and just wear mascara. I just like the look of a cat/winged eyeliner to frame my eyes.  Bobbi Brown Rose Gold

How-to:

1. I applied Bobbi Brown Rose Gold long wearing cream eyeshadow on my eyelid using my ring finger.

2. Using a flat eyeshadow, I applied the middle color from the Bobbi Brown Shimmer Brick in Rose Gold on my eyelid to add extra shimmer.

3. Using a fluffy blending brush, I applied the darkest rose gold shimmer from the Bobbi Brown Shimmer Brick in Rose Gold on the crease.

4. Using a small shader brush, I applied L’oreal Infallible eyeshadow in Bronzed Taupe on the outer V.

5. I applied the same rose color on step no. 2 on the lower lid, and then L’oreal Bronzed Taupe on the outer half of the lower lid.

6. Using MUFE aqua cream shadow no. 11 on the waterline just to add the extra gold in it. Of course you do not have to use gold for this. You can use black, beige, white, or anything you want!

7. I created a winged eyeliner using Kanebo Kate Super Sharp eyeliner on the upper lash line.

8. I filled my brows using Anastasia brow wiz in Brunette.

9. I curled my lashes and applied mascara, as well as Ardell no. 109 false eyelashes on the upper lashes. I also applied mascara on the lower lashes.

Rose Gold bobbi brown

10. For the face, I applied L’oreal Lumi Magique foundation in W4 all over my face using CoverFX foundation brush.

11. Under my eyes, I applied concealer in MAC Pro Conceal/Correct palette in Medium.

12. I powdered under my eyes using CoverFX translucent loose powder.

13. I applied MAC Dainty mineralized blush on my cheeks.

14. I also applied Diorskin Shimmer Star Amber Diamond on the bridge of my nose and on my cheekbones.

15. On the lips, I applied Revlon Colorstay Ultimate Suede in Socialite, and added a little bit of L’occitane Lip Balm (the one with olive in it).

Smashbox Full Exposure Look #1

I’ve recently bought Smashbox Full Exposure palette using my 20% discount from Sephora (yippie!). I’m pretty sure if you guys follow me on Instagram or Twitter, you would’ve seen the picture of the palette there.

Anyways, I’ll talk more about the palette in depth later on. I just have to say, this is an amazing palette! The shimmer side of this Smashbox Full Exposure Palette has beautiful glitters, which surprisingly stayed on the lid really well. Not to mention, the palette consists of nudes, greys, blacks and browns! Both in shimmer and matte! So much love!

This look is perfect for everything! If you want to wear it out on a date, skip the false lashes. It’s so perfect for the upcoming holiday (too early?), brides and any type of parties. It’s warm, not too smoky, not too light. Just enough shimmer, and I love the combination of different textures.

The rest of the face is kept quite minimal, with a tad more highlight to compensate for this winter weather. I used L’oreal Color Caresse Shine Stain to keep my lips moist.

smashbox full expsoure palette

How-to:

1. I prepped my eyelid using Urban Decay Primer Potion.

2. Using a fluffy blending brush (Crown Brush Pro Blending Fluff C433), I applied Smashbox Full Exposure palette M2 eyeshadow slightly above my crease.

3. Then, using Sephora Bullet Crease 221 brush, I applied M1 on the outer V and on the crease.

4. I applied Smashbox Full Exposure palette M7 on the outer quarter of the lid using Crown Brush Round Crease.

5. I used the tip of the Round Crease Crown brush to apply Smashbox Full Exposure palette M1 eyeshadow on the lower lid. Then, I applied M7 just on the outer half of the lower lid.

6. Using  Firm Shadow 157 Crown Brush, I applied S3 on the eyelid.

7. I created a winged liner along the upper lashline using Kanebo Kate Super Sharp Liner.

8. I lined the outer half of my tightline using the black side of Revlon PhotoReady Kajal Intense Eye Liner + Brightener in Carbon Cleopatra.

9. I applied Tarte Light, Camera and Lashes mascara, and also Eyeme false eyelashes (sample from a friend) on the upper lashes.

10. Using Red Sable Oval Crown Brush, I applied Smashbox Full Exposure palette M4 under the brows.

11. I filled my brows using Anastasia Brow Wiz in Medium Ash and Brunette.

smashbox full expsoure palette

12. I applied MUFE HD Elixir to prep my face.

13. Then, I applied MAC Pro Longwear foundation in NC30 all over my face.

14. Under the eyes, I applied Giorgio Armani Master Corrector no. 2.

15. Then, I applied MAC Pro Conceal/Corrector in Medium under my eyes, and on my blemishes.

16. I powdered my face using CoverFX Translucent loose powder.

17. I applied MAC Shadowy as contour, MAC Cubic as blush, and Diorskin Shimmer Star Amber Diamond as highlighter.

18. On the lips, I applied L’oreal Colour Caresse Shine Stain in Eternally Nude.

smashbox full expsoure palette

Chanel Kaska Beige re-visited

Hello, everyone! It’s been a while since my last post. I do apologize for the lack of post. Things have been going really crazy in my personal life, and I can barely catch my breath. Anyways, let’s put those things aside, and get back to this whole blogging things back on track!

Today’s tutorial used one of my all-time favorite palette from Chanel, called Kaska Beige. I’ve actually used this palette before in my Chanel Kaska Beige tutorial. This tutorial has a little bit more of a smokier feel than the older post, however still wearable for party, wedding, prom, night-out, pageant etc.

I also added a white eyeliner on the tightline to make my eyes look bigger, and heavier lashes for a doll-eye look. I applied more blush on the cheeks, just to complete the whole “doll” look. I love to add extra pinch of blush esp. in the winter when the colors are grey, and my skin feels blaaaah.

Oh, I also used the new MAC Masterclass Brush Oval 6 on my face, and I’ve to say I love it! I’ll post a review later.

earthy plum makeup

How-to:

1.  My eyelid was prep using Urban Decay Primer Potion.

2. I applied eyeshadow 2 (refer to picture below) on my crease using a shader brush (MAC 239).

3. Using a clean blending brush (MAC 217) to blend the edge off.

4. Using a flat eyeshadow brush, I applied eyeshadow 4 on my eyelid.

5. I applied eyeshadow 3 on the outer V using a small angled shader brush.

6. Using a clean blending brush (MAC 217), I blended the outer V.

7. I applied eyeshadow 3 along the lower lash line using an angled eyebrow brush.

8. I created a winged liner using L’oreal Infallible Super Slim Liquid Eyeliner.

9. I applied Tarte Light, Camera and Lashes mascara, and also false eyelashes (sample from a friend) on the upper lashes.

10. I lined my tightline using a white eyeliner from Revlon PhotoReady Kajal Intense Eye Liner + Brightener in Carbon Cleopatra.

11. I filled my eyebrows using a mixture of Anastasia Brow Wiz in Medium Ash and Brunette.

12. I applied eyeshadow 1 under my brows and in the inner corner of my eyes.

chanel kaska beige

13. I applied MUFE HD Elixir to prime my face using MAC Masterclass Brush Oval 6.

14. Using the same brush, I applied MUFE HD foundation all over my face.

15. I applied MAC Pro Conceal/Correct in Medium under my eyes.

16. I set my foundation using MUFE Pro Finish powder.

17. I contoured my face slightly using MAC Shadowy and NARS Ita Kabuki brush.

18. I applied MAC Dainty blush along my cheeks using MAC 219 brush.

19. Then, I applied NARS Mata Hari right on the apples of my cheeks using MAC 219 brush.

20. I filled my lips using MAC Dervish lip liner, and then top it off using Revlon Colorstay Ultimate Suede lipstick in Socialite.

asian wedding makeup

Bridesmaids Makeup

Last Sunday, I was offered to do bridesmaid makeup (all thanks to the wonderful Keirsten) for 5 bridesmaids. The first girl, Kristin, came up to me and showed me what kind of makeup she wanted and after she was done with the makeup, the next 3 girls wanted the same look! The last girl, Amanda, had a different look which was similar to a tutorial that I’ve already done in this post. Also, you’ll be able to see Amanda’s makeup if you follow me on Instagram!

Anyways, this look obviously can be used for anyone, bridesmaids or brides. It’s not too smoky, but at the same time there’s some intensity on the eyes. Not a lot of contouring for the face, since the focus is on the pink flushed cheeks. The lips is kept neutral,however one of the bridesmaids, Mimi, had a bright pink lips which also works with this makeup.

The look is very fresh and brightening. Nothing too smoky or too contoured. Very youthful, and the overall look for the face is semi-matte. That way, the bridesmaids didn’t stand out from the bride, since the bride went for a more smoky eyes makeup.

Bridesmaids makeup

How-to:

1. I primed my face by applying MUFE Elixir all over my face and down to my neck. This will ensure that the face is moisturized and primed for foundation. This also will ensure your foundation stays all day long. The Elixir works for every skin type.

2. For the eyes, I applied UD Primer Potion from the eyelid all the way to just below the brow. This will ensure your eyeshadow stays put the whole day.

3. Using a flat eyeshadow brush, I applied A from Sleek Makeup iDivine Storm palette (see picture below) all over the eyelid.

4. Using a small shader brush, I lightly applied B from Sleek Makeup iDivine Storm palette on the crease.

5. Using an angled brow brush, I applied a mixture of C and D from Sleek Makeup iDivine Storm palette on the outer V, and right on the crease/socket.

6. Using a fluffy blending brush, I blended C + D so there’s no harsh line.

7. Using whatever was left on the brush on step 5, I ran it along the lower lash line.

id--storm_1

image is courtesy of Sleek Makeup

8. I created a winged liner using Kate Kanebo Super Sharp liquid liner. (For the bridesmaids, I used MUFE Aqua Black gel eyeliner since it’s waterproof).

9. I lined my waterline and tightline using MAC Smoldering eyeliner. (For the bridesmaids, I used L’oreal Voluminous Smoldering eyeliner).

10. I curled my lashes and applied Tarte Light, Camera and Lashes mascara on both top and bottom lashes.

11. I also applied Quo false eyelashes (I think this is 803). (Bridesmaids brought their own false lashes).

12. I filled my brows using Anastasia Express Brow Powder kit in Brunette.

bridesmaids makeup

13. For the face, I applied MAC Pro Long Wear foundation in NC 30. (for bridesmaids, I used either MUFE HD or Kryolan HD, whichever matched them better).

14. Under the eyes, I applied Benefit Erase Paste. (For bridesmaids, I used MAC Pro Correct/Conceal).

15. I lightly applied Benefit Moon Beam on the high planes of my cheeks (cheekbones, bridge of the nose, cupid’s bow)

16. I set my face using Cover FX Translucent powder.

17. I slightly contoured my face using Smashbox contour/highlight palette (discontinued).

18. On the cheeks, I applied MAC Dainty mineralized blush, which seemed to be the favorite for the girls!

19. For the lips, I applied Revlon Colorstay Ultimate Suede lipstick in Socialite.

Sleek iDivine Storm

Red Invasion [Collaboration]

Lately, my Twitter has been flooded with chats between several Indonesian Beauty Bloggers and myself. These bloggers are: Yonna Kairupan, Iva Asih Era Chrysta, Lauren Renturquise, Sha Aullia, and Riyanti Teressa. So, we decided to do a little collaboration and we wanted to paint the town red 😉 By town, I mean the Indonesian Beauty Bloggers Facebook page.

Anyhow, we decided to do red lips look, and Yonna had posted hers on her youtube page. I decided to post mine next and the obvious choice for me was to use MAC Russian Red (again). I can never get tired of MAC Russian Red, it’s just so gorgeous! It’s definitely my favorite.

For the eyes, I think I wanted to pack more punch on it, so I did a slightly more smoky look than the other tutorial in MAC Russian Red post. I also added a set of false eyelashes on me lashes, since I bought a new one. I don’t love the falsies, but I don’t mind it. Not long enough and not thick enough. Oh well! I also used my new Sleek Makeup iDivine Storm palette, but there’s no name for each shade for this palette. So, I named the shades on the tutorial below based on the hue of each eyeshadow. If you’re confused, just leave the question below 🙂

How-to:

1. I applied MUFE Aqua Shadow in 28E all over the lid.

2. Using a clean fluffy brush, I applied the matte light brown from Sleek Makeup iDivine Storm palette.

3. Using another clean fluffy brush, I applied matte dark brown from Sleek Makeup iDivine Storm palette.

4. I applied the champagne shade from Sleek Makeup iDivine Storm palette on top of the MUFE Aqua Shadow 28E with a flat eyeshadow brush.

5. Using another blending brush, I applied black from Sleek Makeup iDivine Storm palette.

6. I applied both champagne (inner corner) and black (outer corner) from Sleek Makeup iDivine Storm palette on the lower lid using an angled brow brush.

7. Using Kanebo Kate Super Sharp eyeliner, I created a feline flick/cat-eye liner/winged liner on the upper lash line.

8. I curled my lashes and applied Maybelline Volume Express Turbo Boost mascara on both top and bottom lashes.

9. I lined the outer half of my waterline using L’oreal Voluminous Smoldering eyeliner.

10. I applied DUP eyelashes in 906 on the top lashes.

11. For the brows, I applied MUFE Aqua Brow Gel.

sleek makeup storm

12. On my face, I applied Urban Decay Naked Skin foundation.

13. I applied MUFE HD concealer to cover my blemishes and under eye circles.

14. I powdered my face using Cinema Secret loose powder.

15. I contoured my face using NARS Kabuki Ita brush and MAC Shadowy powder.

16. I applied MAC Fleur Power on my cheeks.

17. I lined and filled my entire lips with MAC Redd lip liner.

18. I, then, applied MAC Russian Red on my lips.

asian red lips

MAC Russian Red

As you all know from my Twitter, I’ve been looking forward to use my M.A.C Russian Red lipstick again. I know, I know, it seems like this week is a MAC week. Well, can’t be helped, I’m trying to fall in love with MAC again! Afterall, MAC was one of the reasons why I went into makeup in the first place.

So, talking about MAC Russian Red, this is the best true-red lipstick. If you want a cooler red, you can try MAC Ruby Woo instead. I also love how this lipstick has a matte finish to it. I’m not a big fan of shiny or glossy lips, so I love how even though this lipstick has a matte finish, it is not drying. It also helps if you prep your lips before application to ensure your lips aren’t chapped.

I purchased this Chanel quads in Intuition in February and didn’t have the chance to play with it, so I had to use it for this look. I love how soft and pretty the eyes look. If you are looking for a neutral, day makeup, do try the eye-look and you can skip the red lipstick.

I’ve done a similar look in Battle of the Classics.

How-to:

1. Using a flat eyeshadow brush, I applied the gold eyeshadow from the Chanel Intuition quad.

2. Using a fluffy blending brush, I applied the deep brown shade from the same quad on my  outer V and on the crease. I used whatever was left on the brush and swept it along the lower lash line.

3. I blended out the crease using a clean fluffy brush.

4. Using an angled eyeliner brush, I created a winged liner along the upper lashline.

5. I applied MAC Chromagraphic liner in NC30 on my tightline.

6. Using a small flat shader brush, I applied the pink highlighter shade from Chanel Intuition quad on the inner corner of the lower lid and under the brow.

7. I curled my lashes and applied Maybelline Volume Express mascara on both upper and lower lashes.

8. I filled my brows in using MUFE Aqua Brow Gel.

9. For extra drama, I applied Quo false eyelashes.

natural wedding makeup

10.  For the face, I applied MUFE HD Foundation using a foundation brush.

11. Using whatever was left on the brush, I swept it across my lips.

12. I lined and filled my lips using MAC Redd lip pencil.

13. Using a lip brush, I applied MAC Russian Red on my lips.

14. I powdered my face using a loose translucent powder.

15. I contoured my face using MAC Shadowy and applied MAC Fleur Power on the cheeks as blush.

asian red lips