Neutral Eyes & MAC Diva Lipstick

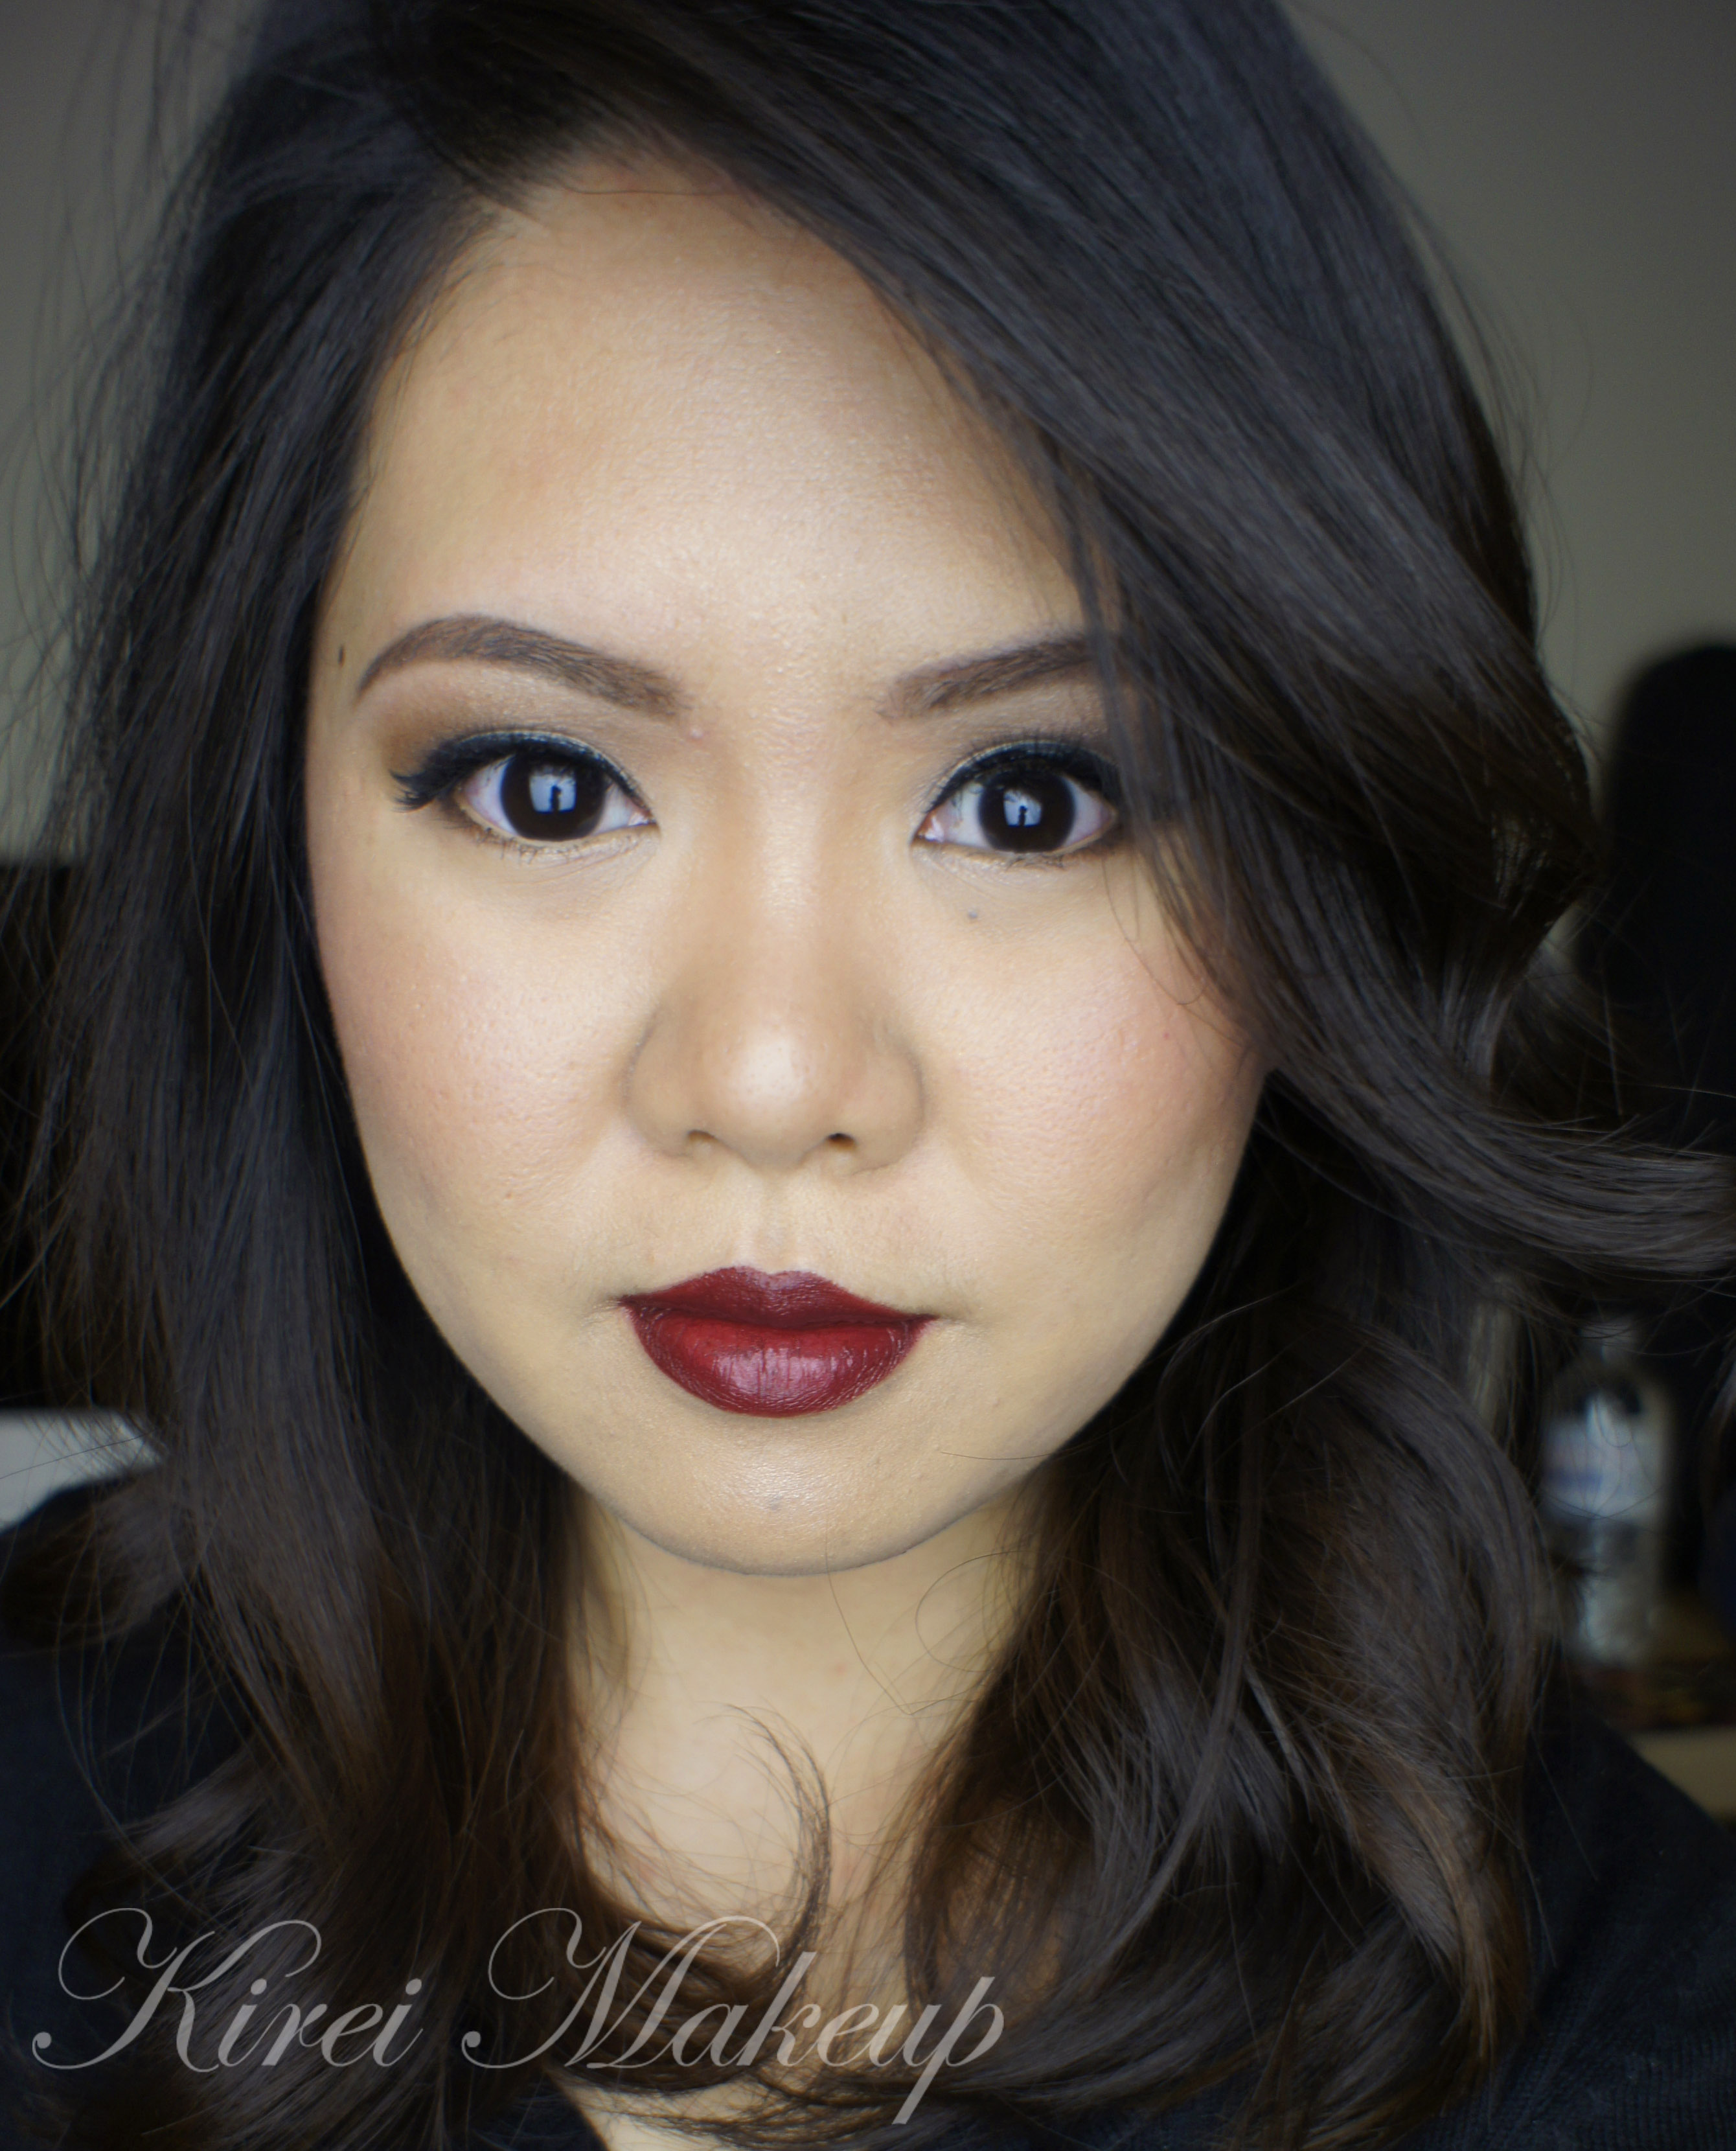
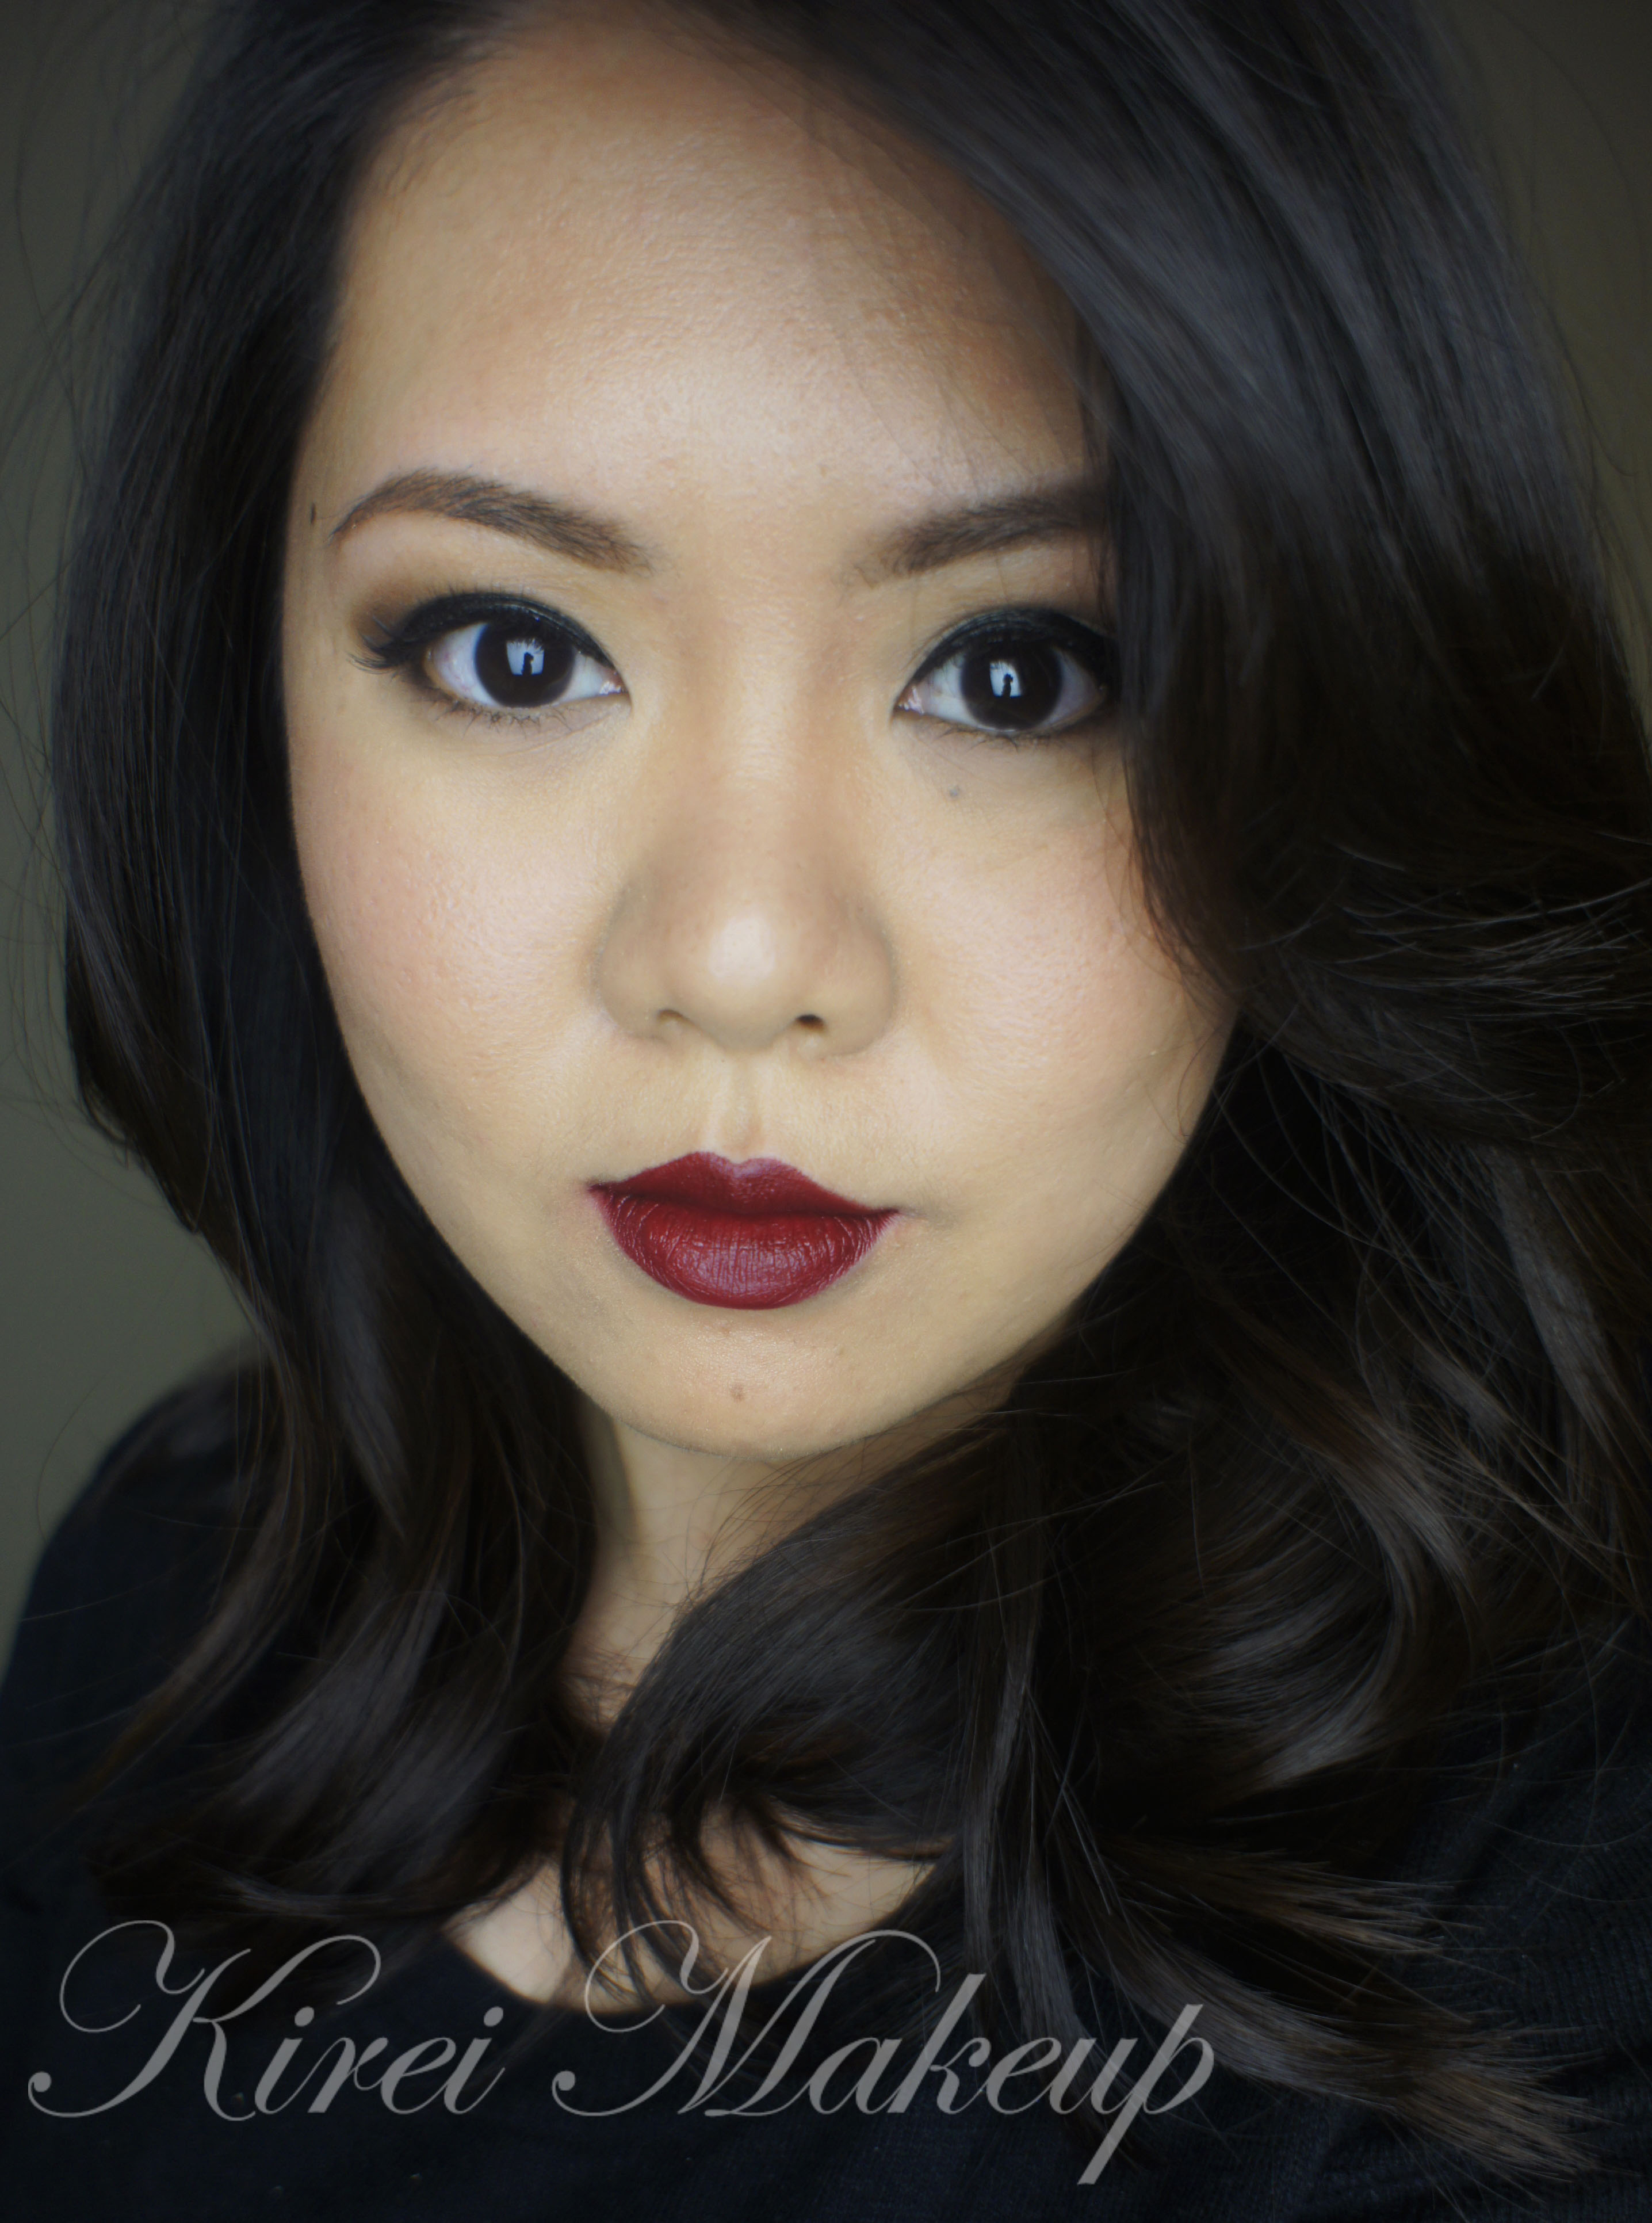
I was asked to do a “Bella Twilight” inspired tutorial. I don’t watch Twilight since I don’t like it, so I had to google up some images of Bella. Her makeup is mostly very natural, with very little blush. I decided to use Bella’s eye makeup as an inspiration for the eyes.

However, I changed the lips since I like more colors on my face. I added extra eyeliner as well just to define my eyes, but you can skip the step altogether. I don’t think the overall look is too inspired by Bella, but the eyes are quite close to how she has it on the Breaking Dawn poster.

Anyhow, I’ve decided to go with MAC Diva lipstick for the lips since I like this lipstick, and I want to wear it more for tutorials. I absolutely love MAC Diva! It’s not too dark, not too light, and it’s perfect for winter. I have done another post using MAC Diva lipstick but with a glitter cat eyeliner in “Holiday Makeup using MAC Diva”. If you’re not used in creating cat eyeliner, this is a good alternative.

I added the liquid liner after I applied my falsies since I didn’t decide to apply the liner after I completed the whole look. You can skip the liquid liner altogether if you want.
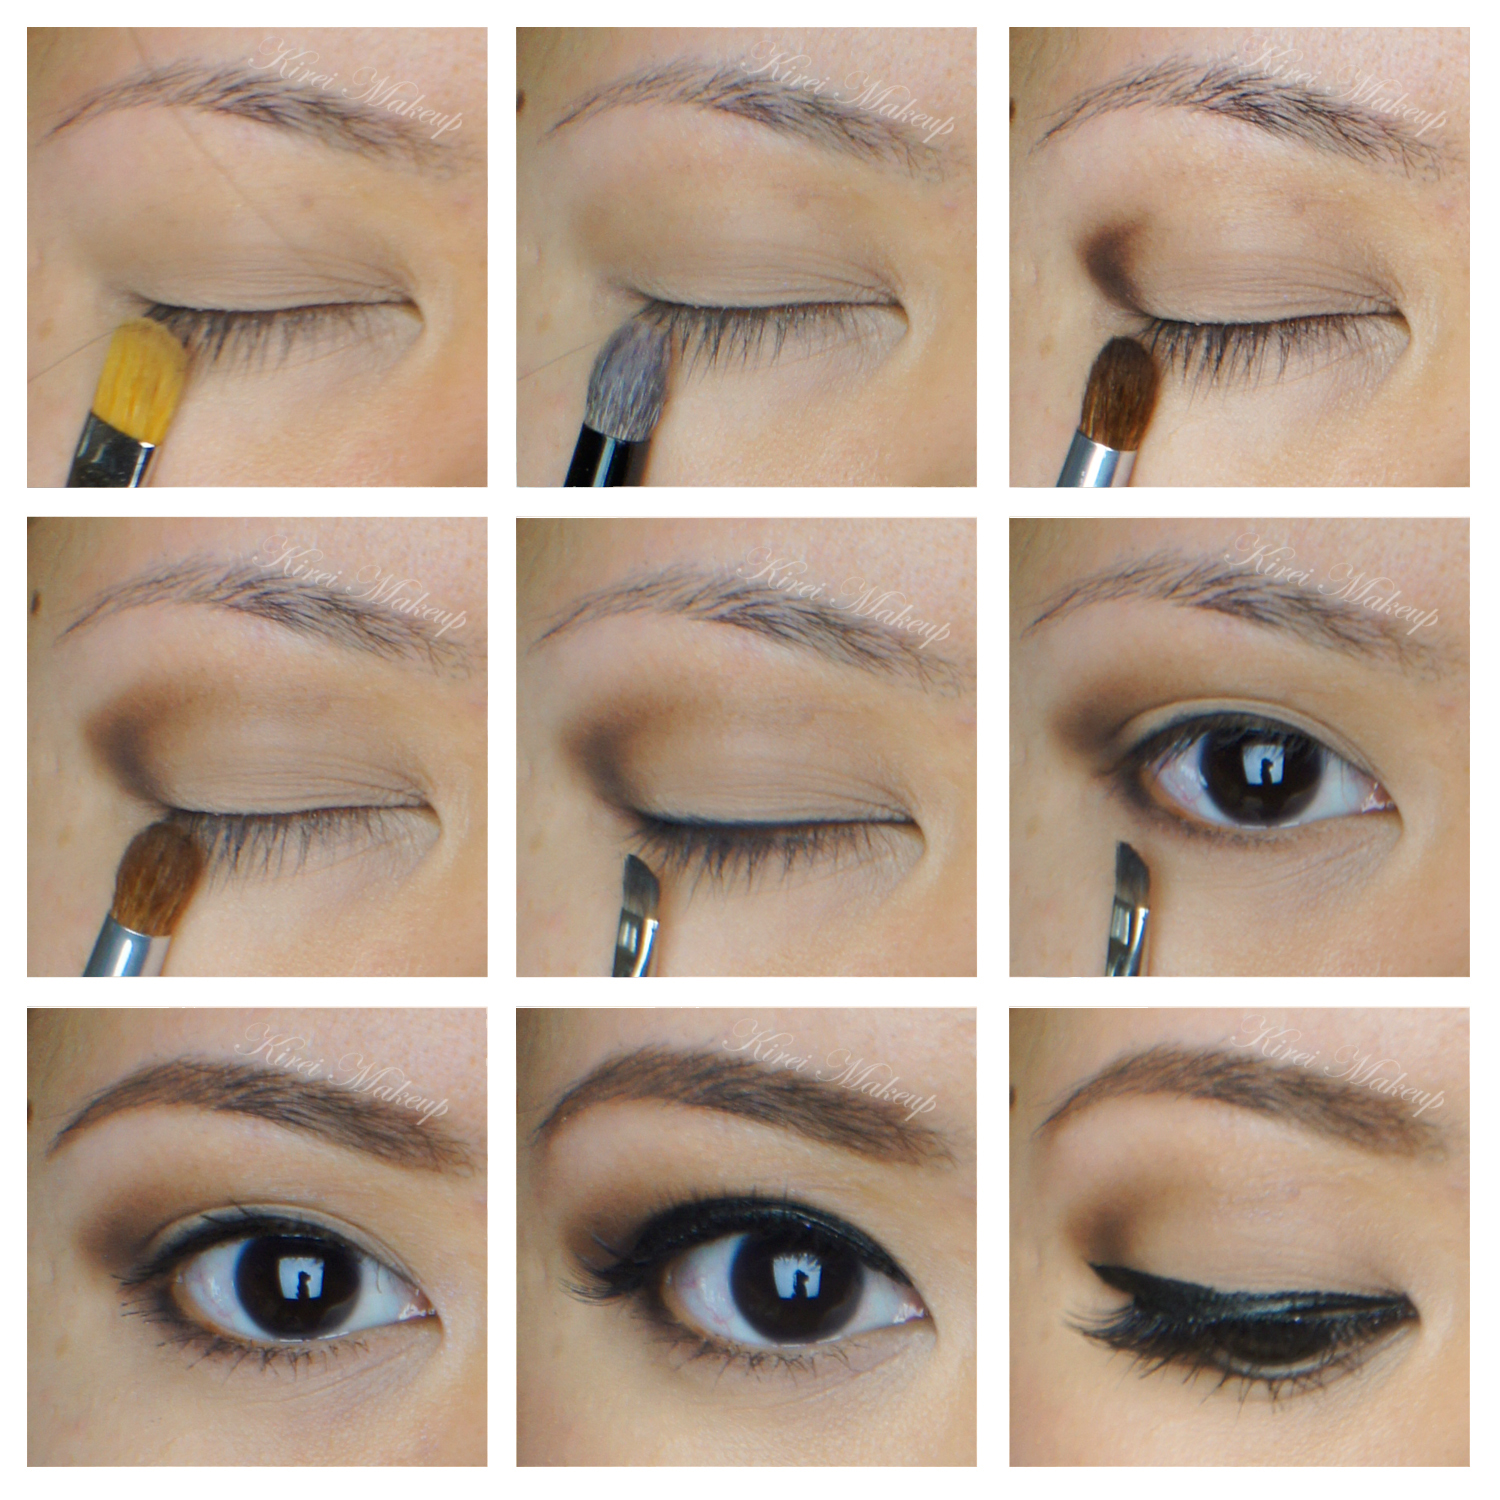
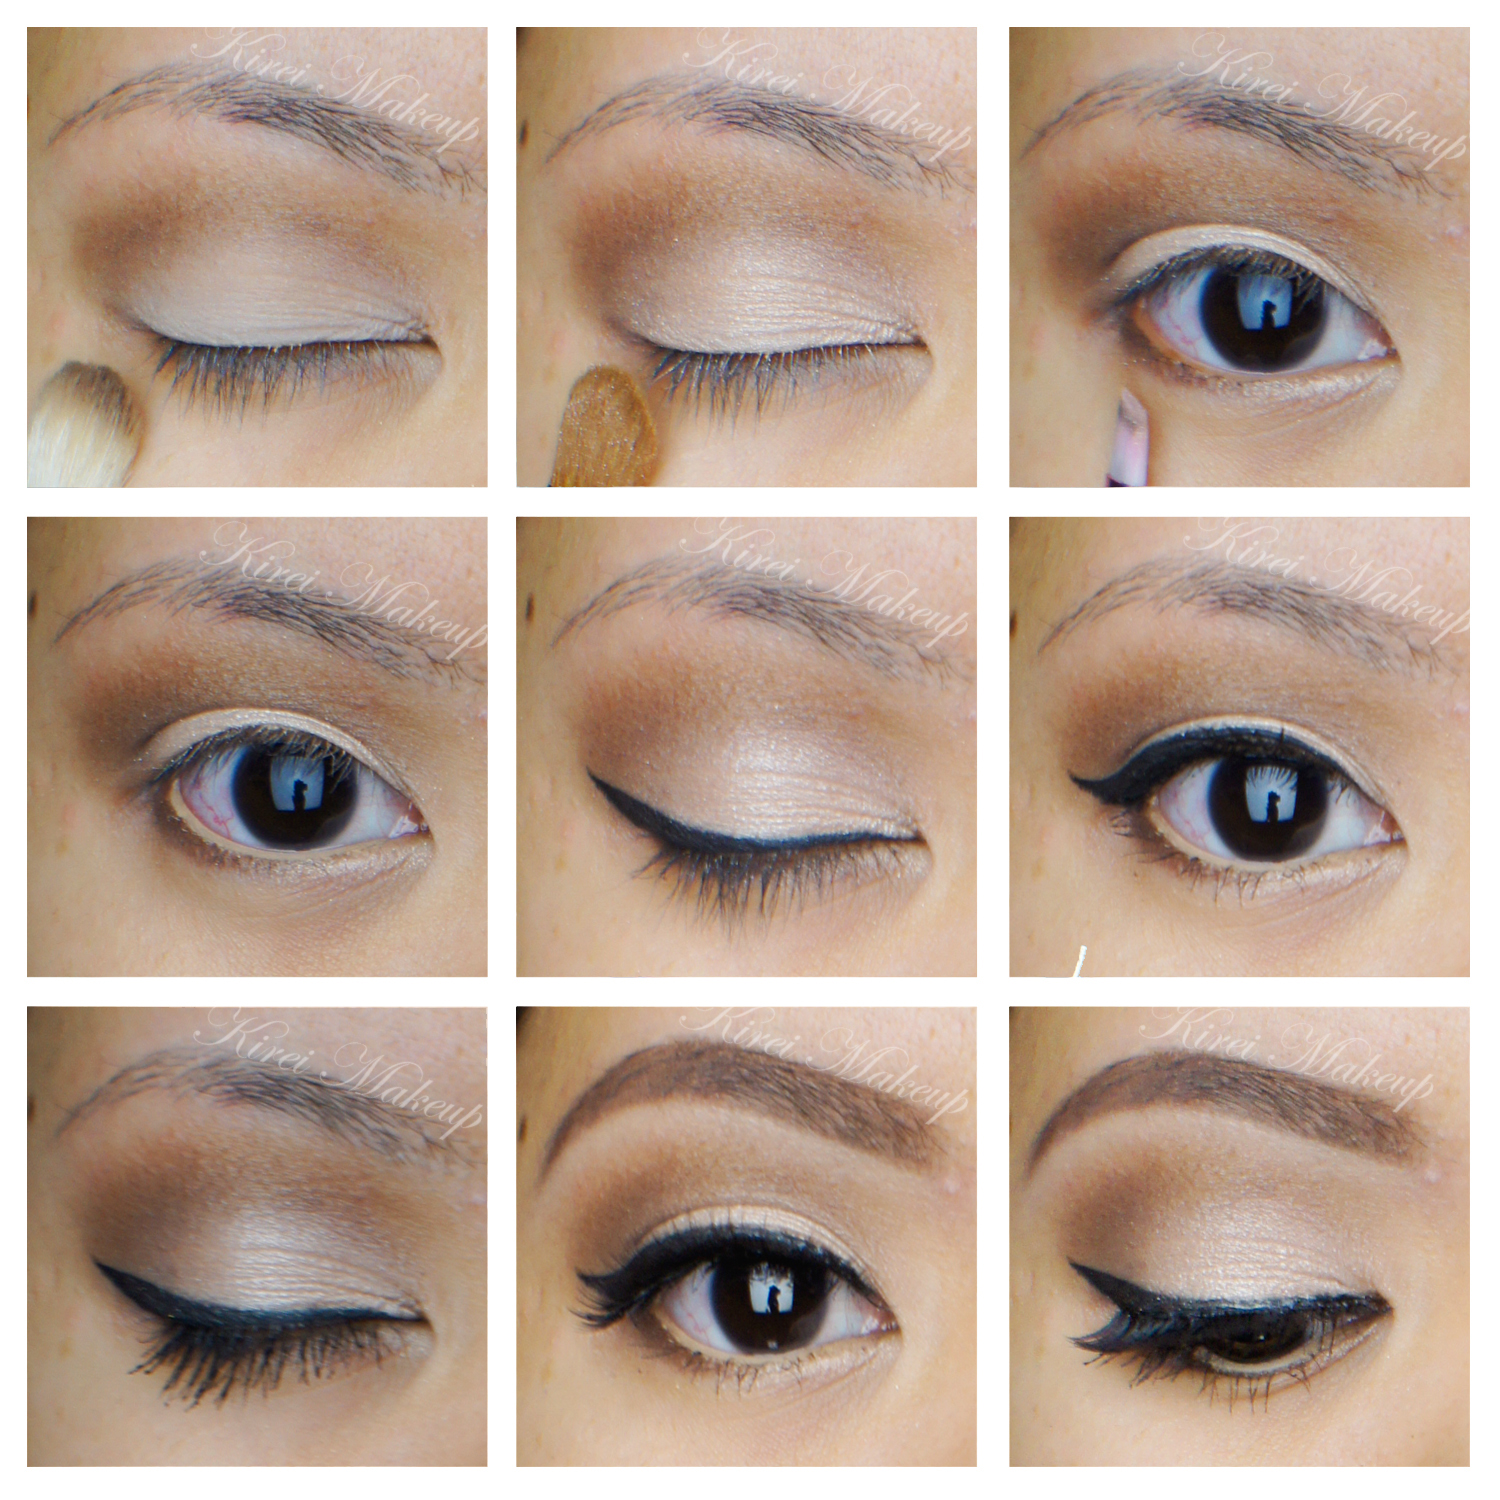
smashbox filter trio eyeshadow

How-to:

1. I applied MAC Omega eyeshadow all over my eyelid using a flat eyeshadow brush.

2. Using Smashbox bullet brush, I applied Sable from Smashbox Filter photo-op trio.

3. I applied Sumatra from Smashbox Filter photo-op trio on the outer V using a crease brush.

4. I blended Sumatra out to remove any harsh lines.

5. Using an angled eyeliner brush, I applied UD Blackout eyeshadow along my upper and lower lash lines.

6. I curled my lashes and applied Maybelline Great Lash mascara on both upper and lower lashes.

7. I filled my brows using a mixture of MAC Omega and MAC Brun.

8. I applied falsies, and then lined it using Kanebo Kate Super Sharp Liner.

9. I applied Vanilla from Smashbox Filter photo-op trio under the brows.

natural look using mac diva

10. On my face, I applied Smashbox Halo foundation using a Sigma Flat Kabuki Brush.

11. On my cheeks, I applied Maybelline Face Studio Master Glaze in Make a Mauve, blending out using my finger.

12. I contoured my face using MAC Shadowy powder and NARS Ita kabuki brush.

13. I also applied Smashbox Halo Highlighting Wand in Gold as highlighter.

14. On my lips, I lined it using L’oreal Colour Riche in Truly Burgundy and then applied MAC Diva lipstick on top.

If you want to know how to apply lipstick to make it last, please check my How-to apply red lips post.

Burgundy Lips

Quick tutorial today, since I wanted to try out my new L’oreal Color Riche lipliner in Truly Burgundy as well as L’oreal Infallible Lacquer Liner 24Hr in Blackest Black. To be honest, I wasn’t sure where I was going with the tutorial since I started out lining my lips first. I just wanted to play around, but I think it turned out to be not bad. If you’re one who’d like to try the bold lips look, give this lip color a try. I, personally, feel the burgundy lips look is perfect for this cold season. What do you think?

For the eyes, you can skip this whole contouring on the crease altogether if you prefer a simpler look. I just wanted to compliment the warmth of the lips with warm eyes.

Let’s get on the tutorial!

How-to:

1. I applied the brown (second darkest color) eyeshadow from Ombres Matelassees De Chanel Charming on my crease using a fluffy blending brush.

2. Using a flat eyeshadow brush, I applied Smashbox Full Exposure palette in s3 on my eyelid area.

3. (not in picture) Using another fluffy blending brush, I applied the bronze eyeshadow (middle color) from Ombres Matelassees De Chanel Charming just slightly above the crease.

4. Using an angled eyeliner brush, I applied eyeshadow in step no. 1 on the outer corner of my lower lid, and S3 on the inner corner.

5. I applied MAC Chromagraphic eyeliner in NC30 on my waterline.

6. I created a winged eyeliner using L’oreal Infallible Lacquer Liner 24Hr in Blackest Black.

7. I curled my lashes and applied L’oreal Butterfly mascara on both upper and lower lashes.

8. I also applied a set of false eyelashes (again, sample from a friend) to thicken up my lashes.

9. I filled my brows using Anastasia Brow Wiz in Brunette.

10. I applied a little bit of concealer under my brows. If you want to know how I fill my brows, please check my Shu Uemura Brow Pencil post.

asian eye makeup

11. For the face, I applied MAC Pro Longwear foundation in NC30 using CoverFX Cream Foundation brush.

12. I contoured my face using MAC Blunt powder and NARS ITA Kabuki brush.

13. On the cheeks, I applied MAC Breezy Sheertone Shimmer Blush.

14. I highlighted my face using Diorskin Shimmer Star Amber Diamond.

15. I lined and filled my lips using L’oreal Colour Riche in Truly Burgundy. On top of that, I applied a thin layer of Revlon Wine Not matte lipstick.

If you want to find out how I do my lips, please check my How-to Apply [Red] Lipstick

Revlon Wine Not

Holiday Makeup using MAC Diva

I’m on a mission to use my new Smashbox Full Exposure palette as much as I can, and in as many tutorials as possible. I will mention that I’ll be doing Smashbox Full Exposure palette review and swatches in my next post!

I’ve recently bought MAC Diva lipstick, which is a retro matte dark red lipstick. So, I wanted to start creating a holiday makeup tutorial that has a little bit of a classic look, with a modern twist. I decided to do this tutorial, which consisted of dark red lips and shimmery cat eyeliner.

Keep in mind that the glitters from Smashbox Full Exposure palette S7 eyeshadow might create a lot of fall-out. You might want to do your eye makeup first before doing the rest of the face.

If you want to see a tutorial using the Smashbox Full Exposure palette, please check my Smashbox Full Exposure Look #1 post. If you want to find out how to apply red lipstick, please check my How-To Apply [red] Lipstick post.

cat eyeliner

How-to:

1. I applied Urban Decay Primer Potion all over my eyelid using my ring finger.

2. Using Smashbox Full Exposure palette M5 eyeshadow, I applied it all over my lid using a flat eyeshadow brush.

3. I created a cat-eyeliner along the upper lash line using MAC 266 brush and Smashbox Full Exposure palette S7 eyeshadow.

4. Using the same brush and eyeshadow from Step 3, I applied the eyeshadow on my lower lash line.

5. I used L’oreal Voluminous Smoldering eyeliner on my waterline and tightline.

6. I filled my brows using MUFE Aqua Brow gel and a clean MAC 266 brush.

7. I curled my lashes and applied Physician’s Formula Organic mascara on both upper and lower lashes.

8. Then, I applied Eyeme false eyelashes on the upper lashes.

Holiday Makeup Tutorial

9. I applied MAC Pro Longwear foundation in NC30 all over my face.

10. I applied Benefit Erase Paste under my eyes.

11. I set the base using Cover FX Translucent powder.

12. Using Diorskin Shimmer Star Amber Diamond as highlighter.

13. I used MAC Shadowy as contour, and NARS Mata Hari on the cheeks.

14. On the lips, I applied MAC Brick lip liner and then applied MAC Diva on top of it.