Red Invasion [Collaboration]

Lately, my Twitter has been flooded with chats between several Indonesian Beauty Bloggers and myself. These bloggers are: Yonna Kairupan, Iva Asih Era Chrysta, Lauren Renturquise, Sha Aullia, and Riyanti Teressa. So, we decided to do a little collaboration and we wanted to paint the town red 😉 By town, I mean the Indonesian Beauty Bloggers Facebook page.

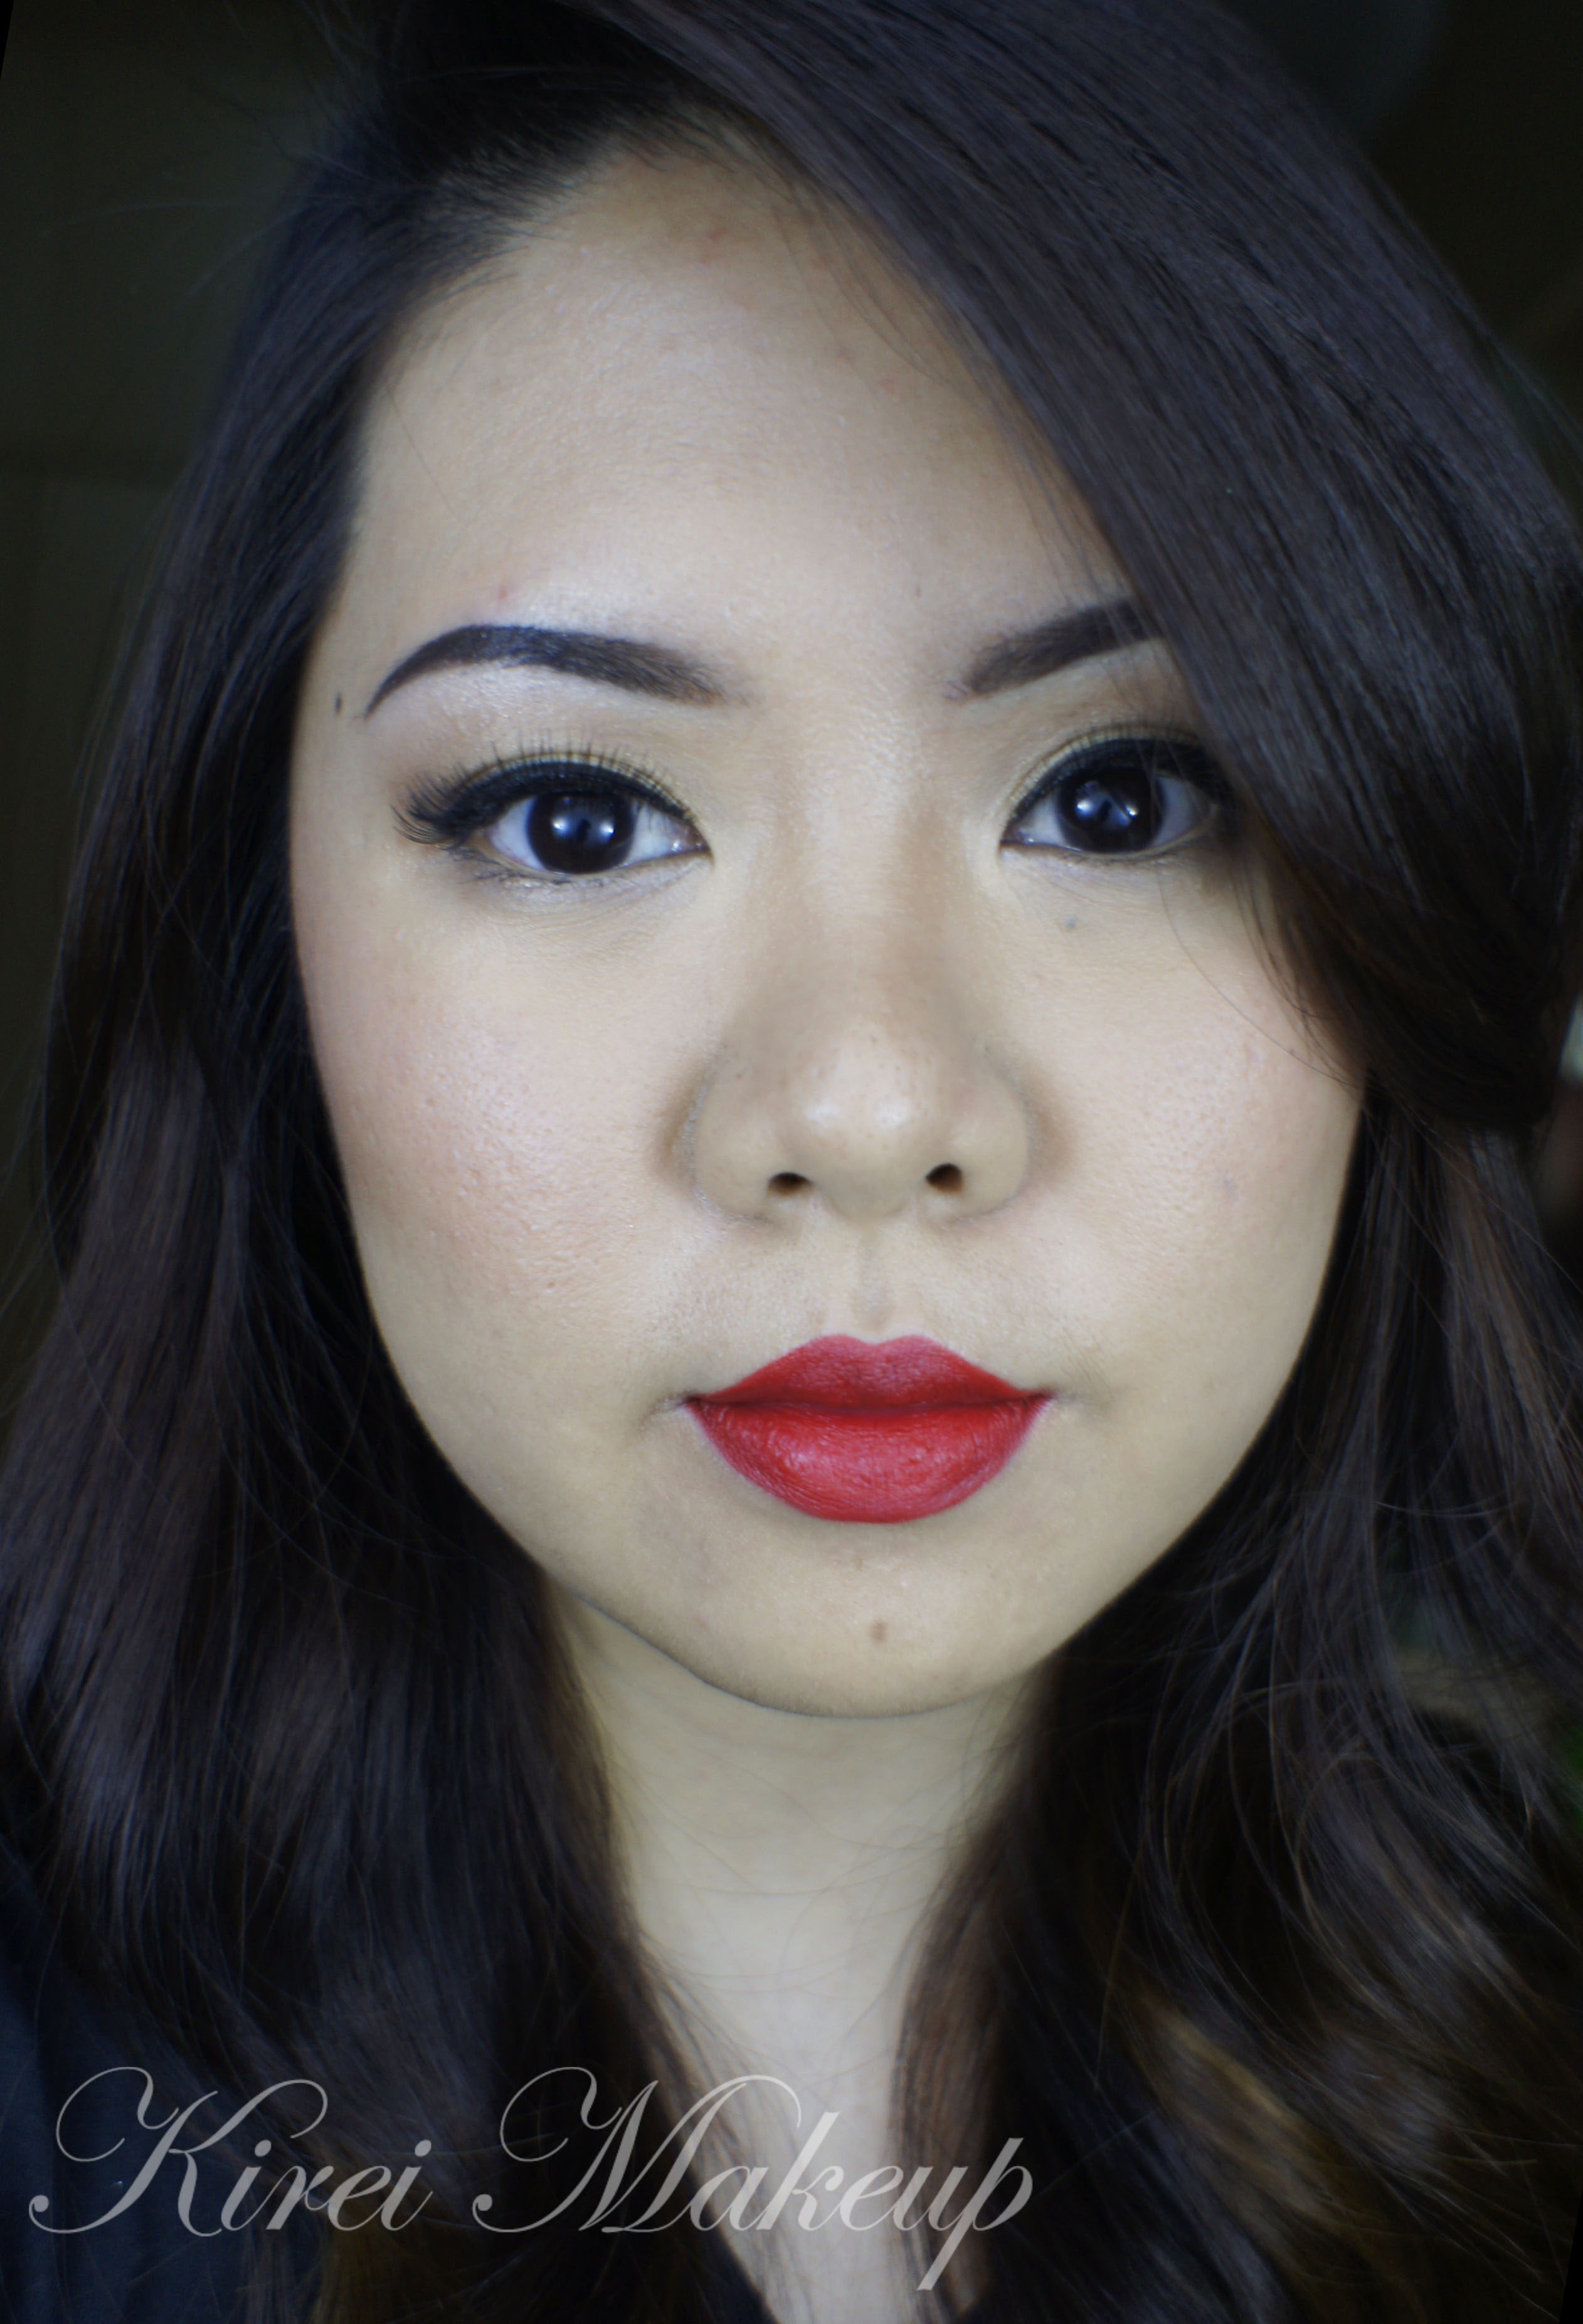
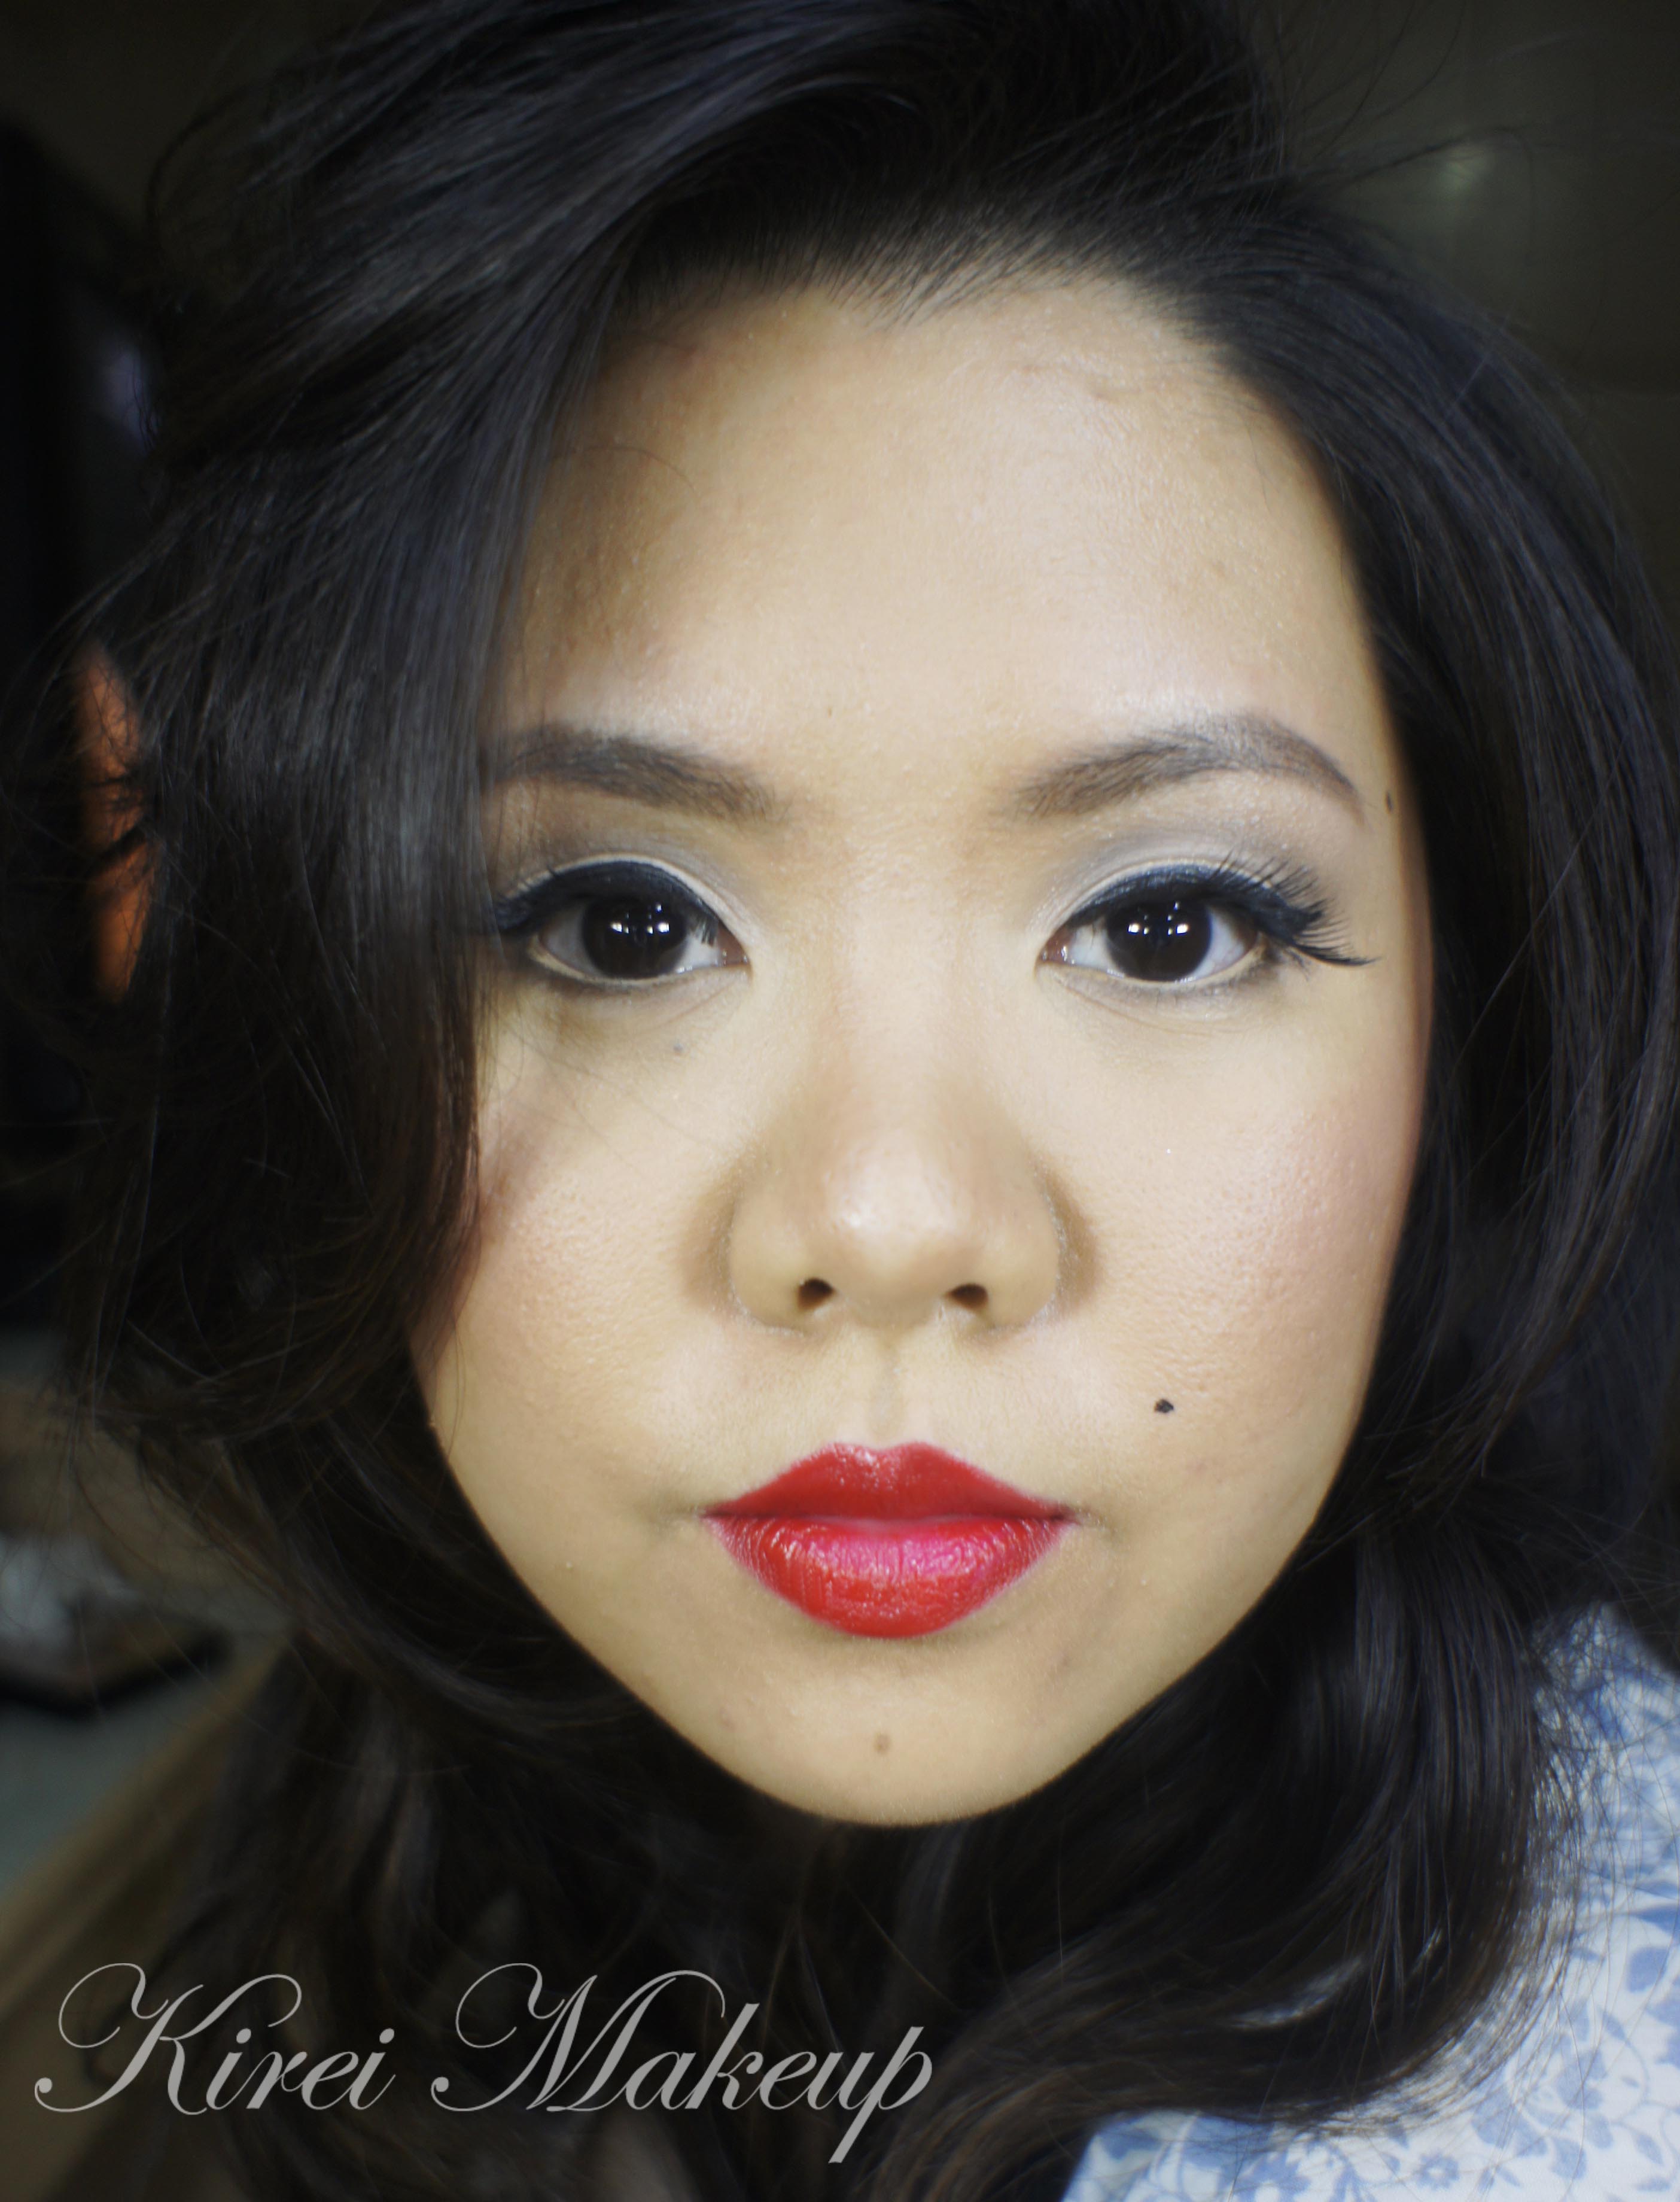
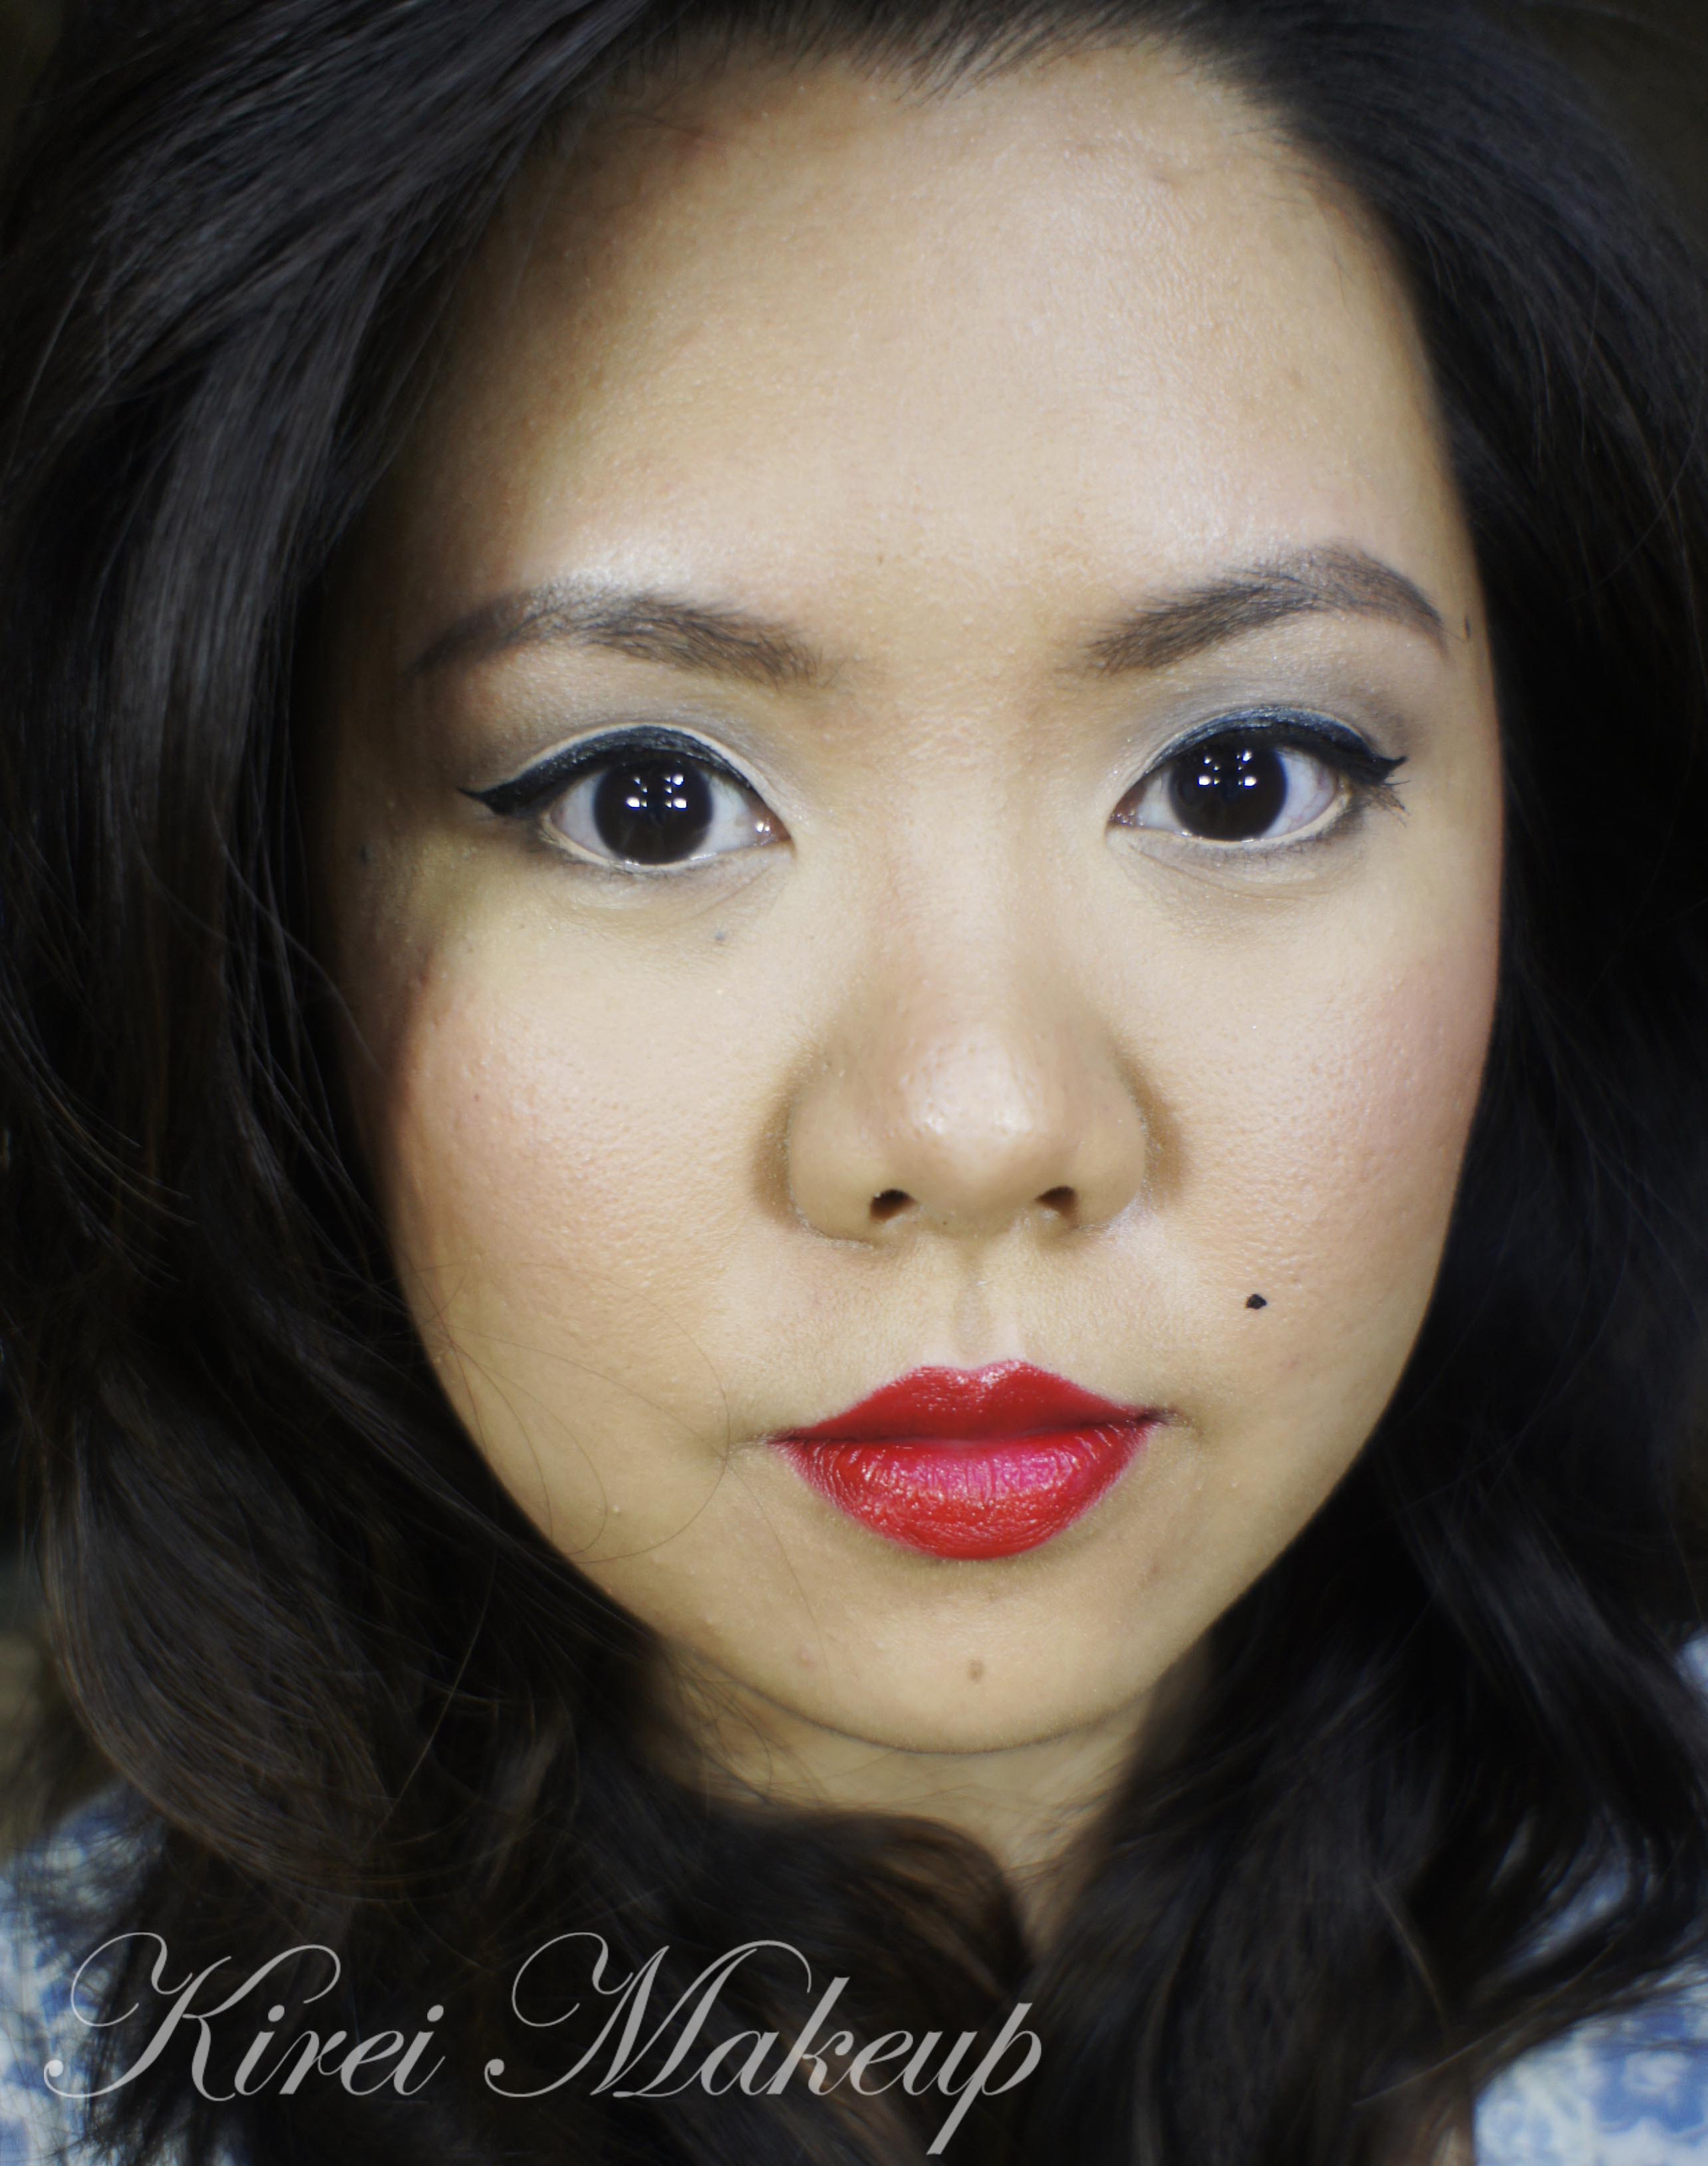
Anyhow, we decided to do red lips look, and Yonna had posted hers on her youtube page. I decided to post mine next and the obvious choice for me was to use MAC Russian Red (again). I can never get tired of MAC Russian Red, it’s just so gorgeous! It’s definitely my favorite.

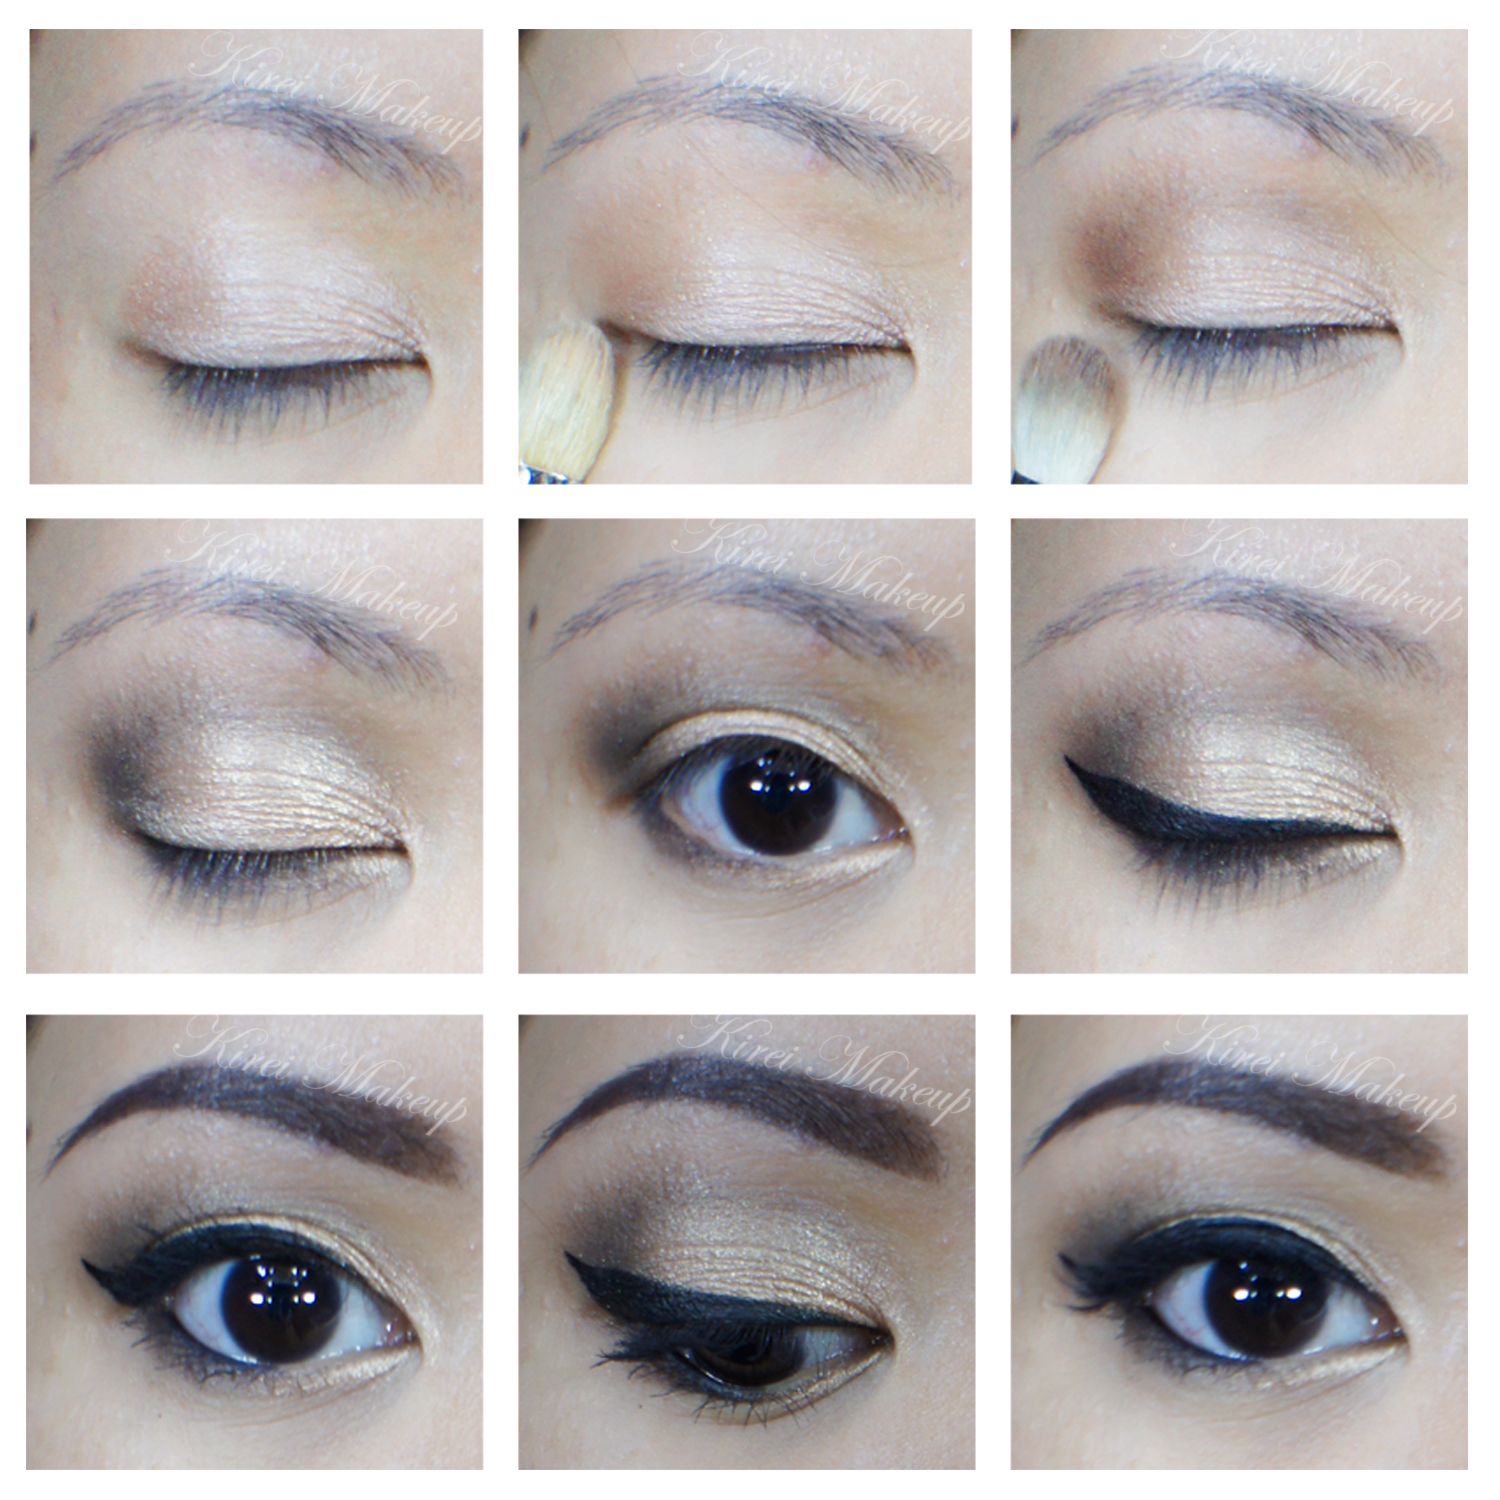
For the eyes, I think I wanted to pack more punch on it, so I did a slightly more smoky look than the other tutorial in MAC Russian Red post. I also added a set of false eyelashes on me lashes, since I bought a new one. I don’t love the falsies, but I don’t mind it. Not long enough and not thick enough. Oh well! I also used my new Sleek Makeup iDivine Storm palette, but there’s no name for each shade for this palette. So, I named the shades on the tutorial below based on the hue of each eyeshadow. If you’re confused, just leave the question below 🙂
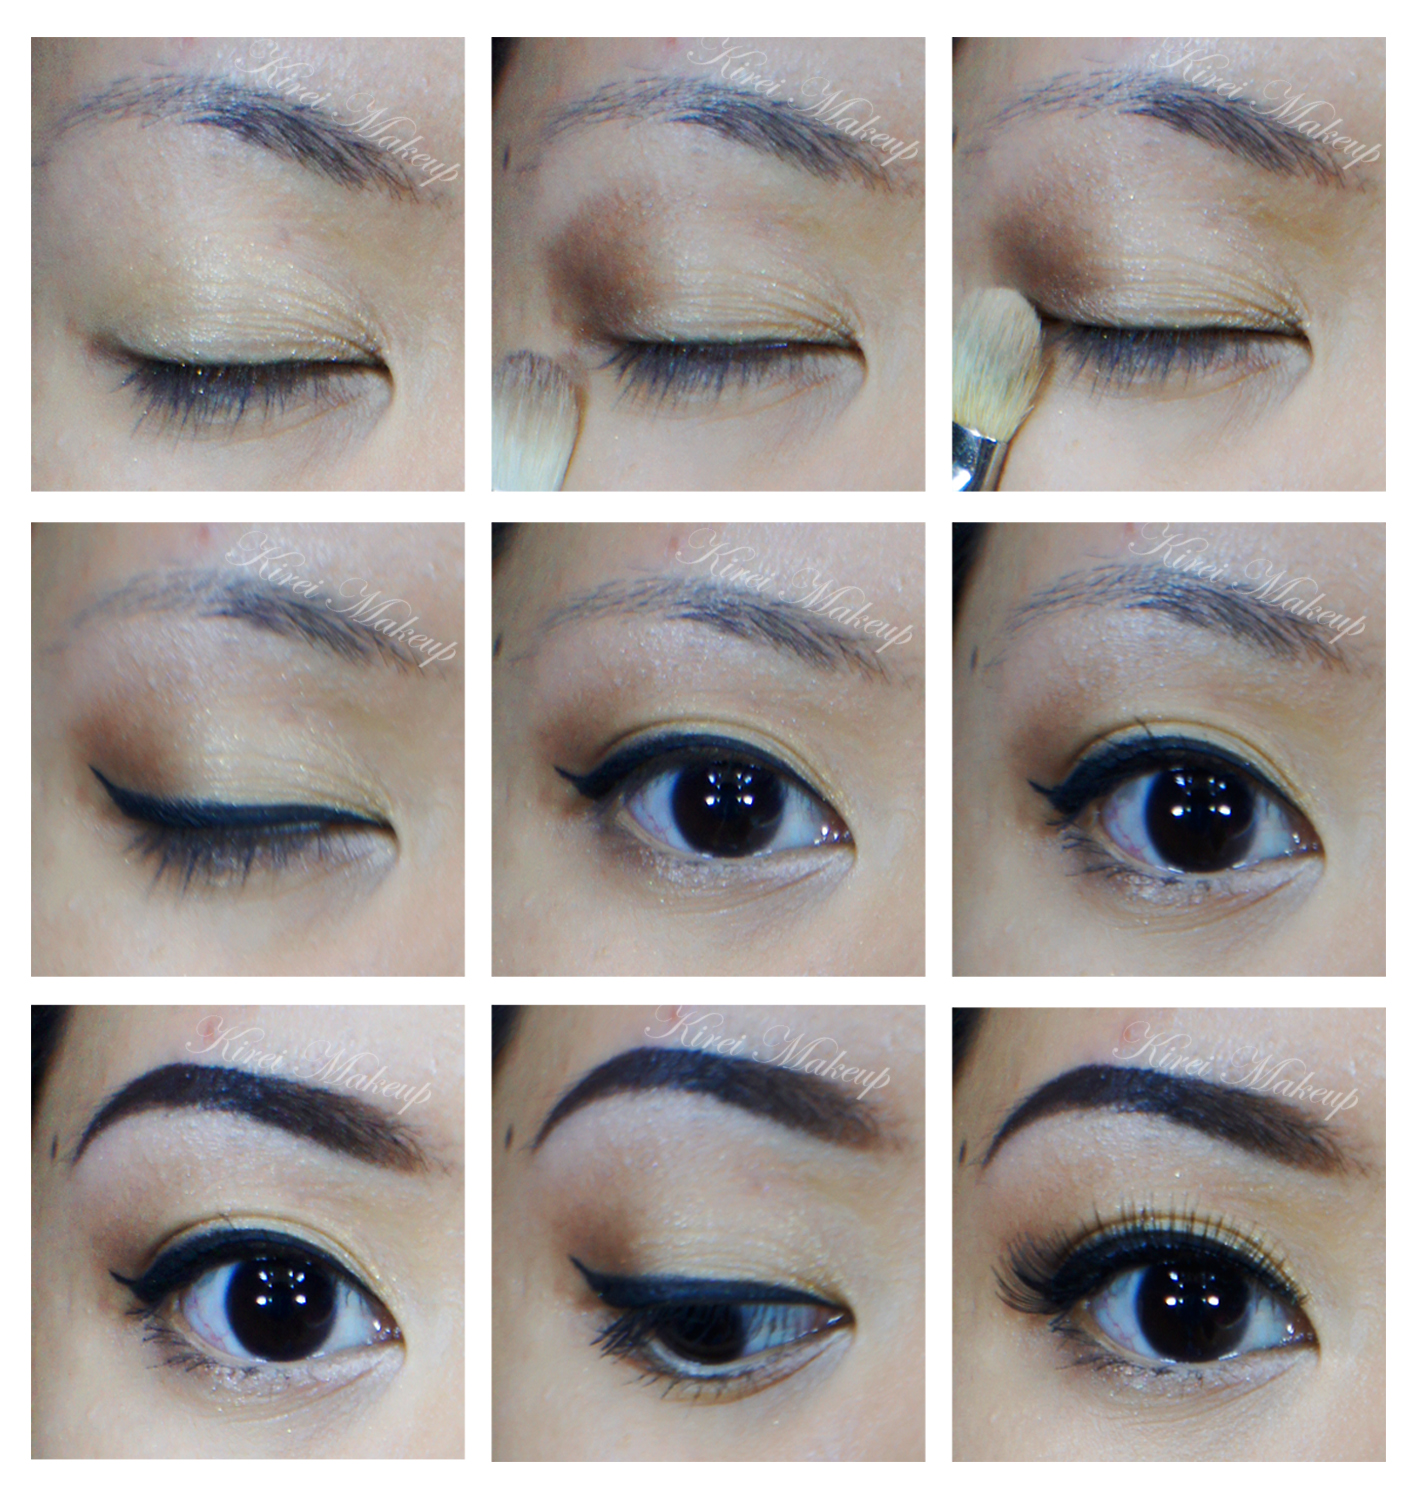
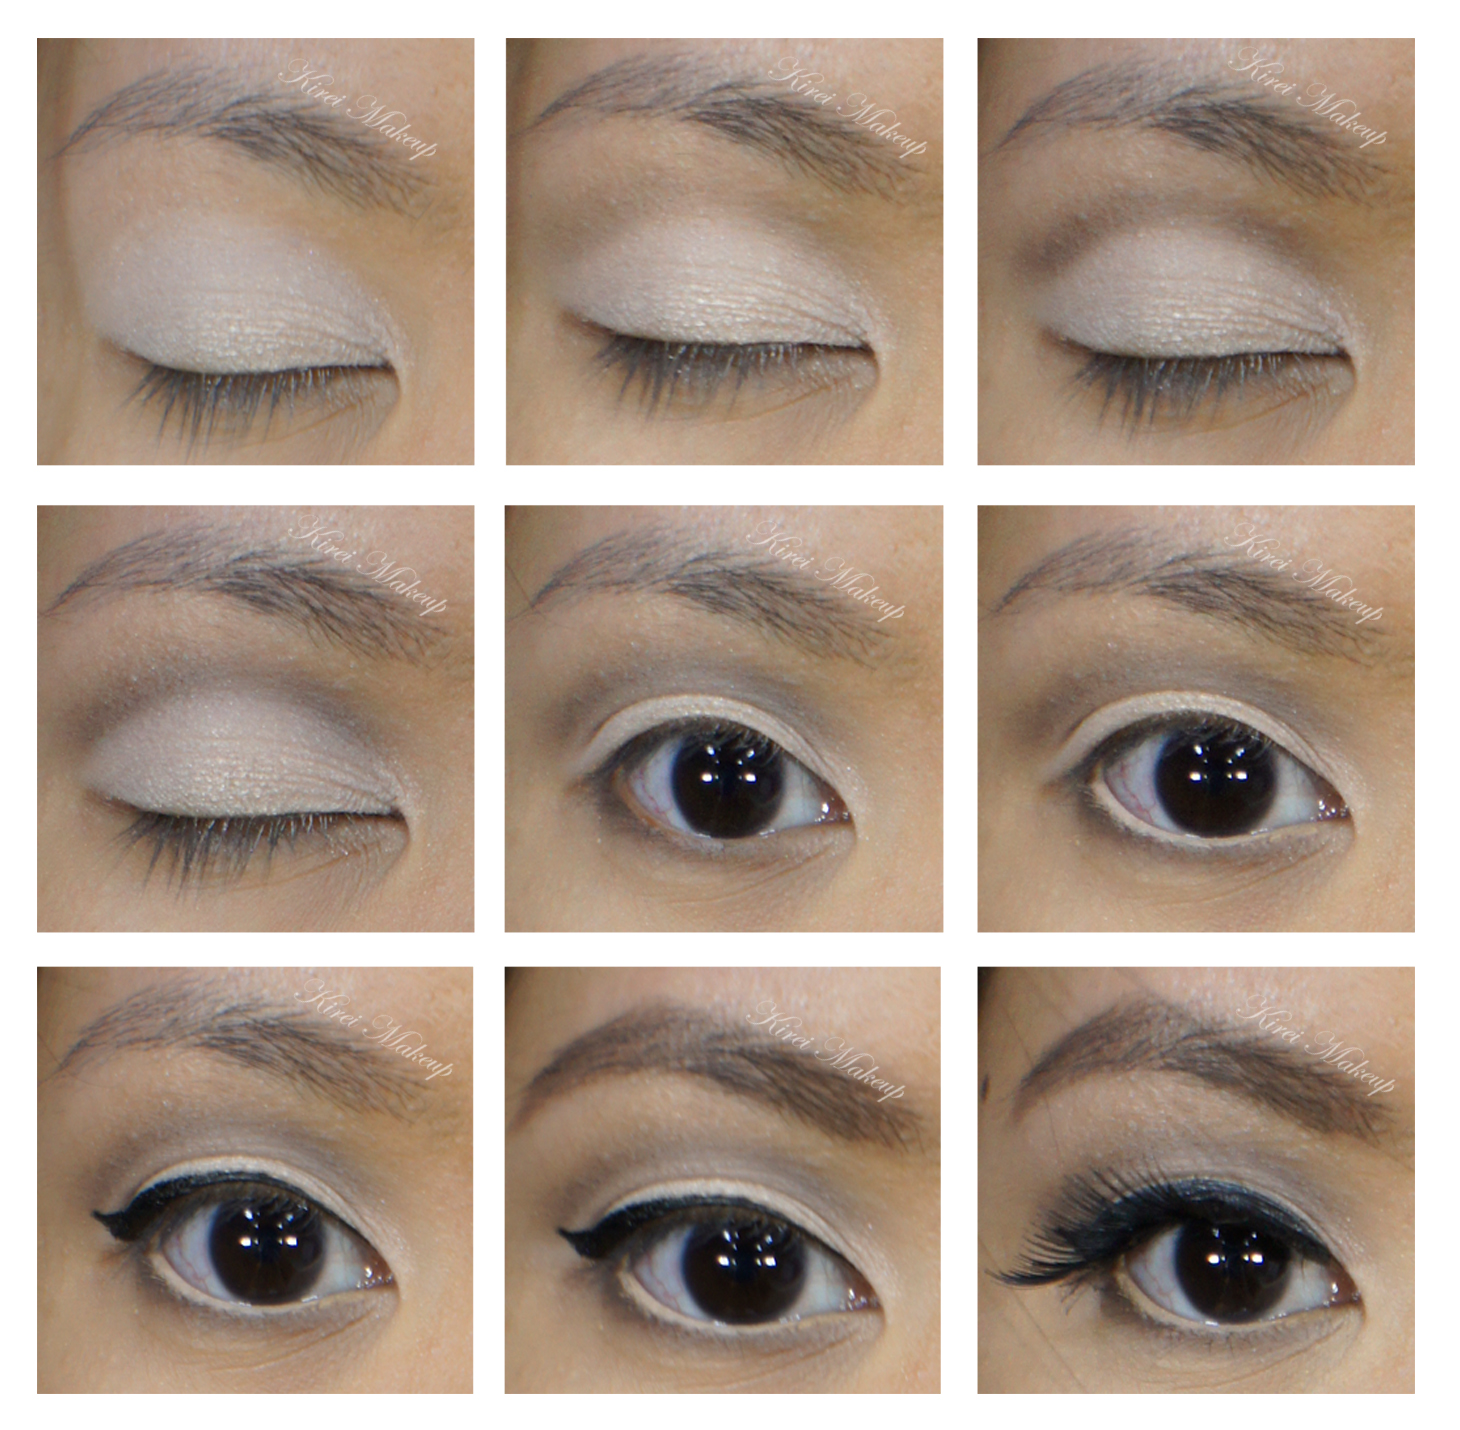
How-to:

1. I applied MUFE Aqua Shadow in 28E all over the lid.

2. Using a clean fluffy brush, I applied the matte light brown from Sleek Makeup iDivine Storm palette.

3. Using another clean fluffy brush, I applied matte dark brown from Sleek Makeup iDivine Storm palette.

4. I applied the champagne shade from Sleek Makeup iDivine Storm palette on top of the MUFE Aqua Shadow 28E with a flat eyeshadow brush.

5. Using another blending brush, I applied black from Sleek Makeup iDivine Storm palette.

6. I applied both champagne (inner corner) and black (outer corner) from Sleek Makeup iDivine Storm palette on the lower lid using an angled brow brush.

7. Using Kanebo Kate Super Sharp eyeliner, I created a feline flick/cat-eye liner/winged liner on the upper lash line.

8. I curled my lashes and applied Maybelline Volume Express Turbo Boost mascara on both top and bottom lashes.

9. I lined the outer half of my waterline using L’oreal Voluminous Smoldering eyeliner.

10. I applied DUP eyelashes in 906 on the top lashes.

11. For the brows, I applied MUFE Aqua Brow Gel.

sleek makeup storm

12. On my face, I applied Urban Decay Naked Skin foundation.

13. I applied MUFE HD concealer to cover my blemishes and under eye circles.

14. I powdered my face using Cinema Secret loose powder.

15. I contoured my face using NARS Kabuki Ita brush and MAC Shadowy powder.

16. I applied MAC Fleur Power on my cheeks.

17. I lined and filled my entire lips with MAC Redd lip liner.

18. I, then, applied MAC Russian Red on my lips.

asian red lips

MAC Russian Red

As you all know from my Twitter, I’ve been looking forward to use my M.A.C Russian Red lipstick again. I know, I know, it seems like this week is a MAC week. Well, can’t be helped, I’m trying to fall in love with MAC again! Afterall, MAC was one of the reasons why I went into makeup in the first place.

So, talking about MAC Russian Red, this is the best true-red lipstick. If you want a cooler red, you can try MAC Ruby Woo instead. I also love how this lipstick has a matte finish to it. I’m not a big fan of shiny or glossy lips, so I love how even though this lipstick has a matte finish, it is not drying. It also helps if you prep your lips before application to ensure your lips aren’t chapped.

I purchased this Chanel quads in Intuition in February and didn’t have the chance to play with it, so I had to use it for this look. I love how soft and pretty the eyes look. If you are looking for a neutral, day makeup, do try the eye-look and you can skip the red lipstick.

I’ve done a similar look in Battle of the Classics.

How-to:

1. Using a flat eyeshadow brush, I applied the gold eyeshadow from the Chanel Intuition quad.

2. Using a fluffy blending brush, I applied the deep brown shade from the same quad on my  outer V and on the crease. I used whatever was left on the brush and swept it along the lower lash line.

3. I blended out the crease using a clean fluffy brush.

4. Using an angled eyeliner brush, I created a winged liner along the upper lashline.

5. I applied MAC Chromagraphic liner in NC30 on my tightline.

6. Using a small flat shader brush, I applied the pink highlighter shade from Chanel Intuition quad on the inner corner of the lower lid and under the brow.

7. I curled my lashes and applied Maybelline Volume Express mascara on both upper and lower lashes.

8. I filled my brows in using MUFE Aqua Brow Gel.

9. For extra drama, I applied Quo false eyelashes.

natural wedding makeup

10.  For the face, I applied MUFE HD Foundation using a foundation brush.

11. Using whatever was left on the brush, I swept it across my lips.

12. I lined and filled my lips using MAC Redd lip pencil.

13. Using a lip brush, I applied MAC Russian Red on my lips.

14. I powdered my face using a loose translucent powder.

15. I contoured my face using MAC Shadowy and applied MAC Fleur Power on the cheeks as blush.

asian red lips

Marylin Inspired

Hellow! I’m back this week with a 50s inspired makeup! Actually there’s a beauty blogger challenge this month in which the theme was Dazzling like Marylin. I’m not sure if I’m gonna join the challenge, I was just running out of some inspiration for tutorials, thus why I made this tutorial..hahaha.. 😛

Anyways, as we all know Marylin Monroe is an icon. The first image that comes to mind when someone said Marylin is probably her gorgeous smile, red lips and those sleepy eyes, and obviously her blonde hair. OBVIOUSLY, I’m not Marylin, nor do I look like her. This is an inspired makeup, not supposed to look exactly like her. I’ve to adjust the makeup to suit my face.

I wanted to do the falsies with individual lashes, but I’ve run out of it, so I had to use this one with long wispy corner at the end from Make Up For Ever. The brows in the 50s are more triangular shaped, so I had to re-shape my brows a little since mine aren’t angular.

How-t0:

1. I applied MAC Blanc Type all over my eyelid using a flat eyeshadow brush.

2. Using a clean blending brush (MAC 217), I applied MAC Omega just slightly above the crease lightly.

3. Using a small blending brush, I applied MAC Brun on the crease.

4. With a MAC 217, I blended out MAC Brun on the crease so it blends out.

5. I applied MAC Brun on the lower lid using a small angled eyeliner brush.

6. For the waterline, I applied MAC Chromagraphic eyeliner in NC30.

7. I lined my upper lashline using Kat Von D Trooper liquid liner.

8. Lashes are curled and I applied L’oreal Voluminous Carbon black mascara on both top and bottom lashes.

9. I applied Make Up For Ever falsies 125 on upper lashes.

10. I filled my brows using a mixture of MAC Omega and MAC Brun, filled them in with an angled brow brush.

cat liner

11. For the face, I applied Make Up For Ever Pro Finish in 118 all over my face using a round kabuki brush from Sigma.

12. For under the eyes, I applied MAC studio finish concealer in NC30.

13. For contour, I used MAC Blunt blush on the hollows of the cheeks, temples and sides of the nose.

14. For the cheeks, I applied NARS Matahari on the apples lightly. Blush intensity is adjusted after I applied red lips to ensure my face does not look washed off.

15. For the lips, I filled it in with MAC Redd lipliner and applied OCC Stalker lip tar on top of it.

16. For the fake mole, I dotted my face using Kat Von D Trooper eyeliner.

marylin monroe makeup

Photo below is without the falsies. Quite wearable, don’t you think? For parties, may be? 😀

marylin monroe makeup