Simple Everyday Makeup

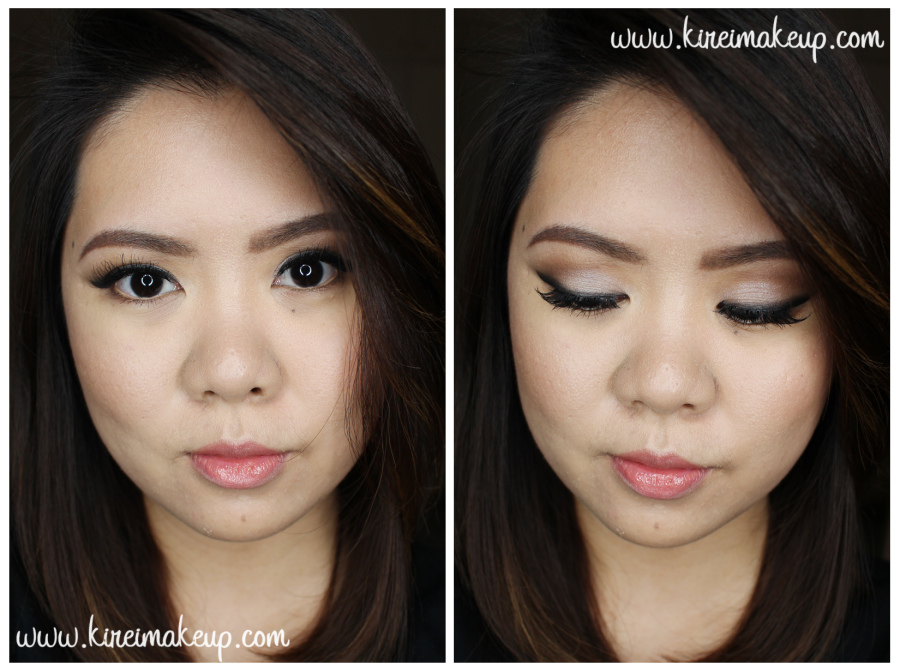
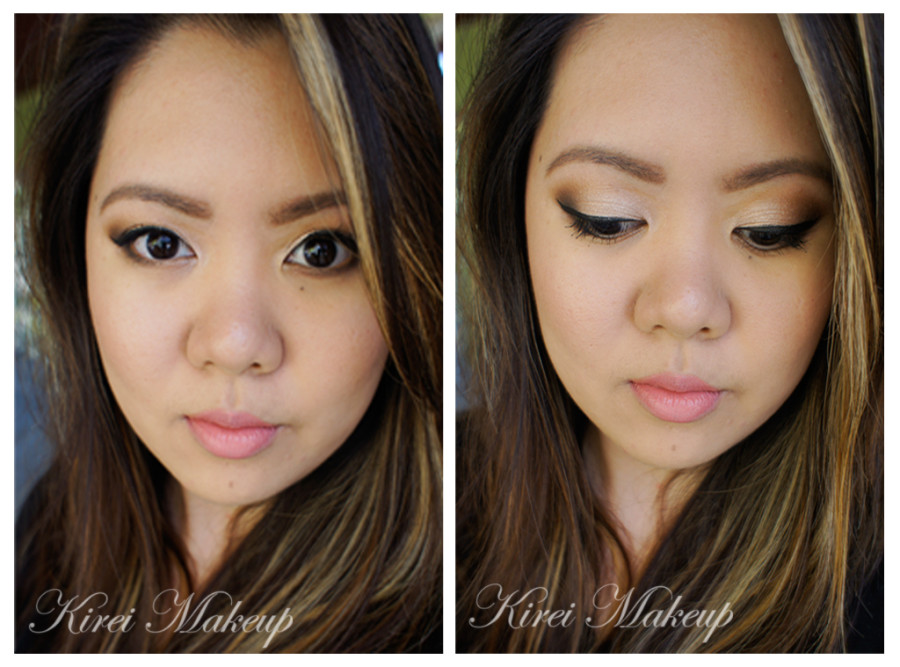
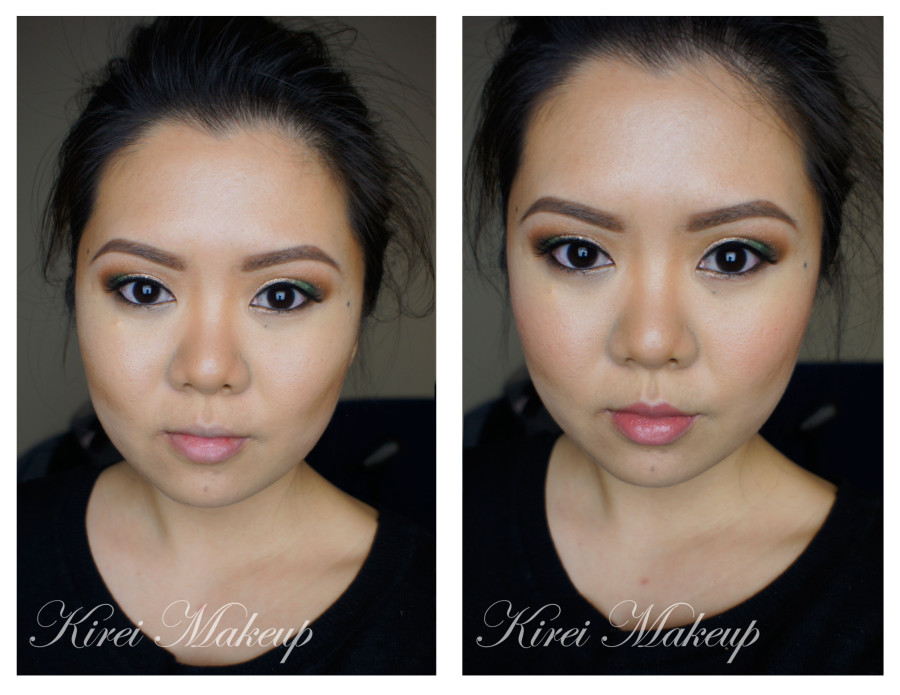
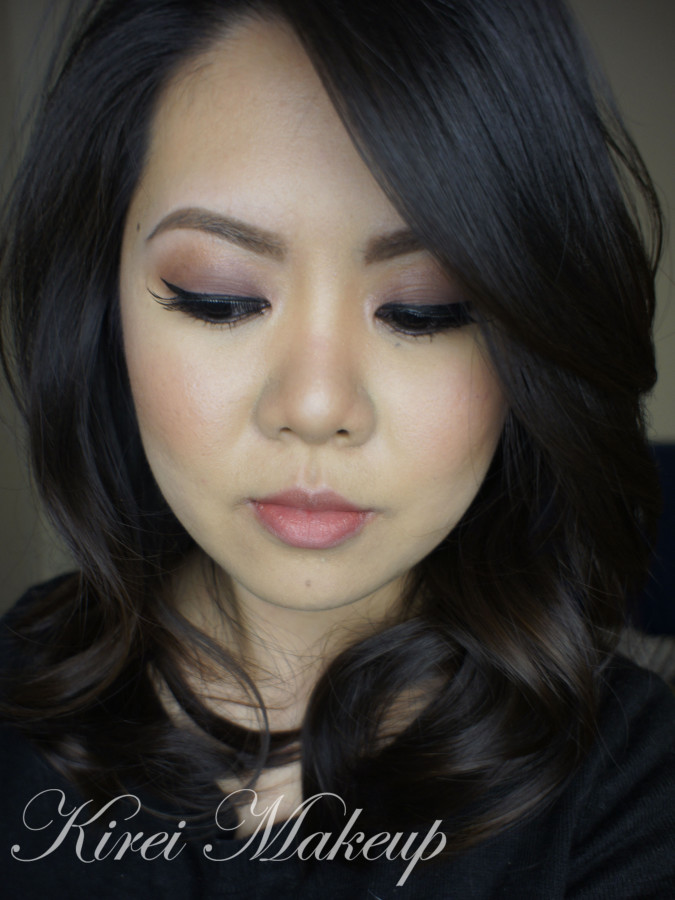
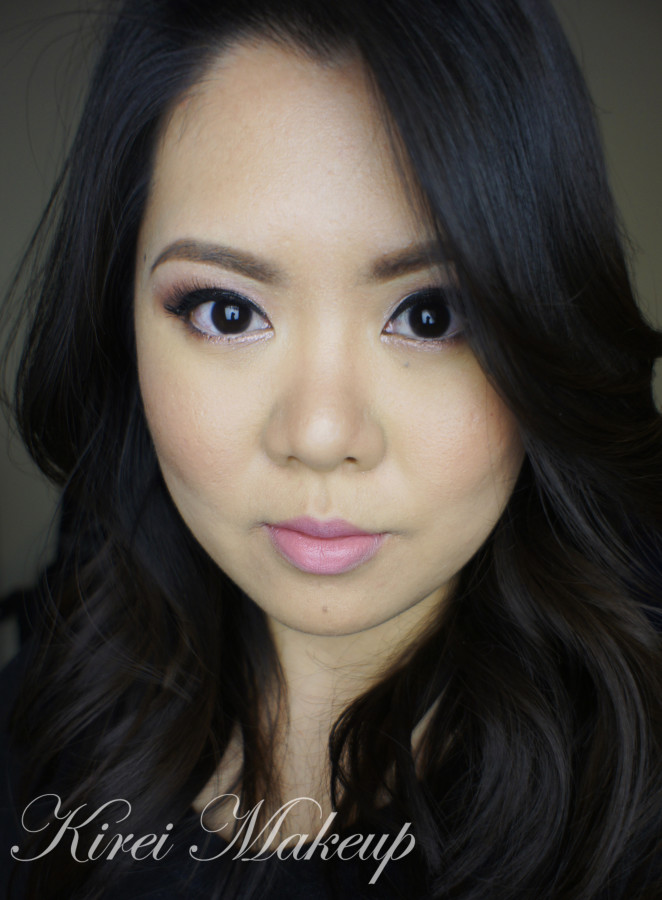
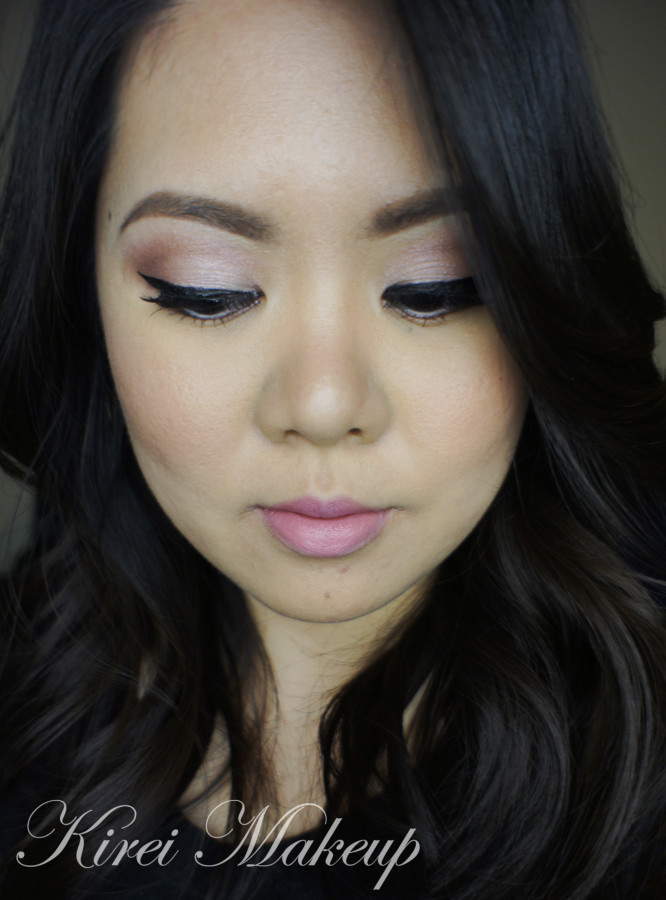
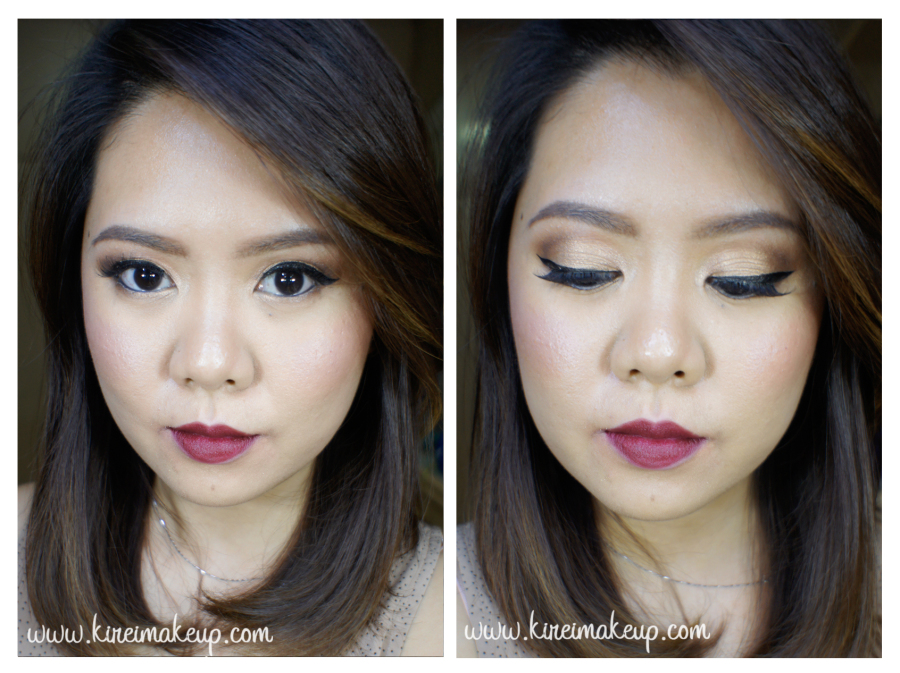
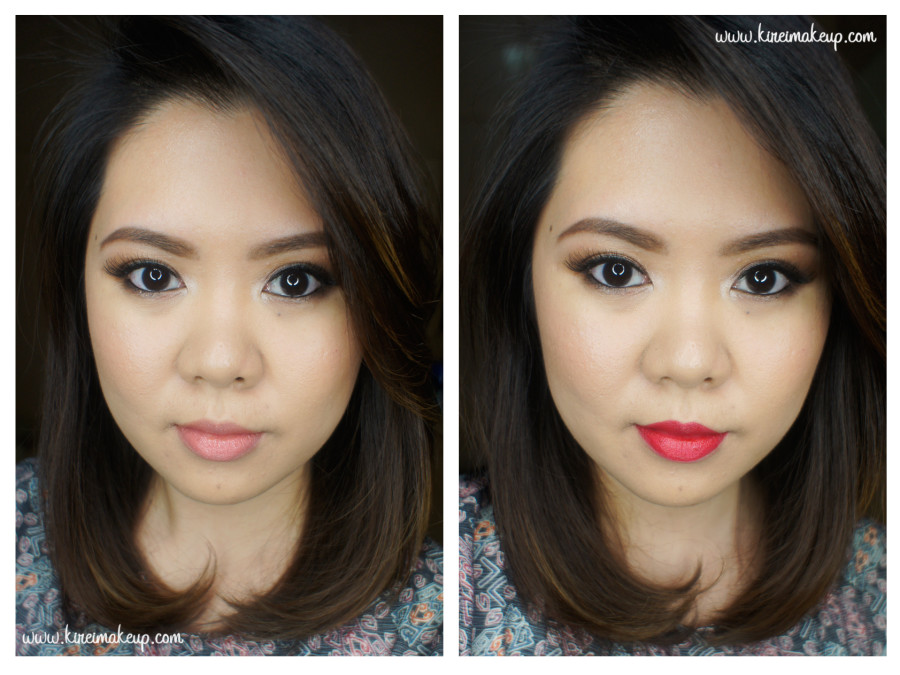
How is everyone’s Monday going? The Holiday is approaching real soon, eh?! I wanted to share with you guys this super easy and simple everyday makeup tutorial which can be worn by everyone, especially those who don’t usually wear much makeup. I did 2 version – one with a simple peachy lips, and another with red lips.

I think this look is great for those who prefer a simple no-fuss makeup. Nothing too dark, nothing too bright, but with a bit of colors. This is also a look for those who prefer earthy brown tones over black. I probably would wear this for a brunch (with peachy lips), or even a dinner party (with red lips).

Eyeshadows used in this tutorial are from the Smashbox Full Exposure Palette.

*You can find other tutorials using this palette right HERE!*

smashbox full exposure makeup tutorial

How-to:

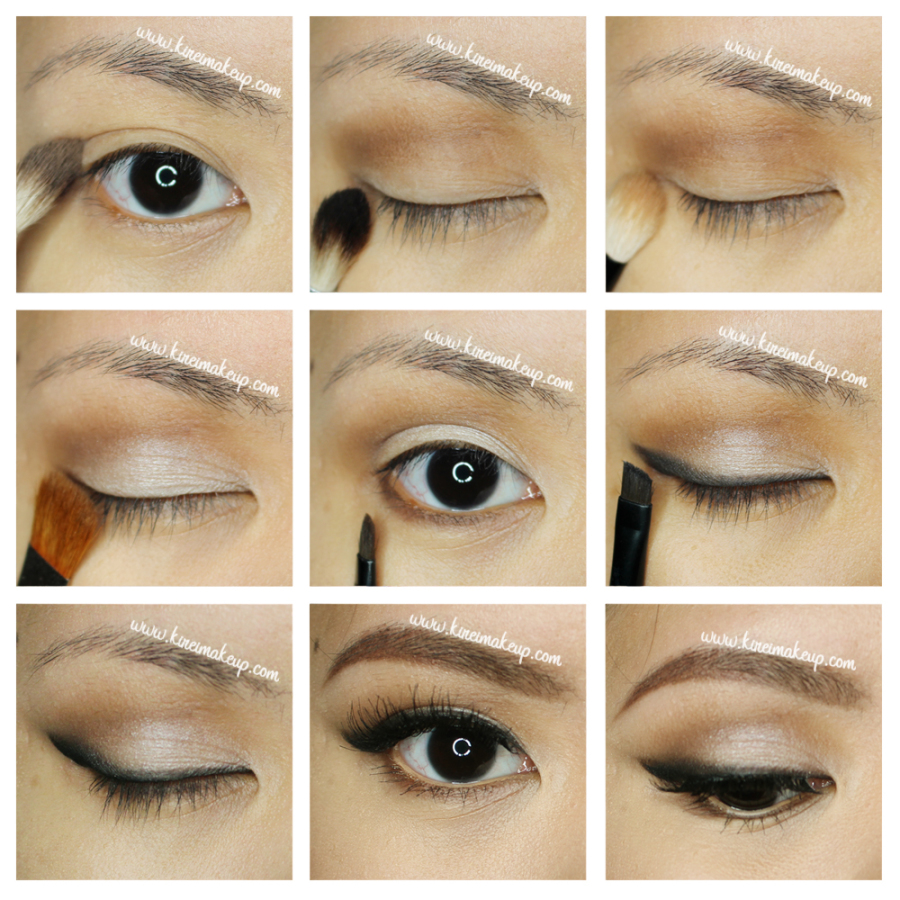
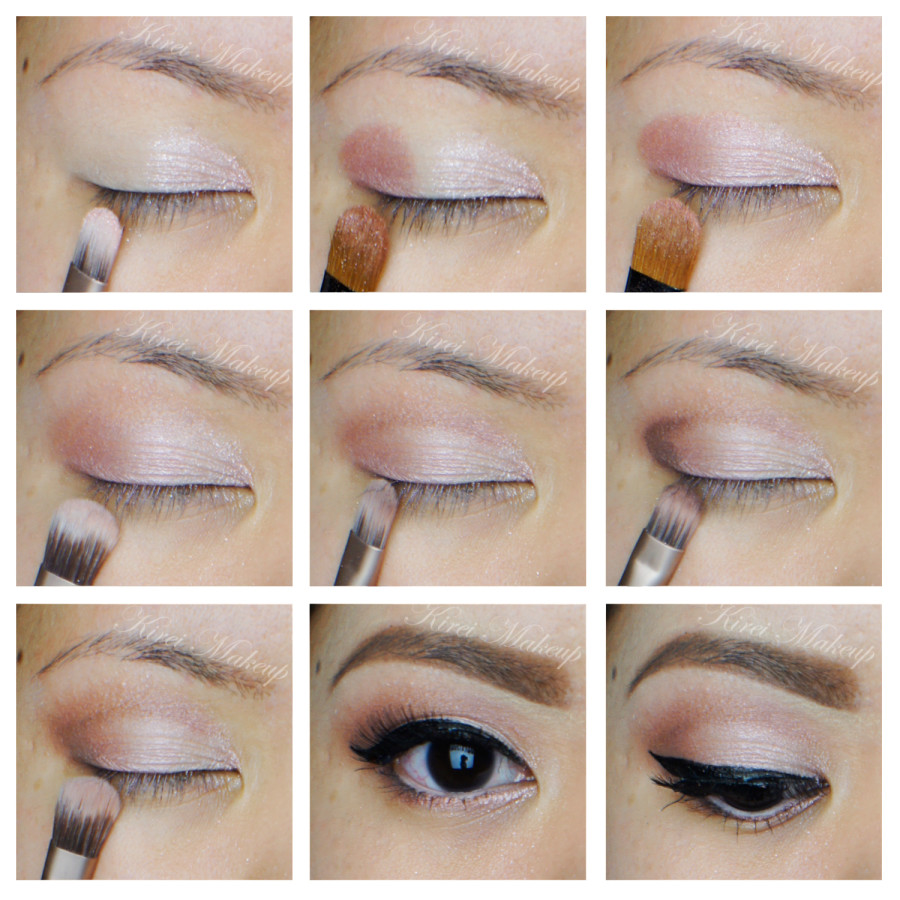
1. I applied MAC Groundwork paint pot on my eyelids using my ring finger.

2. Using a fluffy blending brush, I applied Smashbox Full Exposure palette in M2 above my crease.

3. Using Smashbox bullet crease brush, I applied Smashbox Full Exposure palette in M1 on the outer half of my eyelid.

4. Using a flat eyeshadow brush, I applied S1 on the inner half of the eyelid, blending it towards the outer half.

5. I applied S4 on the inner corner of my eyes using Real Technique shading brush (skip this step if you have wide-set eyes).

6. I lined my waterline and tightline using L’oreal Voluminous Smoldering eyeliner.

7. I also applied M7 along my upper lash line using an angled eyeliner brush. I applied this along the outer half of my lower lash line as well.

8. I curled my lashes and applied Maybelline Express Turbo Boost mascara on my lashes.

9. I filled my brows using Anastasia Beverly Hills Brow Duo Powder.

10. I also applied Mata Nona no. 15 falsies.

nyx monte carlo tutorial

11. On my face, I applied MAC Pro Long-Wear foundation using Real Technique Expert Face brush.

12. Under my eyes and on my blemishes, I applied MAC Pro Long-Wear concealer. I set my face using CoverFX Translucent powder.

13. On my cheeks, I applied Chanel Blush de Horizon.

14a. (left) For the peachy lips, I filled my lips using MAC Spice lip liner. Then I applied YSL Glossy Stain in Peche Cerra-Colla (27).

14b. (right) I removed the previous lip color, and then applied NYX Monte Carlo on my lips.


Products used

Eyes – MAC Groundwork paintpot; Smashbox Full Exposure Palette (crease – M2, outer lid – M1, lid – S1, inner corner – S4, liner – M7); L’oreal Voluminous Smoldering eyeliner; Maybelline Expres Turbo Volume mascara; Anastasia Beverly Hills duo brow powder; Mata Nona falsies no. 15.

Face – MAC Pro Long-Wear foundation NC30; MAC Pro Long-Wear concealer NC25; CoverFX translucent powder.

Cheeks – Chanel Blush de Horizon.

Lips – MAC Spice Lip pencil; YSL Glossy Stain no. 27; NYX Monte Carlo

Smokey Winged Eyeliner

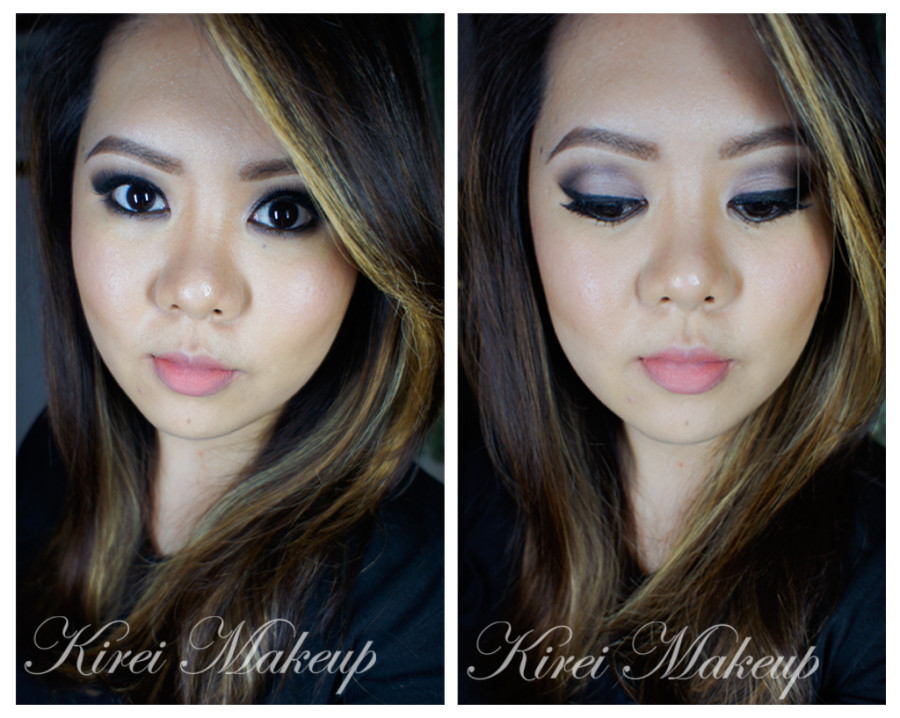
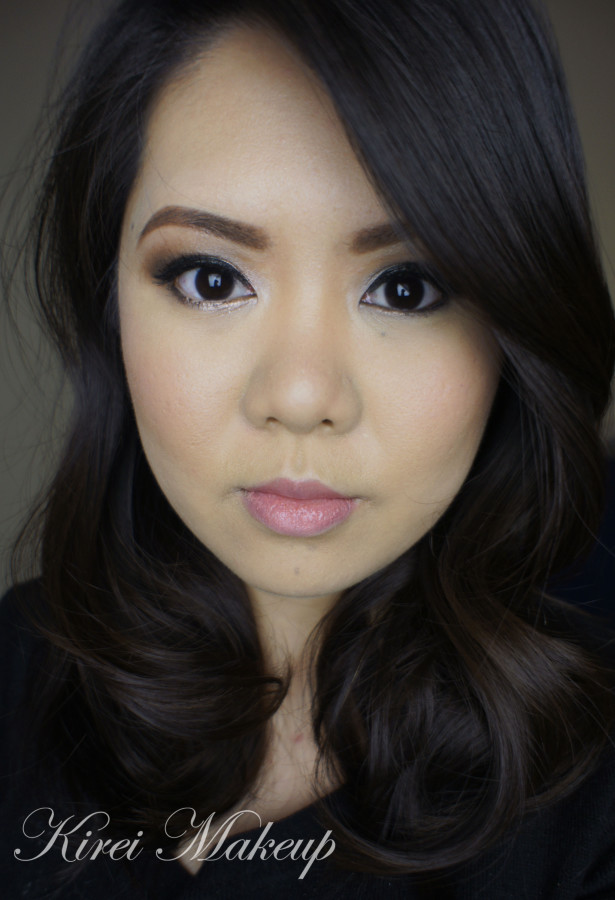
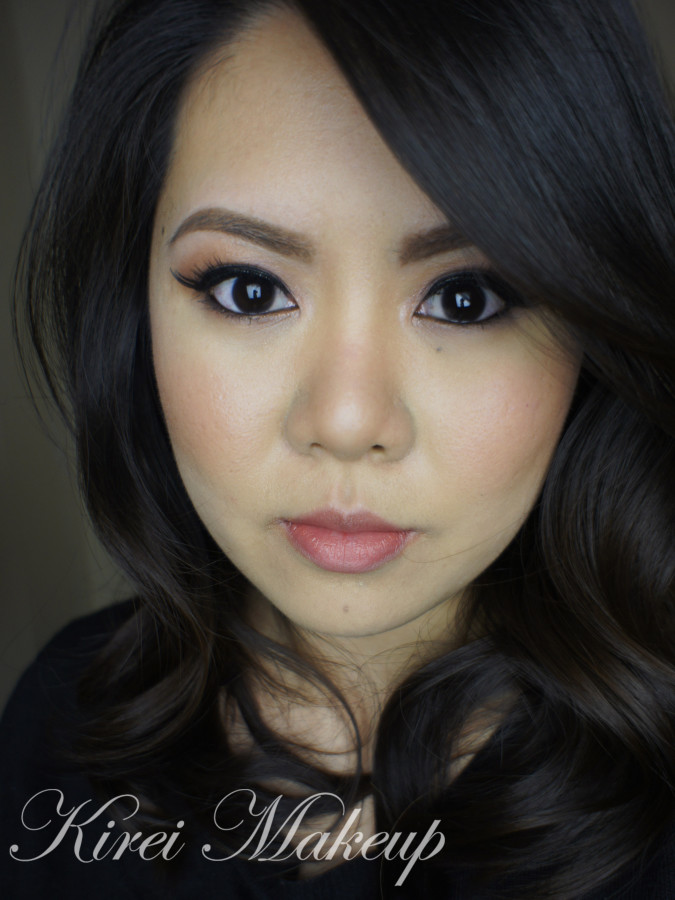
I’ve been wearing trying out a new look last week, and this smokey winged eyeliner look seems to have gotten quite a lot of compliments. I followed quite a few beauty gurus on Instagram and Youtube, and Samantha from Batalash posted a smokey eyeliner video. I loved how it ended up, and I re-created this look. Her technique is slightly different than mine, but the result is not bad I think. I’ve re-done this look when I had to attend the GlamGlow event, and I absolutely love it.

Anyhow, for the rest of the eye makeup, it’s pretty basic nothing fancy. I do not wear this falsies to the GlamGlow event, I actually wore a smaller one. However, for this tutorial I did wear wispy lashes because I wanted to accentuate the wings. Nevertheless, you can opt to wear lashes or not, it’s totally up to you.

You can also pair this look with a simple soft peachy lips like mine or you can pair it with a bold lip color – red, maroon, orange, pink, purple, black etc.

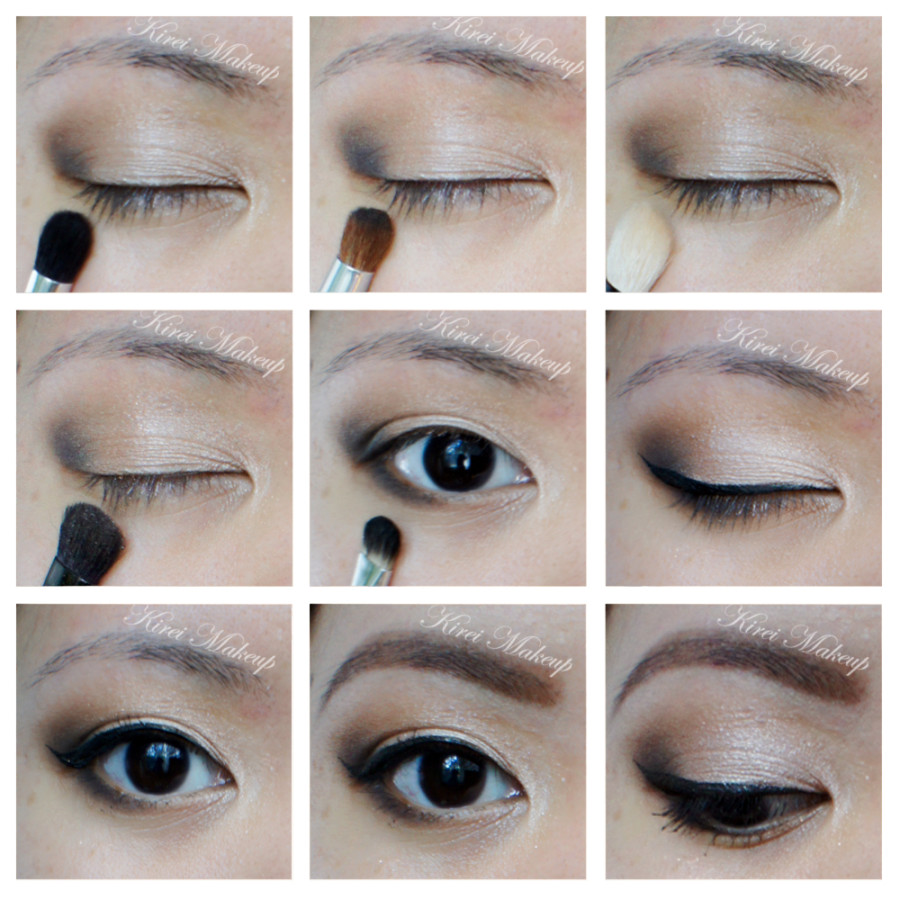
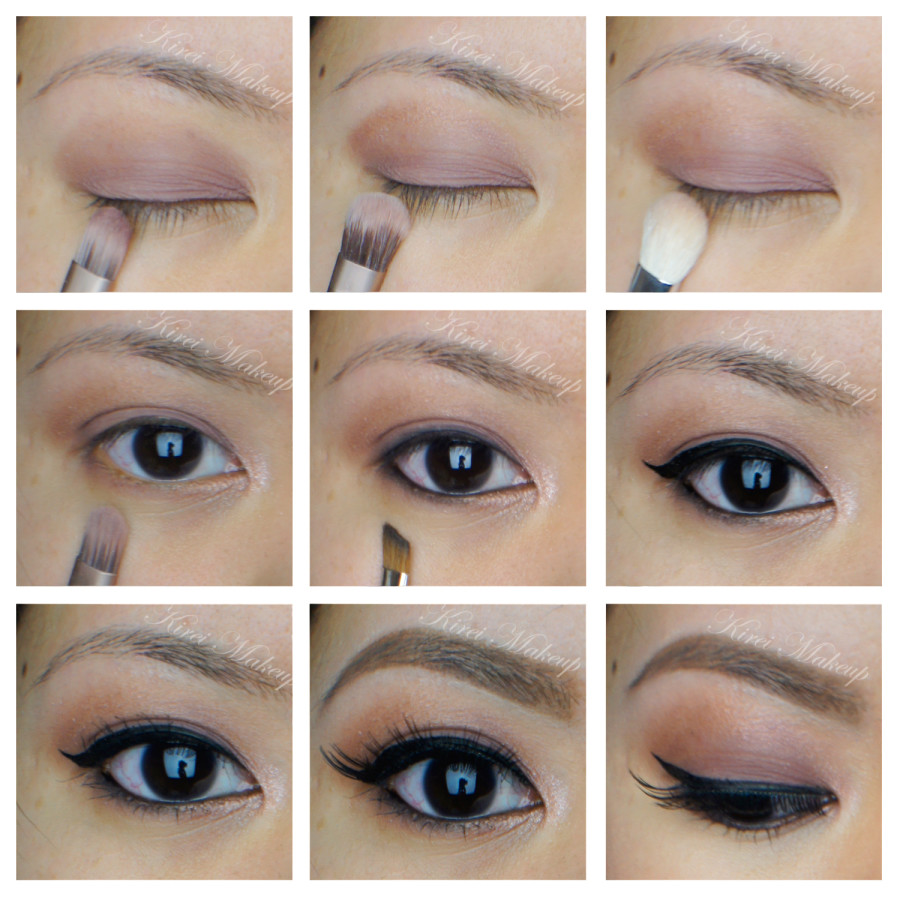
I would like to mention that someone on instagram commented on how she wanted to know how I apply my eyeshadow to my crease. This is how I do it (first photo on top left corner) –

  • When I want to apply my crease color, I looked directly on the mirror and marked where I want the shadow to be.
    • By doing so, I can make sure the eyeshadow color can be seen when my eyes are open, since I’ve quite a hooded lid.
  • Then, I tilted my head back slightly so it looked like I was looking down at the mirror and apply my crease color.

smokey winged liner

List of products used are at the bottom of the page. All eyeshadows used are from Urban Decay Naked Basic palette unless stated otherwise.

My eyelids are prepped with Urban Decay Primer Potion.

How-to:

1. I applied a mix of Urban Decay Faint and Naked 2 on the crease using a crease brush

2. Using a fluffy blending brush, I blended the edge of the crease to avoid harsh line.

3. Using a flat eyeshadow brush, I applied Urban Decay Venus on my eyelid.

4. I lined my lower lash line using Urban Decay Faint using an angled eyebrow brush.

5. Using the same angled eyebrow brush, I applied Urban Decay Crave eyeshadow on the upper lash line creating a winged eyeliner. I focused most of the eyeshadow near the roots of my lashes.

6. I used a pencil brush to smudge the line slightly.

7. Using Kat Von D Trooper eyeliner, I lined just the bottom part of the eyeliner – very close to the roots of the lashes, and the bottom part of the “wing”.

8. I used the same brush and eyeshadow as step 5, and run it through the winged eyeliner again.

9. I filled my brows with Anastasia Beverly Hills Brow Wiz in Taupe and Brunette.

10. I applied Gwiyomi no. 3 false lashes.

11. I applied MAC Chromagraphic eyeliner pencil in NC30.

smokey winged eyeliner

12. For my face, I applied Shu Uemura Oleopact foundation using the sponge that comes with it.

11. I lightly dust my face using MUFE Pro Finish powder in 118.

12. I applied Benefit Hervana on my cheeks.

13. On my lips, I filled it in using L’oreal Color Riche lipliner in Rose, then applied YSL Glossy Stain in Peche Cerra-Colla (27)


Products used

Eyes – Urban Decay Primer Potion (original); Urban Decay Naked Basics (crease: Faint/Naked2, lid: Venus, liner: Crave); Kat Von D Trooper eyeliner; Anastasia Beverly Hills Brow Wiz in Taupe/Brunette; Gwiyomi false lashes no. 3

Face – Shu Uemura Oleopact foundation; MUFE Pro Finish (118)

Cheeks – Benefit Hervana

Lips – L’oreal Color Riche lipliner in Rose; YSL Glossy Stain in Peche Cerra-Colla (27)

4 Bridal Makeup Looks

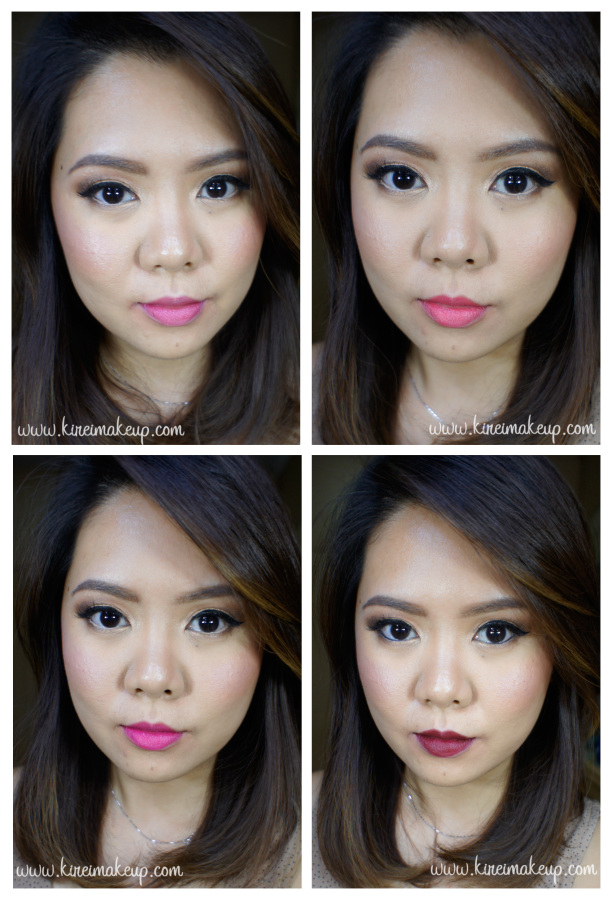
I collaborated with Lover.ly to create a bridal makeup look. I was shown 3 photos of the bridal gowns, and I chose my favorite as below for my post. While I was thinking of to create a look for this gown, I decided to create not one, but FOUR bridal makeup looks to suit the gown! I created 4 looks since I knew that most brides would have their own interpretation of their makeup, some chose to be more on the natural side, while others might not be afraid to go bold!

I also took into consideration of the whole outfit and hair. As you can see, the gown that I chose has a very demure neckline, along with a very elegant lace details. With this in mind, in my opinion, I think brides who chose this type of gown would be very classy, lady-like and conservative.

wedding gown

Since the hair is pulled back, so not to clash with the neckline, I didn’t want to create a heavy dark smoky eyes. I think with this gown and hairstyle, a simple warm eyes would suffice. I feel that a heavy, dark smoky eyes would be too heavy and might clash with the high neckline. Of course, you can go on the dark smoky eyes look, but I prefer going light on the eyes and play on the lips.

So, for this tutorial, I created 1 eye makeup which can be paired with 4 different lips look. Usually for bridal makeup, I tend to choose the warmer neutrals (think browns and gold) since I think it looks very flattering on everyone. Very rarely I do a black smoky eyes, unless the client asked for it, and/or during change of makeup from morning to evening. Even then, I’ll still add some warmth on the smoky eyes.

To compliment the lace and the gown’s off-white color, I decided to use a beautiful gold on the eyelids from the Too Faced Chocolate Bar eye palette called Creme Brulee. This gold isn’t too yellow, nor it is too shimmery. It has a somewhat satin finish, which makes it perfect for this look so it doesn’t clash with the texture of the gown.

Since this gown doesn’t have shiny finish, I decided to keep the face semi-matte to avoid looking too dewy. I feel that this gown has a grown-up feeling to it, so I try to avoid the dewy/glowing finish since it can make the bride looking too youthful. Semi-matte is the right choice for this look.
bridal makeup tutorial

In all of the 4 looks I created, I only added extra blush on the bottom looks (both left and right), and added a black waterline on the look with the dark lips. Otherwise, everything is exactly the same (brows, foundation, highlight, contour etc).

No, I do NOT contour my face heavily with cream foundation. You can if you want, but I prefer not to. I like very subtle highlight/contour so my clients look still like themselves in the photos instead of looking like someone else. HOWEVER, IF or WHEN the client asks for heavy contouring (i.e. Kim K contouring), I’ll still provide the cream contouring for her.

If you’d like to see me do a glam Bridal makeup (i.e. smoky eyes, contour, and the whole nine yards), do let me know by leaving comments here or on my Instagram page!

Natural bridal eye makeup

Eyelids are prepped using Urban Decay Primer Potion. Face is primed using MUFE HD Elixir.

How-to:

1. I applied Salted Caramel from Too Faced Chocolate Bar eye palette on my crease using a clean blending brush.

2. On the outer V, I applied a mixture of Triple Fudge and Semi Sweet (both from Too Faced Chocolate Bar palette) using a Smashbox Bullet Crease brush.

3. Then, using the same brush as step 1, I blended out the edge of my crease.

4. Using a flat eyeshadow brush, I applied Creme Brulee (from Too Faced Chocolate Bar palette) on my eyelid.

5. I lined my waterline using MAC Chromagraphic pencil eyeliner in NC15 (or L‘oreal Voluminous Smoldering eyeliner for the dark lips version).

6. I also applied Triple Fudge/Semi Sweet mix on the outer half of the lower lash line. Then, I applied Creme Brulee on the inner half of the lower lid. I used the edge of a flat eyeshadow brush to do this.

7. I created a winged liner using Shu Uemura Calligraphy:ink liquid liner pen along the upper lash line.

8. I filled my brows using Anastasia Brow Wiz in Taupe FIRST, then I darkened the tail and any sparse area using Anastasia Brow Wiz in Brunette.

9. I curled my lashes and applied Gwiyomi no. 3 false lashes.

10. On my face, I applied MUFE HD foundation all over using a foundation brush.

11. I set my face using CoverFX translucent setting powder.

12. I lightly contour my face using Smashbox contour kit powder, and highlight my face using The Balm Mary-Lou highlighter. If you have oily skin, I’d suggest skipping highlighting using Mary-Lou. Instead, you can use a matte powder which is a shade or two lighter than your skin, or the highlight powder from Smashbox contour kit.

13. I applied Chanel Blush de Horizon on my cheeks.
natural bridal makeup

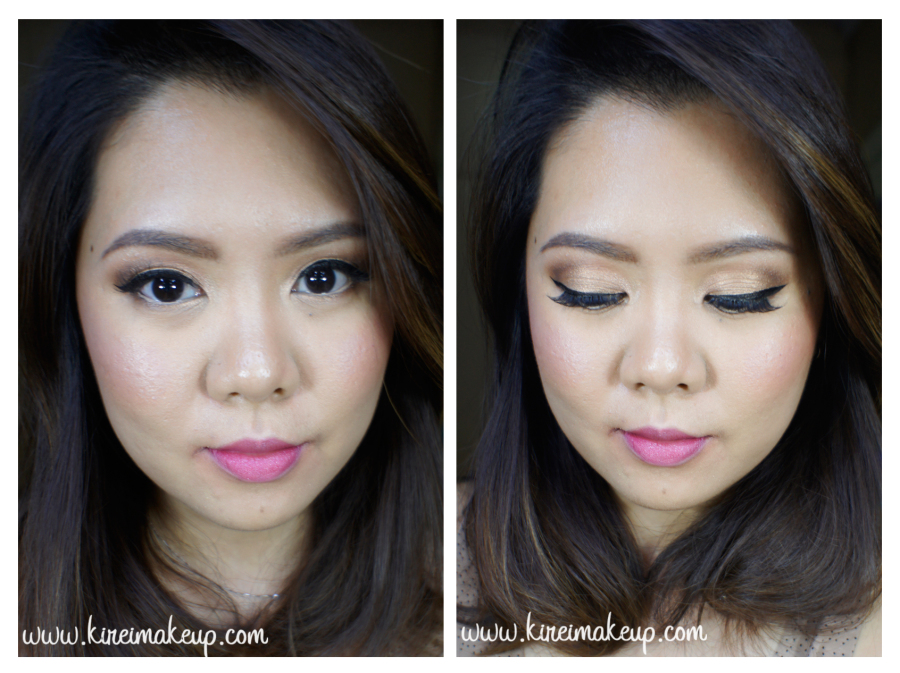
14a. For this blushing bride look, I applied Lancome Color Design in Vintage Rose Sheen.

This look is perfect for those brides who prefer to have a natural look. The rose lipstick has just enough color to brighten up the face. This bridal makeup look is great for Summer Wedding!
blushing bride makeup

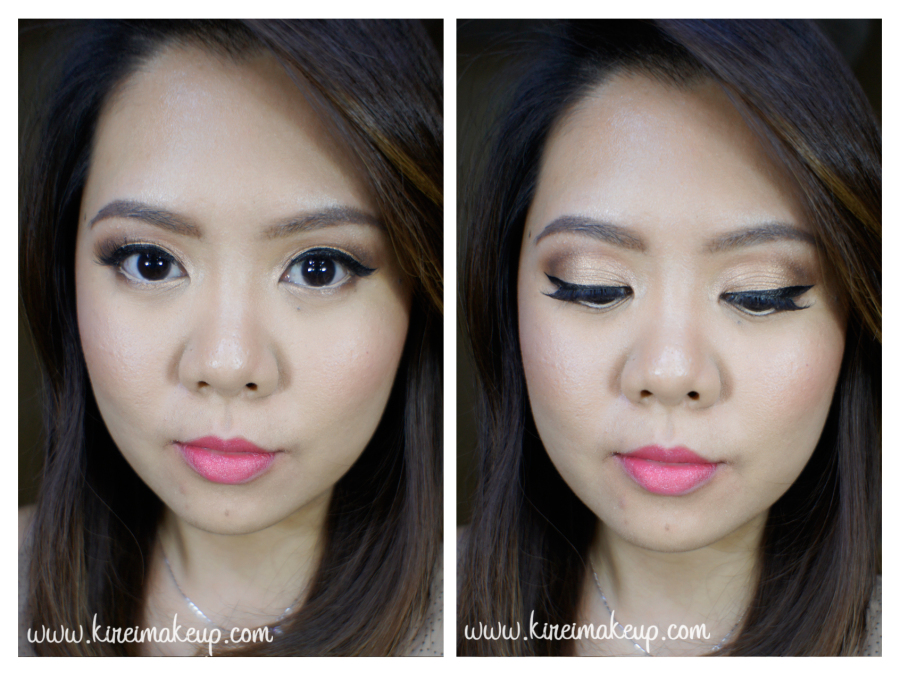
14b. For this youthful bridal look, I added YSL Rouge Pur Couture no. 52. I applied it using a lip brush.

This lipstick is pretty much sold out in Indonesia! When applied lightly on the lips, this YSL no. 52 really lives up to its popularity! It deposits enough pigment without looking too bright on the lips. This gorgeous coral lips is also great for Summer Wedding makeup, but I think it’d be perfect for Spring Wedding where all the flowers are just blooming, and the weather isn’t quite warm yet. This bridal makeup look would instantly gives the bride the most beautiful smile on her big day!blushing bride makeup
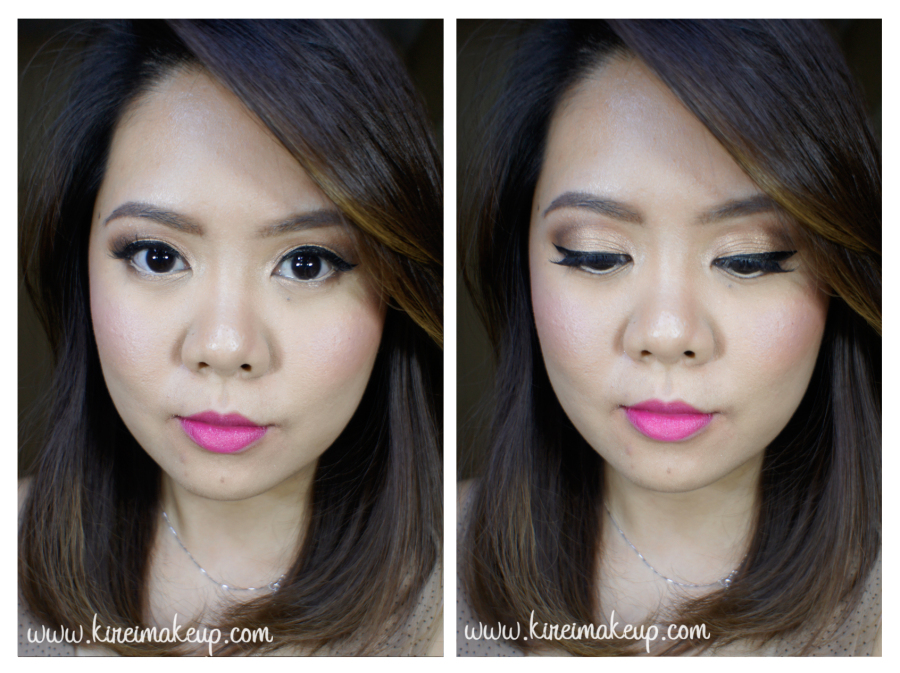
14c. I applied MAC Girl About Town on the lips using a lip brush. I had to add a bit more blush to avoid my face looking washed out for this look since the lips are quite bold.

This is another look which would look great for Spring/Summer Wedding. For brides who are a bit more adventurous, but not into red lips, this is definitely a look to try. What I love about MAC Girl About Town lipstick is that the color is not too fuchsia. It still has enough warm undertone to make it wearable for a wedding, and at the same time bright enough to give a punch of color.
fall bridal makeup

14d. For this lovely deep red, I first lined my lips using L’oreal Color Riche Anti-Feathering lip liner in True Burgundy. Then, I applied MAC Diva lipstick on top of it. (The blush was the same as 14c)

Last but not least, we have the makeup look for a Fall/Winter wedding. Of course you can choose the other lip colors for Fall/Winter wedding, but I really love this deep red lips look. Personally, this is my favorite look out of the 4. I chose to darken my waterline to compliment the deep red lips.

So, that’s all folks! I think everything is pretty self-explanatory from the photos. I’d like to say that  yes, you CAN wear all these makeup looks even if you aren’t a bride! Obviously some steps for bridal makeup are different than daily makeup, but that’s for next time! Yes, you can wear this look to a wedding party, or if you’re bridesmaids etc. Again, like I said, the way I applied and steps taken for bridal makeup is slightly different than daily or party makeup. You can tweak it to your preference!


Products used

Eyes – Urban Decay Primer potion; Too Faced Chocolate Bar eye palette (crease: Salted Caramel, outer V & lower lid: Triple Fudge/Semi Sweet, eyelid & lower lashline: Creme Brulee); Shu Uemura Calligraphy:ink liquid liner; MAC Chromagraphic pencil liner NC15 or L’oreal Voluminous Smoldering eyeliner; Anastasia Brow Wiz in Taupe and Brunette; Gwiyomi no. 3 falsies.

Face – MUFE HD elixir; MUFE HD foundation; Cover FX Translucent Powder.

Cheeks – Smashbox Contour kit; The Balm Mary-Lou; Chanel Blush de Horizon

Lips – Lancome Color Design Vintage Rose Sheen (a); YSL Pur Rouge Couture no. 52 (b); MAC Girl About Town (c); L’oreal Color Riche lipliner in True Burgundy and MAC Diva (d)

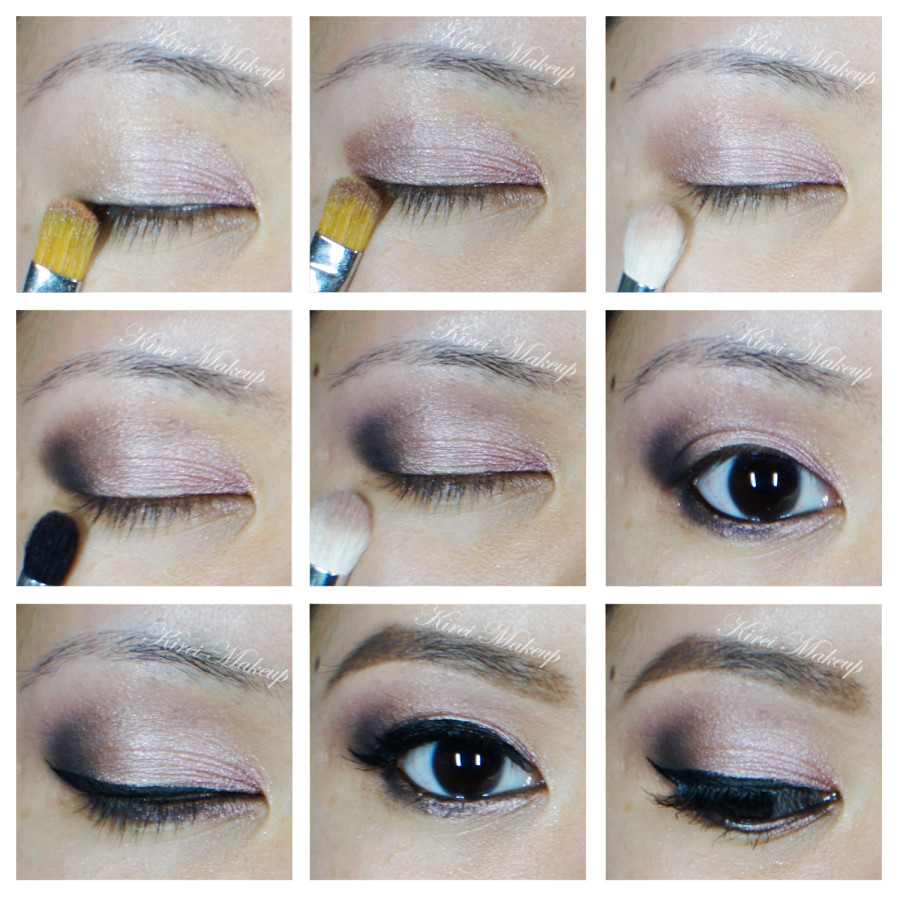
Lavender Grey using NARSissist Palette

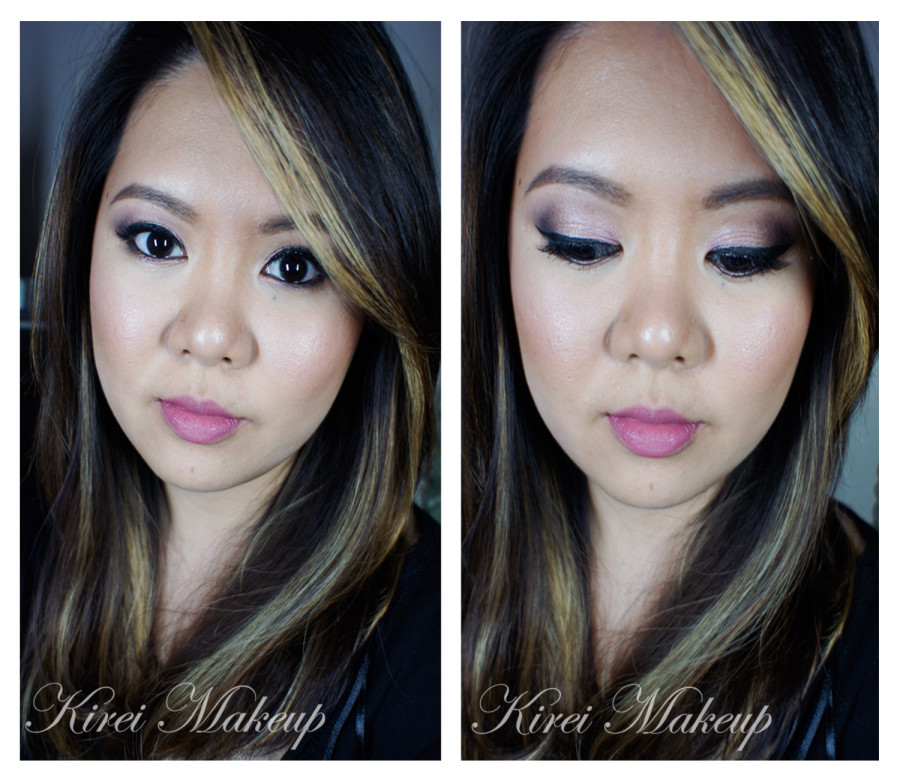
For this week’s tutorial, I decided to use my NARSissist Palette again! I fell in love with this palette all over again. I feel like it’s such a great palette with a more mature color option. For today’s tutorial, I picked out my favorite shades which were in the range of grey, lavender, and violet. I know the picture doesn’t show much of the lavender/violet on the lid, but I assure you it’s such a pretty grey with very subtle hint of lavender/violet in it. If you’re one not to wear color, and prefer a much neutral option, this would be a great addition to your makeup wardrobe.

Oh, just to let you guys know, I have been trying to update my Instagram daily. I’m going to try to do a weekly “Monday Makeup Inspiration”, and regram/repost-ing every look that YOU guys do if you FOLLOW me (@kireimakeup) and add #kireimakeup to your Instagram pictures! I’d love to see your makeup and/or your re-creation of any of my looks!

narsissist smoky eyes

How-to:

1. I’ve prepped my eyelid using Urban Decay Primer Potion in original. Using a blending brush (from UD Naked 3 palette), I applied NARS Brousse II on my crease.

2. Using a small shader brush, I applied NARS Pandora II on the outer V of my eyelid.

3. I blended my crease by applying NARS Madrague I using a clean blending brush. I used this shade as a transition color.

4. I applied NARS Ashes to Ashes on my entire eyelid using a flat eyeshadow brush. I also added a little bit of NARS Lhasa on top of it.

5. I created a winged liner along my upper lash line using L’oreal Infallible Gel Lacquer 24hr in Blackest Black and an angled eyeliner brush. Using whatever was left on the brush, I ran it along the lower lash line, and waterline.

6. I also used a small shader brush and applied NARS Ashes to Ashes along my lower lid.

7. I filled my brows using Anastasia Brow Wiz in Ash Blonde and Brunette. I cleaned up the edges of my brows using Cover FX G20 cream foundation. If you want to know how I fill my brows, please check my brow tutorial.

8. I curled my lashes and applied Cover Girl Lash Blast mascara. I also applied falsies (Korean’s falsies, not sure what it’s called since the brand is not in English).

NARSissist Lavender Grey smoky eyes

9. On my face, I applied Cover FX Cream Foundation in G40 using MAC Masterclass Brush Oval 6.

10. I lightly applied highlight and contour using CoverFX cream foundations in G20 & N110. Check out my BACON post to find out how I used CoverFX to do my highlight and contour.

11. On my cheeks, I applied Revlon cream blush in Pinched.

12. On my lips, I applied Revlon Mauve it Over matte lipstick.

Simple Makeup using Smashbox Full Exposure Palette

Today I wanted to share this oh-so simple makeup look. This is the look that I wore last night for a friend’s birthday dinner (check my instagram), and seemed to be wearing it almost quite often lately. The makeup itself is very easy, perfect for beginners if you want to do something different with your look. I think the only tricky part of this look is the eyeliner, but you can skip the winged eyeliner if you prefer. This is a very basic eyeshadow application technique, and you can obviously change the colors of the eyeshadow to whatever you like.

I’ve done something very similar to this look in my other Smashbox Full Exposure tutorial, but that one is more dramatic (with falsies and more liner, and slightly more smoky). If you prefer a smokier look, I’ve done 2 tutorials using this palette right here and here. I’ve also done swatches and a Smashbox Full Exposure palette review.

Scroll all the way down for complete product list.

natural eyes for asian

How-to:

1. I prepped my lid using Urban Decay Primer Potion in Sin.

2. Using a Sephora bullet crease brush, I applied M1 on the outer V of my eyelid, blending the color to my crease.

3. Using a clean bullet crease brush, I applied M7 on just the outer part of the eye.

4. Using a clean Smashbox fluffy blending brush (from the palette itself), I applied a mixture of M2 and M3 on the crease (the picture doesn’t seem to catch those colors since it’s very close to my skin color).

5. Using the flat-end of the Smashbox brush, I applied S3 on my eyelid.

6. Using a small shader brush, I applied M7 on the outer half of my lower lid.

7. I created a winged eyeliner using Kanebo Kate Super Sharp eyeliner.

8. I curled my lashes and applied Cover Girl Lash Blast mascara.

9. I filled my brows using Anastasia Duo Brow Powder in Brunette.makeup for brown eyes

10. For my face, I applied Urban Decay Naked Skin foundation using a damped sponge.

11. I applied Smashbox contour powder (from the contour/highlight trio kit) under my cheeks.

12. I applied MAC Dainty on my cheeks.

13. For the lips, I applied MAC Please Me lipstick and a little bit of lip balm.

Product used

Eyes – Urban Decay Primer Potion Sin; Smashbox Full Exposure palette; Kanebo Kate Super Sharp eyeliner; Cover Girl lash blast mascara; Anastasia Duo Brow Powder

Face – Urban Decay Naked Skin foundation; Smashbox trio contour kit; MAC Dainty blush

Lips – MAC Please Me lipstick; L’occitane lip balm

Soft Rose Smokey Eyes tutorial using UD Naked 3

Here I am with a new Soft Rose Smoky Eyes tutorial using UD Naked 3 (again)! I do apologize for missing for almost a week without any tutorials. I’ve been having some difficulties with the internet at home. However, if you do follow me on Twitter or Instagram, you’d have gotten a little bit of update here and there every day.

In another news, I was very excited to find out that Urban Decay has used one of my pictures that I did on their email newsletter! I’m not sure if you guys subscribe to their mailing list, but I was so surprised to see my face on it. It’s small, but I’m so happy! If you want to recreate that look, please take a look at my Rose Smoky III tutorial.

Don’t forget to check out my other UD Naked 3 tutorials (pictorials and video)!

Urban Decay

So, for today’s tutorial, I wanted to use my Urban Decay Naked 3 again to create a much softer rosy smoky eyes, something that most people can recreate and do it on themselves. This look would be great for those with medium to darker skin tone as well. If you like a very light eyelid, you can apply Burnout or Dust instead of Buzz.

Scrolls all the way down if you want to skip the how-to, and go straight to the product list.

urban decay naked 3 rose smoky

How-to:

  1. I prepped my eyelids using Urban Decay Primer Potion in Sin.
  2. I applied Buzz on the inner half of my upper eyelid, and Liar on the outer half, using a flat eyeshadow brush.
  3. On the crease, I lightly applied Limit using a blending brush.
  4. Using a bullet crease brush, I applied Blackheart on the outer V.
  5. I blended out the outer V using the same blending brush I used on Step 3.
  6. On the lower lid, I applied Blackheart using an angled brow brush.
  7. I also applied Buzz on the inner corner of the lower lid.
  8. I lined my waterline using L’oreal Voluminous Smoldering eyeliner.
  9. I applied a winged eyeliner along the upper lash line using Kanebo Kate Super Sharp eyeliner.
  10. I curled my lashes, and applied Clinique High Impact mascara. Then, I added false lashes.
  11. I outlined my brows using Anastasia Brow Wiz in Ash Blonde, and filled it with Anastasia Brow Powder in Brunette.

urban decay naked 3 makeup tutorial

  1. I applied Cover FX cream foundation in G20 under my eyes, on the bridge of my nose, chin, and forehead using a clean foundation brush.
  2. I then applied Cover FX cream foundation in N110 on my temples, sides of my nose, on the hollows of my cheeks and on my jawline using a clean foundation brush.
  3. I blended the 2 foundation using a damped sponge.
  4. I set my face using Cover FX translucent powder.
  5. I applied Chanel Blush de Horizon on my cheeks.
  6. On my lips, I applied Tarte Lipsurgence in Lively.


Products used

Eyes – Urban Decay Naked 3 (eyelid: Buzz & Liar, crease: Limit, outer V: Blackheart); L’oreal Voluminous Smoldering eyeliner; Kanebo Kate Super Sharp eyeliner; Ardell false lashes no. 109; Anastasia Brow Wiz in Ash Blonde; Anastasia Duo Brow Powder in Brunette.

Face – Cover FX cream foundation in G20 & N110; Cover FX translucent powder; Chanel Blush de Horizon.

Lips – Tarte lipsurgence in Lively.

How to Contour and Highlight with Cream Foundation (aka BACON)

Notice: In-depth tutorial, lots of information. Feel free to ask questions!

I have mentioned last week regarding Cover FX cream foundations, and I did said that I was going to do a tutorial on contouring. So, today, my post is about how to contour and highlight with cream foundation. I, personally, don’t use this technique much on a daily basis for my own makeup (except for tutorials, obviously). Usually, I do this sort of makeup for brides, and their bridal parties. I don’t do this type of contouring/highlight on photoshoots, films, and fashion show since they, more often than not, ask for a no-makeup makeup, so this type of highlight/contouring is too much.

What does highlighting and contouring do to your face?

  • Highlight – brings light to your face, emphasize the areas that you want to stand out more.
  • Contour – remove light, creating shadow and the illusion of depth.

Cream foundations allow for a more natural finish, and easier to blend. I feel that using cream product is more forgiving if you can blend it properly. However, if you prefer to do a powder contouring, I’ve done it in the Subtle Contouring/Highlighting/Blush post. If you like using a crayon concealer, check my L’oreal Super Blendable Craon Concealer highlight/contour tutorial.

Keep in mind for the contouring color, I chose a neutral shade (Cover FX N110). If you can’t find this foundation, you can use a cool-tone brown shade (i.e. a greyish brown). Try to avoid a reddish brown since it can get too warm on your face (esp. if you’re fair or light-skin), making it look more like a bronzer or tan, and your face can end up looking too orange-y.

I don’t usually use bronzer as contour as most of the bronzers in the market has too much shimmer, which can bring too much light on the face (counterproductive to contouring). However, if you do want to use bronzer as contour, I recommend a matte, cool-toned brown bronzer such as Benefit Hoola, Rimmel Natural Bronzer, Tarte Matte Waterproof Bronzer.

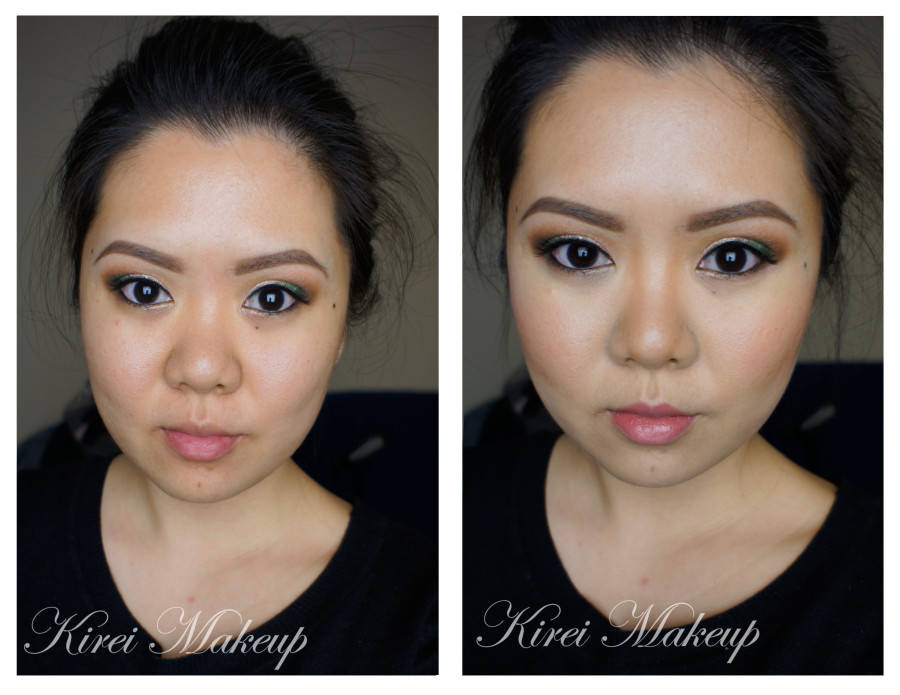
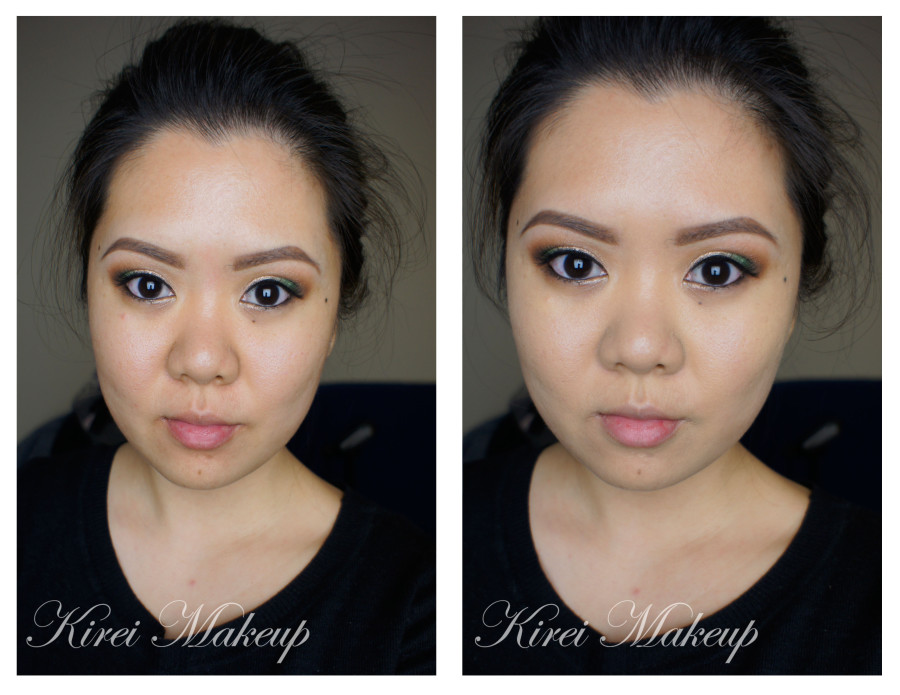
Below on the left side, I have nothing on my face except for MUFE HD Elixir. On the right side, I have full on makeup. As you can see, the contouring and highlighting created some definition on my face (i.e. nose and cheeks).contouring for round face

Products used:

  • Cover FX G40 cream foundation as base.
  • Cover FX G20 cream foundation as highlight.
  • Cover FX N110 cream foundation as contour.
  • Maybelline Master Glaze in Make a Mauve as blush.

Brushes used:

  • Base – Cover FX Cream Foundation brush.
  • Contouring – Sigma Precision Angled brush, Sigma Precision Round brush.
  • Highlight – Sigma Precision Round brush, Foundation brush.
  • Blush – Sephora Pro Airbrush Blush brush.

For Sigma Synthetic Kit brushes, please check my review on my Sigma Brushes review.

How-to:

1. I applied MUFE HD Elixir all over my face as a primer.

2. Then, I applied Cover FX G40 cream foundation all over my face using Cover FX Cream Foundation brush.

how to contour face

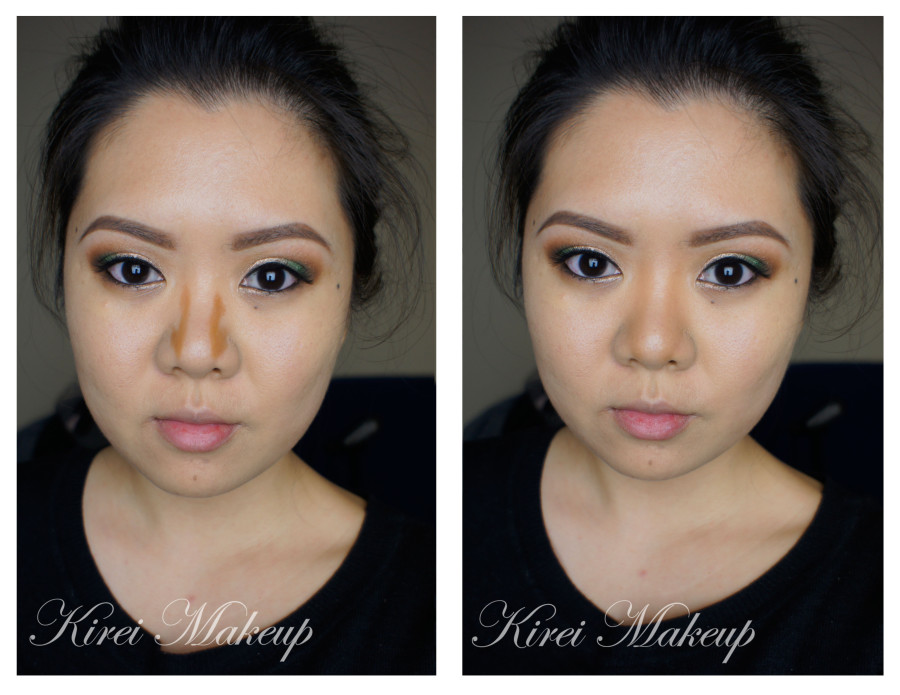
3. I applied Cover FX N110 Cream Foundation on the side of my nose using Sigma Precision Angled Brush.

  • I usually started out by contouring my nose. As you can see, I have a button nose – flat on the bridge, with no definition.
  • I don’t start at the top (near my eyebrows) because I don’t want 2 straight lines going down my nose. I want to create  a very natural illusion of depth, since I have a flat nose.

4. I blended down the contour on the sides of my nose using Sigma Precision Round Brush.

learn how to contour face

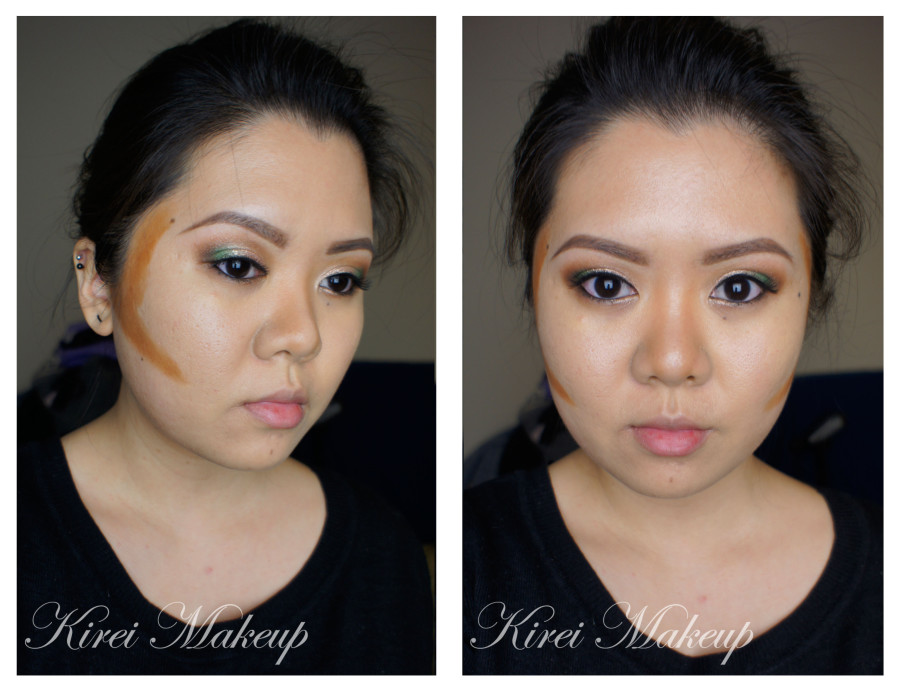
5. Using Sigma Precision Angled Brush, I applied Cover FX N110 cream foundation on the hollows of the cheeks and on the side of my face.

  • You can also applied the foundation on your temple and forehead if you want. I skipped this since I don’t have much area on my forehead (in the picture it looks big, but trust me, I don’t have much space on my forehead).

6. I created an imaginary line from the top of my ear to the corner of my mouth, and drew it using the cream foundation. Using whatever was left on the brush, I applied the foundation on the side of my face.

  • When I smiled, I have this natural smile lines below my cheeks (’cause you know, I have chipmunk cheeks). I just used the lines as a guideline.

Contouring asian face

7. I pushed the cream foundation into my face using Cover FX Cream Foundation brush.

  • I pushed the foundation into my skin to blend it instead of using a brush and swirling it around my face. If you use a brush in a circular motion to blend it, you might disperse the product all over your face causing it to get dragged too low or too high on the face. I like to push the products into my face so the area is concentrated right on the hollow of my cheeks. This is just my preference, obviously.

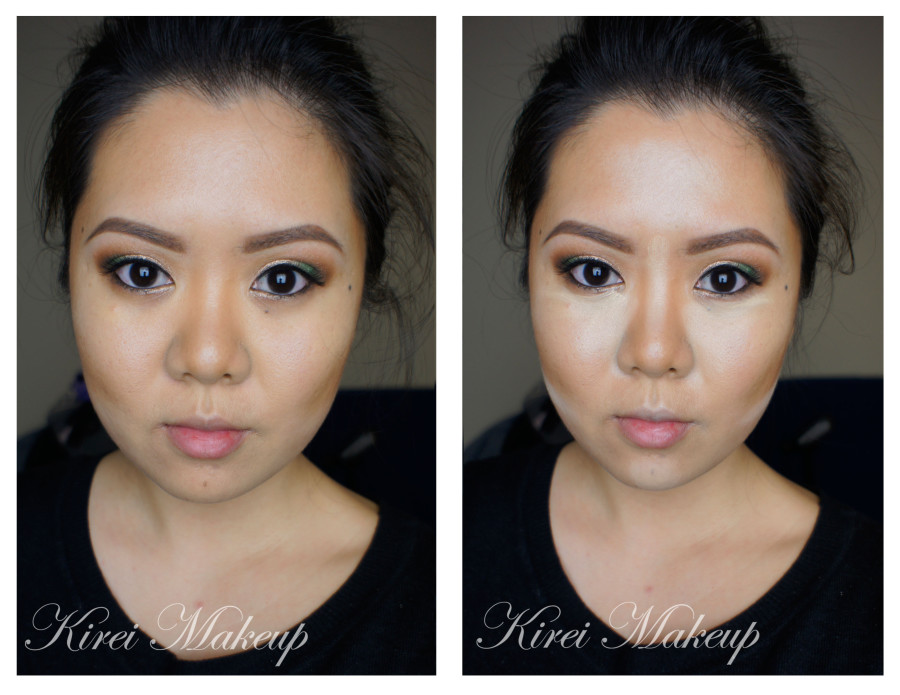
8. I applied Cover FX G20 Cream Foundation using Sigma Precision Round Brush as highlight.

  • I applied it on the bridge of my nose, forehead, under my eyes, on cupid’s bow, chin, and below the contour of my cheeks.
  • You can also applied it under and above the brows, but I’ve done it when I did my eyebrows, so I skipped it at this moment. If you want to find out how, please check my How-to Fill Eyebrows post.

how to contour asian face

9. Using a clean foundation brush, I blended out the highlight.

10. I applied Maybelline Master Glaze in Make a Mauve on my cheeks using Sephora Pro Airbrush Blush Brush #54.

11. Set everything with powder if needed. I set my face using Cover FX loose translucent powder and powder brush.

12. On my lips, I applied Clinique Chubby Stick in Bountiful Blush.

hac

One of my instructors in makeup school back then used to say remember BACON when creating highlight/blush/contour sequence. Highlight (fatty part) at the top of the cheeks, blush (meat part) on the cheeks, and contour (crispy part) on the hollows of the cheeks. So remember, BACON!

For the eye makeup, I’ll post the tutorial in couple days! 🙂

Disclaimer: some of the links provided above (i.e. Sigma Beauty) is an affiliated link. I will earn profit should you click on the link and buy products from Sigma Beauty. The monetary compensation from the link is used towards the maintenance of this website.

Neutral Smokey Eyes using Urban Decay Naked Palette

Another Urban Decay Naked palette post again?! Yes it is! I’ve been showcasing my love for the Urban Decay Naked 3, and I did a tutorial using the Naked 2, so I though that it was time to get in touch with the original Naked palette. For this tutorial, I wanted to do a neutral smokey eyes tutorial, which is perfect for any occasion from party, night-out, date (for Valentine’s) etc.

How-to:

1. I prepped my eyelids using Urban Decay Primer Potion in Sin.

2. Using a flat eyeshadow brush, I applied Sidecar all over the eyelid.

3. I applied Buck on my crease using Smashbox Bullet Crease brush.

4. Using a small shader brush, I applied Creep on the outer V and lightly dragging it to the crease.

5. Using the same Smashbox Bullet Crease brush that I used on step 3, I blended my crease.

6. I applied Naked lightly under the brow, and Sin on the inner corner of my eyes.

7. I applied Creep on the outer half of my lower lid, and Sidecar on the inner half using an angled eyeliner brush.

8. I created a winged eyeliner using Kanebo Kate Super Sharp eyeliner. On my waterline, I used MAC Chromagraphic eyeliner in NC15.

9. I filled my brows using Anastasia Duo Brow Powder in Brunette.

10. I curled my lashes, and applied Buxom Lash mascara on both top and bottom lashes.

11. I also applied Gwiyomi Gillian false eyelashes.

urban decay naked tutorial

12. For my face, I applied CoverFX Cream foundation in G40 using CoverFX cream foundation brush.

13. On my cheeks, I applied Chanel Blush de Horizon.

14. On my lips, I applied Revlon Socialite lipstick.

coverfx cream foundation review g40Products used

Eyes – Urban Decay Primer Potion Sin, Urban Decay Naked palette, Kanebo Kate Super Sharp eyeliner, Buxom Lash mascara, Anastasia Brow Powder Brunette, Gwiyomi Gillian false eyelashes.

Face – Cover FX Cream foundation, Chanel Blush de Horizon, Revlon Socialite lipstick.

Rosy Mauve Makeup using Urban Decay Naked 3

Today’s tutorial is a requested look from one of my followers on Instagram through direct message. She wanted an Urban Decay Naked 3 look that’s not too smoky. I created this rosy mauve makeup using Urban Decay Naked 3 for her, so I hope everyone will enjoy it!

The look is very simple. However, I decided to add the winged liner and Gwiyomi lashes for some added drama for the camera. I also, recently, just bought CoverFX cream foundations, so I decided to play around with it for highlighting and contouring as well. I’m going to do a review soon for the CoverFX products.

Anyways, let’s get the tutorial started! You can skip the winged liner and eyelashes, feel free to omit some of the steps to make it suitable for you!

soft makeup using ud naked 3

How-to:

1. I prepped my eyelid using UD Primer Potion. Then, I applied Nooner on my eyelid using the flat eyeshadow brush that comes with the UD Naked 3 palette.

2. I applied Liar on the crease using the blending brush end from the Naked 3 palette.

3. Using Crown Brush Pro Blending Fluff C433, I blended out the edge of Liar so there’s no harsh edge.

4. Using the tip of the flat eyeshadow brush from UD Naked 3 palette, I applied Nooner on the lower lid. I also applied Trick on the inner corner of my eyes.

5. I lined my waterline, tightline, and upper lash line using Urban Decay  24/7 Glide-on Eyeliner in Perversion.

6. Using an angled eyeliner brush, I applied Blackheart along the upper and lower lash line. If I wear this makeup to go out I definitely would stop here and go on to mascara and my eyebrows.

7. I created a winged eyeliner using L’oreal Super Liner Ultra Sharp Tip.

8. I curled my lashes and applied Cover Girl Lash Blast mascara on both top and bottom lashes.

9. I applied Gwiyomi Sarah false eyelashes, and filled in my brows using Anastasia Brow Wiz in Ash Blonde and Brunette.soft makeup using ud naked 3

10. On my face, I applied CoverFX Cream Foundation in G40 using their cream foundation brush.

11. I highlight using CoverFX G20, and contoured using N110 (will do a tutorial on how to do this next time).

12. I set my face using NARS Setting Powder.

13. I applied Benefit Hervana on my cheeks as blush.

14. On my lips, I applied Clinique Chubby Stick Lip Balm in Mega Melon.

urban decay naked 3 tutorial

Products used

Eyes – UD Naked 3 palette, UD 24/7 Glide-on eyeliner in Perversion, L’oreal Super Liner Ultra Sharp Tip, Cover Girl Lash Blast mascara, Gwiyomi Sarah false eyelashes, and Anastasia Brow Wiz (Ash Blonde+Brunette)

Face – CoverFX Cream foundation (G40, G20, N110), NARS Setting Powder, Benefit Hervana blush, and Clinique Chubby Stick Lip Balm Mega Melon.

Valentine’s Day Makeup using UD Naked 3

Update Jan. 13, 2016: I have a new Valentine’s day tutorial on youtube using UD Gwen Stefani palette! Come check THIS VIDEO OUT if you haven’t already.

Happy mid-week, everyone! Valentine’s day is just a few weeks away, and I wanted to create a soft, feminine makeup using UD Naked 3. This Valentine’s Day makeup is girly, warm, and rose-hued. The eyes are made to look bigger and brighter. I’ll do another smoky eyes tutorial using UD Naked 3 for Valentine’s day next time.

I know I’ve been using UD Naked 3 a lot, but I can’t help it! It’s so pretty and gorgeous, how can I resist it?! It’s one of those palettes that does not have much browns and grey, but at the same time it’s neutral enough to be used daily and in different ways.

I’ve done several different tutorials using UD Naked 3, and you can find it here: Rose Smoky Eyes, Look#2, Rose Smoky Eyes 3, Soft and Romantic, as well as a review in Product of the Week.

I’ve also added a Youtube Video tutorial using UD Naked 3 palette!

valentine's day makeup

I prepped my eyelids using UD Primer Potion.

How-to:

1. Using a flat eyeshadow brush, I applied Dust on the inner half of the lid.

2. Using a clean flat eyeshadow brush, I applied Buzz on the outer half of the lid, leaving the middle part empty if you’d like. If not, that’s fine as well.

3. Using a flat eyeshadow brush, I applied Burnout to the middle of the eyelid. This will act as a good transition color between Dust and Buzz.

4. Using the tip of a flat eyeshadow brush, I applied Liar on the crease to create a bit of depth without going smoky.

5. I applied Factory on the outer V, and blended it out using a blending brush.

6. On the lower lid, I applied Dust on the inner corner, Buzz in the middle, and applied Factory on the outer half using an angled eyeliner brush.

7. I created a winged eyeliner on the upper lash line using L’oreal Super Liner Ultra Sharp Tip.

8. On the waterline, I applied white end of Revlon Photoready Kajal eyeliner in Cleopatra. I applied the black end of this eyeliner on the outer third of my lower lash line.

9. I curled my lashes and applied Cover Girl Lash Blast mascara. I also applied false eyelashes from Gwiyomi boutique (Indonesia-based).

10. I filled my brows using Anastastia Brow Wiz in Ash Blonde and Brunette.

urban decay naked 3 tutorial

11. On my face, I applied UD Naked Skin foundation using a Sigma Round Kabuki Brush.

12. I lightly contour my face using MAC Shadowy powder and NARS Ita Kabuki Brush.

13. I applied MAC Cubic on my cheeks.

14. On my lips, I applied MAC Please Me lipstick.

valentine's day makeup

Products used:

  • Eyes – UD Primer Potion, UD Naked 3 palette, Revlon Photoready Kajal Intense Eyeliner in Cleopatra, L’oreal Super Liner Ultra Sharp Tip, Cover Girl Lash Blast mascara, Anastasia Brow Wiz in Ash Blonde/Brunette.
  • Face – UD Naked Skin foundation, MAC Shadowy powder, MAC Cubic, MAC Please Me.