Holiday Party Makeup #4 – Glitter Liner Tutorial

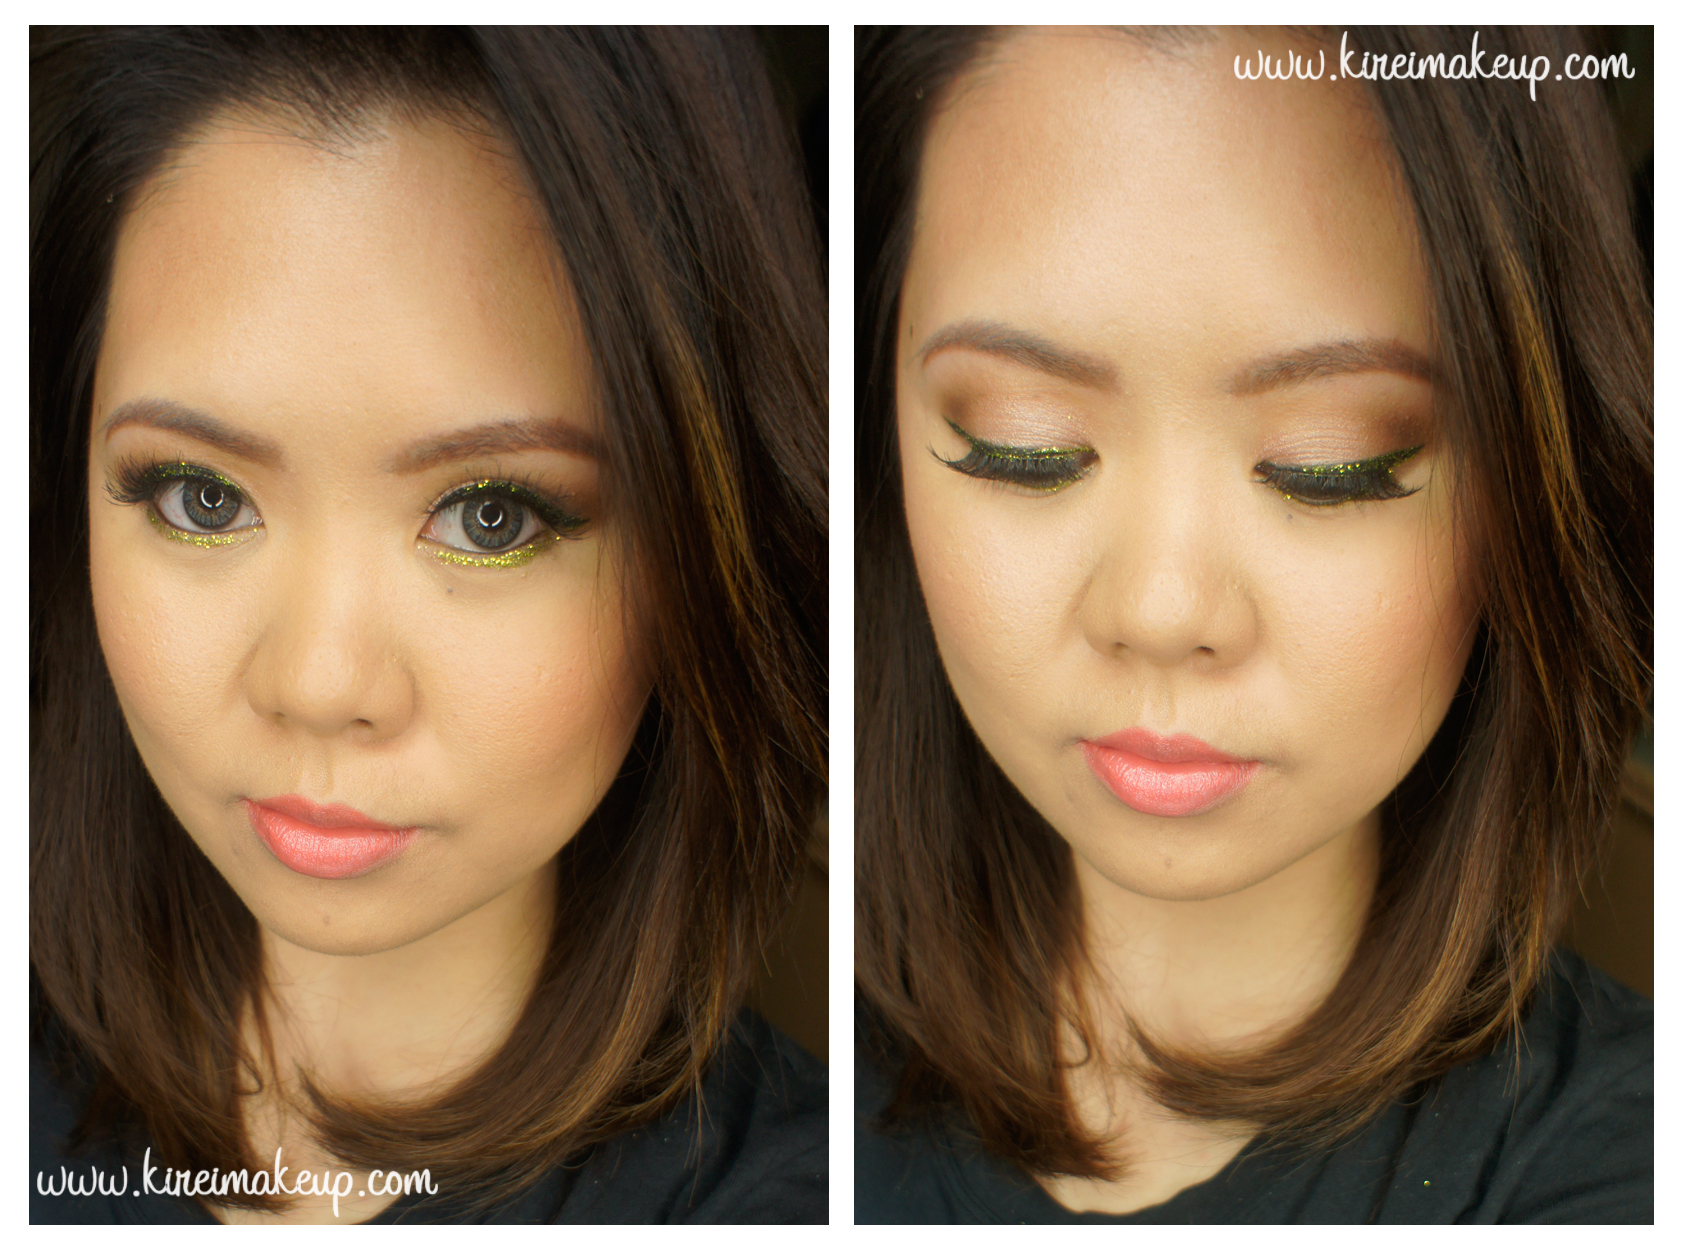
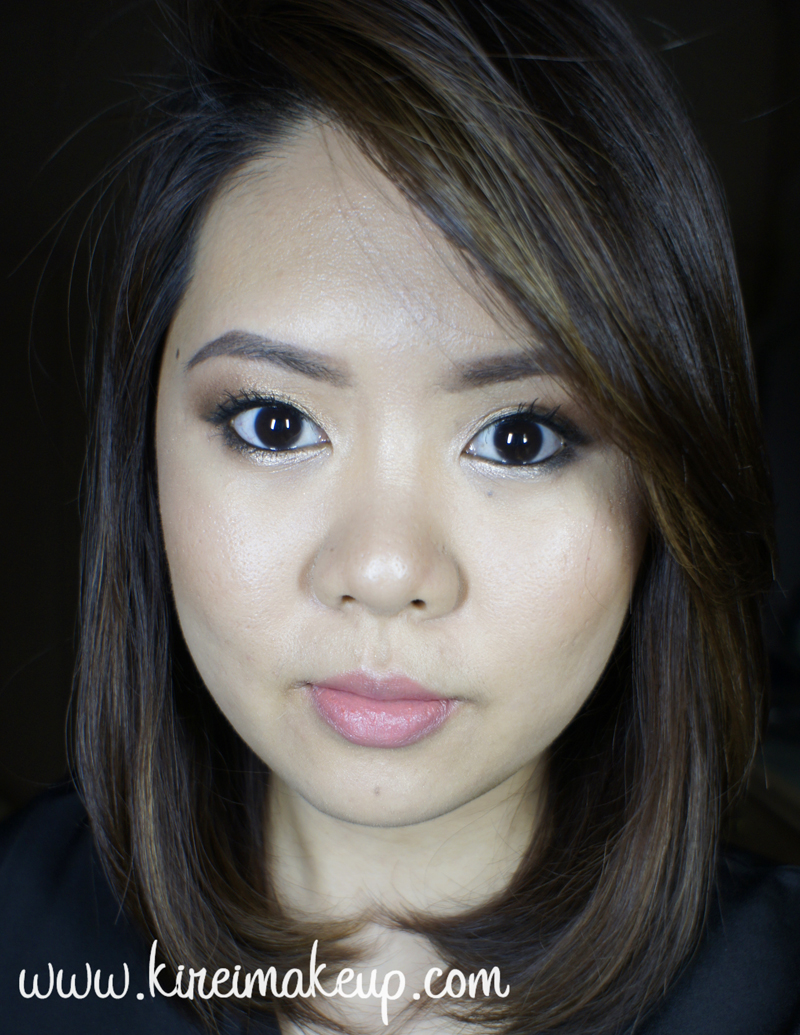
Almost NEW YEAR! I wish everyone a great year ahead! 2014 was fun, it was a bit rocky for me, but nevertheless a good year. 2014 has passed, and here to a great 2015! Hopefully in 2015 everything will go even better! I cannot wait to start 2015, and I have a feeling it’ll be an awesome year! Anyways, since the New Year is almost here, this is my last post of 2014 – a glitter liner tutorial. Last year, for NYE, I did a silver smoky makeup, this time I opted for more glitter!

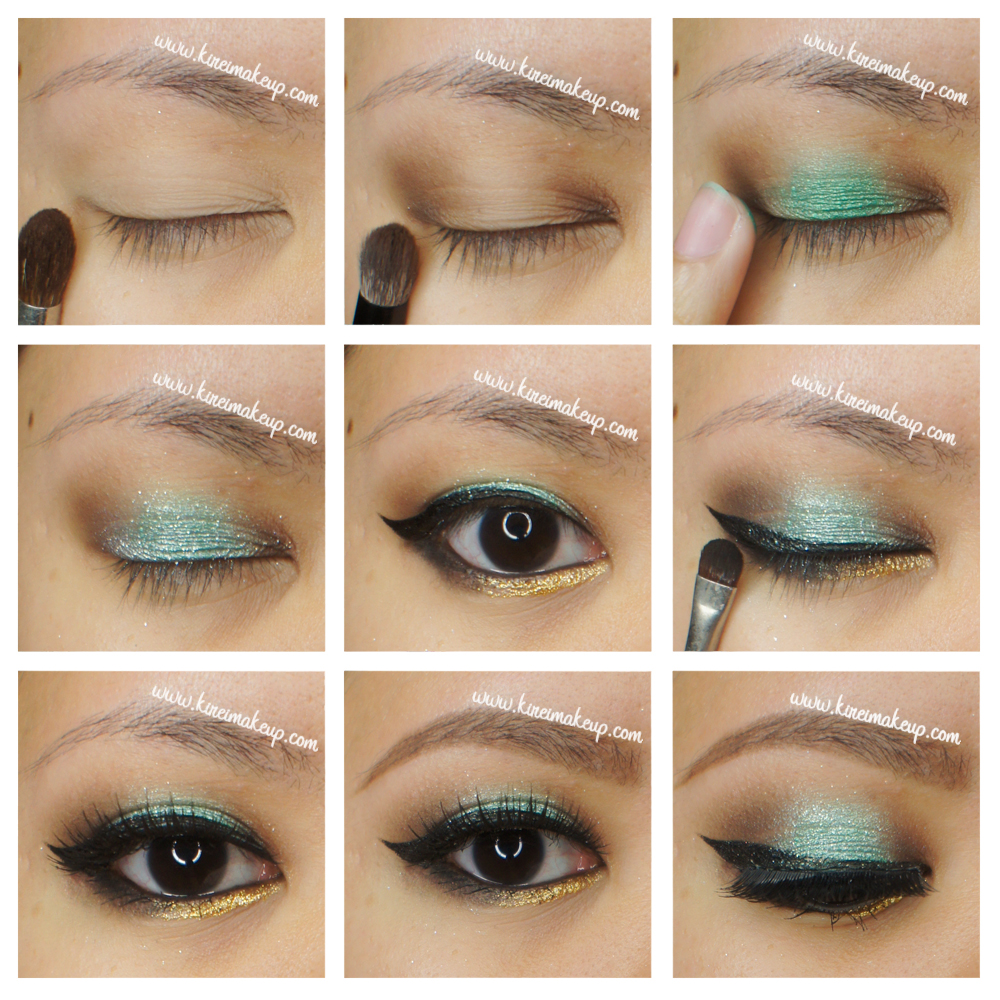
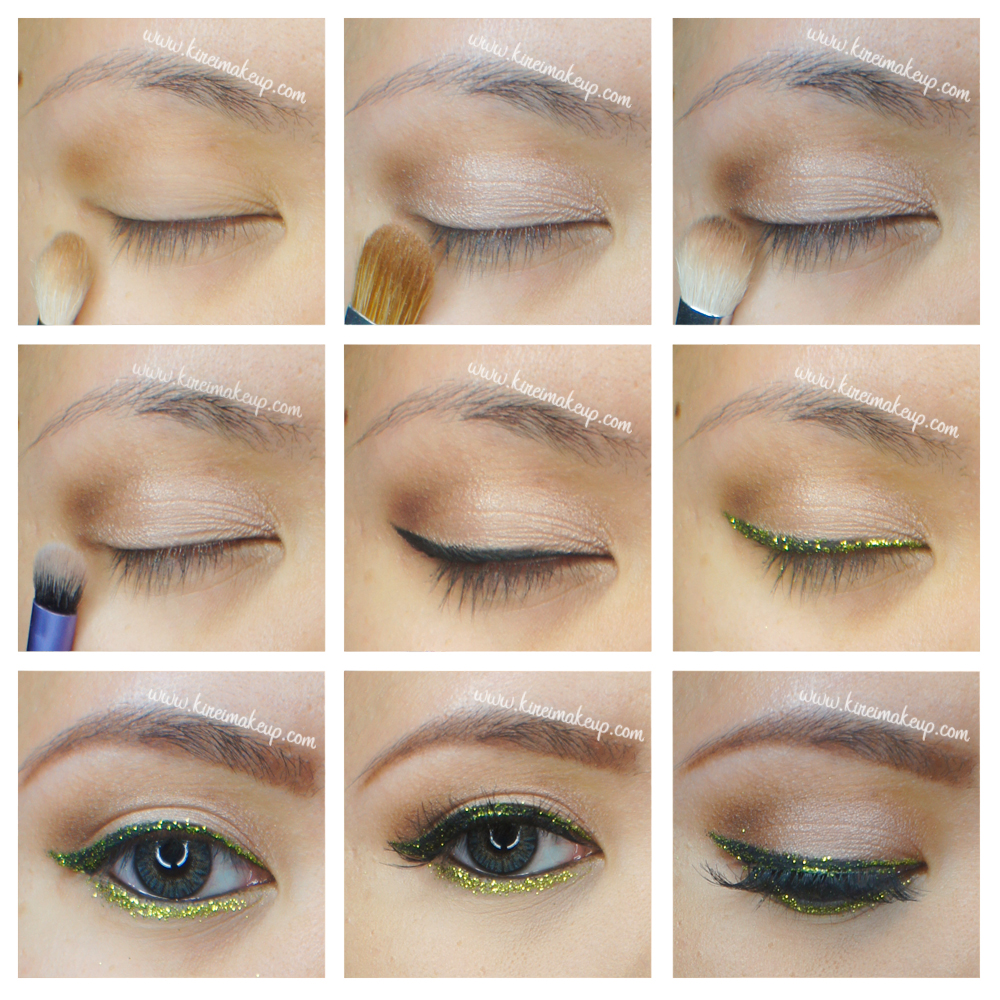
I wanted to do a slightly more silver glitter, but couldn’t find any, so I decided to do this neon green glitter. Keep in mind that some glitters are not meant for the eye area! The one that I used for this tutorial actually is NOT for the eye area. I decided to use it because I know it won’t irritate my eyes. If you are not sure whether to use glitter or not, please consult the makeup artist/sales person who’s selling you the glitter. Also please be careful if you’re wearing contacts and using glitter on your eyes!

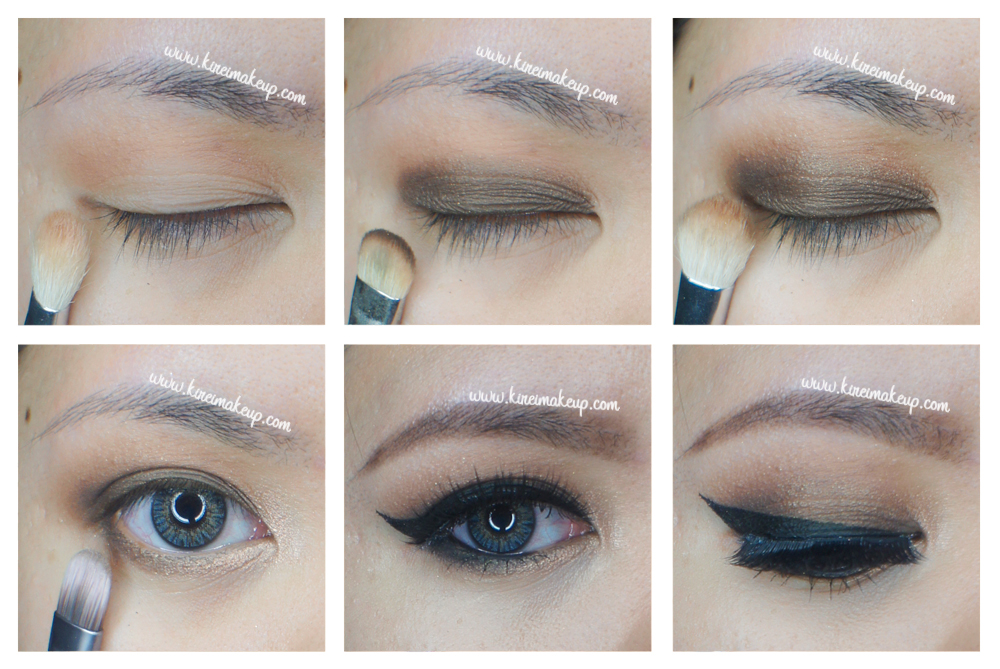
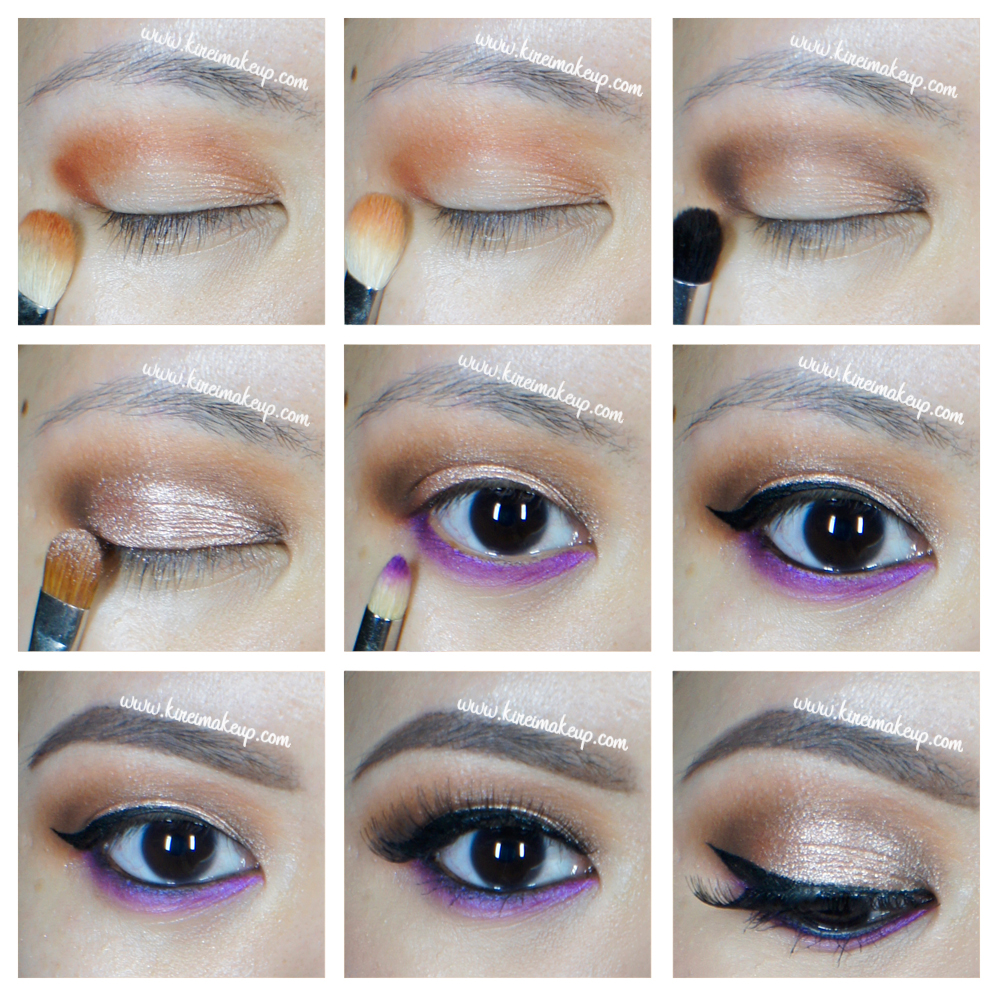
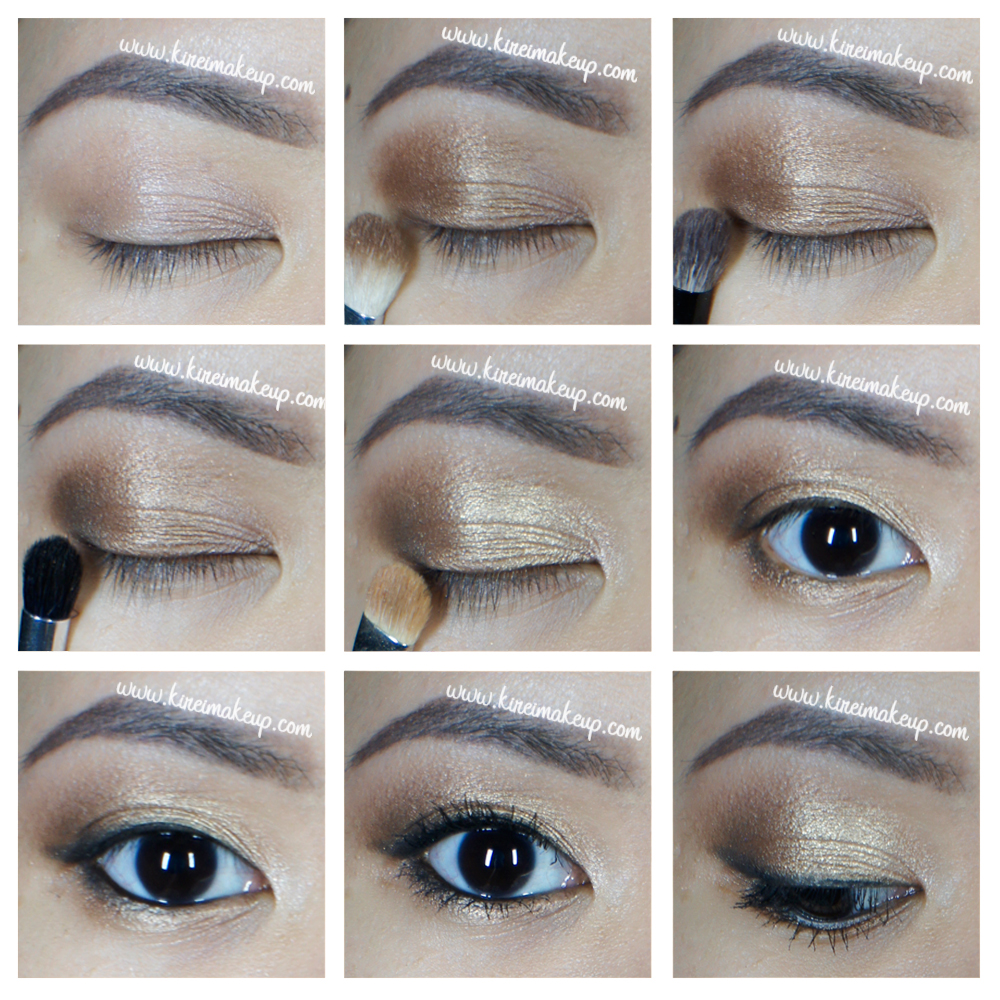
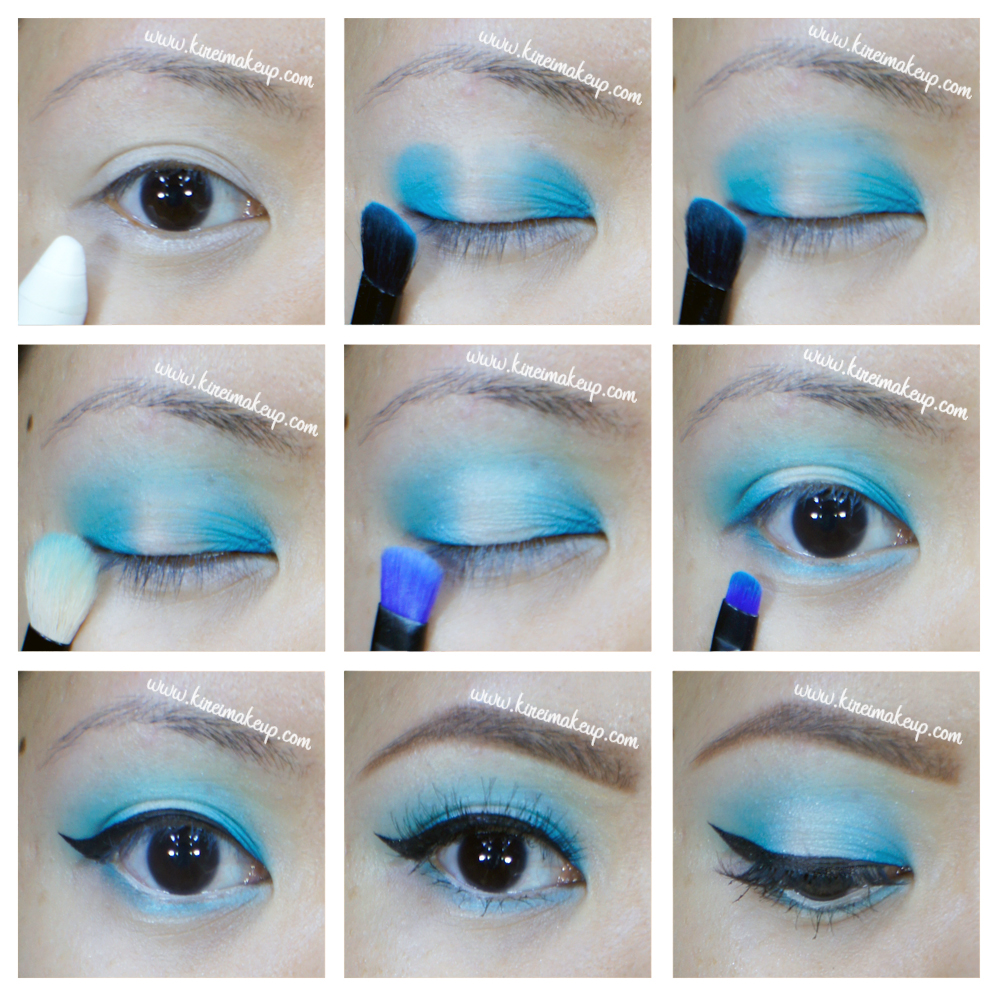
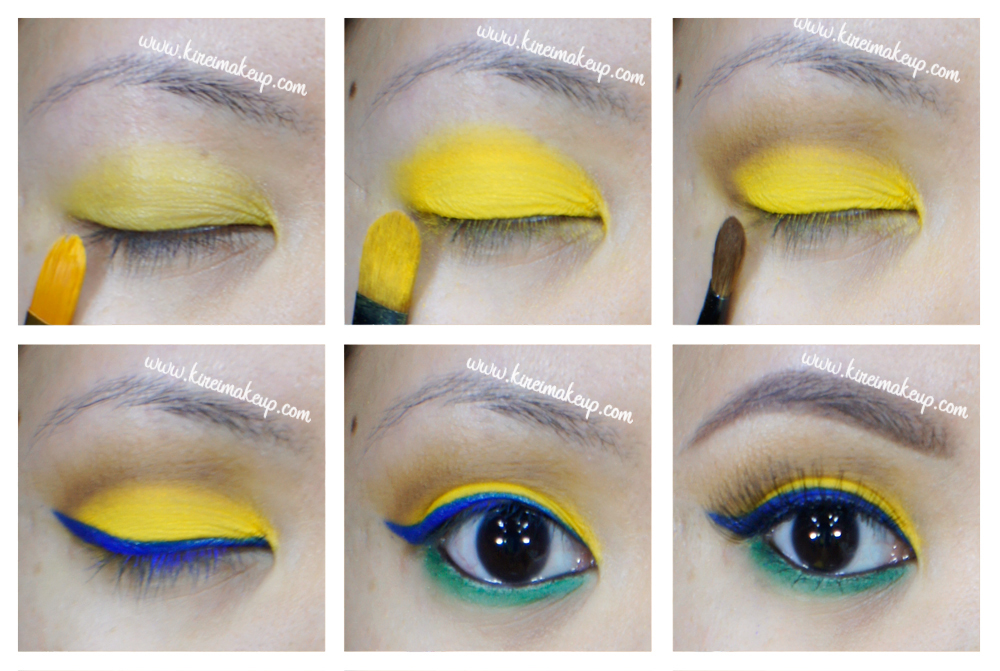
As I said in my previous post, I will not be posting the step-by-step instruction, instead you’ll get the usual photos and product list only. This is a scheduled post, so for any questions, go to my Instagram if you need a quick response.

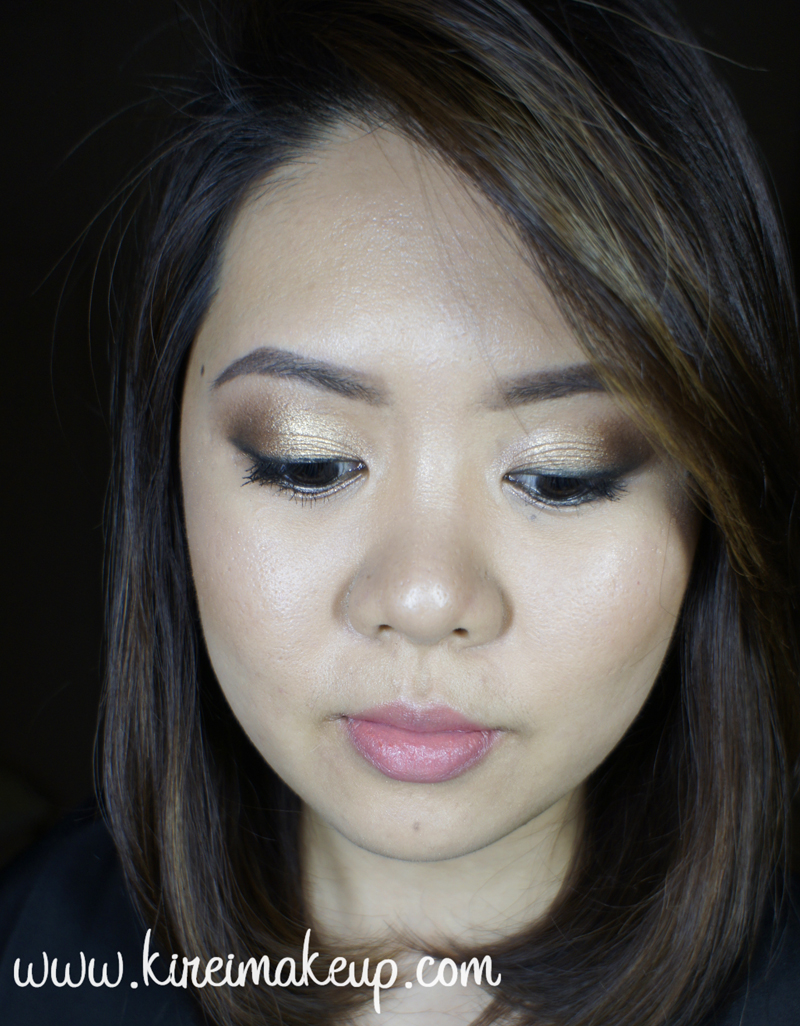
For the glitter, I applied it onto my eyes using a wet angled eyeliner brush. However, if you can find a mixing medium (e.g. MAC), that’d probably be better since I found that when the water evaporated from the glitter, it became apparent that the glitter started to fall all over my lashes and then to my face.

Another tip when using glitter and it falls on your face, use a tape to pick it up – just press it lightly to your face and it’ll pick up all the fallen glitters. If you have no tape around, use a CLEAN SPOOLY (aka mascara wand) to get rid of the glitter – just brush it in places where the glitter has fallen, use the tip of the wand if it is a stubborn one.

glitter new year makeup tutorial
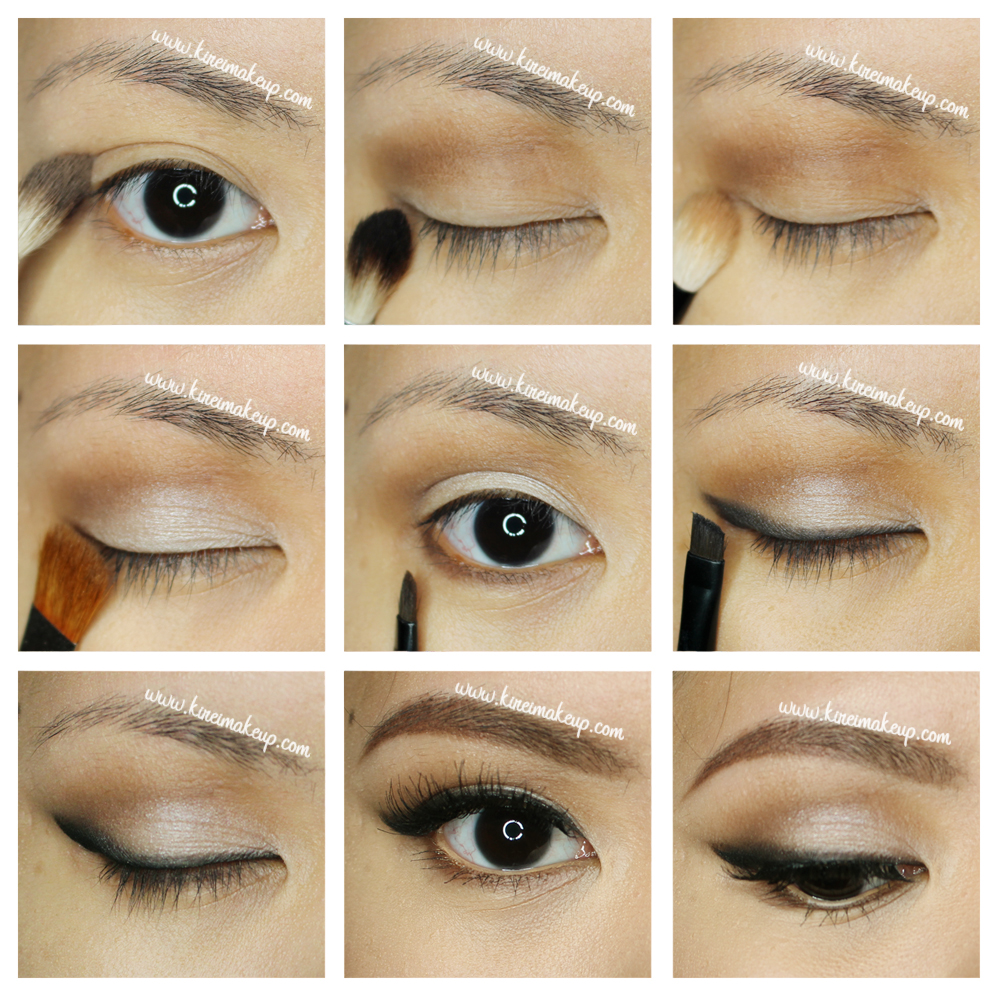
Please check out my how-to winged eyeliner tutorial if you need help. I also have another glitter eyeliner tutorial that’s slightly easier and simpler.

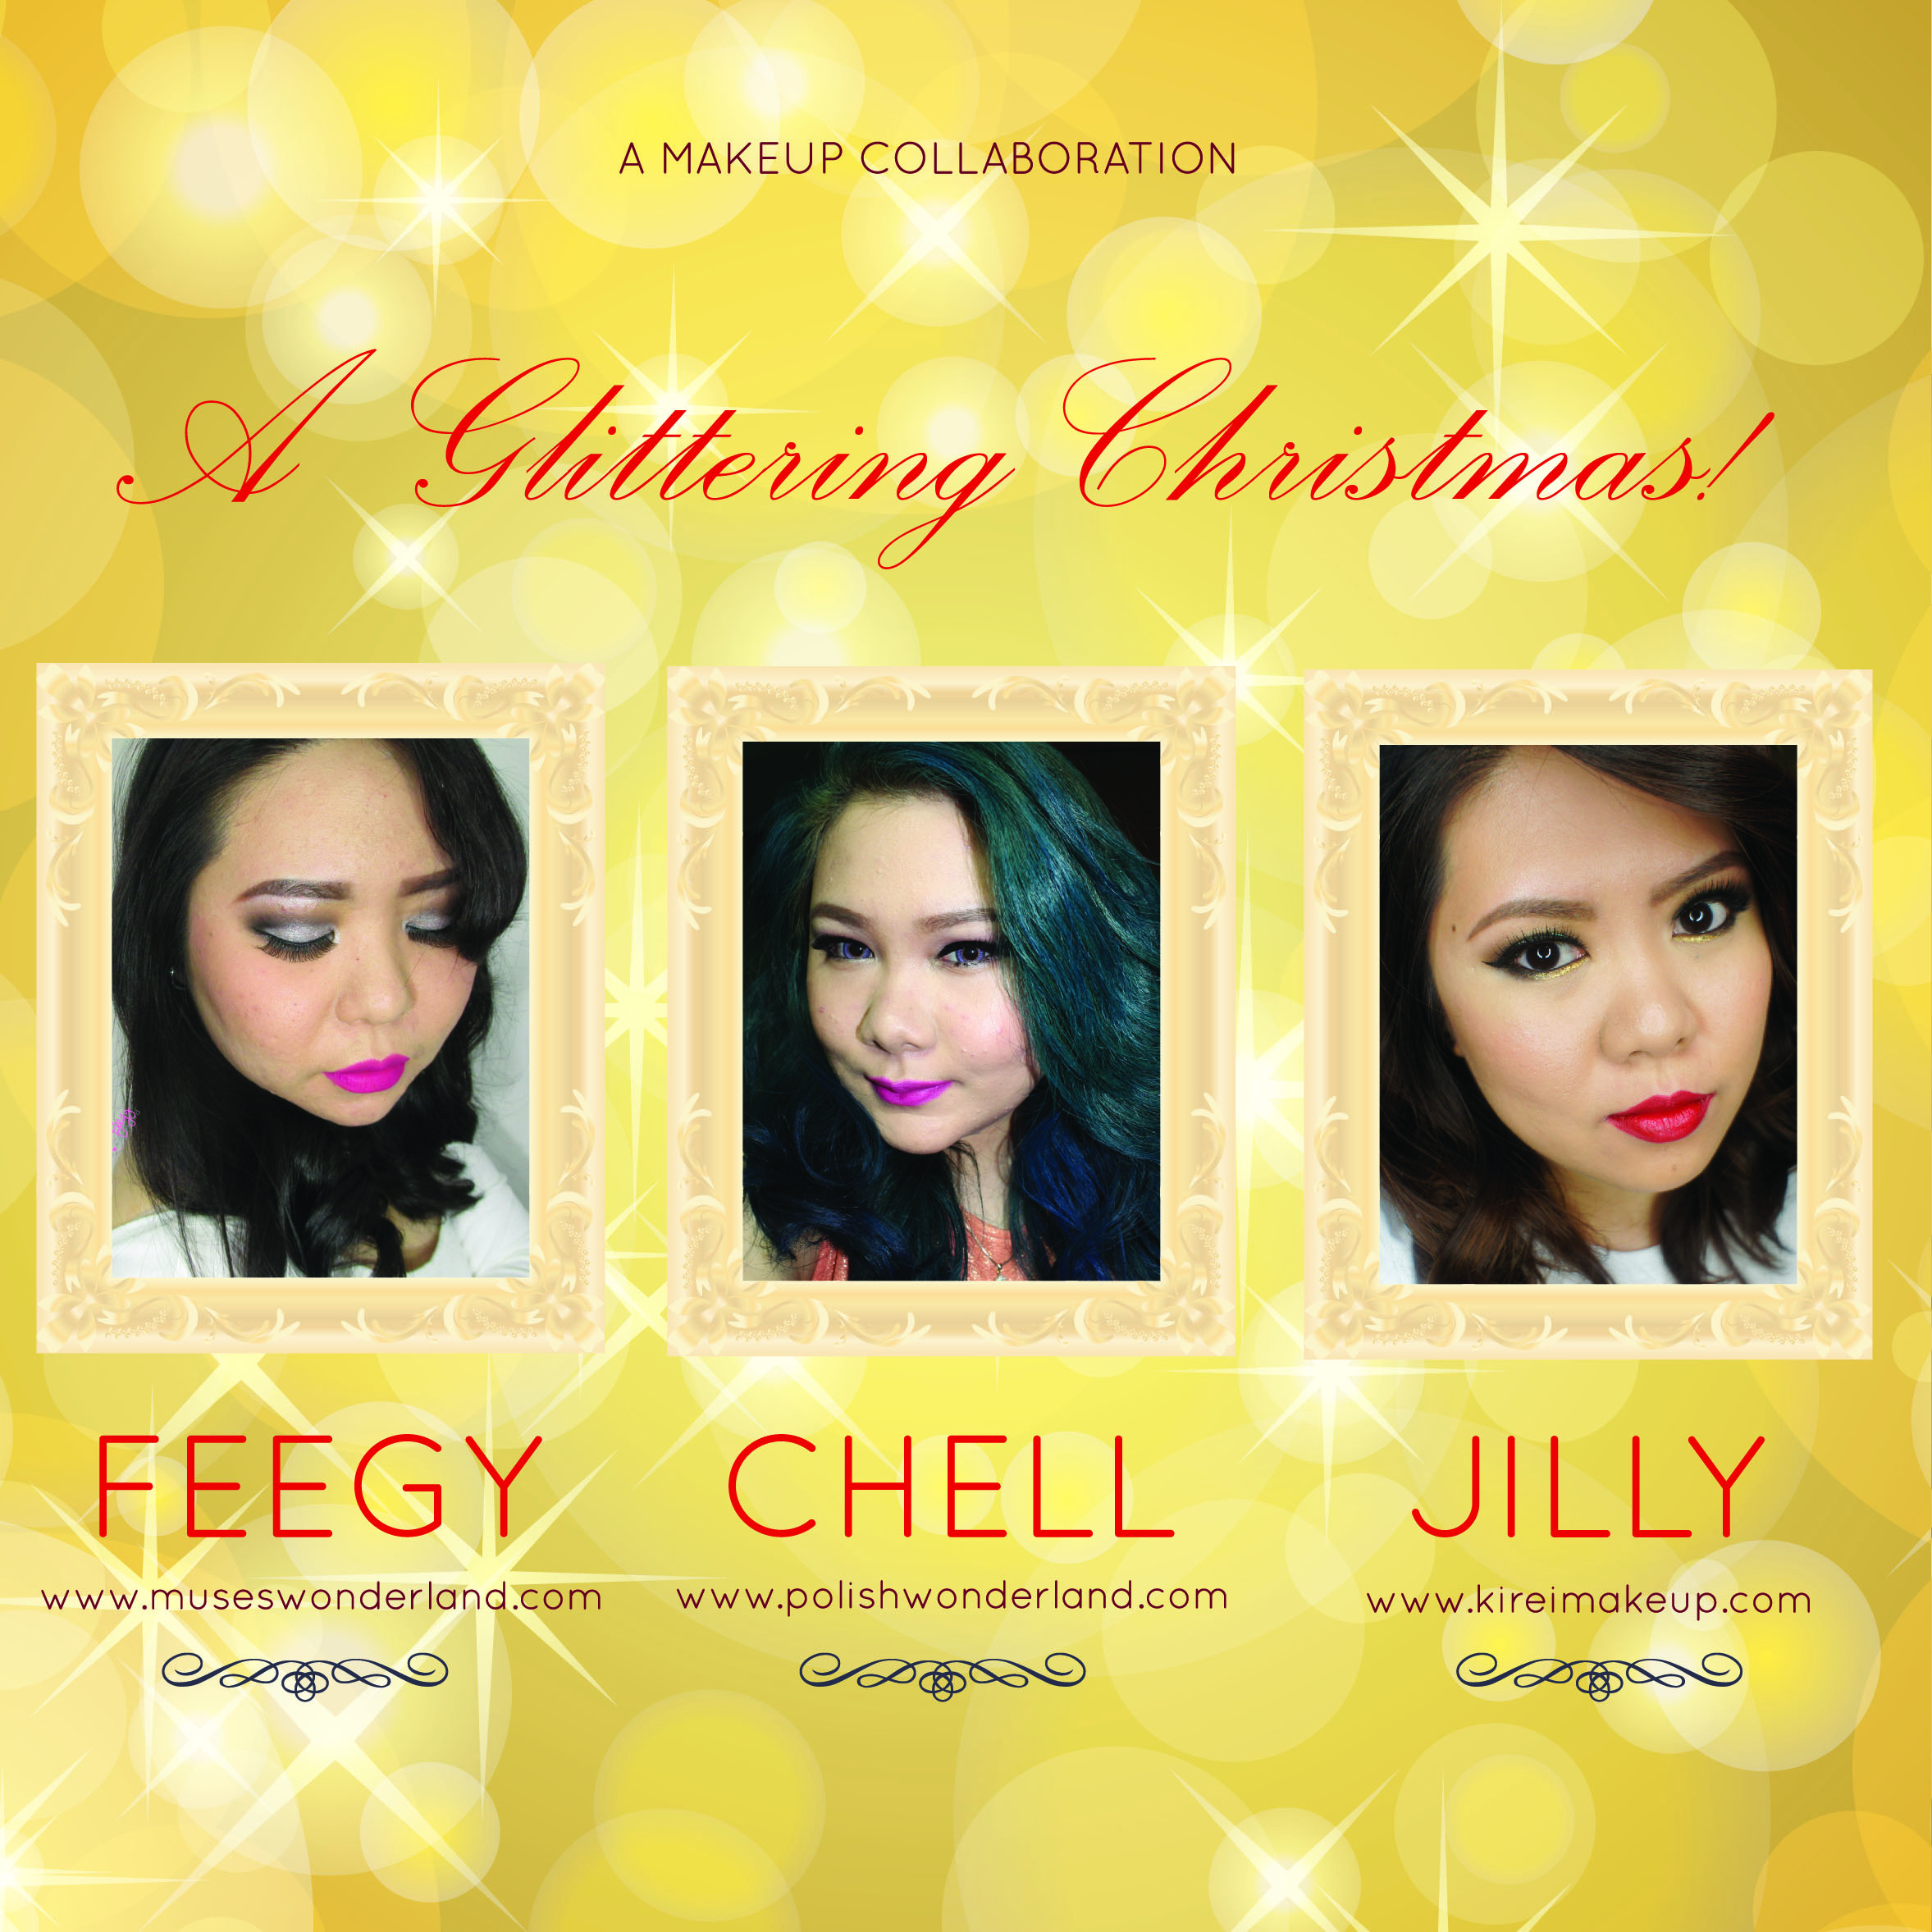
If you prefer a full on glitter makeup, please check out my Christmas inspired makeup, and last year’s gold glitter makeup tutorial.
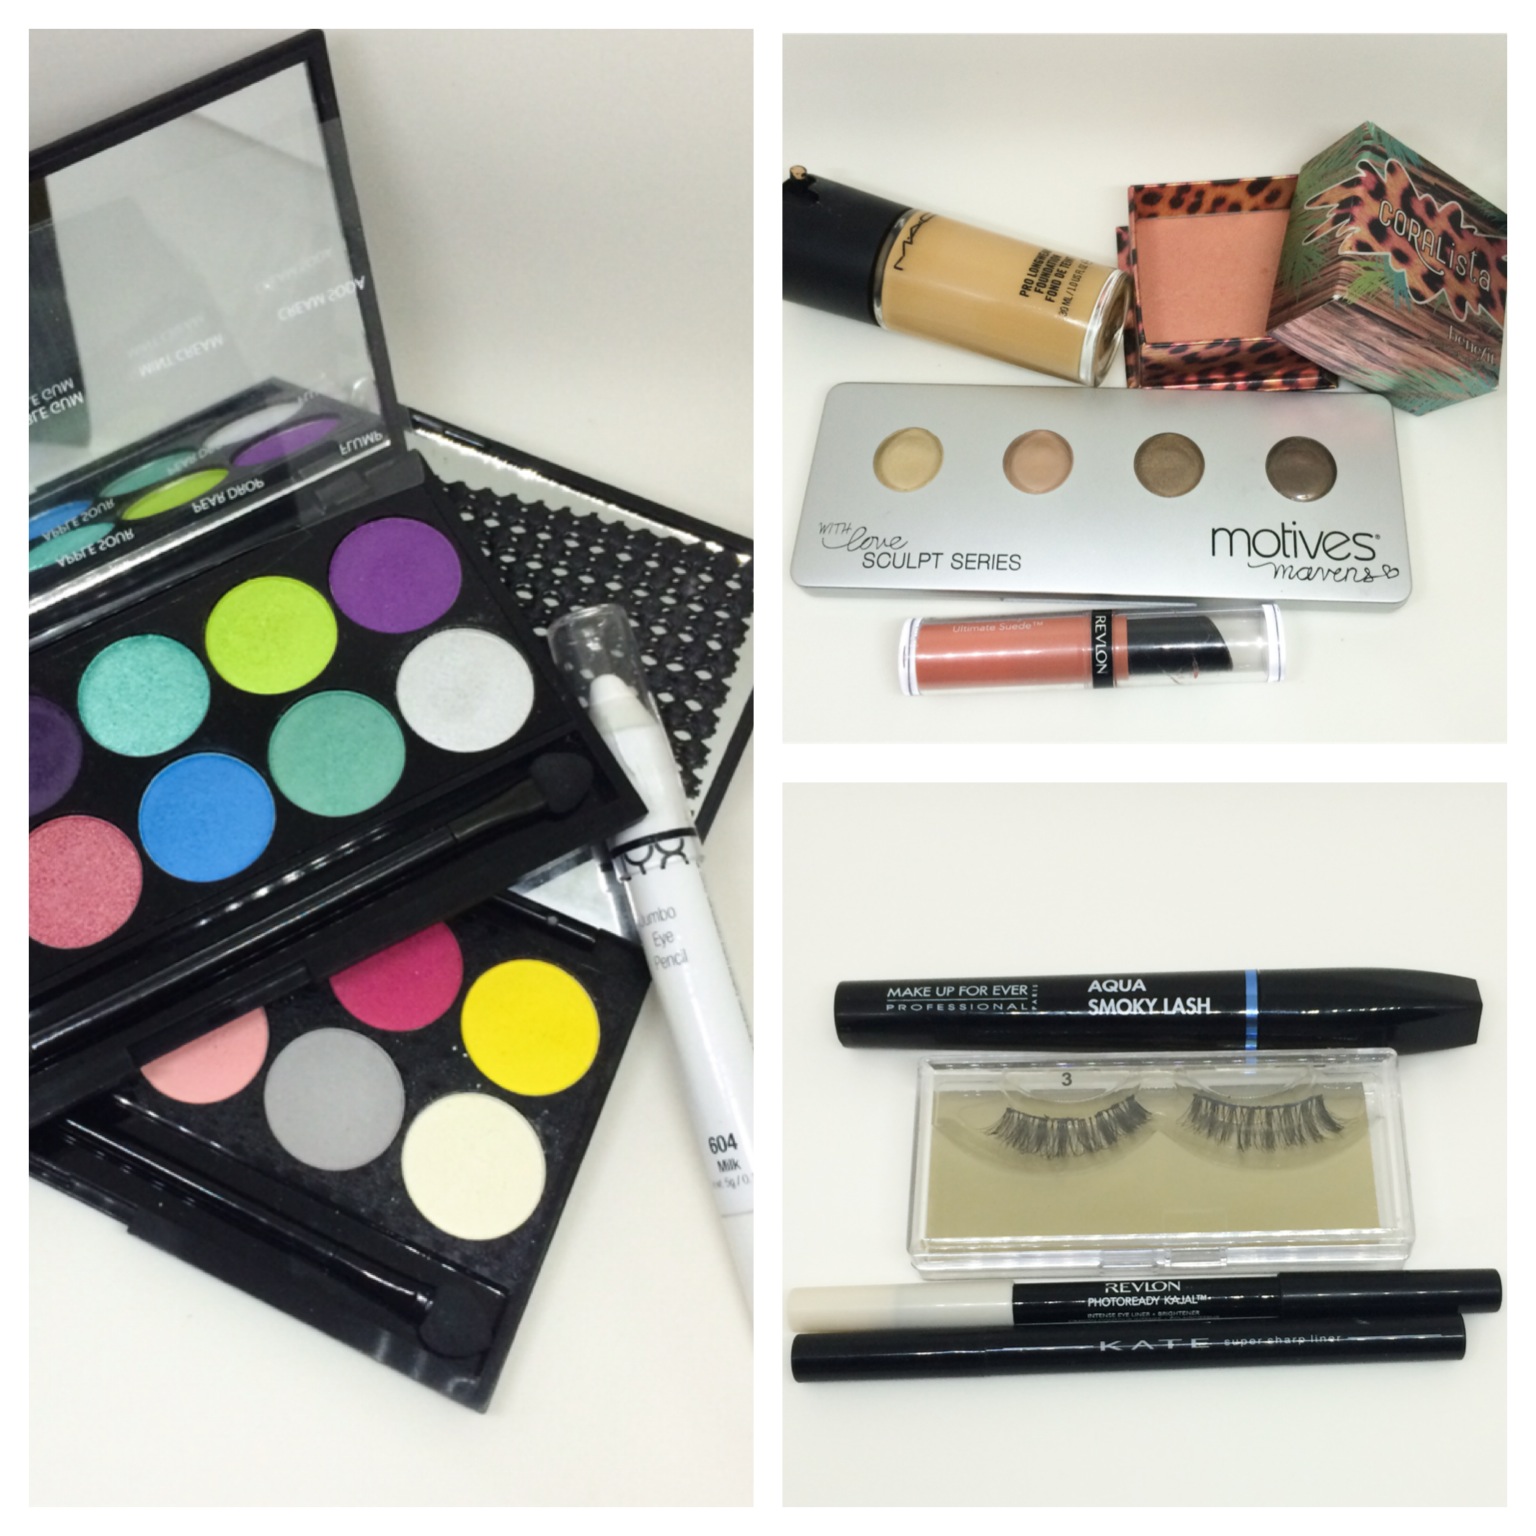
Products used

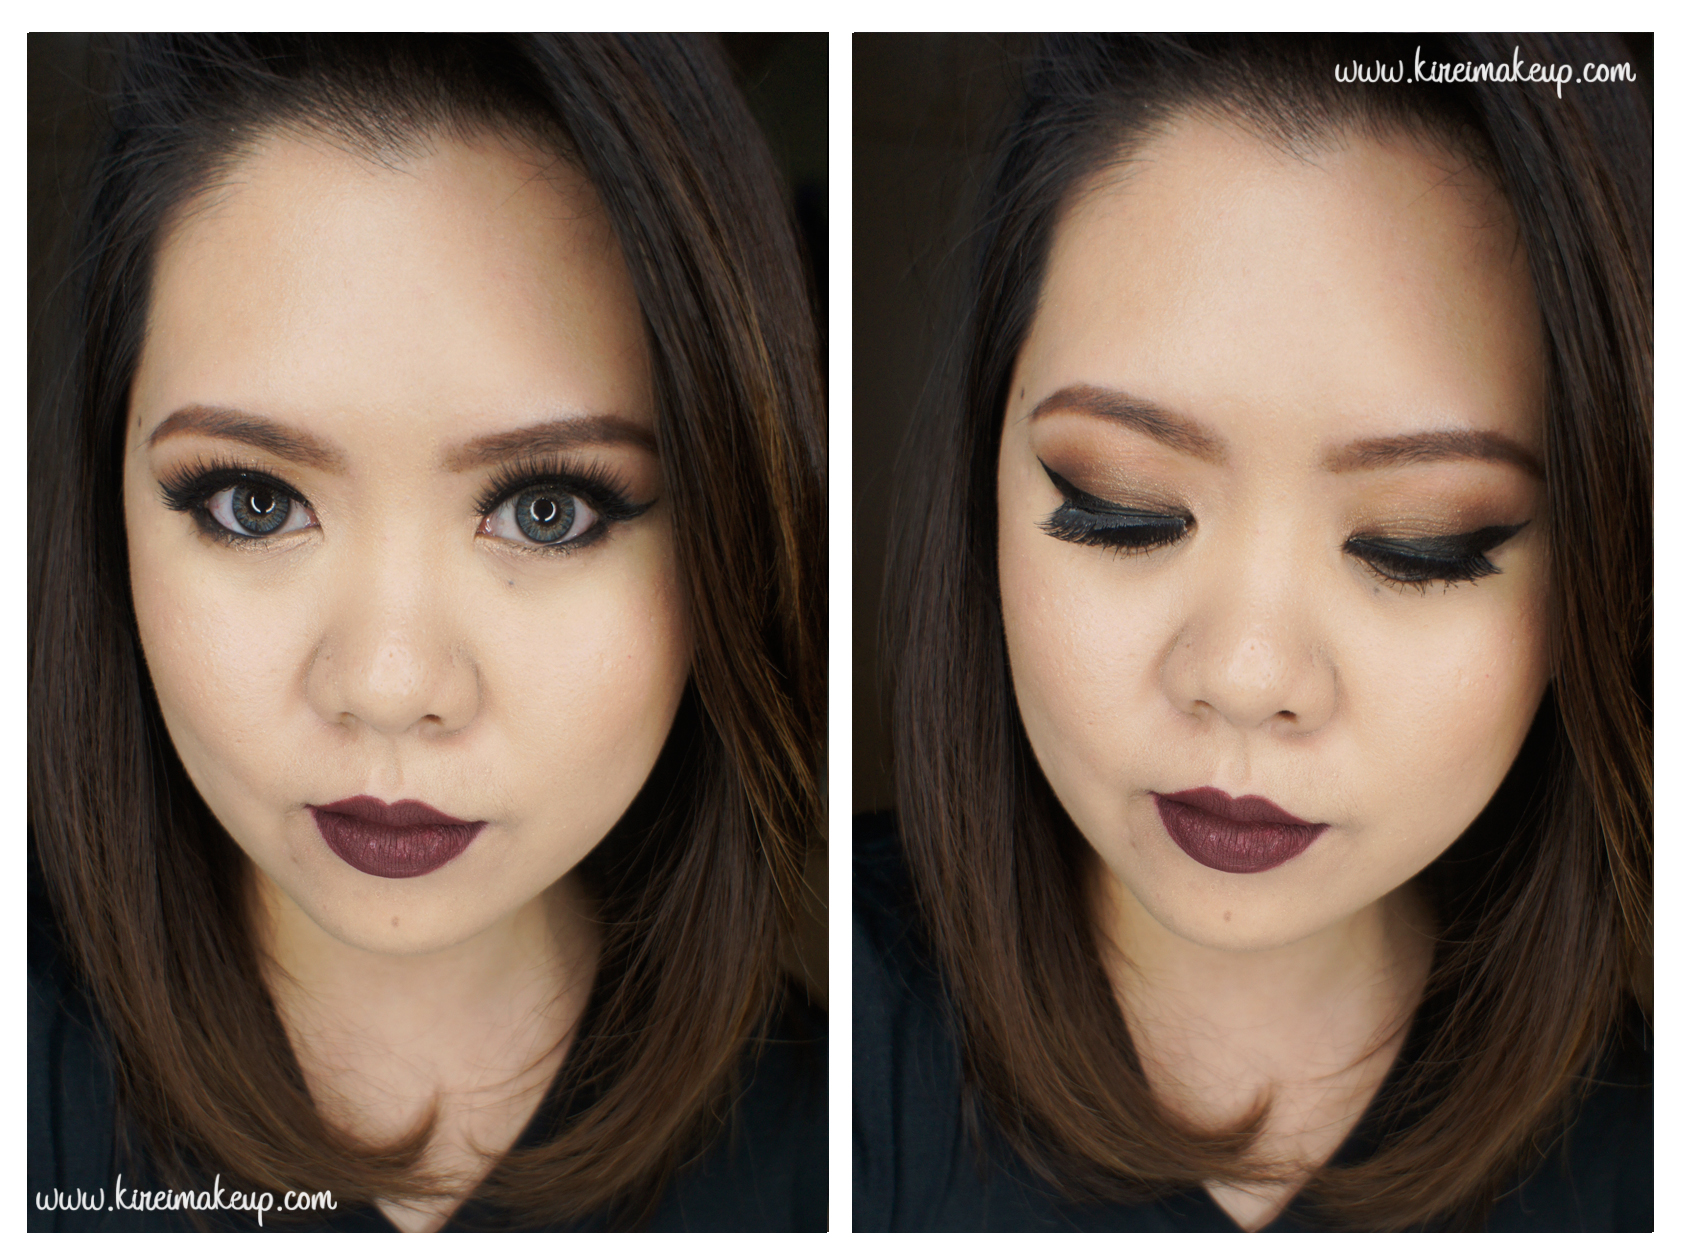
Eyes – Urban Decay Primer Potion; Make-Up Store Smog eyeshadow (crease), Make-Up Store Desert eyeshadow (transition color); Too Faced Chocolate Bar Palette (outer v – Triple Fudge); MUFE Aqua Black; L’oreal Voluminous Smoldering eyeliner; Make-Up Store Northern Lights glitter; Gwiyomi False Eyelashes; Chanel brow pencil

Face – MAC Pro Long-Wear foundation and concealer; MUFE Pro Finish powder.

Cheeks – Chanel Universal Bronzer; Smashbox Halo Blush in In Bloom.

Lips – MUFE Aqua lip pencil #18C

glitter eyeliner makeup tutorial


Holiday Party Makeup #2

Merry Christmas (eve), everyone! I wanted to do a dark lips look for this Holiday Party Makeup tutorial for a while, but I also included an option to go for a light lips for those who prefer a peachy/nude lips. For the eyes, you can always opt for a simpler look, but I wanted to create some more drama so I ended up using my Too Faced Chocolate Bar palette to create a brown/bronze smoky eyes.

If you noticed, I wore contacts on this tutorial. I might wear it on the next tutorial as well. It’s just for fun, I asked on my Instagram if wearing colored contacts is a yay or nay, surprisingly lots of people said yay. So, I might wear it more often.

Anyways, let’s get on the tutorial! Product list is all the way to the end.

asian smokey eyes

Eyelids were prepped using Urban Decay Primer Potion. My face were prepped using MUFE HD Elixir. All eyeshadows are by Too Faced Chocolate Bar palette unless state otherwise.

How-to:

1. I applied Salted Caramel on my crease using a fluffy blending brush.

2. On my eyelid, I applied Gilded Ganache using a shader brush.

3. Using the same fluffy brush as no. 1, I blended the edge where Gilded Ganache and Salted Caramel met.

4. Using the tip of a flat eyeshadow brush, I applied Gilded Ganache on the outer half of the lower lash line, and Creme Brulee on the inner corner.

5. I created a winged liner along the upper lash line using Kanebo Kate Super Sharp Liner.

6. On the waterline, I applied L’oreal Voluminous Smoldering eyeliner stopping just before the inner third.

7. Using an angled eyeliner brush, I applied MAC Carbon on the outer half of the lower lash line.

8. I curled my lashes and applied Maybelline Express VolumeTurbo Boost mascara on my lashes. I also applied Gwiyomi Annabelle lashes to add some drama.

9. I filled in my brows using Shu Uemura Brow Pencil.

christmas party makeup tutorial

10. On my face, I applied Giorgio Armani Maestro foundation using my fingers. For concealers, I applied MAC Pro Long-wear under my eyes and on my blemishes.

11. I applied Benefit Coralista on my cheeks.

12a. For the lips, I applied MAC Please Me lipstick and L’oreal Pink Resistance Color Riche Carresse.

12b. For the darker lip color, I applied MUFE Aqua lip pencil in 12c.

ps: My photos is somehow a bit more yellow than I expected (on my screen). The lip colors are not as peachy (for the lighter lips), and it’s slightly more plum for the darker lips.

mufe aqua lip pencil 12c tutorial

Products list

Eyes – Urban Decay Primer Potion; Too Faced Chocolate Bar palette (crease: Salted Caramel, lid/lower lashline – Gilded Ganache, inner corner: Creme Brulee); MAC Carbon (outer half lower lid); Kate Kanebo Super Sharp eyeliner; L’oreal Voluminous Smoldering eyeliner; Maybelline Express Volume Turbo Boost mascara; Gwiyomi Annabelle lashes; Shu Uemura Hard Formula brow pencil.

Face – MUFE HD Elixir; Giorgio Armani Maestro foundation; MAC Pro Long-wear concealer.

Cheeks – Benefit Coralista.

Lips – MAC Please Me and L’oreal Color Riche Carresse Pink Resistance; Make Up For Ever Aqua lip pencil #12C

Christmas Makeup Tutorial

Are you guys ready for the Holiday season?! For those of you who are celebrating Christmas, I hope you’ll enjoy this Christmas Makeup tutorial! This is a makeup collaboration with fellow Indonesian Beauty Bloggers – Feegy from Muses Wonderland, Chell from Polish Wonderland, and myself (not from any wonderland *wink* hahaha). So, don’t forget to check their tutorial out!

We collaborated in creating a Christmas look with a little bit of glitter ya’know, because it’s Christmas! We need glitters, hon! Sparkles everywhere! Feegy created a silver glitter smoky eyes, and Chell went on the nude glitter eyes. For me, I went all out with green, gold and glitters! Hey, it’s Christmas, I might as well make full use of all the Christmas colors!

makeup collaboration

For my look, even though it’s pretty bold and colorful, it is still wearable if you aren’t afraid of colors. The placement of the colors are quite important so you don’t go looking all crazy, you get what I’m saying? Instead of green, gold and glitter everywhere, I focused these 3 products on specific location on my eyes. This way, the colors work well together, and you don’t look like a glittery mess.

The green is located on the center of the eyelids only so that when you blink, that gorgeous color will pop along with a teensy bit of crushed metallic pigment. You can use glitter if you don’t have the crushed pigment. The gold glitter is on the inner half of the lower lid, this will brighten and open up your eyes.

The key is to apply the bright color and glitter lightly. Notice I used my finger to apply the green shade, I also use my finger just to press the crushed pigment very lightly all over my lid. This way, the colors and glitters aren’t all over the place. By combining bright colors with neutrals, your whole look will be pulled together.

holiday party makeup

My eyelids are prepped using Urban Decay Primer Potion.

How-to:

1. I applied Urban Decay Buck eyeshadow above my crease, as my transition color, using a crease blending brush.

2. Using Smashbox bullet crease brush, I applied Kat Von D Shadow Box (Monarch palette) on the outer and inner V of the eyes.

3. I applied MUFE Aqua Cream no. 52 on the center of my eyelid using my ring finger.

4. Using the same ring finger, I VERY lightly tapped MAC Metallic Crushed Pigment in Moss Garden all over my lid. I just want a little bit of the crushed metallic pigment for shine, not for the color.

5. I lined my upper lash line using Kat Von D Trooper eyeliner. On the waterline, I applied MAC Smolder kohl eyeliner.

6. On the lower lash line, I applied PAC eyeliner liquid in Bazaar Gold on the inner half. On the outer half, I applied Kat Von D Deadhead eyeshadow (Monarch palette) using a smudger brush.

7. Using the same smudger brush as step no. 5, I applied whatever was left on that brush on the outer and inner V of my eyes (on top of Shadow Box), just to add a bit of depth.

8. I applied Gwiyomi Annabelle lashes for extra drama.

9. I filled my brows using Anastasia Beverly Hills Brow Wiz in Taupe and Brunette.

christmas party makeup

10. On my face, I applied Diorskin Star foundation using Real Technique foundation brush.

11. I also applied MAC Pro Long-Wear concealer under my eyes, and any areas I need to cover.

12. I set my face using CoverFX Translucent powder.

13. I applied Smashbox bronzing powder from the contour kit to warm my face up slightly. Then, I applied Chanel Blush de Horizon on my cheeks.

14. On my lips, I lined and filled it with MAC Brick lip pencil. Then, I applied OCC Vintage lip tar on top of it.

holiday party makeup

Products used

Eyes – Urban Decay Primer Potion; Kat Von D Monarch Palette (Shadow Box, Deadhead), Make Up For Ever Aqua Cream no. 52; Kat Von D Trooper eyeliner; PAC eyeliner liquid in Bazaar Gold; Gwiyomi falsies in Annabelle; Anastasia Beverly Hills Brow Wiz in Taupe and Brunette.

Face – Diorskin Star Foundation 030; MAC Pro Long-Wear concealer NC25; CoverFX translucent powder.

Cheeks – Smashbox contour kit (bronzer); Chanel Blush de Horizon.

Lips – MAC Brick lip pencil; OCC Vintage lip tar.

Smokey Winged Eyeliner

I’ve been wearing trying out a new look last week, and this smokey winged eyeliner look seems to have gotten quite a lot of compliments. I followed quite a few beauty gurus on Instagram and Youtube, and Samantha from Batalash posted a smokey eyeliner video. I loved how it ended up, and I re-created this look. Her technique is slightly different than mine, but the result is not bad I think. I’ve re-done this look when I had to attend the GlamGlow event, and I absolutely love it.

Anyhow, for the rest of the eye makeup, it’s pretty basic nothing fancy. I do not wear this falsies to the GlamGlow event, I actually wore a smaller one. However, for this tutorial I did wear wispy lashes because I wanted to accentuate the wings. Nevertheless, you can opt to wear lashes or not, it’s totally up to you.

You can also pair this look with a simple soft peachy lips like mine or you can pair it with a bold lip color – red, maroon, orange, pink, purple, black etc.

I would like to mention that someone on instagram commented on how she wanted to know how I apply my eyeshadow to my crease. This is how I do it (first photo on top left corner) –

  • When I want to apply my crease color, I looked directly on the mirror and marked where I want the shadow to be.
    • By doing so, I can make sure the eyeshadow color can be seen when my eyes are open, since I’ve quite a hooded lid.
  • Then, I tilted my head back slightly so it looked like I was looking down at the mirror and apply my crease color.

smokey winged liner

List of products used are at the bottom of the page. All eyeshadows used are from Urban Decay Naked Basic palette unless stated otherwise.

My eyelids are prepped with Urban Decay Primer Potion.

How-to:

1. I applied a mix of Urban Decay Faint and Naked 2 on the crease using a crease brush

2. Using a fluffy blending brush, I blended the edge of the crease to avoid harsh line.

3. Using a flat eyeshadow brush, I applied Urban Decay Venus on my eyelid.

4. I lined my lower lash line using Urban Decay Faint using an angled eyebrow brush.

5. Using the same angled eyebrow brush, I applied Urban Decay Crave eyeshadow on the upper lash line creating a winged eyeliner. I focused most of the eyeshadow near the roots of my lashes.

6. I used a pencil brush to smudge the line slightly.

7. Using Kat Von D Trooper eyeliner, I lined just the bottom part of the eyeliner – very close to the roots of the lashes, and the bottom part of the “wing”.

8. I used the same brush and eyeshadow as step 5, and run it through the winged eyeliner again.

9. I filled my brows with Anastasia Beverly Hills Brow Wiz in Taupe and Brunette.

10. I applied Gwiyomi no. 3 false lashes.

11. I applied MAC Chromagraphic eyeliner pencil in NC30.

smokey winged eyeliner

12. For my face, I applied Shu Uemura Oleopact foundation using the sponge that comes with it.

11. I lightly dust my face using MUFE Pro Finish powder in 118.

12. I applied Benefit Hervana on my cheeks.

13. On my lips, I filled it in using L’oreal Color Riche lipliner in Rose, then applied YSL Glossy Stain in Peche Cerra-Colla (27)


Products used

Eyes – Urban Decay Primer Potion (original); Urban Decay Naked Basics (crease: Faint/Naked2, lid: Venus, liner: Crave); Kat Von D Trooper eyeliner; Anastasia Beverly Hills Brow Wiz in Taupe/Brunette; Gwiyomi false lashes no. 3

Face – Shu Uemura Oleopact foundation; MUFE Pro Finish (118)

Cheeks – Benefit Hervana

Lips – L’oreal Color Riche lipliner in Rose; YSL Glossy Stain in Peche Cerra-Colla (27)

Kat Von D Monarch Palette Tutorial #2

I kept forgetting how amazing this palette is, so I decided to remind myself and created this Monarch palette tutorial. Like I said on my first tutorial using this palette, the eyeshadows are unbelievably smooth and so easily blended. Love it! I promise I’ll do swatches and review for this palette. If you have the chance to grab it, you should really consider it.

Anyways, I’m quite busy this week, as well as the whole September due to work. I think I’ll try to post twice a week, hopefully more. If you do follow me on Instagram, I’ll do micro-blogging from there. Also, don’t forget to comment here or on my twitter/instagram on what you’d like to see more. I know I still have to do a few requests, and I’ll try to get on it ASAP. What a busy month!

Ok, let’s get the tutorial started! I just want to mention that for some reason my camera picks up Wrath really orange this time round. Not sure why, I did reverted back to my glamcor lights, so that might be the cause. Trust me, it doesn’t look that orange in real life. It’s a very pretty warm reddish-brown, almost like a brick color.

warm brown smoky eyes

I prepped my eyelids using Urban Decay Primer Potion.

How-to:

1. Using a fluffy blending brush, I applied Wrath on the outer V and just above the crease.

2. Using a clean blending brush, I blended out the crease.

3. I applied Shadow Box on the outer V, inner V, and crease of my eyelid using a bullet crease brush.

4. Using a flat eyeshadow brush, I applied MAC Tan loose pigment on the center of my eyelid.

5. I applied Urban Decay Jilted eyeshadow (from the electric palette) along my lower lash line using an angled eyeliner brush, then I applied Urban on top of it using a pencil brush.

6. I lined my waterline using L’oreal Voluminous Smoldering eyeliner.

7. I also created a winged liner using Kanebo Kate Super Sharp eyeliner.

8. I filled my brows using Anastasia Brow Wiz in Medium Ash.

9. I applied MUFE Aqua Smoky lash mascara on top and bottom lashes. Also applied Lavie Lash falsies in Snowdrop.

kat von d monarch palette makeup look

10. On my face, I applied Diorskin Star foundation using a foundation brush.

11. I also applied MUFE HD concealer under my eyes.

12. I wanted an extra glow on my skin, so I applied Smashbox Halo Highlighting wand. I applied this highlighter on the high points of my face – cheekbones, bridge of the nose, cupid’s bow, chin, forehead.

13. I lightly dust Cover FX translucent powder to set everything.

14. I applied contour very lightly on my face using Smashbox Contour Kit (they’re selling it again for a limited quantity on their website!).

15. On my lips, I applied MAC Spice lip liner all over, and then applied Clinique Heaping Hazelnut chubby lip stick.

mac tan makeup tutorial

Daytime Bronze Smokey Eyes

Today’s post, Daytime Bronze smokey eyes, was actually a pending post from last week. I actually did this look after I did my brows video. Since I was uber busy last week (Shu Uemura competition, work and stuff), I didn’t have the chance to post this tutorial up. I also want to mention that I will not be posting any tutorial until end of this week, so I apologize for missing again. However, do follow me on Instagram to find out what I’m up to! Instagram has been a place for me to micro-blog almost daily.

Anyways, for this look was a request over on Instagram by Sammie. She wanted me to do an easy golden smoky eyes that she can wear during daytime. The key to this look is to keep the black to a minimum if you are going to wear it out for a day makeup. The usual smoky eyes are quite strong and dark, meawhile for this look I kept it quite light and not as intense. I smudged a lot of the black out, and skipped my usual black winged liner. Instead, I opted for a smudged eyeliner using powder. I kept the black on the waterline & tightline, but if you’re afraid that this will close your eyes up you can skip it. I just love black eyeliner on waterline & tightline for smoky eyes.

bronze makeup tutorial

I used Urban Decay Naked 1 palette for the eyeshadows. You can also find these shades in single pot from Urban Decay.

Brows are filled using Anastasia Brow Wiz in Medium Ash and Brunette.

How-to:

1. I applied Urban Decay Primer Potion in Sin all over my lid using my ring finger.

2. Using a fluffy blending brush, I applied Urban Decay Smog on the outer half of the lid, all the way to the crease.

3. I used Smashbox bullet crease brush to blend out the edges.

4. Using Sephora crease brush, I applied Urban Decay Darkhorse just to deepen the outer corner.

5. Using a shader brush, I applied Urban Decay Half-Baked on the eyelid.

6. I applied Smog on the outer half of the lower lash line, and Half-Baked on the inner half using an angled eyebrow brush.

7. I applied Urban Decay Creep along the upper lash line and outer third of lower lash line using an angled eyeliner brush.

8. I lined my waterline and tightline using L’oreal Voluminous Smoldering eyeliner.

9. I curled my lashes and applied Make Up For Ever Aqua Smoky Lash mascara on both upper and lower lashes.

daytime makeup

10. For my face, I applied Smashbox Halo Liquid foundation and Cover FX cream foundation brush.

11. I lightly contoured my face using Benefit Hoola bronzer, and added highlight using MAC soft and gentle highlighter.

12. I applied Benefit Coralista blush on my cheeks.

13. On my lips, I applied Shu Uemura Lip Tint Gelato in 01.

golden bronze smoky eyes

Shu Uemura Brave Beauty Competition

Hello everyone!!! Sorry I haven’t been updating my blog this week. I was busy since I entered Shu Uemura Brave Beauty Competition. So, if you haven’t been following me on Instagram (you should, btw..what are you waiting for? Go check out my Instagram to get the latest update!), I’d just do a quick recap of what happened. Last month, I was browsing on Instagram, and saw Shu Uemura Indonesia was organizing a makeup competition. I actually didn’t want to join for many reasons, but first and foremost because I’ve a case of stage fright. N, my sister, and Franky (fellow blogger) kept encouraging me to do it, since I’ve nothing to lose anyways. This was my first makeup competition!

So, I submitted my face chart, portfolio and went on my merry ways. I actually didn’t even remember I entered the competition. Couple days after Eid, I received an email and a call notifying that I was one of the top 10 finalists for Shu Uemura Brave Beauty competition. Fast forward couple days later, I had to attend a briefing for the competition (Monday, Aug. 11), and the competition itself was on the following day (Tuesday, Aug. 12). The other 9 finalists were nice and friendly. They’ve entered makeup competition prior to this one. So, really, I was the only one with no prior experience. Oh well, there’s always a first time for everything right?!

Shu Uemura Brave Beauty top 10 finalists


Makeup station at backstage

Photo above is my makeup station back stage. We were given 2.5hr to do the models’ complexion (skincare, base, foundation), hair, nails, and wardrobe. Nails were provided by Feliz Nail Art, and wardrobe was provided by Tex Saverio. My model is Juanita Haryadi and she’s amazing!

For the competition, we are not allowed to bring our own makeup products, except for our makeup brushes and lashes. All makeup and skincare products are given by Shu Uemura. So this competition was interesting since I don’t actually owned any Shu Uemura eyeshadows. I entered this competition without having any knowledge on how the eyeshadows going to blend and such. On the briefing day, we were given times to know the products and play with the colors. However, swatching and looking at colors are quite different from actually using it on the eyelid. Not to mention, there was no eyeshadow primer at all from Shu. That was quite a concern amongst the finalists.


Shu Uemura Brave Beauty top 10 finalists

Standing (L-R) – Suzi, Vony, Catherine, Irwan, Mirtha (Grand Prize Winner), Stephanie (Best Makeup Show winner). Sitting (L-R) – Shanti, myself, Sari

I, personally, was happy to actually join the competition. I am not a competitive person to begin with, and as I’ve mentioned before I’ve a case of a stage fright. I was like super nervous about this competition. I’ve never entered a competition before, so this was my first experience. I’m glad I did it because I managed to meet amazing makeup artists, and became friends with them. They are a bunch of great people, and we talked, shared and laughed together. We had tons of fun, and no one was mean to anyone. It was wonderful!

Also, we get to meet the legendary Kakuyasu Uchiide (Shu Uemura International Artistic Director), as well as internationally acclaimed Fashion designer Tex Saverio. Why is Tex Saverio there? That’s because Tex Saverio collaborates with Shu Uemura! 2 legendary people, and I was in between! Mr. Uchiide was like “oh come, you should stand in the middle”..OMG I ALMOST DIED!

I’ve met Rae Morris, now I’ve met Kakuyasu Uchiide! Dreams do come true! Master makeup artists! They are so friendly, humble, down-to-earth, and passionate about their work.

Kakuyasu Uchiide

(L-R): Tex Saverio, myself, Kakuyasu Uchiide

Shu Uemura Brave Beauty

Mr. Uchiide’s interpretation of Brave Beauty on the models

So, we were given 30 minutes ONLY to finish up our eye, lips and cheeks makeup. I barely had enough time to complete the look. My hands were shaking throughout the entire time. I think at one point I wasn’t even sure what I was doing. I was too nervous! Stage fright I tell ya! Anyways, 30 minutes was up and that was it!

The winners were announced – Stephanie won 2nd place (best makeup show), and Mirtha won 1st place (grand prize). I didn’t feel much disappointment. I thought they deserved to win since their makeup results were quite elaborate. I knew I wasn’t going to win because I think I have a different interpretation of what Brave Beauty was.

Anyways! I was very happy I entered this competition. I’ve made new friends, I gained experience, and I’ve definitely learn to manage my stage fright. I’ve met great people, and for me it was more than enough! I didn’t even expect to be in the top 10, so that in itself was already quite amazing!

So, I’d like to say thank you to everyone who have cheered and supported me throughout the whole time!

Shu Uemura Brave Beauty competition

(L-R): myself, Juanita, Dara, Mirtha.

Juanita Haryadi

Juanita Haryadi in Tex Saverio 

Shu Uemura Brave Beauty competition top 10

Top 10 Finalists with their models (L-R) –  Felita, Irwan, Stephanie, Sari, Jilly (me), Mirtha, Catherine, Shanti, Vony, Suzi

Shu Uemura Brave Beauty top 10 finalists

Left – my submission for Brave Beauty competition; Right – my creation for Brave Beauty competition top 10Juanita Haryadi

Juanita & me at backstage

World Cup 2014 Argentina Inspired Makeup

We are almost at the end of the World Cup 2014. Today I’m going to do Argentina inspired makeup, which consists mainly of light blue and white. I find it difficult to combine this shade with the rest of my makeup. I had to change my lip colors a few times before I was satisfied (and I’m still not that satisfied, btw..). I think I should’ve went with a cooler lip color, instead. Oh well…

Anyways, I actually found a little bit of difficulty when doing the tutorial since I kept coughing (yes, my cough returned…-__-lll). As you can see on the second pic (top middle), the blue shadow smudged a little to the center of the lid, even though I wanted to keep it bare. That’s because when I was doing the inner part, I coughed and the brush slide to the center of my eyelid. So, please if you decide to recreate this look, keep the middle part of the eyelid free of any blue shadow.

For the other World Cup 2014 makeup series, please check my Brazilian Inspired Makeup post and Netherlands Inspired Makeup. For the use of Sleek Makeup iDivine Candy palette, please check my Psychedelic and Very Purple tutorials.

world cup argentina makeup

How-to:

1. I applied NYX Jumbo Eyeshadow Pencil in Milk all over the eyelids.

2. Using a flat shader brush, I applied Bubble Gum from Sleek Makeup Candy palette on the outer and inner third of the eyelid, keeping the middle part free of any eyeshadow (see note above)

3. I used whatever was left on the brush on my crease.

4. Using a clean blending brush, I blended my crease so there’s no harsh line.

5. I applied Cream Soda from Sleek Makeup Candy palette in the middle part of my eyelid using a flat eyeshadow brush. I also added Pow from Sleek Makeup Ultra Matte v1 Brights palette on top of Cream Soda.

6. Using a small stiff shader brush, I applied Bubble Gum along the lower lash line.

7. I lined my waterline using Revlon Photoready Kajal eyeliner in Carbon Cleopatra.

8. I created a winged liner along the upper lash line using Kanebo Kate Super Sharp eyeliner.

9. I curled my lashes and applied MUFE Aqua Smoky Lash. I also applied Gwiyomi false eyelashes #3.

10. I filled my brows using Shu Uemura Brow Pencil.

argentina inspired makeup

11. I applied MAC Pro Longwear foundation on my face using MAC Masterclass Brush Oval 6.

12. I contoured and highlight my face using Motives Fire sculpt palette.

13. On my cheeks, I applied Benefit Coralista.

14. On my lips, I applied Revlon Colorstay Ultimate Suede Lipstick in Flashing Lights.

argentina inspired makeup

Products used:

Eyes – NYX Jumbo Eyeshadow Pencil in Milk; Sleek Makeup iDivine Candy palette (outer and inner eyelid/lower lash line: Bubblegum; center of eyelid: Cream Soda); Sleek Makeup iDivine Ultra Matte V1 Brights (center of eyelid: Pow); Kanebo Super Sharp Eyeliner; Revlon Photoready Kajal eyeliner in Carbon Cleopatra; MUFE Aqua Smoky Lash; Gwiyomi False lashes #3

Face – MAC Pro Longwear foundation; Motives Fire sculpt series palette; Benefit Coralista blush.

Lips – Revlon Flashing Lights colorstay ultimate suede lipstick.motives fire sculpt palette

World Cup 2014 Brazil Inspired Makeup

Are you guys following FIFA World Cup 2014?! I sure did, and I’m rooting for Brazil! Go Brazil!!! Anyways, since I’m showing my support for Brazil, I decided to do this Brazil Inspired Makeup. I’d probably do a World Cup inspired makeup series for the next couple weeks just for fun! I wanted to post this tomorrow, but decided to do it today.

Anyhow, for this Brazil Inspired Makeup tutorial, I wanted to create a wearable look that uses the colors of the team’s jersey – mainly yellow, a little bit of green and blue (as you can see from the jersey that I wore for today’s tutorial). I love the result, and I especially love that blue eyeliner! If you do re-create this look please TAG ME on twitter or instagram, and hashtag your work with #kireimakeup.

Since the eyes are so bright and bold, I decided to tone it down on my face. My face is kept very minimal, no contouring. My lips, I decided to go with a nude lip, with my new favorite lip pencil, MAC Spice. Since my lips were quite dry, I added Clinique Heaping Hazelnut chubby lip balm to keep it moist. I do apologize if my face doesn’t look that flawless, you can see a bit of breakout here and there, since my immune system is currently down. As you can see, I do not airbrush my face, so what you see is what I actually look like! 😉

brazil inspired makeup

How-to:

1. I applied a yellow cream face paint as a base all over my eyelid. For this tutorial, I used PAC , an Indonesian brand, but you can use any yellow cream base (e.g. MUFE Flash Palette), OR a white base (e.g. NYX Milk Jumbo Pencil in Milk). A good base is necessary so the yellow pops even more.

2. Using a flat eyeshadow brush, I applied MUFE eyeshadow no. 71 all over my eyelid.

3. Using a small blending brush, I applied Urban Decay Buck on outer V and extended it into the crease.

4. Using a dark blue cream face paint from PAC and an angled eyeliner brush, I created a winged liner along the upper lash line.

5. *VERY IMPORTANT STEP* I SET the cream eyeliner using Urban Decay Chaos with another clean eyeliner brush. If you don’t set your cream face paint, it’ll crease.

6. On the bottom lash line, I applied Dragon Fly from Sleek Makeup iDivine Ultra Matte V1 Brights.

7. I lined my tightline and waterline using L’oreal Voluminous Smoldering eyeliner.

8. I curled my lashes, applied mascara, and applied Ardell Demi Luvies falsies.

9. I filled my brows using Anastasia Brow Wiz in Medium Ash.

world cup inspired makeup brazil

10. For my face, I decided to keep it simple. I applied Marc Jacobs Gel foundation using CoverFX cream foundation brush.

11. I applied a little bit of yellow corrector from MAC Conceal/Correct palette in Medium under my eyes.

12. I dusted MAC Mineralized Skinfinish powder all over my face.

13. I applied Smashbox Halo Blush powder in In Bloom.

14. I lined and filled my lips using MAC Spice lip liner. On top of it, I applied Clinique Chubby lip balm in Heaping Hazelnut.

brazil inspired makeup


Very Purple with Sleek Makeup Candy Palette

As mentioned in my previous post, I wanted to share this tutorial with you guys! Today’s look uses Sleek Makeup Candy Palette (Limited Edition) that I bought from Luxola! Don’t worry, the palette that I’m giving away is totally brand new, and unused!

Oh, you didn’t know about the giveaway that’s going on? Check out my Sleek Makeup Candy Palette Giveaway post for details! This giveaway will last until Thursday (June 12, 2014) at 11.59pm.So, hurry up and check out that post for more info!

I also want to mention that since my images were getting used without my permission nor credits, I’m putting a huge watermark in the middle of all my pictures from here onwards. I do apologize if the watermark is bothering the picture, but I have to protect my work. I do want to thank all of you who have been kind enough to let me know whenever someone used my pictures (aka plagiarism). I appreciate all your kindness! A big thank you, hugs, and kisses for you who have been supporting me!

Anyways, let’s get the tutorial started!

sleek makeup idivine candy paletteEyelids are prepped using Urban Decay Primer Potion in Eden. All shades for the eyes are from Sleek Makeup iDivine Candy Palette.

How-to:

1. Using Smashbox bullet crease brush, I applied Flump slightly above my crease.

2. Using a small blending brush, I applied Parma Violet on the outer V and the crease. You can apply this using a small shader brush for a more precise application.

3. Using the same bullet crease brush as step 1, I blended out Parma Violet to remove any harsh edge on the crease. I also slightly winged the outer part.

4. Using a flat eyeshadow brush, I applied Aniseed all over my eyelid.

5. Using a small shader brush, I applied Bon Bon on the inner corner of my eyes, and then I applied Parma Violet along the lower lash line.

6. I used my face powder (MUFE 118 Pro Finish) and a blending brush under my brows, blending it into the purple shades slightly to remove any harsh edge.

7. I lined my upper lash line using Kanebo Kate Super Sharp Eyeliner. On the waterline, I applied black eyeliner pencil.

8. I curled my lashes, applied mascara, and then applied Ardell Demi Wispies lashes. (As you can see, Ardell demi wispies falsies are my current favorite lol).

9. For the brows, I applied Anastasia Brow Wiz in Medium Ash. I lightly set it with Anastasia Brow Powder duo in Brunette.

sleek makeup candy tutorial

10. For my face, I applied Motives Fire highlight/contour palette. I applied the lightest highlight color on the high planes of my face – cheekbones, bridge of the nose, cupid’s bow, forehead, chin, below hollows of the cheeks, and under my eyes. I applied the darkest contour color on the hollows of my cheeks, sides of my nose, and temples. I blended them out using a damped beauty blender sponge and MUFE HD Foundation in 118.

11. For my cheeks, I applied Smashbox Halo blush in In Bloom.

12. For the lips, my new favorite, I applied L’oreal Color Riche Extraordinaire Liquid Lipstick in Rose Symphony