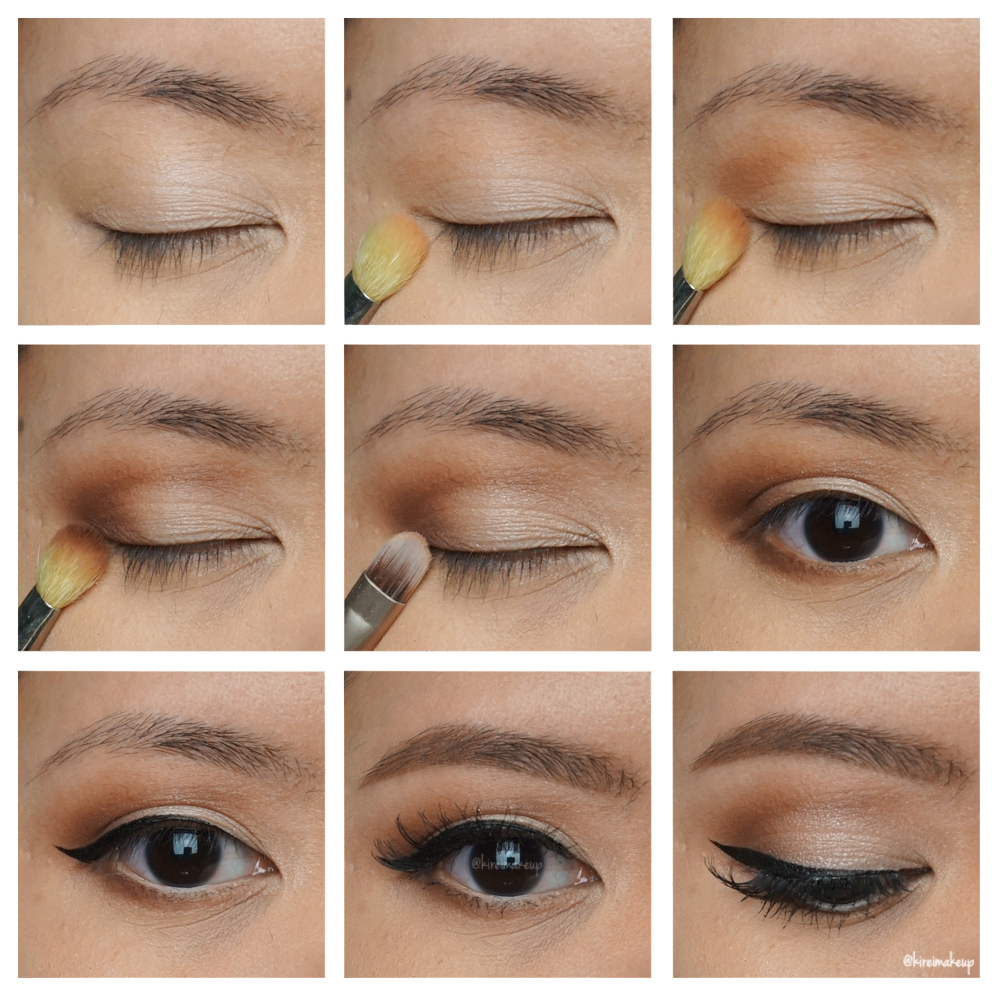
 Today’s Gold New Year Party Makeup tutorial would by my last post for 2015. Almost time for 2016, and so I shall end 2015 with a gold sparkly makeup. This look is super simple, and it doesn’t require much. It’s sparkly, it’s light, it’s super pretty for the New Year. I, myself, prefer this kind of look to attend parties and such.
Tag: beauty blogger
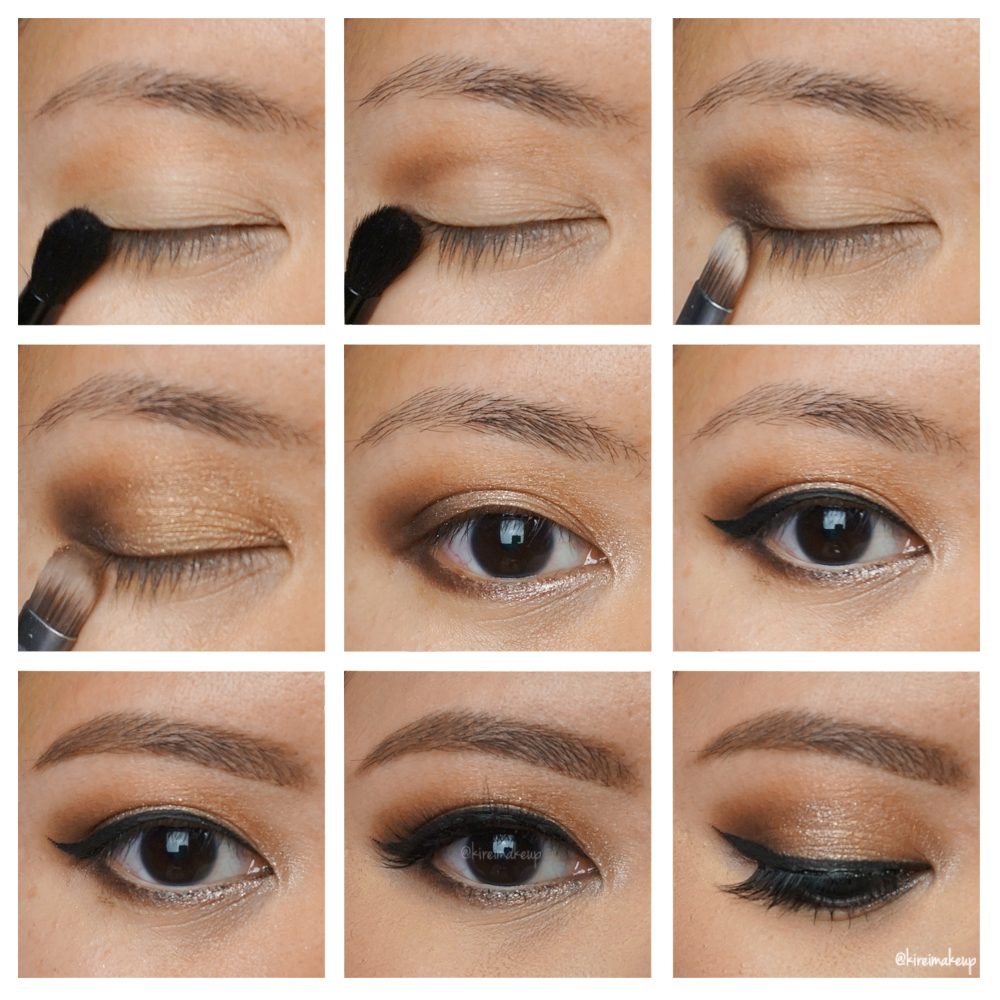
New Year Party Makeup
Alright, I think we can start with New Year Party makeup and move on past the Christmas party makeup for now. If you are still looking for makeup inspiration for Christmas parties, please check my Party makeup tutorials, or use the search bar for specific brands or looks. For this tutorial, I used mainly UD Gwen Stefani palette for the eyes.
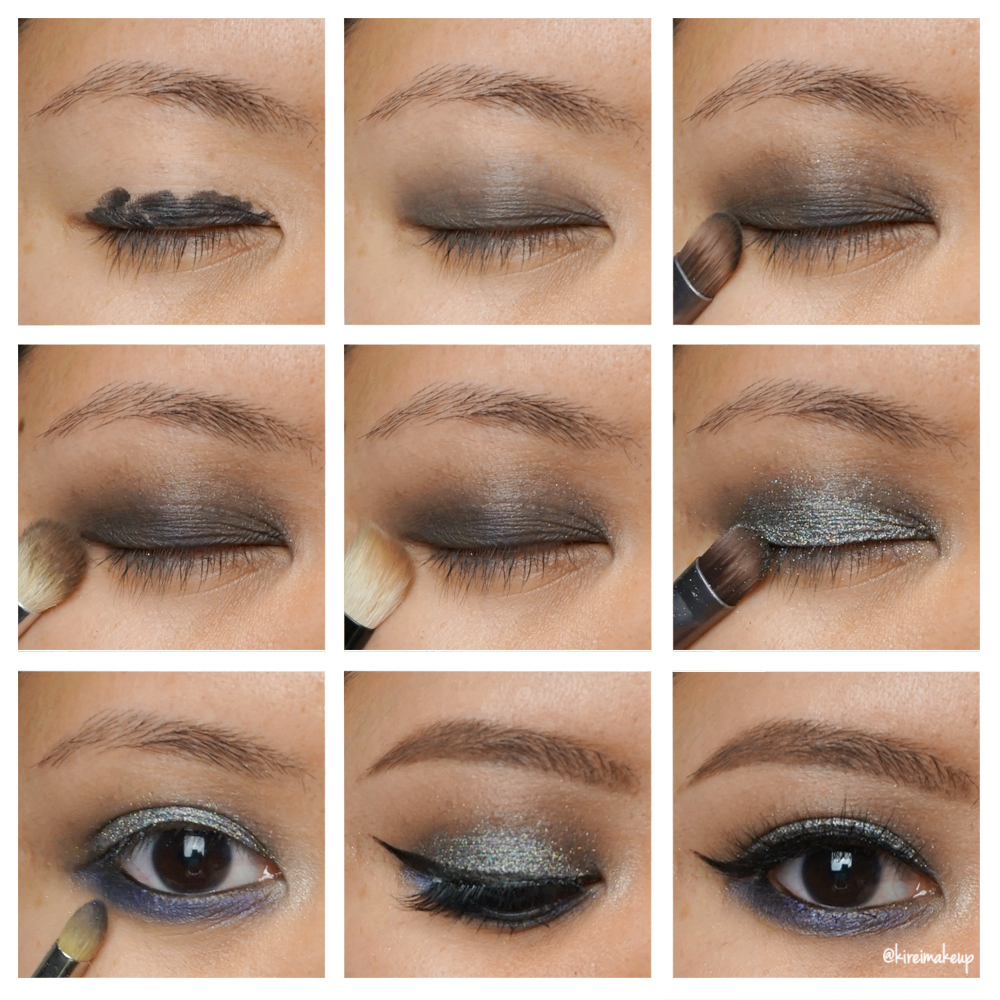
Party Makeup Tutorial [ABH Self Made]
Another Party Makeup tutorial for you guys, since you know Christmas is in 2 weeks! Anyways, for this tutorial I used Anastasia Beverly Hills (ABH) Self Made palette, which I completely forgotten about. It was sitting at the back of my drawer, and I was so busy that I didn’t remember I actually bought the palette.
For this look, my focus is on a very strong eyes. I didn’t make this too smoky since I knew I was going to create a winged liner, but if you prefer a smokier look, omit the winged liner, and use a matte black eyeshadow along the lash line for a smokier lash line.
Products used
Eyes
- Primer – Urban Decay Primer Potion “Anti-Aging”
- Transition – ABH Self Made Palette “Sherbet”
- Crease – ABH Self Made Palette “Hot Chocolate”
- Outer V – ABH Self Made Palette “Hot Chocolate”
- Eyelid – ABH Self Made Palette “Self-Made”
- Lower lash line – ABH Self Made Palette “Hot & Cold” (outer); ABH Self Made Palette “Pink Champagne” (inner)
- Winged liner – Maybelline Gel Liner “Black”
- Waterline – MAC Chromagraphic pencil liner “NW25/NC30”
- Brows – ABH Dip Brow Pomade “Medium Brown”
- Falsies – Esqido Mink lashes “Oh So Sweet”

Face
- Primer – Bobbi Brown “Vitamin Enriched Face Base”; The BodyShop Drops of Youth “Wonderblur”
- Foundation – MAC Pro Longwear Foundation
- Concealer – MAC Pro Longwear concealer
- Powder – Laura Mercier “Invisible Loose powder”
Cheeks
- Blush – Hourglass Ambient Lighting Blush “Vibrant Poppy”
Lips
- Lipstick – YSL Glossy Stain “Peche Cerra-Cola (27)”

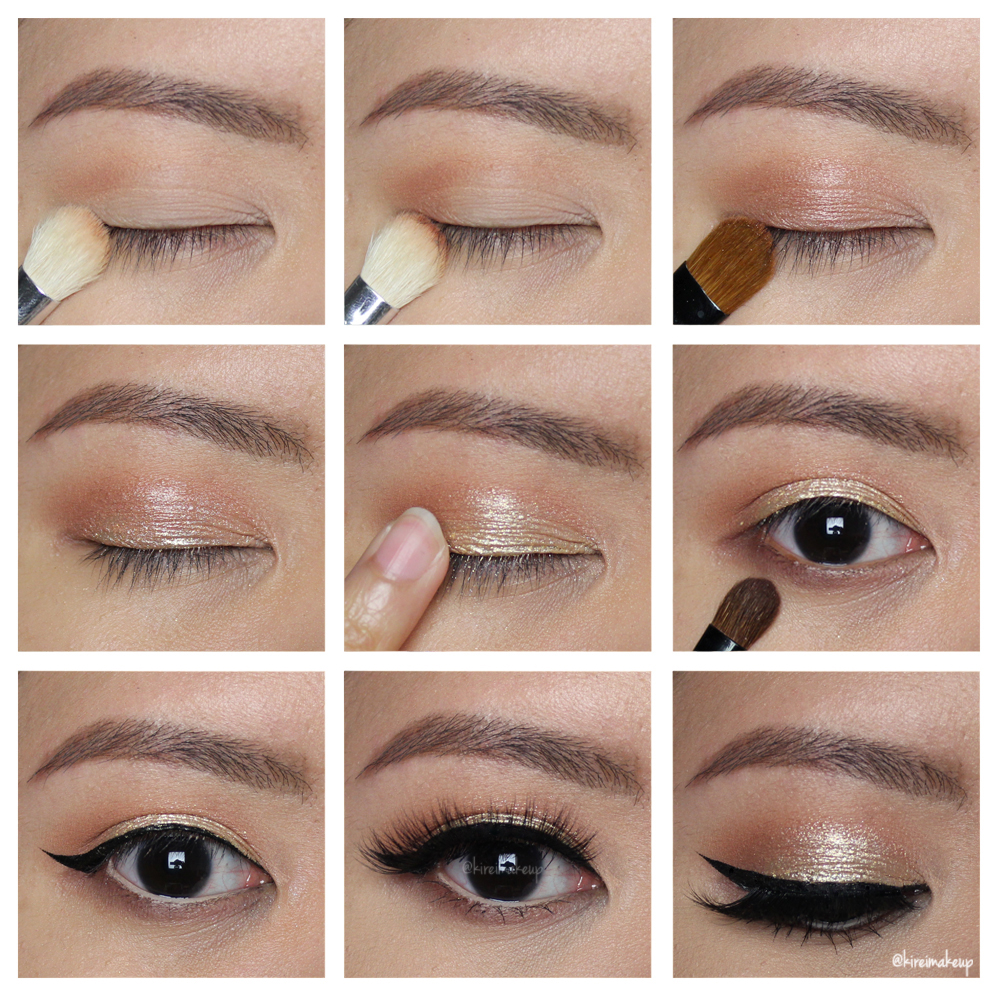
Urban Decay Gwen Stefani Tutorial #1
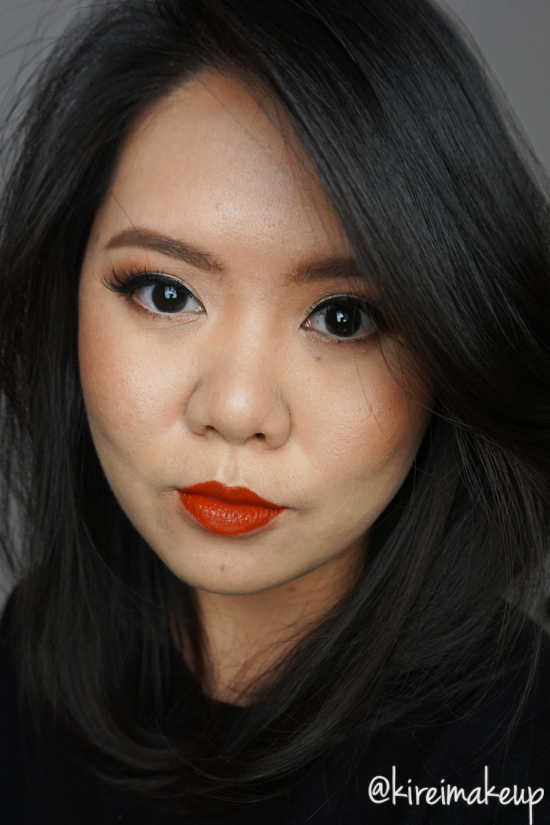
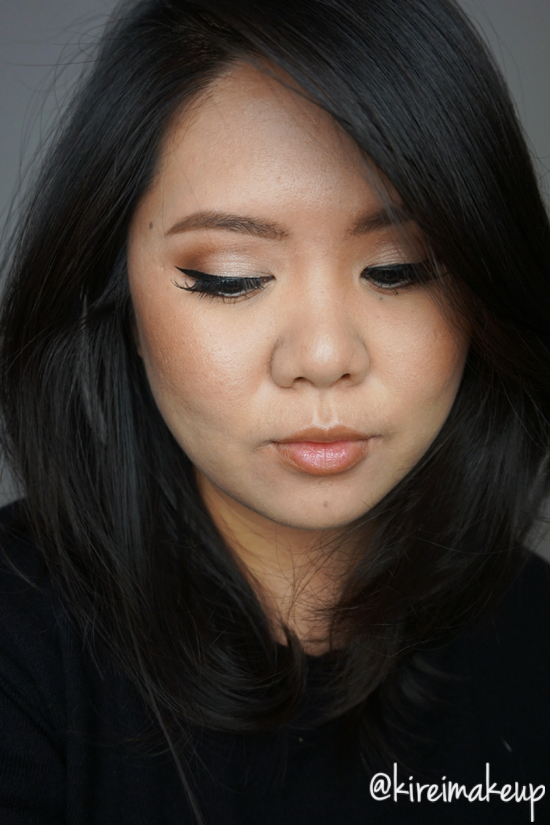
I did promise to post an Urban Decay Gwen Stefani tutorial in my previous post, and here it is! I did this pretty quickly since I was testing several products all at once. It’s very simple and easy to do. I pretty much only used 2 brushes for the eyes – blending and flat eyeshadow brushes, and this is just my regular go-to eye makeup look.
I’ll be posting more Urban Decay Gwen Stefani tutorials, so if you have any requests, feel free to leave a comment below! As you know, Gwen Stefani is no stranger to bold makeup look, so for this tutorial, I’ve decided to pair the eyes with red lips. Gwen Stefani does wear a lot of red lipstick paired with bold winged liner. I did a winged liner, but not as bold as her since I don’t have the “real estate” (aka enough space) on my eyelids to do so.
Check out my VLOG using this palette!
Have you guys check out my UD x Gwen Stefani swatches and first impression yet?! You should!
Products used
Eyes
- Primer – Urban Decay Primer Potion “Anti Aging”
- Base – Urban Decay Gwen Stefani “Skimp”
- Transition –Urban Decay Gwen Stefani Stefani “Anaheim”
- Crease – Urban Decay Gwen Stefani “Zone”
- Outer V/Lower Lash line – Urban Decay Gwen Stefani “Punk”
- Eyelid – Urban Decay Gwen Stefani “Blonde”
- Waterline – MAC Chromagraphic eyeliner NC30
- Winged liner – Kanebo Kate Super Sharp eyeliner
- Mascara – NARS “Audicious” mascara
- Falsies – Ardell “Demi Wispies”
- Brows – Anastasia Brow Pomade “Medium Brown”
Face
- Base – Bobbi Brown “Vitamin Enriched Face Base”
- Foundation – Shu Uemura Skin:Fit foundation
- Concealer – NARS Radiant Creamy Concealer “Custard”
- Setting powder – Laura Mercier “Invisible Loose Powder”
- Nose contour – Make Up Store “Smog” Micro Eyeshadow
Cheeks
- Blush – Eve Pearl “Bronzing Trio”
Lips
- Lip pencil – MAC “Brick” lip pencil
- Lipstick – MAC “Russian Red” lipstick
THEFACESHOP Canada (Product Reviews)
As you know, I recently received a few great products from THEFACESHOP Canada. If you have not checked out my post using these products, please check out my Lavender Glitter Party Makeup tutorial! It’s easy, fun, and definitely eye catching!
Have you tried any THEFACESHOP products? If you have, what’s your favorite product from this brand? If you haven’t, which product would you like to try? Leave your answer below on the comment section.
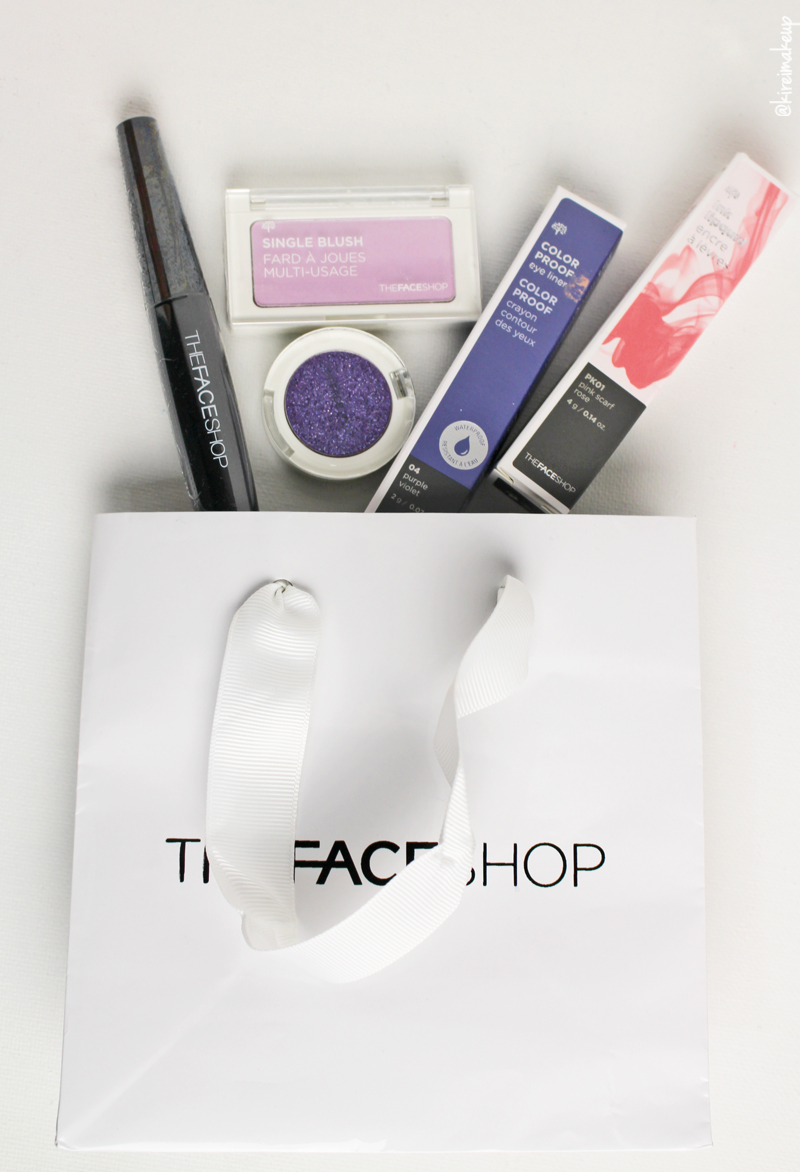
So, as part of the Canadian Beauty Bloggers network, I was selected to give THEFACESHOP Canada products a try. Big shout out to Canadian Beauty Bloggers, as well as THEFACESHOP Canada! I received these 5 products in the mail (L-R) – Freshian Big Mascara, Candy Violet blush, Lavender Glitter eyeshadow, Purple Violet Color Proof eyeliner, and Pink Scarf Rose Ink Lipquid. Keep on reading below to find out the swatches, as well as my review on these products!
 THEFACESHOP Canada
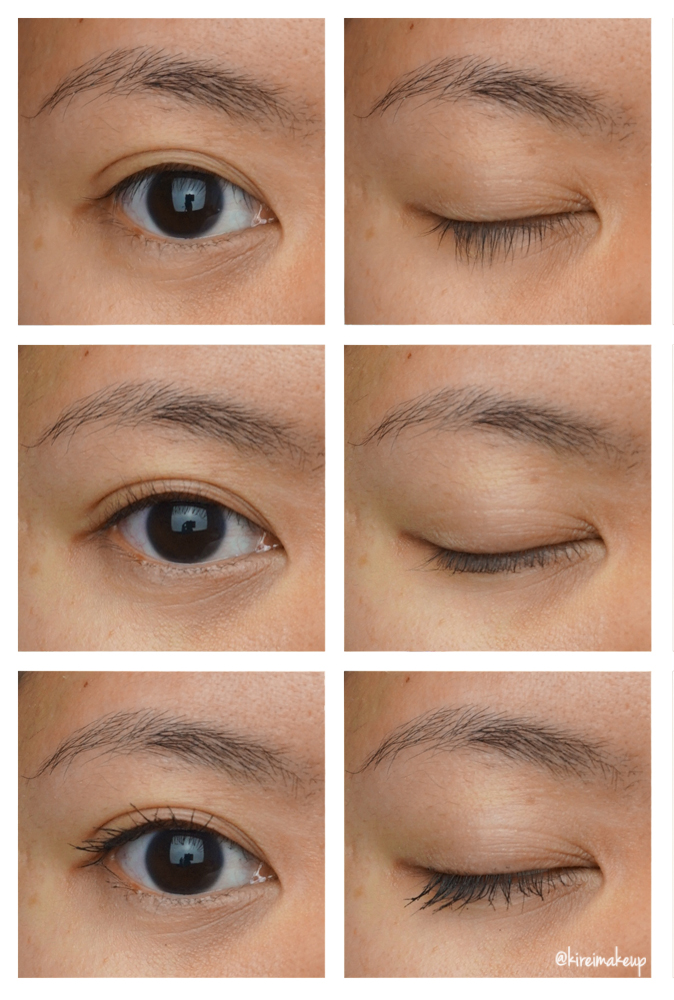
Let’s start with THEFACESHOP Canada Freshian Big Mascara (01 Curling). The Freshian Big mascara is described as “Mascara that provides natural eyelash looks. Curling & volume effects are well seen!”. There’s actually a Volume version of this mascara, the one that I received is the Curling effect. I actually quite like the wand on this mascara, it’s thin and I can get the bristles right in between my lashes. The formula is not too runny, and it does not dry out too quick either.
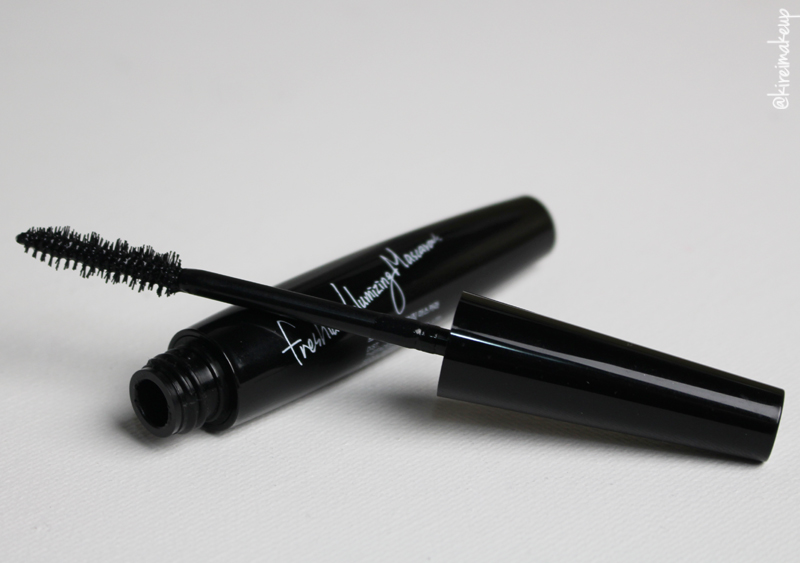
THEFACESHOP Canada Freshian Big Mascara (01 Curling)
In the “before” picture below (top row), you can see that my lashes are stick-straight and long. I have to curl my lashes before I apply the mascara (middle row). As you can see in the “after” picture (bottom row), my lashes lost some of its curls but gain extra length. The mascara itself does not cause my lashes to clump, it separates the lashes pretty well. The reason why this mascara does not keep the curls of my lashes is because it does not dry quick enough. If you’re looking for a curling mascara, you should look for one that is waterproof since waterproof mascara dries out faster when you apply it, which then would help to lock the curls in place. This mascara is NOT waterproof, and so it does not hold the curls very well. It is still better than other non-waterproof mascara though in terms of holding the curls.
THEFACESHOP Canada also sent me a Candy Violet blush! Prior to this, I did not own a violet blush. This was my first time using a purple-toned blush. I know it looks quite pink in the picture, but it is actually a light purple if compared to other pink/rosy blushes. It is a very pale cool tone blush, so I wasn’t quite sure how this would show up on my skin.
The blush, since it’s purple, is really great to brighten your skin. As you know, purple/violet works as a brightening corrector. So, this blush does a good job to brighten up your skin. It has a little bit of shimmer, and it works well as a highlighter. The downside to this blush is the fact that it’s too light for my skin. I can’t really use this as a blush on its own, so I use it as a highlighter or a brightener on top of my other blush. I also can use this blush to change the “warmness” of my other blushes. For example, if I think my other blush is too warm-toned, I can apply this blush first then the warmer blush on top to make it more cool-toned or neutral.
 THEFACESHOP Candy Violet single blush
One of my favorite products from this package is this stunning sparkly purple eyeshadow! THEFACESHOP Lavender Glitter eyeshadow is described as “Highly pigmented Single Shadow Glitter gives a uniform and ultra shiny finish. Its silky, easy-to-adjust texture applies easily and adheres without smudging, for long-lasting hold.”
Oh, this gorgeous eyeshadow is amazing! Just enough glitters and there was no fallout at all! Glitter eyeshadows are notorious for their fallout, where the glitters will be everywhere EXCEPT in your eyelids where you want it to be! Not this eyeshadow! The glitters in the eyeshadow stay on the eyelids. You can also apply this eyeshadow with a wet brush, and it’ll make the shade even more purple and sparklier. Don’t believe me? Check out my Lavender Glitter Party makeup tutorial to see the eyeshadow in action.
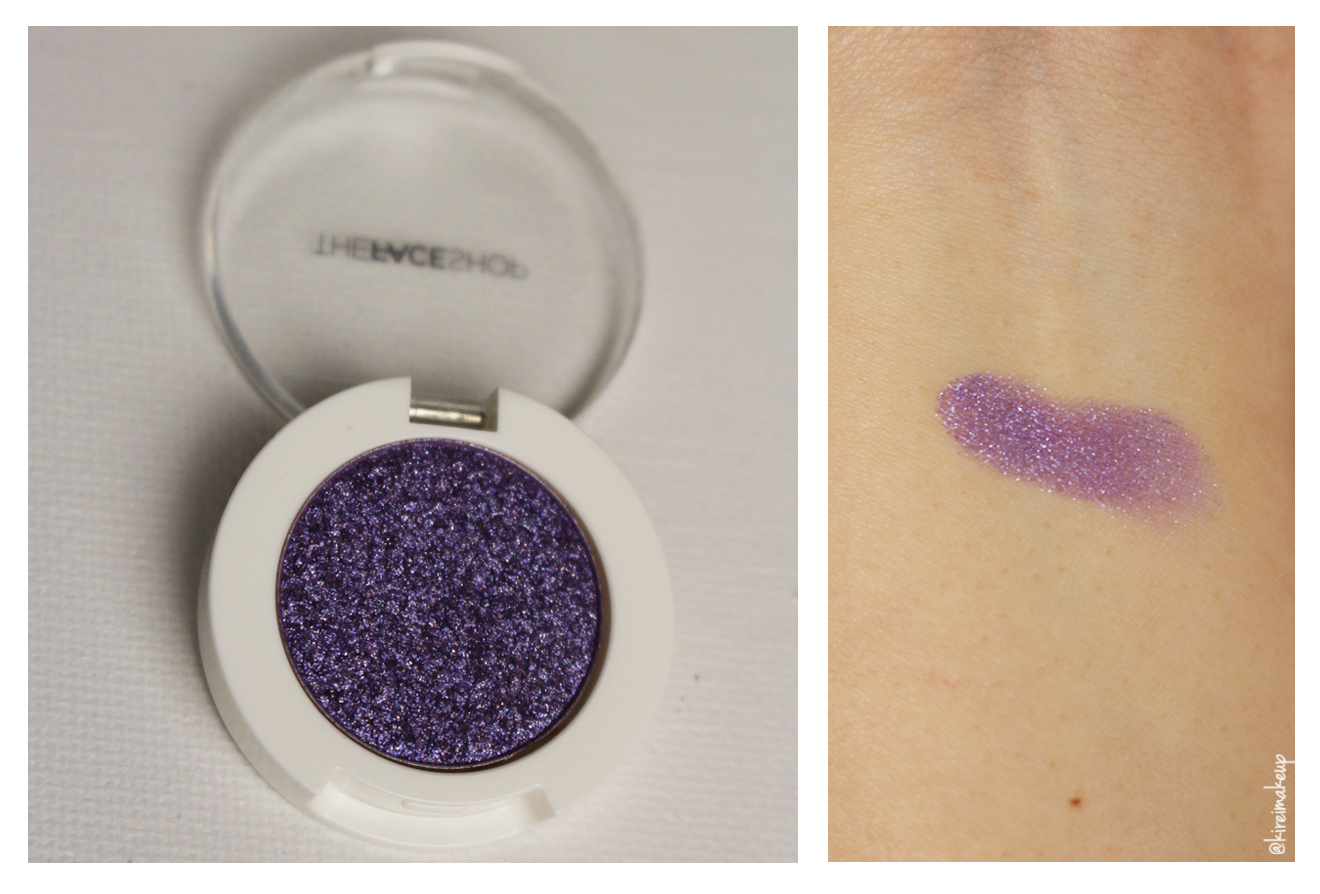 THEFACESHOP Lavender Glitter eyeshadow
My other favorite product from THEFACESHOP Canada PR Package is this Purple Violet Color Proof eyeliner. I wish the eyeliner is slightly more purple, but as you can see from my swatch, it’s actually pretty dark in color. On my tutorial, you can see that it looks almost black. However, I don’t really mind it. It almost looks like a soft black eyeliner, which will be a great alternative for those who prefer a non-black eyeliner. Sometimes a black eyeliner can look too harsh on those with fair-light skin tones. The hint of violet in this eyeliner will bring out the colors on your eyes. Purple is universally flattering on everyone and every eye colors!
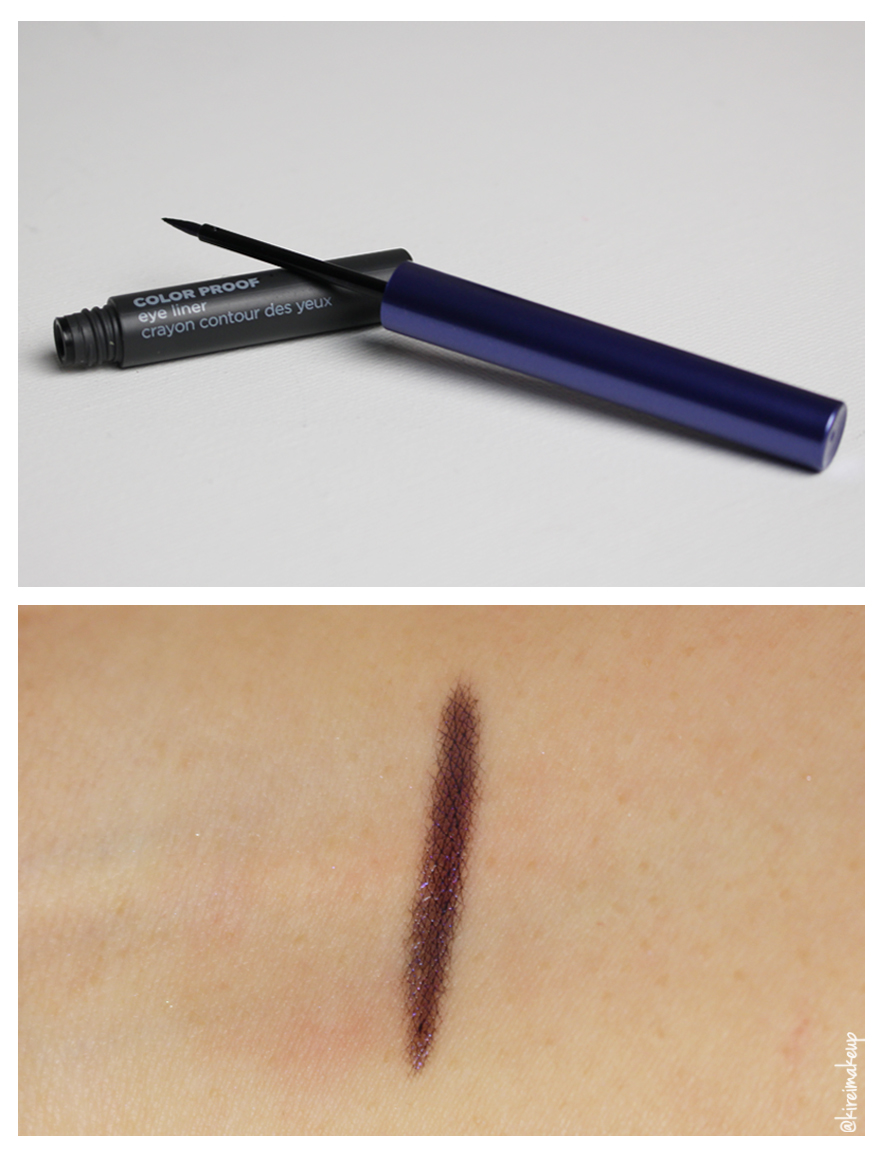 THEFACESHOP Color Proof Purple Violet eyeliner
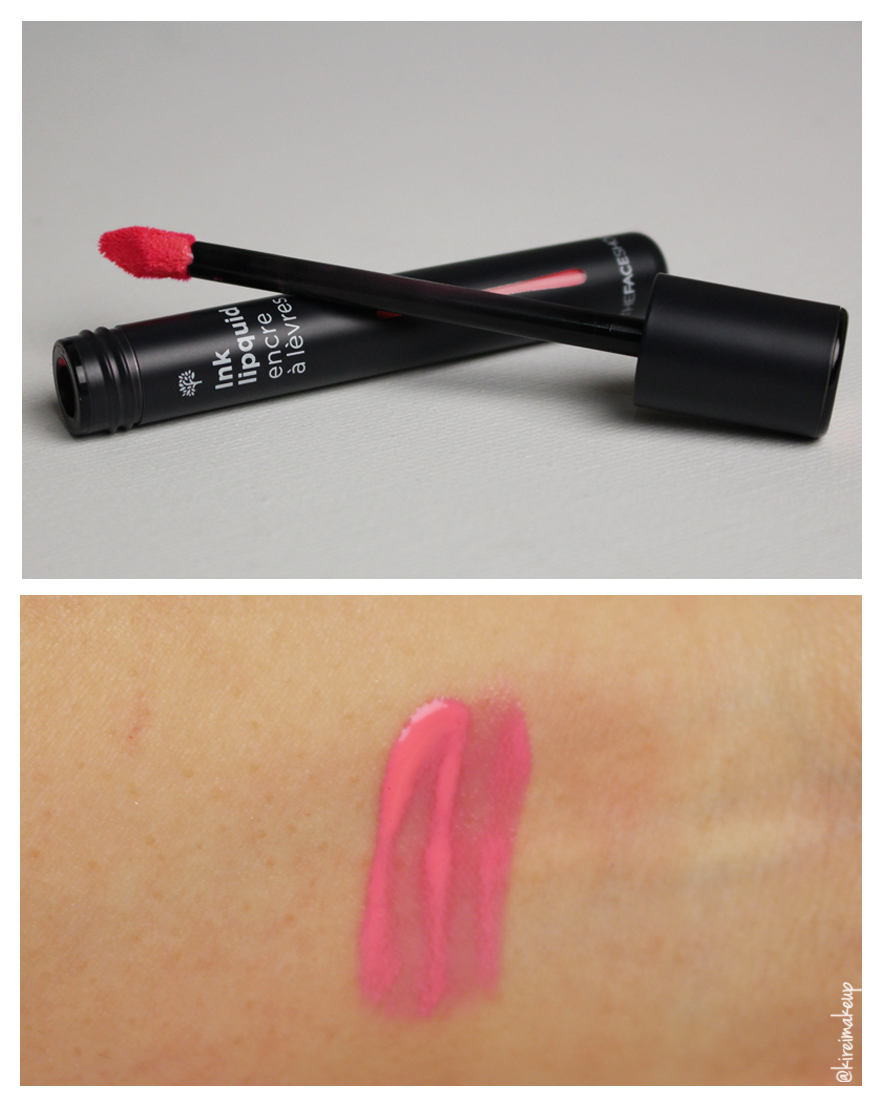
The last product in my package is THEFACESHOP Pink Scarf Rose Ink lipquid. It’s a liquid lipstick, hence the name lipquid. It is described as ” [An] all-in-one lipstick, gloss, and tint comes in 12 shades and provides hydration and hold for up to 12 hours! The specially shaped applicator helps both define lip contours and fill in the lips. Using the chisel tip, you can define and color your lips with great precision.”
This lipquid is similar to a lip stain. It stains your lips with a pretty color, and you can layer it to make the color more intense. Since it is a stain, it lasts pretty long even after eating and drinking. When I did the swatch for this lipquid, my hand was stained for the whole day.
I love this lipquid, it’s not sticky or drying like other brands, and it’s also moisturizing. This shade Pink Rose Scarf is a beautiful shade of rosy pink, which is very flattering on everyone. One tip on using this lipquid is to apply it in layers. When you apply it in layers, apply it sparingly to control the intensity of the stain. On my previous tutorial, I applied a sheer layer on my lips, then I added more layers just in the center of my lips to create a gradient effect.
 THEFACESHOP Ink Lipquid Pink Scarf Rose
UD Vice 4 Review & Swatches
I posted a picture of this UD Vice 4 palette last month on my Instagram, but didn’t get the chance to post it on the blog nor to swatch this palette. So, today I decided to post this UD Vice 4 Review & Swatches. I’ve posted a tutorial using this vice 4 palette on my previous post, please check it out! I’ll be posting more tutorials using this palette in the near future.
YES THIS PALETTE IS LIMITED EDITION! So, if you want it you better get it before it’s gone! Actually at this moment when I’m writing this post, this palette is already out of stock in Sephora. I was lucky to have bought it right when it was released in Sephora’s website, along with my KVD Mi Vida Loca Remix palette.
What is UD Vice 4?
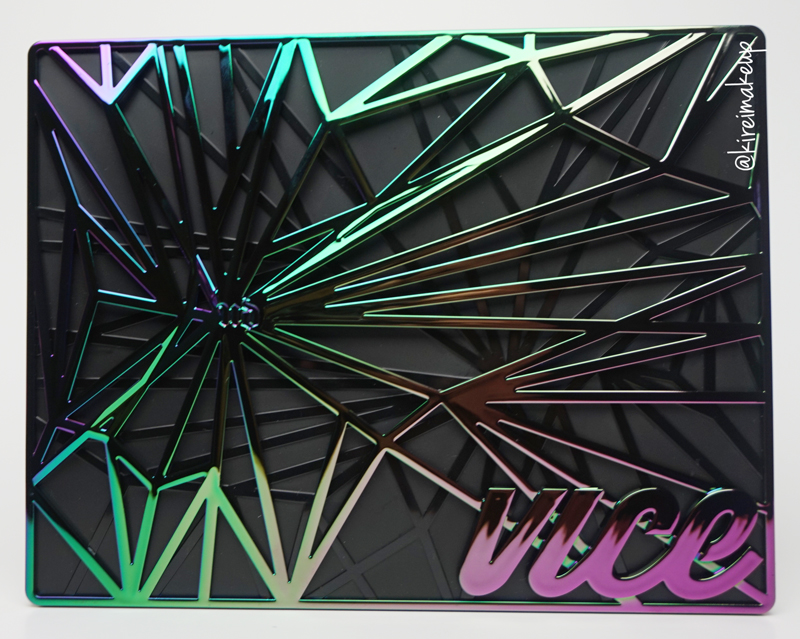
“A limited-edition palette packed with 20 gorgeous, never-before-seen shades, a huge mirror, a double-ended brush, and a chic bag.
These shades are filled with rich, deep jewel tones in a wide range of finishes—from velvety-smooth mattes and shimmering metallics to shades infused with micro-glitter. Each Eyeshadow in Vice4 is formulated with Urban Decay’s own Pigment Infusion System™, a proprietary blend of ingredients that deliver rich, velvety, blendable color that lasts and sparkle that stays in place.”
First Impression
Gorgeous palette, with beautiful shades. You get some colorful shades, you get neutral ones, some with sparkles, some are matte. The packaging is breathtaking, I absolutely in love with the cover. Very pretty! The eyeshadows are very vibrant in color, very pigmented. Knowing how the UD palettes are, I expected these shadows to be smooth and blendable, and they are!
Shades
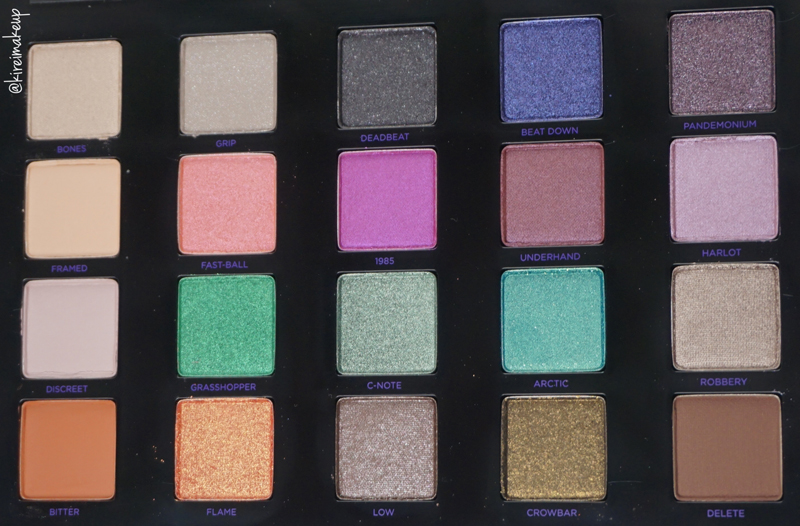
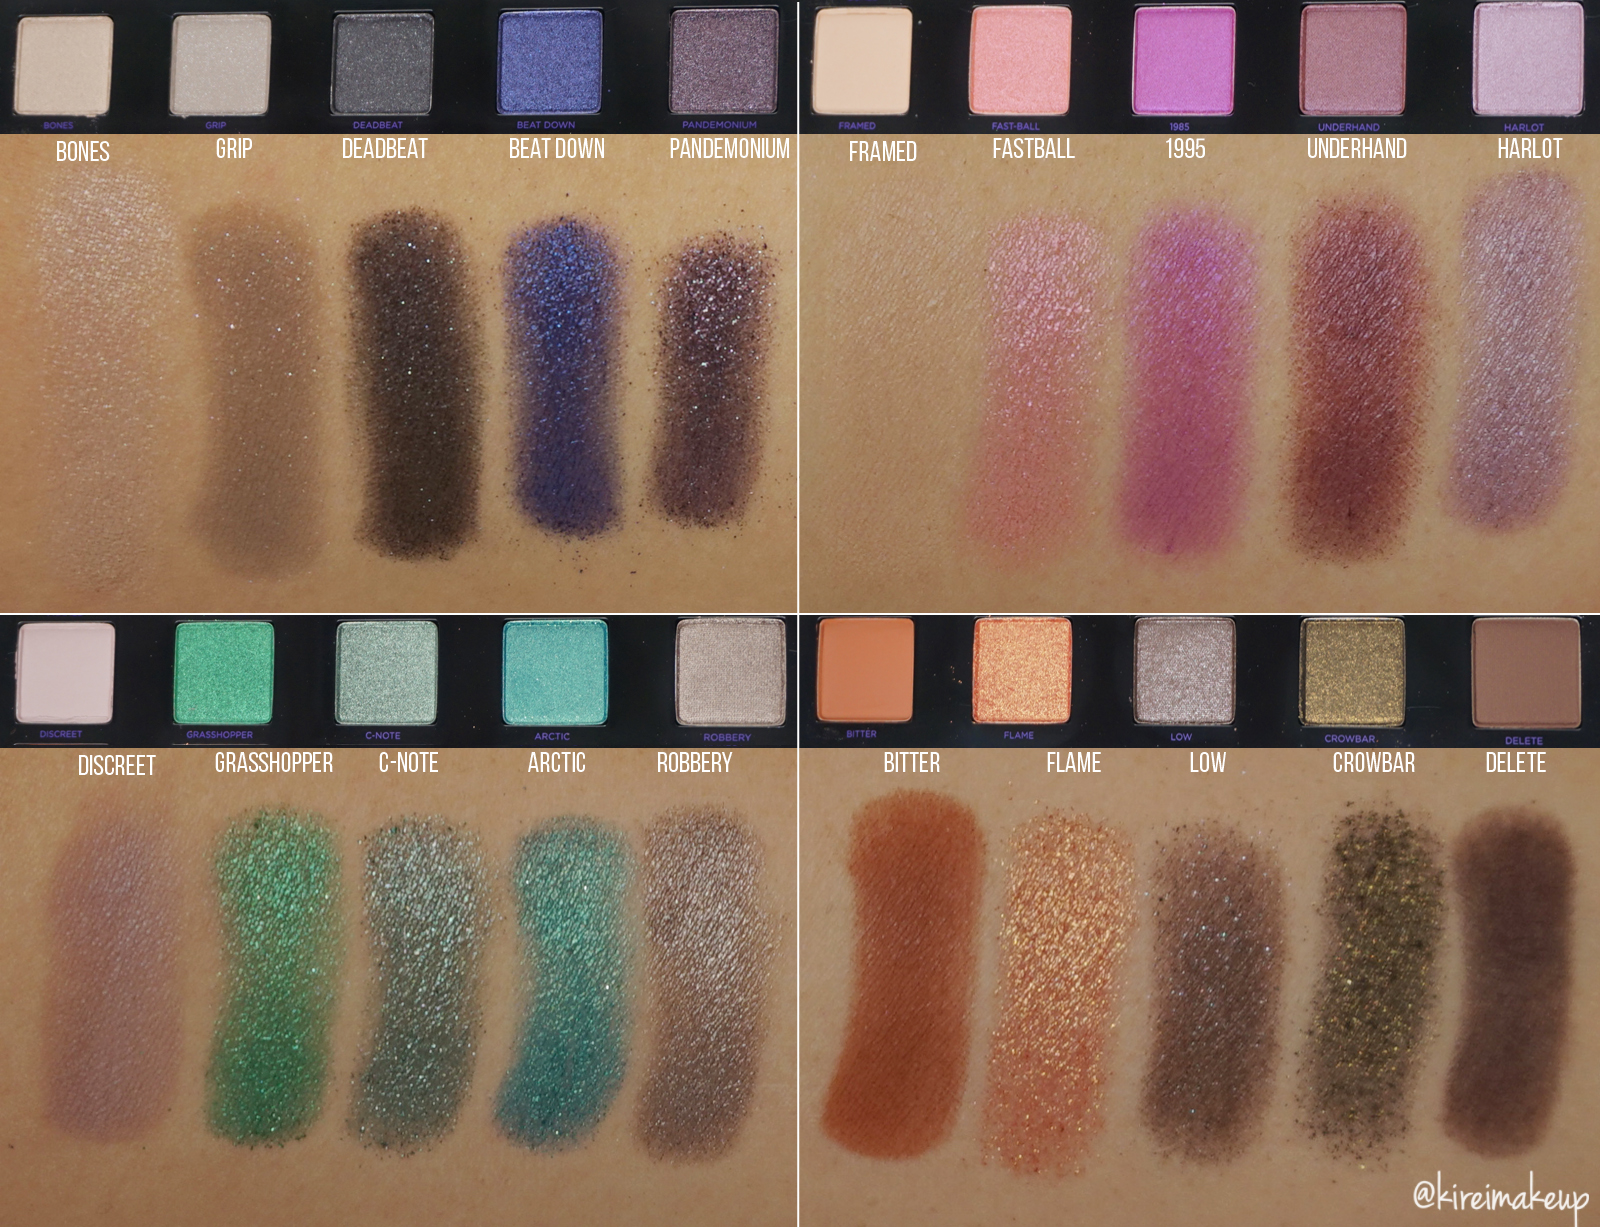
There are 20 shades in this palette, and I categorize them according to their rows (across from L-R). The first row seems to be where the “Party” shades with all the pearls and glitters. The second row is the “Reds”, most of the shadows on this row has a red/pinky undertone. The third row is the “Greens” since the majority of the shades on this row is green, while the other 2 is more on the taupe-brown shade. The fourth row is the “Orange” since the shades on this row is very warm. I find that this palette doesn’t really have a pattern, but oh well going across makes more sense than going down the column.
- First row
- Bones (oyster satin with pearl)
- Grip (taupe matte with iridescent micro-glitter)
- Deadbeat (black satin with micro-glitter)
- Beat Down (deep metallic violet with blue micro-glitter)
- Pandemonium (no description from Sephora, so my description of this shade is deep plum with micro-glitter)
- Second row
- Framed (light neutral matte-satin)
- Fast-ball (metallic peachy pink with micro-glitter)
- 1985 (metallic fuchsia with fuchsia micro-glitter)
- Underhand (burgundy-brown satin)
- Harlot (metallic lavender)
- Third row
- Discreet (soft dusty mauve matte)
- Grasshopper (metallic emerald w/green micro-glitter)
- C-Note (frosted green with micro-glitter)
- Arctic (bright teal with tonal sparkle)
- Robbery (deep metallic brown-gunmetal)
- Fourth row
- Bitter (reddish brown matte)
- Flame (bright orange with gold micro-glitter)
- Low (brown matte with iridescent micro-glitter)
- Crowbar (black with golden metallic pearl/micro-glitter)
- Delete (deep chestnut brown matte-satin)
 Pros
Pros
- 20 shades x 0.6 oz
- Variety of shades and textures
- High pigmentation
- Easily blended
- Buttery and smooth
- Long lasting
- $70 for 20 shades, which come down to $3-ish/shade
- Can be used wet to create an even more intense shine
Cons
- Limited edition
- Some shades have a lot of fallout, esp. the ones with sparkles!
Shu Uemura Sheer Shine Lipsticks
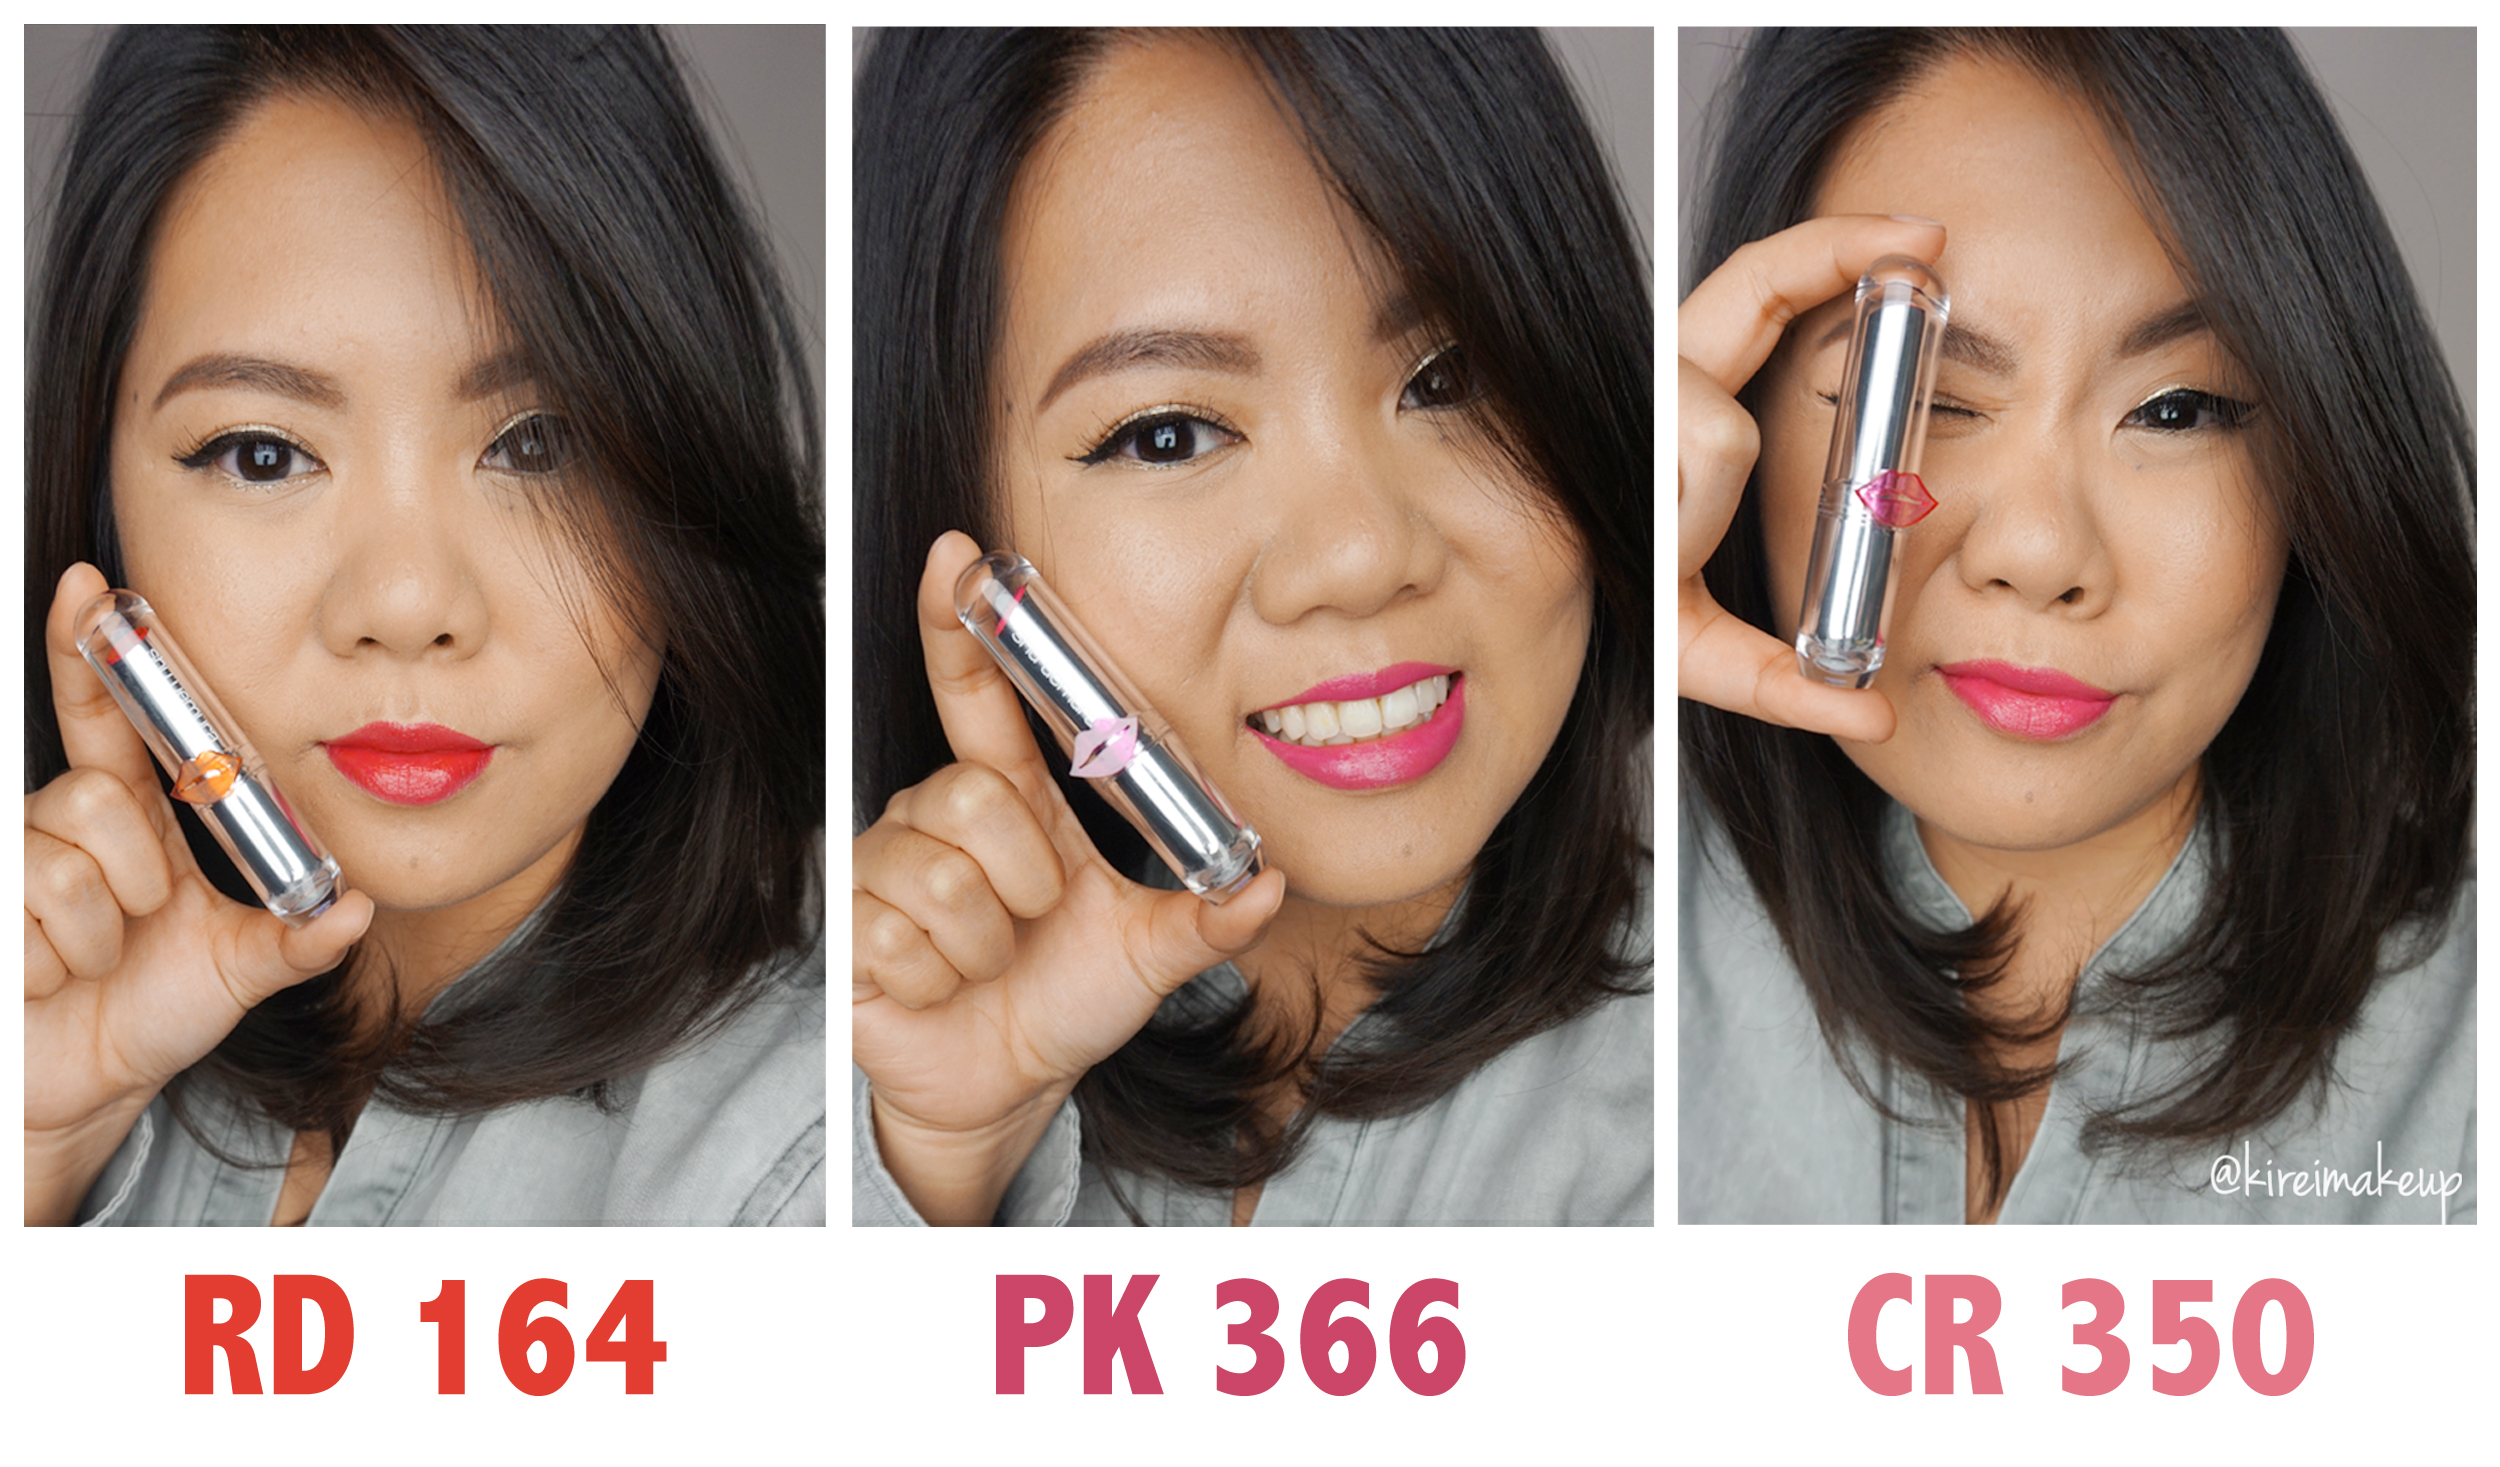
Last month, I was chosen to be one of the 20 beauty bloggers to try out Shu Uemura Sheer Shine lipsticks! I was thrilled to receive 3 of the Shu Uemura Rouge Unlimited Sheer Shine lipsticks at my door step. I’m sure you all have seen these 3 gorgeous lipsticks on my Instagram. I absolutely love these lipsticks!
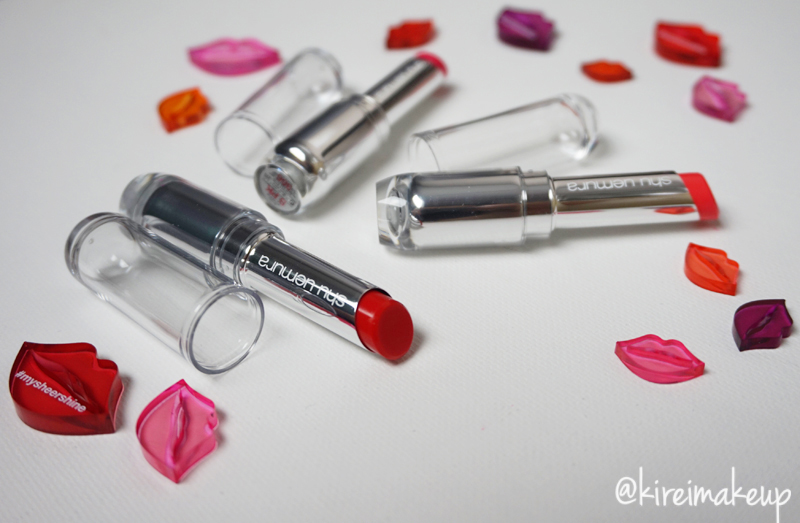
So, the 3 shades that I received are RD 164 (red), PK 366 (pink), CR 350 (peach). I can’t really pick a favorite because I love them all equally! They are very vibrant, and you can layer it. If you are not used to wearing bright colored lipsticks, you should definitely give this a try. This way, you can apply it sheer at first then build it to a more opaque finish once you get used to the color, especially if you want to try the red lipstick.
The best part, for me, is the fact that these Sheer Shine lipsticks are very moisturizing, and it has a “glass-like” finish, similar to a gloss but without the stickiness. Actually the shine on these lipsticks are amazing! It’s definitely better than a gloss! If you apply the Sheer Shine lipsticks with a lip brush (I recommend the Shu Uemura lip brush), you can actually create a stain on your lips.
These lipsticks are very pigmented, don’t let the name “Sheer” fools you! So vibrant, high shine and very colorful! On top of that, this product is just like butter. Very smooth and you can apply this very easily to the lips.
 Disclaimer:
- Links on this post are not affiliated links
- These products were sent to me, however all opinions expressed are honest and were based on my experience with the products.
- Please do your research & test patch before buying any products, I am not responsible should any irritation occurs
IMATS Toronto 2015 – Recap
As you all know, I went to IMATS Toronto on Saturday, and I had a blast! I’ve been to the IMATS since 2010, but last year I was back in Jakarta, so I really wanted to go this year. Fortunately, I was able to attend it with N, and I’m glad I went this year. I managed to meet my role models, my mentors, and couple friends! The meetings were even more amazing than the shopping experience!

So, this year, the IMATS were held in the North building of the Metro Toronto Convention Center, which is unusual since in the past it was held in the South building. The space was a tad smaller, but it was still pretty good. There were a lot of people who came to the tradeshow, and there were long queues everywhere! I came around 10am, but looking for parking was challenging since there were Blue Jays game and University fair. After finding parking, I checked in at around 10.30, and already long lineups as far as the eyes can see! NYX, MUFE, Benefit, MAC, Morphe, Crown, Nigel, Frends booths were packed!
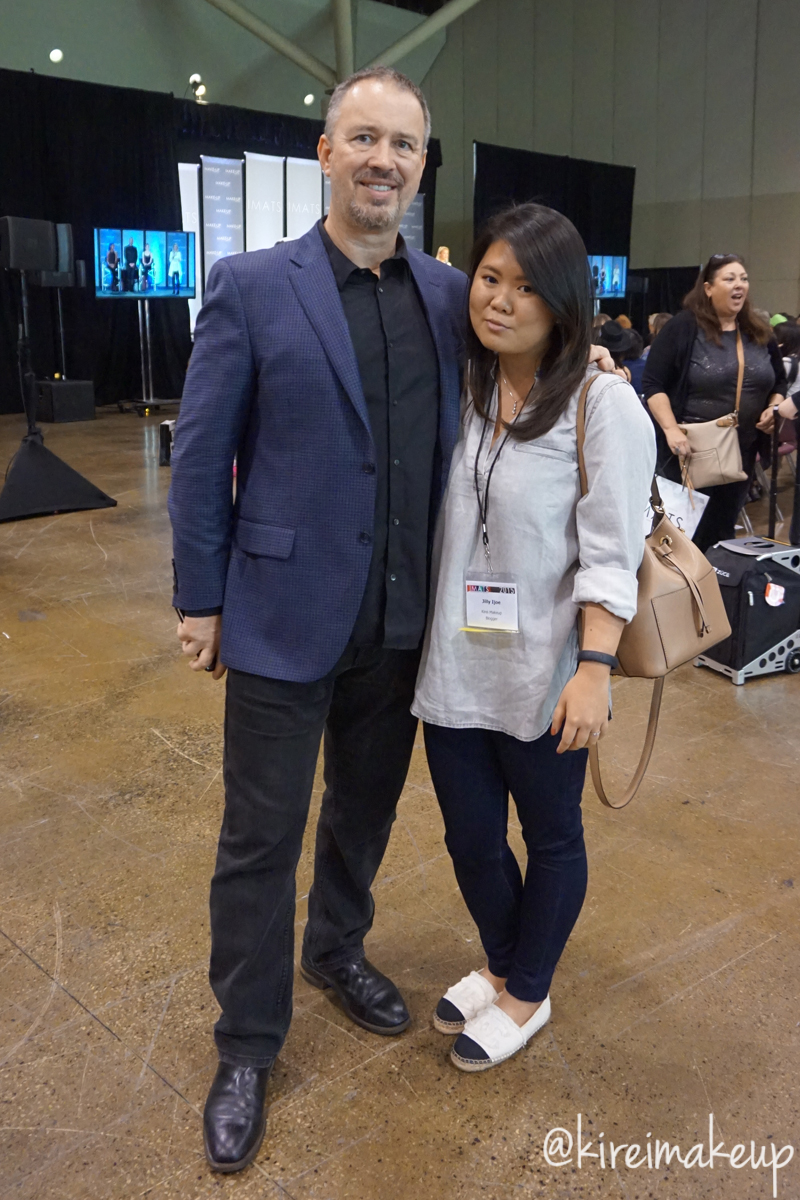
Anyways, this year when I posted a picture on Instagram regarding IMATS, Michael Key commented on the picture and I promised him that I would look for him. I managed to see him (more like hunting him), and took a picture with him! If you guys don’t know who Michael Key is, you should know! Michael Key is 2-time Emmy Winning makeup artist, executive of IMATS and Makeup Artist Magazine. He is the man behind IMATS, so of course I have to take a picture and say hi to him. Such a great guy, so friendly and humble.
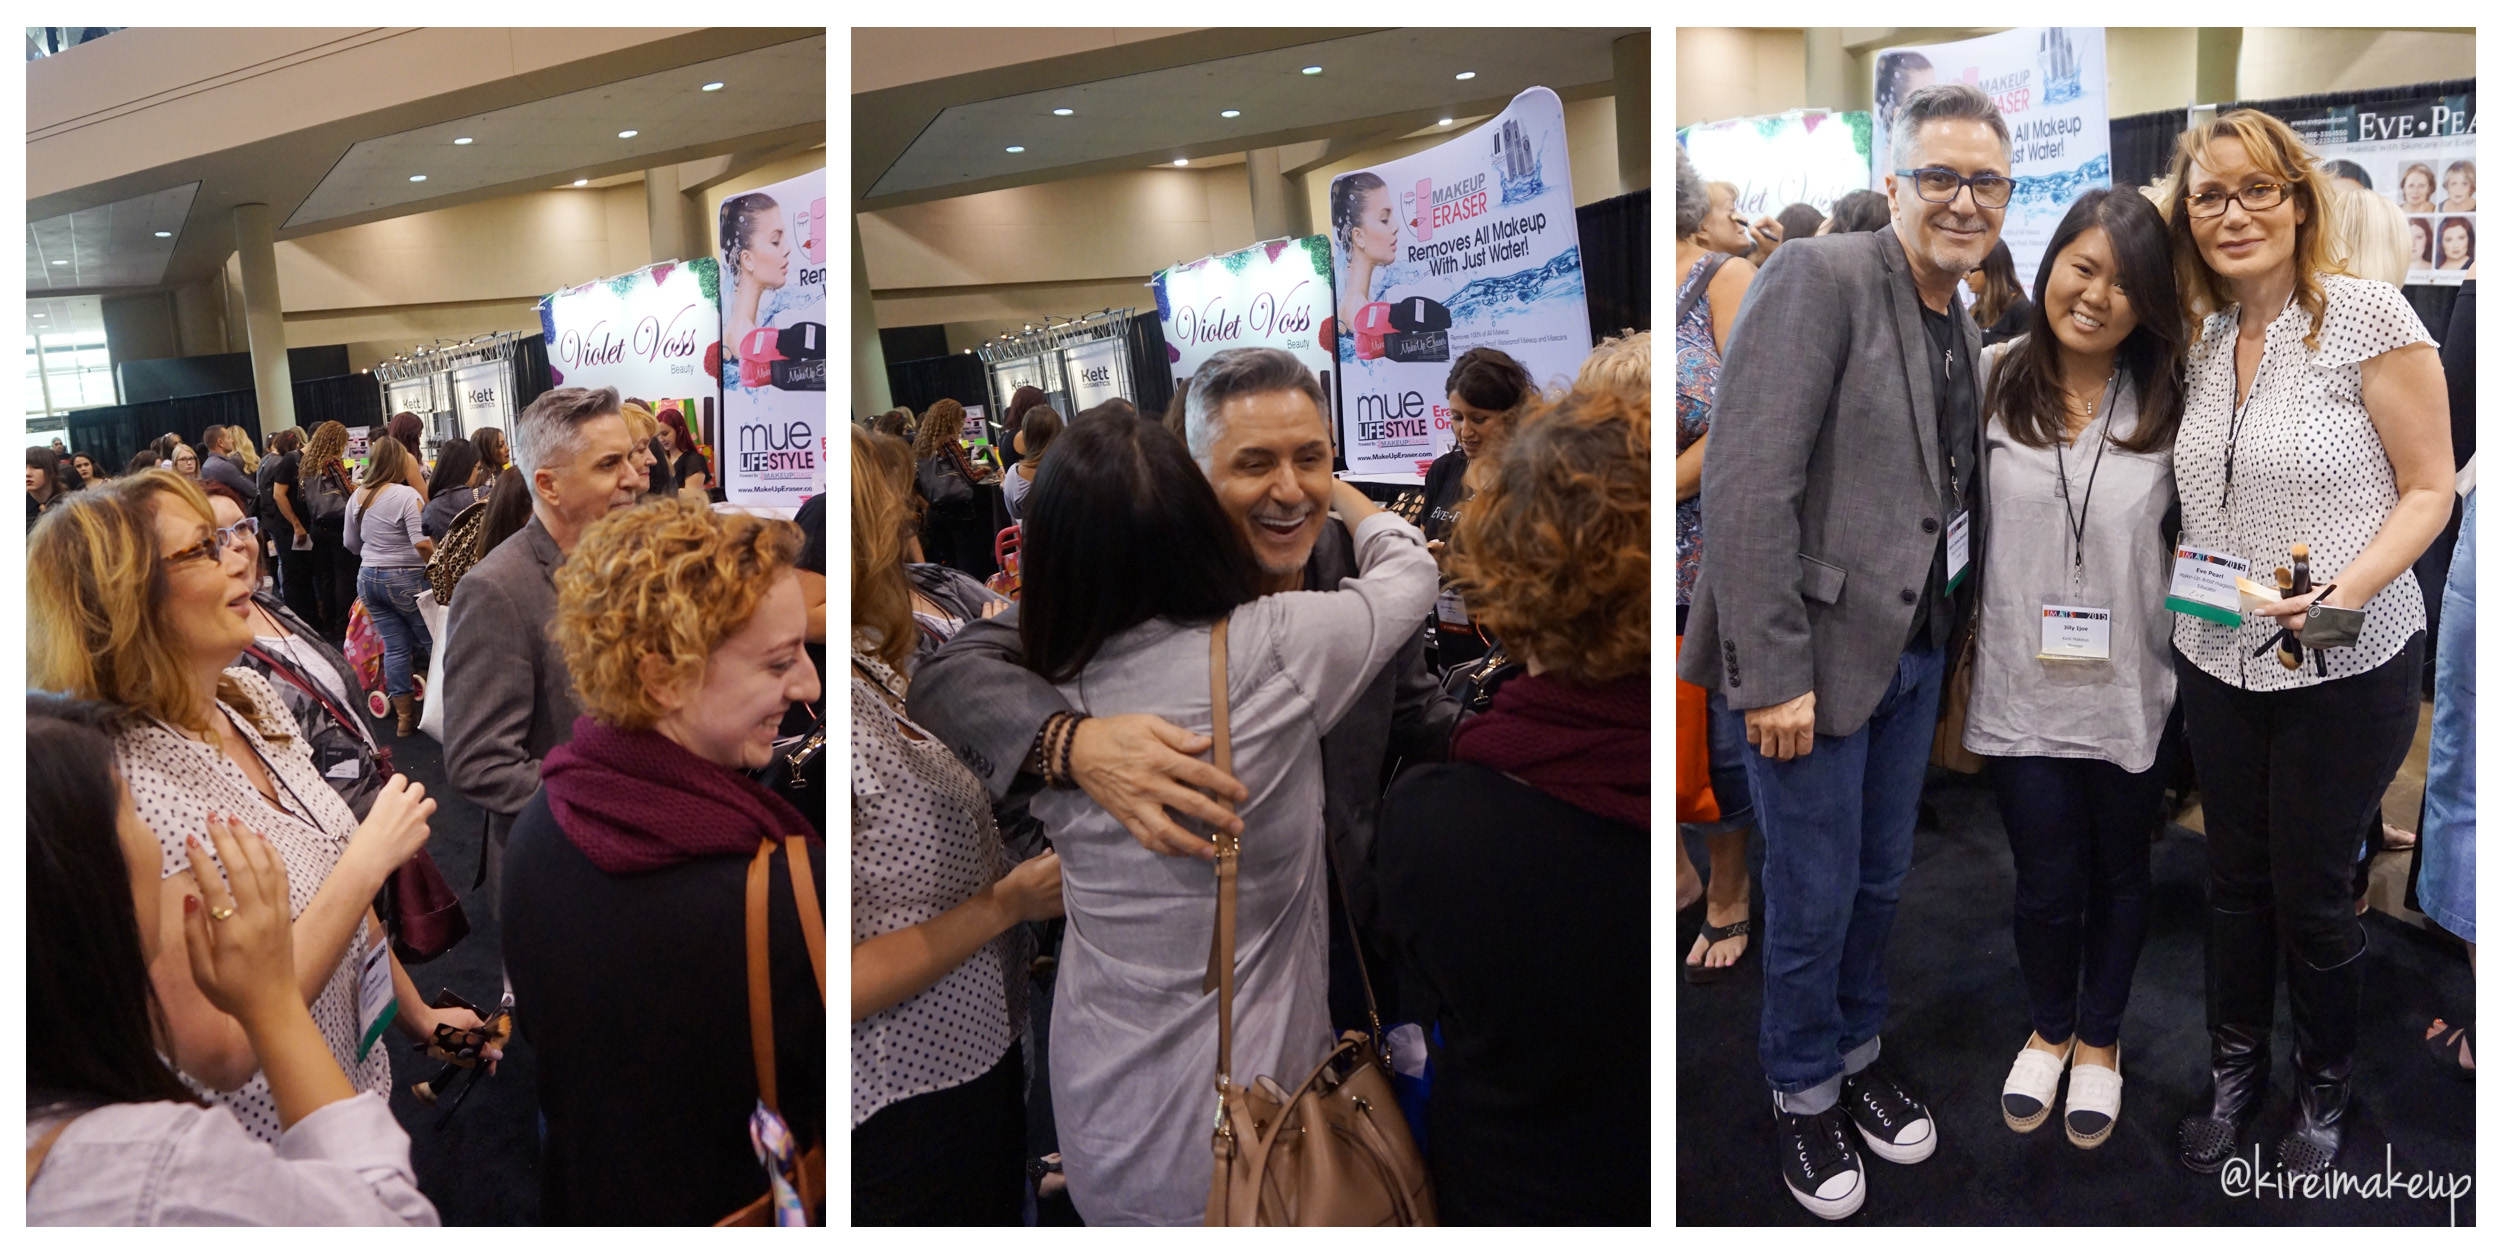
Then, I managed to see Kevin James Bennett while I was at Eve Pearl’s booth. As you can see on the photo collage below, I was fan girl-ing at KJB. I was like “I’m a big fan of your work!!!” *laughs* Eve Pearl was there and told him “she’s your fan!”. Unreal! I mean, KJB and Eve Pearl are like the big names in the beauty industry! I still can’t believe I managed to talk to them, and took pictures with them. It felt so surreal! They were giving out tips and tricks, chit chatting with the attendees.
Kevin James Bennett and Eve Pearl are always in the IMATS Toronto, so if you missed them this year don’t forget to look for them next year. KJB and Eve Pearl are Emmy Winning Makeup Artists, they KNOW what they are talking about! All of their classes are very informative, and they are so kind, always willing to answer questions.
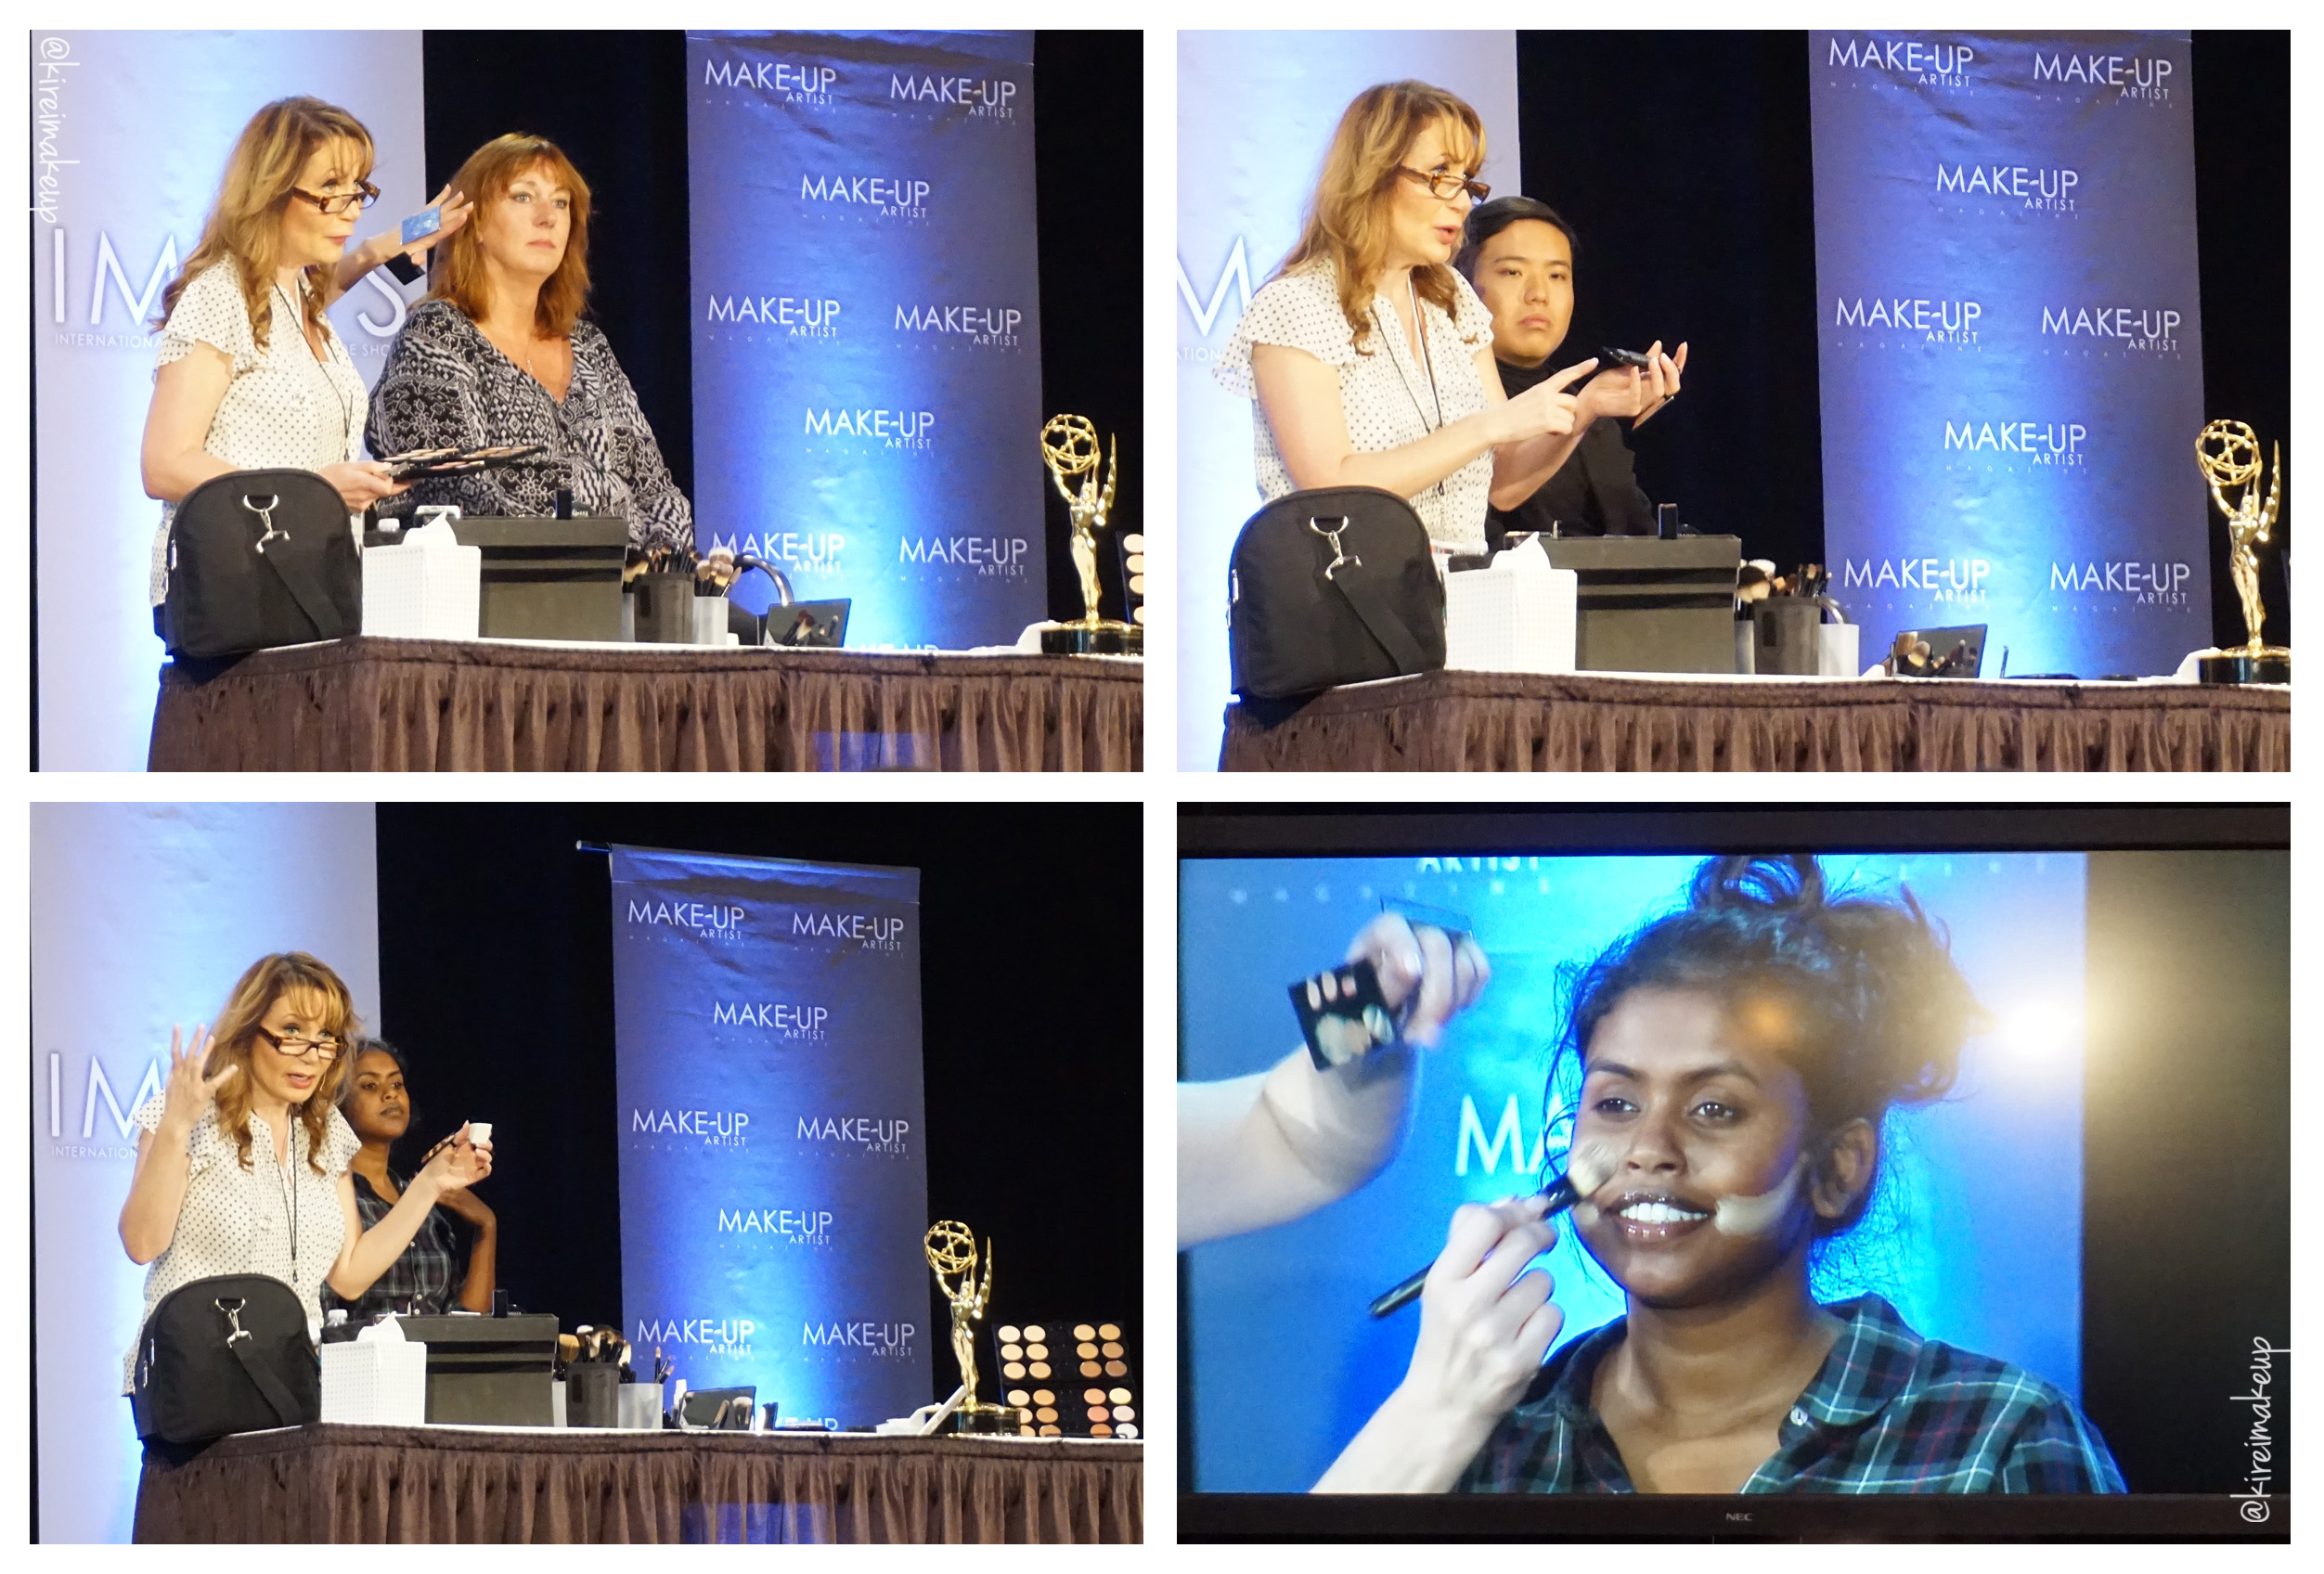
All the makeup workshops were amazing! I cannot say enough about these classes. I only managed to sit in on 2 classes this time, but it was really fun and informative. For beauty, I went to Eve Pearl makeup demo. She started out by giving us tips on how to make it in the industry, how to pack our makeup kits and how to work on clients. Then, of course, she proceeded by showing us her famous “Reverse Contouring” technique. I live tweeted during the workshop, so check out my twitter!
Eve was given an hour for her class, and within 45mins she managed to do 4 makeup while talking to us and answering our questions. I only took pictures of 3 of the attendees, but there were actually 4 whose makeup was done by her. She showed us how to do her “Reverse Contouring” technique on all skintone, just by using her Pro kit. I’ll try to apply this technique on myself in the future, so wait for the post!
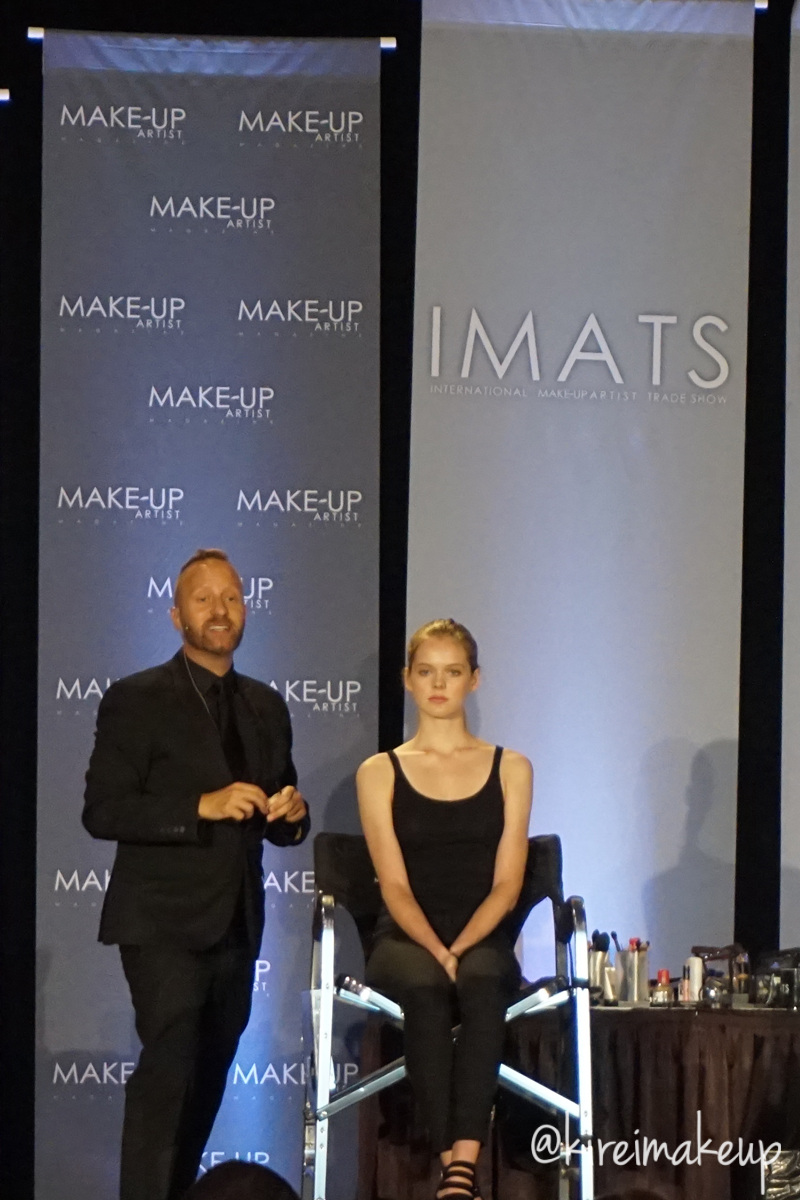
I wanted to attend Gregory Arlt beauty class, but I didn’t manage to do so since I wanted to see The Strain demo. So, I do apologize for being unable to share any tips he shared. I know a couple other bloggers who attended this class, and they might have tips on their blogs! Anyways, I managed to snap this picture of his class moments after The Strain demo, and before I saw Michael Key walking around.
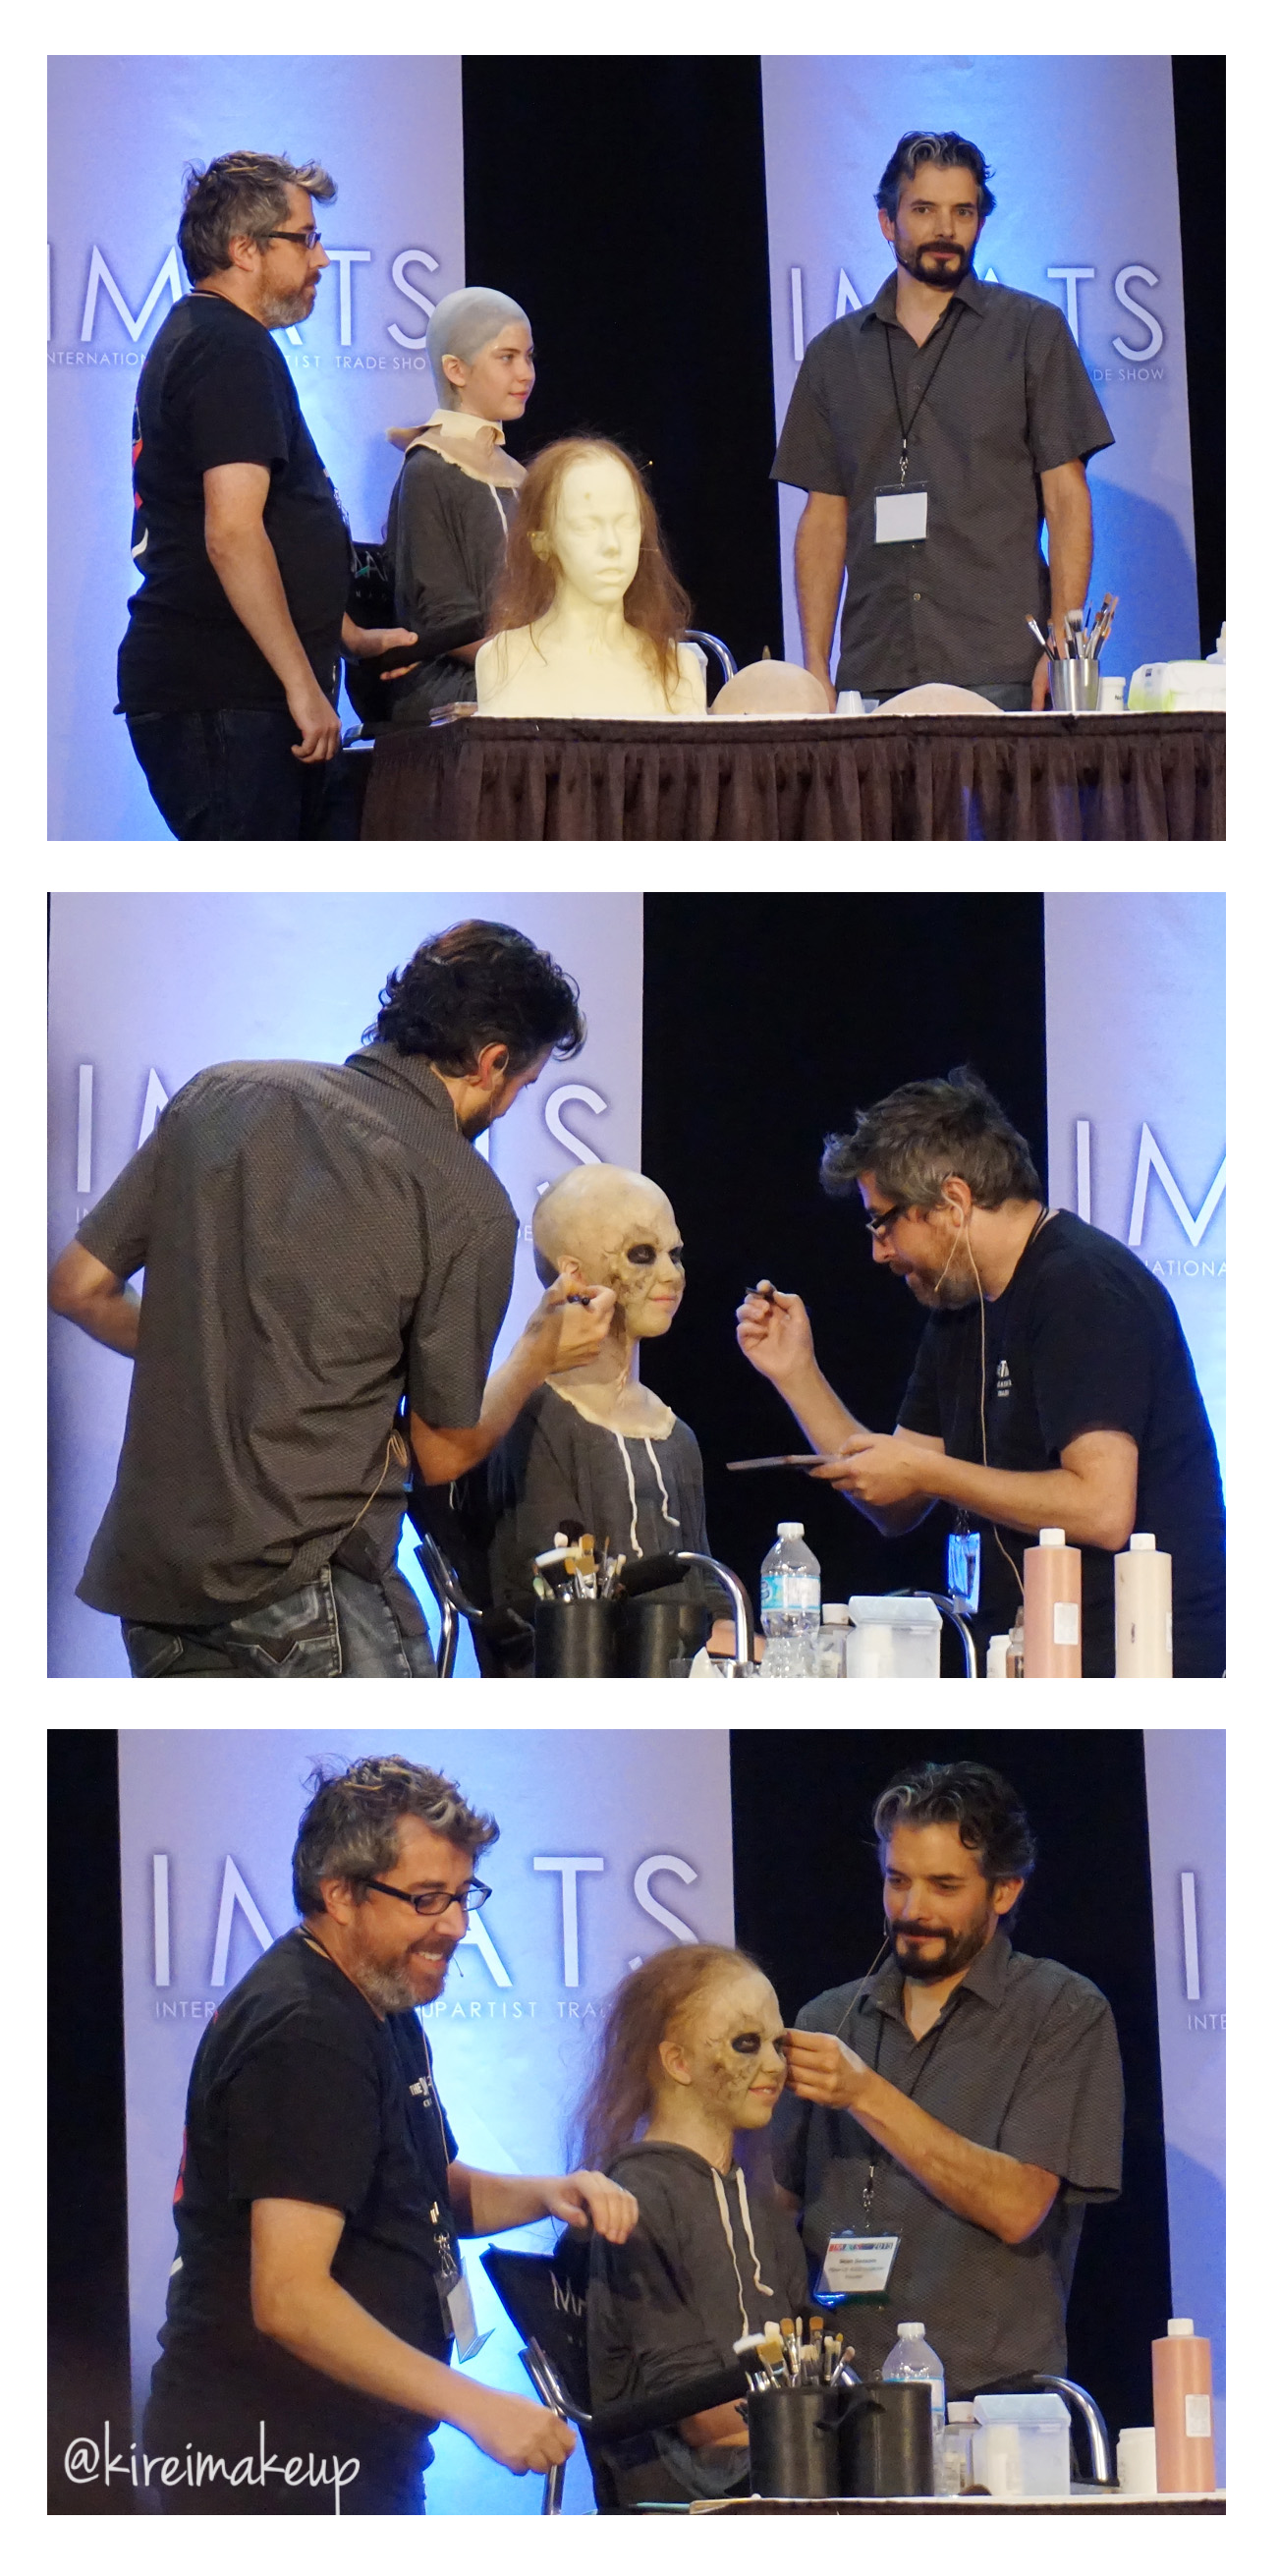
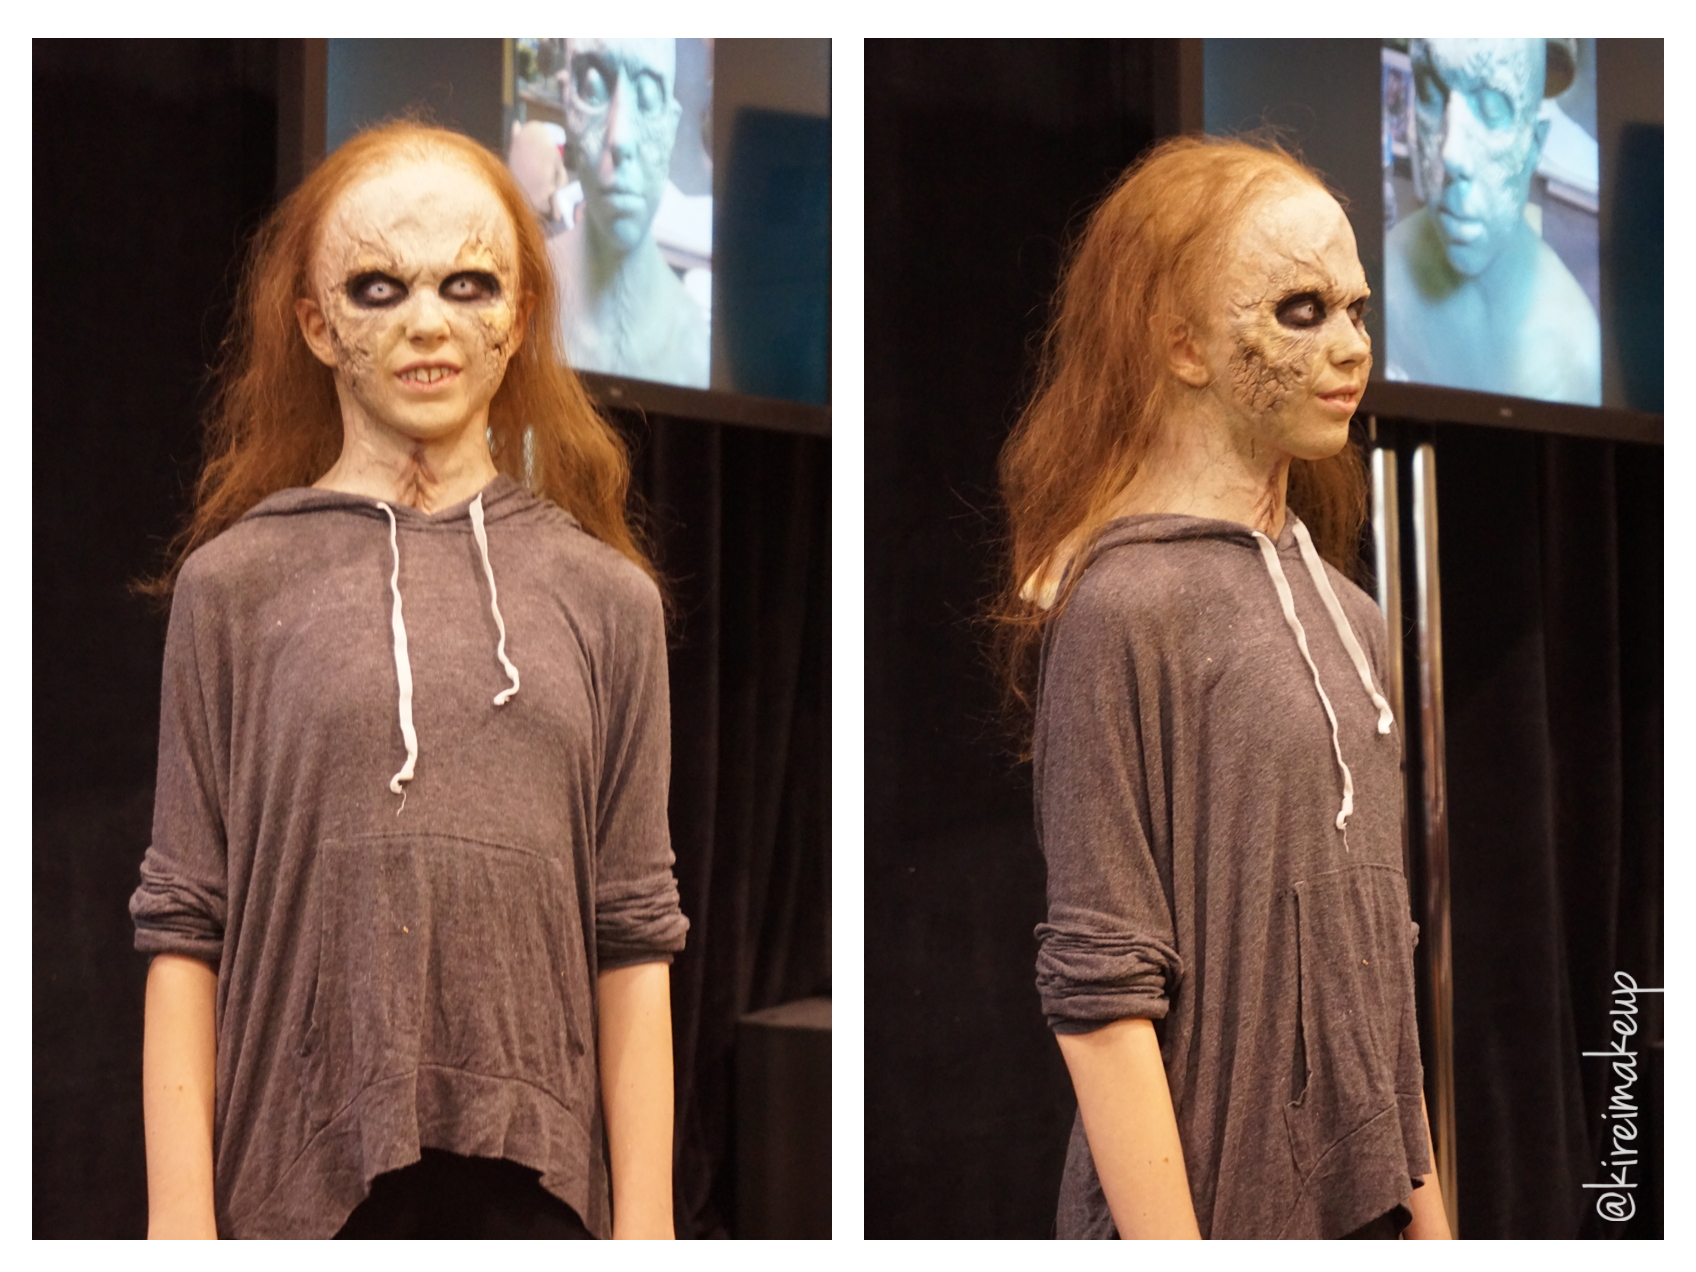
The workshop that I really wanted to attende to was “The Strain” Character Demo done by Sean Samson and Neil Morrill. This demo took 1.5hr. Sean and Neil showed us how they applied the Foam Latex pieces, they also demonstrated how they colored the pieces. It was pretty great since N and I loved the show, and we really enjoyed the demonstration. They told us that during the filming, these prosthetic pieces took around 3hr to be put on the talent.
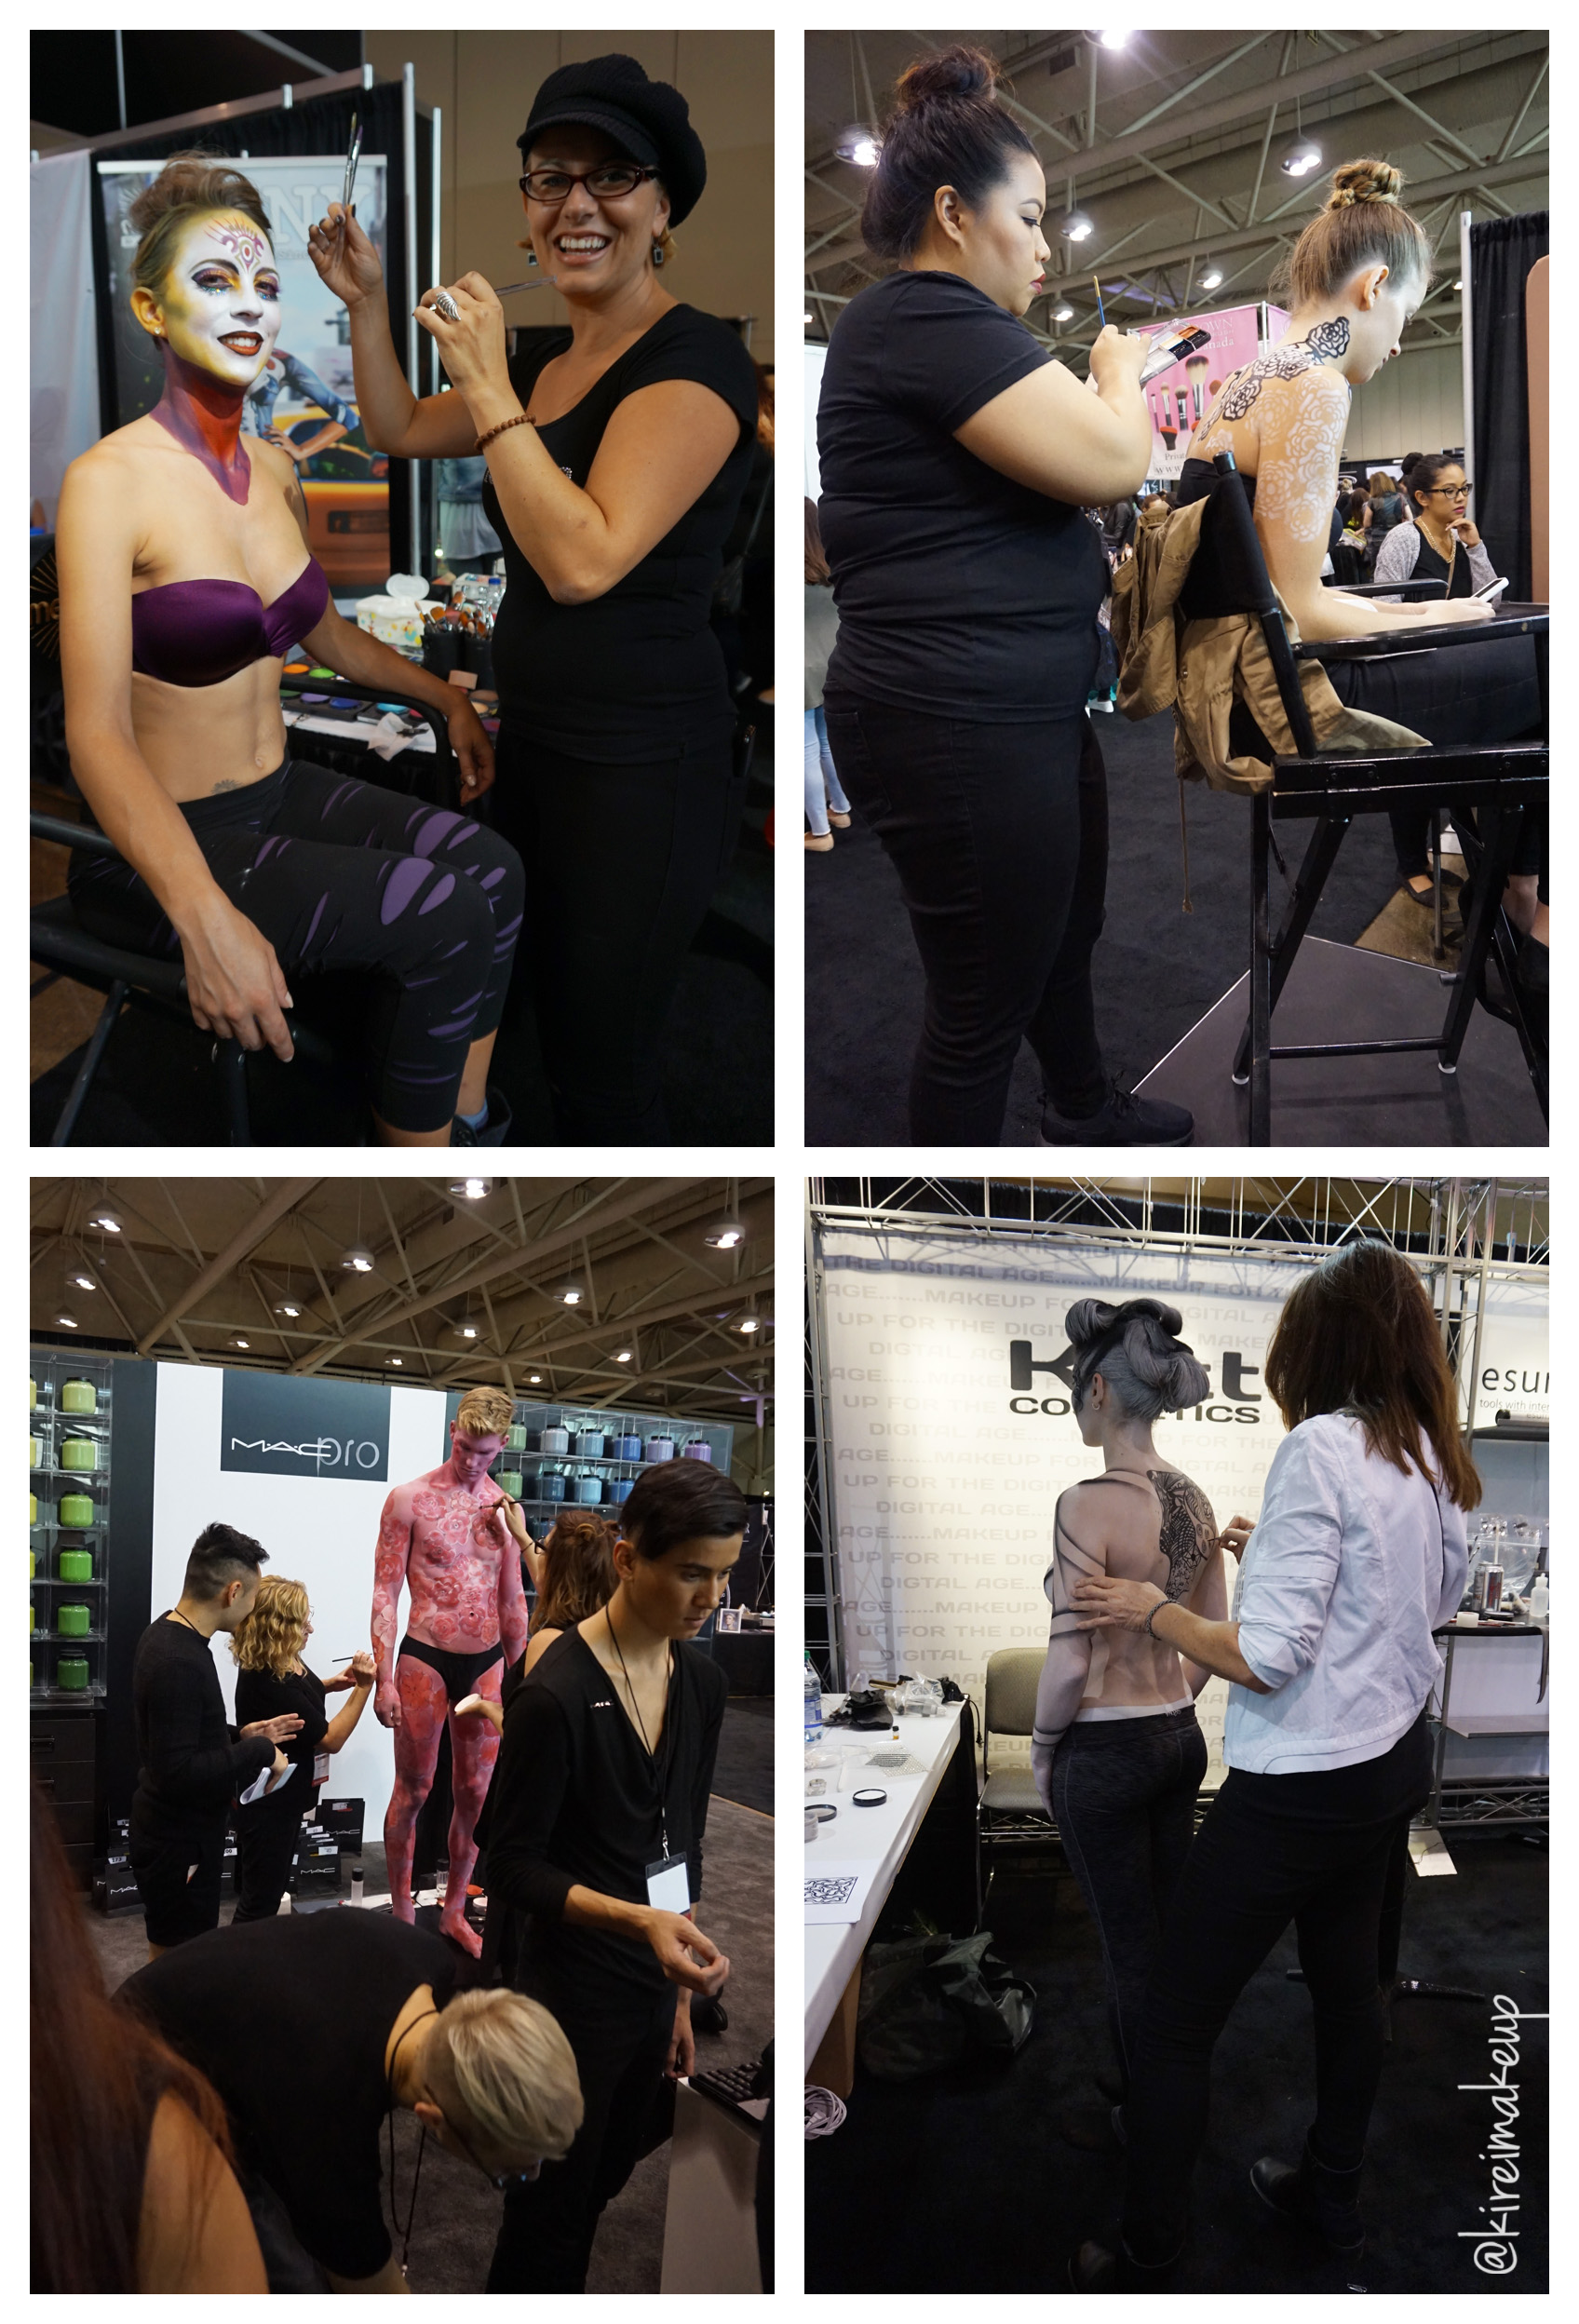
Besides the workshops and meeting all these amazing makeup artist, I walked around to take a look at what the booths offer. I absolutely love how some of these amazing makeup artists took their time to talk to the attendees. As you can see on the pictures below, Sebastien Tardif and Eve Pearl were showing attendees how to correctly apply their products to enhance their beauty!
Of course there would be lots of body painting around the IMATS. Pretty, colorful, and meticulous. These body paintings took hours to complete. There were some demo on how to cover tattoo, and prosthetic application as well in some of the booths.

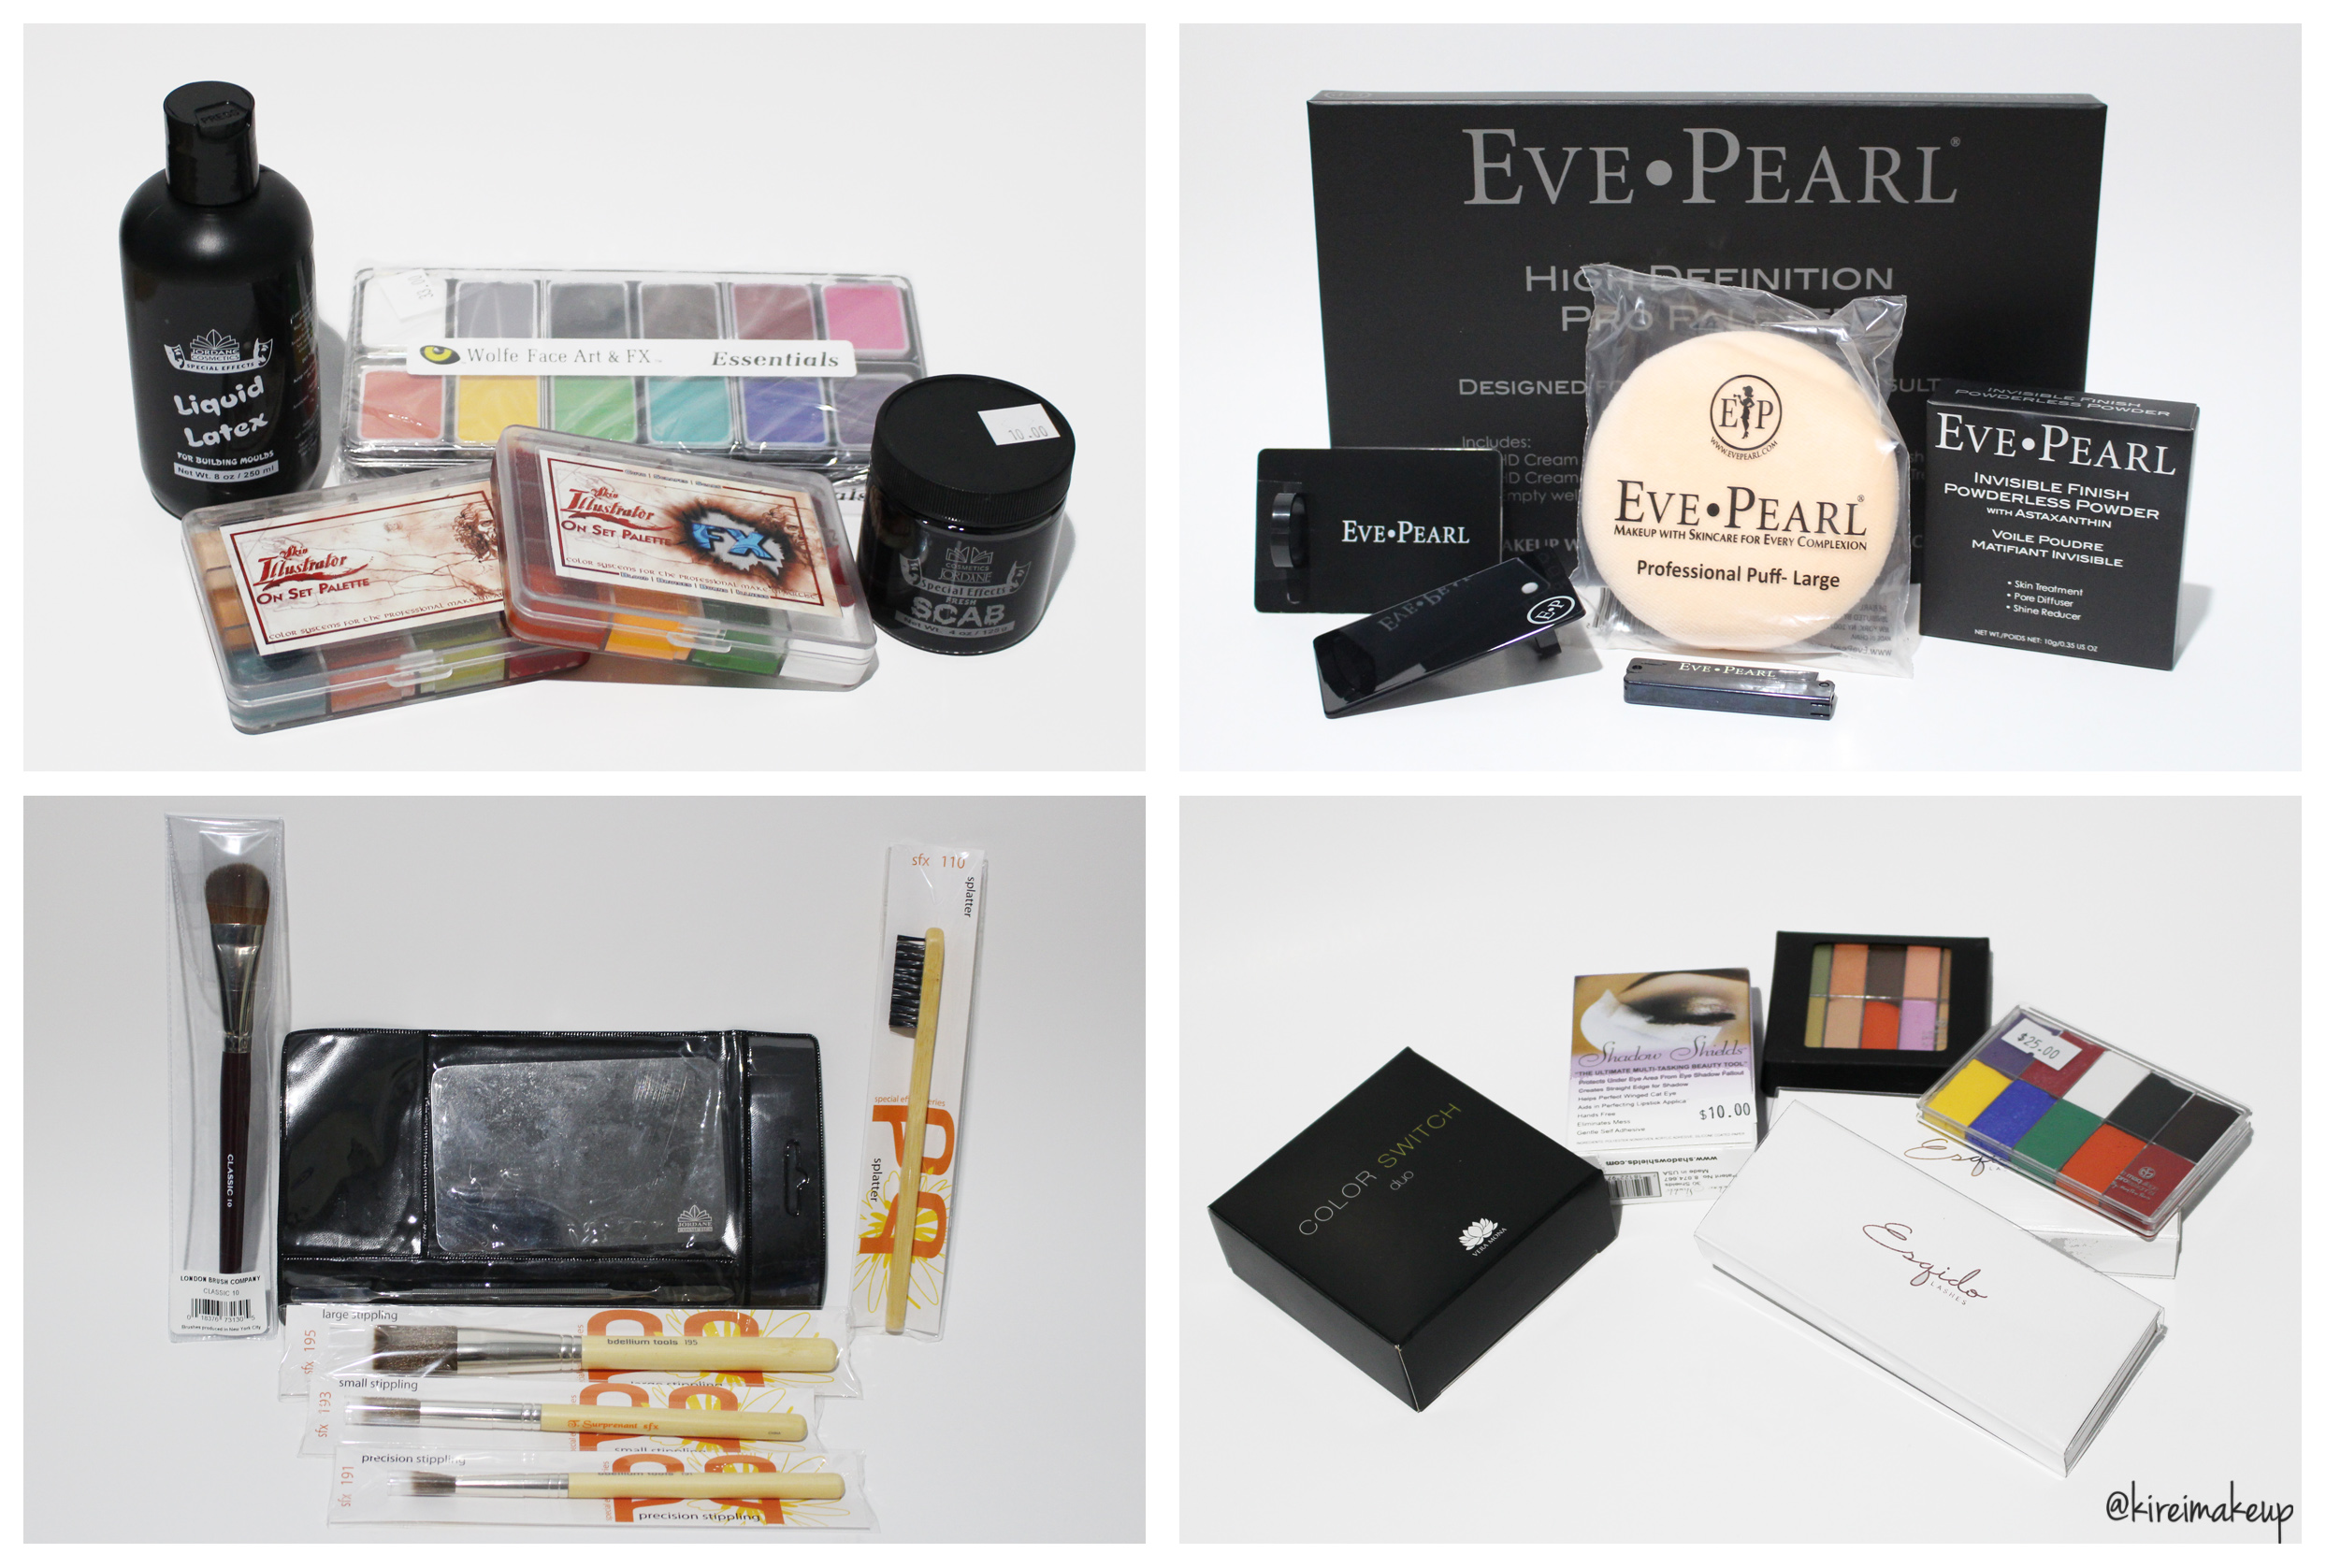
I, obviously, have to do some shopping around! There were some good deals on the products. I bought a smaller version of the illustrator palettes, scabs, liquid latex, and Wolfe face paint from Crown Brush/Jordane Cosmetics. I bought Eve Pearl’s Pro Kit, Invisible powder, powder puff, eyebrow razor, and finger palettes. Eve really gave great discounts! The powder puff was only $1, the Pro kit was only $100! What a steal!
Other than that, I bought a couple of spfx brushes from Bdellium, another palette from Crowne, and some other miscellaneous stuffs – MAQPro cream corrector and primary color from MUSST, mink lashes from Esquido, and color switch along with shadow shield from Nigel.
Big Dolly Eye Makeup Tutorial
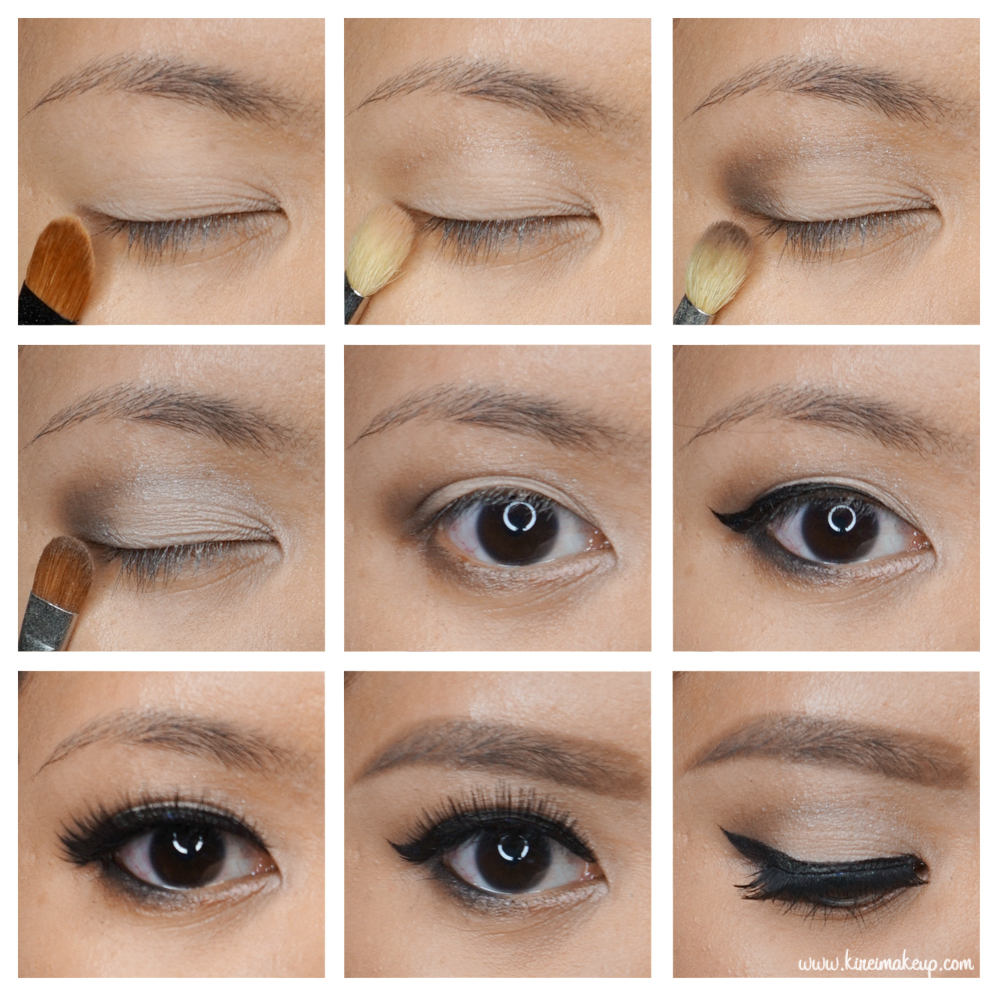
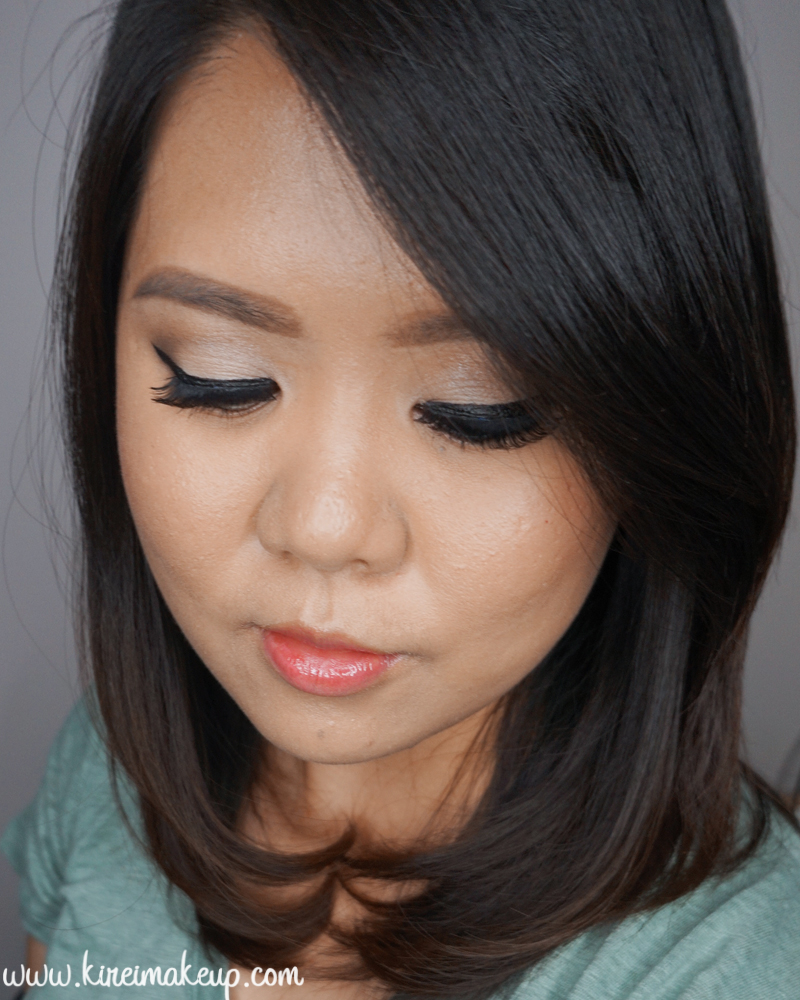
Today’s Big Dolly Eye Makeup tutorial is for those who’d like to make their eyes look enlarged and more doll-like! I think this type of makeup look is very popular in Asia, and I know personally in my home country, Indonesia, girls love this kind of look since it makes their eyes look bigger. For me, this look is already pretty heavy, and I would not wear this out for a day makeup. I’ll probably wear it if I go to party, but again, it’s up to your preference.
The key to this look is heavy eyeliner and lots of lashes. I could have done something a bit more extreme, and made it look even bigger, but I also wanted to make the look more wearable. If you want to make your eyes even bigger and more doll-like, feel free to substitute the black eyeliner on the waterline with a beige or white eyeliner. If you have monolids, you can use eyelid tape/glue/fiber to create a fold, it’ll help to open up the eyes more and make it look bigger.
Also, add more lashes, you can stack 2 lashes on the upper lashes and a bottom falsies. I don’t have bottom falsies, so I didn’t put any. The falsies I’m using is already thick and long, so I didn’t stack my falsies.
 I used my Dior Eye Reviver palette for this tutorial. I’ve used this palette on my other tutorial, so if you’d like to see the shades that correspond with the number I listed below, please check out my Summer Wedding Guest Makeup Tutorial post. I have a picture of the palette there with the shades’ numbers.
Products used
Eyes
- Primer – Urban Decay Primer Potion “Original”
- Base – Dior Eye Reviver palette “#1”
- Transition – Dior Eye Reviver palette “#3”
- Outer V/Crease – Dior Eye Reviver palette “#5”
- Eyelid – Dior Eye Reviver palette “#2”
- Outer half of lower lash line – Dior Eye Reviver palette “#5”; Kat Von D Eye Contour Shade + Light “Shax”
- Inner half of lower lash line – Dior Eye Reviver palette “#4”
- Winged liner – Kat Von D Tattoo Liner “Trooper”
- Waterline (outer half only) – L’oreal Paris Voluminous Smoldering eyeliner
- Falsies – Gwiyomi falsies “Putri”
- Brows – Anastasia Brow Wiz Taupe; Kat Von D Tattoo Brown “Medium Brown”

Face
- Primer – Kat Von D Lock-it Featherweight Primer
- Foundation – Diorskin Star Foundation “#31” (update: yes I bought #31, and its undertone matches me better than #30)
- Concealer – Dior Star Concealer “003”
- Setting powder – Diorskin Nude Air Healthy Glow Invisible Loose Powder “#30”
Cheeks
- Contour – Kat Von D Shade + Light “Shadowplay”
- Blush – Chanel “Blush de Horizon”
Lips
- Lipstain – YSL Pop Water Glossy Stain “203 (Eau de Corail)”
Navy Blue Smoky Eyes
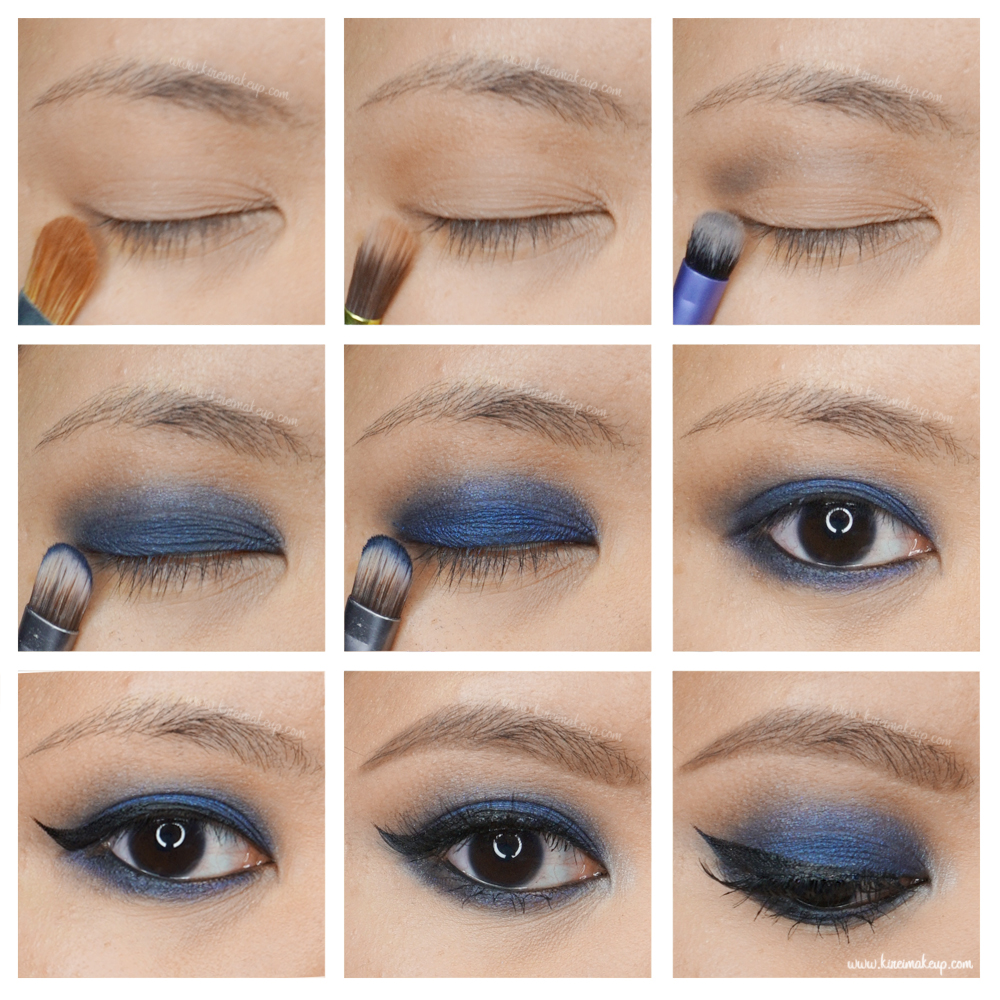
I’ve been going pretty neutrals with my tutorials lately, and I wanted to do colors. I don’t have my bright palettes with me since I left it back in Jakarta, so I decided to utilize what I have here in Canada. I decided to do a very rich Navy Blue smoky eyes tutorial, since I think it’s a really pretty color to do.
I used layers of eyeshadows to make sure everything is blended well. 2 blue eyeshadows are used on this tutorial to allow for the blue to pop even more. This look would look great on brown eyes, green eyes, and gray eyes.
You can skip the winged liner, I just added it as an extra. It’s just something I’m used to do. You can definitely opt out the winged liner.
Products used
Eyes
- Primer – Urban Decay Primer Potion “Original”.
- Base – Urban Decay Vice 3 “Undone”.
- Transition – Urban Decay Vice 3 “Downfall”.
- Crease – Urban Decay Vice 3 “Revolver”.
- Eyelid – Urban Decay Vice 3 “Heroine”; L’oreal Infallible eyeshadow “All Night Blue”.
- Lower lid – Urban Decay Vice 3 “Heroine”.
- Lower lash line – MAC “Black Tied”.
- Waterline – L’oreal Paris “Voluminous Smoldering eyeliner in Black”
- Winged liner – Kat Von D Tattoo Liner “Trooper”.
- Brows – Anastasia Beverly Hills Brow Wiz “Taupe” + “Medium Brown”.
- Falsies – Ardell falsies “Demi 120”.

Face
- Primer – The Bodyshop Drops of Youth “Wonderblur”.
- Foundation – NARS Luminous Weightless Foundation “Punjab”.
- Under eye concealer – NARS Radiant Creamy concealer “Custard”.
- Blemish concealer – MAC Studio Finish concealer “NC30”.
- Setting powder – CoverFX translucent setting powder “Light”.
Cheeks
- Contour – MAC powder blush “Blunt”.
- Highlight – The Balm “Mary-Lou Manizer”.
- Blush – MAC powder blush “Breezy”.
Lips
- Lipstick – Sonia Kashuk Velvety Matte Crayon in “Pink Nude”.
- Lip stain – L’oreal Paris Color Riche Extraordinaire “Blushing Harmony”.
