Daytime Bronze Smokey Eyes

Today’s post, Daytime Bronze smokey eyes, was actually a pending post from last week. I actually did this look after I did my brows video. Since I was uber busy last week (Shu Uemura competition, work and stuff), I didn’t have the chance to post this tutorial up. I also want to mention that I will not be posting any tutorial until end of this week, so I apologize for missing again. However, do follow me on Instagram to find out what I’m up to! Instagram has been a place for me to micro-blog almost daily.

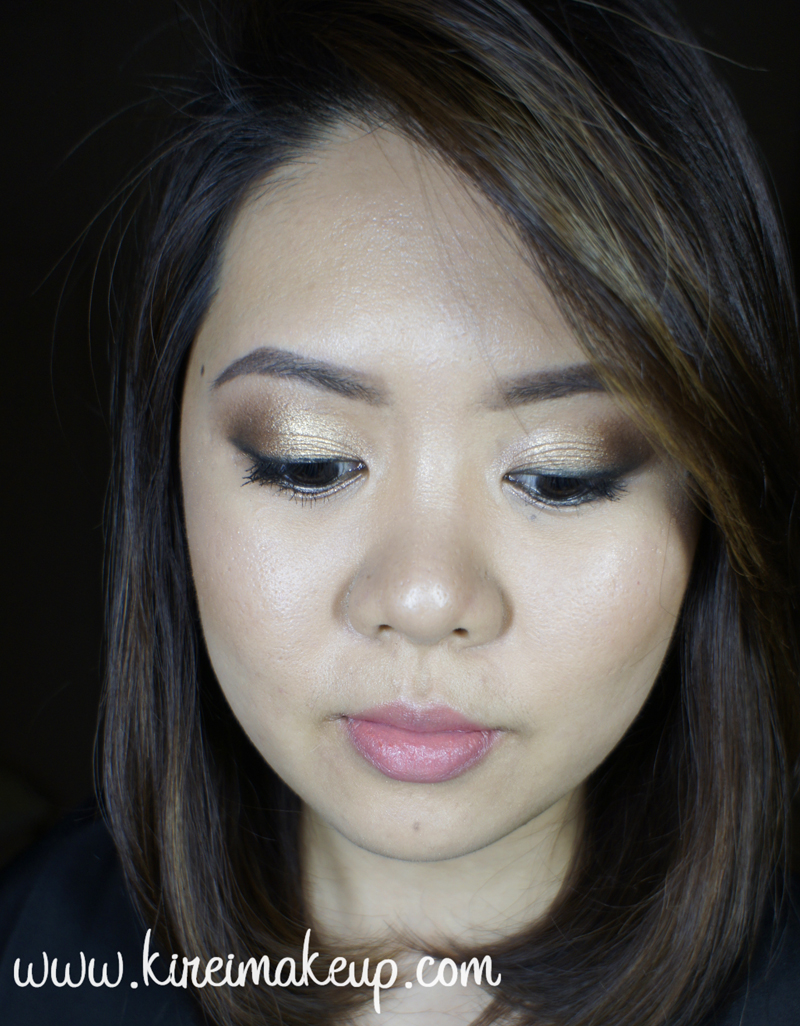
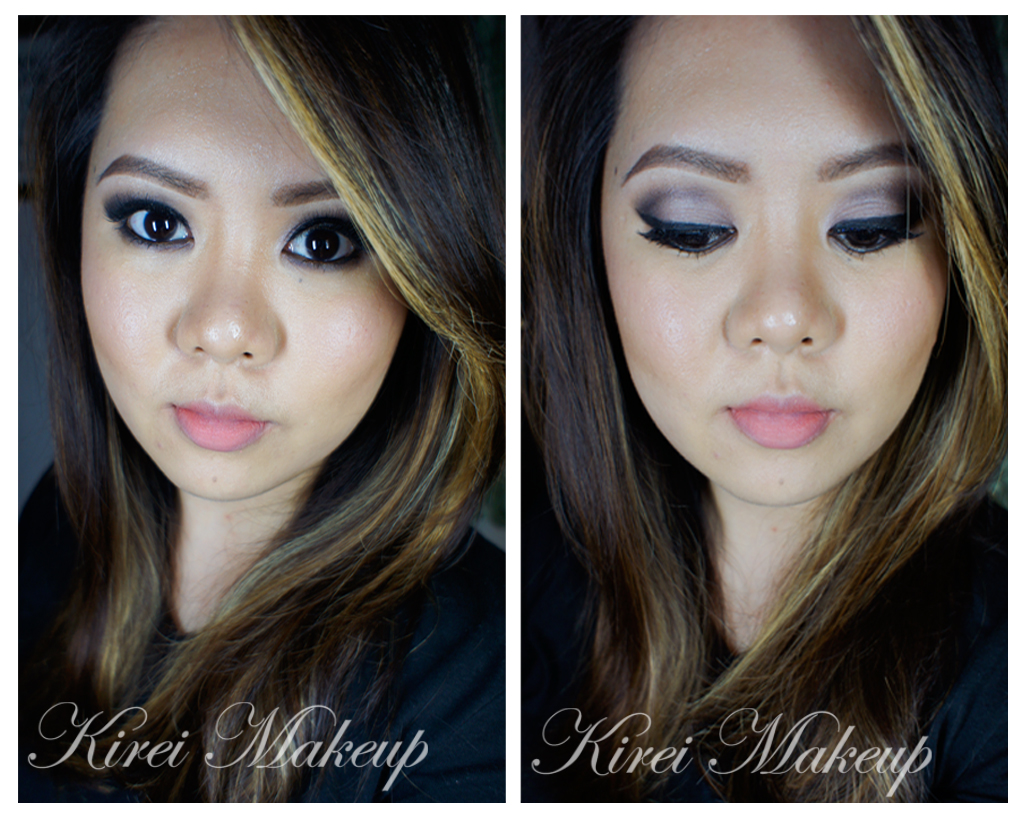
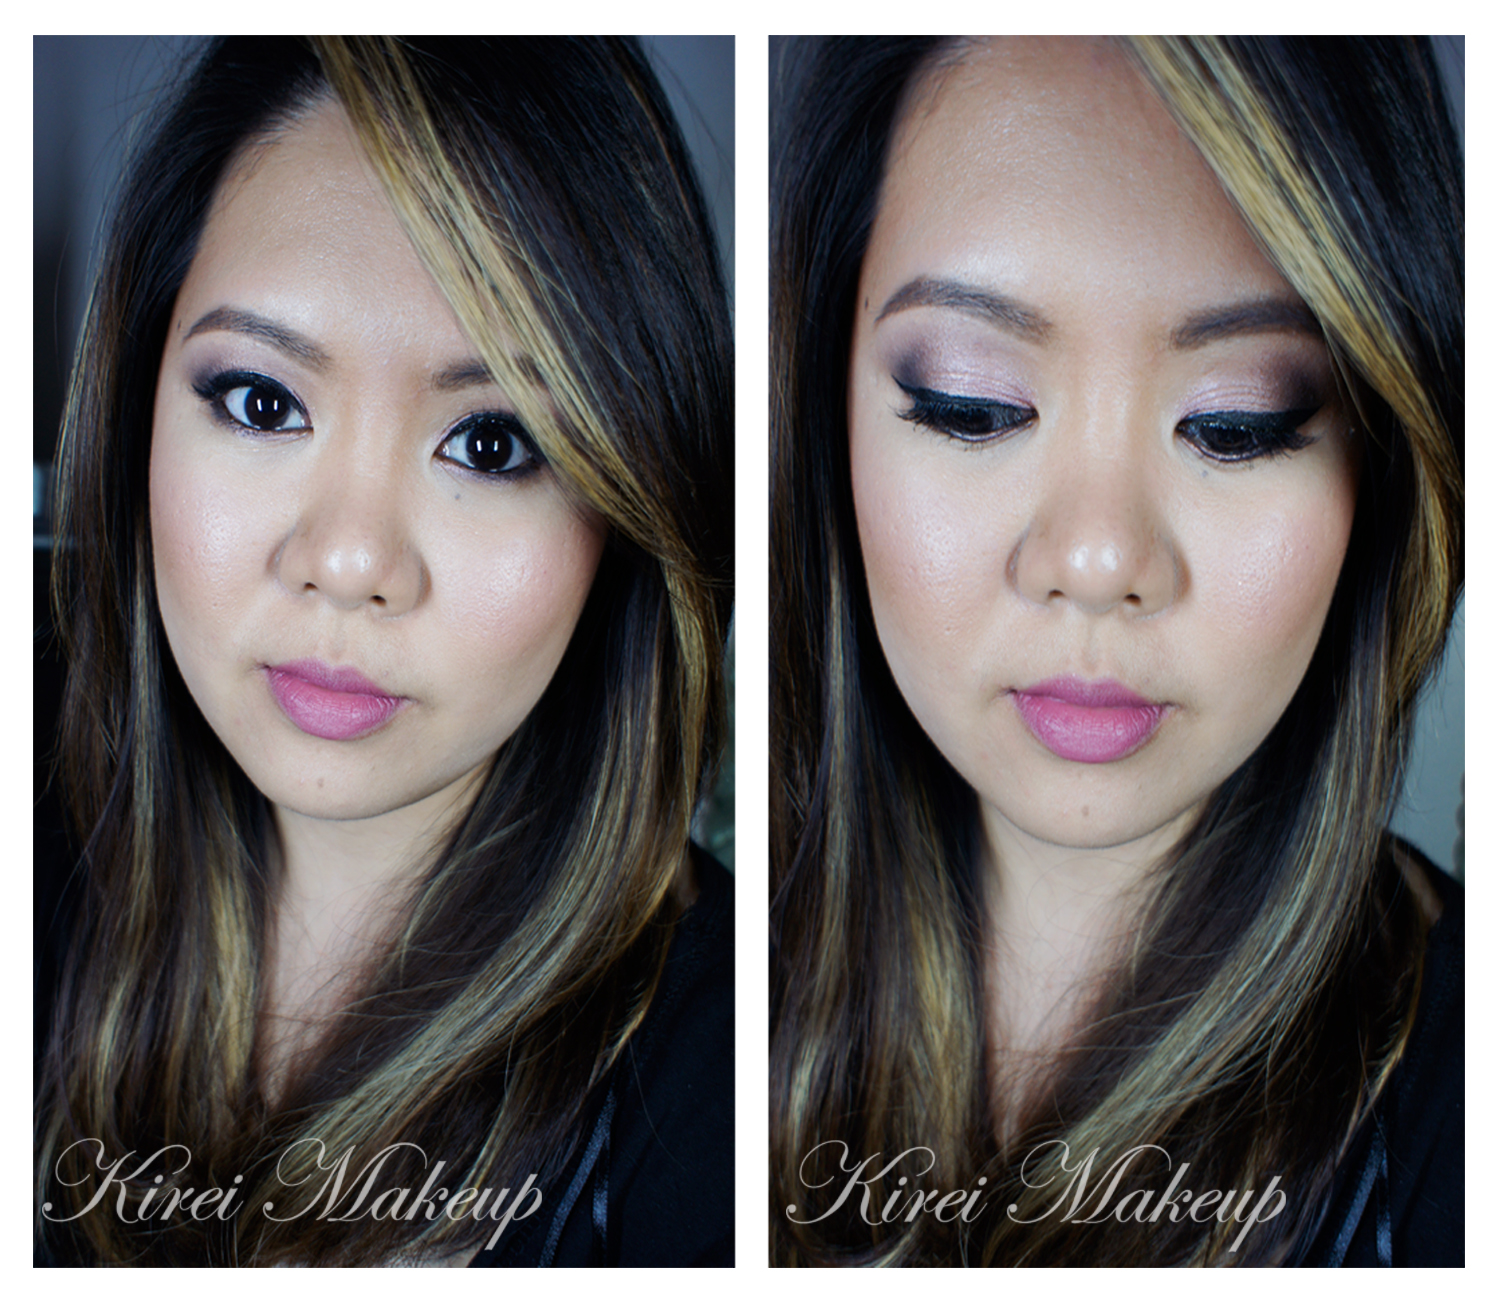
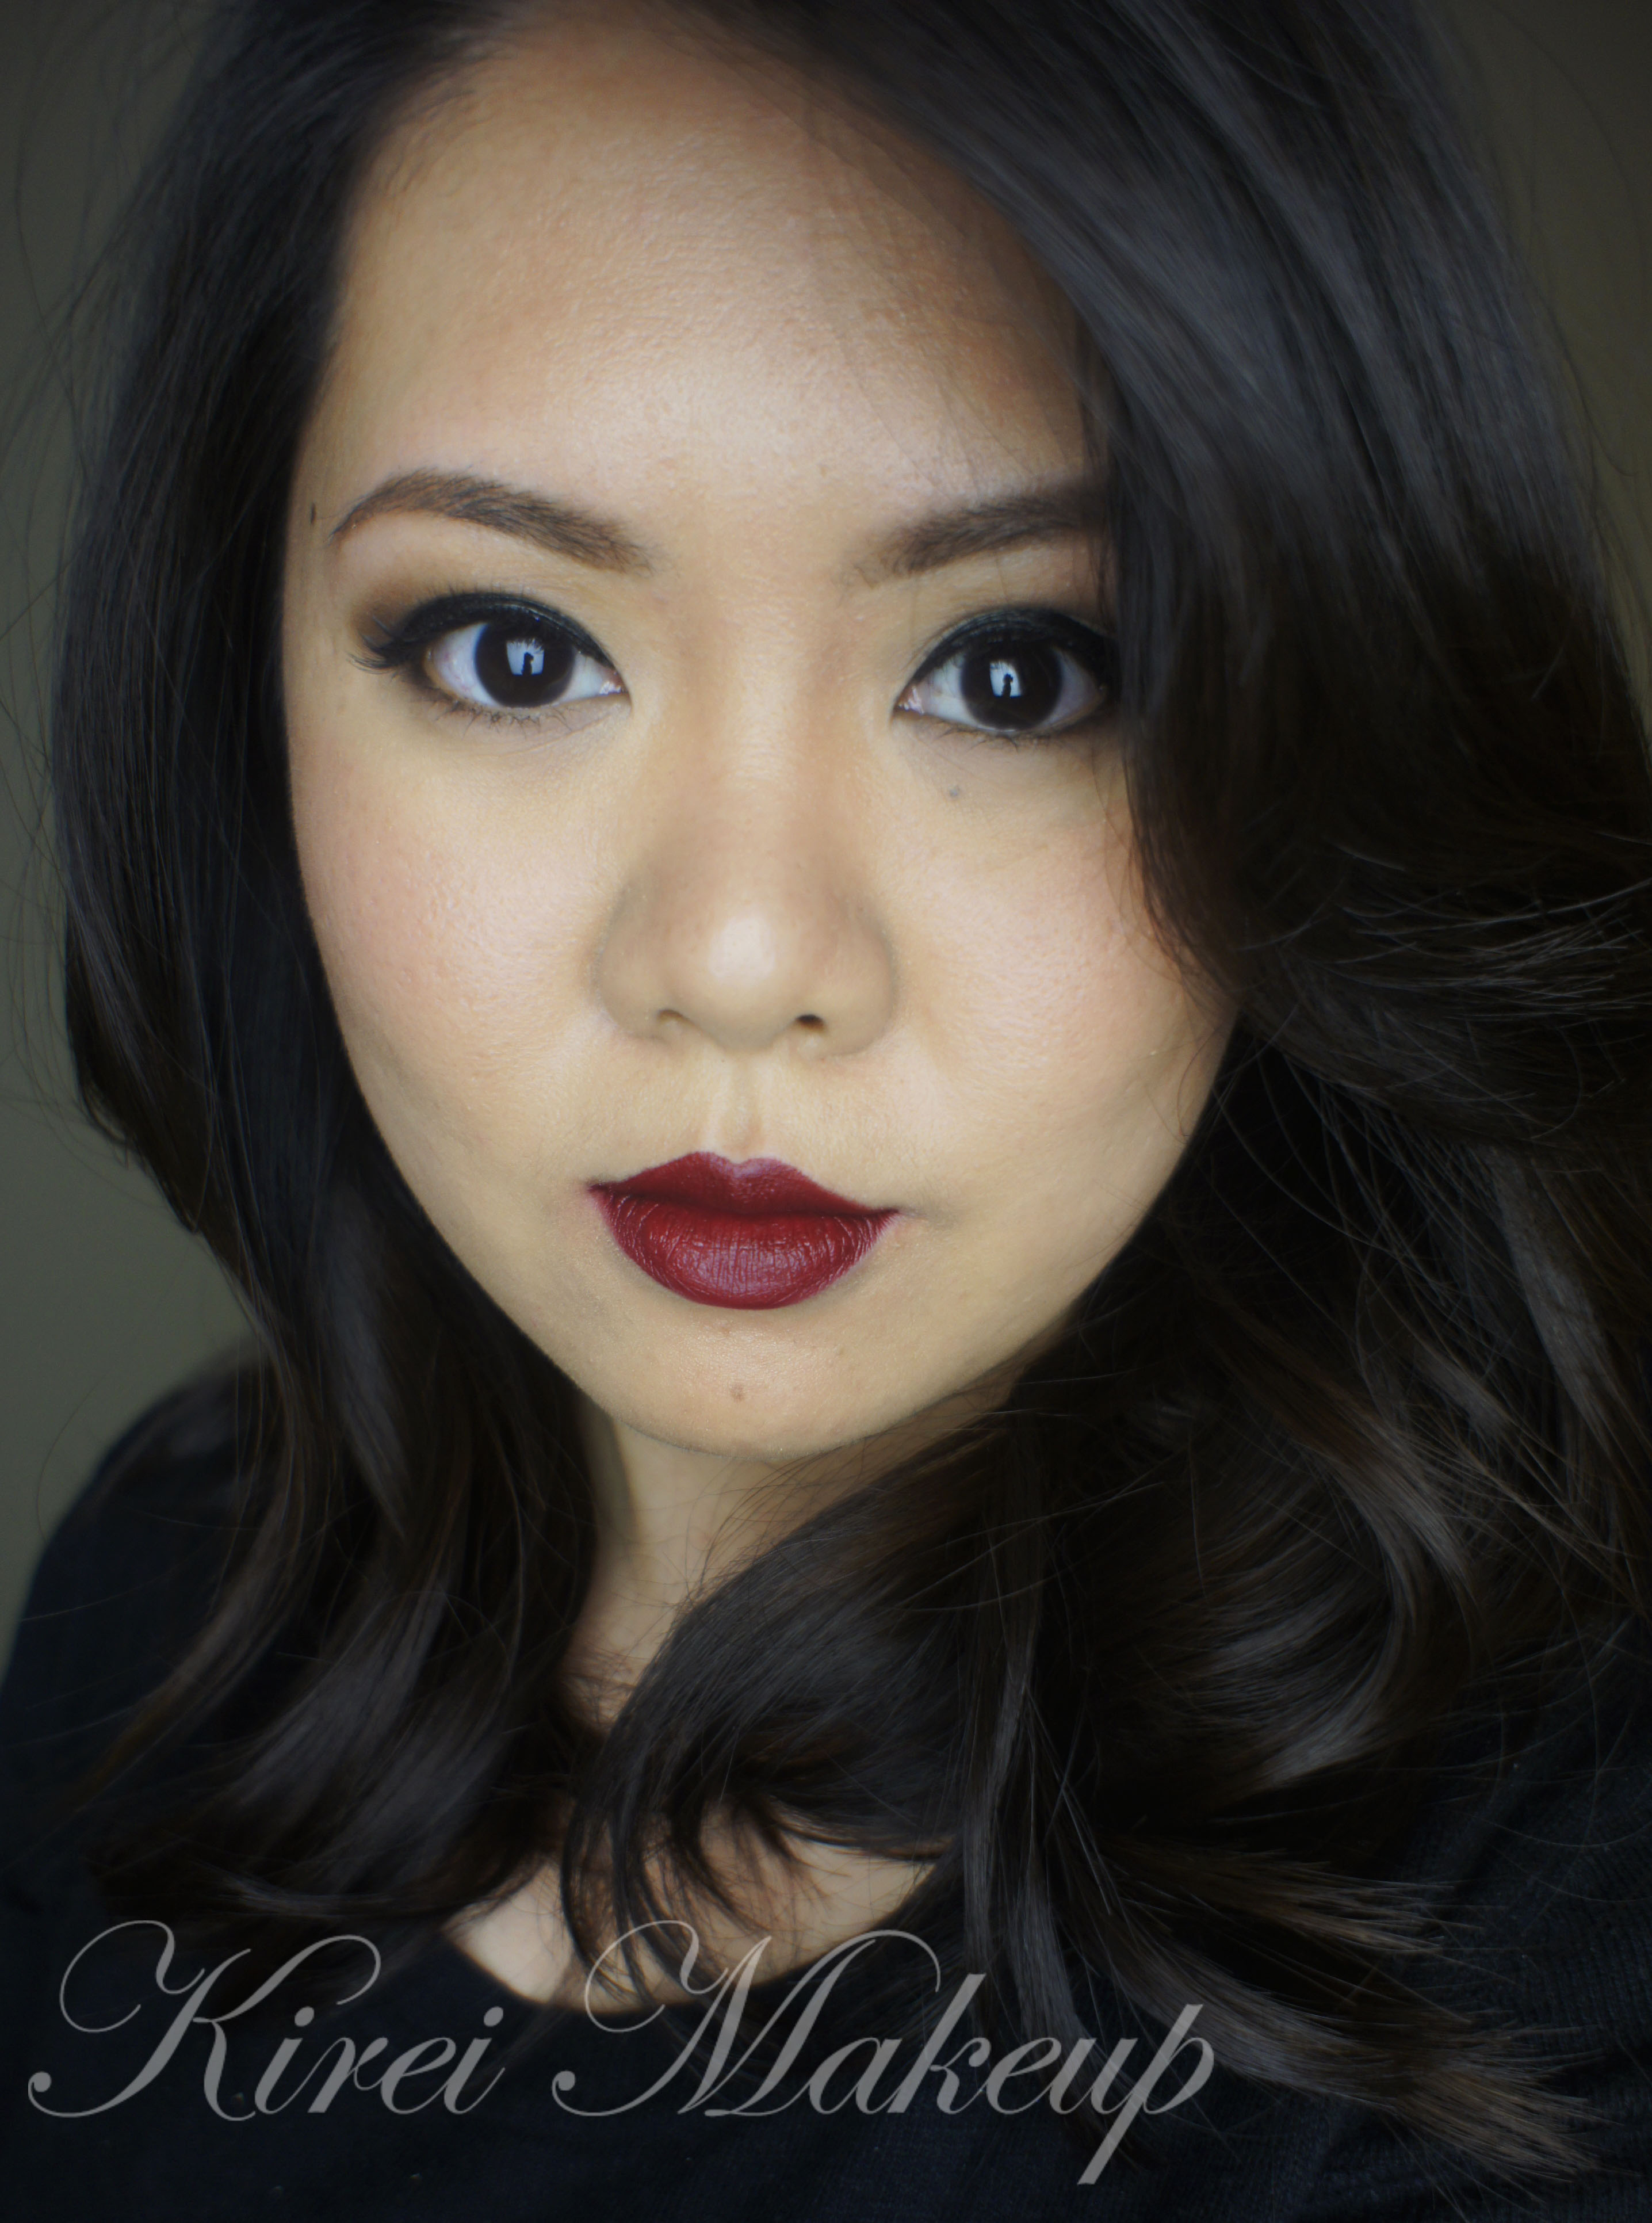
Anyways, for this look was a request over on Instagram by Sammie. She wanted me to do an easy golden smoky eyes that she can wear during daytime. The key to this look is to keep the black to a minimum if you are going to wear it out for a day makeup. The usual smoky eyes are quite strong and dark, meawhile for this look I kept it quite light and not as intense. I smudged a lot of the black out, and skipped my usual black winged liner. Instead, I opted for a smudged eyeliner using powder. I kept the black on the waterline & tightline, but if you’re afraid that this will close your eyes up you can skip it. I just love black eyeliner on waterline & tightline for smoky eyes.

bronze makeup tutorial

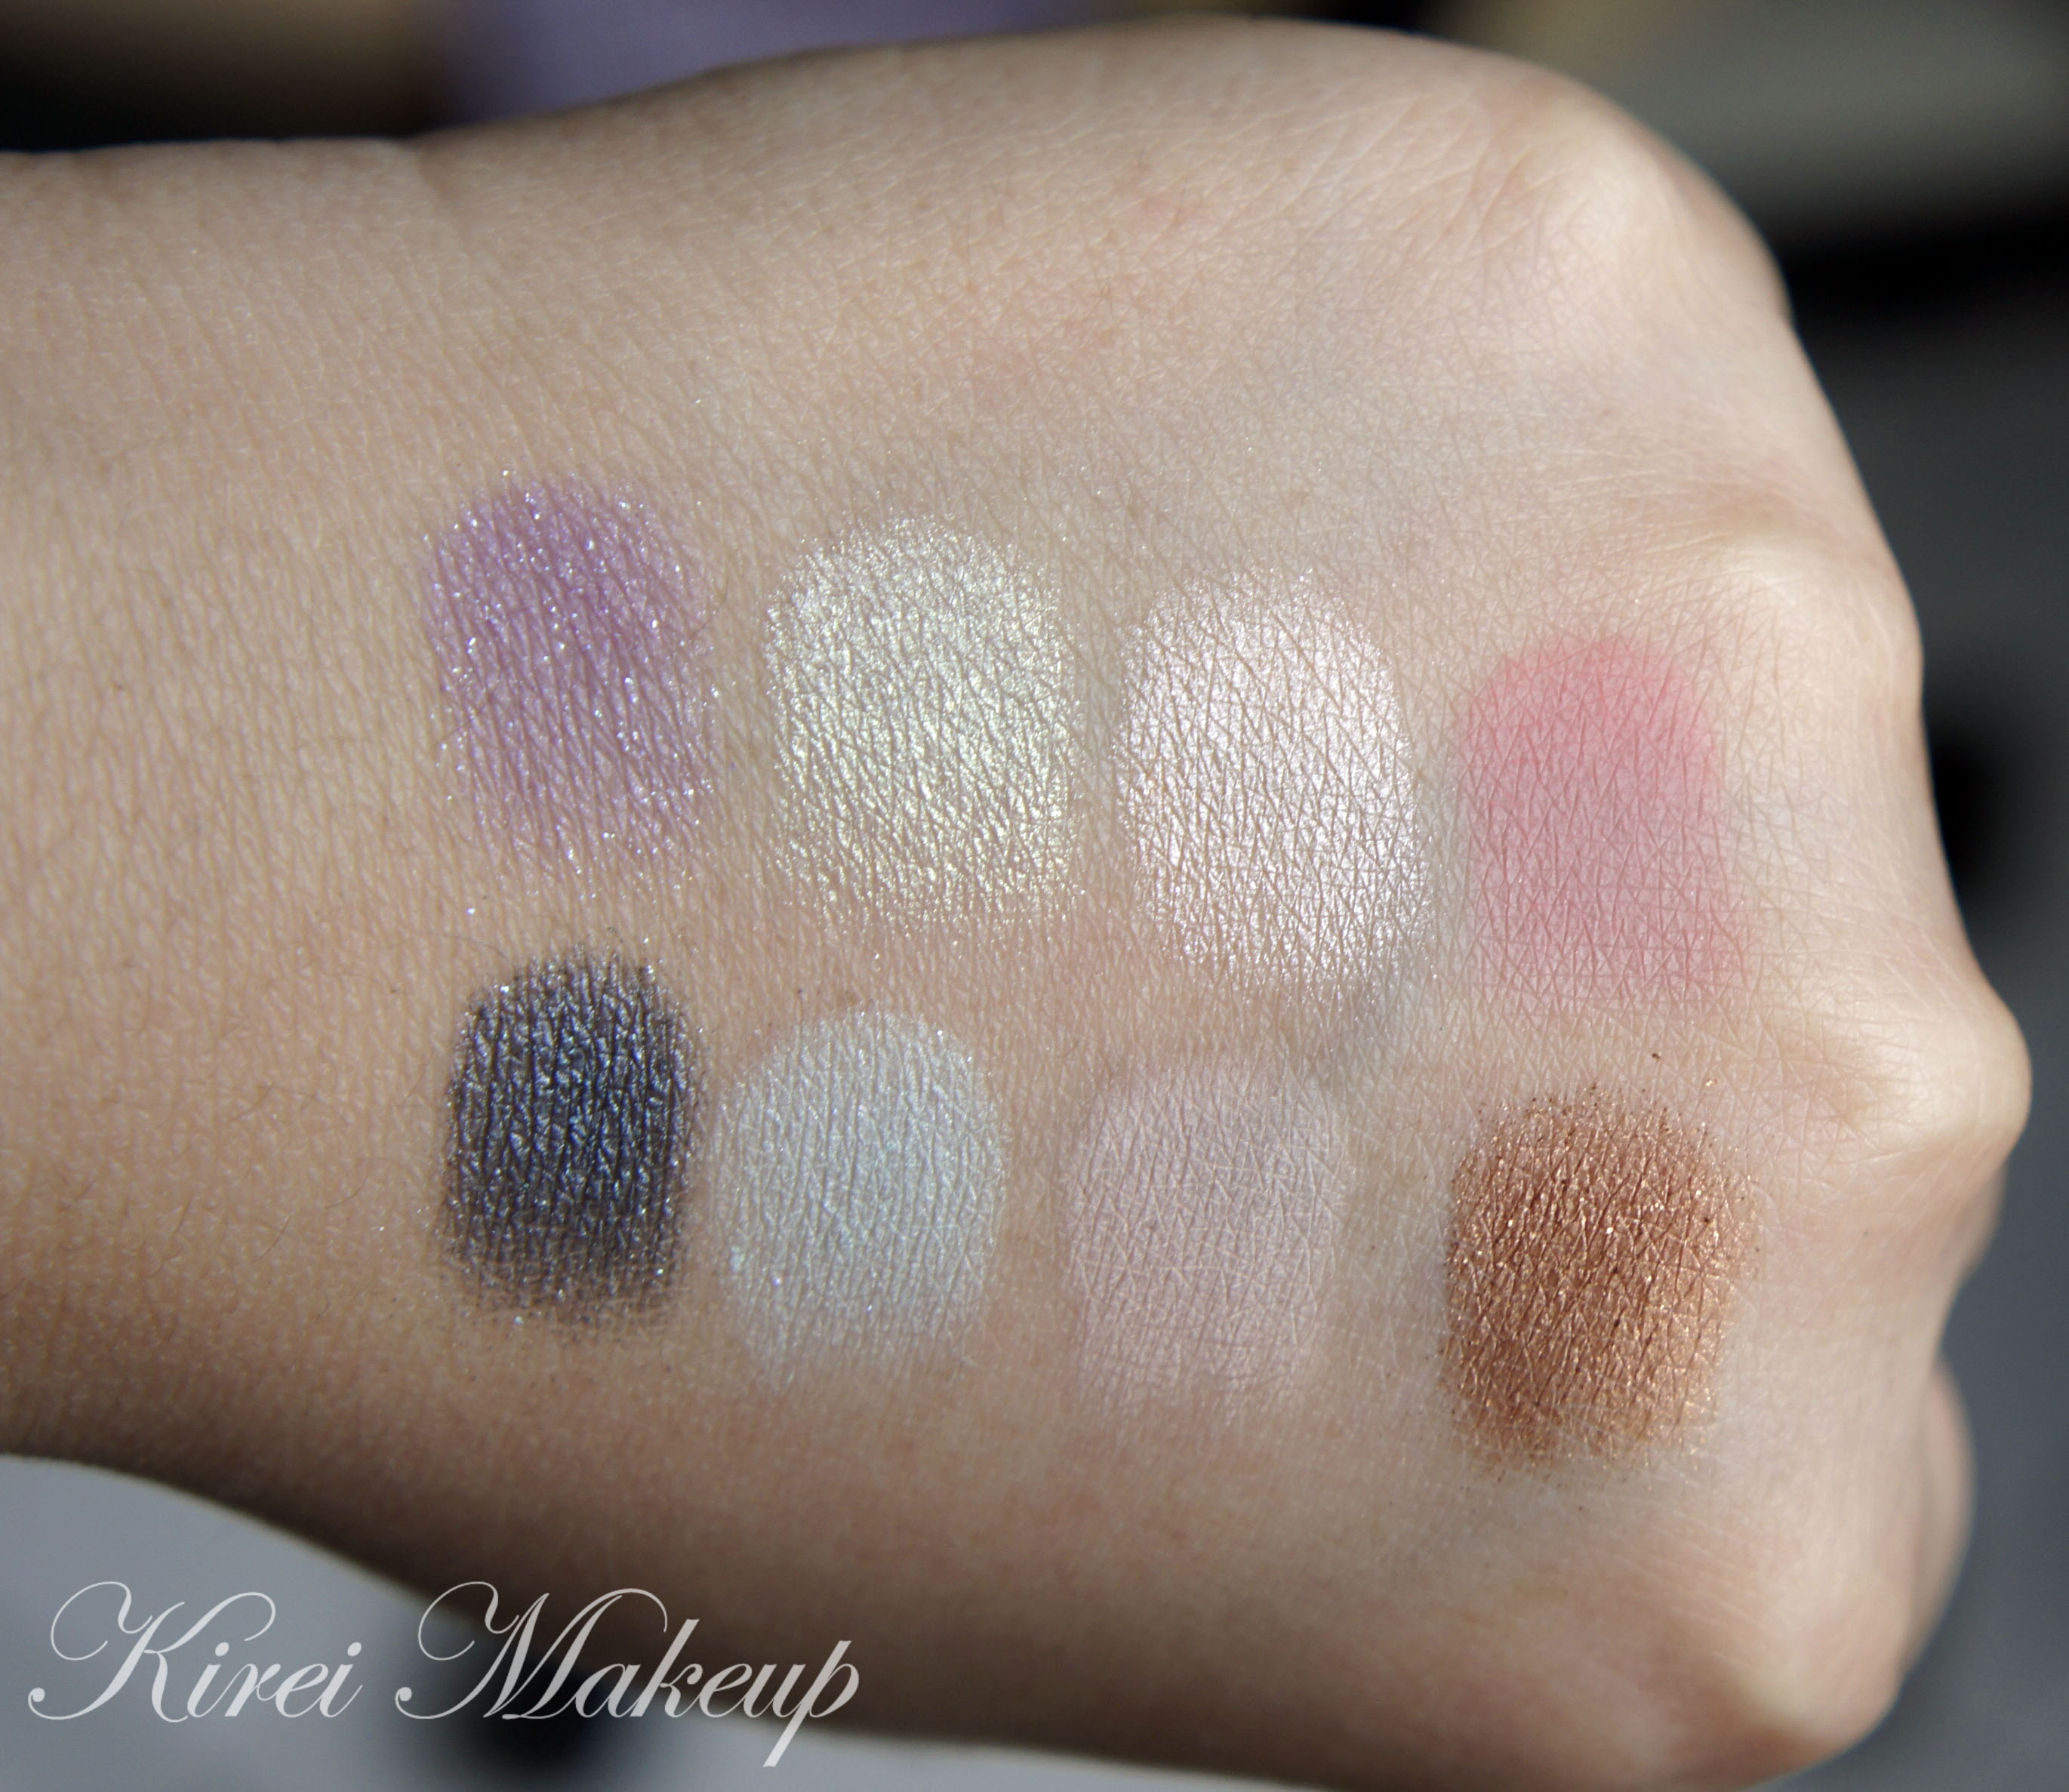
I used Urban Decay Naked 1 palette for the eyeshadows. You can also find these shades in single pot from Urban Decay.

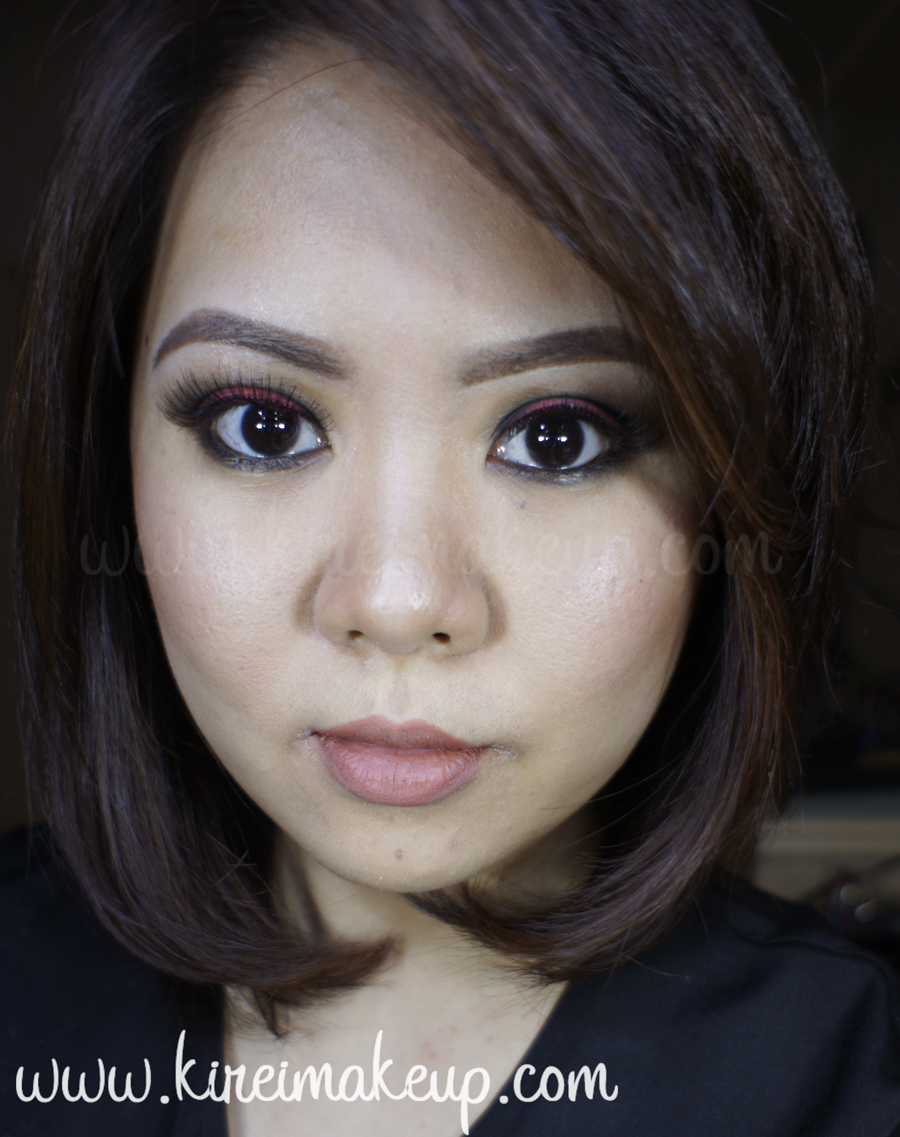
Brows are filled using Anastasia Brow Wiz in Medium Ash and Brunette.

How-to:

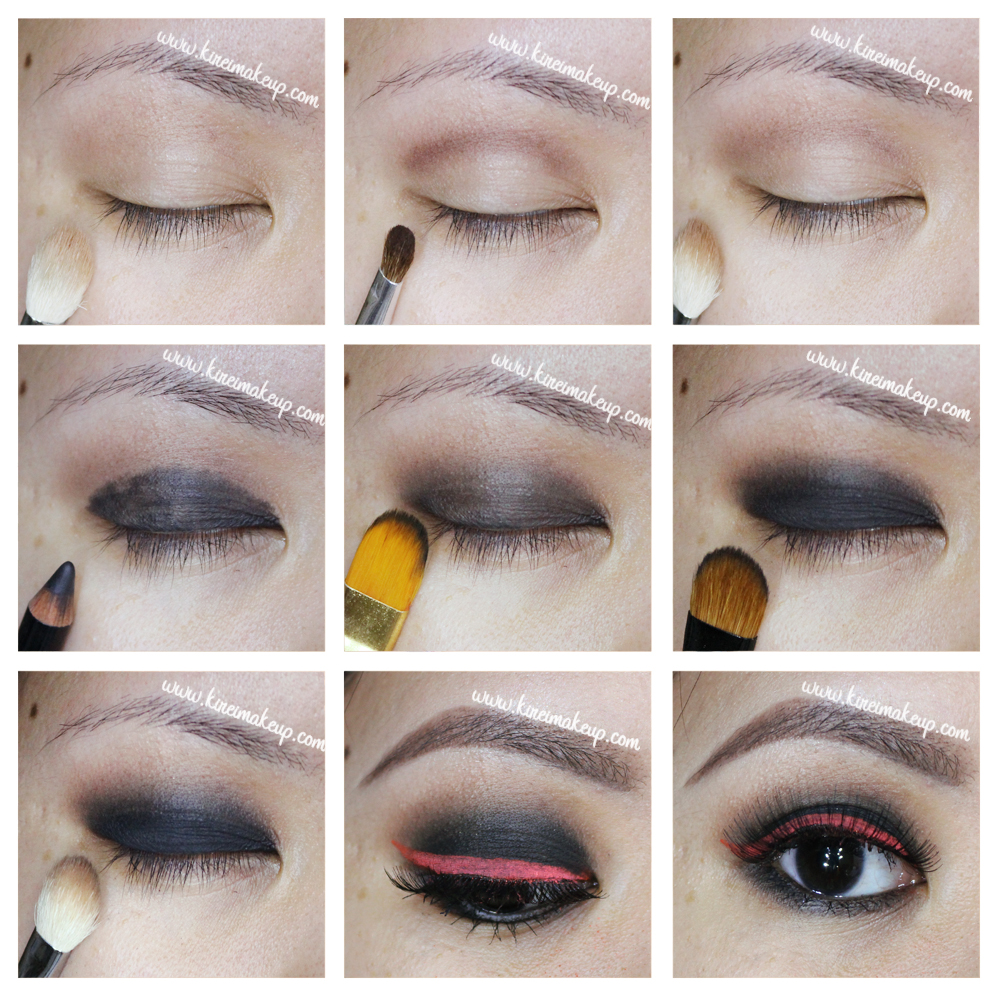
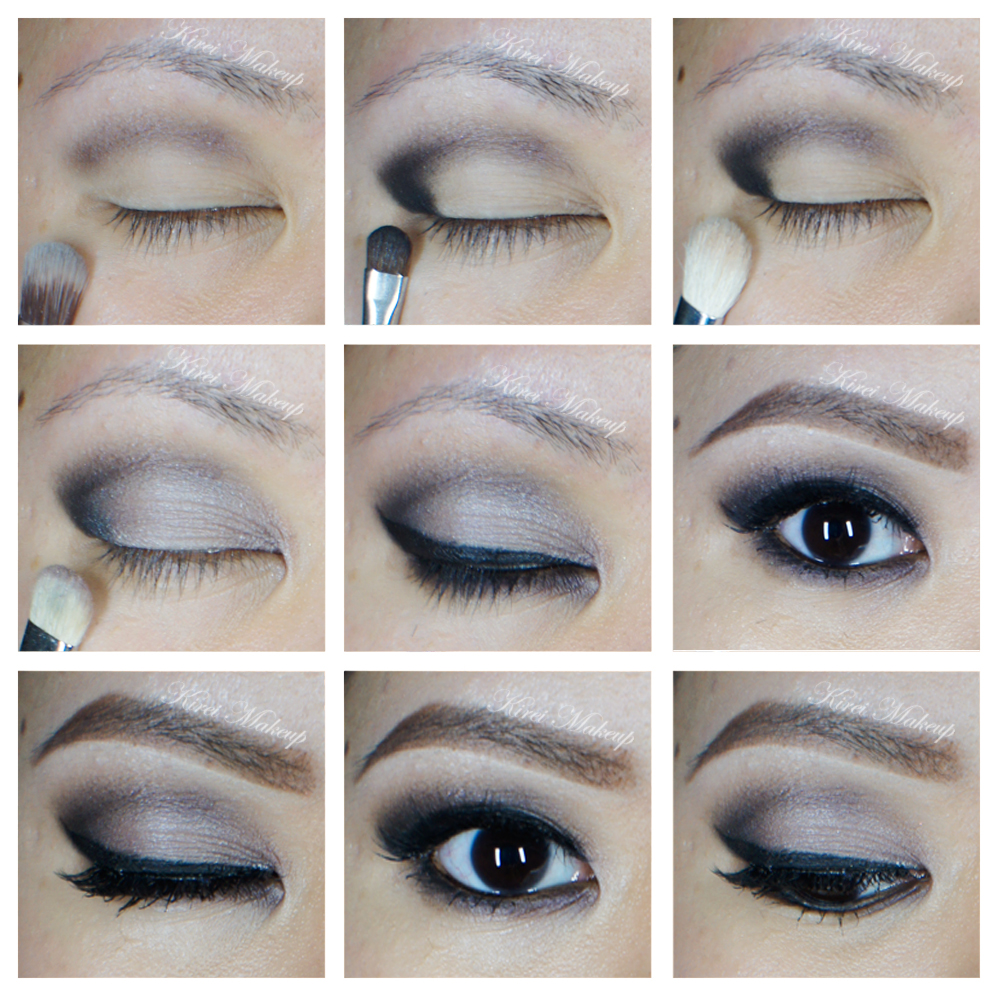
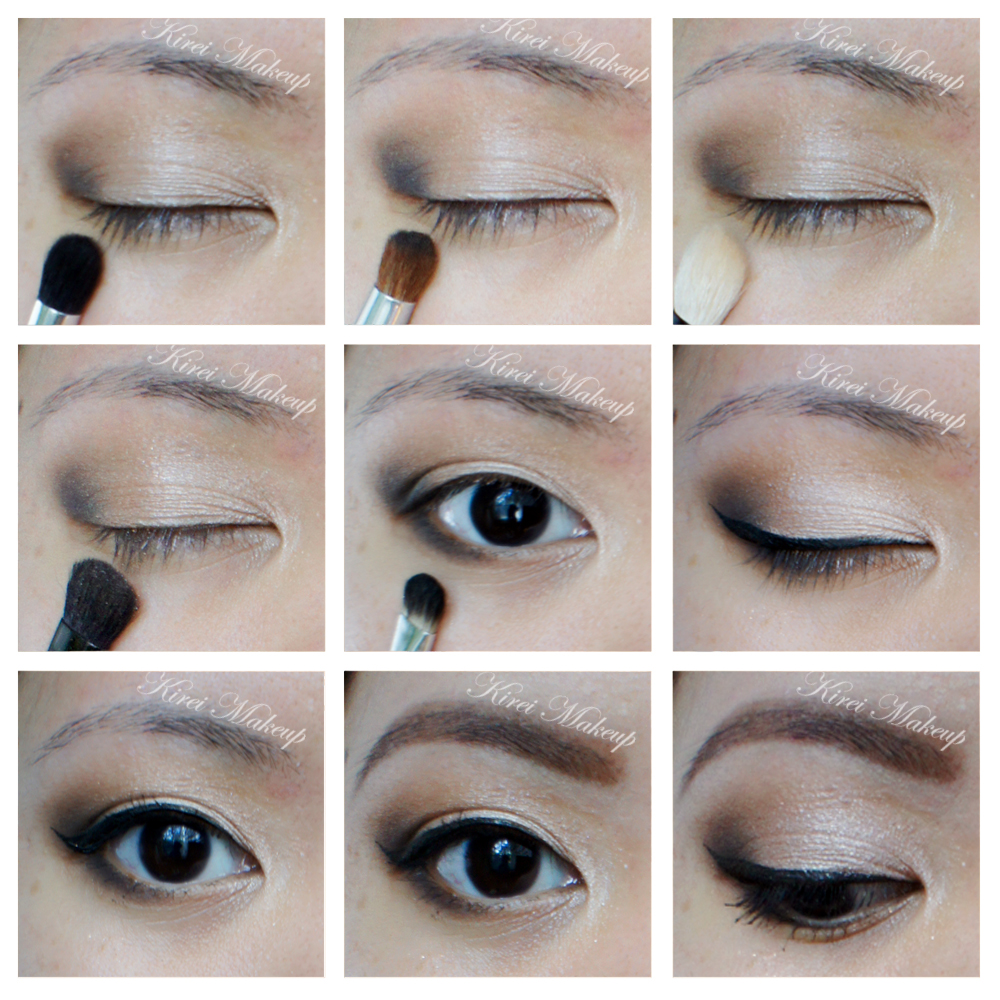
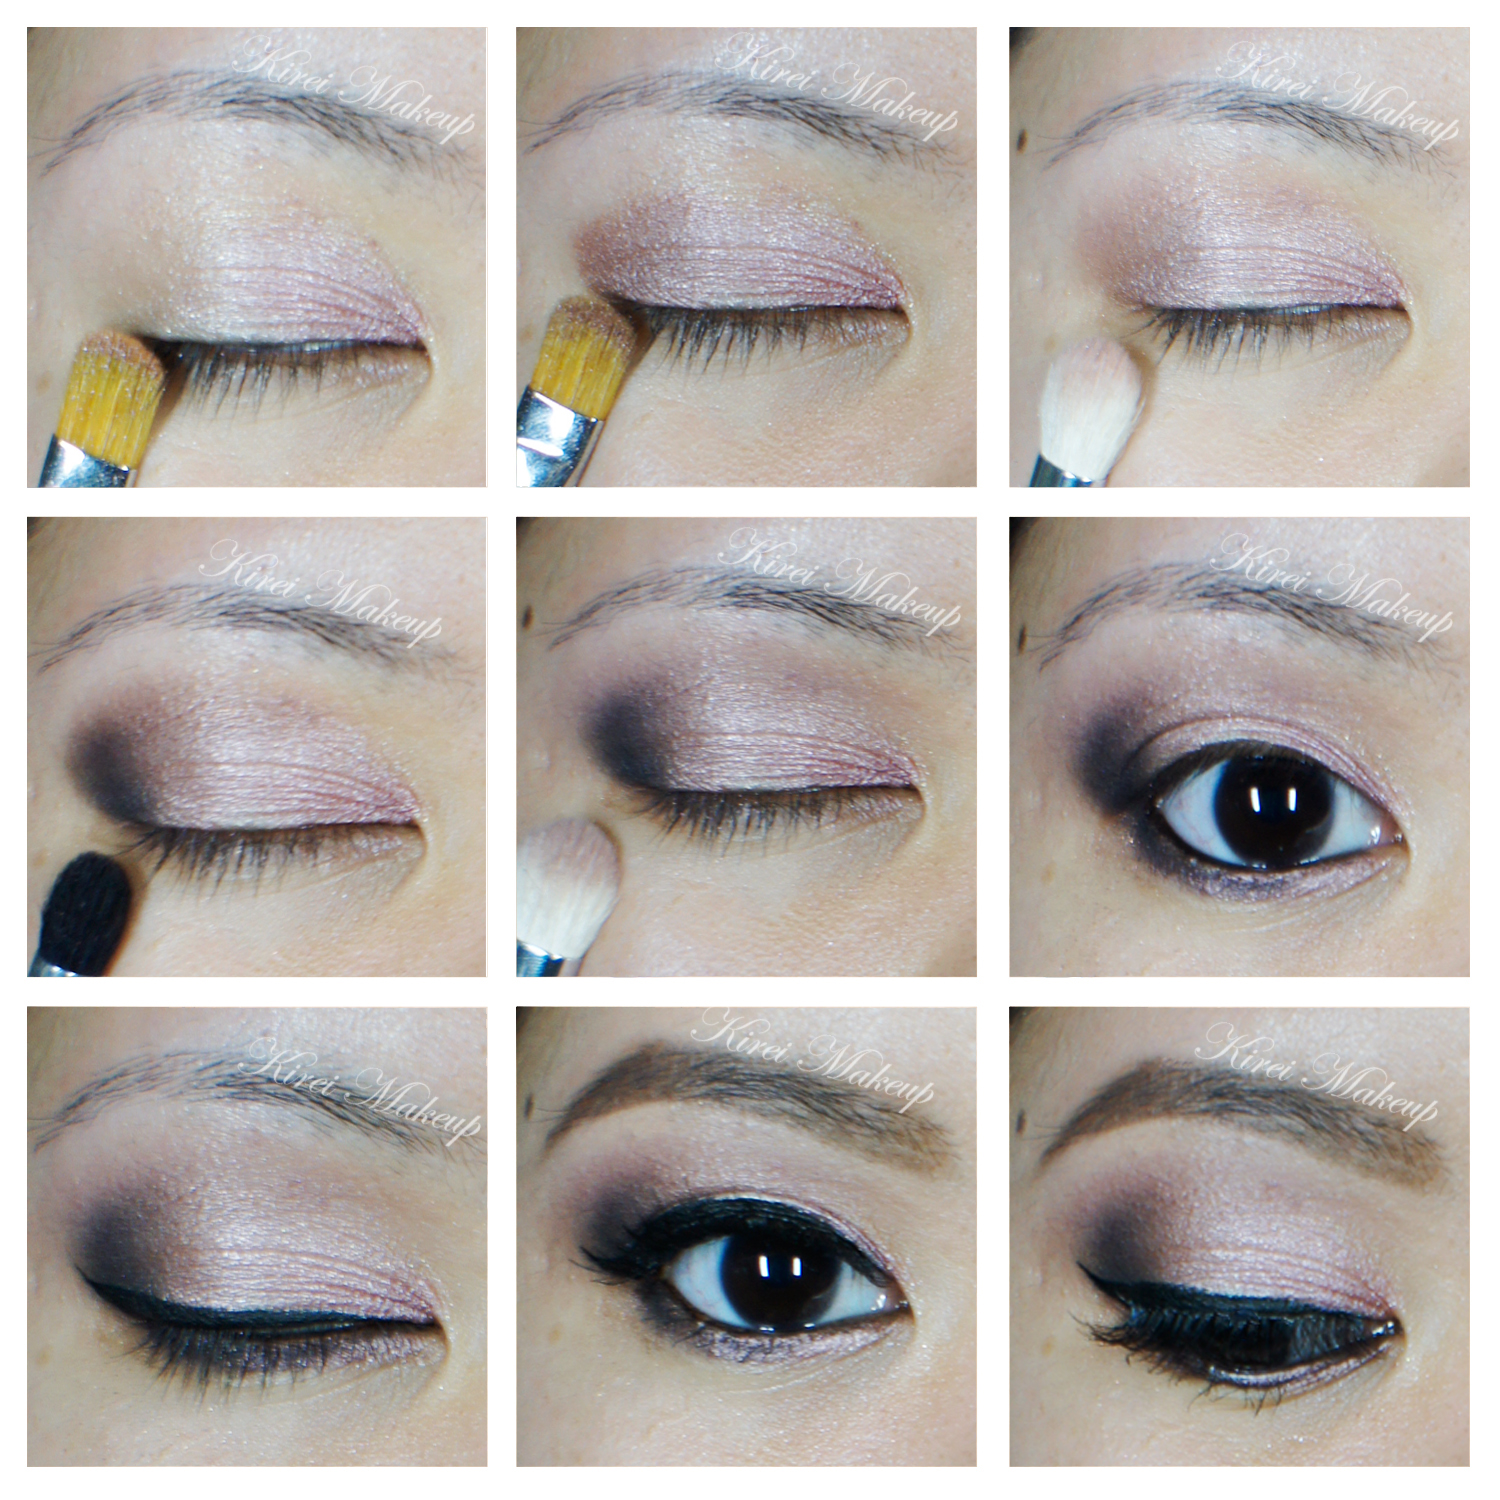
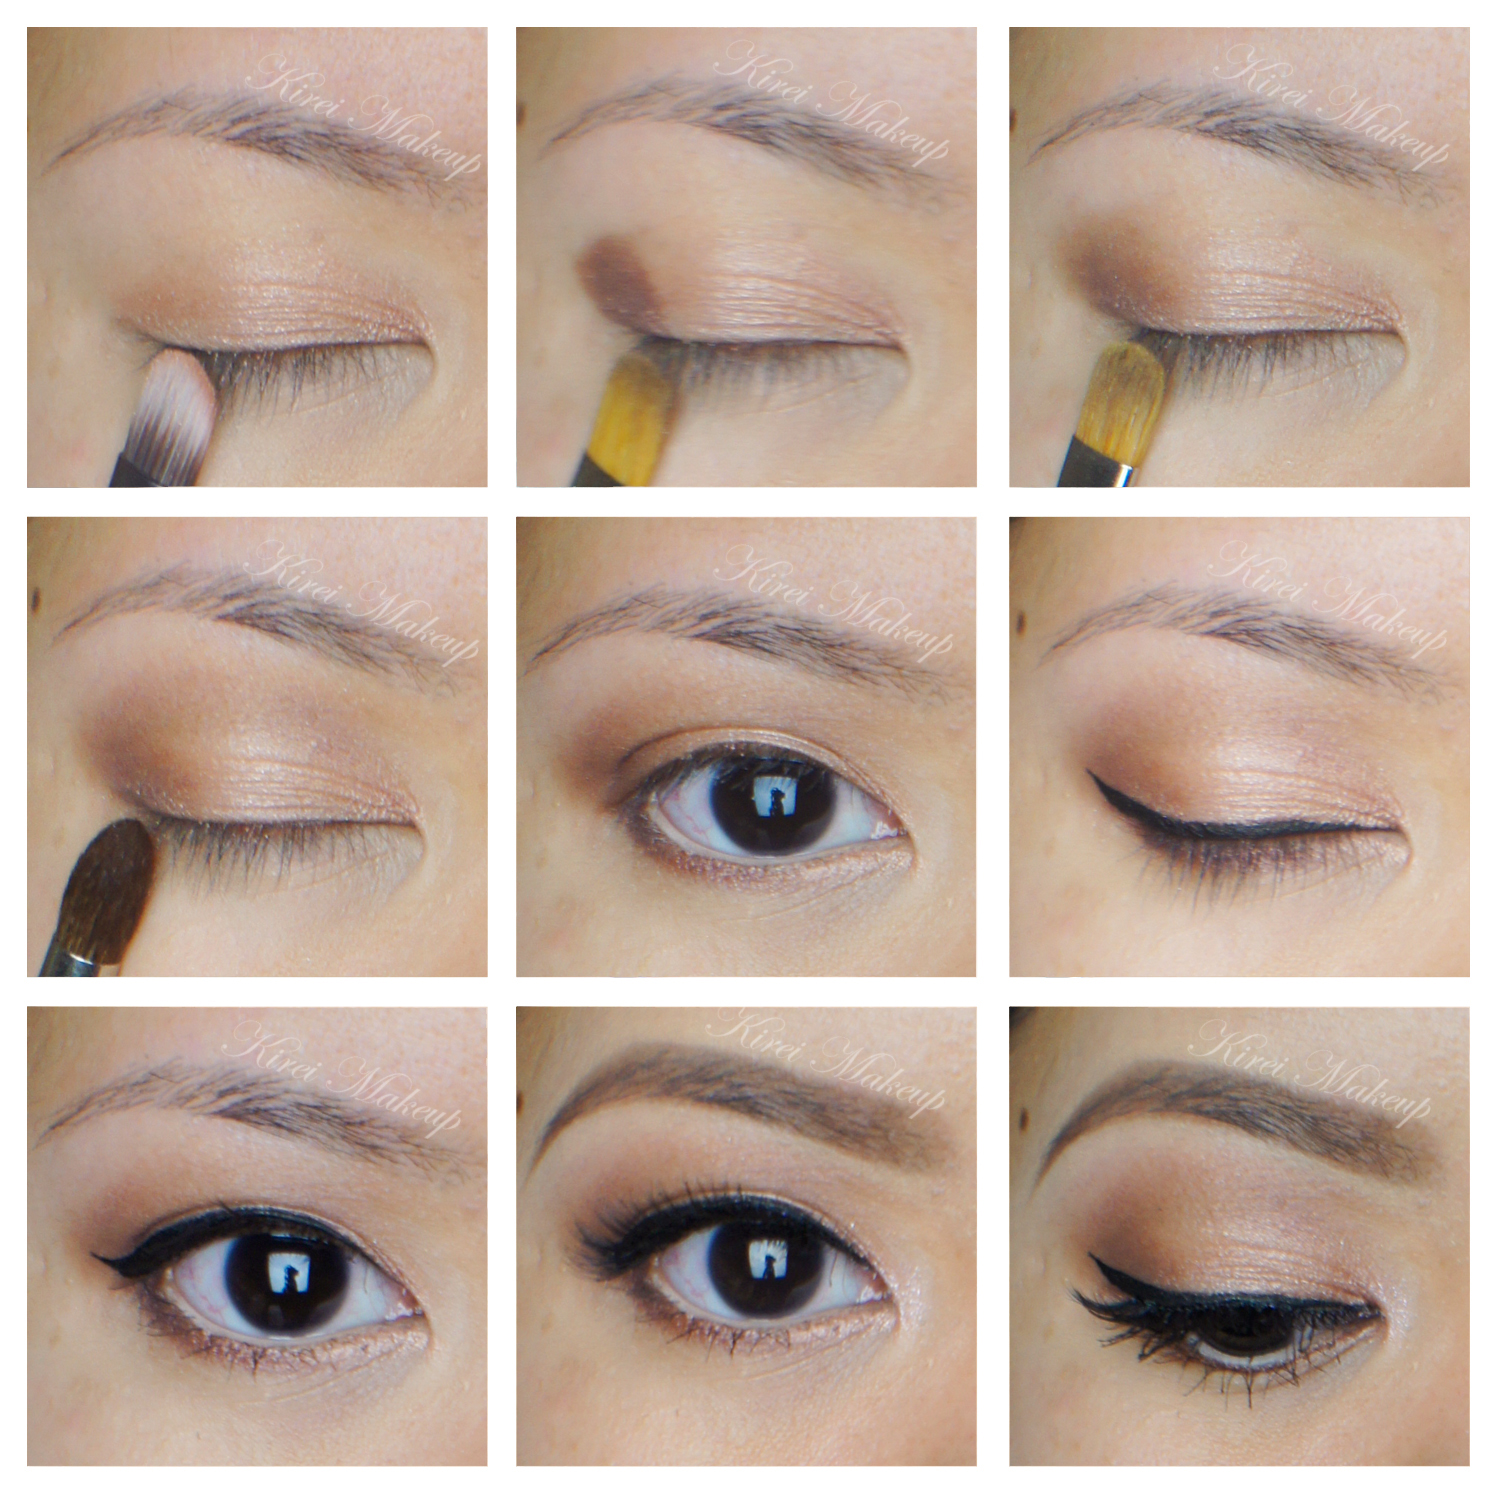
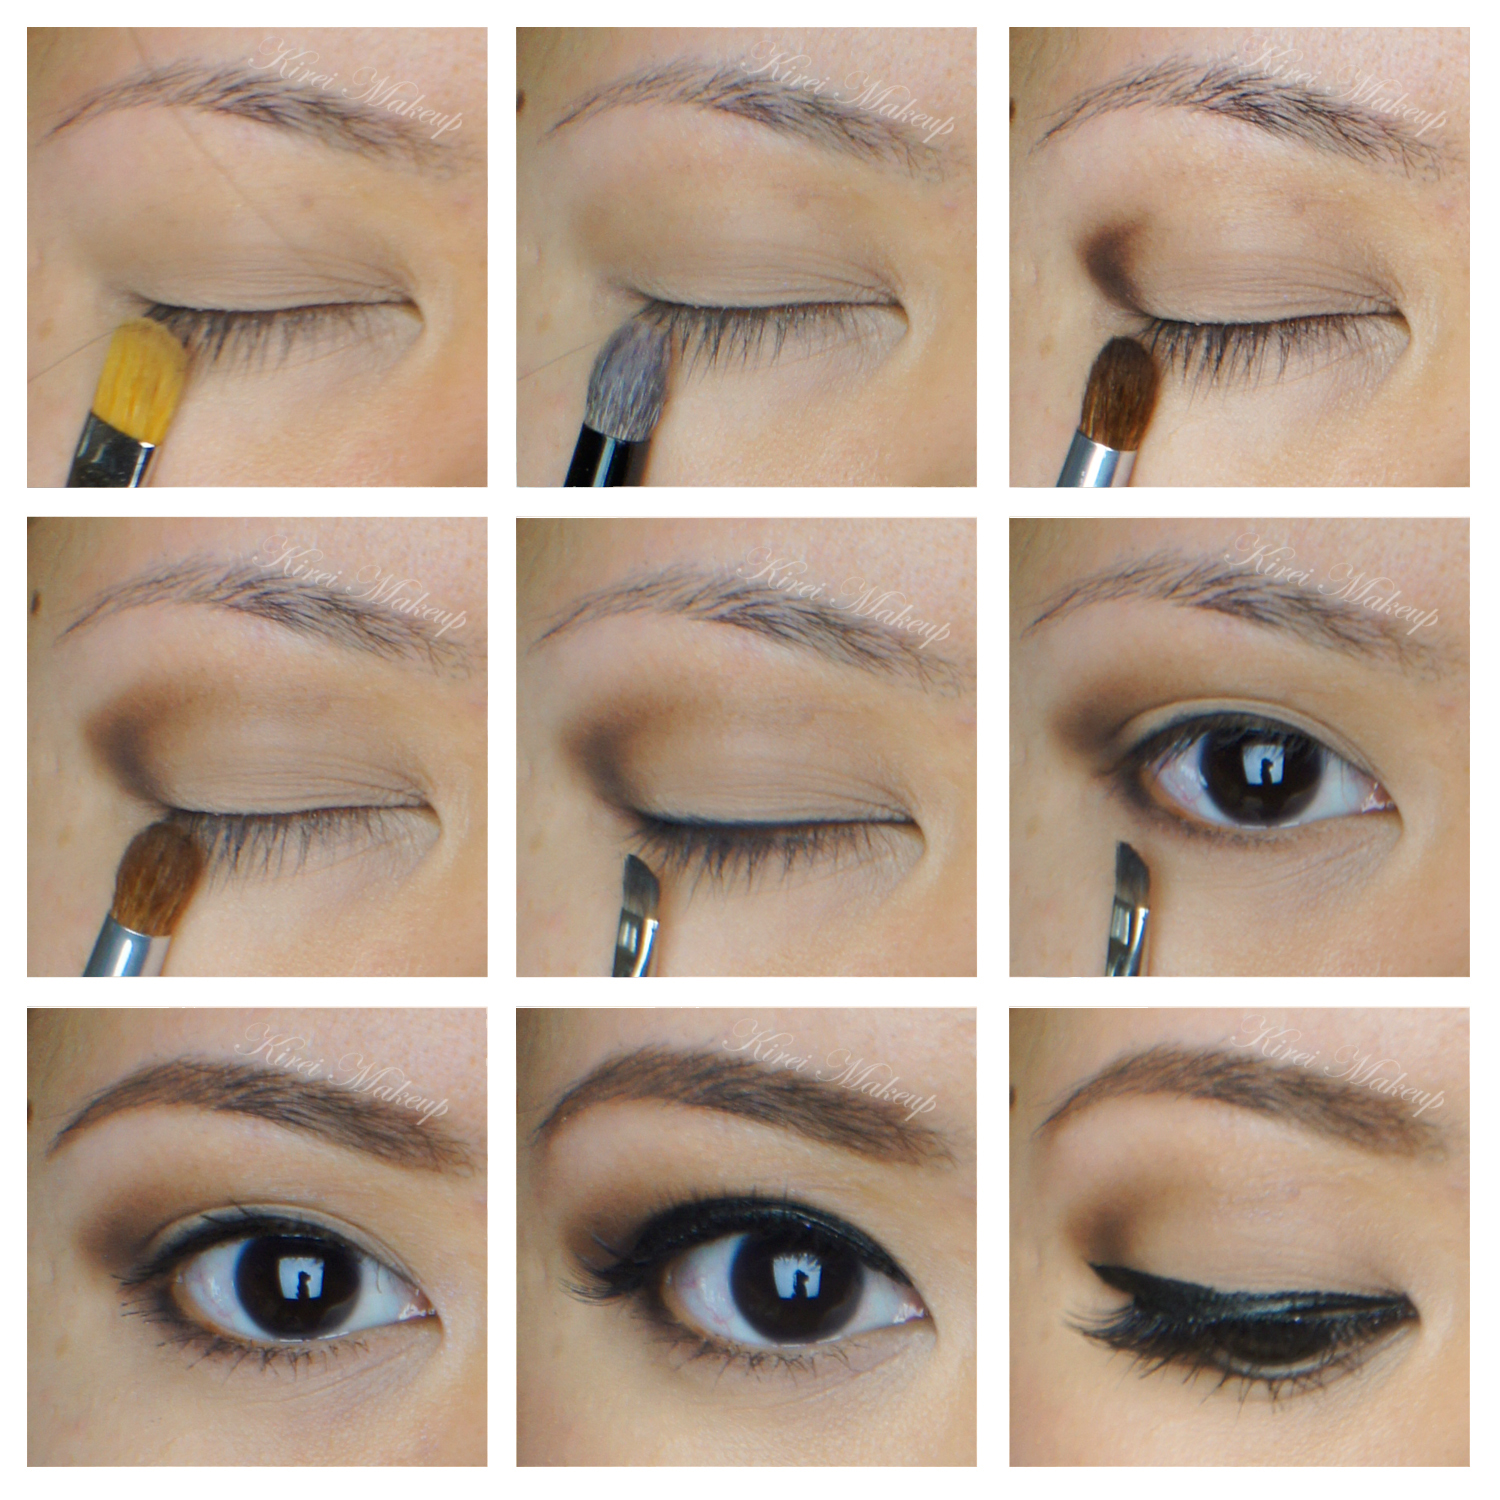
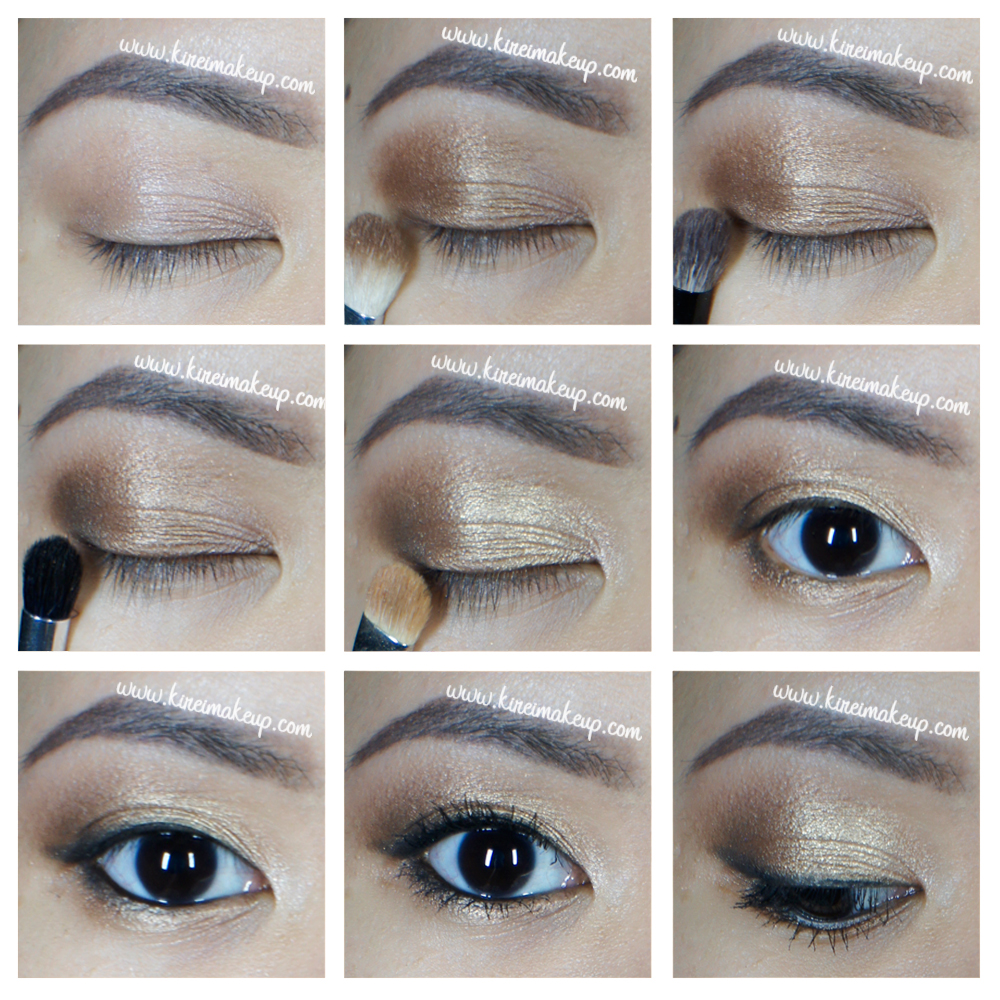
1. I applied Urban Decay Primer Potion in Sin all over my lid using my ring finger.

2. Using a fluffy blending brush, I applied Urban Decay Smog on the outer half of the lid, all the way to the crease.

3. I used Smashbox bullet crease brush to blend out the edges.

4. Using Sephora crease brush, I applied Urban Decay Darkhorse just to deepen the outer corner.

5. Using a shader brush, I applied Urban Decay Half-Baked on the eyelid.

6. I applied Smog on the outer half of the lower lash line, and Half-Baked on the inner half using an angled eyebrow brush.

7. I applied Urban Decay Creep along the upper lash line and outer third of lower lash line using an angled eyeliner brush.

8. I lined my waterline and tightline using L’oreal Voluminous Smoldering eyeliner.

9. I curled my lashes and applied Make Up For Ever Aqua Smoky Lash mascara on both upper and lower lashes.

daytime makeup

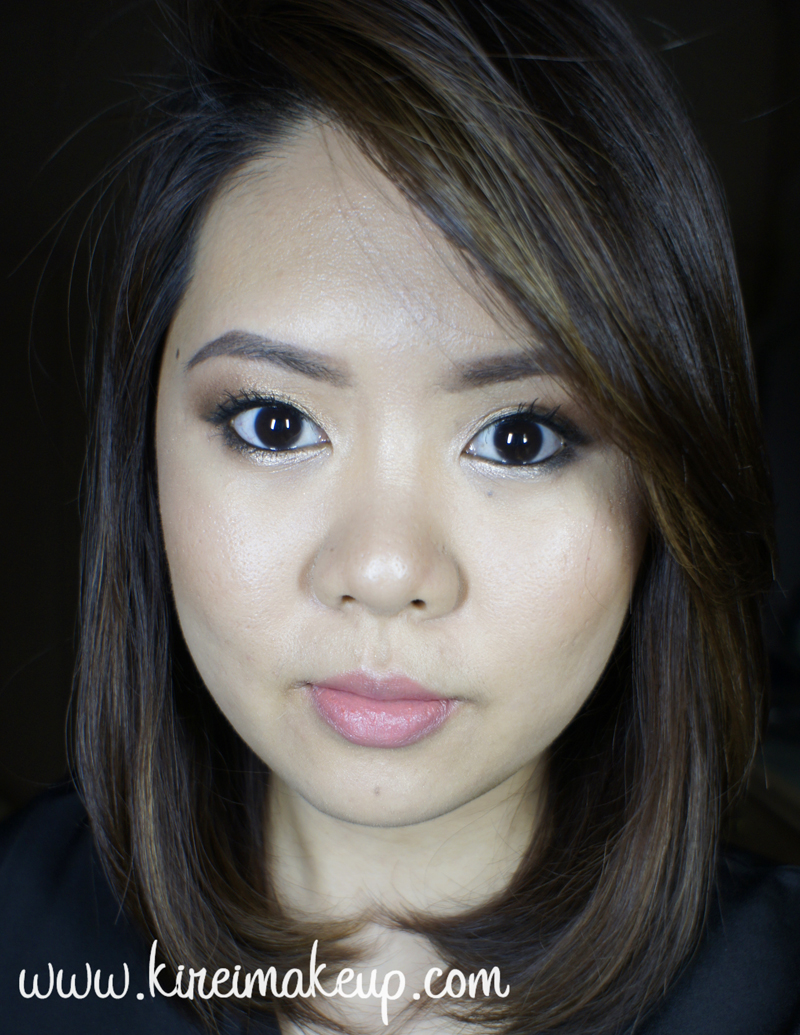
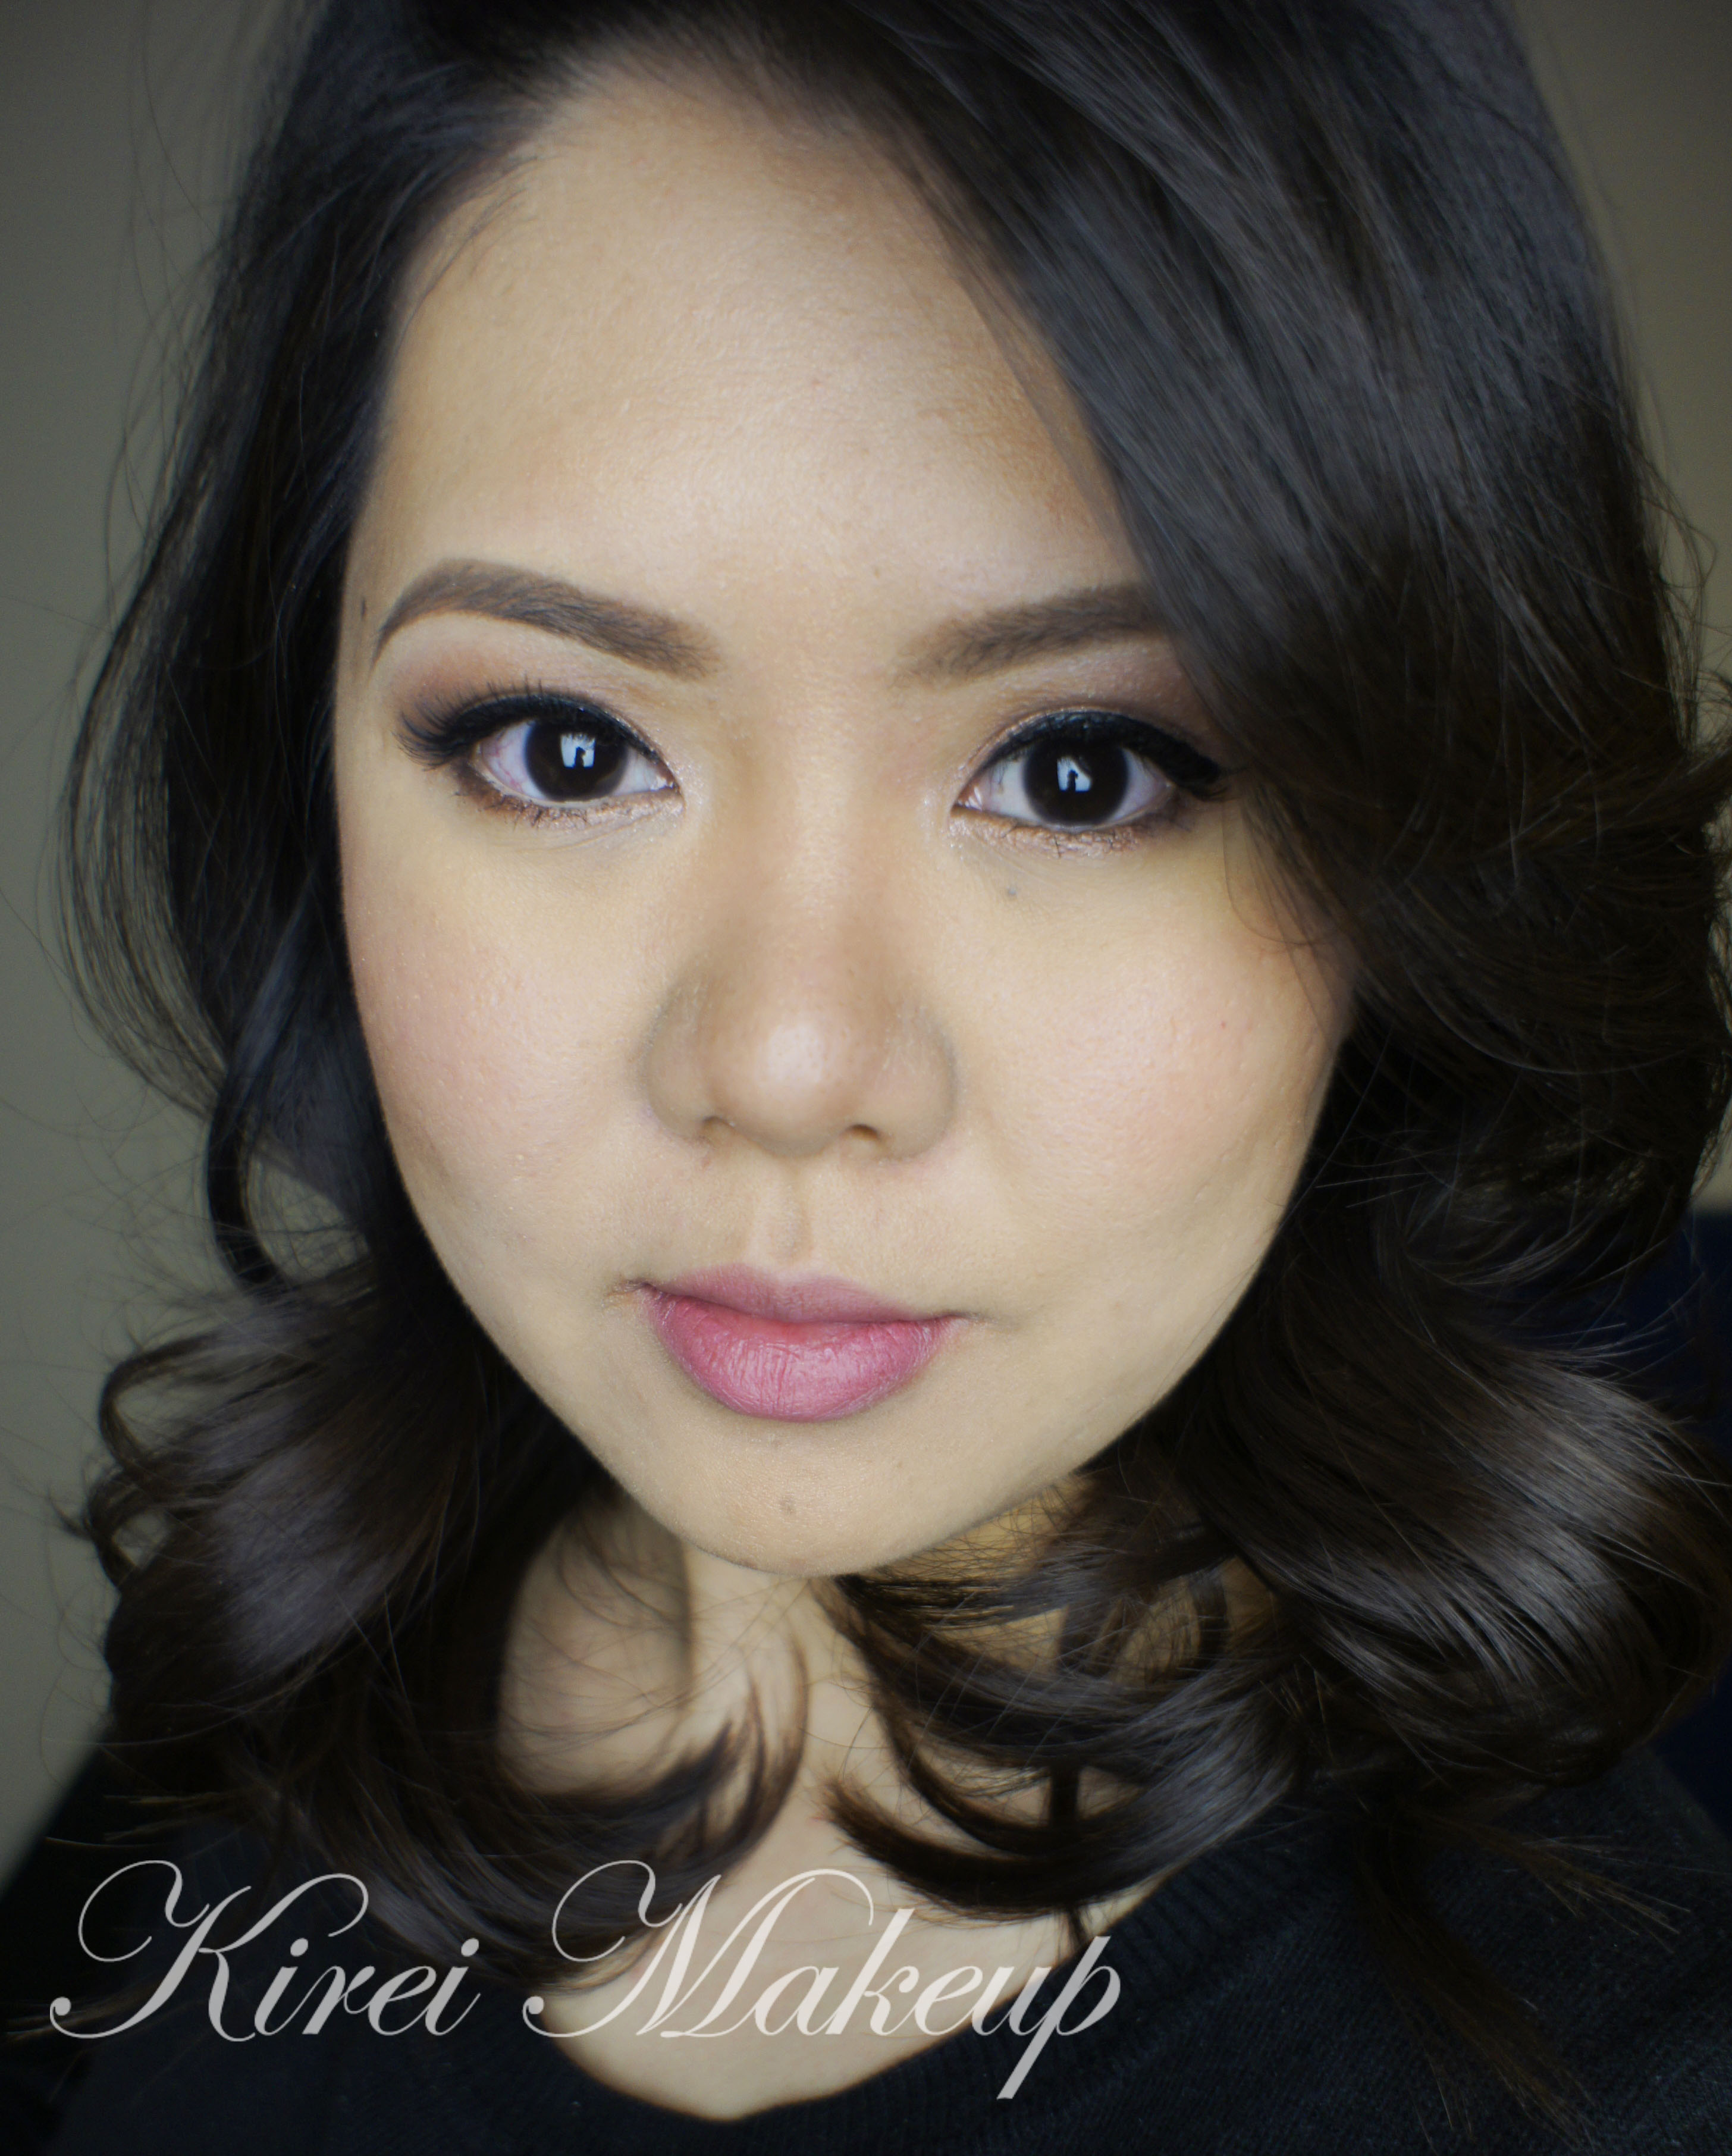
10. For my face, I applied Smashbox Halo Liquid foundation and Cover FX cream foundation brush.

11. I lightly contoured my face using Benefit Hoola bronzer, and added highlight using MAC soft and gentle highlighter.

12. I applied Benefit Coralista blush on my cheeks.

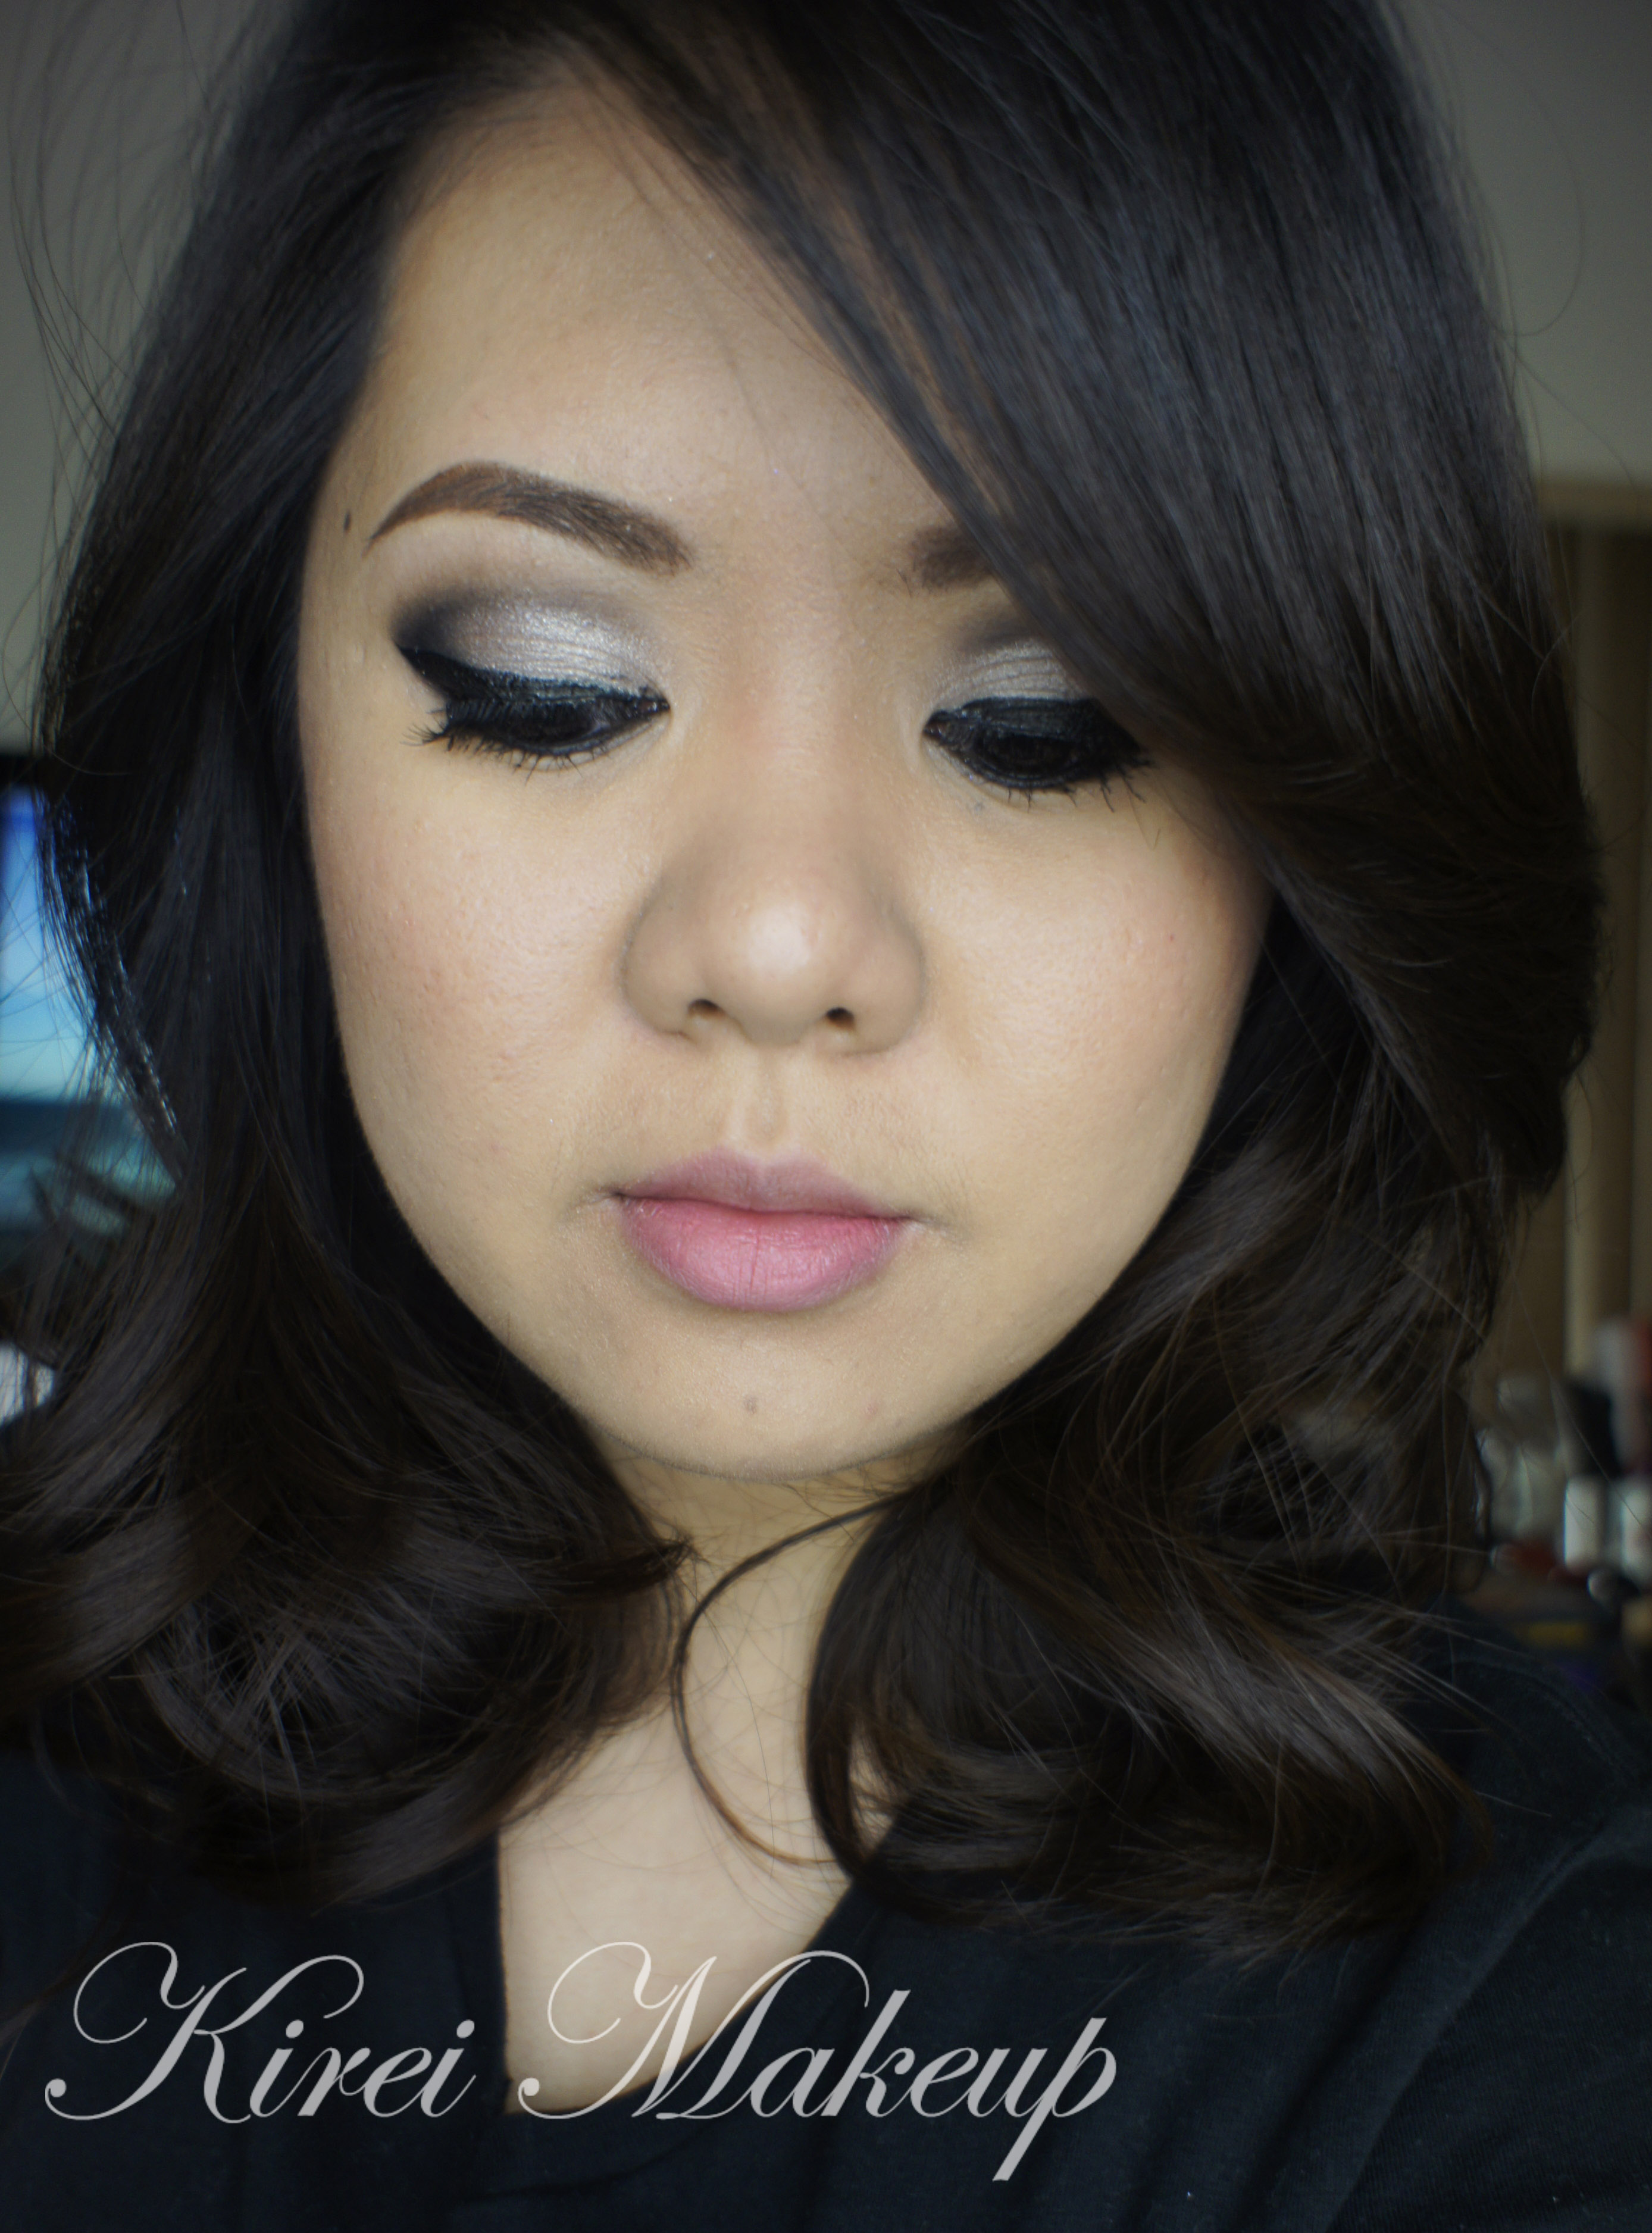
13. On my lips, I applied Shu Uemura Lip Tint Gelato in 01.

golden bronze smoky eyes

Smoky Eyes with a Neon Eyeliner

Hey ya’ll! I hope everyone is doing great this weekend! I posted this look on Instagram last night, and I almost forgot to upload it today. Anyways, as mentioned on my Instagram account, this smoky eyes with a neon eyeliner look is a recreation from @jenmiamakeup. She’s one of the many great makeup artists who I follow on Instagram. I love how she does hers with a neon yellow. I tried this one with the only neon pigment I owned – MAC Neo-orange loose pigment.

If you are going to recreate this look, I’d suggest using a mixing medium instead of water, like I did. I used water and for some reason the pigment didn’t want to mix smoothly. I ran out of my mixing medium so I have to go get one in the near future. The other issue that I kept having is the fact that my smoky eyes kept creasing. Ugh, I should have used a different eyeshadow base (and probably should have prime my eyelid first). So, I’d suggest for you to use an eyelid primer to avoid creasing.

Anyhow, let’s get the tutorial started!

smoky eyes for asian

How-to:

1. Using a light brown eyeshadow (mine was a sample, and it has no brand nor name), I applied this shade just above my crease using a clean blending brush. I used this shade as a transition color, the shade is just slightly darker than my own skin color.

2. Using a deep chocolate brown (again, this was a sample with no brand and no name), I applied this shade right on the crease using a small crease brush.

3. Using the same blending brush as step no. 1, I blended the chocolate shade.

4. I applied Revlon Photoready Kajal eyeliner in Carbon Cleopatra, I applied the black eyeliner all over my eyelid, and waterline.

5. I lightly blended the eyeliner using a synthetic art brush.

6. I applied Kat Von D Monarch palette Deadhead eyeshadow on top of the black base using a flat eyeshadow brush. I also applied this eyeshadow along the lower lash line using a small shader brush.

7. Using the same brush as step no. 1, I blended out the edge of Deadhead so there’s no harsh line.

8. I mixed water and MAC Neo-Orange loose pigment to create the neon winged eyeliner.

9. On my brows, I used Anastasia Brow Wiz in Medium Ash to fill them.

10. On my lashes, I applied Ardell 105 false lashes.

mac twig lipstick

11. On my face, I applied MARC JACOBS gel foundation using CoverFX foundation brush. I concealed using MUFE HD concealer, and set my face using CoverFX translucent powder.

12. I applied Benefit Moon Beam highlighter on the bridge of my nose, cupid’s bow, chin and cheekbones.

13. I lightly contoured my face (sides of the nose, under my cheeks, jawline, and temples) using NARS ITA kabuki brush and MAC Blunt powder.

14. I applied MAC Dainty on my cheeks.

15. For the lips, I applied MAC Spice lip pencil all over.

Lavender Grey using NARSissist Palette

For this week’s tutorial, I decided to use my NARSissist Palette again! I fell in love with this palette all over again. I feel like it’s such a great palette with a more mature color option. For today’s tutorial, I picked out my favorite shades which were in the range of grey, lavender, and violet. I know the picture doesn’t show much of the lavender/violet on the lid, but I assure you it’s such a pretty grey with very subtle hint of lavender/violet in it. If you’re one not to wear color, and prefer a much neutral option, this would be a great addition to your makeup wardrobe.

Oh, just to let you guys know, I have been trying to update my Instagram daily. I’m going to try to do a weekly “Monday Makeup Inspiration”, and regram/repost-ing every look that YOU guys do if you FOLLOW me (@kireimakeup) and add #kireimakeup to your Instagram pictures! I’d love to see your makeup and/or your re-creation of any of my looks!

narsissist smoky eyes

How-to:

1. I’ve prepped my eyelid using Urban Decay Primer Potion in original. Using a blending brush (from UD Naked 3 palette), I applied NARS Brousse II on my crease.

2. Using a small shader brush, I applied NARS Pandora II on the outer V of my eyelid.

3. I blended my crease by applying NARS Madrague I using a clean blending brush. I used this shade as a transition color.

4. I applied NARS Ashes to Ashes on my entire eyelid using a flat eyeshadow brush. I also added a little bit of NARS Lhasa on top of it.

5. I created a winged liner along my upper lash line using L’oreal Infallible Gel Lacquer 24hr in Blackest Black and an angled eyeliner brush. Using whatever was left on the brush, I ran it along the lower lash line, and waterline.

6. I also used a small shader brush and applied NARS Ashes to Ashes along my lower lid.

7. I filled my brows using Anastasia Brow Wiz in Ash Blonde and Brunette. I cleaned up the edges of my brows using Cover FX G20 cream foundation. If you want to know how I fill my brows, please check my brow tutorial.

8. I curled my lashes and applied Cover Girl Lash Blast mascara. I also applied falsies (Korean’s falsies, not sure what it’s called since the brand is not in English).

NARSissist Lavender Grey smoky eyes

9. On my face, I applied Cover FX Cream Foundation in G40 using MAC Masterclass Brush Oval 6.

10. I lightly applied highlight and contour using CoverFX cream foundations in G20 & N110. Check out my BACON post to find out how I used CoverFX to do my highlight and contour.

11. On my cheeks, I applied Revlon cream blush in Pinched.

12. On my lips, I applied Revlon Mauve it Over matte lipstick.

Simple Makeup using Smashbox Full Exposure Palette

Today I wanted to share this oh-so simple makeup look. This is the look that I wore last night for a friend’s birthday dinner (check my instagram), and seemed to be wearing it almost quite often lately. The makeup itself is very easy, perfect for beginners if you want to do something different with your look. I think the only tricky part of this look is the eyeliner, but you can skip the winged eyeliner if you prefer. This is a very basic eyeshadow application technique, and you can obviously change the colors of the eyeshadow to whatever you like.

I’ve done something very similar to this look in my other Smashbox Full Exposure tutorial, but that one is more dramatic (with falsies and more liner, and slightly more smoky). If you prefer a smokier look, I’ve done 2 tutorials using this palette right here and here. I’ve also done swatches and a Smashbox Full Exposure palette review.

Scroll all the way down for complete product list.

natural eyes for asian

How-to:

1. I prepped my lid using Urban Decay Primer Potion in Sin.

2. Using a Sephora bullet crease brush, I applied M1 on the outer V of my eyelid, blending the color to my crease.

3. Using a clean bullet crease brush, I applied M7 on just the outer part of the eye.

4. Using a clean Smashbox fluffy blending brush (from the palette itself), I applied a mixture of M2 and M3 on the crease (the picture doesn’t seem to catch those colors since it’s very close to my skin color).

5. Using the flat-end of the Smashbox brush, I applied S3 on my eyelid.

6. Using a small shader brush, I applied M7 on the outer half of my lower lid.

7. I created a winged eyeliner using Kanebo Kate Super Sharp eyeliner.

8. I curled my lashes and applied Cover Girl Lash Blast mascara.

9. I filled my brows using Anastasia Duo Brow Powder in Brunette.makeup for brown eyes

10. For my face, I applied Urban Decay Naked Skin foundation using a damped sponge.

11. I applied Smashbox contour powder (from the contour/highlight trio kit) under my cheeks.

12. I applied MAC Dainty on my cheeks.

13. For the lips, I applied MAC Please Me lipstick and a little bit of lip balm.

Product used

Eyes – Urban Decay Primer Potion Sin; Smashbox Full Exposure palette; Kanebo Kate Super Sharp eyeliner; Cover Girl lash blast mascara; Anastasia Duo Brow Powder

Face – Urban Decay Naked Skin foundation; Smashbox trio contour kit; MAC Dainty blush

Lips – MAC Please Me lipstick; L’occitane lip balm

Soft Rose Smokey Eyes tutorial using UD Naked 3

Here I am with a new Soft Rose Smoky Eyes tutorial using UD Naked 3 (again)! I do apologize for missing for almost a week without any tutorials. I’ve been having some difficulties with the internet at home. However, if you do follow me on Twitter or Instagram, you’d have gotten a little bit of update here and there every day.

In another news, I was very excited to find out that Urban Decay has used one of my pictures that I did on their email newsletter! I’m not sure if you guys subscribe to their mailing list, but I was so surprised to see my face on it. It’s small, but I’m so happy! If you want to recreate that look, please take a look at my Rose Smoky III tutorial.

Don’t forget to check out my other UD Naked 3 tutorials (pictorials and video)!

Urban Decay

So, for today’s tutorial, I wanted to use my Urban Decay Naked 3 again to create a much softer rosy smoky eyes, something that most people can recreate and do it on themselves. This look would be great for those with medium to darker skin tone as well. If you like a very light eyelid, you can apply Burnout or Dust instead of Buzz.

Scrolls all the way down if you want to skip the how-to, and go straight to the product list.

urban decay naked 3 rose smoky

How-to:

  1. I prepped my eyelids using Urban Decay Primer Potion in Sin.
  2. I applied Buzz on the inner half of my upper eyelid, and Liar on the outer half, using a flat eyeshadow brush.
  3. On the crease, I lightly applied Limit using a blending brush.
  4. Using a bullet crease brush, I applied Blackheart on the outer V.
  5. I blended out the outer V using the same blending brush I used on Step 3.
  6. On the lower lid, I applied Blackheart using an angled brow brush.
  7. I also applied Buzz on the inner corner of the lower lid.
  8. I lined my waterline using L’oreal Voluminous Smoldering eyeliner.
  9. I applied a winged eyeliner along the upper lash line using Kanebo Kate Super Sharp eyeliner.
  10. I curled my lashes, and applied Clinique High Impact mascara. Then, I added false lashes.
  11. I outlined my brows using Anastasia Brow Wiz in Ash Blonde, and filled it with Anastasia Brow Powder in Brunette.

urban decay naked 3 makeup tutorial

  1. I applied Cover FX cream foundation in G20 under my eyes, on the bridge of my nose, chin, and forehead using a clean foundation brush.
  2. I then applied Cover FX cream foundation in N110 on my temples, sides of my nose, on the hollows of my cheeks and on my jawline using a clean foundation brush.
  3. I blended the 2 foundation using a damped sponge.
  4. I set my face using Cover FX translucent powder.
  5. I applied Chanel Blush de Horizon on my cheeks.
  6. On my lips, I applied Tarte Lipsurgence in Lively.


Products used

Eyes – Urban Decay Naked 3 (eyelid: Buzz & Liar, crease: Limit, outer V: Blackheart); L’oreal Voluminous Smoldering eyeliner; Kanebo Kate Super Sharp eyeliner; Ardell false lashes no. 109; Anastasia Brow Wiz in Ash Blonde; Anastasia Duo Brow Powder in Brunette.

Face – Cover FX cream foundation in G20 & N110; Cover FX translucent powder; Chanel Blush de Horizon.

Lips – Tarte lipsurgence in Lively.

Kat Von D Esperanza Palette Review

Happy Friday (or Saturday depending on which time zone you are in), everyone! I wanted to actually do a tutorial today but the Sun is hiding behind the cloud, so I decided to fulfill my promise from my last post to put up my Kat Von D Esperanza Palette review. I hope when the Sun decides to come out again, I can do a fun tutorial for the upcoming week! Don’t forget to follow me on Instagram and Twitter to find out what I’m up to daily, and also like my Facebook page so you can get notification on facebook whenever I upload a new post (or subscribe if you prefer email notification!).

Anyways, let’s get down to the review!

Kat Von D Esperanza palette review

What is the Kat Von D Esperanza palette?

“A fresh palette of eight long-wear, full coverage shadows that deliver matte, pearl, and high-glitter finishes, plus one transformative color veil.

Inspired by the transformative spirit of spring, this luxurious eye shadow palette contains a variety of shades ranging from subtle mattes to bold shimmers and pearls. The transformer shade, Dayglo, can layer on to each color to add a unique dimension. A built-in mirror helps you create an abundance of on-the-go eye looks.

Palette is infused with rose extract to moisturize delicate eyelid area.”

(Sephora, 2014)

First impression – what a gorgeous coveeeer! I want it! I have to have iiiit! *while standing in front of the cashier, and without any shame asking her if she can get the palette from behind her*. Pretty much that sums up how I felt about the palette when I first saw it at Sephora…hahahaha…So, yeeep! There you go, I’m a sucker for any pretty packaging!

I actually have owned several Kat Von D products before – liquid eyeliner (Trooper), and Beethoven palette. I’ve loved those products, and have re-bought them several times, especially the Trooper liquid eyeliner. So, I expected quite a few things from this palette – great pigments, long-lasting, easily blendable etc. I’m pretty happy to see that Kat Von D finally released a palette with pastels and colors for Spring. However, this palette is just OK. I think you’ll be better off buying her True Romance palettes than this one, unless you like the pastels in this palette.

Keep reading to see why this palette didn’t make it to my Product of the Week!

Kat Von D Esperanza palette review

Packaging

The Esperanza palette comes in a carton box. As you can see, there’s a beautiful art work in the cover, very reminiscent of the Sugar Skull. Inside, you get a mirror on one side, and 8 eyeshadows on the other side.

To be honest, I’m quite disappointed with the packaging, since I find it quite flimsy, considering the other True Romance palettes come in a hard plastic package with a clasp.

Longevity/Blendability/Pigmentation

As with most of the other Kat Von D palettes, the shadows in this palette last really well. I’ve worn it with UD Primer Potion for 6-hour with no creasing.

The eyeshadows are so soft and buttery; it blends so easily. I do have to say that if you have a skin tone like me (or darker), Archangel might look a little chalky (although I love this shade so much!). I find that Santeria and Dog Roses have the most pigment pay-off out of all the 8. I also love Dayglo, which can work really well as a transition color on the eyelid if you have 2 or more shades on the lid. It also gives a nice iridescent finish whether you wear it alone or on top of any shadow.

I do have to mention that there’s a significantly more fall-out from this palette compared to the other Kat Von D palettes.

Kat Von D Esperanza palette swatches

Shades & Finish

Top (L-R)

  • Selena (glitter purple)
  • Dayglo (transformer shade, iridescent white)
  • Galore (pearl peach)
  • Placebo (matte peony pink)

Bottom (L-R)

  • Santeria (glitter greenish grey)
  • Archangel (sparkle seafoam green)
  • South (matte beige)
  • Dog Roses (sparkle bronze)

*shades description taken from Sephora*

Kat Von D Esperanza palette review

Price

CA$43 for 0.035 oz x 8 eyeshadows. It is a limited edition palette, so I’ve expected it to be a bit more expensive. The other Kat Von D palettes (the True Romance) are also $43/each, but you get 0.05 oz x 8 shades (with better packaging). I think this palette is slightly more expensive, but if you love pastels and light colors then this would be a great palette for you.

Pros

  • What is so great about this palette is that the colors work with each other very well in any combination!
  • Love all the soft, spring colors.
  • Easily blended and great pigment pay-off.
  • Beautiful cover.
  • Paraben free.

Cons

  • Flimsy packaging.
  • Some of the lighter shades might look chalky on medium to dark skin tone.
  • Quite a few fall-out.
  • Pricy considering you pay the same price as the other Kat Von D palettes, but you get less product and flimsier packaging.


Disclaimer: I am not affiliated nor sponsored to do this review. I bought this palette out of my own pocket, and I do not gain any monetary profit out of it.

Wearable Purple Eye Makeup

How is everyone this week? It’s been really cold here in Canada! If you are anywhere in the colder region, keep yourself warm, yes?! Anyways, due to the cold gloomy weather, I wanted to create a look in which I incorporated a little bit of colour. I’ve decided to do a wearable purple eye makeup. It’s super simple and easy, you can use any colour of your liking on the crease. I chose purple just because I think it’ll look great on every eye colours.

The trick to this light colored eye makeup is to use a black mascara and eyeliner to tie the whole look together. Black mascara and eyeliner are a must with this look since the eyeshadows used in this tutorial is quite light, and I didn’t use any contour colour on the crease.

Wearable purple makeup

How-to:

1. I applied NYX jumbo eyeshadow pencil in Milk all over my eyelid using my finger.

2. Using a fluffy blending brush (or you can use a flat eyeshadow brush), I applied Bad Girl from Sleek Makeup Showstoppers palette all over the lid.

3. Using a clean fluffy crease brush, I applied MUFE purple eyeshadow no. 92 on the crease.

4. I blended the purple eyeshadow slightly using a clean blending brush, blending the eyeshadow upwards above the crease.

5. I created a winged eyeliner using an angled eyeliner brush and L’oreal Infallible Gel Lacquer Liner in Blackkest Black.

6. Using a clean angled eyeliner brush, I applied UD Faint eyeshadow along the lower lash line.

7. I also lined my waterline using MAC Chromagraphic pencil eyeliner in NC15.

8. I filled my brows using Anastasia Duo Brow Powder in Brunette.

9. I curled my lashes, and applied Clinique High Impact Mascara on both upper and lower lashes.

Feel free to add false eyelashes to make your eyes look more wide awake. I ran out of falsies, so I didn’t apply any.

Jlo american idol sf audition makeup

10. On my face, I applied Smashbox Halo foundation all over using Sigma Flat Kabuki brush.

11. I applied MAC Pro Conceal/Correct palette in yellow corrector under my eyes, and on the bridge of my nose.

12. I lightly contour my face using MAC Skinfinish natural in Medium Deep.

13. I applied MAC Dainty blush on my cheeks.

14. On my lips, I applied Revlon Colorstay Ultimate Suede lipstick in Socialite, and added a few dabs of YSL Glossy Stain in Peche Cerra-Colla (27).

Soft Romantic Makeup using UD Naked 3

I’m sure you guys are getting tired of my UD Naked 3 obsession, but I have to share this look with you just to show how versatile this palette is. Today tutorial, I’m using UD Naked 3 to create a soft romantic makeup which can be used for daily makeup, date makeup, and even bridal makeup.

This look is very pretty and natural looking. The eyes are made to look brighter and bigger looking, while the rest of the face is kept fresh and slightly flushed. I also skip the glossy lips, and opt for a natural looking lip color. Everything about this makeup is about keeping everything to the minimal.

I’ve done something similar to this look in my Chanel Kaska Beige re-visited post. If you prefer a stronger, more intense eye look, please do check my other tutorials using the UD Naked 3 palette

I’ve also added a Youtube Video tutorial using UD Naked 3 palette!

urban decay naked 3

My eyes are prepped using UD Primer Potion, and my face is prepped using Smashbox foundation primer.

How-to:

1. I applied Trick all over my eyelid using a flat eyeshadow brush.

2. Using another clean flat eyeshadow brush, I patted Factory on the outer third of my eyes.

3. I removed excess from the flat eyeshadow brush I used on step 2, and blended Factory towards the center part of the eyes.

4. Using a clean blending brush, I applied Nooner on the crease.

5.  I applied Factory along the lower lash line using an angled eyeliner brush.

6. I also applied Dust on the inner corner of the lower lash line using an angled eyeliner brush.

7. I lined my waterline using MAC Chromagraphic pencil eyeliner in NC 15.

8. On my upper lash line, I created a winged eyeliner using Kanebo Kate Super Sharp eyeliner.

9. I curled my lashes and applied Maybelline Great Lash mascara on both upper and lower lashes.

10. I added false eyelashes on the upper lashes to make my eyes appear open and larger.

11. I filled my brows using Anastasia Brow Wiz in a mix of Ash Blonde and Brunette.

ud naked 3

12. On my face, I applied Giorgio Armani Maestro foundation and blended it using my fingers.

13. I lightly contoured my face using MAC Shadowy powder.

14. On my cheeks, I applied MAC Well Dressed blush.

15. I added Smashbox Halo wand highlighter in Gold as highlighter.

16. On my lips, I applied Revlon Colorstay Ultimate Suede Lipstick in Socialite.

bridal romantic makeup

Neutral Eyes & MAC Diva Lipstick

I was asked to do a “Bella Twilight” inspired tutorial. I don’t watch Twilight since I don’t like it, so I had to google up some images of Bella. Her makeup is mostly very natural, with very little blush. I decided to use Bella’s eye makeup as an inspiration for the eyes.

However, I changed the lips since I like more colors on my face. I added extra eyeliner as well just to define my eyes, but you can skip the step altogether. I don’t think the overall look is too inspired by Bella, but the eyes are quite close to how she has it on the Breaking Dawn poster.

Anyhow, I’ve decided to go with MAC Diva lipstick for the lips since I like this lipstick, and I want to wear it more for tutorials. I absolutely love MAC Diva! It’s not too dark, not too light, and it’s perfect for winter. I have done another post using MAC Diva lipstick but with a glitter cat eyeliner in “Holiday Makeup using MAC Diva”. If you’re not used in creating cat eyeliner, this is a good alternative.

I added the liquid liner after I applied my falsies since I didn’t decide to apply the liner after I completed the whole look. You can skip the liquid liner altogether if you want.

smashbox filter trio eyeshadow

How-to:

1. I applied MAC Omega eyeshadow all over my eyelid using a flat eyeshadow brush.

2. Using Smashbox bullet brush, I applied Sable from Smashbox Filter photo-op trio.

3. I applied Sumatra from Smashbox Filter photo-op trio on the outer V using a crease brush.

4. I blended Sumatra out to remove any harsh lines.

5. Using an angled eyeliner brush, I applied UD Blackout eyeshadow along my upper and lower lash lines.

6. I curled my lashes and applied Maybelline Great Lash mascara on both upper and lower lashes.

7. I filled my brows using a mixture of MAC Omega and MAC Brun.

8. I applied falsies, and then lined it using Kanebo Kate Super Sharp Liner.

9. I applied Vanilla from Smashbox Filter photo-op trio under the brows.

natural look using mac diva

10. On my face, I applied Smashbox Halo foundation using a Sigma Flat Kabuki Brush.

11. On my cheeks, I applied Maybelline Face Studio Master Glaze in Make a Mauve, blending out using my finger.

12. I contoured my face using MAC Shadowy powder and NARS Ita kabuki brush.

13. I also applied Smashbox Halo Highlighting Wand in Gold as highlighter.

14. On my lips, I lined it using L’oreal Colour Riche in Truly Burgundy and then applied MAC Diva lipstick on top.

If you want to know how to apply lipstick to make it last, please check my How-to apply red lips post.

NYE Makeup Using Smashbox Full Exposure Palette

For this NYE Makeup tutorial, I decided to use my Smashbox Full Exposure palette, which I love! I’ve done a review/swatch post on Smashbox Full Exposure Palette Review. I’ve also done a few tutorial using the same palette in Smashbox Full Exposure Look #1 and Smokey Eyes using Smashbox Full Exposure Palette.

I wanted to create a more cat-eye effect with this smoky eye look, so if you want to create a more rounded smoky eyes please check my Glitter Holiday Makeup. My step-by-step picture looks slightly out of focus, that’s because I did not realize that my lens was dirty! So, my apologies if the pictures are not clear.

Smashbox Full Exposure tutorial

How-to:

1. I prepped my lids using UD Primer Potion.

2. I applied M6 on the crease using a blending brush.

3. Using an angled eyebrow brush, I applied M7 on the outer V.

4. Using a clean small shader brush, I blended M7 towards the inner part of the eyes.

5. I repeated step 3 and 4 until I get that outer V really dark.

6. Using a fluffy blending brush, I applied M5 slightly above the crease.

7. Using a flat eyeshadow brush, I applied S6 on the eyelid, and S4 just on the inner tear duct.

8. I created a thick winged eyeliner using Kanebo Kate Super Sharp eyeliner.

 Smashbox Full Exposure tutorial

9. Using an eyeliner brush, I lined my lower lid using M7.

10. I lined my waterline using L’oreal Voluminous Smoldering eyeliner.

11. I curled my lashes and applied Tarte Lights, Camera, Flashes mascara on both upper and lower lashes. I also applied false eyelashes.

12. I filled my brows using Anastasia Brow Powder in Brunette.

13. I applied Marc Jacobs Gel Foundation on my face using CoverFX Cream Foundation.

14. I applied MAC Dainty blush on my cheeks.

15. I also applied Revlon Socialite lipstick on my lips.

Smashbox Full Exposure tutorial