Fall Makeup Tutorial

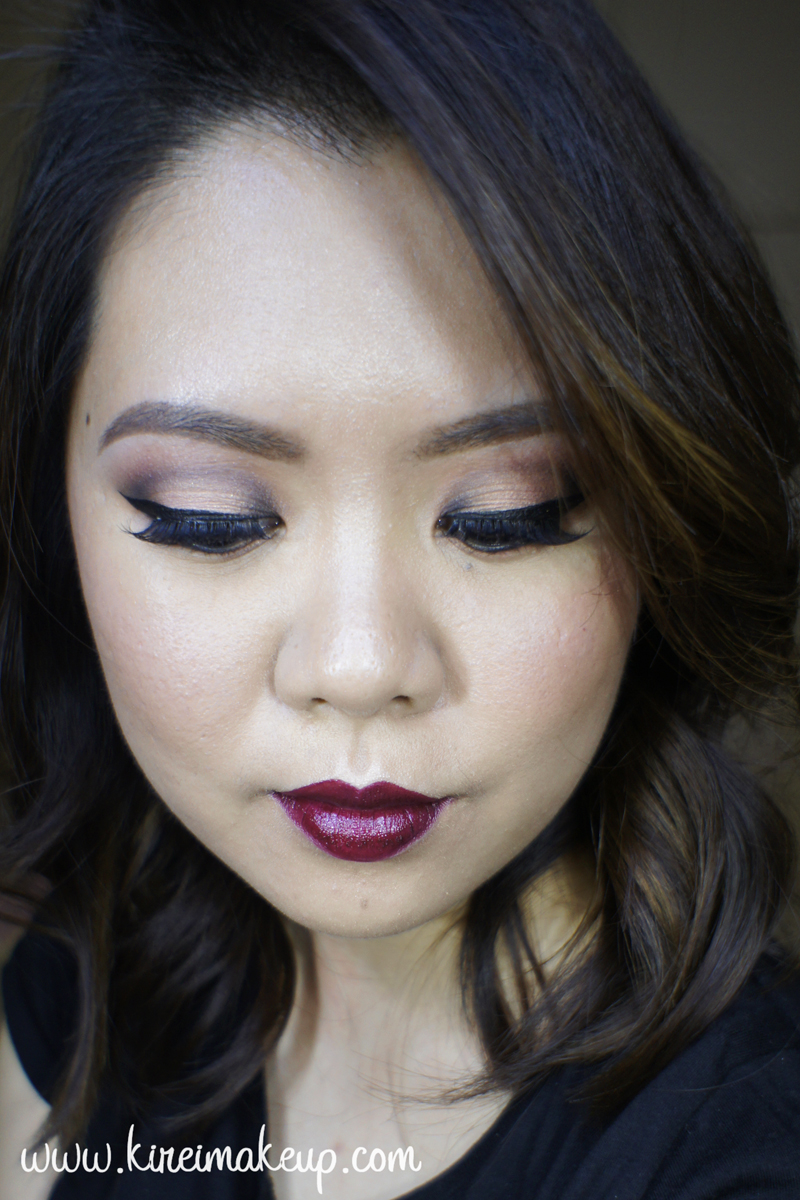
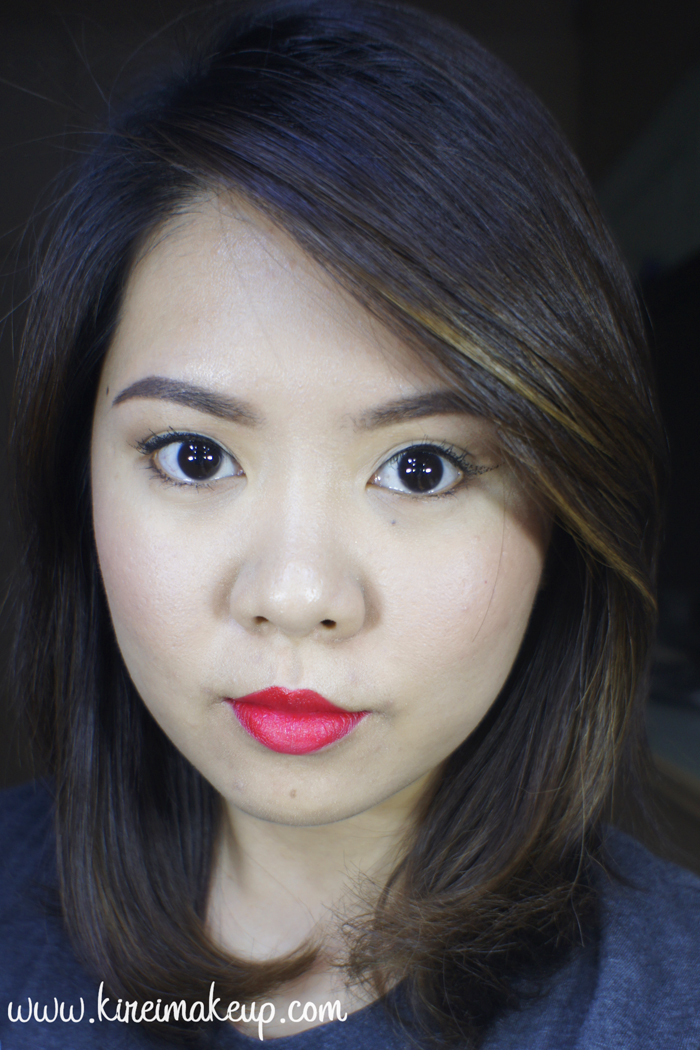
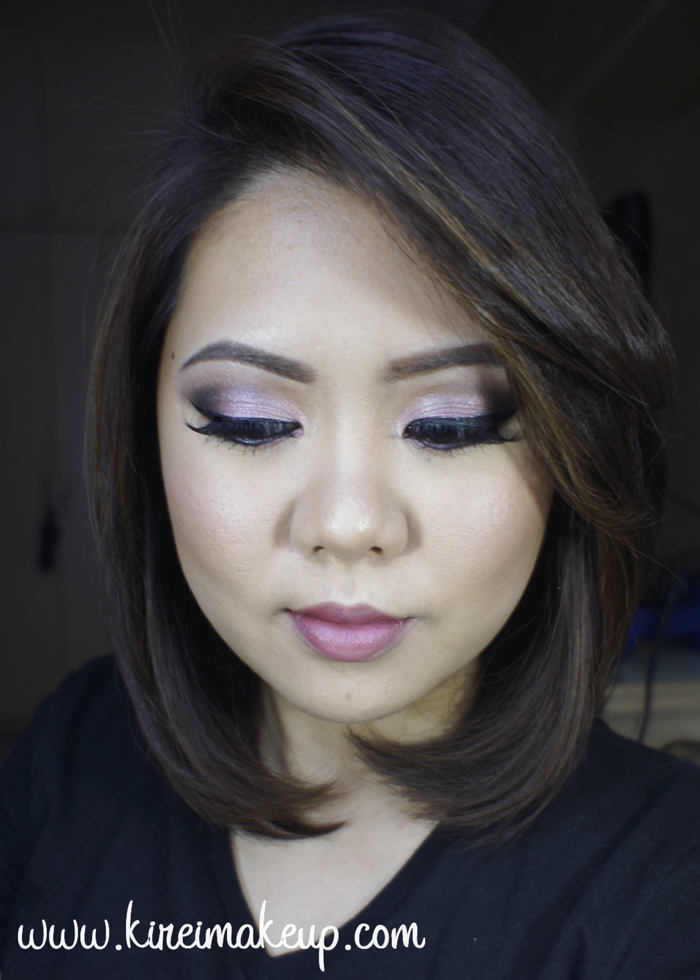
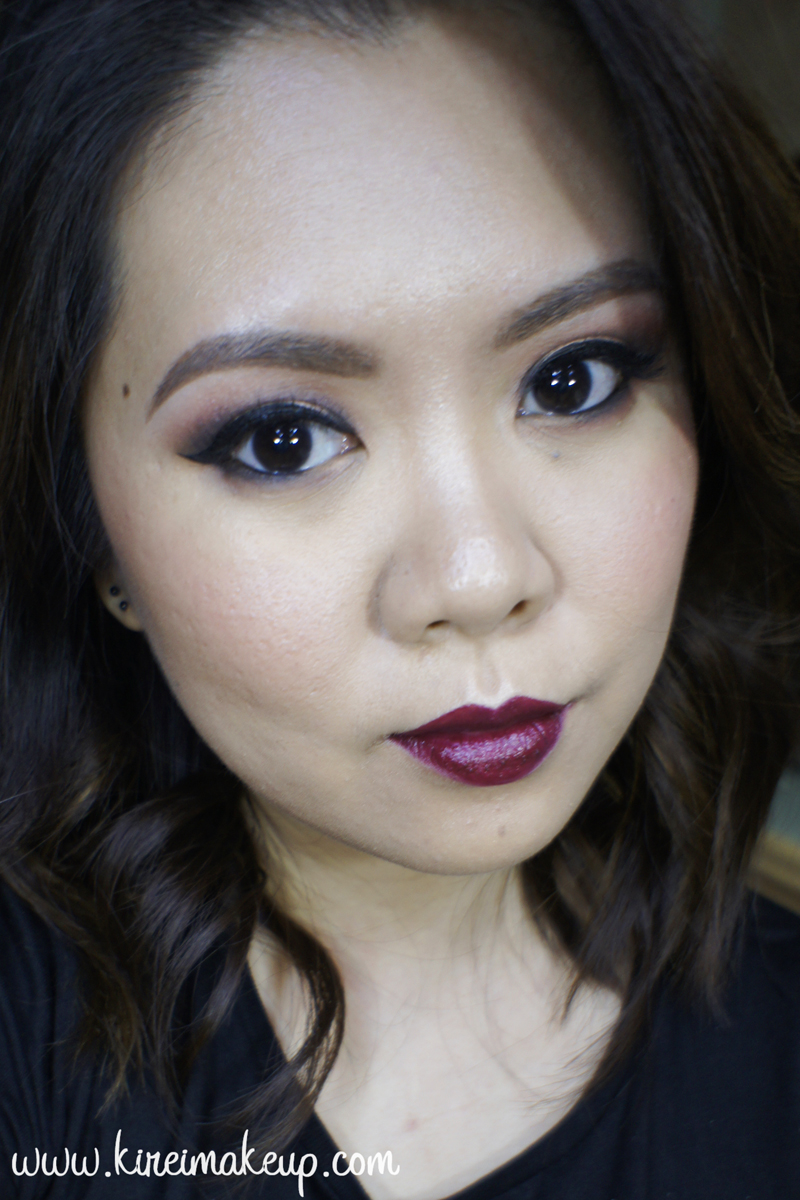
Fall is almost over I heard! How I miss those beautiful leaves turning yellow, orange, and red! Anyways, since I’ve been reminiscing about Fall, I decided to do a Fall Makeup Tutorial, inspired by the beautiful maple leaves that turn red during the season. I’ve done a review on the lipstick that I’ll be wearing for this tutorial too! You guys should check Revlon Black Cherry out if you are looking for a dark lipstick for this Fall/Winter season.

I usually don’t do bold lips and eyes at the same time like on this post, but I like to break the rules some times, so hey why not?! Anyways, enough with the chit-chat, let’s get on the tutorial!

For product list, scroll all the way to the bottom!

*Check out my tutorial on how to have a long lasting lipstick*

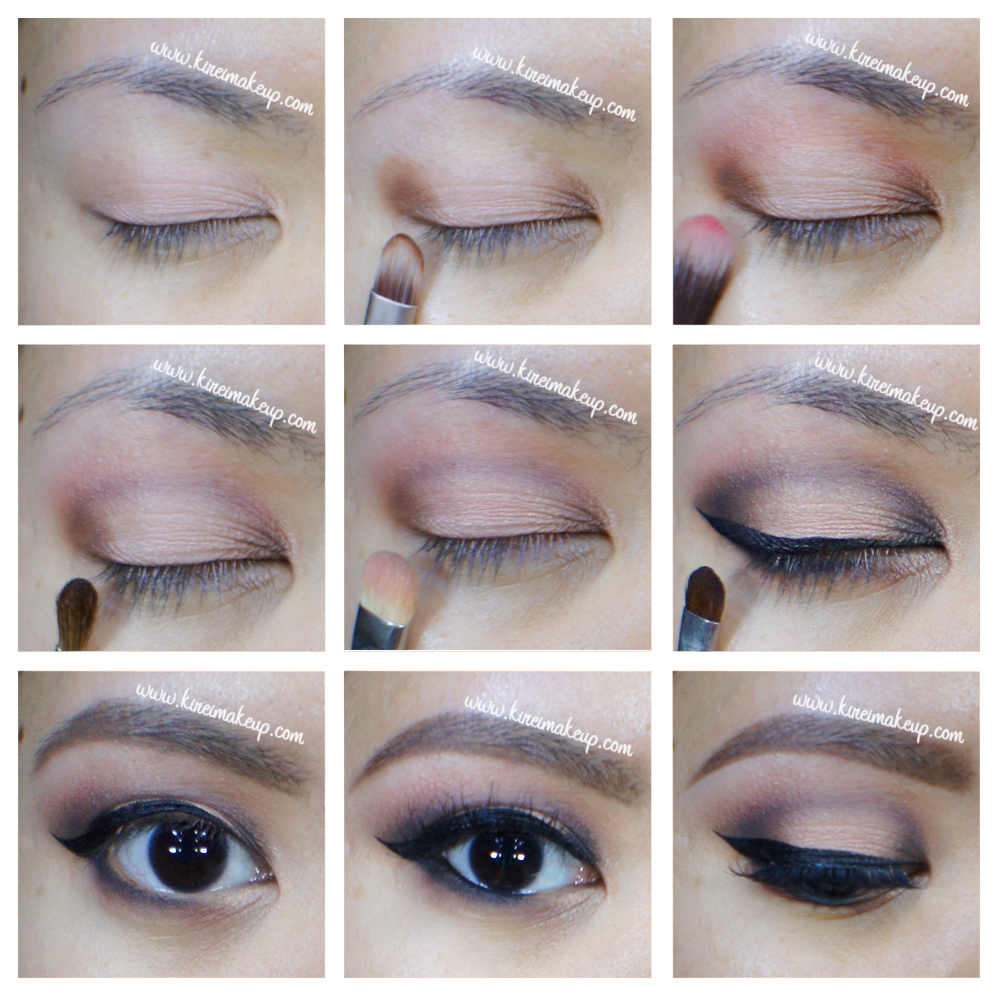
My eyelids are prepped using Urban Decay Primer Potion.

How-to:

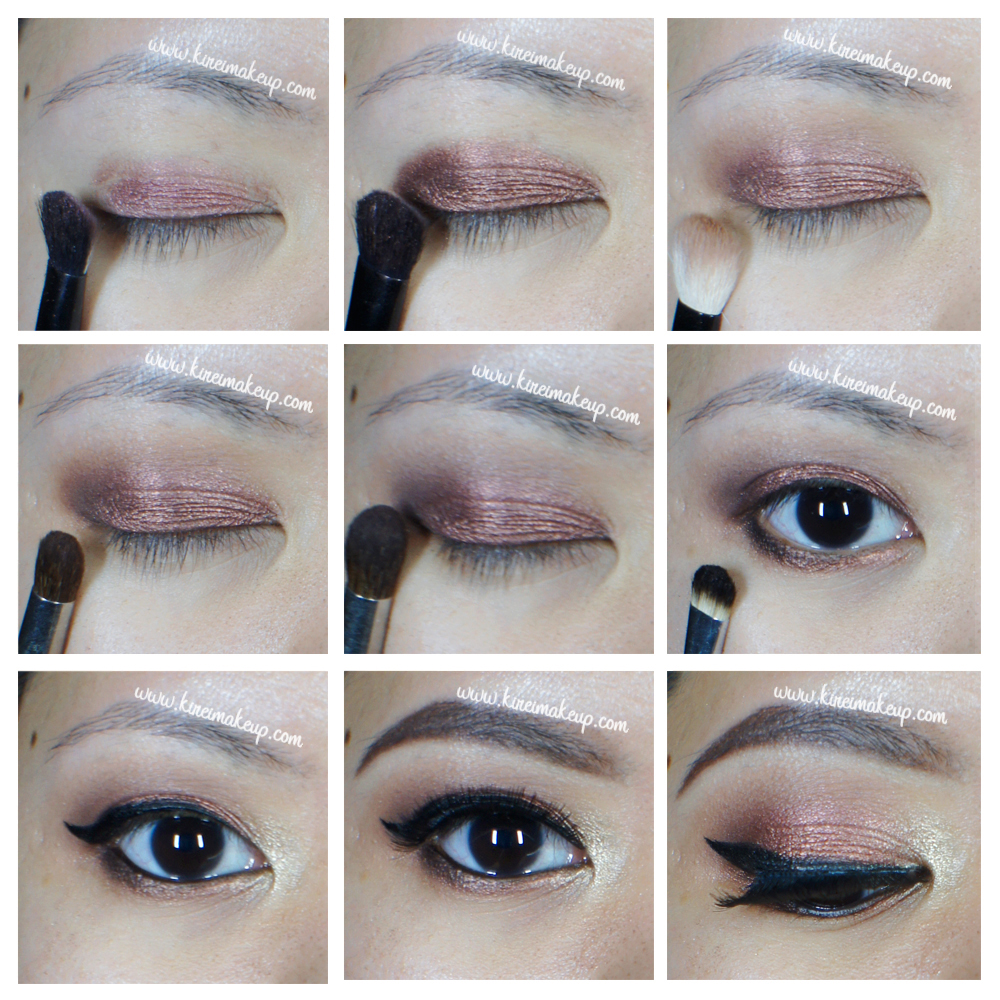
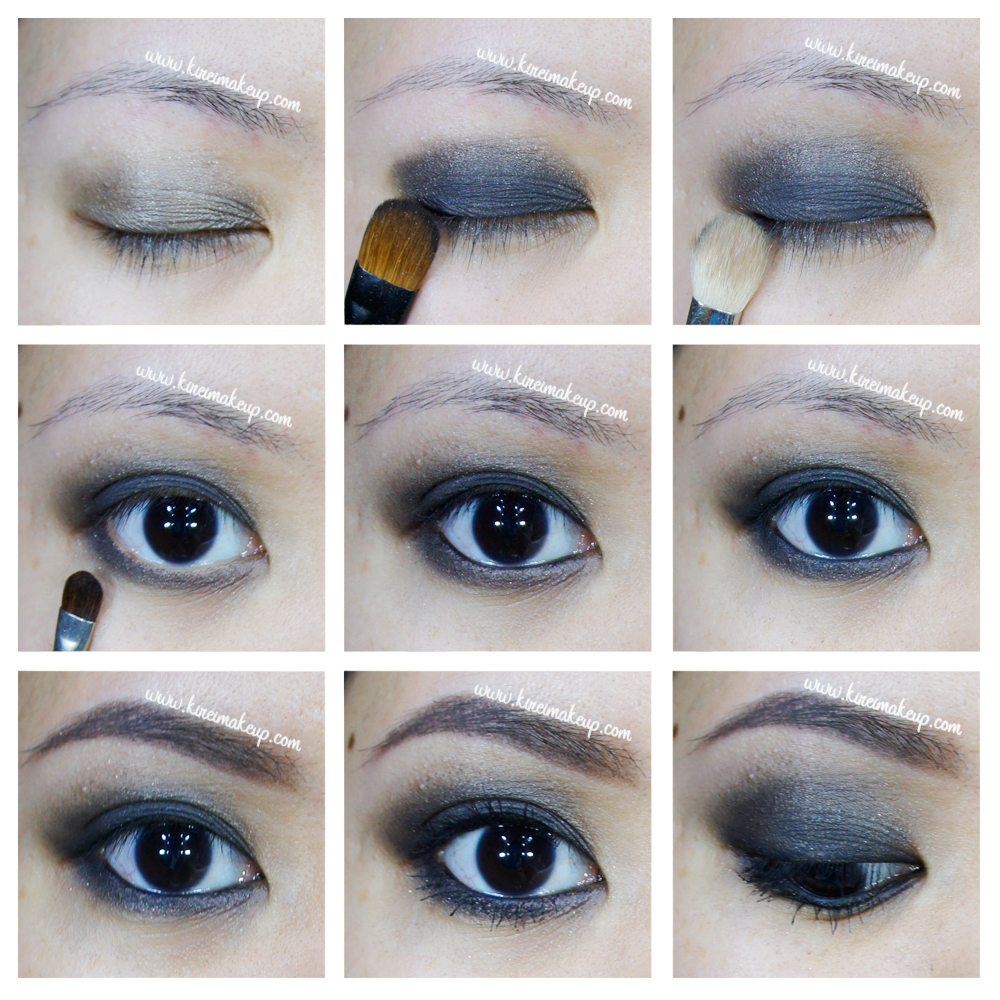
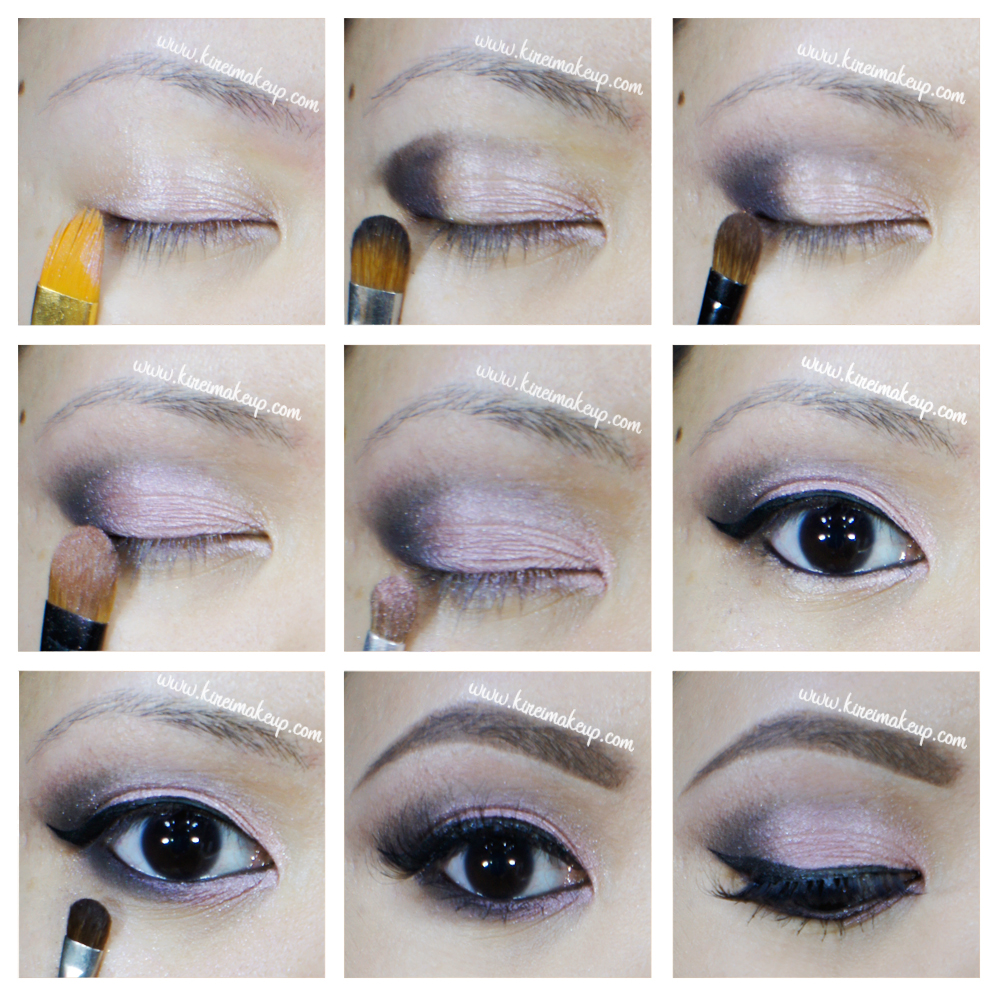
1. I applied MAC Pro Longwear Paint Pot in Perky all over the eyelid.

2. Using a flat eyeshadow brush, I applied The Balm Meet Matt(e) Nude Matt Rosen on the inner and outer third of my eyelid.

3. I applied Kat Von D Esperanza Placebo just slightly above my crease as the transition color.

4. On the crease, I used a small brush and applied The Balm Meet Matt(e) Hung.

5. I applied MAC Artistic License eyeshadow on the eyelid using a flat eyeshadow brush.

6. I lined my upper lash line using Shu Uemura Calligraphy Ink eyeliner, and created a winged liner. I also added MAC Carbon on the outer and inner third of my eyelid, and on my crease. I decided to add MAC Carbon to add extra intensity and depth.

7. I applied MAC Carbon lightly along my lower lash line.

8. I lined my waterline using L’oreal Voluminous Smoldering eyeliner.

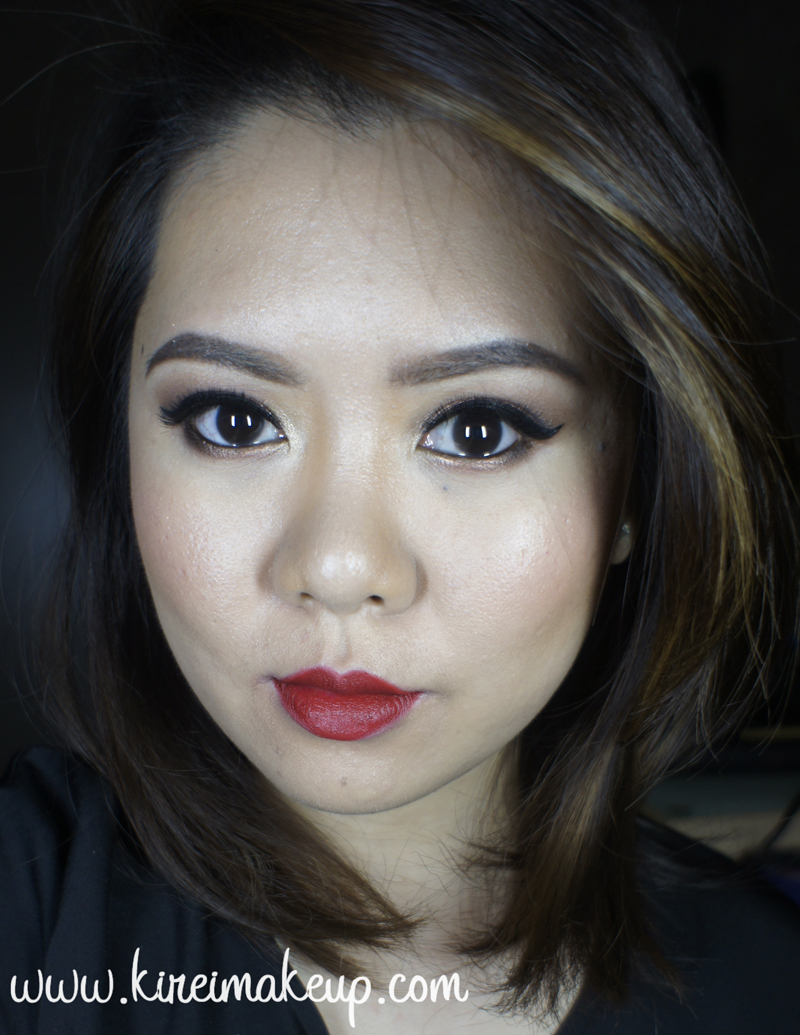
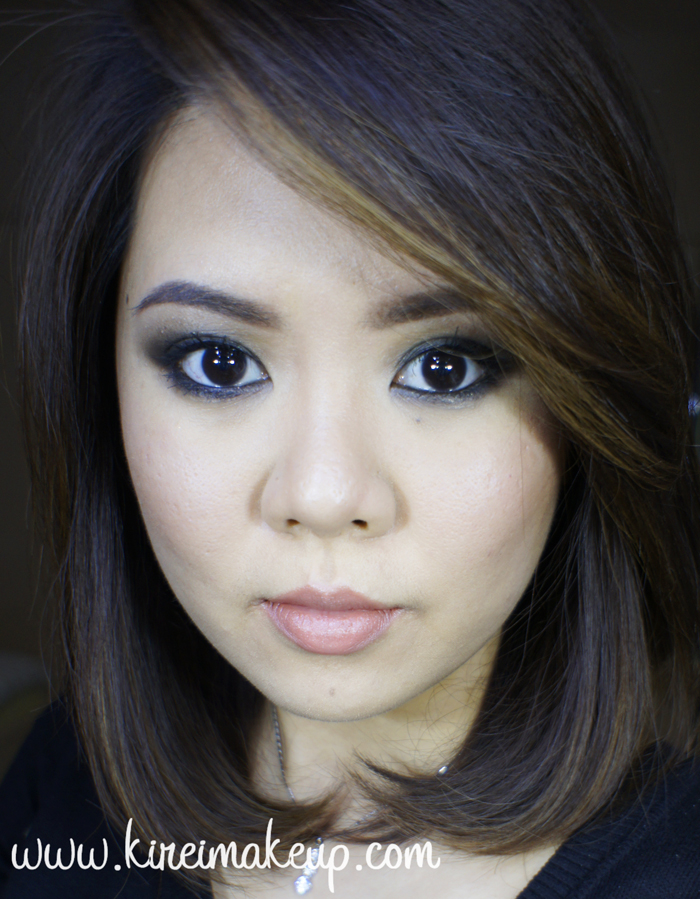
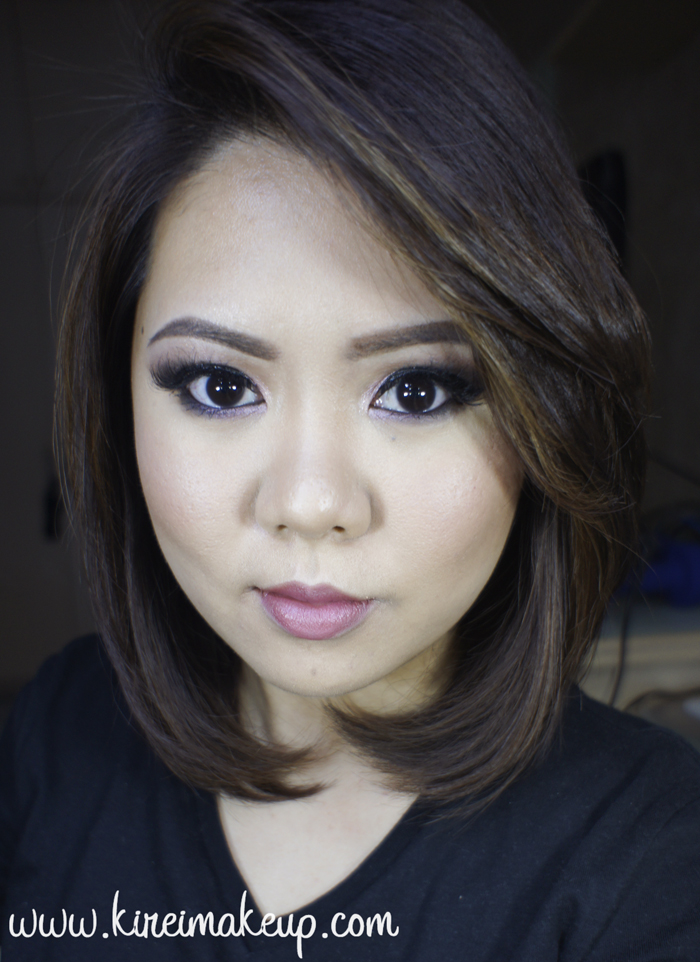
9. My brows are filled using Anastasia Brow Wiz in Taupe and Brunette. My falsies are Gwiyomi false eyelashes no. 3

peach smoky eyes

10. I applied Diorskin Star foundation all over my face using Real Technique buffing brush.

11. I applied MAC Conceal/Correct palette in Medium under my eyes.

12. I set my face using Cover FX translucent powder.

13. I lightly contoured my face using Smashbox contour kit powder.

14. I applied The Balm Mary Lou manizier highlighter on my cheekbones, nose and cupid’s bow.

15. I applied The Balm Instain blush in Houndstooth on my cheeks.

16. On my lips, I applied Revlon Black Cherry lipstick using a lipbrush.

Revlon Black Cherry makeup tutorial

Product list

Eyes – Urban Decay Primer Potion; MAC Perky Pro Longwear Paint Pot; The Balm Meet Matt(e) Nude (Matt Rosen: lid, Matt Hung: Crease); Kat Von D Esperanza Palette (Placebo: upper crease); MAC Artistic License eyeshadow (lid); MAC Carbon eyeshadow  (lid & crease) ; Shu Uemura Calligraphy Ink pen liner; Anastasia Beverly Hills Brow Wiz (Taupe and Brunette); Gwiyomi False Lashes no. 3

Face – Diorskin Star foundation; MAC Conceal/Correct palette in Medium; CoverFX translucent powder.

Cheeks – Smashbox contour kit; The Balm Mary-Lou manizier highlighter; The Balm Instain Houndstooth blush.

Lips – Revlon Black Cherry lipstick.


Fall Makeup dark lips

Bioderma Sensibio H2O Review

I’m back with a new post ya’ll! Today is my Bioderma Sensibio H2O review! Apologies for the late update, been super duper busy with work, and my health condition wasn’t at its best. However, if you have followed me on Instagram, you would have known that I was recently featured on a talkshow called Ping Me at RTV in Indonesia. Just a small segment, but it was a pretty cool experience. Photos are over on my Instagram!

Anyways, let’s get back on today’s topic: Best makeup remover ever! If you have not heard of this makeup remover, shame on you! Let’s take a look at the before and after photos below shall we?

  • On the left, my face was filled with makeup products from my “Dr. Who the Waters of Mars” makeup tutorial.
    • I have foundation on, eyeshadows, eyeliner, and face paint.
  • On the right, my face after I removed all the makeup using Bioderma Sensibio H2O makeup remover.
    • 2 cotton pads somewhat half-soaked in the makeup remover.

Bioderma Indonesia

So, I’ve used Bioderma since 2010, and when I returned to Indonesia in 2012, I couldn’t find any. However, in 2013, Bioderma entered the Indonesian market, and I was thrilled!  I was even more excited this year when Bioderma’s Brand Manager and Marketing Director invited me for a coffee break last month! Amazing! So awesome to have meet both of them, and they were so kind as to give me their 2 best-sellers! Thank you and thank you and thank you Bioderma Indonesia!

Let’s get back on track a little, shall we? What exactly is Bioderma?

” The Laboratoire Dermatologique BIODERMA, based in Lyon, France, develops and markets, in close collaboration with dermatologists and renowned institutional research centers (CNRS. INSERM, CHU, Universities,…), dermo-cosmetic products intended for medical prescription and medicinal consultancy.

BIODERMA is among the most frequently prescribed laboratories by French dermatologists. Present in more than 70 countries, BIODERMA is growing very fast at international level. (…)

Bioderma’s reserach is performed by a team of highly qualified scientists and extremely reputable operators. (…) These works gave birth to numerous innovations which since became references:

  • The 1st non detergent shampoo : NodéFluid.
  • The 1st cleansing waters : the micellar solutions Sensibio H2O and Sébium H2O.
  • The 1st biologically-active sunscreen ingredient that counters the long-term damaging effects of UV exposure :  Photoderm and the patent Cellular BIOprotection®.
  • The 1st skincare product that corrects the quality of sebum : Sébium AKN and its patented ingredient, Fluidactiv®.
  • The first skincare who acts directly on the main cause of skin redness : Sensibio AR and its patent Rosactiv®. “

Bioderma, 2014

As you all can see, Bioderma is the pioneer in creating “Cleansing Water”. The micellar technology comes from Bioderma, and they are still the best at it. I’ve tried other micellar-based makeup remover, but none of them are as superior as Bioderma’s.

What is a micellar technology?

(…) Micelles (…) effectively micro-emulsify impurities while maintaining the skin’s balance (soap-free, physiological pH).

Bioderma, 2014

So there’s 2 actions in the Micellar technology:

  1. Break down impurities
  2. Restore skin to its optimal condition

This makeup remover has these tiny molecules called Micelles. What micelles do is to break down any impurities (dirt, oil, makeup etc) as soon as it touches your skin. However, instead of breaking down your skin cells along with all these impurities, it detects and recognizes your skin cells. The micelles molecules will then restore your skin’s condition to its optimum balance.

Isn’t Science amazing?! Awesome!

Best Makeup Remover

So, I was given 2 products – the Sensibio H2O and the Sebium H2O. I’ve only been using the Sensibio H2O, so I cannot say much about the Sebium. However, I’d have think that the Sebium would give similar result to the Sensibio.

There’s 2 main difference between the Sensibio and the Sebium:

  • The Sensibio is catered towards sensitive skin, while the Sebium is for oily skin.
  • The Sebium cannot be used in the eyes and lips area while the Sensibio can be used in those areas.
    • The reason why the Sebium cannot be used in the eyes and lips area is because those areas are more sensitive. Since the Sebium is made for oily skin, it’ll absorb excess oil on the skin. However, since the eye and lip areas aren’t as oily as the skin, using the Sebium in those areas might cause it to be dried out and thus irritated.
    • Please do avoid using the Sebium on the eye and lip areas.


best makeup remover for sensitive skin

Below is a list of pros and cons for Bioderma Sensibio H2O

Pros

  • Removes makeup without the need to rinse.
  • Will remove even the hardest waterproof mascara and eyeliner.
    • Soaked the remover on a cotton pad, leave it on eyes for 3-5 minutes and wipe away.
  • Suitable for every skin type.
  • Does not dry out skin.
  • Does not leave any weird sticky or oily residue on skin.
  • Does not irritate the skin and eyes.
  • PERFECT to clean up the edges of your WINGED LINER.
  • Fast and quick makeup removal, especially for makeup changes.

Cons

  • Removing mascara and eyeliner might take a few minutes for the remover to break it down. I prefer using Shu Uemura cleansing oil for this instead, since I always rinse my face after removing my makeup anyways.


White Sugar Skull Makeup

As Halloween is fast approaching, I’m trying to squeeze in as many Halloween Looks as I can! This is my 5th Halloween tutorial for 2014, and I think this year I created the most Halloween tutorials compared to previous years! Anyways, for the 5th tutorial, I wanted to do a Sugar Skull makeup, but I wanted to create something different than the usual sugar skull. I’ve done a sugar skull makeup before on models using colors and black lines. So, while I was browsing for inspiration, I found this video on youtube by one of my favorite youtube gurus, Samantha from Batalash. I loved how she did hers using white and mainly brown colors. I decided to use her video as my inspiration and create this look.

I was running out of white pencil eyeliner while I was doing this look, so I switched to a white water-activated face paint by Snazaroo. Due to this, you might see some part of the makeup looks whiter than the others, that’s because of the change in medium (pencil to paint).

What you need for this look:

  • Foundation
  • Setting powder
  • Eyeshadows – light brown, dark brown, black
  • White pencil eyeliner or face paint
  • Brushes
  • Contact lens – optional

For a list of all the brands that I’ve used in this tutorial, please check it at the end of the tutorial.

*Check out my other Halloween Tutorials*

white sugar skull makeup

How-to:

1. I applied foundation all over my face, and set it using a setting powder.

2. Using the tip of a very firm flat eyeshadow brush, I applied a light brown eyeshadow around my eye socket.

white sugar skull makeup

3. Using a flat eyeshadow brush, I filled my eye area using the same brown eyeshadow as step 2.

4. Again, using the tip of a firm flat eyeshadow brush, I applied a darker brown eyeshadow, lightly blending it towards the center of my eyes.

easy sugar skull makeup

5. Using an angled eyeliner brush, I applied a black eyeshadow as an outline of my eyesocket. I lightly blend it inwards.

6. Again, I outlined my eye socket using a white pencil eyeliner. You want to sharpen this eyeliner and clean the tip every now and then to prevent the color from getting muddy.

white sugar skull makeup

7. Using the same white pencil eyeliner, I created the outline and spider web design on my face.

  • I created a wide spider web on my forehead.
  • I outlined where I’d like the hollow of my nose going to be.
  • I also created a line on the hollow of my cheeks towards the corner of my mouth.
  • I created vertical lines over my mouth to outline where my teeth are going to be.

8. Next, I used the brown eyeshadow to filled in my nose and create some shadows in between my teeth, as well as the hollows of my cheeks.

9. On the nose, I also lightly applied a black eyeshadow just  at the edge where the white and the brown meets to create depth.

easy sugar skull makeup

10. Using a white face paint, I created some dots on my face.

11. I also created flower petals around the eye socket, and lighten up the teeth to make it stand out even more.


Products used

  • Foundation – Diorskin Star foundation
  • Setting powder – Cinema Secret Loose powder (Transparent)
  • Eyeshadows – The Balm Meet Matt(e) Nude
    • Light brown – Matt Rosen
    • Dark brown – Matt Garcia
  • Black eyeshadow – MAC Carbon
  • White pencil eyeliner  – Revlon Carbon Cleopatra photoready eyeliner
  • White face paint – Snazaroo classic white

*Check out my other Halloween Tutorials*

  • L’oreal Colour Riche Moist Matte in Lincoln Rose

    I was watching Kat Von D video tutorial on Sephora’s youtube channel, and I absolutely love how she created the ombre dotted eyeliner, similar to pointilism. I think it’s a pretty cool way to get creative with your eyeliner while keeping it simple. You can pair this dotted eyeliner with a rich-colored lips, like the L‘oreal Colour Riche Moist Matte in Lincoln Rose to brighten up your look.

    As promised on my L’oreal Colour Riche Moist Matte swatches, I wanted to show you guys how the lipsticks look on my skin. This time I played around with Lincoln Rose, but I’ll try to work on the other shade next time. I’m quite surprise at how bright the lipstick shade is on my lips. I did not line my lips at all for this tutorial since I want to see how the real color is against my skintone. I think if you have a medium or dark complexion, this would work really well on you. I personally find this shade to be a little bit overpowering.

    The shade itself is a very interesting red. It does have quite a warm undertone to it. I think it’s a very pretty shade for summer, or for us in the Tropics where everyday is pretty much summer. Very warm, bright, and tropical. I applies very smoothly on the lips. Although it is a “matte” line, it doesn’t dry out your lips like some other brands “matte” lipsticks are. It is still creamy, while the finish is matte. Overall, I think the L’oreal Colour Riche Matte line is worth a try. I definitely am going to look for another one or two the next time I go to the mall!

    how-to dotted winged liner

    How-to:

    1. I applied a nude eyeshadow on my eyelid, all the way to the brow bone using a flat eyeshadow brush. For this look, I used Entomology from Kat Von D Monarch palette.

    2. On the crease, I applied Vanish from Kat Von D monarch palette, using a clean fluffy blending brush.

    3. I placed a tape on where I want my “wings” to be as my eyeliner. You can skip this step if you have steady hand.

    4. Using Kat Von D Trooper tattoo ink eyeliner, I started drawing a solid line from the inner corner to the middle of my lash line.

    5. Then, using the tip of the eyeliner, I started drawing dots from the middle to the end-tip of the eyeliner. I placed more dots on the middle, and it gets more spaced out as it approaches the end of the wing.

    6. I ran Vanish slightly on the lower lash line using an angled eyeliner brush.

    7. I curled my lashes and applied MUFE Aqua Smoky Lash mascara on both upper and lower lashes.

    8. On my brows, I filled it in using Anastasia Brow Wiz in Medium Ash.

    L'oreal Colour Riche Matte Rose Bud

    9. On my face, I applied Giorgio Armani Maestro foundation.

    10. I applied Smashbox Halo blush in In Bloom.

    11. On my lips, I applied L’oreal Colour Riche Matte in Lincoln Rose.

    Halloween #1- Monster Teeth

    Alright! I finally decided to start my Halloween tutorials early this year! I’m super pumped since my parents are setting up a haunted house at work for everyone to enjoy! Anyways, you can be sure I’m going to be there with full makeup on! For my first tutorial, I decided to do a Monster Teeth or monster smile, since I always find difficulty creating these teeth. I’m not that happy with the result, but oh well, I think it worked pretty well.

    One tip that I should keep in mind for myself, is to use water-based white paint for the teeth instead of cream face paint. I think the cream is hard to work with since it moves around so easily, but that’s just my preference. Also, funny story (not so funny when it happened), I was so close to finishing the whole look, and I decided to “fix” the two teeth on the bottom lip, then my hand slip and smudged everything. I had to remove the 2 teeth and just created 1 since it was getting late, and I had to go to bed.

    *For Killer Clown tutorial please check out my latest post*

    *Please check out my other Halloween post*

    Ok, let’s get this whole thing started!

    How-t0:

    1. I started out by drawing an outline of the smile using a black eyeliner pencil.

    halloween makeup tutorial

    2. Using the same eyeliner pencil, I started drawing the outline of the teeth. It doesn’t have to be pretty, it can be as sharp or as big as you want. I drew the teeth at the back of the mouth a little bit curved in to create an eerier smile.

    3. Using a small synthetic artist brush, I applied black cream face paint outside the teeth area.

    halloween makeup tutorial

    4. Using a clean synthetic artist brush, I applied white cream face paint inside the teeth.halloween makeup tutorial

    5. To create some depth, I created some smile lines at the end of the monster mouth, above and below the monster lips.

    6. Using an angled eyeliner brush, I blended the lines down for the lines on below the lips, and upwards for the lines above the lips. This will create an illusion of depth.

    halloween makeup tutorial

    7. For the rest of the face, I applied foundation and smoky eyes just for fun.

    8. I also set the cream face paint using eyeshadow of similar colors – black for the black areas, and white mixed with beige for the teeth.

    halloween makeup tutorial

    It looks really good in black and white!

    halloween makeup tutorial

    Ta-daaaah! So, let me know if you have any request for Halloween, ‘kay?!


    xoxo

    MAC Viva Glam 1 Look #1

    My friend, Elfa, and I went to Tex Saverio Trunk Show last week (photos on instagram). I did Elfa’s makeup, she wanted smoky eyes with red lips, and I actually loved how she looked. So, today I decided to recreate the makeup she wore, but twist it to suit me. I also wanted to use my the Original Viva Glam lipstick (MAC Viva Glam 1), so that look was perfect!

    For the eyes, I decided to use my Sleek Makeup iDivine Storm palette since I wanted to do a warmer, coppery smoky eyes. I really seem to like a warmer, redder shades lately. Anyways, if you’re in Southeast Asia and want to purchase Sleek Makeup, you can do so with Luxola. Since this palette doesn’t have the names of each eyeshadow, I decided to number them for this post.

    Sleek Makeup iDivine Storm tutorial

    image courtesy of Sleek Makeup

    Eyes are prepped using Urban Decay Primer Potion.

    How-to:

    1. I applied no. 1 on the center of my eyelid using a flat eyeshadow brush.

    2. Using the same flat eyeshadow brush, I applied no. 2 all over the eyelid.

    3. Using a fluffy blending brush, I blended out the edge all the way to above the crease using shade no. 3

    4. I applied  no. 4 just on the outer V using a small crease brush.

    5. Using a clean blending brush, I applied shade no. 5 under the brows.

    6. I applied shade no. 2 along the lower lash line, and no. 6 just on the outer half using a small shader brush.

    7. I lined my upper lash line using Kanebo Kate Super Sharp eyeliner, and on the waterline I used L’oreal Voluminous Smoldering eyeliner.

    8. I applied a golden eyeshadow (above shade no. 3 – I forgot to add it) just on the inner corner of the eyes.

    9. I filled my brows using Anastasia Brow Wiz in Medium Ash and Brunette. Also added Gwiyomi false eyelashes no. 18.

    Copper smoky eyes

    10. I applied Dior Star foundation on my face using CoverFX cream foundation brush.

    11. I highlight and contour my face using Motives Fire sculpting palette. (Will do a highlight/contour tutorial using this palette soon).

    12. I set my face using Cover FX translucent setting powder.

    13. I added extra highlight using MAC Soft and Gentle highlighter powder. Then, I applied Smashbox Halo Blush in In Bloom.

    14. On my lips, I applied MAC Viva Glam 1 straight from the tube.

    Ru Paul MAC lipstick

    Shu Uemura Brave Beauty Competition

    Hello everyone!!! Sorry I haven’t been updating my blog this week. I was busy since I entered Shu Uemura Brave Beauty Competition. So, if you haven’t been following me on Instagram (you should, btw..what are you waiting for? Go check out my Instagram to get the latest update!), I’d just do a quick recap of what happened. Last month, I was browsing on Instagram, and saw Shu Uemura Indonesia was organizing a makeup competition. I actually didn’t want to join for many reasons, but first and foremost because I’ve a case of stage fright. N, my sister, and Franky (fellow blogger) kept encouraging me to do it, since I’ve nothing to lose anyways. This was my first makeup competition!

    So, I submitted my face chart, portfolio and went on my merry ways. I actually didn’t even remember I entered the competition. Couple days after Eid, I received an email and a call notifying that I was one of the top 10 finalists for Shu Uemura Brave Beauty competition. Fast forward couple days later, I had to attend a briefing for the competition (Monday, Aug. 11), and the competition itself was on the following day (Tuesday, Aug. 12). The other 9 finalists were nice and friendly. They’ve entered makeup competition prior to this one. So, really, I was the only one with no prior experience. Oh well, there’s always a first time for everything right?!

    Shu Uemura Brave Beauty top 10 finalists


    Makeup station at backstage

    Photo above is my makeup station back stage. We were given 2.5hr to do the models’ complexion (skincare, base, foundation), hair, nails, and wardrobe. Nails were provided by Feliz Nail Art, and wardrobe was provided by Tex Saverio. My model is Juanita Haryadi and she’s amazing!

    For the competition, we are not allowed to bring our own makeup products, except for our makeup brushes and lashes. All makeup and skincare products are given by Shu Uemura. So this competition was interesting since I don’t actually owned any Shu Uemura eyeshadows. I entered this competition without having any knowledge on how the eyeshadows going to blend and such. On the briefing day, we were given times to know the products and play with the colors. However, swatching and looking at colors are quite different from actually using it on the eyelid. Not to mention, there was no eyeshadow primer at all from Shu. That was quite a concern amongst the finalists.


    Shu Uemura Brave Beauty top 10 finalists

    Standing (L-R) – Suzi, Vony, Catherine, Irwan, Mirtha (Grand Prize Winner), Stephanie (Best Makeup Show winner). Sitting (L-R) – Shanti, myself, Sari

    I, personally, was happy to actually join the competition. I am not a competitive person to begin with, and as I’ve mentioned before I’ve a case of a stage fright. I was like super nervous about this competition. I’ve never entered a competition before, so this was my first experience. I’m glad I did it because I managed to meet amazing makeup artists, and became friends with them. They are a bunch of great people, and we talked, shared and laughed together. We had tons of fun, and no one was mean to anyone. It was wonderful!

    Also, we get to meet the legendary Kakuyasu Uchiide (Shu Uemura International Artistic Director), as well as internationally acclaimed Fashion designer Tex Saverio. Why is Tex Saverio there? That’s because Tex Saverio collaborates with Shu Uemura! 2 legendary people, and I was in between! Mr. Uchiide was like “oh come, you should stand in the middle”..OMG I ALMOST DIED!

    I’ve met Rae Morris, now I’ve met Kakuyasu Uchiide! Dreams do come true! Master makeup artists! They are so friendly, humble, down-to-earth, and passionate about their work.

    Kakuyasu Uchiide

    (L-R): Tex Saverio, myself, Kakuyasu Uchiide

    Shu Uemura Brave Beauty

    Mr. Uchiide’s interpretation of Brave Beauty on the models

    So, we were given 30 minutes ONLY to finish up our eye, lips and cheeks makeup. I barely had enough time to complete the look. My hands were shaking throughout the entire time. I think at one point I wasn’t even sure what I was doing. I was too nervous! Stage fright I tell ya! Anyways, 30 minutes was up and that was it!

    The winners were announced – Stephanie won 2nd place (best makeup show), and Mirtha won 1st place (grand prize). I didn’t feel much disappointment. I thought they deserved to win since their makeup results were quite elaborate. I knew I wasn’t going to win because I think I have a different interpretation of what Brave Beauty was.

    Anyways! I was very happy I entered this competition. I’ve made new friends, I gained experience, and I’ve definitely learn to manage my stage fright. I’ve met great people, and for me it was more than enough! I didn’t even expect to be in the top 10, so that in itself was already quite amazing!

    So, I’d like to say thank you to everyone who have cheered and supported me throughout the whole time!

    Shu Uemura Brave Beauty competition

    (L-R): myself, Juanita, Dara, Mirtha.

    Juanita Haryadi

    Juanita Haryadi in Tex Saverio 

    Shu Uemura Brave Beauty competition top 10

    Top 10 Finalists with their models (L-R) –  Felita, Irwan, Stephanie, Sari, Jilly (me), Mirtha, Catherine, Shanti, Vony, Suzi

    Shu Uemura Brave Beauty top 10 finalists

    Left – my submission for Brave Beauty competition; Right – my creation for Brave Beauty competition top 10Juanita Haryadi

    Juanita & me at backstage

    NARS Mekong Smoky Eyes (NARSissist palette)

    Who doesn’t love a good smoky eyes? I sure do! I’m sure my friend, Finency, loves it too! She showed me this picture on Instagram, and it showed a smoky eyes using NARS Mekong eyeshadow. I love how simple, easy, and definitely I’ll wear this for a night out.

    I skipped the whole false lashes so this look is more grungy, and more me. I don’t usually wear falsies, so this really stay true to how I’d wear my smoky eyes. I also filled my brows without shaping it using any concealer. Again, just want to stay true to how I usually do my makeup. As I said, it’s very simple and quick. No fuss, sexy, and sultry. I like my makeup to be as simple as possible. This is just how I prefer to do my makeup, but if you like more of a glam look you can take a look at my other tutorials under smoky eyes.

    For this tutorial, I used NARS eyeshadows from the NARSississt palette. I’ve done tutorials, and review of this palette. Please feel free to check them out.

    NARS Mekong tutorial

    How-to:

    1. I prepped my eyelids by applying a cream-base eyeshadow. I used Smashbox limitless 15-hour cream shadow in Stone.

    2. Using a flat eyeshadow brush, I applied NARS Mekong eyeshadow all over my eyelid. The camera didn’t pick it up, but there’s lots of gorgeous golden flecks on my lids.

    3. Using a fluffy blending brush, I applied NARS Madrague I on the crease to diffuse the color out.

    4. I applied NARS Mekong on the lower lash line using a small shader brush.

    5. I lined my waterline, tightline, and upper lash line using L’oreal Voluminous Smoldering eyeliner.

    6. Using an angled eyebrow brush, I applied NARS Pandora II along the upper lash line. I kind of winged mine a little, but you don’t have to.

    7. I filled my brows using Anastasia Brow Wiz in Medium Ash.

    8. I curled my lashes and applied MUFE Aqua Smoky Lash mascara on both upper and bottom lashes.

    NARS Mekong smoky eyes

    9. On my face, I applied Smashbox Liquid Halo Foundation using CoverFX cream foundation brush.

    10. I highlighted (under my eyes, bridge of my nose, cupid’s bow, chin, & forehead) my face using YSL Touche Eclat.

    11. I set my face using Cover FX translucent powder.

    12. I lightly contoured my face using Smashbox contour palette.

    13. On my cheeks, I applied Chanel Blush de Horizon.

    14. I filled my lips using MAC Spice lip liner, and Clinique Heaping Hazelnut Chubby Stick lip balm.


    Products used

    Eyes – Smashbox limitless 15-hour cream shadow in Stone; NARSissist eyeshadow palette (Lid: Mekong, crease: Madrague I, liner: Pandora II); Anastasia Brow Wiz in Medium Ash; MUFE Aqua Smoky Lash mascara

    Face – Smashbox Liquid Halo foundation; YSL Touche Eclat; Cover FX Translucent Powder; Smashbox contour powder; Chanel Blush de Horizon

    Lips – MAC Spice lip pencil; Clinique Heaping Hazelnut chubby stick

    World Cup 2014 Argentina Inspired Makeup

    We are almost at the end of the World Cup 2014. Today I’m going to do Argentina inspired makeup, which consists mainly of light blue and white. I find it difficult to combine this shade with the rest of my makeup. I had to change my lip colors a few times before I was satisfied (and I’m still not that satisfied, btw..). I think I should’ve went with a cooler lip color, instead. Oh well…

    Anyways, I actually found a little bit of difficulty when doing the tutorial since I kept coughing (yes, my cough returned…-__-lll). As you can see on the second pic (top middle), the blue shadow smudged a little to the center of the lid, even though I wanted to keep it bare. That’s because when I was doing the inner part, I coughed and the brush slide to the center of my eyelid. So, please if you decide to recreate this look, keep the middle part of the eyelid free of any blue shadow.

    For the other World Cup 2014 makeup series, please check my Brazilian Inspired Makeup post and Netherlands Inspired Makeup. For the use of Sleek Makeup iDivine Candy palette, please check my Psychedelic and Very Purple tutorials.

    world cup argentina makeup

    How-to:

    1. I applied NYX Jumbo Eyeshadow Pencil in Milk all over the eyelids.

    2. Using a flat shader brush, I applied Bubble Gum from Sleek Makeup Candy palette on the outer and inner third of the eyelid, keeping the middle part free of any eyeshadow (see note above)

    3. I used whatever was left on the brush on my crease.

    4. Using a clean blending brush, I blended my crease so there’s no harsh line.

    5. I applied Cream Soda from Sleek Makeup Candy palette in the middle part of my eyelid using a flat eyeshadow brush. I also added Pow from Sleek Makeup Ultra Matte v1 Brights palette on top of Cream Soda.

    6. Using a small stiff shader brush, I applied Bubble Gum along the lower lash line.

    7. I lined my waterline using Revlon Photoready Kajal eyeliner in Carbon Cleopatra.

    8. I created a winged liner along the upper lash line using Kanebo Kate Super Sharp eyeliner.

    9. I curled my lashes and applied MUFE Aqua Smoky Lash. I also applied Gwiyomi false eyelashes #3.

    10. I filled my brows using Shu Uemura Brow Pencil.

    argentina inspired makeup

    11. I applied MAC Pro Longwear foundation on my face using MAC Masterclass Brush Oval 6.

    12. I contoured and highlight my face using Motives Fire sculpt palette.

    13. On my cheeks, I applied Benefit Coralista.

    14. On my lips, I applied Revlon Colorstay Ultimate Suede Lipstick in Flashing Lights.

    argentina inspired makeup

    Products used:

    Eyes – NYX Jumbo Eyeshadow Pencil in Milk; Sleek Makeup iDivine Candy palette (outer and inner eyelid/lower lash line: Bubblegum; center of eyelid: Cream Soda); Sleek Makeup iDivine Ultra Matte V1 Brights (center of eyelid: Pow); Kanebo Super Sharp Eyeliner; Revlon Photoready Kajal eyeliner in Carbon Cleopatra; MUFE Aqua Smoky Lash; Gwiyomi False lashes #3

    Face – MAC Pro Longwear foundation; Motives Fire sculpt series palette; Benefit Coralista blush.

    Lips – Revlon Flashing Lights colorstay ultimate suede lipstick.motives fire sculpt palette

    Pink Smokey Eyes Tutorial with UD Naked 3

    If you guys followed my Instagram account, you’d have known that last night I was doing a tutorial, yes? Anyways, today’s look is a Pink Smokey Eyes tutorial using Urban Decay Naked 3 palette. Yes, again! Naked 3 again! I know you guys might have gotten bored with Naked 3, but I have not. I loved this palette and wanted to make use of this palette as much as I can. If you want to check out my other Naked 3 tutorials, please take a look at Urban Decay Naked 3, and UD Naked 3.

    I created this look since I wanted a more girly take on the smoky eyes. At the same time, I wanted a darker, more glam, and sultrier looking smoky eyes using the Naked 3 palette. Check out my review on the naked 3 palette.

    I would like to mention that I absolutely love how my skin looks like in this tutorial. I, for some reason, love how MAC Pro Longwear foundation photographs. It makes my skin looks absolutely flawless, at the same time it doesn’t feel heavy at all. I really should give this foundation more compliment. I’ll try to do a review of this foundation next time.

    rose smoky eyes

    How-to:

    1. My eyelids are primed using Maybelline Inked in Pink cream eyeshadow.

    2. Using a flat eyeshadow brush, I applied Blackheart on the outer third of the eyelid, extending it slightly on to my crease.

    3. Using a small fluffy blending brush, I applied Nooner on my crease to blend Blackheart out.

    4.  I applied Buzz on the eyelid using a flat eyeshadow brush.

    5. To add extra sparkles, I applied Dust using a small eyeshadow brush on the inner corner, and in the middle of my eyelid.

    6. I created a winged liner along my upper lash line using Kanebo Kate Super Sharp eyeliner, and lined my waterline using L’oreal Voluminous Smoldering eyeliner.

    7. I also applied Blackheart along the lower lash line, and Buzz on the inner third of the lower lash line.

    8. I curled my lashes and applied Buxom Lash mascara. I, then, applied Lavie Lash Bluebell falsies.

    9. I filled my brows using Anastasia Brow Wiz in Brunette.

    naked 3 makeup tutorial

    10. I applied MAC Pro Longwear foundation all over my face using MAC Masterclass brush Oval 6.

    11. I lightly contoured and highlight my face using Motives Fire sculpting palette.

    12. On my cheeks, I applied Maybelline Master Glaze in Make A Mauve.

    13. I set everything using CoverFX Translucent powder.

    14. I filled my lips using MAC Whirl lip liner. Next, I applied Revlon Just Bitten Kissable lip balm in Honey Douce just in the center of my lips. I blended the 2 shades together by pursing my lips.

    naked 3 smoky eyes look

    I forgot to take pictures of the products, so I’m just going to list them here.

    Products used:

    Eyes – Maybelline Inked in Pink; Urban Decay Naked 3 (eyelid: Buzz, outer V: Blackheart, inner corner: Dust); Kanebo Kate Super Sharp eyeliner; L’oreal Voluminous Smoldering eyeliner; Buxom Lash mascara; Lavie Lash Bluebell falsies; Anastasia Brow Wiz in brunette.

    Face – MAC Pro Longwear foundation; Motive Fire sculpting palette; Maybelline master glaze in Make A Mauve; Cover FX Translucent setting powder.

    Lips – MAC Whirl lip pencil; Revlon Just Bitten Kissable Lip Balm in Honey Douce.