MAC Russian Red

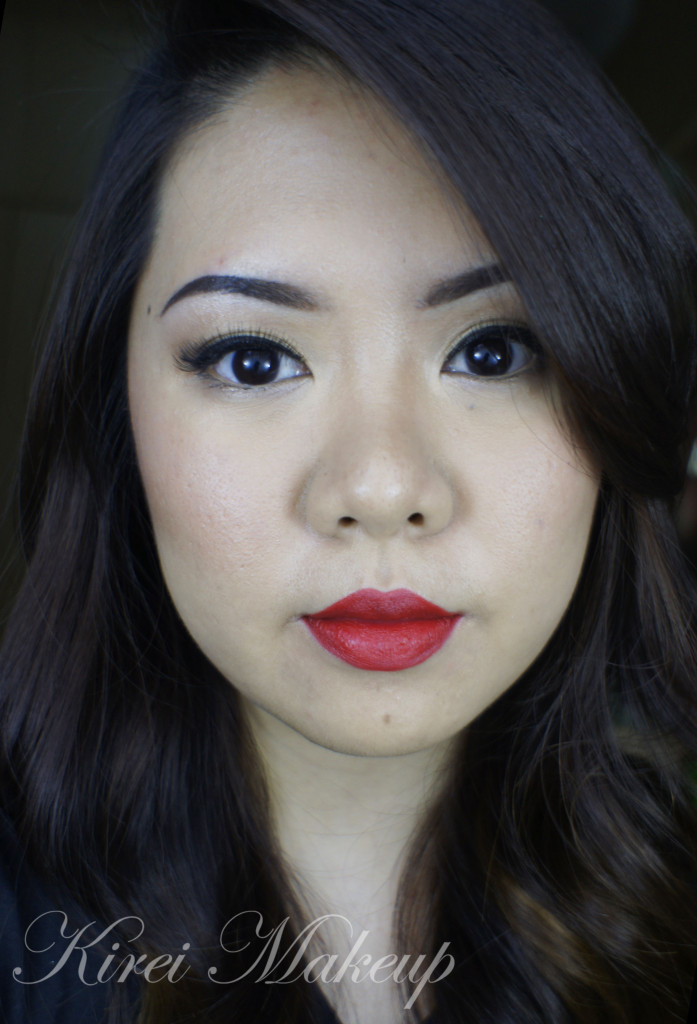
As you all know from my Twitter, I’ve been looking forward to use my M.A.C Russian Red lipstick again. I know, I know, it seems like this week is a MAC week. Well, can’t be helped, I’m trying to fall in love with MAC again! Afterall, MAC was one of the reasons why I went into makeup in the first place.

So, talking about MAC Russian Red, this is the best true-red lipstick. If you want a cooler red, you can try MAC Ruby Woo instead. I also love how this lipstick has a matte finish to it. I’m not a big fan of shiny or glossy lips, so I love how even though this lipstick has a matte finish, it is not drying. It also helps if you prep your lips before application to ensure your lips aren’t chapped.

I purchased this Chanel quads in Intuition in February and didn’t have the chance to play with it, so I had to use it for this look. I love how soft and pretty the eyes look. If you are looking for a neutral, day makeup, do try the eye-look and you can skip the red lipstick.

I’ve done a similar look in Battle of the Classics.

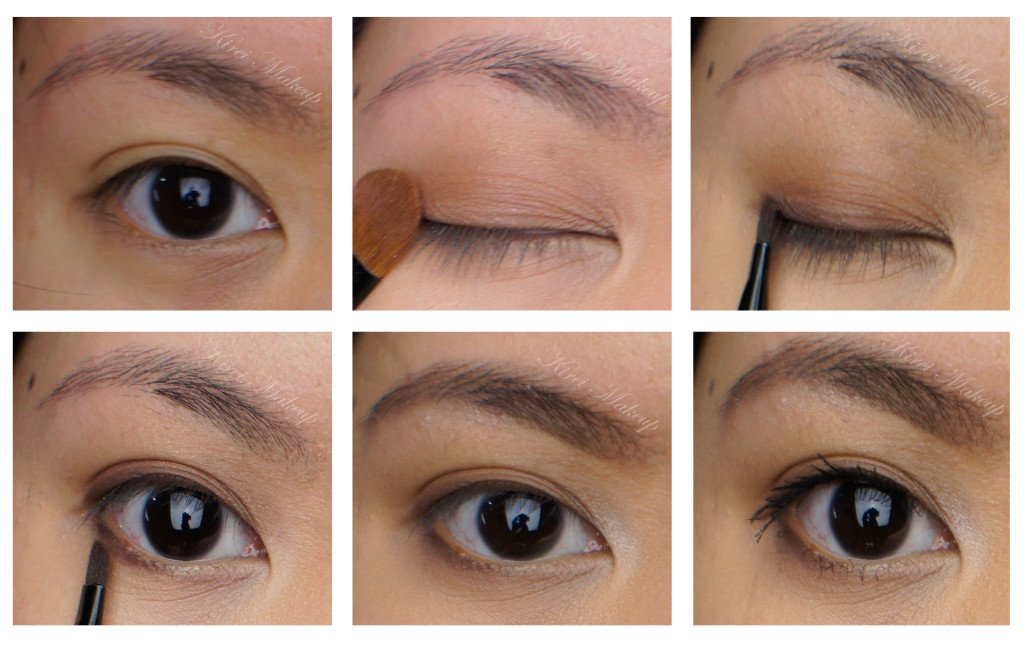
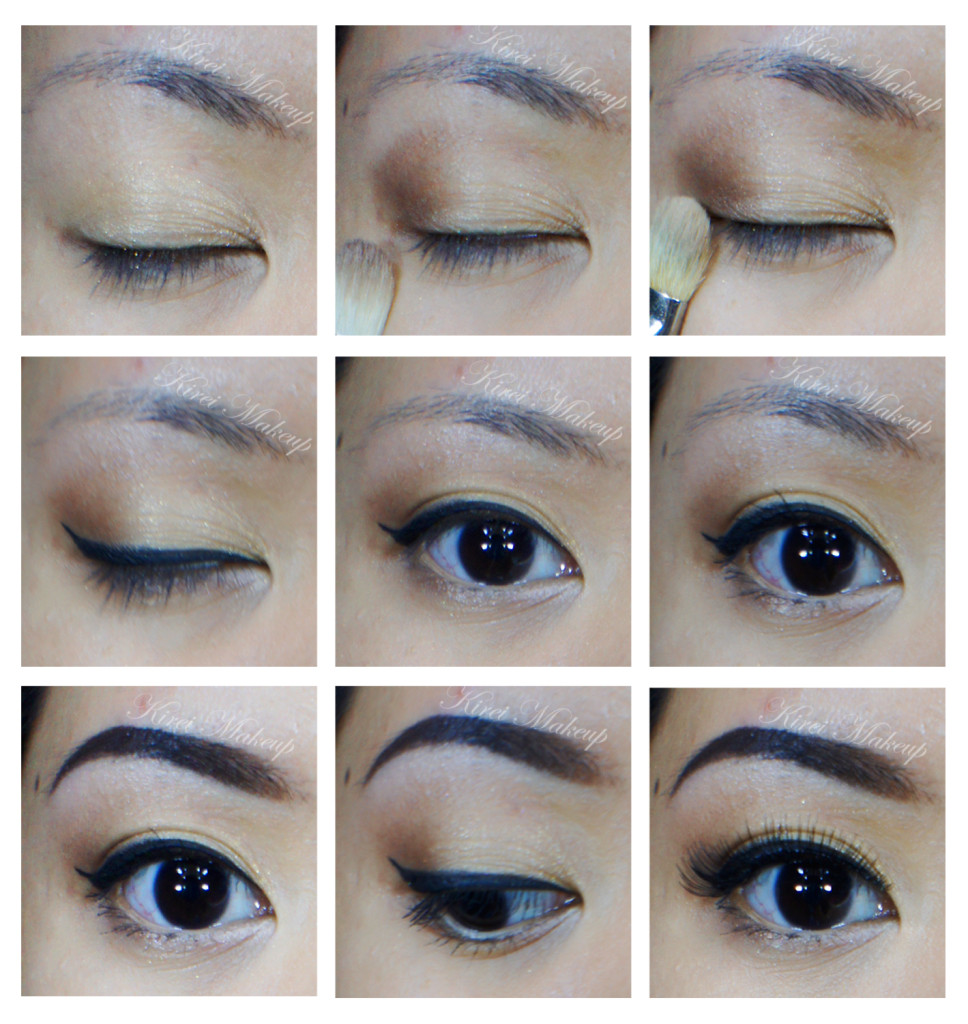
How-to:

1. Using a flat eyeshadow brush, I applied the gold eyeshadow from the Chanel Intuition quad.

2. Using a fluffy blending brush, I applied the deep brown shade from the same quad on my  outer V and on the crease. I used whatever was left on the brush and swept it along the lower lash line.

3. I blended out the crease using a clean fluffy brush.

4. Using an angled eyeliner brush, I created a winged liner along the upper lashline.

5. I applied MAC Chromagraphic liner in NC30 on my tightline.

6. Using a small flat shader brush, I applied the pink highlighter shade from Chanel Intuition quad on the inner corner of the lower lid and under the brow.

7. I curled my lashes and applied Maybelline Volume Express mascara on both upper and lower lashes.

8. I filled my brows in using MUFE Aqua Brow Gel.

9. For extra drama, I applied Quo false eyelashes.

natural wedding makeup

10.  For the face, I applied MUFE HD Foundation using a foundation brush.

11. Using whatever was left on the brush, I swept it across my lips.

12. I lined and filled my lips using MAC Redd lip pencil.

13. Using a lip brush, I applied MAC Russian Red on my lips.

14. I powdered my face using a loose translucent powder.

15. I contoured my face using MAC Shadowy and applied MAC Fleur Power on the cheeks as blush.
asian red lips

Vintage Red

My love for OCC lip tars grows stronger every day! I’ve never been the “lipstick” kinda gal but I have a certain fondness for anything red lips. So, I’ve another version of the red lips look using OCC lip tars in Stalker. In this tutorial, I’m using OCC lip tars in Vintage. Stalker is blue red, while Vintage is burgundy red.

I bought mine from Sephora Eaton Center in Toronto. It comes in a small pouch with a small lip brush (I’ll do swatches and all that jazz on my next post).

For the look, the eyes are kept to a bare minimum and I skipped the winged liner. The face is dewy with a little contour. I love how the look turned out. The look is wearable for party or a night-out, or even bridal makeup!

Make sure to re-check the blush after you complete the lips. Since the lip color is quite strong, you might need to add more blush so your face don’t look wash-out.

How-to:

1. I applied L’oreal Magic Lumi foundation with my fingers. I applied it on the center of my face, blending it outwards.

2. I applied Bobbi Brown Corrector in Peach under my eyes, tapping it using my ring finger.

3. I applied L’oreal Magic Touche Concealer on my blemishes and under my eyes.

4. I powdered my T-zone with Cinema Secret loose powder and a tapered face brush.

Brown eyeshadow

5. For the eyes, I applied the light brown eyeshadow from L’oreal Paris Good Luck Charm quad eyeshadow with a flat eyeshadow brush, and blended the crease using a clean blending brush.

6. I applied the dark brown eyeshadow from L’oreal Paris Good Luck Charm along my upper lash line and lower lash line using an angled brush.

7. I used a clean blending brush and applied the highlighter color from L’oreal Paris Good Luck Charm quad under the brow.

8. Using whatever is left on the brush, I applied the highlighter color on the inner corner of my eyelid.

9. I curled my lashes and applied L’oreal Telescopic Shocking Extension mascara on both upper and lower lashes.

10.  I filled my brows using an angled brush and a mix of MAC Omega + MAC Brun.

OCC Lip Tars Vintage

11. Using a face fan brush, I applied Smashbox Fusion Soft Lights in Baked Stardust on the cheekbones.

12. Using the same fan brush, I applied MAC  Sculpting Powder in Shadowy on the hollows of the cheeks.

13. Using a blush brush, I applied a mixture of MAC Cubic and MAC Fleur Powder on the cheeks.

14. Using the lip brush that comes with the OCC Lip Tar, I applied OCC Vintage lip tar on my lips.

  • I applied a thin layer at first on the center of the lips.
  • Using whatever is on the brush, I traced the outline of my lips to make sure I like the shape.
  • I applied another thin layer to complete the look.