Asian Smokey Eyes

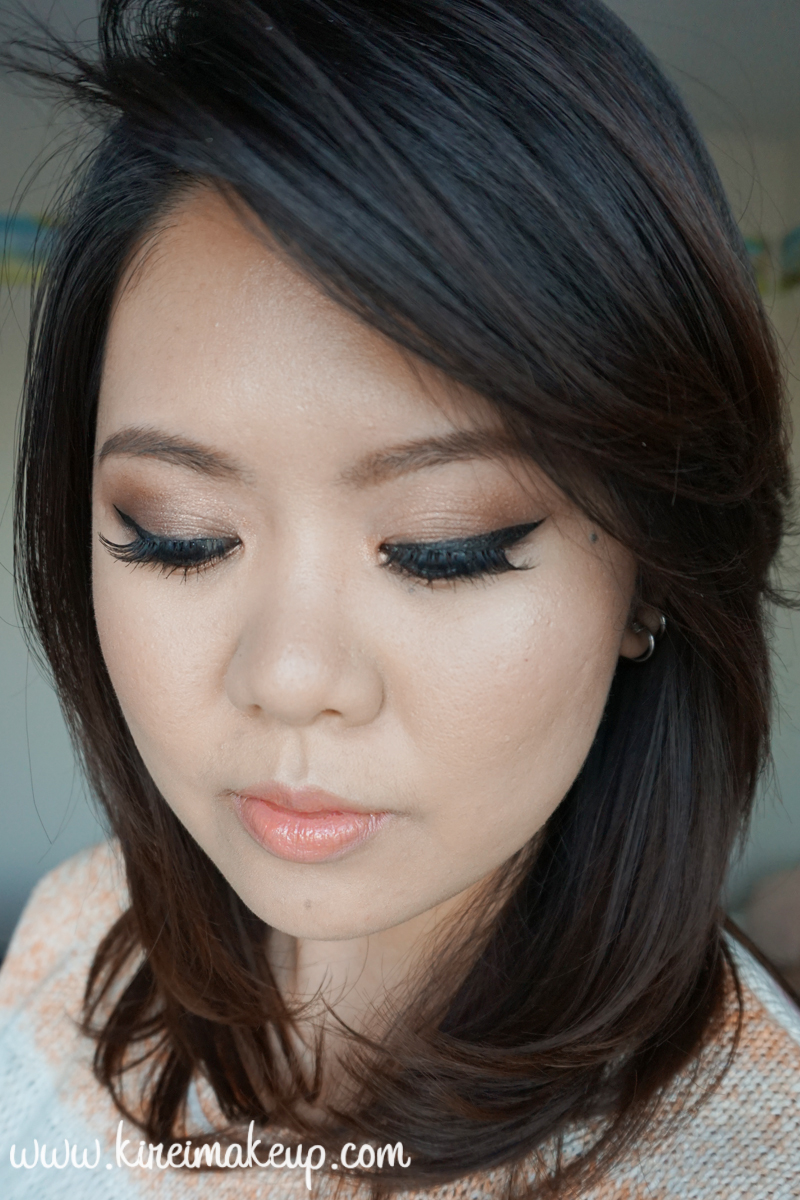
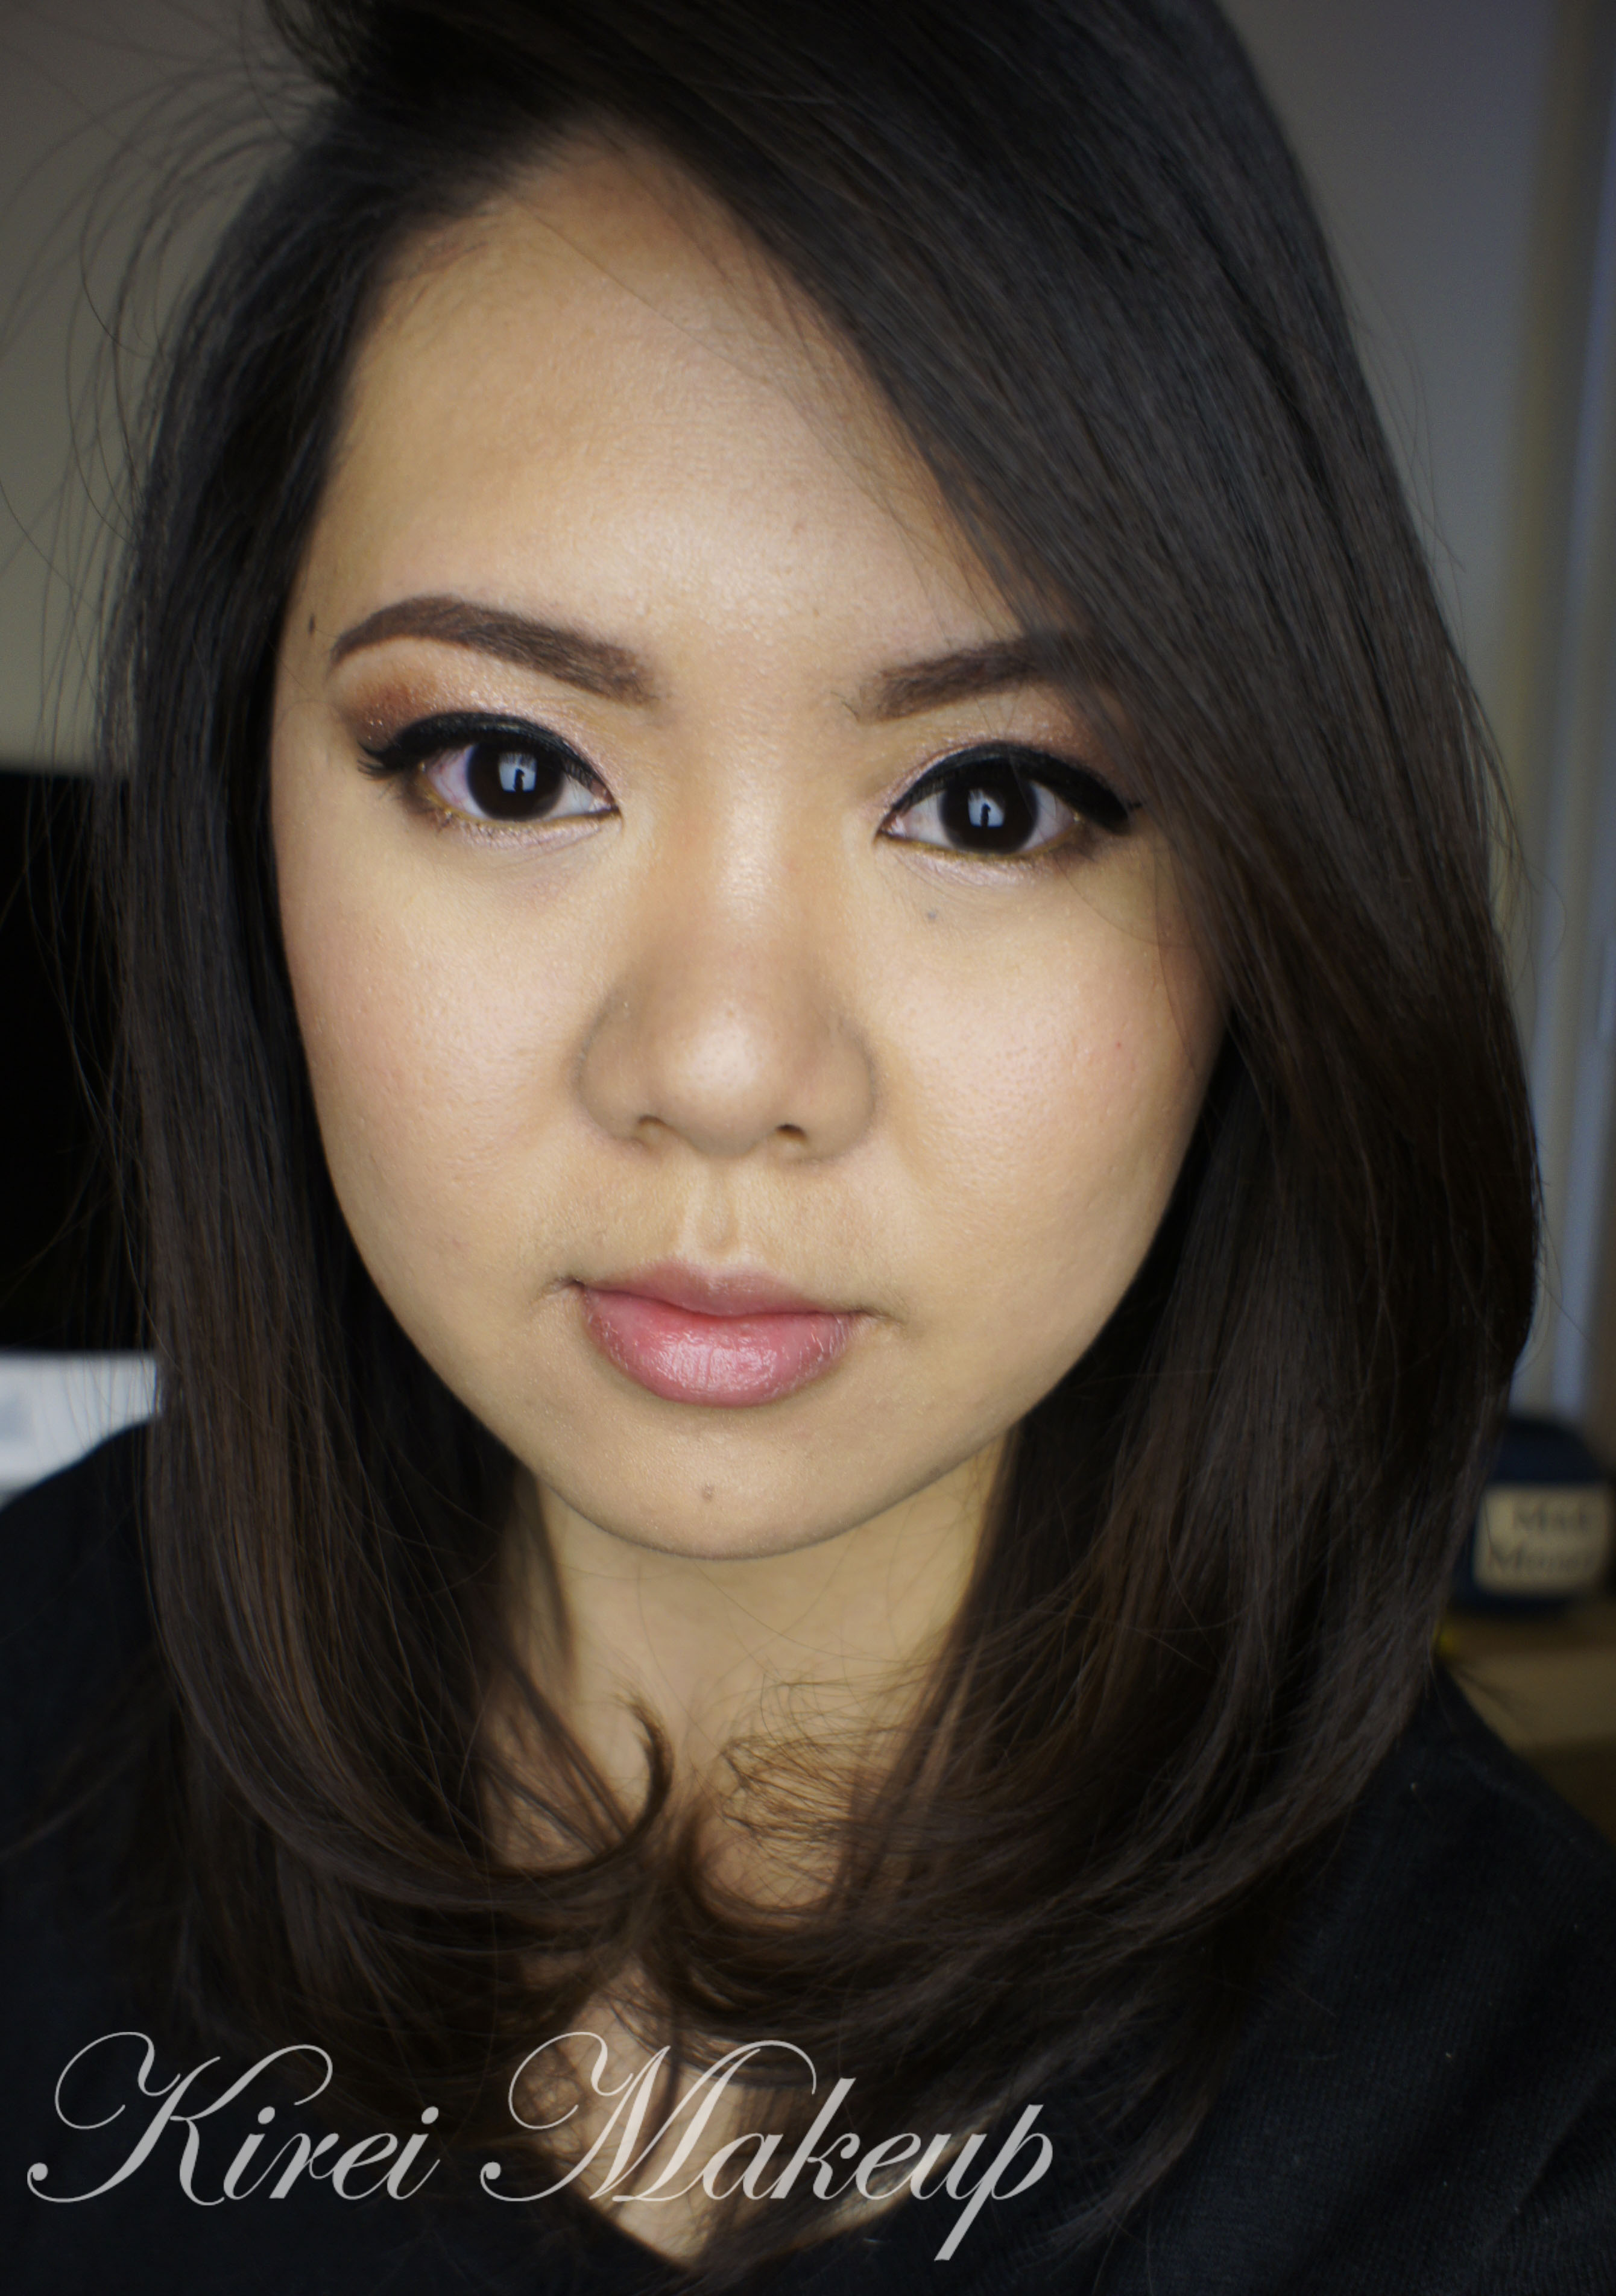
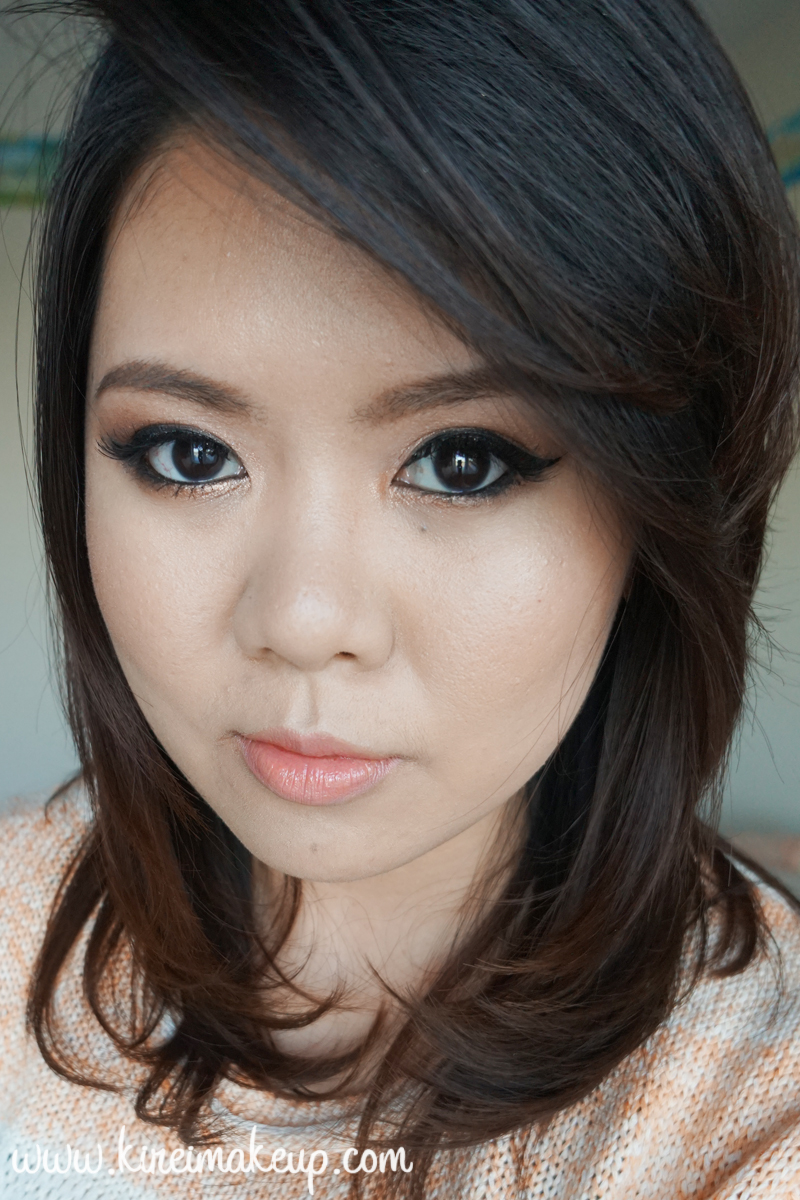
I’ve been going to this Korean restaurant in Hamilton, and in the restaurant they kept playing some sort of K-pop singers/bands performing on TV. Anyways, I was inspired by the singers from the various girl band to do this Asian smokey eyes look. I love how their skin looks absolutely flawless, with barely any contouring, and just a bit of blush.

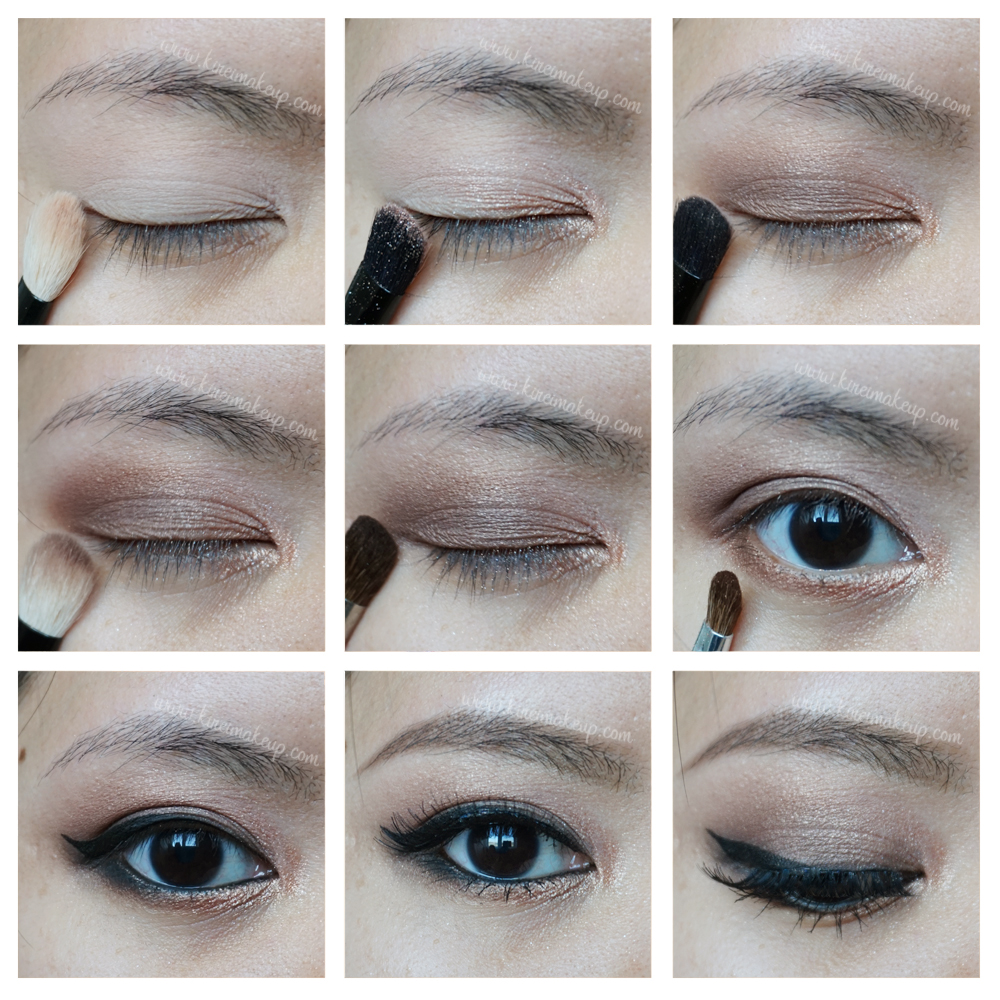
Their smokey eyes are slightly winged, and the darker colors are mostly concentrated on the outer corner, since most of these girls don’t have a defined crease, like mine! Their eyeshadows are mostly on the lid, and on the outer half of the eyes, to elongate the eyes even more, creating a bigger eyes illusion.

For this look, I chose to pair it with a peachy lip, most of the girls in K-pop opt for a more pink or ombre pink lips. However, I prefer the peach lips especially with the warm bronze colors on the eyes. Warm tones on the eyes matched the warm tone on the lips to pull the look together.

I also wore a new foundation I recently bought (actually, exchanged for the Diorskin Nude Air). The new NARS weightless luminous foundation is pretty lovely, and I think I’ll do a review about it soon, hopefully next week! I think I might have found a new favorite foundation, guys!

Anyways, I apologize if the colors on my step-by-step pictures are a bit off (slightly cooler than real life) since I was trying out a new zoom lens. The full face pictures show the real colors, especially on the eyes. Pictures for the full face were taken using my usual lens, and with day light.

bronze smoky eyes

Products used

Eyes

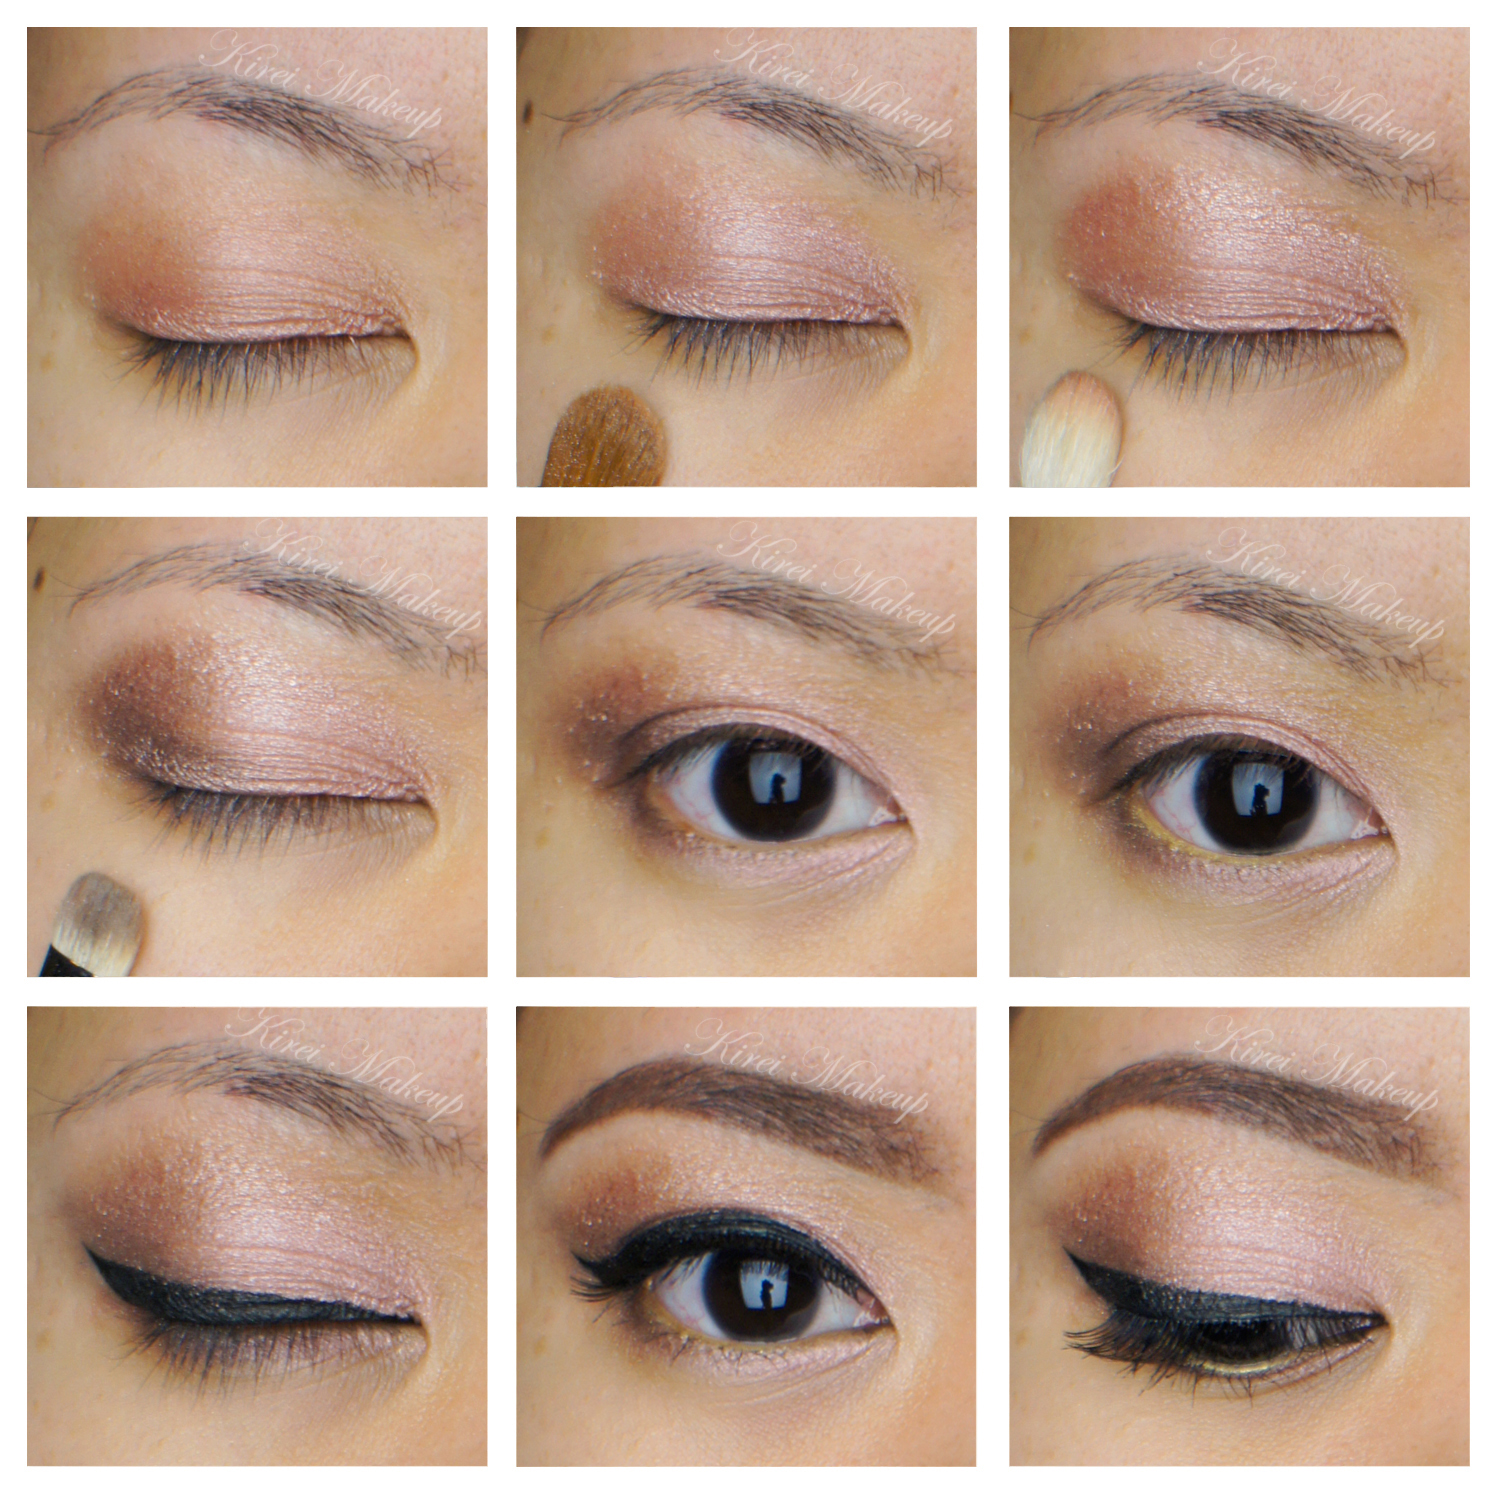
  • Primer – Urban Decay Primer Potion
  • Base – MAC Brule
  • Crease – MAC Soft Brown
  • Inner corner (upper and lower lid) – MAC Honey Lust
  • Lid – MAC Mulch
  • Outer corner/Lower Lid – MAC Bronze
  • Outer lower lid – The Balm Balmsai in Righteous
  • Eyeliner – Shu Uemura Calligraphy Ink
  • Waterline – MAC Feline kohl pencil liner
  • EyebrowsAnastasia Beverly Hills Brow Pomade in Medium Brown
  • Mascara – Urban Decay Perversion mascara
  • Falsies – Gwiyomi false lashes #3


asian makeup

Face

  • Foundation – NARS weightless luminous foundation
  • Concealer/Highlighter – YSL Touche Eclat
  • Powder – MAC Magically Cool Liquid Powder

Cheeks

Lips

  • Liner – Urban Decay Naked lip pencil
  • Gloss – YSL Glossy Stain in Pêche Cerra-Cola

asian smoky eyes


Rose Gold Holiday Makeup

I’ve done gold/brown makeup, a silver smoky eyes makeup, natural looking makeup, as well as bold lips holiday makeup. Today, I wanted to do another more wearable, soft and easy holiday makeup. I used Rose Gold since I think it’s fun and feminine. This tutorial is for those of you who are girly, and want to look more on the natural low-key for the holiday. I also feel that this look will be good for those with deep set eyes.

The idea is similar to the Fresh Dewy makeup tutorial post couple days a go. The eyes are simple and high in shimmer, the face is semi-matte and natural finish. This look suits those who don’t like to wear heavy makeup. Everything is very simple and light. You can skip the eyeliner altogether, and just wear mascara. I just like the look of a cat/winged eyeliner to frame my eyes.  Bobbi Brown Rose Gold

How-to:

1. I applied Bobbi Brown Rose Gold long wearing cream eyeshadow on my eyelid using my ring finger.

2. Using a flat eyeshadow, I applied the middle color from the Bobbi Brown Shimmer Brick in Rose Gold on my eyelid to add extra shimmer.

3. Using a fluffy blending brush, I applied the darkest rose gold shimmer from the Bobbi Brown Shimmer Brick in Rose Gold on the crease.

4. Using a small shader brush, I applied L’oreal Infallible eyeshadow in Bronzed Taupe on the outer V.

5. I applied the same rose color on step no. 2 on the lower lid, and then L’oreal Bronzed Taupe on the outer half of the lower lid.

6. Using MUFE aqua cream shadow no. 11 on the waterline just to add the extra gold in it. Of course you do not have to use gold for this. You can use black, beige, white, or anything you want!

7. I created a winged eyeliner using Kanebo Kate Super Sharp eyeliner on the upper lash line.

8. I filled my brows using Anastasia brow wiz in Brunette.

9. I curled my lashes and applied mascara, as well as Ardell no. 109 false eyelashes on the upper lashes. I also applied mascara on the lower lashes.

Rose Gold bobbi brown

10. For the face, I applied L’oreal Lumi Magique foundation in W4 all over my face using CoverFX foundation brush.

11. Under my eyes, I applied concealer in MAC Pro Conceal/Correct palette in Medium.

12. I powdered under my eyes using CoverFX translucent loose powder.

13. I applied MAC Dainty mineralized blush on my cheeks.

14. I also applied Diorskin Shimmer Star Amber Diamond on the bridge of my nose and on my cheekbones.

15. On the lips, I applied Revlon Colorstay Ultimate Suede in Socialite, and added a little bit of L’occitane Lip Balm (the one with olive in it).

L’oreal Neon Skirt

Finally! A tutorial to be posted. I do have to say, I’m not really loving how this look ends up. I used L’oreal Neon Skirt Color Riche quad eyeshadow that I recently purchased (posted on Instagram and Twitter). I love the colors that come with this quad, but…*sigh here comes the but*…I feel that one of the shadows is quite difficult to blend. May be it’s my fault for not priming my eyelid since  I can’t find my primers because I’m not totally unpacked yet.

Anyhooow, I just wanted to do a quick tutorial so I don’t go missing for another week or so, leaving the blog empty. Hmm, what do you guys think? I followed the instruction from the back of the quad for this look. I feel that the green color wasn’t blended properly. I wanted a sheer wash of color, so I tried blending it out, but it doesn’t look that great, eh…Also, I don’t know how I feel about the purple eyeliner. It’s not intense enough for me to be an eyeliner. Also, there’s a lot of fall out from the purple, so watch out for it.

Nevertheless, I think this can be a great look if you want to try to wear colors to go out. It’s very sheer and kinda look like watercolors, no? Oh, I love the vanilla highlighter in the middle of the lid! It makes the eyes look so pretty when you blink.

How-to:

1. I applied the gold eyeshadow from L’oreal Neon Skirt quad on the inner half of the lid using a flat eyeshadow brush.

2. Using a clean blending brush, I applied the green shadow from the same quad on the outer half of the lid.

3. (you can skip this step) I blended out the green eyeshadow towards the brow bone, leaving a little bit of color concentration in mostly the outer V of the eyelid.

4. Using my ring finger, I lightly tapped the vanilla eyeshadow from the quad to the middle of the lid.

5. Using an angled brush, I applied the purple eyeshadow of the L’oreal Neon Skirt quad along the upper lashline.

6. I applied the green along the lower lash line using a pencil brush. I dabbed a tiny bit of gold in the inner corner of the lower lid using a small shader brush.

7. I also lined the waterline and tightline using L’oreal Voluminous Smoldering eyeliner.

8. I curled my lashes and applied L’oreal Carbon Black mascara on both upper and lower lashes. I also applied EyeMe false eyelashes (free sample from a friend) on the upper lashes.

9. I filled my brows in using Anastasia Brow Wiz in Brunette.

L'oreal Neon Skirt

10. For the face, I applied MUFE HD Foundation in 118 using a foundation brush.

11. I set the foundation using MUFE Pro Finish powder.

12. I contoured my face and nose slightly using MAC Shadowy.

13. On the cheeks, I applied MAC Dainty blush.

14. I filled my lips in using MAC Dervish lip liner.

L'oreal Neon Skirt

ps: Pictures are taken using natural light.

pps: Like my new hair? hahaha 😛