I wrote a bunch of stuff for this Holiday Makeup post, and when I tried to save it as my draft, I lost my post! I’m so mad!!! Uggh!!! Anyways, I’m so tired and busy that I don’t have the energy to re-write what I already lost. I do apologize, but I’m going to keep this post short and simple. Please watch the tutorial for explanation and read more below for product info.
Tag: smoky eyes
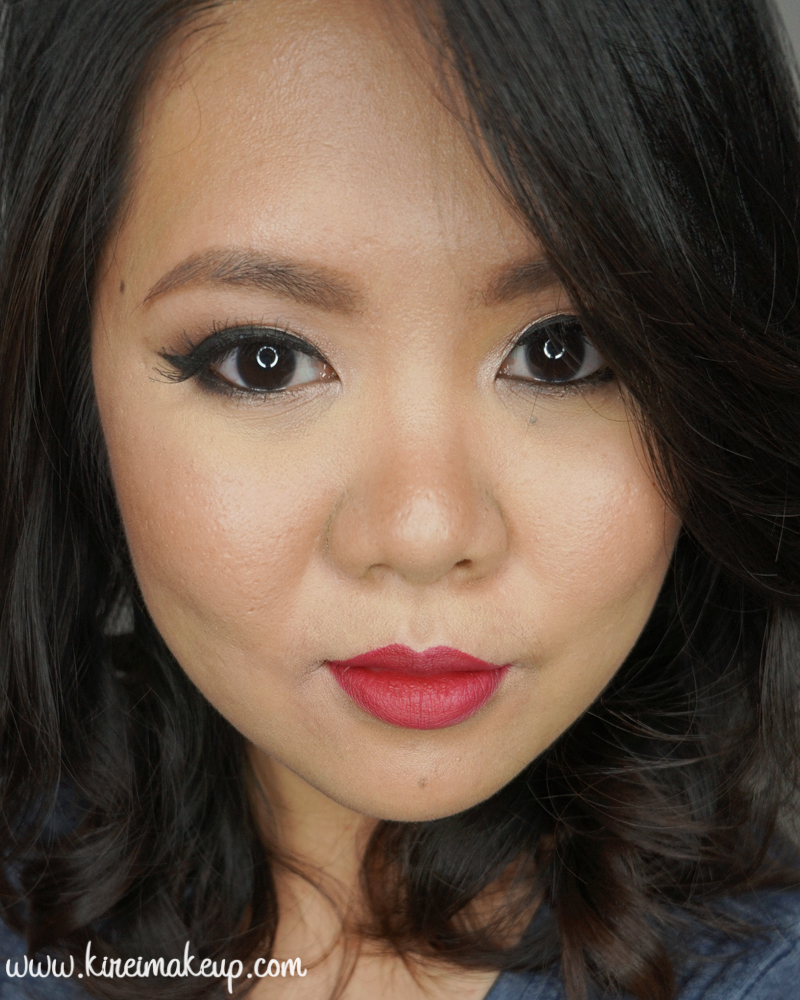
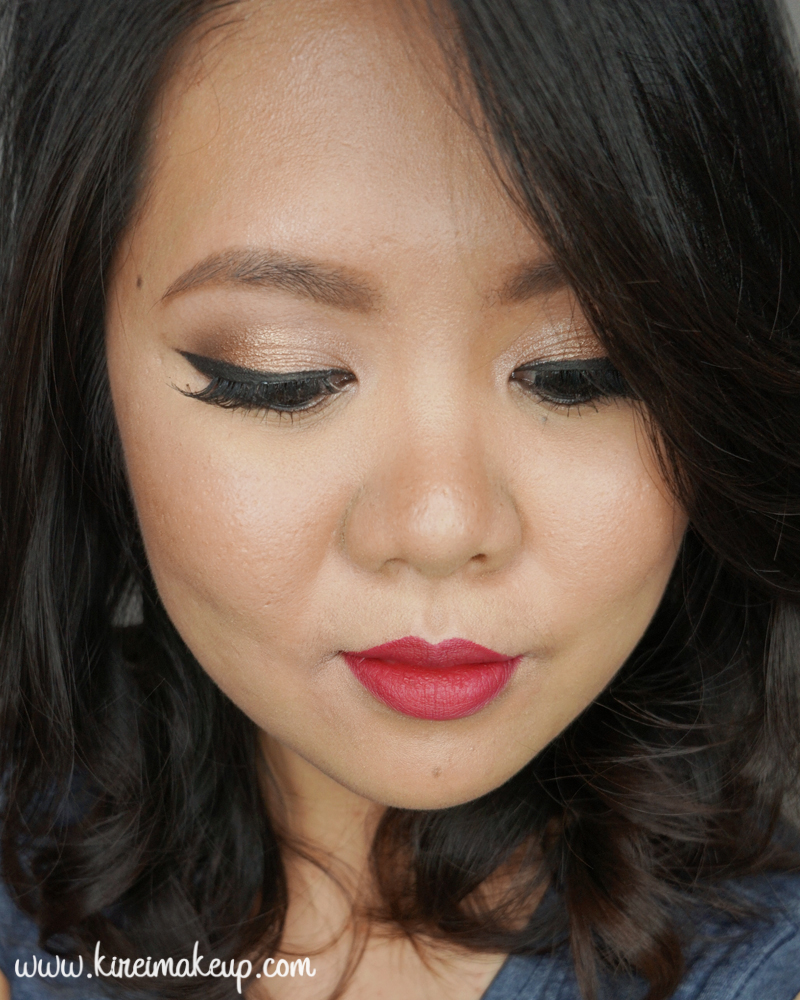
Chanel Candeur Et Experience Makeup Tutorial
Recently I bought a few Chanel’s products from the newly opened Chanel Nordstrom counter in Yorkdale, and so today I want to use those products to create this soft smoky eyes look paired with red lips for the cold weather. I’m absolutely loving the Chanel Candeur Et Experience palette, and I’m definitely obsessed with Chanel Rouge Allure Ink! Read more below.
Prom Makeup 2016
Prom season is here! Today I’m creating a pretty Prom Makeup 2016 tutorial using the Sephora x Minnie Mouse eyeshadow palette. This look is a little bit smoky, but not too much. If you’d like to find out how to create this look, watch my video below or read more to see more pictures and step-by-step tutorial.
UD Naked 3 Smoky Eyes
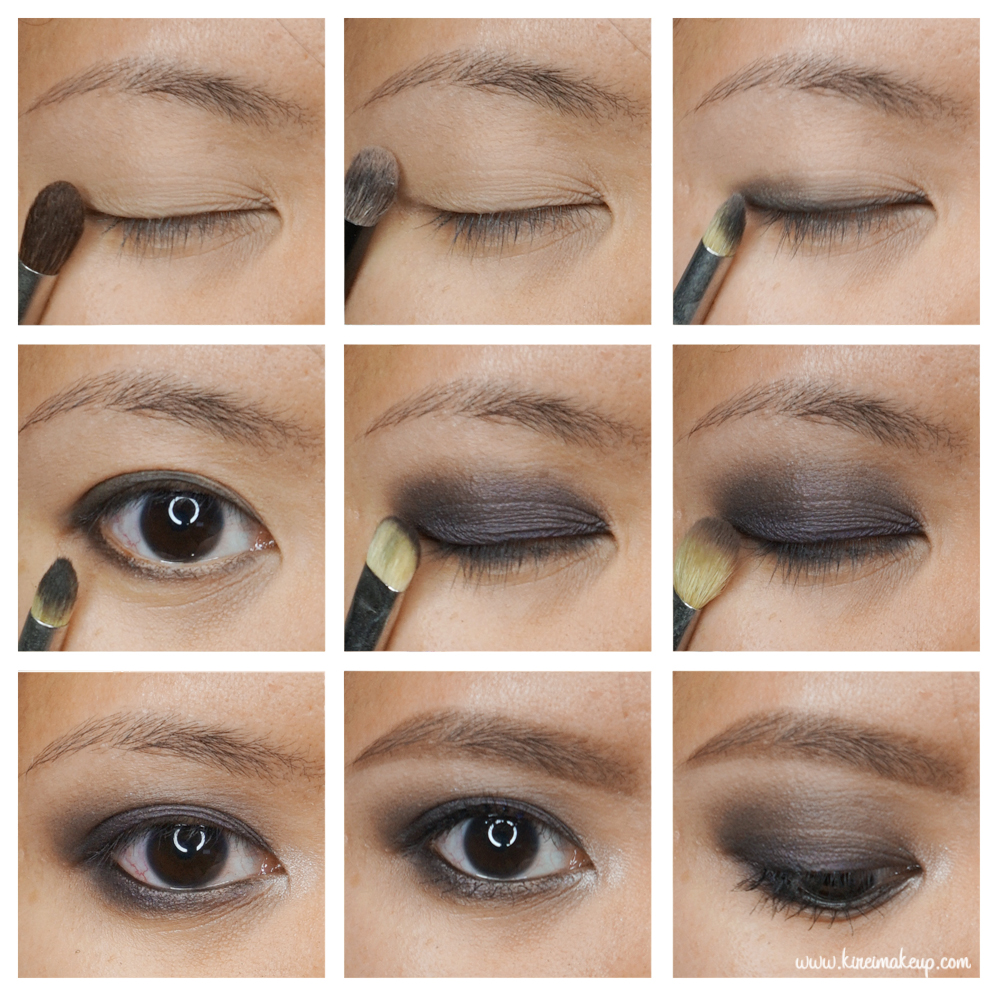
About time I did a really dark smoky eyes tutorial, eh? Today’s post is a really dark UD Naked 3 smoky eyes tutorial on my Youtube channel. Have you guys subscribe yet? If you haven’t, what are you waiting for? Go to my Youtube channel and subscribe now!
Maison Kitsune for Shu Uemura Smoky Eyes
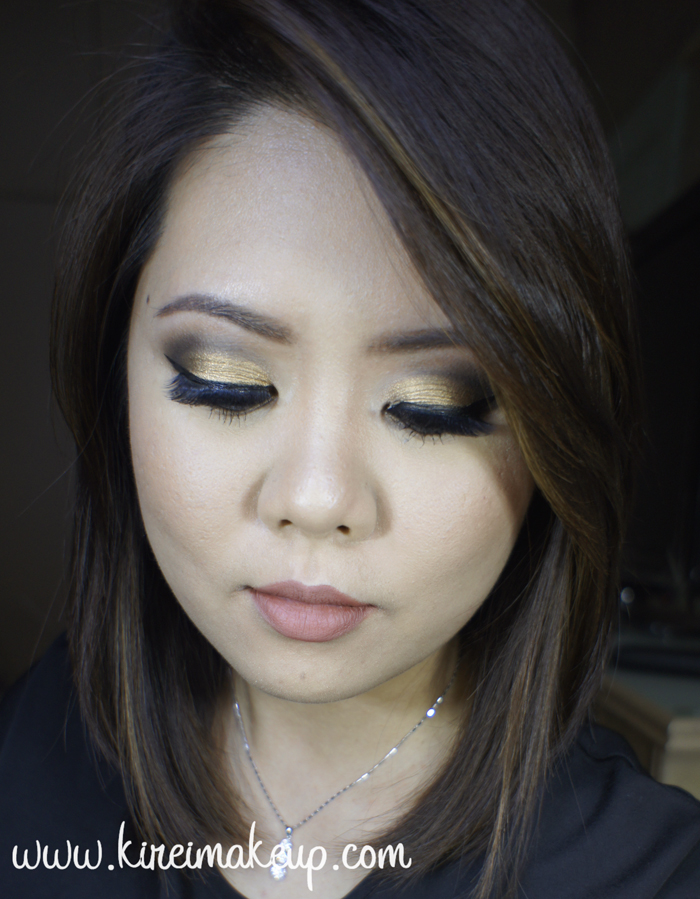
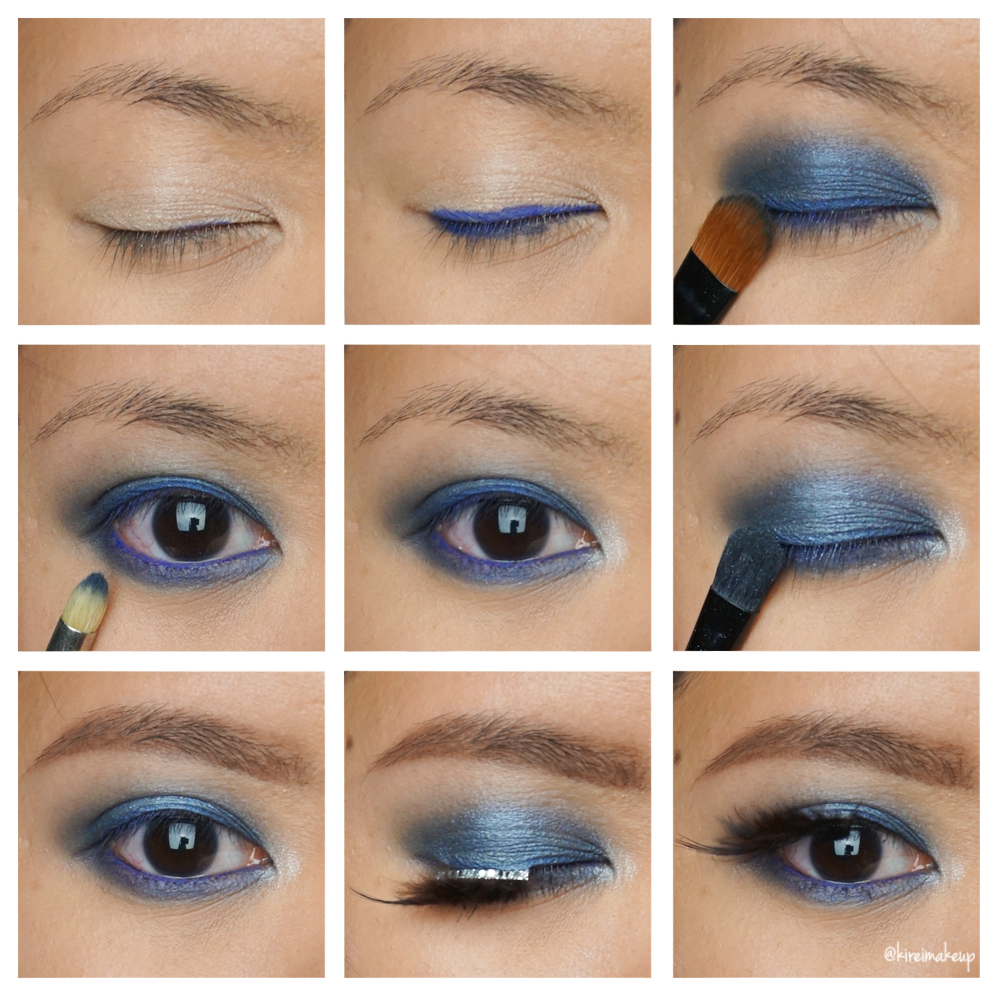
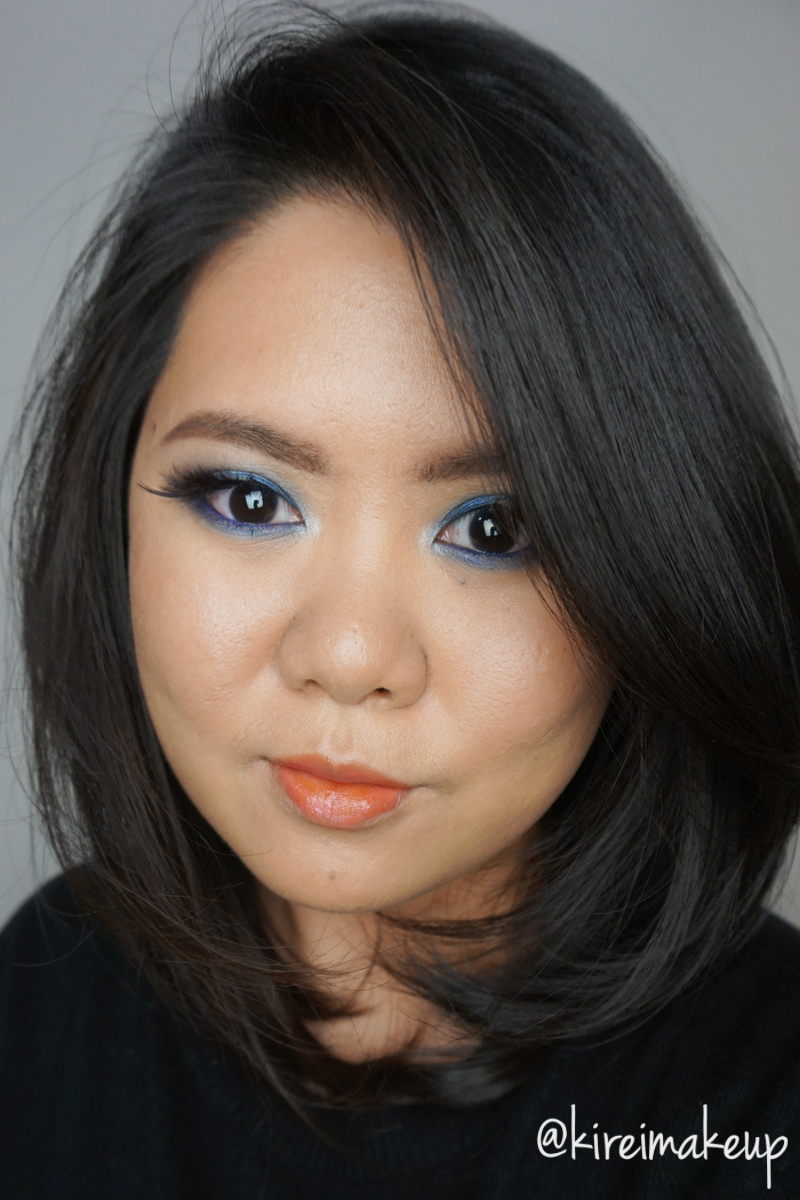
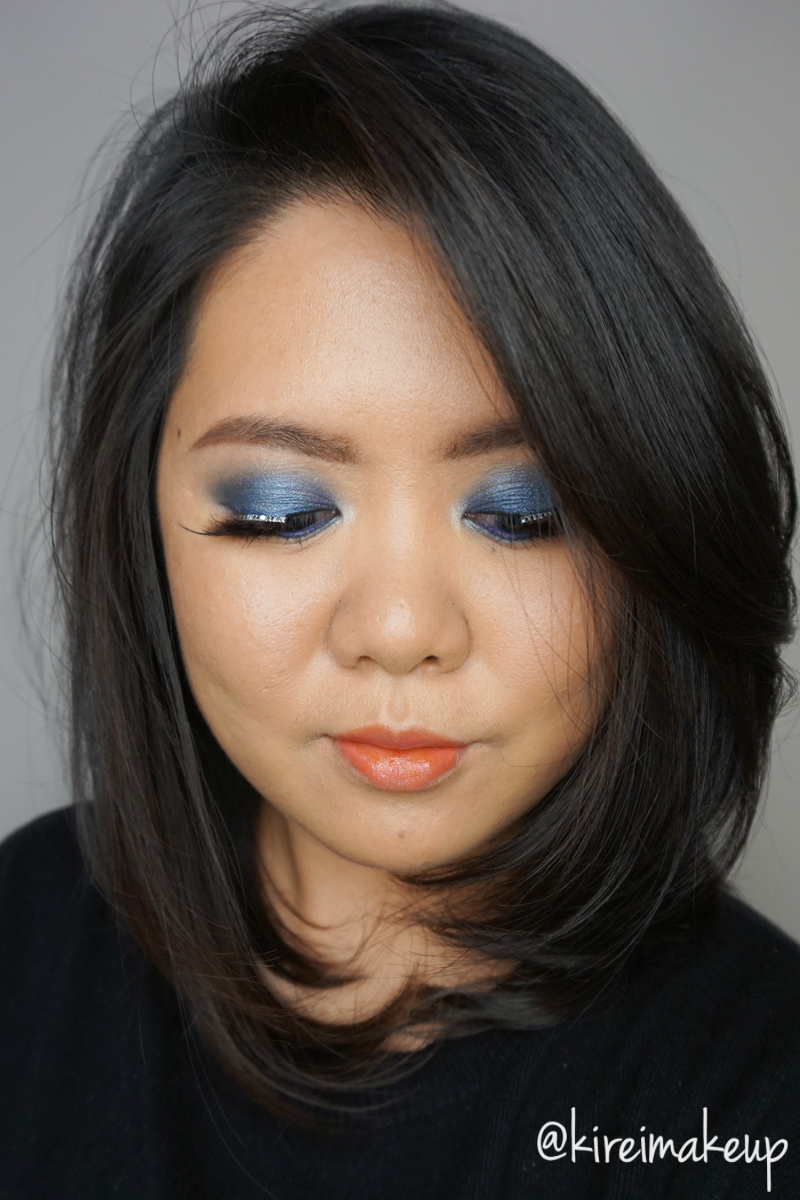
Another look using Maison Kitsune for Shu Uemura Indigo eye/cheek palette! This time, I really wanted to showcase the gorgeous blue eyeshadow fron the palette, so I created this blue smoky eyes look! This look is super easy to recreate, and it’s a really fresh take on a non-black smoky eyes.The only product that is black is my mascara, even my eyeliner is blue (surprise, surprise..lol).
We’ve all seen black smoky eyes, brown smoky eyes, grey smoky eyes, well why not an all blue smoky eyes? This blue smoky eyes will bring out those with brown, or green, or grey eyes! I love how the blue shadow from the palette looks almost jewel like. It’s not too dark, yet still have a rich deep blue hue.
For the lashes, I decided to apply the Maison Kitsune Jewel-Fur-for-a Wink falsies since I thought it was going to add a bit of fun to the whole look. Very extravagant, perfect for Holiday party makeup! Of course, you can skip this special falsies and wear the regular ones, but I think this falsies are amazing! Also, if you want to know what else I’ve bought from this collection, check out my Instagram account!
*Please check out my other Maison Kitsune for Shu Uemura tutorials*
Products used
Eyes
- Base – Shu Uemura cream eyeshadow “Ivory”
- Eyeliner – Shu Uemura Maison Kitsune Play & Remix Drawing pencil “Indigo”
- All over eyelid – Shu Uemura Maison Kitsune Indigo Palette “Navy”
- Inner corner – Shu Uemura Maison Kitsune Indigo Palette “White”
- Center of lid – Shu Uemura Maison Kitsune Indigo Palette “Soft Blue”
- Brows – Shu Uemura Brow Sword
- Mascara – NARS Audicious mascara
- Falsies – Shu Uemura Maison Kitsune “Jewel-Fur-For-A-Wink” false lashes
Face
- Primer – Bobbi Brown “Vitamin Enriched Face Base”
- Foundation – Shu Uemura Lightbulb foundation #754
- Concealer – YSL Touche Eclat
- Setting powder – Shu Uemura Lightbulb Glowing Face Powder “Colorless”
Cheeks
- Highlighter – Guerlain Meteorites Powder
- Blush – Shu Uemura Maison Kitsune Indigo palette glow on blush “Pink”
Lips
- Lip lacquer – Shu Uemura lip Lacque Supreme “CR1 Chu Chu Coral”
MAC D for Danger
I have a new favorite lip color! MAC D for Danger lipstick is a gorgeous berry shade with a matte finish. I love it! I have been looking for a berry lip color for a while now, but usually it’s too purple, so I’m very excited when I found this shade. D for Danger is a permanent lipstick shade at MAC. I recently found it when I was browsing their Retro Matte collection.
Anyways, I paired UD Naked Smoky with this berry lips. I went with a winged liner, and bronze on the lids. Nothing too dark on the crease since I want the focus to be on the winged liner itself. This look is quite heavy on both eyes and lips, but I don’t quite mind it. I think this will look nice for a party. For a day look, I probably will leave the eyes bare, just mascara and groomed brows, leaving the lips to be the focus of the attention.
I have done a smoky eye look using UD Naked Smoky in my previous tutorial, please check it out!
Products used
Eyes
- Primer – Urban Decay Primer Potion “Original”
- Transition – UD Naked Smoky “Combust”
- Crease/outer lid – UD Naked Smoky “Whiskey”
- Middle lid – UD Naked Smoky “Dirtysweet”
- Inner corner – UD Naked Smoky “High”
- Winged liner/outer corner of lower lid – Maybelline “Eye Studio Lasting Drama Gel Liner in Black”
- Waterline – L’oreal “Voluminous Smoldering eyeliner”
- Brows – Anastasia Brow Wiz “Taupe” and “Medium Brown”
- Falsies – Gwiyomi Boutique false lashes “no. 3”
Face
- Primer – Becca “Ever Matte Poreless Priming Perfector”
- Foundation – NARS Luminous Weightless Foundation “Punjab”
- Concealer – NARS Radiant Creamy Concealer “Custard”
- Setting powder – CoverFX translucent setting powder
Cheeks
- Contour – Smashbox contour kit “contour” shade
- Cheeks – NARS “Mata Hari” blush
Lips
- Lipstick – MAC “D for Danger”
UD Naked Smoky Tutorial “Iconic Smoky Eye”
As you know from my Instagram, I recently purchased and received my UD Naked Smoky Palette. I was so excited when I got it yesterday, and couldn’t wait to play around with it, so I created this UD Naked Smoky Tutorial! I bought mine online from Sephora since the palette was an online exclusive. It arrived within 3 days of my order, pretty fast and I’m one happy gal!
Anyways, I’ll try to do a review of the palette pretty soon. For now, I just wanted to share with you this look that I re-create from their leaflet. The palette came with a leaflet that contained several different looks you can achieve, and I chose to do the Iconic UD Smoky Eye look. I replaced some of the products, like the eyeliner, blush, lipstick etc since I don’t own those. Nevertheless, I used all the shades mentioned in the leaflet accordingly.
Personally, for me, this kind of smoky eye look is supposed to be messy and worn in, I skipped wearing false lashes. False lashes tend to make everything look more glamorous. If you prefer, though, feel free to add the falsies.

The transition shade, Combust, doesn’t really show up on pictures below because it’s very similar to my skin color. However, this step is very important whether the color shows up or not because this transition shade will allow for a smooth edge on your smoky eyes. It will diffuse the grey eyeshadow on the crease into your skin seamlessly.
The brow bone shade, Thirteen, is a vanilla shade. It might look like there’s nothing on the brow bone at first (top middle row) in the pictorial, but as you add those darker colors on the lid, the highlight becomes more prominent. If you like a highlight on the brow bone, feel free to add more at the end of the look. If you have a hooded lid, I recommend not to add too much or any since it might create a hooded effect even more.
Products used
Eyes
- Primer – Urban Decay Primer Potion “Original”
- Base – MAC Mineralized SkinFinish “Medium Plus”
- Transition – UD Naked Smoky “Combust”
- Brow bone – UD Naked Smoky “Thirteen”
- Eyeliner/waterline – L’oreal “Voluminous Smoldering” Eyeliner
- Eyelid/lower lash line – UD Naked Smoky “Smolder”
- Crease/lower lid – UD Naked Smoky “Password”
- Inner Corner – UD Naked Smoky “High”
- Lashes – Dior “Diorshow” Mascara
- Brows – Anastasia Beverly Hills Brow Wiz “Medium Brown”
Face
- Foundation – Dior “Diorskin Star foundation 031”
- Concealer – Dior “Diorskin Star concealer 03”
- Setting powder – CoverFX translucent setting powder “light”
Cheeks
- Contour – Smashbox Contour Kit “contour”
- Blush – Smashbox Halo Powder Blush “In Passion”
- Highlight – The Balm “Mary-Lou Manizer”
Lips
- Lip pencil – UD lip pencil “Naked 2”
- Lip Balm – vaseline
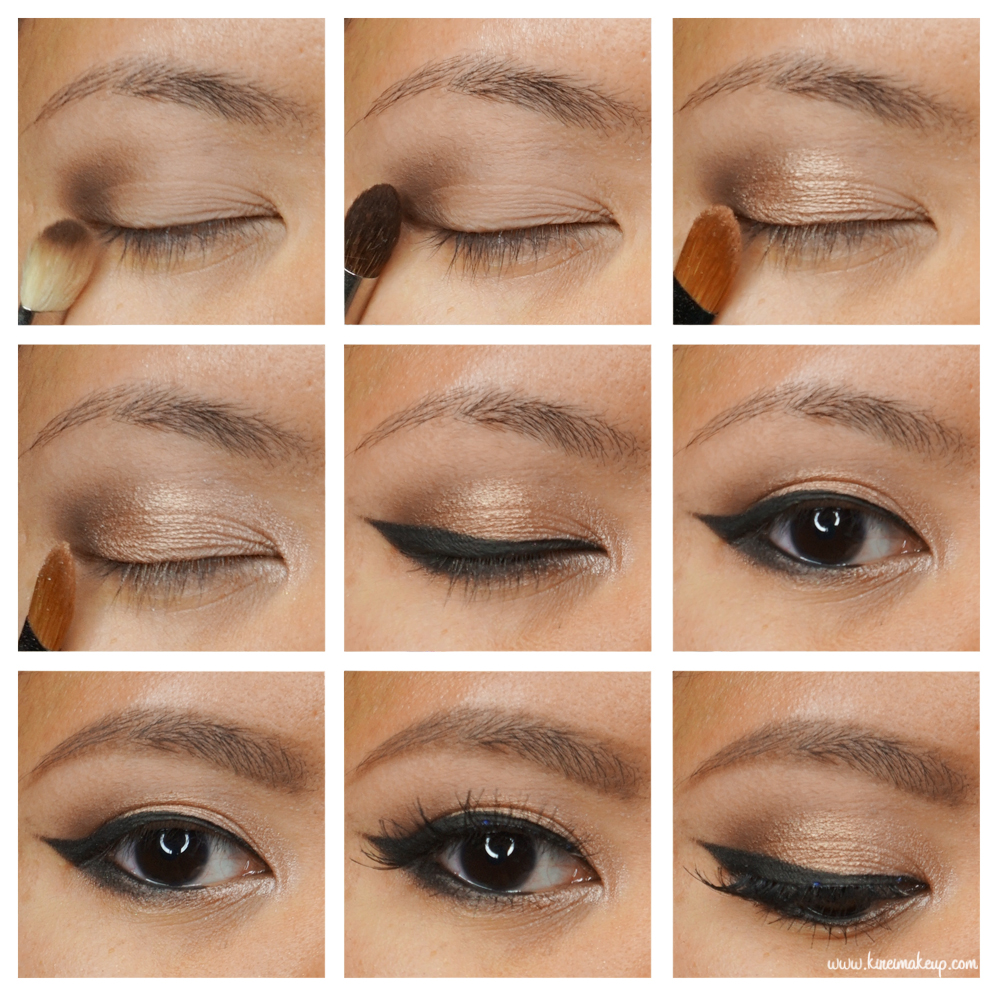
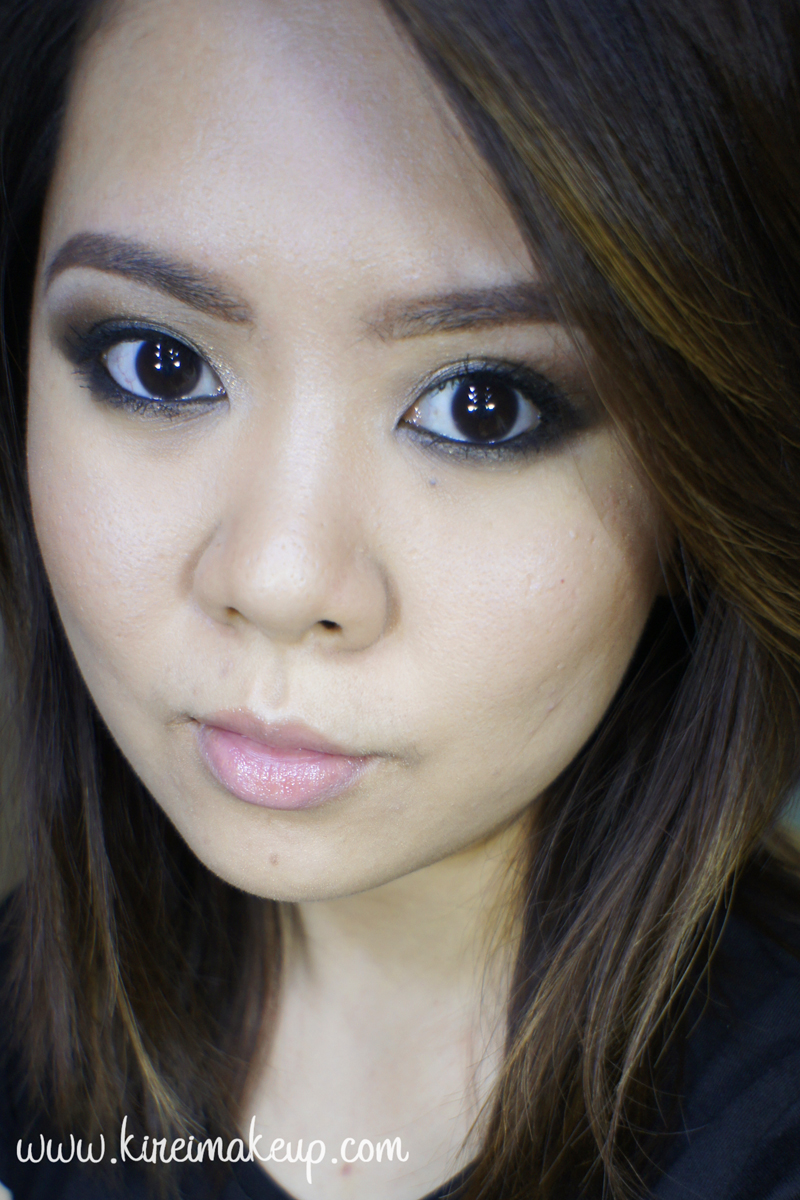
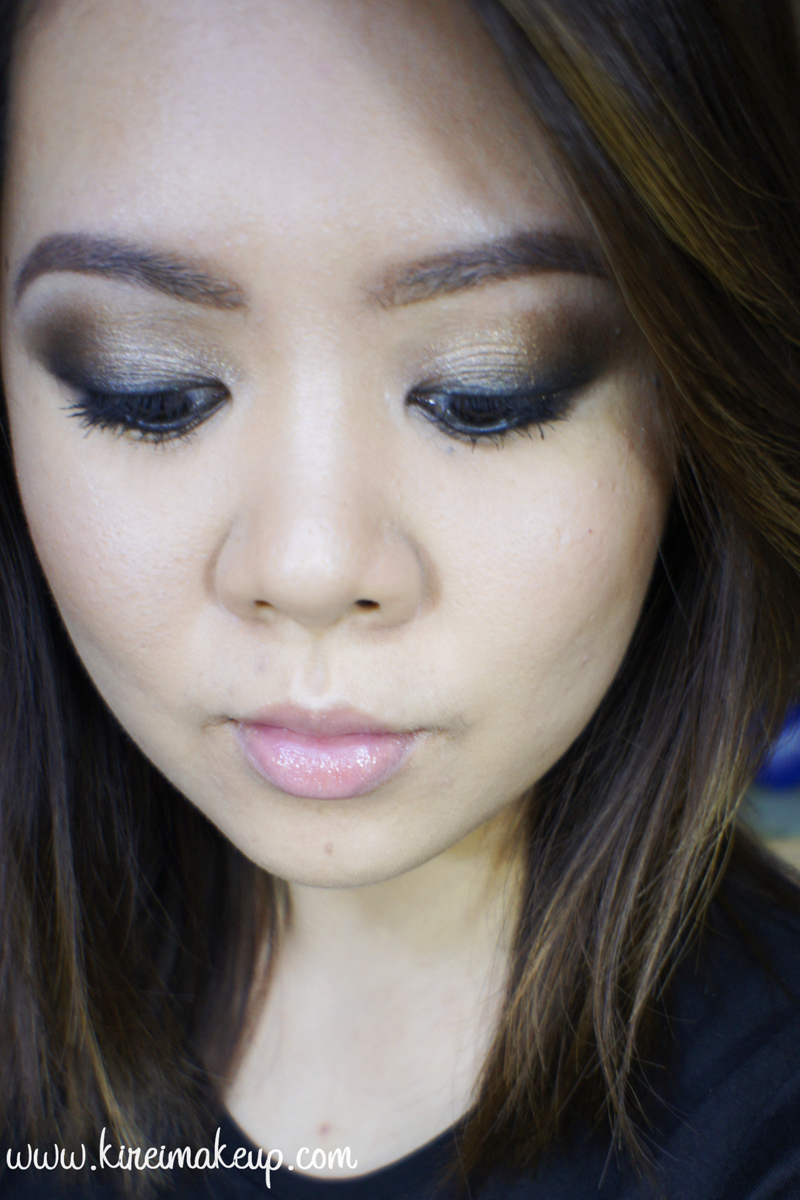
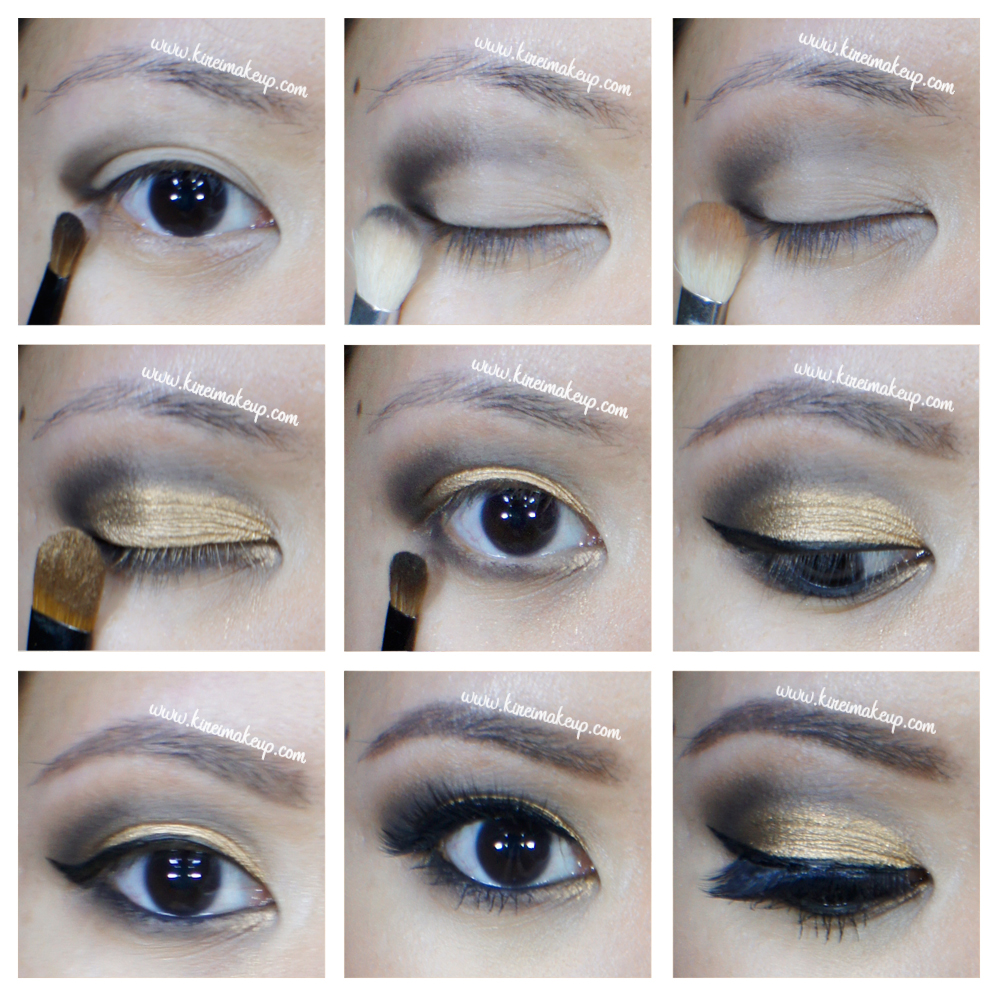
Tarnished Gold Smokey Eyes
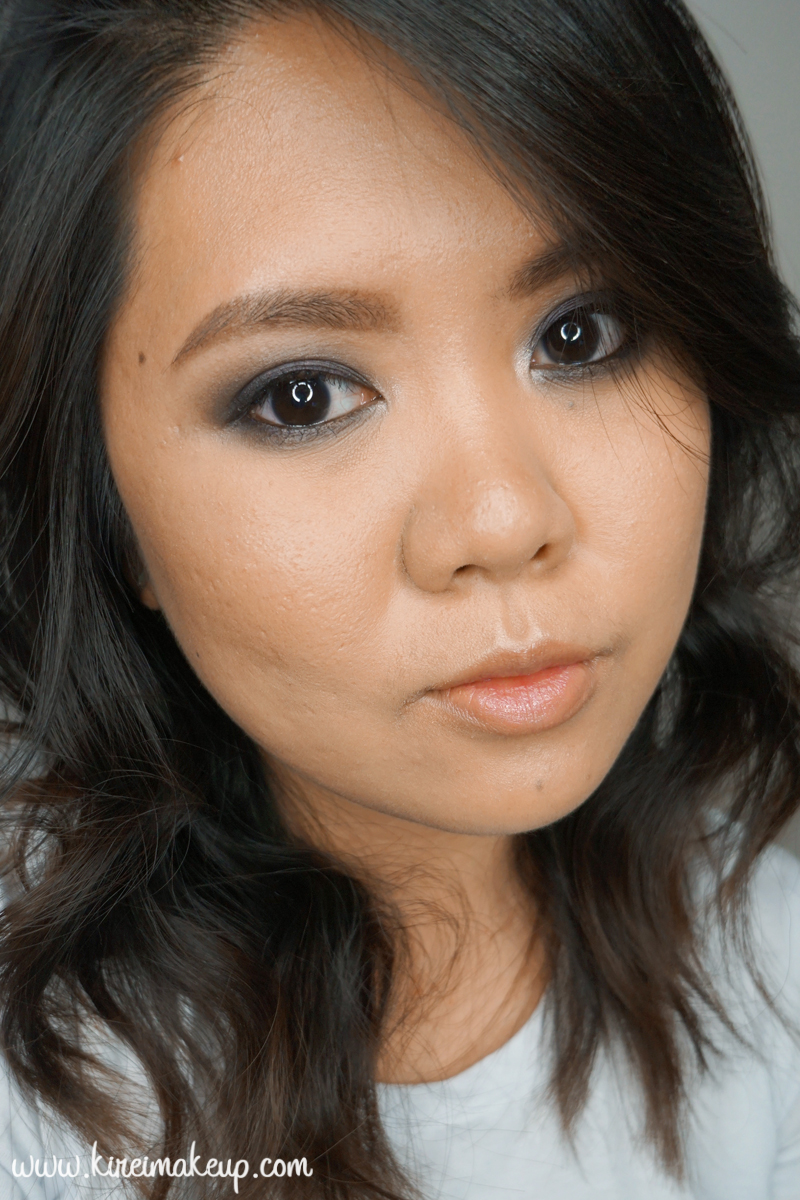
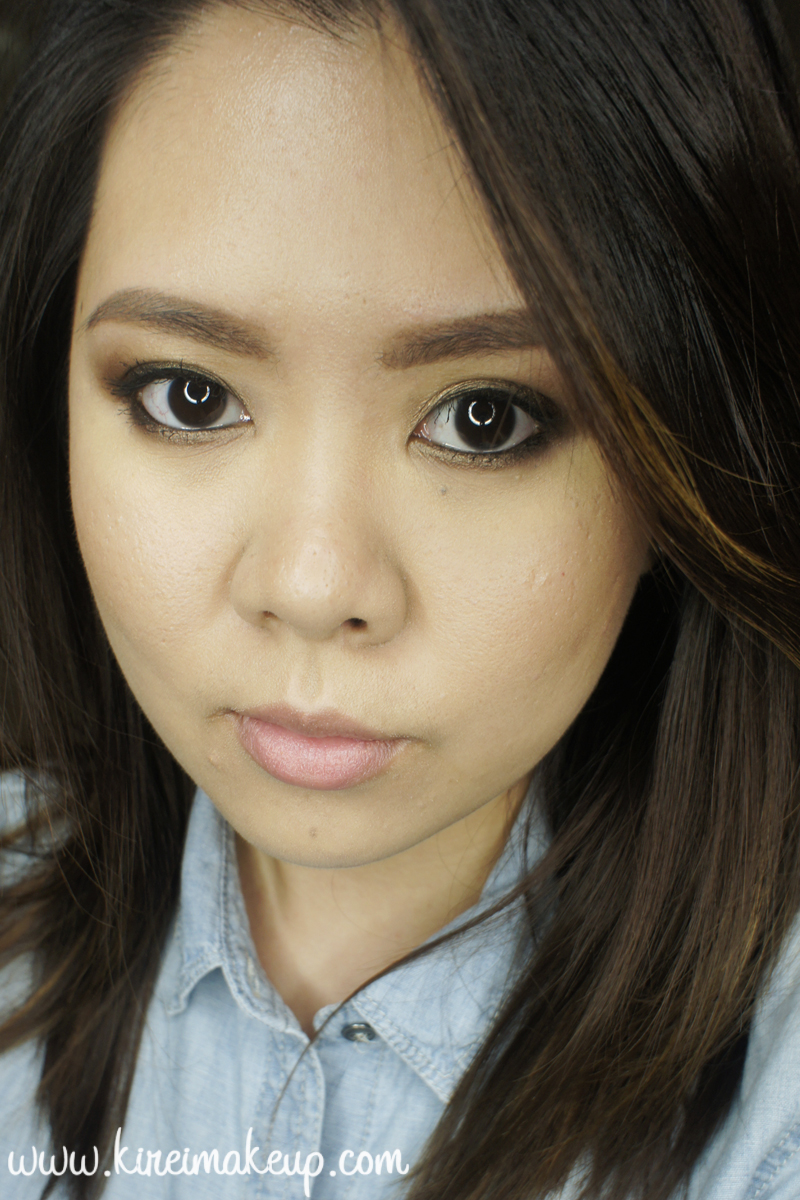
I wanted to share with you guys my favorite way of wearing a warm smokey eyes, without having to use too many products. My Tarnished Gold Smokey eyes tutorial is warm, it’s earthy, and it doesn’t look too dark. You can add more intensity by adding black eyeshadow on the outer V, but this is how I wear my smoky eyes.
So, I’ve written a lengthy explanation regarding this tutorial, but something went wrong and everything I’ve done went down the drain. It’s missing and I can’t find it. To waste no time, I’m just going to list all the products used and I’m sure the pictorials are pretty self-explanatory. I apologize for any inconvenience and should you have any questions regarding this tutorial please feel free to leave comments below or on my social network account (preferably Instagram).
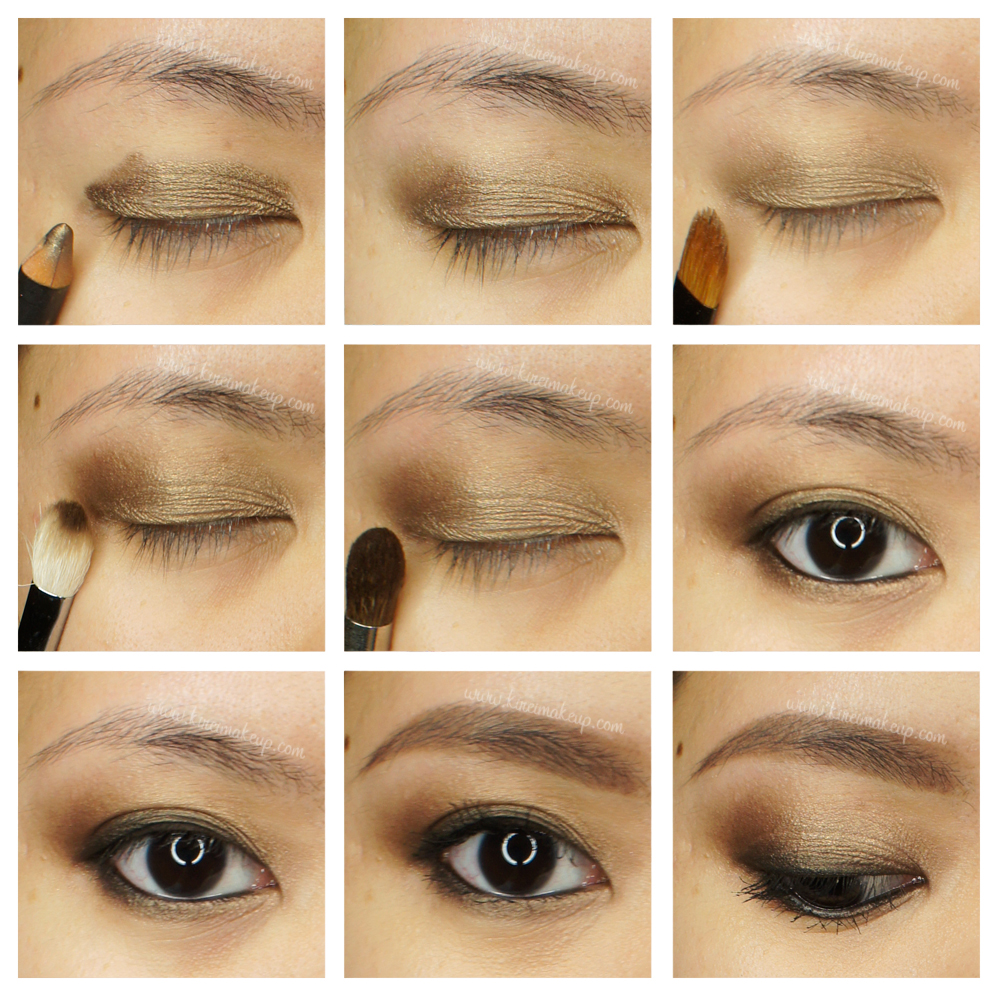
Eyes
- Urban Decay Primer Potion (primer)
- MAC Powersurge eyeliner (base)
- MAC Patina (eyelid and lower lash line)
- Kat Von D Monarch palette (Shadow Box + Papilio: outer V and outer half of lower lash line; Deadhead: upper lash line and outer half of lower lash line)
- L’oreal Voluminous Smoldering Eyeliner (tightline, waterline, upper lash line)
- Anastasia Brow Wiz in Taupe (brows)
- Maybelline Express Volume Turbo boost mascara (upper and lower lashes)
Face
- Make Up For Ever HD Foundation 120 (base)
- Bobbi Brown Peach corrector (under eyes corrector)
- MAC Pro Longwear Concealer (under eyes concealer)
- MAC Pro Conceal/Correct palette in Medium (blemish concealer)
- NARS Setting powder (setting powder)
Cheeks
- MAC Cubic powder (blush)
- MAC Sculpt powder (contour)
- The Balm Mary-Lou Manizer (highlighter)
Lips
- NARS Multiple Riviera
Grunge Smokey Eye Tutorial
Ah, yes, the grunge smokey eye look. This has been my go-to makeup for any night-out or parties since it’s so easy and simple. I could go as dark and intense as I want, and I could even go messier if I need to. Smoldering, sexy and effortless! You can achieve this look in less than 10 minutes, seriously!
For this look, you can use black eyeshadow all around, but I like some warmth on my smoky eyes, so I prefer adding non-black shadow. The technique I showed you in the photo below would be great for those who have troubles creating crease to create smoky eyes.
The key to this look is to use an eyeliner that is soft, and doesn’t set easily. You don’t have to be precise for this look, and I suggest skipping the falsies altogether if you want it to look a bit more grunged or rocker chic! No falsies, falsies = glam! Well, of course you can use falsies, just in my opinion once you use falsies it’s no longer grunge and messy. It becomes very glam.
*Don’t forget to check out my other Smoky Eyes tutorial!*
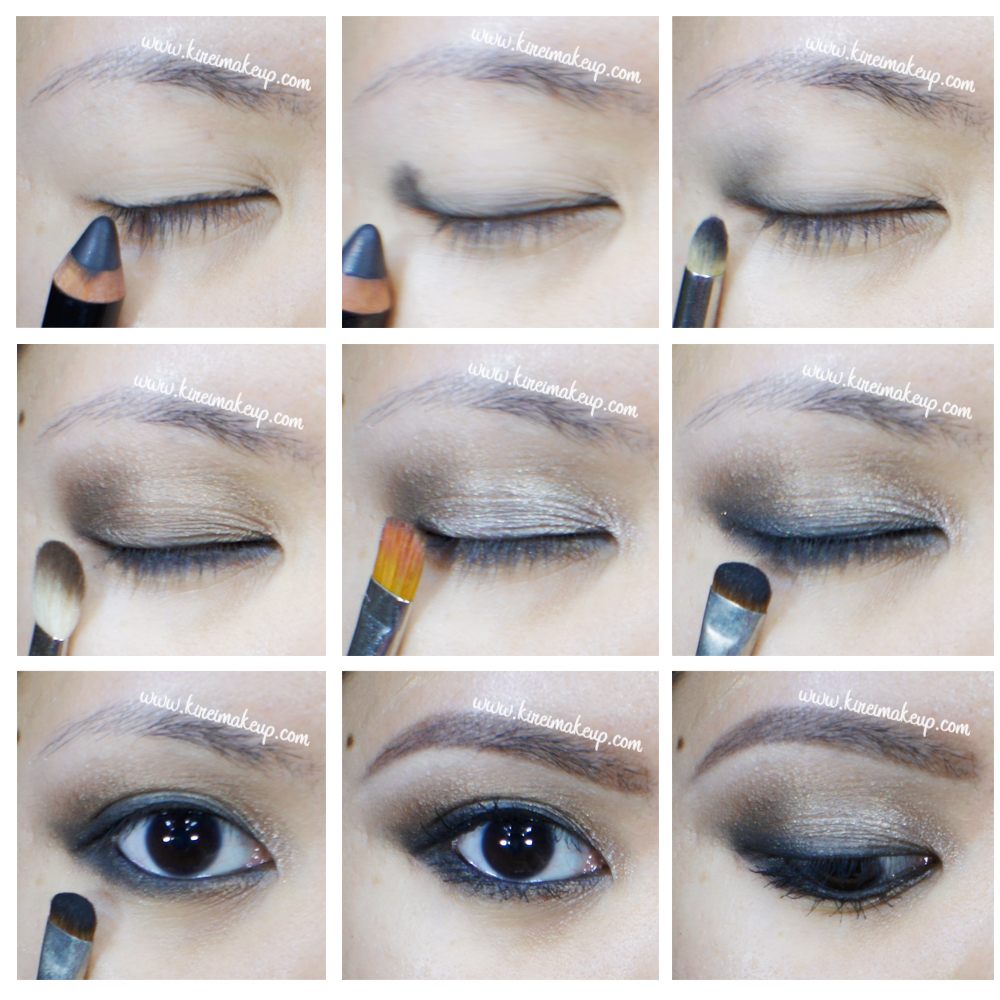
Eyelids are prepped using Urban Decay Primer Potion original.
How-to:
1. Using L’oreal Voluminous Smoldering eyeliner, I lined my upper lash line. Don’t worry about it being imperfect.
2. I dotted the same eyeliner on the outer part of my eyelid.
3. Using a pencil brush, I lightly smudged the eyeliner before it has the chance to set.
4. I applied Kat Von D Disintegration eyeshadow (from Kat Von D Monarch palette) all over my eyelid all the way up to my crease using a blending brush.
5. I sprayed water on my flat eyeshadow brush, and applied loose pigment from Gosh Tan Mineral Colour pigment on the inner half of my eyelid.
6. Using a smudging brush, I applied Kat Von D Deadhead eyeshadow (from Monarch palette) along my upper lash line, winging it slightly on the outer part.
7. I used the same eyeshadow and brush as no. 6 on the lower lid. I also lined my waterline and tightline using L’oreal Voluminous Smoldering eyeliner.
8. I curled my lashes and applied several coats of MUFE Aqua Smoky Lash mascara on both upper and lower lashes.
9. I filled my brows using Anastasia Brow Wiz in Brunette.
10. I lightly applied Entomology from Kat Von D Monarch palette just above the crease to blend out the eyeshadow a bit more.
11. On my face, I applied Diorstar foundation using Cover FX cream foundation brush.
12. Under my eyes, I applied MUFE HD concealer.
13. I set my face by dusting Cover FX translucent powder lightly with a large powder brush.
14. I also applied a Smashbox contour powder under my cheekbones and on my temples, and very lightly on the sides of my nose.
15. I applied Benefit Hervana on my cheeks, and The Balm Mary Lou highlighter on top of my cheeks, on the bridge of my nose and on my cupid’s bow.
16. On my lips, I applied a little bit of foundation (from whatever was left on my foundation brush). Then, I added YSL Glossy Stain in Peche Cerra-Colla (27) for that nude peachy lips.
Products used
Eyes – Urban Decay Primer Potion (original); Kat Von D Monarch palette (Disintegration, Deadhead, Entomology); Gosh Mineral Colour Pigment (Tan); L’oreal Voluminous Smoldering Eyeliner; Make Up For Ever Aqua Smoky Lash; Anastasia Beverly Hills Brow Wiz (Brunette).
Face – Diorskin Star foundation; Make Up For Ever HD Concealer; CoverFX Translucent powder.
Cheeks – Smashbox contour powder; Mary Lou Manizer highlighter; Benefit Hervana blush.
Lips – YSL Glossy Stain in Peche Cerra-Colla (27).
Smoky Eyes using MAC Rose Gold Pigment
At one point some time last year, I was crazy about anything Rose Gold. In fact, I am still obsessed with anything Rose Gold. Anyhow, I was browsing around and saw this MAC Rose Gold pigment on their website. I bought it, and played with it. To be honest, when it first came, I was quite disappointed how it does not look anything rose-colored. I should’ve paid more attention to the description. On the MAC website it was described as “smooth, tarnished gold with a touch of rose”. Not sure where the “touch of rose” comes from, I think this pigment is a lot more “tarnished gold”.
Anyways, I actually love this pigment. It has amazing pigment pay-off, and it’s super smooth! I have used this pigment before on my New Year makeup post. I think the hardest part of using this pigment is actually finding a combination of color that will match it. I’m not that crazy on the result for this tutorial, I feel like the pigment should’ve been paired with a warmer shade. May be I’ll re-do this look in the future.
How-to:
1. I prepped my eyelids using Urban Decay Primer Potion.
2. Using a small fluffy blending brush, I applied Ultra Mattes V2 from Sleek Makeup iDivine Showstopper on my outer V. If you have a monolid, or droppy/hooded eyelids, apply this eyeshadow with your eyes open.
3. I blended out the crease using a clean fluffy blending brush. I added a little bit of the same black eyeshadow to create more depth.
4. I wanted to add a bit more warmth, so I ran a little bit of bronzer, from the Smashbox contour palette, just above the crease.
5. I applied MAC Rose Gold pigment on my eyelid using a flat eyeshadow brush.
6. Using the same brush as no. 2, I applied Ultra Mattes v2 on my lower lid. I applied a little bit of the pigment just on the inner corner of the lower lid.
7. I created a winged liner using Kanebo Super Sharp eyeliner. I also applied a little bit on my waterline.
8. I filled my brows using Anastasia Brow Wiz in Medium Ash. Then, I feathered in Brunette a bit more.
9. I curled my lashes, and applied Gwiyomi Boutique false eyelashes in Annabelle.

10. On my face, I applied MAC Pro Longwear foundation using MAC Masterclass Oval 6 brush.
11. I applied the concealer from MAC Pro conceal/correct palette under my eyes.
12. I set my face using Cover FX translucent powder.
13. I lightly contoured and highlight my face using Smashbox contour palette.
14. I applied MAC Cubic blush on my cheeks.
15. For my lips, I lined and filled it in using MAC Spice lip liner.