About time I did a really dark smoky eyes tutorial, eh? Today’s post is a really dark UD Naked 3 smoky eyes tutorial on my Youtube channel. Have you guys subscribe yet? If you haven’t, what are you waiting for? Go to my Youtube channel and subscribe now!
Tag: ud naked 3
Party Makeup using UD Naked 3
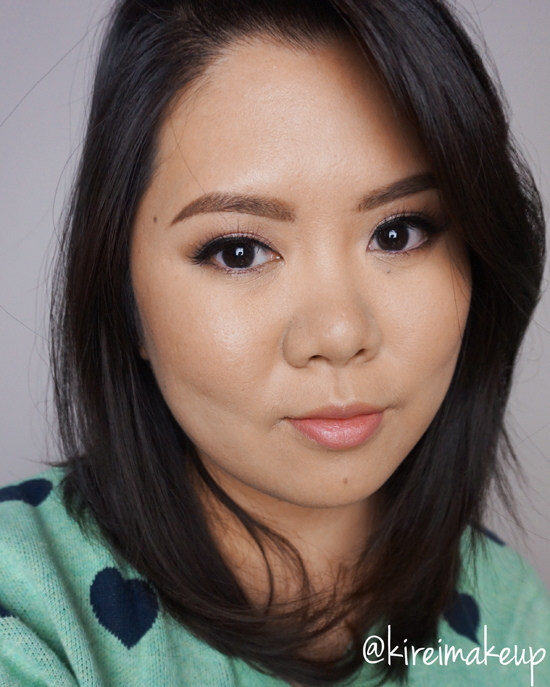
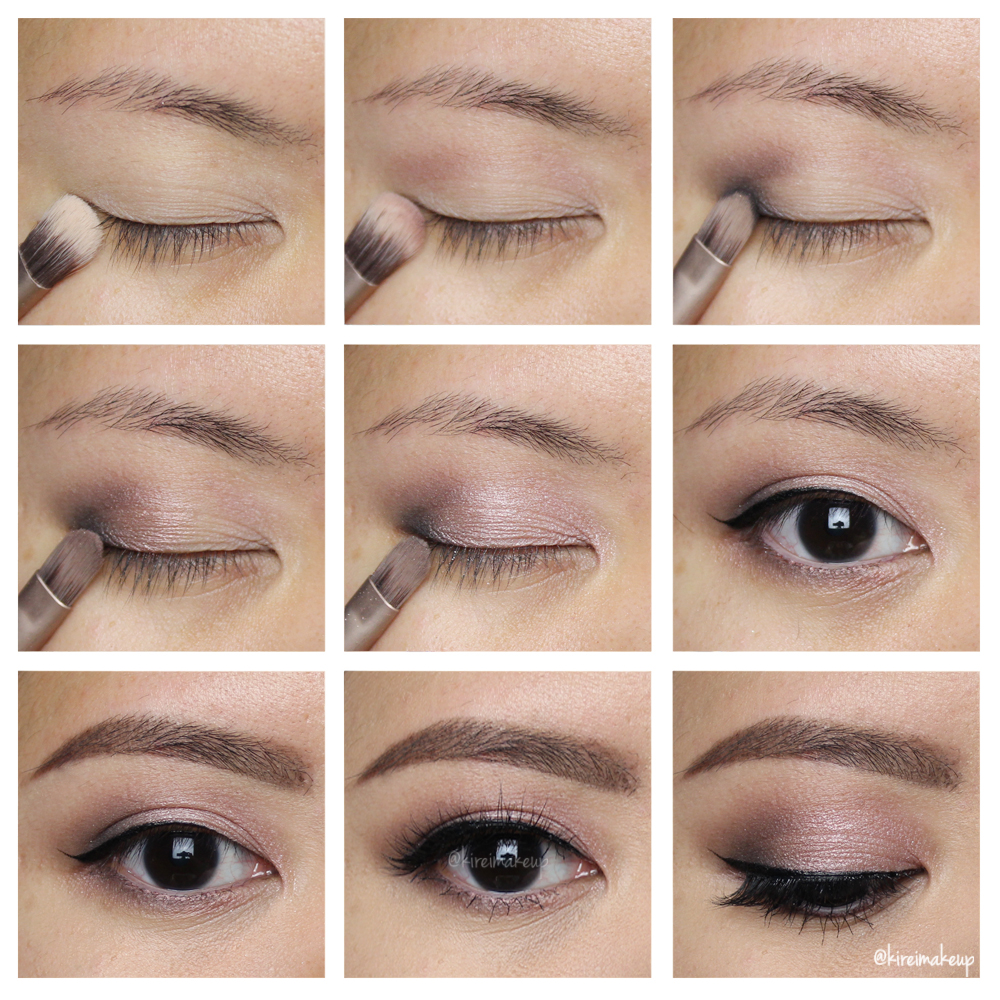
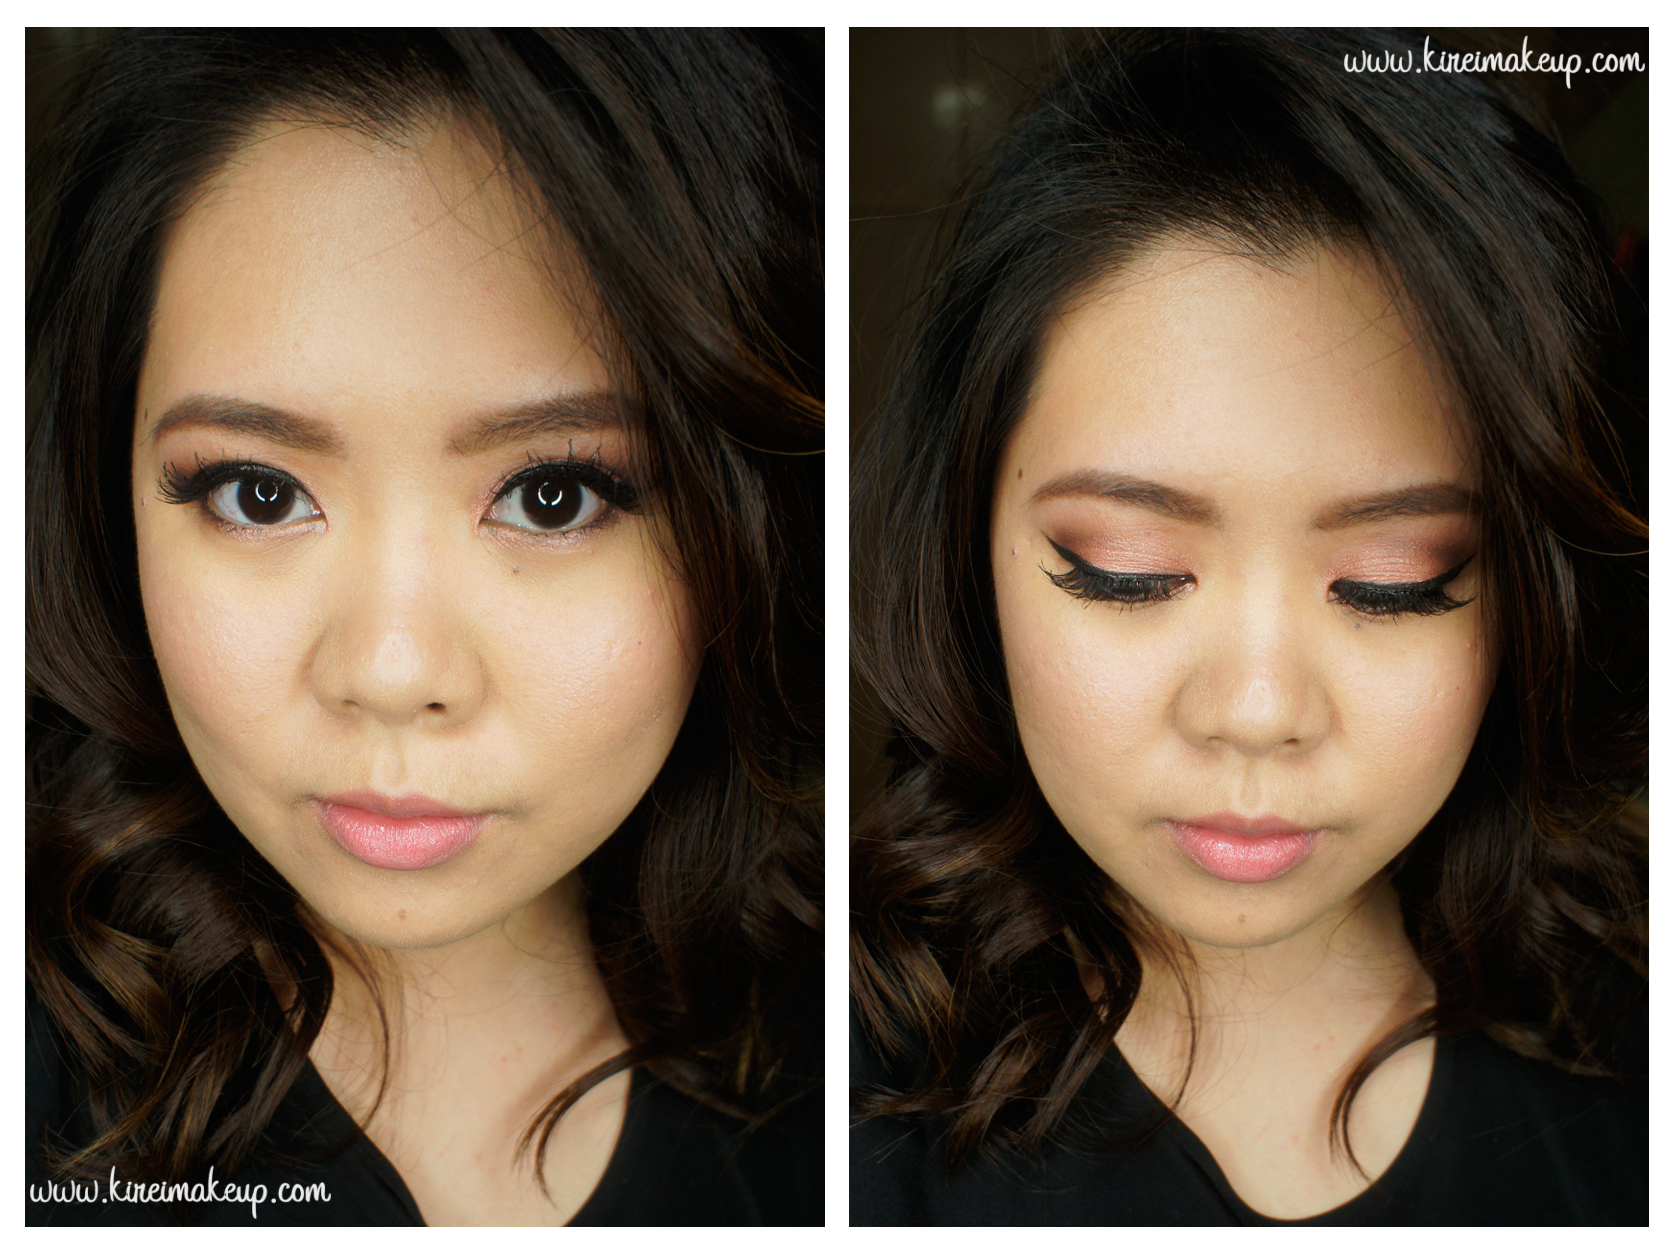
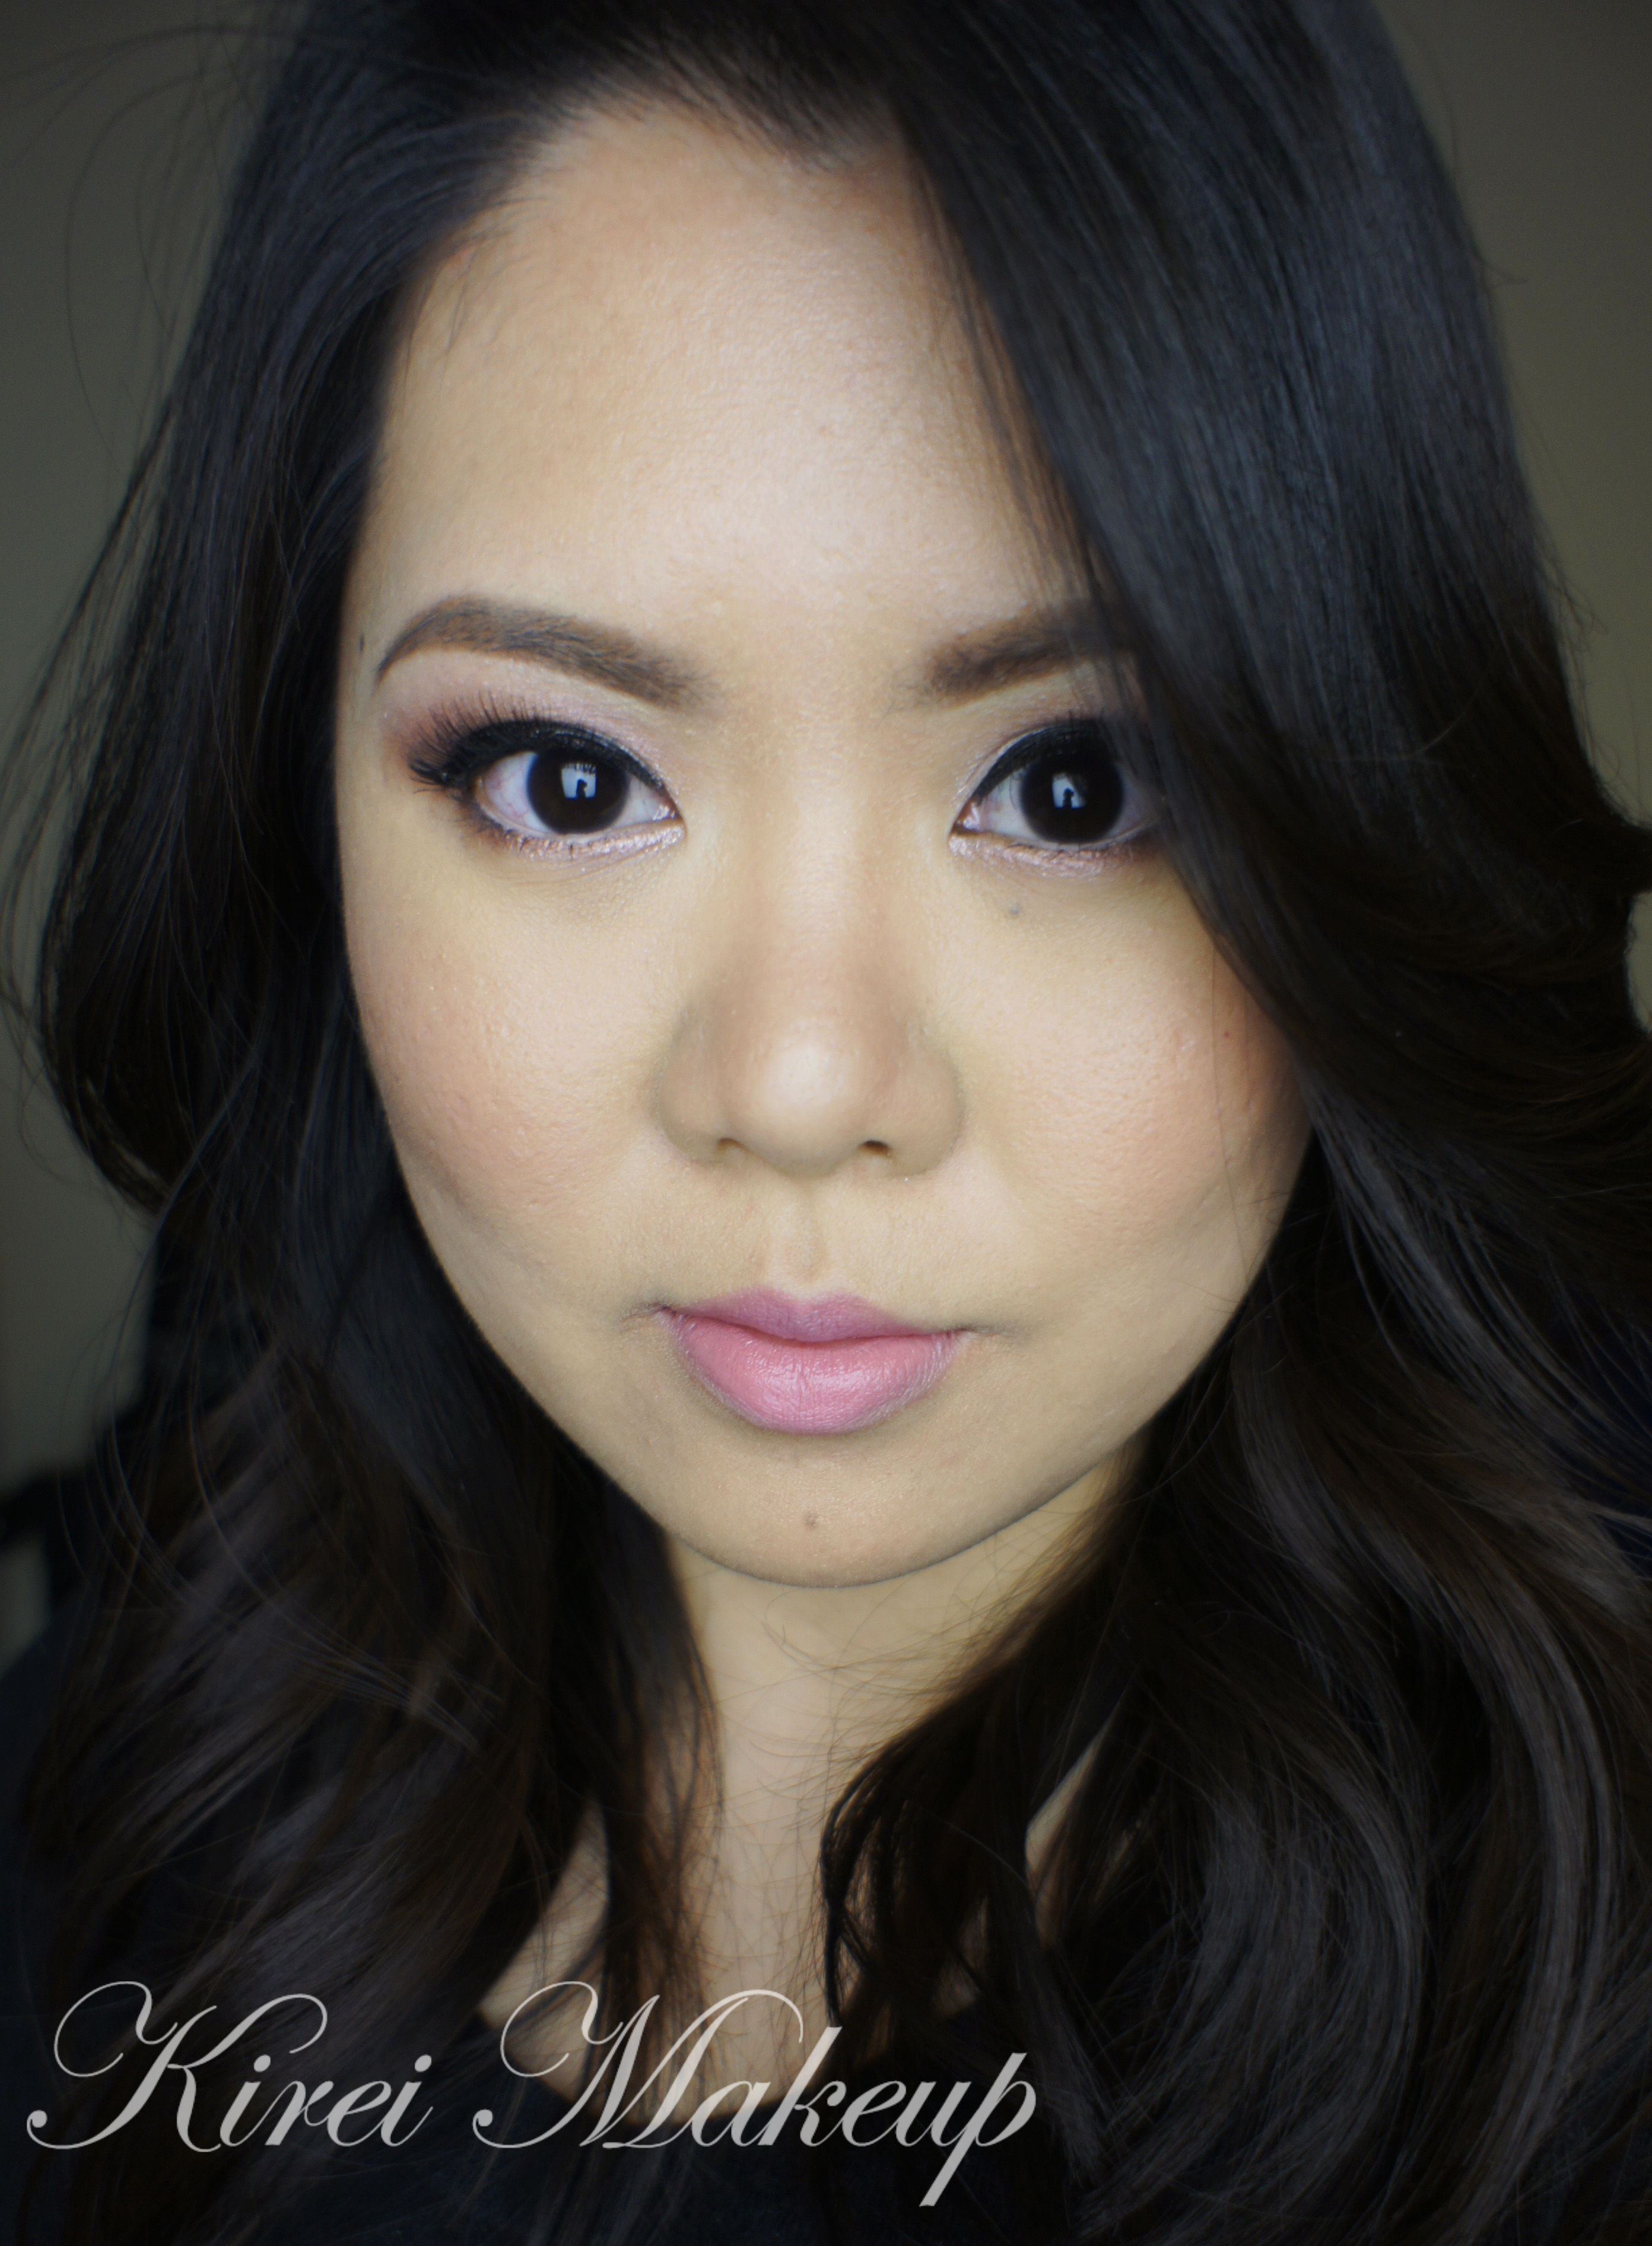
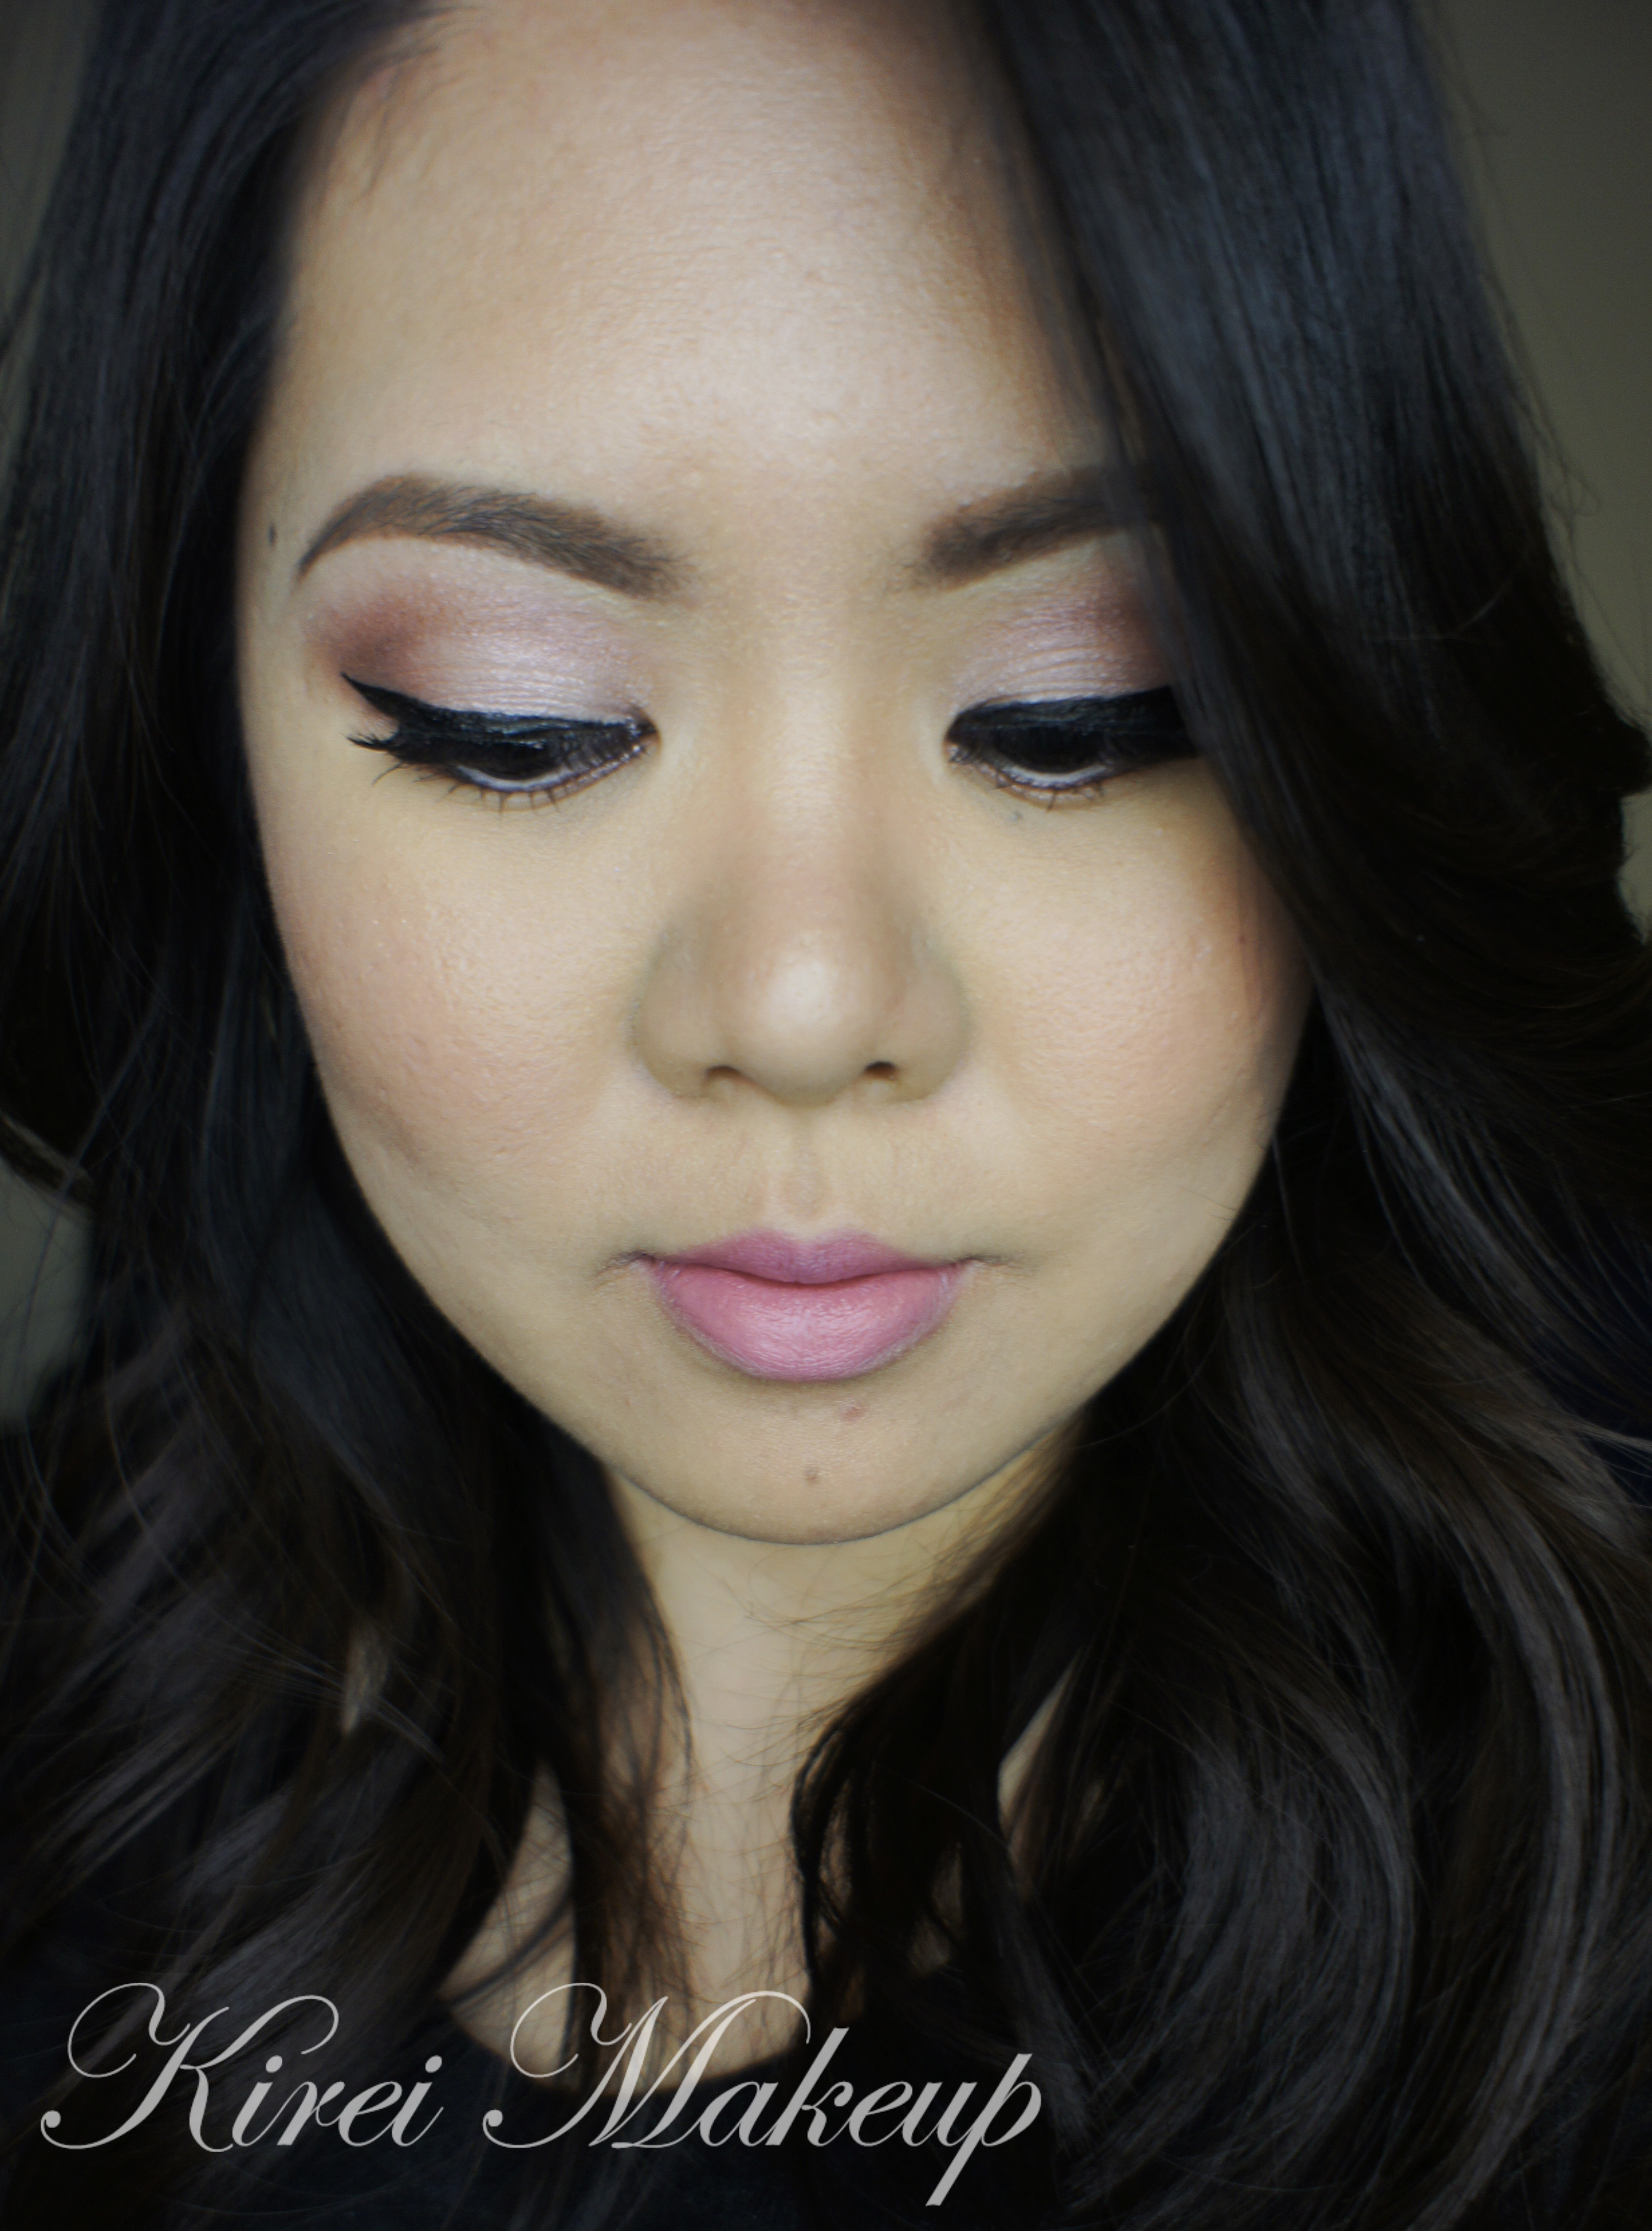
I’ve realized that there’re a lot of people who land in my blog looking for an UD Naked 3 tutorial. So, here’s my Party Makeup look using UD Naked 3. This look is not too smoky, but if you’re looking for a smoky using this palette, you can check out my UD Naked 3 smoky eyes video tutorial, and other UD Naked 3 tutorials. I’ve also done an UD Naked 3 review, so if you’re thinking of buying this palette for yourself or as a gift, do read the review first.
I’m using a new camera for this tutorial, and I’m not sure how this pictorial looks on your screen, I hope you can see the colors as I see it on my screen. It’s a very nice mauve shade, and it looks very feminine and soft.
Anyways, for my face, I used a new foundation I recently bought. I think I’m really liking this foundation, it’s the Chanel Perfection Velvet Lumiere. Anyways, will have a line up of reviews coming up soon. I’m trying to push all the makeup tutorials first since it’s almost Christmas and New Year, so reviews will be up in January probably.
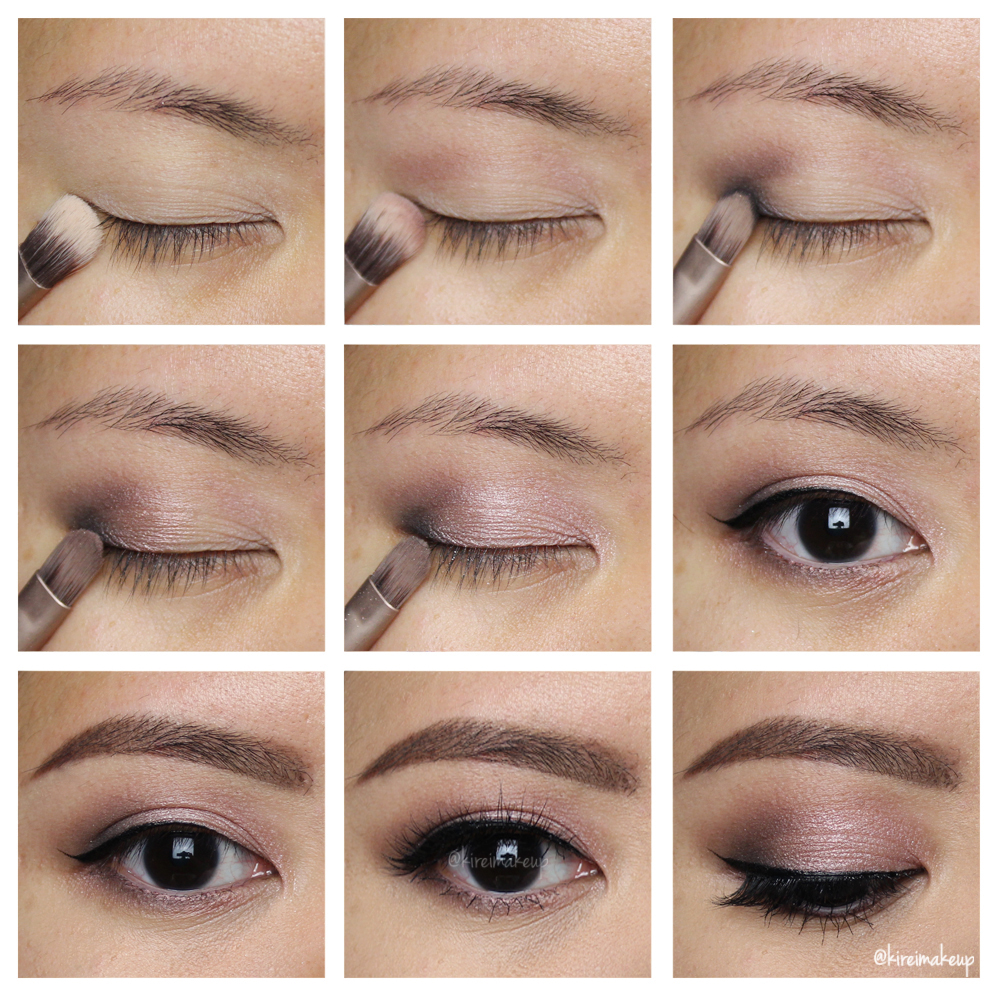
One thing regarding this tutorial is that I only used 1 brush, which is the brush that came with the palette. All I did to keep the brush clean between application is to run it through a black stippling sponge (similar to the Vera Mona Color Switch).
Products used
Eyes
- Primer – Urban Decay Primer Potion “Anti-Aging”
- Base – UD Naked 3 “Strange”
- Crease – UD Naked 3 “Nooner”
- Outer V – UD Naked 3 “Blackheart”
- Middle lid – UD Naked 3 “Liar”
- Inner lid – UD Naked 3 “Burnout” mixed with “Buzz”
- Lower lash line – UD Naked 3 “Liar”; UD Naked 3 “Blackheart” (outer half)
- Waterline – MAC Chromagraphic pencil “NW25/NC30”
- Winged liner – Kat Von D Tattoo liner “Trooper”
- Brows – The Balm Balmsai palette “Woodie”
- Lashes – Esqido Lashes “Oh So Sweet”
Face
- Primer – The BodyShop “Drops of Youth Wonderblur”
- Foundation – Chanel “Perfection Velvet Lumiere #30”
- Concealer – NARS Radiant Cream Concealer “Custard”
- Setting Powder – Laura Mercier “Invisible Loose Powder”
Cheeks
- Blush – Chanel “Blush de Horizon”
- Highlighter – The Balm “Mary-Lou Manizer”
Lips
- Lip pencil – Annabelle lip pencil “Natural Rose”
- Lipstick – Sonia Kashuk lipstick “Nude Pink”

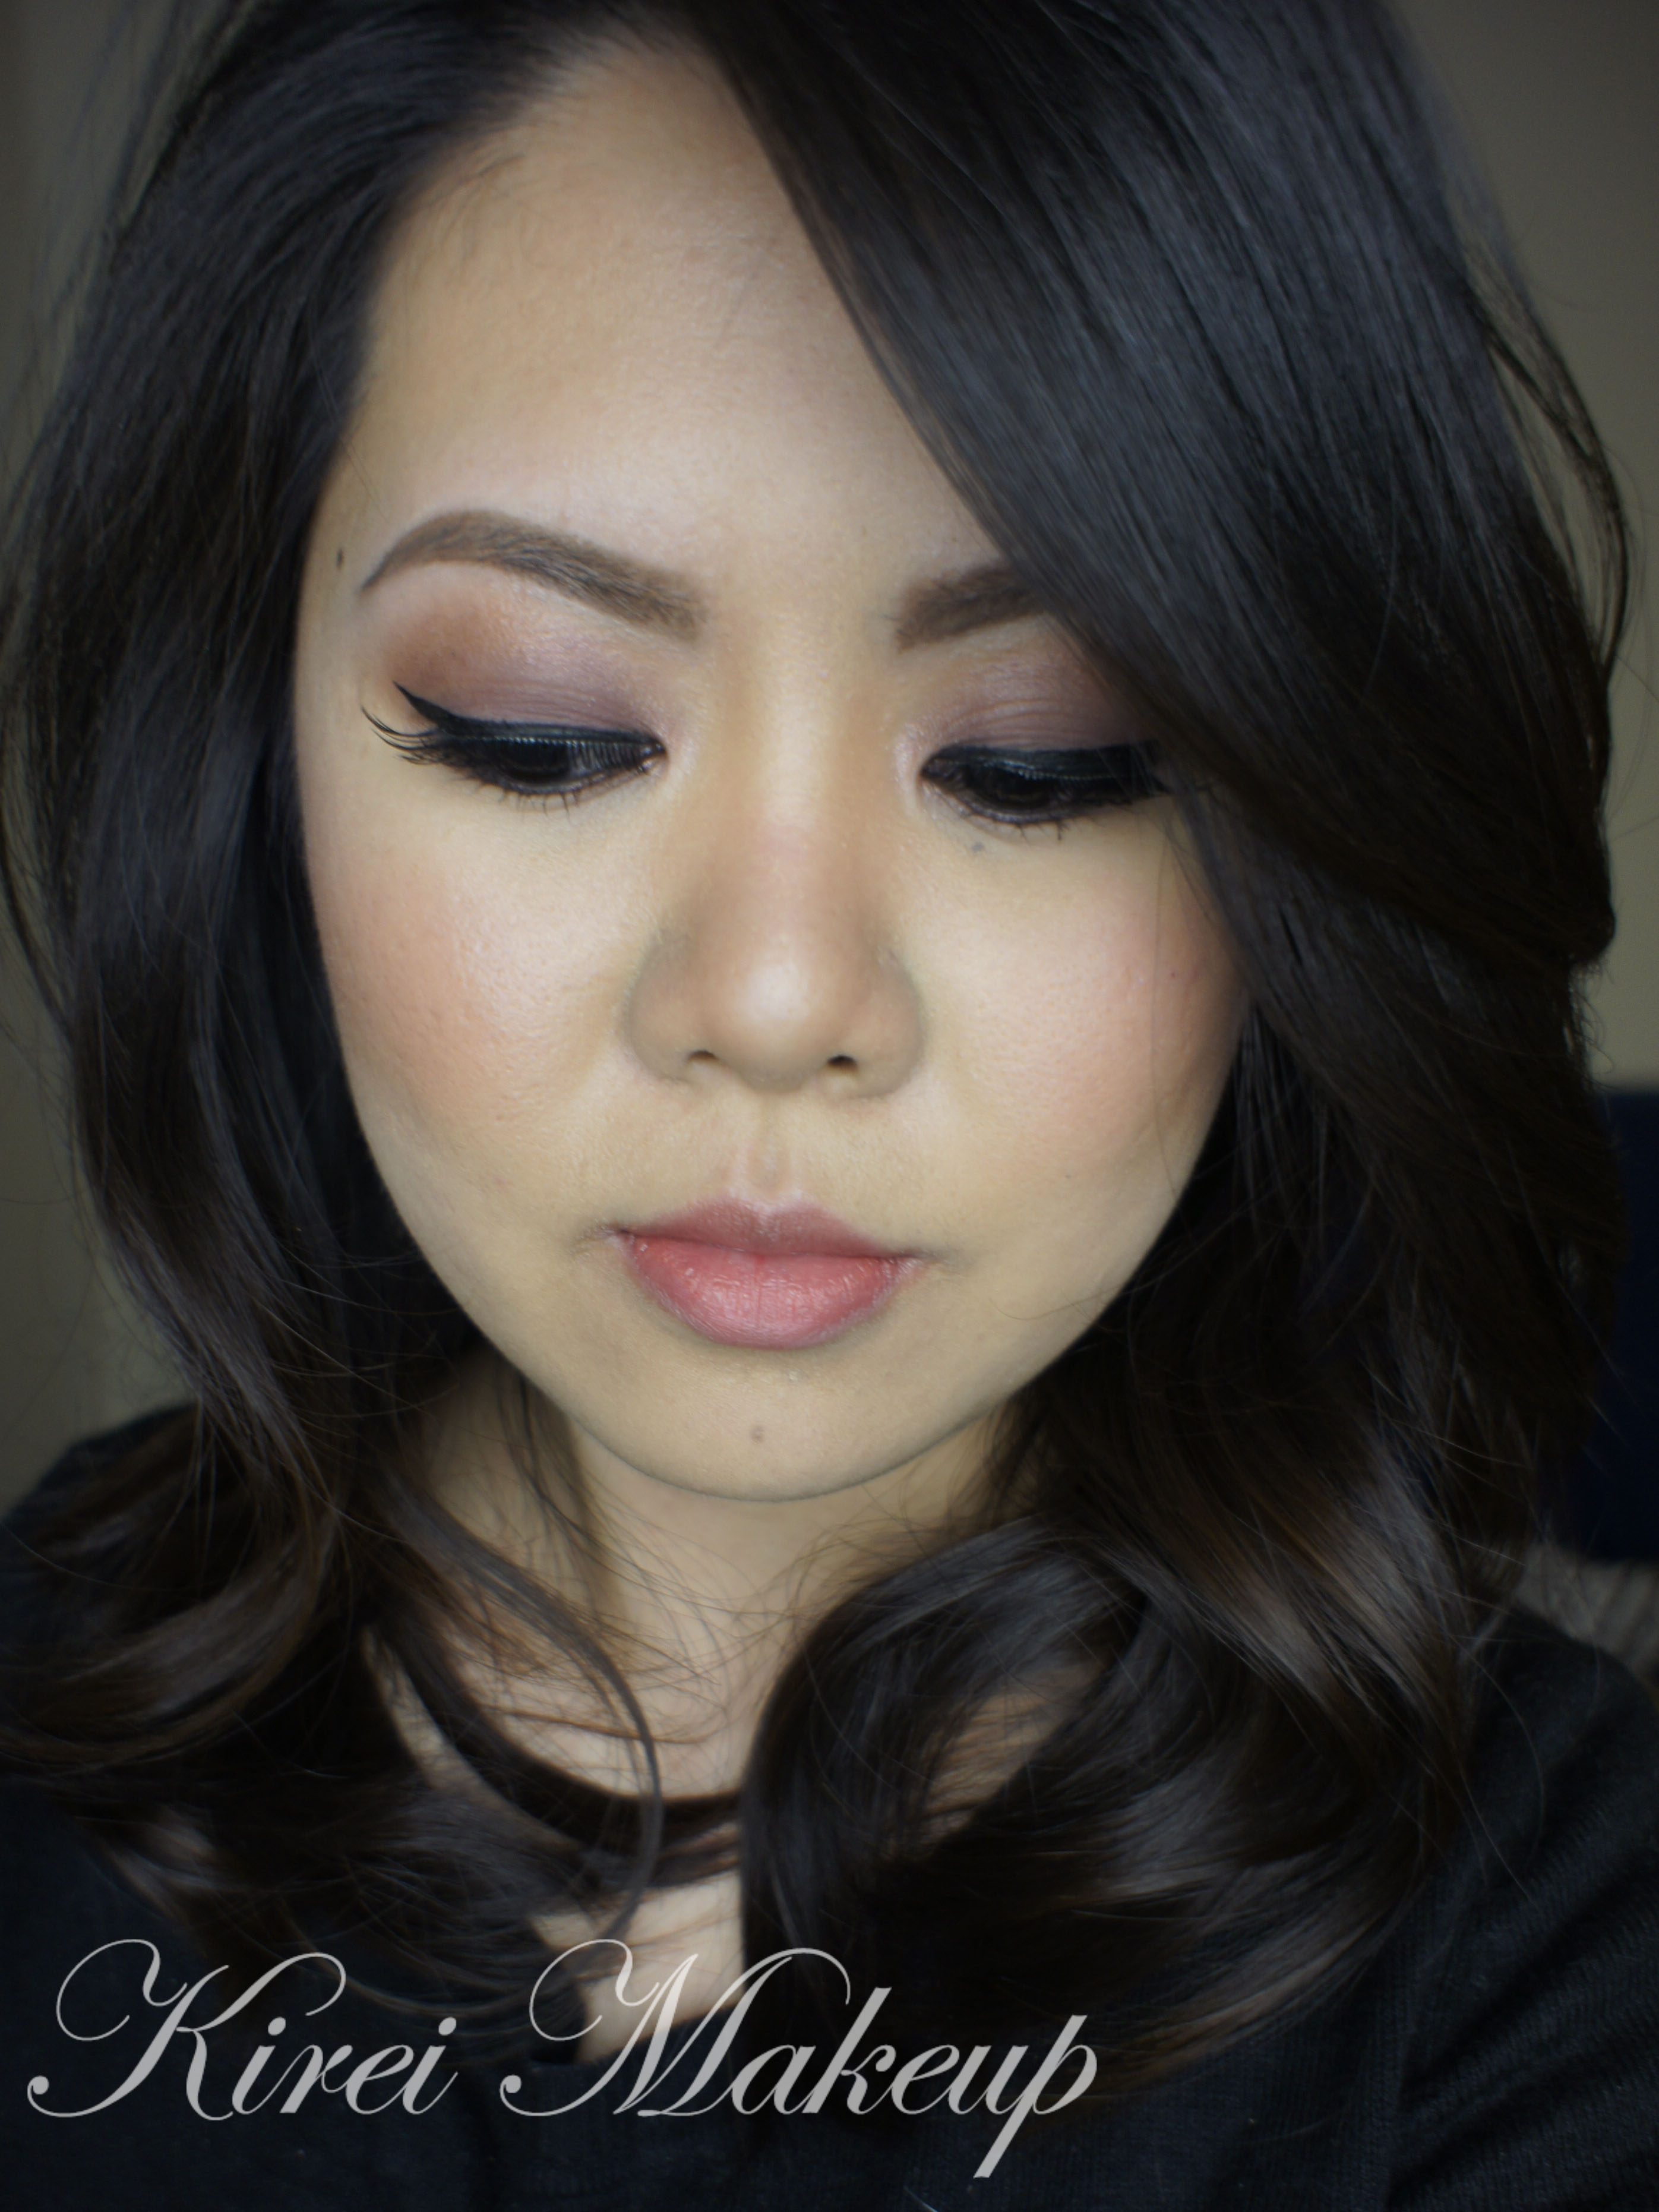
Soft Romantic Makeup (Revisited)
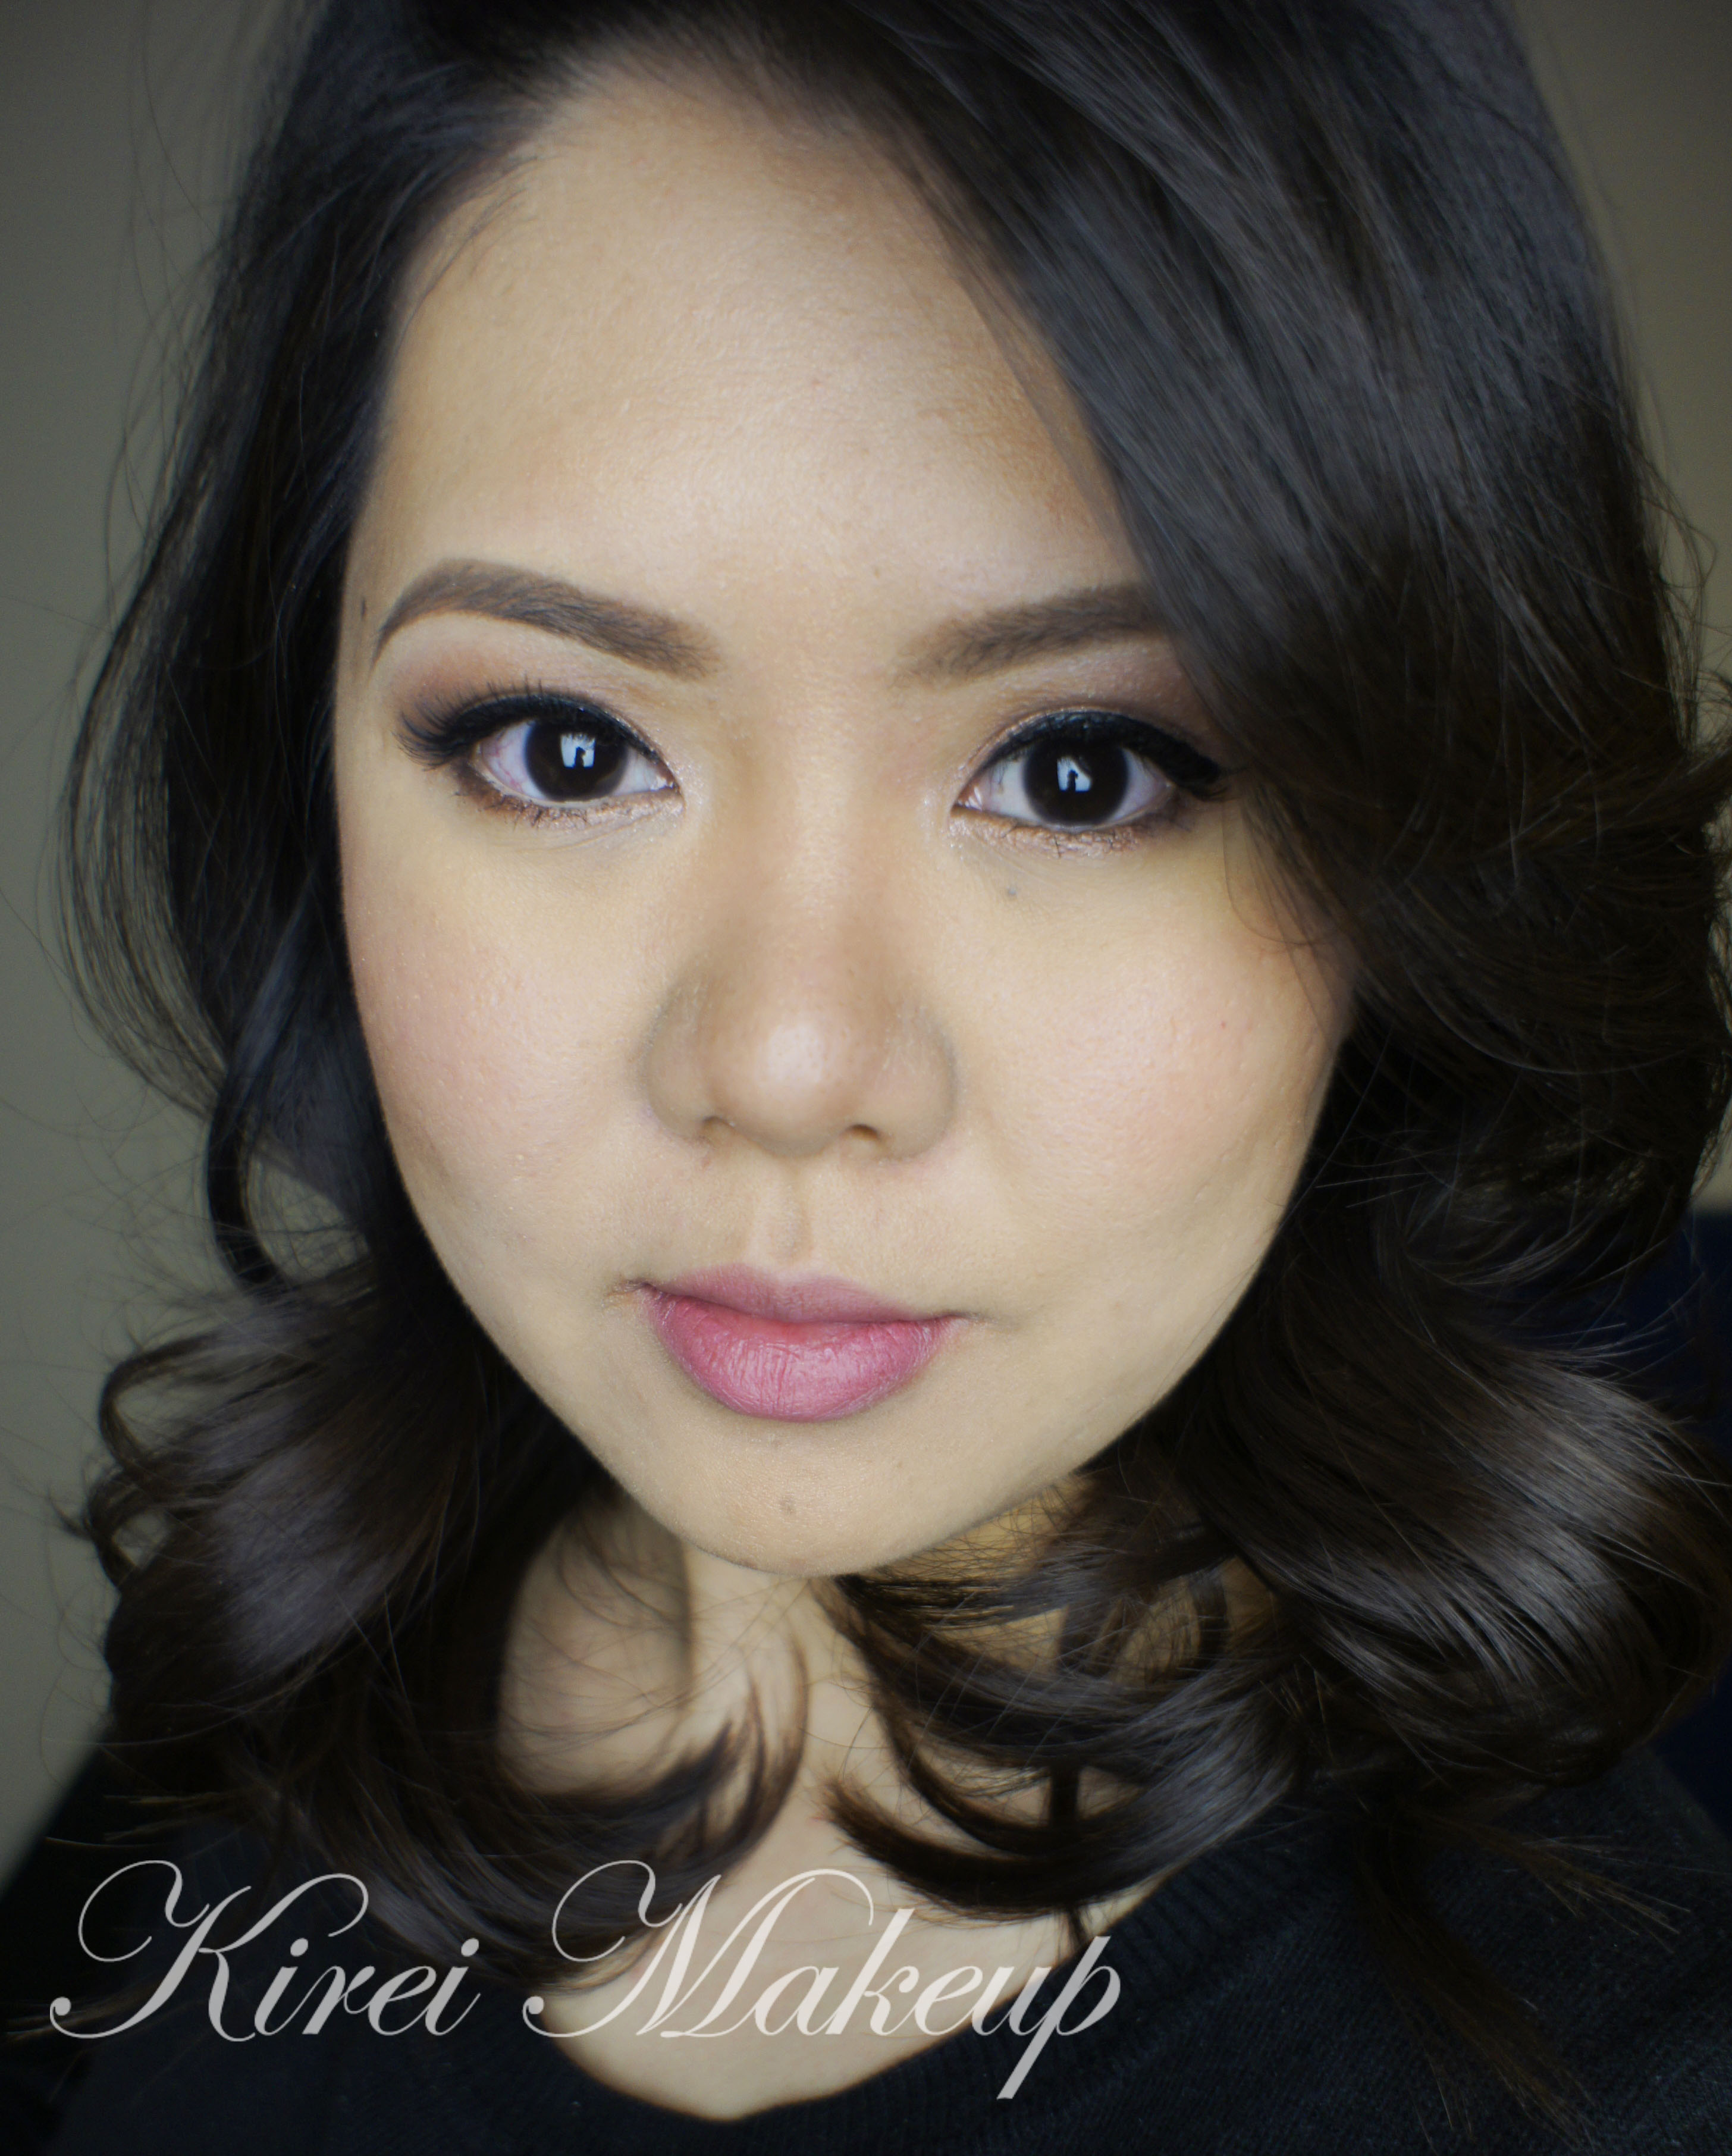
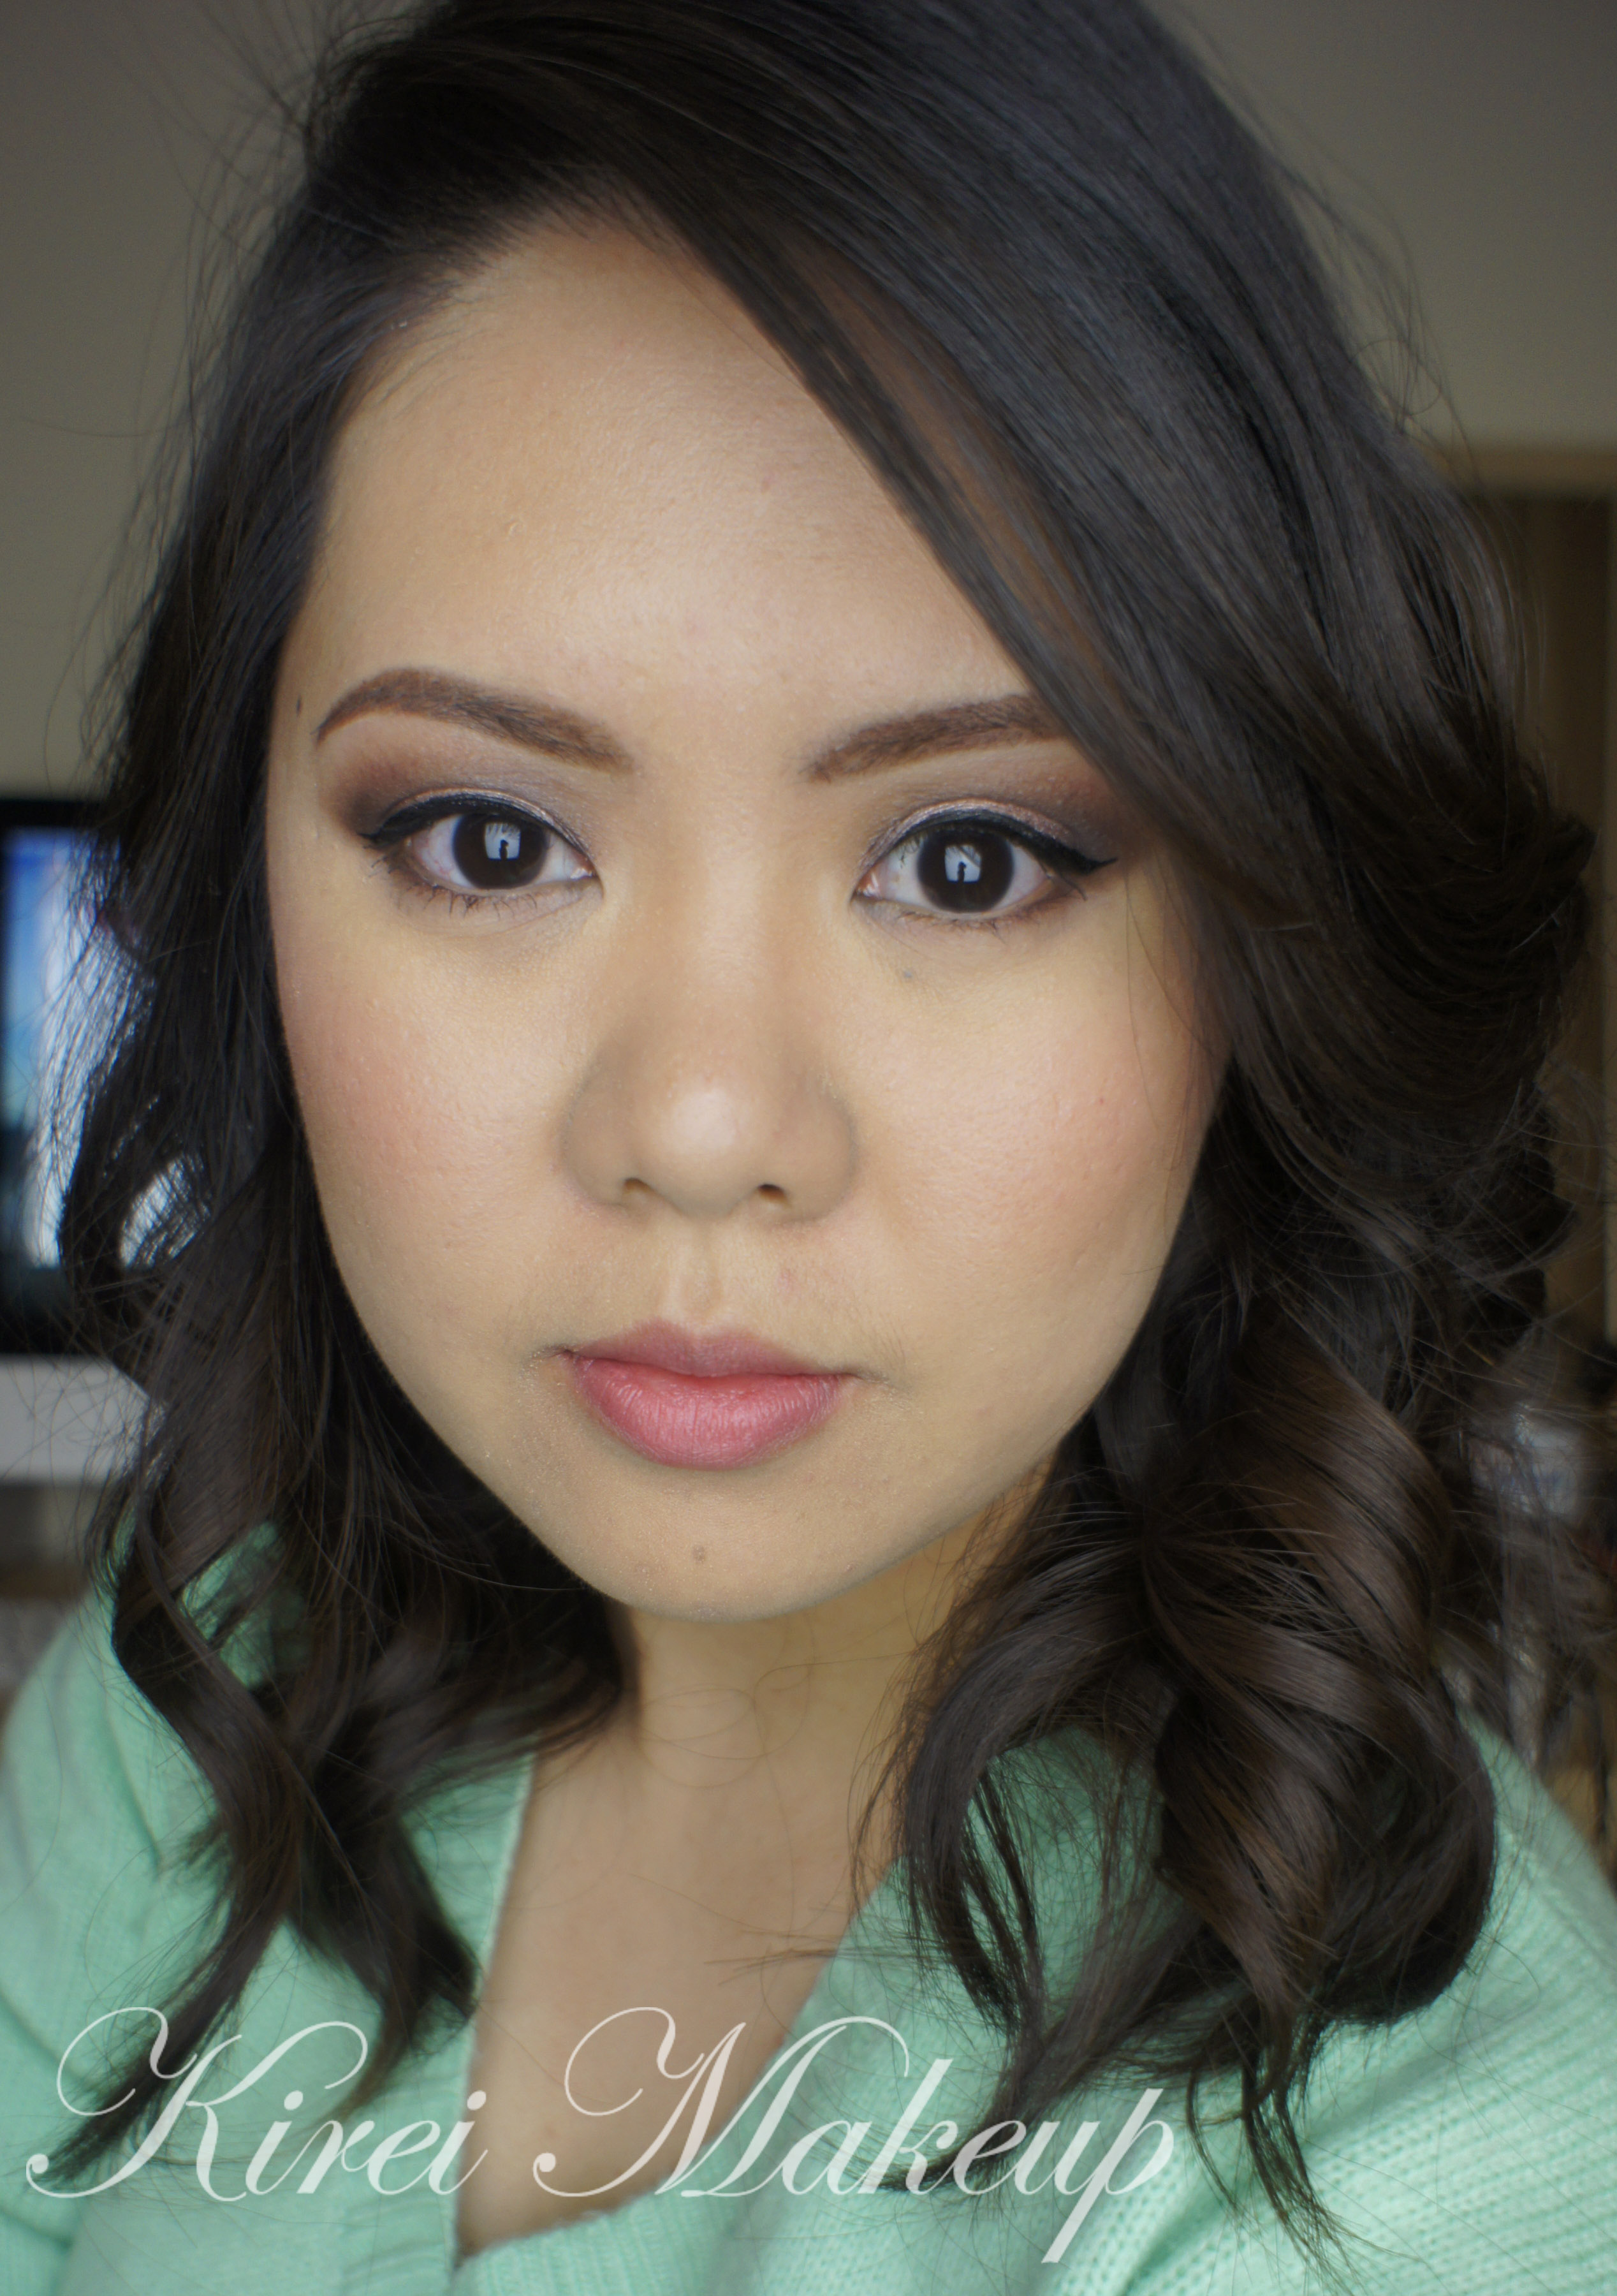
I’ve done a lot of UD Naked 3 makeup tutorials, and though most of them are smoky eyes, I do have a few non-smoky eyes tutorials. I was looking back on those tutorials, and I’ve decided to revisit this Soft Romantic Makeup post. I actually liked how I did my makeup in that post, but I felt that I wanted to redo it, and added more intensity to the shadows. Which one do you prefer? This tutorial or the original one? Let me know on the comments below!
I’d also like to mention that I’ve changed the way I filled my brows for this tutorial – it’s thicker, and more natural looking. I think I prefer this brow, even though it might look “less polished” than the “carved out” brows (aka concealer on top and bottom of my brows), I do like how it looks more organic. What do you guys think?
I apologize if the photos are slightly too warm, I didn’t realize my camera’s white balance setting was on the “warming filter” option. I tried to neutralize it using photoshop, but this is all I can do for now (besides trying to neutralize the yellow shade, I did not do anything else – no airbrushing whatsoever). I’ll be more careful next time.
*Check out my other UD NAKED 3 TUTORIALS*

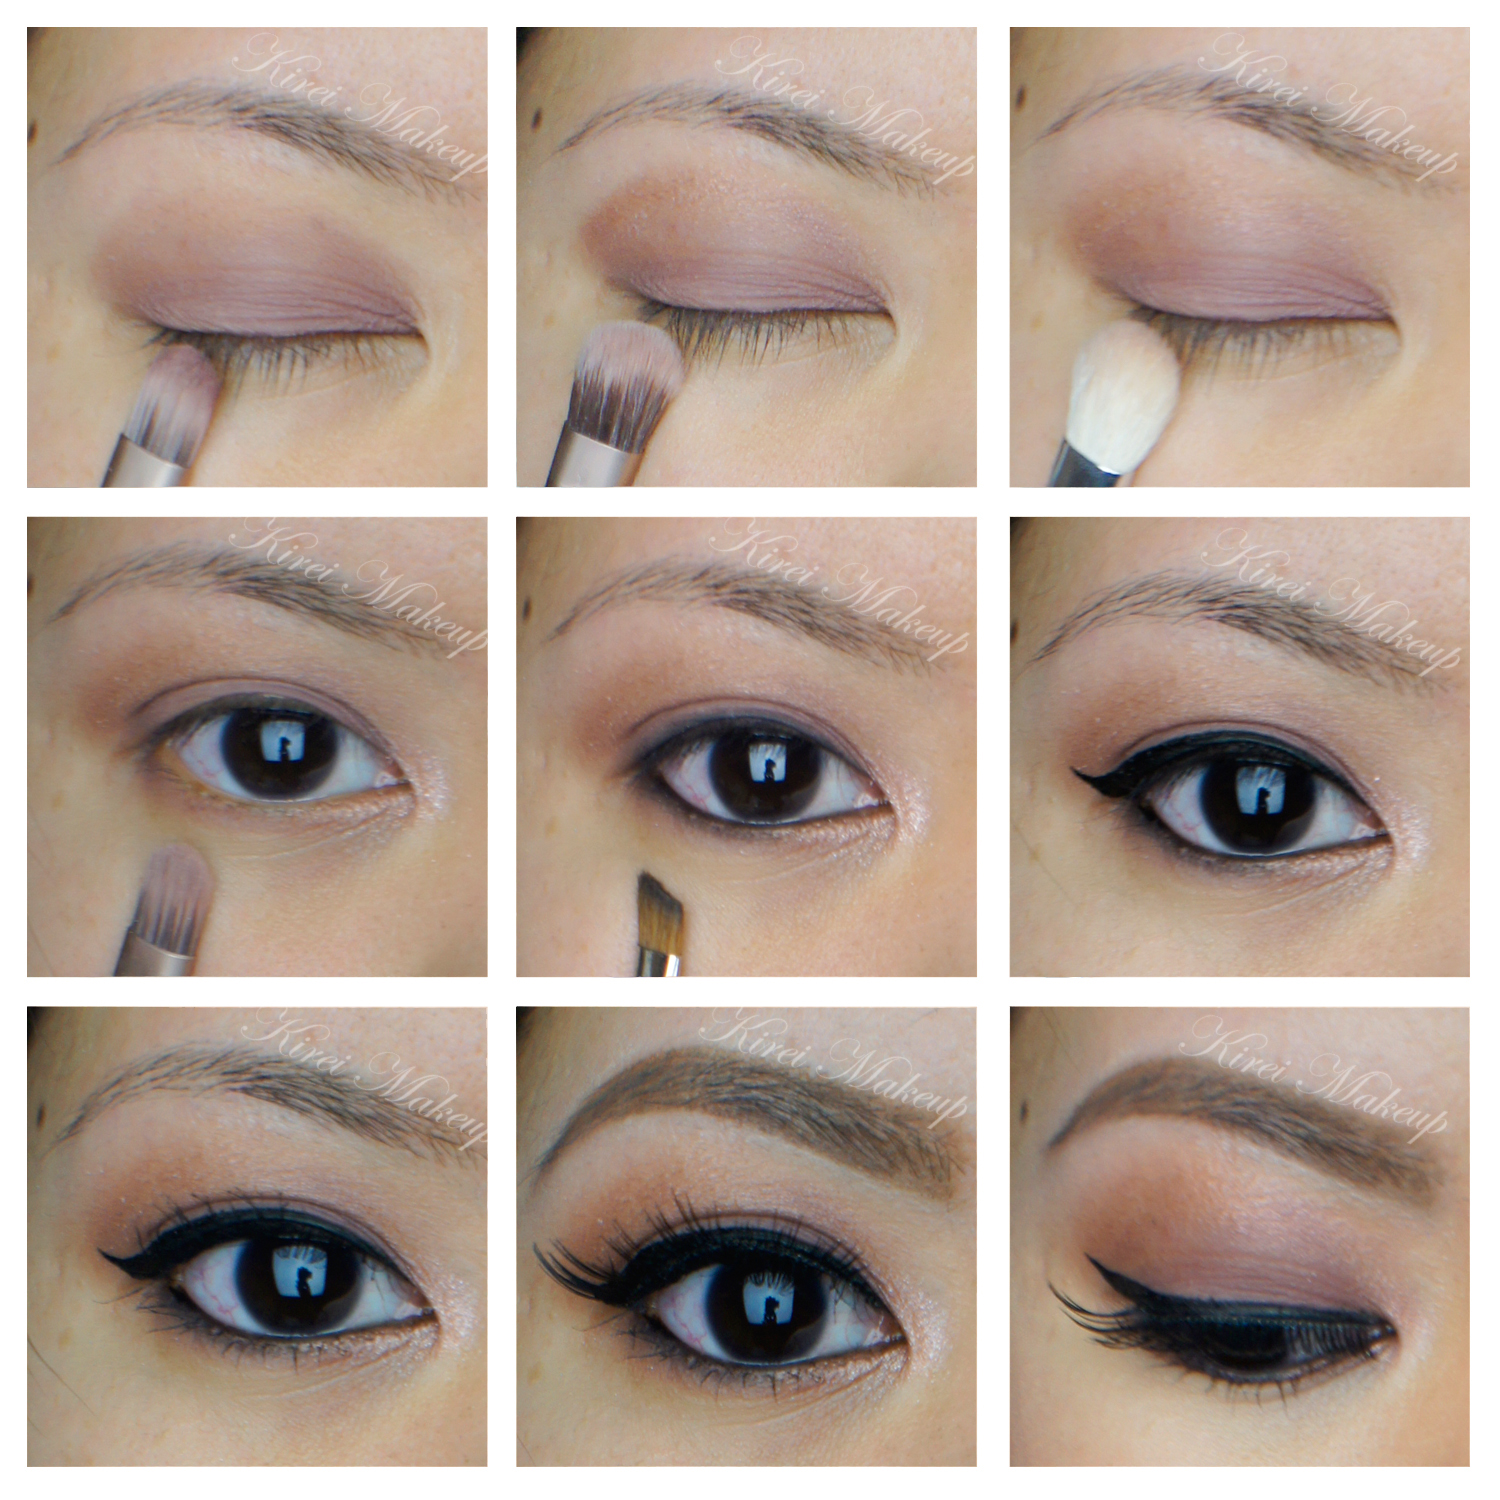
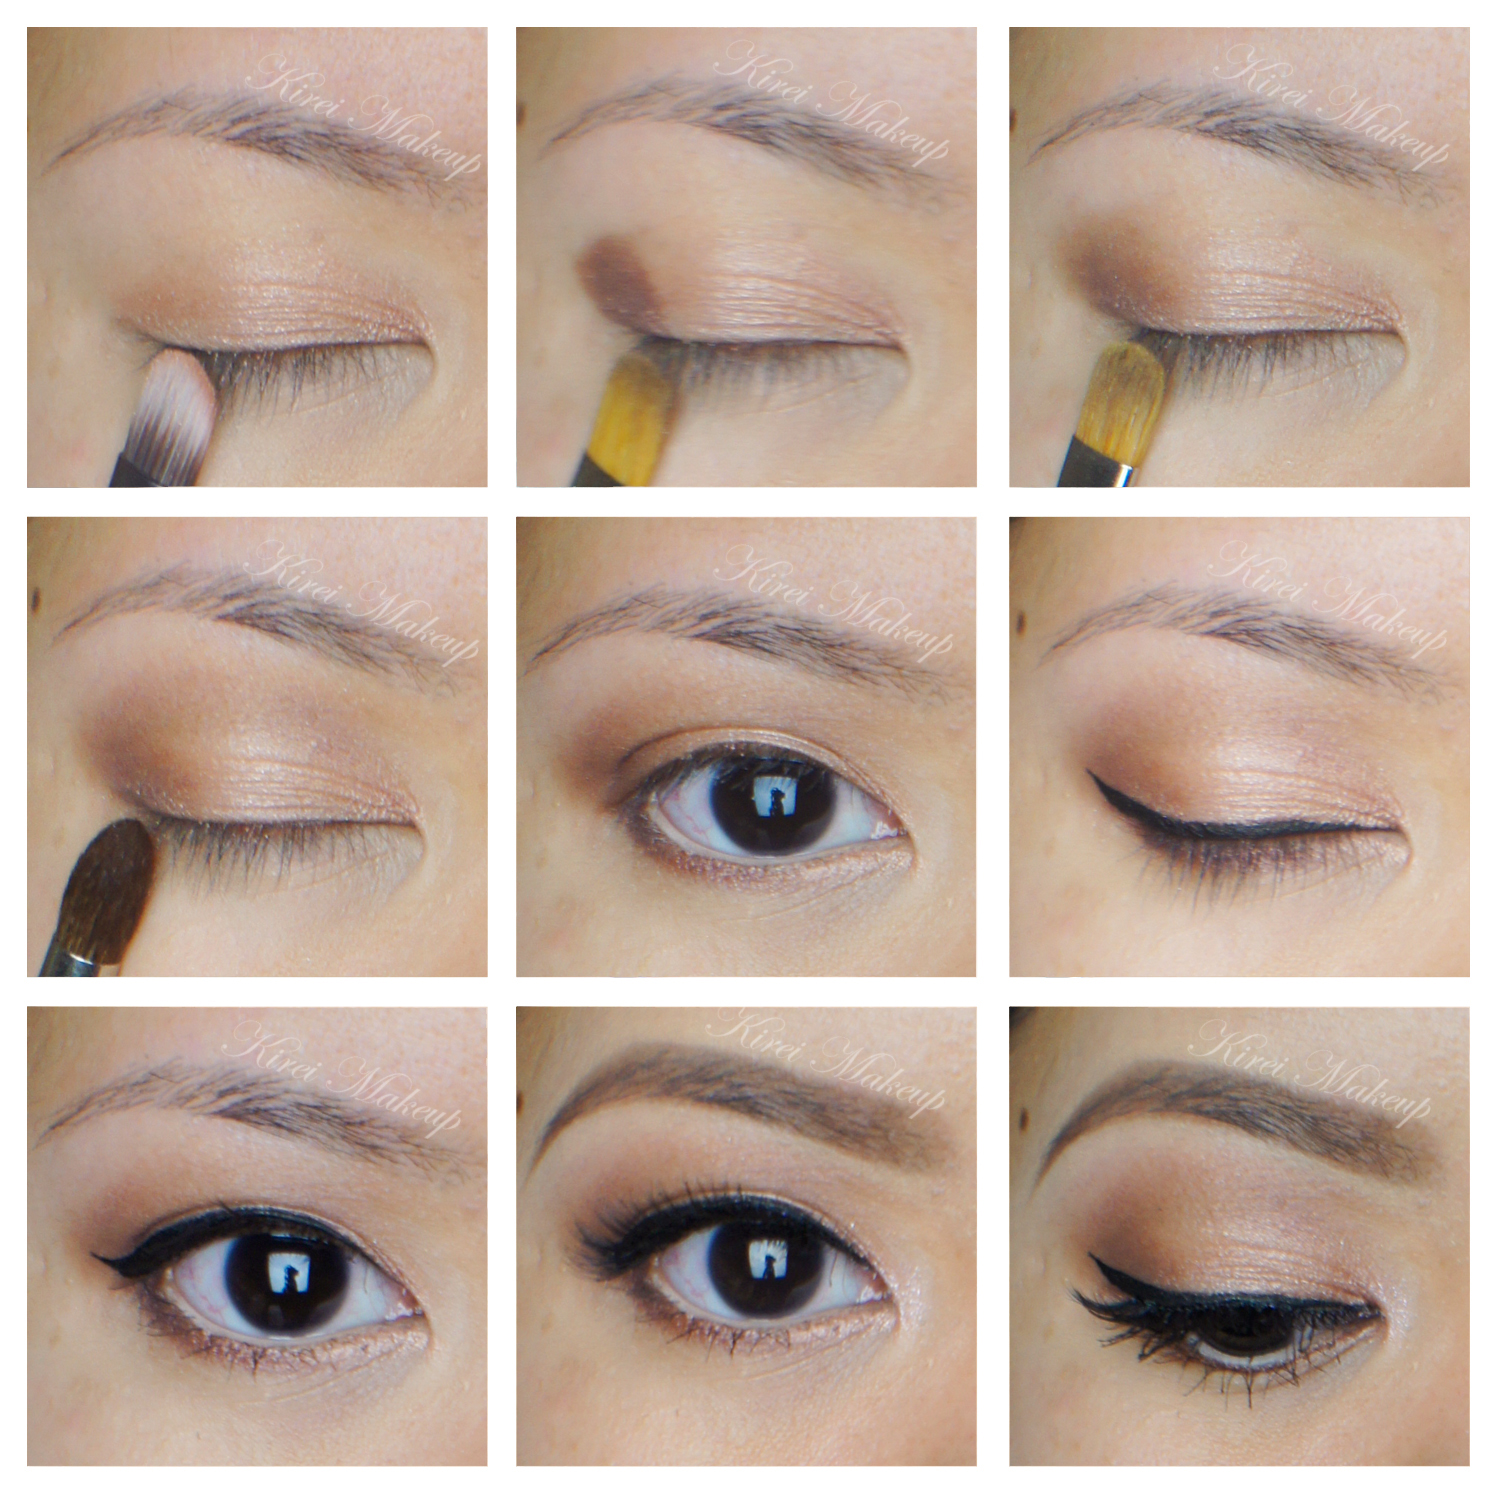
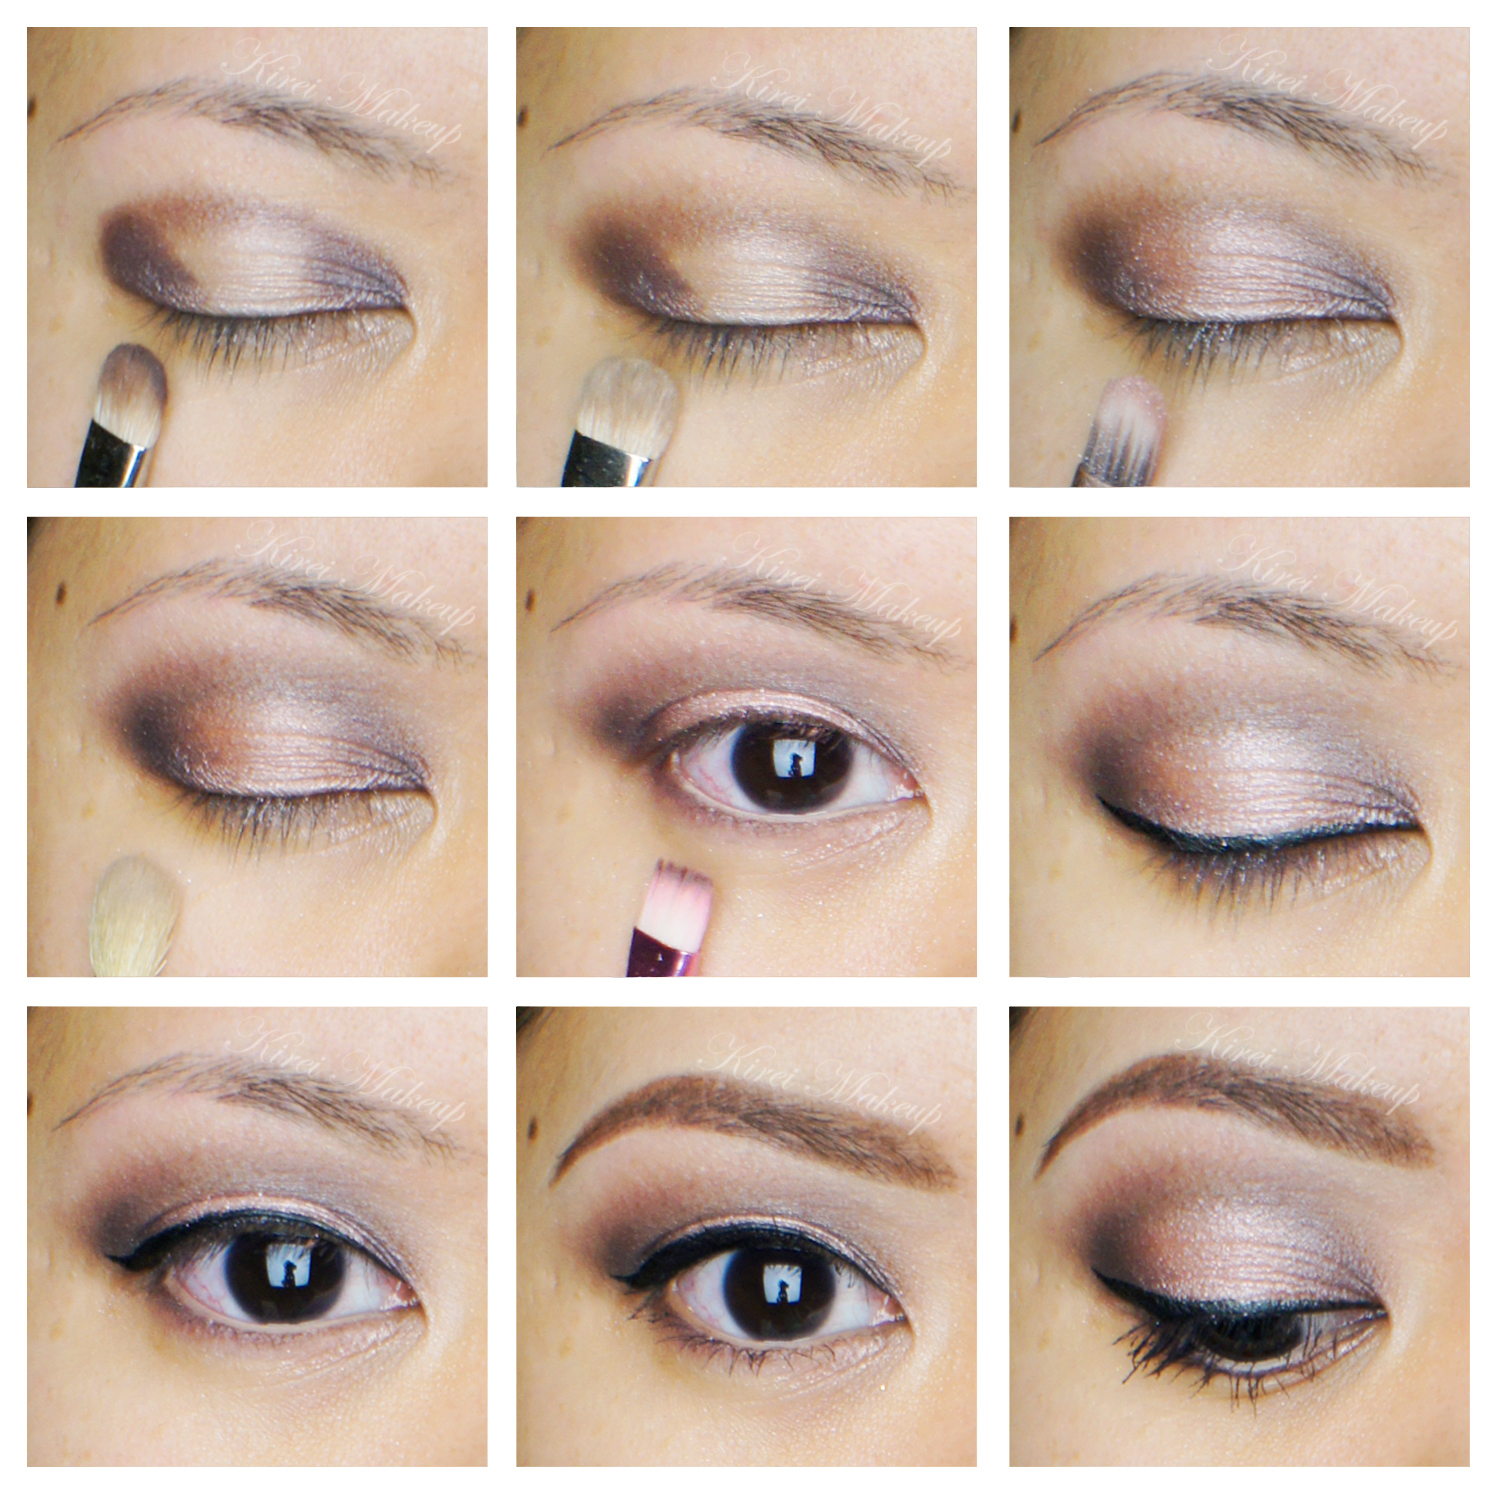
How-to:
1. I applied MAC Perky paint pot all over my (mobile) eyelid using my ring finger.
2. Using a small blending brush, I applied UD Naked 3 Darkside on the outer V.
3. Using the blending brush that came with the palette, I applied Nooner on the crease. I used this shade to blend out the edge of Darkside.
4. I applied Trick on the eyelid, using the flat eyeshadow brush that came with the palette.
5. Using a small shader brush, I applied Burnout on the inner corner of the lower lid, and Darkside on the outer half.
6. I, very lightly, applied a teeeensy bit of Blackheart right on the roots of the lower lashes (just the outer half).
7. I lined my waterline using MAC Chromagraphic eyeliner in NW25/NC30. Along the upper lash line, I created a winged liner using L’oreal 24H Lacquer Liner and an angled eyeliner brush.
8. I filled my brows using Anastasia Brow Wiz in Taupe and Brunette.
9. Curled my lashes, and applied Gwiyomi False lashes no. 3.
10. I applied Benefit Porefessional primer all over my face.
11. While letting the primer set, I applied Bobbi Brown Peach Corrector underneath my eyes (my dark circles are getting prominent lately!)
11. Then, I applied MUFE HD Foundation in 120 using Real Technique Expert Face brush.
12. I applied MAC Pro Longwear Concealer under my eyes, as well as on the bridge of my nose (just between the brows).
13. I also applied L’oreal Visible Lift blush in Rose Gold on my cheeks.
14. I set my face using NARS Setting Powder.
15. On my lips, I applied MAC Please Me lipstick and a few dabs of clear gloss.
Products used
Eyes – MAC Perky paint pot; Urban Decay Naked 3 palette (eyelid: Trick, outer V/lower lashline: Darkside, inner corner of lower lid: Burnout; roots of lashes: Blackheart); MAC Chromagraphic liner NW25/NC30; L’oreal 24H Lacquer Liner in Blackest Black; Anastasia Beverly Hills Brow Wiz in Taupe and Brunette; Gwiyomi False lashes no. 3
Face – Benefit Porefessional primer; MUFE HD Foundation in 120; Bobbi Brown Peach Corrector; MAC Pro Longwear concealer; NARS Setting Powder.
Cheeks – L’oreal Visible Lift Blush in Rose Gold.
Lips – MAC Please Me lipstick; L’occitane clear lip balm.
Rosy Mauve Makeup using Urban Decay Naked 3
Today’s tutorial is a requested look from one of my followers on Instagram through direct message. She wanted an Urban Decay Naked 3 look that’s not too smoky. I created this rosy mauve makeup using Urban Decay Naked 3 for her, so I hope everyone will enjoy it!
The look is very simple. However, I decided to add the winged liner and Gwiyomi lashes for some added drama for the camera. I also, recently, just bought CoverFX cream foundations, so I decided to play around with it for highlighting and contouring as well. I’m going to do a review soon for the CoverFX products.
Anyways, let’s get the tutorial started! You can skip the winged liner and eyelashes, feel free to omit some of the steps to make it suitable for you!
How-to:
1. I prepped my eyelid using UD Primer Potion. Then, I applied Nooner on my eyelid using the flat eyeshadow brush that comes with the UD Naked 3 palette.
2. I applied Liar on the crease using the blending brush end from the Naked 3 palette.
3. Using Crown Brush Pro Blending Fluff C433, I blended out the edge of Liar so there’s no harsh edge.
4. Using the tip of the flat eyeshadow brush from UD Naked 3 palette, I applied Nooner on the lower lid. I also applied Trick on the inner corner of my eyes.
5. I lined my waterline, tightline, and upper lash line using Urban Decay 24/7 Glide-on Eyeliner in Perversion.
6. Using an angled eyeliner brush, I applied Blackheart along the upper and lower lash line. If I wear this makeup to go out I definitely would stop here and go on to mascara and my eyebrows.
7. I created a winged eyeliner using L’oreal Super Liner Ultra Sharp Tip.
8. I curled my lashes and applied Cover Girl Lash Blast mascara on both top and bottom lashes.
9. I applied Gwiyomi Sarah false eyelashes, and filled in my brows using Anastasia Brow Wiz in Ash Blonde and Brunette.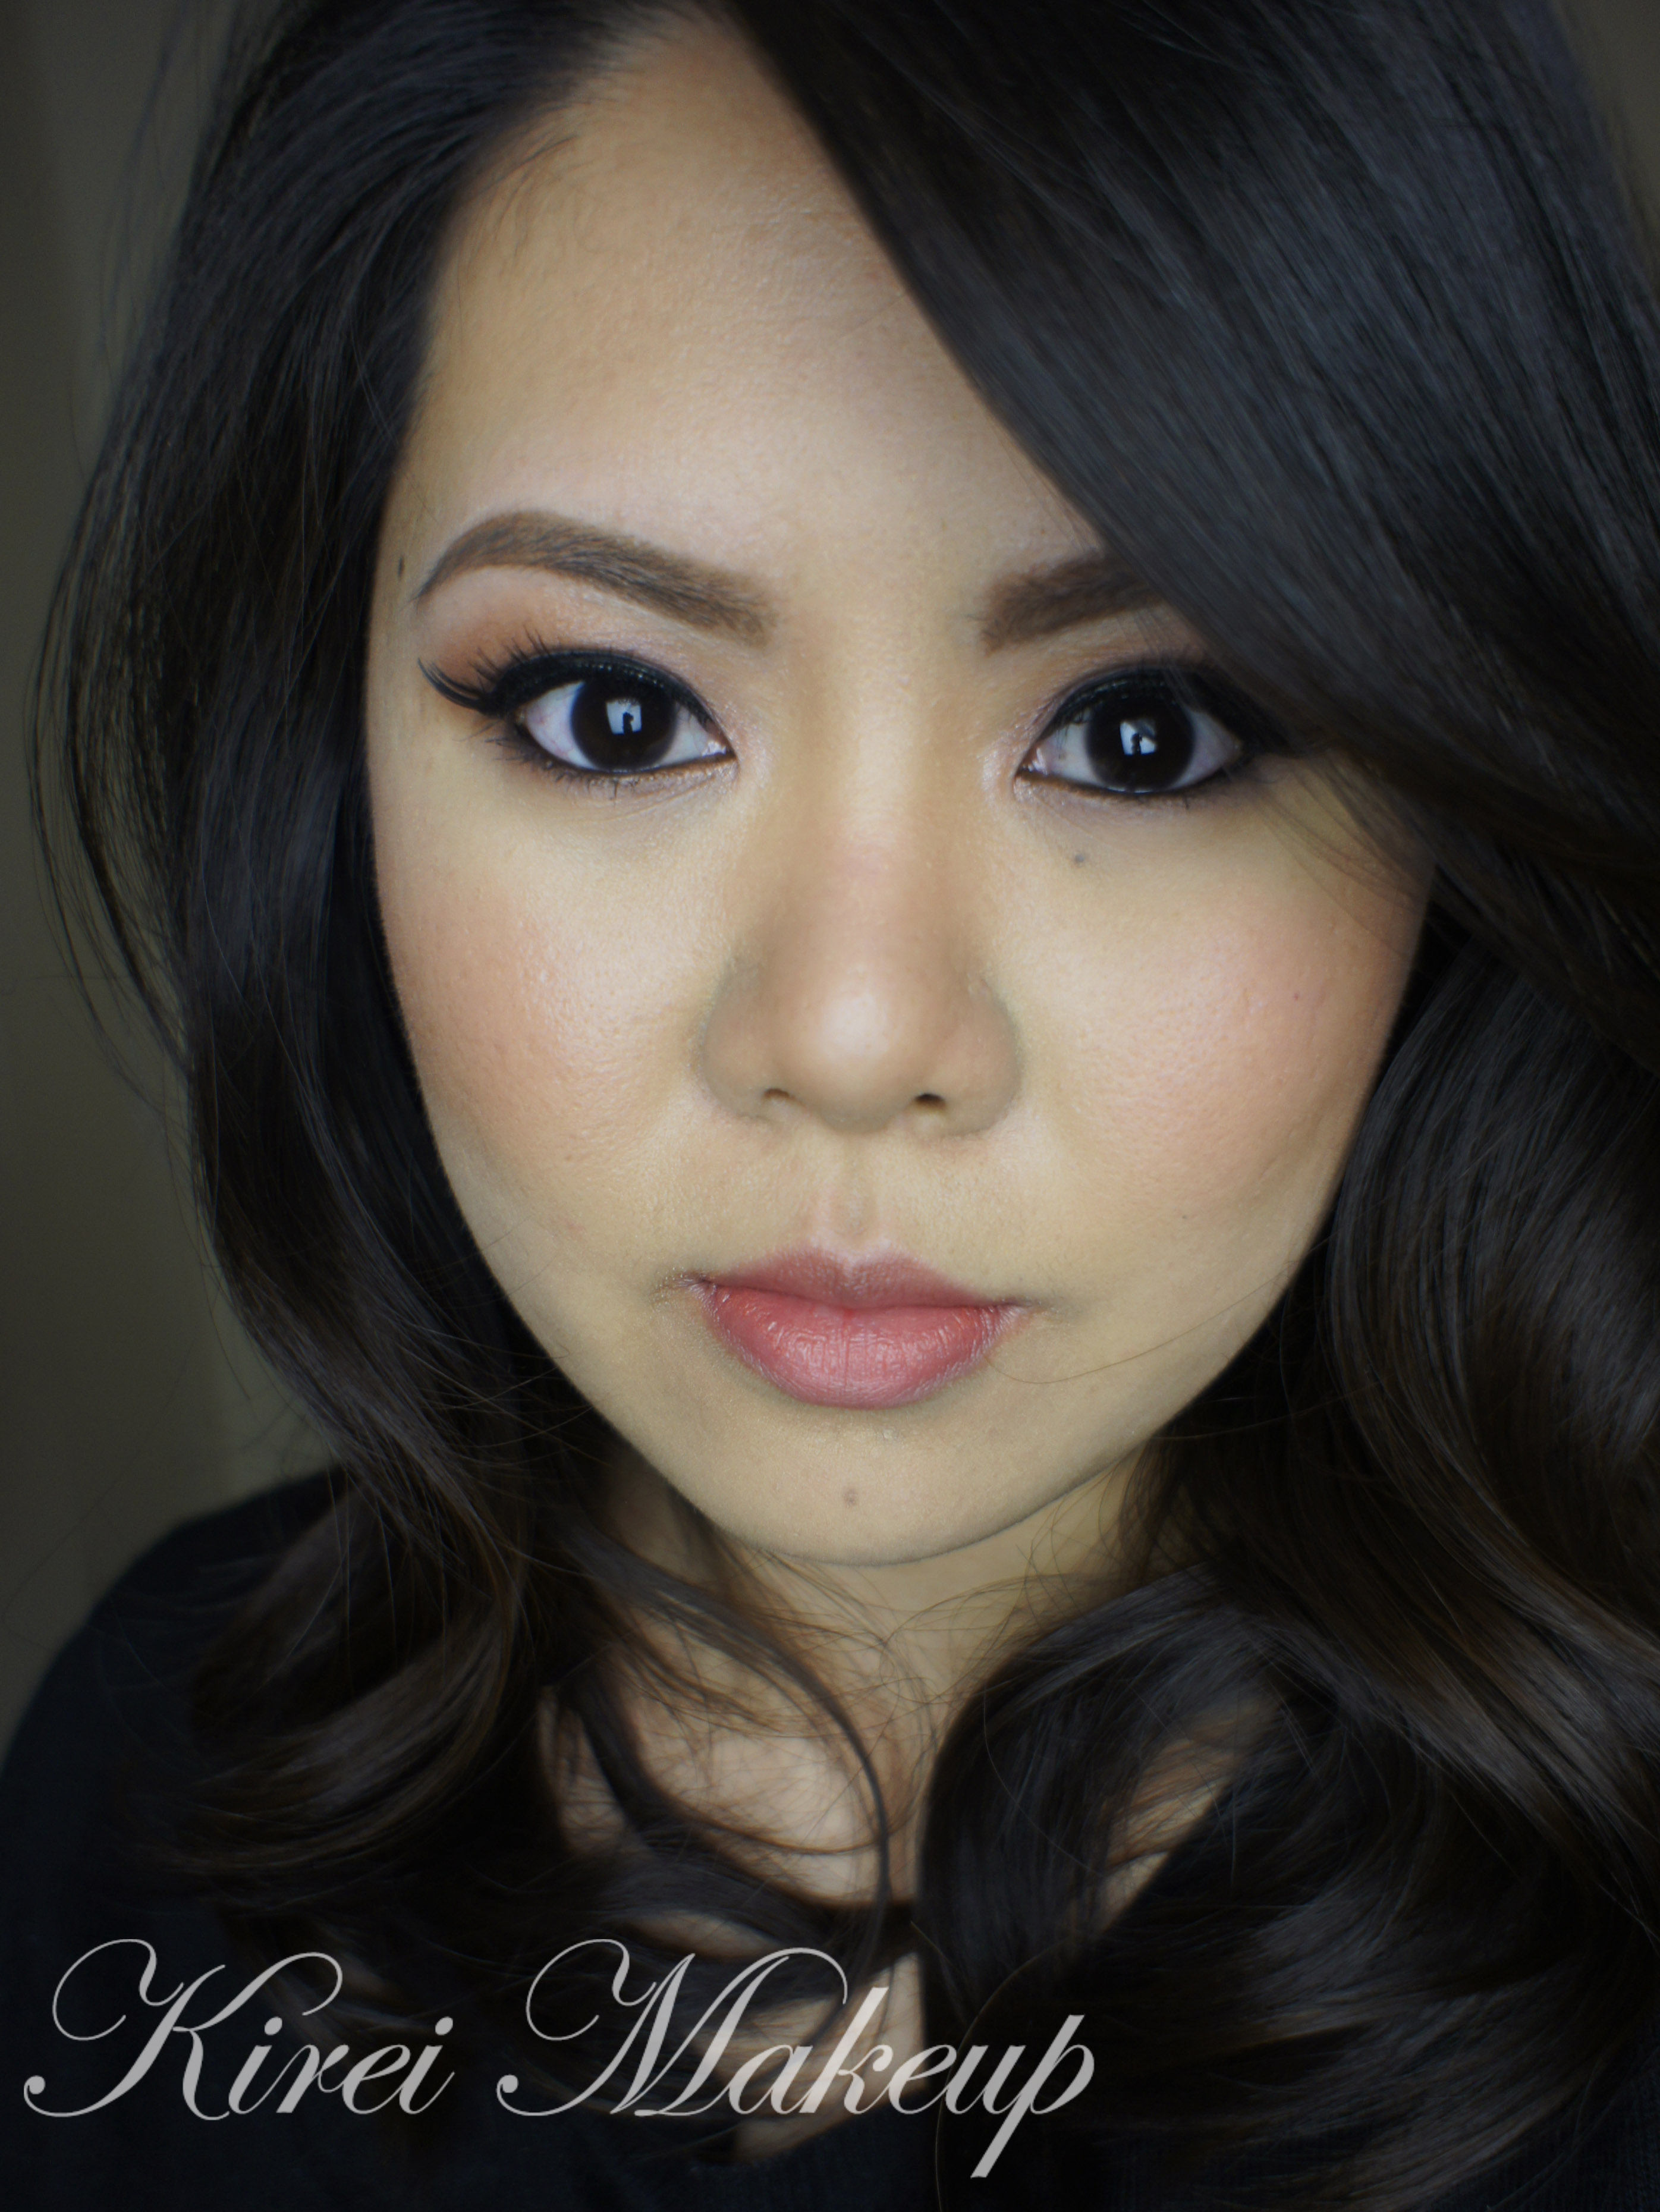
10. On my face, I applied CoverFX Cream Foundation in G40 using their cream foundation brush.
11. I highlight using CoverFX G20, and contoured using N110 (will do a tutorial on how to do this next time).
12. I set my face using NARS Setting Powder.
13. I applied Benefit Hervana on my cheeks as blush.
14. On my lips, I applied Clinique Chubby Stick Lip Balm in Mega Melon.
Products used
Eyes – UD Naked 3 palette, UD 24/7 Glide-on eyeliner in Perversion, L’oreal Super Liner Ultra Sharp Tip, Cover Girl Lash Blast mascara, Gwiyomi Sarah false eyelashes, and Anastasia Brow Wiz (Ash Blonde+Brunette)
Face – CoverFX Cream foundation (G40, G20, N110), NARS Setting Powder, Benefit Hervana blush, and Clinique Chubby Stick Lip Balm Mega Melon.
Valentine’s Day Makeup using UD Naked 3
Update Jan. 13, 2016: I have a new Valentine’s day tutorial on youtube using UD Gwen Stefani palette! Come check THIS VIDEO OUT if you haven’t already.
Happy mid-week, everyone! Valentine’s day is just a few weeks away, and I wanted to create a soft, feminine makeup using UD Naked 3. This Valentine’s Day makeup is girly, warm, and rose-hued. The eyes are made to look bigger and brighter. I’ll do another smoky eyes tutorial using UD Naked 3 for Valentine’s day next time.
I know I’ve been using UD Naked 3 a lot, but I can’t help it! It’s so pretty and gorgeous, how can I resist it?! It’s one of those palettes that does not have much browns and grey, but at the same time it’s neutral enough to be used daily and in different ways.
I’ve done several different tutorials using UD Naked 3, and you can find it here: Rose Smoky Eyes, Look#2, Rose Smoky Eyes 3, Soft and Romantic, as well as a review in Product of the Week.
I’ve also added a Youtube Video tutorial using UD Naked 3 palette!
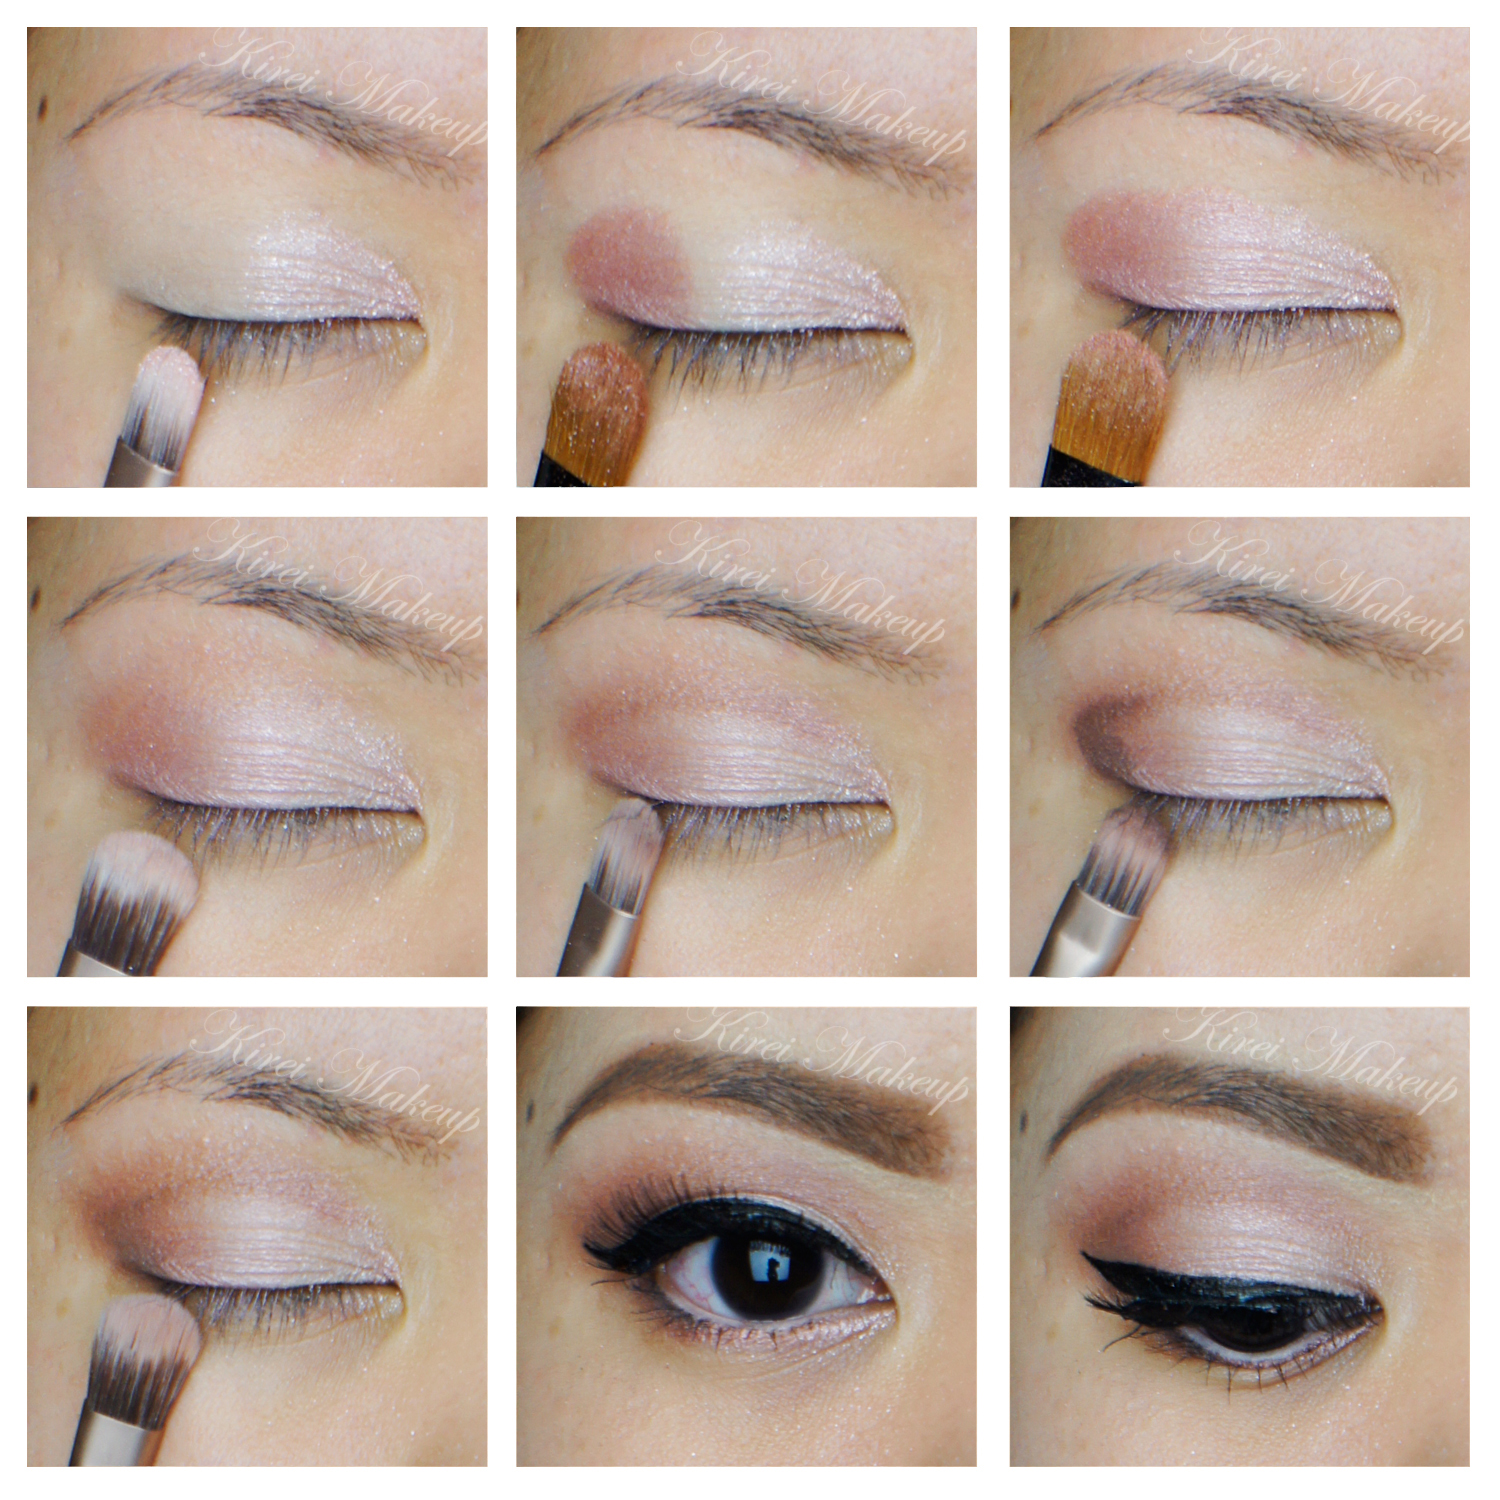
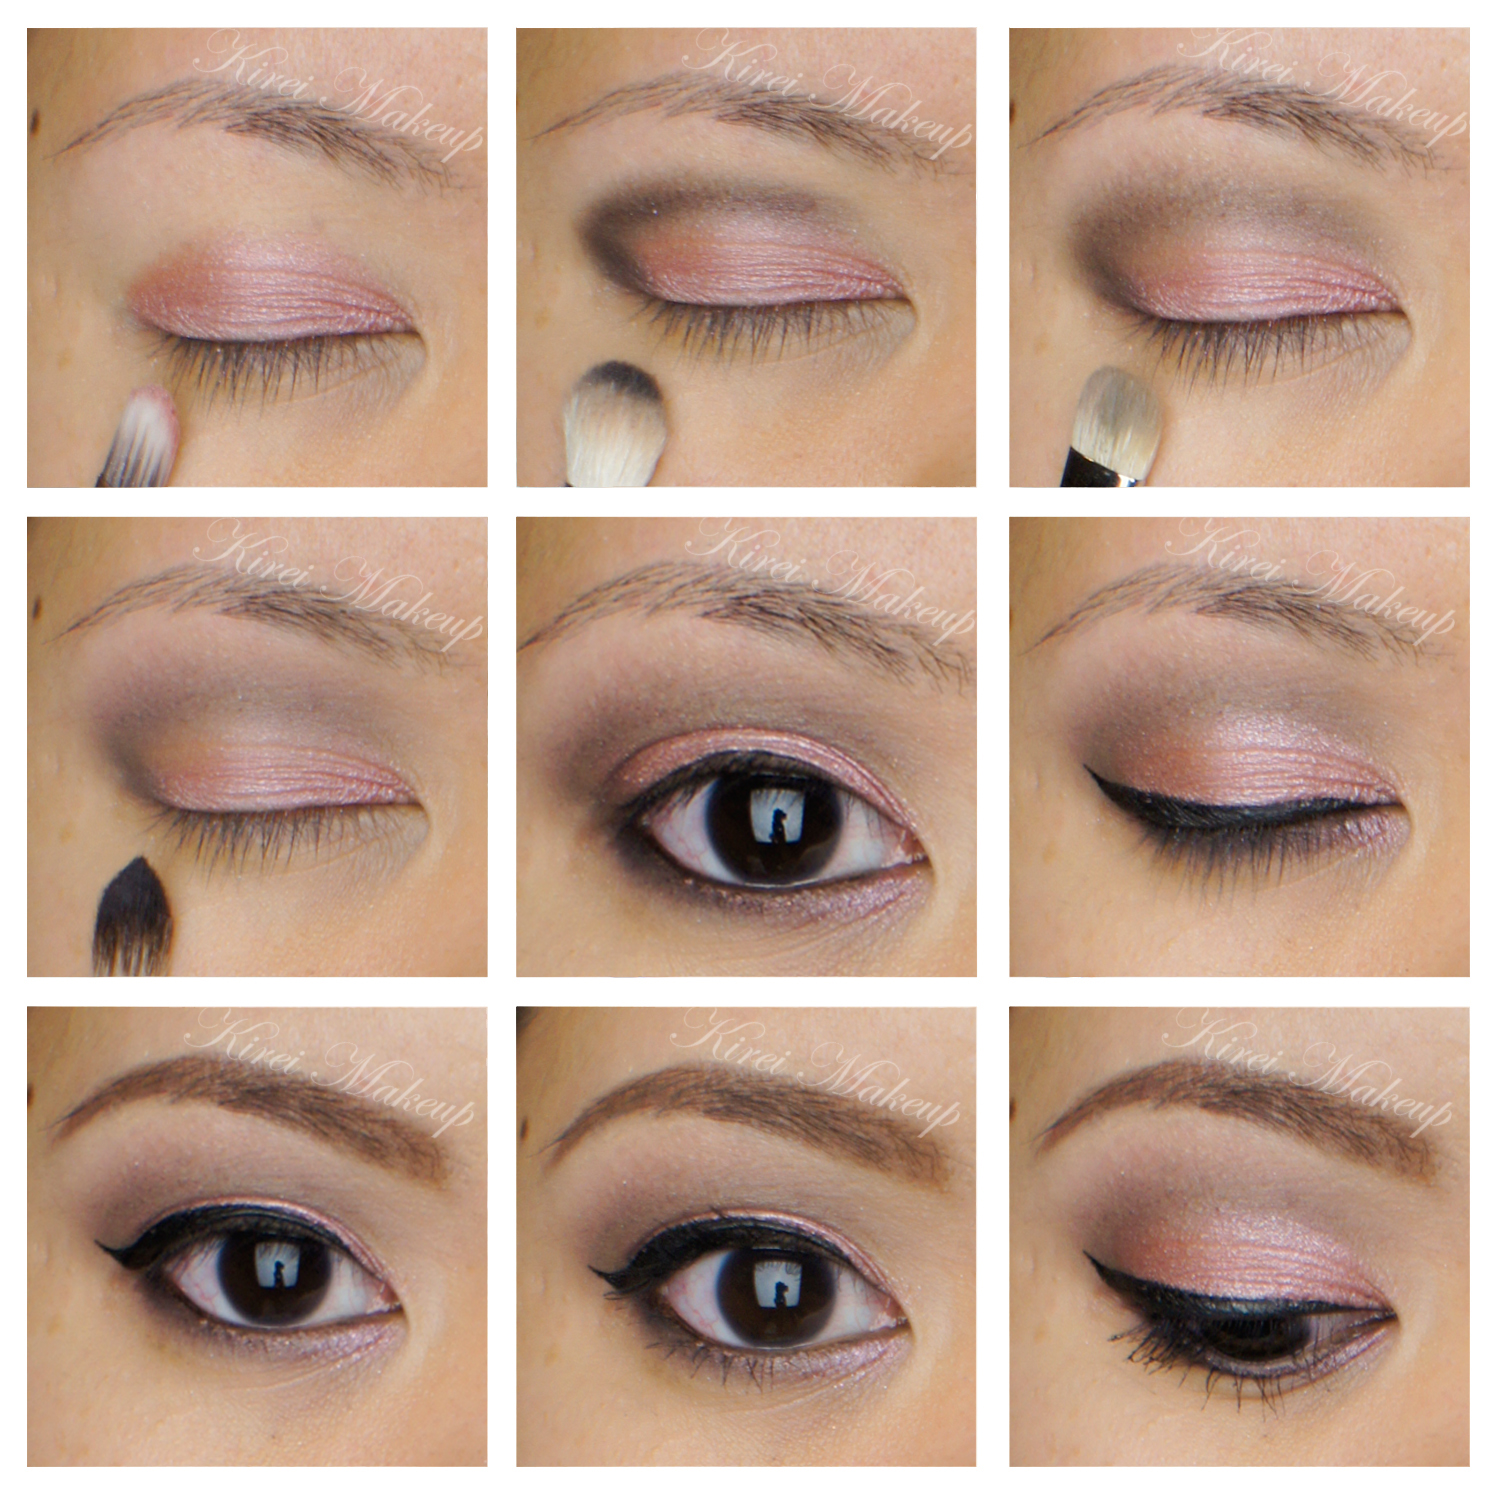
I prepped my eyelids using UD Primer Potion.
How-to:
1. Using a flat eyeshadow brush, I applied Dust on the inner half of the lid.
2. Using a clean flat eyeshadow brush, I applied Buzz on the outer half of the lid, leaving the middle part empty if you’d like. If not, that’s fine as well.
3. Using a flat eyeshadow brush, I applied Burnout to the middle of the eyelid. This will act as a good transition color between Dust and Buzz.
4. Using the tip of a flat eyeshadow brush, I applied Liar on the crease to create a bit of depth without going smoky.
5. I applied Factory on the outer V, and blended it out using a blending brush.
6. On the lower lid, I applied Dust on the inner corner, Buzz in the middle, and applied Factory on the outer half using an angled eyeliner brush.
7. I created a winged eyeliner on the upper lash line using L’oreal Super Liner Ultra Sharp Tip.
8. On the waterline, I applied white end of Revlon Photoready Kajal eyeliner in Cleopatra. I applied the black end of this eyeliner on the outer third of my lower lash line.
9. I curled my lashes and applied Cover Girl Lash Blast mascara. I also applied false eyelashes from Gwiyomi boutique (Indonesia-based).
10. I filled my brows using Anastastia Brow Wiz in Ash Blonde and Brunette.
11. On my face, I applied UD Naked Skin foundation using a Sigma Round Kabuki Brush.
12. I lightly contour my face using MAC Shadowy powder and NARS Ita Kabuki Brush.
13. I applied MAC Cubic on my cheeks.
14. On my lips, I applied MAC Please Me lipstick.
Products used:
- Eyes – UD Primer Potion, UD Naked 3 palette, Revlon Photoready Kajal Intense Eyeliner in Cleopatra, L’oreal Super Liner Ultra Sharp Tip, Cover Girl Lash Blast mascara, Anastasia Brow Wiz in Ash Blonde/Brunette.
- Face – UD Naked Skin foundation, MAC Shadowy powder, MAC Cubic, MAC Please Me.
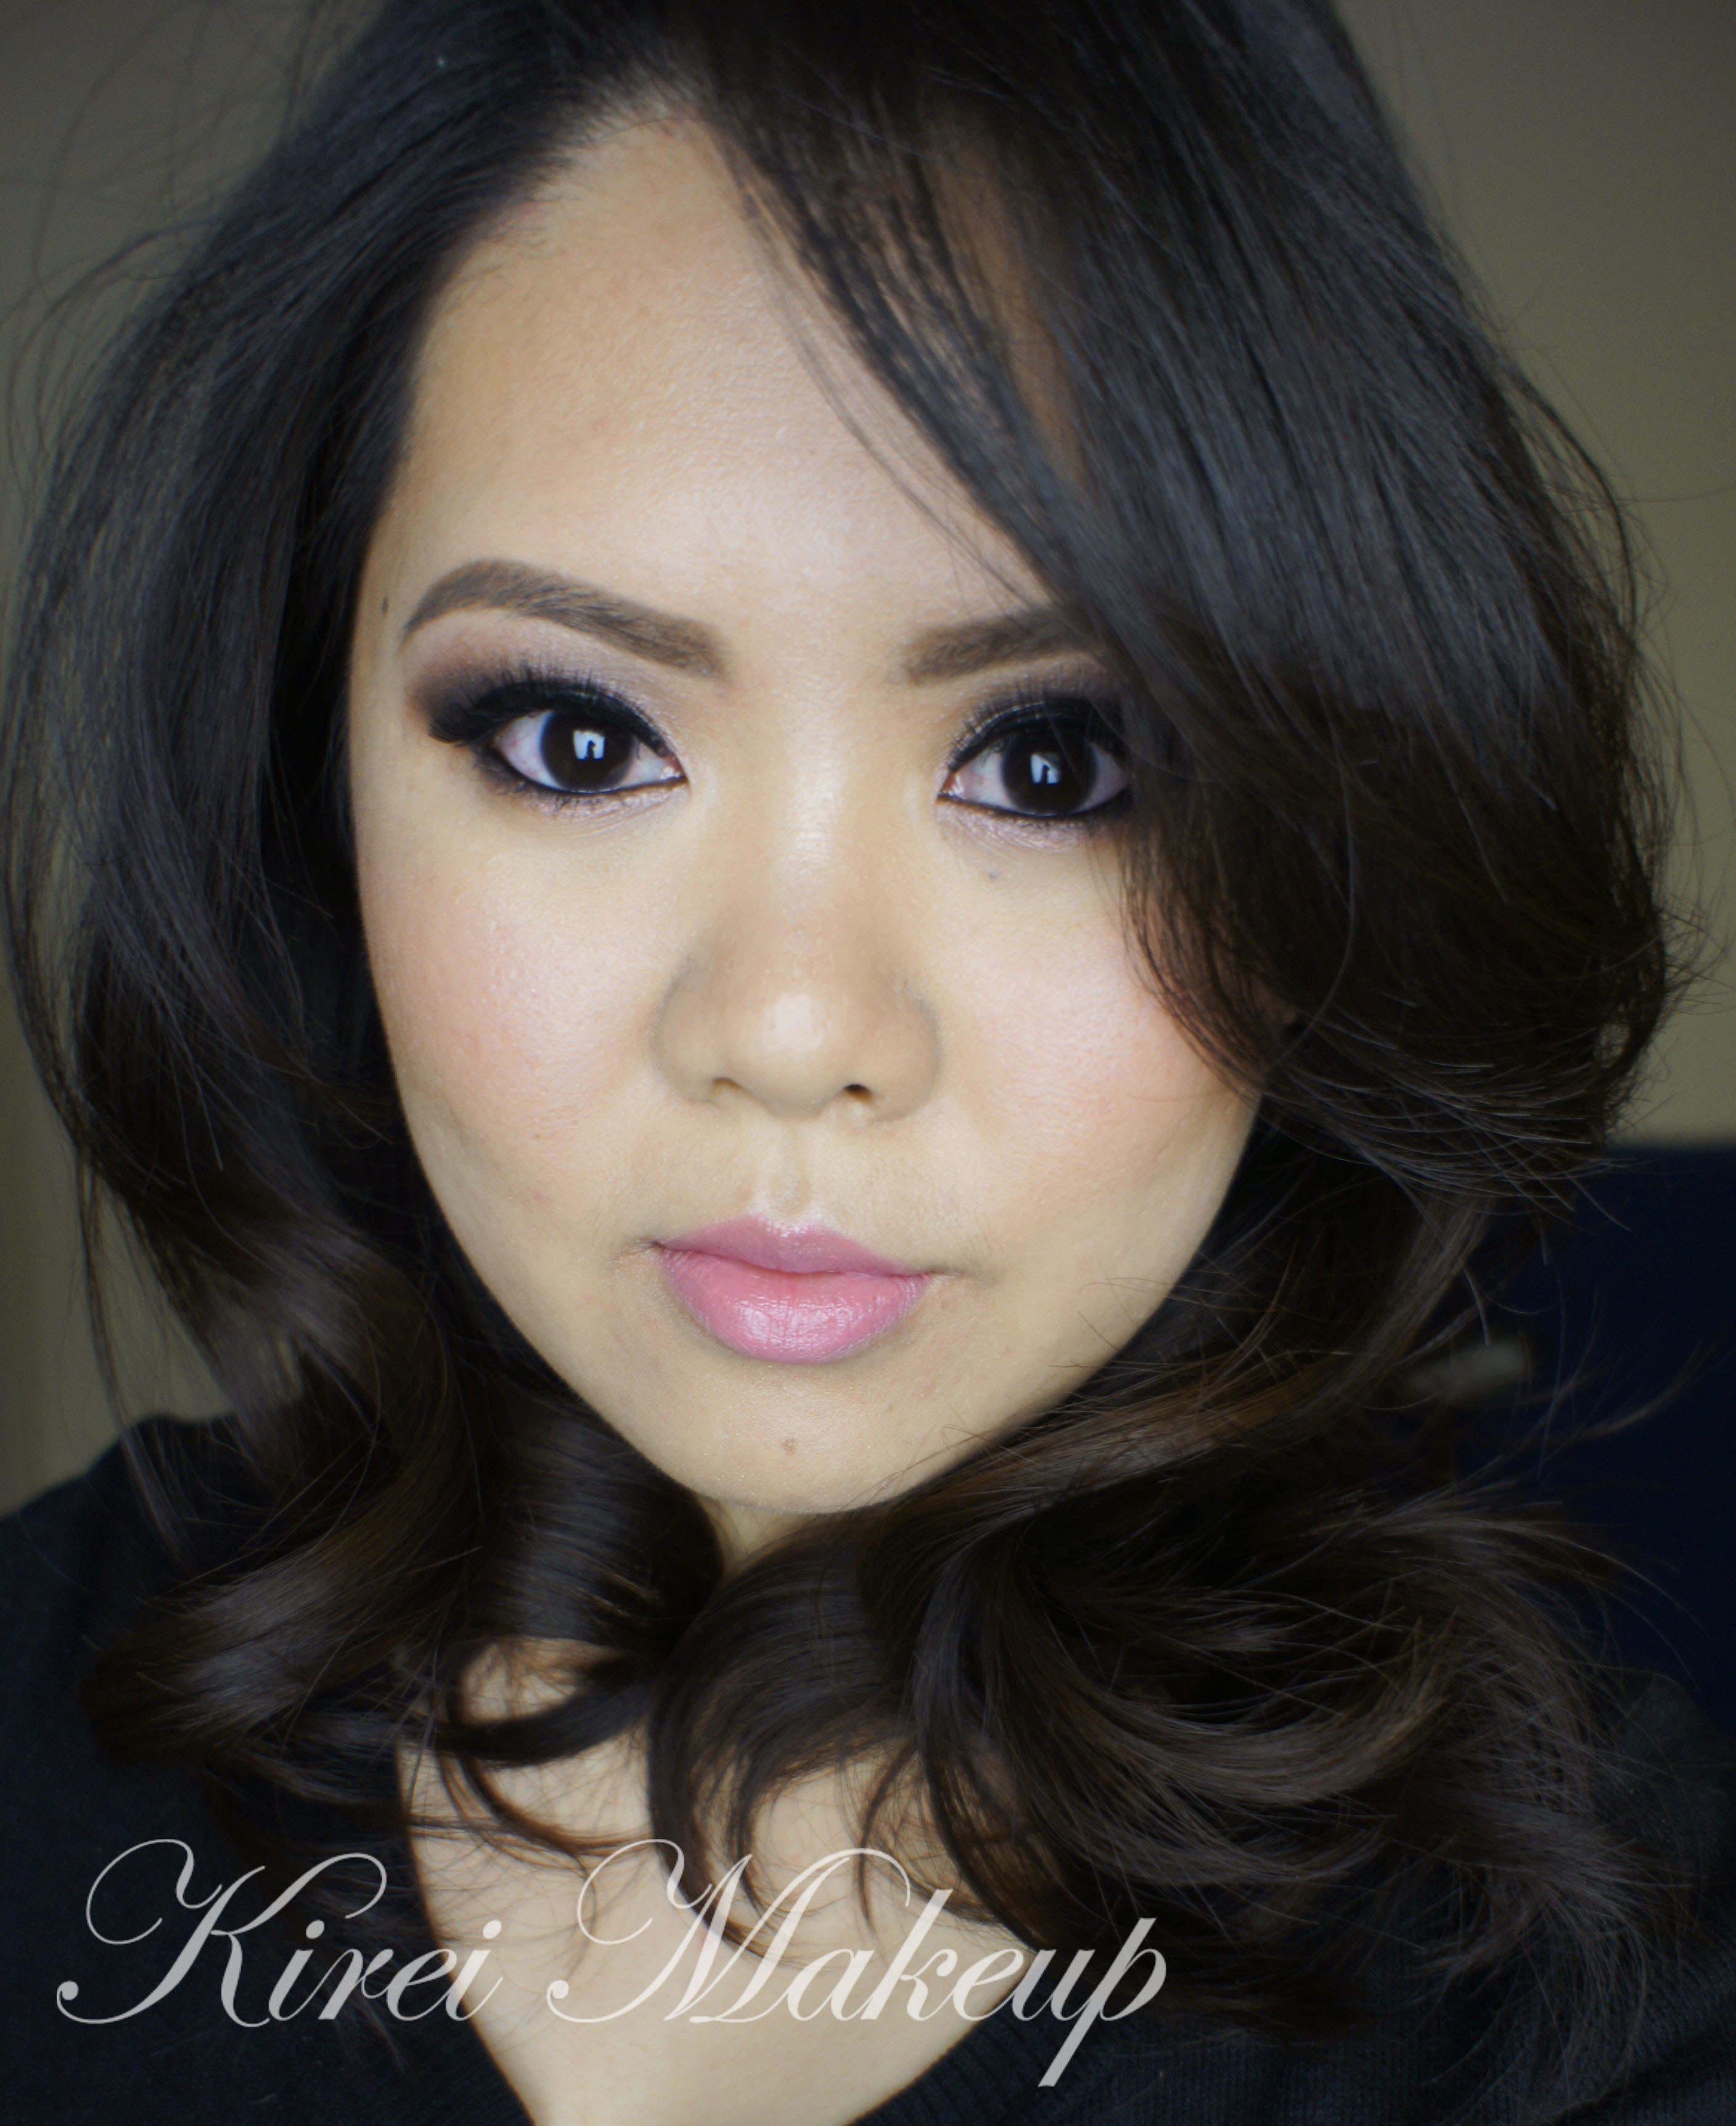
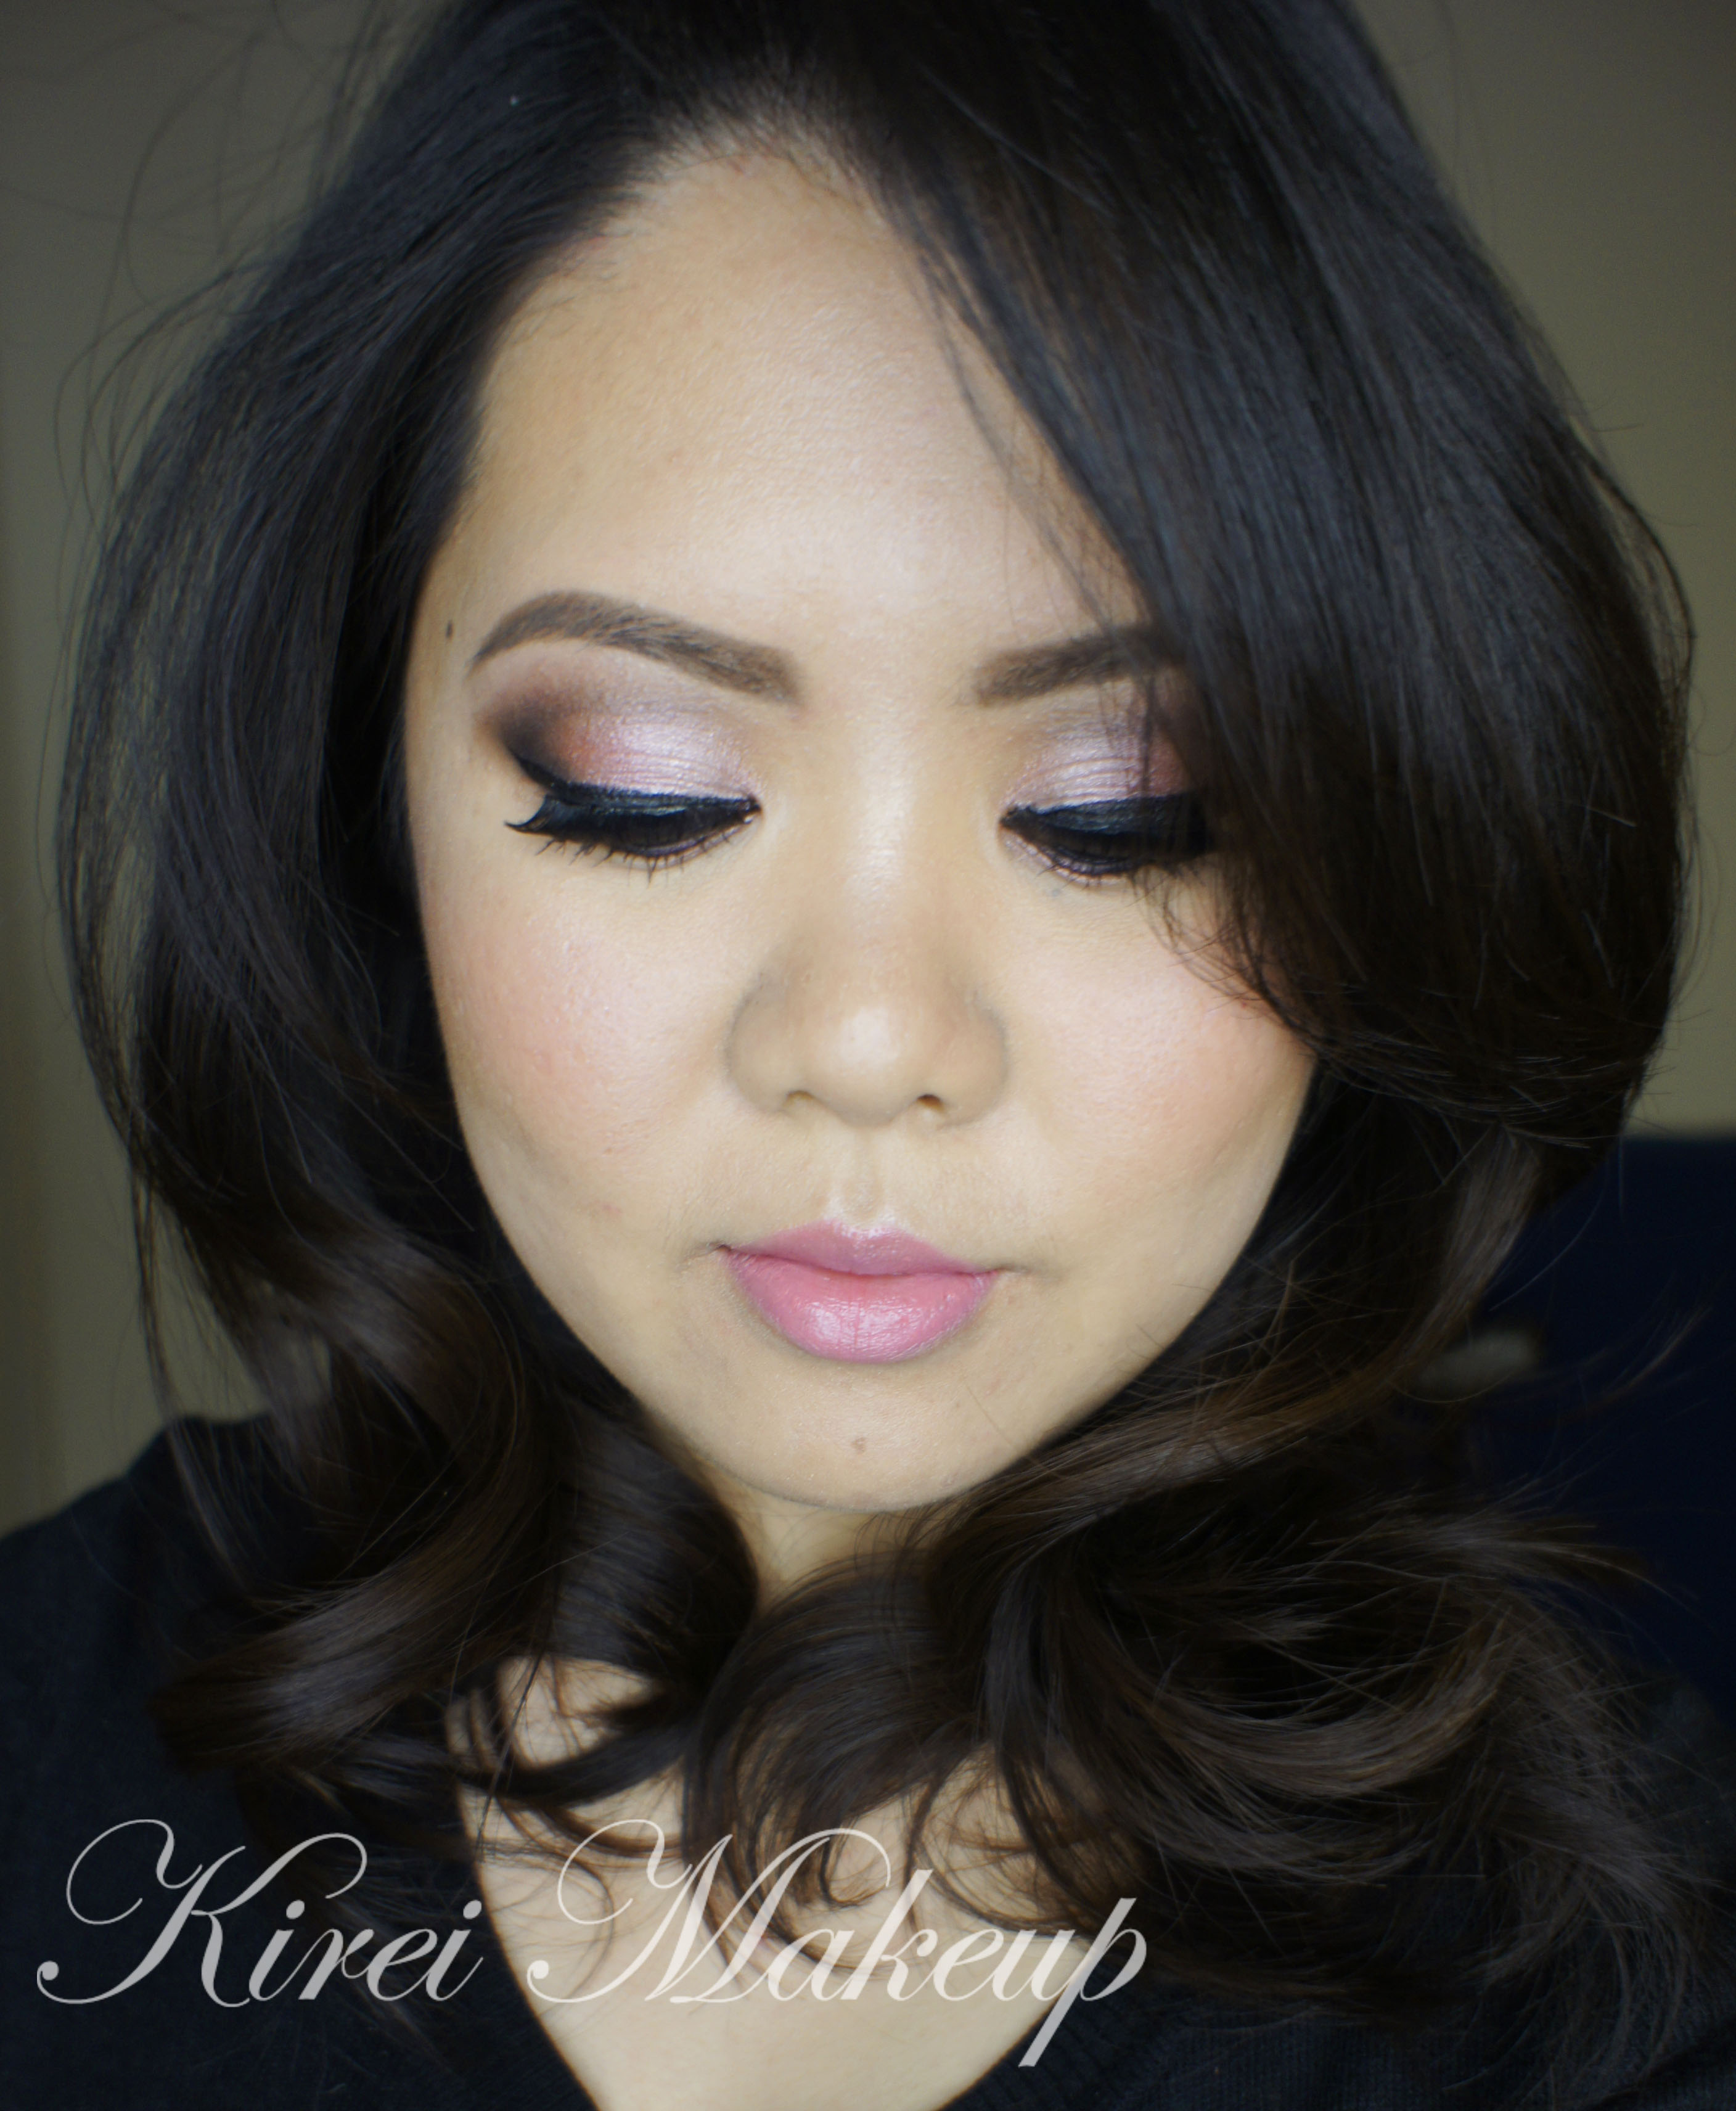
Soft Romantic Makeup using UD Naked 3
I’m sure you guys are getting tired of my UD Naked 3 obsession, but I have to share this look with you just to show how versatile this palette is. Today tutorial, I’m using UD Naked 3 to create a soft romantic makeup which can be used for daily makeup, date makeup, and even bridal makeup.
This look is very pretty and natural looking. The eyes are made to look brighter and bigger looking, while the rest of the face is kept fresh and slightly flushed. I also skip the glossy lips, and opt for a natural looking lip color. Everything about this makeup is about keeping everything to the minimal.
I’ve done something similar to this look in my Chanel Kaska Beige re-visited post. If you prefer a stronger, more intense eye look, please do check my other tutorials using the UD Naked 3 palette
I’ve also added a Youtube Video tutorial using UD Naked 3 palette!
My eyes are prepped using UD Primer Potion, and my face is prepped using Smashbox foundation primer.
How-to:
1. I applied Trick all over my eyelid using a flat eyeshadow brush.
2. Using another clean flat eyeshadow brush, I patted Factory on the outer third of my eyes.
3. I removed excess from the flat eyeshadow brush I used on step 2, and blended Factory towards the center part of the eyes.
4. Using a clean blending brush, I applied Nooner on the crease.
5. I applied Factory along the lower lash line using an angled eyeliner brush.
6. I also applied Dust on the inner corner of the lower lash line using an angled eyeliner brush.
7. I lined my waterline using MAC Chromagraphic pencil eyeliner in NC 15.
8. On my upper lash line, I created a winged eyeliner using Kanebo Kate Super Sharp eyeliner.
9. I curled my lashes and applied Maybelline Great Lash mascara on both upper and lower lashes.
10. I added false eyelashes on the upper lashes to make my eyes appear open and larger.
11. I filled my brows using Anastasia Brow Wiz in a mix of Ash Blonde and Brunette.
12. On my face, I applied Giorgio Armani Maestro foundation and blended it using my fingers.
13. I lightly contoured my face using MAC Shadowy powder.
14. On my cheeks, I applied MAC Well Dressed blush.
15. I added Smashbox Halo wand highlighter in Gold as highlighter.
16. On my lips, I applied Revlon Colorstay Ultimate Suede Lipstick in Socialite.

Product of The Week: UD Naked 3 Review
Finally, I get the chance to do the UD Naked 3 review! As you all know, I LOVE this Naked 3 palette. I’ve done several tutorials with this palette- Rose Smoky Eyes, UD Look#2, Berry lips, and Rose Smoky Eyes 3. I do owned the other 3 palettes, Naked 1, Naked 2, and Naked Basics.
Anyways, I do have to say that this is by far my favorite Naked palette! I absolutely recommend this palette for everyone. The UD Naked 3 palette consists of such soft, rose and gold colored hues. I absolutely love it!
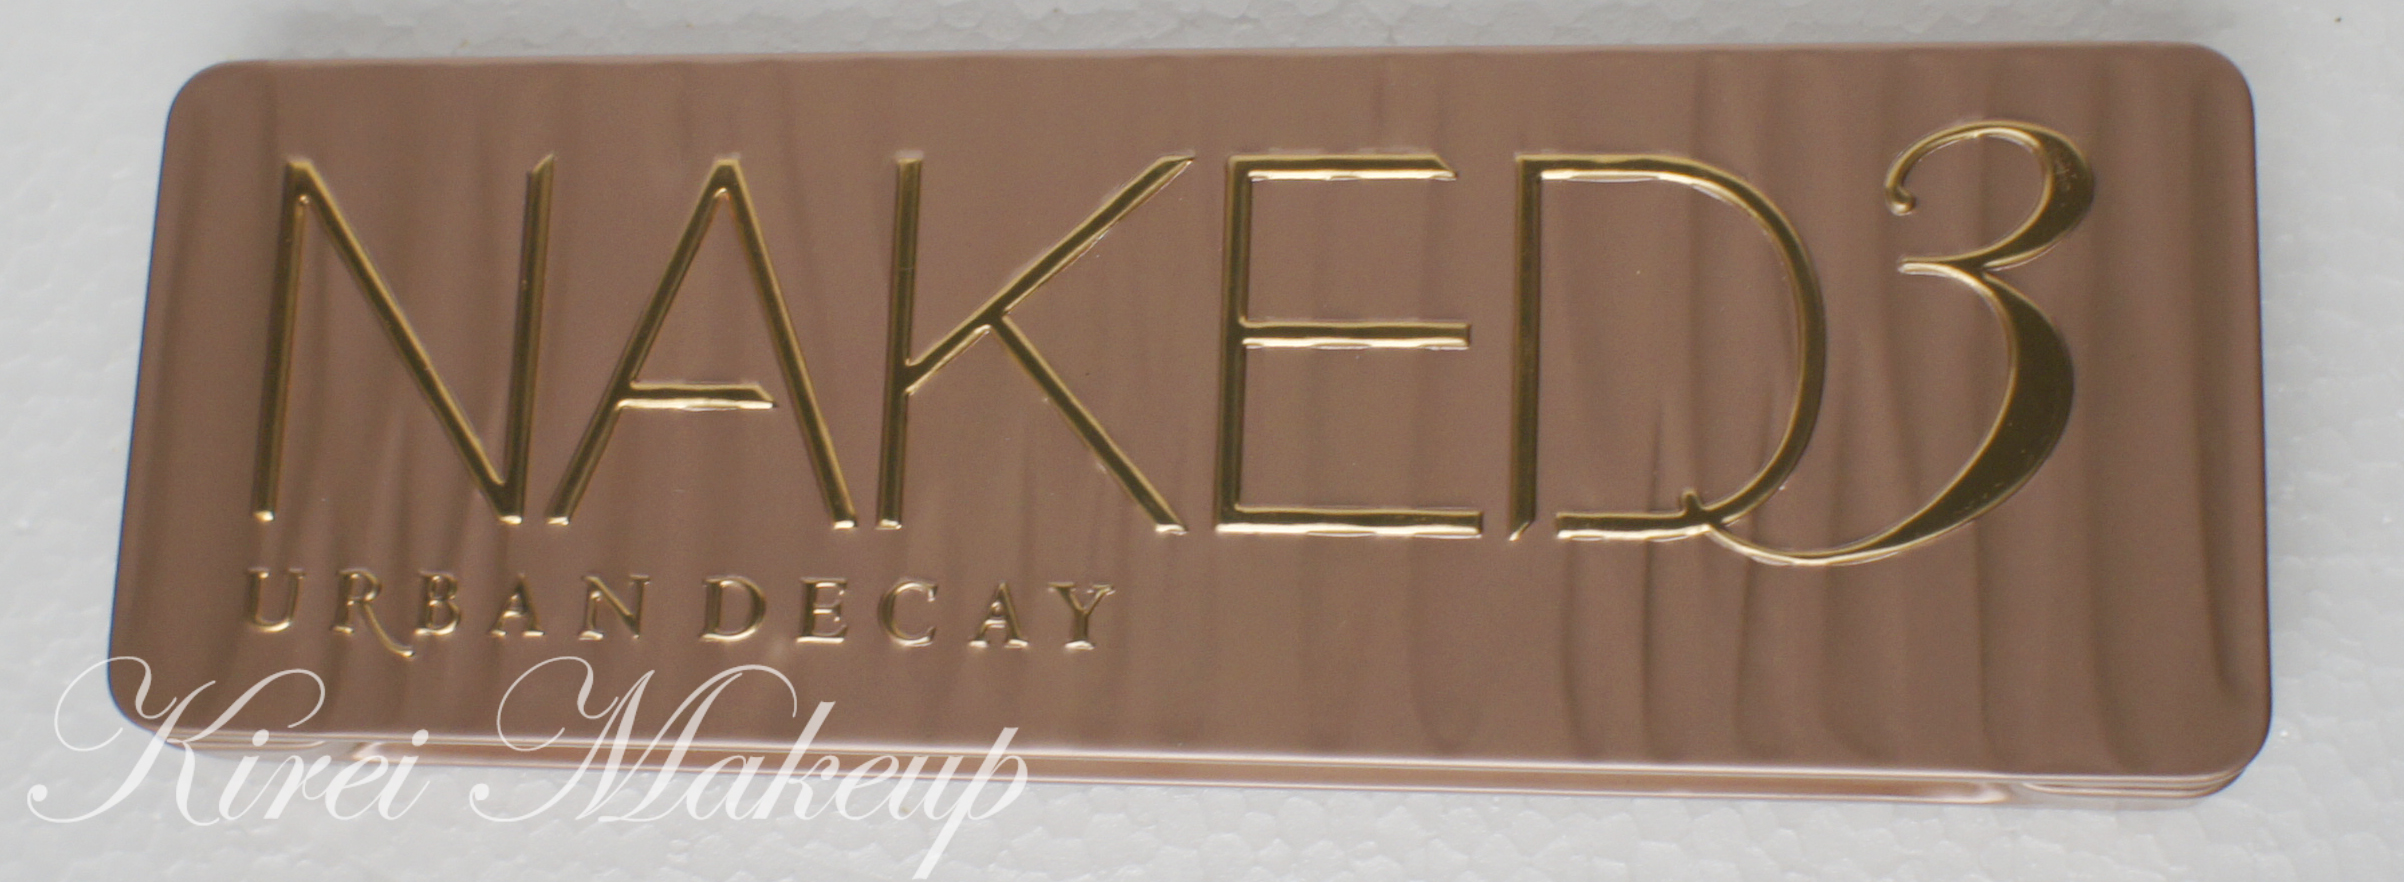
What is the UD Naked 3 palette
“Naked3 debuts 12 insanely beautiful rose-hued neutrals in an impressive range of shades—from pale, shimmery pink to deep black matte with red microglitter—in ultrasmooth matte, pearl, and glimmering metallic finishes. Each shadow features Urban Decay’s Pigment Infusion System™, the proprietary blend of ingredients that gives every shade its velvety texture, rich color, serious staying power, and blendability.”
Packaging
Gold letters embossed on a rose-colored tin case. The eyeshadows are in a rectangular pan, with mirror on the other side.
Longevity
I’ve never worn this eyeshadow without a primer, since I know I do have oily lids. So, with UD Primer Potion primer, the eyeshadows last up to 8-hour with no creasing.

Finish
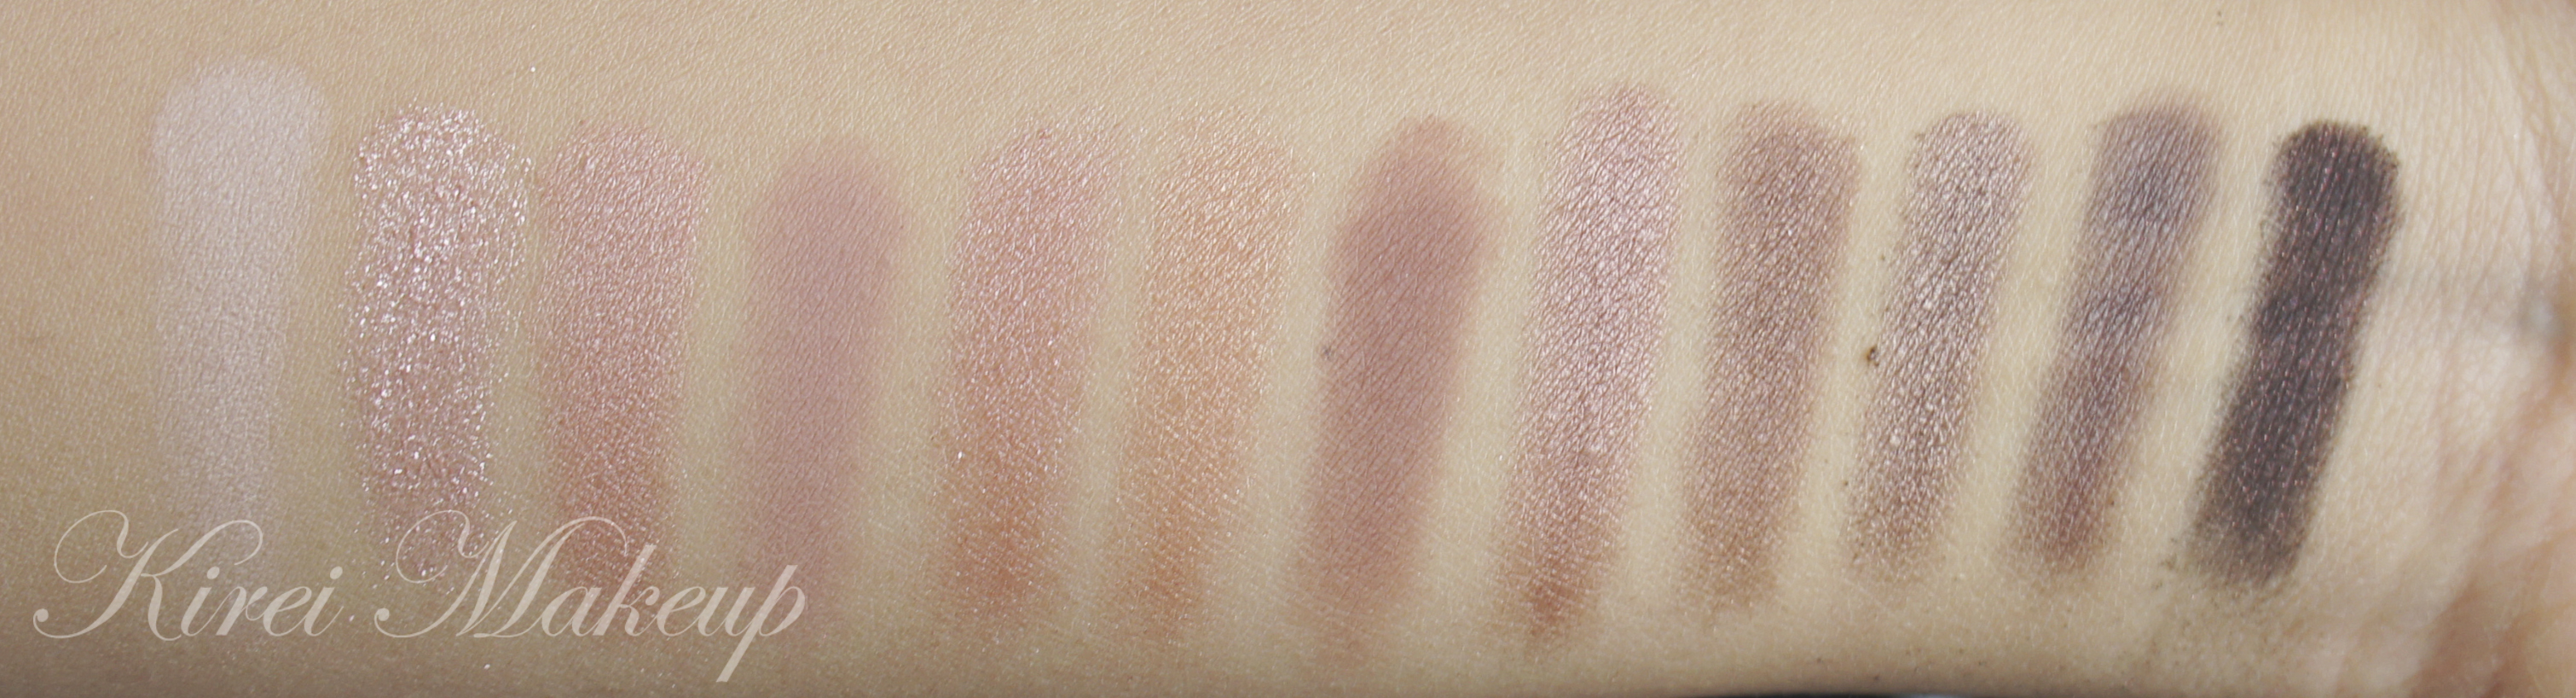
From Left – Right
- Strange: pale neutral pink matte (satin)
- Dust: pale metallic pink shimmer w/iridescent micro glitter (glitter)
- Burnout: light pinky-peach (satin)
- Limit: light dusty rose (matte)
- Buzz: metallic rose shimmer w/silver microglitter (glitter)
- Trick: light metallic pinky-copper shimmer w/tonal microsparkle (shimmer)
- Nooner: medium pinky-brown (matte)
- Liar: medium metallic mauve (shimmer)
- Factory: pinky-brown (satin)
- Mugshot: metallic taupe shimmer w/slight pink shift (shimmer)
- Darkside: deep taupe-mauve (satin)
- Blackheart: smoky black matte w/rosy red microsparkle (matte with sparkle)
Price
CA$52 in Sephora, for 0.05oz x 12 eyeshadows, double-ended makeup brush, and 4 primer potion samples.
Pros:
- Beautiful rose-colored shades
- You get the best of all textures – matte, shimmer, metallic, glitter, and satin
- Great pigment pay-off
- You get neutral shades, so it’s wearable for daily use
- 12 eyeshadows in 1 case!
- You get highlight, medium, contour and eyeliner colors
- Excellent double-ended brush
- 4 primer potion samples that last for up to a week for each
- Works for any skin tones
Cons:
- Blackheart is not dark enough. I find UD Blackout from Naked 2 is a better black eyeshadow than Blackheart
- Dust tends to have a lot of fallout
Rose Smokey Eyes III with UD Naked 3
I think I’ve made my obsession with UD Naked 3 palette pretty clear – I’m in love with it! The colors are wonderful, the pigments are so easy to blend, the double-ended brush is pretty amazing. What’s not to love?! So, to show another appreciation for this palette, I’ve decided to do another the third Rose Smoky Eyes tutorial. This look is far more intense and darker than the first rose smokey eyes that I did. I also think this one is prettier than the 2nd smoky eyes that I did with Naked 3. If you prefer a more natural looking one, I do have a post for you in my Berry Lips post.
I’ve also added a Youtube Video tutorial using UD Naked 3 palette!
This look is perfect for those who’re not afraid to play with the darker color, and already feel comfortable with blending. You can make it even darker and more intense if you’d like by adding a matte black eyeshadow (i.e. MAC Carbon) on the outer V. I like doing it this way since I want to showcase the Rose eyeshadow.
I hope you enjoy this look! I know a lot of people on Pinterest enjoyed my first tutorial! I’m so grateful that it’s getting 700+ repins on Pinterest.
I know I’ve said I was going to do a review, I’ll try to do it soon. It’s just so cold in Canada right now, it caused me to go on hibernation mode..hahaha..In all seriousness, though, -40 deg. Celsius is not a joke!

How-to:
1. I prepped my eyelids using Urban Decay Primer Potion in Sin.
2. I applied Burnout on the inner third of my eyelid using the flat-end of the brush.
(I wiped away excess shadow on the brush on a clean towel before step 3)
3. Using the same brush, I applied Liar on the middle of the eyelid.
(I wiped away excess shadow on the brush on a clean towel before step 4 )
4. Again, using the same brush, I applied Mugshot on the outer third of my eyelid.
5. Using the blending-end of the brush, I blended the edge of the eyeshadow.
6. I applied Blackheart using a small crease brush on the outer V.
7. After wiping excess eyeshadow from the crease brush I used on step 6, I dragged Blackheart on to my crease, and blended it out.
8. Using a fluffy brush, I applied Limit right at the edge where Blackheart meets with my skin. This helps to blend out Blackheart, and make a nice transition to my skin.
9. I lined my waterline and tightline using L’oreal Voluminous Smoldering eyeliner. On the lower lid, I applied Mugshot using an angled eyeliner brush, then Blackheart very close to the roots of the lower lashes.
10. Then, I created a winged eyeliner on the upper lash line using L’oreal Super Liner Ultra Sharp Tip.
11. I curled my lashes and applied Buxom Lash mascara on both top and bottom lashes.
12. For extra drama, I added false lashes for extra length and volume. These falsies were samples from my friend, which is currently in production.
13. I filled my brows using a mix of Anastasia Brow Wiz in Ash Blonde and Brunette.
14. I applied Giorgio Armani Maestro foundation on my face, blending it using my fingers.
15. On my cheeks, I applied Revlon Cream Blush in Charmed Enchantment using a foundation brush.
16. Then, I applied MAC cream base in Pearl on top of my cheekbones, bridge of my nose, and cupid’s bow using my finger.
17. I applied MAC Please Me lipstick on my lips using a lip brush. Then, I added a little bit of L’occitane lip balm just to keep my lips moist since it’s so cold here in Canada!!!
18. My hair was set using a velcro rollers set and 1.5in Chi curling iron.
Urban Decay Naked 3 Look #2
I hope everyone is enjoying their holiday! 🙂 I’m sorry if I’m not too active on the social media platforms, such as Twitter, Instagram, Facebook and Pinterest these days since I’m enjoying some time off with my loved ones. Aaah, who am I to kid, I’m still very much active on Pinterest..hehehe..I’m addicted to Pinterest!
Anyways, today’s tutorial is another look using Urban Decay Naked 3 palette! I have to say I do love this palette a lot more than the other 2. May be it’s just my obsession with anything Rose Gold! Anyways, this tutorial is an evening look, that’s not too smoky, but at the same time not too light either. If you want to make it smokier, you can use Blackheart from the palette instead of Darkside.
I’ve done other tutorials using similar technique in Pearlescent and Smoky Purple posts. The other tutorial using the same Urban Decay Naked 3 palette is on the Rose Smoky post.
 How-to:
1. I prepped my lids using UD Primer Potion in Sin.
2. Using a shader eyeshadow brush, I applied Darkside on the outer third of the lid, the inner third, as well as on the crease.
3. I blended the crease using a clean shader eyeshadow brush.
4. Using a flat eyeshadow brush, I applied Trick in the middle of the lid, and then added Dust on top of it.
5. I lightly applied Nooner above my crease, and run it along the lower lash line.
6. I created a very thin feline flick using Kanebo Kate Super Sharp Liner.
7. I lined my waterline using MAC Chromagraphic pencil eyeliner in NC30.
8. I filled my brows using Anastasia Brow Wiz in Brunette.
9. I curled my lashes, and applied Clinique High Impact mascara on both upper and lower lashes.
10. I applied Giorgio Armani Maestro foundation on my face using my fingers.
11. I contoured my face using Smashbox Contour palette.
12. On my cheeks, I applied MAC Danity blush.
13. On the lips, I applied Revlon Socialite and then added a touch of clear lipbalm on top of it.

Rose Smoky Eyes using Urban Decay Naked 3
Happy Holiday, everyone! Merry Christmas for those who are celebrating, and I hope everyone is having a blast! I know it might be a day too early for my North American readers, but it’s already the 25th in Indonesia.
Anyways, I wanted to post this tutorial up just because I recently gotten my hands on the Urban Decay Naked 3 (you’d know if you follow me on Instagram!!! ;). I actually didn’t want to get one, but I decided to since the shades are gorgeous!
I didn’t want to do a super dark smoky eyes, as I prefer a much softer side for this look. This rose smoky eyes look is very wearable, and so easy to do! I love how the pink eyeshadow has a gold undertone, so you won’t look sickly.
If you want to check out a more intense smoky eyes, check my post Rose Smoky eyes III, and if you prefer a more subtle, low-key look please check my Berry Lips post!
How-to:
1. I applied Buzz all over the lid using a flat eyeshadow brush.
2. Using a fluffy blending brush, I applied Blackheart on the outer V and crease.
3. Using a clean shader brush, I blended the edge of my crease.
4. I applied Limit using a clean blending brush just above the crease as a transition color.
5. I lined my waterline and tightline using UD 24/7 Glide-on pencil eyeliner in Perversion.
7. Using an angled eyeliner brush, I applied Blackheart on the outer half of the lower lid, and Buzz on the inner half.
8. I created a winged liner using L’oreal Super Liner Ultra Sharp Tip.
9. I filled my brows using Anastasia Brow Wiz in Brunette.
10. I curled my lashes and applied Buxom Lash mascara on both top and lower lashes.

11. For my face, I applied Giorgio Armani Maestro foundation using Sigma Angled Kabuki Brush.
12. I contoured my face using Smashbox Contour/Highlight trio palette.
13. On the cheeks, I applied Chanel Brush de Horizon.
14. I applied MAC Please Me lipstick on my lips.