Cute Valentine Makeup ft. NARS Wanted Palette

It’s almost close to Valentine’s Day, or Galentine and I thought I’d share this cute valentine makeup tutorial with you guys. I’m using NARS Wanted palette for this look since I bought the palette a while back but didn’t get a change to use it.

This look is all about that doll eye with soft kissable lips. Nothing too dramatic besides the eyelashes, which obviously you can skip if you .prefer. I chose to create this look since I think this is something that I’d definitely wear on a date.

Read more below to see how I achieve this look and to check out the step-by-step pictorial (with product list).

Read More

Rose Gold Makeup ft. NARS Outer Limits Eyeshadow

New eyeshadow obsession alert! I’m absolutely loving NARS Outer Limits eyeshadow! I first saw this eyeshadow on Pinterest, but to my dismay it was no longer sold. However, last week, I saw it on Sephora’s website and decided to grab one before it’s too late! I’m so glad I bought it because I love it!!! Anyways, enough with my excitement over this eyeshadow, watch the tutorial below or read more to find out how I create this soft wearable Rose Gold makeup.

Please subscribe if you haven’t!

https://youtu.be/WfMd7JGBQvc

Read More

Shu Uemura Blushing Beige Palette Tutorial #1

Today’s tutorial is all about looking soft, fresh and glowing, which would be perfect for those of you who have to attend Summer Wedding, or even for Summer Brides. For this look, I’m using my new Shu Uemura Blushing Beige palette, and if you’ve followed me on Instagram, you’d know that I’ve posted the picture of the palette. This palette is absolutely gorgeous and I can’t wait to create more looks using it.

Anyways, for this Romantic makeup look using the Shu Uemura Blushing Beige palette, go ahead and watch it on my Youtube channel ,or read more and check out the step-by-step pictorial below!

Read More

Party Makeup Tutorial [ABH Self Made]

Another Party Makeup tutorial for you guys, since you know Christmas is in 2 weeks! Anyways, for this tutorial I used Anastasia Beverly Hills (ABH) Self Made palette, which I completely forgotten about. It was sitting at the back of my drawer, and I was so busy that I didn’t remember I actually bought the palette.

For this look, my focus is on a very strong eyes. I didn’t make this too smoky since I knew I was going to create a winged liner, but if you prefer a smokier look, omit the winged liner, and use a matte black eyeshadow along the lash line for a smokier lash line.

Gold smoky eyes

Products used

Eyes

  • Primer – Urban Decay Primer Potion “Anti-Aging”
  • Transition – ABH Self Made Palette “Sherbet”
  • Crease – ABH Self Made Palette “Hot Chocolate”
  • Outer V – ABH Self Made Palette “Hot Chocolate”
  • Eyelid – ABH Self Made Palette “Self-Made”
  • Lower lash line – ABH Self Made Palette “Hot & Cold” (outer); ABH Self Made Palette “Pink Champagne” (inner)
  • Winged liner – Maybelline Gel Liner “Black”
  • Waterline – MAC Chromagraphic pencil liner “NW25/NC30”
  • Brows – ABH Dip Brow Pomade “Medium Brown”
  • Falsies – Esqido Mink lashes “Oh So Sweet”


Christmas Party makeup tutorial

Face

  • Primer – Bobbi Brown “Vitamin Enriched Face Base”; The BodyShop Drops of Youth “Wonderblur”
  • Foundation – MAC Pro Longwear Foundation
  • Concealer – MAC Pro Longwear concealer
  • Powder – Laura Mercier “Invisible Loose powder”

Cheeks

  • Blush – Hourglass Ambient Lighting Blush “Vibrant Poppy”

Lips

  • Lipstick – YSL Glossy Stain “Peche Cerra-Cola (27)”

ABH Self Made palette


UD Naked Smoky & KVD Lolita

Today, I’m creating a light daytime look using UD Naked Smoky, and I’m pairing it with my new KVD Lolita liquid lipstick. The eyes are very light and simple, and obviously you can skip the false lashes altogether if you’re going to wear it as a daytime makeup.

The lips are quite different than what I’m usually used to. I usually like to pair a peachy or corally lips with this kind of eye look. However, I stepped out of my comfort zone, and decided to pair this with KVD Lolita liquid lipstick, which is a mauve color. I have had mauve lipstick before, but this KVD Lolita is slightly darker than what I’m used to. I didn’t mind it, I think it’s still a very pretty color. Just a word of warning, this liquid lipstick will dry to a darker shade than what you see on the tube.

For other looks using UD Naked Smoky palette please check out my other posts – “Iconic UD Smoky“, “MAC D for Danger“, “Grey“, and lastly my review on this palette “UD Naked Smoky Review“.

ud naked smoky

Again, I’m featuring Tweezerman Brush IQ brushes that were sent to me by Preen.me as part of their PreenMeVIP program. The brushes used in this tutorial are: “Blender“, “Shader“, “Line Glider“, and “Brow” brushes. Not in picture: Tweezerman ProMaster lash curler, used to curl the false lashes and my lashes.

Products used

Eyes

  • Primer – UD Primer Potion “Original”
  • Base – UD Naked Smoky “Combust”
  • Crease/lower lash line – UD Naked Smoky “Whiskey”
  • Inner/Outer third – UD Naked Smoky “Radar”
  • Center of lid – UD Naked Smoky “High”
  • Upper lash liner – UD Naked Smoky “Blackmarket”
  • Waterline – MAC Chromagraphic pencil liner “NC30”
  • Brows – Anastasia Beverly Hills Brow Pomade “Medium Brown”
  • Falsies – Ardell falsies “Demi Wispies”


kvd lolita

Face

  • Foundation – Diorskin Star foundation “31”
  • Concealer – Diorskin Star concealer “3”
  • Setting powder – Diorskin Nude Air Healthy Glow Invisible Loose Powder “#30″

Cheeks

  • Blush – Smashbox Halo Blush Powder “In Bloom”
  • Contour – MAC powder “Blunt”

Lips

  • Lipstick – Kat Von D “Lolita” liquid lipstick

Kat von d lolita liquid lipstick

Summer Wedding Guest Makeup

Summer is the season for Wedding, and this Summer Wedding Guest Makeup look would be perfect for those beautiful outdoor wedding parties! It’s flirty and summery! I love coral lips for summer, it’s very youthful and less intimidating than red or orange lips. A fun look to wear! If you want to wear this as a daily makeup, just skip the falsies. This makeup is wearable and will look great on everyone.

The lip color for this look is the YSL Rouge Pur Couture 52, also known as Rosy Coral. This lipstick is popular in Asia, it was sold out everywhere in Indonesia! Apparently it was made popular by a Korean actress. Anyways, I can see why Asian women are obsessing over this lip color. You can wear it as a stain, or full on like me. The one thing with this lipstick I disliked is the fact that it’s quite drying on the lips. I have very dry lips, so I have to apply lip balm before and after I apply the lipstick.

Dior Eye Reviver palette

Also, I just grabbed the Dior Eye Reviver palette, and this is the first time I’m using it. I really like this palette, it has soft wearable shades. It’s so easy to blend and buttery. Not as heavily pigmented as some other brands, but gorgeous shades. It is too pretty to be passed on.

Dior Eye Reviver palette

Products used

Eyes

  • Primer – Urban Decay Primer Potion “Original”.
  • Base – Dior Eye Reviver Palette “1”.
  • Crease/Lower lid – Dior Eye Reviver Palette “4”.
  • Eyelid – Dior Eye Reviver Palette “3”.
  • Tear Duct – Dior Eye Reviver Palette “2”.
  • Outer V – Dior Eye Reviver Palette “5”.
  • Waterline – MAC Chromagraphic pencil liner “NC15/NW20”.
  • Winged liner/lower lash line – Dior Eye Reviver Palette “6”.
  • Brows – Anastasia Beverly Hills Brow Wiz “Taupe” + “Medium Brown”.
  • Mascara – Cover Girl “Lash Blast” mascara.
  • Falsies – Gwiyomi Boutique “no. 3” falsies

Dior Eye Reviver palette

Face

  • Primer – Kat Von D “Lock-it Featherweight Primer”.
  • Foundation – Bare Minerals “bareSkin Pure Brightening Serum”. (PS: don’t expect me to do a review on this foundation because I’ve returned it)
  • Under Eye Concealer – NARS Radiant Creamy concealer “Custard”.
  • Blemish Concealer – MAC Studio Finish concealer “NC30”.
  • Setting Powder – CoverFX translucent setting powder “Light”.

Cheeks

Lips

  • Lipstick – YSL Rouge Pur Couture “52 (Rosy Coral)”.

Summer wedding guest makeup

UD Naked 3 Prom Makeup Look

If you have this UD Naked 3 palette lying around, you could create this UD Naked 3 Prom Makeup Look! Instead of buying new palettes, or eyeshadows, you could always use what you already have. I have done other UD Naked 3 tutorials, which you can find HERE. However, one of my most repinned UD Naked 3 tutorial is the Valentine’s Day makeup post, which is perfect if you prefer a softer look.

If you are looking for a makeup artist in Toronto or makeup artist in Hamilton for Prom, feel free to contact me at jilly@kireimakeup.com! I’m also taking bookings for eyelash extension in Hamilton.

ud naked 3 prom makeup

Products used

Eyes

Face/Cheeks

  • Foundation – Make Up For Ever HD Foundation “120”
  • Concealer – MAC Pro Longwear concealer “NC25”
  • Setting Powder – CoverFX Translucent powder
  • Blush – MAC blush powder “Fleur Power”

Lips

  • Lip Pencil – Urban Decay lip pencil “Naked 2”
  • Lip balm – L’oreal Colour Riche Extraordinaire “Blushing Harmony”


ud naked 3 prom makeup

2015 Prom Makeup Look

Happy Monday, everyone! Today I wanted to create a tutorial for 2015 Prom Makeup, and this look works for every eye colors, and dress colors! I think this color would look especially great for those with blue eyes. The warmth from Makeup Geek Cocoa Bear will bring out the blue even more.

This look would be great for any dress colors since I used neutral shades. Also, you can change this makeup according to what you like – if you prefer to make it less smoky, skip the eyeliner. If you want to wear it with a red lipstick, by all means pair it with a red lipstick. If you can’t create a winged liner yet, check out my winged liner tutorial, or skip it altogether and just create a basic eyeliner! Customize it according to what you prefer.

If you are in need of a makeup artist in Toronto or in Hamilton to do your prom makeup, I’m available! Please feel free to message me by filling out the contact form or email me at jilly@kireimakeup.com, or DM me on my Instagram page.

makeup geek foiled eyeshadow in the spotlight

Product used

Eyes


prom makeup tutorial

Face/cheeks

  • Primer – Kat Von D foundation primer
  • Foundation – Kat Von D Lock-it Tattoo foundation
  • Concealer – MAC Pro Longwear concealer “NC25”
  • Blush – L’oreal Visible Lift Blur bush “Soft Pink”
  • Setting powder – CoverFX translucent loose powder
  • Highlighter – The Balm “Mary-Lou Manizer”

Lips

  • Lip pencil – Urban Decay lip pencil “Naked 2”
  • Lip gloss – L’oreal Color Riche Extraordinaire “Blushing Harmony”

prom makeup 2015

4 Bridal Makeup Looks

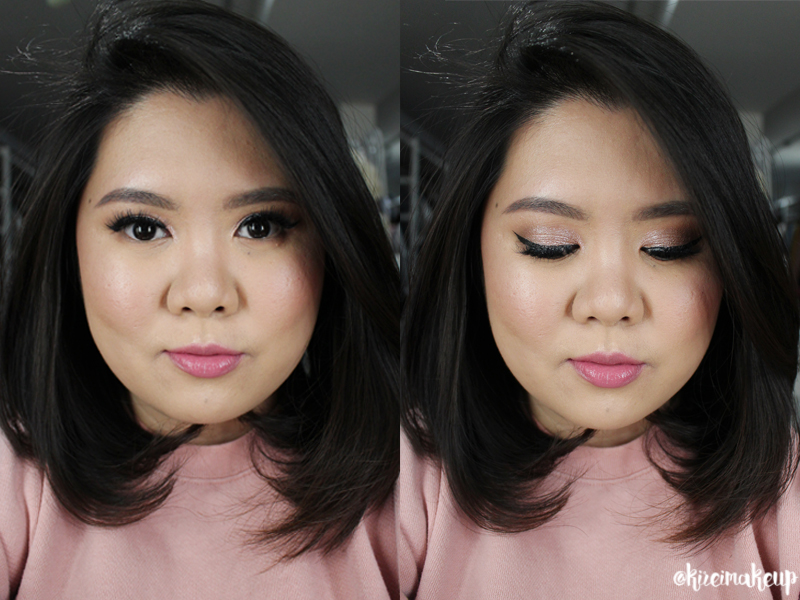
I collaborated with Lover.ly to create a bridal makeup look. I was shown 3 photos of the bridal gowns, and I chose my favorite as below for my post. While I was thinking of to create a look for this gown, I decided to create not one, but FOUR bridal makeup looks to suit the gown! I created 4 looks since I knew that most brides would have their own interpretation of their makeup, some chose to be more on the natural side, while others might not be afraid to go bold!

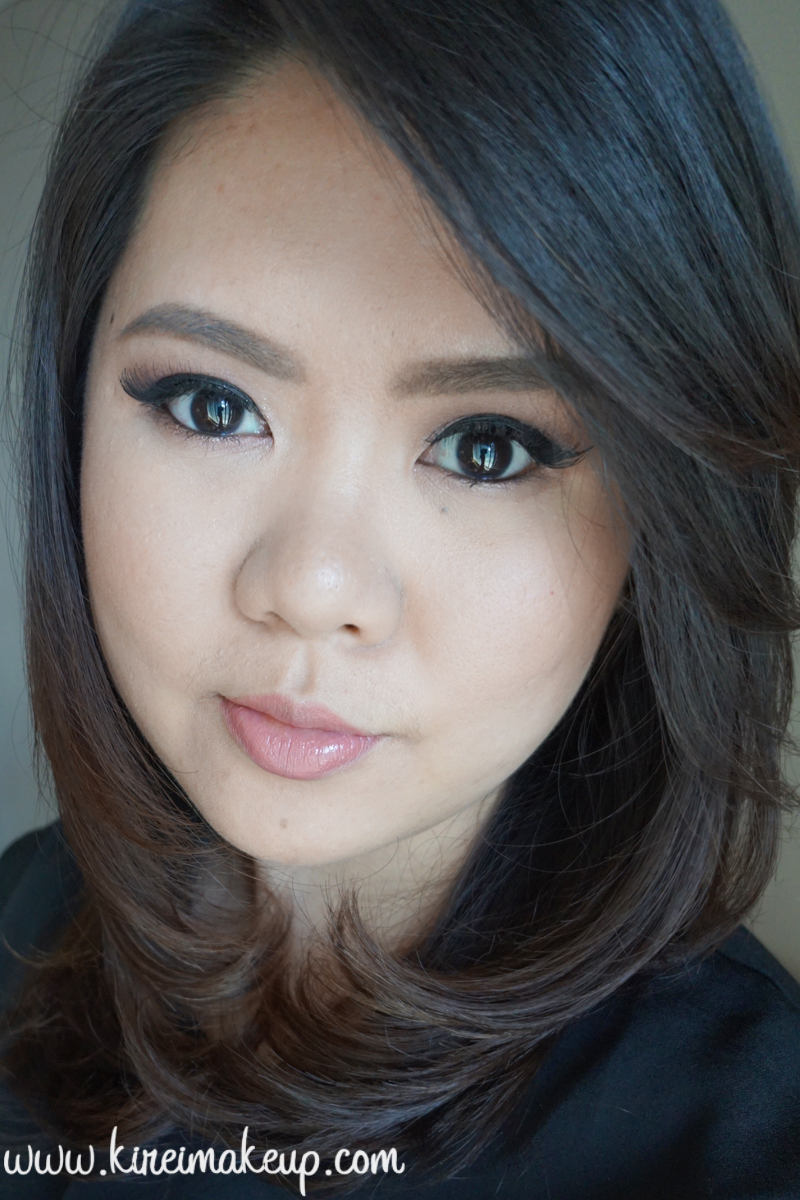
I also took into consideration of the whole outfit and hair. As you can see, the gown that I chose has a very demure neckline, along with a very elegant lace details. With this in mind, in my opinion, I think brides who chose this type of gown would be very classy, lady-like and conservative.

wedding gown

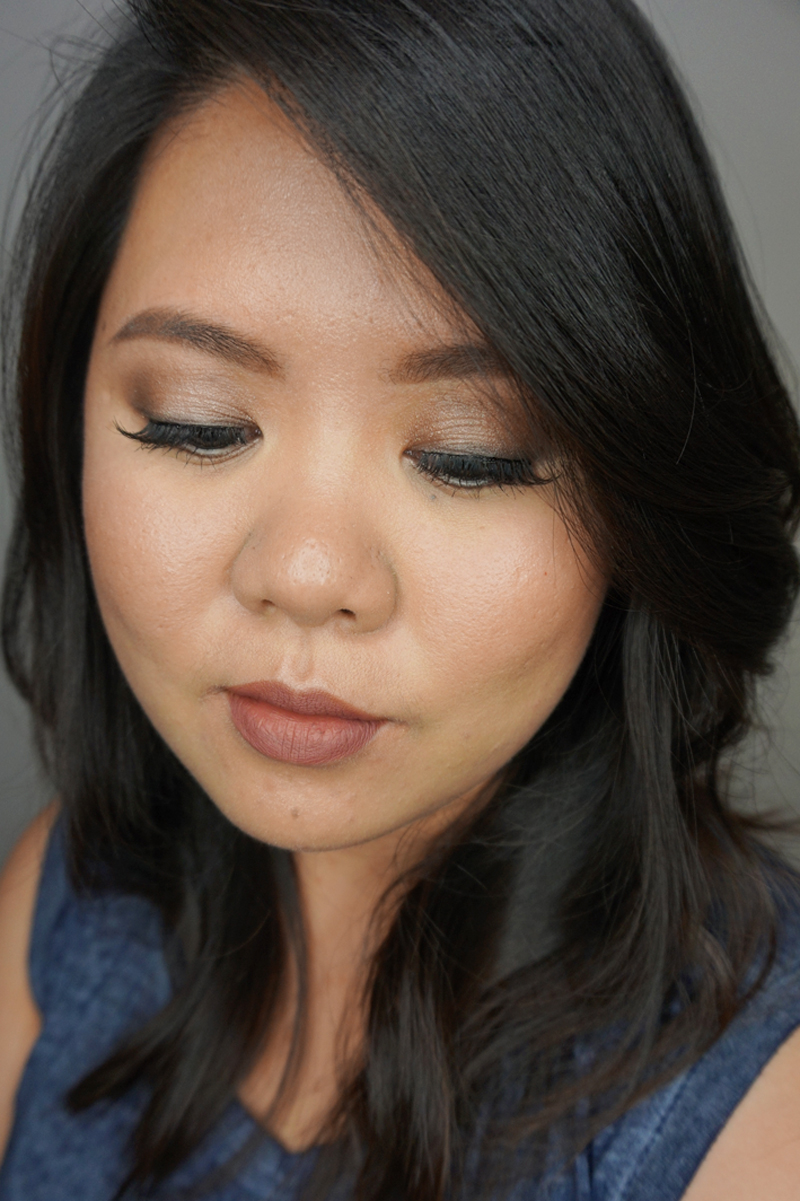
Since the hair is pulled back, so not to clash with the neckline, I didn’t want to create a heavy dark smoky eyes. I think with this gown and hairstyle, a simple warm eyes would suffice. I feel that a heavy, dark smoky eyes would be too heavy and might clash with the high neckline. Of course, you can go on the dark smoky eyes look, but I prefer going light on the eyes and play on the lips.

So, for this tutorial, I created 1 eye makeup which can be paired with 4 different lips look. Usually for bridal makeup, I tend to choose the warmer neutrals (think browns and gold) since I think it looks very flattering on everyone. Very rarely I do a black smoky eyes, unless the client asked for it, and/or during change of makeup from morning to evening. Even then, I’ll still add some warmth on the smoky eyes.

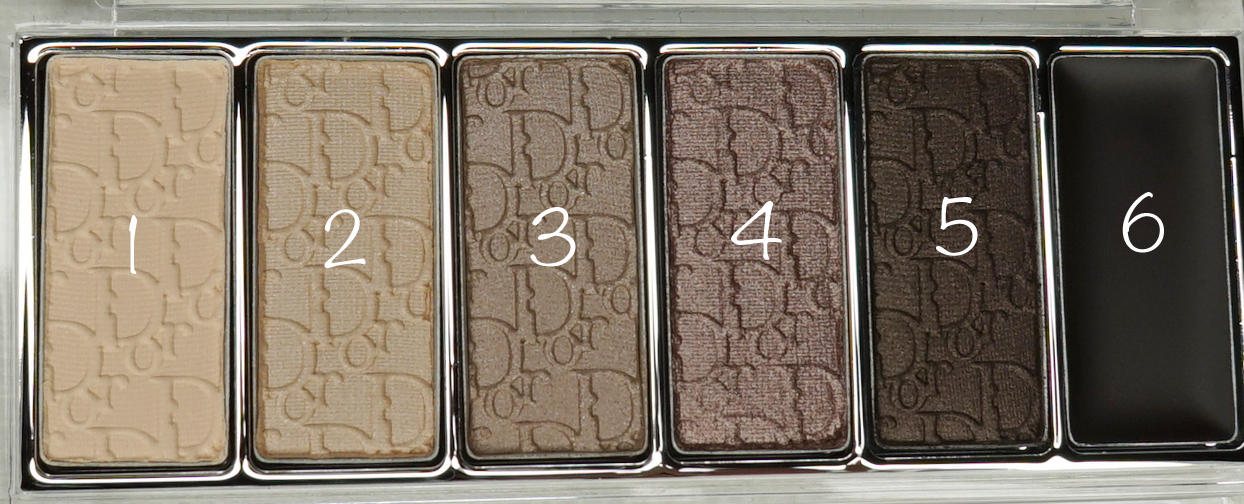
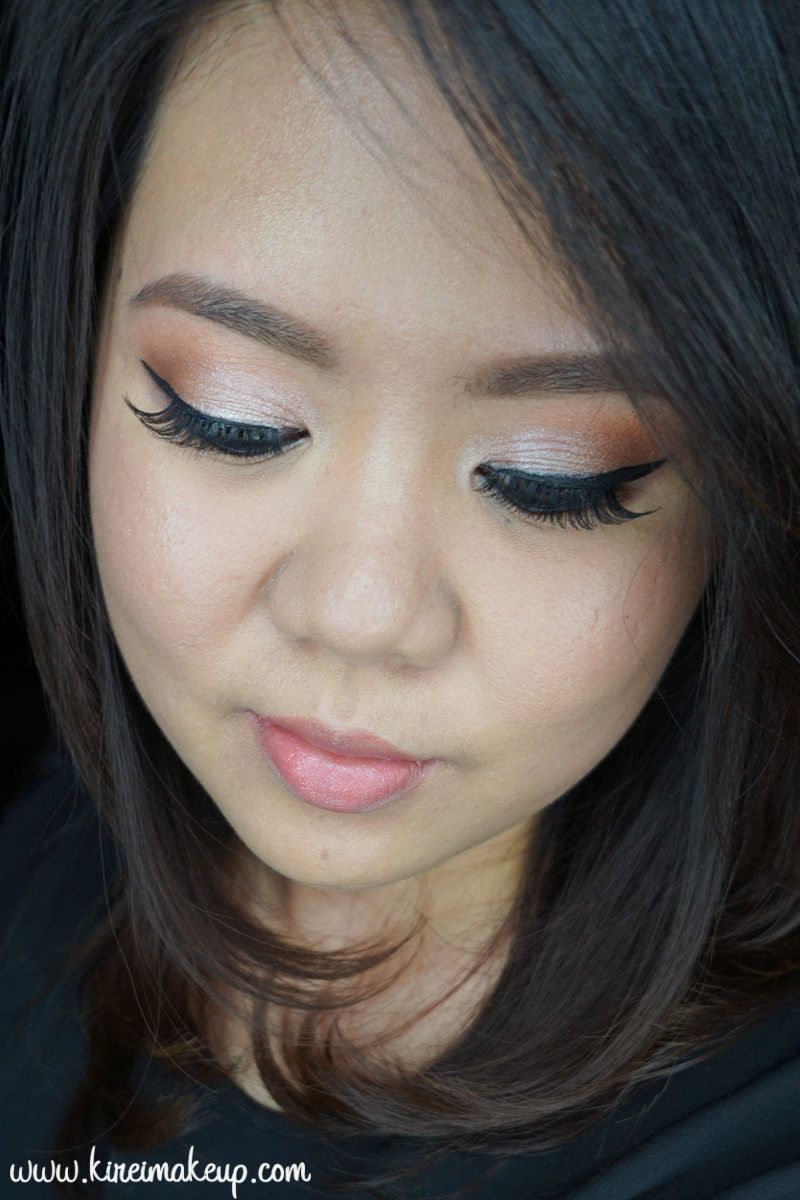
To compliment the lace and the gown’s off-white color, I decided to use a beautiful gold on the eyelids from the Too Faced Chocolate Bar eye palette called Creme Brulee. This gold isn’t too yellow, nor it is too shimmery. It has a somewhat satin finish, which makes it perfect for this look so it doesn’t clash with the texture of the gown.

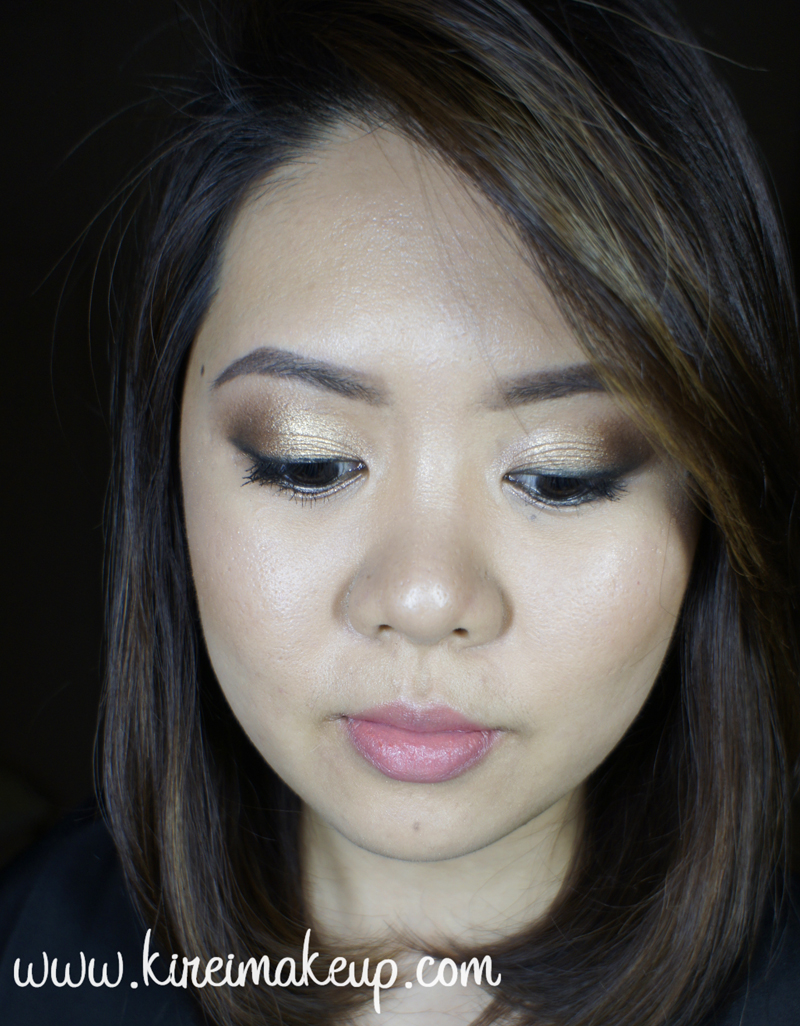
Since this gown doesn’t have shiny finish, I decided to keep the face semi-matte to avoid looking too dewy. I feel that this gown has a grown-up feeling to it, so I try to avoid the dewy/glowing finish since it can make the bride looking too youthful. Semi-matte is the right choice for this look.

bridal makeup tutorial

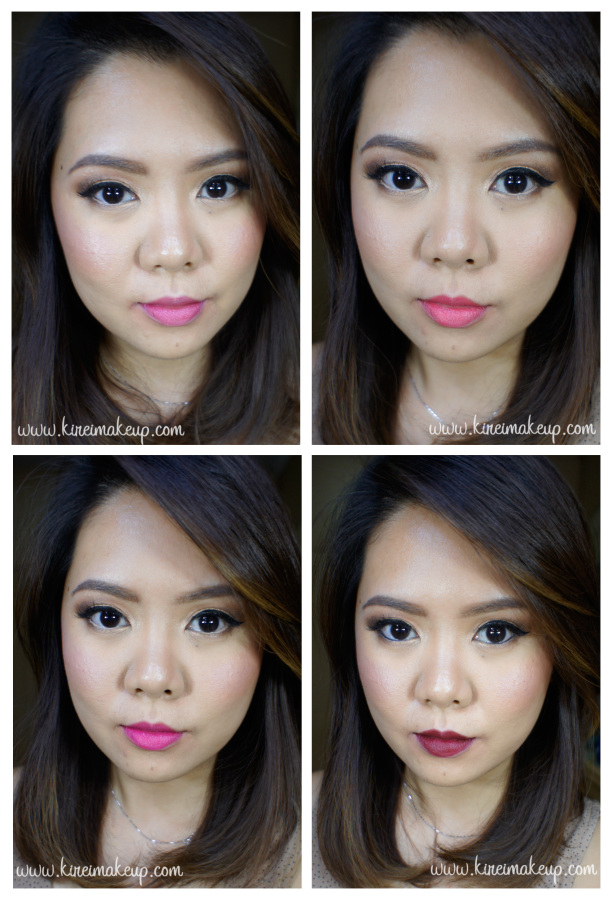
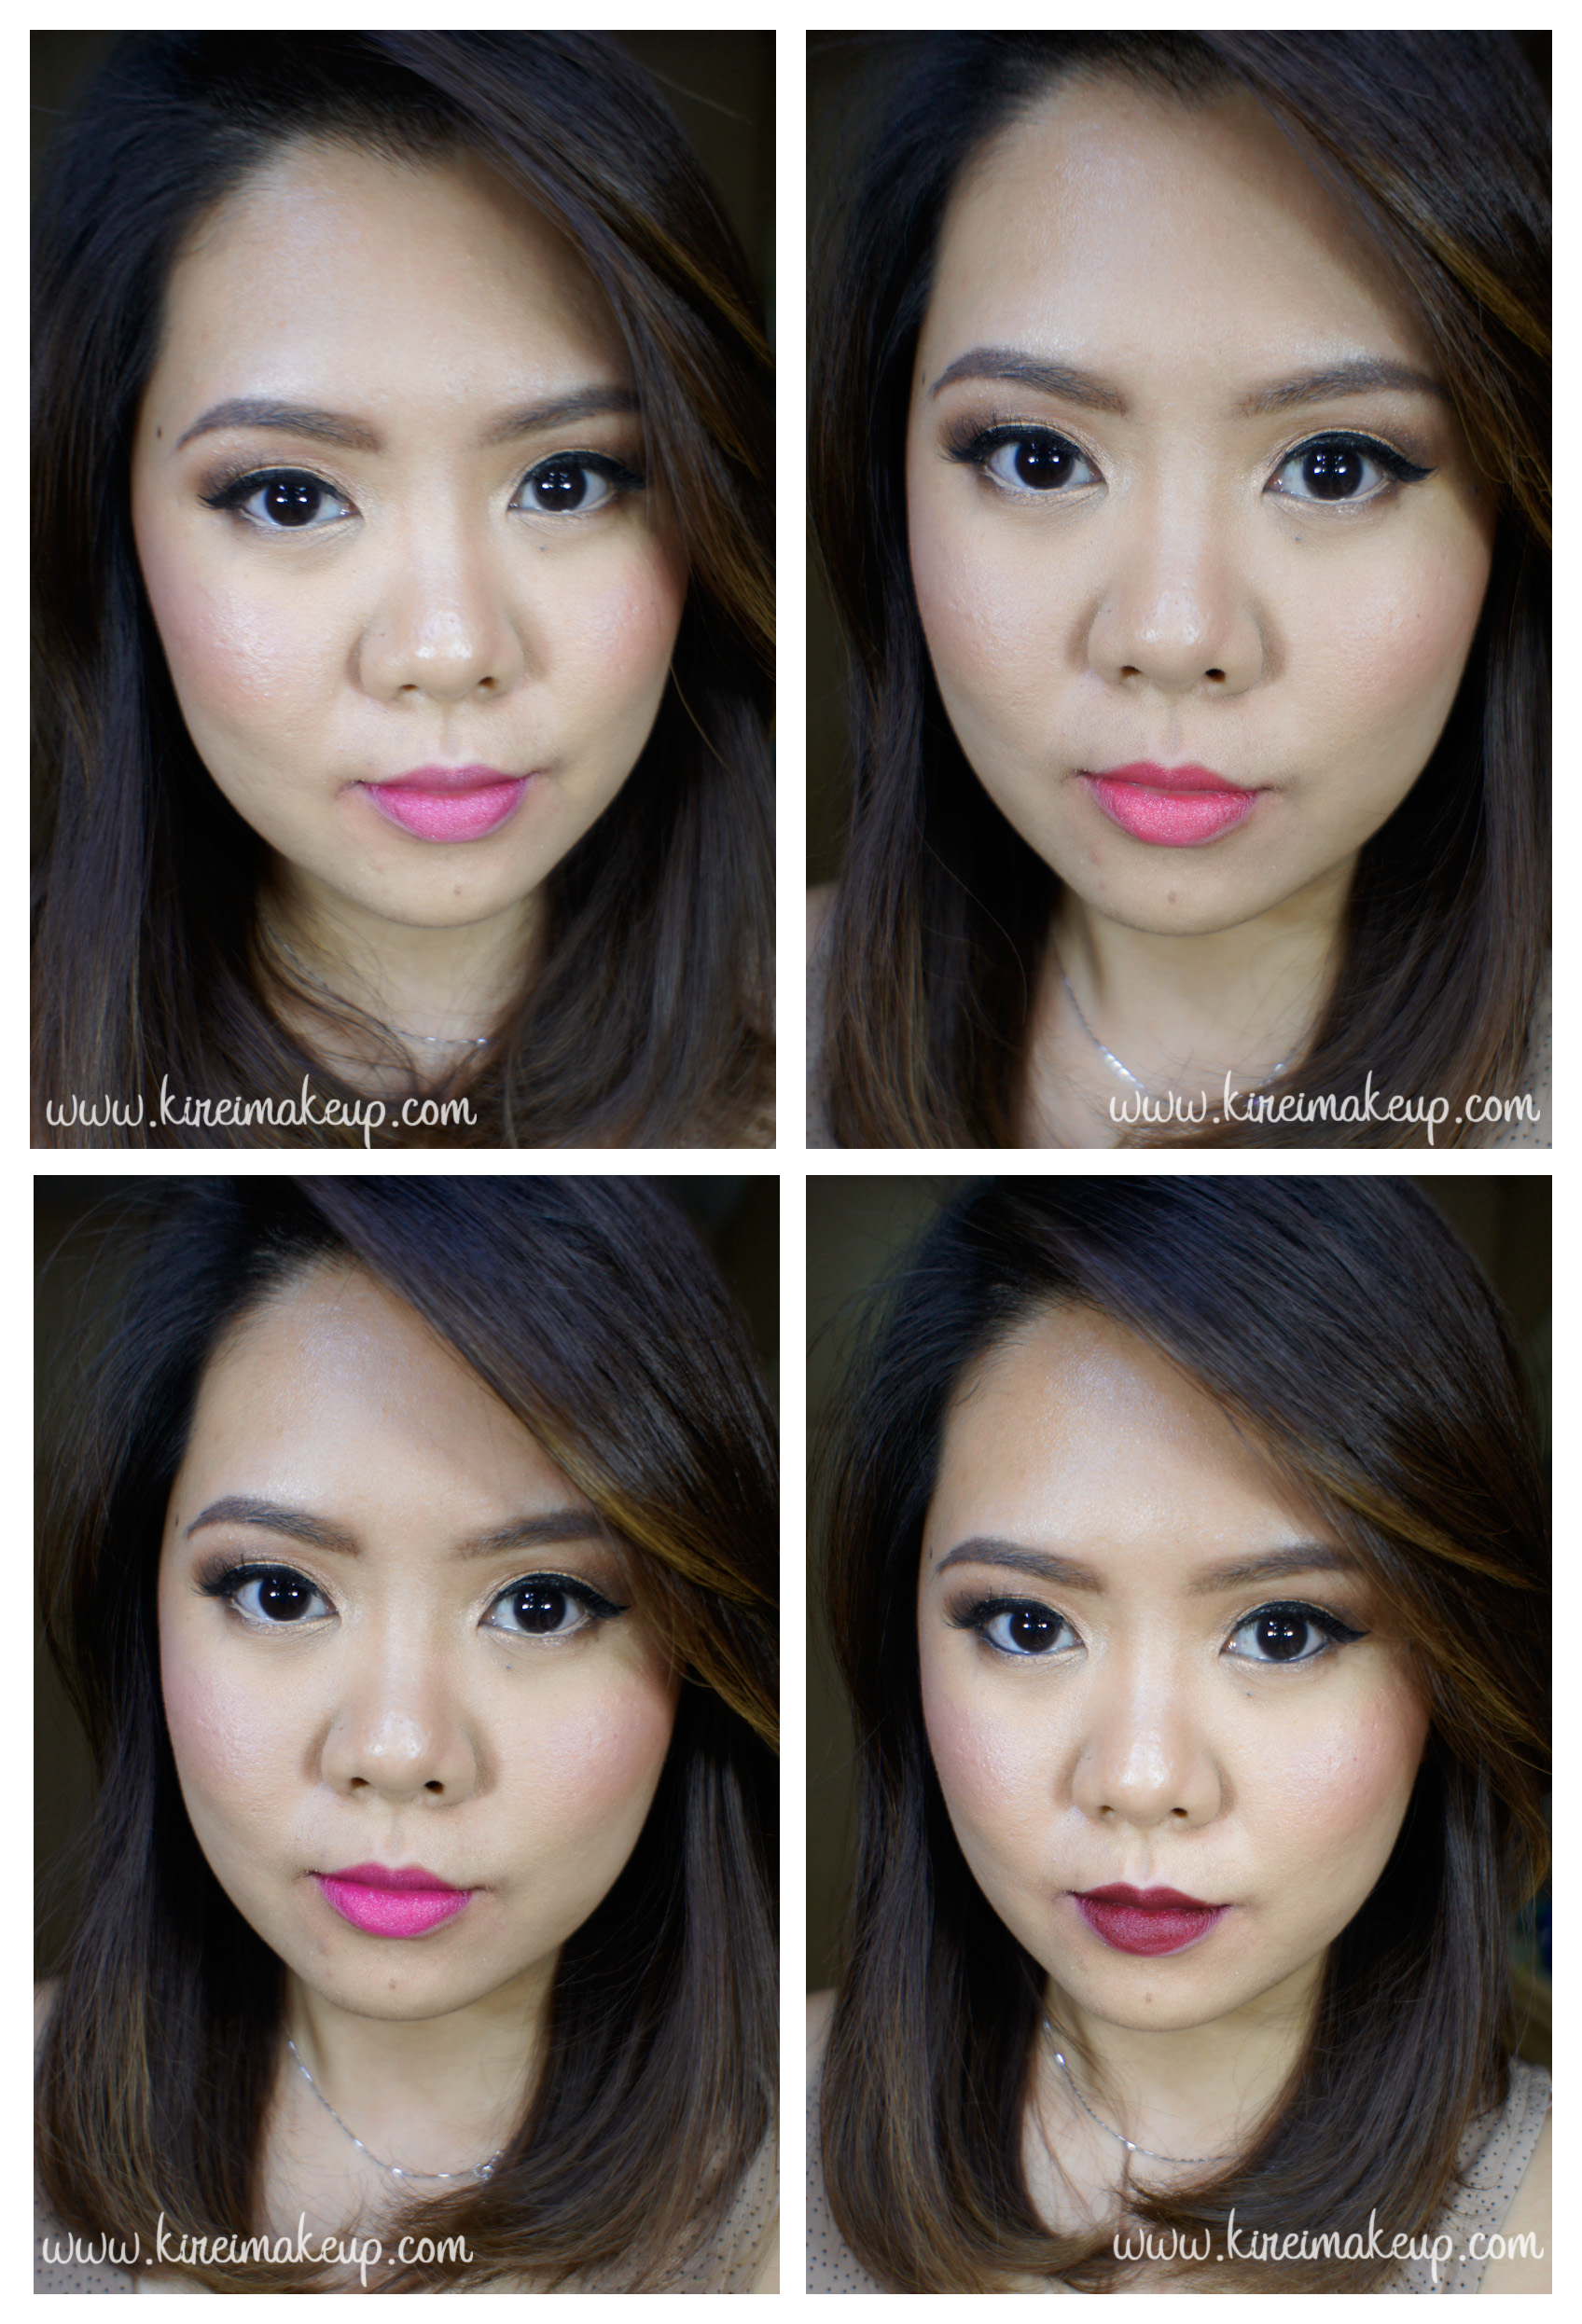
In all of the 4 looks I created, I only added extra blush on the bottom looks (both left and right), and added a black waterline on the look with the dark lips. Otherwise, everything is exactly the same (brows, foundation, highlight, contour etc).

No, I do NOT contour my face heavily with cream foundation. You can if you want, but I prefer not to. I like very subtle highlight/contour so my clients look still like themselves in the photos instead of looking like someone else. HOWEVER, IF or WHEN the client asks for heavy contouring (i.e. Kim K contouring), I’ll still provide the cream contouring for her.

If you’d like to see me do a glam Bridal makeup (i.e. smoky eyes, contour, and the whole nine yards), do let me know by leaving comments here or on my Instagram page!

Natural bridal eye makeup

Eyelids are prepped using Urban Decay Primer Potion. Face is primed using MUFE HD Elixir.
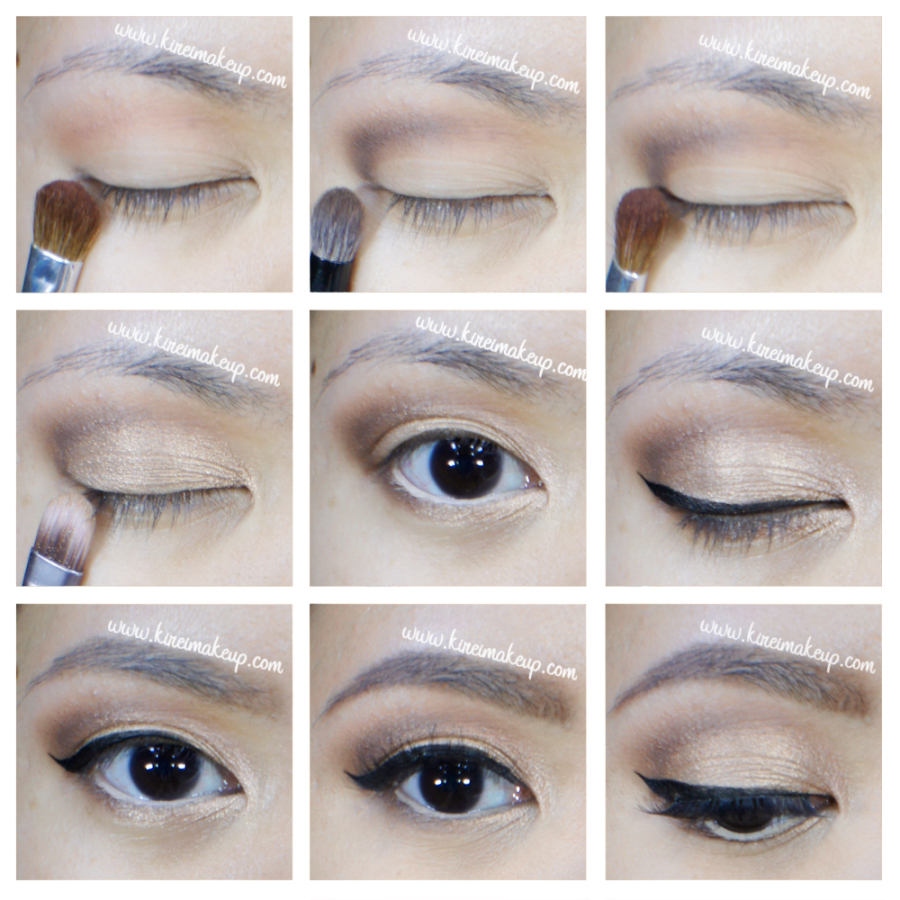
How-to:

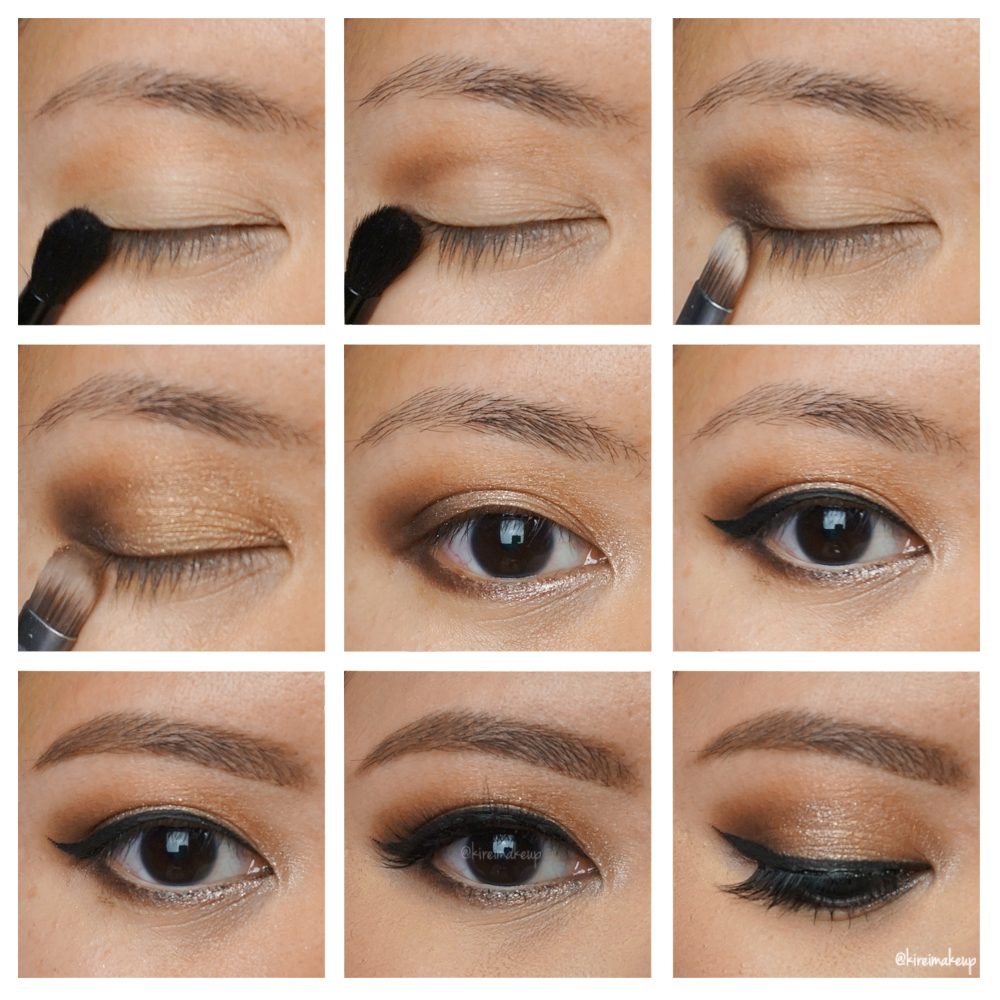
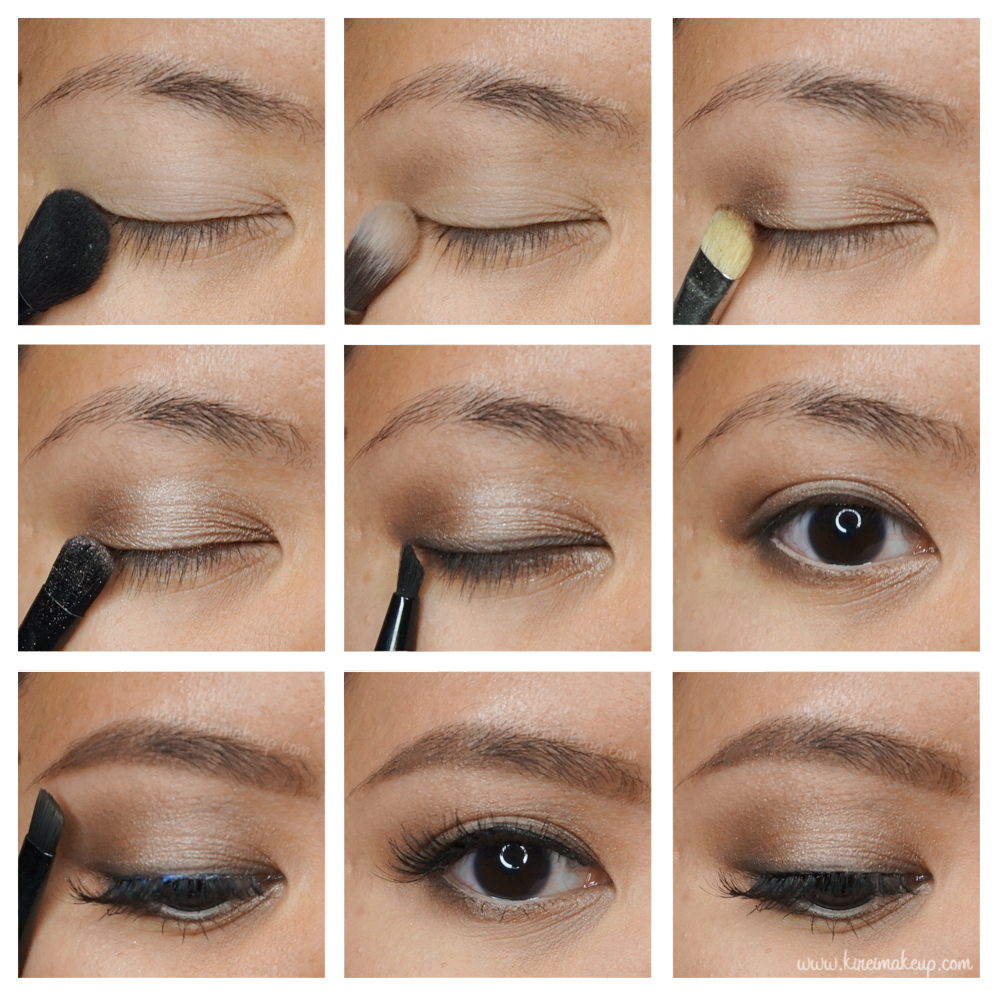
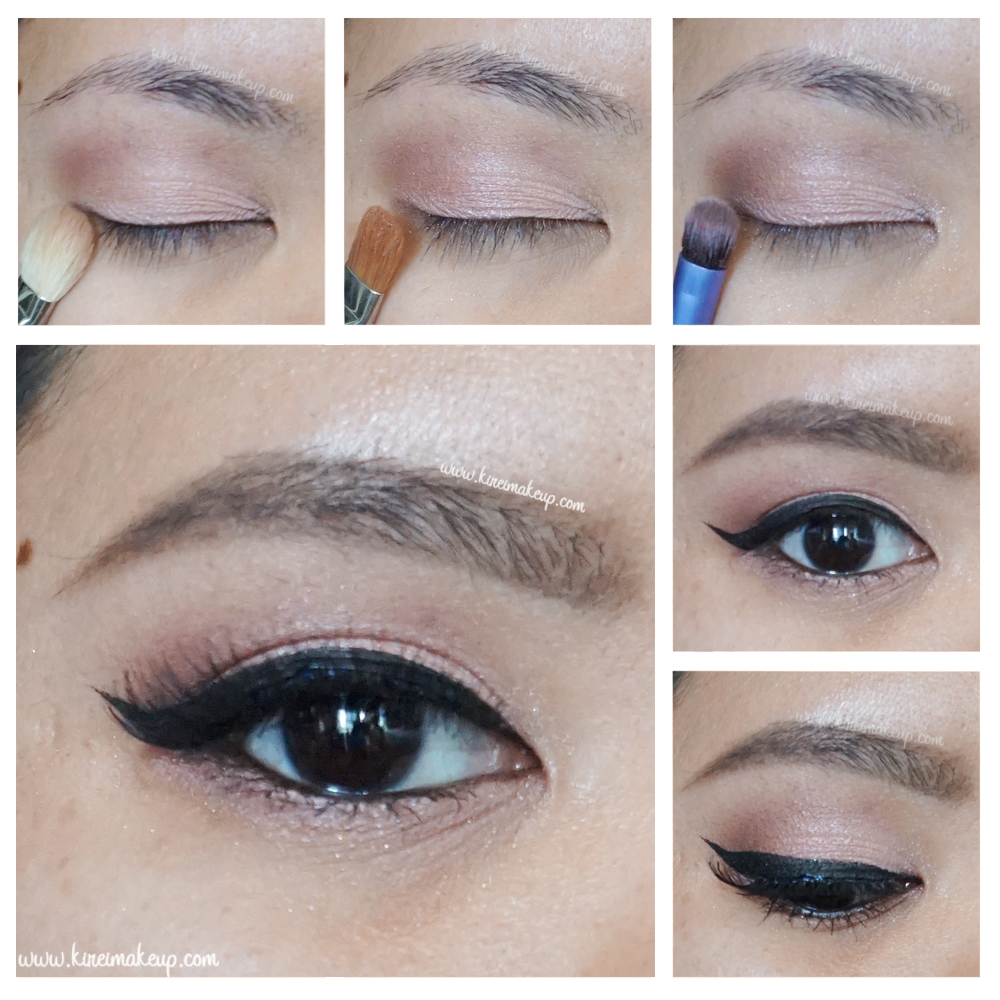
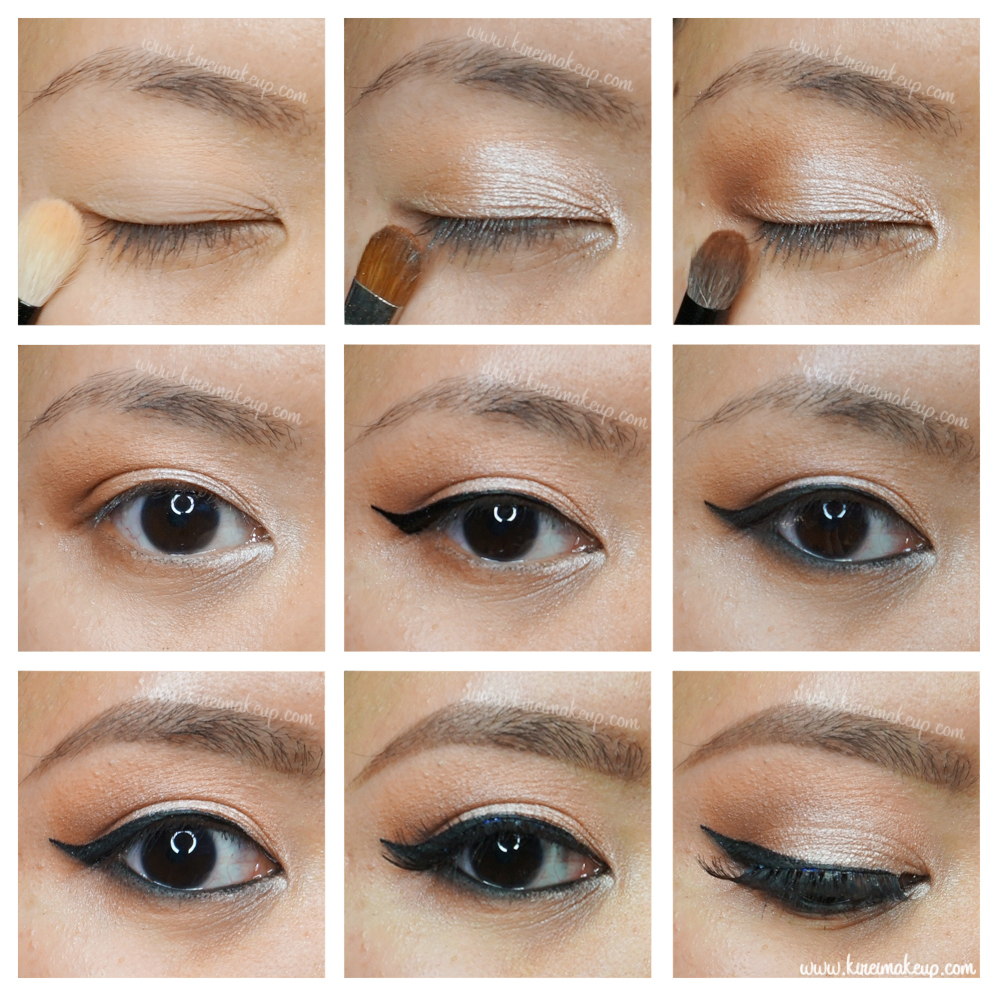
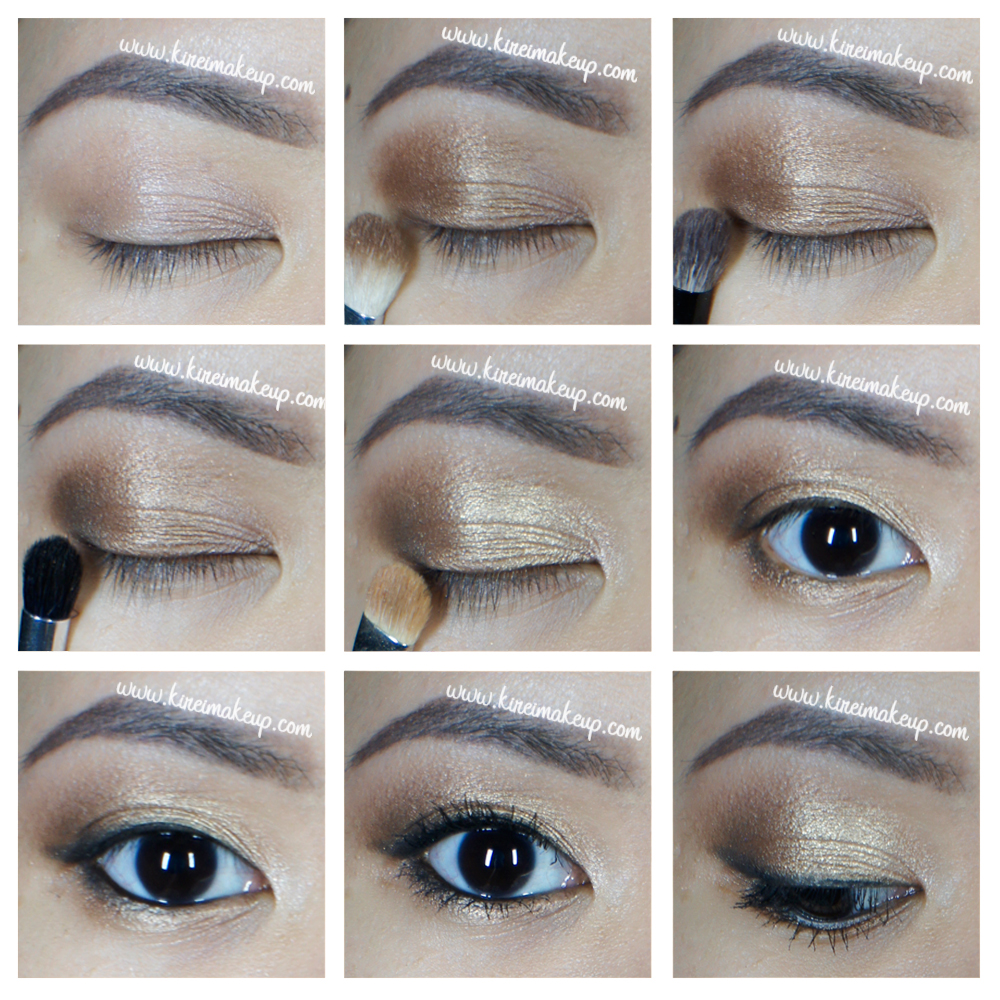
1. I applied Salted Caramel from Too Faced Chocolate Bar eye palette on my crease using a clean blending brush.

2. On the outer V, I applied a mixture of Triple Fudge and Semi Sweet (both from Too Faced Chocolate Bar palette) using a Smashbox Bullet Crease brush.

3. Then, using the same brush as step 1, I blended out the edge of my crease.

4. Using a flat eyeshadow brush, I applied Creme Brulee (from Too Faced Chocolate Bar palette) on my eyelid.

5. I lined my waterline using MAC Chromagraphic pencil eyeliner in NC15 (or L‘oreal Voluminous Smoldering eyeliner for the dark lips version).

6. I also applied Triple Fudge/Semi Sweet mix on the outer half of the lower lash line. Then, I applied Creme Brulee on the inner half of the lower lid. I used the edge of a flat eyeshadow brush to do this.

7. I created a winged liner using Shu Uemura Calligraphy:ink liquid liner pen along the upper lash line.

8. I filled my brows using Anastasia Brow Wiz in Taupe FIRST, then I darkened the tail and any sparse area using Anastasia Brow Wiz in Brunette.

9. I curled my lashes and applied Gwiyomi no. 3 false lashes.

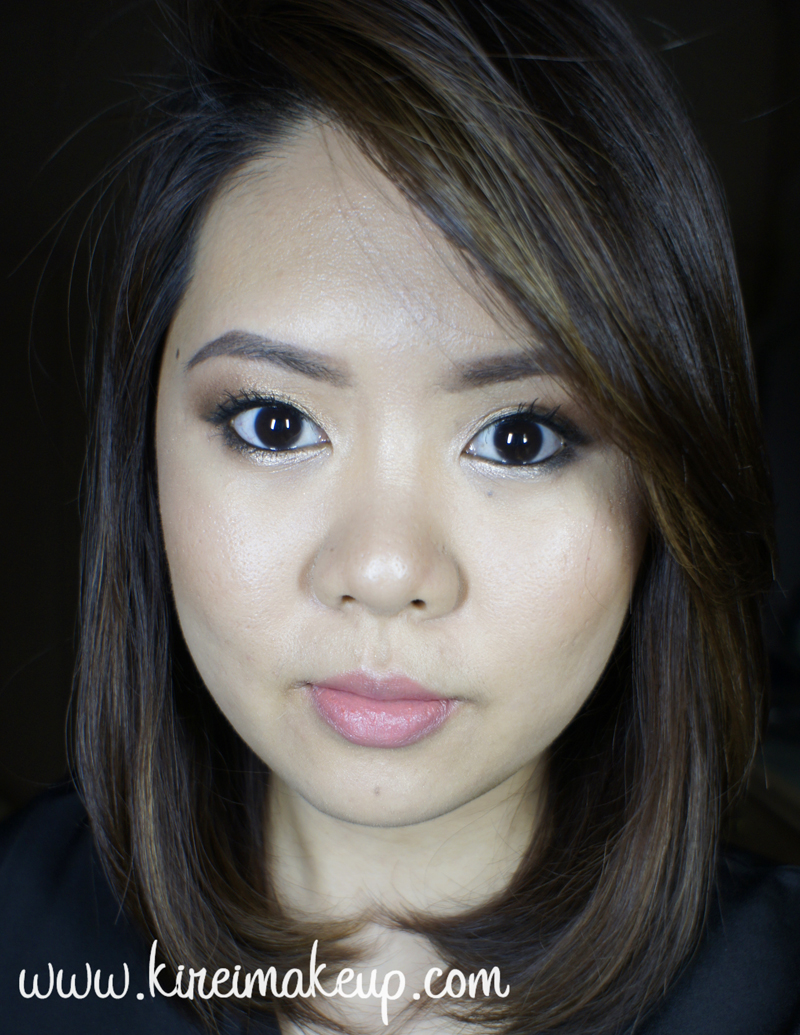
10. On my face, I applied MUFE HD foundation all over using a foundation brush.

11. I set my face using CoverFX translucent setting powder.

12. I lightly contour my face using Smashbox contour kit powder, and highlight my face using The Balm Mary-Lou highlighter. If you have oily skin, I’d suggest skipping highlighting using Mary-Lou. Instead, you can use a matte powder which is a shade or two lighter than your skin, or the highlight powder from Smashbox contour kit.

13. I applied Chanel Blush de Horizon on my cheeks.

natural bridal makeup

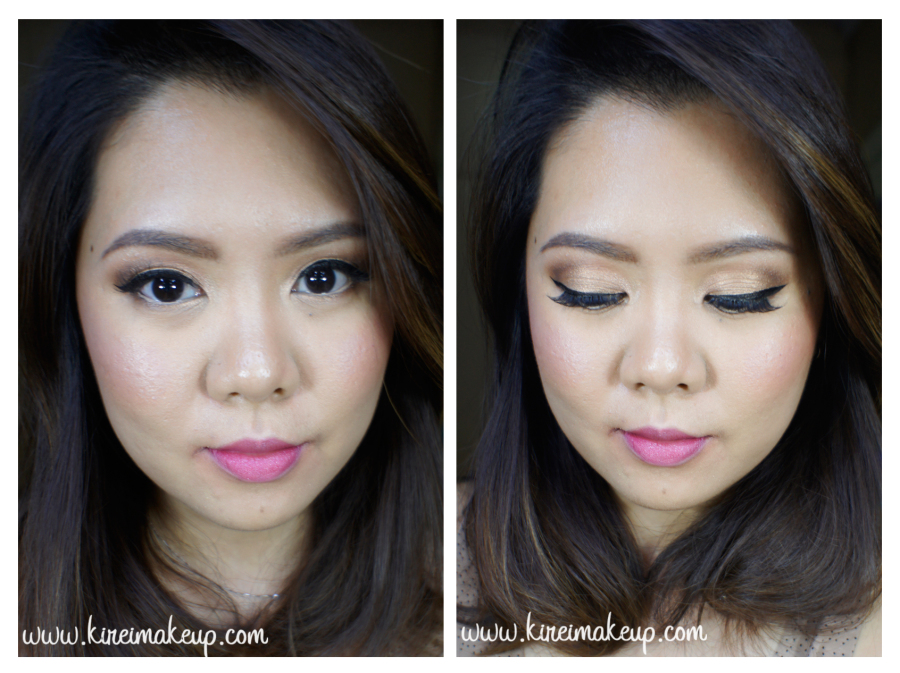
14a. For this blushing bride look, I applied Lancome Color Design in Vintage Rose Sheen.

This look is perfect for those brides who prefer to have a natural look. The rose lipstick has just enough color to brighten up the face. This bridal makeup look is great for Summer Wedding!

blushing bride makeup

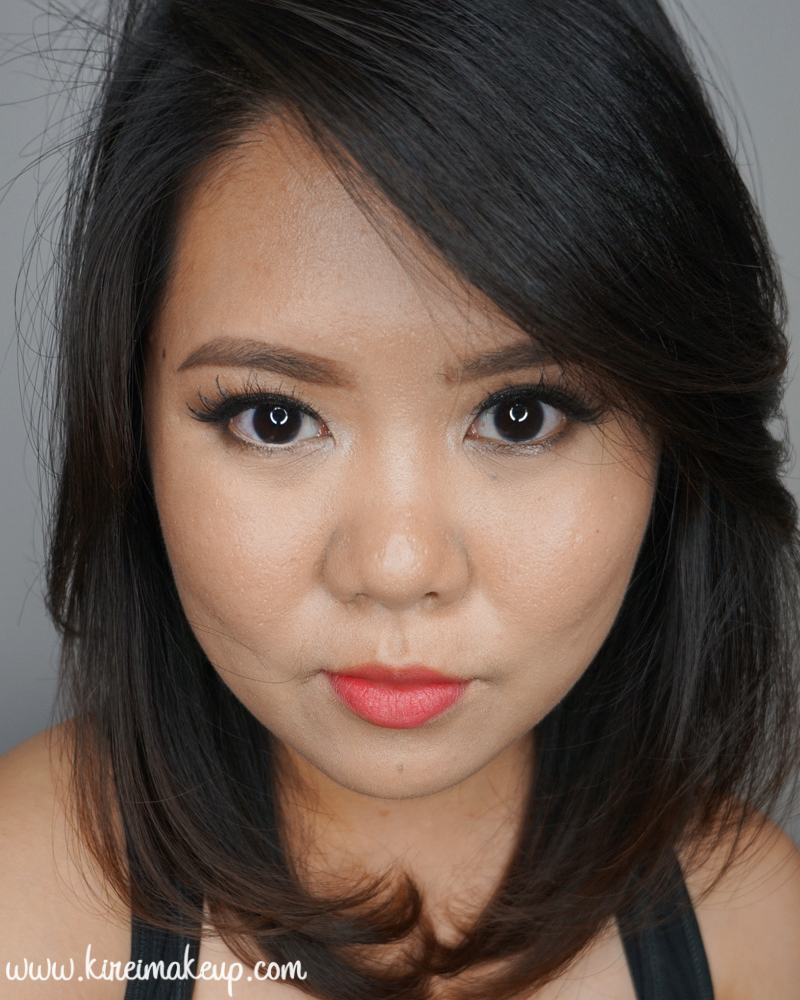
14b. For this youthful bridal look, I added YSL Rouge Pur Couture no. 52. I applied it using a lip brush.

This lipstick is pretty much sold out in Indonesia! When applied lightly on the lips, this YSL no. 52 really lives up to its popularity! It deposits enough pigment without looking too bright on the lips. This gorgeous coral lips is also great for Summer Wedding makeup, but I think it’d be perfect for Spring Wedding where all the flowers are just blooming, and the weather isn’t quite warm yet. This bridal makeup look would instantly gives the bride the most beautiful smile on her big day!blushing bride makeup

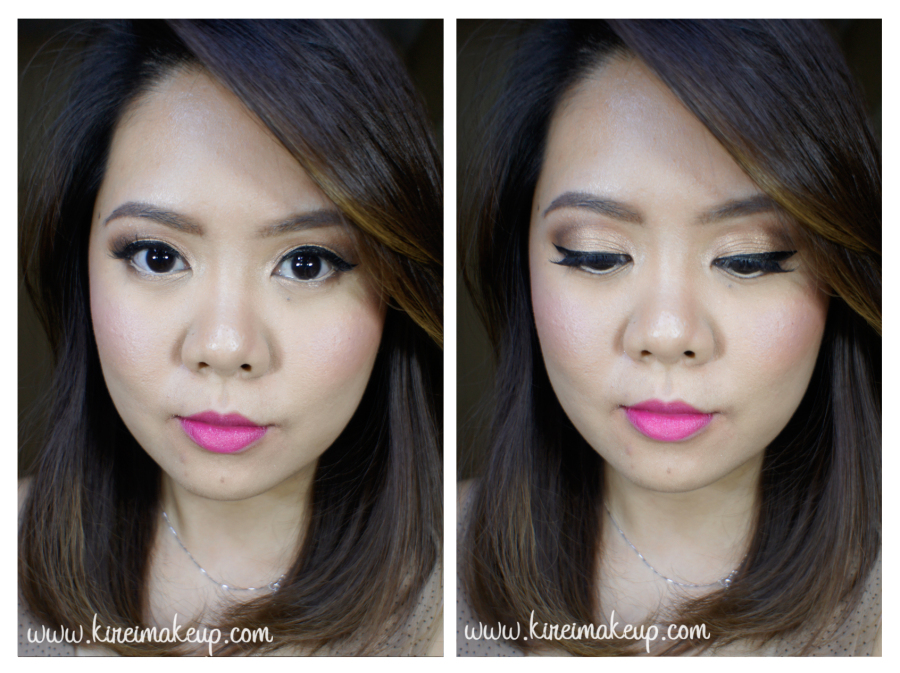
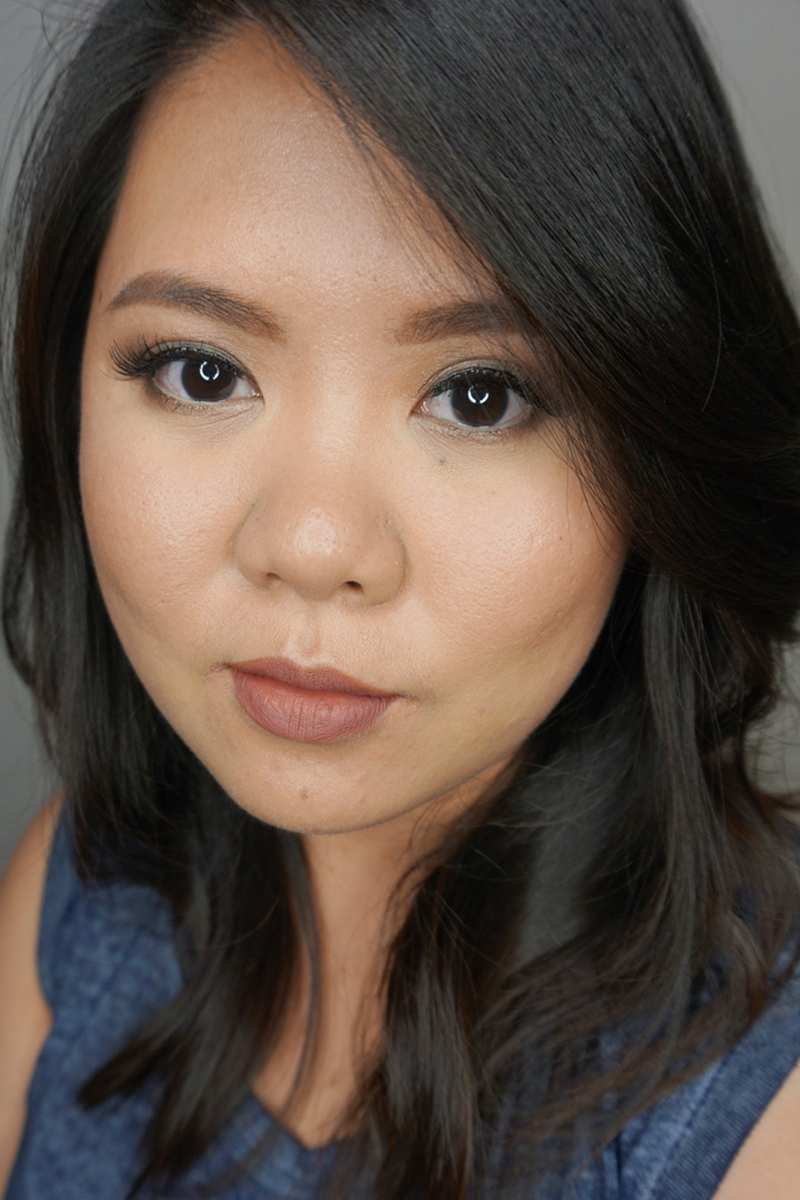
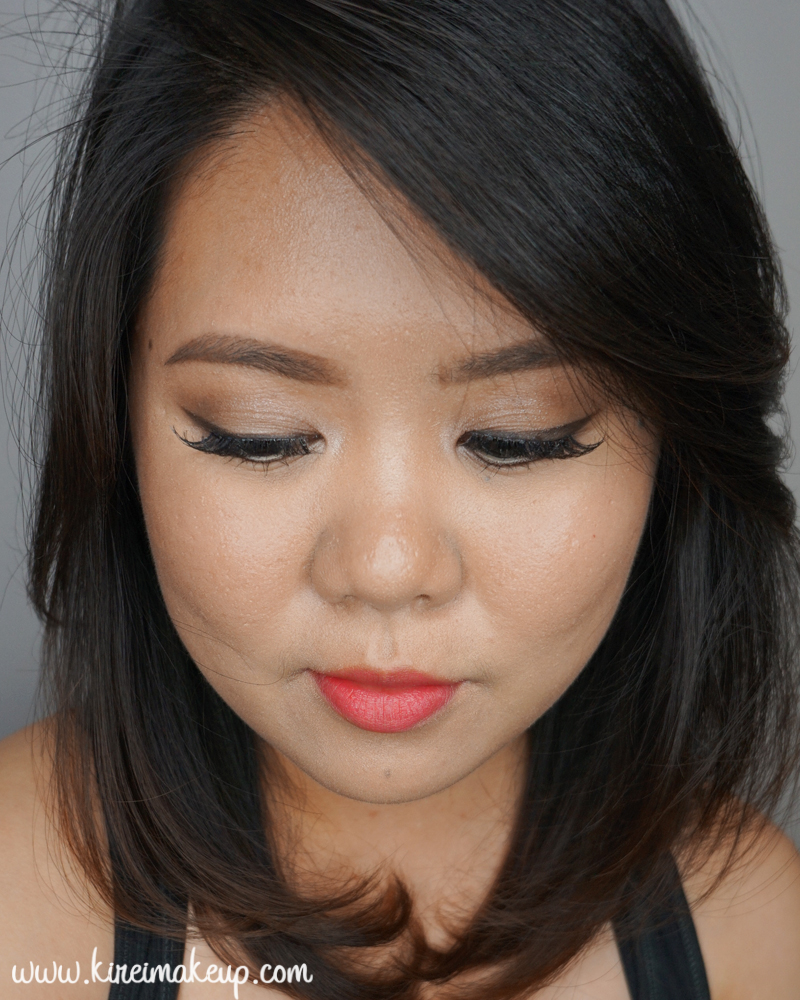
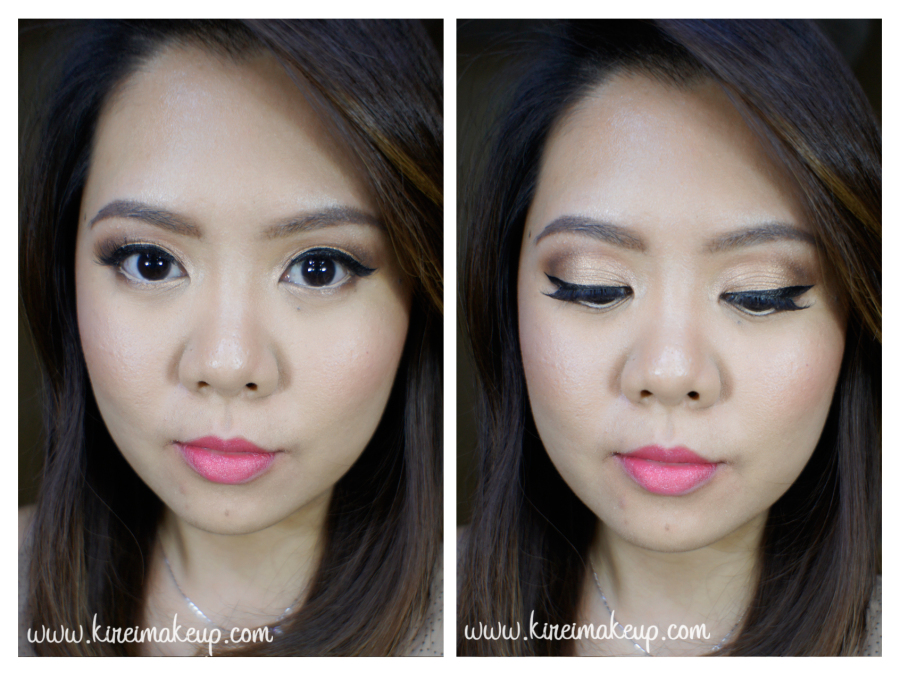
14c. I applied MAC Girl About Town on the lips using a lip brush. I had to add a bit more blush to avoid my face looking washed out for this look since the lips are quite bold.

This is another look which would look great for Spring/Summer Wedding. For brides who are a bit more adventurous, but not into red lips, this is definitely a look to try. What I love about MAC Girl About Town lipstick is that the color is not too fuchsia. It still has enough warm undertone to make it wearable for a wedding, and at the same time bright enough to give a punch of color.

fall bridal makeup

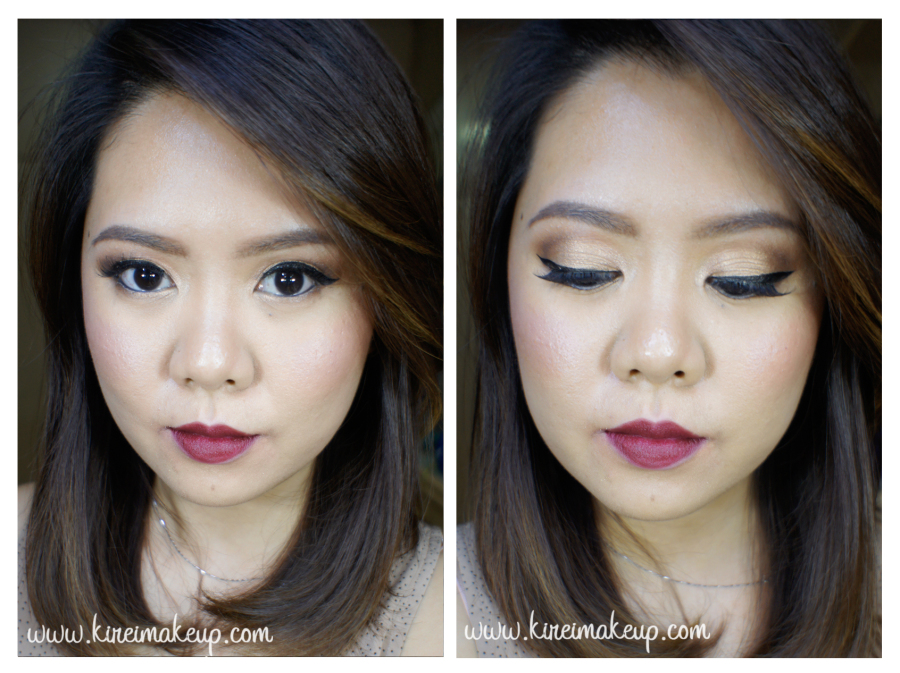
14d. For this lovely deep red, I first lined my lips using L’oreal Color Riche Anti-Feathering lip liner in True Burgundy. Then, I applied MAC Diva lipstick on top of it. (The blush was the same as 14c)

Last but not least, we have the makeup look for a Fall/Winter wedding. Of course you can choose the other lip colors for Fall/Winter wedding, but I really love this deep red lips look. Personally, this is my favorite look out of the 4. I chose to darken my waterline to compliment the deep red lips.

So, that’s all folks! I think everything is pretty self-explanatory from the photos. I’d like to say that  yes, you CAN wear all these makeup looks even if you aren’t a bride! Obviously some steps for bridal makeup are different than daily makeup, but that’s for next time! Yes, you can wear this look to a wedding party, or if you’re bridesmaids etc. Again, like I said, the way I applied and steps taken for bridal makeup is slightly different than daily or party makeup. You can tweak it to your preference!


Products used

Eyes – Urban Decay Primer potion; Too Faced Chocolate Bar eye palette (crease: Salted Caramel, outer V & lower lid: Triple Fudge/Semi Sweet, eyelid & lower lashline: Creme Brulee); Shu Uemura Calligraphy:ink liquid liner; MAC Chromagraphic pencil liner NC15 or L’oreal Voluminous Smoldering eyeliner; Anastasia Brow Wiz in Taupe and Brunette; Gwiyomi no. 3 falsies.

Face – MUFE HD elixir; MUFE HD foundation; Cover FX Translucent Powder.

Cheeks – Smashbox Contour kit; The Balm Mary-Lou; Chanel Blush de Horizon

Lips – Lancome Color Design Vintage Rose Sheen (a); YSL Pur Rouge Couture no. 52 (b); MAC Girl About Town (c); L’oreal Color Riche lipliner in True Burgundy and MAC Diva (d)

Daytime Bronze Smokey Eyes

Today’s post, Daytime Bronze smokey eyes, was actually a pending post from last week. I actually did this look after I did my brows video. Since I was uber busy last week (Shu Uemura competition, work and stuff), I didn’t have the chance to post this tutorial up. I also want to mention that I will not be posting any tutorial until end of this week, so I apologize for missing again. However, do follow me on Instagram to find out what I’m up to! Instagram has been a place for me to micro-blog almost daily.

Anyways, for this look was a request over on Instagram by Sammie. She wanted me to do an easy golden smoky eyes that she can wear during daytime. The key to this look is to keep the black to a minimum if you are going to wear it out for a day makeup. The usual smoky eyes are quite strong and dark, meawhile for this look I kept it quite light and not as intense. I smudged a lot of the black out, and skipped my usual black winged liner. Instead, I opted for a smudged eyeliner using powder. I kept the black on the waterline & tightline, but if you’re afraid that this will close your eyes up you can skip it. I just love black eyeliner on waterline & tightline for smoky eyes.

bronze makeup tutorial

I used Urban Decay Naked 1 palette for the eyeshadows. You can also find these shades in single pot from Urban Decay.

Brows are filled using Anastasia Brow Wiz in Medium Ash and Brunette.

How-to:

1. I applied Urban Decay Primer Potion in Sin all over my lid using my ring finger.

2. Using a fluffy blending brush, I applied Urban Decay Smog on the outer half of the lid, all the way to the crease.

3. I used Smashbox bullet crease brush to blend out the edges.

4. Using Sephora crease brush, I applied Urban Decay Darkhorse just to deepen the outer corner.

5. Using a shader brush, I applied Urban Decay Half-Baked on the eyelid.

6. I applied Smog on the outer half of the lower lash line, and Half-Baked on the inner half using an angled eyebrow brush.

7. I applied Urban Decay Creep along the upper lash line and outer third of lower lash line using an angled eyeliner brush.

8. I lined my waterline and tightline using L’oreal Voluminous Smoldering eyeliner.

9. I curled my lashes and applied Make Up For Ever Aqua Smoky Lash mascara on both upper and lower lashes.

daytime makeup

10. For my face, I applied Smashbox Halo Liquid foundation and Cover FX cream foundation brush.

11. I lightly contoured my face using Benefit Hoola bronzer, and added highlight using MAC soft and gentle highlighter.

12. I applied Benefit Coralista blush on my cheeks.

13. On my lips, I applied Shu Uemura Lip Tint Gelato in 01.

golden bronze smoky eyes