Colorful Carnival Makeup

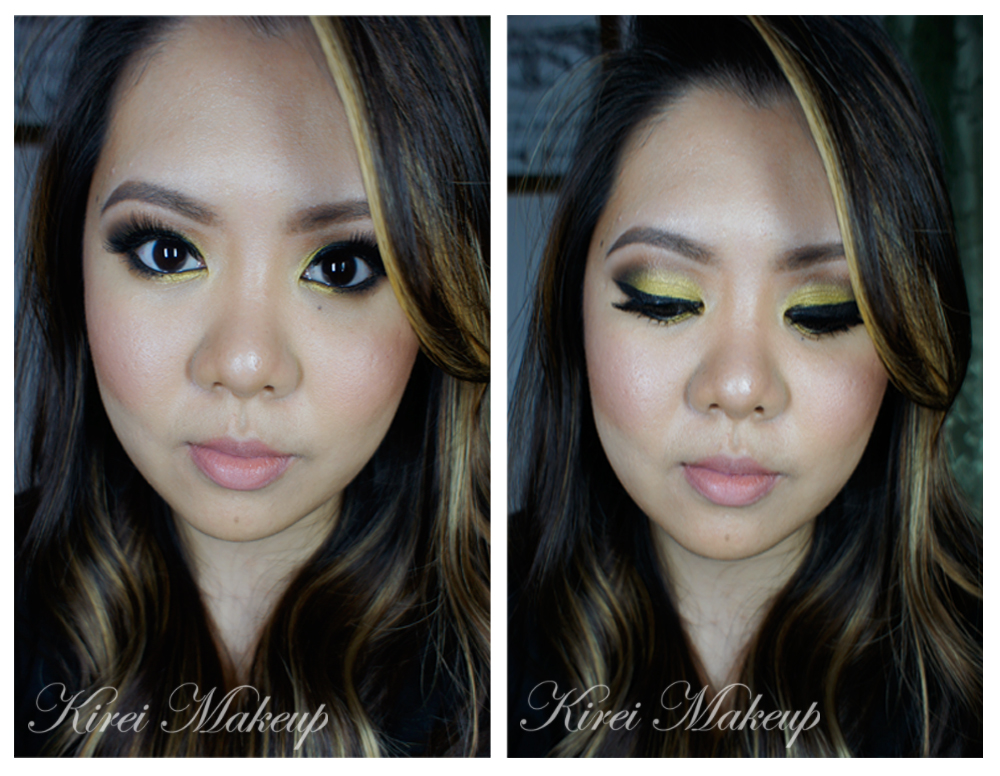
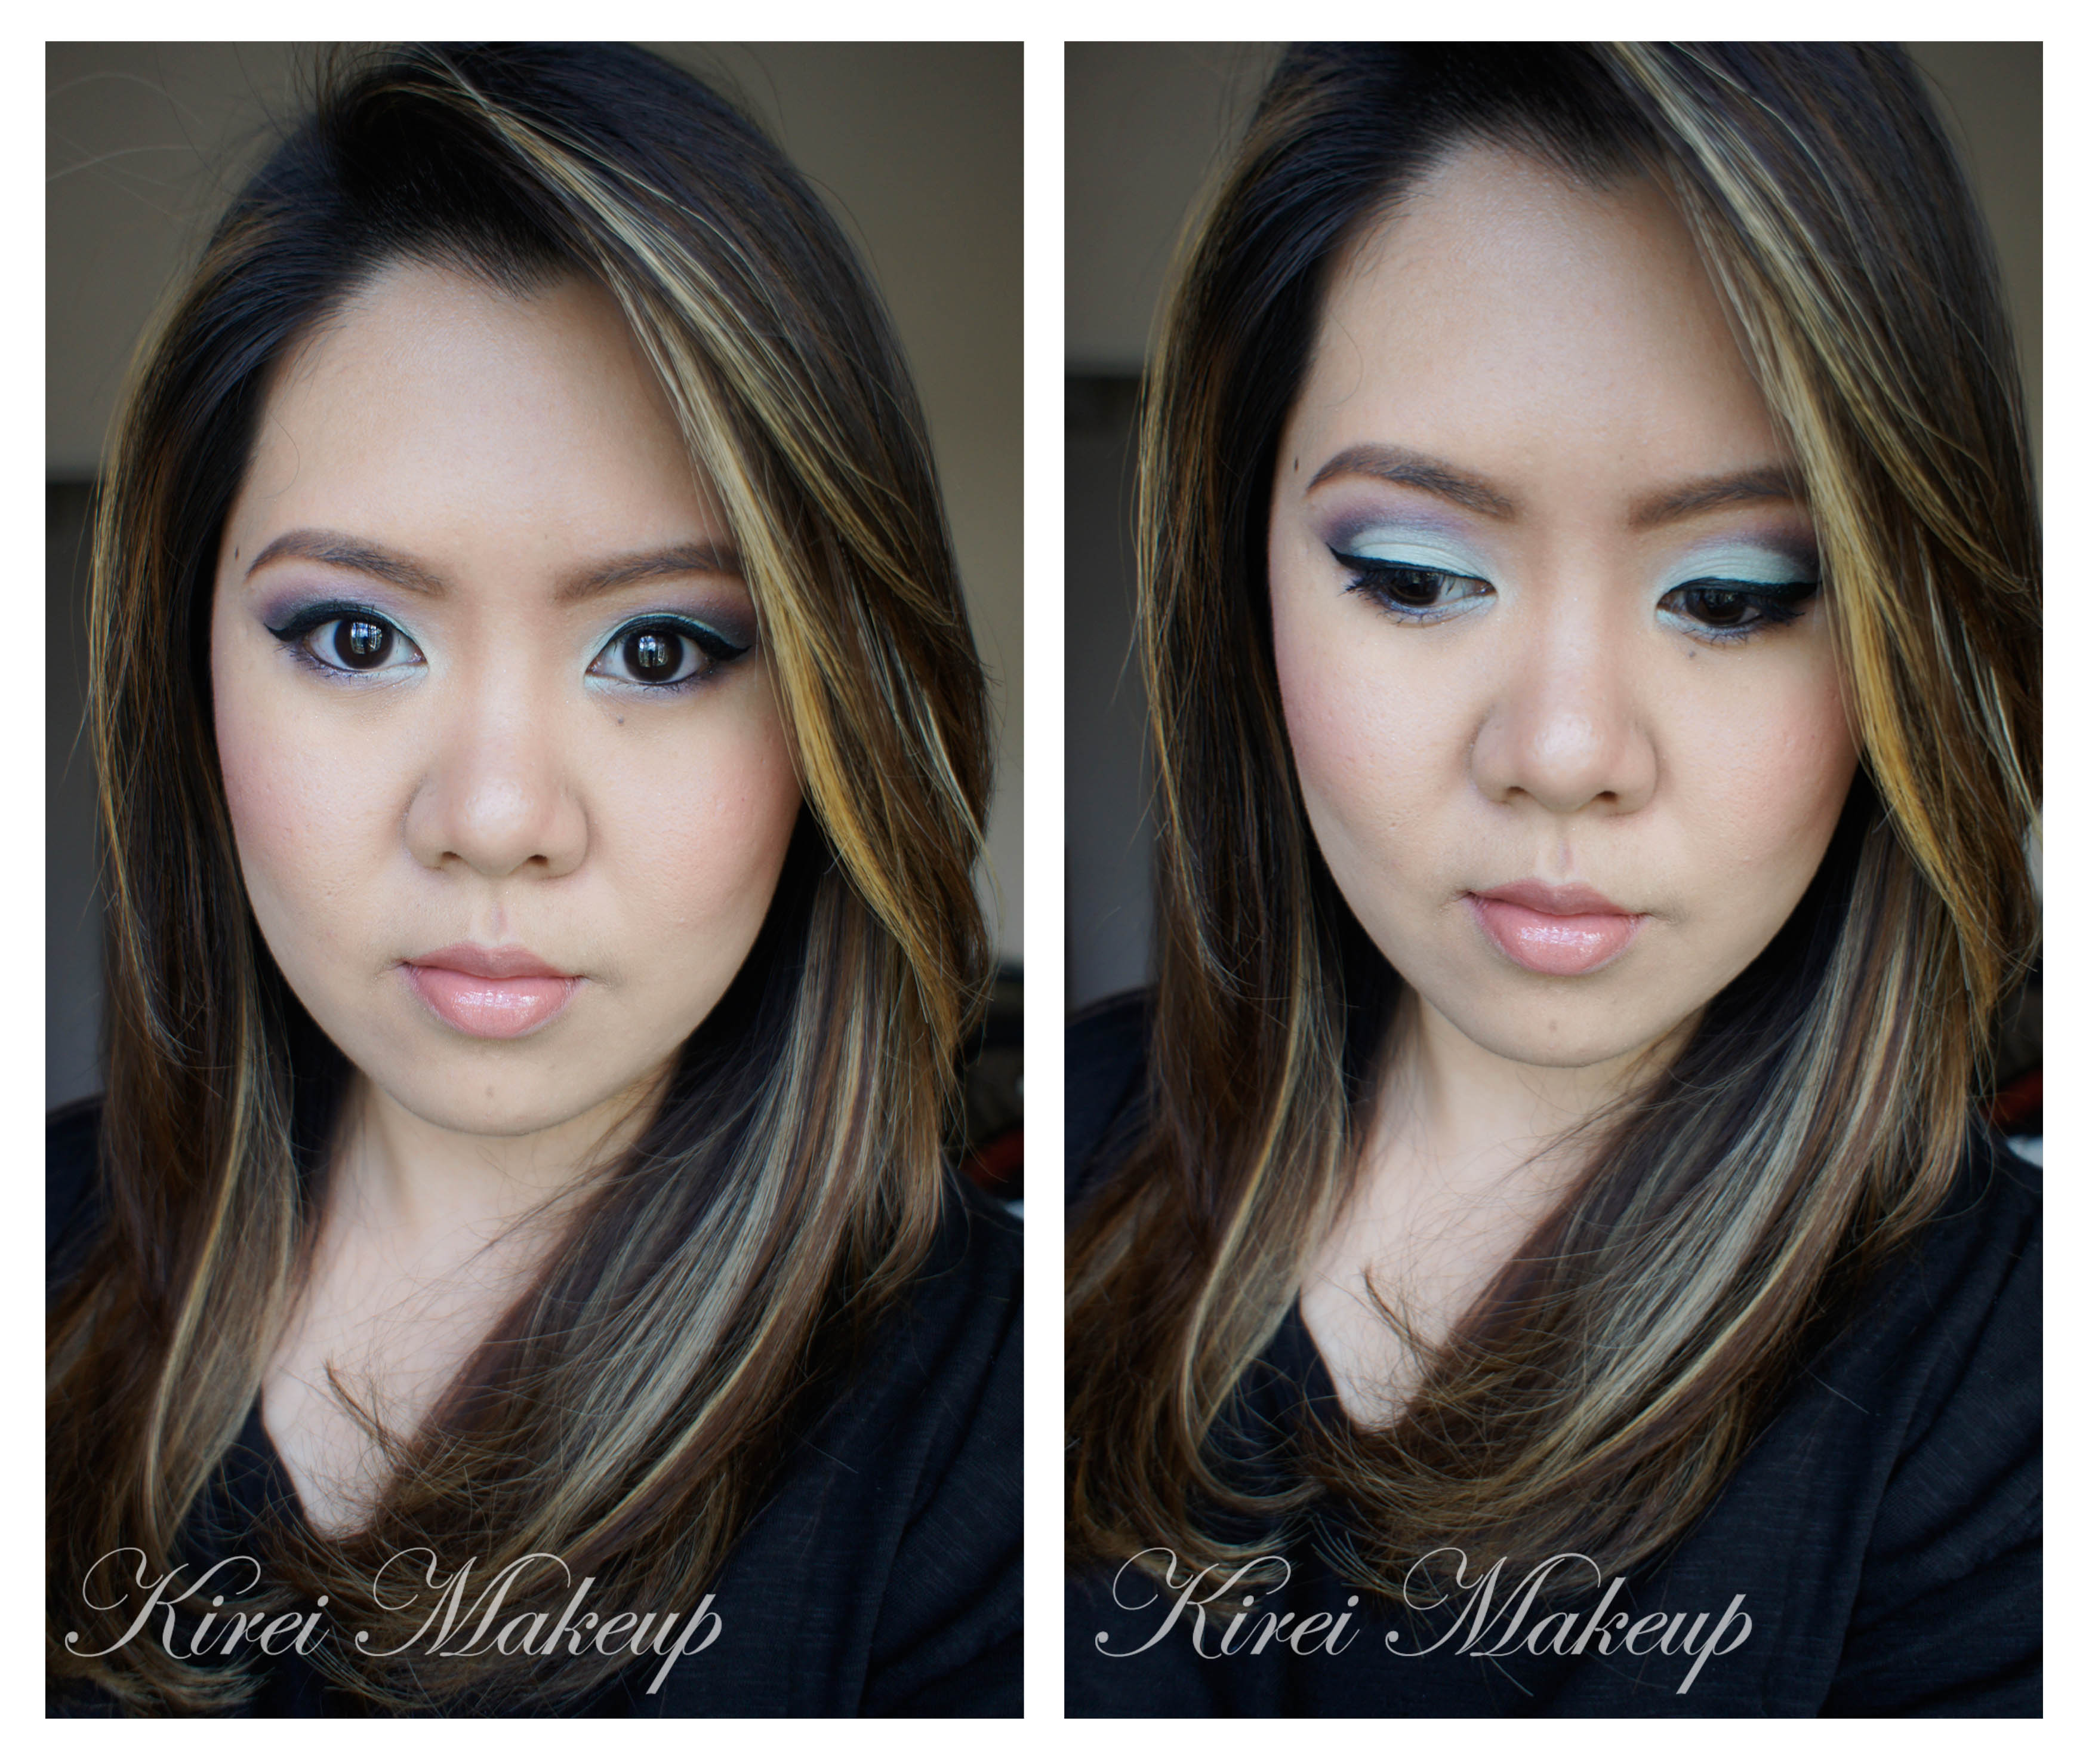
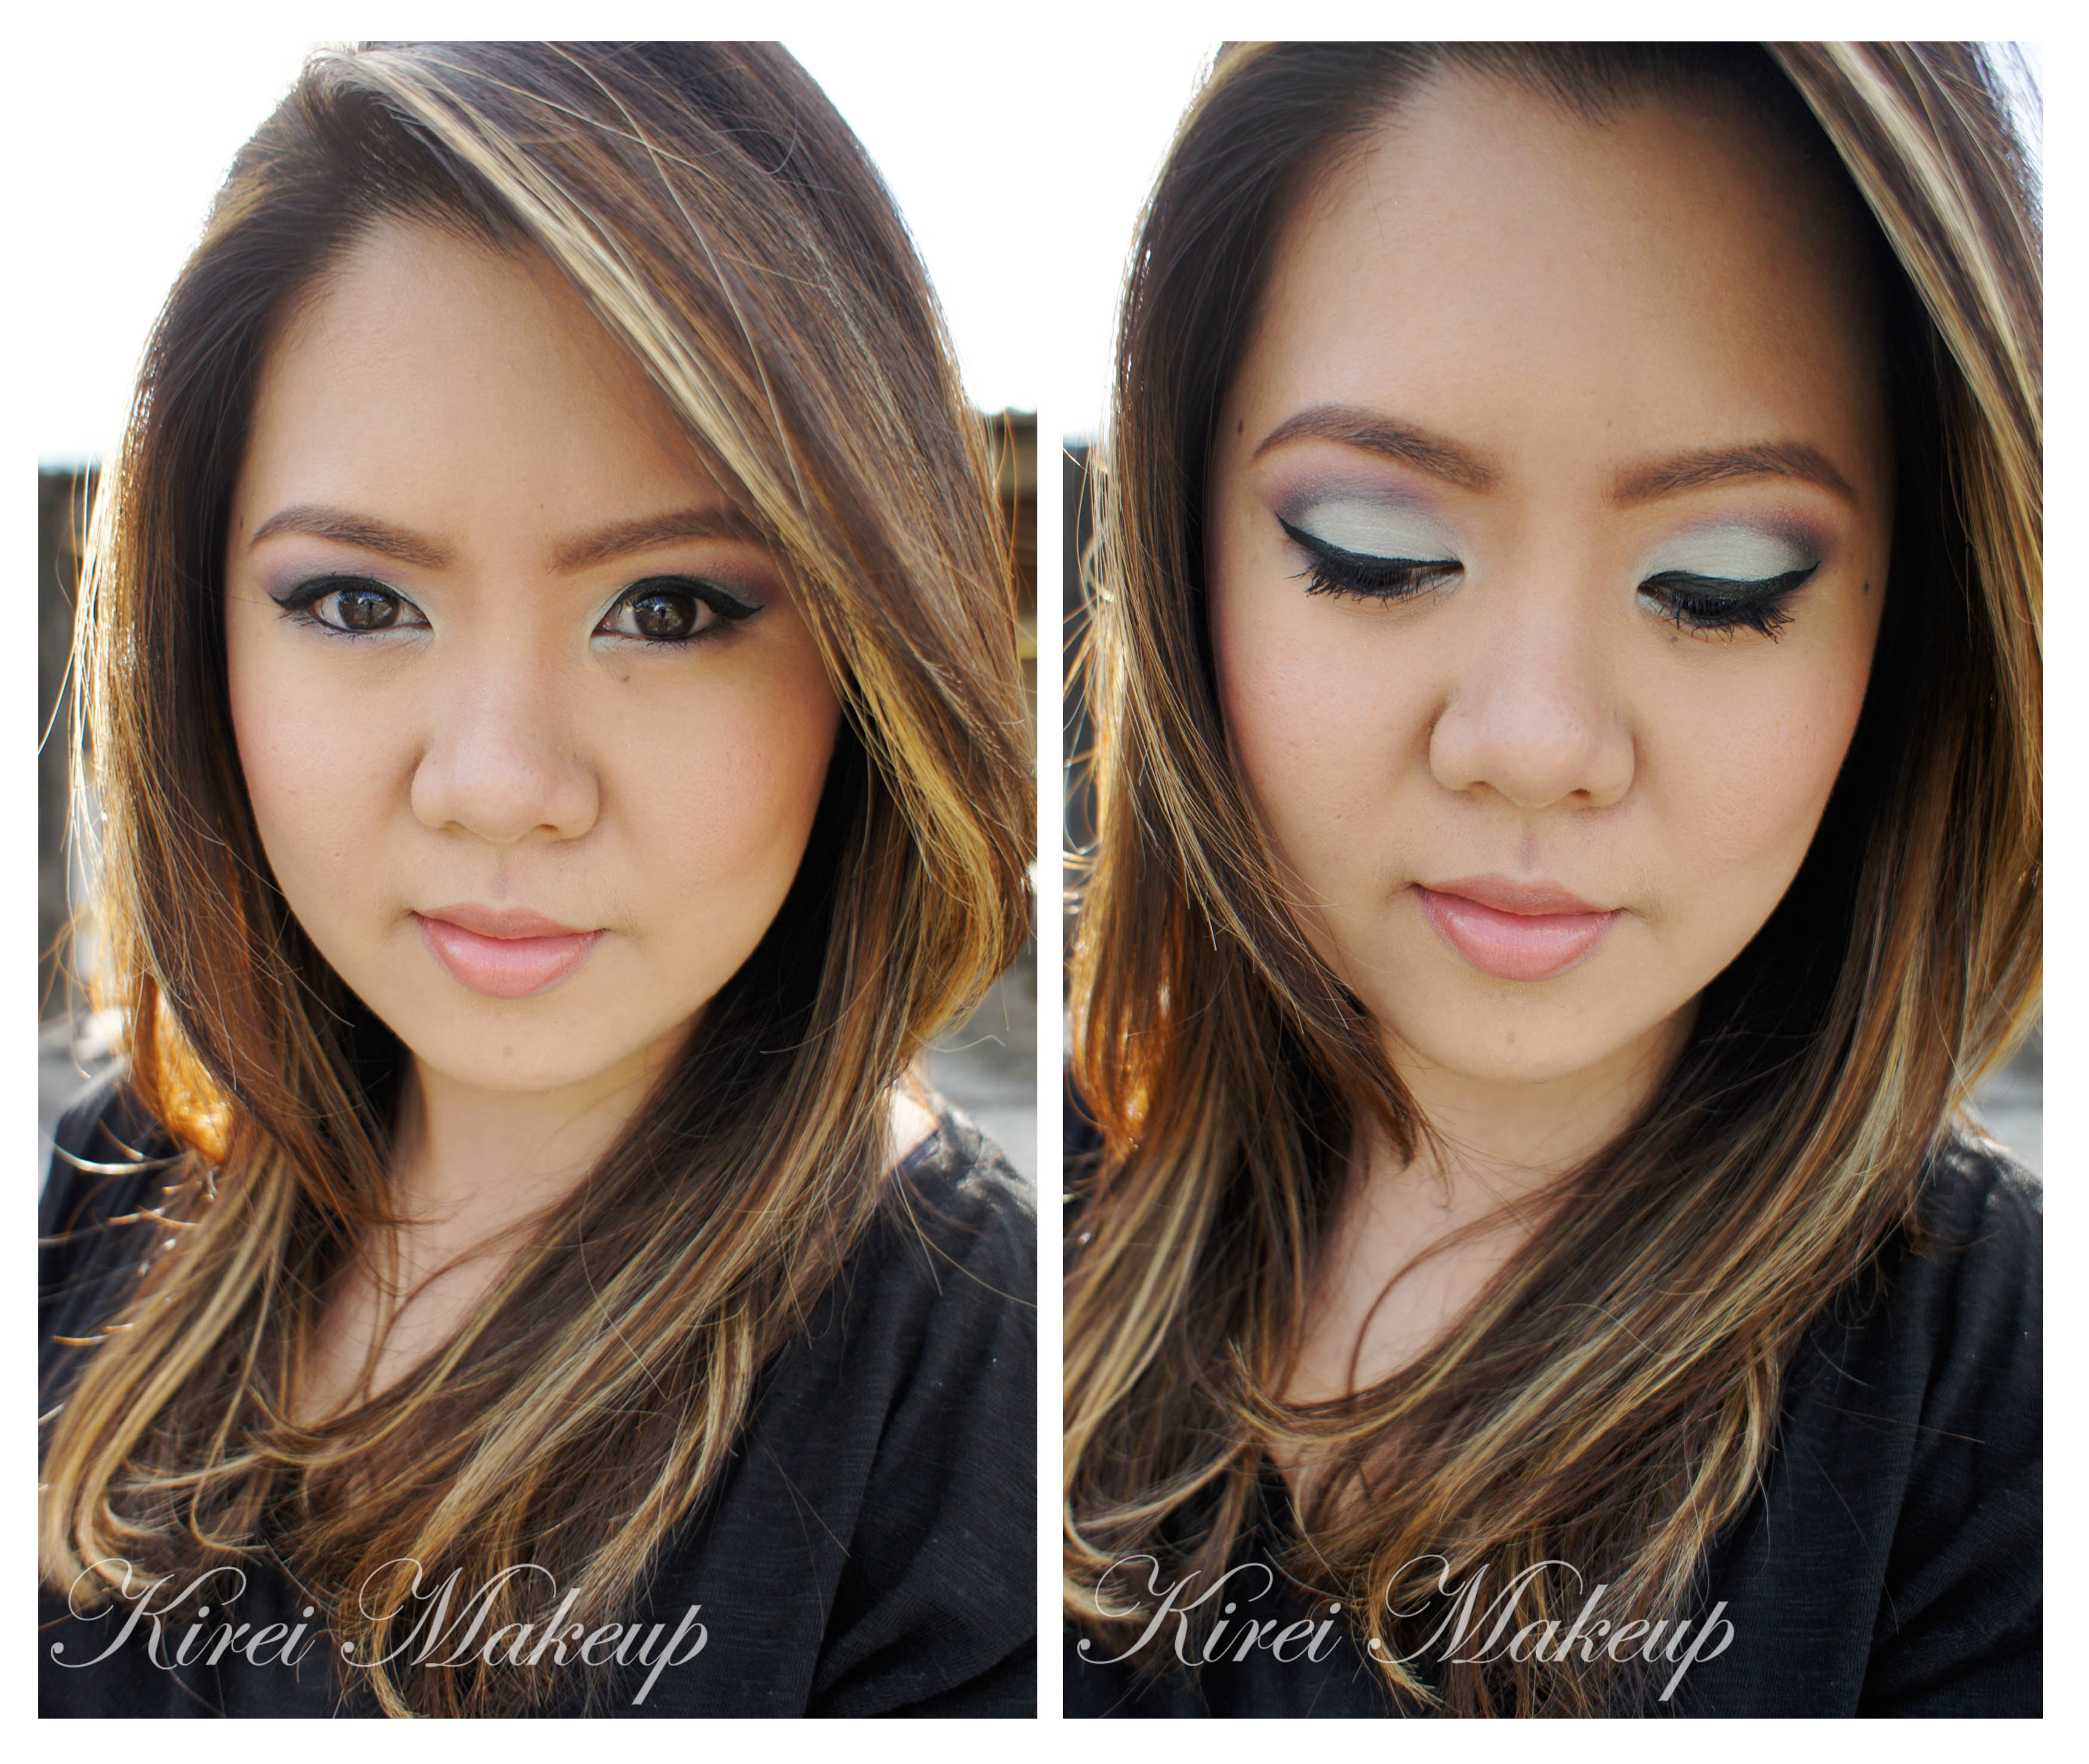
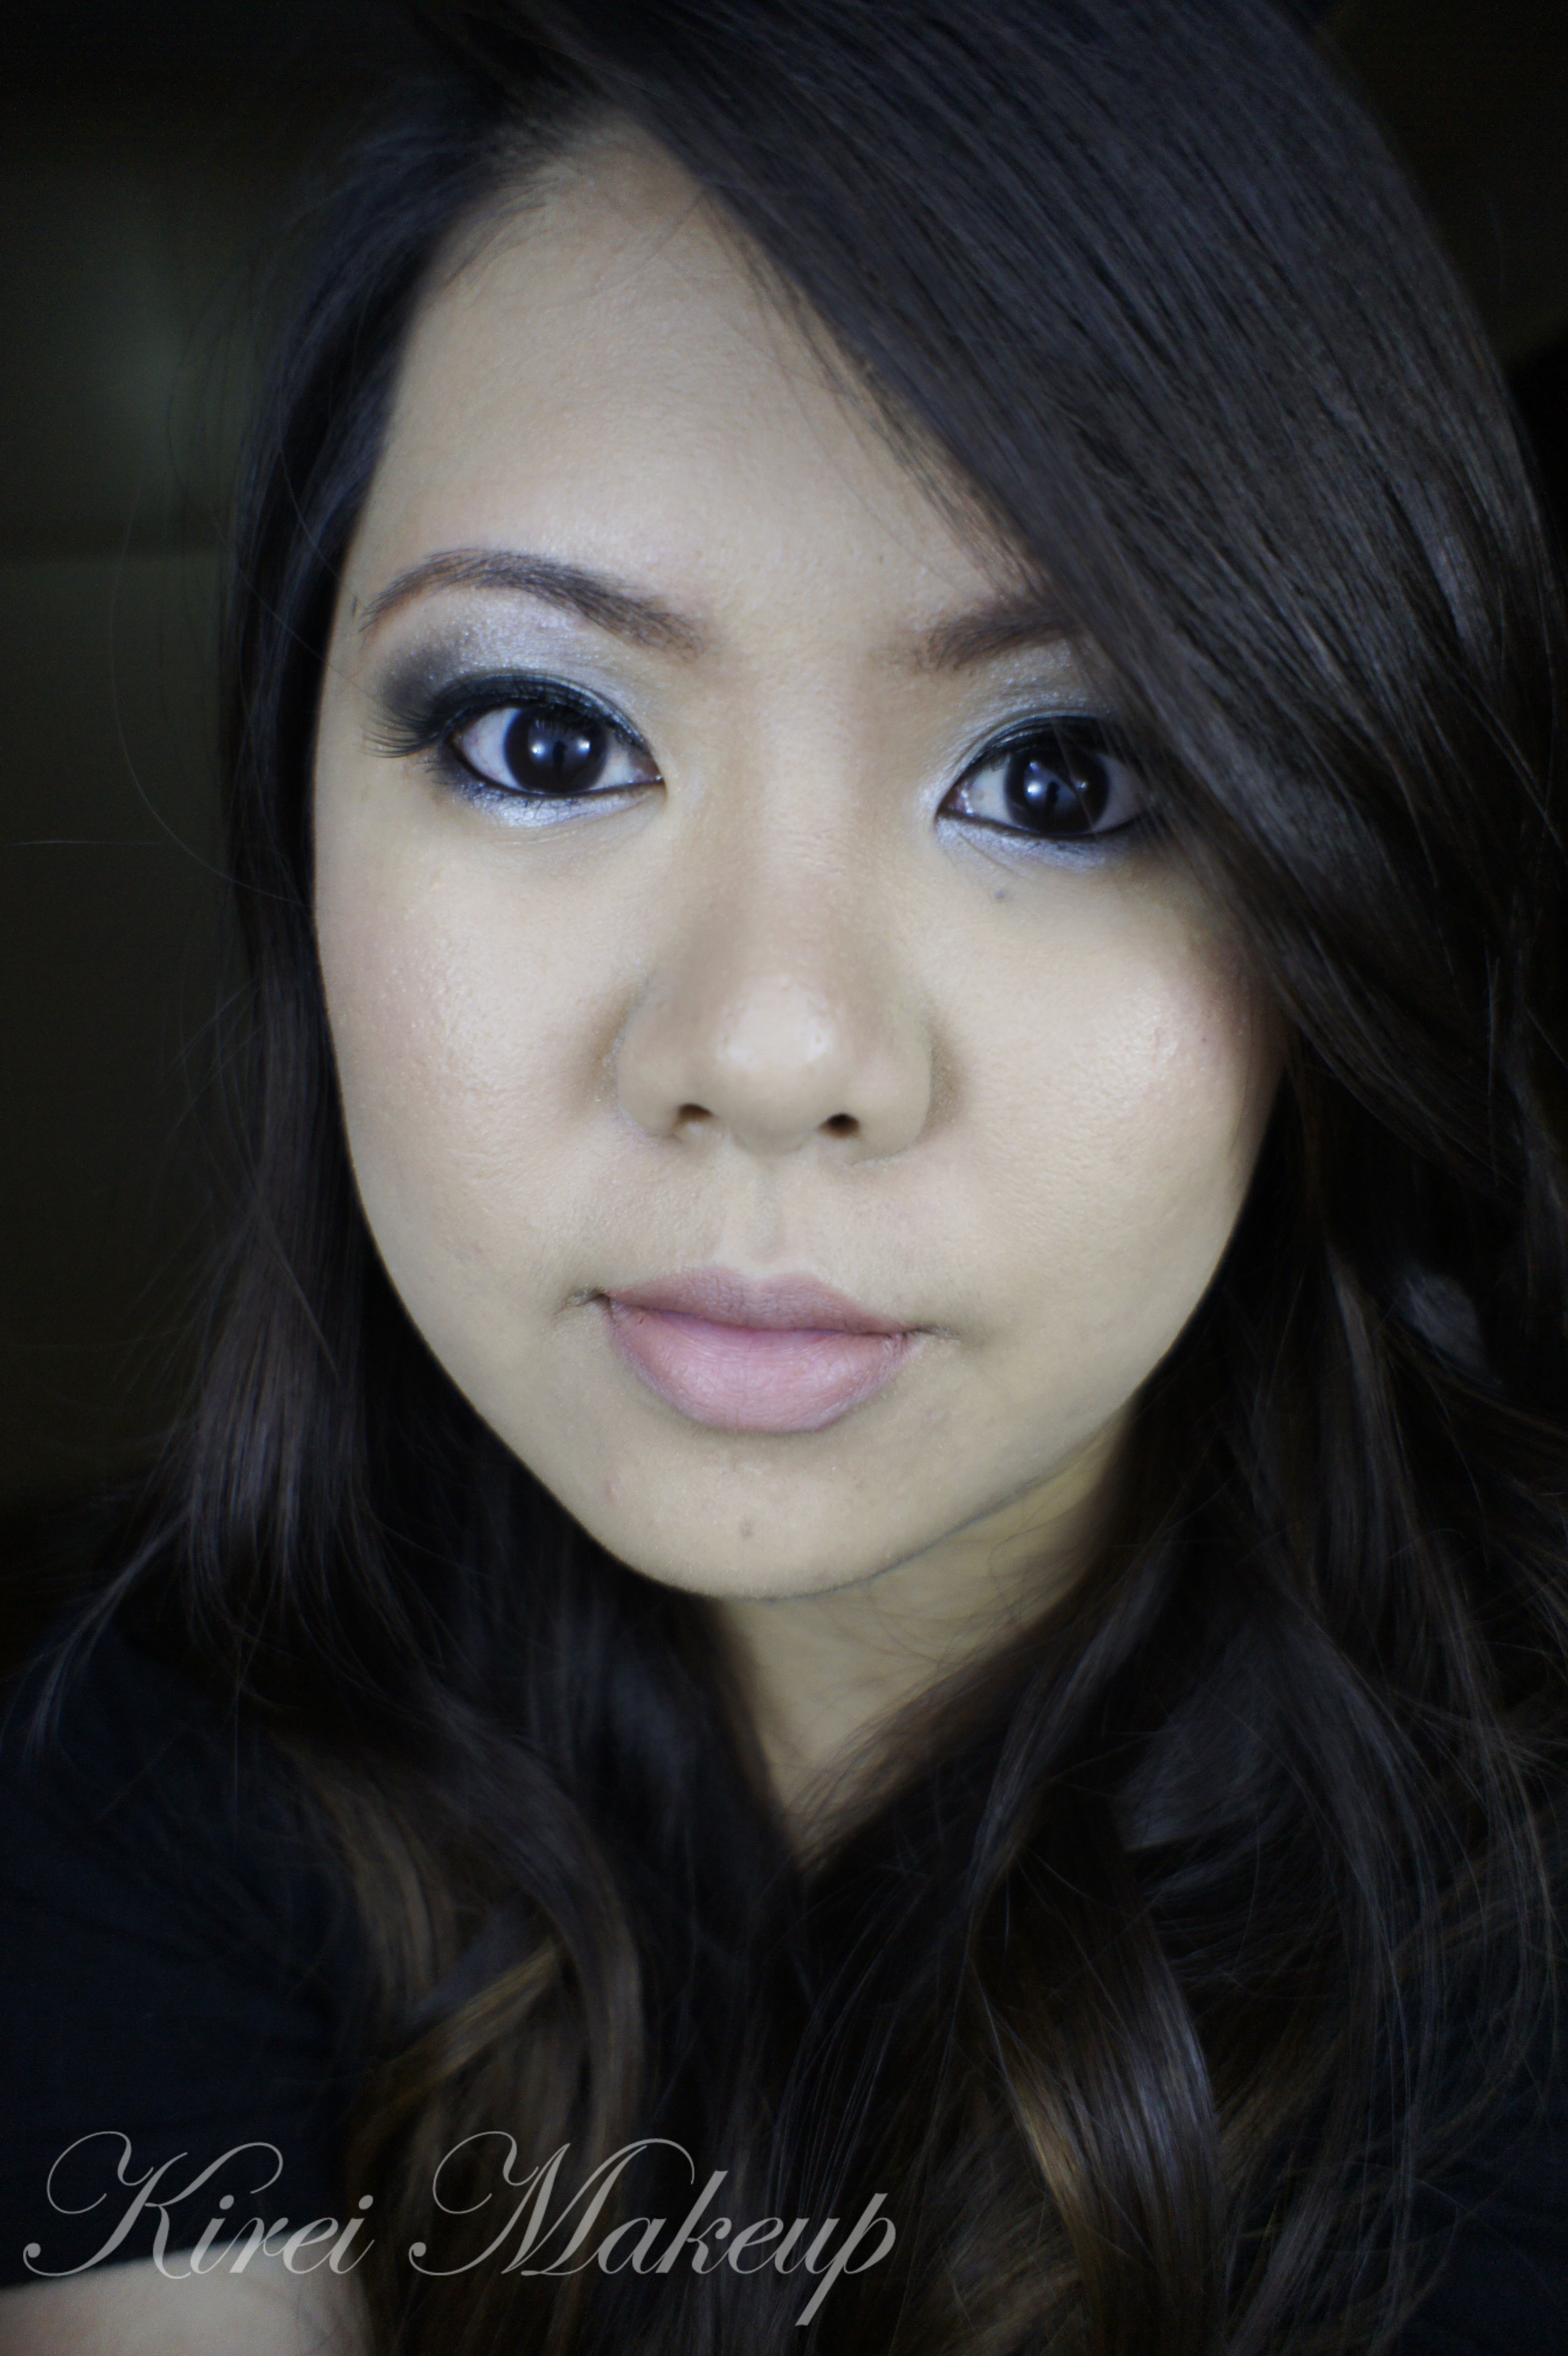
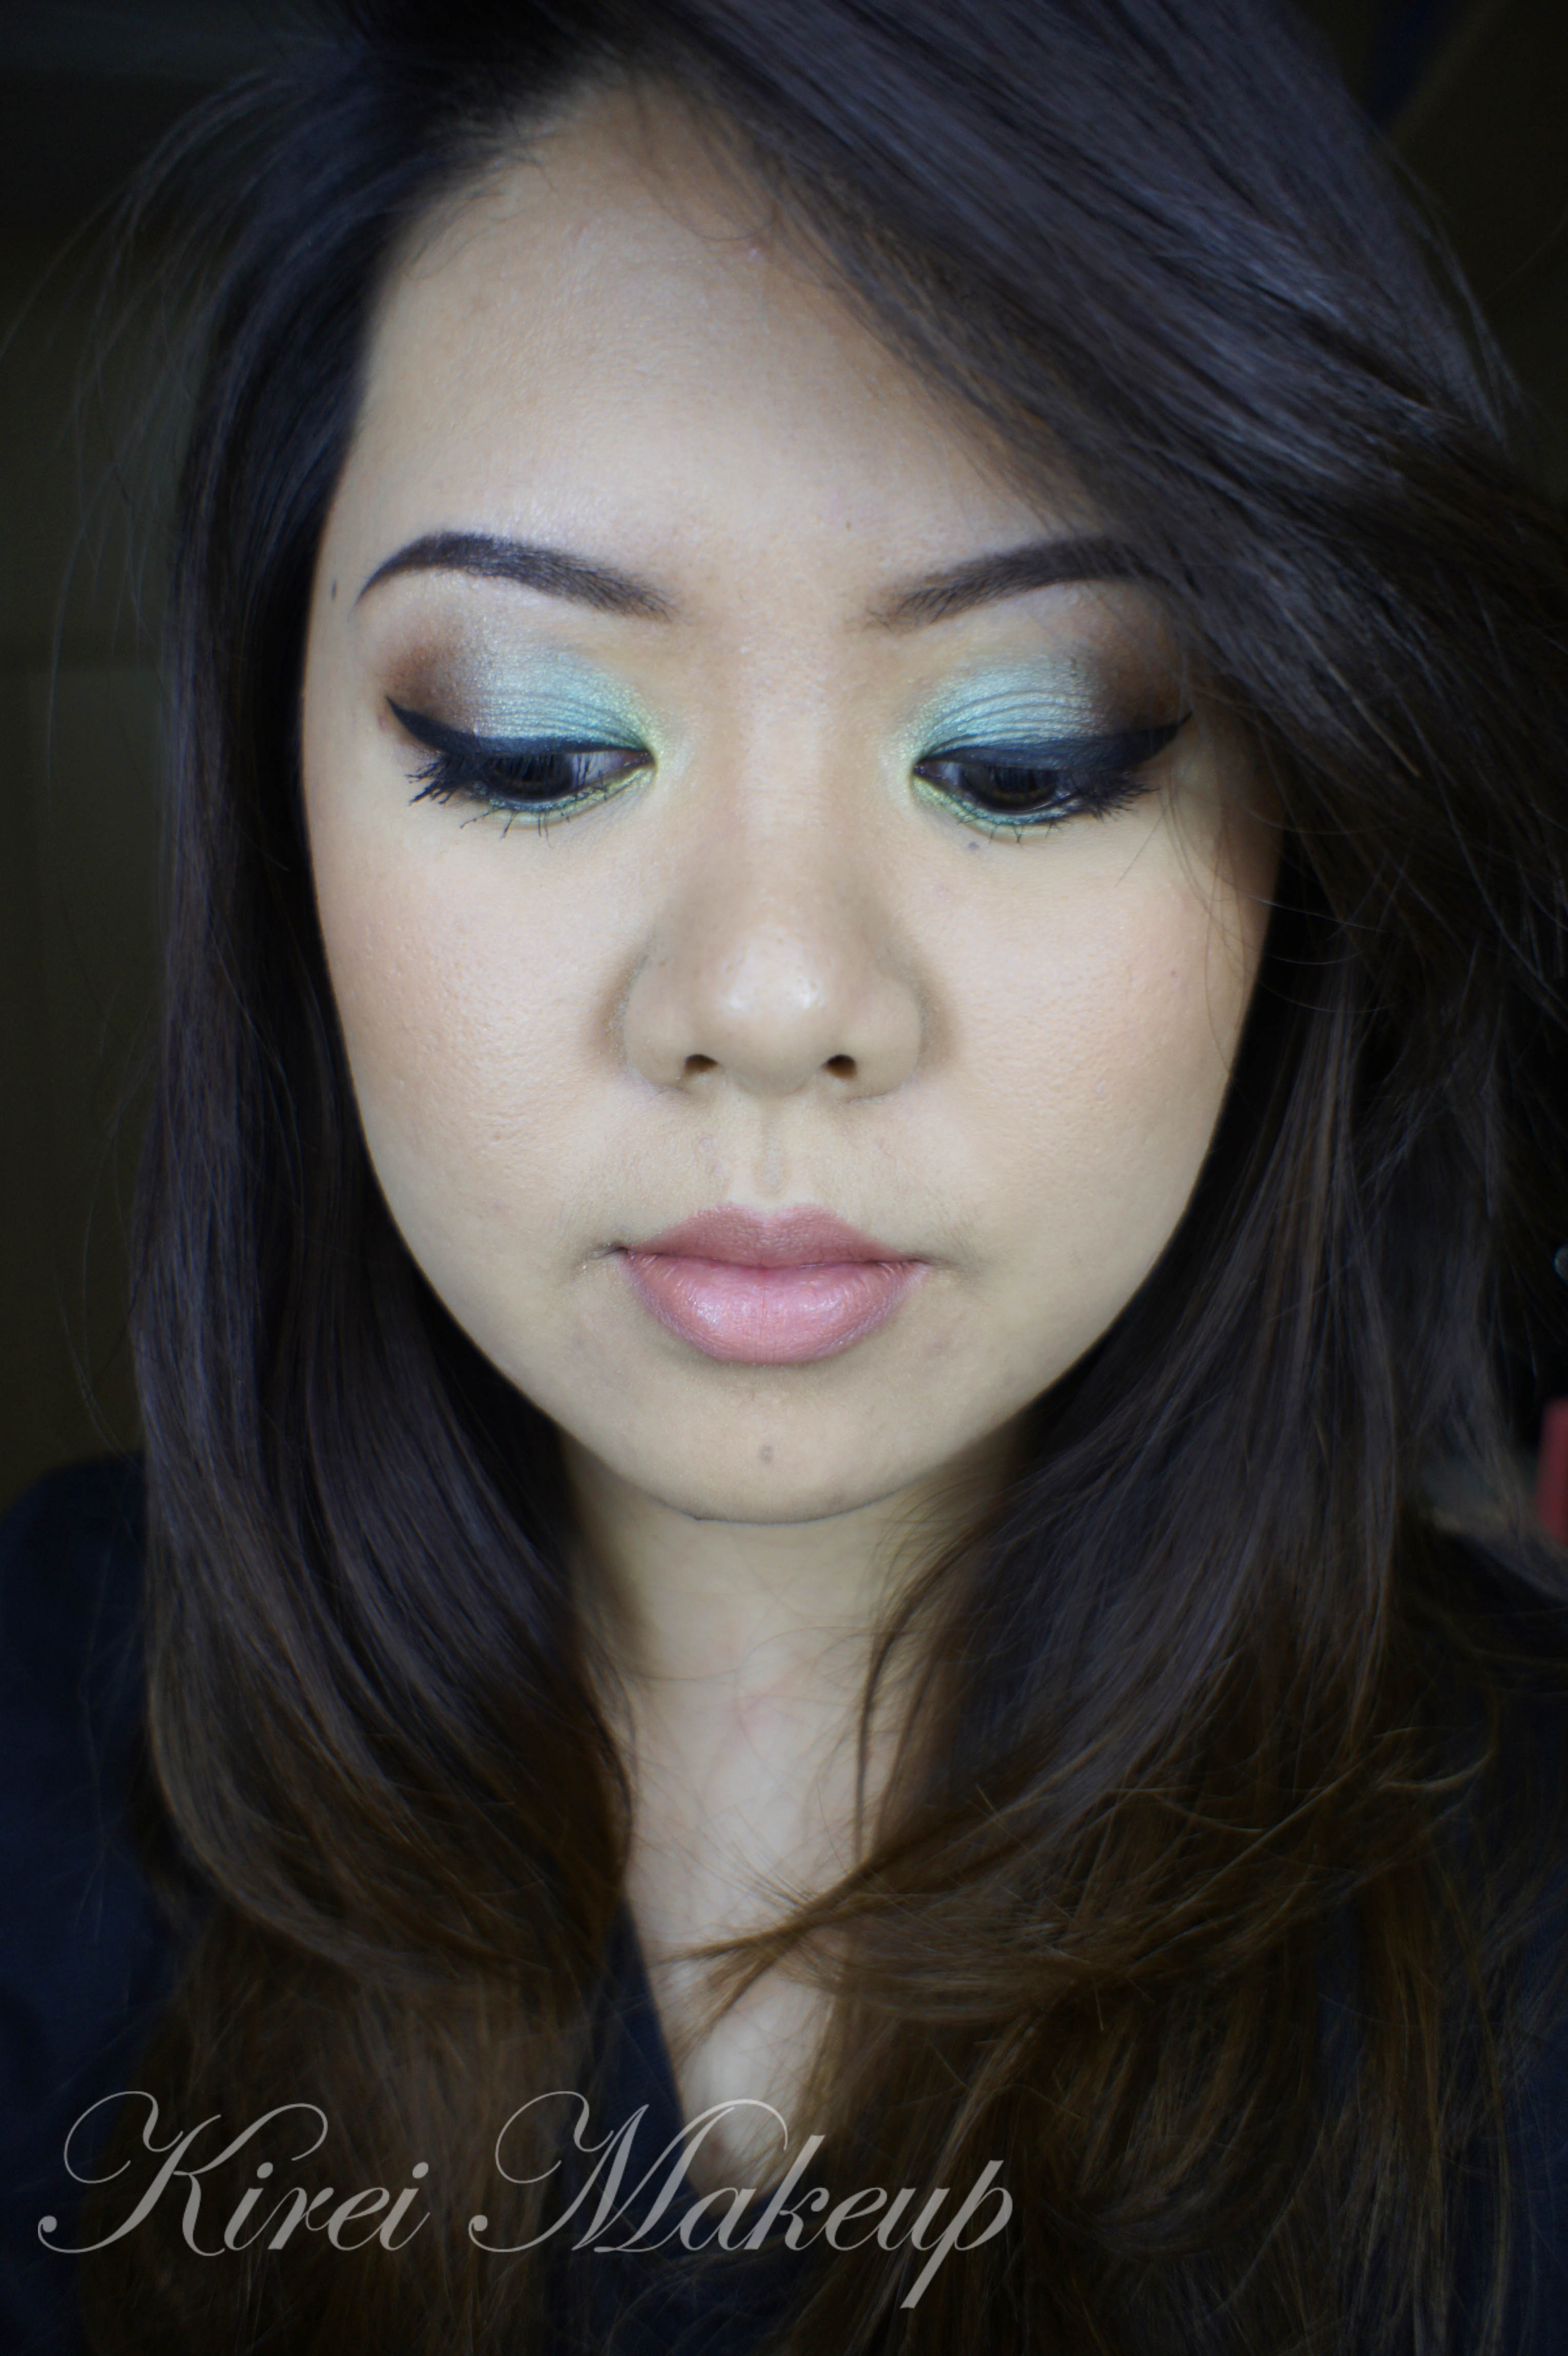
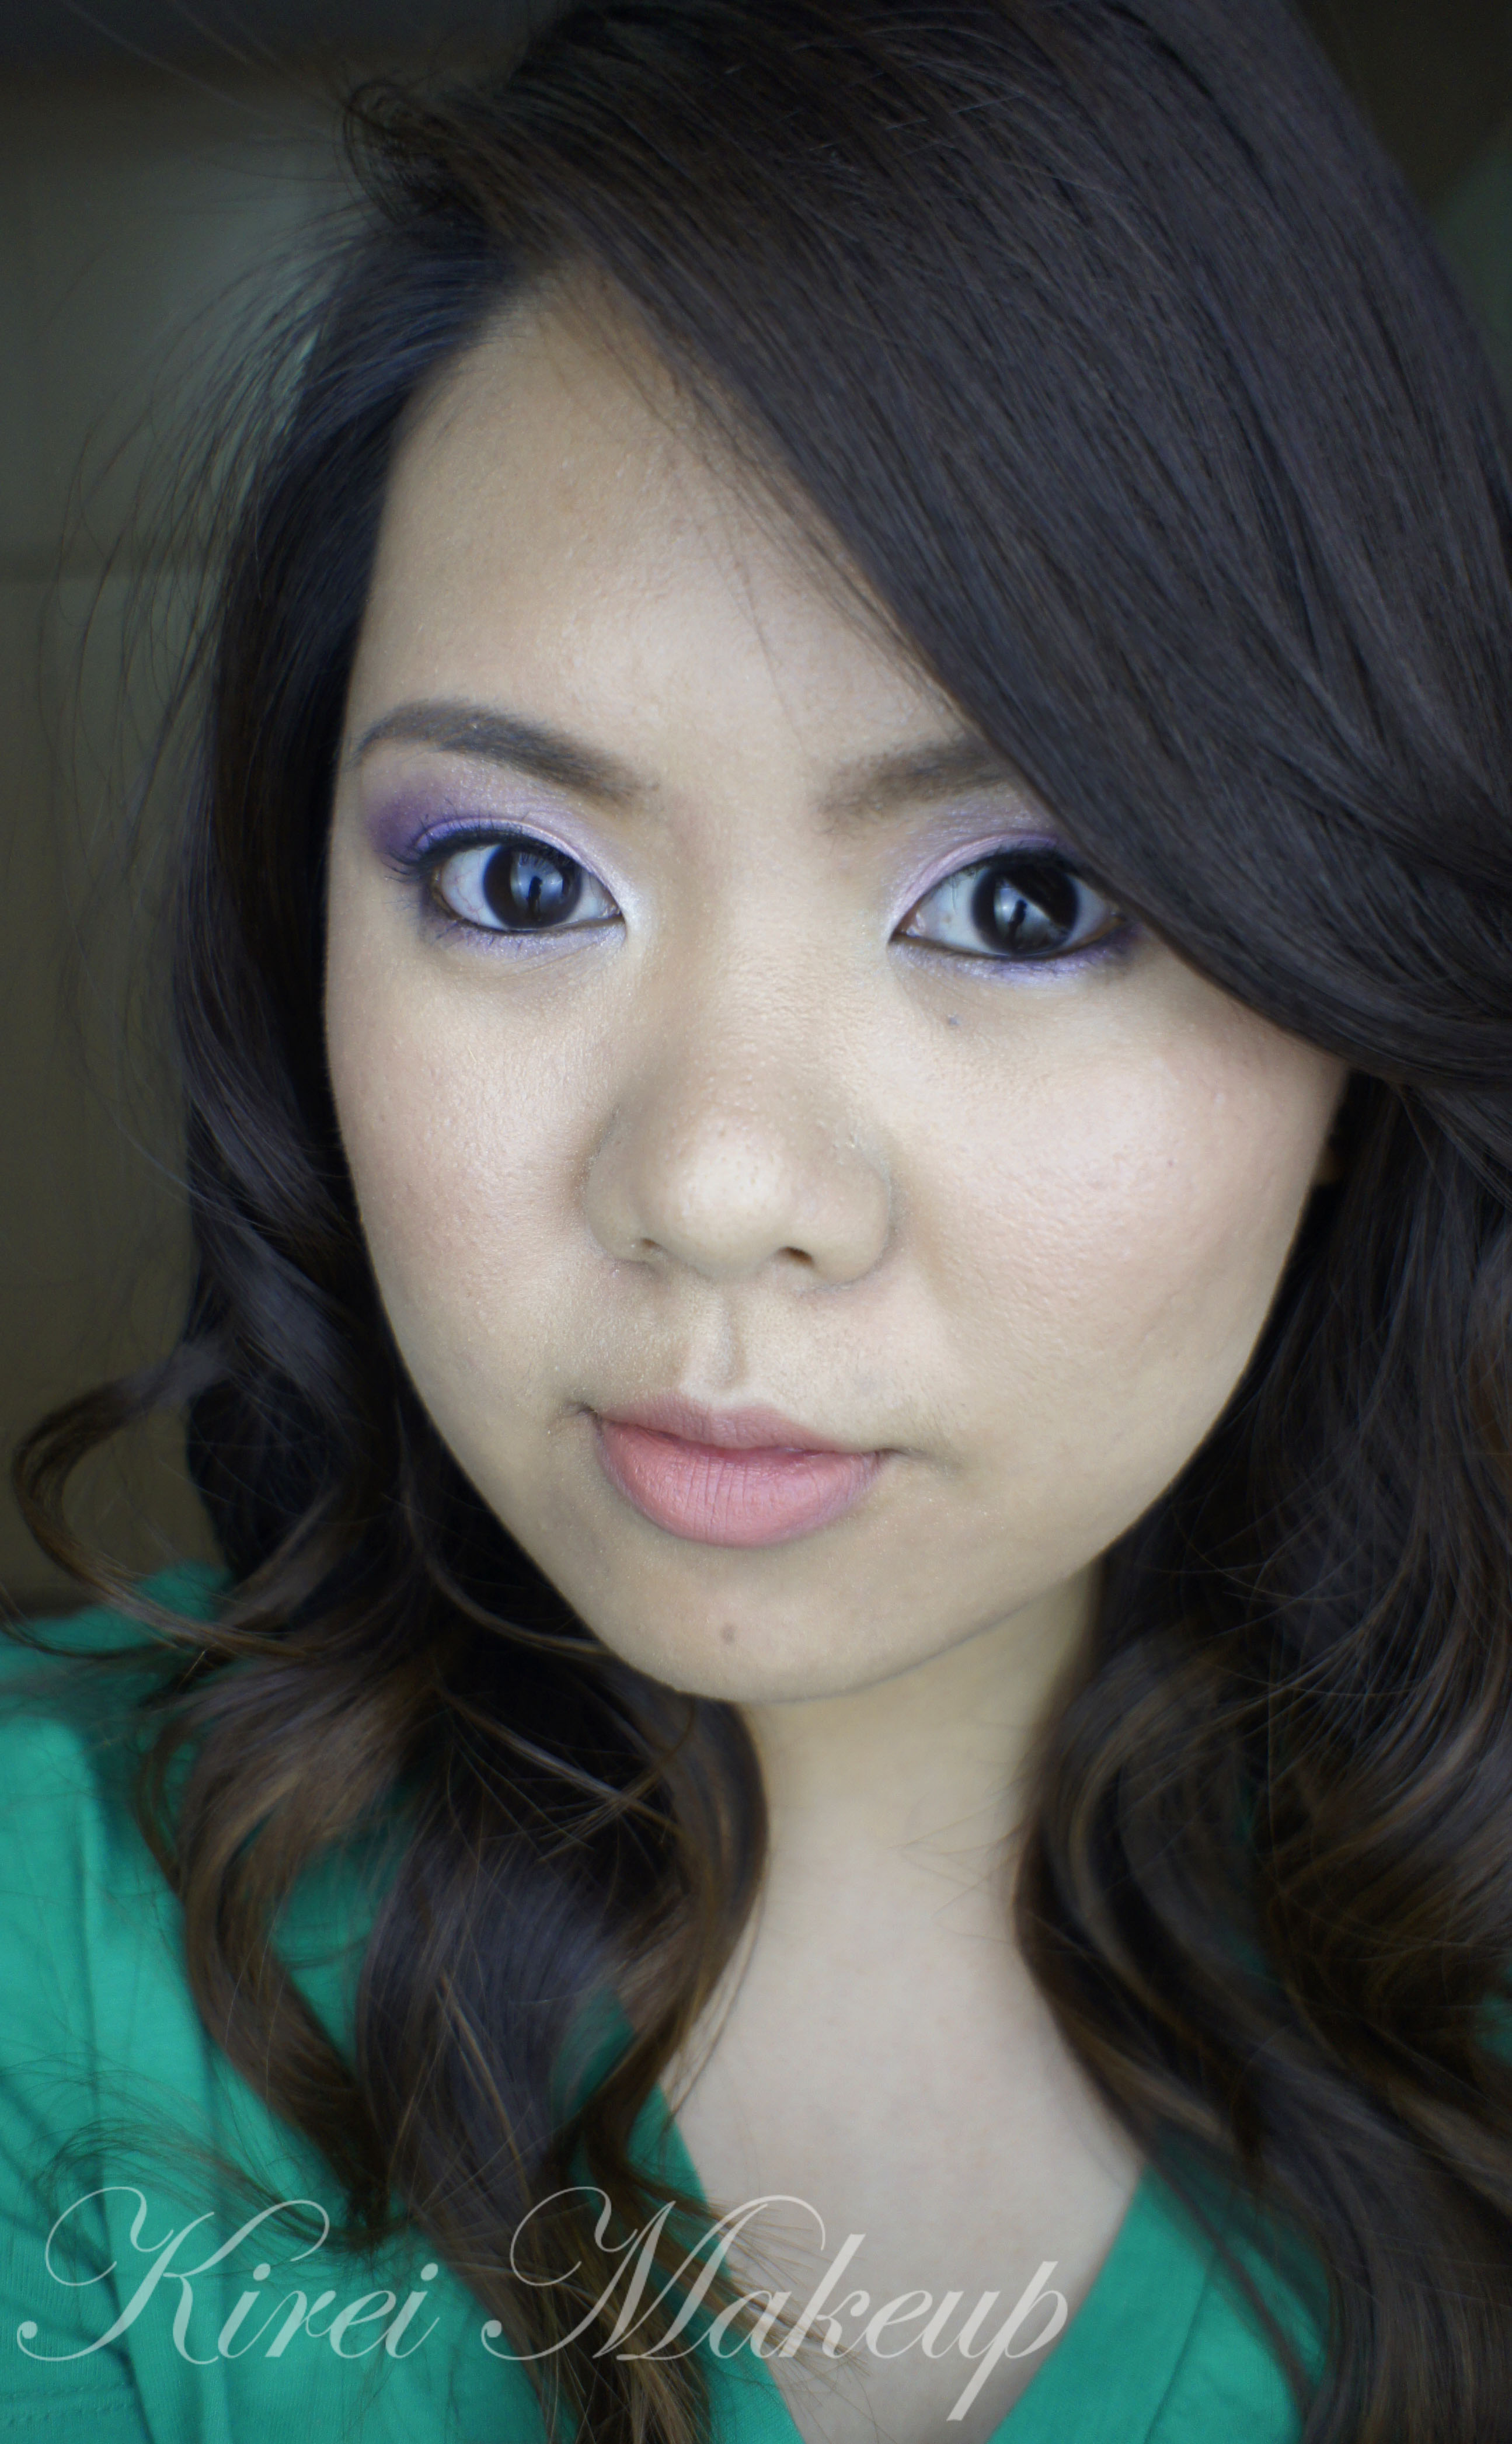
As Easter is approaching this weekend, and Carnival next weekend, I wanted to do a tutorial that incorporates super bright and really fun colors onto my makeup. This Colorful Carnival Makeup look is inspired by the ladies in Jamaica, who are unafraid to wear bright eyeshadows!

I used Sleek Makeup Ultra Matte Brights V1 for the eyeshadows since I really wanted to use matte eyeshadows for this look. If you do decide to use this palette for your makeup, I suggest that you use a white base (i.e. NYX Jumbo pencil in Milk) so the colors pop even more.

Again, don’t forget to check my Instagram for daily updates since I’ll be away from my laptop this weekend! Remember to TAG your work with #KIREIMAKEUP so I can see and get inspired by YOU! 😉

Scroll all the way down for products list.

sleek makeup matte bright tutorial

All eyeshadows used in this tutorial is from Sleek Makeup Ultra Matte Brights V1. If you are in Asia, and you want to buy this palette, please check Luxola website! Use the code LXBLOG for 15% off!
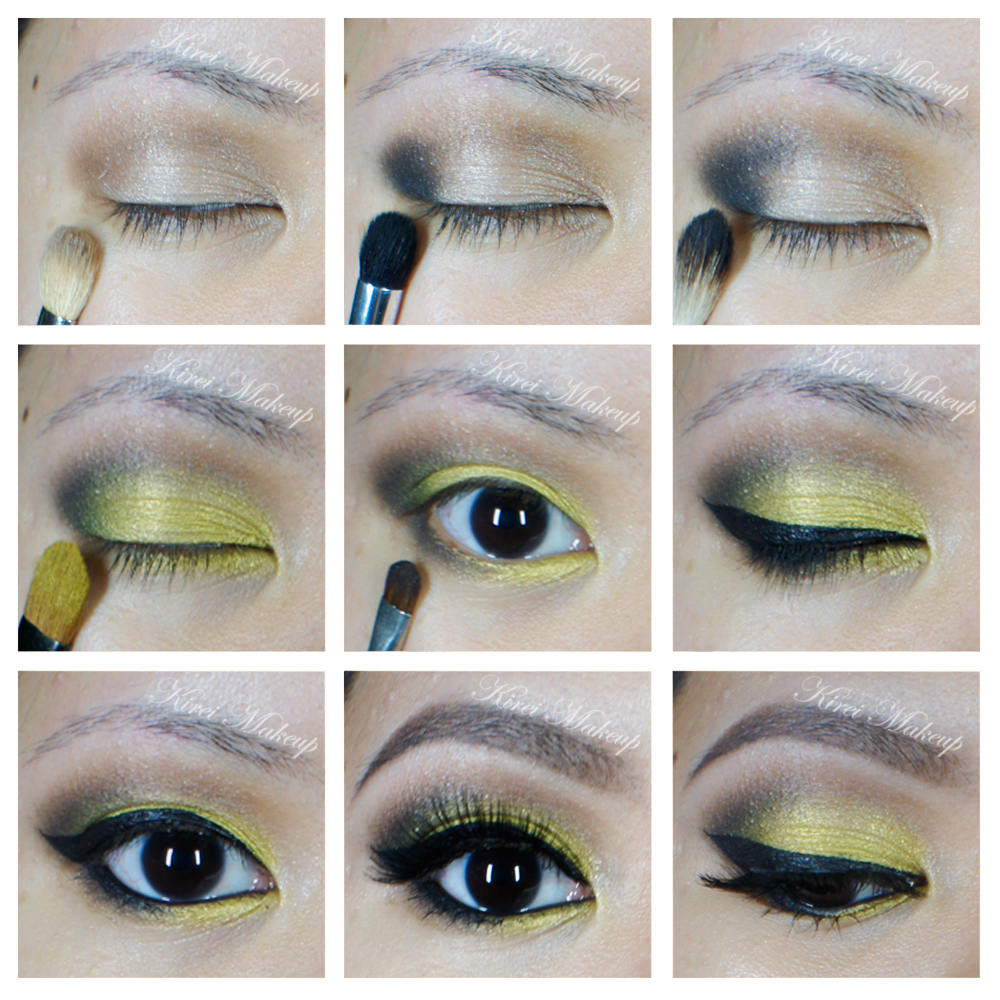
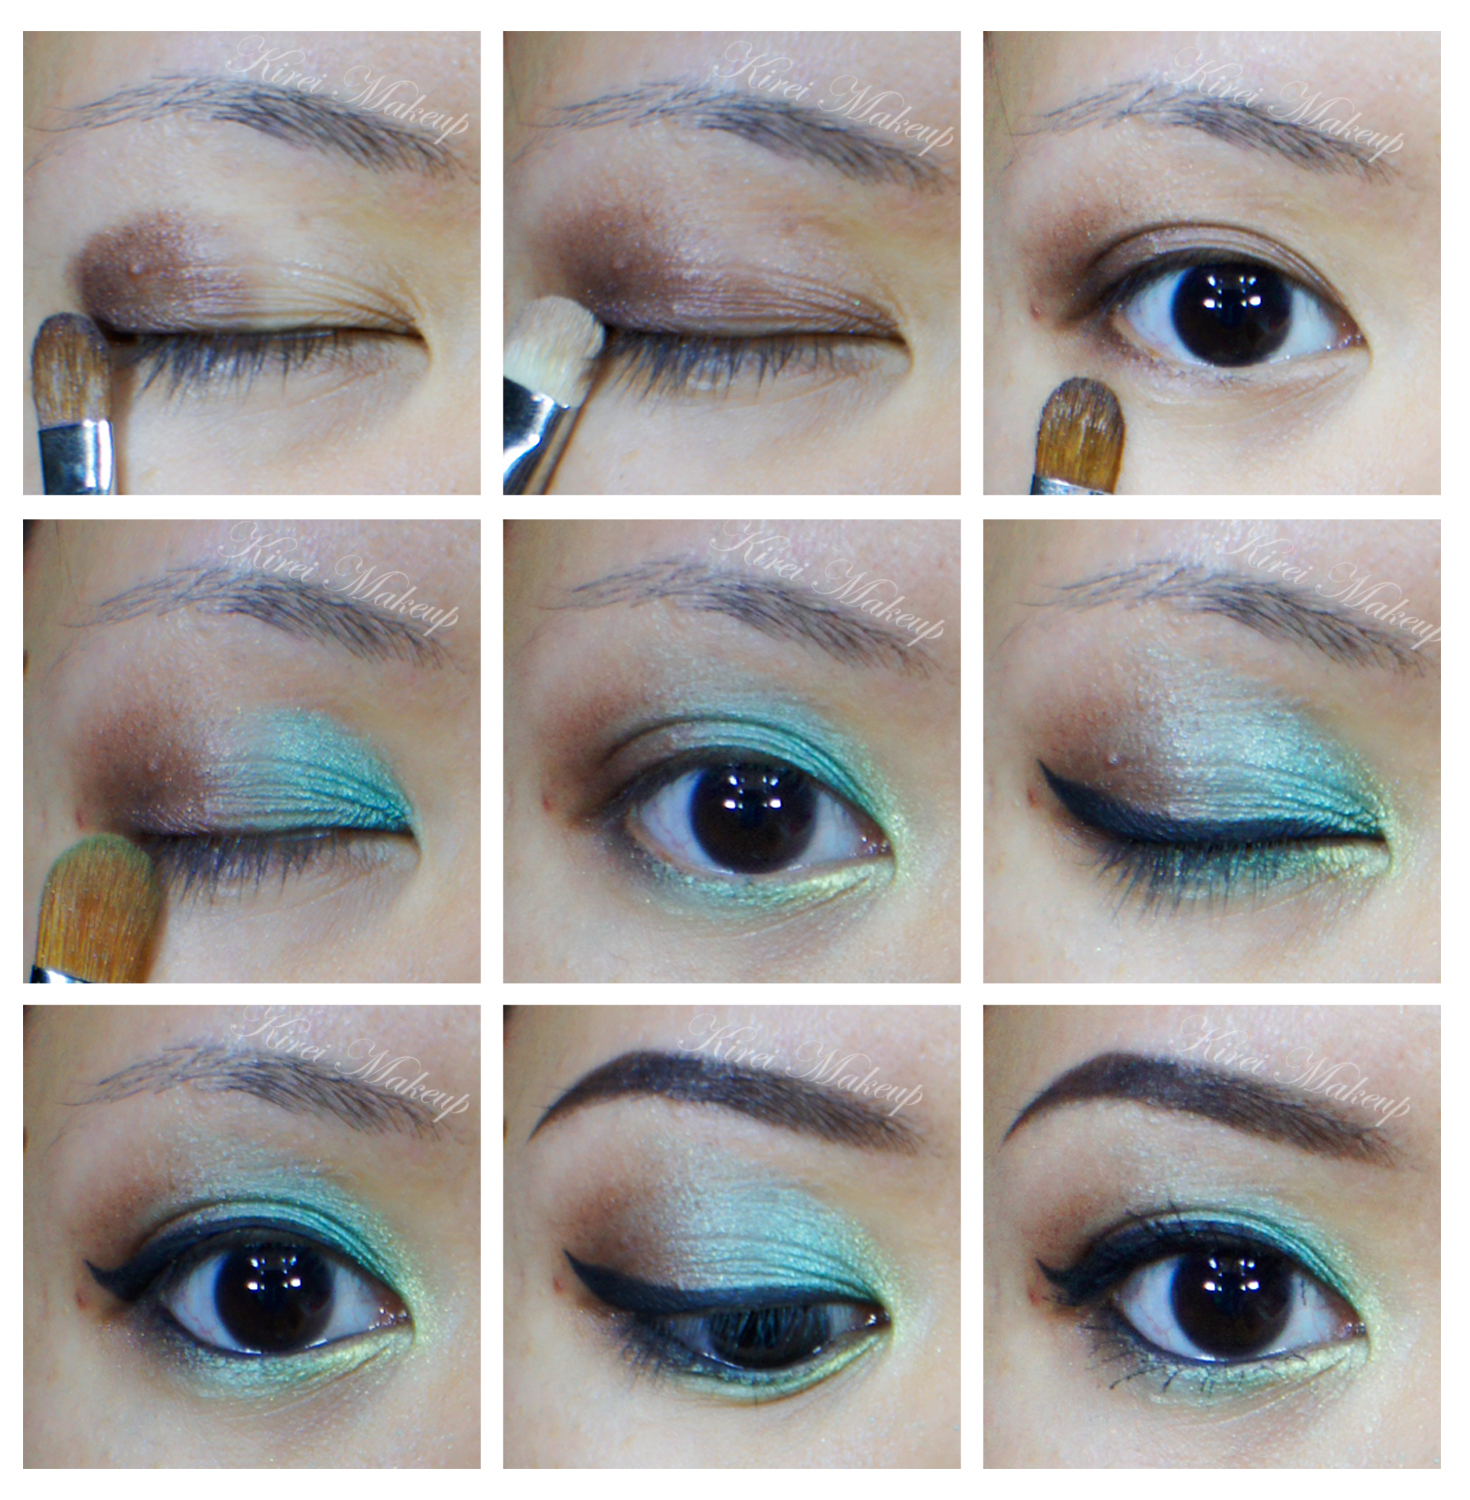
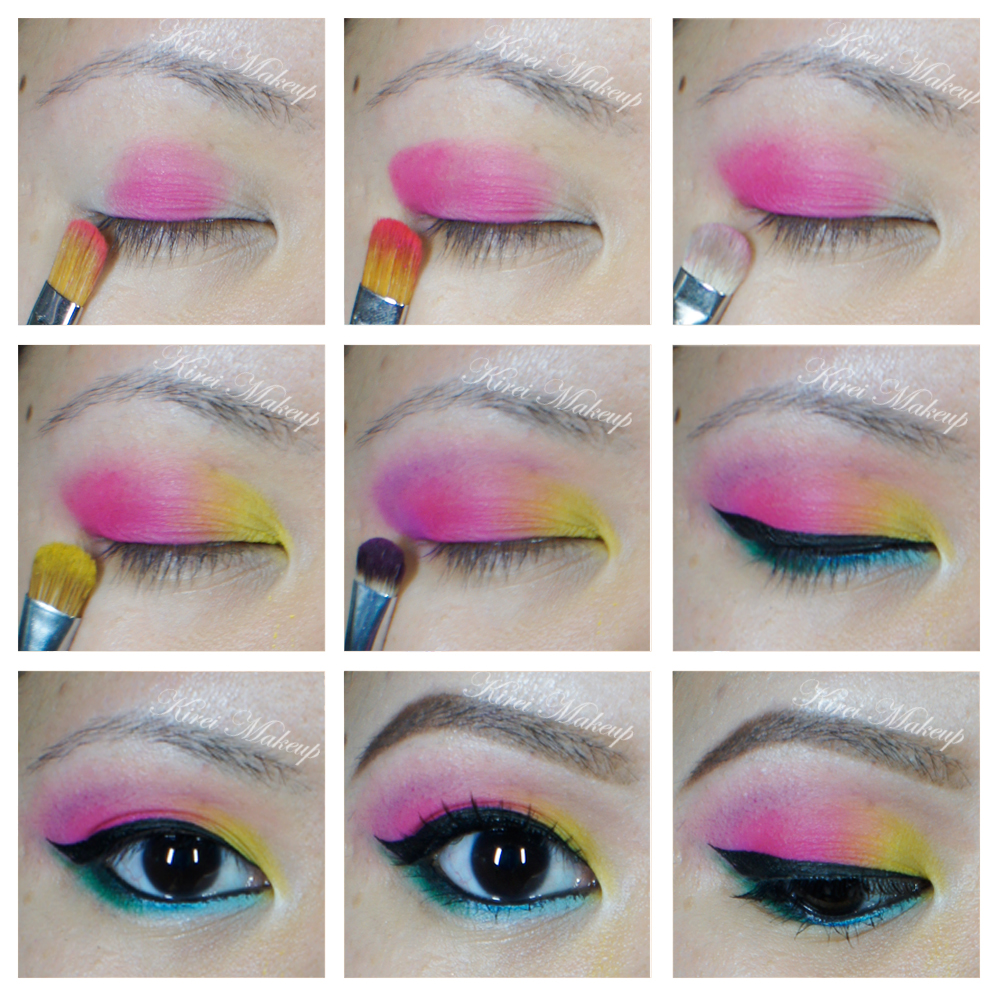
How-to:

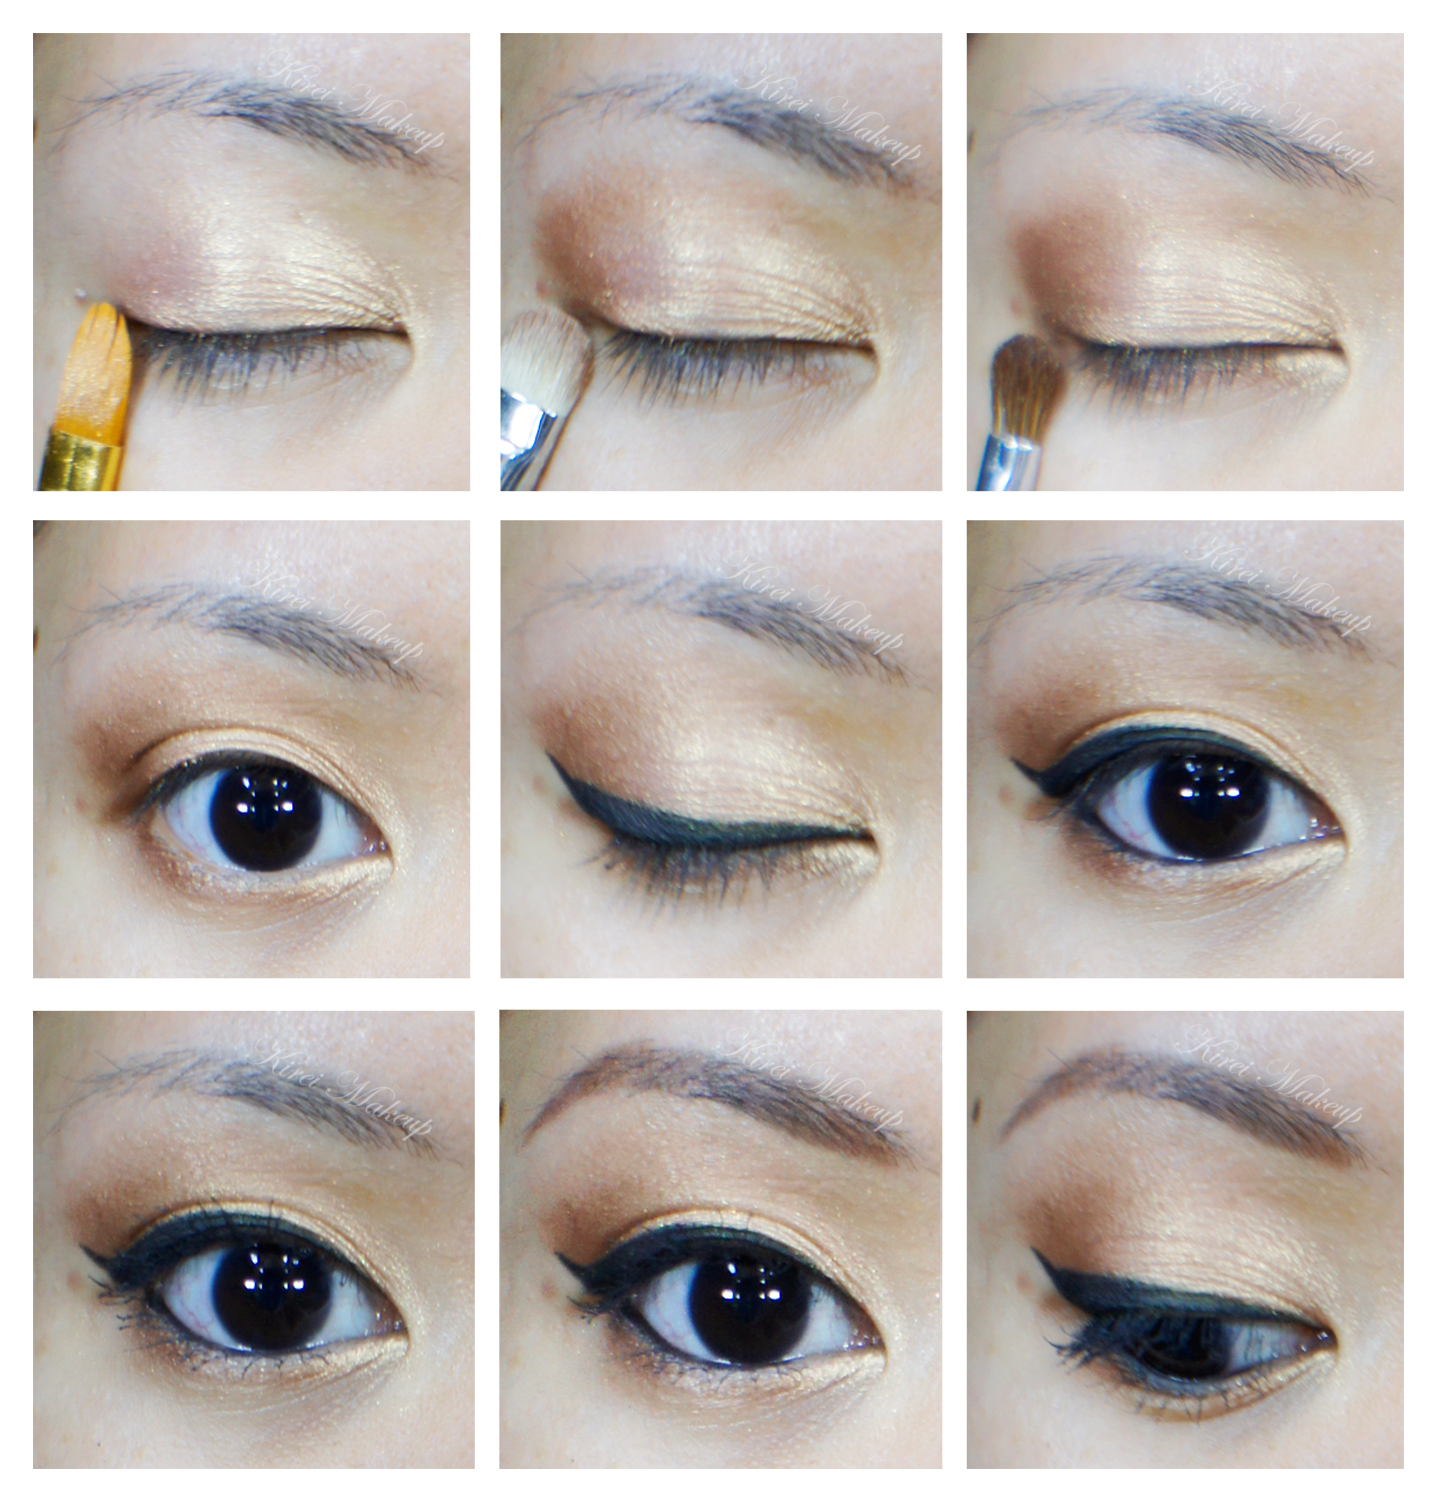
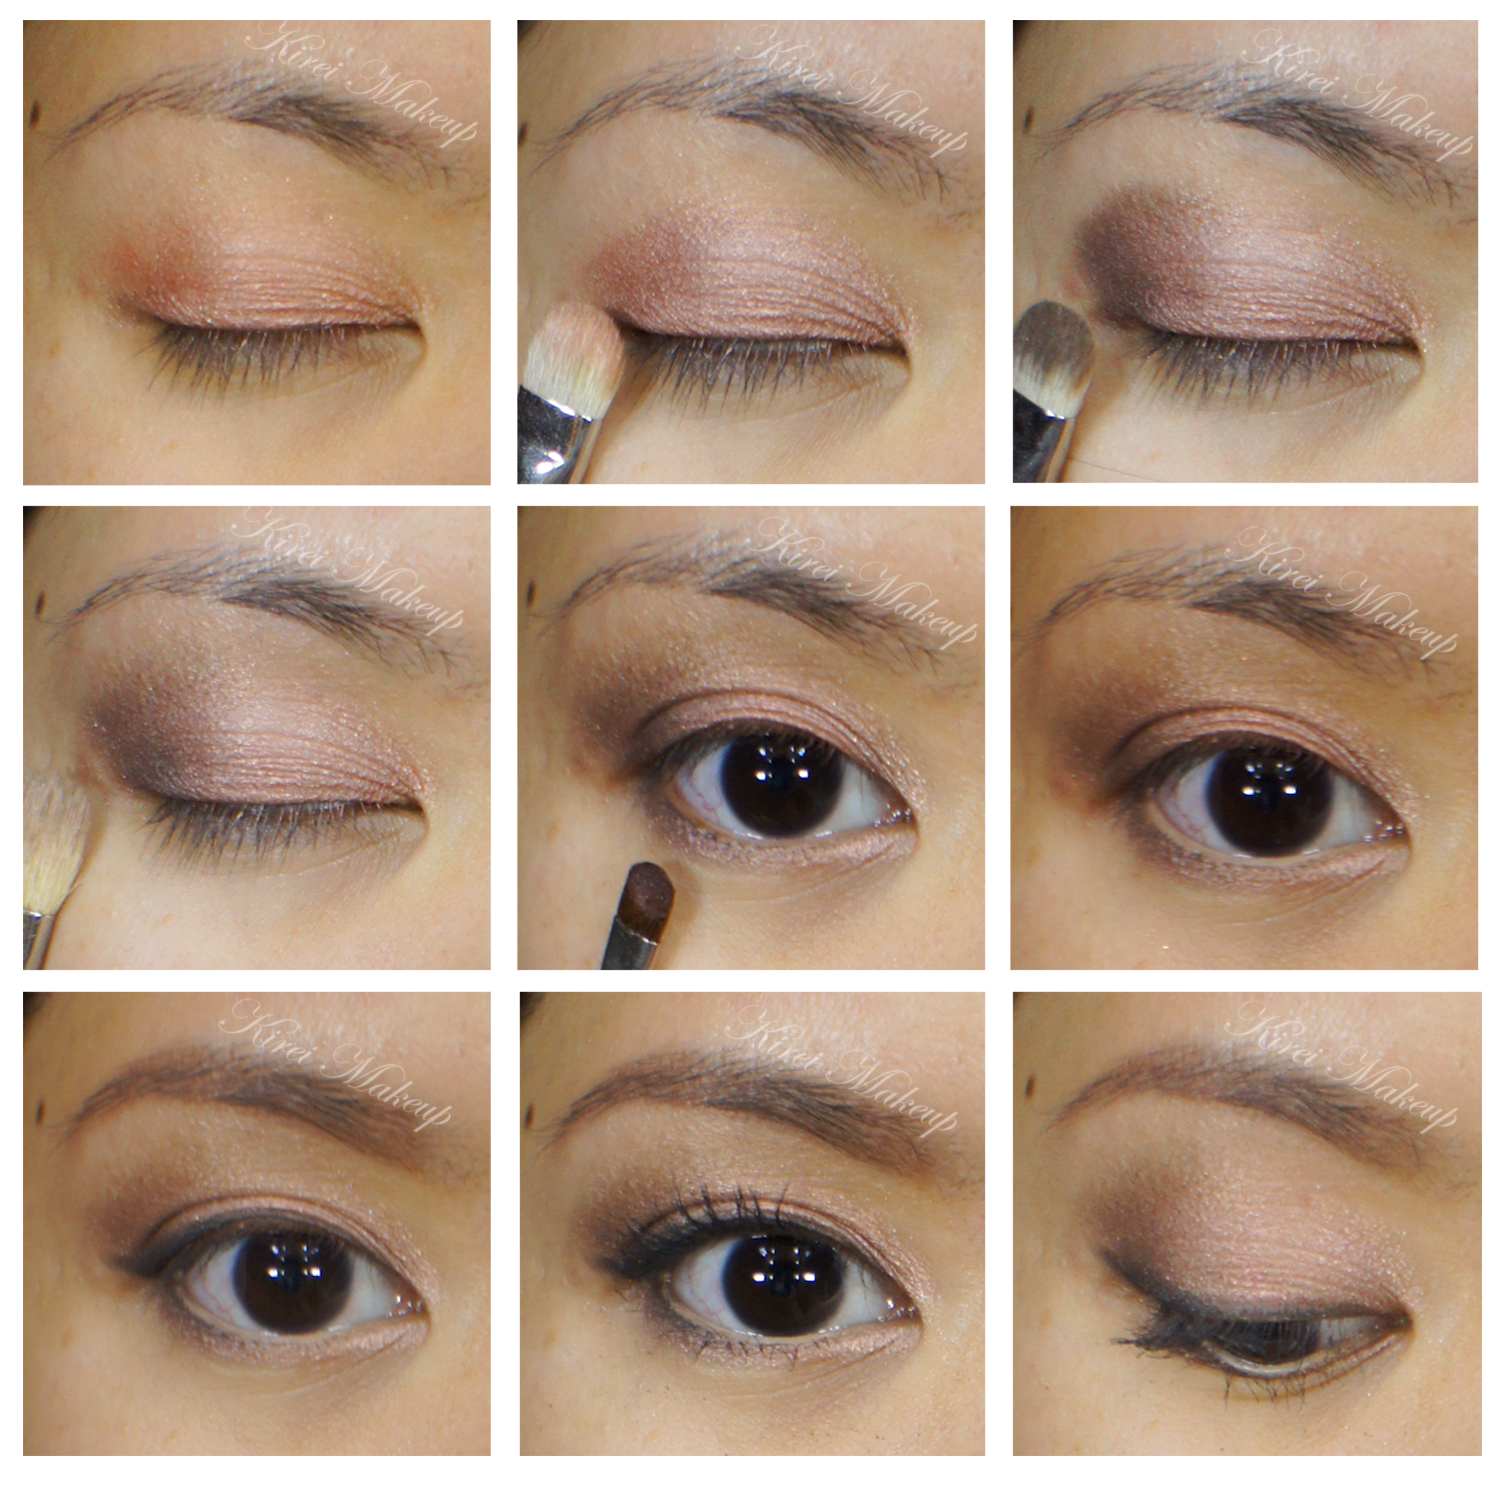
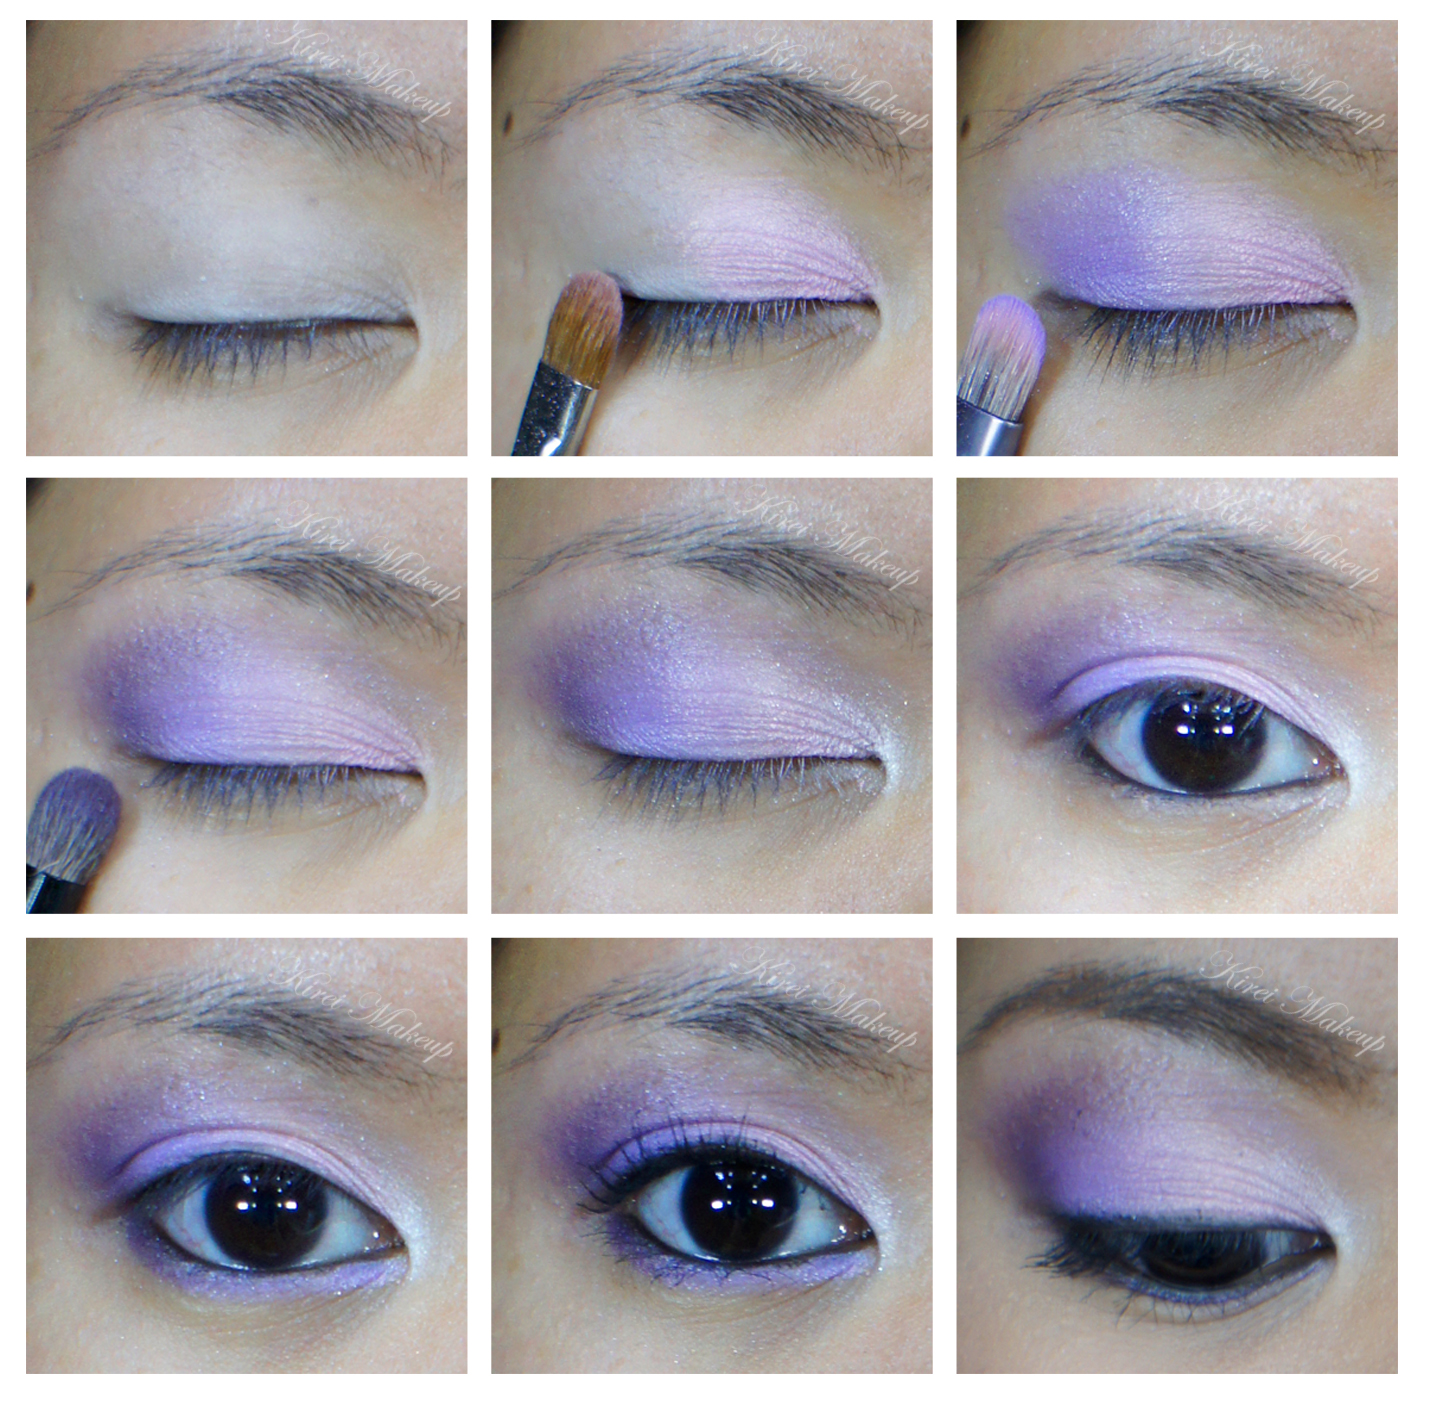
1. I prepped my eyelid using NYX Jumbo Pencil Shadow in Milk on both upper and lower lid.

2. I applied Pucker in the middle of my eyelid using a flat eyeshadow brush.

3. Using the same brush, I applied Pout on the outer part of my eyelid.

4. Using a clean shader brush, I blended out the edge of Pucker and Pout to remove any harsh edge.

5. I applied Bammi on the inner corner of the eyelid using a flat eyeshadow brush.

6. (Optional) I applied Sugarlite on my crease using a small shader brush. Optional step since the purple isn’t dark enough.

7. (Not in picture) I applied Floss on the crease using a blending brush as a transition color.

8. I lined my upper lash line with Kanebo Kate Super Sharp Eyeliner. On my waterline, I applied L’oreal Voluminous Smoldering eyeliner.

9. On the lower lid I used an angled eyebrow brush and  applied Chill on the inner corner, Bolt in the middle, and Dragonfly on the outer part.

10. I curled my lashes and applied Cover Girls Lash blast mascara on both upper and lower lashes.

11. I also applied Gwiyomi “Yuki” False Eyelashes (Indonesian store, check my Instagram if you want to buy).

12. I filled my brows using Anastasia Brow Wiz in Ash Blonde and Brunette.rainbow makeup

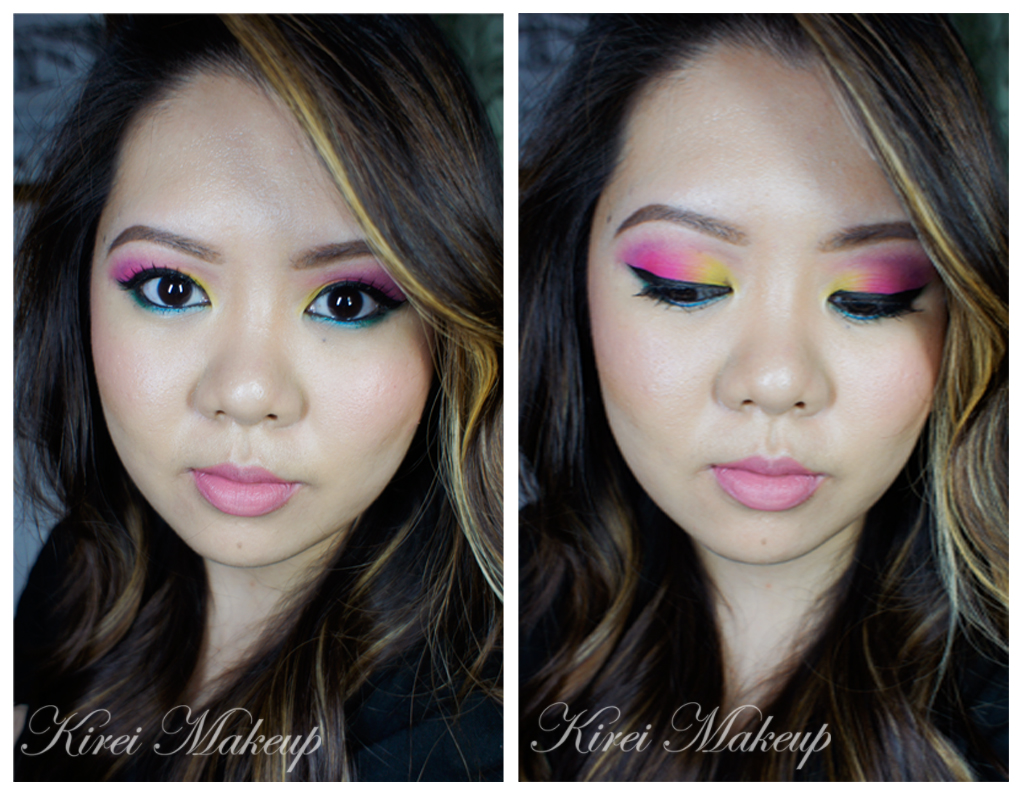
13. On my face, I applied Cover FX cream foundation in G40 using MAC Masterclass Brush Oval 6.

14. Very lightly, I applied Cover FX cream foundation in G20 under my eyes. I set my base using CoverFX translucent powder.

15. On my cheeks, I applied MAC Dainty blush.

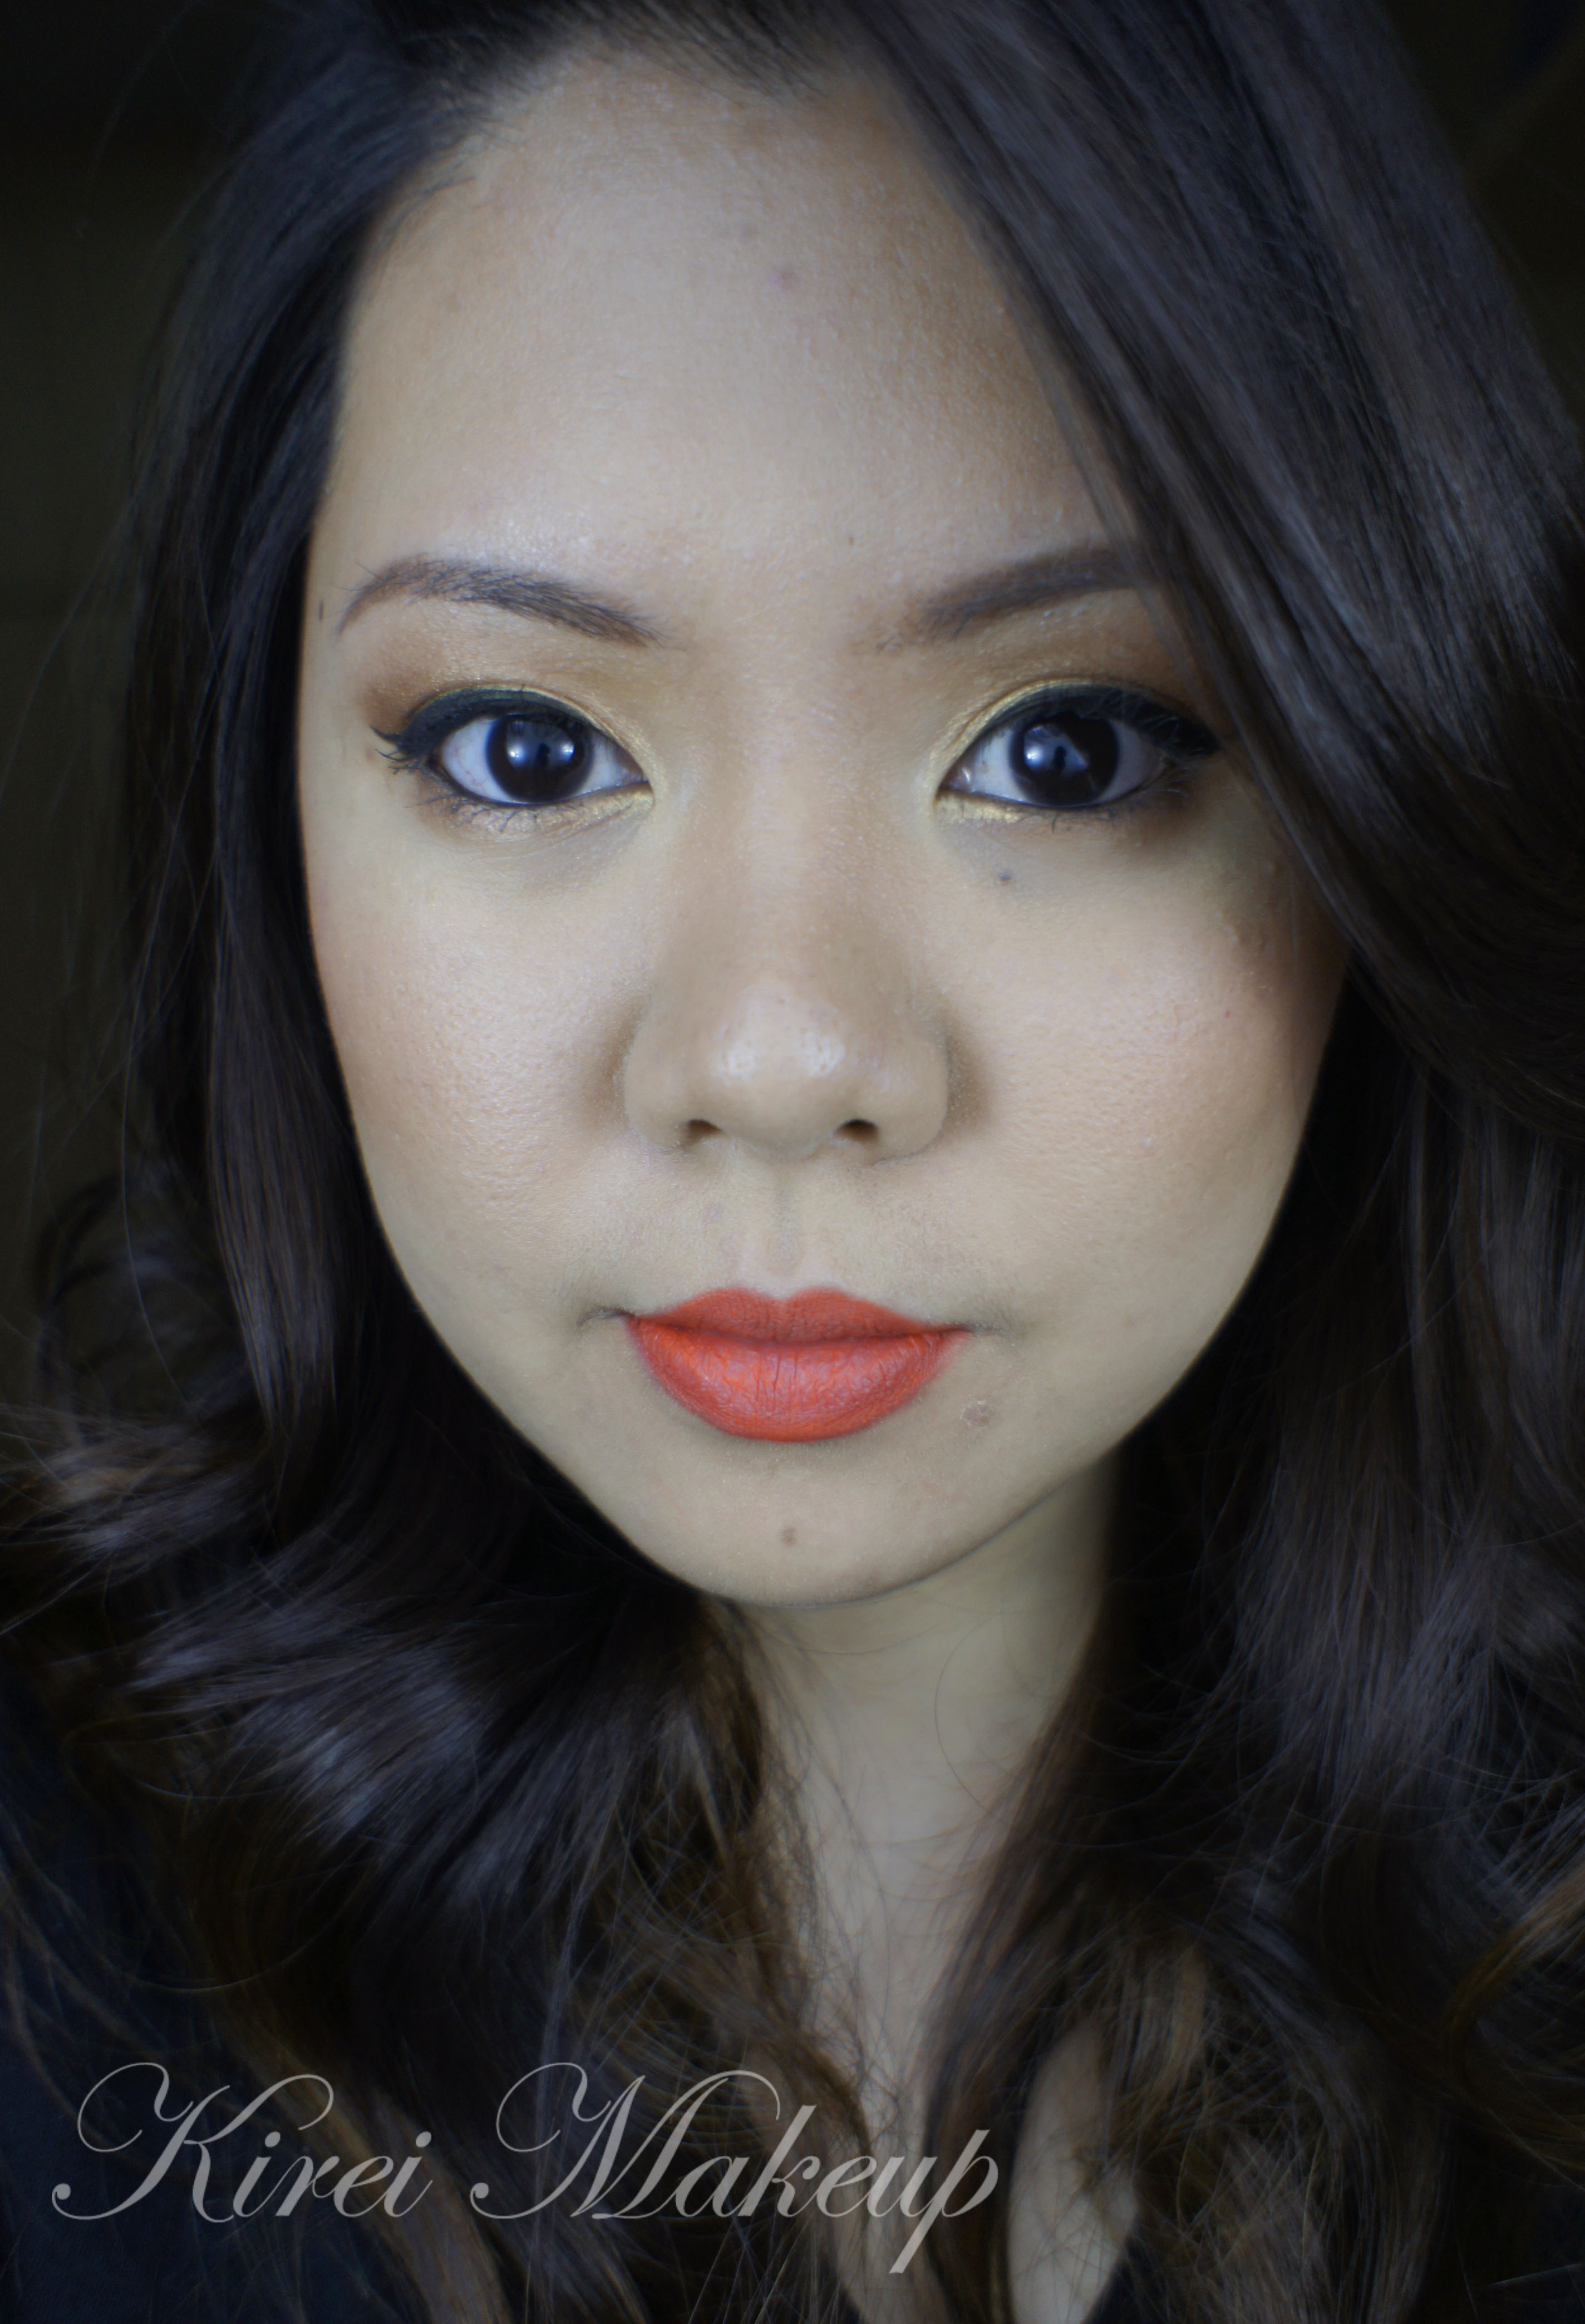
16. I lined my lips using L’oreal Color Riche Lip Liner in Beyond Pink, and applied MAC Please Me Lipstick using a lip brush.


Products used

Eyes – NYX Jumbo Pencil Shadow in Milk; Sleek Makeup iDivine Ultra Matte V1 Brights; Kanebo Kate Super Sharp eyeliner; L’oreal Voluminous Smoldering eyeliner; Cover Girl Lash Blast mascara; Gwiyomi “Yuki” false eyelashes; Anastasia Brow Wiz in Ash Blonde and Brunette.

Face – CoverFX cream foundation in G40 (base) and G20 (under eyes); CoverFX translucent powder; MAC Dainty blush.

Lips – L’oreal Color Riche Lip Liner in Beyond Pink; MAC Please Me lipstick.

Summer Makeup using MAC Sweet and Punchy

Last night, I put up a sneak preview on today’s tutorial on my Instagram account! I was super pumped to do this tutorial since I can show you guys how you can use the previous tutorial technique and incorporate other color into the look. Don’t you just love that bright green-yellow eyeshadow?! It’s actually MAC Sweet and Punchy eyeshadow, which was from the old MAC collection. If you can’t find this eyeshadow, you can substitute it for MAC Rated R which is exactly the same color.

Anyways, I also want to mention that I’ll start doing “repost” or “regram” on my Instagram account if you follow me and tag your beautiful makeup works with #kireimakeup. I’d love to see your works, especially if you re-create one of my looks! So, please do follow and tag me on Instagram!

As always, scroll all the way down if you want to skip the how-to, and get on the list of products used for this look.

bright green makeup tutorial

How-to:

1. My eyelids were prepped using Urban Decay Primer Potion in Sin. Next, I applied Smashbox Full Exposure eyeshadow in M1 using a blending brush on my crease.

2. Using a Sephora bullet crease brush, I applied Smashbox Full Exposure eyeshadow in M7 on the outer V.

3. Using a clean blending brush, I blended out my crease so there’s no harsh line.

4. I applied MAC Sweet and Punchy using a flat eyeshadow brush on my eyelid area.

5. Using a small shader brush, I applied MAC Sweet and Punchy on the inner part of my lower lid, and then I applied Smashbox Full Exposure M7 eyeshadow on the outer corner.

6. I created a thick winged eyeliner using a small angled eyeliner brush and L’oreal Infallible Gel Lacquer Liner 24H in Blackest Black.

7. Using whatever was left on the brush on step 6, I applied the gel liner on my waterline as well as the outer half of my lower lid.

8. I curled my lashes, applied Cover Girl Lash Blast mascara, and then I added Gwiyomi “Putri” false eyelashes.

9. I filled my brows using Anastasia Brow Wiz in Ash Blonde and Brunette (I filled my brows slightly differently this time, might do a tutorial on how I filled it in next time).mac sweet and punchy tutorial

10. On my face, I applied CoverFX cream foundation in G40 using a Sigma Tapered Kabuki brush.

11. I added a little bit of CoverFX N110 cream foundation along my jawline, underneath my cheeks and sides of my nose using a damped sponge.

12. I set my face using CoverFX translucent powder.

13. On my cheeks, I applied Benefit Hervana. I also added Benefit Coralista just on the apples of my cheeks.

14. On my lips, I applied L’oreal Color Riche lip liner in Beyond Pink.

Products used

Eyes – Urban Decay Primer Potion in Sin; MAC Sweet and Punchy eyeshadow; Smashbox Full Exposure palette (M1 on the crease; M7 on outer V); Cover Girl Lash Blast mascara; L’oreal Infallible Gel Lacquer 24Hr in Blackest Black; Gwiyomi “Putri” false eyelashes; Anastasia Brow Wiz in Ash Blonde and Brunette.

Face – CoverFX cream foundation (G40 as base, N110 as contour); CoverFX translucent powder; Benefit Hervana blush; Benefit Coralista blush.

Lips – L’oreal Color Riche lip liner in Beyond Pink.

Disclaimer: Please note that links to Sigma Beauty will land you to my affiliate page. However, I strive to recommend only the best products for you, and ones that I love myself, so you know you are in good hands. Your support in purchasing through these links will go towards the maintenance of this website, and to keep the blog updated and running. Thank you for your support!

Kat Von D Esperanza Tutorial #1

If you guys follow me on Instagram (you should, btw!), you would know that I’ve posted a little sneak peek on today’s tutorial there. Today, I wanted to do my first Kat Von D Esperanza tutorial, using the mint eyeshadow as the main focus. If you are wondering why the pictures on the step-by-step is a bit off in terms of the color, it’s because the Sun was playing hide and seek with me today. Luckily, the sky cleared up, and I managed to get good shots for the final looks!

I’ll try to post a review for this palette some time this week. I prepped my eyelids using UD Primer Potion, which I think didn’t work too well for this look. May be for future tutorial, I might use a white-colored base (i.e. NYX Jumbo Pencil in Milk) OR a mint-colored base for the lid. I feel that the mint eyeshadow that I used doesn’t have much color on it, and look slightly chalky.

All eyeshadows mention are from Kat Von D Esperanza palette. If you want to find out the product I used and skip the how-to, scroll all the way down.

How-to:

1. After prepping my lid using UD Primer Potion, I applied Archangel using a flat eyeshadow brush.

2. Using Sigma E25 Blending Brush, I applied Placebo slightly above the crease.

3. Using the tip of a flat eyeshadow brush (like the Sigma E54 Medium Shader brush), I applied Santeria on the crease and outer V.

4. Using the same Sigma E25 blending brush that I used on step 2, I blended out Santeria.

5. Using a fluffy blending brush (like the Sigma E38 Diffused Crease brush), I applied South under the brow. I also buffed South slightly on to my crease.

6. Using a small shader brush, I applied Archangel on the inner corner of the lower lid, and Selena on the outer corner.

7. (not in picture), I applied Danglo on top of Archangel using a flat eyeshadow brush.

8. I created a winged eyeliner using Kanebo Kate Super Sharp eyeliner, and lined my waterline using L’oreal Voluminous Smoldering eyeliner.

9. I curled my lashes and applied Cover Girl Lash Blast Mascara.

10. I filled my brows using Anastasia Brow Wiz in Ash Blonde, and then I set it using Faint eyeshadow from the Naked Basic palette.

Kat Von D Esperanza makeup tutorial

11. On my face, I applied UD Naked Skin foundation using a damped makeup sponge.

12. I set my face using NARS Setting Powder.

13. I lightly contoured my face and nose using MAC Blunt.

14. On my cheeks, I applied Chanel Blush de Horizon.

15. Lastly, on my lips, I applied L’oreal Color Riche lipliner in Beyond Pink, top it off with Revlon Socialite suede lipstick and a little tiny bit of clear lip balm from L’occitane.Kat Von D Esperanza eye makeup

I took the pictures above in a room with big windows and natural day light. For the pictures below, I actually stepped out of the house and took the pictures outdoor with the Sun somewhat behind me. As you can see, in both pictures, my makeup is not heavy at all, esp. for the face. The focus is still on the eyes, while the skin is left pretty natural looking.

If you are curious about my hair, please check my post on Highlights for Brunette.

Kat Von D Esperanza tutorial

Products used:

Eyes – Kat Von D Esperanza palette; Kanebo Kate Super Sharp eyeliner; L’oreal Voluminous Smoldering eyeliner; Cover Girl Lash Blast Mascara; Anastasia Brow Wiz in Ash Blonde; Faint eyeshadow (Naked Basic palette).

FaceUD Naked Skin foundation; NARS Setting Powder; MAC Blunt; Chanel Blush de Horizon.

Lips – L’oreal Color Riche lipliner in Beyond Pink; Revlon Socialite suede lipstick; clear lip balm from L’occitane.

Recommended Sigma brushes – Sigma E25 Blending Brush; E54 Medium Shader brush; Sigma E38 Diffused Crease brush.

Disclaimer: clicking on the Sigma link will take you to my Sigma affiliate page. Any purchase you make on Sigma from my website will help in this blog’s maintenance. Rest assured, I only recommend products that I honestly love and use on myself. Thank you for your support!

L’oreal Cookies and Cream

Finally! A tutorial, whaaat?! Well, beauty lovers, I hope this will satisfy you for a while. I do have a few more stuffs lining up, but one by one, shall we?

So, I’ve owned this L‘oreal Cookies and Cream palette for a while (please check my post for the swatches here). However, I didn’t really get the chance to play with until now. For the tutorial below, I followed the instruction from the back of the palette. Personally I won’t do it this way since I find that it’s not smoky enough for me.

Also, I recommend everyone to use a primer on the lid before eyeshadow application. Although the pigments are pretty good, the eyeshadows didn’t really have any staying power. The reason why I didn’t apply any primer is because I was testing for creasing and such. If you have an oily lid, you’d probably want to apply primer.

How-to:

1. I applied the 2nd lightest eyeshadow (a silver) from the palette all over the lid.

2. On the crease, I applied the medium (silver grey) eyeshadow using a fluffy blending brush.

3. Using Smashbox bullet brush, I applied the darkest eyeshadow (graphite) on the outer V.

4. I blended the outer V using a clean blending brush.

5. Using a clean blending brush, I applied the highlighter color (vanilla) under the brow.

6. I applied the medium color (silver grey) along the lower lash line using an angled brush, and the darkest color on the outer half of the lower lash line.

7. I created a slight winged liner using L’oreal Super Slim Liquid Eyeliner along the upper lash line.

8. I also lined my waterline using L’oreal Smoldering Voluminous pencil liner.

9. I curled my lashes and applied mascara.

10. I also applied false eyelashes Fleur Fleur in 201.

11. I filled my brows using Shu Uemura Hard Formula no. 9.

Asian Smoky Eyes

12. For the face, I applied UD Naked foundation.

13. On the cheeks, I applied L’oreal Rose Gold Visible Lift blush.

14. Slightly contoured my nose using Smashbox contour/highlight trio palette (discontinued).

15. On the lips, I filled it in using L’oreal Infallible lipliner in Rose.

Asian Smoky Eyes

Summer Splash

This look today is one of my fav. summer makeup. It doesn’t matter where I am in the summer, somehow I always seem to resort back to this look. It’s very light and bright, and of course you can always eliminate some of the steps below to make it easier and to suit your own look. Most of the time, I only used the MAC Melon pigment on my lid with mascara, skipping the liner and the contour colors altogether.

Anyways, the 2nd look to this post used an orange lip liner. I don’t know where my orange lipstick is, so I only used the lip liner to fill my entire lip. Of course you can change the lips to whatever color you want, red, pink, or even nude. No rules, just fun playful makeup.

How-to:

1. Using a synthetic brush, I dipped the brush in water and then dipped it in MAC Melon pigment. I mixed it at the back of my hand to turn it into a paste form and applied this paste to my lid, and on the inner corner of the lower lid.

2. Using a shader brush, I applied MAC Bronze eyeshadow on the outer V and on the crease. I used whatever left on the brush and ran it through the lower lid.

3. Using a clean fluffy brush, I blended the crease to remove any harsh edge.

4. I applied Smashbox Deep Golden Brown on the outer corner, blending it inwards. I focused most of the color on the outer V of the lid.

5. Using whatever left on the brush, I applied it on the lower lid.

6. Using an angled eyeliner brush and MUFE Aqua Black, I created a winged liner along the upper lash line.

7. I lined my waterline using whatever product remained on the brush from step 6.

8. I curled my lashes and applied Maybelline Express Volume Turbo Boost mascara on both top and bottom lashes.

9. I filled my brows in using Shu Uemura Hard Formula 9 brow pencil.

natural makeup

10. I applied UD Naked foundation all over my face using a foundation brush.

11. I contoured my face using MAC Studio Tech in NW 55. (If you want to know how I contour my face, check out this post for powder contouring or here for cream contouring)

12. I applied MAC Peaches blush on the cheeks.

13a. For the lips, I applied YSL Pur Couture rouge no. 17 using a lip brush.

natural bridal makeup

13b. For the orange lips, I lined and filled my lips using MAC Entertain Me lipliner.

orange lips

Sea Siren

I’m sooo sorry I’ve been missing for a while! First of all, my face has gotten better, but then I’ve gotten sick over on the weekend, continuing to the weekday. My July started out pretty awesome, eh? *sarcastic look*. Anyways, I was bored since I stayed in bed for couple days and so I made this look.

I wanted to actually unbox the June Beauty Treats box and posted it, but since I was very disappointed with the very late delivery and the products I received, I decided not to post it here. I’ve posted pictures of what I received on my Twitter, so feel free to check it out to see what’s in the box. I will not be renewing my subscription with them after this month. A few other bloggers have expressed similar disappointment as well.

Anyhow, this look is similar to my “Hint of Mint“, but instead of using a mint eyeshadow, I used a turquoise and a light green. I think it turns out to be very pretty. I feel that the light green really bring the whole combo together. It’s wearable if you dare to wear colors out. Very tropical! I used my Sleek Makeup palettes for this look since I want to play with the palettes some more.

Oh, I also played around with my nails on Monday, so if you haven’t seen it, go over to my Instagram to check it out.

How-to:

1. I applied Truffle from Sleek Makeup iDivine Sparkle 2 palette on the outer corner of my lid using a flat eyeshadow brush.

2. Using a MAC 239 (shader brush), I blended the color towards the inner part of the eyelid.

3. Repeat step 1 and 2 if necessary.

4. I used whatever was left on the flat eyeshadow brush from step 1 and applied it to the outer half of the lower lid.

5. Using a clean flat eyeshadow brush, I applied Green Iguana from the Sleek Makeup iDivine Snapshots palette on the inner part of the eyelid. I also applied this color in the middle of the lower lid.

turquoise eyeshadow

6. I applied Kiwi Flower from the Sleek Makeup iDivine Snapshots palette on the tear duct area using a pencil brush as a highlighter.

7. Using MUFE Aqua Black and an angled eyeliner, I created a winged liner along my upper lash line.

8. I lined my waterline using L’oreal Voluminous Smoldering eyeliner.

9. I filled my brows in using MUFE Aqua Brow Gel and an angled eyebrow brush.

10. I curled my lashes and applied MUFE Smoky Lash mascara on my lashes.

sleek makeup snapshot

11. For the face, I applied UD Naked foundation using a foundation brush.

12. I applied Benefit Dallas bronzer along the outside perimeter of my face.

13. On the cheeks, I applied MAC Peaches blush.

14. I filled my lips using L’oreal Colour Riche Lip Liner in Beyond Pink, and applied MUFE Rouge Artist Natural Lipstick in N39 (Soft Apricot).

sleek makeup snapshot

Golden Bronze

This week is like my non-colorful week! Today’s look used Urban Decay Naked Palette, and it’s perfect for daytime and bridal makeup. It’s packed with bronze goodness. The colors are perfect for every eye-colors and skintones. Very flattering, very warm and it’s really easy to achieve this look.

I love wearing this look for the summer. It might look like it’s a lot, but once you complete the face, the eyes look pretty natural looking. It really do brighten up the face too. This is my fav. way of wearing bronze eyeshadow. You can immediately turn this makeup to a night look just by adding black liner along the upper lashline and waterline, turning it into a smoky look.

For tutorial on how to fill-in brows, please visit “Product of The Week: MUFE Aqua Brow“. For a smokier version of this look please visit “Baked It Up!

urban decay naked palette

How-to:

1. Using a flat eyeshadow brush, I applied UD Half-Baked all over the lid.

2. Using a flat fluffy brush, I applied UD Buck lightly on the crease and the outer V.

3. Using a fluffy blending brush, I applied a mixture of UD Smog + Snakebite on the outer half of the lid, blending in towards Half-Baked.

4. I applied UD Half-Baked on the inner corner of the lower lid, and UD Smog + Snakebite on the outer half using a small shader brush.

5. I created a winged liner along my upper lashline using Bobbi Brown Caviar Ink cream liner.

6. Using whatever is left on the brush, I applied the liner along the outer corner of the lower lid.

7. I curled my lashes and applied MUFE Smoky Lash mascara on both upper and lower lashes.

8. I filled my brows in using MUFE Aqua Brow.

urban decay naked palette

9. For my face, I applied Tarte Amazonian Clay BB Tinted Moisturizer.

10. I applied Benefit Dallas on my temples, the tip of my nose, my chin and my cheeks.

11. I also applied MAC Peaches on the cheeks.

12. For the lips, I applied L’oreal Colour Riche Lip Liner in Beyond Pink.urban decay naked palette

Spring Lilac

I couldn’t resist to try my new Sleek Makeup iDivine Snapshot palette that I bought from Luxola! Oh, just to let you know, there’s a 10%  15% off if you use the code LXBLOG when you check out over at Luxola (over $25 purchase) 😉 For swatches on the iDivine palettes, please check Sleek Makeup iDivine Swatches post.

Anyways, so I wanted to try the Lotus Flower and Green Iguana shadows for this look since those 2 eyeshadows were the ones that caught my attention the most. I LOVE…let me repeat, I LOVE Lotus Flower! Amazing color, so perfect for Spring/Summer! Green Iguana too is oh so prettyy! For some reason, my camera doesn’t pick the green, instead it might look bluish on your screen.

How-to:

1. Using a flat eyeshadow brush, I applied Lotus Flower from Sleek Makeup iDivine Snapshot palette on the inner half of my upper eyelid.

2. Using another flat eyeshadow brush, I applied Green Iguana on the outer half.

3. Using a clean blending brush, I blended the edge and the crease to remove any hard line.

4. Using a small fluffy brush, I applied Urban Decay Hijack on the outer V and crease.

5. Using a clean blending brush, I blended UD Hijack.

6. Using a small shader brush, I applied Lotus Flower on the inner half of the lower lid and Green Iguana on the outer half.

7. I created a tiny winged liner along my upper lashline using Kat Von D Trooper eyeliner.

8. I lined my waterline and tightline using L’oreal Voluminous Smoldering eyeliner.

9. I curled my lashes using Shu Uemura eyelash curler and applied L’oreal Double Extender Curl mascara on both top and lower lashes.

10. I filled my brows in using Shu Uemura brow pencil.

sleek makeup lotus flower

11. I applied MUFE HD foundation all over my face.

12. Under my eyes, I applied Bobbi Brown peach corrector.

13. On the cheeks, I applied Benefit Hoola and Benefit Coralista.

14. On the lips, I applied Chanel Confidentielle lipstick.

sleek makeup green iguana

Rosy

Today’s look is more on the softer, romantic, feminine colors. This look is great for first date, or for whoever wants a more natural look. Will work great on brides as well!

I also wanted my eyes to look bright and open, so I skipped the black liner on the waterline. Instead, I opted for a beige eyeliner. If you prefer a more darker version to this, feel free to substitute the dark shadow and eyeliner to black.

For this look, the focus is on the overall appearance. Nothing stands out too much, yet the whole look feels right and if done correctly, people will notice a subtle difference in your face but cannot put their finger why you look so great 😉

FYI, if you’d like to know how I contour, highlight and apply my blush come check the blog out tomorrow 😉

How-to:

1. I applied Bobbi Brown Rose Gold cream shadow all over the lid using my ring finger.

2. Using a flat eyeshadow brush, I applied Urban Decay Toasted eyeshadow on top of the base.

3. Using the same flat eyeshadow brush, I applied Urban Decay Busted eyeshadow on the outer V of the eyes.

4. I used a clean blending brush to blend the edge of UD Busted eyeshadow.

5. Using a small shader brush, I applied UD Toasted on the inner half of the lower lid and UD Busted on the outer half of the lower lid.

6. I lined my waterline using MAC Chromagraphic eyeliner in NC30.

7. I created a slight winged liner along my upper lashline using UD Blackout eyeshadow and an angled eyeliner brush.

8. I used whatever was left on the eyeliner brush to line the outer half my lower lash line (very close to the lashes).

9. I filled my brows in using Shu Uemura brow pencil.

10. I curled my lashes and applied L’oreal Double Extender Curl mascara on both top and bottom lashes.

11. I applied my face powder right underneath the brows.

Urban Decay Hustle

12. For the face, I applied MUFE HD Foundation using a foundation brush.

13. Under the eyes, I applied YSL Touche Eclat.

14. For the contour, I applied MAC Shadowy.

15. On the cheeks, I applied Benefit Hervana blush.

16. On the lips, I applied YSL no. 17 lipstick lightly using a lip brush.

urban decay naked palette

Cutie Mcpurple

I wanted to use my pastel and light eyeshadow palette lately. I managed to find my MAC Cutie eyeshadow palette which was from ages a go. I barely used the palette since I wasn’t sure how I was going to tackle the color back when I bought this palette. On top of that, I was into smoky eyes, neutral shades back then.

Anyhow, I don’t think the MAC Cutie palette is on sale anymore. Even if it is, please don’t buy it, it’s not worth your money. The pigment pay-off is so-so, the colors are too light for anyone who’s above NC 15 and it’s not that wearable. I had to pack the colors several time for it to show up. The colors are very sheer if you don’t use any base underneath.

How-to:

1. I applied NYX Jumbo pencil in Milk on the upper lid, blending using my ring finger all the way up to the brow bone.

2. Using a flat eyeshadow brush, I applied MAC Goody Goody Gum Drop on the inner half of the eyelid.

3. Using another flat eyeshadow brush, I applied MAC Boy Crazy on the outer half of the lid.

4. Using Smashbox bullet brush, I applied MAC Azuki Bean on the outer V.

5. Using a small shader brush, I applied MAC Moshi Moshi on the inner corner.

6. I lined my waterline and tightline using L‘oreal Voluminous Smoldering eyeliner.

7. I also lined the eyeliner along my upper lashline.

8. Using a small angled eyeliner brush, I applied MAC Boy Crazy on the inner half of the lower lid and MAC Azuki Bean on the outer half.

9. I curled my lashes and applied Maybelline Volume Express Turbo Boost mascara on the upper as well as lower lashes.

10. I filled my brows in using Dollywinked brow pencil.

Pastel makeup

11. For the face, I applied MUFE HD foundation using CoverFX foundation brush.

12. Under the eyes, I applied MUFE concealer.

13. For the cheeks, I applied MAC Fleur power blush.

14. The look is completed by applying Revlon Mauve It Over matte lipstick on the lips.

MAC CutieMu