Sea Siren

I’m sooo sorry I’ve been missing for a while! First of all, my face has gotten better, but then I’ve gotten sick over on the weekend, continuing to the weekday. My July started out pretty awesome, eh? *sarcastic look*. Anyways, I was bored since I stayed in bed for couple days and so I made this look.

I wanted to actually unbox the June Beauty Treats box and posted it, but since I was very disappointed with the very late delivery and the products I received, I decided not to post it here. I’ve posted pictures of what I received on my Twitter, so feel free to check it out to see what’s in the box. I will not be renewing my subscription with them after this month. A few other bloggers have expressed similar disappointment as well.

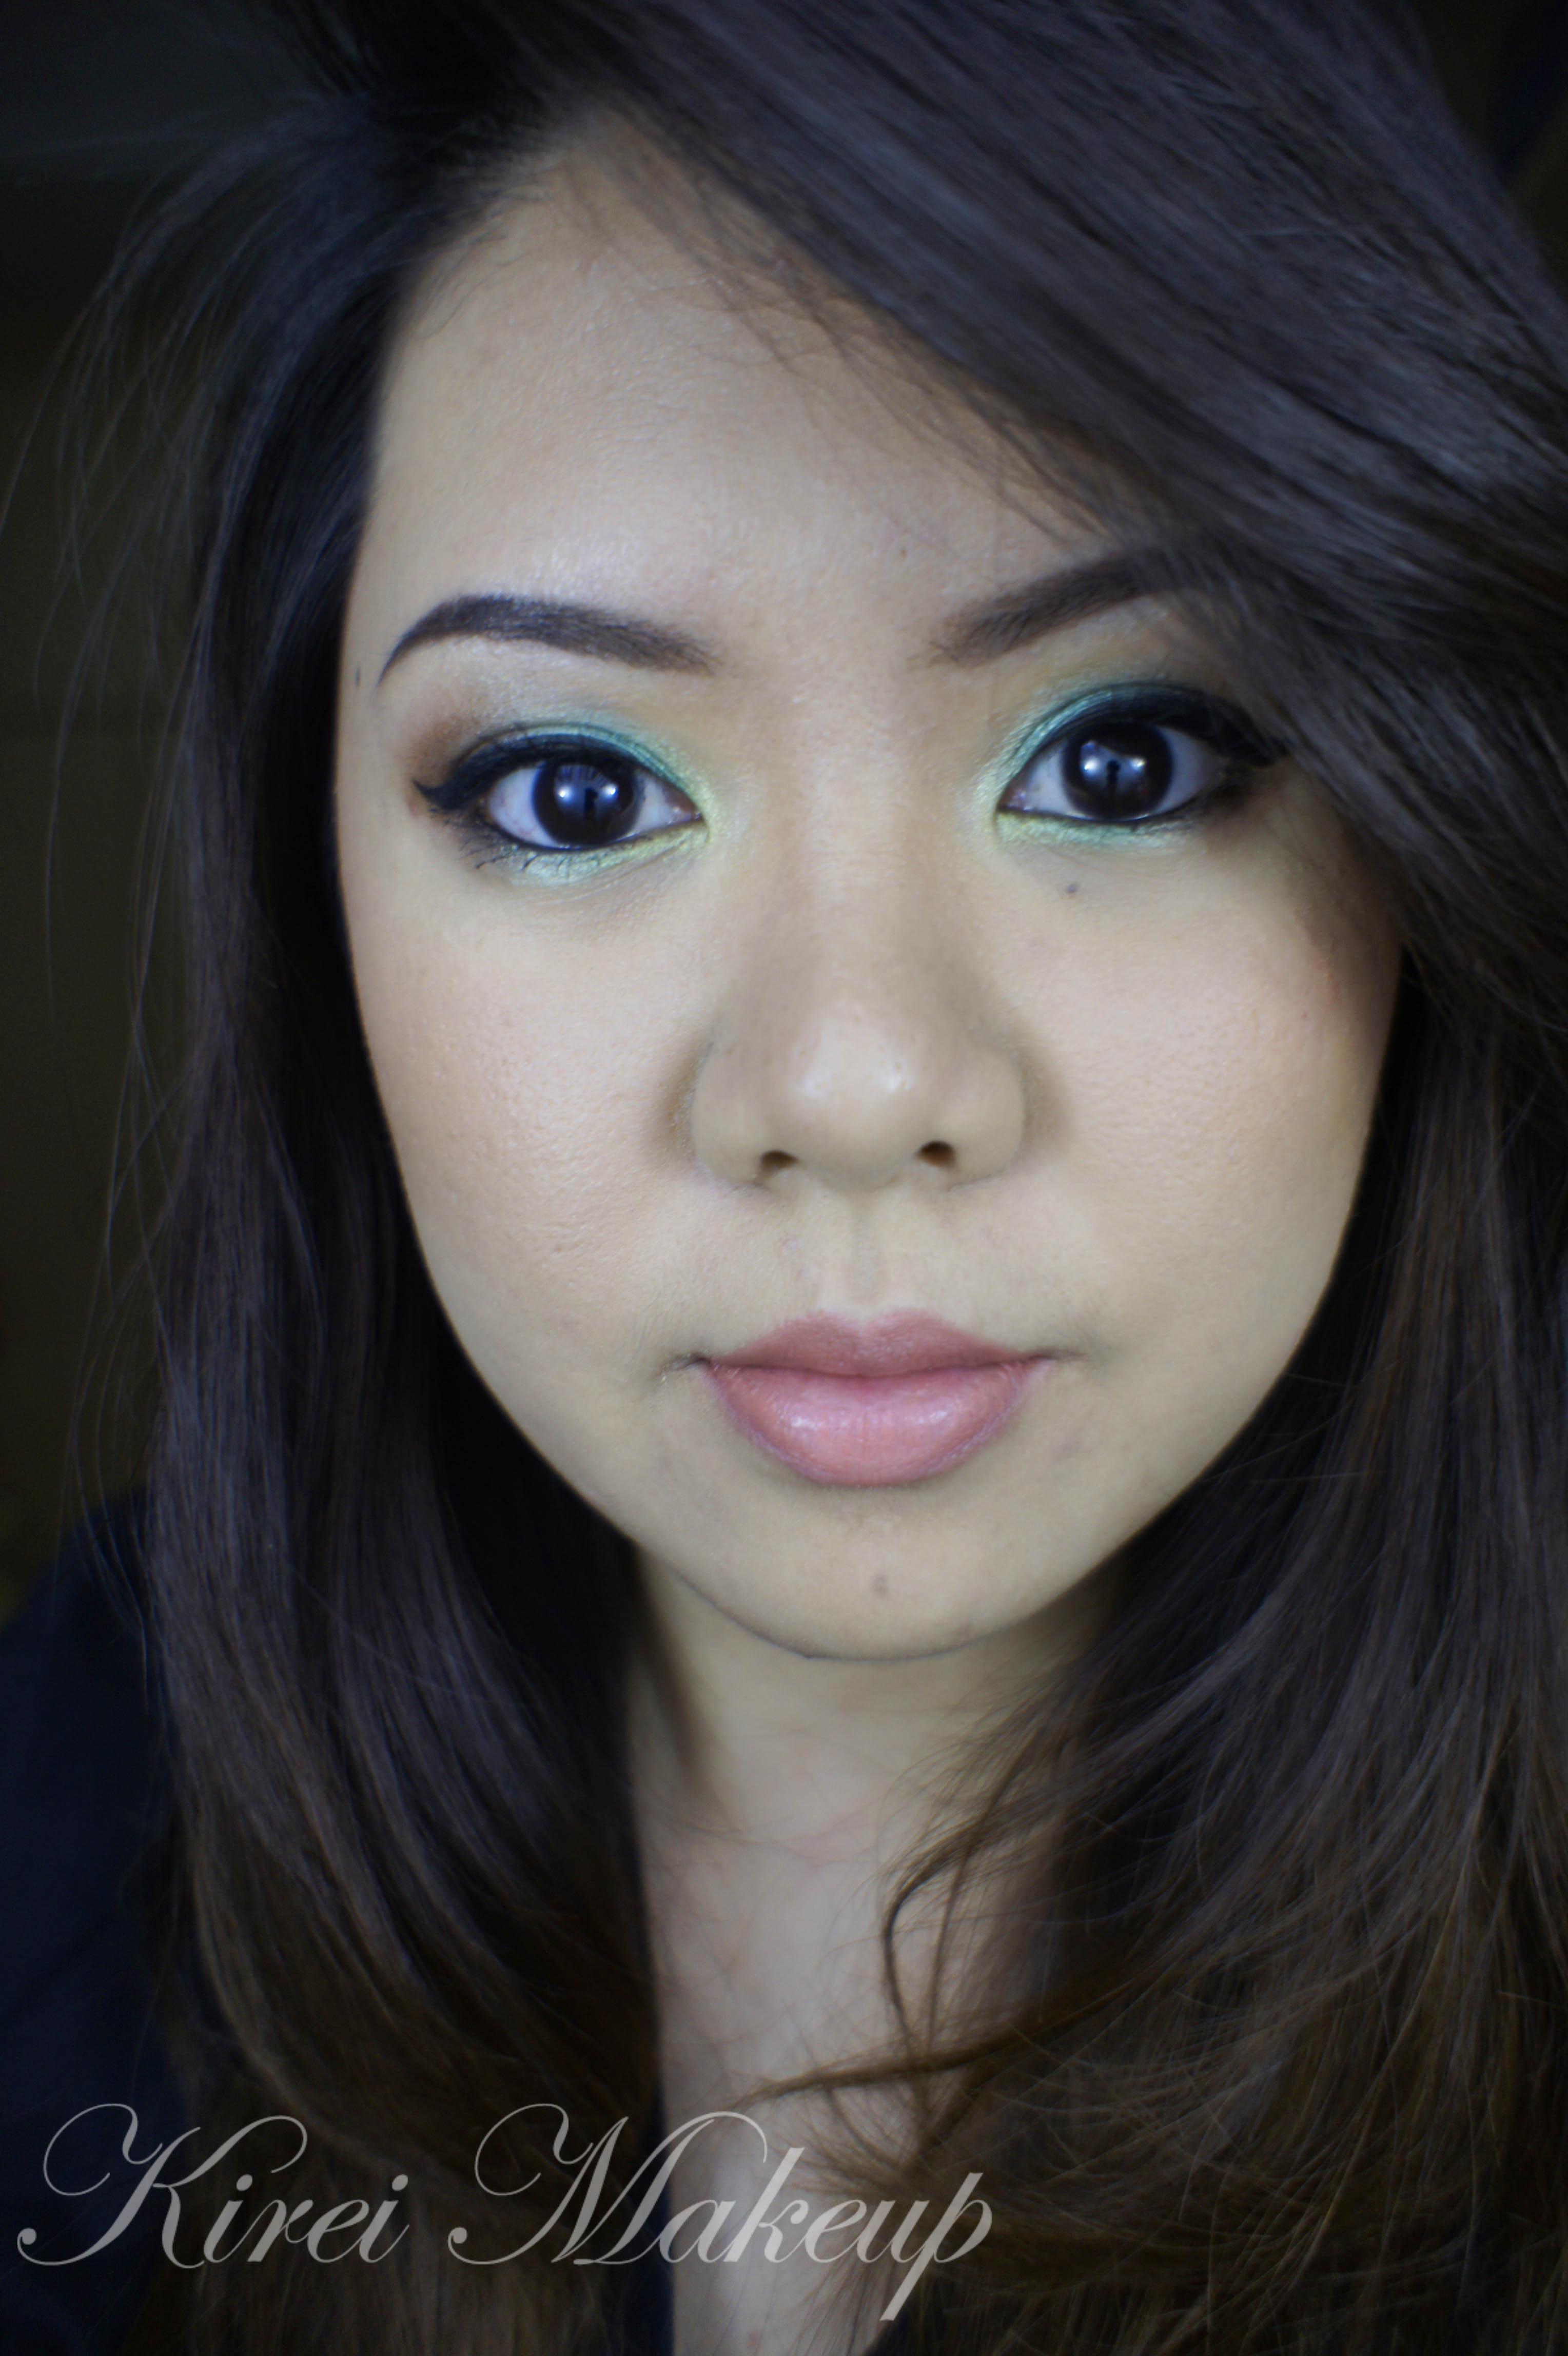
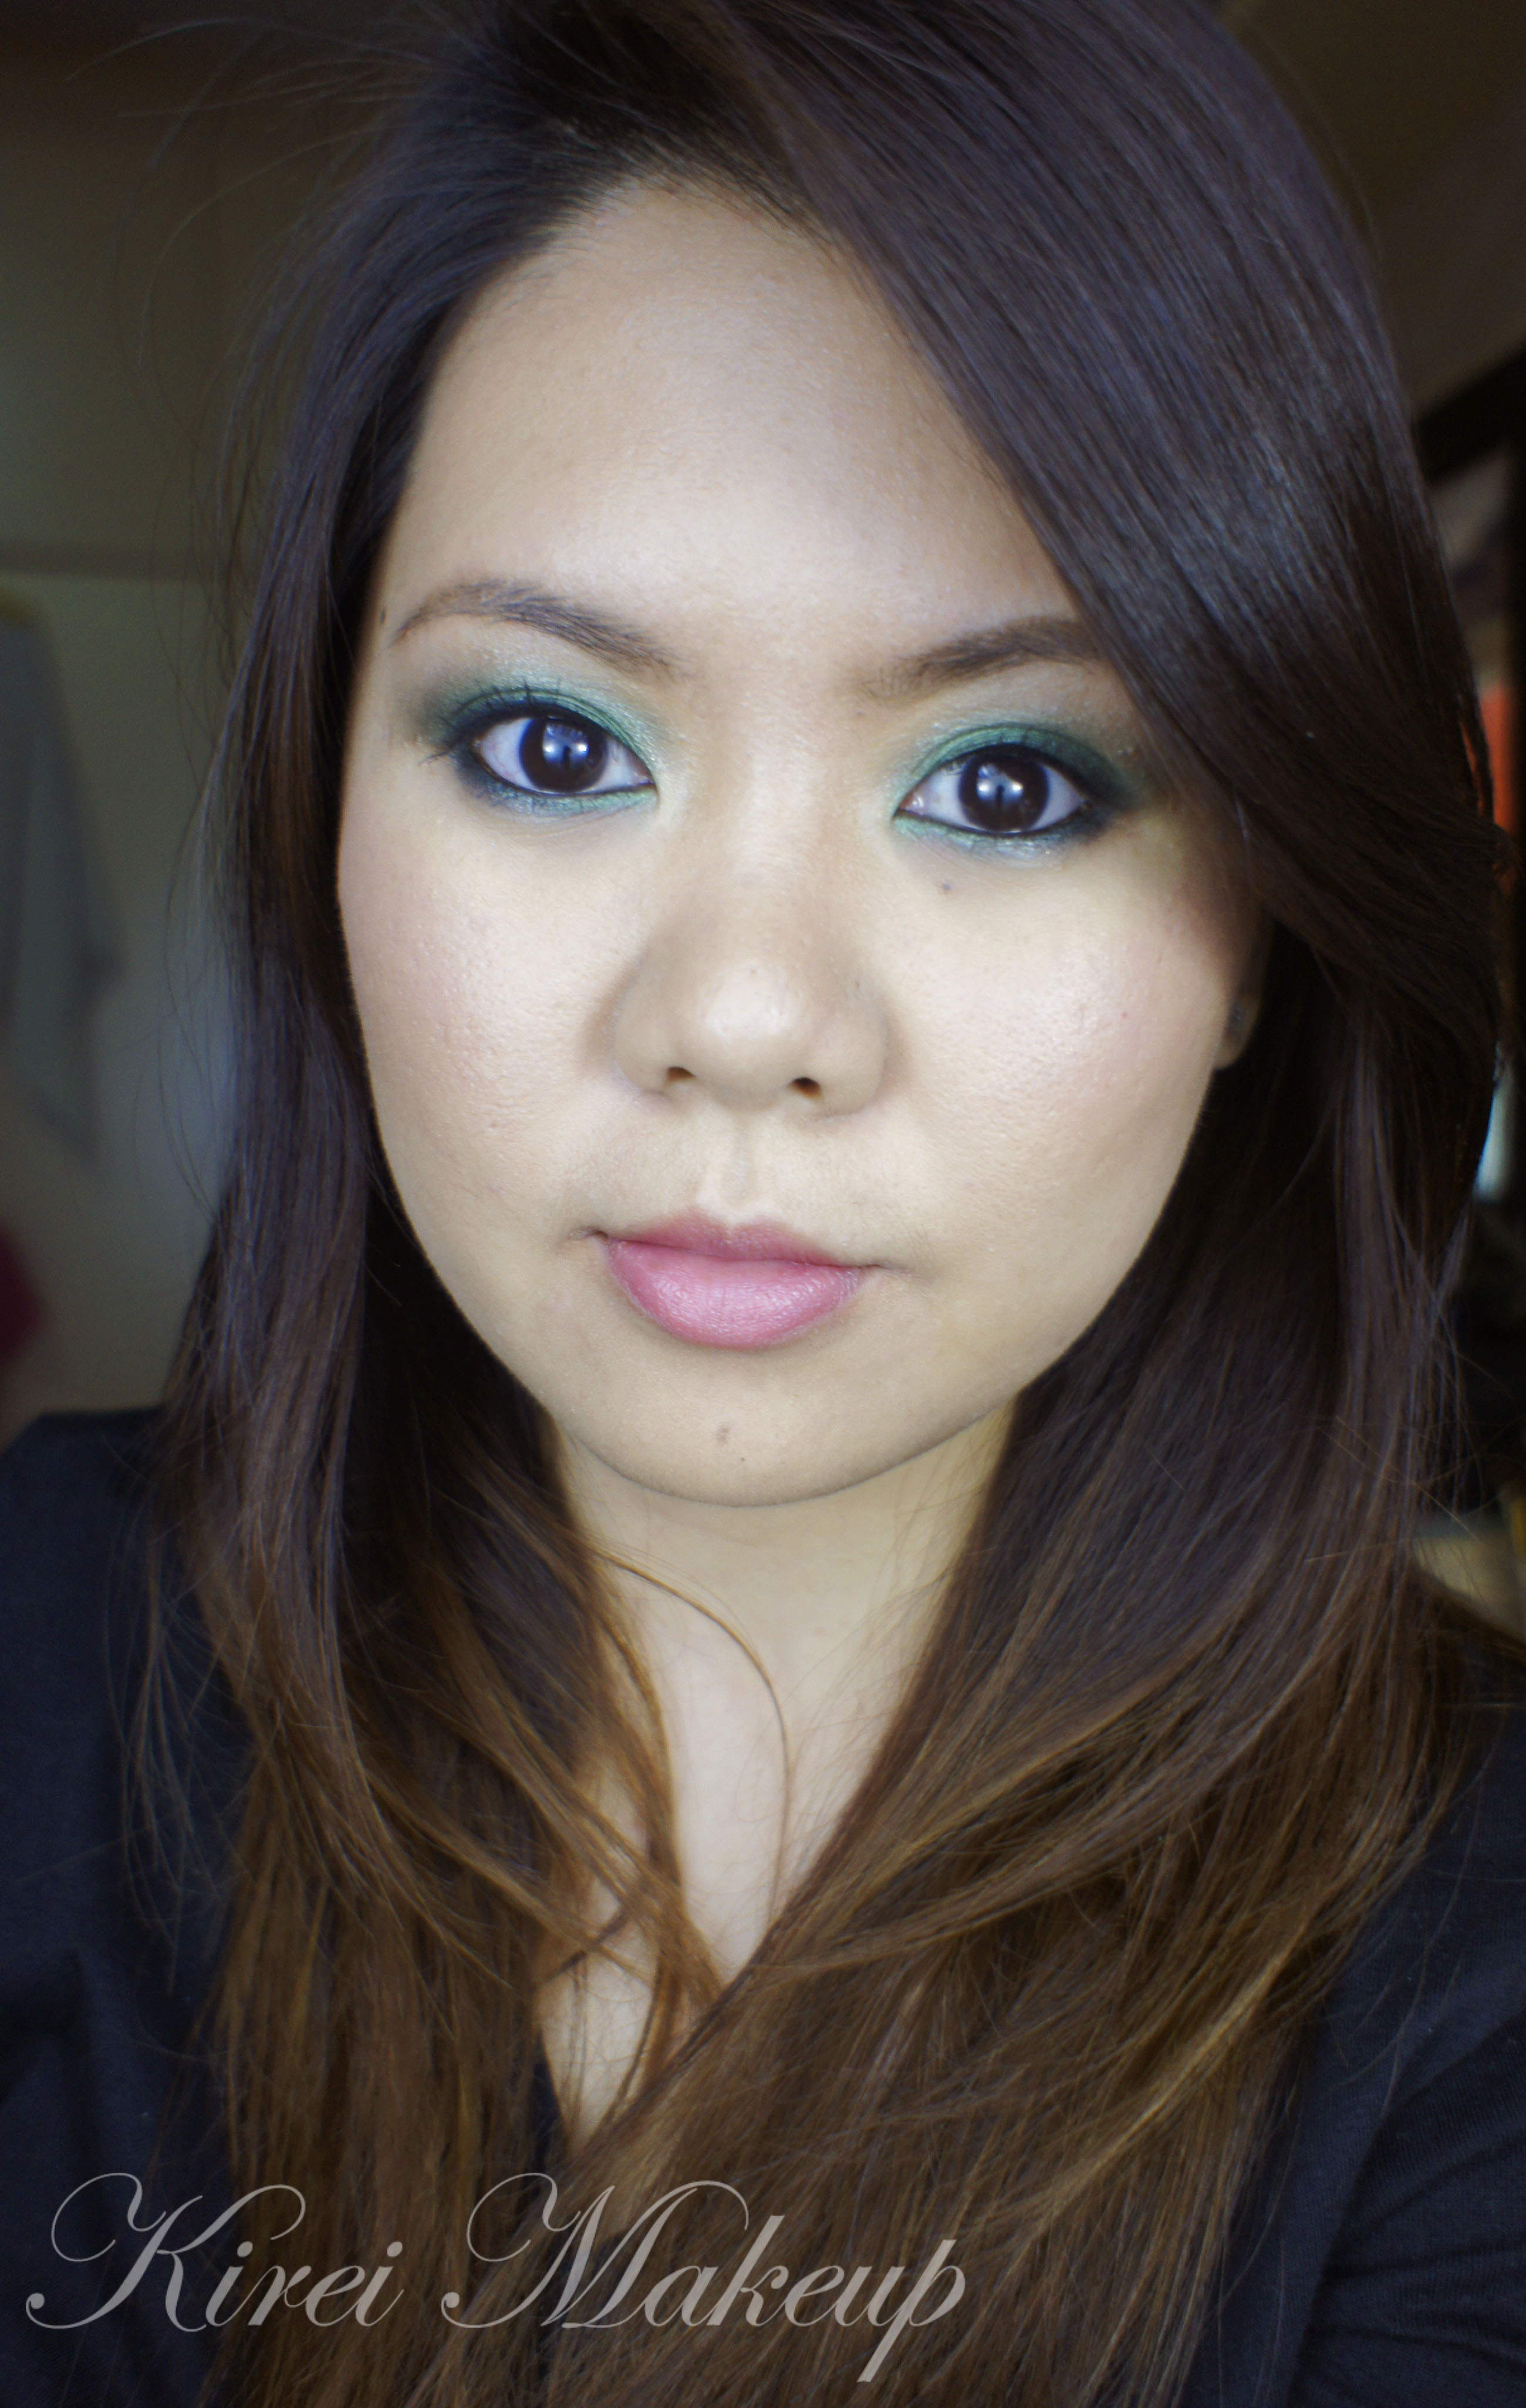
Anyhow, this look is similar to my “Hint of Mint“, but instead of using a mint eyeshadow, I used a turquoise and a light green. I think it turns out to be very pretty. I feel that the light green really bring the whole combo together. It’s wearable if you dare to wear colors out. Very tropical! I used my Sleek Makeup palettes for this look since I want to play with the palettes some more.

Oh, I also played around with my nails on Monday, so if you haven’t seen it, go over to my Instagram to check it out.

How-to:

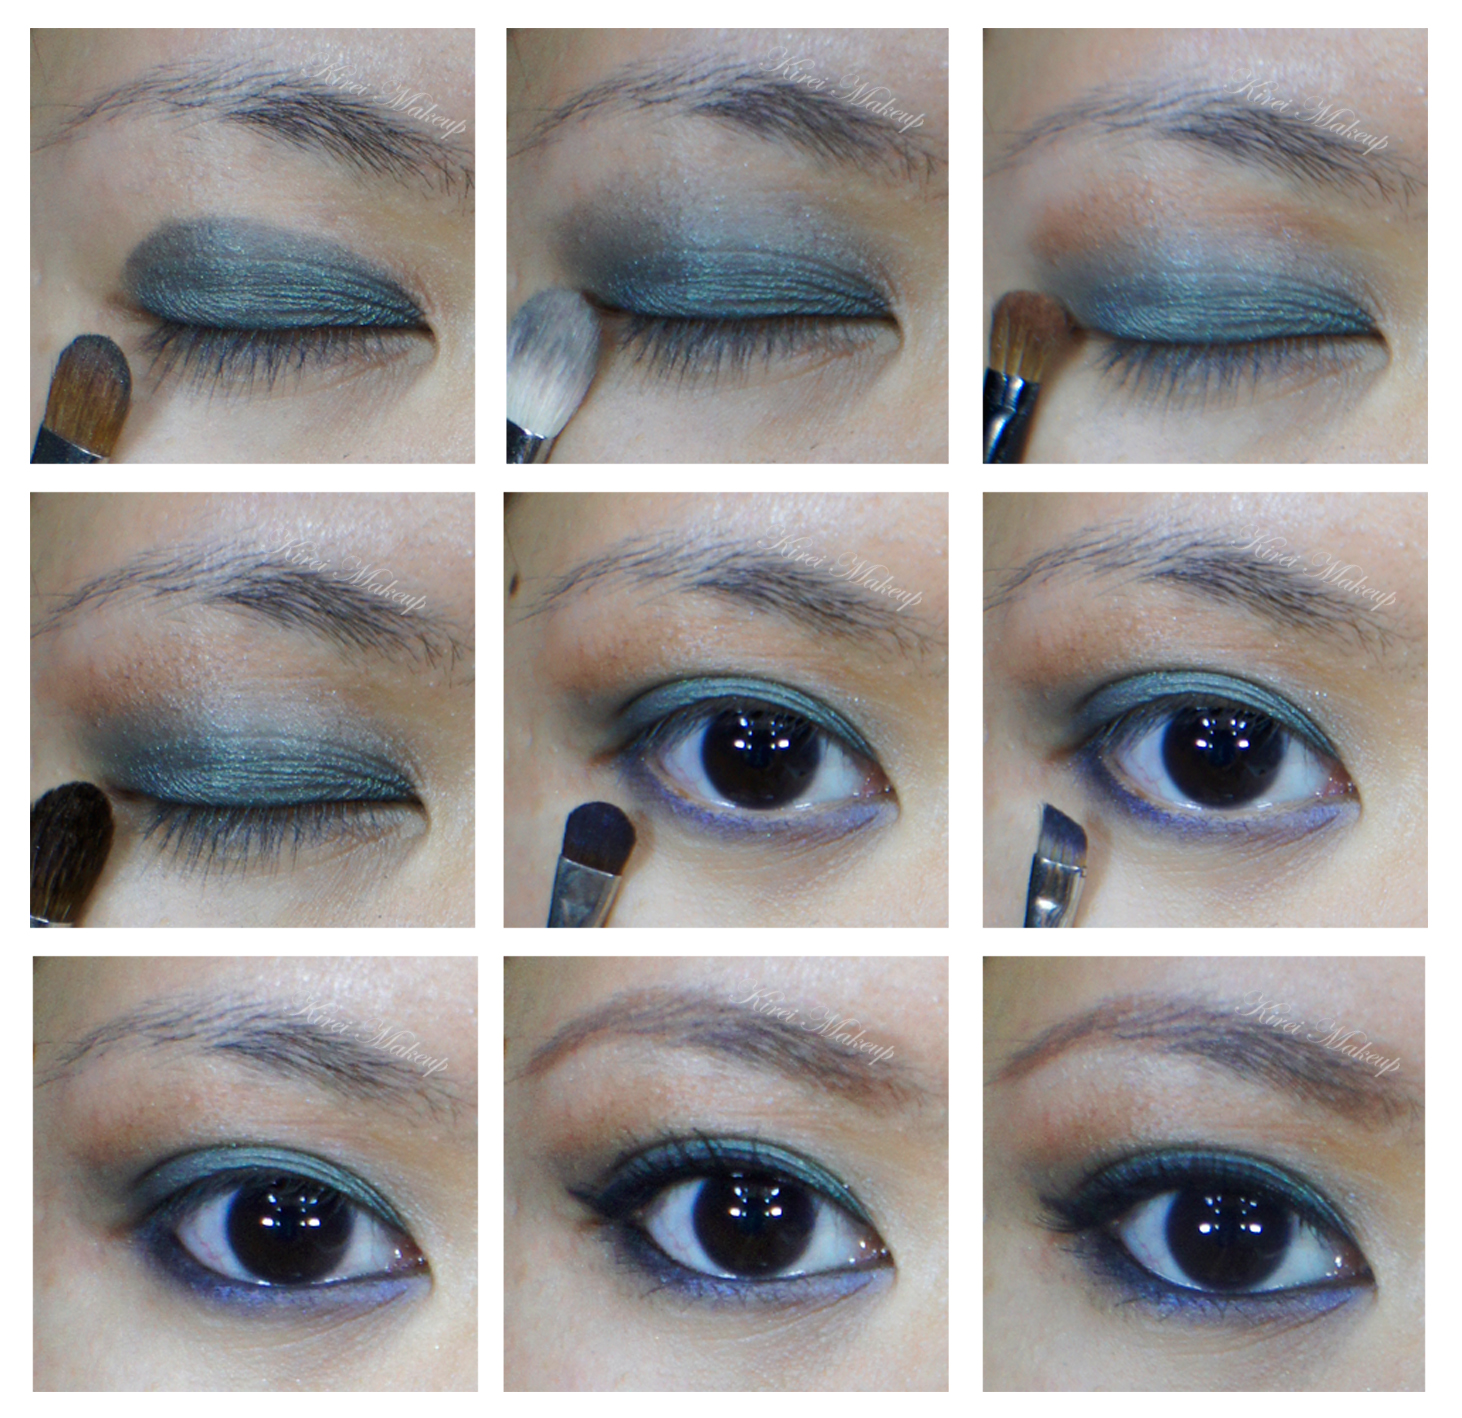
1. I applied Truffle from Sleek Makeup iDivine Sparkle 2 palette on the outer corner of my lid using a flat eyeshadow brush.

2. Using a MAC 239 (shader brush), I blended the color towards the inner part of the eyelid.

3. Repeat step 1 and 2 if necessary.

4. I used whatever was left on the flat eyeshadow brush from step 1 and applied it to the outer half of the lower lid.

5. Using a clean flat eyeshadow brush, I applied Green Iguana from the Sleek Makeup iDivine Snapshots palette on the inner part of the eyelid. I also applied this color in the middle of the lower lid.

turquoise eyeshadow

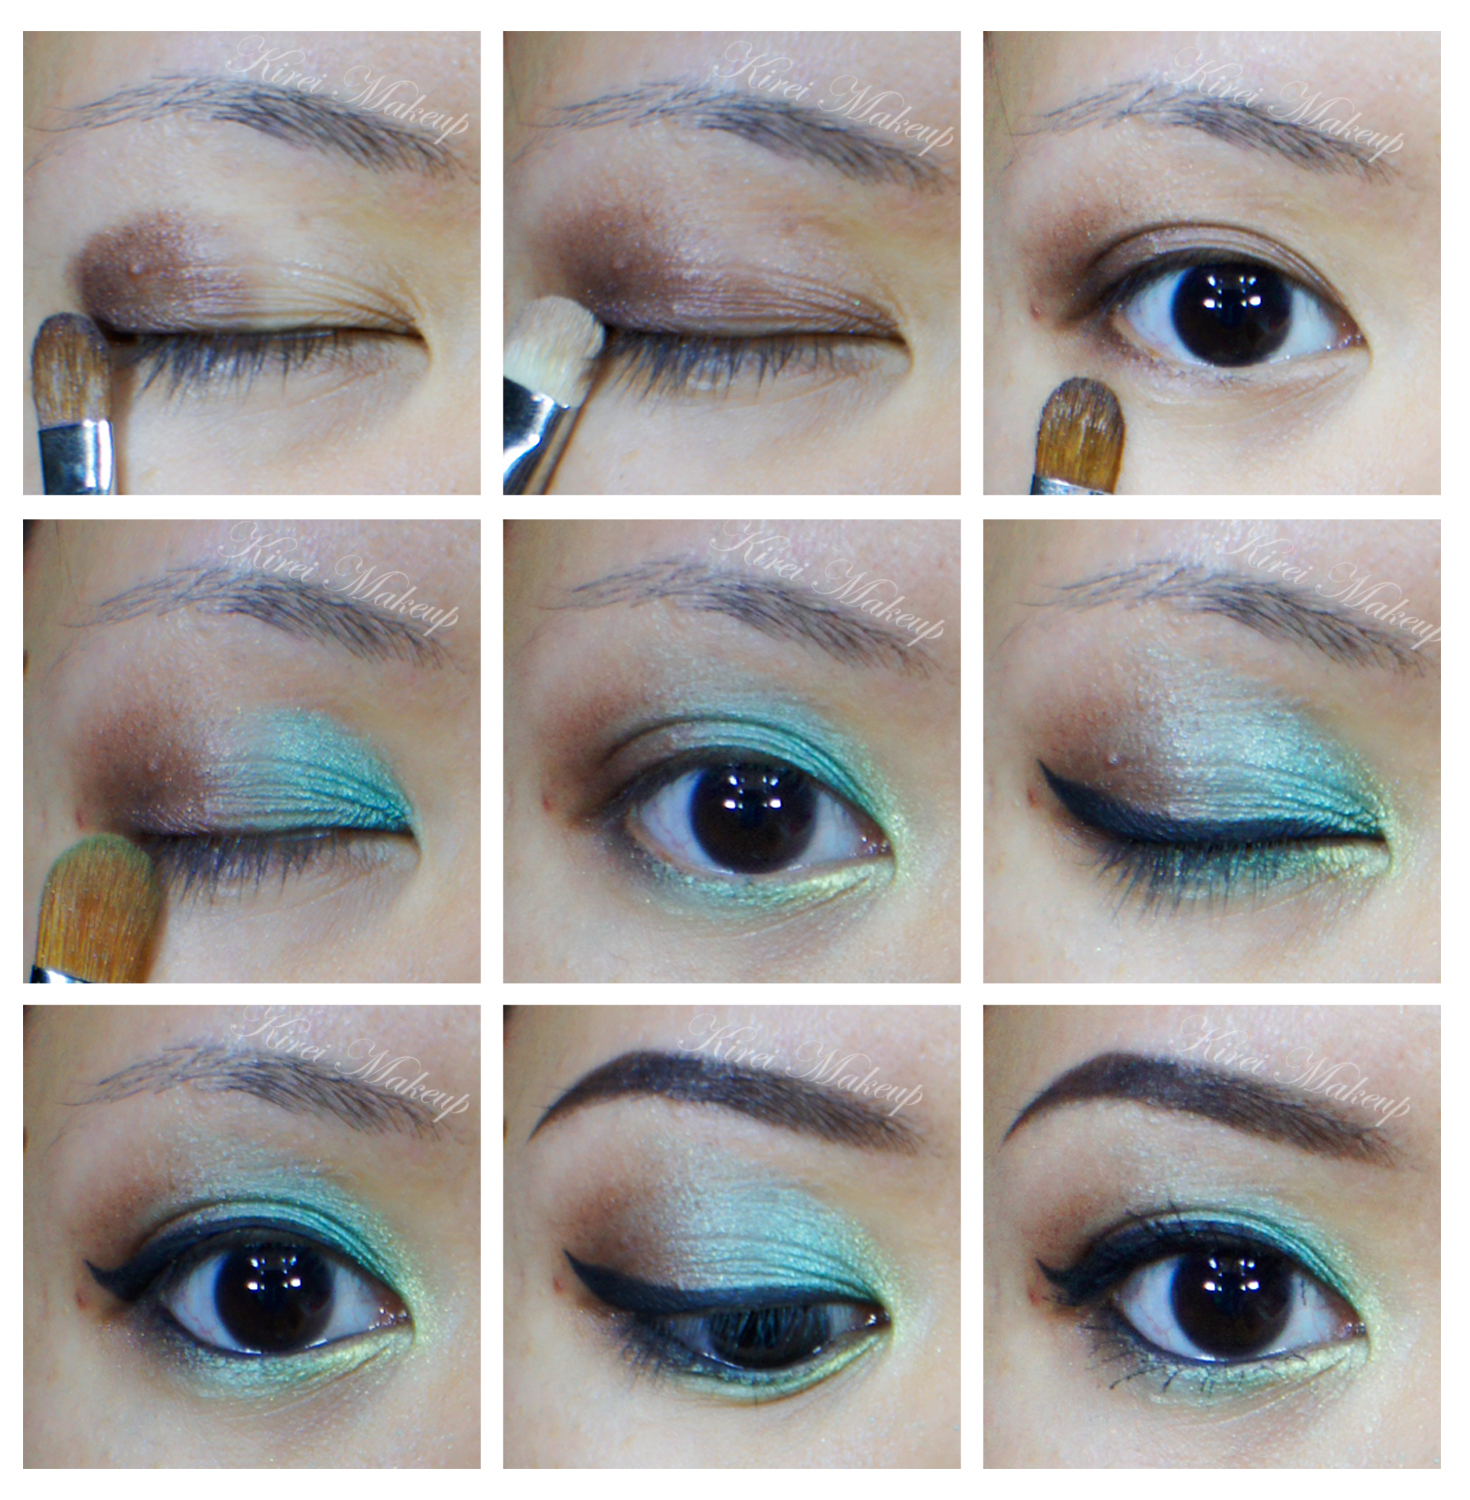
6. I applied Kiwi Flower from the Sleek Makeup iDivine Snapshots palette on the tear duct area using a pencil brush as a highlighter.

7. Using MUFE Aqua Black and an angled eyeliner, I created a winged liner along my upper lash line.

8. I lined my waterline using L’oreal Voluminous Smoldering eyeliner.

9. I filled my brows in using MUFE Aqua Brow Gel and an angled eyebrow brush.

10. I curled my lashes and applied MUFE Smoky Lash mascara on my lashes.

sleek makeup snapshot

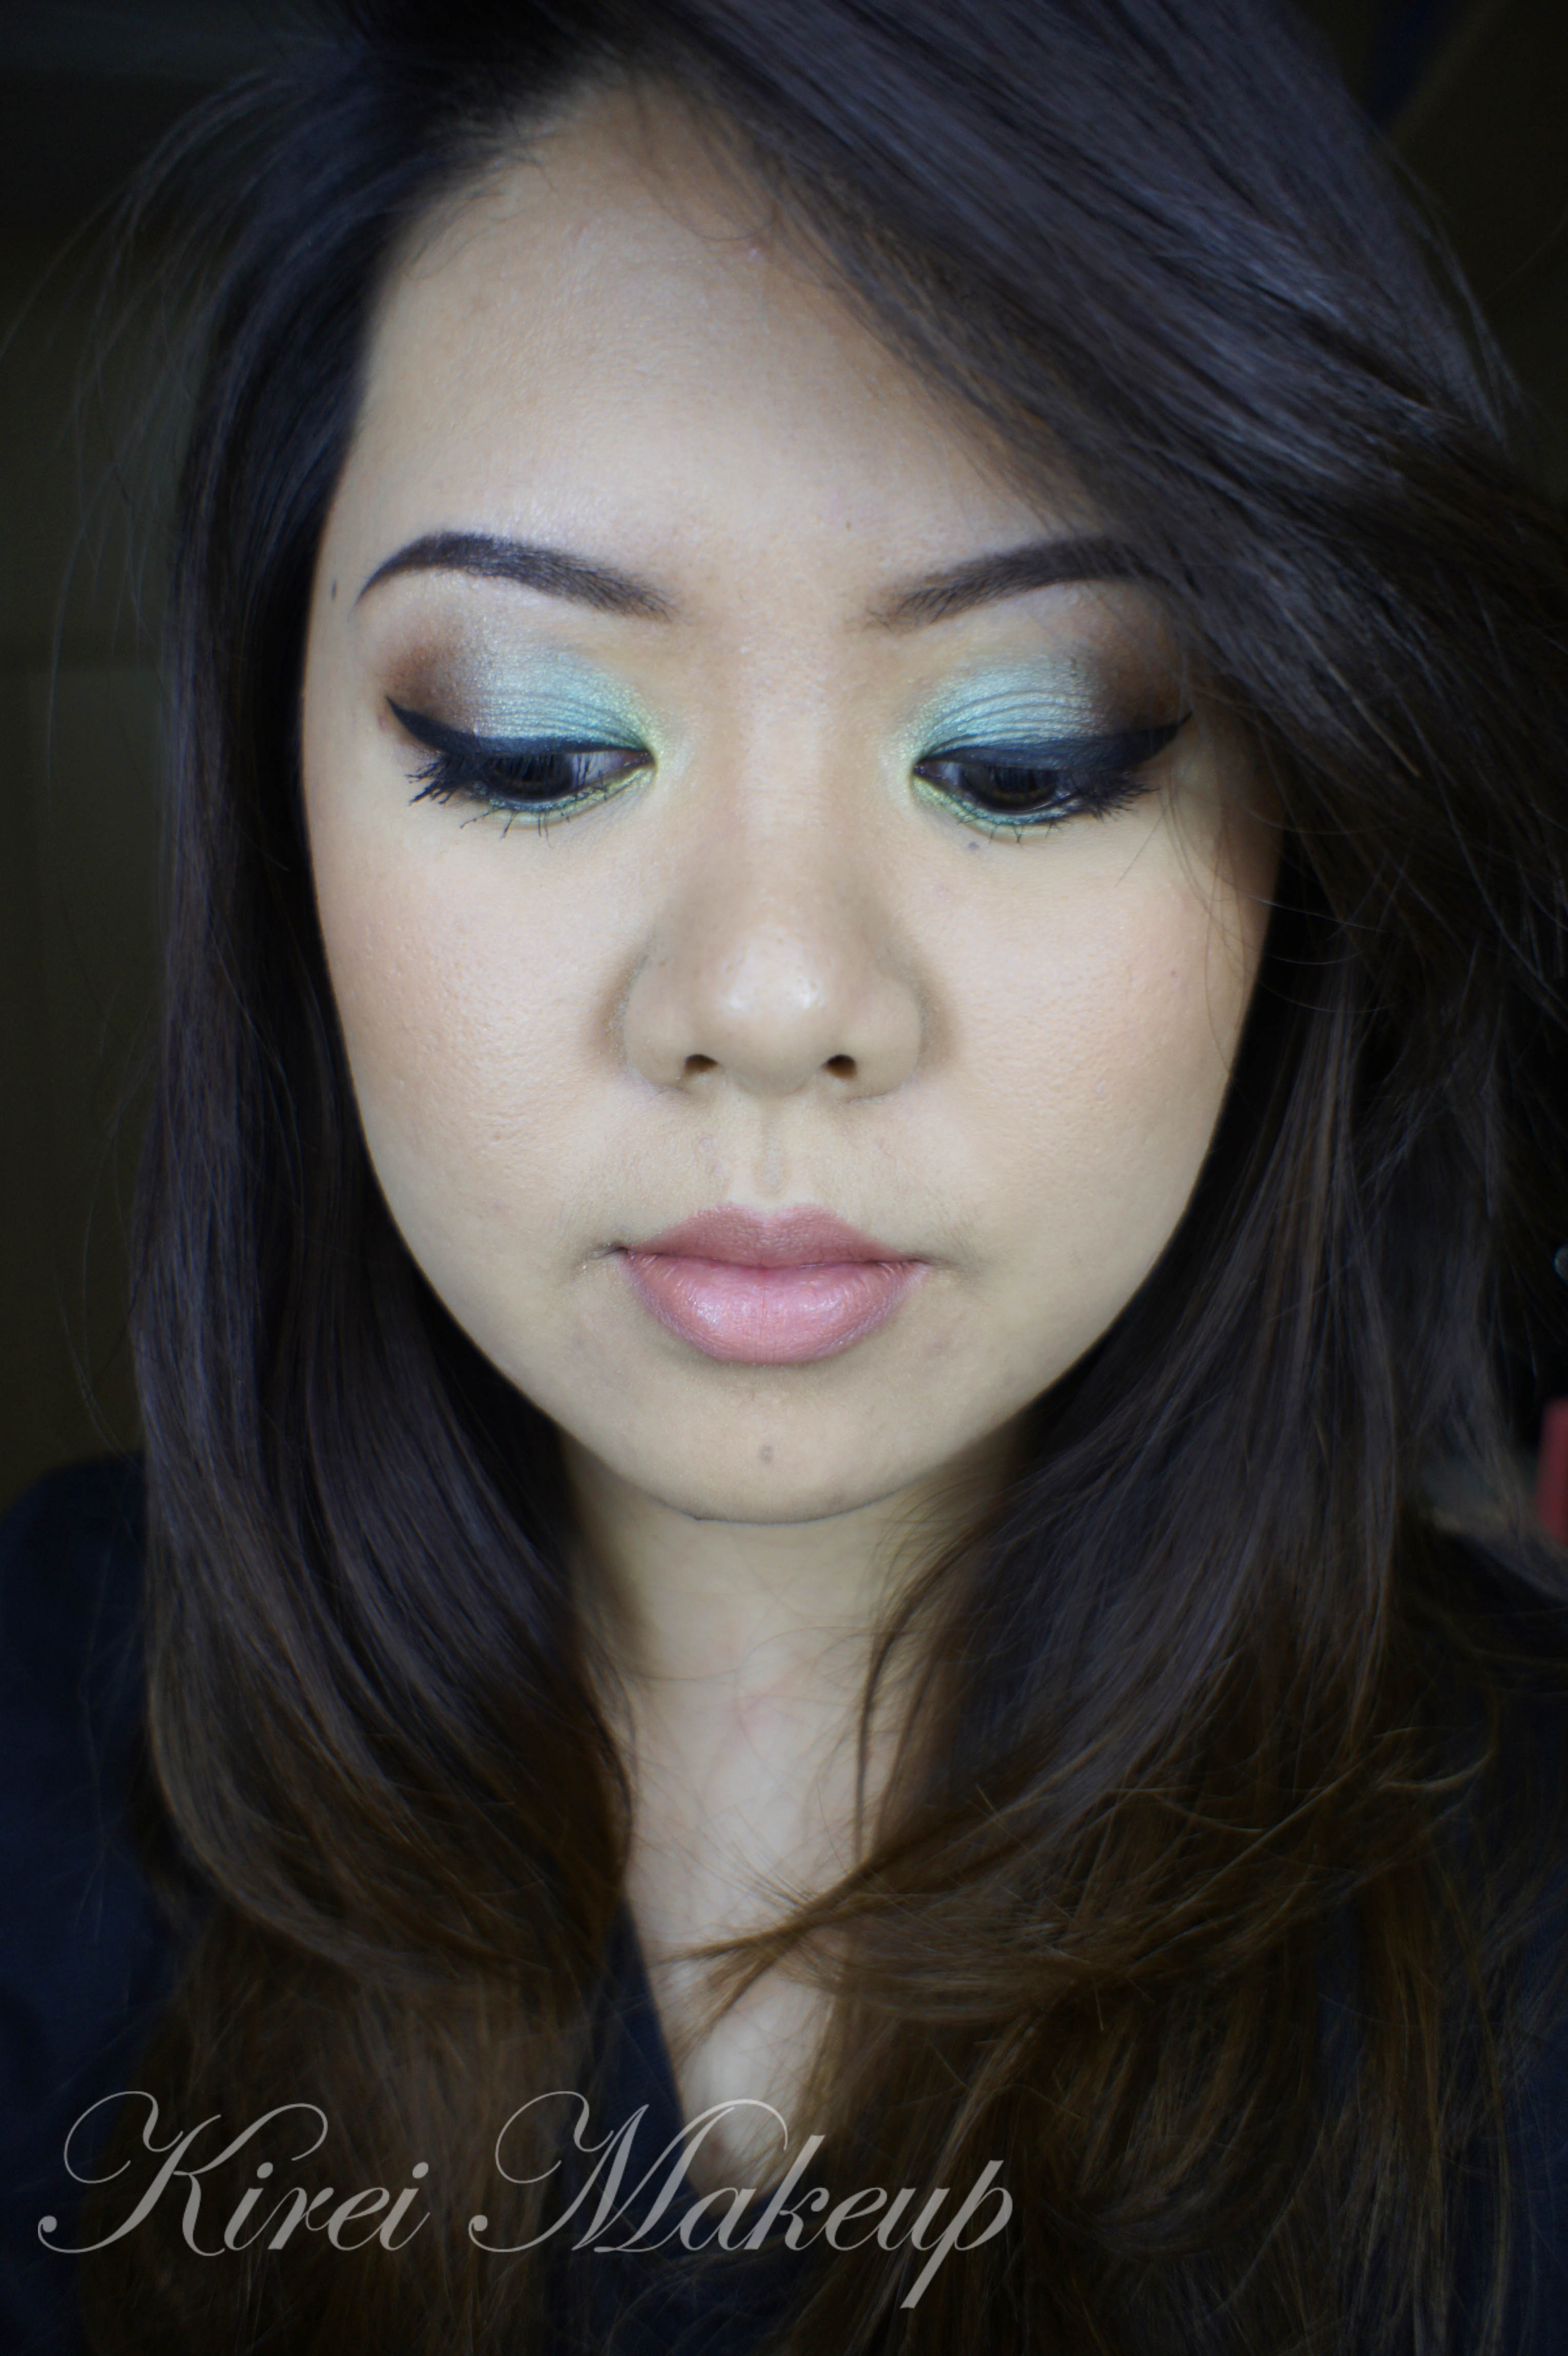
11. For the face, I applied UD Naked foundation using a foundation brush.

12. I applied Benefit Dallas bronzer along the outside perimeter of my face.

13. On the cheeks, I applied MAC Peaches blush.

14. I filled my lips using L’oreal Colour Riche Lip Liner in Beyond Pink, and applied MUFE Rouge Artist Natural Lipstick in N39 (Soft Apricot).

sleek makeup snapshot

Dark Forest

I wanted to do a smoky look just for a night-out on the weekend, and decided to go with green eyeshadow instead of my usual purple. I wanted a dark smoky eyes, but at the same time I want color in it. I was just a very fussy person..hahaha..anyways, I did this look in less than 30mins. Very easy and simple smoky eyes. If you prefer the darker, smokier version, skip the last 3 steps and just apply mascara (and/or false eyelashes).

How-to:

1. I applied Chanel Illusion D’ombre in Epatant all over my lid using my finger.

2. Using a flat eyeshadow brush, I applied Lancome Strut eyeshadow on the lid.

3. Using a clean fluffy blending brush, I blended the crease.

4. I lined my waterline, tightline, upper lash line and lower lash line using L’oreal Voluminous Smoldering eyeliner. Smudged the liner a little to my lower lid as well.

5. I used my pencil brush and smudged the liner on the lower lid.

6. Using an angled eyebrow brush, I applied Lancome Strut eyeshadow on the lower lid.

7. *optional* I applied the green eyeshadow from Sariayu Karimunjawa palette on my eyelid using a flat eyeshadow brush. I also added a little bit of this eyeshadow on the inner corner of the lower lid.

8. I applied black eyeshadow along the upper lashline, curled my lashes and applied mascara.

9. I filled my brows in using Anastasia Brow powder.

emerald smoky eyes

10. Since I found the brows to be a bit too bold, I decided to tone it down a little by brushing it upwards using a clean spooly (a.k.a mascara brush).

11. For the face, I applied MUFE HD Foundation using my fingers.

12. On the cheeks, I applied L’oreal Visible Lift blush in Rose Gold.

13. I powdered lightly using translucent powder on my T-zone.

14. On the lips, I applied Clinique Chubby Lip pencil in Curvy Candy.

green smoky eyes

MUFE Smoky Palette

These couple days I’ve been digging my makeup stash, trying to find which palette I’ve been putting aside and barely used. I have to say, I am a product hoarder. I think some (or most) of you can relate to me, right? Come on you bloggers out there, I know you’re probably as bad as me 😉

Anyways, I managed to find the Make Up For Ever Smoky palette that I bought and barely touched. I fell in love with this palette again! The pigments are amazing and you have all the basic colors you need for smoky eyes. You have the earthy tones like brown (dark and light), the highlighters (white and champagne), the medium and darks (blue, purple and black). What’s not to love? I wonder why I didn’t fell in love with it as much last time..Oh well!

How-to:

1. I applied the green eyeshadow from the MUFE Smoky palette on the eyelid using a flat eyeshadow brush.

2. Using a clean blending brush, I feathered out the edge of the crease.

3. I applied the light brown eyeshadow from the Smoky palette slightly above the crease using the brush that comes with the palette.

4. Using a clean blending brush, I blended out the edge so there’s no harsh line on the crease.

5. Using a small shader brush, I applied the blue eyeshadow from the MUFE Smoky palette on the lower lid.

6. I also applied the black eyeshadow from MUFE smoky palette on the outer half of the lower lid using an angled eyeliner brush.

7. I lined my waterline and tightline using MAC Engraved eyeliner.

8. Using an angled eyeliner brush and the black eyeshadow from MUFE Smoky palette, I created a winged liner along the upper lashline.

9. I curled my lashes and applied Maybelline Volume Express Turbo Boost mascara on both top and lower lashes.

10. I also applied Ardell Demure lashes to make my lashes look slightly thicker. My real lashes were longer than the falsies surprisingly.

11. Eyebrows are filled using Dollywinked brow pencil.

asian smoky eyes

12. For the face, I applied MUFE HD foundation using Sigma Round Kabuki brush.

13. Under the eyes, I applied Chanel Eclat Lumiere.

14. For the cheeeks, I applied MAC Cubic blush.

15. I applied Tarte Lipsurgence in Hope for the lips very lightly on the center of the lips and blending it outwards using my finger.

smoky eyes for asian