Soft Romantic Makeup (Revisited)

I’ve done a lot of UD Naked 3 makeup tutorials, and though most of them are smoky eyes, I do have a few non-smoky eyes tutorials. I was looking back on those tutorials, and I’ve decided to revisit this Soft Romantic Makeup post. I actually liked how I did my makeup in that post, but I felt that I wanted to redo it, and added more intensity to the shadows. Which one do you prefer? This tutorial or the original one? Let me know on the comments below!

I’d also like to mention that I’ve changed the way I filled my brows for this tutorial – it’s thicker, and more natural looking. I think I prefer this brow, even though it might look “less polished” than the “carved out” brows (aka concealer on top and bottom of my brows), I do like how it looks more organic. What do you guys think?

I apologize if the photos are slightly too warm, I didn’t realize my camera’s white balance setting was on the “warming filter” option. I tried to neutralize it using photoshop, but this is all I can do for now (besides trying to neutralize the yellow shade, I did not do anything else – no airbrushing whatsoever). I’ll be more careful next time.

*Check out my other UD NAKED 3 TUTORIALS*

soft smokey eyes tutorial

How-to:

1. I applied MAC Perky paint pot all over my (mobile) eyelid using my ring finger.

2. Using a small blending brush, I applied UD Naked 3 Darkside on the outer V.

3. Using the blending brush that came with the palette, I applied Nooner on the crease. I used this shade to blend out the edge of Darkside.

4. I applied Trick on the eyelid, using the flat eyeshadow brush that came with the palette.

5. Using a small shader brush, I applied Burnout on the inner corner of the lower lid, and Darkside on the outer half.

6. I, very lightly, applied a teeeensy bit of Blackheart right on the roots of the lower lashes (just the outer half).

7. I lined my waterline using MAC Chromagraphic eyeliner in NW25/NC30. Along the upper lash line, I created a winged liner using L’oreal 24H Lacquer Liner and an angled eyeliner brush.

8. I filled my brows using Anastasia Brow Wiz in Taupe and Brunette.

9. Curled my lashes, and applied Gwiyomi False lashes no. 3.

ud naked 3 soft smoky tutorial

10. I applied Benefit Porefessional primer all over my face.

11. While letting the primer set, I applied Bobbi Brown Peach Corrector underneath my eyes (my dark circles are getting prominent lately!)

11. Then, I applied MUFE HD Foundation in 120 using Real Technique Expert Face brush.

12. I applied MAC Pro Longwear Concealer under my eyes, as well as on the bridge of my nose (just between the brows).

13. I also applied L’oreal Visible Lift blush in Rose Gold on my cheeks.

14. I set my face using NARS Setting Powder.

15. On my lips, I applied MAC Please Me lipstick and a few dabs of clear gloss.


Products used

Eyes – MAC Perky paint pot; Urban Decay Naked 3 palette (eyelid: Trick, outer V/lower lashline: Darkside, inner corner of lower lid: Burnout; roots of lashes: Blackheart); MAC Chromagraphic liner NW25/NC30; L’oreal 24H Lacquer Liner in Blackest Black; Anastasia Beverly Hills Brow Wiz in Taupe and Brunette; Gwiyomi False lashes no. 3

Face – Benefit Porefessional primer; MUFE HD Foundation in 120; Bobbi Brown Peach Corrector; MAC Pro Longwear concealer; NARS Setting Powder.

Cheeks – L’oreal Visible Lift Blush in Rose Gold.

Lips – MAC Please Me lipstick; L’occitane clear lip balm.

Christmas Makeup Tutorial

Are you guys ready for the Holiday season?! For those of you who are celebrating Christmas, I hope you’ll enjoy this Christmas Makeup tutorial! This is a makeup collaboration with fellow Indonesian Beauty Bloggers – Feegy from Muses Wonderland, Chell from Polish Wonderland, and myself (not from any wonderland *wink* hahaha). So, don’t forget to check their tutorial out!

We collaborated in creating a Christmas look with a little bit of glitter ya’know, because it’s Christmas! We need glitters, hon! Sparkles everywhere! Feegy created a silver glitter smoky eyes, and Chell went on the nude glitter eyes. For me, I went all out with green, gold and glitters! Hey, it’s Christmas, I might as well make full use of all the Christmas colors!

makeup collaboration

For my look, even though it’s pretty bold and colorful, it is still wearable if you aren’t afraid of colors. The placement of the colors are quite important so you don’t go looking all crazy, you get what I’m saying? Instead of green, gold and glitter everywhere, I focused these 3 products on specific location on my eyes. This way, the colors work well together, and you don’t look like a glittery mess.

The green is located on the center of the eyelids only so that when you blink, that gorgeous color will pop along with a teensy bit of crushed metallic pigment. You can use glitter if you don’t have the crushed pigment. The gold glitter is on the inner half of the lower lid, this will brighten and open up your eyes.

The key is to apply the bright color and glitter lightly. Notice I used my finger to apply the green shade, I also use my finger just to press the crushed pigment very lightly all over my lid. This way, the colors and glitters aren’t all over the place. By combining bright colors with neutrals, your whole look will be pulled together.

holiday party makeup

My eyelids are prepped using Urban Decay Primer Potion.

How-to:

1. I applied Urban Decay Buck eyeshadow above my crease, as my transition color, using a crease blending brush.

2. Using Smashbox bullet crease brush, I applied Kat Von D Shadow Box (Monarch palette) on the outer and inner V of the eyes.

3. I applied MUFE Aqua Cream no. 52 on the center of my eyelid using my ring finger.

4. Using the same ring finger, I VERY lightly tapped MAC Metallic Crushed Pigment in Moss Garden all over my lid. I just want a little bit of the crushed metallic pigment for shine, not for the color.

5. I lined my upper lash line using Kat Von D Trooper eyeliner. On the waterline, I applied MAC Smolder kohl eyeliner.

6. On the lower lash line, I applied PAC eyeliner liquid in Bazaar Gold on the inner half. On the outer half, I applied Kat Von D Deadhead eyeshadow (Monarch palette) using a smudger brush.

7. Using the same smudger brush as step no. 5, I applied whatever was left on that brush on the outer and inner V of my eyes (on top of Shadow Box), just to add a bit of depth.

8. I applied Gwiyomi Annabelle lashes for extra drama.

9. I filled my brows using Anastasia Beverly Hills Brow Wiz in Taupe and Brunette.

christmas party makeup

10. On my face, I applied Diorskin Star foundation using Real Technique foundation brush.

11. I also applied MAC Pro Long-Wear concealer under my eyes, and any areas I need to cover.

12. I set my face using CoverFX Translucent powder.

13. I applied Smashbox bronzing powder from the contour kit to warm my face up slightly. Then, I applied Chanel Blush de Horizon on my cheeks.

14. On my lips, I lined and filled it with MAC Brick lip pencil. Then, I applied OCC Vintage lip tar on top of it.

holiday party makeup

Products used

Eyes – Urban Decay Primer Potion; Kat Von D Monarch Palette (Shadow Box, Deadhead), Make Up For Ever Aqua Cream no. 52; Kat Von D Trooper eyeliner; PAC eyeliner liquid in Bazaar Gold; Gwiyomi falsies in Annabelle; Anastasia Beverly Hills Brow Wiz in Taupe and Brunette.

Face – Diorskin Star Foundation 030; MAC Pro Long-Wear concealer NC25; CoverFX translucent powder.

Cheeks – Smashbox contour kit (bronzer); Chanel Blush de Horizon.

Lips – MAC Brick lip pencil; OCC Vintage lip tar.

GlamGlow Super Mud Review

This week started out with a GlamGlow Super Mud review post since I’ve been holding in back last week! I was going to post it on the weekend, but I was invited to join GlamGlow Power Mud product launch, so I decided to compile everything for today’s post. If you followed me on Instagram (if you haven’t please do!), you’d noticed that I’ve posted a few photos regarding the mask and the event. I’ll post more photos from the event on Instagram, so please do follow me there!

Glam Glow Super Mud

Everyone knows about GlamGlow right? The masks that took Hollywood by storm, the masks that everyone talks about, THE MUD MASK that’s in everyone’s wish list! Finally, I decided to BUY it last week and gave it a try. I was having issues with breakouts and clogged pores, so I decided to grab the GlamGlow SuperMud.

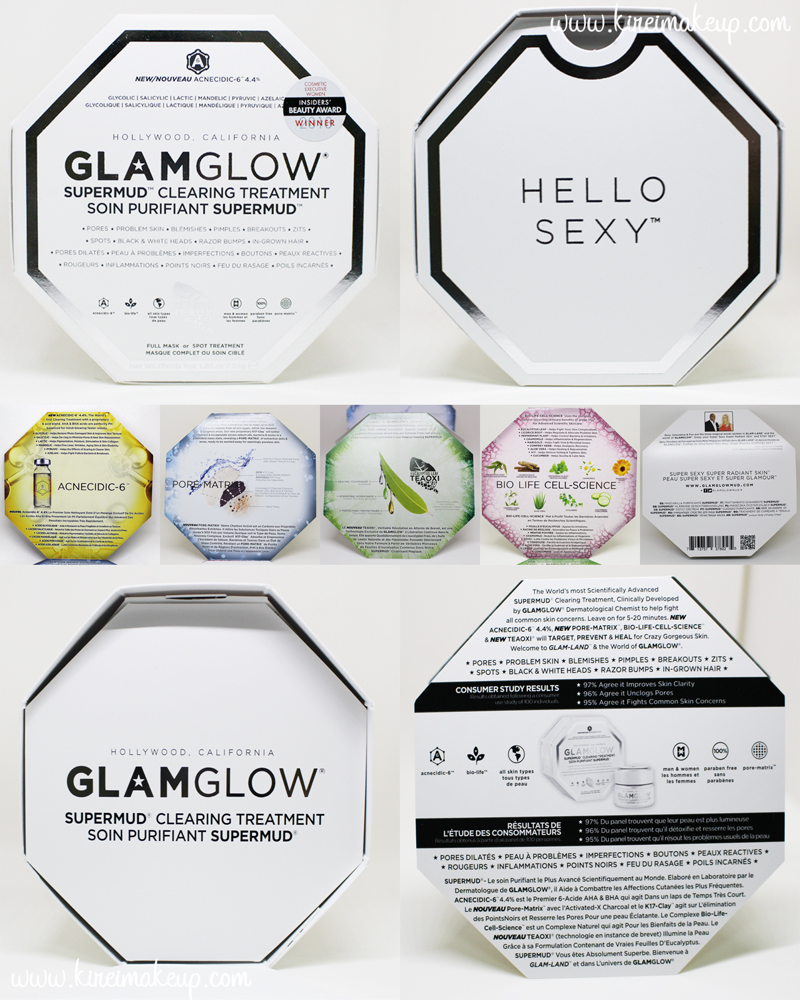
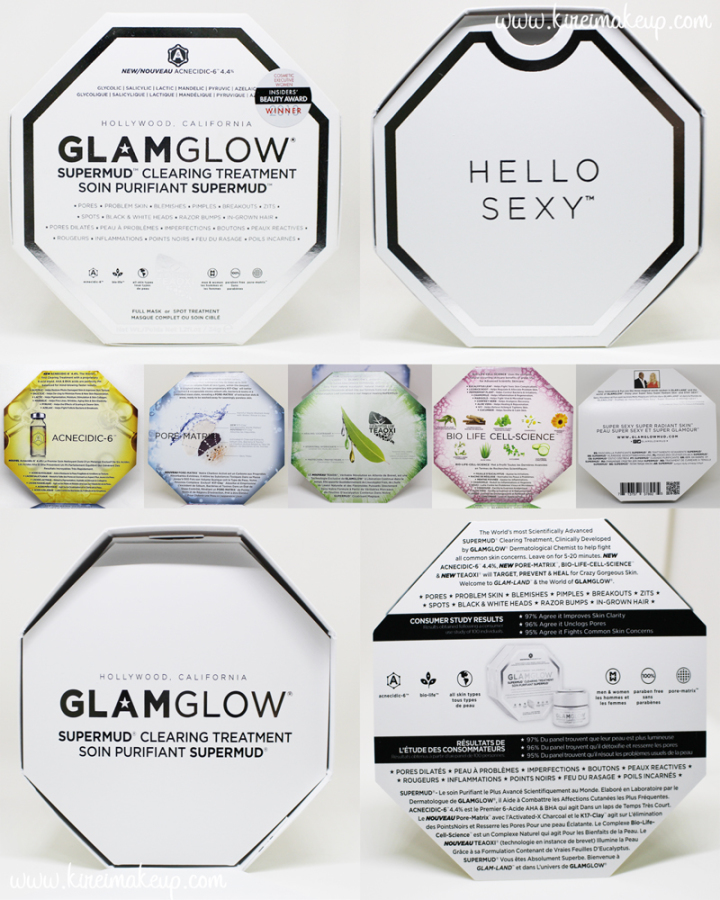
Let’s unbox the SuperMud together! Photo below as reference.

  1. So the SuperMud came in a beautiful white box.
  2. When you open the cover, you’ll notice their tagline “Hello Sexy”
  3. Then, you’ll receive a pamphlet that talks about the benefits of each ingredients in the mask, as well as a few words about the creators.
  4. You’ll get a jar of mask in the middle of the box.
  5. The back of the box talks about instructions, ingredients etc.

Glam Glow Super Mud review

Curious yet??? So, what exactly is GlamGlow SuperMud Clearing Treatment?

What it is:
A scientifically advanced SUPERMUD™ clearing treatment to target, prevent, and heal problem skin.

What it is formulated to do:
This formula was clinically developed by GLAMGLOW® dermatological chemists to help fight all common skin concerns including breakouts, discoloration, black and white heads, razor bumps, and in-grown hair. Powerful, skin-clearing mud visibly draws out dirt and congestion while a proprietary six-acid blend dramatically brightens and softens skin. It works to magnetically draw out dirt and pores with Activated-X Charcoal, leaving skin smooth and healthy-looking.

What it is formulated WITHOUT:
– Parabens
– Sulfates
– Phthalates

Research results:
Based on consumer trials:
After 1 day of use:
– 94% felt their skin looked renewed
– 91% saw an improvement in skin clarity
– 94% felt it gently cleared their skin

On day 7 after using it 3 times in a week:
– 98% felt their skin looked renewed
– 97% saw an improvement in skin clarity
– 97% felt it gently cleared their skin

Sephora Canada, 2014

Glam Glow Super Mud

Ingredients:

ACNECIDIC-6™ 4.4%: A proprietary six-acid blend of AHA and BHA acids perfectly PH balanced to deal with damaged skin, de-clog, and minimize pores, pigmentation, scaring, and breakouts.
Activated-X Charcoal: An extreme absorption carbon, attracting toxic substances into its mass up to 500 times its volume from all skin types.
K17-Clay™: Extracts and encapsulates excess sebum oils, bacteria, and toxins in a controlled stasis state.
TEAOXI™: Delivers daily fresh natural eucalyptol, natural-linalool oil, and powerful flavonoids direct into the formula from real pieces of eucalyptus leaf.

Water, Kaolin, Magnesium Aluminum Silicate, Sodium Hydroxide, Eucalyptus Globulus, Mandelic Acid, Charcoal, Parfum [Benzyl Benzoate, Linalool], Glycolic Acid, Lactic Acid, Azelaic Acid, Pyruvic Acid, Salicylic Acid, Xanthan Gum, Aloe Barbadensis Leaf Juice, Maltodextrin, Iron Oxides, Peppermint Oil, Butylene Glycol, Glycyrrhiza Glabra Root Extract, Glycerin, Chamoilla Recutita Flower Extract, Calendula Officinalis Flower Extract, Cucumis Sativus Fruit Extract, Hendera Helix Extract, Symphytum Officinale Leaf Extract, Phenoxyethanol, Ethylhexylglycerin, Caprylyl Glycol, Hexylene Glycol, Methylchloroisothiazolinone, Methylisothiazolinone.

Sephora Canada, 2014

Glam Glow Mud Mask

Impression and Verdict

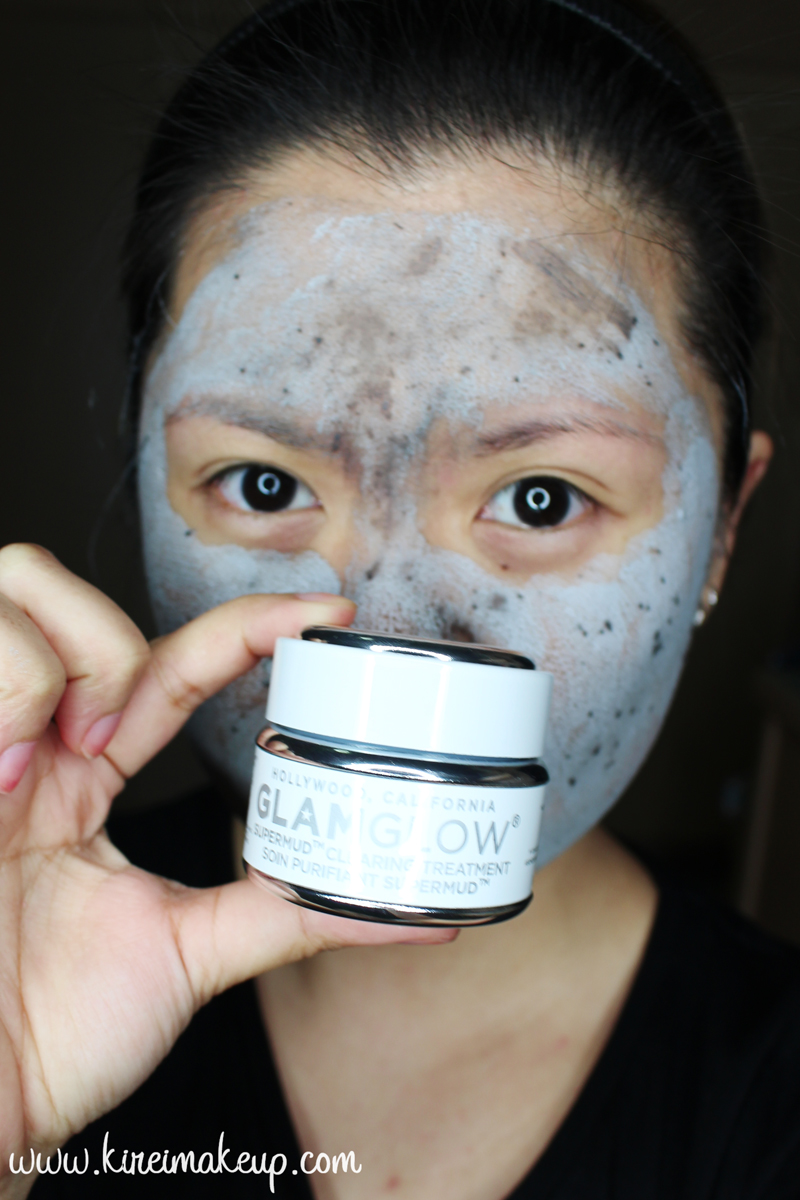
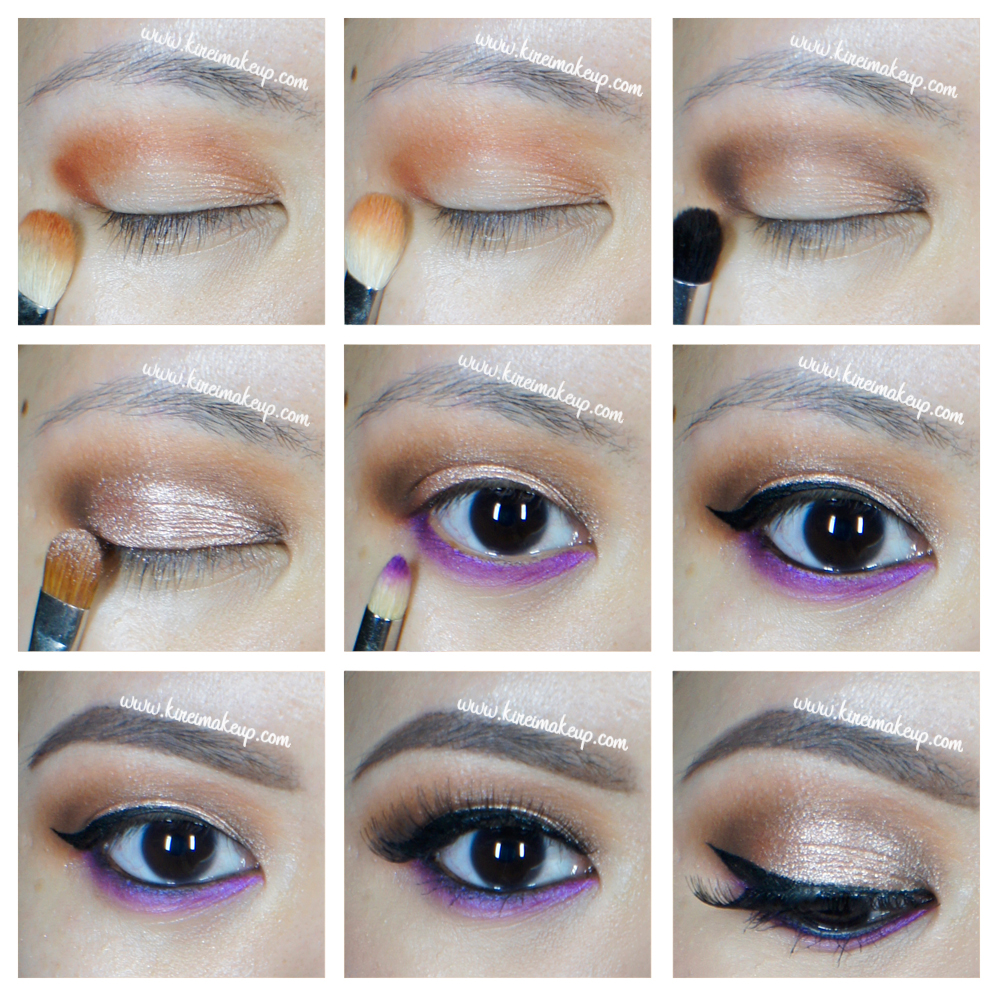
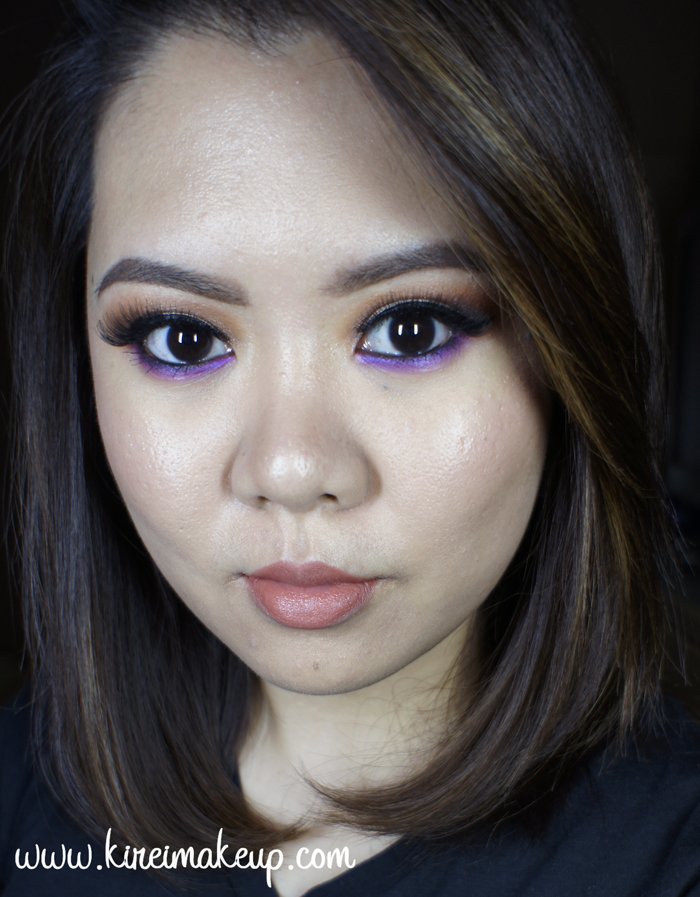
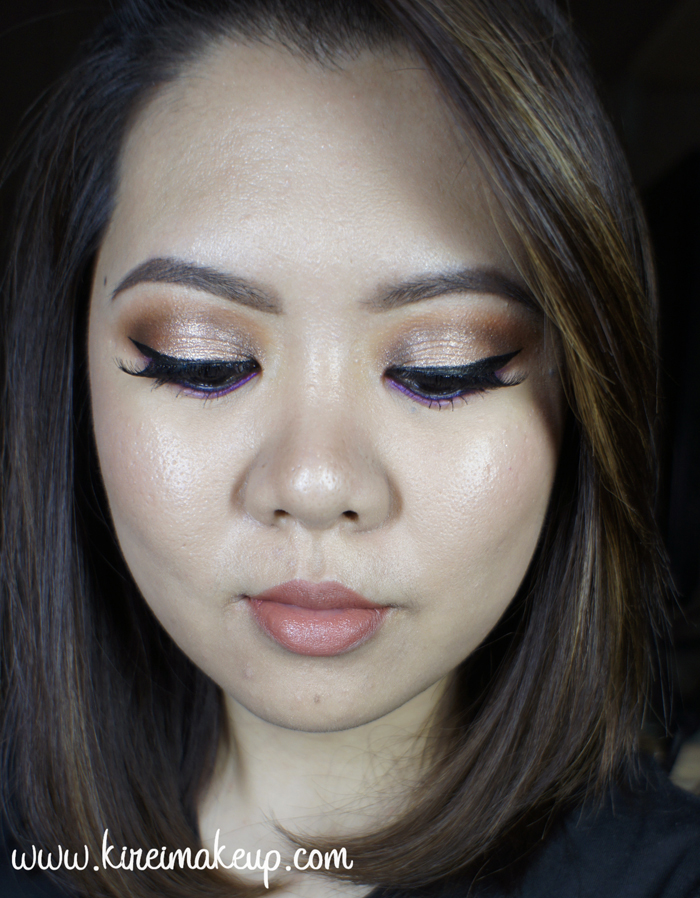
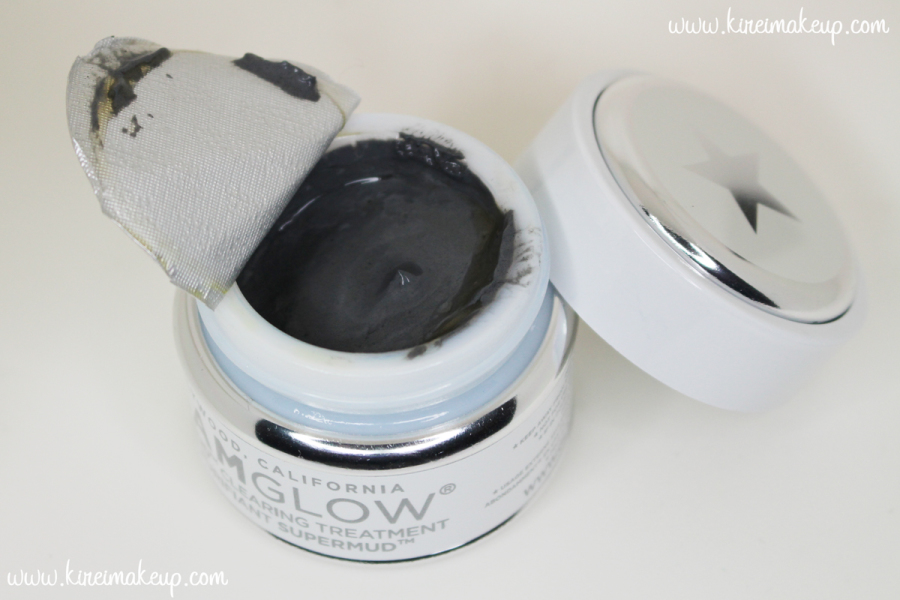
So, I’ve only tried this mask once as an overall mask, and once as a spot treatment. Both times, I loved it! The mask has a minty smell to it, it doesn’t really give much sensation when you apply it all over your face. I applied my mask using a clean foundation brush, you can use your finger if you want.

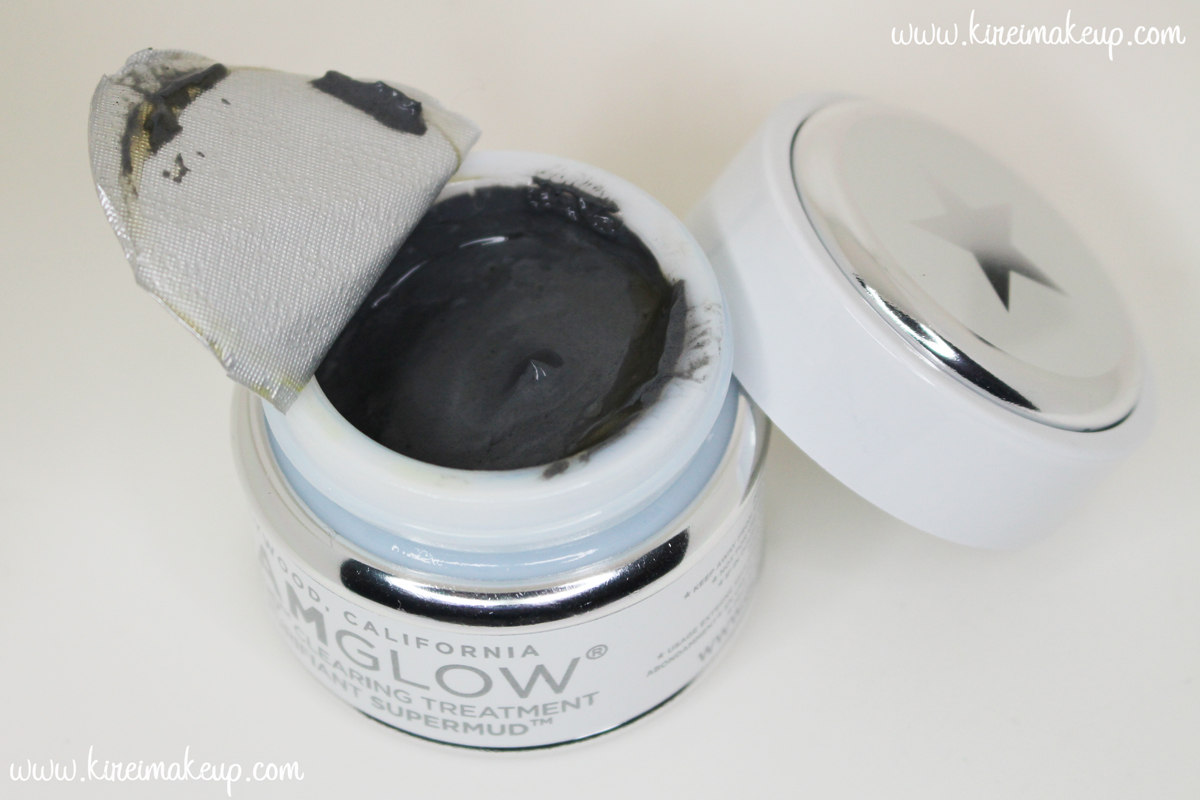
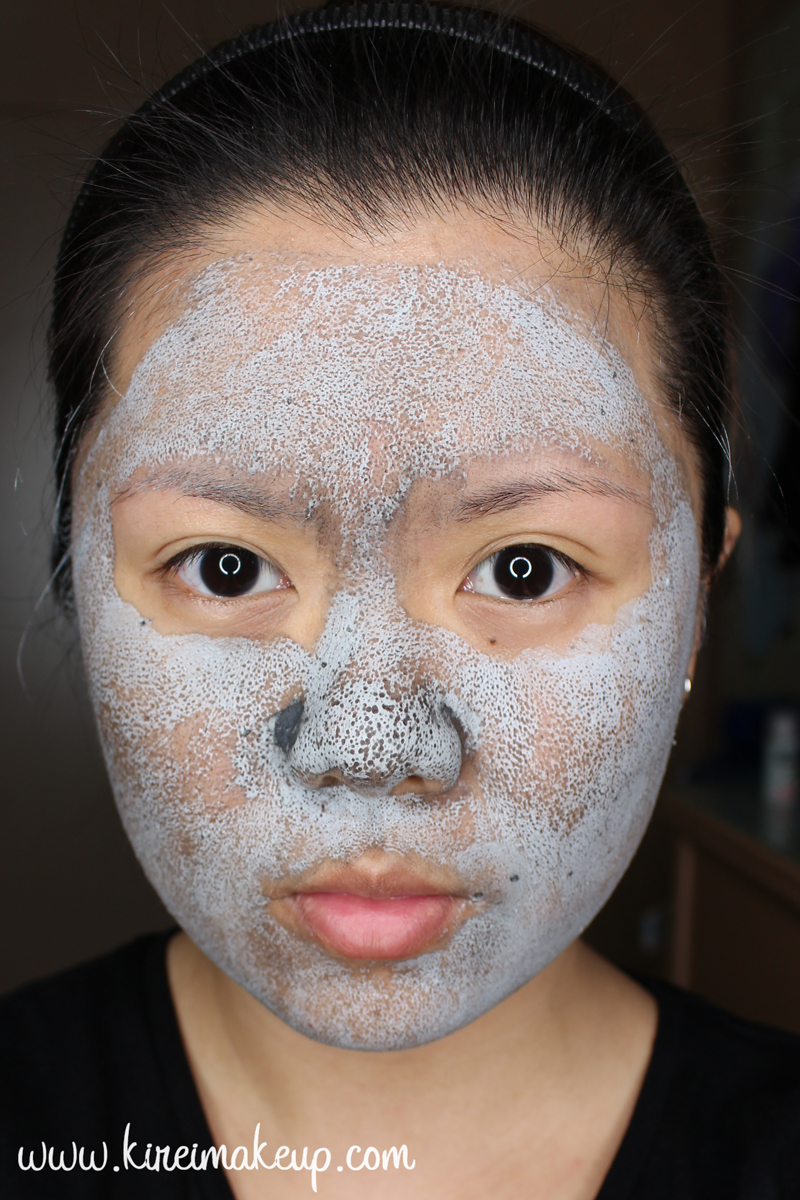
The mask is of a dark grey color when it’s wet (you can see it on the side of my nose), and when it dries, it hardens and turns into a light grey color. If you notice my nose area, you’ll see there’s a few spots, that’s all oil. Yep, I’ve oily nose, and those oil started to secrete onto my skin when the mask was drying out. The oil was absorbed by the mask.

Glam Glow Super Mud

After leaving the mask on my skin for 10-minute, I went to wash my face, then continued with my normal skincare routine. My face felt fresh, a little bit tight, but my skin looks a bit brighter than before. My sis even commented how good my skin looks the day AFTER, even though she didn’t know I’ve tried the mask. She said my skin looks smoother than before. So, YAY!

I think the biggest difference before and after the mask is my pores. It doesn’t feel clogged anymore. I felt cleaner, fresher, and definitely feel my skin looks brighter. I have yet to notice any big difference in my skin yet, but that’s probably I’ve only tried this product once. When doing the spot treatment, I left the mask on my zits and leave it overnight. The next morning I noticed the swelling has reduced.

I definitely would buy this mask again, and probably would try their other masks! This mask is great for weekly treatment. The price is a bit steep though. For a jar (1.7 oz) it costs IDR 780K in Sephora Jakarta, and CAD$76 (before tax) in Canada. It’s a luxury item, not a must have.

If you live in Indonesia, you can grab the GlamGlow mud masks at Sephora Indonesia or Glam Glow Studio both located in Plaza Indonesia, Jakarta. If you do go to the Glam Glow Studio, you can ask them to let you try the mask first!

Glam Glow Super Mud

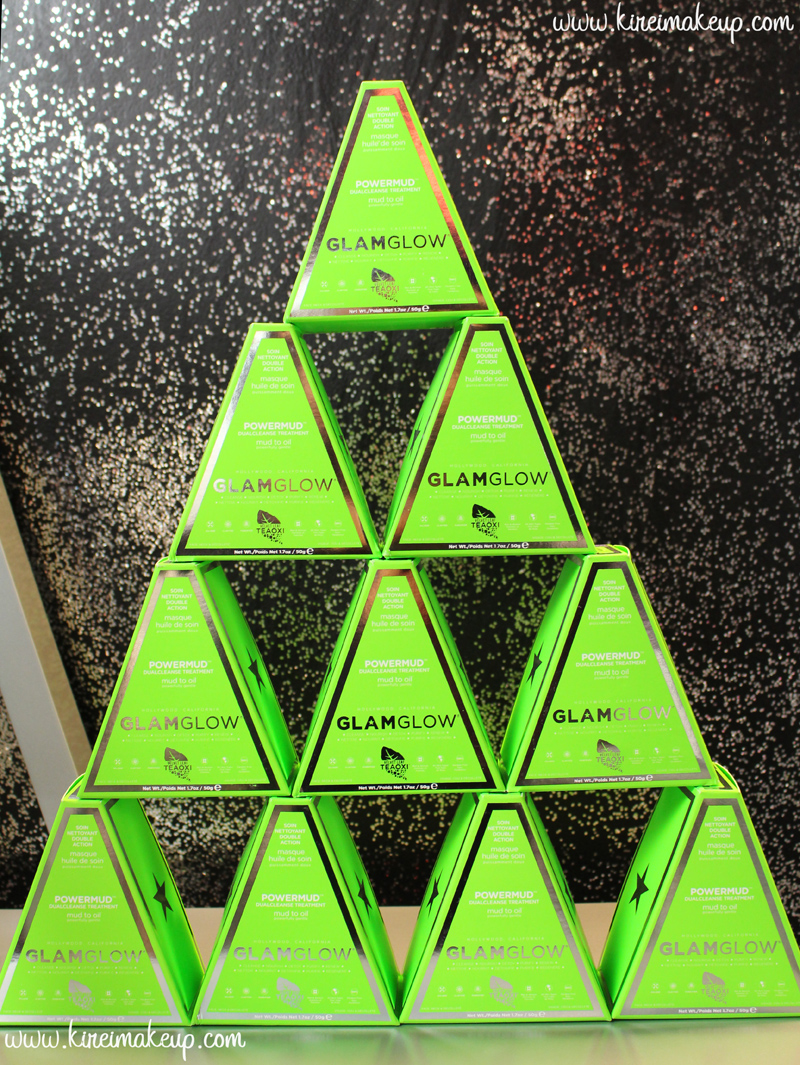
So, AFTER I bought the mask, I was invited to join Glam Glow PowerMUD product launch event as a Clozette Ambassador. Curious what a Clozette Ambassador is? Check out my Clozette Indonesia post!

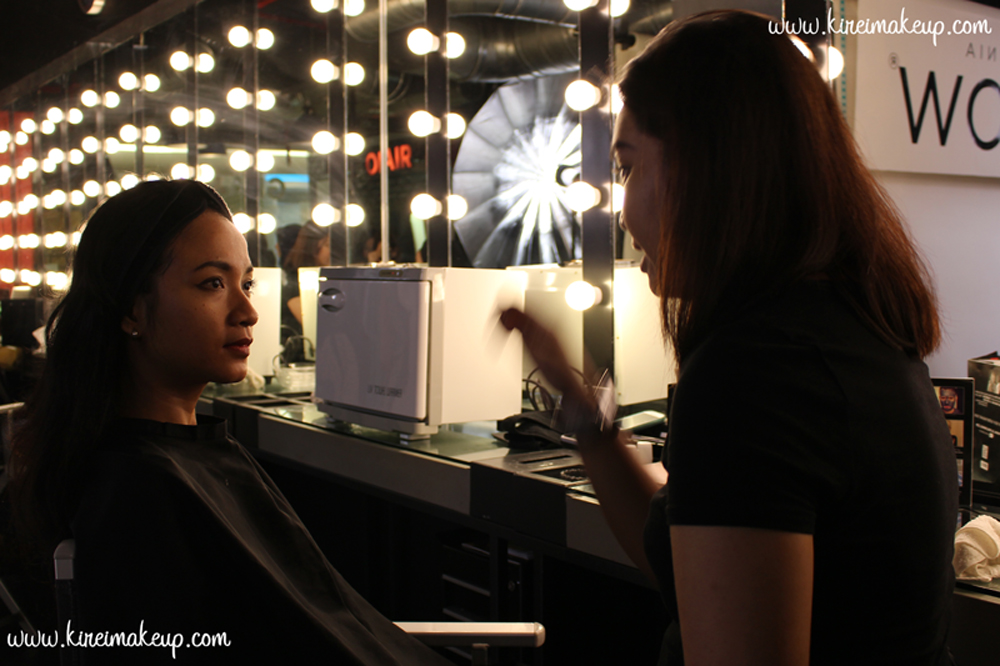
Anyways, so on Saturday I went to the product launch event along with fellow Clozette Ambassadors and bloggers. There, we were given a chance to try out the PowerMud mask. I didn’t give it a try since I was in a rush for another appointment, but I did take a lot of photos with the other bloggers! So, please do go over to my Instagram to check them out!

Glam Glow Power Mud

The POWERMUD mask is a mask I wished I had bought earlier! I wished this mask was there when I bought the SuperMud. Nothing wrong with the SuperMud, but the PowerMud is infused with cleansing oil. This mud mask is meant to be used after you remove your makeup. It also contained exfoliators and astringents which help to deep clean your skin! I do love the SuperMud, but I feel like the SuperMud would be an excellent mask to deep cleanse the skin weekly to remove makeup build up.

I did open up the tester jar for the PowerMud and it smells amazing! Smells like apples or pears, can’t really quite put my finger on the smell, but smells so good! It also has bits of scrubs which will help to exfoliate your skin. I received 5 sample size PowerMud, and can’t wait to give it a try!

Glam Glow Power Mud

Again, don’t forget to sign up at Clozette Indonesia, and if you become Clozette Ambassadors, you might just see us on the next event! Can’t wait to see everyone again!

xoxo

Glam Glow Power Mud


Hakubi White C Gel

For today’s post, I want to introduce a product by Sato Pharmaceutical company called Hakubi White C gelSuplemen Pemutih Kulit, which is now available in Indonesia! Curious about this product? Read more about it below!

What is Hakubi White C gel?

  • Magnesium Ascorbyl Phosphate is a concentrated Vitamin C derivative that is easily absorbed into the skin, to help prevent spots and freckles caused by sunburn.
  • Helps to sooth sunburn.
  • Non-greasy, non-sticky gel with a smooth after-touch.
  • Can also be used to spot-treat pimples and acne

Active Ingredients: Water, Magnesium Ascorbyl Phosphate, Disodium EDTA, Panthenol, Potassium Hydroxide, Hydroxypropyl Methylcellulose Stearoxy Ether, Sodium Citrate, Citric Acid, Xanthan Gum, Dipotassium Glycyrrhizate, Methylparaben, Flavouring, Sodium Hyaluronate, Propylparaben

Hakubi, 2014


Hakubi White C Gel Indonesia

So, this Hakubi White C gel uses Vitamin C to prevent sun damage on your skin. Also, if you don’t already know, Vitamin C is known to lighten skin colour by increasing the level of glutathione on the body (Johnston et al, 1993). The Hakubi White C Gel is a product to help brighten your skin.

The product itself comes in a squeeze bottle, with a small tip. When you squeeze the bottle, a clear transparent gel will come out. The gel is slightly runnier than I expected, and it reminds me of those aloe-vera sunburn gel. I find that this product is somewhat sticky on the skin if you apply too much. However, other than that, it goes on smoothly on the skin.

You can find Hakubi White C Gel along with any other Hakubi products in Guardian, Watson, and Century outlets throughout Indonesia.

Hakubi White C Gel

Dr. Who The Waters of Mars Makeup

Alright! So, another quick Halloween makeup tutorial for those who don’t feel like buying overpriced costumes, or have time to make one! I was actually running out of ideas on what kind of last minute Halloween makeup looks I should do, so I asked N for advice and since he’s a Whovian, I knew he was going to say Weeping Angels. Instead, he surprised me and told me to check out Dr. Who The Waters of Mars makeup on Google. I did an image search and I absolutely love it!

By no means the Waters of Mars virus makeup was easy if you want to replicate the exact look since they used prosthetic piece in the show. I used a picture I found on the Tardis Wiki and Bleeding Cool websites as references. Again, let me repeat myself by saying I could not replicate the makeup exactly on how the photos look like – I couldn’t really figured out how to get those super thin line using face paint, but still create an illusion of the skin sunken in or risen. I ended up creating depth on the cracks by creating a thicker line. Nevertheless, I was quite happy with the result!

If you’re a Whovian, and don’t think this looks like the makeup on the show, I do sincerely apologize! I wish I can recreate to look exactly like the pictures just by face painting, but alas I couldn’t. Anyways, I hope everyone does enjoy this tutorial! Even if you don’t know the show, you can still recreate this look into a “Cracked skin” look or “broken doll” since it’s a similar concept!

*Don’t forget to check out my other Halloween tutorials!*

the waters of mars makeup

I’m going to list all the products you need below, and all the brands I used at the bottom of the page.

What you need for this tutorial:

  1. White contact lenses – optional
  2. Foundation, preferably a matte finish.
  3. Setting powder.
  4. Eyeshadows – light & dark brown, purple, and grey eyeshadows.
  5. Black face paint – it can be cream or water-based, or even a liquid eyeliner.
  6. Beige face paint or a light-colored (a few shades lighter than your skin) foundation/concealer as highlight.
  7. Brushes
    • Foundation – Sigma Angled Kabuki brush.
    • Eyes – Sigma Blending brush.
    • Face contour – Sigma angled brush.
    • Lines – Sigma Eyeliner brush.
    • Contour – flat eyeshadow brush.
    • Highlight – Sigma Pencil Eyeliner brush.
    • Lips – lipstick brush (unnamed – similar to Sigma Lip Brush).

*You can substitute all the brushes mentioned above to any art brushes you can find in bookstores or art stores.

*Don’t forget to check out my other Halloween tutorials!*

the waters of mars makeup

How-to:

1. I applied a matte foundation all over my face using a Sigma Kabuki Angled brush.

  • I used a matte foundation since I want to look very matte and sickly.
  • You can even apply a lighter colored foundation if you prefer to look even paler.

2. I set my foundation using a loose transparent powder and a powder brush.

3. Using a blending brush, I mixed light and dark brown eyeshadow and applied it under my eyes, around the inner part of the eye socket, along the lower lash line, and on the crease. The idea is to make the eyes look sunken in since you’re infected with the virus and sick.

4. I added a mix of purple and grey eyeshadow on top of the brown eyeshadow to create more depth.

  • The reason why you need a purple and grey eyeshadow is because under your skin you have blood vessels, which aren’t getting enough oxygen due to the virus (or you being sick).
  • So, those vessels on my skin will look purplish, while on others they might look more on the blue end.
  • How you find out if you have purple or blue vessels? Take a look at your wrist and see if you have a bluish vein or a purplish one.

Dr. Who The Waters of Mars

5. Using an angled face contour brush, I applied a mixture of dark brown and grey eyeshadow on the hollows of my cheeks to make my cheeks look sunken in.

  • I blended the contour down to make my cheeks look even more sunken in.

6. I also applied some of the same powder along my temples and sides of my nose.

Dr. Who The Waters of Mars

7. Using a flat eyeshadow brush, I applied a mixture of the light and dark brown eyeshadow on the folds of my cheeks.

  • You can skip this step altogether if you don’t feel like doing it.
  • I did it because I wanted to create an even more eerie feeling to the whole look.

8. Using the pictures I found on the Tardis Wiki and Bleeding Cool, I created the outlines of the cracked skin using a black face paint and eyeliner brush.

the waters of mars makeup

9. I filled in my lips with black face paint and a lip brush.

10. I used the same dark brown eyeshadow as I’ve used in the previous steps to darken the edge of the lines.

  • While applying the eyeshadow, I keep in mind how to make these lines look deeper and sunken in.

the waters of mars makeup

11. Using a liquid eyeliner pen, I deepened the cracks by tracing the lines from step no. 8.

  • On some part of the cracks, I even colored some bits and pieces black altogether so I can create an illusion of depth.

12. Lastly, I highlighted some part of the skin to make it look like it’s popping out from the face, and to make the lines look even deeper.

  • I used a light colored cream concealer for this and a pencil brush.


Products used

  • Foundation – MUFE HD Foundation.
  • Setting powder – Cinema Secret loose powder (transparent)
  • Shadows for eyes and face – The Balm Meet Matt(e) Nude palette.
    • Light Brown – Matt Rosen
    • Dark Brown – Matte Wood
    • Purple – Matt Hung
    • Grey – Matt Johnson
  • Lines – Snazaaro Black Face Paint; Shu Uemura Calligraphy Ink eyeliner pen.
  • Highlight – Motives Sculpt Palette in Ice (the lightest shade).
  • Lips – Snazaroo black face paint.

*Don’t forget to check out my other Halloween tutorials!*

Halloween – 3D Spider Face Painting

Today’s tutorial is a good option for a last minute Halloween makeup idea! If you still haven’t decide what to do for Halloween, you can try to do this quick 3D Spider Face Painting look! Let me tell you that I have no background whatsoever in Art, and I managed to complete this look in about 20-minute. It’s fast, easy, and you don’t need many tools to create this 3D spider. You can also do it anywhere on your face/body. Actually my sister wanted me to do this on her face for Halloween when I showed it to her. So, there you go! A last minute Halloween idea without the need to wear any costumes!

So, I googled “Black Widow Spider” and also “realistic spider tattoo” to be used as reference for this look. You’ll see a tons of images on the web, so just pick one you like, and put it in front of you when you’re doing this. It’s a lot easier to create this look when you have a visual right in front of you.

All you need for this tutorial is:

  1. Image of spider (or tattoo)
  2. Brown eyeliner or eyebrow pencil (optional)
  3. Black liquid pen eyeliner – the easiest to work with. Try to find a pen-type liquid eyeliner so you can use it like you would use a marker.
  4. Red face paint or lip liner or lipstick
  5. White face paint or eyeliner
  6. Black pencil eyeliner

For brands I used, please check out the list of products at the end of the tutorial.

How-to:

1. I began by sketching out the outline of the spider on my arm using a brown eyebrow pencil.

2. Using the same brown pencil, I also sketched out where the shadows of the legs and body going to be. Make sure the “shadows” are thinner (use less pressure on the pencil). This way, you won’t mistook the legs from the shadow.

3. Using a black eyeliner pen, I thickened the body and legs of the spider.

  • The spider legs have 3 parts – upper thigh, middle thigh, and the long thin thigh. These thighs are separated by 2 joints. The easiest way to imagine the way their legs work is to look at your finger, or just use your reference photo as a sample.
  • To draw the thigh, just create a long almond-ish shape (look at photo below to see what I mean).

4. I created the red marking of the “Black Widow” spider using a red face paint, then I filled out the rest of the body using a black liquid eyeliner.

5. I filled in the gap on the thighs using the same black liquid pen eyeliner.

6. I cleaned up any excess of the sketch from step 1 using Maybelline Clean Express Mineral Water and cotton bud (i.e. q-tip).

  • For example, you can see that I made the top front leg slightly shorter with the black eyeliner than my initial sketch using brown eyeliner.

7. You can skip this step if you want to, but I darken the shadow of the legs and body slightly using a black pencil eyeliner.

  • Make sure all the shadows of the legs touched the tip of the spider’s “real” leg where it touches your body. This will create that 3D effect, where it looks like the spider is on your body.

8. Lastly, using the tip of an eyeliner brush and a white face paint, I applied some highlight on the legs of the spider and 4 dots on the head, and VOILA! DONE!

Don’t forget to check the rest of my Halloween tutorials!

realistic spider face paint

Products used:

  1. Brown eyebrow pencil – Chanel eyebrow pencil
  2. Black liquid pen eyeliner – Shu Uemura Calligraphy:ink eyeliner pen
  3. Red face paint – Snazaroo classic red face paint
  4. Black eyeliner pencil – Revlon photoready eyeliner pencil in Carbon Cleopatra
  5. White face paint – Snazaroo classic white face paint

Don’t forget to check the rest of my Halloween tutorials!

Halloween #2 Jack-O-Lantern Makeup

Are you ready for Halloween?! I sure am! So, for the second installment of my Halloween series, I decided to do a Jack-O-Lantern makeup tutorial. WHY you ask? Well, that’s because Jack-O-Lantern aka pumpkin carving is very popular in Canada during Halloween month. My sister and I actually love carving pumpkins! We love the scary face ones!

JUST FYI – I am accepting Halloween makeup jobs! If you need a makeup artist to do your scary makeup, I’m available! Contact me through email jilly@kireimakeup.com, or line – KireiMakeup!

Anyways, for this tutorial, you need:

1. Orange face paint (water or cream) – I mixed red and yellow cream face paint to create the orange base. I used a local Indonesian brand called PAC.

2. Black water based face paint – you can use cream too if you prefer cream product, or even an eyeliner.  I used Snazaroo.

3. Eyeshadow – matte black, matte orange, matte yellow for highlight and contour.

4. Brushes – I used mostly synthetic artist brushes.

  • For large area, I used an angled brush (similar to MAC 263 but slightly bigger).
  • For details like the lines and contouring, I used the Rigger type (similar to MAC 209, but with longer bristles)
  • For highlight I used a blending brush, like MAC 217

5. Contacts (optional) – you don’t have to use contacts, or you can use a brighter one than mine. I could only find this honey colored ones from Fresh Kon, since it’s pretty hard to find specialty contact lenses here in Jakarta.

halloween tutorial

How-to:

1. I applied an orange cream-based face paint all over my face using a wedged sponge. Lightly stippled it all over my face, neck, and ears for an even coverage.

2. I outlined where I want the mouth, nose, eyes, wrinkles to be using black water-based face paint.

halloween makeup tutorial

3. I filled in the areas on step no. 2 with black face paint.

4. Then, using an eyeliner brush and a matte black eyeshadow, I lightly create lines all over the face to create the crease of the pumpkin. I also created some cracks near the mouth area.

pumpkin king makeup tutorial

5. Using a small blending brush, I blend out the edges of the lines. I also carefully added some shading on the areas where I want it to look like it’s receding.

6. On top of those black shadows, I applied a matte Orange eyeshadow (I used the orange from Sleek Makeup Ultra Mattes V1 palette).

7. In the area where I want it to pop out a bit more (to mimick the shape of pumpkin), I applied a matte Yellow eyeshadow (from Sleek makeup Ultra Mattes v1 palette) with a blending brush. I put it in the middle of the “squares” on my forehead, above the eyebrows, on my cheeks area. I really want to make these areas to poof out a bit more.

creepy jack-o-lantern face paint

Voila! You are done! Looks pretty cool in black and white, but looking more like a scary clown. I love how the orange/yellow contour/highlight really helps with the whole pumpkin look!


Halloween #1- Monster Teeth

Alright! I finally decided to start my Halloween tutorials early this year! I’m super pumped since my parents are setting up a haunted house at work for everyone to enjoy! Anyways, you can be sure I’m going to be there with full makeup on! For my first tutorial, I decided to do a Monster Teeth or monster smile, since I always find difficulty creating these teeth. I’m not that happy with the result, but oh well, I think it worked pretty well.

One tip that I should keep in mind for myself, is to use water-based white paint for the teeth instead of cream face paint. I think the cream is hard to work with since it moves around so easily, but that’s just my preference. Also, funny story (not so funny when it happened), I was so close to finishing the whole look, and I decided to “fix” the two teeth on the bottom lip, then my hand slip and smudged everything. I had to remove the 2 teeth and just created 1 since it was getting late, and I had to go to bed.

*For Killer Clown tutorial please check out my latest post*

*Please check out my other Halloween post*

Ok, let’s get this whole thing started!

How-t0:

1. I started out by drawing an outline of the smile using a black eyeliner pencil.

halloween makeup tutorial

2. Using the same eyeliner pencil, I started drawing the outline of the teeth. It doesn’t have to be pretty, it can be as sharp or as big as you want. I drew the teeth at the back of the mouth a little bit curved in to create an eerier smile.

3. Using a small synthetic artist brush, I applied black cream face paint outside the teeth area.

halloween makeup tutorial

4. Using a clean synthetic artist brush, I applied white cream face paint inside the teeth.halloween makeup tutorial

5. To create some depth, I created some smile lines at the end of the monster mouth, above and below the monster lips.

6. Using an angled eyeliner brush, I blended the lines down for the lines on below the lips, and upwards for the lines above the lips. This will create an illusion of depth.

halloween makeup tutorial

7. For the rest of the face, I applied foundation and smoky eyes just for fun.

8. I also set the cream face paint using eyeshadow of similar colors – black for the black areas, and white mixed with beige for the teeth.

halloween makeup tutorial

It looks really good in black and white!

halloween makeup tutorial

Ta-daaaah! So, let me know if you have any request for Halloween, ‘kay?!


xoxo

My First Kiehl’s Indonesia Haul

How is everyone doing???? I apologize for missing last week! I had to do a business trip to Medan for work. I posted some photos on Instagram from my trip, and also my skin condition. Anyways, as mentioned couple weeks a go, I went to Kiehl’s Indonesia Grand Opening at Emporium Pluit Mall. After the grand opening, I decided to go to the store couple days later to grab some stuff, mainly for my hair. So here’s what I bought at Kiehl’s! I don’t know if you can call this a haul since I didn’t buy much.

So, I went to the store with one thing in mind, and that’s to get products for my hair! Ever since 4 years a go, I have been having allergic reaction towards non-natural/organic shampoos and conditioners. I used to be able to use pantene, dove, or tre semme without any issues, but ever since 4 years a go, I’ve noticed itchy scalps, red tiny bumps, and significant hair loss when I continued using those non-organic or non-natural brands. The one brand that I somehow managed to continue using is actually L’oreal.

With those issues in mind, I was searching high and low for a somewhat more natural shampoos in Jakarta, and I decided to give Kiehl’s a try. I have used their Amino Acids shampoo way back when I was in Canada, and was happy with the result. However, the closest Kiehl’s from my place was 1-hr away, so I stopped using it. You can imagine how thrilled I was when Kiehl’s opened a store right around the corner from my house, just a 15min. drive from home and ta-daaaah it’s right there!

All I bought was a Magic Elixir, a Thickening Shampoo, and a Recovery Pak hair mask. As you might know, I have been coloring and bleaching my hair since beginning of the year, so I really want to take a good care of my hair again. I decided I need those 3 products to reset my hair.

Kiehl's Magic Elixir

I’ve only started using these products for 1.5 weeks now, so I can’t really say what the results are, that’s why I didn’t put the title as review. First of all, I think I absolutely love the Magic Elixir! I ran out of Morrocan Oil, and can’t find one in Jakarta. So this Magic Elixir is a good alternative! I’ve only been using it every 2-3days for 5mins since it says to wash it off after applying it on the scalp. Next time, I’m going to try leaving it for a few hours. I noticed almost immediately after the wash, my scalp and my hair feel a lot lighter. It doesn’t leave any oily residue or cause your hair to be greasy. It washes off very easily!

Of course you can always mix your own oils, DIY hair masks are plenty on Pinterest, even I pinned them! But, I just find getting the Magic Elixir is a lot faster and simpler than making one your own. Less hassle for this career woman (hehehe)..Not to mention, I won’t be messing around and having to clean up. Just one bottle and everything is good!

The Magic Elixir costs Rp. 410,000 (125ml) in Jakarta, while it’s only CA$24 in Canada. It drives me crazy how beauty/skincare/cosmetic products are so much more expensive in Jakarta. That’s almost double of what I paid for in Canada. Anyways, I’ll rant some other time..may be I’ll rant on twitter instead…

Kiehl's Ultimate Thickening Shampoo

The Ultimate Thickening Shampoo is perfect for me since I have fine hair, and not much of it. I’m very conscious of my hair loss ever since 4 years a go. Seriously guys, I was so stressed out, I thought I was going bald *cries*. I think this shampoo works really well with the Magic Elixir since the combination of both products will promote hair growth and healthier scalp.

The shampoo lathers easily and you don’t need to use much. I think this shampoo doesn’t have that “clean” feel as strong as other brands since it’s more natural, however, you feel absolutely refreshed when you’re drying your hair. My hair feels stronger after a few wash (I wash my hair everyday – no, don’t tell me not to do it). I also felt that this shampoo gives my hair a bit more volume after the wash.

The Ultimate Thickening Shampoo costs Rp. 260,000 in Jakarta, CA$25.50 in Canada. So, not much difference in price for this product. I was happy to know that the price was similar.

Kiehl's Sunflower Color Preserving Deep Recovery Pak

Last but not least, one of the best purchase in my whole life is this Kiehl’s Sunflower Color Preserving Deep Recovery Pak! Quite a mouthful, but SO WORTH IT! This is the best smelling product I’ve ever encountered. The smell is DIVINE. I will buy this just because it smells soooo goood!

Listen to me guys, like seriously!!! I deep conditioned my hair, dry it off, styled it, left my room. Came back 4 hours later and my room smells like my hair! My hair smells so awesome for the whole day, until the next morning. I mean, come on! You have to try this hair mask if you have colored your hair. Even if you don’t color your hair, I still think this hair mask will work too. Seriously, it smells like a fruit heaven. I can’t really put my finger in it, but it smells like a mixture of apricot, passion fruit and mango. Absolutely DIVINE!

This hair mask doesn’t weigh your hair down, it makes the hair feels so smooth and silky afterwards. My hair color looks shinier too, and did I mention it smells great?! Awesome product!

This hair mask costs Rp. 420,000 in Jakarta, and CA$35 in Canada.


Overall, I’m very happy with my purchase, and willing to fork out the money to buy these high quality natural products. My hair feels great and smells peachy! Love it!

Kat Von D Monarch Palette Tutorial #2

I kept forgetting how amazing this palette is, so I decided to remind myself and created this Monarch palette tutorial. Like I said on my first tutorial using this palette, the eyeshadows are unbelievably smooth and so easily blended. Love it! I promise I’ll do swatches and review for this palette. If you have the chance to grab it, you should really consider it.

Anyways, I’m quite busy this week, as well as the whole September due to work. I think I’ll try to post twice a week, hopefully more. If you do follow me on Instagram, I’ll do micro-blogging from there. Also, don’t forget to comment here or on my twitter/instagram on what you’d like to see more. I know I still have to do a few requests, and I’ll try to get on it ASAP. What a busy month!

Ok, let’s get the tutorial started! I just want to mention that for some reason my camera picks up Wrath really orange this time round. Not sure why, I did reverted back to my glamcor lights, so that might be the cause. Trust me, it doesn’t look that orange in real life. It’s a very pretty warm reddish-brown, almost like a brick color.

warm brown smoky eyes

I prepped my eyelids using Urban Decay Primer Potion.

How-to:

1. Using a fluffy blending brush, I applied Wrath on the outer V and just above the crease.

2. Using a clean blending brush, I blended out the crease.

3. I applied Shadow Box on the outer V, inner V, and crease of my eyelid using a bullet crease brush.

4. Using a flat eyeshadow brush, I applied MAC Tan loose pigment on the center of my eyelid.

5. I applied Urban Decay Jilted eyeshadow (from the electric palette) along my lower lash line using an angled eyeliner brush, then I applied Urban on top of it using a pencil brush.

6. I lined my waterline using L’oreal Voluminous Smoldering eyeliner.

7. I also created a winged liner using Kanebo Kate Super Sharp eyeliner.

8. I filled my brows using Anastasia Brow Wiz in Medium Ash.

9. I applied MUFE Aqua Smoky lash mascara on top and bottom lashes. Also applied Lavie Lash falsies in Snowdrop.

kat von d monarch palette makeup look

10. On my face, I applied Diorskin Star foundation using a foundation brush.

11. I also applied MUFE HD concealer under my eyes.

12. I wanted an extra glow on my skin, so I applied Smashbox Halo Highlighting wand. I applied this highlighter on the high points of my face – cheekbones, bridge of the nose, cupid’s bow, chin, forehead.

13. I lightly dust Cover FX translucent powder to set everything.

14. I applied contour very lightly on my face using Smashbox Contour Kit (they’re selling it again for a limited quantity on their website!).

15. On my lips, I applied MAC Spice lip liner all over, and then applied Clinique Heaping Hazelnut chubby lip stick.

mac tan makeup tutorial