Pink Smokey Eyes Tutorial with UD Naked 3

If you guys followed my Instagram account, you’d have known that last night I was doing a tutorial, yes? Anyways, today’s look is a Pink Smokey Eyes tutorial using Urban Decay Naked 3 palette. Yes, again! Naked 3 again! I know you guys might have gotten bored with Naked 3, but I have not. I loved this palette and wanted to make use of this palette as much as I can. If you want to check out my other Naked 3 tutorials, please take a look at Urban Decay Naked 3, and UD Naked 3.

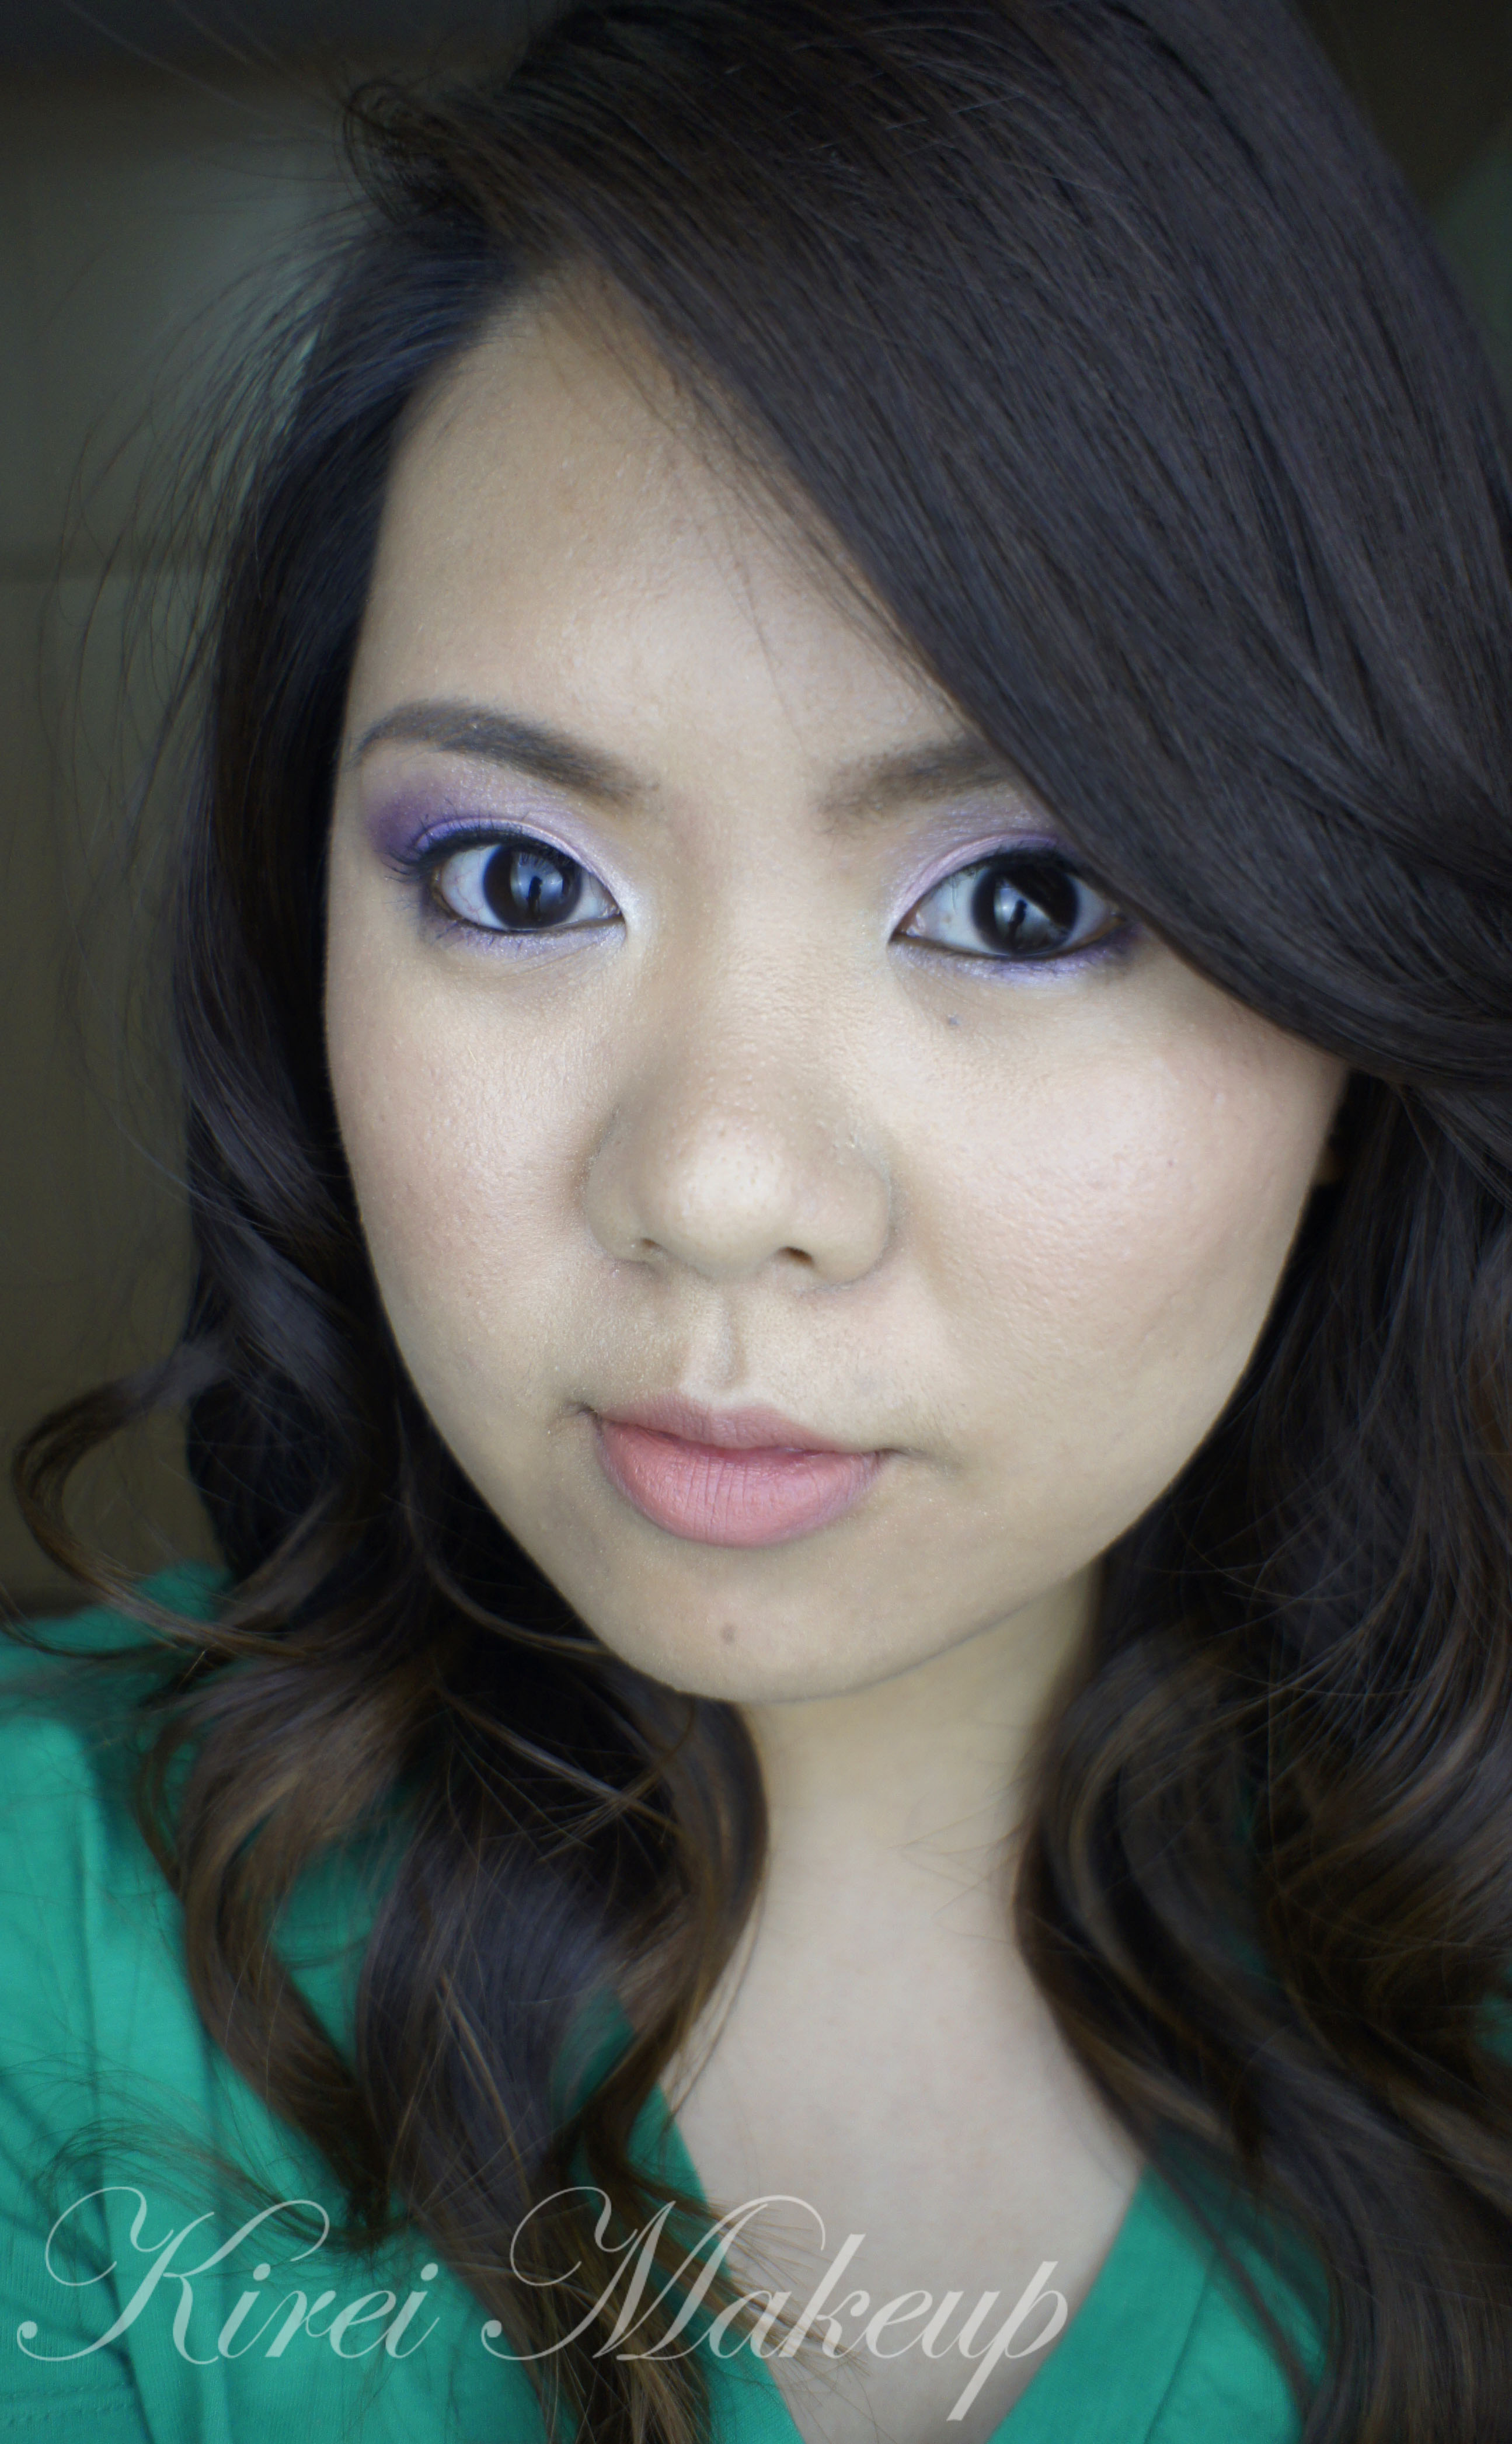
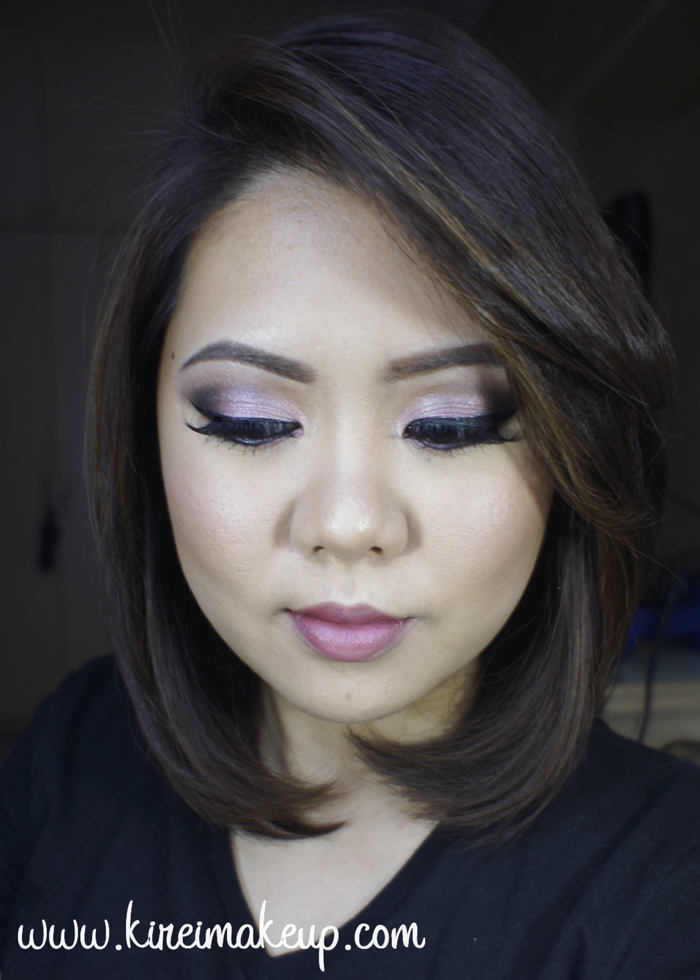
I created this look since I wanted a more girly take on the smoky eyes. At the same time, I wanted a darker, more glam, and sultrier looking smoky eyes using the Naked 3 palette. Check out my review on the naked 3 palette.

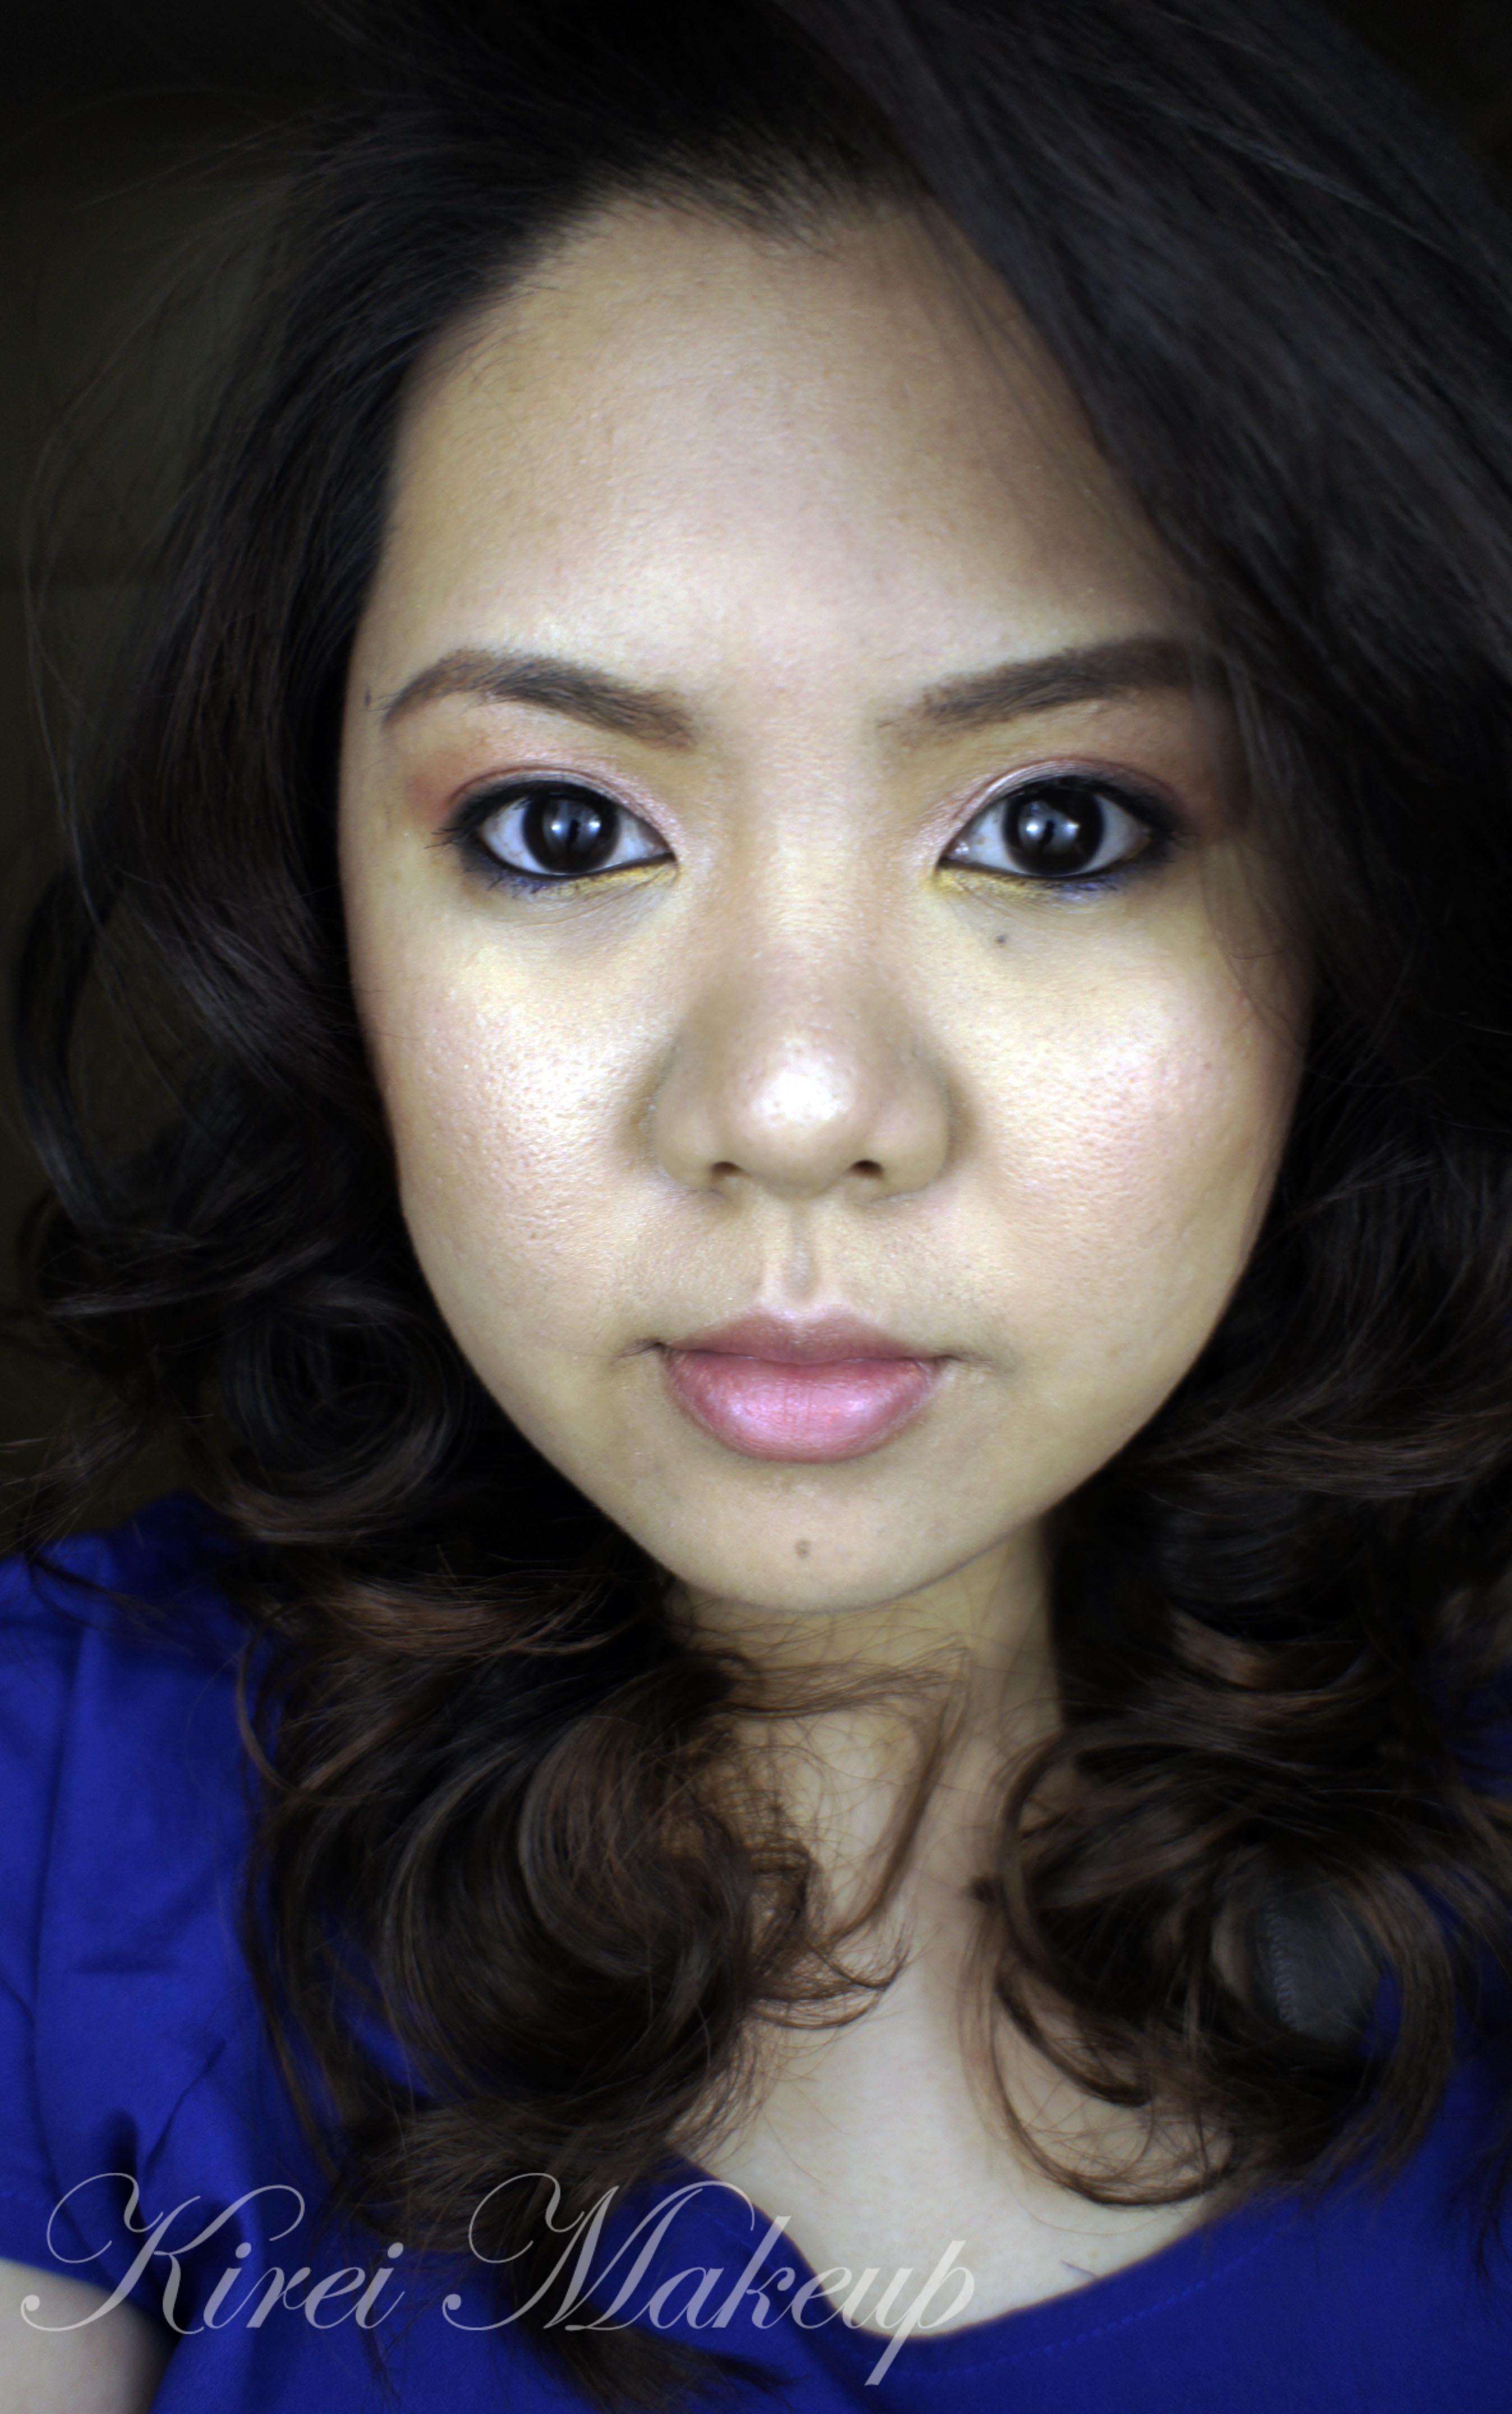
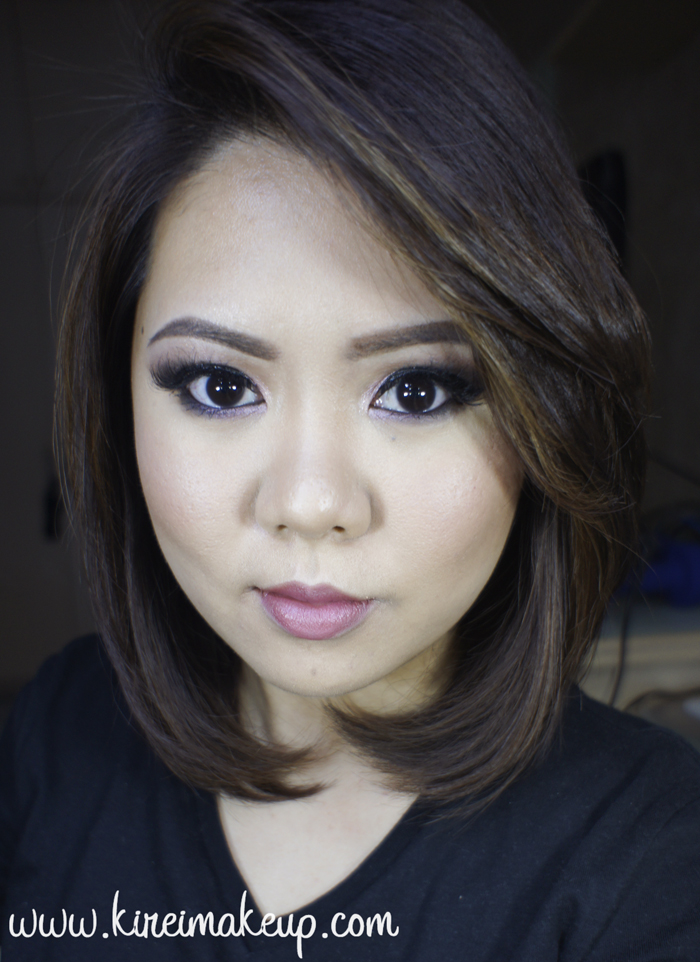
I would like to mention that I absolutely love how my skin looks like in this tutorial. I, for some reason, love how MAC Pro Longwear foundation photographs. It makes my skin looks absolutely flawless, at the same time it doesn’t feel heavy at all. I really should give this foundation more compliment. I’ll try to do a review of this foundation next time.
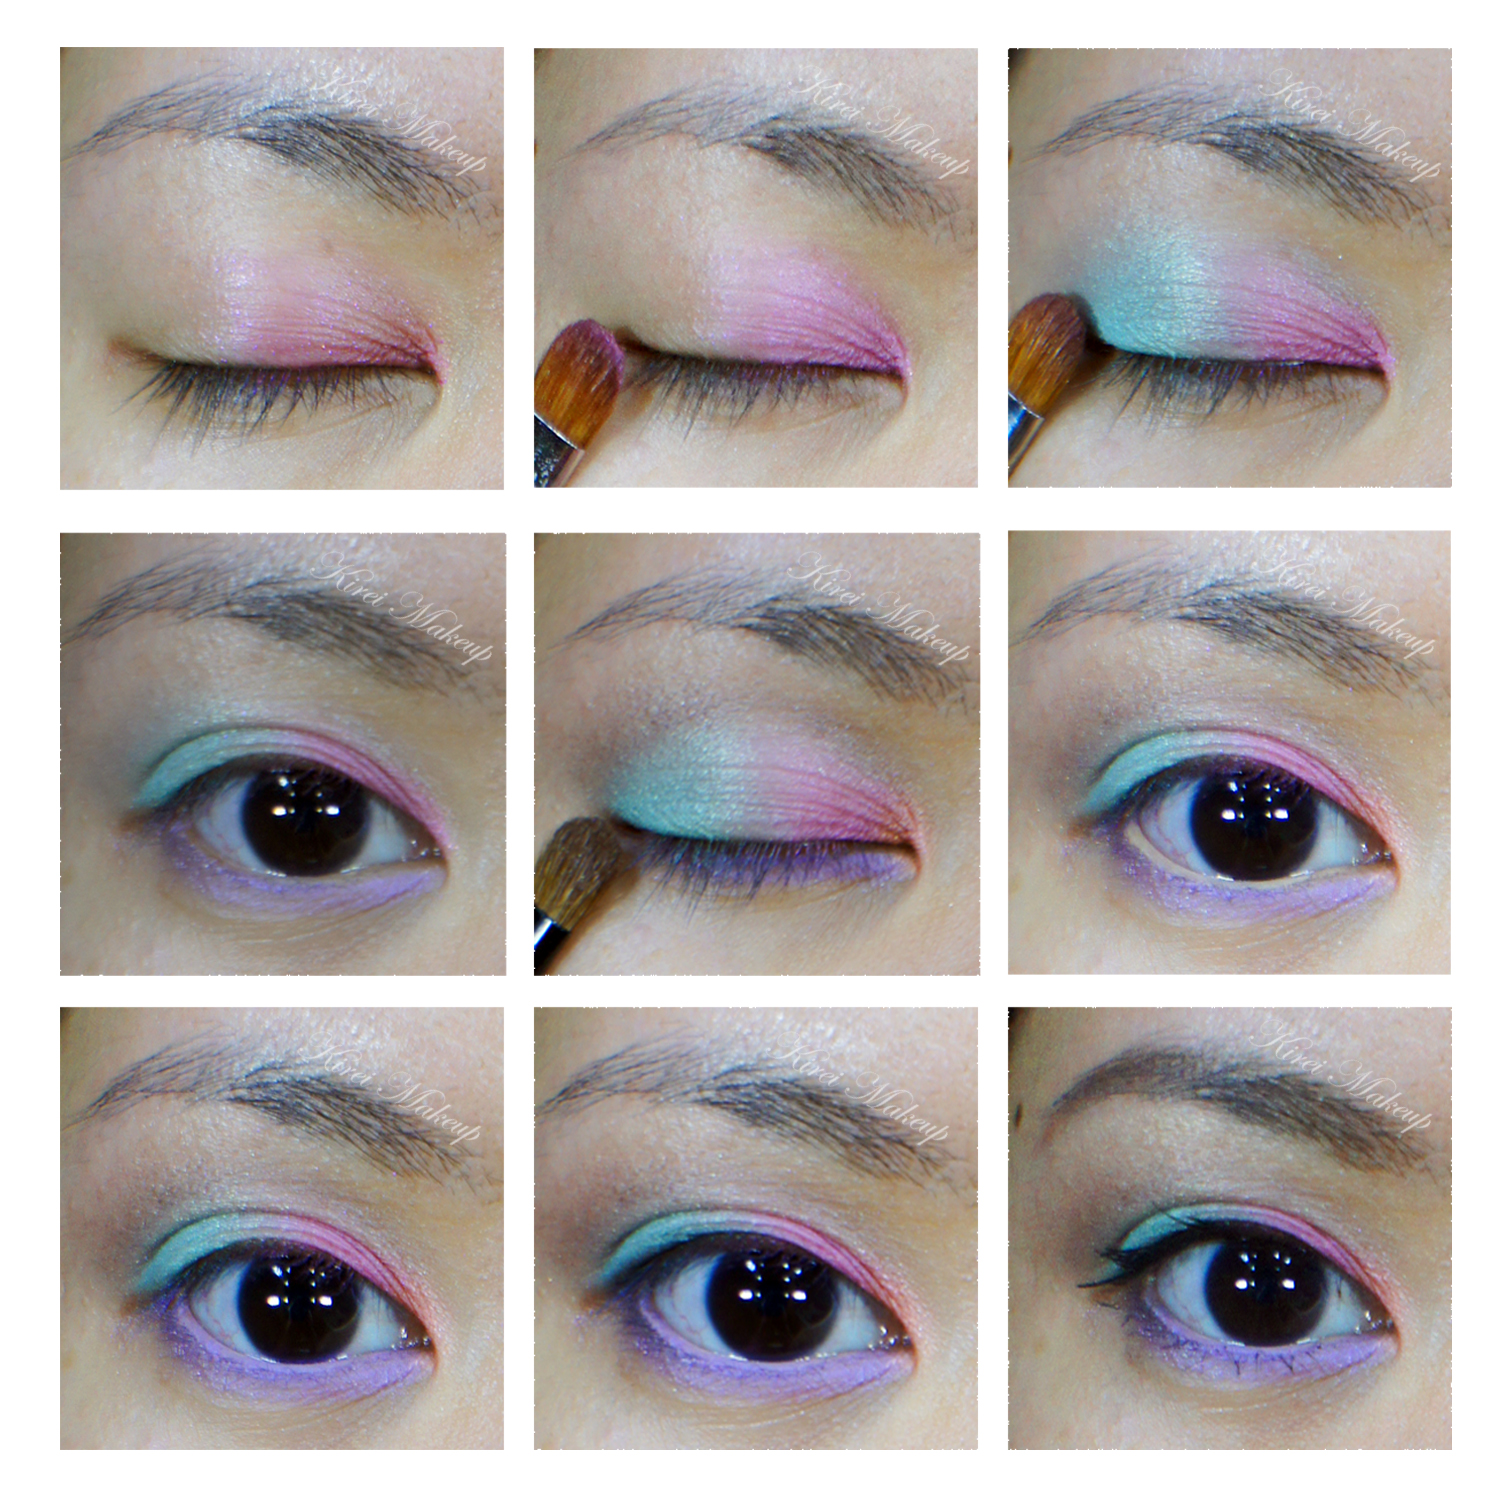
rose smoky eyes

How-to:

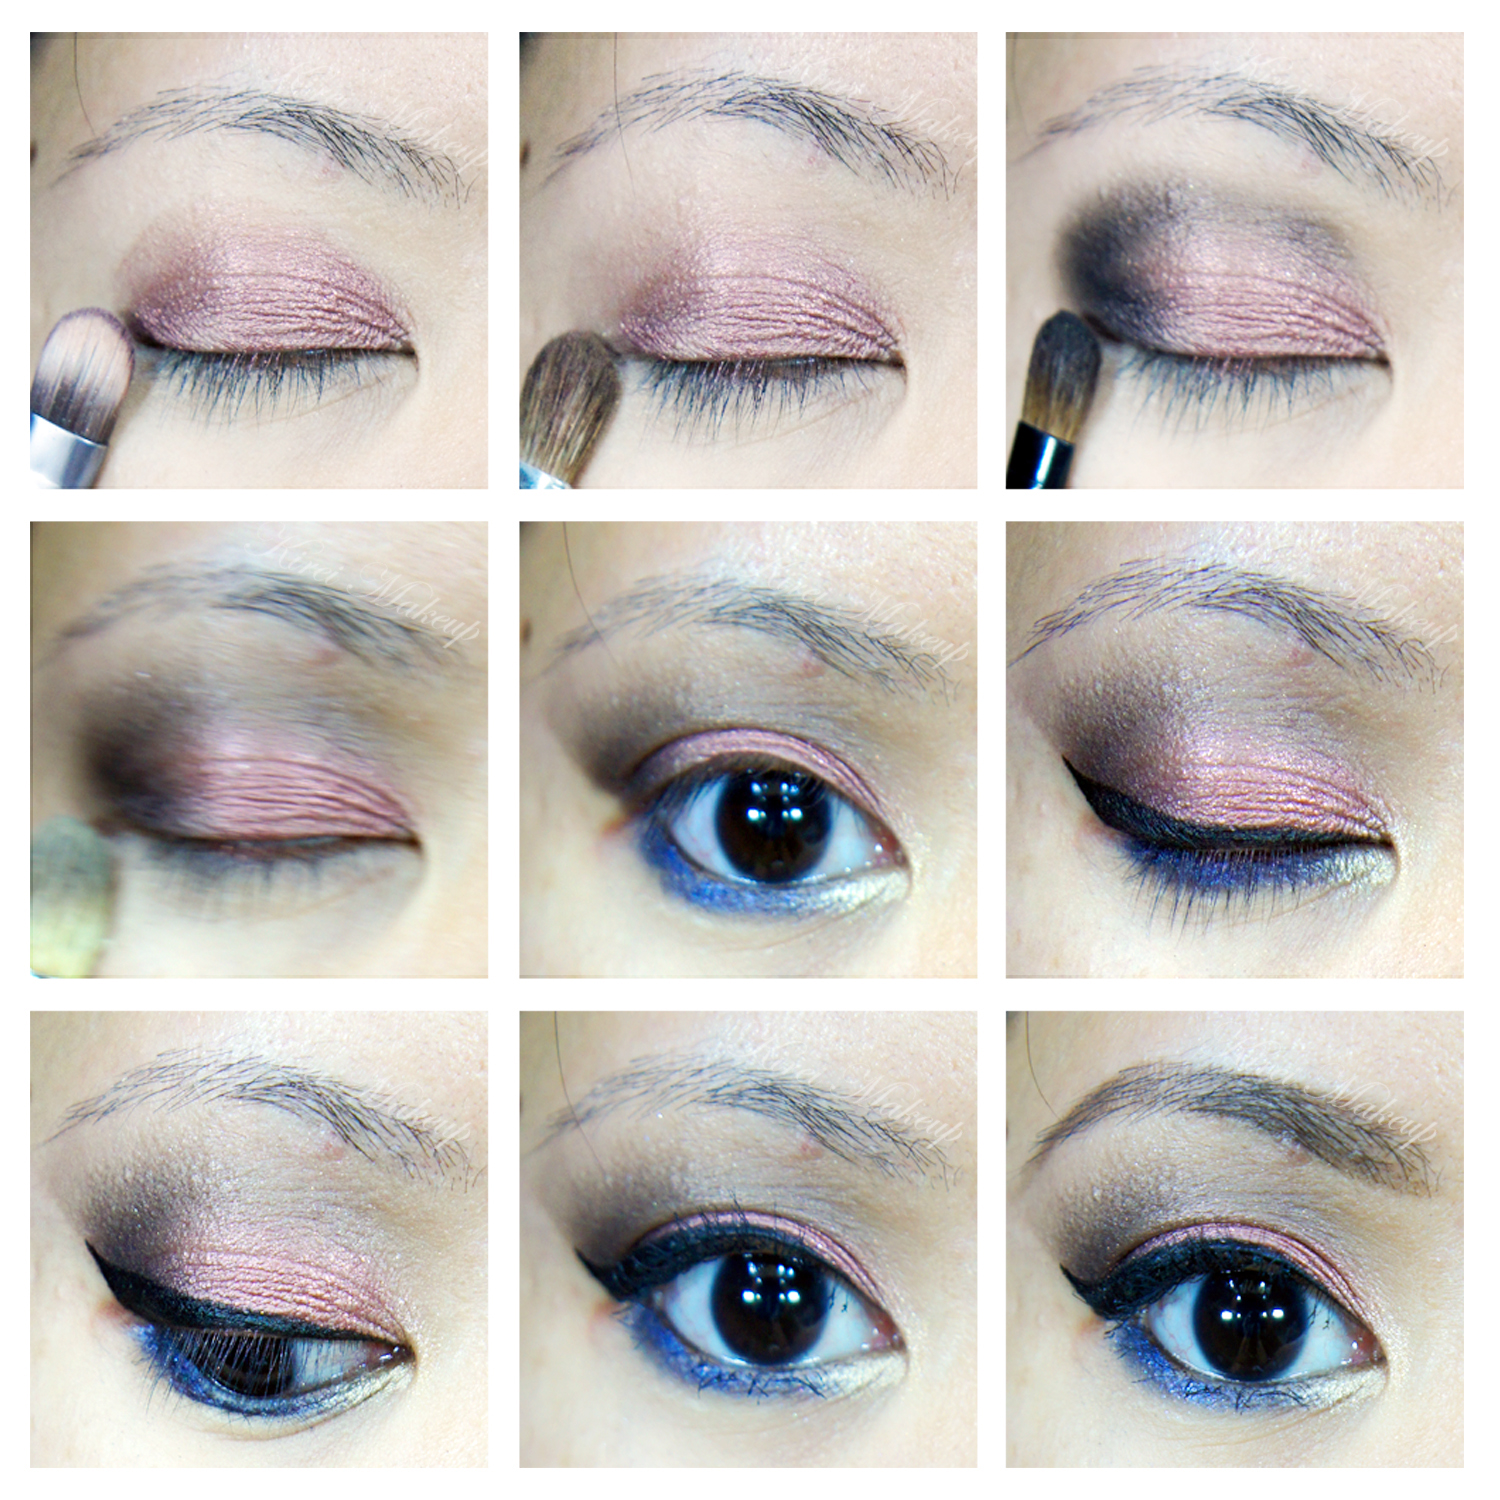
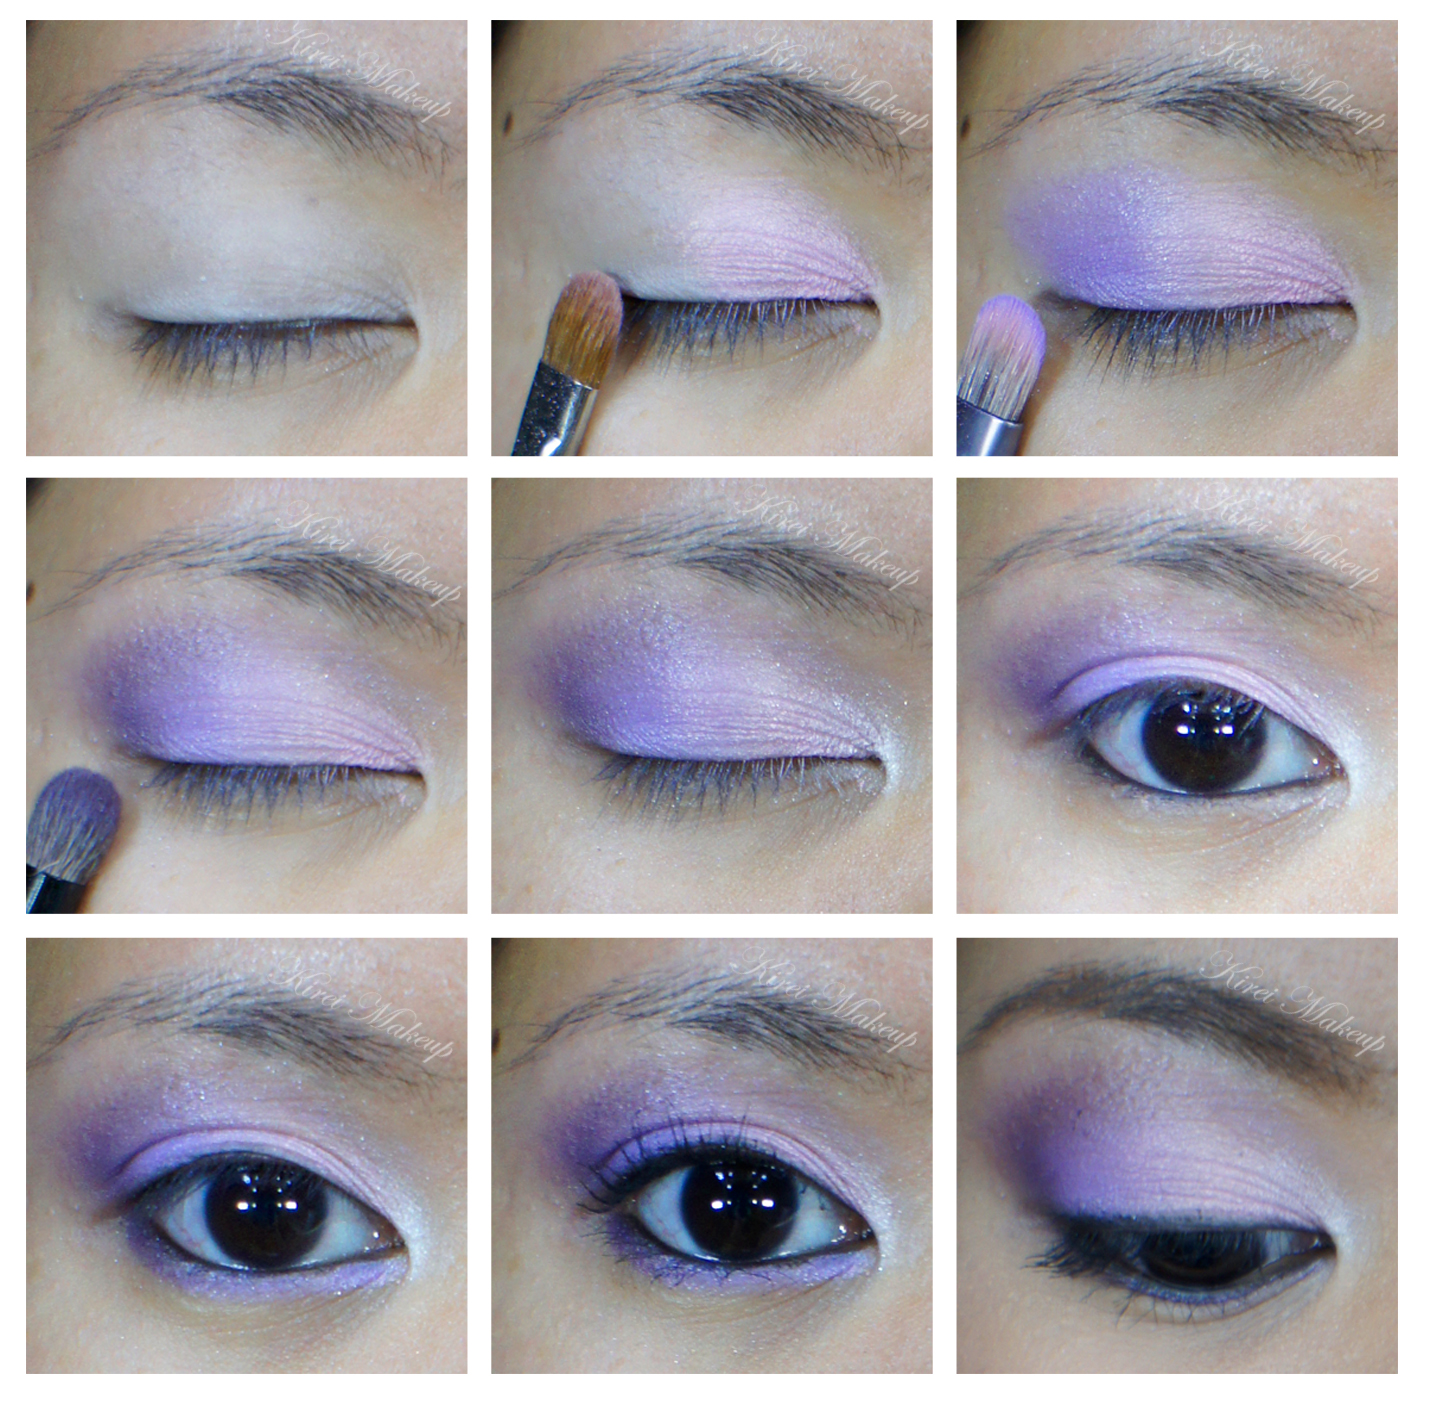
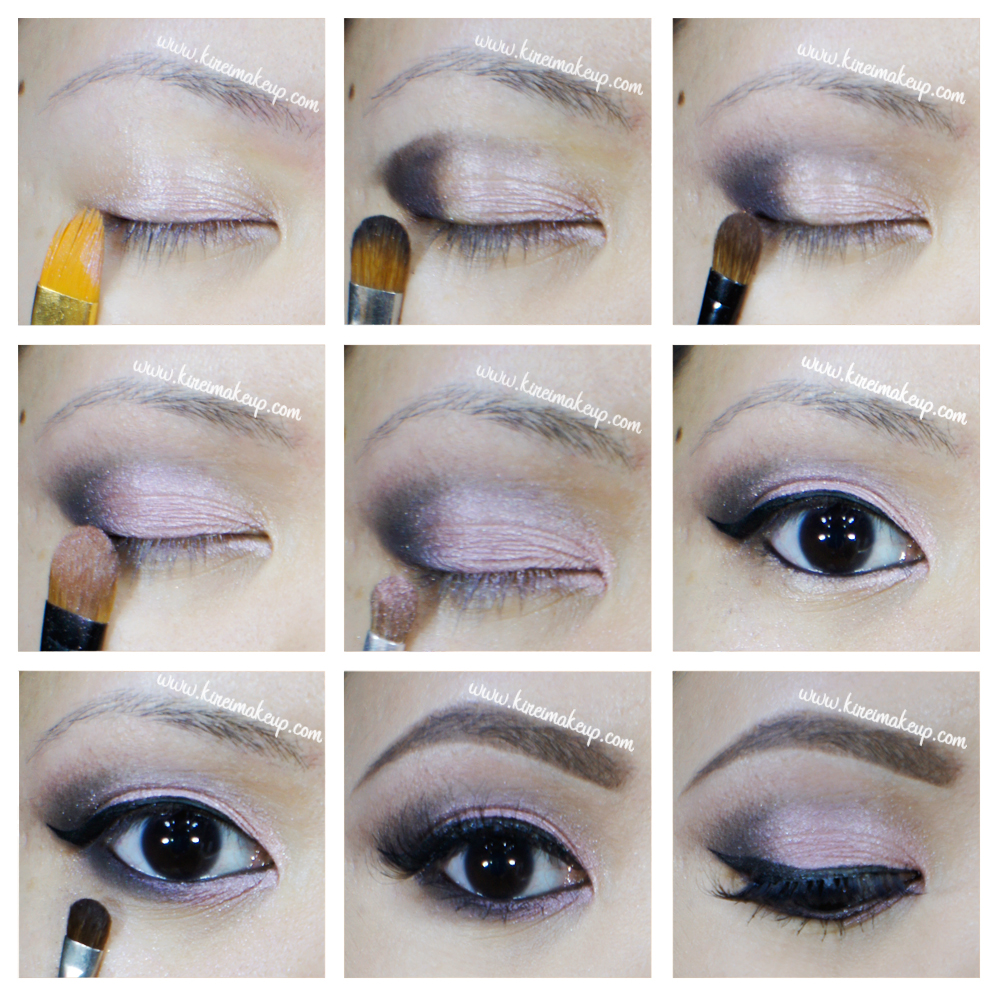
1. My eyelids are primed using Maybelline Inked in Pink cream eyeshadow.

2. Using a flat eyeshadow brush, I applied Blackheart on the outer third of the eyelid, extending it slightly on to my crease.

3. Using a small fluffy blending brush, I applied Nooner on my crease to blend Blackheart out.

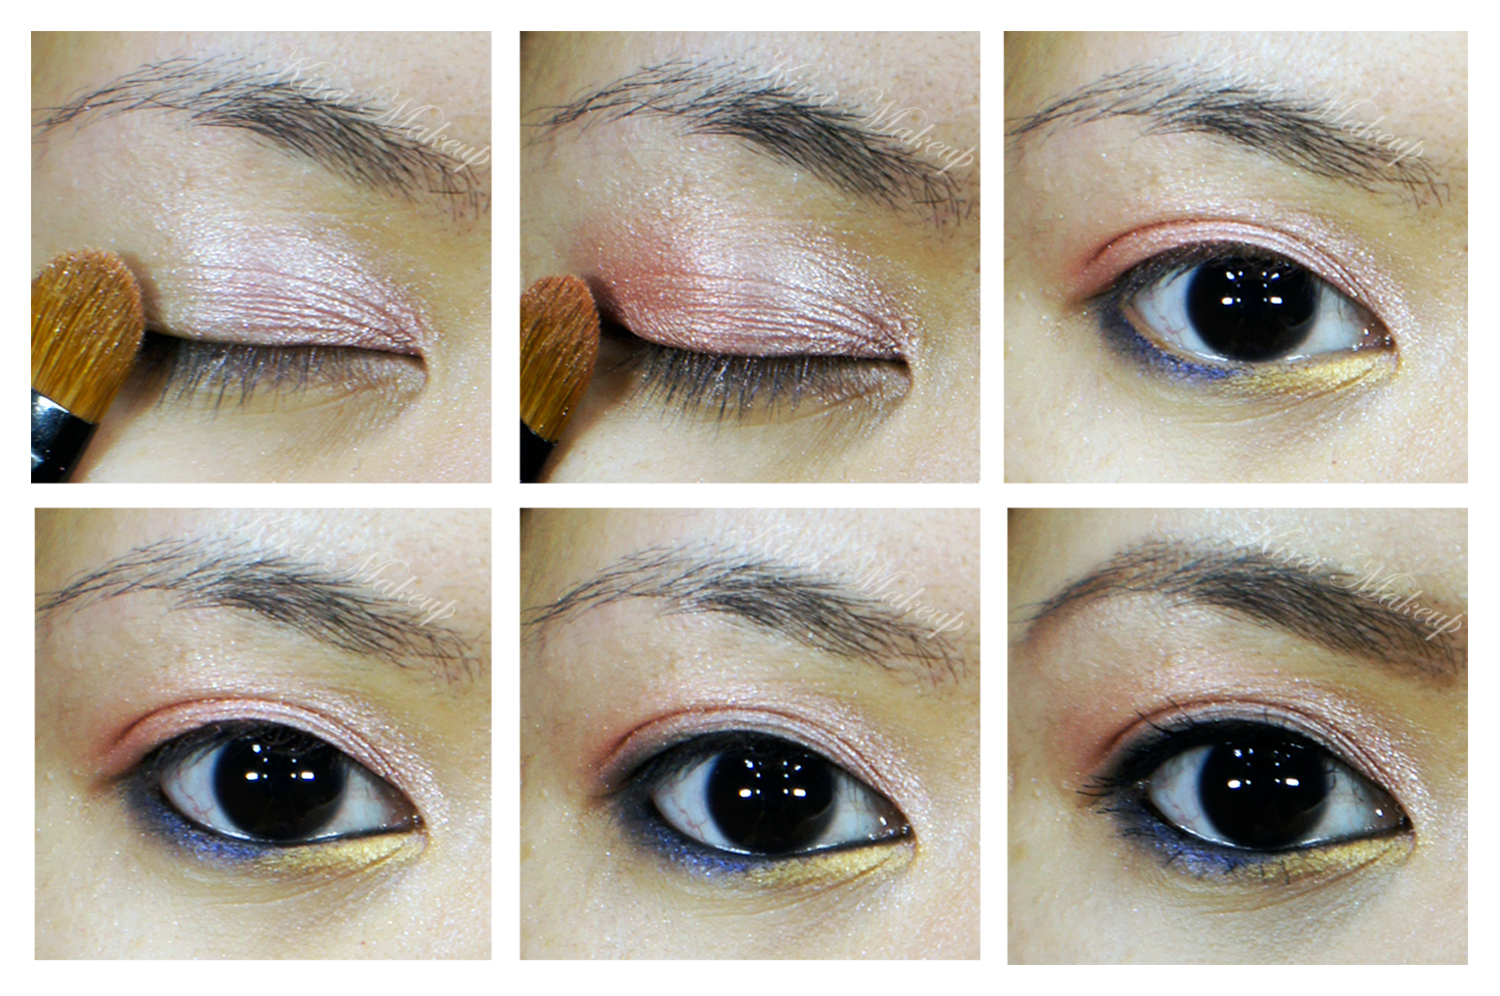
4.  I applied Buzz on the eyelid using a flat eyeshadow brush.

5. To add extra sparkles, I applied Dust using a small eyeshadow brush on the inner corner, and in the middle of my eyelid.

6. I created a winged liner along my upper lash line using Kanebo Kate Super Sharp eyeliner, and lined my waterline using L’oreal Voluminous Smoldering eyeliner.

7. I also applied Blackheart along the lower lash line, and Buzz on the inner third of the lower lash line.

8. I curled my lashes and applied Buxom Lash mascara. I, then, applied Lavie Lash Bluebell falsies.

9. I filled my brows using Anastasia Brow Wiz in Brunette.

naked 3 makeup tutorial

10. I applied MAC Pro Longwear foundation all over my face using MAC Masterclass brush Oval 6.

11. I lightly contoured and highlight my face using Motives Fire sculpting palette.

12. On my cheeks, I applied Maybelline Master Glaze in Make A Mauve.

13. I set everything using CoverFX Translucent powder.

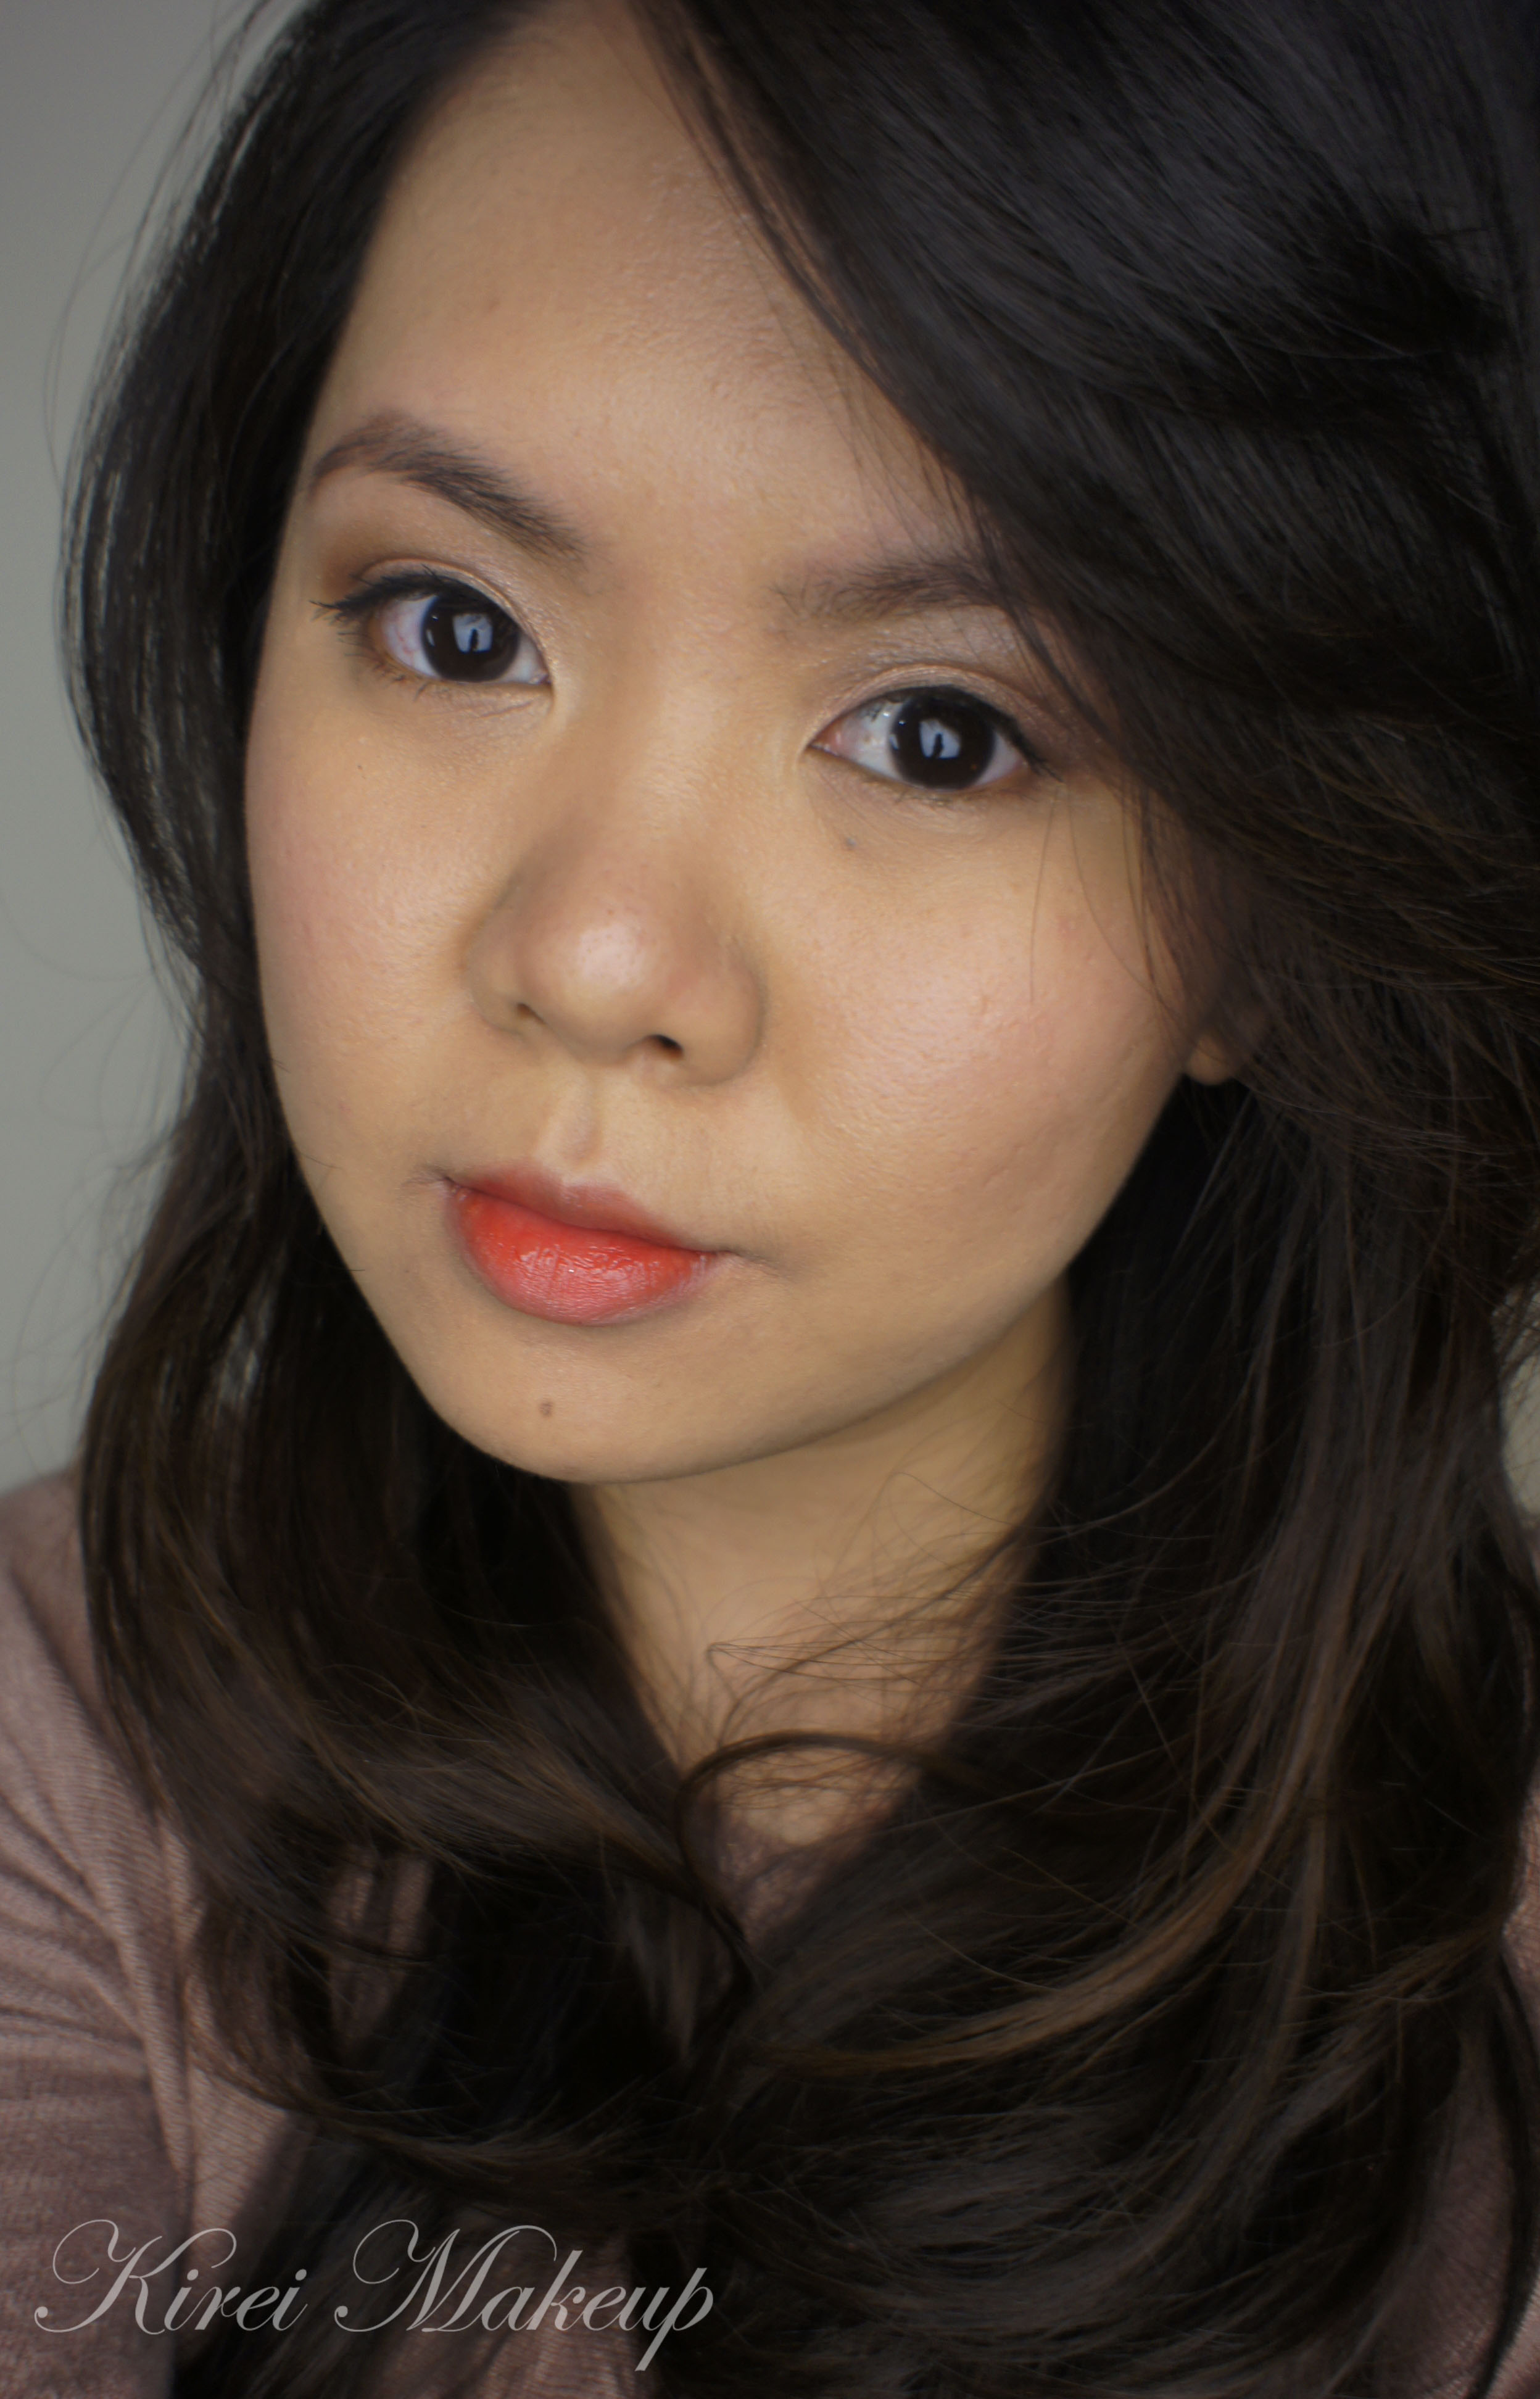
14. I filled my lips using MAC Whirl lip liner. Next, I applied Revlon Just Bitten Kissable lip balm in Honey Douce just in the center of my lips. I blended the 2 shades together by pursing my lips.

naked 3 smoky eyes look

I forgot to take pictures of the products, so I’m just going to list them here.

Products used:

Eyes – Maybelline Inked in Pink; Urban Decay Naked 3 (eyelid: Buzz, outer V: Blackheart, inner corner: Dust); Kanebo Kate Super Sharp eyeliner; L’oreal Voluminous Smoldering eyeliner; Buxom Lash mascara; Lavie Lash Bluebell falsies; Anastasia Brow Wiz in brunette.

Face – MAC Pro Longwear foundation; Motive Fire sculpting palette; Maybelline master glaze in Make A Mauve; Cover FX Translucent setting powder.

Lips – MAC Whirl lip pencil; Revlon Just Bitten Kissable Lip Balm in Honey Douce.

Metallic Storm

A new tutorial using my brand new Sleek Makeup iDivine Storm Palette. I actually been wanting to buy the palette for a while, and I couldn’t made up my mind because I had a bad experience with Indonesian custom not releasing my palettes. So, I was extremely happy when Luxola finally has an office in Jakarta. That makes online shopping in Luxola so much easier. My palette arrived in 2 days after I purchased it. So fast and quick! If you do click on my Luxola banner or links, you’ll get a 15% off. I am affiliated with Luxola and do earn commission in store credit form. However, I have to buy my palettes out of my own pocket.

Anyways, In the Storm palette, there’s a lot of metallic colors, and I’m sure you all know that Metallics are in again this Fall 2013. There is no individual shades name from the palette (which is super weird), but I hope you get the idea.

I prepped my eyes using MAC Paint Pot in Soft Ochre.

How-to:

1. I applied a cranberry eyeshadow (darkest pink from the palette) all over my lid using a flat eyeshadow brush.

2. Using a fluffy blending brush, I blended the edge out. (Optional step)

3. Using a small fluffy brush, I applied a black eyeshadow from the palette on the outer corner to the crease.

4. Using a clean blending brush, I blended the edge until there’s no harsh line on the crease. (sorry for the blurry picture)

5. Using a wet wipe, I cleaned the outer edge of my eyelid to create a diagonal clean line.

6. I also applied MUFE Aqua Liner in black on the outer half of the waterline. I also applied a gold eyeshadow from Sleek iDivine Storm on the inner corner of the lid, and a blue eyeshadow on the rest of the lower lid.

7. I created winged liner/cat-eye liner/feline flick along the upper lash line using Kanebo Kate Super Sharp eyeliner.

8. I applied MAC Brule under the brow bone.

9. I curled my lashes and applied L’oreal Double Curl Extension mascara on both upper and lower lashes.

10.  I filled my brows using Shu Uemura Hard Formula 9.

11. I also applied Ardell individual short flare eyelashes on my top lashes to make them look thicker.sleek idivine storm

12. On the face, I applied MUFE HD Foundation, and under the eyes I applied MUFE HD concealer.

13. I powdered my face using Cinema Secret loose powder.

14. I applied MAC Cubic on my cheeks as blush.

15. On the lips, I applied some lipstick that I’ve melted and forgot to label it…(sorry)

Anything that can go wrong on this tutorial went wrong. I mean, I couldn’t get the lights to work like normal for some reason, may be they are dying. Then, my skin was so dry that day, and I ran out of moisturizer. So, apologies if my foundation looks slightly cakey (or a lot). On top of that, my palette fell from the table because I accidentally tripped – when I was trying to break the fall by holding onto the table, my hand hit the palette. Ah, what a day 🙂 hahahaha…

 Sleek iDivine Storm

Cutie Mcpurple

I wanted to use my pastel and light eyeshadow palette lately. I managed to find my MAC Cutie eyeshadow palette which was from ages a go. I barely used the palette since I wasn’t sure how I was going to tackle the color back when I bought this palette. On top of that, I was into smoky eyes, neutral shades back then.

Anyhow, I don’t think the MAC Cutie palette is on sale anymore. Even if it is, please don’t buy it, it’s not worth your money. The pigment pay-off is so-so, the colors are too light for anyone who’s above NC 15 and it’s not that wearable. I had to pack the colors several time for it to show up. The colors are very sheer if you don’t use any base underneath.

How-to:

1. I applied NYX Jumbo pencil in Milk on the upper lid, blending using my ring finger all the way up to the brow bone.

2. Using a flat eyeshadow brush, I applied MAC Goody Goody Gum Drop on the inner half of the eyelid.

3. Using another flat eyeshadow brush, I applied MAC Boy Crazy on the outer half of the lid.

4. Using Smashbox bullet brush, I applied MAC Azuki Bean on the outer V.

5. Using a small shader brush, I applied MAC Moshi Moshi on the inner corner.

6. I lined my waterline and tightline using L‘oreal Voluminous Smoldering eyeliner.

7. I also lined the eyeliner along my upper lashline.

8. Using a small angled eyeliner brush, I applied MAC Boy Crazy on the inner half of the lower lid and MAC Azuki Bean on the outer half.

9. I curled my lashes and applied Maybelline Volume Express Turbo Boost mascara on the upper as well as lower lashes.

10. I filled my brows in using Dollywinked brow pencil.

Pastel makeup

11. For the face, I applied MUFE HD foundation using CoverFX foundation brush.

12. Under the eyes, I applied MUFE concealer.

13. For the cheeks, I applied MAC Fleur power blush.

14. The look is completed by applying Revlon Mauve It Over matte lipstick on the lips.

MAC CutieMu

Opposites

Hello beauties! Today’s tutorial is something simple and to be honest I did this look just because I wanted to play with some colors. As you all know, I’ve quite a collection of the lovely L’oreal La  Couleur Infallible eyeshadows. FYI, it’s not available in Indonesia. I received mine from L’oreal Canada and they hold a special place in my makeup kit…hahaha..cheesy, much…

I do wish that L’oreal Indonesia can start selling these gems. I mean, the eyeshadows are amaaaazing! You can apply them dry of wet. I think so far, I’ve about 12 infallible eyeshadows. If I were still in Canda, I’d definitely bought more…:P

Tutorials using the infallible eyeshadows are Icy Blue, L’oreal Infallible in Bronzed Taupe, Sweet Plums , Pretty in Pink and Purple, Carrie Underwood Allure Cover and L’oreal Infallible tutorial.

For the tutorial, I wanted to pair colors that are warm and also cold. I want something bright and dark, but at the same time I want this to be wearable. The colors on the eyelids are warm and bright, while those on the lower lid is darker. I think this might work well for those who have monolids. The colors on the upper lids are bright, thus allowing the eyes to look bigger, while the colors on the lower lid is darker and more intense to play up with a smoky look.

I find the gold/blue combination on the lower lid is quite pretty, and I might do a tutorial on that.

Anyways! Let’s get the tutorial started 🙂

How-t0:

1. Using a flat eyeshadow brush, I applied L’oreal Infallible eyeshadow in Forever Pink on the inner half of the lid.

2. Using another flat eyeshadow brush (or the same one but cleaned), I applied L’oreal Infallible eyeshadow in Pepsy Coral on the outer half of the lid.

3. Using an angled eyeliner brush, I applied Smashbox 24k eyeshadow on the inner corner of the lower lid and L’oreal Infallible eyeshadow in All Night Blue on the outer half of the lower lid. I used a pencil brush to blend the shadows ‘ edge.

4. Using L’oreal Voluminous Smoldering eyeliner, I applied it on the tightline and waterline.

5. Using an angled eyeliner brush, I applied MAC Black Tied eyeshadow along the upper lashline just to make my lashes look thicker.

6. I curled my lashes and applied L’oreal Curl Impact Collagen mascara on the upper and lower lashes.

7. I filled my lashes in with Anastasia Brow Powder in Brunette, and applied Anastasia highlighter under my brows.

L'oreal Infallible eyeshadows

8. For the face, I applied Tarte BB cream using Sigma Kabuki Round Brush.

9. For under the eyes, I applied Bobbi Brown under eye brightener.

10. On the cheeks, I applied Benefit Hervana blush.

11. Top it all off with Revlon Just Bitten Kissable Balm Stain in Charmed.

L'oreal La Couleur infallible

Easter Pastels


Easter is near! Lots of pastel colored eggs around and I looove those pastel colors – yellow, blue, pink, purple etc. I am very fond of pastel colors,especially Givenchy Bucolic Blossom quad.. But too bad for my skintone, any pastel colored eyeshadows will just show up very light, whitish-like and pretty much I’ll look washed out.

However, I think I found a trick to wearing the lovely pastels. I know most people use a white base (aka NYX Milk Jumbo Pencil). I found the NYX jumbo pencil to crease a lot even though I applied it sparingly. So, I decided to use a colored base underneath instead of white.  I found that the colored base allows the colors of the Givenchy Bucolic Blossom quad to show through. I love it!

I’ve done an earlier tutorial using the same quad but with a nude base right here 😀

How-to:

1. I applied Urban Decay 24/7 Glide-on eyeliner in Woodstock on the inner half of the upper eyelid. I applied very little and used my finger to blend the eyeliner out. Work fast since the eyeliner dries out pretty fast.

2. Using a flat eyeshadow brush, I applied the pink shadow from Givenchy Bucolic Blossom quad on top of the base.

3. (Not shown in picture – I applied a very sheer layer of Maybelline Color Tattoo in Edgy Emerald on the outer half of the lid). Using a flat eyeshadow brush, I applied the Cyan eyeshadow from the Givenchy Bucolic Blossom quad on top of the base.

4. Using a pencil brush, I applied the lilac from the quad on the lower lid.

5. Using a small blending brush, I applied the brown shadow from the quad on the crease just to add some depth.

6. On the waterline, I applied MAC Chromagraphic eyeliner in NC30 and gently patted the lilac shadow on top of the eyeliner using an angled eyeliner brush.

7. I lined my upper lashline, very close to the roots of the lashes, using MAC Black Tied.

8. I curled my lashes and applied Dior Overcurl mascara.

9. I filled in my brows using a mixture of MAC Omega and MAC Brun.

10. I lightly applied MAC Ricepaper under the brows.

Pastel makeup

11. For the face, I applied MAC Matchmaster foundation using Tarte foundation brush.

12. I applied MAC Peaches blush on the cheeks and Revlon Just Bitten lipbalm in Charmed

Givenchy bucolic blossom


L’oreal Paris Good Luck Charm

Sprained neck is no fun! I could barely move for several days and my shoulder was so sore. Anyways, to cheer myself and put me out of misery I decided to go grab a makeup product (bahahahaha). I bought myself a Maybelline Colour Tattoo in Inked in Pink. I love it!

As you guys know, I received this L’oreal Paris Good Luck Charm eyeshadow from the L’oreal Paris Canada event’s goodie bag. As mentioned, I felt that the pink shadow doesn’t really show up on my skin-tone, so I decided to layer the Maybelline Colour Tattoo Think in Pink underneath L’oreal Good Luck Charm.

I’m usually quite wary about pink eyeshadow since it can make one look sickly, but the gold in the shadow quad makes it workable, usable and wearable.

How-to:

1. I applied Maybelline Inked in Pink all over the eyelid using my ring finger.

2. Using a flat eyeshadow brush, I applied the pink eyeshadow from L’oreal Good Luck Charm quad.

3. Using a blending brush, I applied the light brown eyeshadow from L’oreal Good Luck Charm quad on the crease.

4. Using a small shader brush, I applied the darkest brown eyeshadow from Good Luck Charm quad on the outer corner and on the crease.

5. Using a clean blending brush, I blended the brown eyeshadow to the light brown eyeshadow.

6. Using a clean flat eyeshadow brush, I applied the highlighter color from the quad under my brows.

7. I filled my brows using Anastasia Brow Wiz in Brunette, curled my lashes and applied mascara.

pink and brown makeup

8. For the face, I applied Urban Decay Naked foundation all over my face using a foundation brush.

9. For the cheeks, I applied L’oreal Rose Gold blush using a clean foundation brush.

10. For the lips, I applied L’oreal Colour Riche Caresse Shine Stain Lipcolour in Extremely Nude.

Maybelline Inked in Pink