IMATS Toronto 2015 – Recap

As you all know, I went to IMATS Toronto on Saturday, and I had a blast! I’ve been to the IMATS since 2010, but last year I was back in Jakarta, so I really wanted to go this year. Fortunately, I was able to attend it with N, and I’m glad I went this year. I managed to meet my role models, my mentors, and couple friends! The meetings were even more amazing than the shopping experience!

IMATS Toronto 2015
IMATS Toronto 2015

So, this year, the IMATS were held in the North building of the Metro Toronto Convention Center, which is unusual since in the past it was held in the South building. The space was a tad smaller, but it was still pretty good. There were a lot of people who came to the tradeshow, and there were long queues everywhere! I came around 10am, but looking for parking was challenging since there were Blue Jays game and University fair. After finding parking, I checked in at around 10.30, and already long lineups as far as the eyes can see! NYX, MUFE, Benefit, MAC, Morphe, Crown, Nigel, Frends booths were packed!

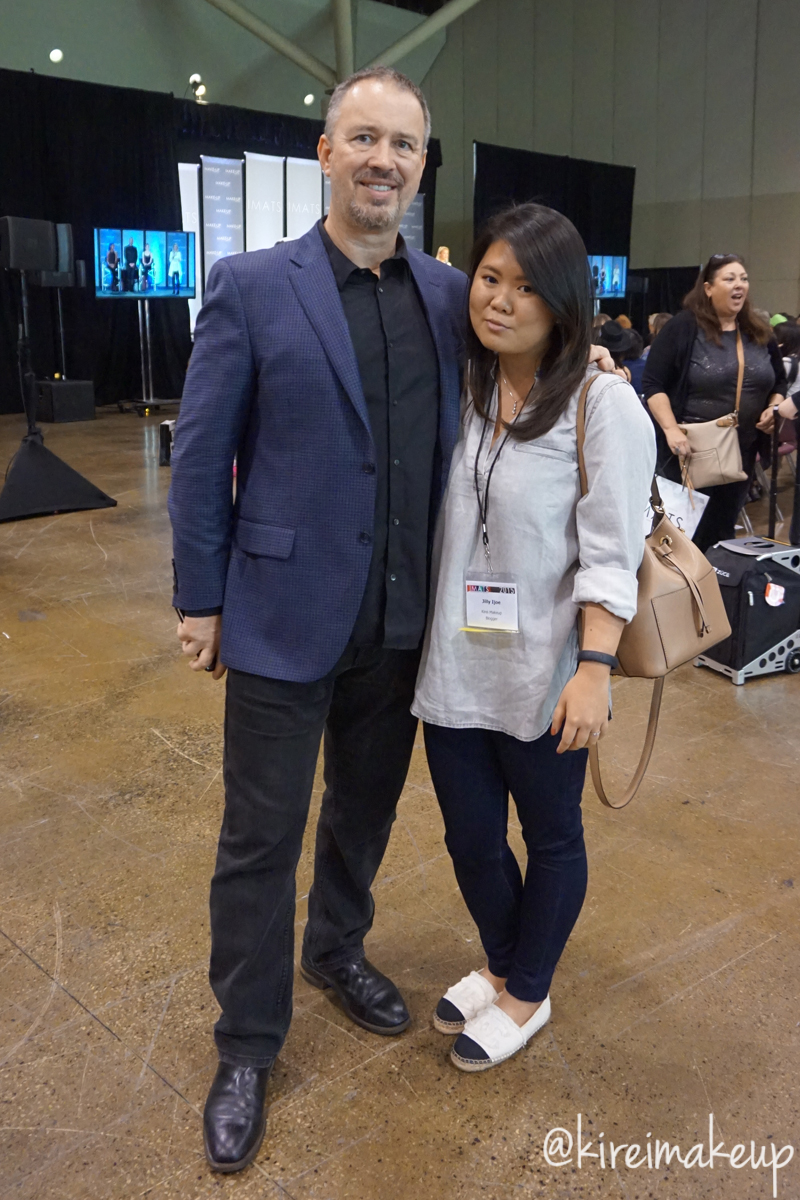
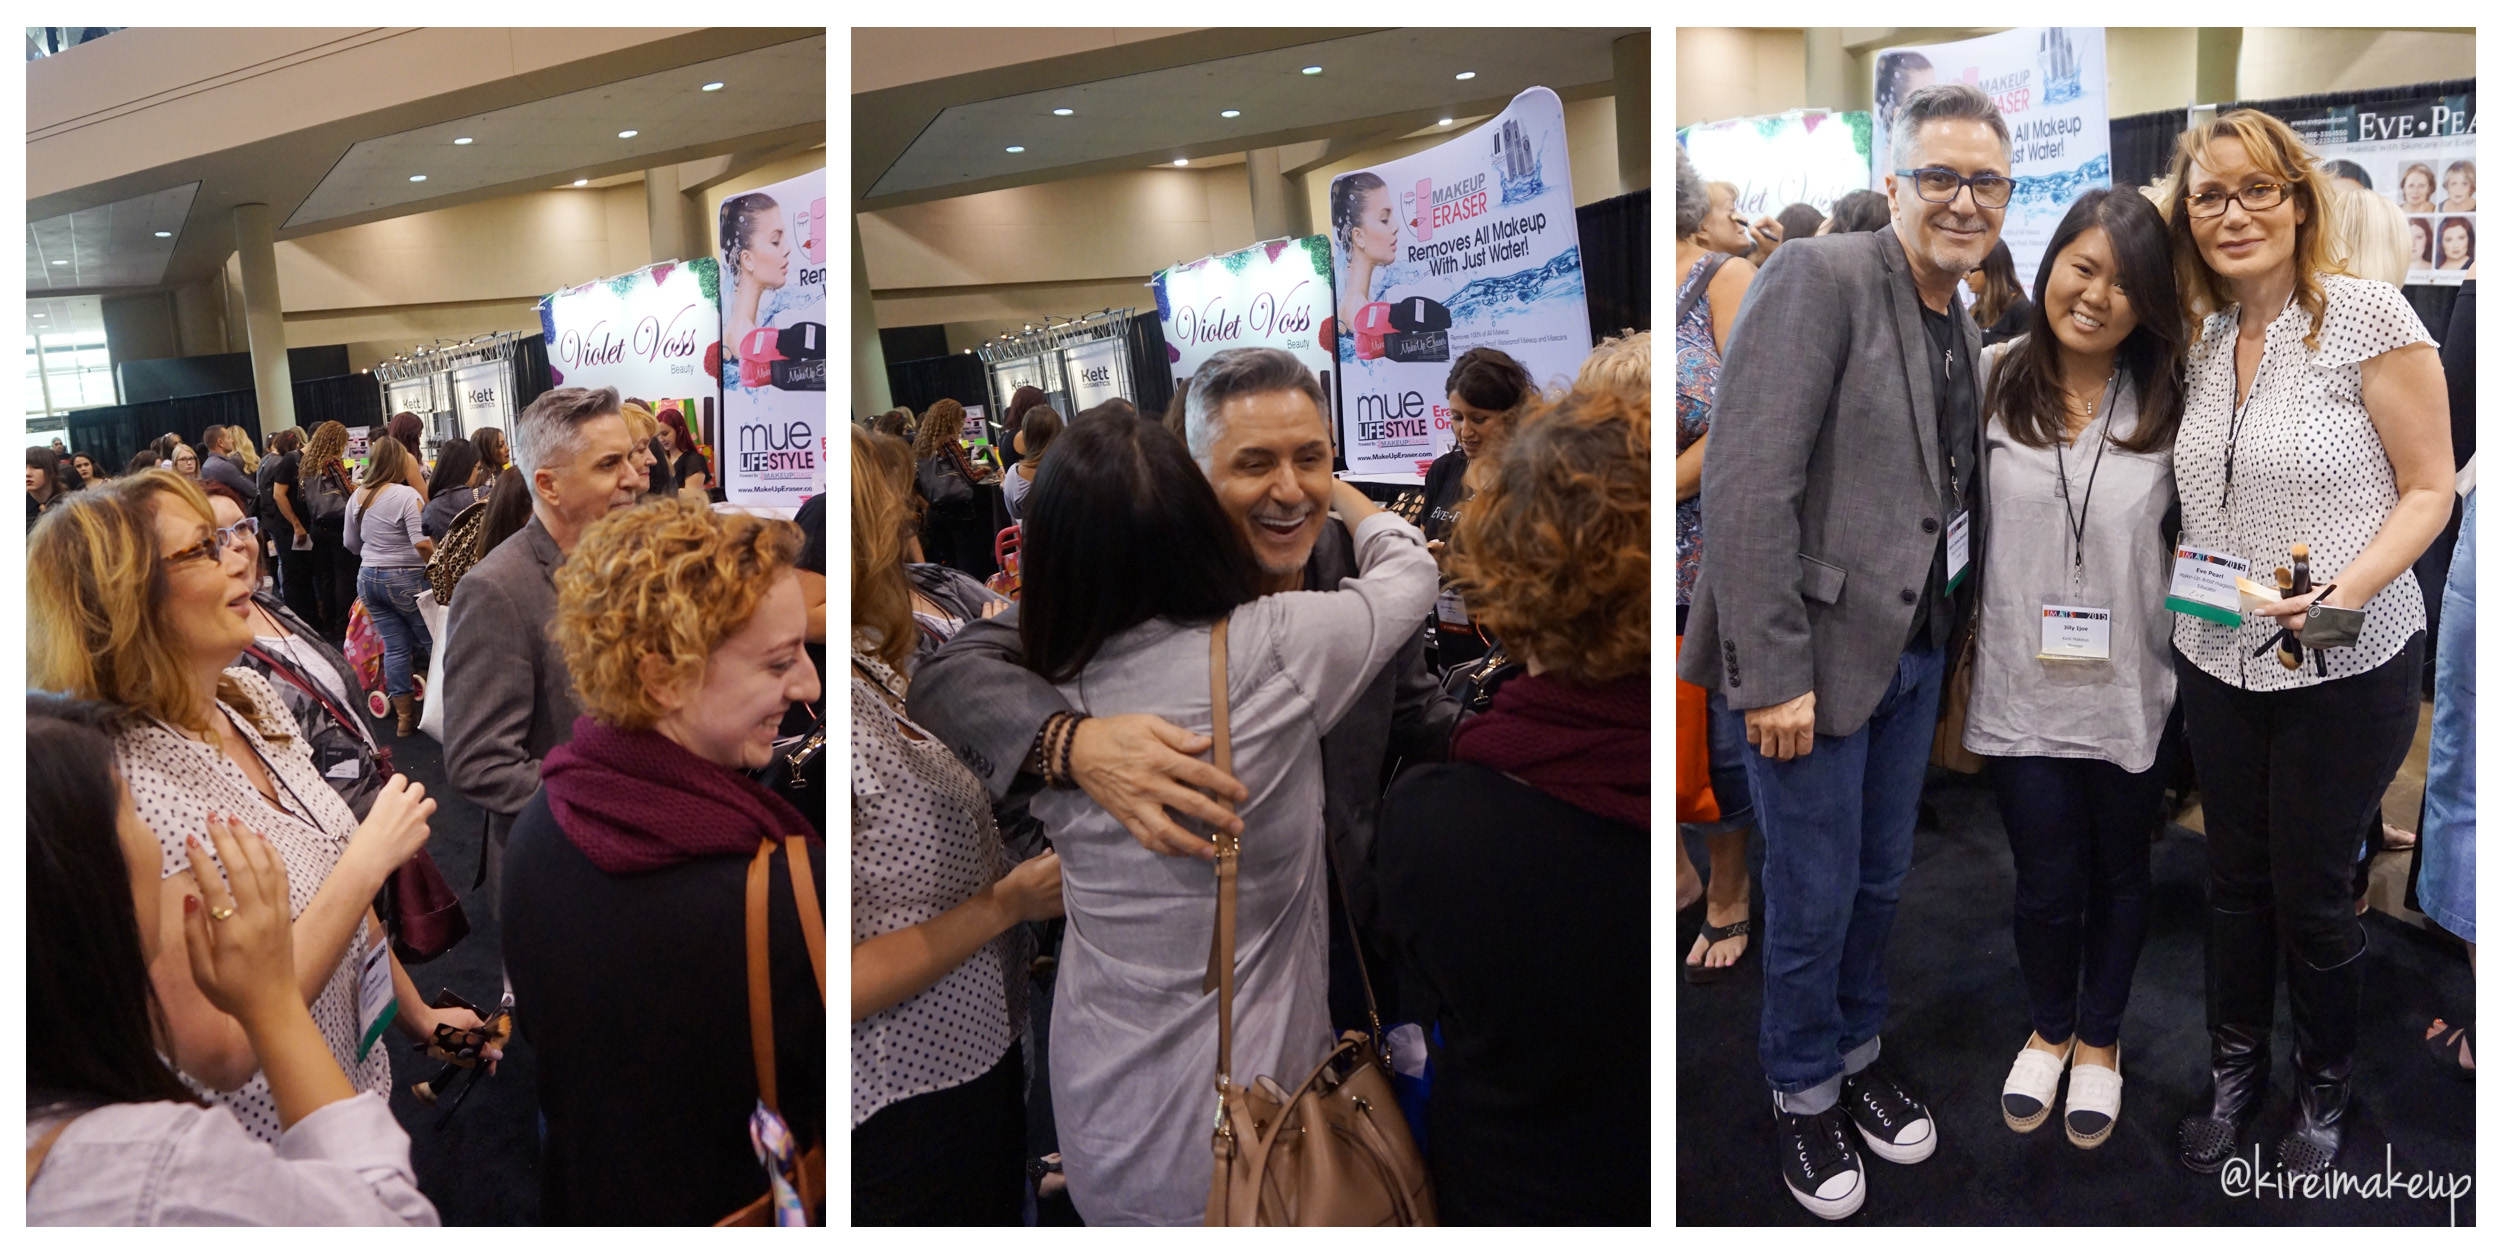
Anyways, this year when I posted a picture on Instagram regarding IMATS, Michael Key commented on the picture and I promised him that I would look for him. I managed to see him (more like hunting him), and took a picture with him! If you guys don’t know who Michael Key is, you should know! Michael Key is 2-time Emmy Winning makeup artist, executive of IMATS and Makeup Artist Magazine. He is the man behind IMATS, so of course I have to take a picture and say hi to him. Such a great guy, so friendly and humble.


IMATS Toronto 2015
Michael Key & me

Then, I managed to see Kevin James Bennett while I was at Eve Pearl’s booth. As you can see on the photo collage below, I was fan girl-ing at KJB. I was like “I’m a big fan of your work!!!” *laughs* Eve Pearl was there and told him “she’s your fan!”. Unreal! I mean, KJB and Eve Pearl are like the big names in the beauty industry! I still can’t believe I managed to talk to them, and took pictures with them. It felt so surreal! They were giving out tips and tricks, chit chatting with the attendees.

Kevin James Bennett and Eve Pearl are always in the IMATS Toronto, so if you missed them this year don’t forget to look for them next year. KJB and Eve Pearl are Emmy Winning Makeup Artists, they KNOW what they are talking about! All of their classes are very informative, and they are so kind, always willing to answer questions.

Kevin James Benett
Kevin James Benett & Eve Pearl


IMATS Toronto 2015
Eve Pearl Makeup Demo

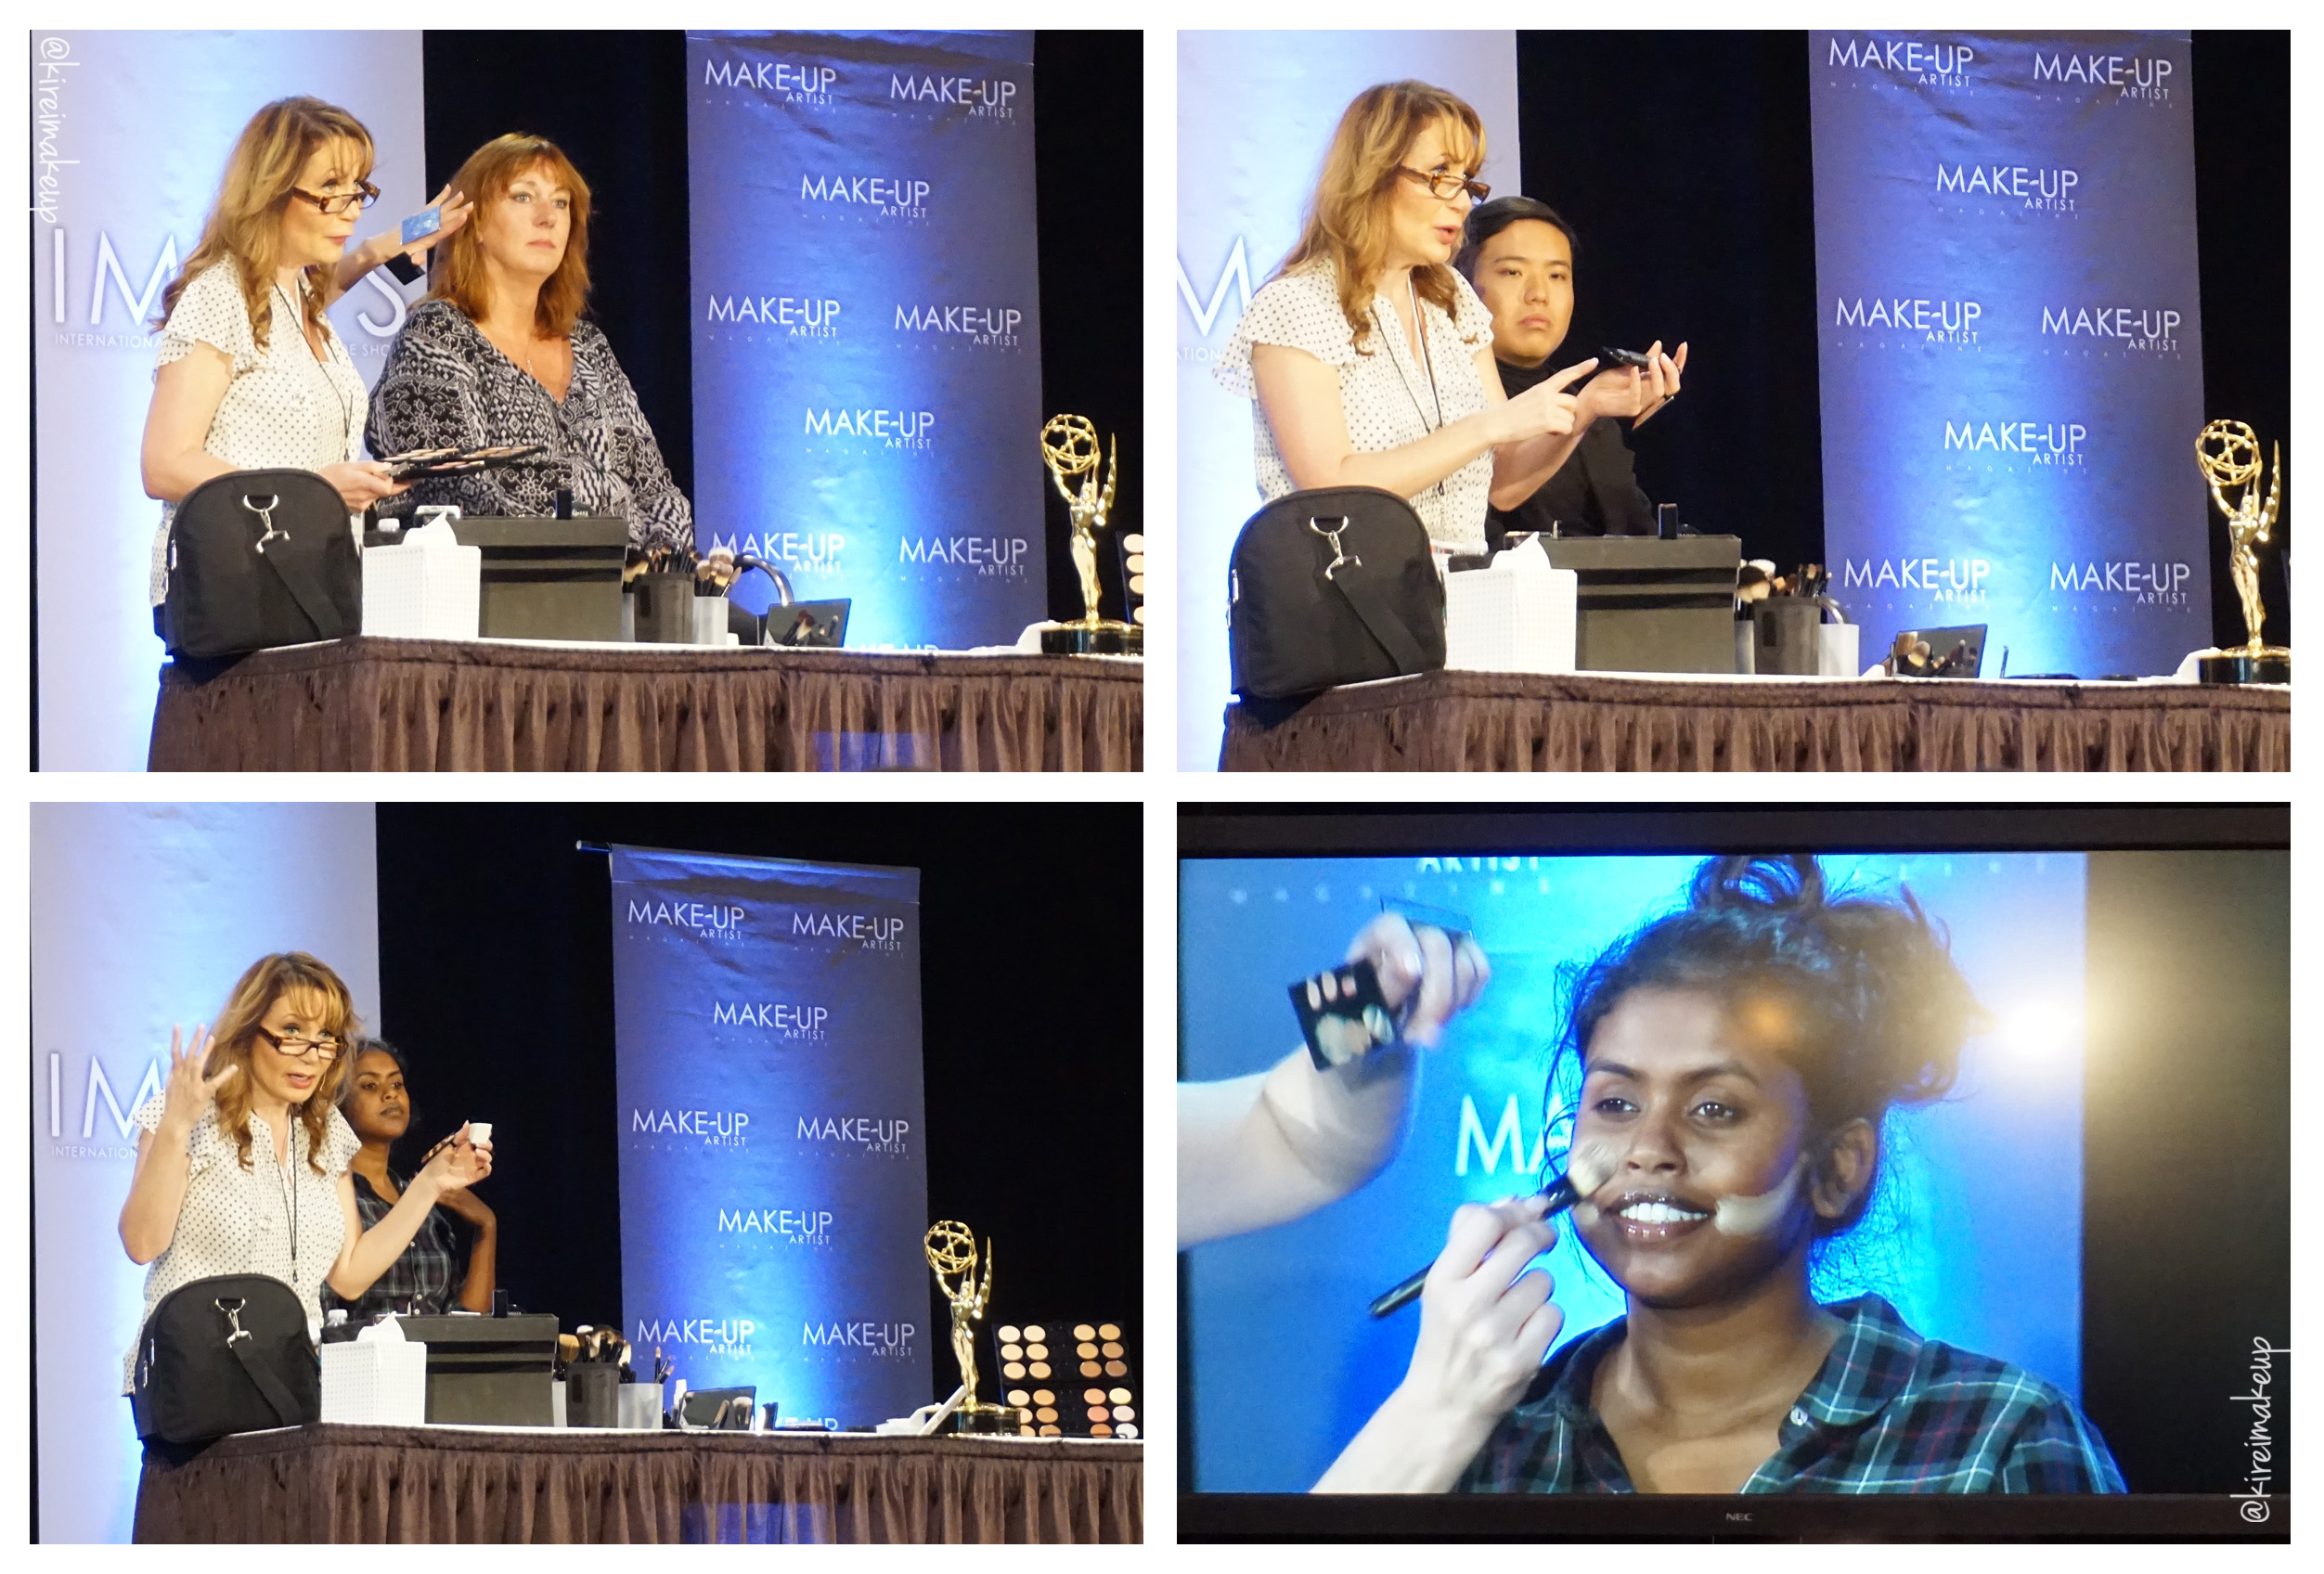
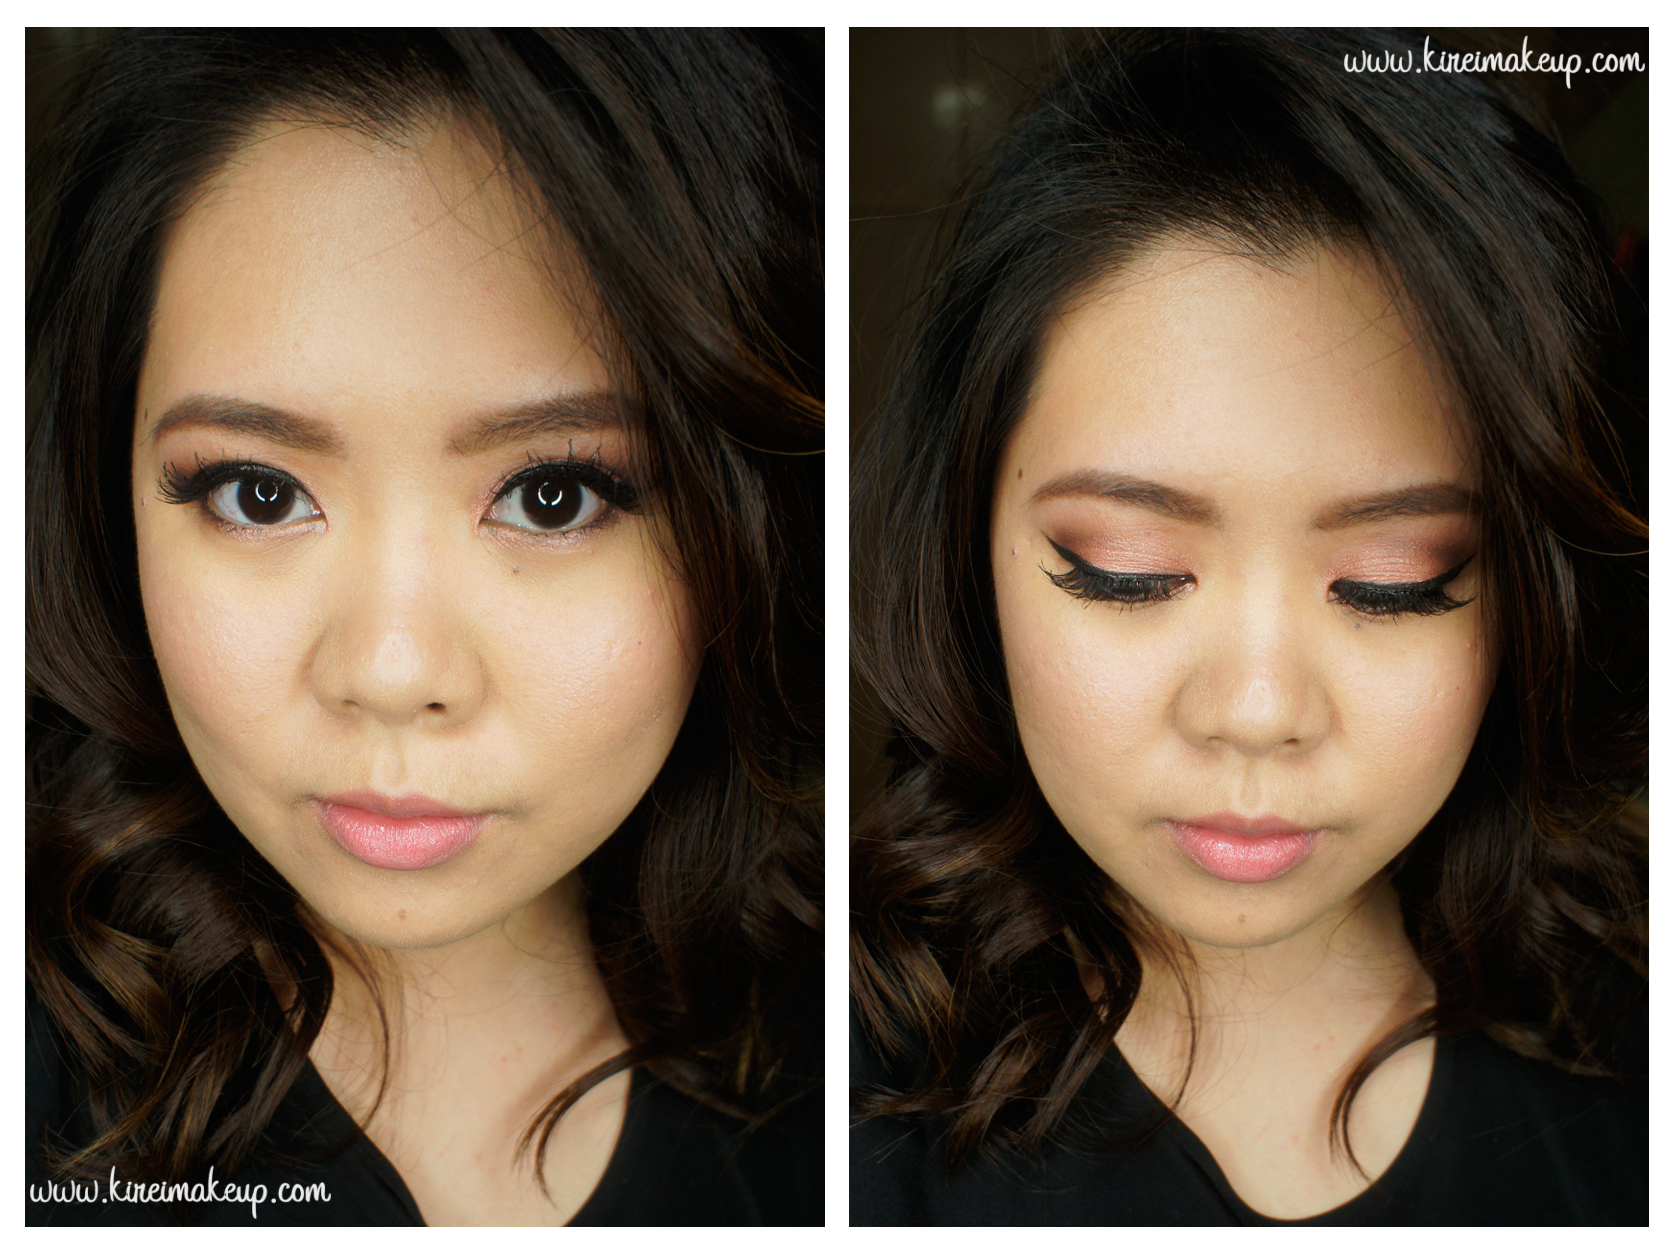
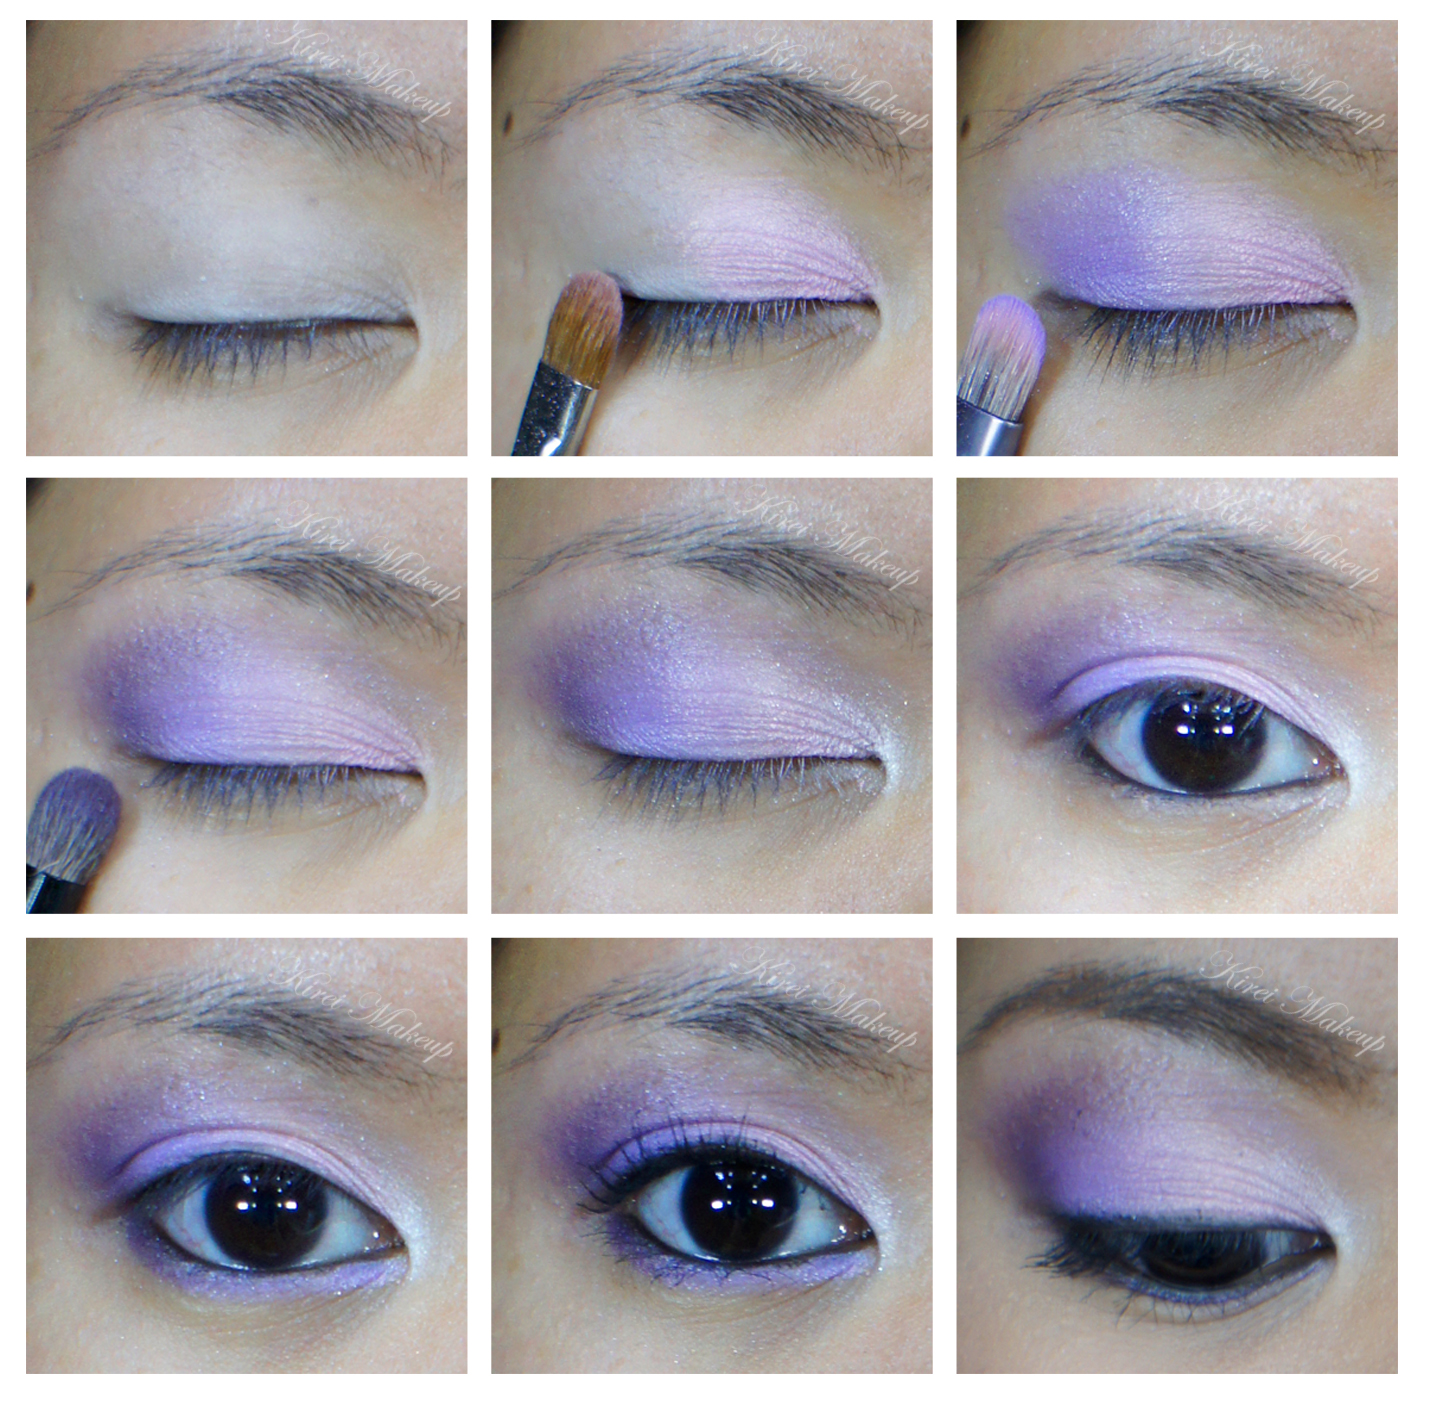
All the makeup workshops were amazing! I cannot say enough about these classes. I only managed to sit in on 2 classes this time, but it was really fun and informative. For beauty, I went to Eve Pearl makeup demo. She started out by giving us tips on how to make it in the industry, how to pack our makeup kits and how to work on clients. Then, of course, she proceeded by showing us her famous “Reverse Contouring” technique. I live tweeted during the workshop, so check out my twitter!

Eve was given an hour for her class, and within 45mins she managed to do 4 makeup while talking to us and answering our questions. I only took pictures of 3 of the attendees, but there were actually 4 whose makeup was done by her. She showed us how to do her “Reverse Contouring” technique on all skintone, just by using her Pro kit. I’ll try to apply this technique on myself in the future, so wait for the post!

IMATS Toronto 2015
Gregory Arlt

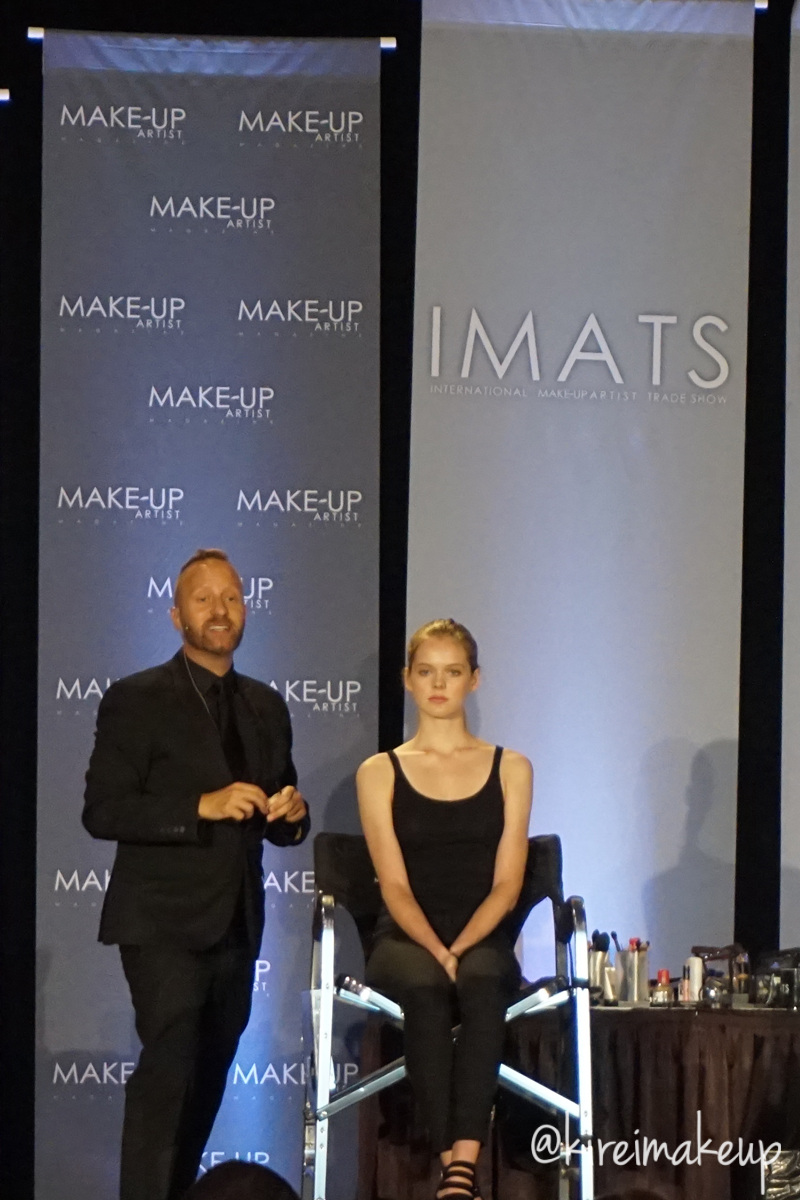
I wanted to attend Gregory Arlt beauty class, but I didn’t manage to do so since I wanted to see The Strain demo. So, I do apologize for being unable to share any tips he shared. I know a couple other bloggers who attended this class, and they might have tips on their blogs! Anyways, I managed to snap this picture of his class moments after The Strain demo, and before I saw Michael Key walking around.

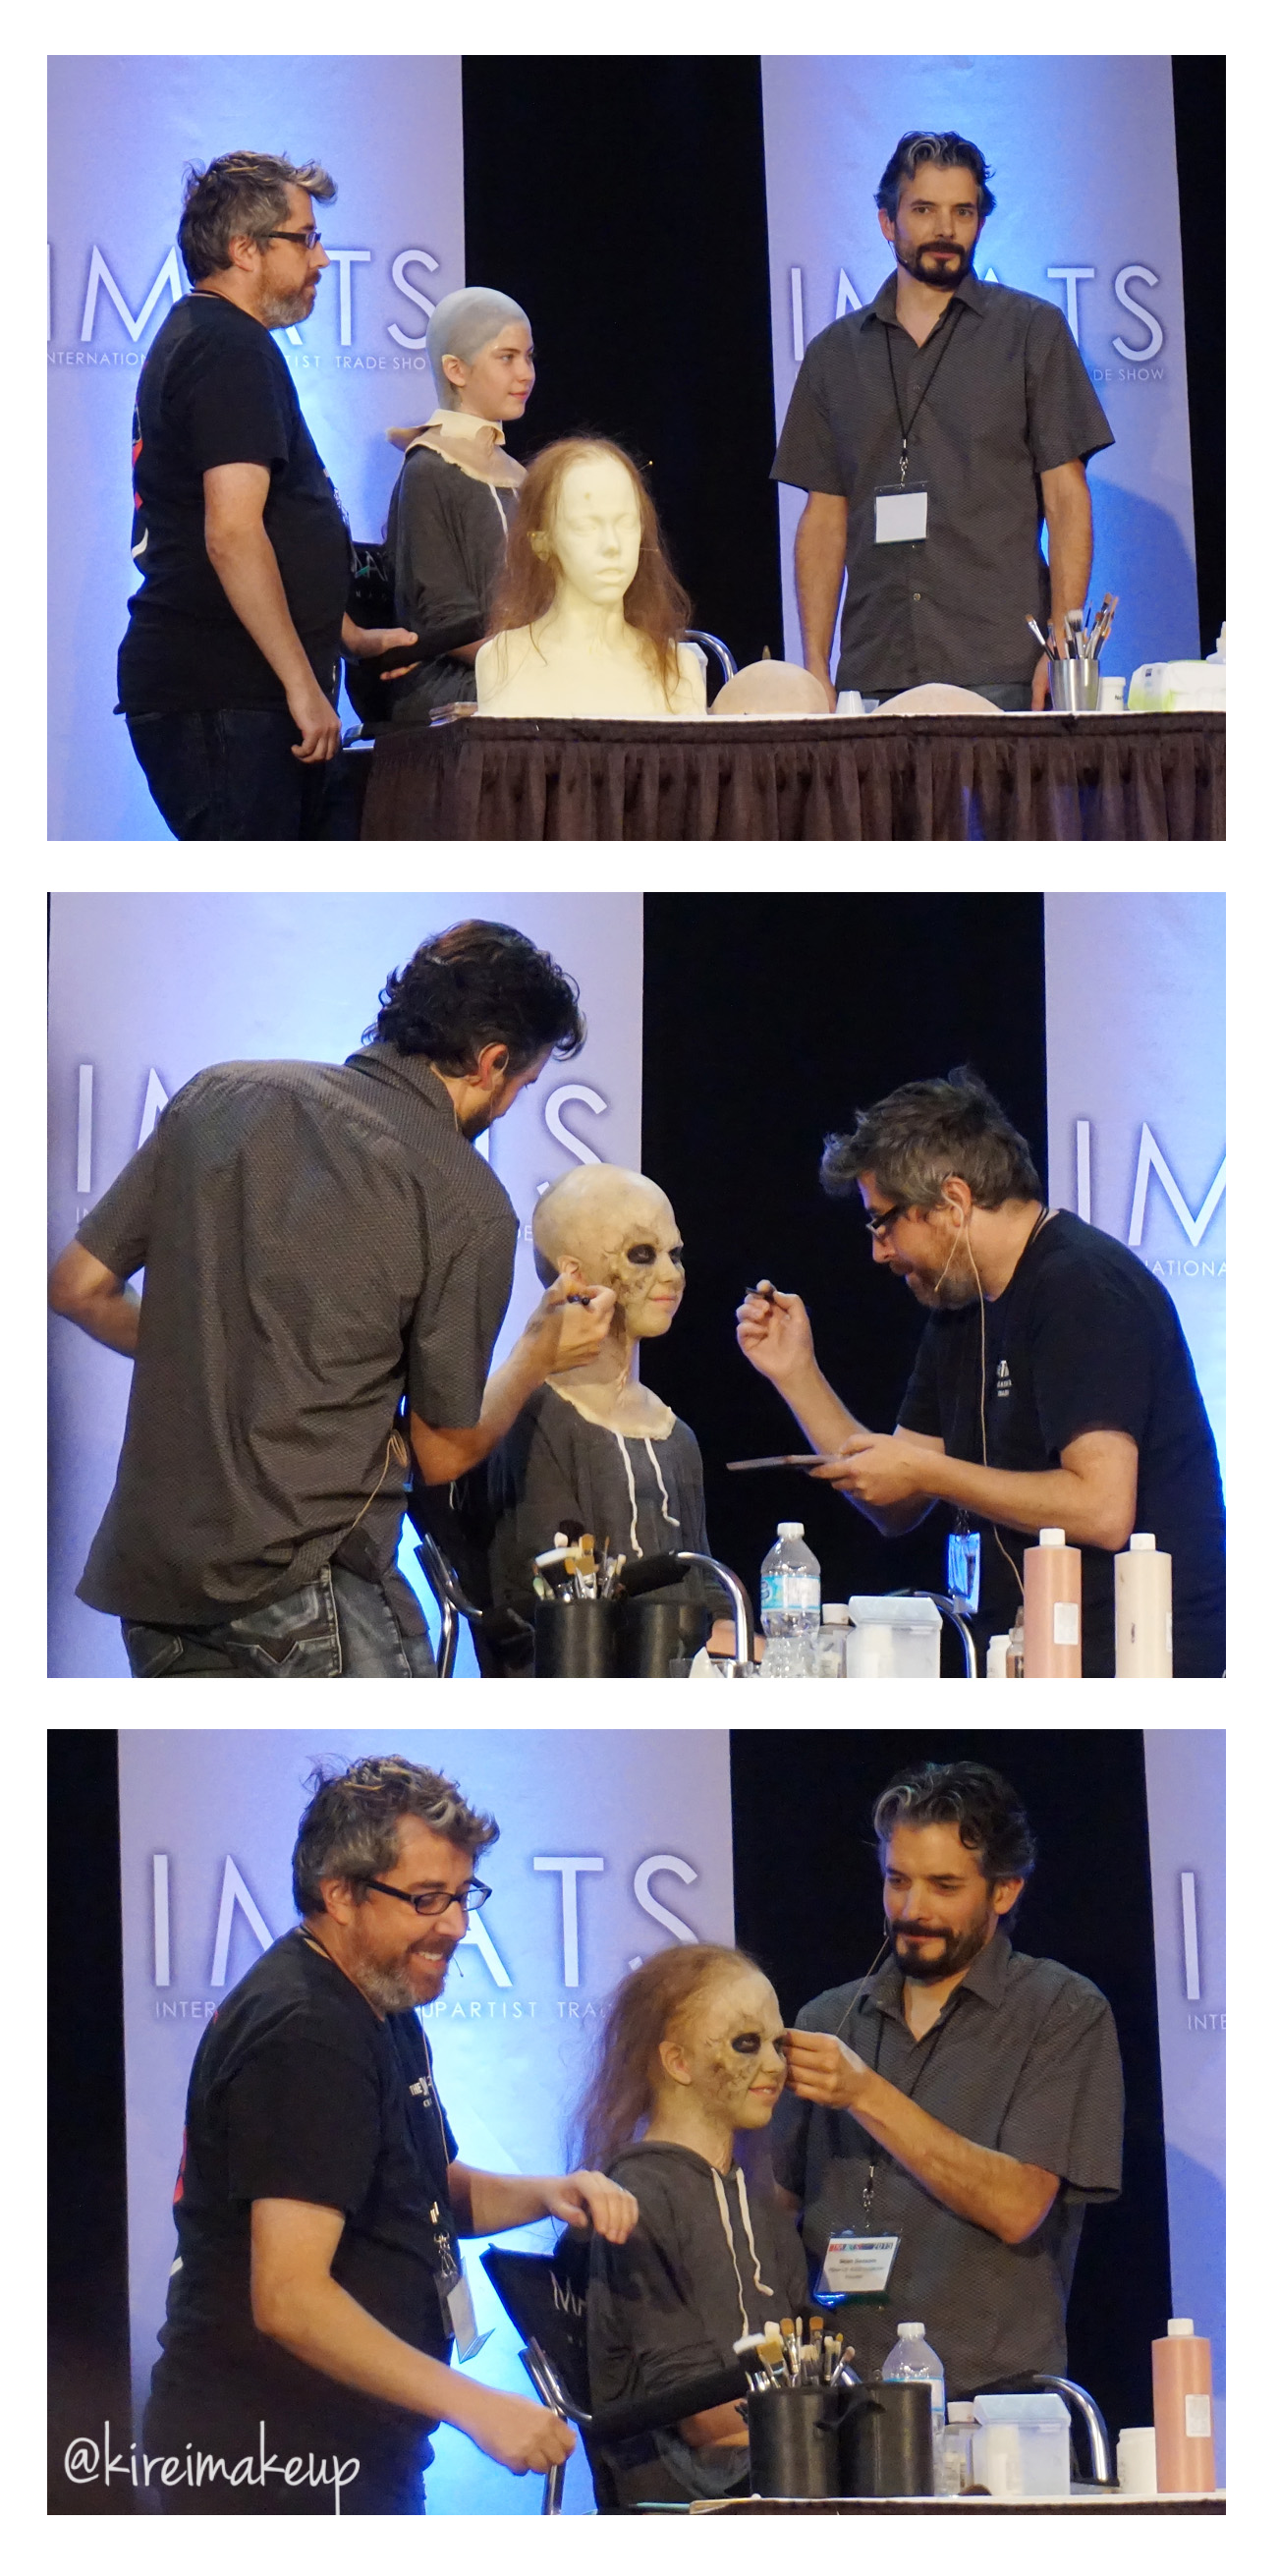
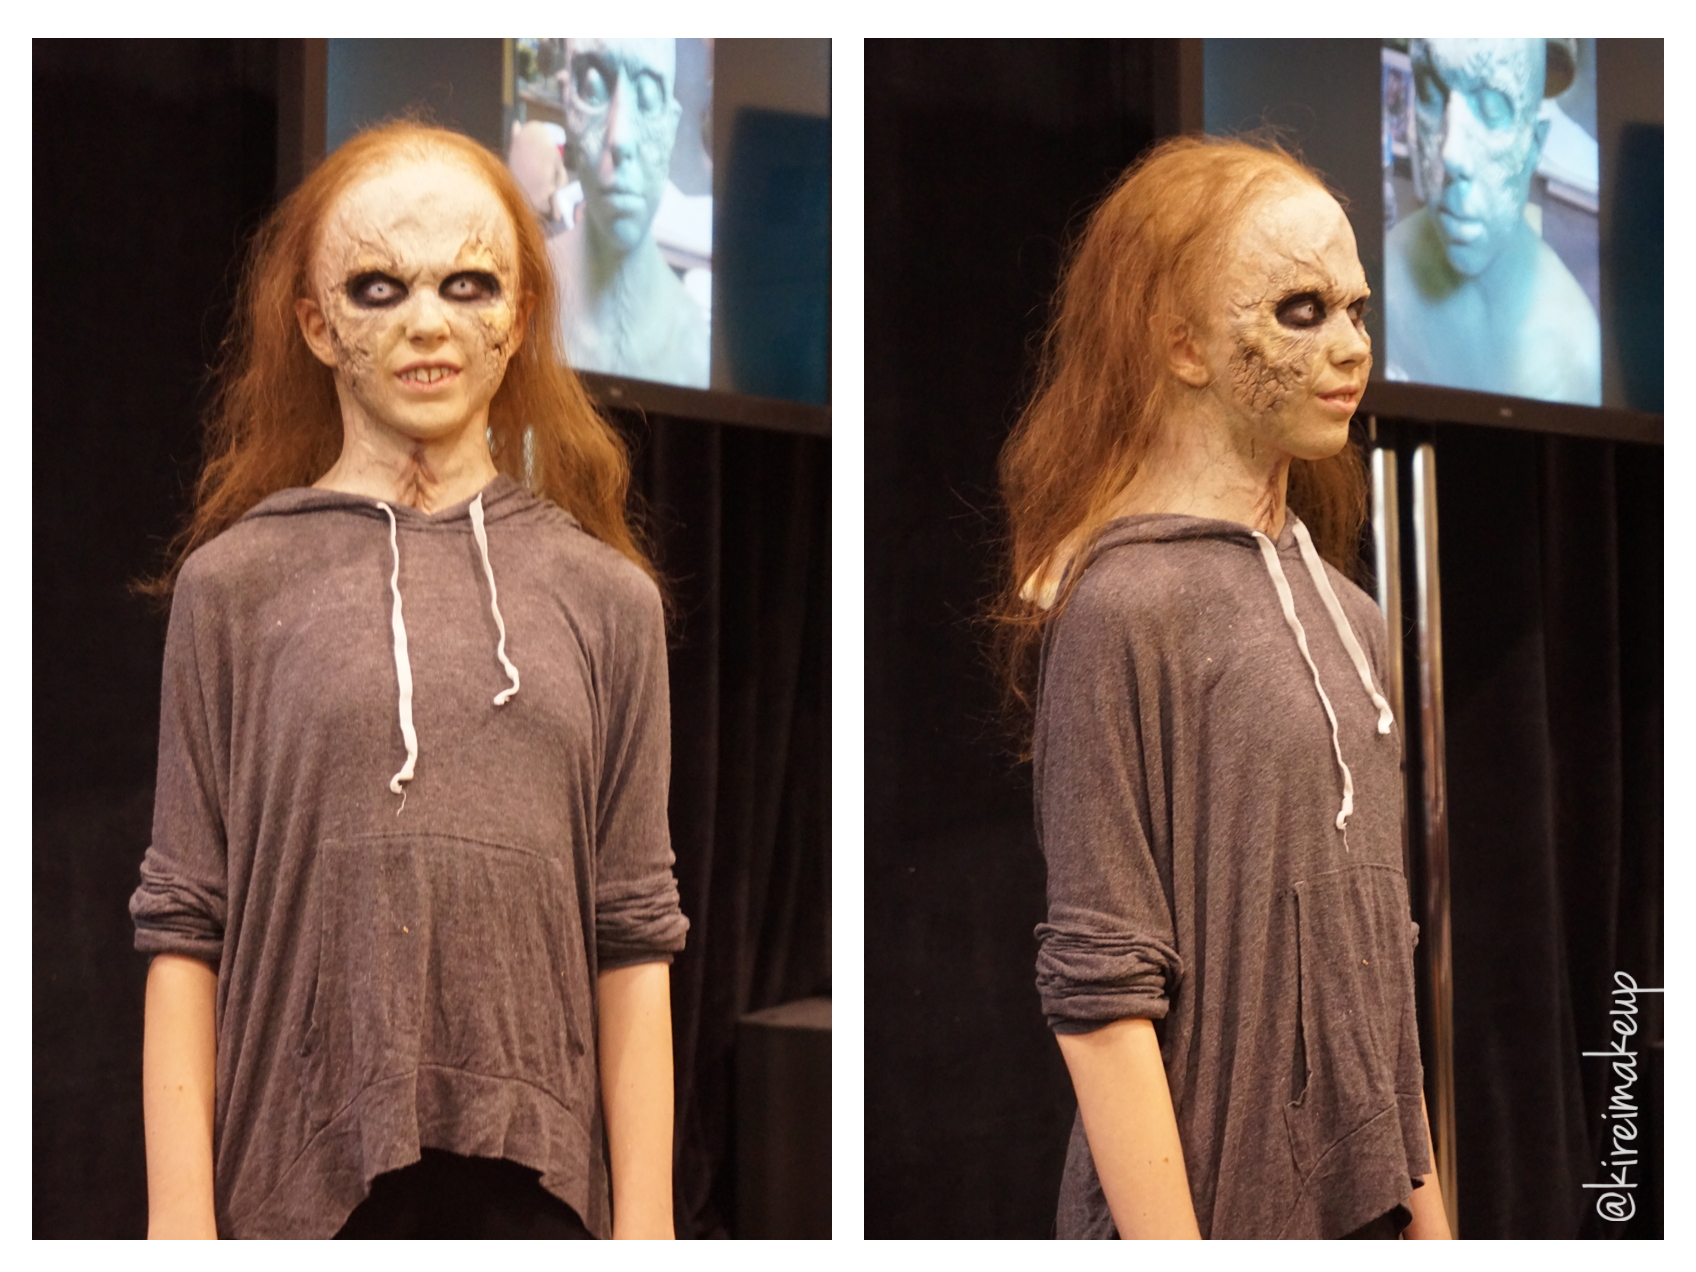
The workshop that I really wanted to attende to was “The Strain” Character Demo done by Sean Samson and Neil Morrill. This demo took 1.5hr. Sean and Neil showed us how they applied the Foam Latex pieces, they also demonstrated how they colored the pieces. It was pretty great since N and I loved the show, and we really enjoyed the demonstration. They told us that during the filming, these prosthetic pieces took around 3hr to be put on the talent.

The Strain makeup
The Strain Demo
The Strain creature
The Strain Demo

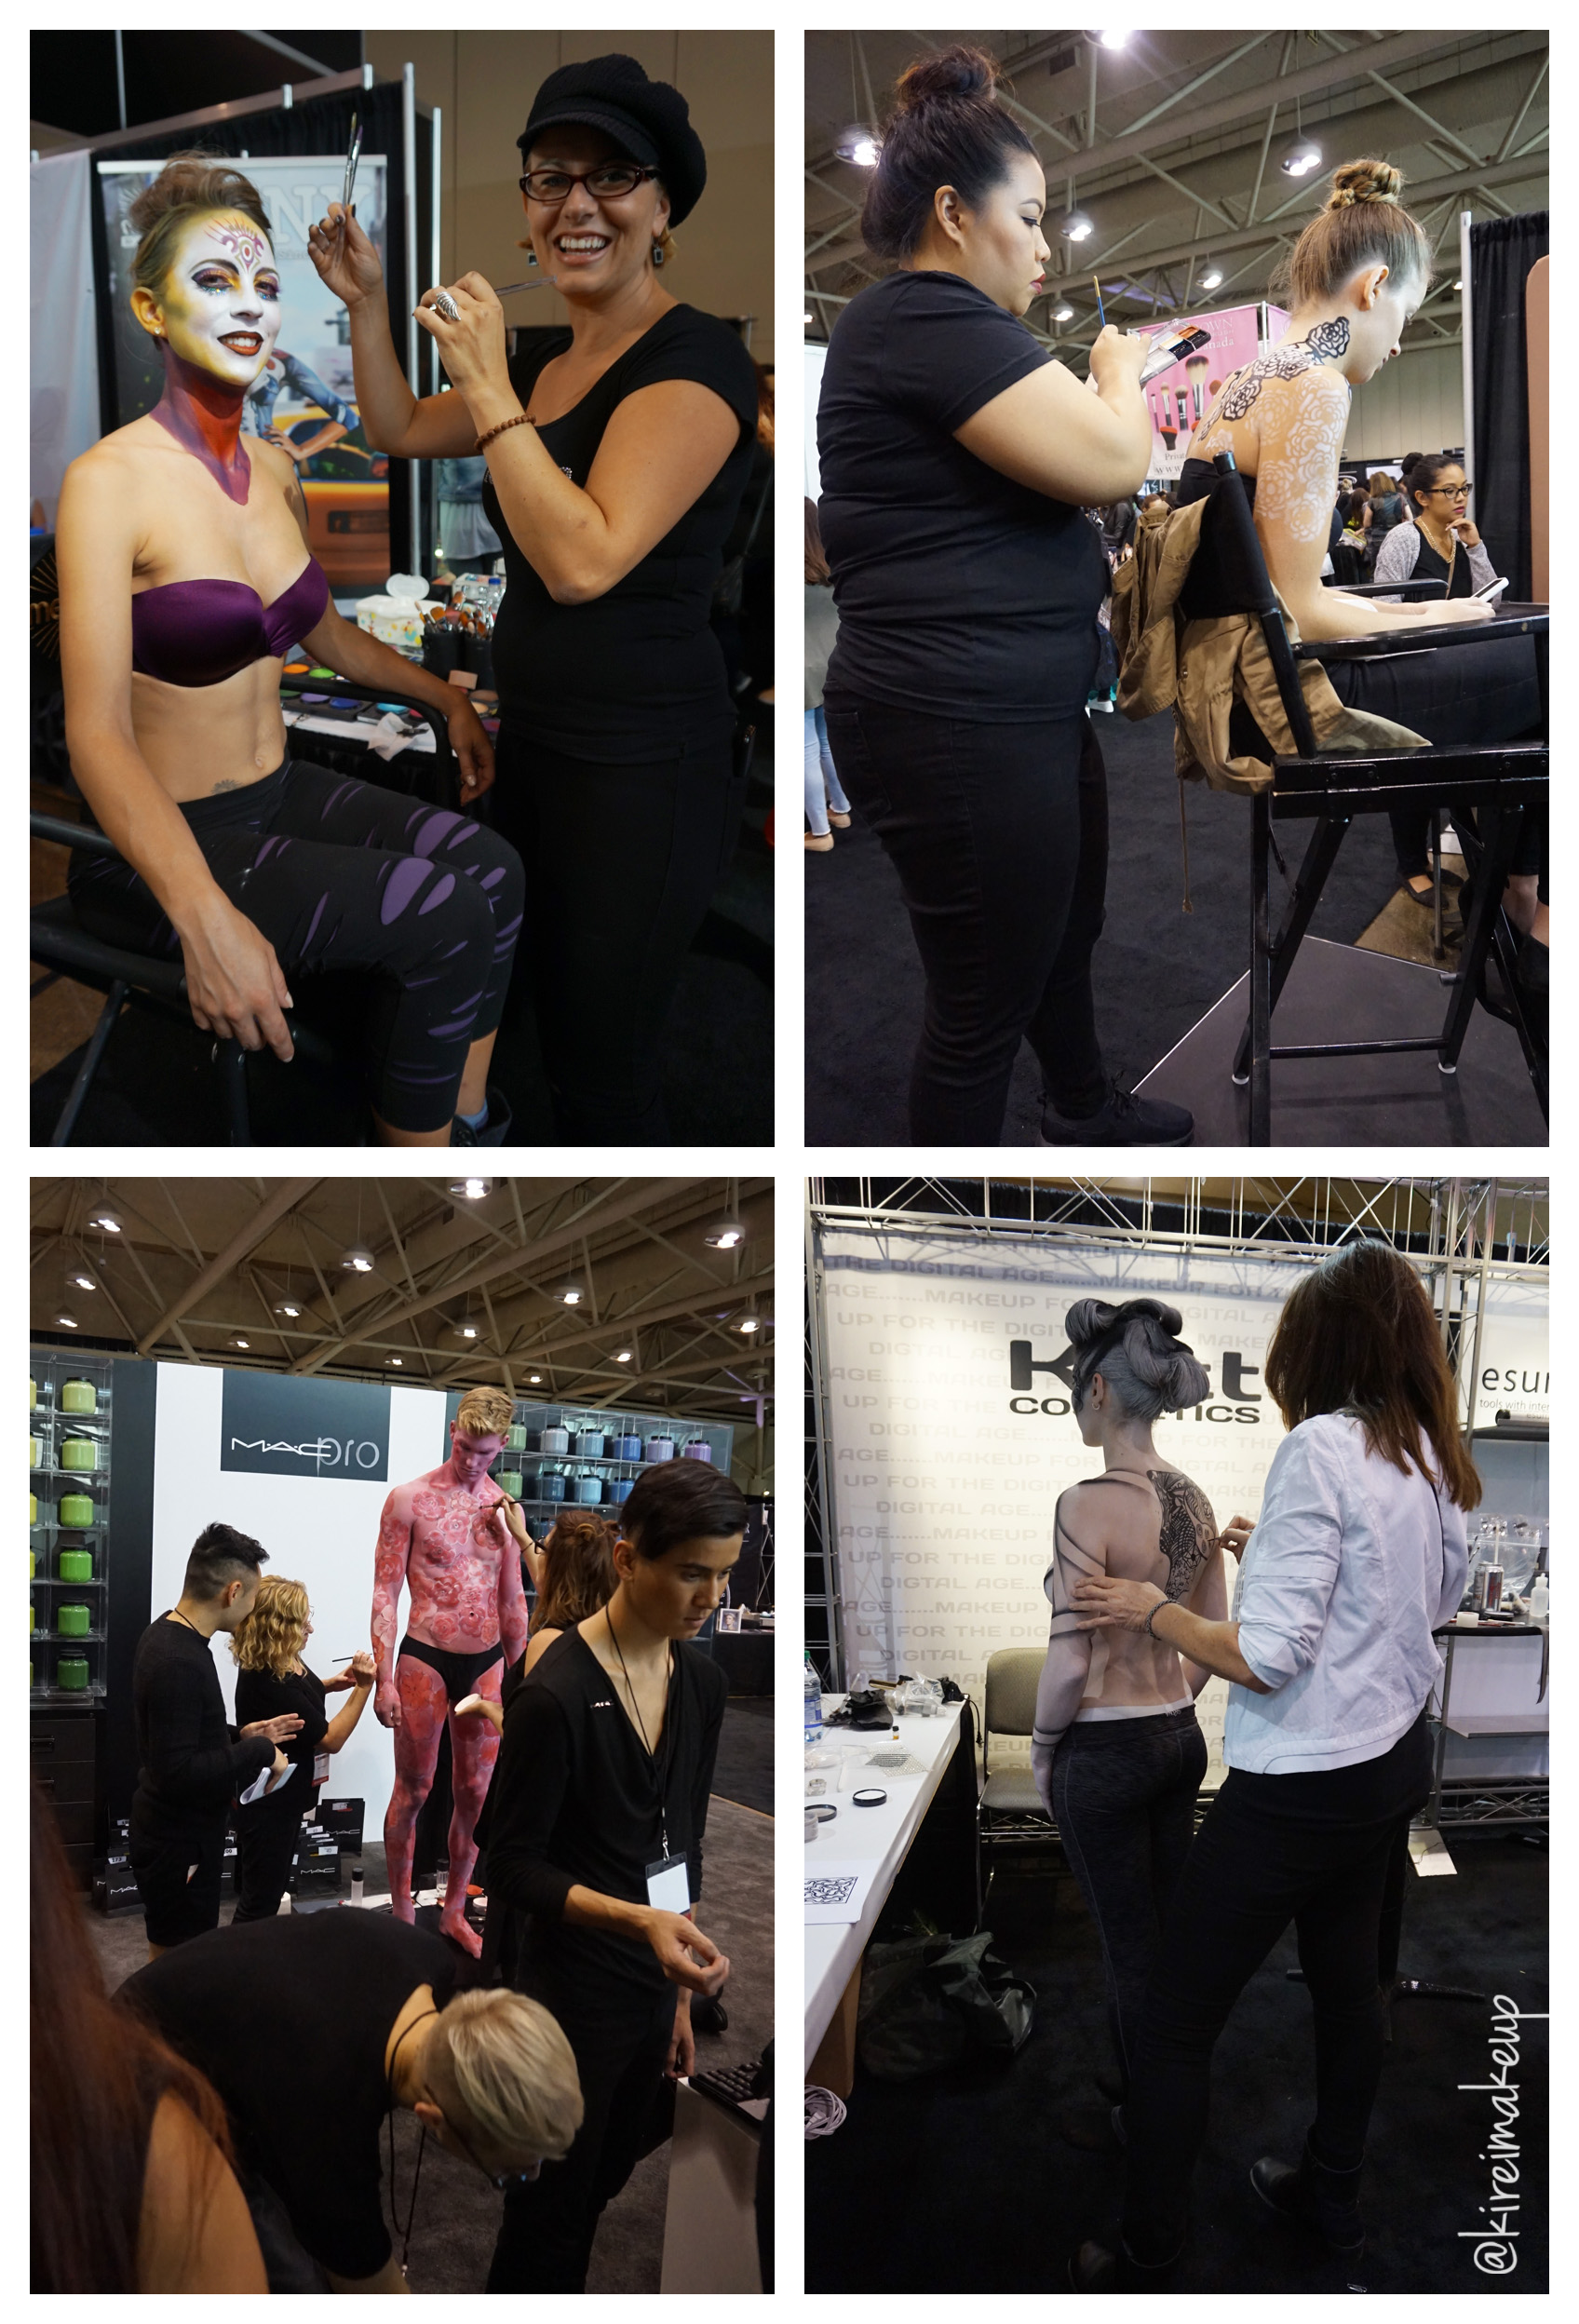
Besides the workshops and meeting all these amazing makeup artist, I walked around to take a look at what the booths offer. I absolutely love how some of these amazing makeup artists took their time to talk to the attendees. As you can see on the pictures below, Sebastien Tardif and Eve Pearl were showing attendees how to correctly apply their products to enhance their beauty!

Of course there would be lots of body painting around the IMATS. Pretty, colorful, and meticulous. These body paintings took hours to complete. There were some demo on how to cover tattoo, and prosthetic application as well in some of the booths.

IMATS Toronto 2015
Sebastien Tardif & Eve Pearl
IMATS Toronto 2015
Body Painting

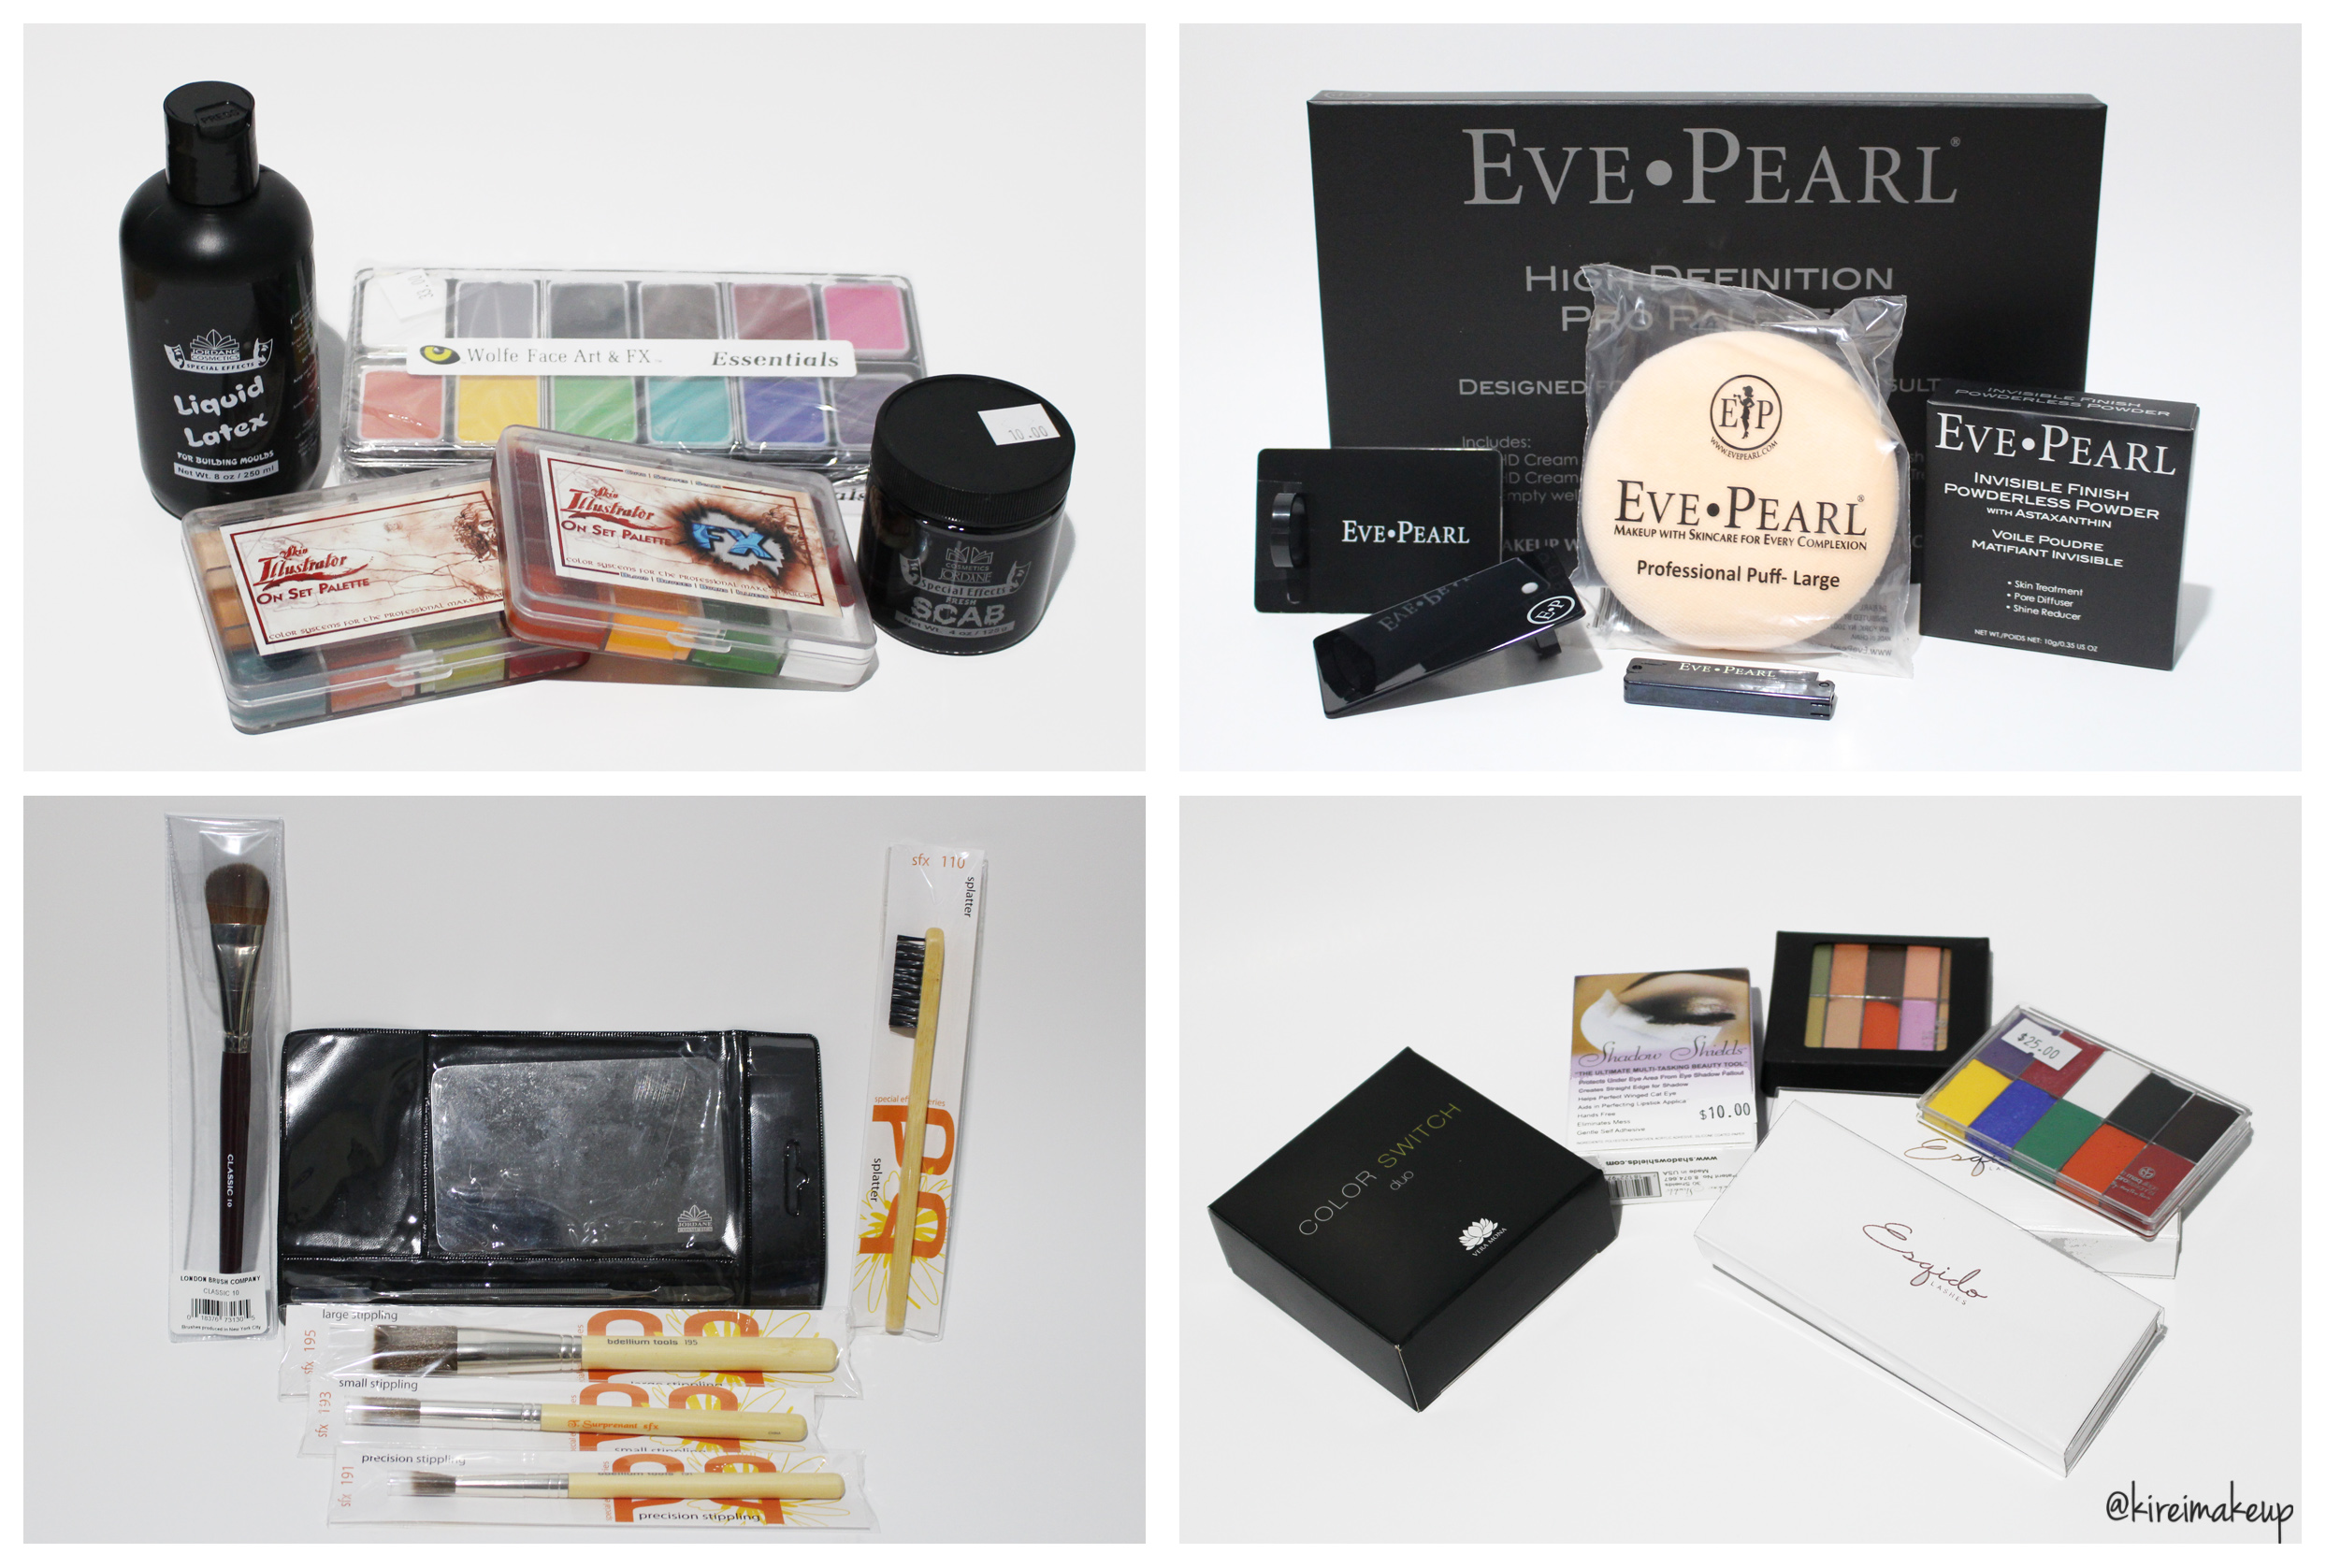
I, obviously, have to do some shopping around! There were some good deals on the products. I bought a smaller version of the illustrator palettes, scabs, liquid latex, and Wolfe face paint from Crown Brush/Jordane Cosmetics. I bought Eve Pearl’s Pro Kit, Invisible powder, powder puff, eyebrow razor, and finger palettes. Eve really gave great discounts! The powder puff was only $1, the Pro kit was only $100! What a steal!

Other than that, I bought a couple of spfx brushes from Bdellium, another palette from Crowne, and some other miscellaneous stuffs – MAQPro cream corrector and primary color from MUSST, mink lashes from Esquido, and color switch along with shadow shield from Nigel.

IMATS Toronto 2015
IMATS Toronto 2015 Haul

Soft Romantic Makeup (Revisited)

I’ve done a lot of UD Naked 3 makeup tutorials, and though most of them are smoky eyes, I do have a few non-smoky eyes tutorials. I was looking back on those tutorials, and I’ve decided to revisit this Soft Romantic Makeup post. I actually liked how I did my makeup in that post, but I felt that I wanted to redo it, and added more intensity to the shadows. Which one do you prefer? This tutorial or the original one? Let me know on the comments below!

I’d also like to mention that I’ve changed the way I filled my brows for this tutorial – it’s thicker, and more natural looking. I think I prefer this brow, even though it might look “less polished” than the “carved out” brows (aka concealer on top and bottom of my brows), I do like how it looks more organic. What do you guys think?

I apologize if the photos are slightly too warm, I didn’t realize my camera’s white balance setting was on the “warming filter” option. I tried to neutralize it using photoshop, but this is all I can do for now (besides trying to neutralize the yellow shade, I did not do anything else – no airbrushing whatsoever). I’ll be more careful next time.

*Check out my other UD NAKED 3 TUTORIALS*

soft smokey eyes tutorial

How-to:

1. I applied MAC Perky paint pot all over my (mobile) eyelid using my ring finger.

2. Using a small blending brush, I applied UD Naked 3 Darkside on the outer V.

3. Using the blending brush that came with the palette, I applied Nooner on the crease. I used this shade to blend out the edge of Darkside.

4. I applied Trick on the eyelid, using the flat eyeshadow brush that came with the palette.

5. Using a small shader brush, I applied Burnout on the inner corner of the lower lid, and Darkside on the outer half.

6. I, very lightly, applied a teeeensy bit of Blackheart right on the roots of the lower lashes (just the outer half).

7. I lined my waterline using MAC Chromagraphic eyeliner in NW25/NC30. Along the upper lash line, I created a winged liner using L’oreal 24H Lacquer Liner and an angled eyeliner brush.

8. I filled my brows using Anastasia Brow Wiz in Taupe and Brunette.

9. Curled my lashes, and applied Gwiyomi False lashes no. 3.

ud naked 3 soft smoky tutorial

10. I applied Benefit Porefessional primer all over my face.

11. While letting the primer set, I applied Bobbi Brown Peach Corrector underneath my eyes (my dark circles are getting prominent lately!)

11. Then, I applied MUFE HD Foundation in 120 using Real Technique Expert Face brush.

12. I applied MAC Pro Longwear Concealer under my eyes, as well as on the bridge of my nose (just between the brows).

13. I also applied L’oreal Visible Lift blush in Rose Gold on my cheeks.

14. I set my face using NARS Setting Powder.

15. On my lips, I applied MAC Please Me lipstick and a few dabs of clear gloss.


Products used

Eyes – MAC Perky paint pot; Urban Decay Naked 3 palette (eyelid: Trick, outer V/lower lashline: Darkside, inner corner of lower lid: Burnout; roots of lashes: Blackheart); MAC Chromagraphic liner NW25/NC30; L’oreal 24H Lacquer Liner in Blackest Black; Anastasia Beverly Hills Brow Wiz in Taupe and Brunette; Gwiyomi False lashes no. 3

Face – Benefit Porefessional primer; MUFE HD Foundation in 120; Bobbi Brown Peach Corrector; MAC Pro Longwear concealer; NARS Setting Powder.

Cheeks – L’oreal Visible Lift Blush in Rose Gold.

Lips – MAC Please Me lipstick; L’occitane clear lip balm.

Urban Decay Electric Makeup Look #2

Another look using Urban Decay Electric palette! I will do a review and swatch the shades this week, promise! I was just playing with the colors for today’s look, and decided to post this tutorial up. I was expecting the orange shade, Slow Burn, to be a little bit lighter. However, it turned up to be quite dark, and has a lot more red in it. I think this color combo – green and orange, is a little bit different than I expected, but looks good nevertheless. I just love how easy it is to blend the shadows.

As always, scroll all the way to the bottom to skip the how-to, and get on the product list.ud electric makeup looks


How-to:

1. I prepped my eyelids using Urban Decay Primer Potion in Eden.

2. I applied Urban Decay Slow Burn all over my entire eyelid using a flat eyeshadow brush.

3. Using a shade brush, I applied Urban Decay Freak on my crease.

4. Using a small shader brush, I applied Lancome Strut on the outer V, blending the color in between the edge of Slowburn and Freak.

5. I applied Urban Decay Freak on the lower lid, and Lancome Strut on the outer half of the lower lid. I used an angled eyebrow brush for this.

6. I created a winged liner using Kanebo Kate Super Sharp eyeliner. On the waterline, I applied L’oreal Voluminous Smoldering eyeliner.

7. I filled my brows using Anastasia Brow Wiz in Medium Ash.

8. I curled my lashes, and applied L’oreal Carbon Black Mascara.

9. I also applied Ardell Demi Wispies falsies.

ud electric makeup looks

10. On my face, I applied CoverFX cream foundation in G40 (base), G20 (highlight), and N110 (contour).

11. On the cheeks, I applied Benefit Hervana blush.

12. I applied Clinique Mega Melon chubby lip tint.


Products used

Eyes – Urban Decay Electric palette (eyelid: Slowburn, crease and lower lid: Freak); Lancome Strut color design eyeshadow (outer V); Kanebo Kate Super Sharp eyeliner; L’oreal Voluminous Smoldering eyeliner; L’oreal Carbon Black mascara; Ardell Demi Wispies; Anastasia Beverly Hills Brow Wiz in Medium Ash.

Face – CoverFX cream foundation (G40: base, G20: highlight, N110: contour)

Cheeks – Benefit Hervana Blush.

Lips – Clinique Mega Melon chubby lip pencil.

Make Up For Ever Pro Finish Workshop Event

So many events lately! Not that I’m complaining, but I’m really sorry for the lack of tutorial posts, and again soooo sorry if there’s too many “event” posts. It’s just pure coincidence that all the events were very close to each other this week. Anyways, today’s post is about MUFE Pro Finish Workshop event. I do have to say that MUFE Indonesia PR Staff was one of the best team that I’ve met so far. They are extremely kind, and friendly, so helpful and I really had a good time with them.

This MUFE Pro Finish workshop event was an introduction to their new product, which is (duh!) MUFE Pro Finish. This product was released to the public on September 7, 2013 in Indonesia. There’s only 17 shades in this range for Indonesia. There’s actually 25, but only 17 is available in Indonesia. I think this is one of the best brand for foundation since there’s a huge range of colors, besides MAC. This product will cost IDR. 430,000.

MUFE Academy IndonesiaMorris introduced MUFE Pro Finish

Just to let you know, I’ve actually already owned this product (my shade is 118). I bought it in Canada beginning of the year and have been using it. Let me just give you a brief introduction about MUFE Pro Finish. This product is a compact powder. What’s special about it is the fact that it can be used both DRY and Wet.

However, a word of warning, if you do apply this wet, you might find that the shade goes darker when applied to the skin. I’m not too sure why, but this is what I find. They also said, if you apply this wet, you get a sheer finish. I find this otherwise. I think applying it dry gives a more sheer finish.

I don’t like using this product wet. I, much prefer, using it dry to set my liquid/cream foundation. If you apply this dry with a buffing brush, you can get a good medium coverage. You, do, need to set it with a setting spray to avoid looking cakey or powdery.

It’s so great how, after you apply this wet, the powder will just dry and return to its normal powder state. If you’re like and have tried to wet MAC compact powder or ANY compact powders, you’ll find that there’s this weird coating, and had to scrape the coating off first before you can apply the powder underneath. With MUFE Pro Finish, you don’t have to do that! No coating!

MUFE Indonesia

Anyhow, let’s get back to the event. I felt like I’ve just done a short review about the product…lol…So, the event started out with a little makeup demo by Morris, a MUFE Makeup Artist. Then we were asked to try the products on our own face. Obviously, if you followed me on twitter/instagram, you’d have seen my makeup in the morning – bare face, strong brows, mascara and bold lips. However, since I wanted to be a good sport, I removed my makeup and stripped it down using MUFE Gentle Milk (picture above). Everyone was provided with a little table and a few products, as well as brushes on the table. We pretty much shared everything, not the most hygienic thing to do, but at least I already wore my mascara and I sharpened all the lip liners. The brushes were clean, so that was great.

Below on the left is my face with nothing on, but mascara. On the right, I’ve applied MUFE Pro Finish (dry) using foundation brush, filled my brows using MUFE brow pencil, contour slightly, a little bit of blush and added lip-liner to fill my lips. As you can see, the result from MUFE Pro Finish is pretty natural. It knocks out the redness and it covers my pores pretty well. Very sheer and natural. It also helps when my skin has been behaving well lately. However, you can see my dark under eyes (those late night sleeps are taking its toll..hahahaha). I didn’t apply any concealer.MUFE Pro Finish 118

Before and After MUFE Pro Finish

After I did my own makeup, Franky (from Rebzone) and I did Lucia’s makeup. Lucia is actually a friend of mine who tagged along today. So, again, thanks MUFE for allowing her to join us. It was fun, she enjoyed it a lot and she actually ended up buying that pink lip-liner on her lips!  Isn’t she gorgeous? 😉

Jilly Kirei Makeup and Franky Wu RebzoneLucia

So, after I did Lucia’s makeup, I wanted to go back to my bold lips since my face is quite bare. So, I applied MUFE Aqua Lip Liner in 11C and filled it in my lips. I, then, applied my Revlon Black Cherry on top of it. The result is the photo below! Super awesomely dark! Perfect for Fall/Winter makeup! I’m starting to love dark lips now.

Below is a picture of me with Maria. The pretty lady is a MUFE Intern, and guess what?! She is Indonesian, but her background is a Pakistani. She’s so friendly, and we couldn’t stop talking the whole time!

MUFE Academy IndonesiaWith Maria

Indonesian Beauty Bloggers(L-R) Franky, Lucia, myself, and Mukti

MUFE IndonesiaWith Mukti Lim

Of course the event won’t be completed without a great pictures of us! By this time almost everyone was gone, so it was just the 5 of us and the Staff.  Thanks MUFE Indonesia for inviting us! Thank you for being such a great host!

Make Up For Ever Indonesia

MUFE Indonesia

P.S.: FYI, I was not forced or felt compelled to post every events I go to. I think it was nice that I was invited to all these different events, and I just wanted to share with you guys what I learnt and did during the event. To be honest, no one told me I’ve to do an event coverage or anything. I just wanted to share my good experience, and hopefully you guys can learn something from this post as well (i.e. the products).


Cutie Mcpurple

I wanted to use my pastel and light eyeshadow palette lately. I managed to find my MAC Cutie eyeshadow palette which was from ages a go. I barely used the palette since I wasn’t sure how I was going to tackle the color back when I bought this palette. On top of that, I was into smoky eyes, neutral shades back then.

Anyhow, I don’t think the MAC Cutie palette is on sale anymore. Even if it is, please don’t buy it, it’s not worth your money. The pigment pay-off is so-so, the colors are too light for anyone who’s above NC 15 and it’s not that wearable. I had to pack the colors several time for it to show up. The colors are very sheer if you don’t use any base underneath.

How-to:

1. I applied NYX Jumbo pencil in Milk on the upper lid, blending using my ring finger all the way up to the brow bone.

2. Using a flat eyeshadow brush, I applied MAC Goody Goody Gum Drop on the inner half of the eyelid.

3. Using another flat eyeshadow brush, I applied MAC Boy Crazy on the outer half of the lid.

4. Using Smashbox bullet brush, I applied MAC Azuki Bean on the outer V.

5. Using a small shader brush, I applied MAC Moshi Moshi on the inner corner.

6. I lined my waterline and tightline using L‘oreal Voluminous Smoldering eyeliner.

7. I also lined the eyeliner along my upper lashline.

8. Using a small angled eyeliner brush, I applied MAC Boy Crazy on the inner half of the lower lid and MAC Azuki Bean on the outer half.

9. I curled my lashes and applied Maybelline Volume Express Turbo Boost mascara on the upper as well as lower lashes.

10. I filled my brows in using Dollywinked brow pencil.

Pastel makeup

11. For the face, I applied MUFE HD foundation using CoverFX foundation brush.

12. Under the eyes, I applied MUFE concealer.

13. For the cheeks, I applied MAC Fleur power blush.

14. The look is completed by applying Revlon Mauve It Over matte lipstick on the lips.

MAC CutieMu

Smashbox Admire Me from Love Me Collection

I think I like this palette. Like I’ve said on my “Entice Me” post, the eyeshadows are creamy and buttery, blend very easily. The Admire Me palette has warmer shadows, very bronzy, very summer-y. It has 5 colors: Bronze (left most), Soft Shimmering Coral (top left), Champagne (bottom), Matte Nude (top right) and Deep Golden Brown (right most).Smashbox Admire Me

Picture courtesy of Smashbox

The colors will probably look more intense, leaning towards smoky for those with lighter skin tone (lighter than NC 30), and will be more on the neutral-earthy colors for those with medium to dark skin tone. I really do believe this is a great palette for those with really dark skin tones who are looking for a natural/neutral/nude eyeshadow palette.

This palette on me works as neutral as well as smoky. For this tutorial, I wear it on a lighter side and coralish. 🙂 I kept the rest of the face on the same color palette – coral-orange toned.

How-to:

1. I applied Soft Shimmering Coral using a flat eyeshadow brush all over my eyelid.

2. Using a soft blending brush, I applied Bronze lightly on the crease.

3. I also applied Bronze on the lower lid using a large eye angled brush.

4. Using a smaller blending brush, I applied Deep Golden Brown on the outer V lightly.

5. I applied Champagne to the inner corner of the eye.

6. I lined my waterline and tightline using L’oreal Voluminous Smoldering eyeliner.

7. My lashes are curled using Shu Uemura eyelash curler and I applied L’oreal Voluminous Carbon Black on both top and bottom lashes.

8. I filled my brows using Anastasia Brow Wiz in Brunette.

Smashbox Admire me

9. For my face, I applied Revlon Colorstay foundation using Shiseido foundation brush.

10. For cheeks I applied MAC Utterly Game and for the lips I applied Revlon Just Bitten in Charmed.

Love Me Smashbox

Vintage Red

My love for OCC lip tars grows stronger every day! I’ve never been the “lipstick” kinda gal but I have a certain fondness for anything red lips. So, I’ve another version of the red lips look using OCC lip tars in Stalker. In this tutorial, I’m using OCC lip tars in Vintage. Stalker is blue red, while Vintage is burgundy red.

I bought mine from Sephora Eaton Center in Toronto. It comes in a small pouch with a small lip brush (I’ll do swatches and all that jazz on my next post).

For the look, the eyes are kept to a bare minimum and I skipped the winged liner. The face is dewy with a little contour. I love how the look turned out. The look is wearable for party or a night-out, or even bridal makeup!

Make sure to re-check the blush after you complete the lips. Since the lip color is quite strong, you might need to add more blush so your face don’t look wash-out.

How-to:

1. I applied L’oreal Magic Lumi foundation with my fingers. I applied it on the center of my face, blending it outwards.

2. I applied Bobbi Brown Corrector in Peach under my eyes, tapping it using my ring finger.

3. I applied L’oreal Magic Touche Concealer on my blemishes and under my eyes.

4. I powdered my T-zone with Cinema Secret loose powder and a tapered face brush.

Brown eyeshadow

5. For the eyes, I applied the light brown eyeshadow from L’oreal Paris Good Luck Charm quad eyeshadow with a flat eyeshadow brush, and blended the crease using a clean blending brush.

6. I applied the dark brown eyeshadow from L’oreal Paris Good Luck Charm along my upper lash line and lower lash line using an angled brush.

7. I used a clean blending brush and applied the highlighter color from L’oreal Paris Good Luck Charm quad under the brow.

8. Using whatever is left on the brush, I applied the highlighter color on the inner corner of my eyelid.

9. I curled my lashes and applied L’oreal Telescopic Shocking Extension mascara on both upper and lower lashes.

10.  I filled my brows using an angled brush and a mix of MAC Omega + MAC Brun.

OCC Lip Tars Vintage

11. Using a face fan brush, I applied Smashbox Fusion Soft Lights in Baked Stardust on the cheekbones.

12. Using the same fan brush, I applied MAC  Sculpting Powder in Shadowy on the hollows of the cheeks.

13. Using a blush brush, I applied a mixture of MAC Cubic and MAC Fleur Powder on the cheeks.

14. Using the lip brush that comes with the OCC Lip Tar, I applied OCC Vintage lip tar on my lips.

  • I applied a thin layer at first on the center of the lips.
  • Using whatever is on the brush, I traced the outline of my lips to make sure I like the shape.
  • I applied another thin layer to complete the look.