Simple Everyday Makeup

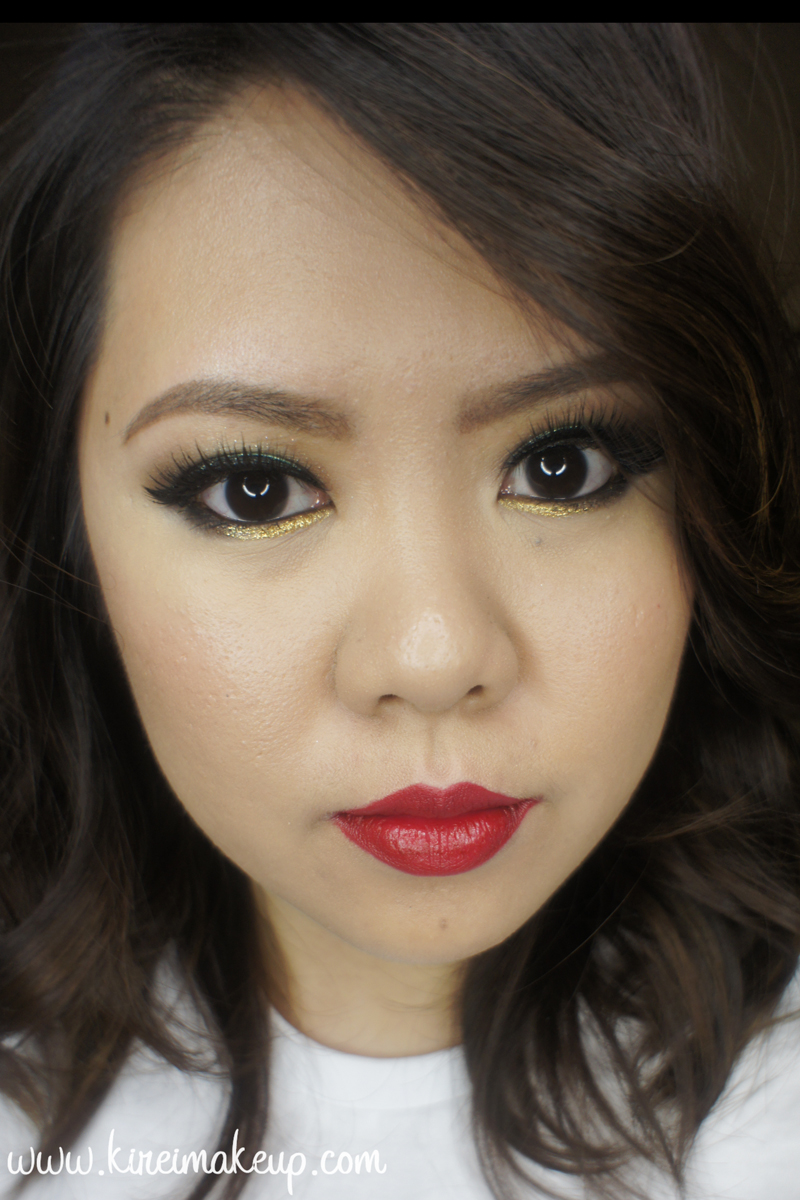
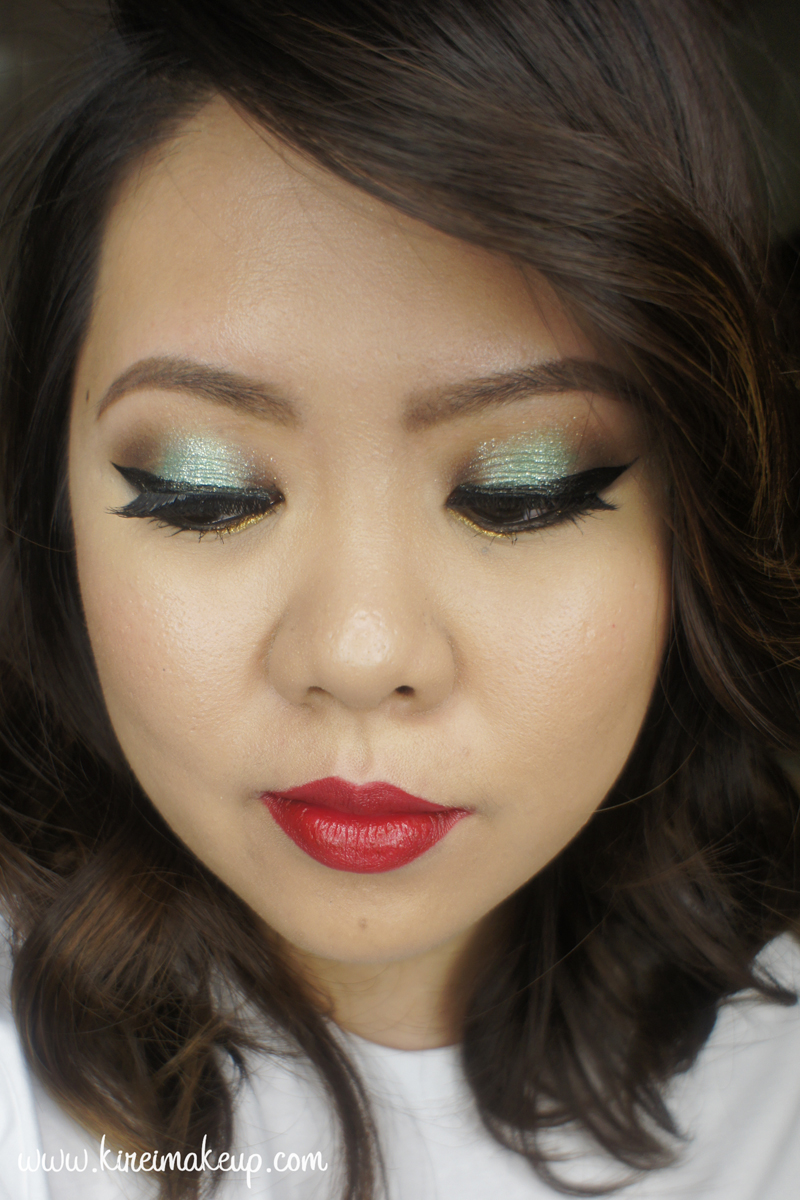
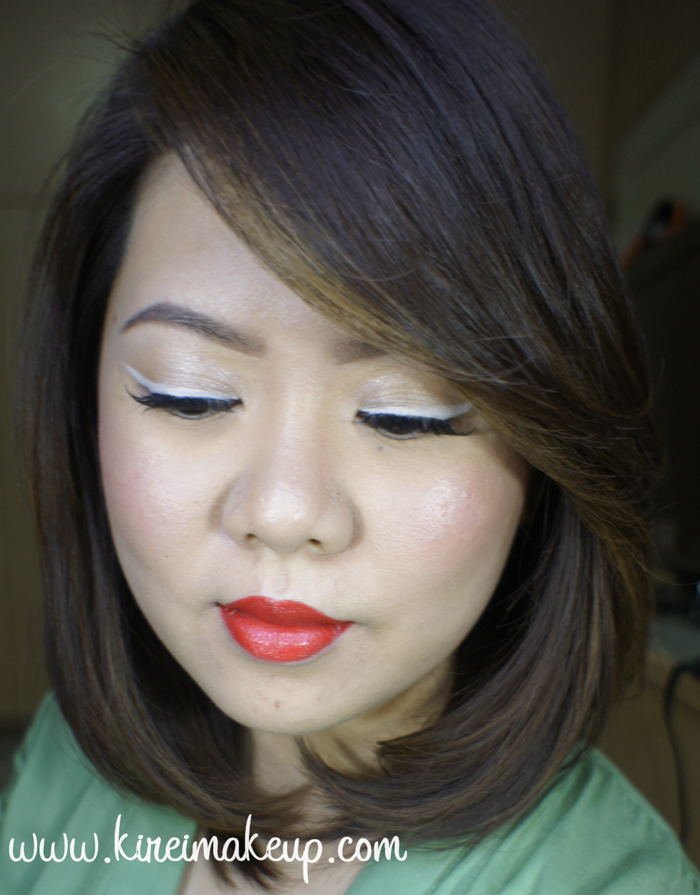
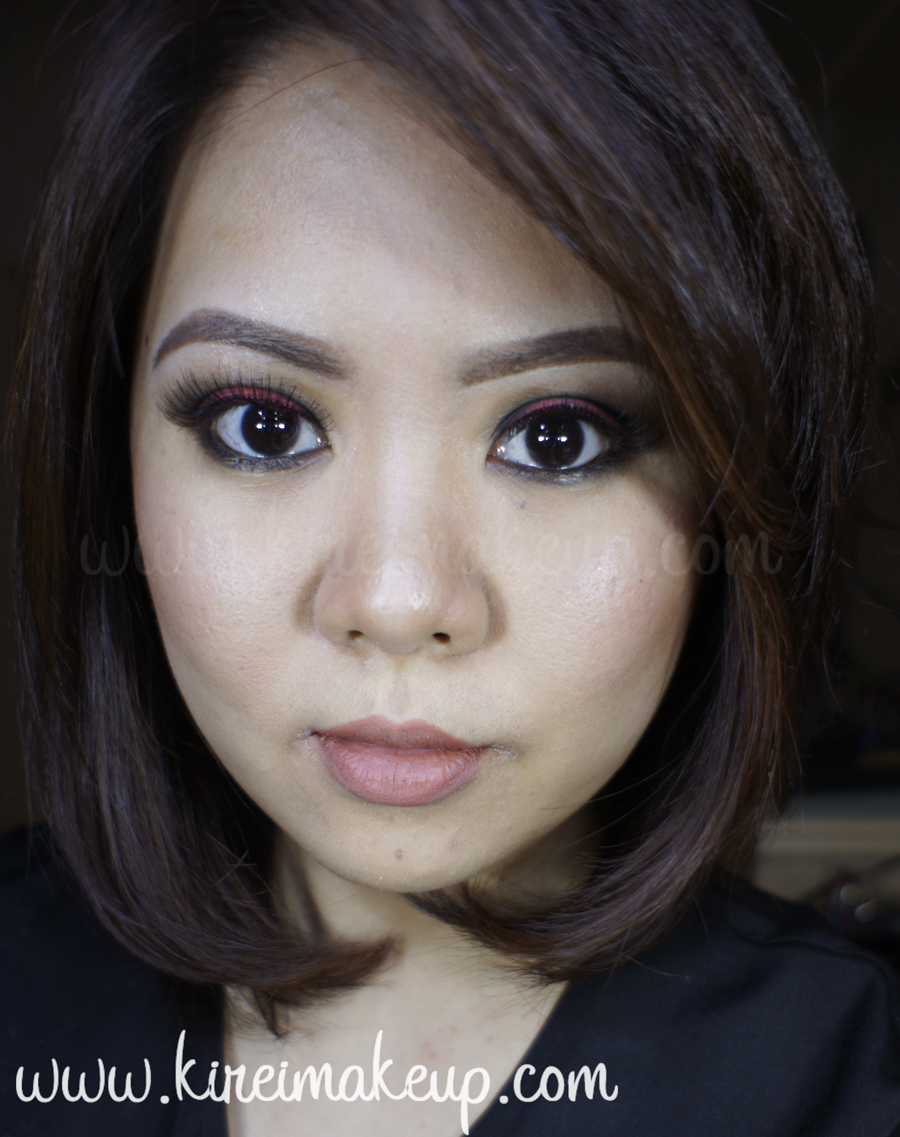
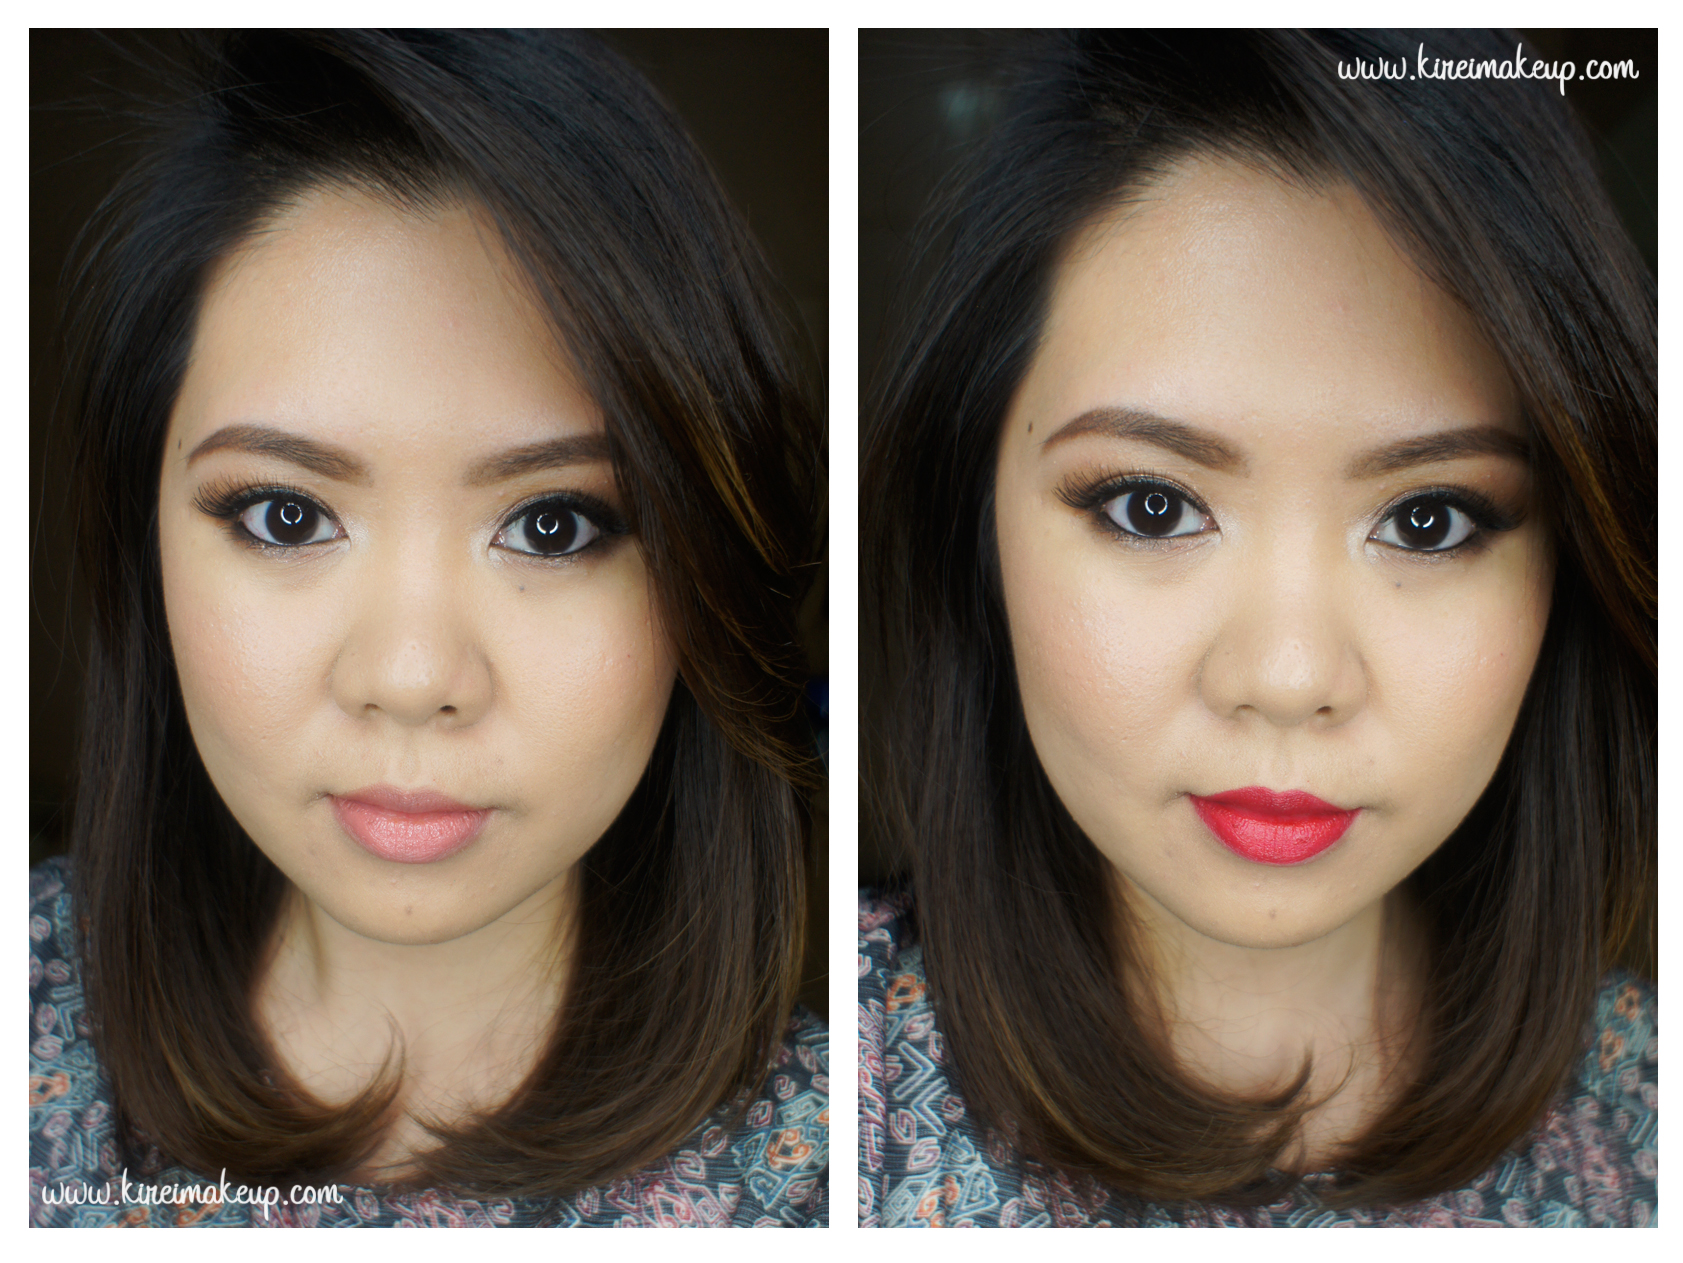
How is everyone’s Monday going? The Holiday is approaching real soon, eh?! I wanted to share with you guys this super easy and simple everyday makeup tutorial which can be worn by everyone, especially those who don’t usually wear much makeup. I did 2 version – one with a simple peachy lips, and another with red lips.

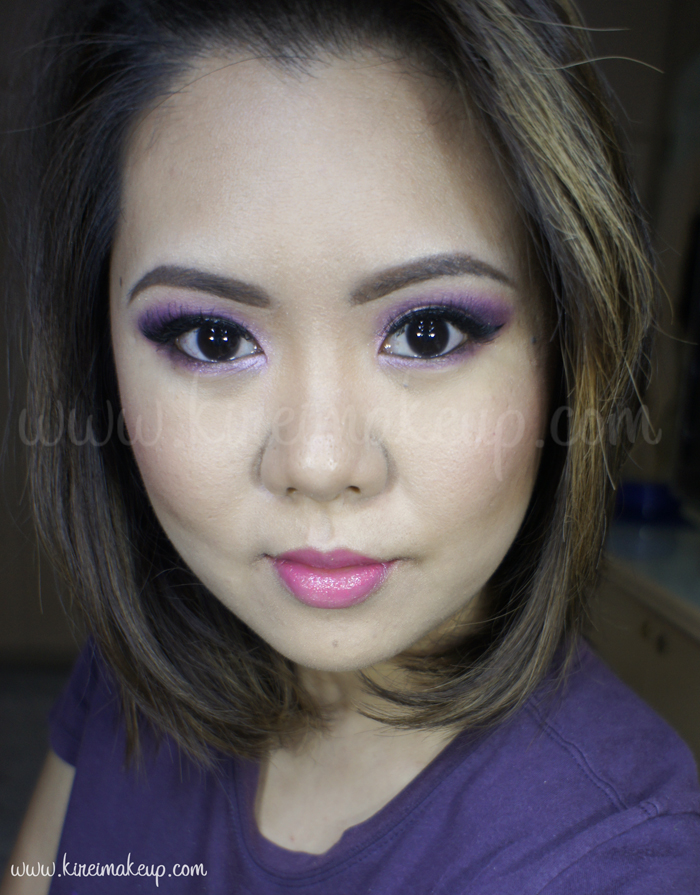
I think this look is great for those who prefer a simple no-fuss makeup. Nothing too dark, nothing too bright, but with a bit of colors. This is also a look for those who prefer earthy brown tones over black. I probably would wear this for a brunch (with peachy lips), or even a dinner party (with red lips).

Eyeshadows used in this tutorial are from the Smashbox Full Exposure Palette.

*You can find other tutorials using this palette right HERE!*
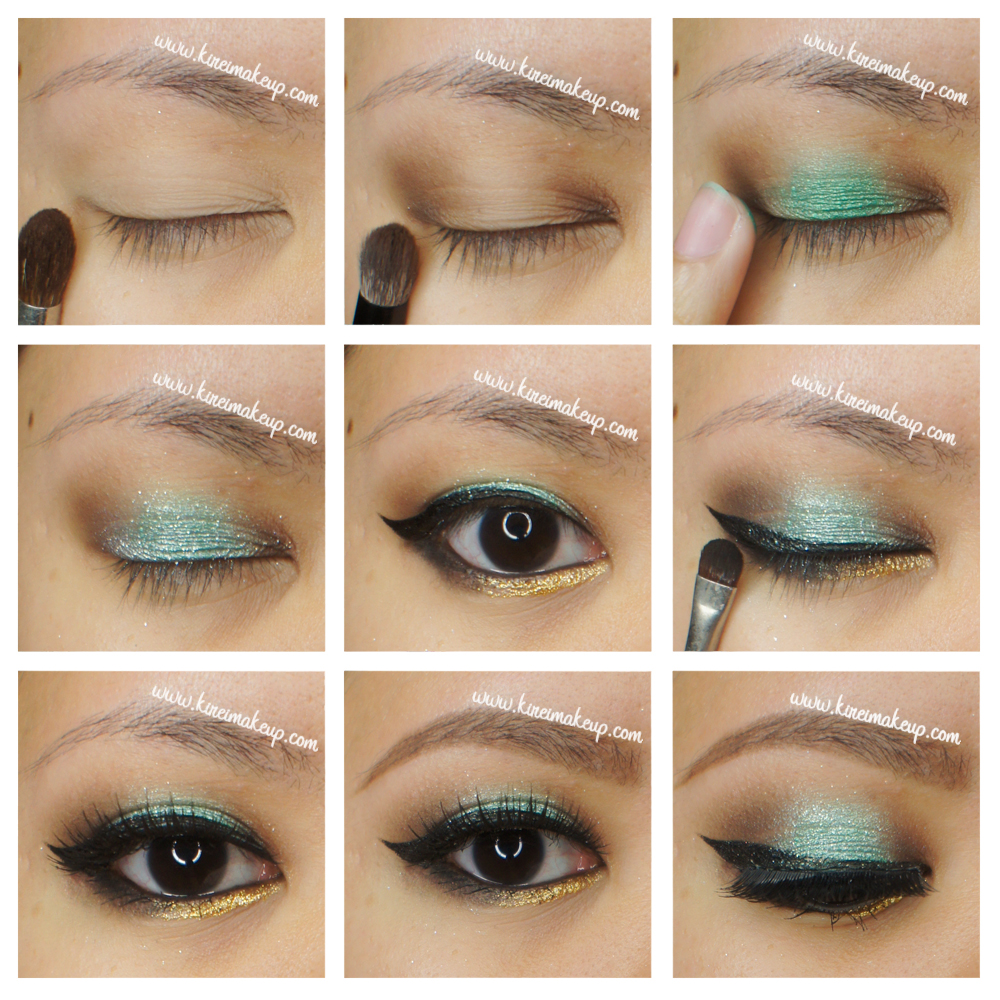
smashbox full exposure makeup tutorial

How-to:

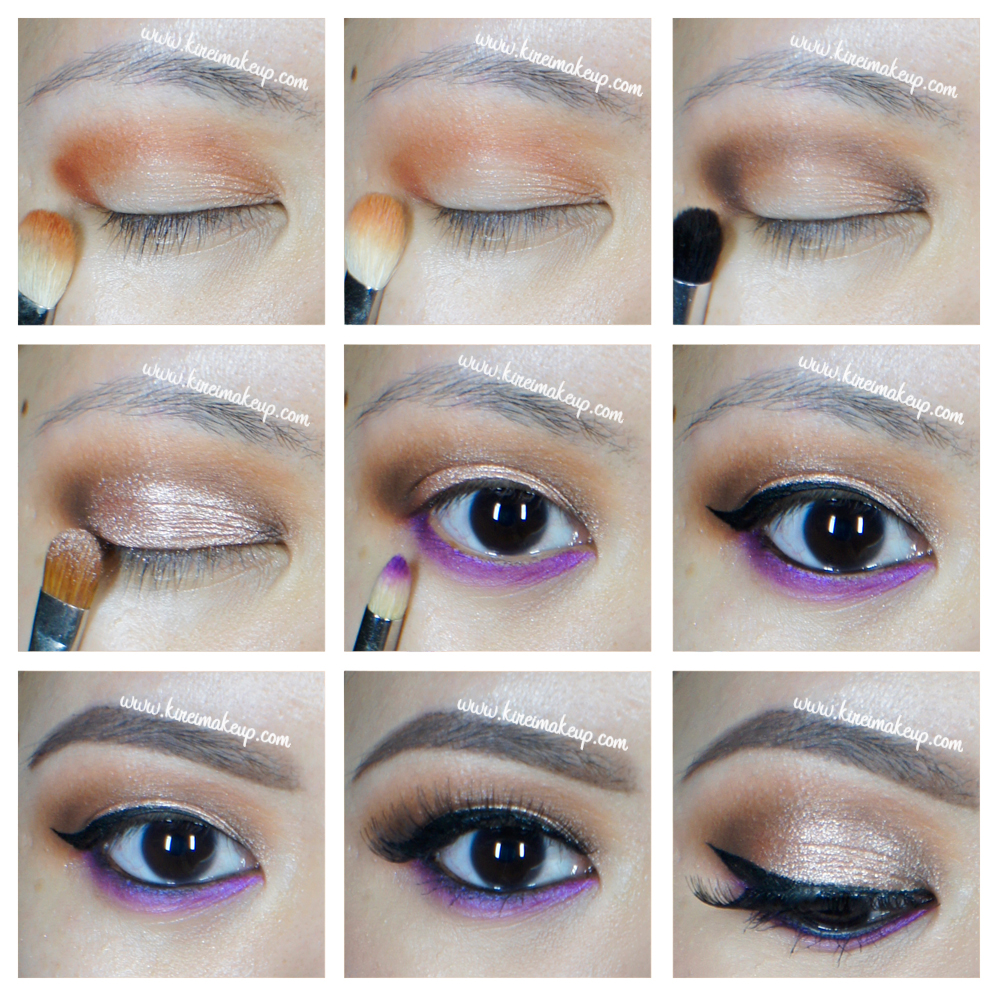
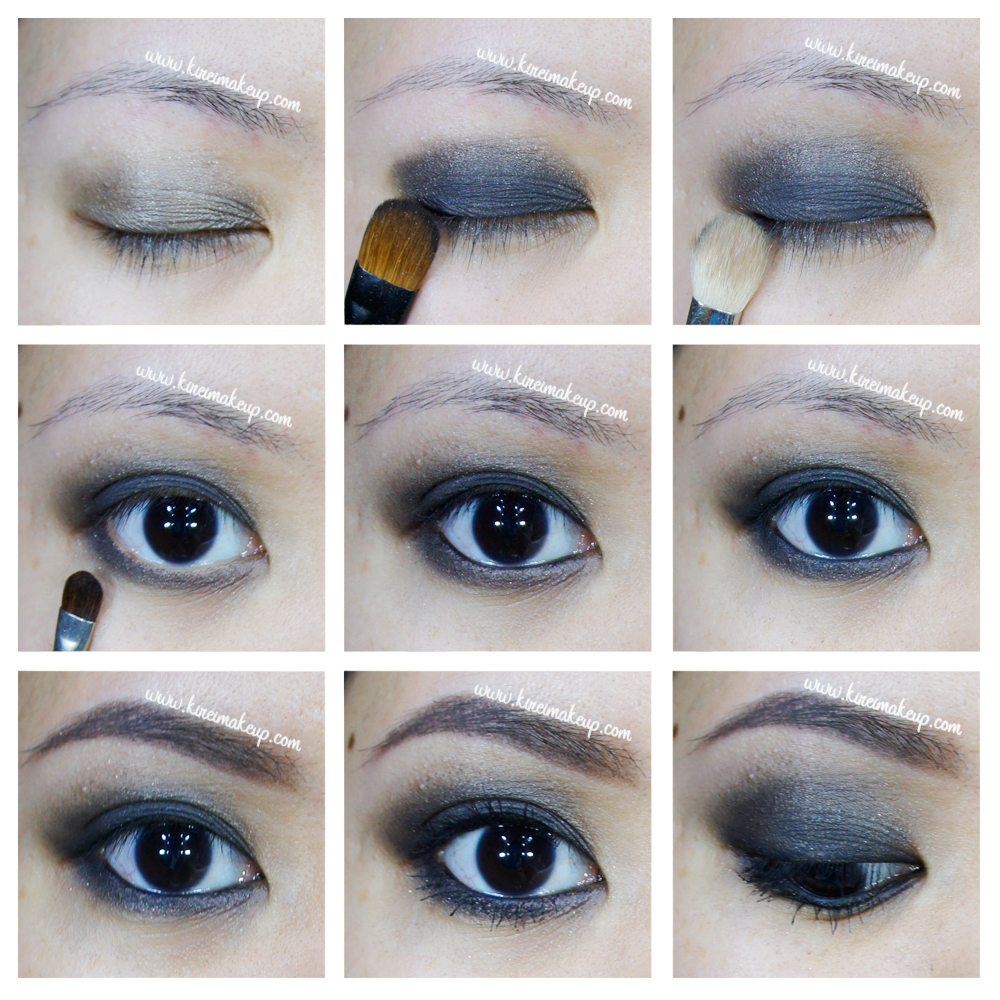
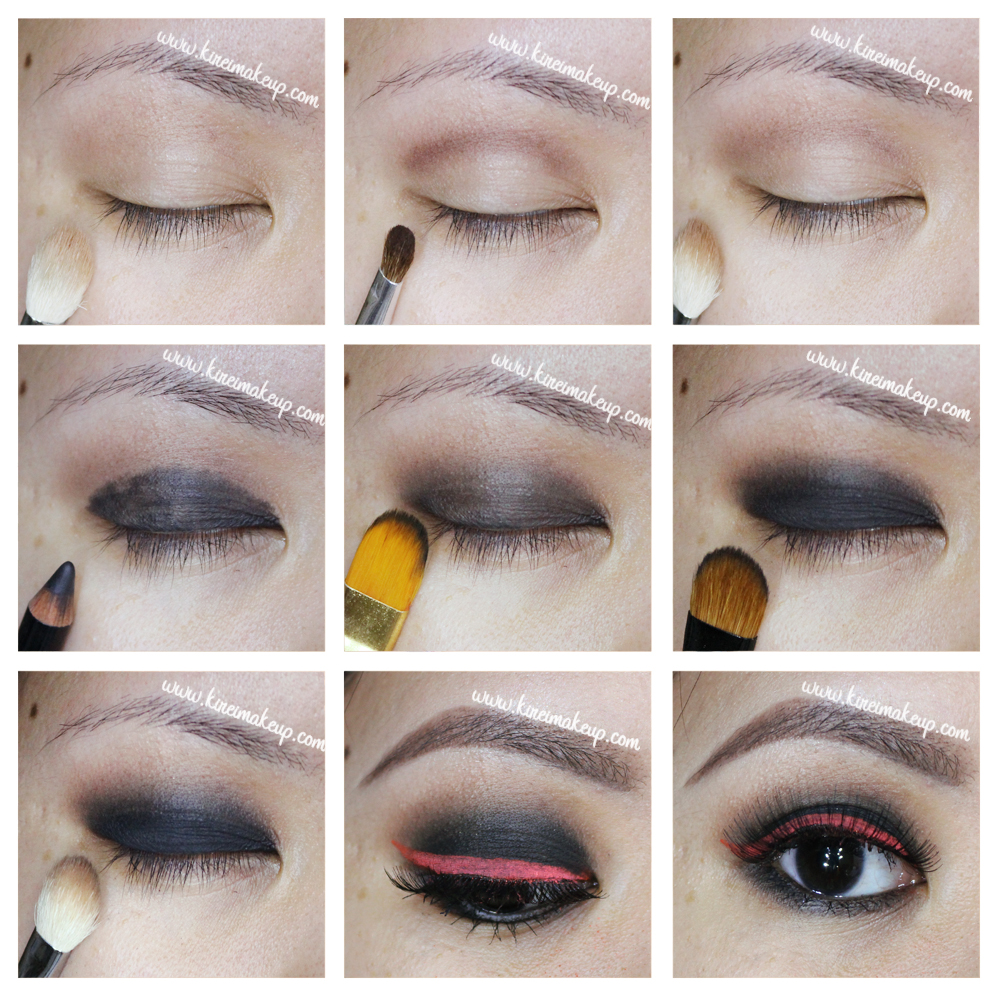
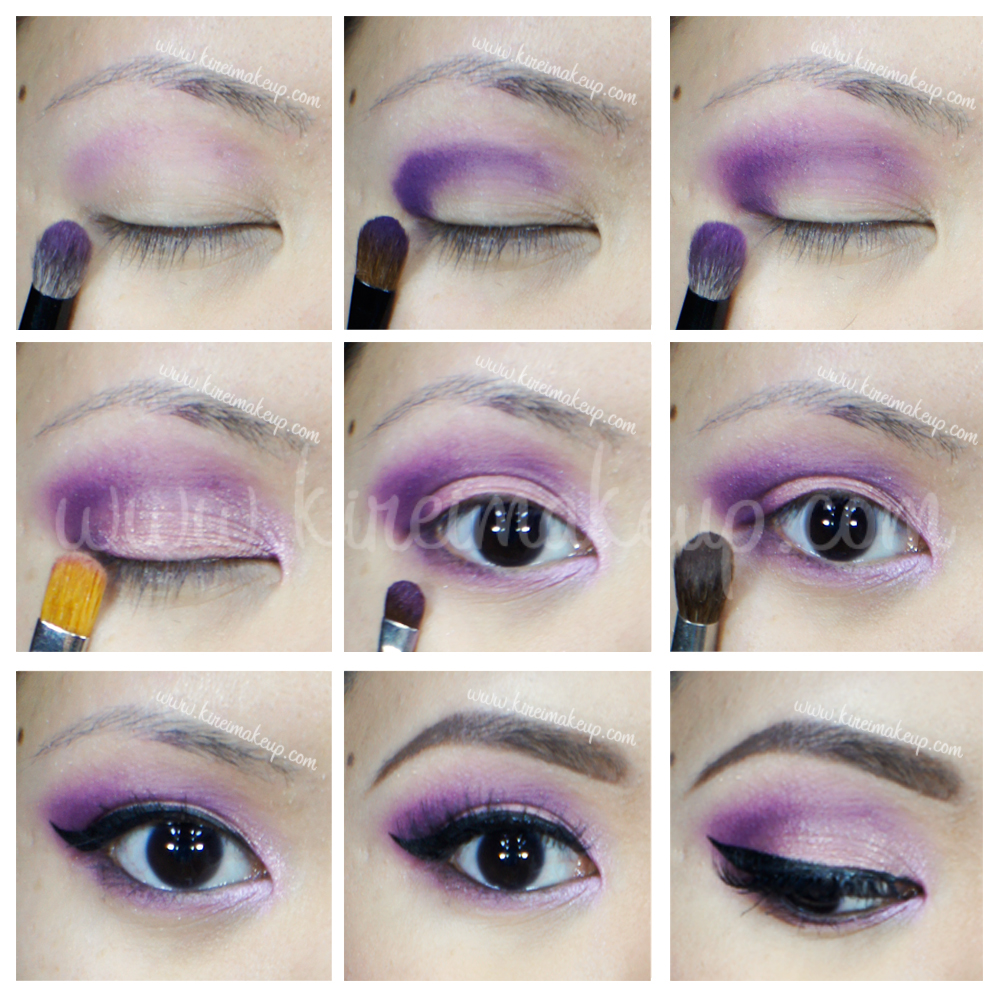
1. I applied MAC Groundwork paint pot on my eyelids using my ring finger.

2. Using a fluffy blending brush, I applied Smashbox Full Exposure palette in M2 above my crease.

3. Using Smashbox bullet crease brush, I applied Smashbox Full Exposure palette in M1 on the outer half of my eyelid.

4. Using a flat eyeshadow brush, I applied S1 on the inner half of the eyelid, blending it towards the outer half.

5. I applied S4 on the inner corner of my eyes using Real Technique shading brush (skip this step if you have wide-set eyes).

6. I lined my waterline and tightline using L’oreal Voluminous Smoldering eyeliner.

7. I also applied M7 along my upper lash line using an angled eyeliner brush. I applied this along the outer half of my lower lash line as well.

8. I curled my lashes and applied Maybelline Express Turbo Boost mascara on my lashes.

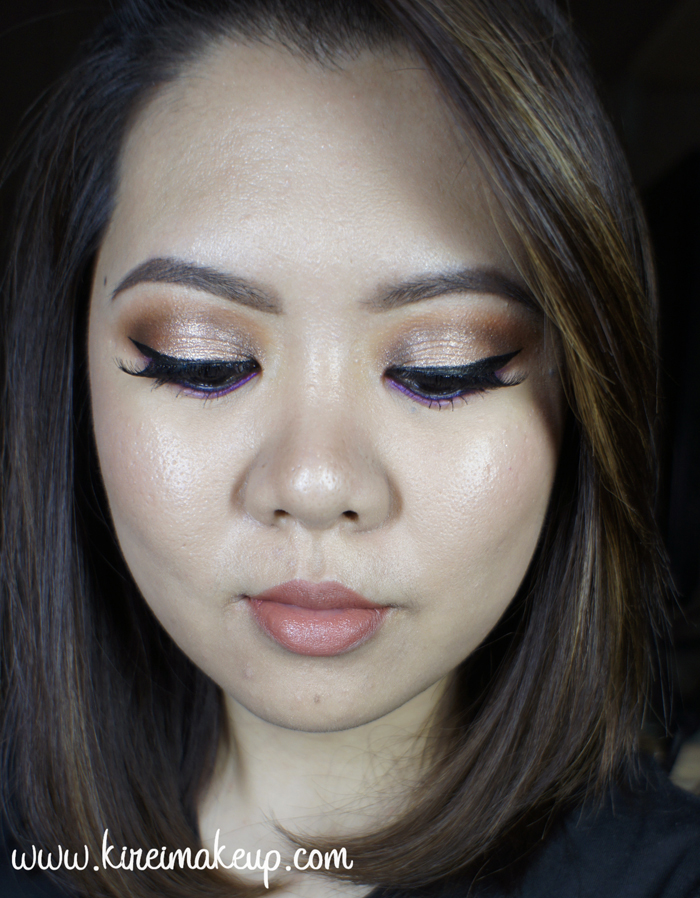
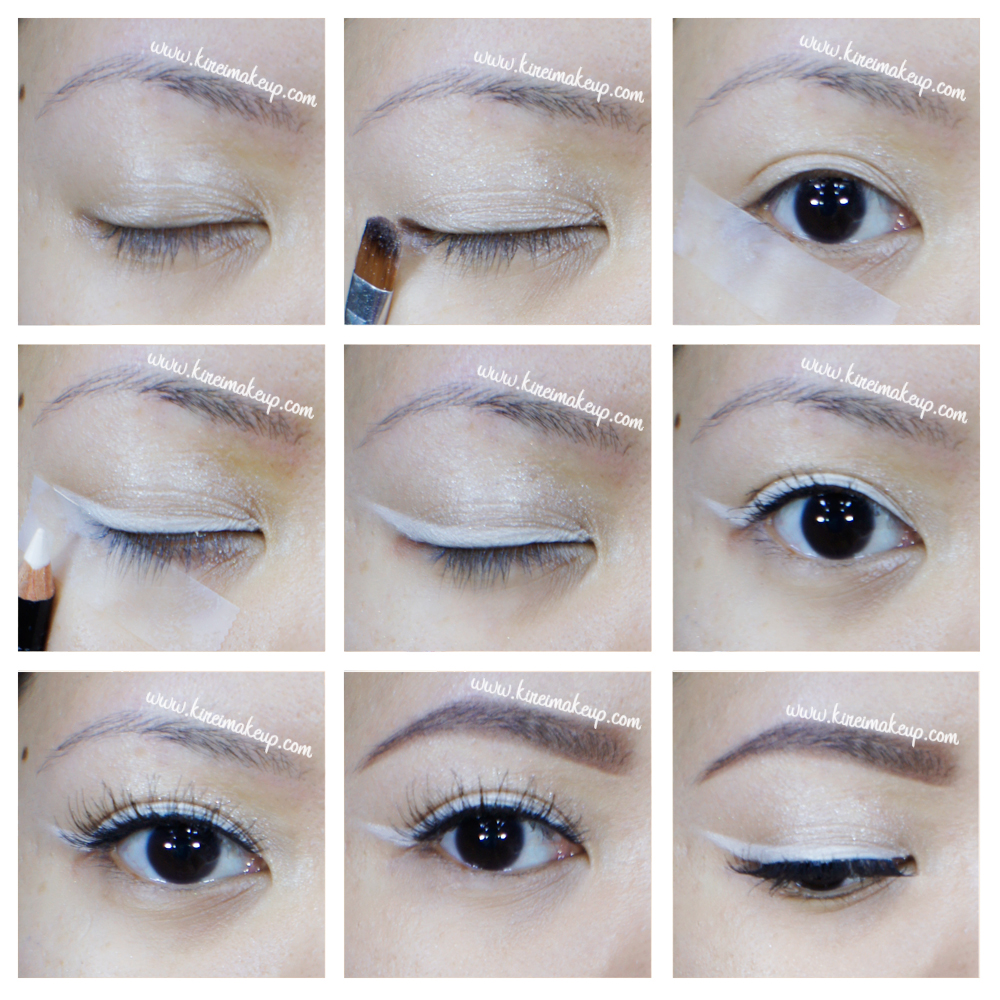
9. I filled my brows using Anastasia Beverly Hills Brow Duo Powder.

10. I also applied Mata Nona no. 15 falsies.

nyx monte carlo tutorial

11. On my face, I applied MAC Pro Long-Wear foundation using Real Technique Expert Face brush.

12. Under my eyes and on my blemishes, I applied MAC Pro Long-Wear concealer. I set my face using CoverFX Translucent powder.

13. On my cheeks, I applied Chanel Blush de Horizon.

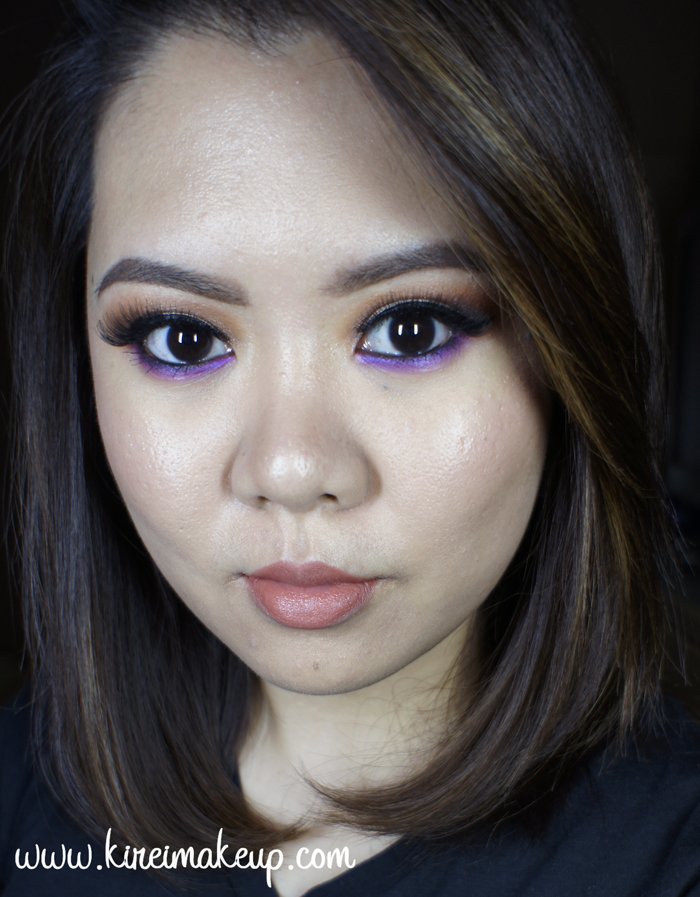
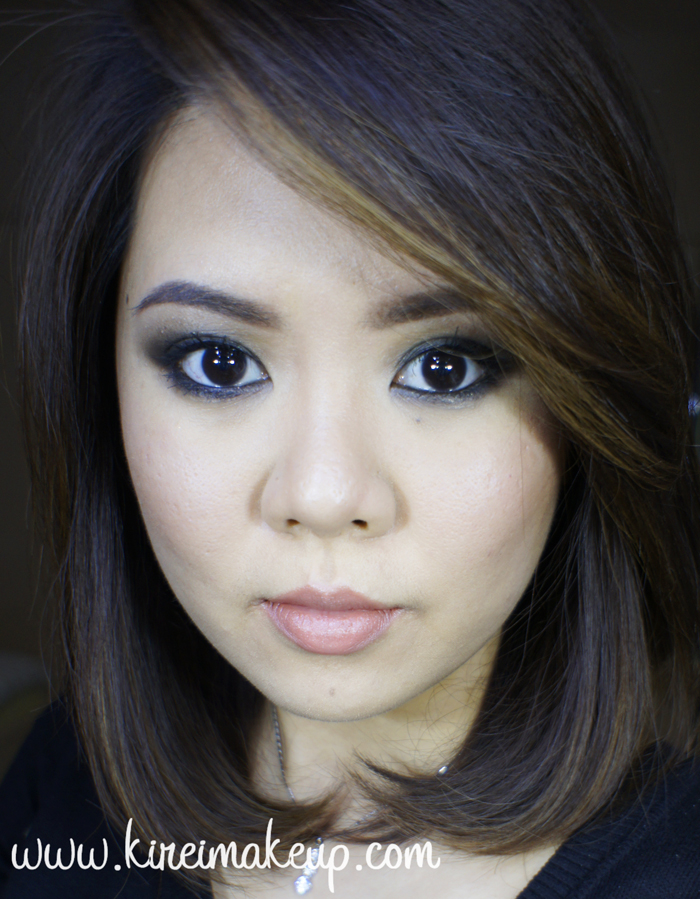
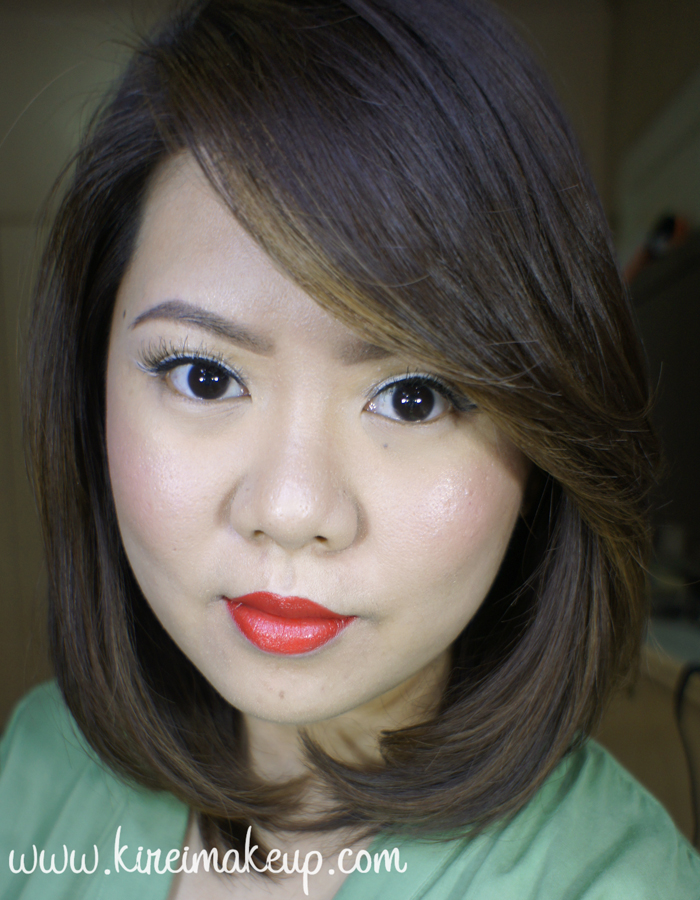
14a. (left) For the peachy lips, I filled my lips using MAC Spice lip liner. Then I applied YSL Glossy Stain in Peche Cerra-Colla (27).

14b. (right) I removed the previous lip color, and then applied NYX Monte Carlo on my lips.


Products used

Eyes – MAC Groundwork paintpot; Smashbox Full Exposure Palette (crease – M2, outer lid – M1, lid – S1, inner corner – S4, liner – M7); L’oreal Voluminous Smoldering eyeliner; Maybelline Expres Turbo Volume mascara; Anastasia Beverly Hills duo brow powder; Mata Nona falsies no. 15.

Face – MAC Pro Long-Wear foundation NC30; MAC Pro Long-Wear concealer NC25; CoverFX translucent powder.

Cheeks – Chanel Blush de Horizon.

Lips – MAC Spice Lip pencil; YSL Glossy Stain no. 27; NYX Monte Carlo

Christmas Makeup Tutorial

Are you guys ready for the Holiday season?! For those of you who are celebrating Christmas, I hope you’ll enjoy this Christmas Makeup tutorial! This is a makeup collaboration with fellow Indonesian Beauty Bloggers – Feegy from Muses Wonderland, Chell from Polish Wonderland, and myself (not from any wonderland *wink* hahaha). So, don’t forget to check their tutorial out!

We collaborated in creating a Christmas look with a little bit of glitter ya’know, because it’s Christmas! We need glitters, hon! Sparkles everywhere! Feegy created a silver glitter smoky eyes, and Chell went on the nude glitter eyes. For me, I went all out with green, gold and glitters! Hey, it’s Christmas, I might as well make full use of all the Christmas colors!

makeup collaboration

For my look, even though it’s pretty bold and colorful, it is still wearable if you aren’t afraid of colors. The placement of the colors are quite important so you don’t go looking all crazy, you get what I’m saying? Instead of green, gold and glitter everywhere, I focused these 3 products on specific location on my eyes. This way, the colors work well together, and you don’t look like a glittery mess.

The green is located on the center of the eyelids only so that when you blink, that gorgeous color will pop along with a teensy bit of crushed metallic pigment. You can use glitter if you don’t have the crushed pigment. The gold glitter is on the inner half of the lower lid, this will brighten and open up your eyes.

The key is to apply the bright color and glitter lightly. Notice I used my finger to apply the green shade, I also use my finger just to press the crushed pigment very lightly all over my lid. This way, the colors and glitters aren’t all over the place. By combining bright colors with neutrals, your whole look will be pulled together.

holiday party makeup

My eyelids are prepped using Urban Decay Primer Potion.

How-to:

1. I applied Urban Decay Buck eyeshadow above my crease, as my transition color, using a crease blending brush.

2. Using Smashbox bullet crease brush, I applied Kat Von D Shadow Box (Monarch palette) on the outer and inner V of the eyes.

3. I applied MUFE Aqua Cream no. 52 on the center of my eyelid using my ring finger.

4. Using the same ring finger, I VERY lightly tapped MAC Metallic Crushed Pigment in Moss Garden all over my lid. I just want a little bit of the crushed metallic pigment for shine, not for the color.

5. I lined my upper lash line using Kat Von D Trooper eyeliner. On the waterline, I applied MAC Smolder kohl eyeliner.

6. On the lower lash line, I applied PAC eyeliner liquid in Bazaar Gold on the inner half. On the outer half, I applied Kat Von D Deadhead eyeshadow (Monarch palette) using a smudger brush.

7. Using the same smudger brush as step no. 5, I applied whatever was left on that brush on the outer and inner V of my eyes (on top of Shadow Box), just to add a bit of depth.

8. I applied Gwiyomi Annabelle lashes for extra drama.

9. I filled my brows using Anastasia Beverly Hills Brow Wiz in Taupe and Brunette.

christmas party makeup

10. On my face, I applied Diorskin Star foundation using Real Technique foundation brush.

11. I also applied MAC Pro Long-Wear concealer under my eyes, and any areas I need to cover.

12. I set my face using CoverFX Translucent powder.

13. I applied Smashbox bronzing powder from the contour kit to warm my face up slightly. Then, I applied Chanel Blush de Horizon on my cheeks.

14. On my lips, I lined and filled it with MAC Brick lip pencil. Then, I applied OCC Vintage lip tar on top of it.

holiday party makeup

Products used

Eyes – Urban Decay Primer Potion; Kat Von D Monarch Palette (Shadow Box, Deadhead), Make Up For Ever Aqua Cream no. 52; Kat Von D Trooper eyeliner; PAC eyeliner liquid in Bazaar Gold; Gwiyomi falsies in Annabelle; Anastasia Beverly Hills Brow Wiz in Taupe and Brunette.

Face – Diorskin Star Foundation 030; MAC Pro Long-Wear concealer NC25; CoverFX translucent powder.

Cheeks – Smashbox contour kit (bronzer); Chanel Blush de Horizon.

Lips – MAC Brick lip pencil; OCC Vintage lip tar.

Hakubi White C Gel

For today’s post, I want to introduce a product by Sato Pharmaceutical company called Hakubi White C gelSuplemen Pemutih Kulit, which is now available in Indonesia! Curious about this product? Read more about it below!

What is Hakubi White C gel?

  • Magnesium Ascorbyl Phosphate is a concentrated Vitamin C derivative that is easily absorbed into the skin, to help prevent spots and freckles caused by sunburn.
  • Helps to sooth sunburn.
  • Non-greasy, non-sticky gel with a smooth after-touch.
  • Can also be used to spot-treat pimples and acne

Active Ingredients: Water, Magnesium Ascorbyl Phosphate, Disodium EDTA, Panthenol, Potassium Hydroxide, Hydroxypropyl Methylcellulose Stearoxy Ether, Sodium Citrate, Citric Acid, Xanthan Gum, Dipotassium Glycyrrhizate, Methylparaben, Flavouring, Sodium Hyaluronate, Propylparaben

Hakubi, 2014


Hakubi White C Gel Indonesia

So, this Hakubi White C gel uses Vitamin C to prevent sun damage on your skin. Also, if you don’t already know, Vitamin C is known to lighten skin colour by increasing the level of glutathione on the body (Johnston et al, 1993). The Hakubi White C Gel is a product to help brighten your skin.

The product itself comes in a squeeze bottle, with a small tip. When you squeeze the bottle, a clear transparent gel will come out. The gel is slightly runnier than I expected, and it reminds me of those aloe-vera sunburn gel. I find that this product is somewhat sticky on the skin if you apply too much. However, other than that, it goes on smoothly on the skin.

You can find Hakubi White C Gel along with any other Hakubi products in Guardian, Watson, and Century outlets throughout Indonesia.

Hakubi White C Gel

Bioderma Sensibio H2O Review

I’m back with a new post ya’ll! Today is my Bioderma Sensibio H2O review! Apologies for the late update, been super duper busy with work, and my health condition wasn’t at its best. However, if you have followed me on Instagram, you would have known that I was recently featured on a talkshow called Ping Me at RTV in Indonesia. Just a small segment, but it was a pretty cool experience. Photos are over on my Instagram!

Anyways, let’s get back on today’s topic: Best makeup remover ever! If you have not heard of this makeup remover, shame on you! Let’s take a look at the before and after photos below shall we?

  • On the left, my face was filled with makeup products from my “Dr. Who the Waters of Mars” makeup tutorial.
    • I have foundation on, eyeshadows, eyeliner, and face paint.
  • On the right, my face after I removed all the makeup using Bioderma Sensibio H2O makeup remover.
    • 2 cotton pads somewhat half-soaked in the makeup remover.

Bioderma Indonesia

So, I’ve used Bioderma since 2010, and when I returned to Indonesia in 2012, I couldn’t find any. However, in 2013, Bioderma entered the Indonesian market, and I was thrilled!  I was even more excited this year when Bioderma’s Brand Manager and Marketing Director invited me for a coffee break last month! Amazing! So awesome to have meet both of them, and they were so kind as to give me their 2 best-sellers! Thank you and thank you and thank you Bioderma Indonesia!

Let’s get back on track a little, shall we? What exactly is Bioderma?

” The Laboratoire Dermatologique BIODERMA, based in Lyon, France, develops and markets, in close collaboration with dermatologists and renowned institutional research centers (CNRS. INSERM, CHU, Universities,…), dermo-cosmetic products intended for medical prescription and medicinal consultancy.

BIODERMA is among the most frequently prescribed laboratories by French dermatologists. Present in more than 70 countries, BIODERMA is growing very fast at international level. (…)

Bioderma’s reserach is performed by a team of highly qualified scientists and extremely reputable operators. (…) These works gave birth to numerous innovations which since became references:

  • The 1st non detergent shampoo : NodéFluid.
  • The 1st cleansing waters : the micellar solutions Sensibio H2O and Sébium H2O.
  • The 1st biologically-active sunscreen ingredient that counters the long-term damaging effects of UV exposure :  Photoderm and the patent Cellular BIOprotection®.
  • The 1st skincare product that corrects the quality of sebum : Sébium AKN and its patented ingredient, Fluidactiv®.
  • The first skincare who acts directly on the main cause of skin redness : Sensibio AR and its patent Rosactiv®. “

Bioderma, 2014

As you all can see, Bioderma is the pioneer in creating “Cleansing Water”. The micellar technology comes from Bioderma, and they are still the best at it. I’ve tried other micellar-based makeup remover, but none of them are as superior as Bioderma’s.

What is a micellar technology?

(…) Micelles (…) effectively micro-emulsify impurities while maintaining the skin’s balance (soap-free, physiological pH).

Bioderma, 2014

So there’s 2 actions in the Micellar technology:

  1. Break down impurities
  2. Restore skin to its optimal condition

This makeup remover has these tiny molecules called Micelles. What micelles do is to break down any impurities (dirt, oil, makeup etc) as soon as it touches your skin. However, instead of breaking down your skin cells along with all these impurities, it detects and recognizes your skin cells. The micelles molecules will then restore your skin’s condition to its optimum balance.

Isn’t Science amazing?! Awesome!

Best Makeup Remover

So, I was given 2 products – the Sensibio H2O and the Sebium H2O. I’ve only been using the Sensibio H2O, so I cannot say much about the Sebium. However, I’d have think that the Sebium would give similar result to the Sensibio.

There’s 2 main difference between the Sensibio and the Sebium:

  • The Sensibio is catered towards sensitive skin, while the Sebium is for oily skin.
  • The Sebium cannot be used in the eyes and lips area while the Sensibio can be used in those areas.
    • The reason why the Sebium cannot be used in the eyes and lips area is because those areas are more sensitive. Since the Sebium is made for oily skin, it’ll absorb excess oil on the skin. However, since the eye and lip areas aren’t as oily as the skin, using the Sebium in those areas might cause it to be dried out and thus irritated.
    • Please do avoid using the Sebium on the eye and lip areas.


best makeup remover for sensitive skin

Below is a list of pros and cons for Bioderma Sensibio H2O

Pros

  • Removes makeup without the need to rinse.
  • Will remove even the hardest waterproof mascara and eyeliner.
    • Soaked the remover on a cotton pad, leave it on eyes for 3-5 minutes and wipe away.
  • Suitable for every skin type.
  • Does not dry out skin.
  • Does not leave any weird sticky or oily residue on skin.
  • Does not irritate the skin and eyes.
  • PERFECT to clean up the edges of your WINGED LINER.
  • Fast and quick makeup removal, especially for makeup changes.

Cons

  • Removing mascara and eyeliner might take a few minutes for the remover to break it down. I prefer using Shu Uemura cleansing oil for this instead, since I always rinse my face after removing my makeup anyways.


White Sugar Skull Makeup

As Halloween is fast approaching, I’m trying to squeeze in as many Halloween Looks as I can! This is my 5th Halloween tutorial for 2014, and I think this year I created the most Halloween tutorials compared to previous years! Anyways, for the 5th tutorial, I wanted to do a Sugar Skull makeup, but I wanted to create something different than the usual sugar skull. I’ve done a sugar skull makeup before on models using colors and black lines. So, while I was browsing for inspiration, I found this video on youtube by one of my favorite youtube gurus, Samantha from Batalash. I loved how she did hers using white and mainly brown colors. I decided to use her video as my inspiration and create this look.

I was running out of white pencil eyeliner while I was doing this look, so I switched to a white water-activated face paint by Snazaroo. Due to this, you might see some part of the makeup looks whiter than the others, that’s because of the change in medium (pencil to paint).

What you need for this look:

  • Foundation
  • Setting powder
  • Eyeshadows – light brown, dark brown, black
  • White pencil eyeliner or face paint
  • Brushes
  • Contact lens – optional

For a list of all the brands that I’ve used in this tutorial, please check it at the end of the tutorial.

*Check out my other Halloween Tutorials*

white sugar skull makeup

How-to:

1. I applied foundation all over my face, and set it using a setting powder.

2. Using the tip of a very firm flat eyeshadow brush, I applied a light brown eyeshadow around my eye socket.

white sugar skull makeup

3. Using a flat eyeshadow brush, I filled my eye area using the same brown eyeshadow as step 2.

4. Again, using the tip of a firm flat eyeshadow brush, I applied a darker brown eyeshadow, lightly blending it towards the center of my eyes.

easy sugar skull makeup

5. Using an angled eyeliner brush, I applied a black eyeshadow as an outline of my eyesocket. I lightly blend it inwards.

6. Again, I outlined my eye socket using a white pencil eyeliner. You want to sharpen this eyeliner and clean the tip every now and then to prevent the color from getting muddy.

white sugar skull makeup

7. Using the same white pencil eyeliner, I created the outline and spider web design on my face.

  • I created a wide spider web on my forehead.
  • I outlined where I’d like the hollow of my nose going to be.
  • I also created a line on the hollow of my cheeks towards the corner of my mouth.
  • I created vertical lines over my mouth to outline where my teeth are going to be.

8. Next, I used the brown eyeshadow to filled in my nose and create some shadows in between my teeth, as well as the hollows of my cheeks.

9. On the nose, I also lightly applied a black eyeshadow just  at the edge where the white and the brown meets to create depth.

easy sugar skull makeup

10. Using a white face paint, I created some dots on my face.

11. I also created flower petals around the eye socket, and lighten up the teeth to make it stand out even more.


Products used

  • Foundation – Diorskin Star foundation
  • Setting powder – Cinema Secret Loose powder (Transparent)
  • Eyeshadows – The Balm Meet Matt(e) Nude
    • Light brown – Matt Rosen
    • Dark brown – Matt Garcia
  • Black eyeshadow – MAC Carbon
  • White pencil eyeliner  – Revlon Carbon Cleopatra photoready eyeliner
  • White face paint – Snazaroo classic white

*Check out my other Halloween Tutorials*

  • Kat Von D Monarch Palette Tutorial #2

    I kept forgetting how amazing this palette is, so I decided to remind myself and created this Monarch palette tutorial. Like I said on my first tutorial using this palette, the eyeshadows are unbelievably smooth and so easily blended. Love it! I promise I’ll do swatches and review for this palette. If you have the chance to grab it, you should really consider it.

    Anyways, I’m quite busy this week, as well as the whole September due to work. I think I’ll try to post twice a week, hopefully more. If you do follow me on Instagram, I’ll do micro-blogging from there. Also, don’t forget to comment here or on my twitter/instagram on what you’d like to see more. I know I still have to do a few requests, and I’ll try to get on it ASAP. What a busy month!

    Ok, let’s get the tutorial started! I just want to mention that for some reason my camera picks up Wrath really orange this time round. Not sure why, I did reverted back to my glamcor lights, so that might be the cause. Trust me, it doesn’t look that orange in real life. It’s a very pretty warm reddish-brown, almost like a brick color.

    warm brown smoky eyes

    I prepped my eyelids using Urban Decay Primer Potion.

    How-to:

    1. Using a fluffy blending brush, I applied Wrath on the outer V and just above the crease.

    2. Using a clean blending brush, I blended out the crease.

    3. I applied Shadow Box on the outer V, inner V, and crease of my eyelid using a bullet crease brush.

    4. Using a flat eyeshadow brush, I applied MAC Tan loose pigment on the center of my eyelid.

    5. I applied Urban Decay Jilted eyeshadow (from the electric palette) along my lower lash line using an angled eyeliner brush, then I applied Urban on top of it using a pencil brush.

    6. I lined my waterline using L’oreal Voluminous Smoldering eyeliner.

    7. I also created a winged liner using Kanebo Kate Super Sharp eyeliner.

    8. I filled my brows using Anastasia Brow Wiz in Medium Ash.

    9. I applied MUFE Aqua Smoky lash mascara on top and bottom lashes. Also applied Lavie Lash falsies in Snowdrop.

    kat von d monarch palette makeup look

    10. On my face, I applied Diorskin Star foundation using a foundation brush.

    11. I also applied MUFE HD concealer under my eyes.

    12. I wanted an extra glow on my skin, so I applied Smashbox Halo Highlighting wand. I applied this highlighter on the high points of my face – cheekbones, bridge of the nose, cupid’s bow, chin, forehead.

    13. I lightly dust Cover FX translucent powder to set everything.

    14. I applied contour very lightly on my face using Smashbox Contour Kit (they’re selling it again for a limited quantity on their website!).

    15. On my lips, I applied MAC Spice lip liner all over, and then applied Clinique Heaping Hazelnut chubby lip stick.

    mac tan makeup tutorial

    NARS Mekong Smoky Eyes (NARSissist palette)

    Who doesn’t love a good smoky eyes? I sure do! I’m sure my friend, Finency, loves it too! She showed me this picture on Instagram, and it showed a smoky eyes using NARS Mekong eyeshadow. I love how simple, easy, and definitely I’ll wear this for a night out.

    I skipped the whole false lashes so this look is more grungy, and more me. I don’t usually wear falsies, so this really stay true to how I’d wear my smoky eyes. I also filled my brows without shaping it using any concealer. Again, just want to stay true to how I usually do my makeup. As I said, it’s very simple and quick. No fuss, sexy, and sultry. I like my makeup to be as simple as possible. This is just how I prefer to do my makeup, but if you like more of a glam look you can take a look at my other tutorials under smoky eyes.

    For this tutorial, I used NARS eyeshadows from the NARSississt palette. I’ve done tutorials, and review of this palette. Please feel free to check them out.

    NARS Mekong tutorial

    How-to:

    1. I prepped my eyelids by applying a cream-base eyeshadow. I used Smashbox limitless 15-hour cream shadow in Stone.

    2. Using a flat eyeshadow brush, I applied NARS Mekong eyeshadow all over my eyelid. The camera didn’t pick it up, but there’s lots of gorgeous golden flecks on my lids.

    3. Using a fluffy blending brush, I applied NARS Madrague I on the crease to diffuse the color out.

    4. I applied NARS Mekong on the lower lash line using a small shader brush.

    5. I lined my waterline, tightline, and upper lash line using L’oreal Voluminous Smoldering eyeliner.

    6. Using an angled eyebrow brush, I applied NARS Pandora II along the upper lash line. I kind of winged mine a little, but you don’t have to.

    7. I filled my brows using Anastasia Brow Wiz in Medium Ash.

    8. I curled my lashes and applied MUFE Aqua Smoky Lash mascara on both upper and bottom lashes.

    NARS Mekong smoky eyes

    9. On my face, I applied Smashbox Liquid Halo Foundation using CoverFX cream foundation brush.

    10. I highlighted (under my eyes, bridge of my nose, cupid’s bow, chin, & forehead) my face using YSL Touche Eclat.

    11. I set my face using Cover FX translucent powder.

    12. I lightly contoured my face using Smashbox contour palette.

    13. On my cheeks, I applied Chanel Blush de Horizon.

    14. I filled my lips using MAC Spice lip liner, and Clinique Heaping Hazelnut Chubby Stick lip balm.


    Products used

    Eyes – Smashbox limitless 15-hour cream shadow in Stone; NARSissist eyeshadow palette (Lid: Mekong, crease: Madrague I, liner: Pandora II); Anastasia Brow Wiz in Medium Ash; MUFE Aqua Smoky Lash mascara

    Face – Smashbox Liquid Halo foundation; YSL Touche Eclat; Cover FX Translucent Powder; Smashbox contour powder; Chanel Blush de Horizon

    Lips – MAC Spice lip pencil; Clinique Heaping Hazelnut chubby stick

    White Eyeliner Makeup Tutorial

    Ok, so this White Eyeliner makeup tutorial is actually my World Cup 2014 England Inspired Makeup, as requested by Nurina over on facebook. However, since World Cup is over, I didn’t want to title it as England inspired makeup. Not to mention, I feel like this look can be worn during Indonesia’s Independence Day which is coming up next month, or any country with a red/white flag.

    Anyways, I think ever since I tried out the white eyeliner look in my Netherlands inspired makeup, I’ve been quite a fan of white winged eyeliner. It’s a fresh outtake on my usual black winged eyeliner, not to mention it does brighten up the eyes quite a bit. For my World Cup 2014 makeup series, please check my Brazil, Netherlands, Argentina, and Germany inspired makeup posts.

    For this white eyeliner makeup tutorial, I wanted to show you how you can use tape to create your winged liner. I’ve done this before in my other tutorial, but just going to show it again. That tape will create a very clean edge for your eyeliner. All you have to do is run a diagonal line from the outer tip towards the inner corner of your eye. For a detailed tutorial on how to create winged eyeliner, please check my how-to post.

    The only word of caution I’m going to mention again, is to be very careful when applying mascara. If you’re not careful you might end up with black spots from the mascara all over your eyeliner. The easiest way to fix this is to let the mascara dry first, run a clean cotton bud over the mascara spots, and then run the white eyeliner on top of it again.

    white eyeliner makeup

    How-to:

    1. I applied MAC Pearl cream base all over the eyelid for some shine.

    2. Then, I realized it started on crease on my eyelid, so I set it with Revlon Sand eyeshadow.

    3. I placed a tape on my skin to create an angle for my eyeliner.

    4. Using Revlon Photoready Kajal eyeliner in Carbon Cleopatra, I created a diagonal line from the outer corner of my eye towards the inner corner. I just dragged the pencil eyeliner on my lid, and filled in any gaps.

    5. I set the eyeliner using Sleek Makeup iDivine Ultra Matte v1 Brights in Pow using an angled eyebrow brush.

    6. I removed the tape, curled my lashes and applied MUFE Aqua Smoky Lash.

    7. I applied Gwiyomi false eyelashes no. 3 for added drama.

    8. I filled my brows using Anastasia Brow Wiz in Medium Ash.

    white eyeliner makeup tutorial

    9. I applied Giorgio Armani Maestro foundation using my fingertips all over my face. (Such an amazing foundation, btw!)

    10. I applied Bobby Brown under eye brightener in Peach, and blended it out using my finger.

    11. I set my face using NARS setting powder.

    12. On my cheeks, I applied Smashbox Halo Powder blush in In Bloom.

    13. For added shine, I applied MAC Soft and Gentle on top of my cheekbones, and the bridge of my nose.

    14. I very lightly contoured my face using Smashbox contouring palette.

    15. I lined and filled my lips using MAC Redd lip liner, then added L’oreal Super Lustrous lipstick in Ravish Me Red.

    red lips makeup tutorial


    Smoky Eyes with a Neon Eyeliner

    Hey ya’ll! I hope everyone is doing great this weekend! I posted this look on Instagram last night, and I almost forgot to upload it today. Anyways, as mentioned on my Instagram account, this smoky eyes with a neon eyeliner look is a recreation from @jenmiamakeup. She’s one of the many great makeup artists who I follow on Instagram. I love how she does hers with a neon yellow. I tried this one with the only neon pigment I owned – MAC Neo-orange loose pigment.

    If you are going to recreate this look, I’d suggest using a mixing medium instead of water, like I did. I used water and for some reason the pigment didn’t want to mix smoothly. I ran out of my mixing medium so I have to go get one in the near future. The other issue that I kept having is the fact that my smoky eyes kept creasing. Ugh, I should have used a different eyeshadow base (and probably should have prime my eyelid first). So, I’d suggest for you to use an eyelid primer to avoid creasing.

    Anyhow, let’s get the tutorial started!

    smoky eyes for asian

    How-to:

    1. Using a light brown eyeshadow (mine was a sample, and it has no brand nor name), I applied this shade just above my crease using a clean blending brush. I used this shade as a transition color, the shade is just slightly darker than my own skin color.

    2. Using a deep chocolate brown (again, this was a sample with no brand and no name), I applied this shade right on the crease using a small crease brush.

    3. Using the same blending brush as step no. 1, I blended the chocolate shade.

    4. I applied Revlon Photoready Kajal eyeliner in Carbon Cleopatra, I applied the black eyeliner all over my eyelid, and waterline.

    5. I lightly blended the eyeliner using a synthetic art brush.

    6. I applied Kat Von D Monarch palette Deadhead eyeshadow on top of the black base using a flat eyeshadow brush. I also applied this eyeshadow along the lower lash line using a small shader brush.

    7. Using the same brush as step no. 1, I blended out the edge of Deadhead so there’s no harsh line.

    8. I mixed water and MAC Neo-Orange loose pigment to create the neon winged eyeliner.

    9. On my brows, I used Anastasia Brow Wiz in Medium Ash to fill them.

    10. On my lashes, I applied Ardell 105 false lashes.

    mac twig lipstick

    11. On my face, I applied MARC JACOBS gel foundation using CoverFX foundation brush. I concealed using MUFE HD concealer, and set my face using CoverFX translucent powder.

    12. I applied Benefit Moon Beam highlighter on the bridge of my nose, cupid’s bow, chin and cheekbones.

    13. I lightly contoured my face (sides of the nose, under my cheeks, jawline, and temples) using NARS ITA kabuki brush and MAC Blunt powder.

    14. I applied MAC Dainty on my cheeks.

    15. For the lips, I applied MAC Spice lip pencil all over.

    Very Purple with Sleek Makeup Candy Palette

    As mentioned in my previous post, I wanted to share this tutorial with you guys! Today’s look uses Sleek Makeup Candy Palette (Limited Edition) that I bought from Luxola! Don’t worry, the palette that I’m giving away is totally brand new, and unused!

    Oh, you didn’t know about the giveaway that’s going on? Check out my Sleek Makeup Candy Palette Giveaway post for details! This giveaway will last until Thursday (June 12, 2014) at 11.59pm.So, hurry up and check out that post for more info!

    I also want to mention that since my images were getting used without my permission nor credits, I’m putting a huge watermark in the middle of all my pictures from here onwards. I do apologize if the watermark is bothering the picture, but I have to protect my work. I do want to thank all of you who have been kind enough to let me know whenever someone used my pictures (aka plagiarism). I appreciate all your kindness! A big thank you, hugs, and kisses for you who have been supporting me!

    Anyways, let’s get the tutorial started!

    sleek makeup idivine candy paletteEyelids are prepped using Urban Decay Primer Potion in Eden. All shades for the eyes are from Sleek Makeup iDivine Candy Palette.

    How-to:

    1. Using Smashbox bullet crease brush, I applied Flump slightly above my crease.

    2. Using a small blending brush, I applied Parma Violet on the outer V and the crease. You can apply this using a small shader brush for a more precise application.

    3. Using the same bullet crease brush as step 1, I blended out Parma Violet to remove any harsh edge on the crease. I also slightly winged the outer part.

    4. Using a flat eyeshadow brush, I applied Aniseed all over my eyelid.

    5. Using a small shader brush, I applied Bon Bon on the inner corner of my eyes, and then I applied Parma Violet along the lower lash line.

    6. I used my face powder (MUFE 118 Pro Finish) and a blending brush under my brows, blending it into the purple shades slightly to remove any harsh edge.

    7. I lined my upper lash line using Kanebo Kate Super Sharp Eyeliner. On the waterline, I applied black eyeliner pencil.

    8. I curled my lashes, applied mascara, and then applied Ardell Demi Wispies lashes. (As you can see, Ardell demi wispies falsies are my current favorite lol).

    9. For the brows, I applied Anastasia Brow Wiz in Medium Ash. I lightly set it with Anastasia Brow Powder duo in Brunette.

    sleek makeup candy tutorial

    10. For my face, I applied Motives Fire highlight/contour palette. I applied the lightest highlight color on the high planes of my face – cheekbones, bridge of the nose, cupid’s bow, forehead, chin, below hollows of the cheeks, and under my eyes. I applied the darkest contour color on the hollows of my cheeks, sides of my nose, and temples. I blended them out using a damped beauty blender sponge and MUFE HD Foundation in 118.

    11. For my cheeks, I applied Smashbox Halo blush in In Bloom.

    12. For the lips, my new favorite, I applied L’oreal Color Riche Extraordinaire Liquid Lipstick in Rose Symphony