Purple and Peach Spring Makeup ft. KVD Pastel Goth

I shared this look on my Instastory a while back when Spring was around the corner. I knew I wanted to create this Purple and Peach spring makeup, but I also wanted to create something more fun along with it. So for this look, I did 3 variations – the original and 2 graphic liners look. This was fun to create and I hope you enjoyed this look as much as I did.

purple and peach spring makeup using KVD pastel goth palette
Read More

Shu Uemura Pastel Fantasy Makeup Tutorial #1

https://youtu.be/yHUFLJ3lUio

The newest Shu Uemura Pastel Fantasy Collection for Spring/Summer 2016 is to die for! These pastel colors are so pretty!!!! To be honest I thought when I bought the products I was going to end up with chalky eyeshadows, but nooope I was totally wrong. Anyways, I hope you guys will enjoy this Shu Uemura Pastel Fantasy makeup tutorial, and if you haven’t please do subscribe to my Youtube Channel! I upload 2 videos every week for you guys! If you have any request just leave me a comment.

Read More

Lily Cole Bodyshop Shimmer Cube Look #2

I wanted to do another tutorial using the Lily Cole BodyShop Shimmer Cube that I bought in April. I’ve done a review in this post Body Shop Lily Cole Shimmer Cube, and a tutorial in this Spring Lilac post. I really love the eyeshadow combination, and wanted to create another look that’s wearable and not too over the top, yet at the same time there’s still a play of colors on the eyes.

I decided to use the eyeshadows dry for a sheer wash of color. If you like a more intense color, feel free to apply the eyeshadows wet. I like how this look ends up to be very light and just enough. I think it’s perfect for the Summer, esp. since the weather is getting really hot in Jakarta.

How-to:

1. I applied the Live Lilac eyeshadow from BodyShop Lily Cole Shimmer cube using a flat eyeshadow brush all over my lid.

2. Next, I applied Think Pink eyeshadow from Bodyshop Lily Cole Shimmer cube on the outer half of the lid using a flat eyeshadow brush.

3. On the outer corner only, I applied Go Violet using a flat eyeshadow brush.

4. Using a clean blending brush, I blended Go Violet on the crease.

5. I applied Think Pink on the lower lid, as well as Go Violet on the outer corner of the lower lid using a small shader brush.

6. I dabbed Live Lilac on the inner corner of the lower lid using a pencil brush.

7. Using L’oreal Voluminous Smoldering eyeliner, I lined my waterline, tightline and along the upper lash line creating a small flick at the outer corner.

8. I filled my brows using Shu Uemura Hard Formula 9 eyebrow pencil.

9. I curled my lashes and applied Maybelline Volume Express Turbo Boost mascara.

Lily Cole Bodyshop Shimmer Cube

10. For the face, I applied Urban Decay Naked foundation using foundation brush.

11. On the cheeks, I applied Benefit Hervana.

12. I completed the look by applying Clinique Chubbystick Lip pencil in Bountiful Blush.

Lily Cole Bodyshop Shimmer Cube

Pastel Rainbow

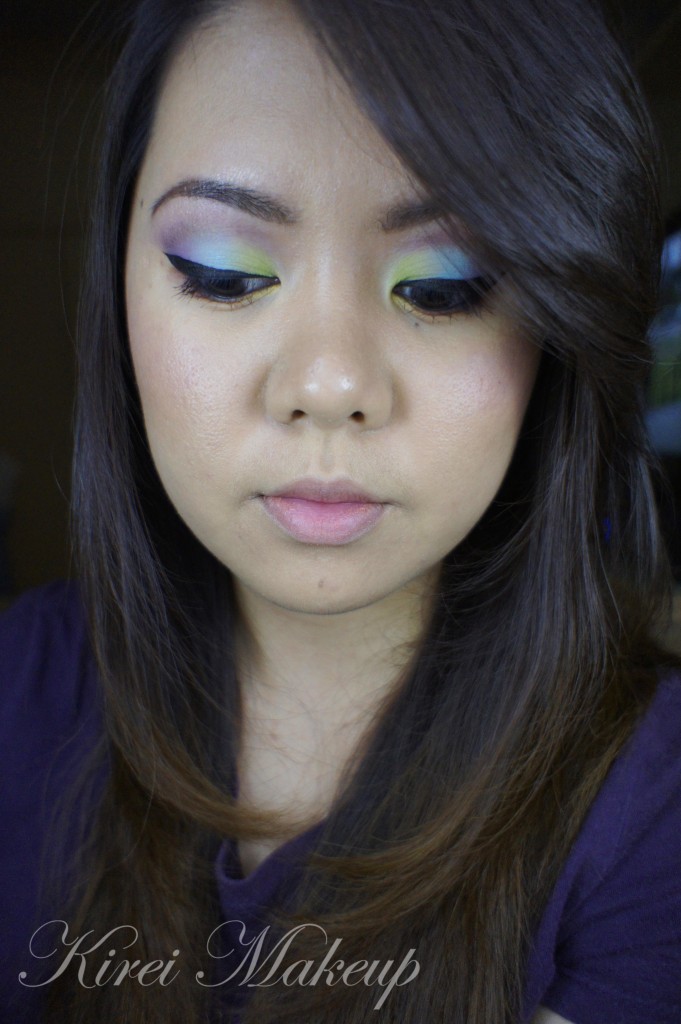
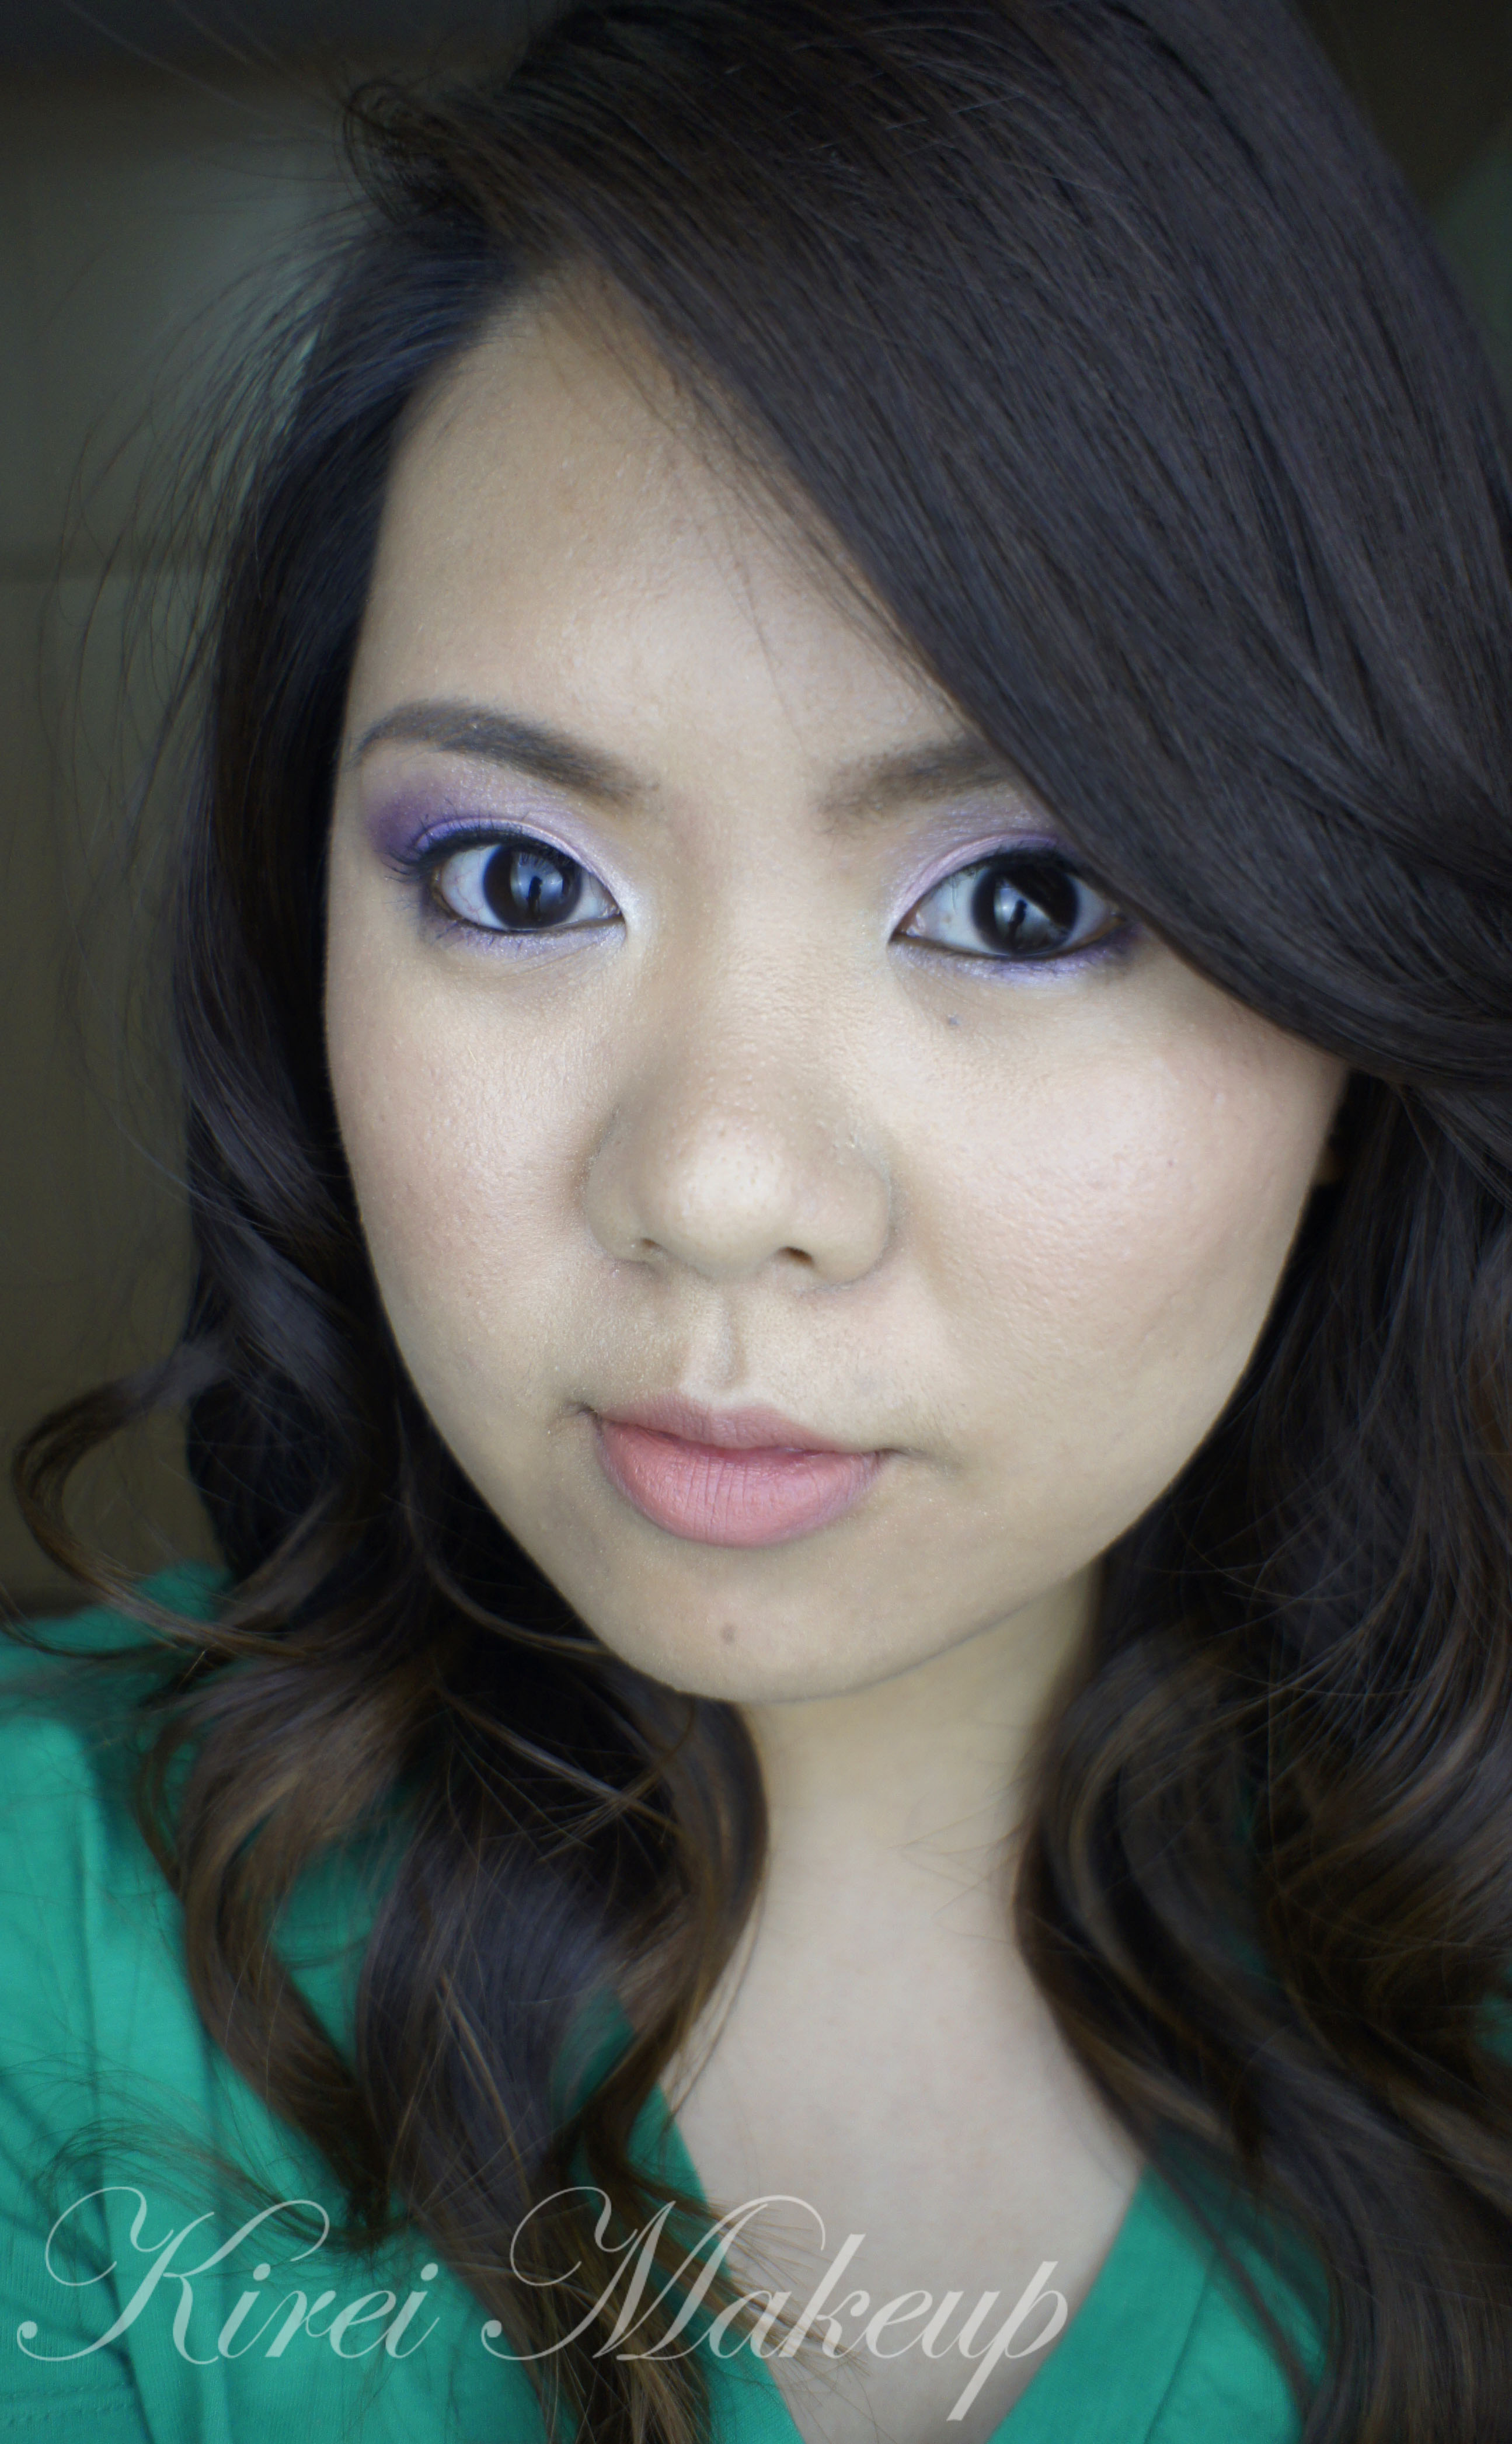
Hi all! I apologize for missing 2 days of tutorials. To be honest, I had 1 tutorial but I wasn’t too happy with how it turned out. So, I rather postponed the post than posting a not-so-great tutorial.

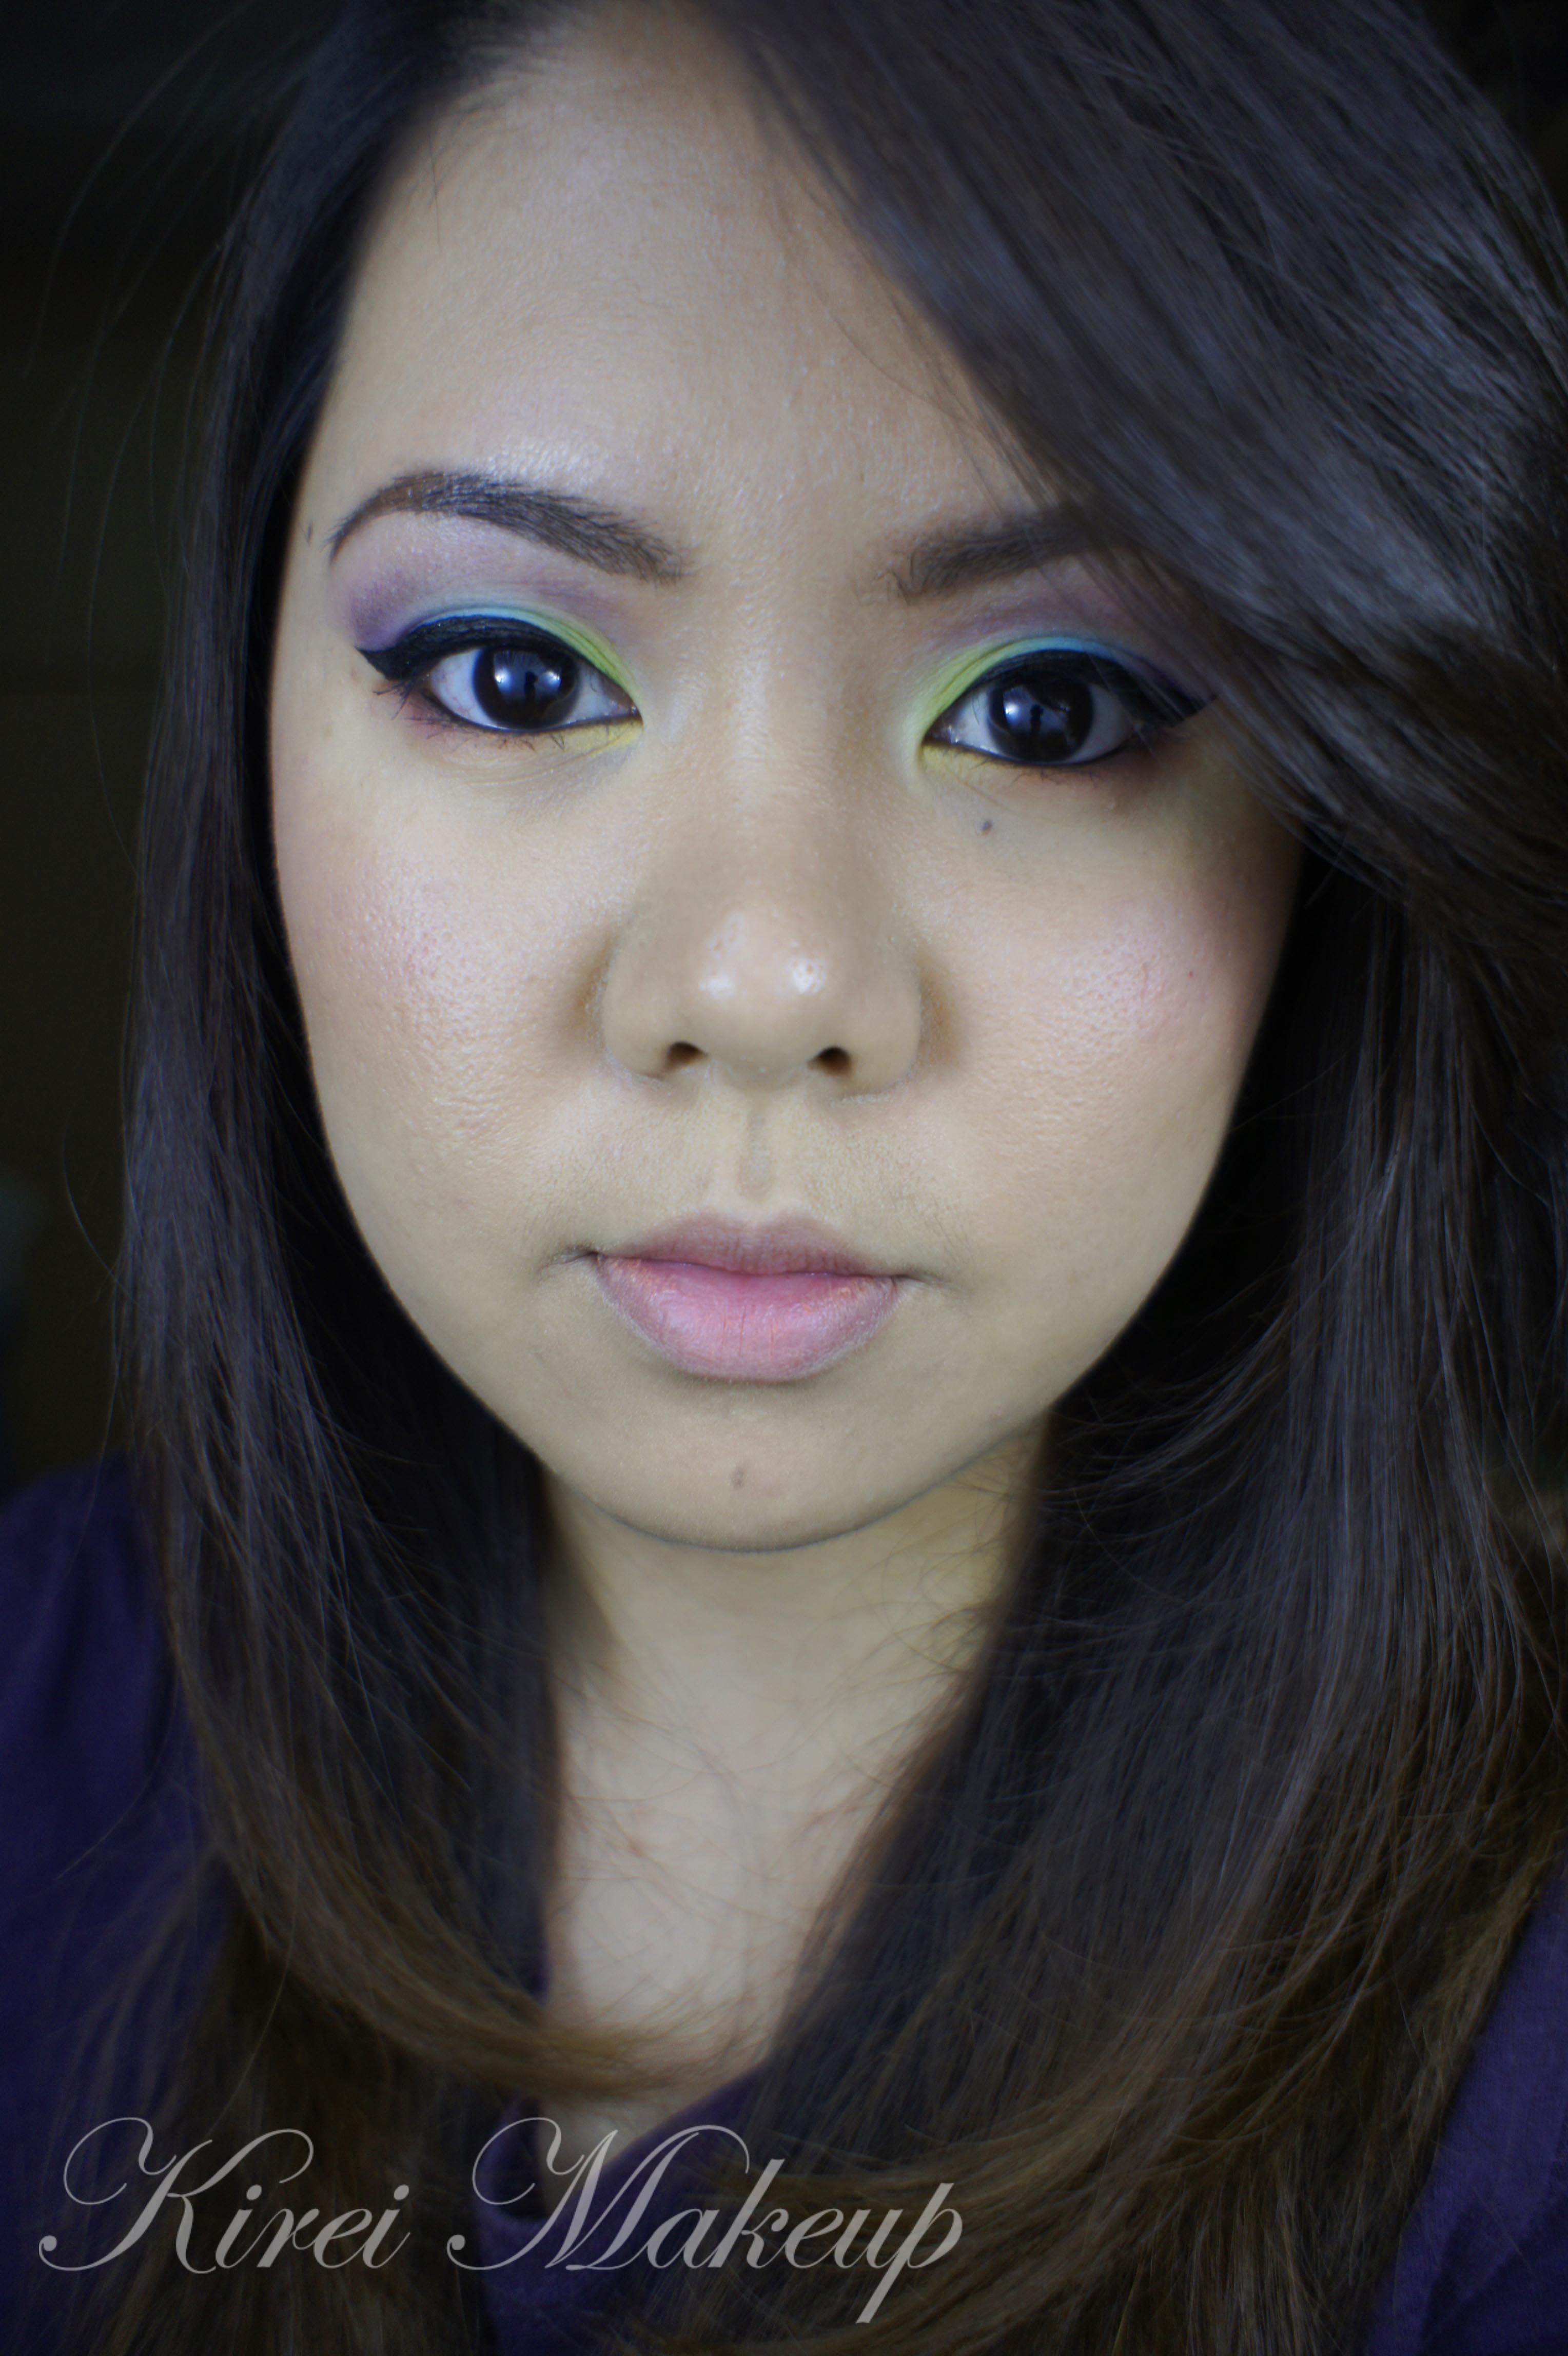
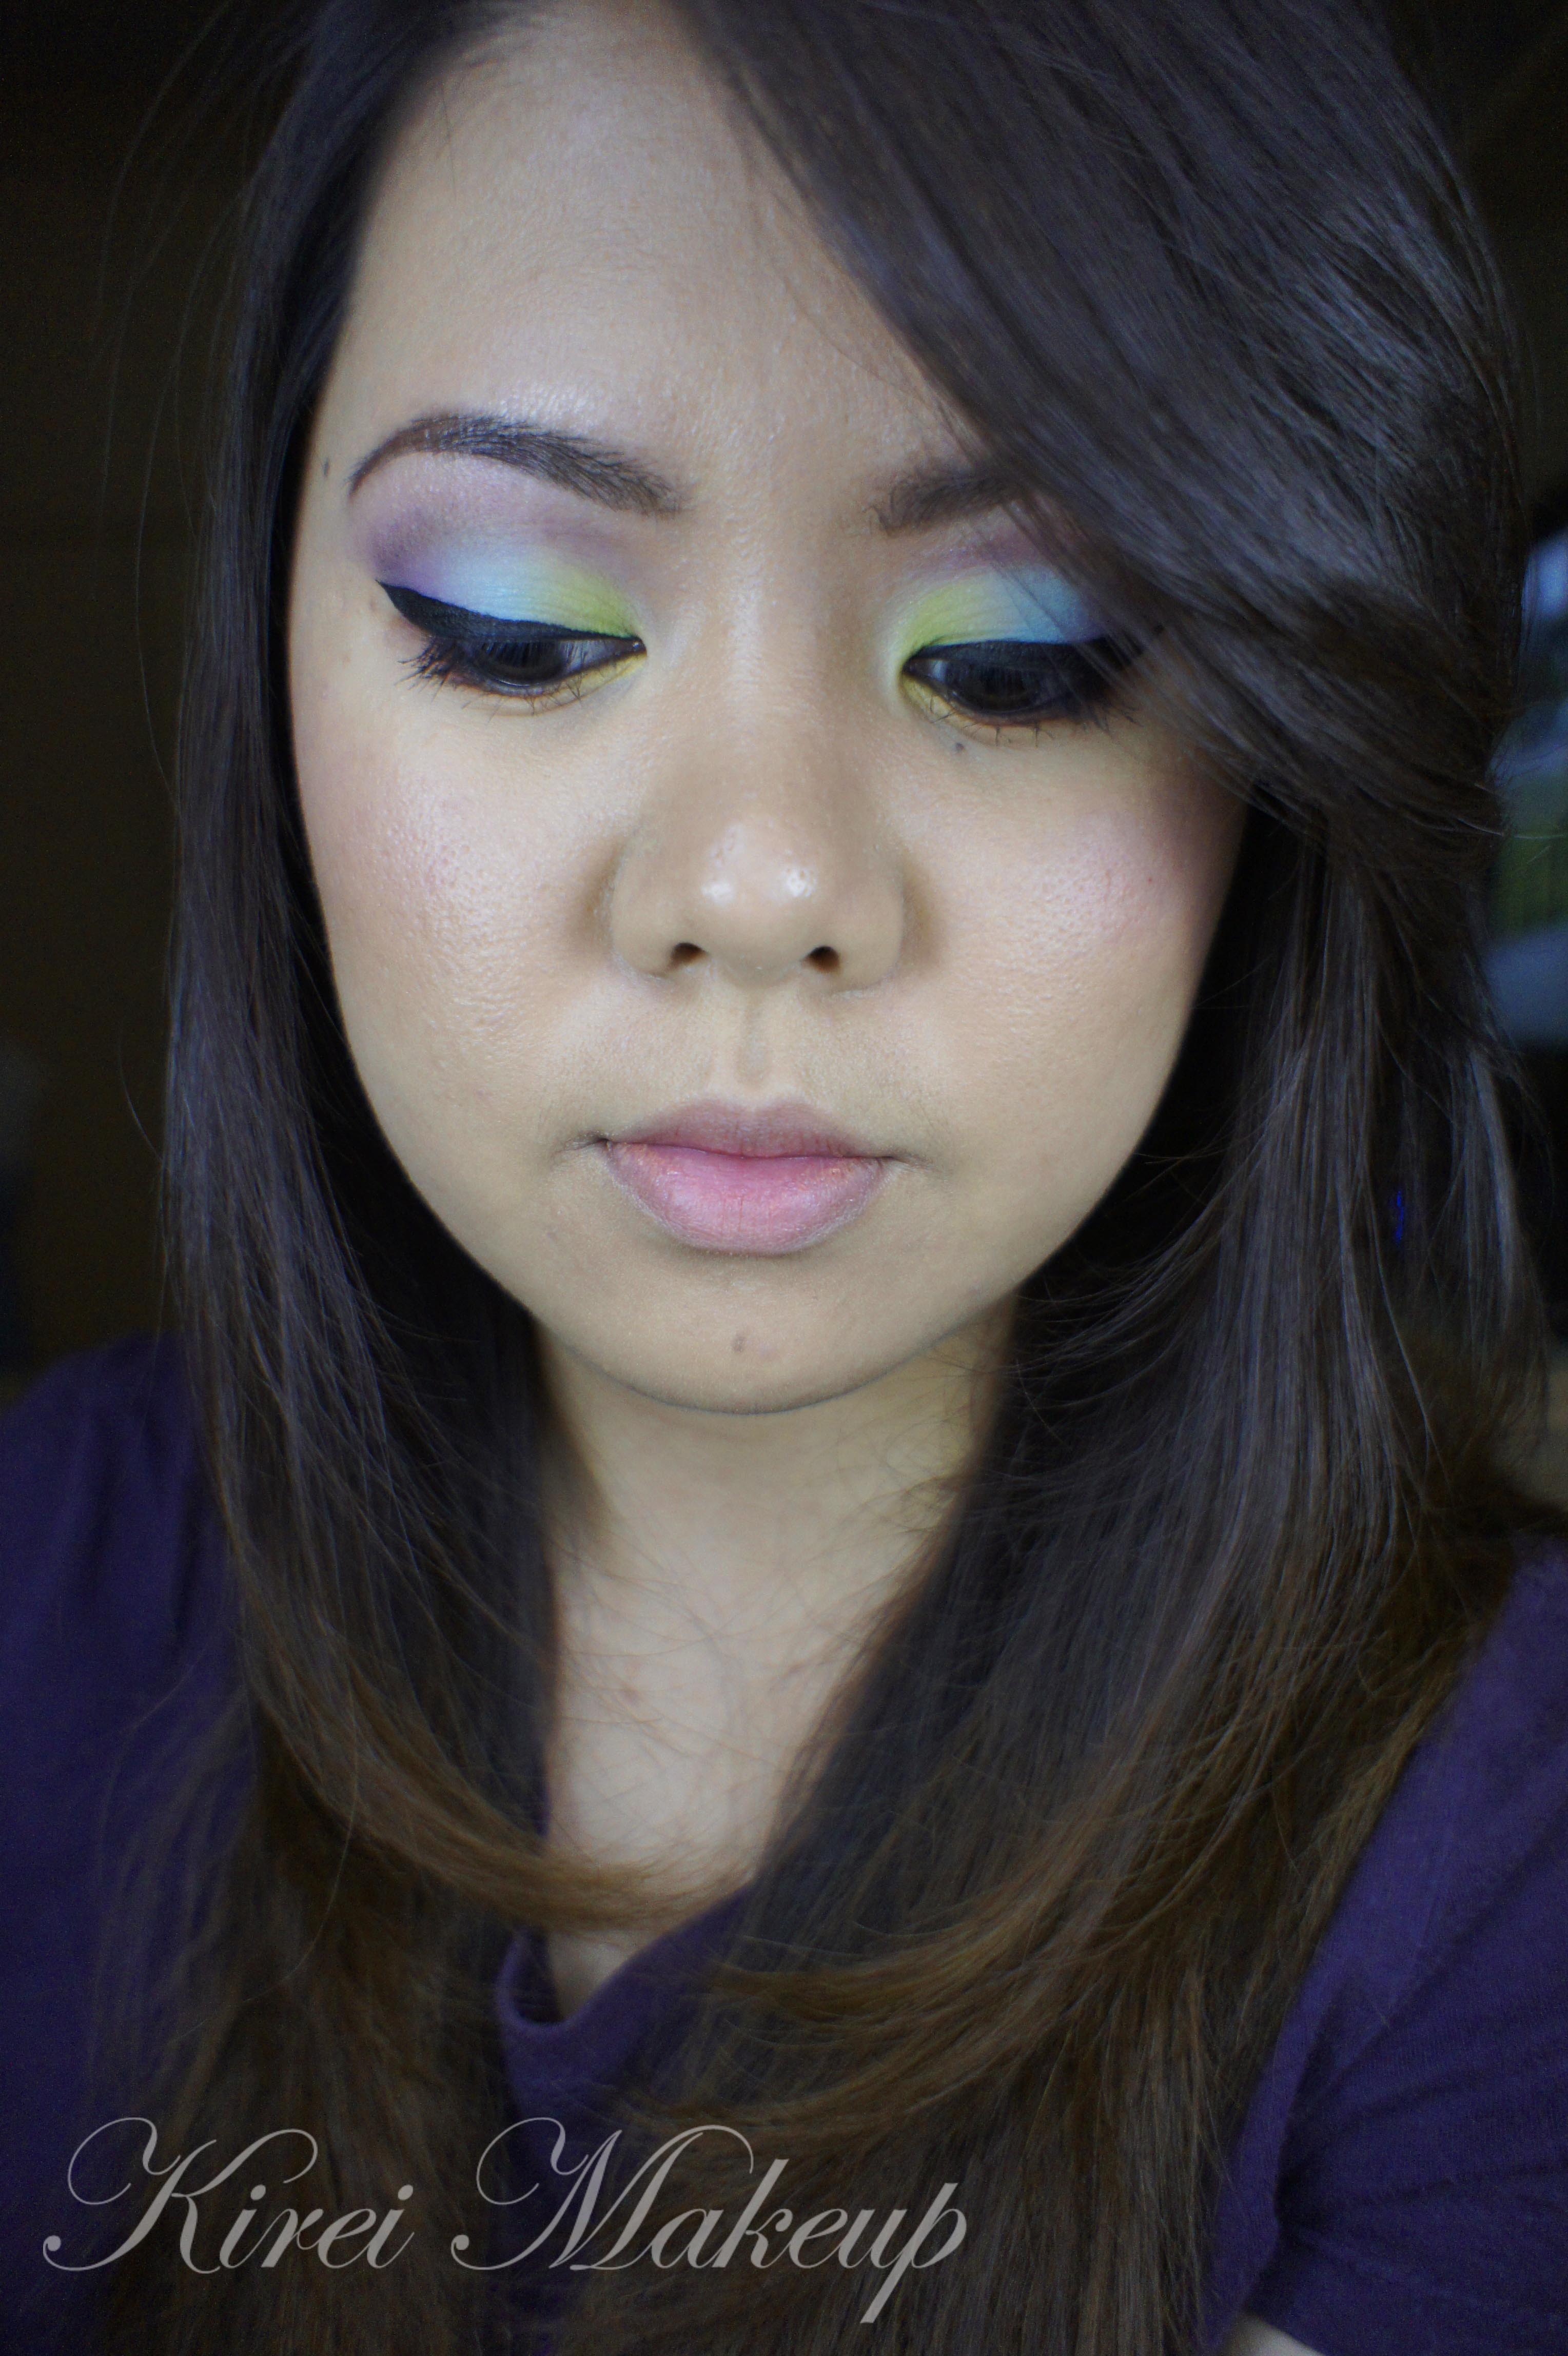
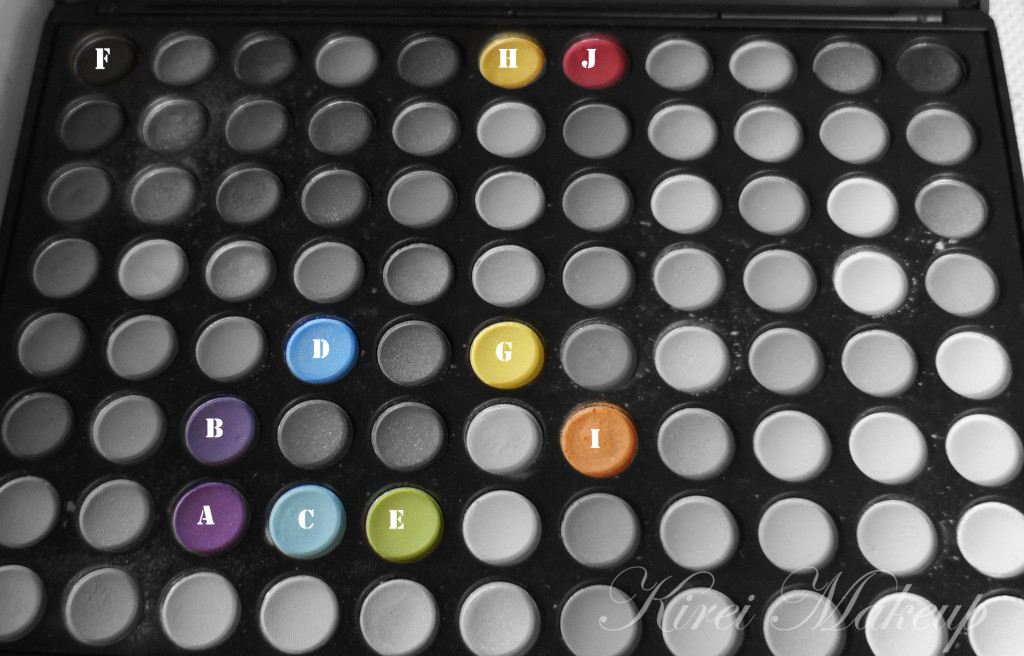
Anyhow, I decided to use my Coastal Scents 88 Prism palette  (only $19.95!) for the look, so it’s easier for whoever wants to re-create this look. If you do decide to re-create the look, please link me up!

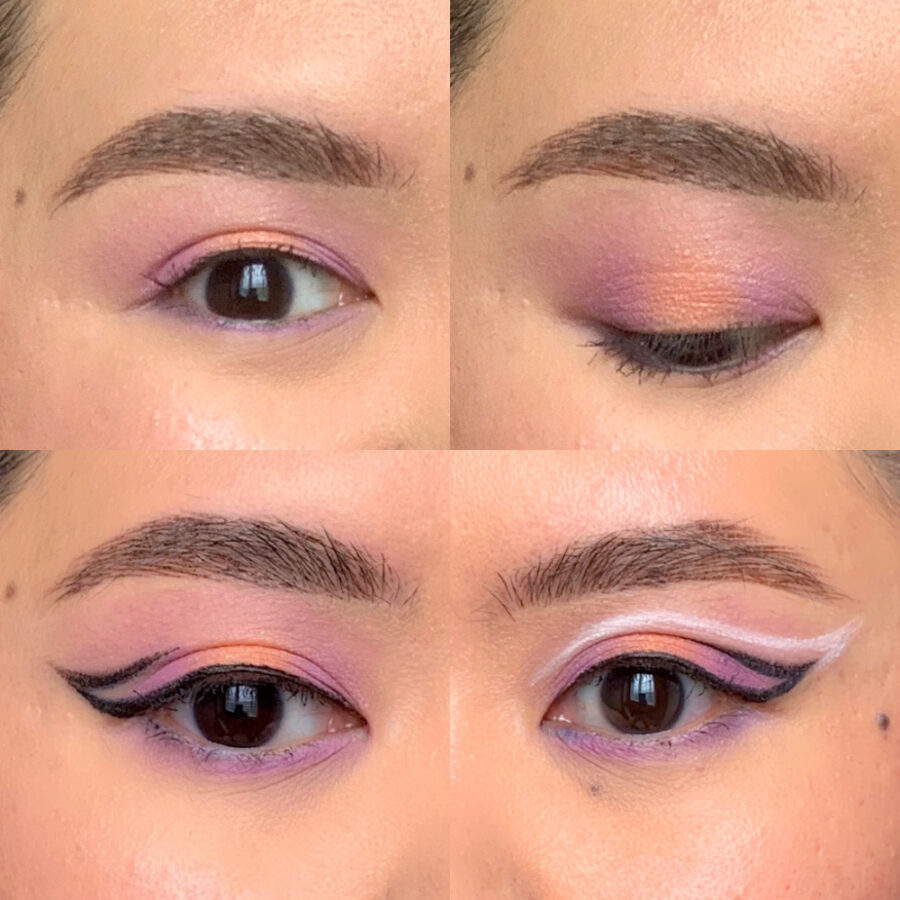
The reason why I wanted to use the Coastal Scents 88 Prism palette is to create a pastel finish to the look. I quite like how this turned out. I was quite skeptical cause I like a shimmery finish, but as I said I love how this turns out! I’ve labelled the colors that I used in the picture below, so please refer to the colors on the tutorial.

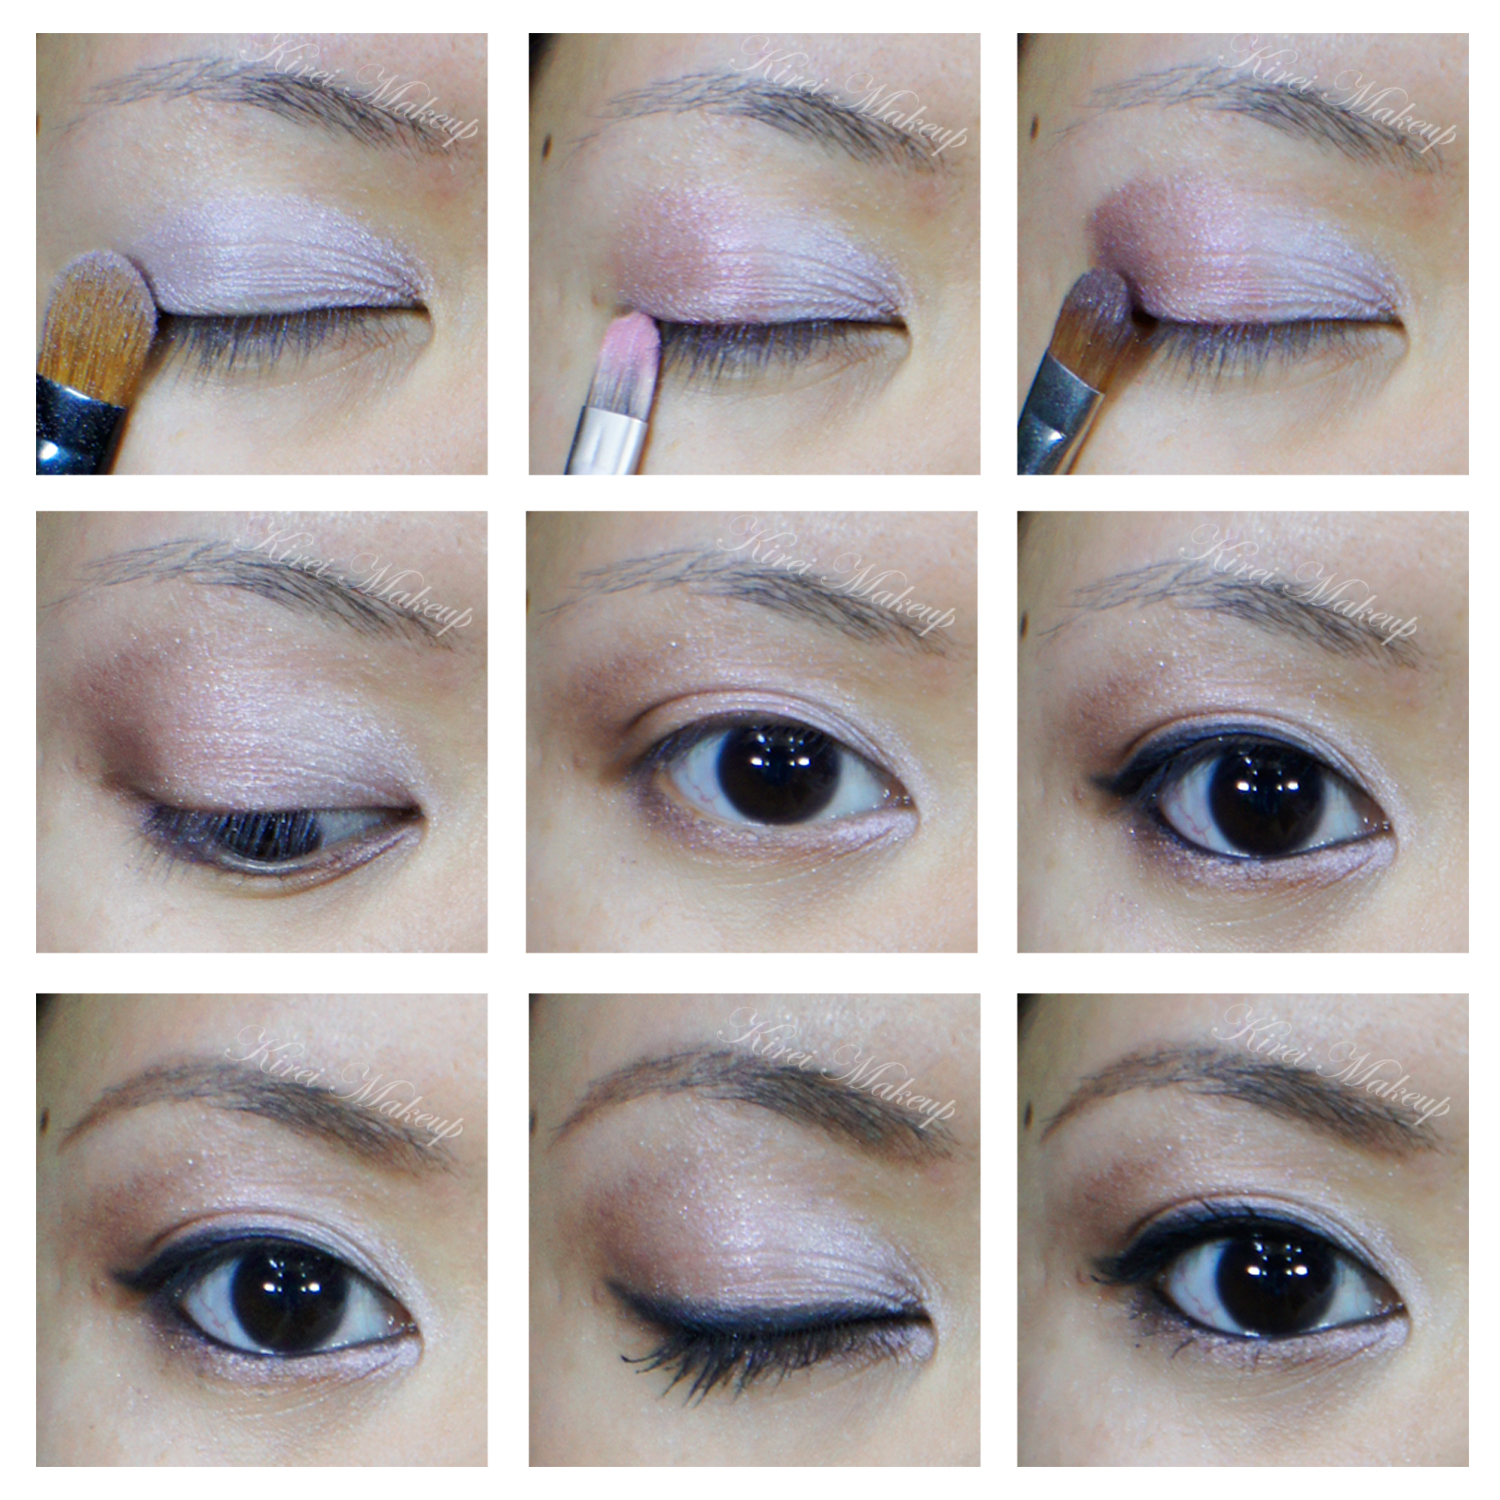
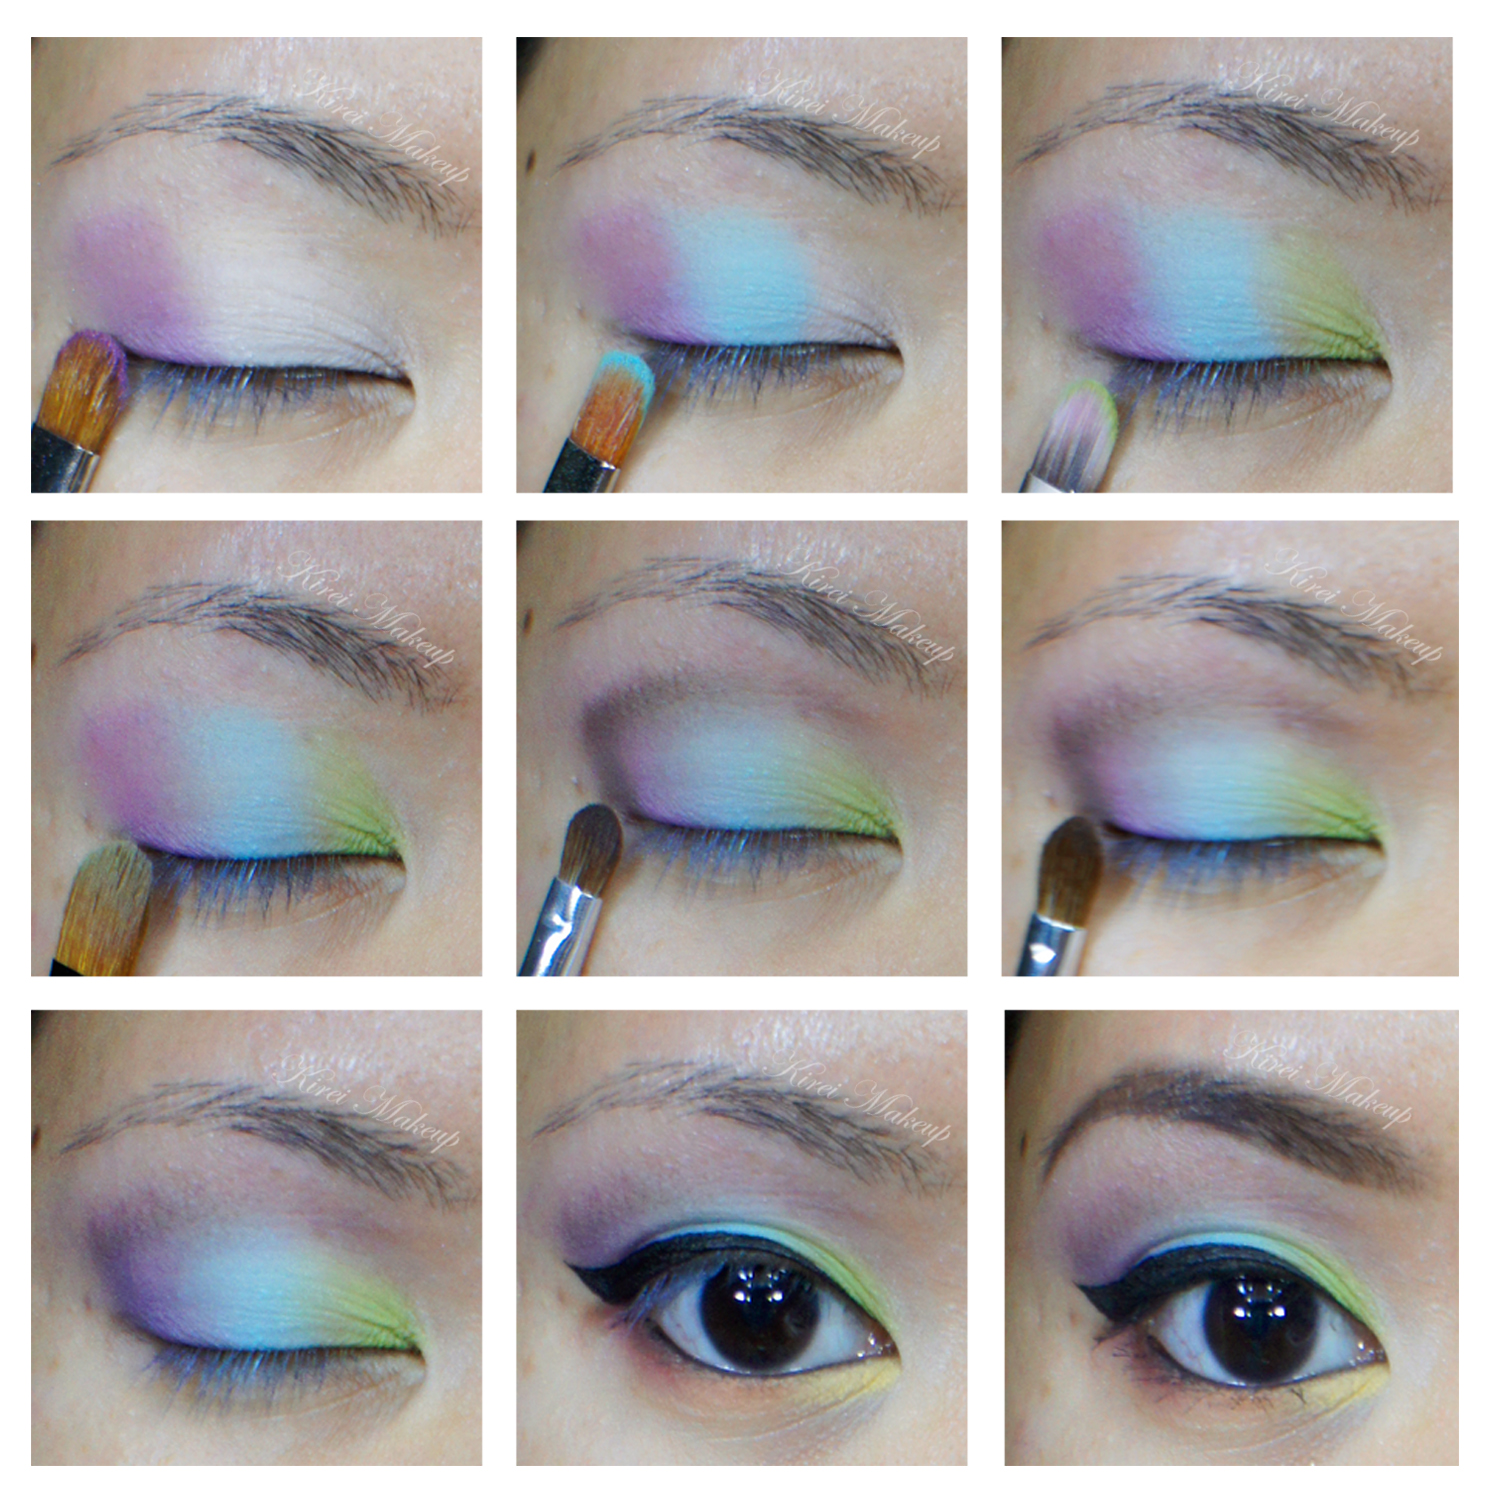
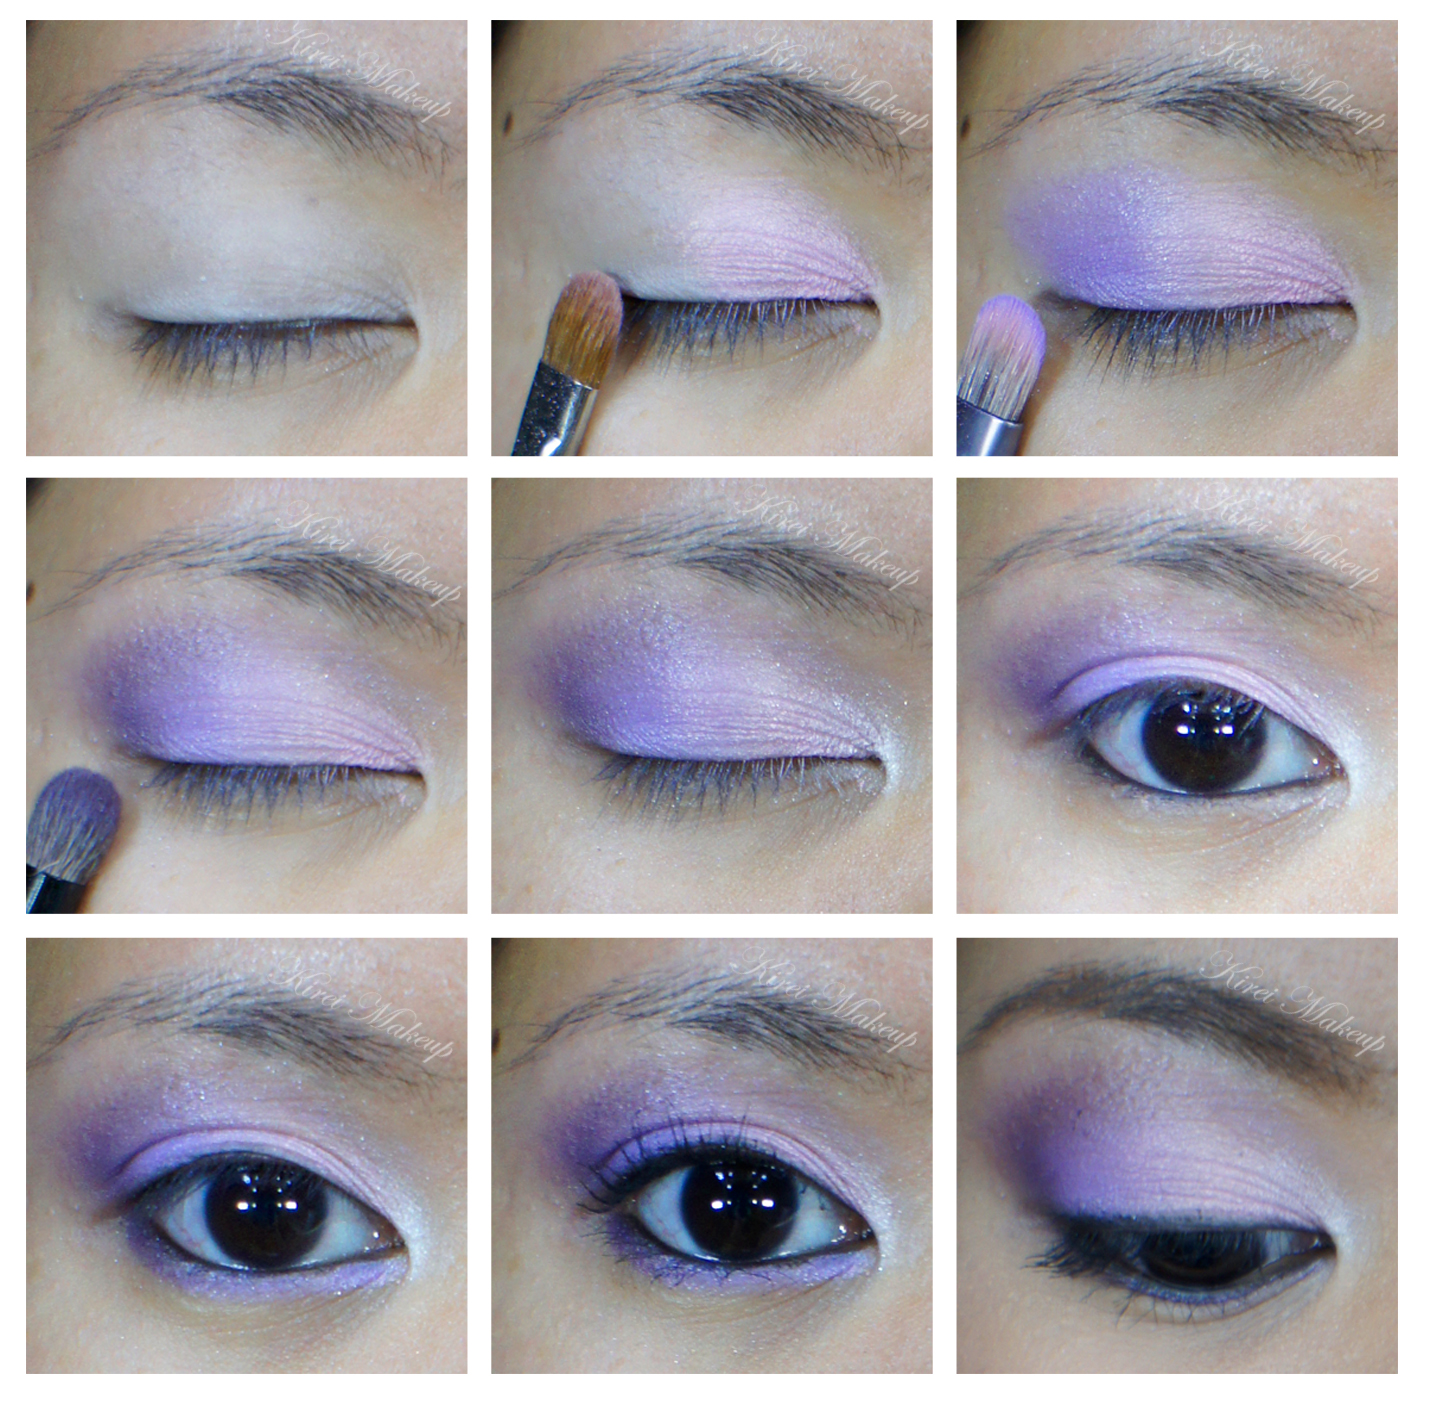
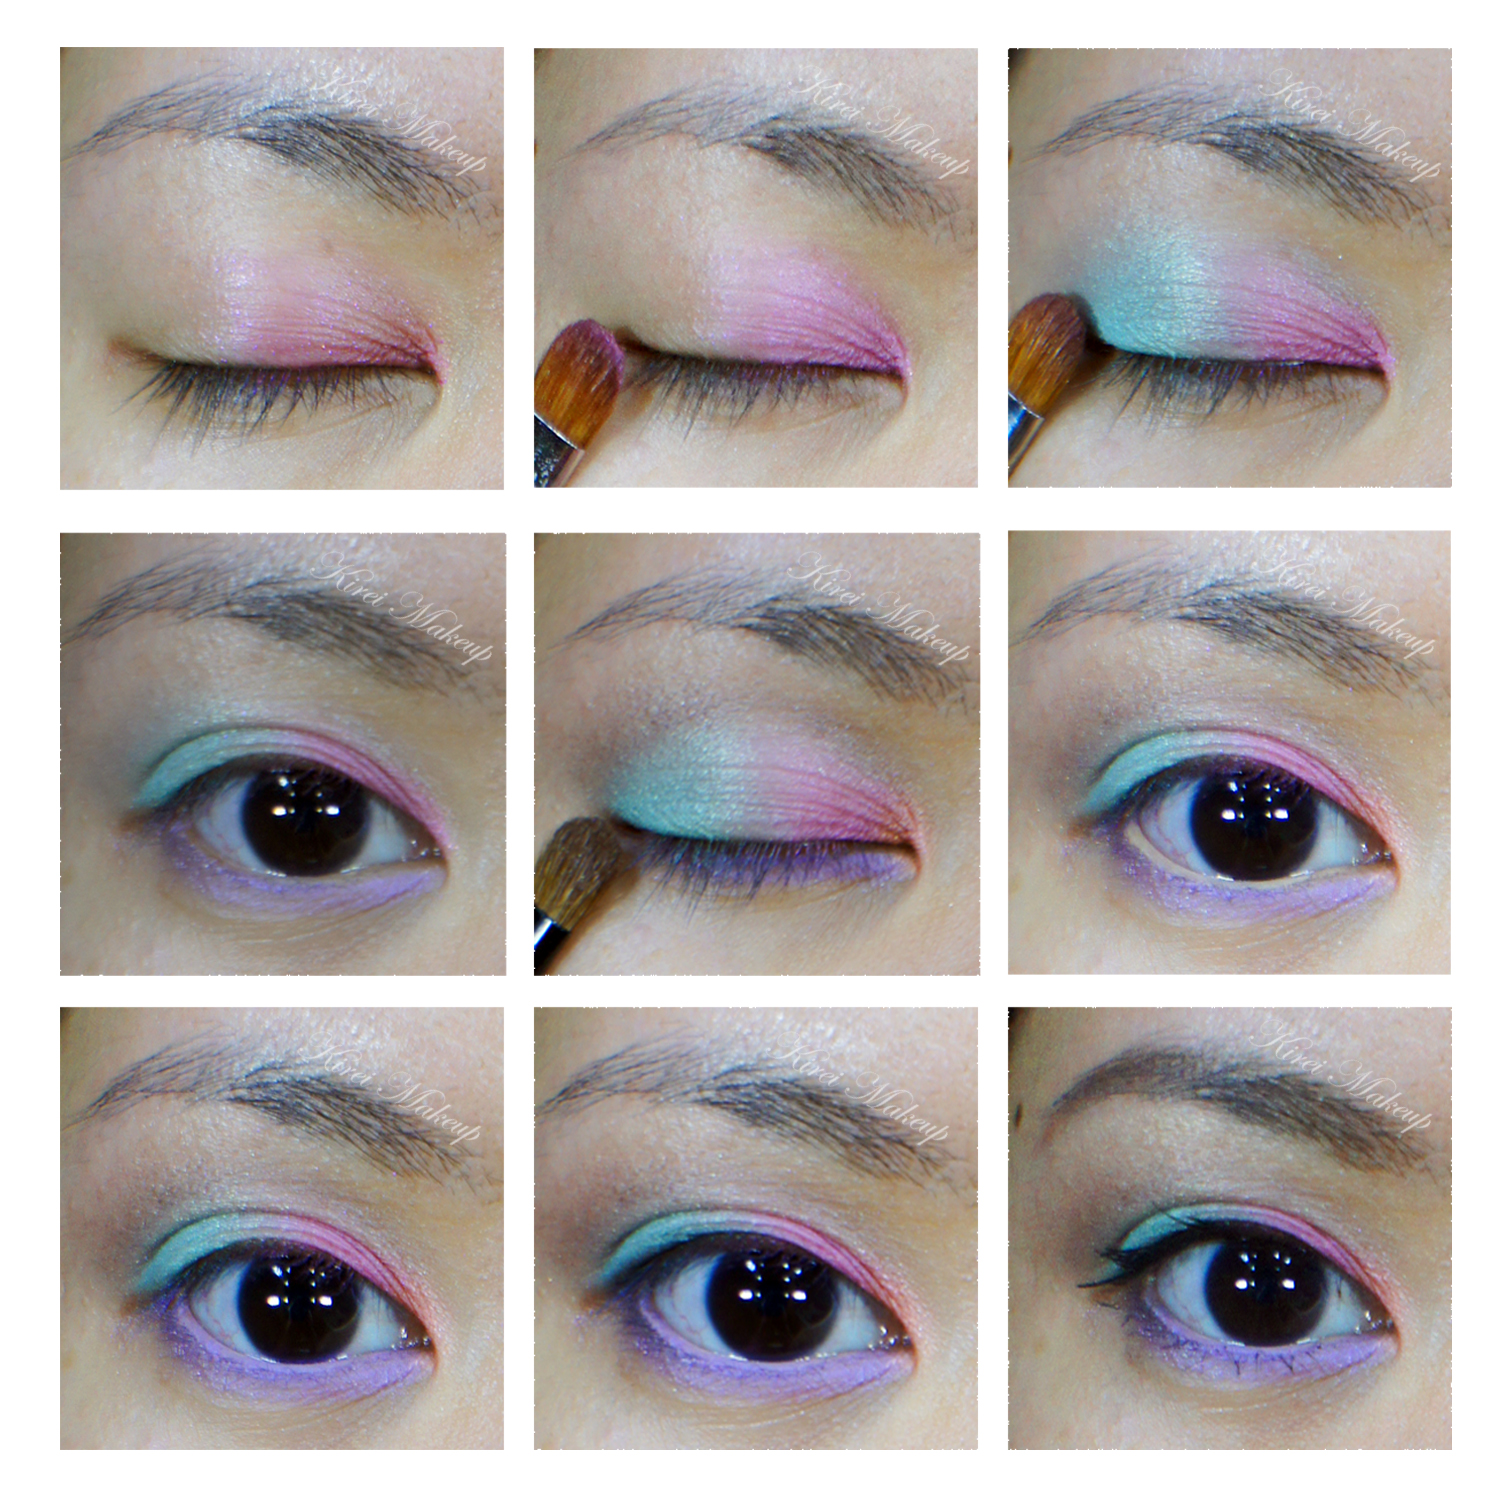
The steps are quite long, so please be patient reading it…the key to this tutorial is to have clean flat eyeshadow brushes (or you can clean in between steps). Make sure it’s clean so the colors don’t get muddy and mixed up.

coastal scent 88 prism palette

How-to:

1. I applied NYX Jumbo eyeshadow in Milk and blended it on my eyelid using my ring finger.

2. Using a flat eyeshadow brush, I applied eyeshadow A on the outer corner of the lid.

3. Using another clean eyeshadow brush, I applied eyeshadow C + D (mixed) on the middle lid.

4. I applied eyeshadow E on the inner corner of the lid using a clean eyeshadow brush.

5. Using another clean eyeshadow brush, I blended the line where the eyeshadow met.

pastel rainbow makeup

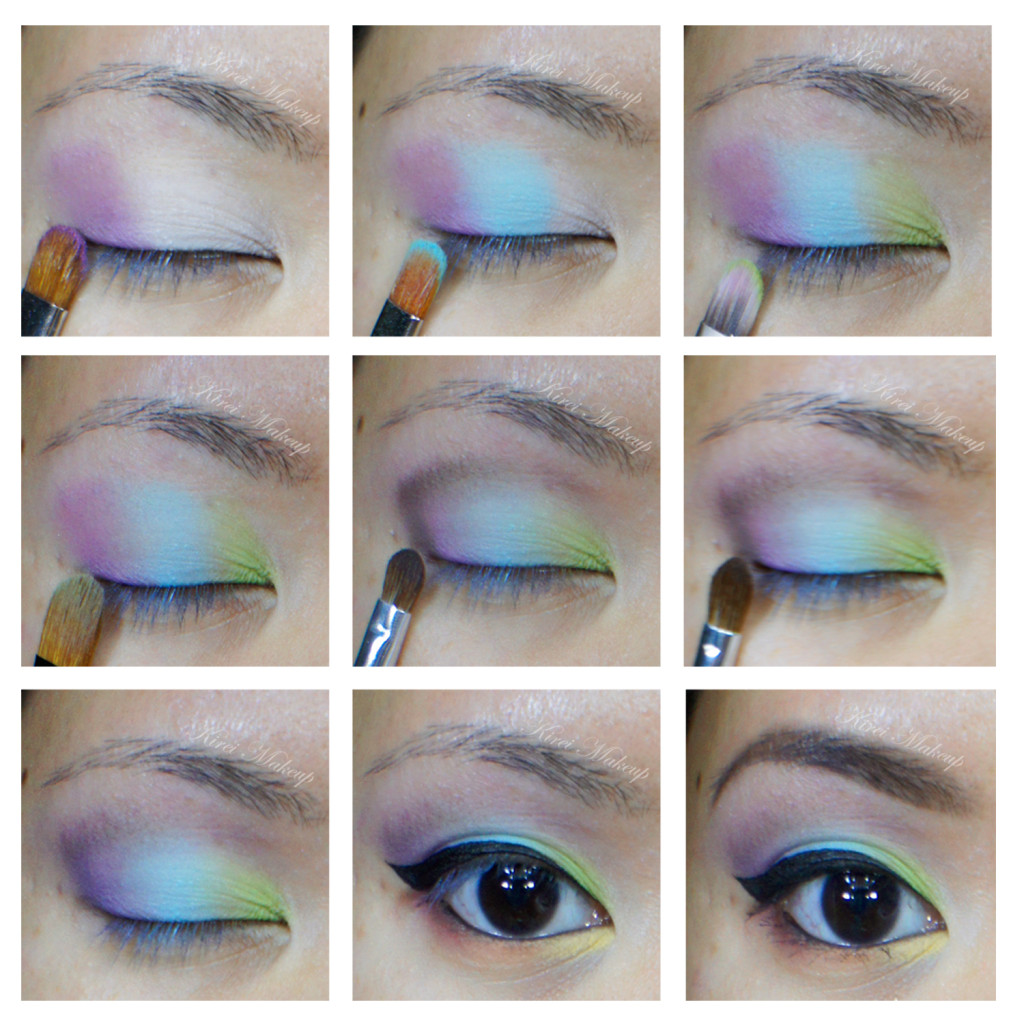
6. I applied eyeshadow F on the outer V using a small fluffy brush.

7. Using a clean fluffy brush, I blended the black eyeshadow so there’s no harsh edge.

8. Using a flat eyeshadow brush (from step 1), I applied eyeshadow B on the outer corner and on top of the black eyeshadow.

9. Using an angled eyebrow brush, I applied eyeshadow G+H on the inner corner of the lower lid, I in the middle and J on the outer corner.

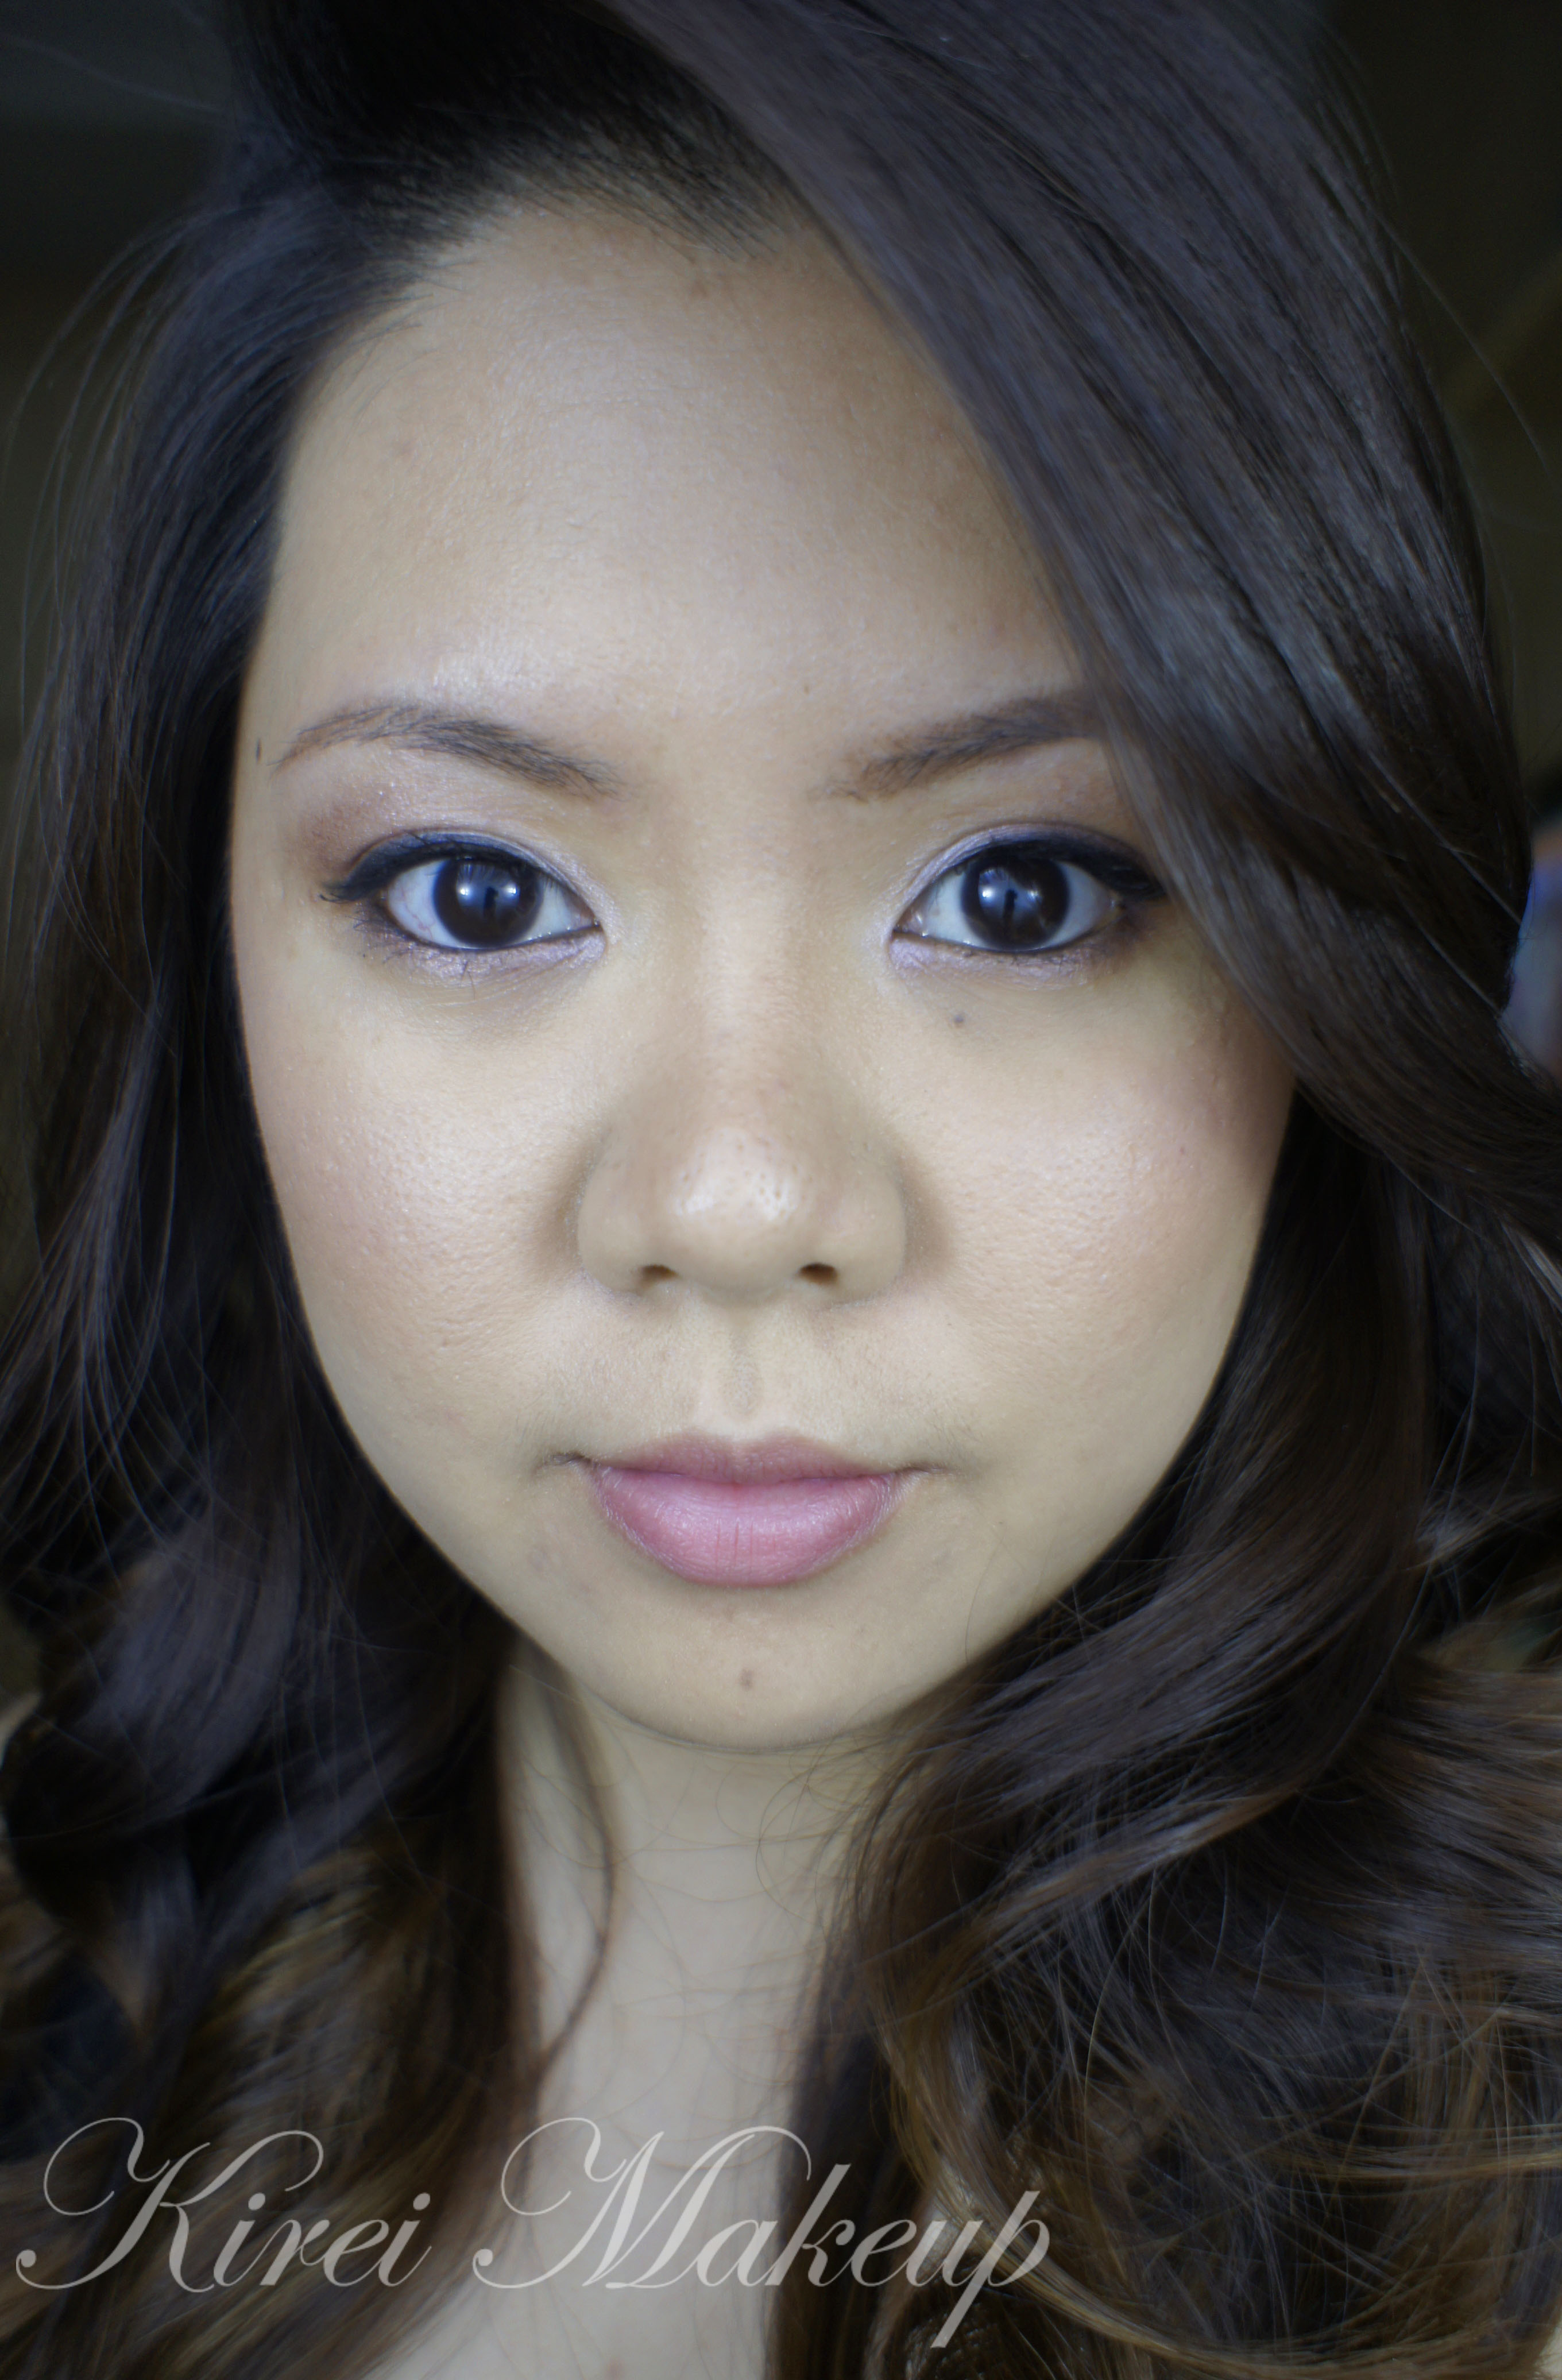
10. I lined my waterline using L’oreal Voluminous Smoldering eyeliner.

11. I created a winged liner using Kat Von D Trooper liquid liner.

12. I curled my lashes and applied MUFE Smoky Lash mascara on both top and lower lashes.

13. I filled my brows in using MUFE Aqua Brow gel.

coastal scent 88 prism palette

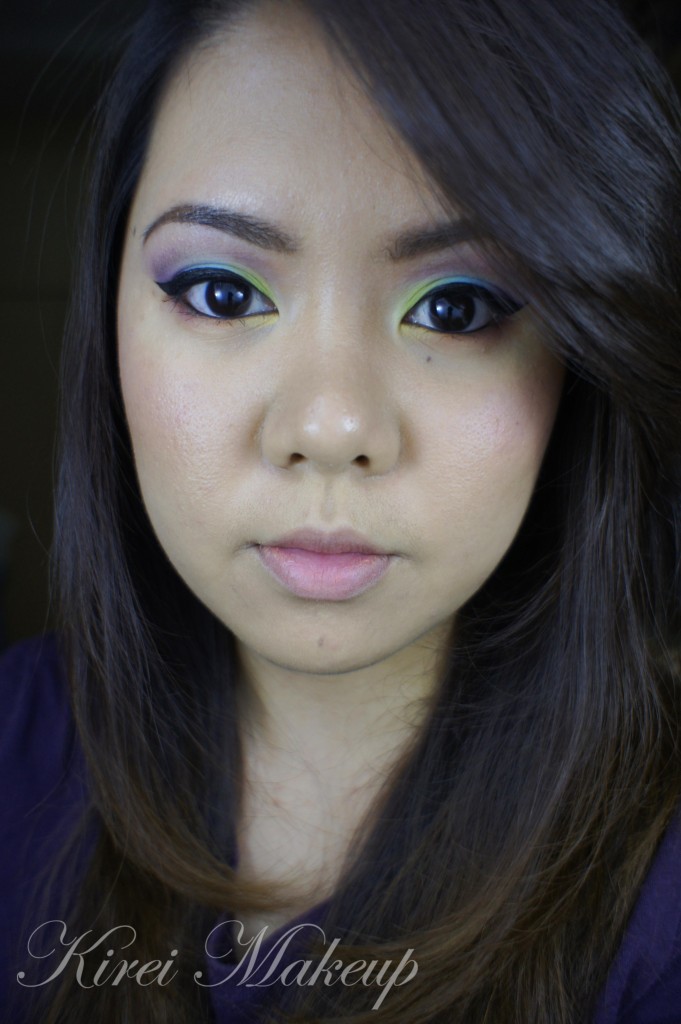
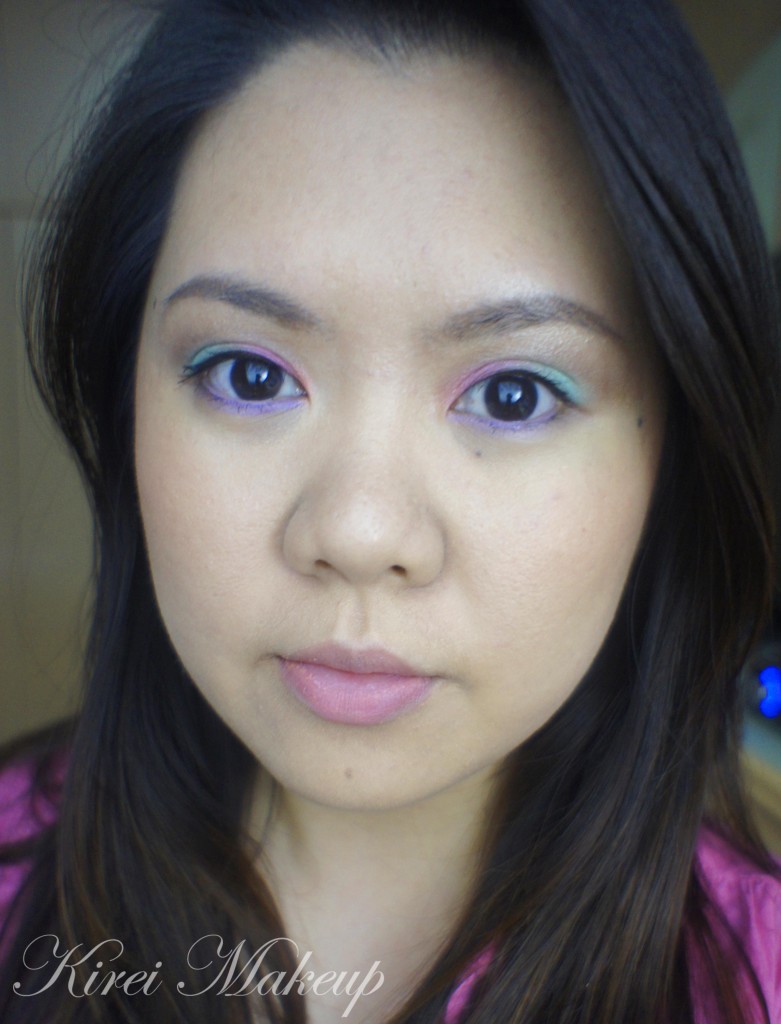
14. On my face, I applied Urban Decay Naked foundation all over using Shiseido foundation brush.

15. I applied Benefit Benetint on my cheeks, and blended it out using a foundation brush.

16. I applied MUFE Rouge Artist Natural Lipstick in N39 (Soft Apricot).

17. Powdered my face using CoverFX translucent powder.

rainbow makeup

Cutie Mcpurple

I wanted to use my pastel and light eyeshadow palette lately. I managed to find my MAC Cutie eyeshadow palette which was from ages a go. I barely used the palette since I wasn’t sure how I was going to tackle the color back when I bought this palette. On top of that, I was into smoky eyes, neutral shades back then.

Anyhow, I don’t think the MAC Cutie palette is on sale anymore. Even if it is, please don’t buy it, it’s not worth your money. The pigment pay-off is so-so, the colors are too light for anyone who’s above NC 15 and it’s not that wearable. I had to pack the colors several time for it to show up. The colors are very sheer if you don’t use any base underneath.

How-to:

1. I applied NYX Jumbo pencil in Milk on the upper lid, blending using my ring finger all the way up to the brow bone.

2. Using a flat eyeshadow brush, I applied MAC Goody Goody Gum Drop on the inner half of the eyelid.

3. Using another flat eyeshadow brush, I applied MAC Boy Crazy on the outer half of the lid.

4. Using Smashbox bullet brush, I applied MAC Azuki Bean on the outer V.

5. Using a small shader brush, I applied MAC Moshi Moshi on the inner corner.

6. I lined my waterline and tightline using L‘oreal Voluminous Smoldering eyeliner.

7. I also lined the eyeliner along my upper lashline.

8. Using a small angled eyeliner brush, I applied MAC Boy Crazy on the inner half of the lower lid and MAC Azuki Bean on the outer half.

9. I curled my lashes and applied Maybelline Volume Express Turbo Boost mascara on the upper as well as lower lashes.

10. I filled my brows in using Dollywinked brow pencil.

Pastel makeup

11. For the face, I applied MUFE HD foundation using CoverFX foundation brush.

12. Under the eyes, I applied MUFE concealer.

13. For the cheeks, I applied MAC Fleur power blush.

14. The look is completed by applying Revlon Mauve It Over matte lipstick on the lips.

MAC CutieMu

Easter Pastels


Easter is near! Lots of pastel colored eggs around and I looove those pastel colors – yellow, blue, pink, purple etc. I am very fond of pastel colors,especially Givenchy Bucolic Blossom quad.. But too bad for my skintone, any pastel colored eyeshadows will just show up very light, whitish-like and pretty much I’ll look washed out.

However, I think I found a trick to wearing the lovely pastels. I know most people use a white base (aka NYX Milk Jumbo Pencil). I found the NYX jumbo pencil to crease a lot even though I applied it sparingly. So, I decided to use a colored base underneath instead of white.  I found that the colored base allows the colors of the Givenchy Bucolic Blossom quad to show through. I love it!

I’ve done an earlier tutorial using the same quad but with a nude base right here 😀

How-to:

1. I applied Urban Decay 24/7 Glide-on eyeliner in Woodstock on the inner half of the upper eyelid. I applied very little and used my finger to blend the eyeliner out. Work fast since the eyeliner dries out pretty fast.

2. Using a flat eyeshadow brush, I applied the pink shadow from Givenchy Bucolic Blossom quad on top of the base.

3. (Not shown in picture – I applied a very sheer layer of Maybelline Color Tattoo in Edgy Emerald on the outer half of the lid). Using a flat eyeshadow brush, I applied the Cyan eyeshadow from the Givenchy Bucolic Blossom quad on top of the base.

4. Using a pencil brush, I applied the lilac from the quad on the lower lid.

5. Using a small blending brush, I applied the brown shadow from the quad on the crease just to add some depth.

6. On the waterline, I applied MAC Chromagraphic eyeliner in NC30 and gently patted the lilac shadow on top of the eyeliner using an angled eyeliner brush.

7. I lined my upper lashline, very close to the roots of the lashes, using MAC Black Tied.

8. I curled my lashes and applied Dior Overcurl mascara.

9. I filled in my brows using a mixture of MAC Omega and MAC Brun.

10. I lightly applied MAC Ricepaper under the brows.

Pastel makeup

11. For the face, I applied MAC Matchmaster foundation using Tarte foundation brush.

12. I applied MAC Peaches blush on the cheeks and Revlon Just Bitten lipbalm in Charmed

Givenchy bucolic blossom


Smashbox Entice Me from Love Me Spring Collection

If you are following me on Twitter, you should know that I went to grab the new Love Me eyeshadow palette from Smashbox couple days a go. Since I couldn’t decide which palette to buy, N told me to grab both! So, I bought both the Entice Me and Admire Me palettes. I bought it at Shopper’s and lucky me, I was able to use my points to pretty much buy both palettes (woo-hoo!!!). It costs CAD$40 for each palette at Shopper’s.

Entice Me Smashbox

Entice Me comes in 5 shadows – Purple Taupe (left), Sparkling Purple (top), Icy Pink (bottom), Icy Blue (right top) and Deep Sparkling Navy (right). The “base colors (Sparkling Purple and Icy Pink)” occupied most of the palette.

The texture of the shadows is very buttery and creamy. It blends very easily. The Icy Blue and Icy Pink are very light and pastel-y. The other 3 colors are quite shimmery.

Love Me palette Smashbox

Anyhow, I’m using Entice Me palette for this tutorial. I used the same step-by-step look on the upper eyelid as what they recommend at the back of the palette.

How-to:

1. I applied Icy Blue from the inner corner to the center of the eyelid using a flat eyeshadow brush.

2. Then, I applied Sparkling Purple from the outer corner to the center of the lid, blending it towards Icy Blue.

3. Using a small shader brush, I applied Icy Pink on the inner corner of the eyelid.

4. Using an angled brush, I applied Deep Sparkling Navy on along the upper lashline as a winged liner.

5. I used a clean angled brush to apply Purple Taupe on the lower lashline (not on the palette instruction).

6. I lined my waterline and tightline using L’oreal Smoldering Voluminous eyeliner.

7. I curled my lashes and applied L’oreal Voluminous Carbon Black mascara on both top and bottom lashes.

8. I filled my brows using Anastasia Brow Wiz in Brunette.

Love Me Smashbox

9. For my face, I applied Urban Decay Naked foundation.

10. I applied L’oreal True Match Concealer Crayon W1-w3 under my eyes, along the bridge of my nose, on top of my brows and on my cupid’s bow.

11. Then, I used L’oreal True Match Concealer Crayon N6-N8 on the hollows of my cheeks, on the side of my nose and on my temple.

12. I applied MAC Cubic on the cheeks and completed the look by applying Revlon Mauve It Over matte lipstick.

ps: please ignore my under eye circles..I haven’t been able to have a good rest for a few days, and I got sick…

Entice Me Smashbox


Givenchy Bucolic Blossoms

Since I’ve been doing a lot of in-your-face bright colour makeup, I thought it’d be fun to do something bright but softer. I don’t know if you guys know this makeup artist, Lisa Elridge (and a great youtube guru), but I love her..no, I adore her! She’s my inspiration and one of the few REAL makeup artists on youtube. She is amazing! Anyhow, She has done something similar to the tutorial below but on a lighter skin tone, and since I also have the same quad as her (the quad has been sitting at the back of my vanity drawer and hiding) I thought why not re-create the look. I guess for those with darker skin tones, you can try a deeper shades of eyeshadows so it doesn’t look chalky or ashy on your skin tone. I actually quite like how this look turns out, not too bright and still wearable.

Givency Bucolic Blossom

How-to:

1. I applied MAC Soft Ochre paint pot all over my lid to prep my eyes with  my ring finger.

2. Using a flat eyeshadow brush from Urban Decay, I applied the eyeshadows from the Givenchy Bucolic Blossoms quad: mint green colour on the inner corner of the lid, the pink in the middle and the purple on the outer corner.

3. Using a clean blending brush, I blended the colours towards the crease.

4. I applied the same colour combination on the lower lid using a small angled brush from MAC.

5. To define my eyes a little, I applied the brown from the palette along my upper and lower lash line. I found that the brown isn’t intense enough, and so I applied MAC Brun eyeshadow on top of it.

6. I curled my lashes using Urban Decay eyelash curler and applied Diorshow New Look mascara lightly on upper and lower lashes.

7. I applied MAC Studio fix fluid all over my face using CoverFX foundation brush 160.

8. I applied Benefit Coralista blush on the cheeks and completed the look by applying Tarte Lipsurgence in Enchanted.

Givency Bucolic Blossom
Pastel Eyeshadows


Givency Bucolic Blossom