Lily Cole Bodyshop Shimmer Cube Look #2

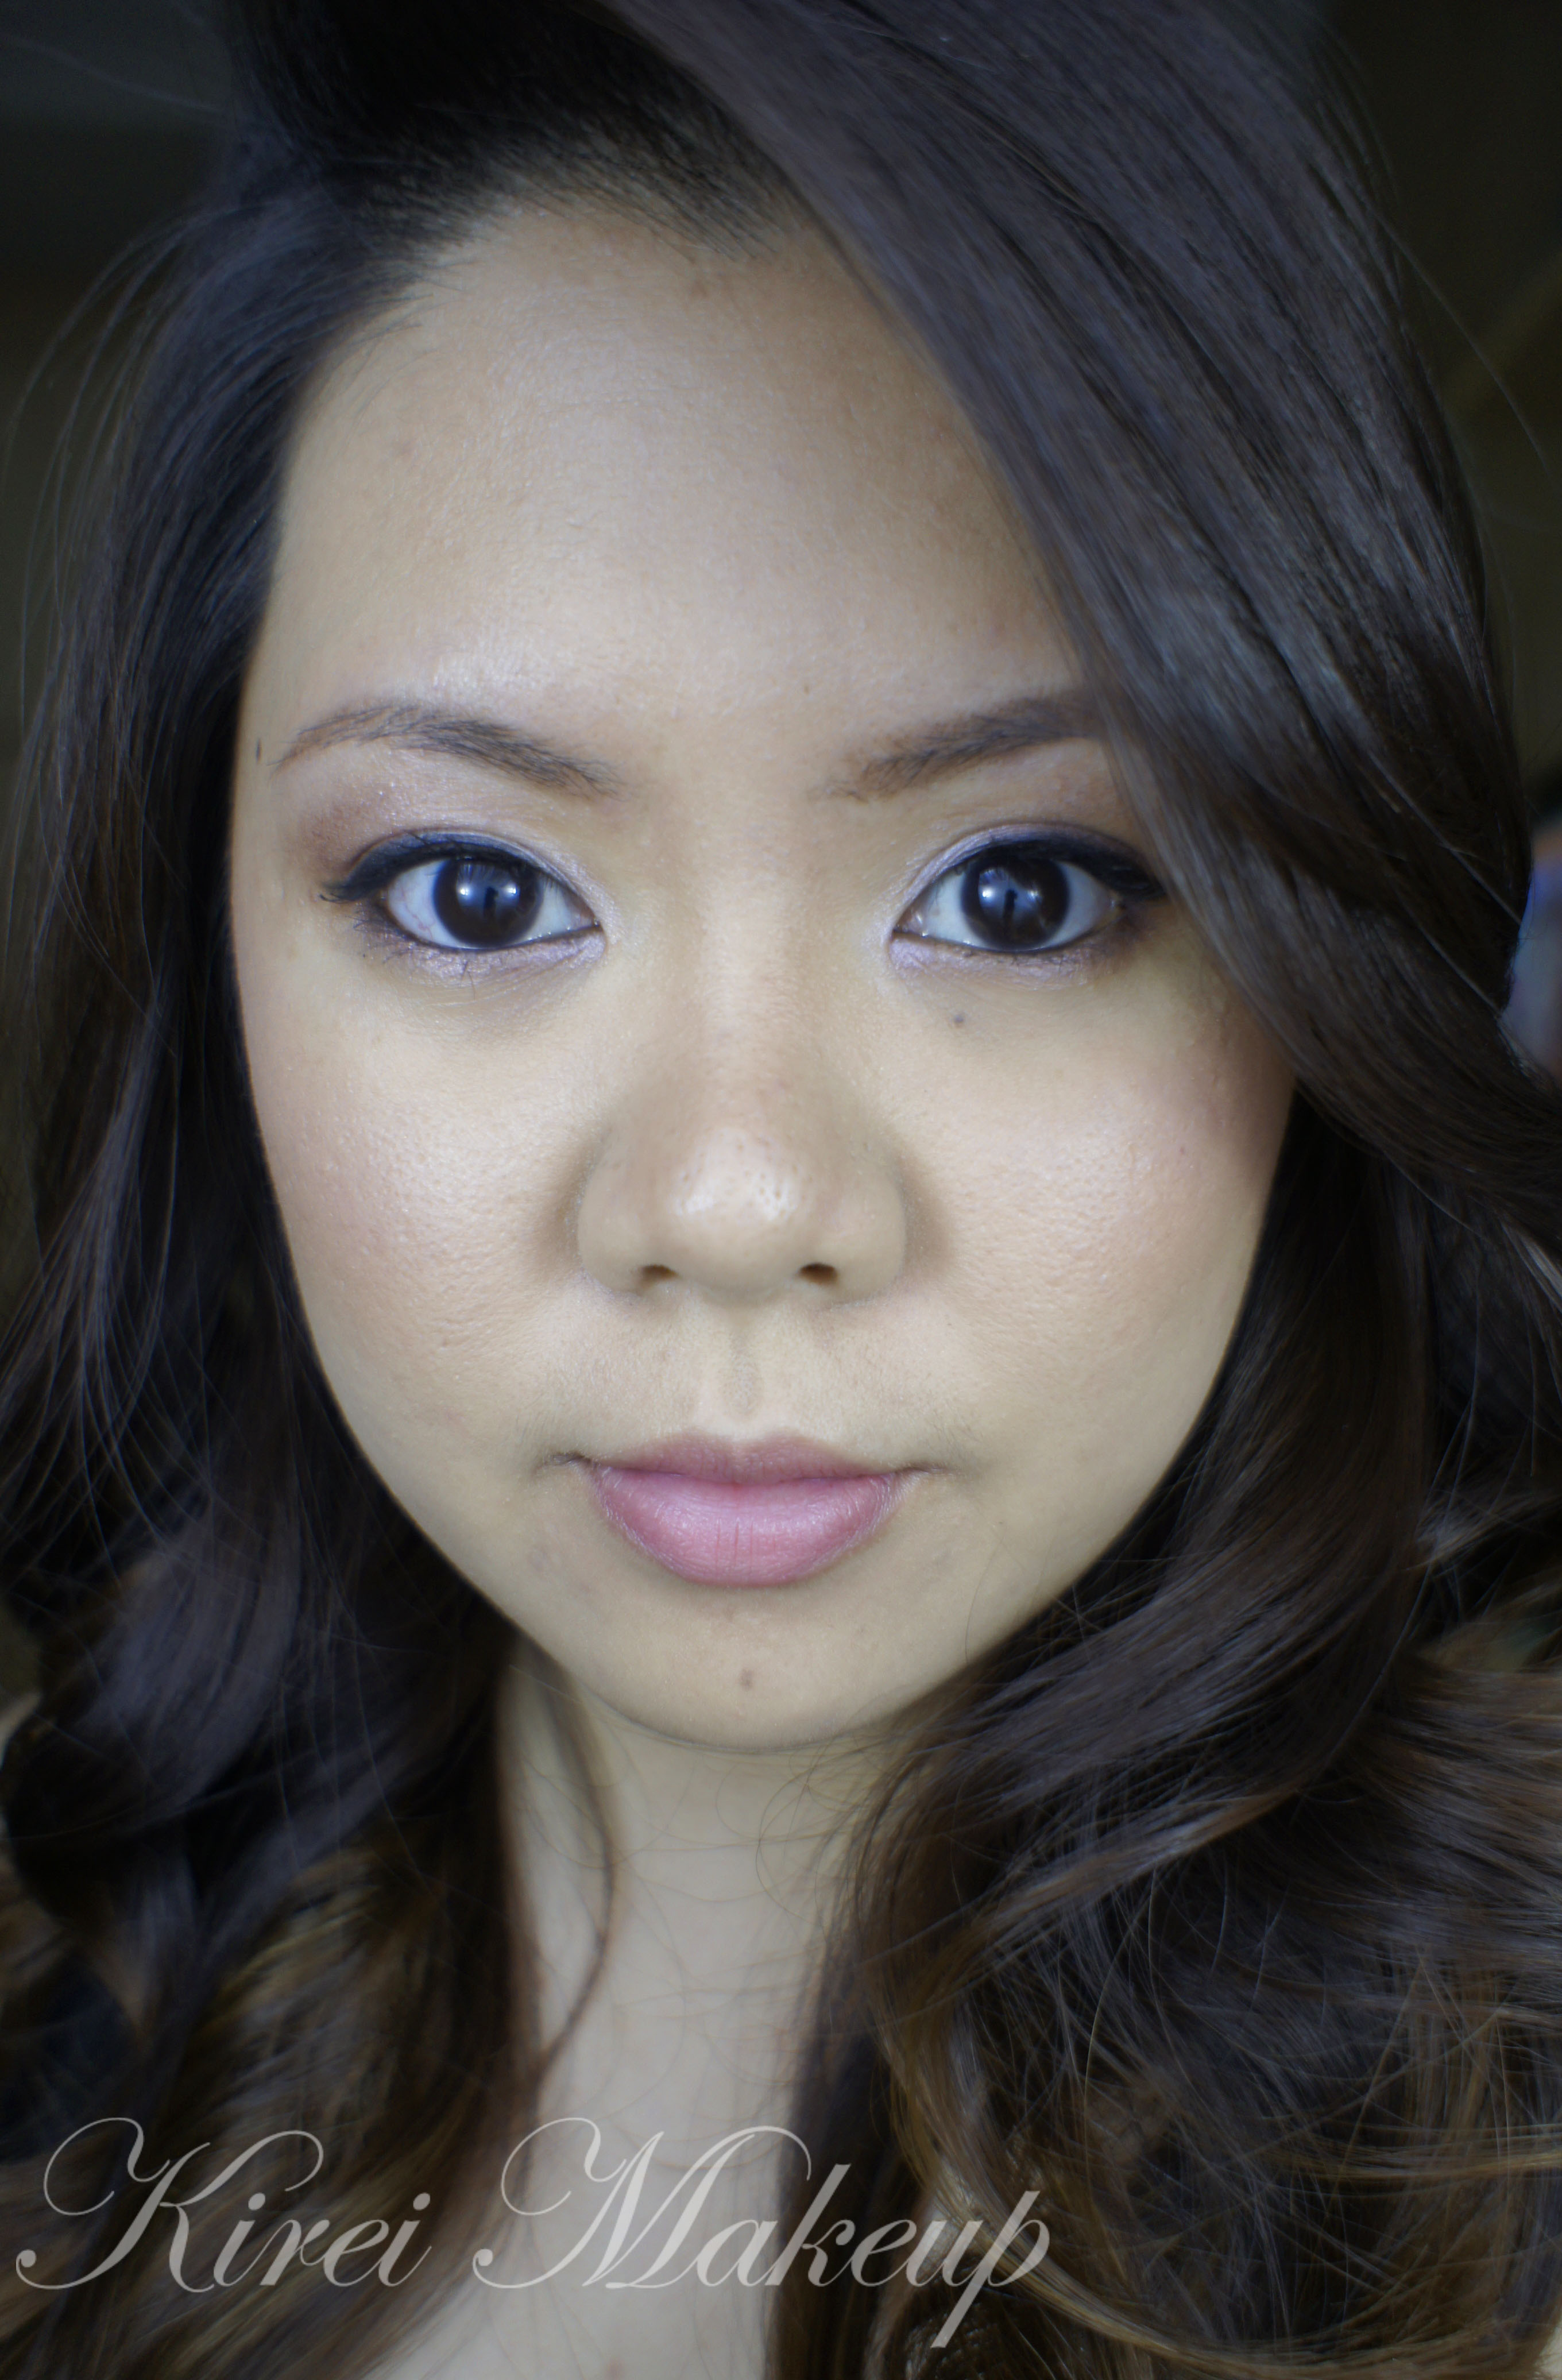
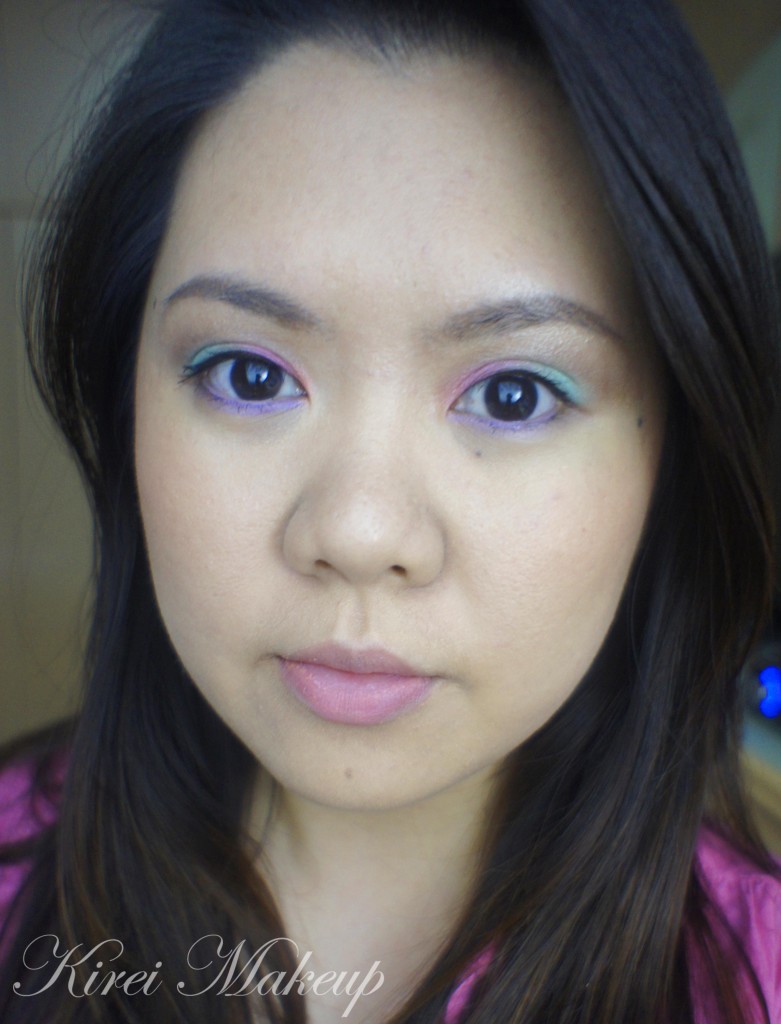
I wanted to do another tutorial using the Lily Cole BodyShop Shimmer Cube that I bought in April. I’ve done a review in this post Body Shop Lily Cole Shimmer Cube, and a tutorial in this Spring Lilac post. I really love the eyeshadow combination, and wanted to create another look that’s wearable and not too over the top, yet at the same time there’s still a play of colors on the eyes.

I decided to use the eyeshadows dry for a sheer wash of color. If you like a more intense color, feel free to apply the eyeshadows wet. I like how this look ends up to be very light and just enough. I think it’s perfect for the Summer, esp. since the weather is getting really hot in Jakarta.
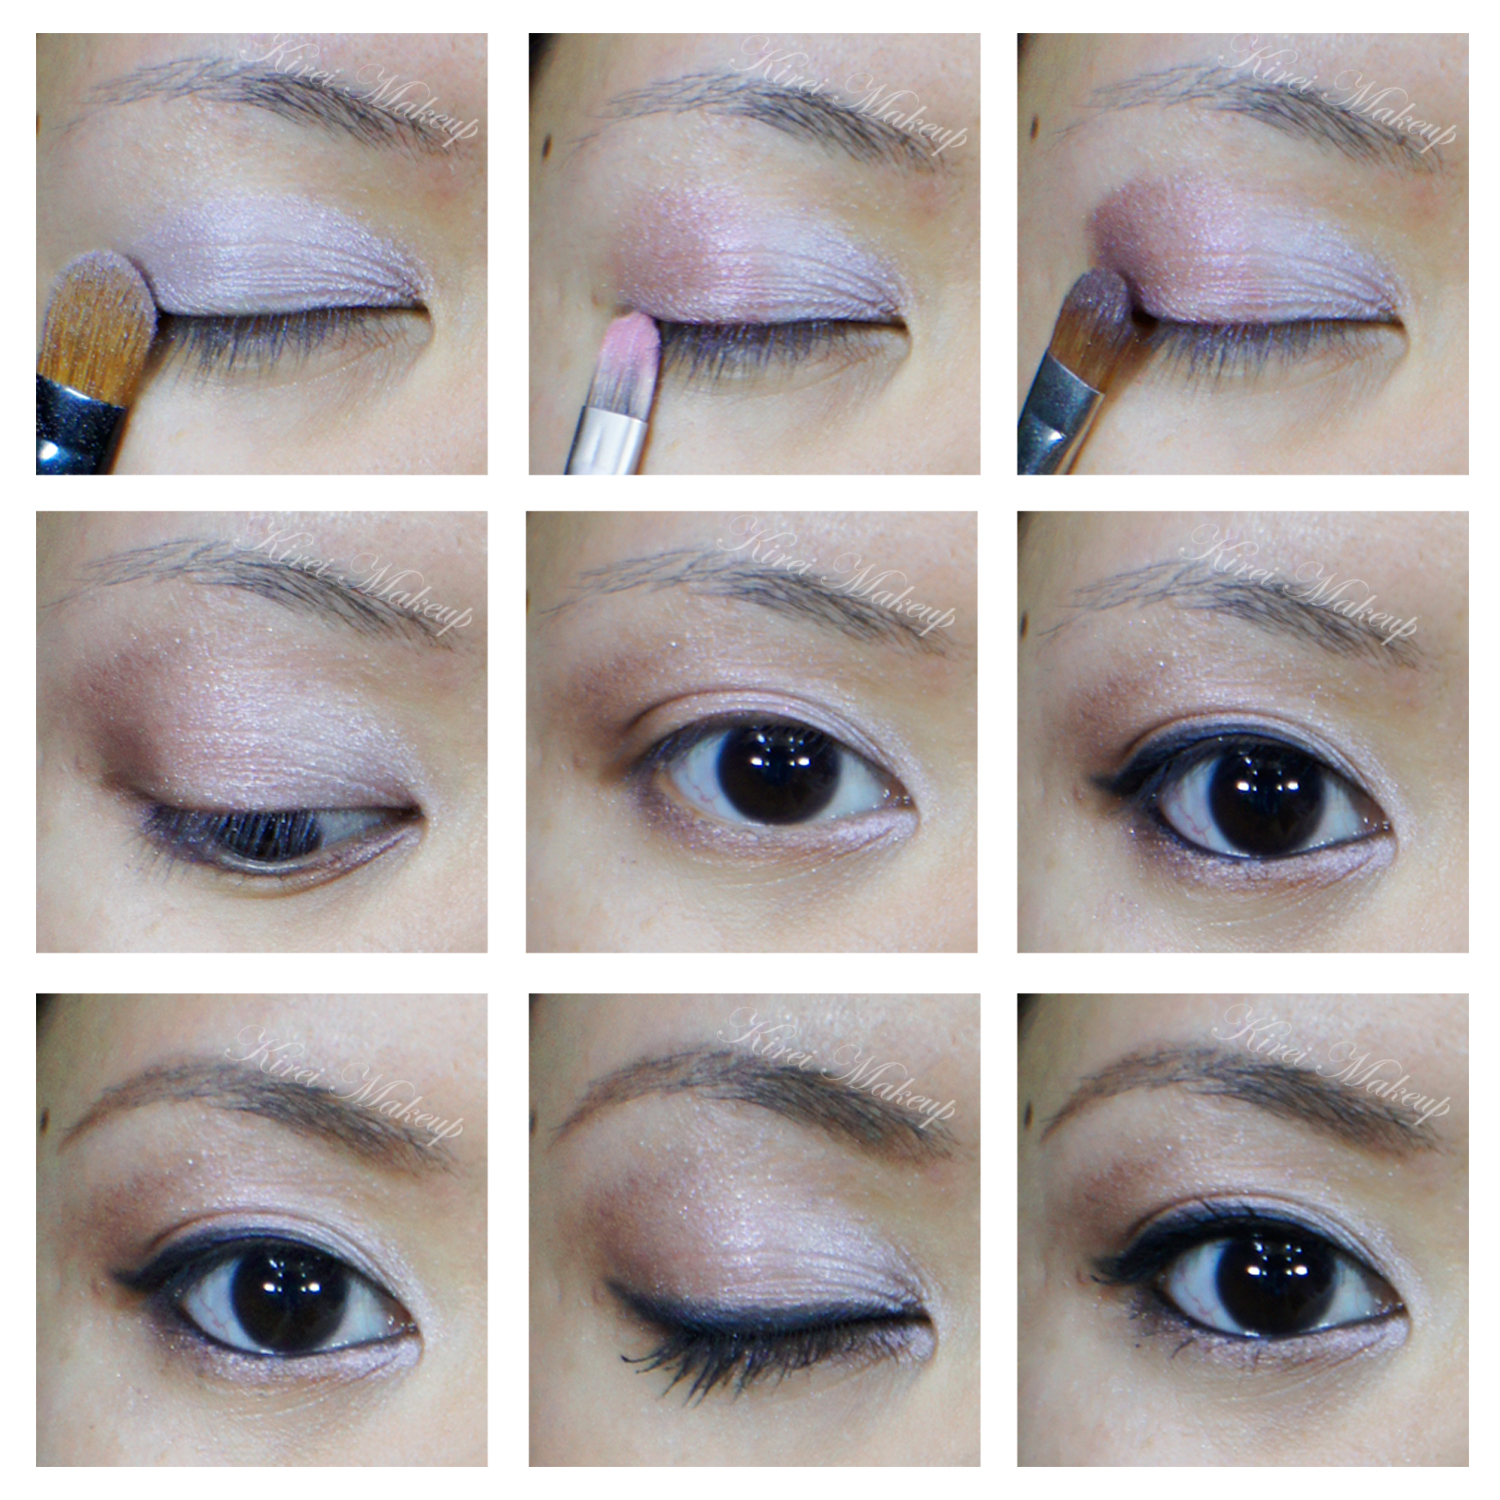
How-to:

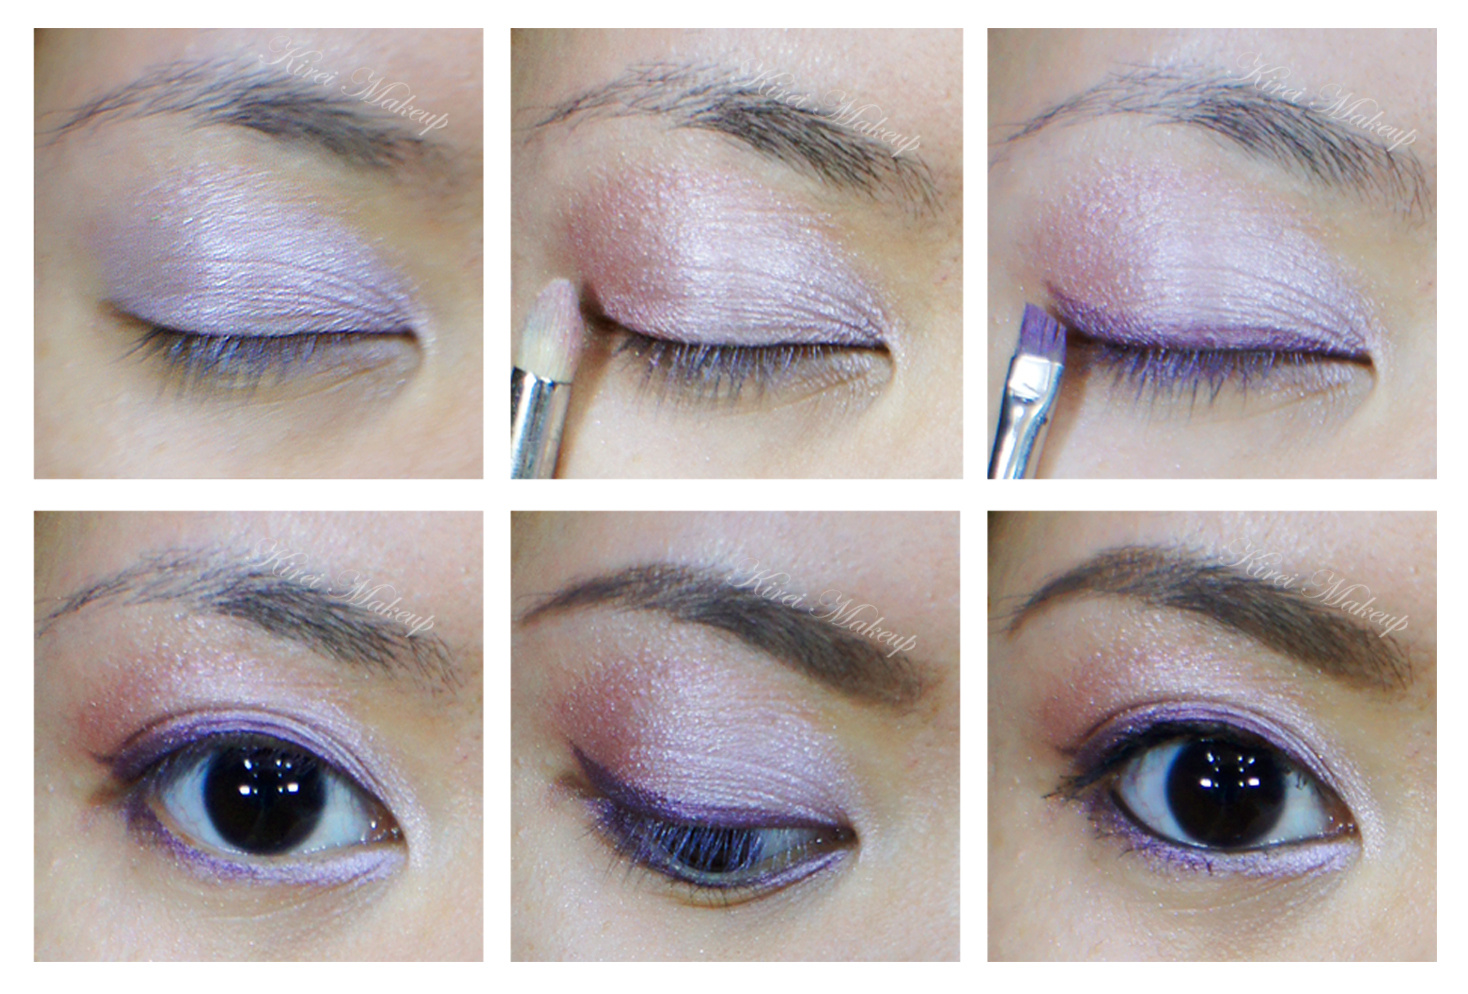
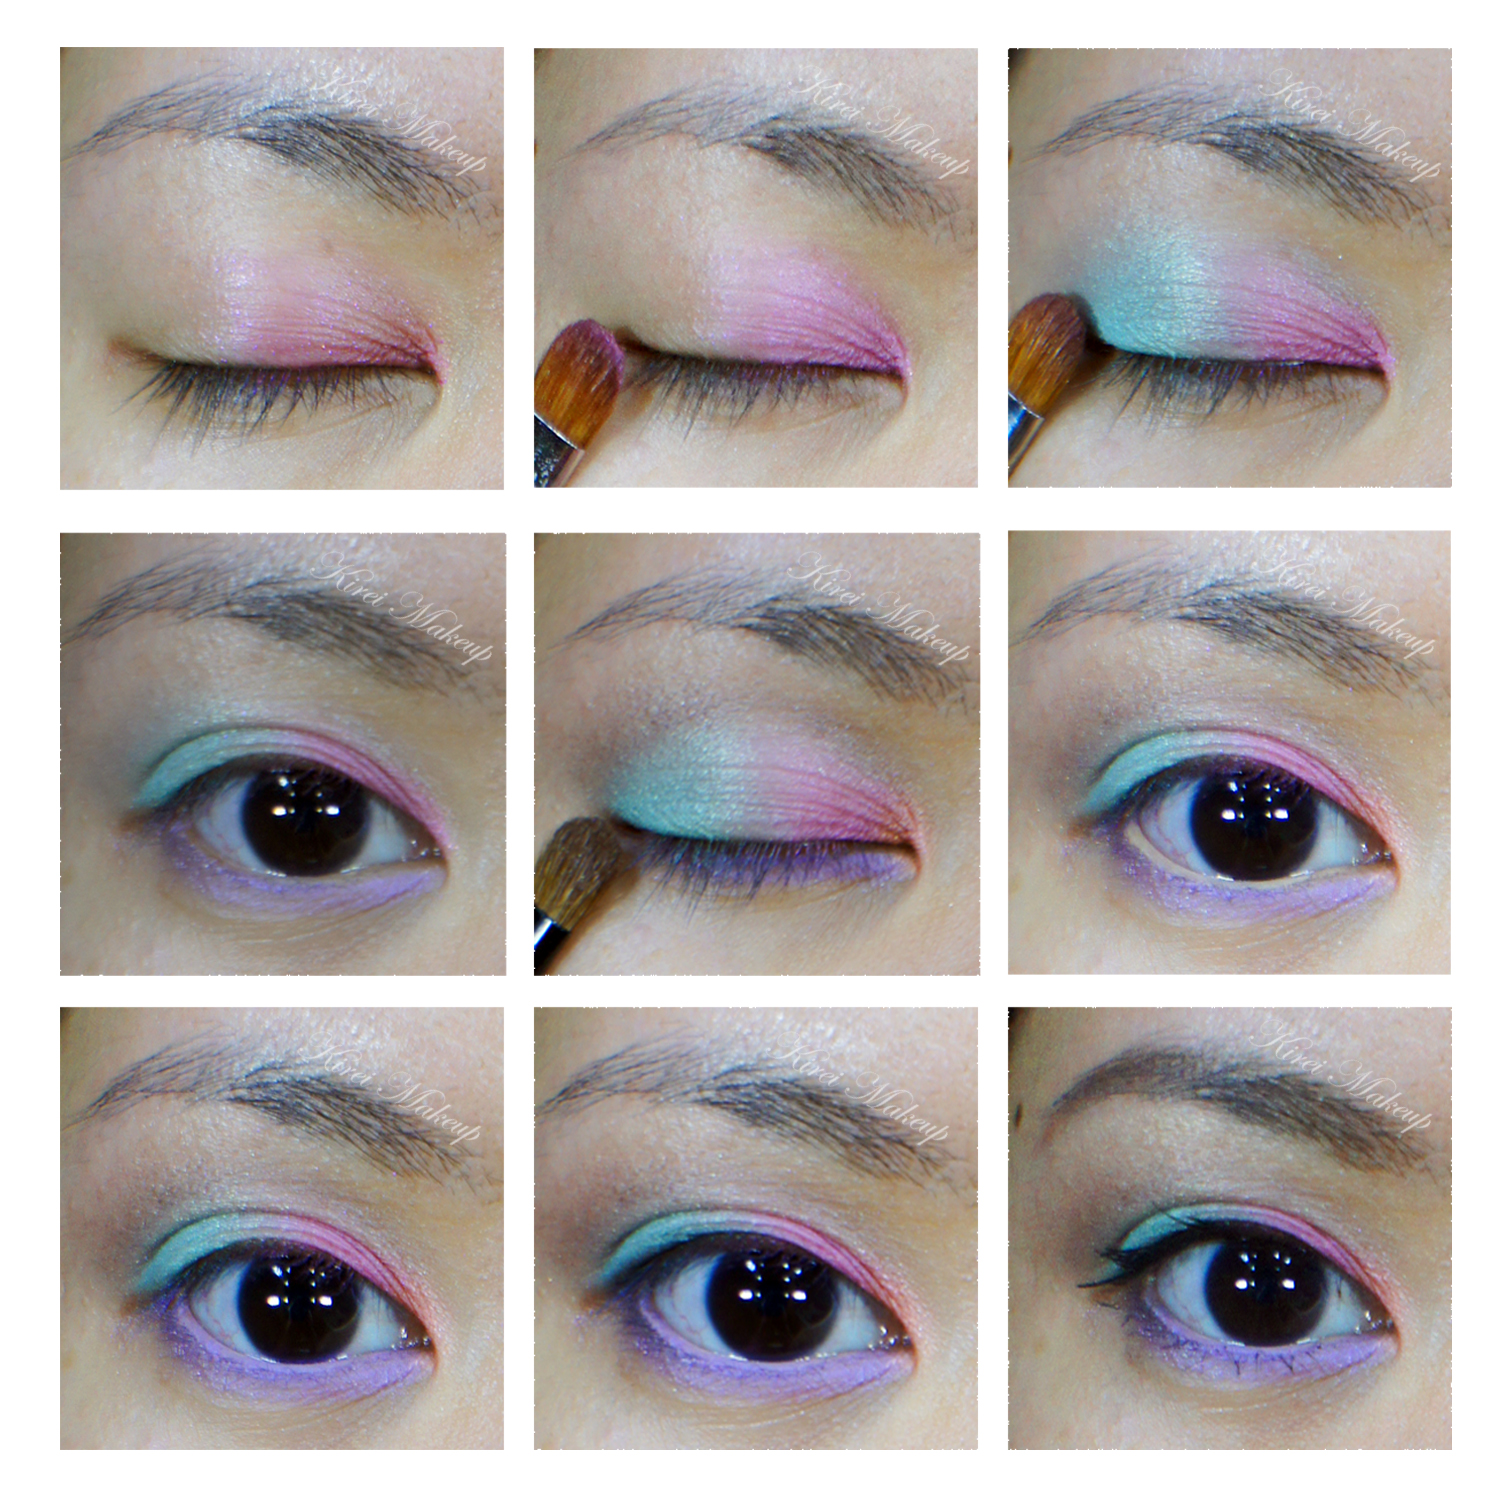
1. I applied the Live Lilac eyeshadow from BodyShop Lily Cole Shimmer cube using a flat eyeshadow brush all over my lid.

2. Next, I applied Think Pink eyeshadow from Bodyshop Lily Cole Shimmer cube on the outer half of the lid using a flat eyeshadow brush.

3. On the outer corner only, I applied Go Violet using a flat eyeshadow brush.

4. Using a clean blending brush, I blended Go Violet on the crease.

5. I applied Think Pink on the lower lid, as well as Go Violet on the outer corner of the lower lid using a small shader brush.

6. I dabbed Live Lilac on the inner corner of the lower lid using a pencil brush.

7. Using L’oreal Voluminous Smoldering eyeliner, I lined my waterline, tightline and along the upper lash line creating a small flick at the outer corner.

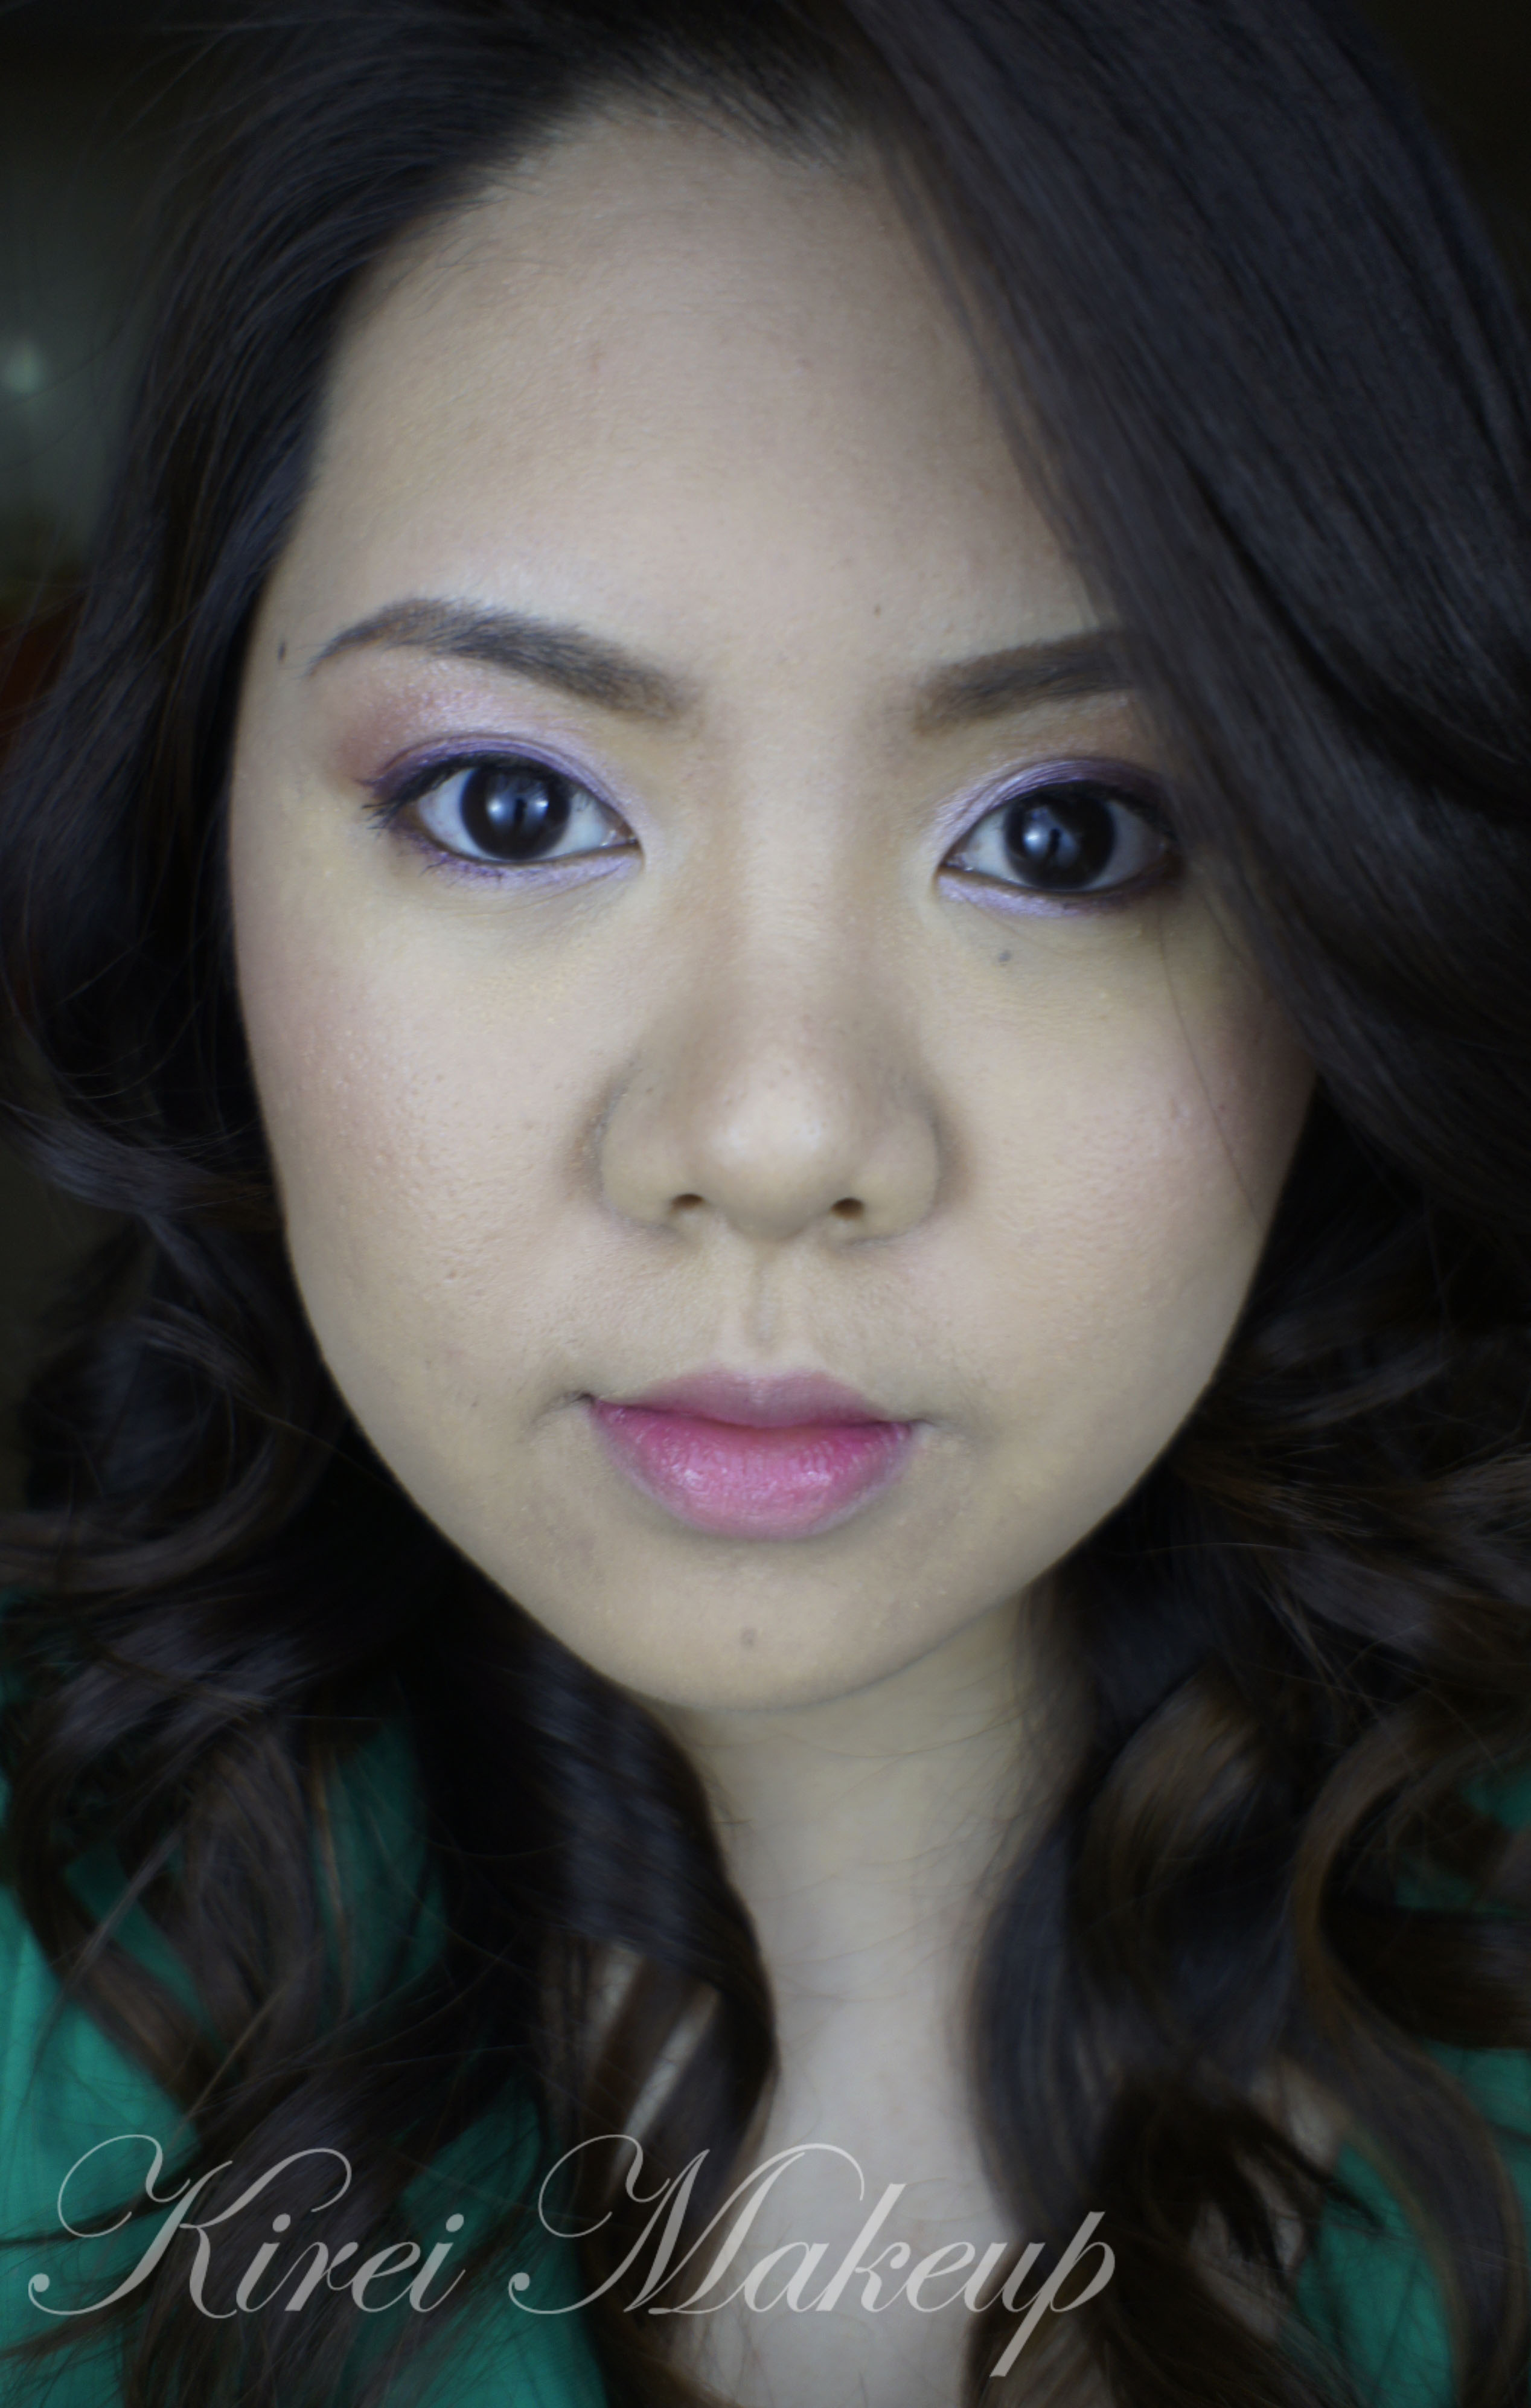
8. I filled my brows using Shu Uemura Hard Formula 9 eyebrow pencil.

9. I curled my lashes and applied Maybelline Volume Express Turbo Boost mascara.

Lily Cole Bodyshop Shimmer Cube

10. For the face, I applied Urban Decay Naked foundation using foundation brush.

11. On the cheeks, I applied Benefit Hervana.

12. I completed the look by applying Clinique Chubbystick Lip pencil in Bountiful Blush.

Lily Cole Bodyshop Shimmer Cube

Spring Lilac

I couldn’t resist to try my new Sleek Makeup iDivine Snapshot palette that I bought from Luxola! Oh, just to let you know, there’s a 10%ย  15% off if you use the code LXBLOG when you check out over at Luxola (over $25 purchase) ๐Ÿ˜‰ For swatches on the iDivine palettes, please check Sleek Makeup iDivine Swatches post.

Anyways, so I wanted to try the Lotus Flower and Green Iguana shadows for this look since those 2 eyeshadows were the ones that caught my attention the most. I LOVE…let me repeat, I LOVE Lotus Flower! Amazing color, so perfect for Spring/Summer! Green Iguana too is oh so prettyy! For some reason, my camera doesn’t pick the green, instead it might look bluish on your screen.

How-to:

1. Using a flat eyeshadow brush, I applied Lotus Flower from Sleek Makeup iDivine Snapshot palette on the inner half of my upper eyelid.

2. Using another flat eyeshadow brush, I applied Green Iguana on the outer half.

3. Using a clean blending brush, I blended the edge and the crease to remove any hard line.

4. Using a small fluffy brush, I applied Urban Decay Hijack on the outer V and crease.

5. Using a clean blending brush, I blended UD Hijack.

6. Using a small shader brush, I applied Lotus Flower on the inner half of the lower lid and Green Iguana on the outer half.

7. I created a tiny winged liner along my upper lashline using Kat Von D Trooper eyeliner.

8. I lined my waterline and tightline using L’oreal Voluminous Smoldering eyeliner.

9. I curled my lashes using Shu Uemura eyelash curler and applied L’oreal Double Extender Curl mascara on both top and lower lashes.

10. I filled my brows in using Shu Uemura brow pencil.

sleek makeup lotus flower

11. I applied MUFE HD foundation all over my face.

12. Under my eyes, I applied Bobbi Brown peach corrector.

13. On the cheeks, I applied Benefit Hoola and Benefit Coralista.

14. On the lips, I applied Chanel Confidentielle lipstick.

sleek makeup green iguana

Spring Lilac

Aye, if you’ve read my previous post, you know this tutorial is coming, right? Right! As I’ve said previously, the colors from this Bodyshop Lily Cole Shimmer Cube are a lot more pigmented when applied with a flat eyeshadow brush. So, don’t be surprised when you see that the colors here are a lot more pigmented than the ones that I swatched on my hand.

Now, I added an extra full front photo of myself with my eyes looking down. You might notice that the eyeliner on the other eye is way thicker, that’s because one of my eye is smaller than the other one. So, I have to draw a thicker eyeliner on the other eye so when I opened both eyes, the eyeliner looked equal. Also, the bigger eye has a lot more folds/lines. The small eye has an almond shape while the bigger one is more rounded. Ugh, there’s a reason why I have the bangs covering that eye! hahaha..Anyways, doesn’t matter. I can’t really help it, so I just make the best out of it!

Repeat after me, people: my imperfections make me perfect and unique ๐Ÿ˜‰

So this look will suit almost everyone! I’m not sure how this will show up on those with darker skin than mine. I think darker skin might be able to use the 2 dark colors, but might not be able to use the lighter ones. This cube works for any eye colors! The look is very spring. It’s a great look if you dare to wear colors during the day.

Anyhow, let’s get the tutorial started! I prep my eyelids by applying Maybelline Inked in Pink 24hr Color Tattoo.

Lilac makeup

How-to:

1. Using a flat eyeshadow brush, I applied Live Lilac all over the lid.

2. With a pencil brush, I applied Think Pink on the outer V and on the crease.

3. I blended the crease by applying a clean blending brush.

4. Using an angled eyeliner brush, I dipped the brush in water and then to Go Violet eyeshadow. I created a winged liner on the upper lid. I also lined my waterline using black eyeliner from Annabelle.

5. Using whatever is left on the brush, I applied Go Violet on the lower lashline. I also applied Live Lilac on the inner corner of the lower lid.

6. I filled in my brows using Anastasia Brow Powder in Brunette.

7. I curled my lashes and applied L’oreal Curl Impact Collagen mascara on both top and lower lashes.

bodyshop lily cole shimmer cube

8. I applied MAC Matchmaster foundation on my face using MAC Stippling brush. This foundation is quite matte, and I purposely chose it because the eyes are quite frosty.

9. I powdered my T-zone using a loose powder.

10. I contoured the side of my nose and the hollow of the cheeks using MAC Shadowy.

11. For the cheeks, I applied MAC Well Dressed blush.

12. For the lips, I applied Revlon Just Bitten lip balm in Crush on the center of the lid and blended it outwards using my finger. On top of it, I applied a clear lipgloss and blot excess off.

spring makeup 2013

Easter Pastels


Easter is near! Lots of pastel colored eggs around and I looove those pastel colors – yellow, blue, pink, purple etc. I am very fond of pastel colors,especially Givenchy Bucolic Blossom quad.. But too bad for my skintone, any pastel colored eyeshadows will just show up very light, whitish-like and pretty much I’ll look washed out.

However, I think I found a trick to wearing the lovely pastels. I know most people use a white base (aka NYX Milk Jumbo Pencil). I found the NYX jumbo pencil to crease a lot even though I applied it sparingly. So, I decided to use a colored base underneath instead of white.ย  I found that the colored base allows the colors of the Givenchy Bucolic Blossom quad to show through. I love it!

I’ve done an earlier tutorial using the same quad but with a nude base right here ๐Ÿ˜€

How-to:

1. I applied Urban Decay 24/7 Glide-on eyeliner in Woodstock on the inner half of the upper eyelid. I applied very little and used my finger to blend the eyeliner out. Work fast since the eyeliner dries out pretty fast.

2. Using a flat eyeshadow brush, I applied the pink shadow from Givenchy Bucolic Blossom quad on top of the base.

3. (Not shown in picture – I applied a very sheer layer of Maybelline Color Tattoo in Edgy Emerald on the outer half of the lid). Using a flat eyeshadow brush, I applied the Cyan eyeshadow from the Givenchy Bucolic Blossom quad on top of the base.

4. Using a pencil brush, I applied theย lilac from the quad on the lower lid.

5. Using a small blending brush, I applied the brown shadow from the quad on the crease just to add some depth.

6. On the waterline, I applied MAC Chromagraphic eyeliner in NC30 and gently patted the lilac shadow on top of the eyeliner using an angled eyeliner brush.

7. I lined my upper lashline, very close to the roots of the lashes, using MAC Black Tied.

8. I curled my lashes and applied Dior Overcurl mascara.

9. I filled in my brows using a mixture of MAC Omega and MAC Brun.

10. I lightly applied MAC Ricepaper under the brows.

Pastel makeup

11. For the face, I applied MAC Matchmaster foundation using Tarte foundation brush.

12. I applied MAC Peaches blush on the cheeks and Revlon Just Bitten lipbalm in Charmed

Givenchy bucolic blossom