Metallic Storm

A new tutorial using my brand new Sleek Makeup iDivine Storm Palette. I actually been wanting to buy the palette for a while, and I couldn’t made up my mind because I had a bad experience with Indonesian custom not releasing my palettes. So, I was extremely happy when Luxola finally has an office in Jakarta. That makes online shopping in Luxola so much easier. My palette arrived in 2 days after I purchased it. So fast and quick! If you do click on my Luxola banner or links, you’ll get a 15% off. I am affiliated with Luxola and do earn commission in store credit form. However, I have to buy my palettes out of my own pocket.

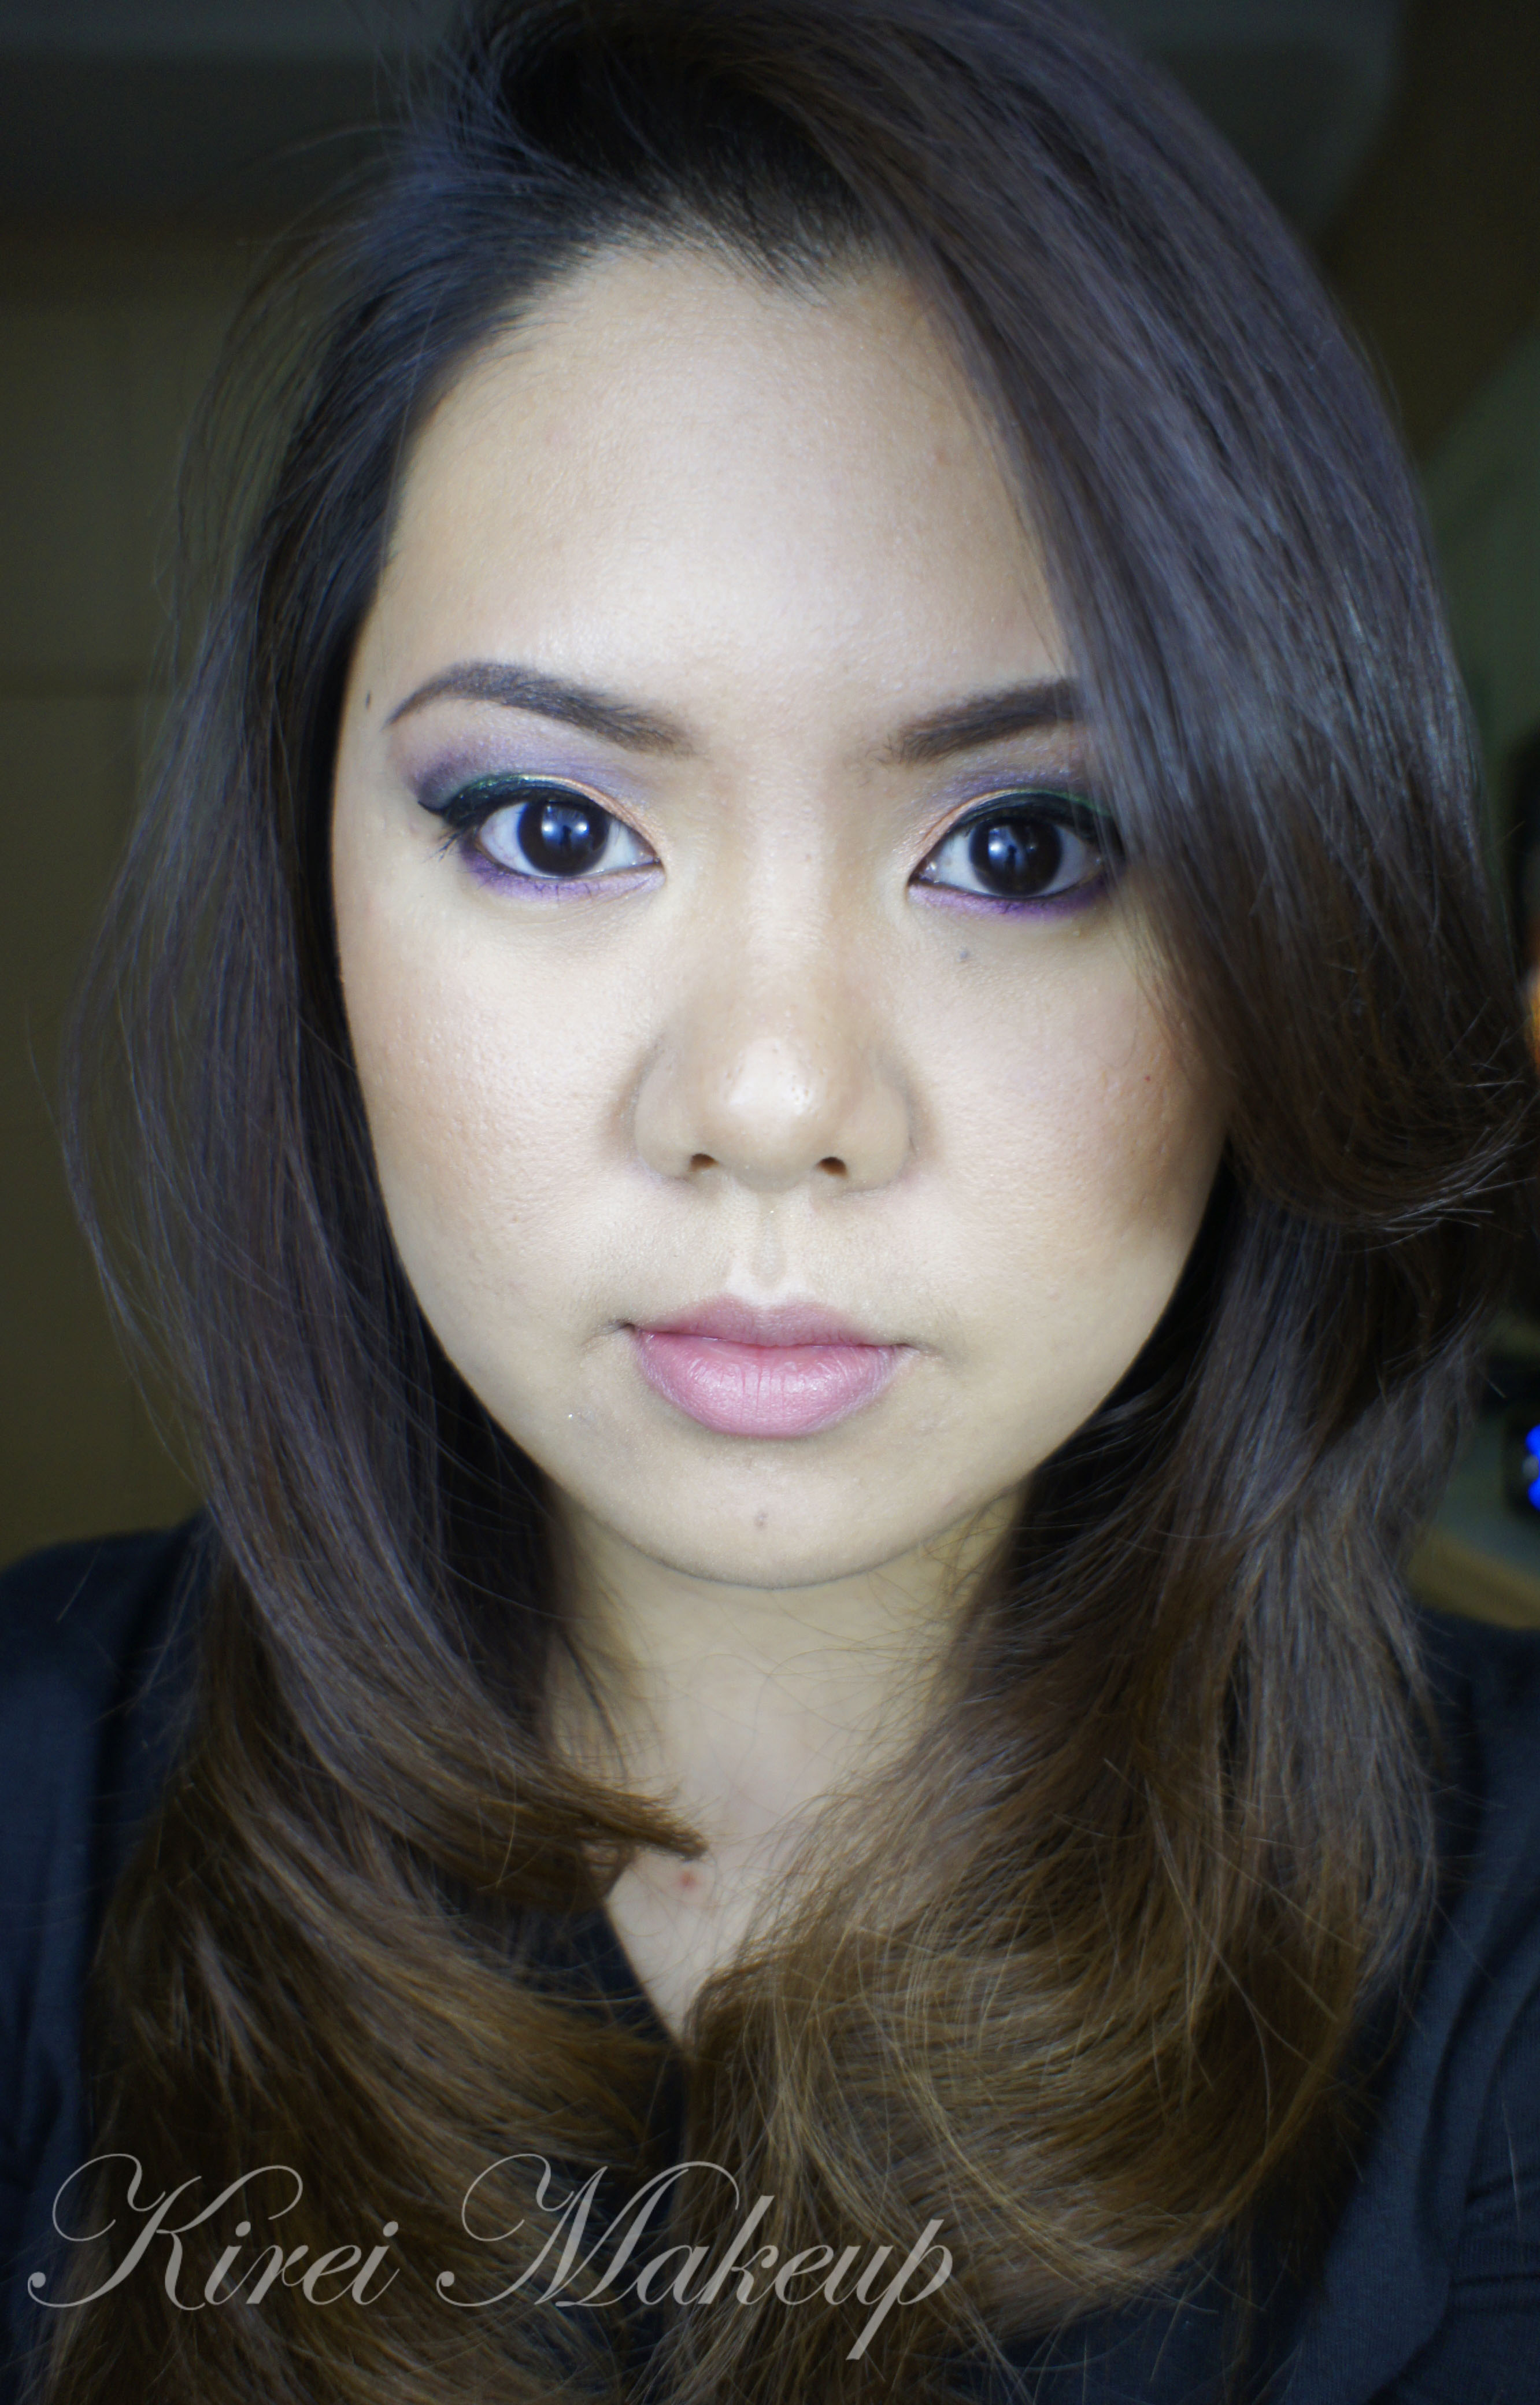
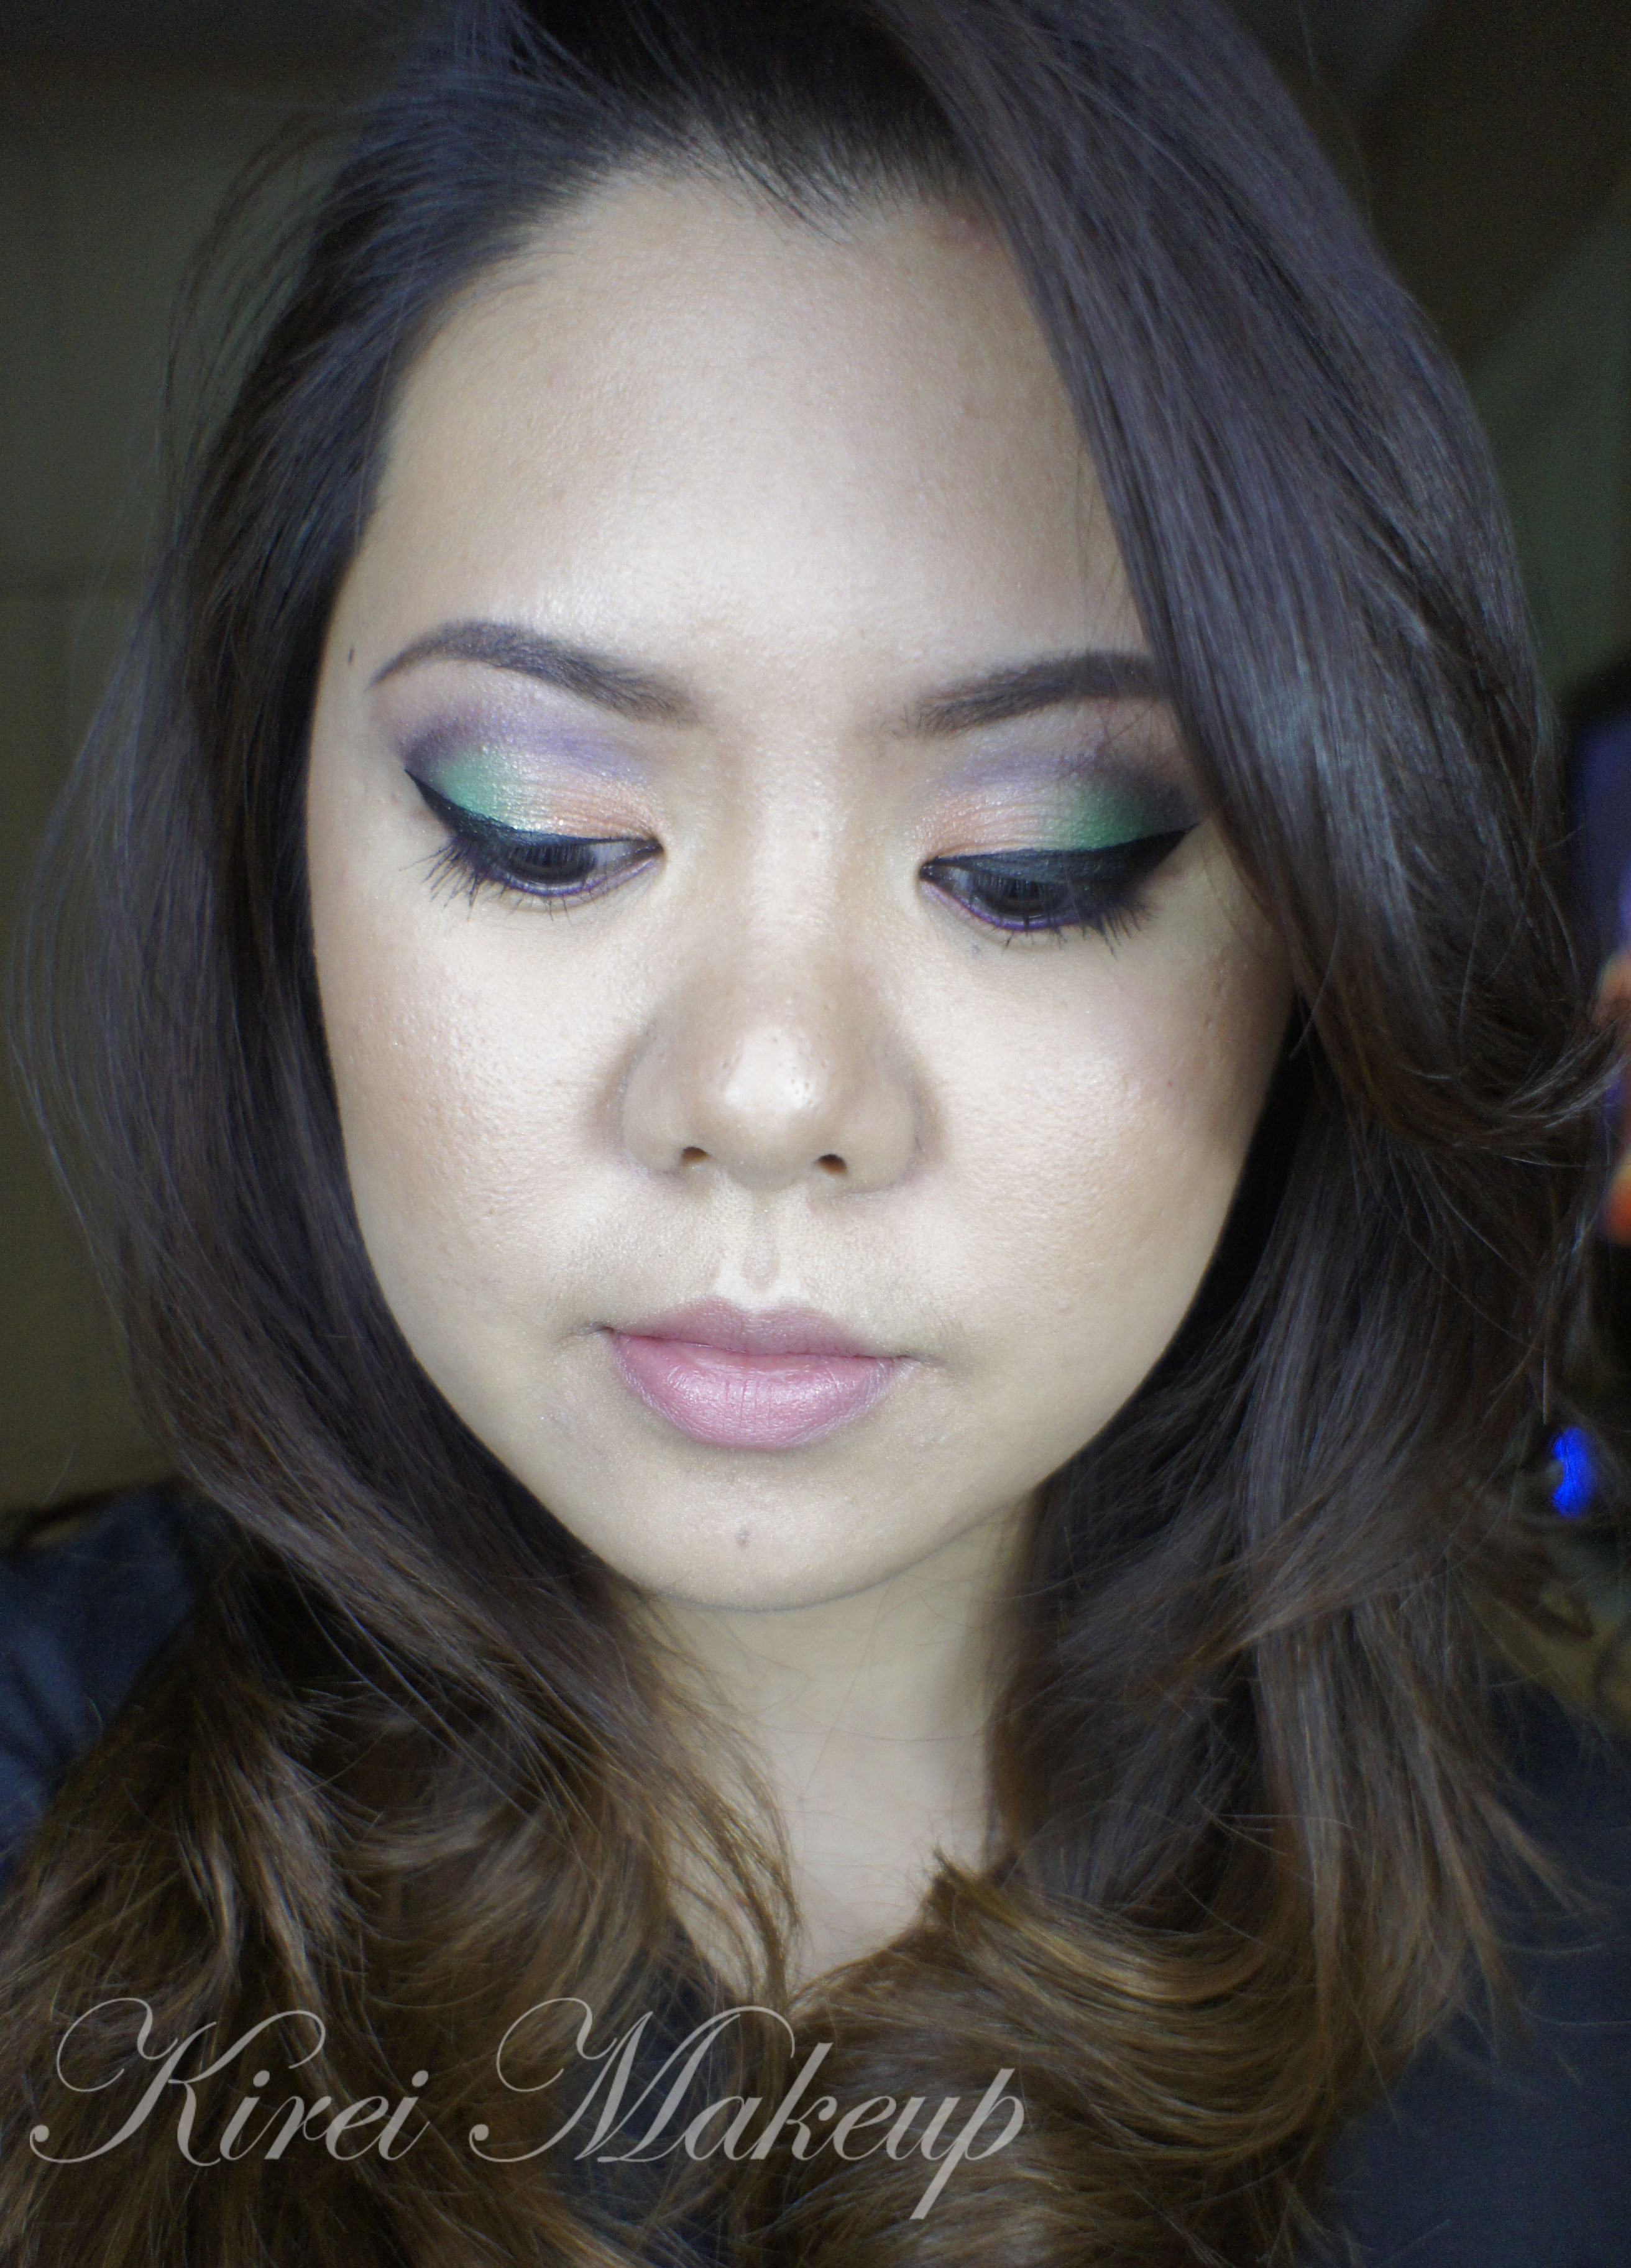
Anyways, In the Storm palette, there’s a lot of metallic colors, and I’m sure you all know that Metallics are in again this Fall 2013. There is no individual shades name from the palette (which is super weird), but I hope you get the idea.

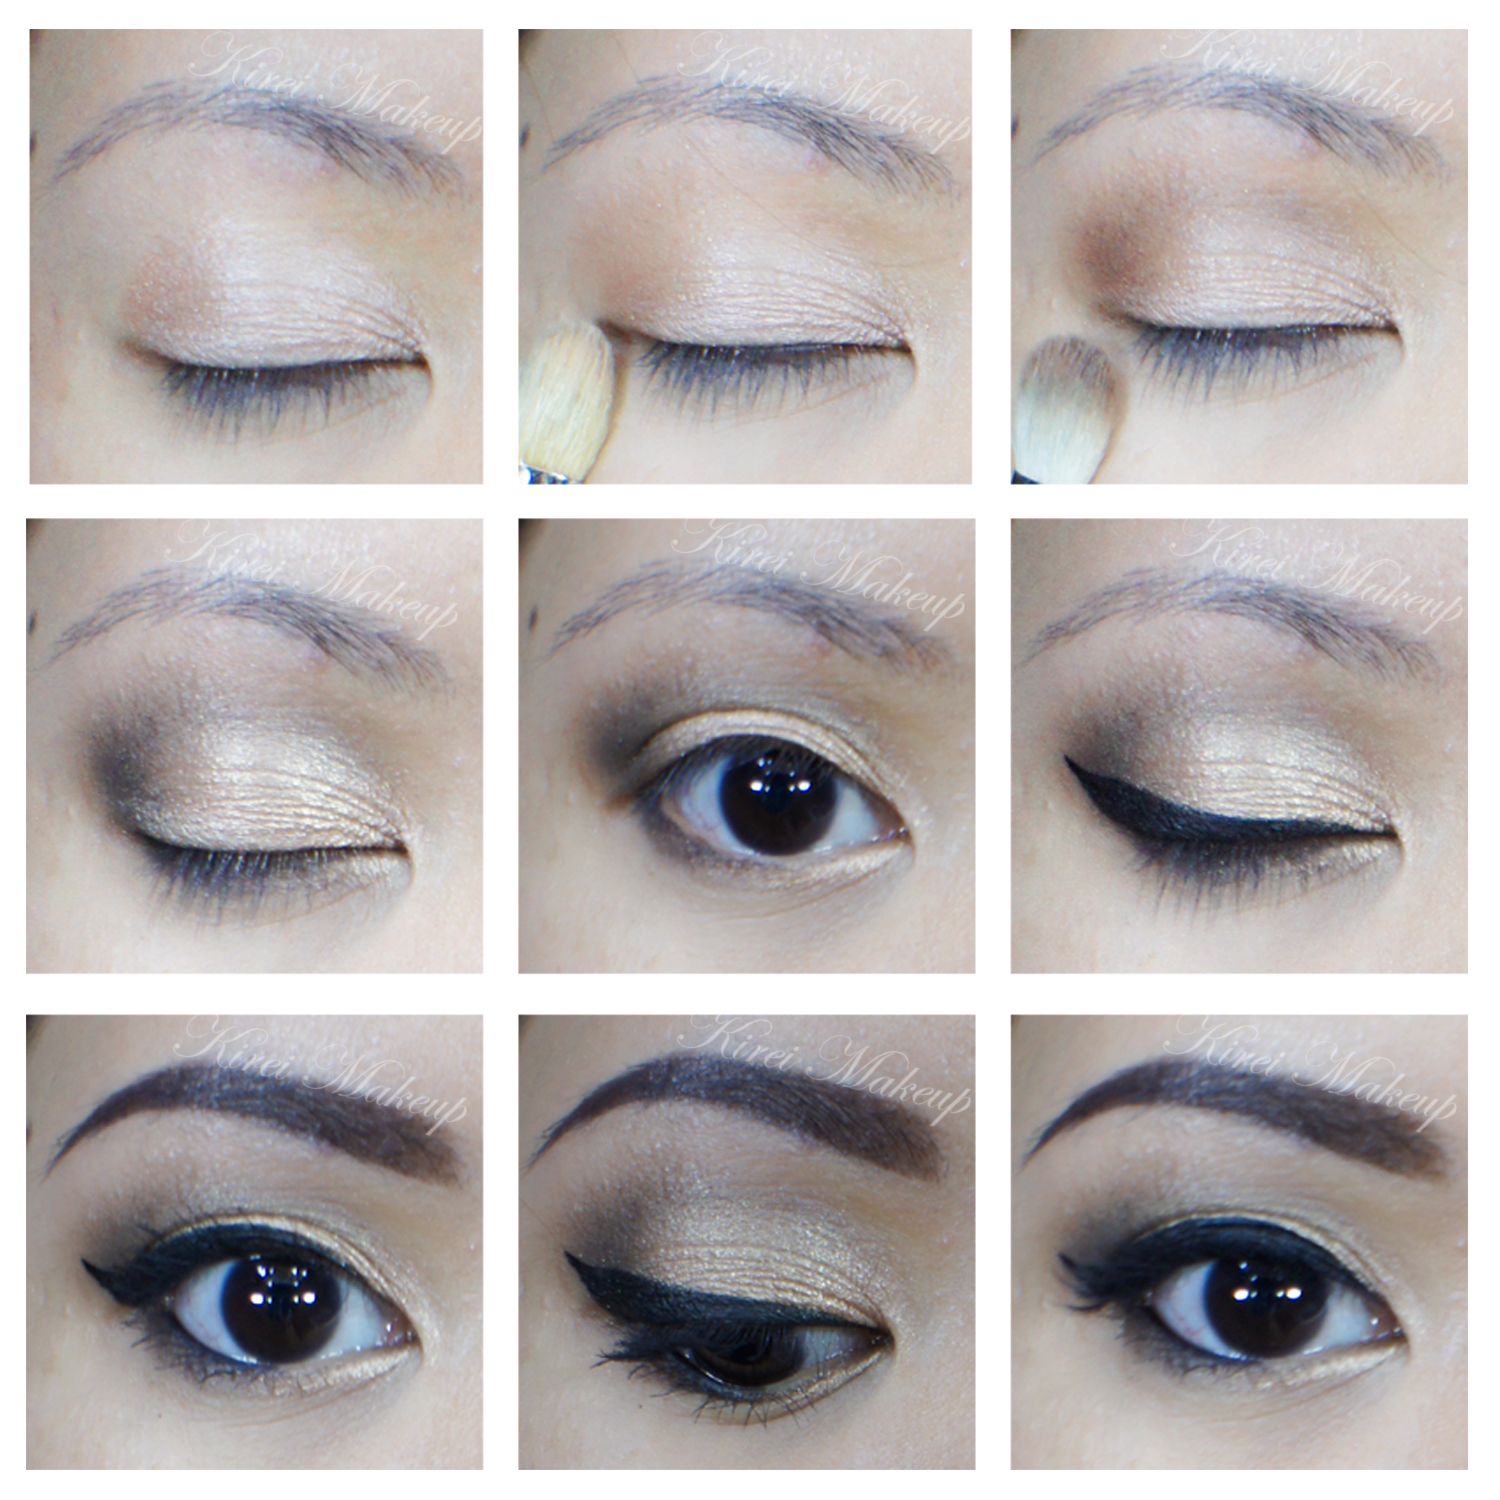
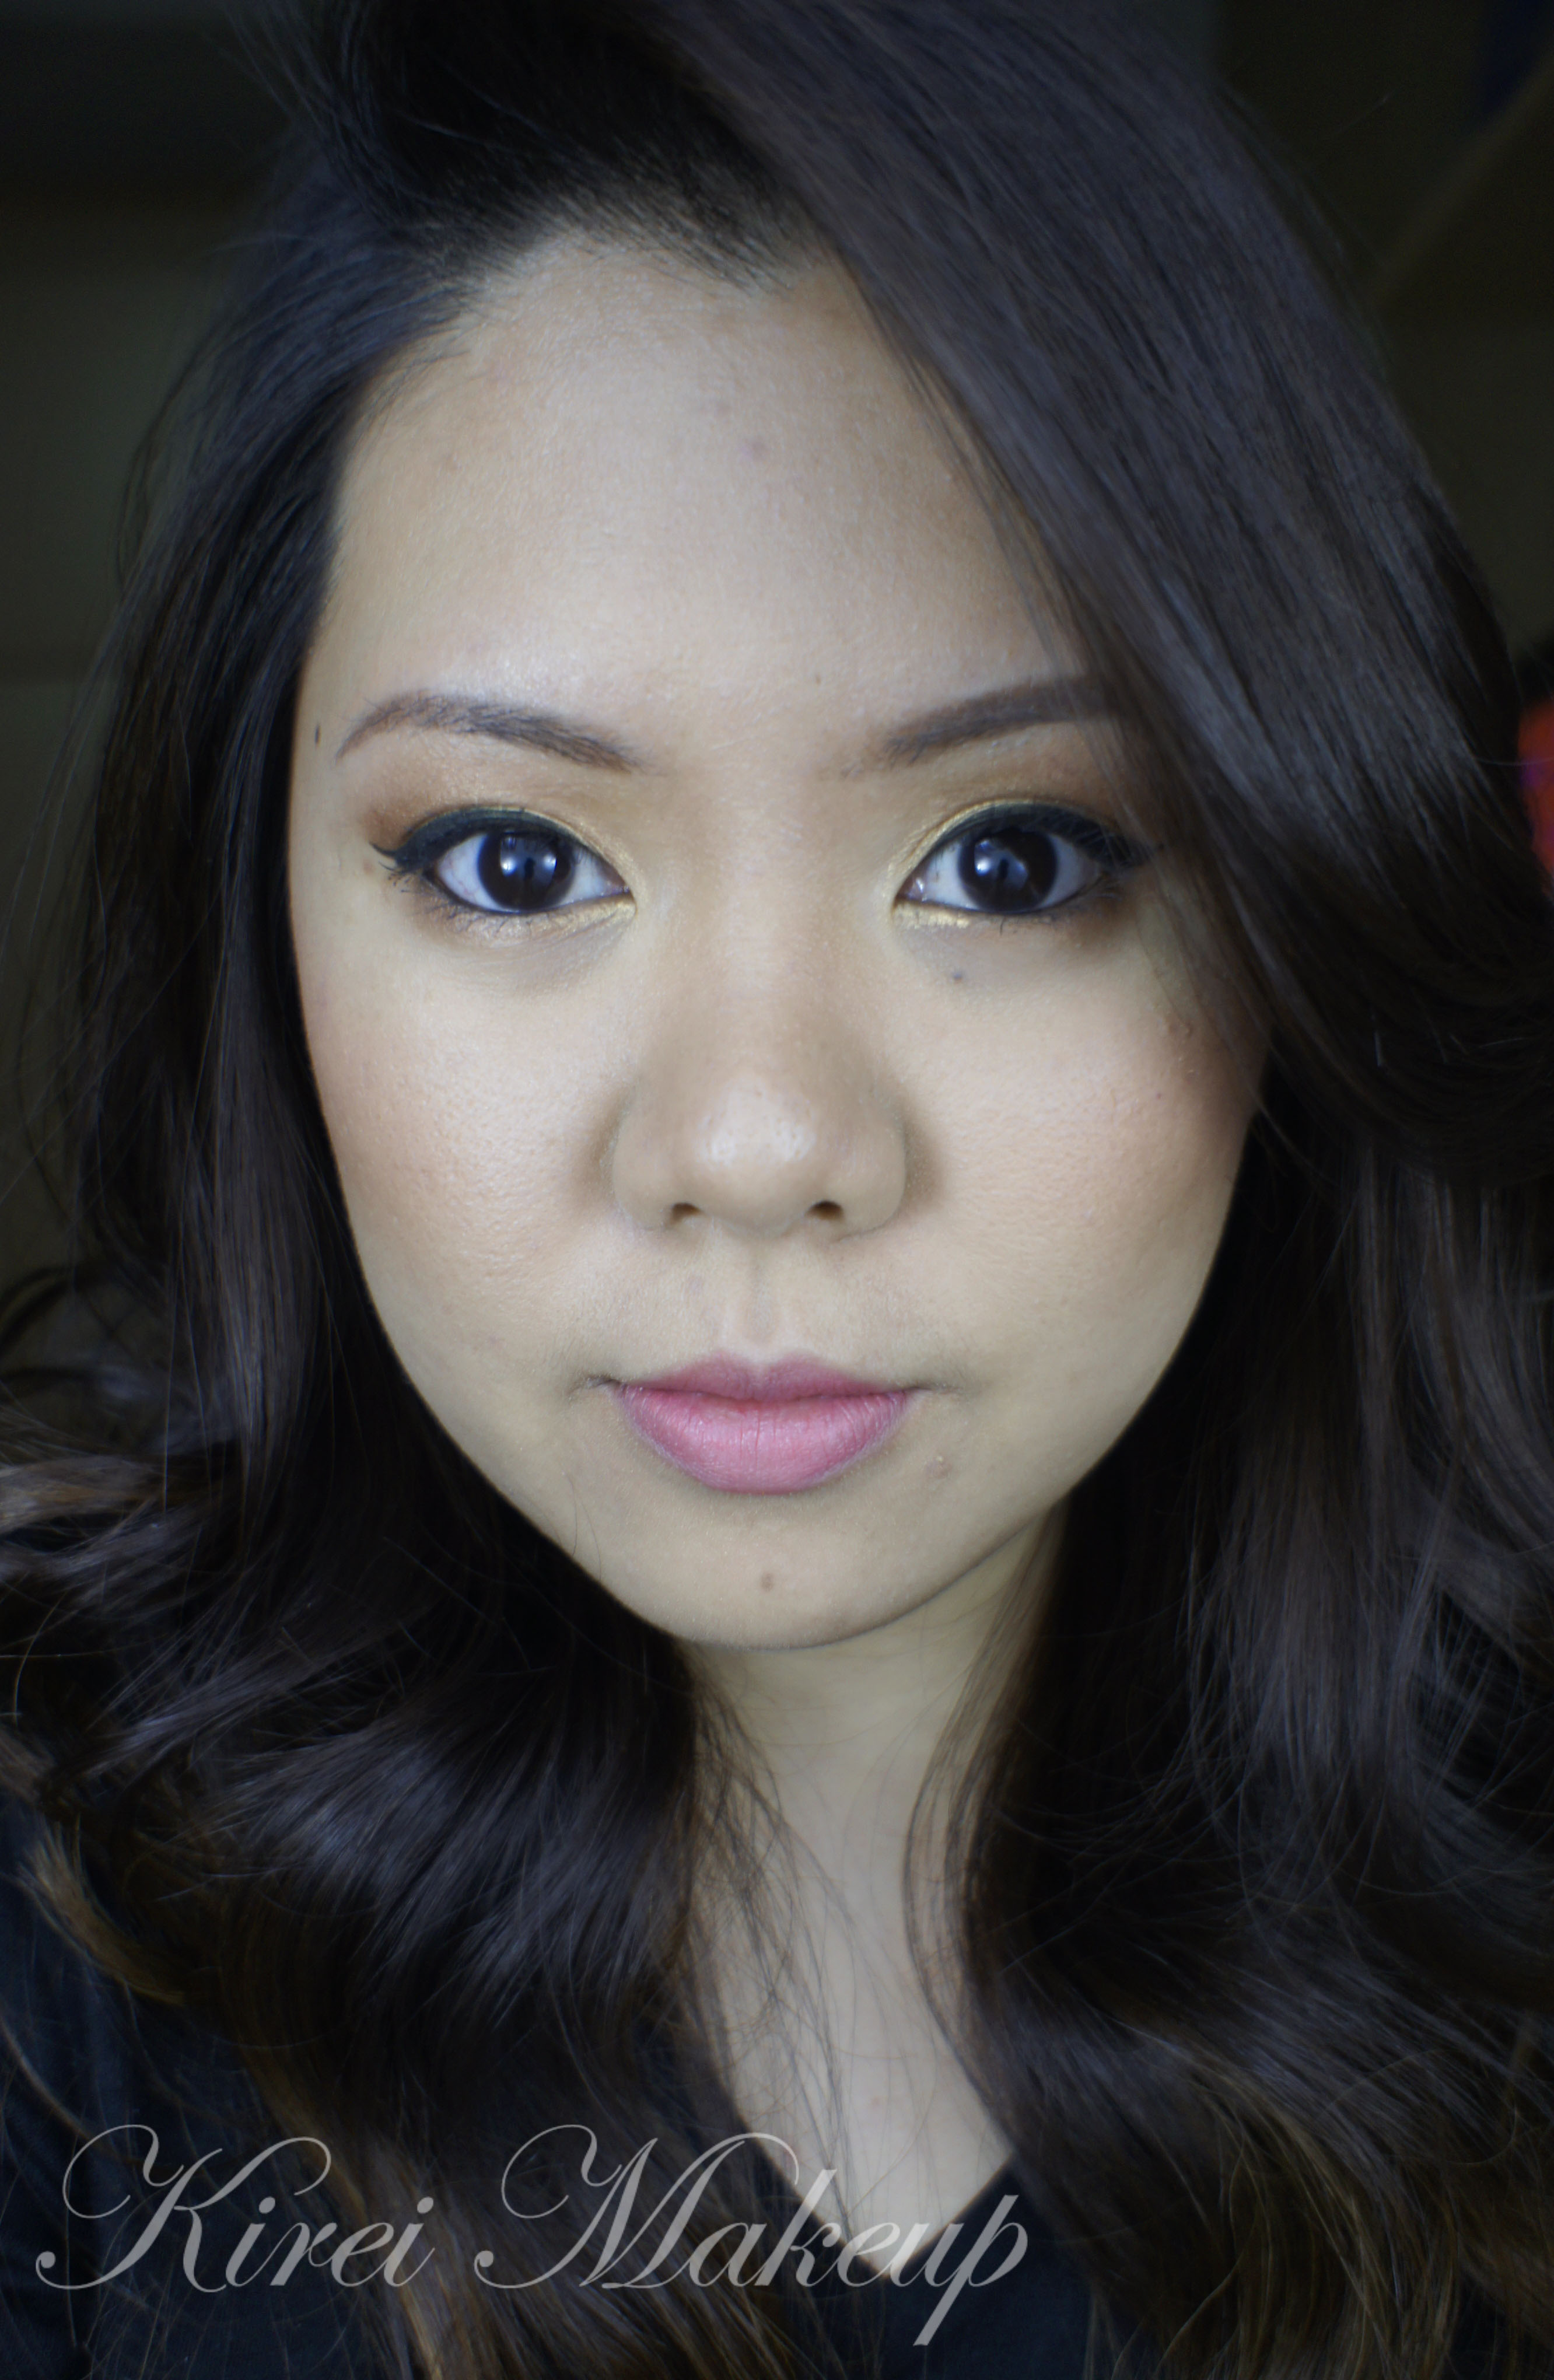
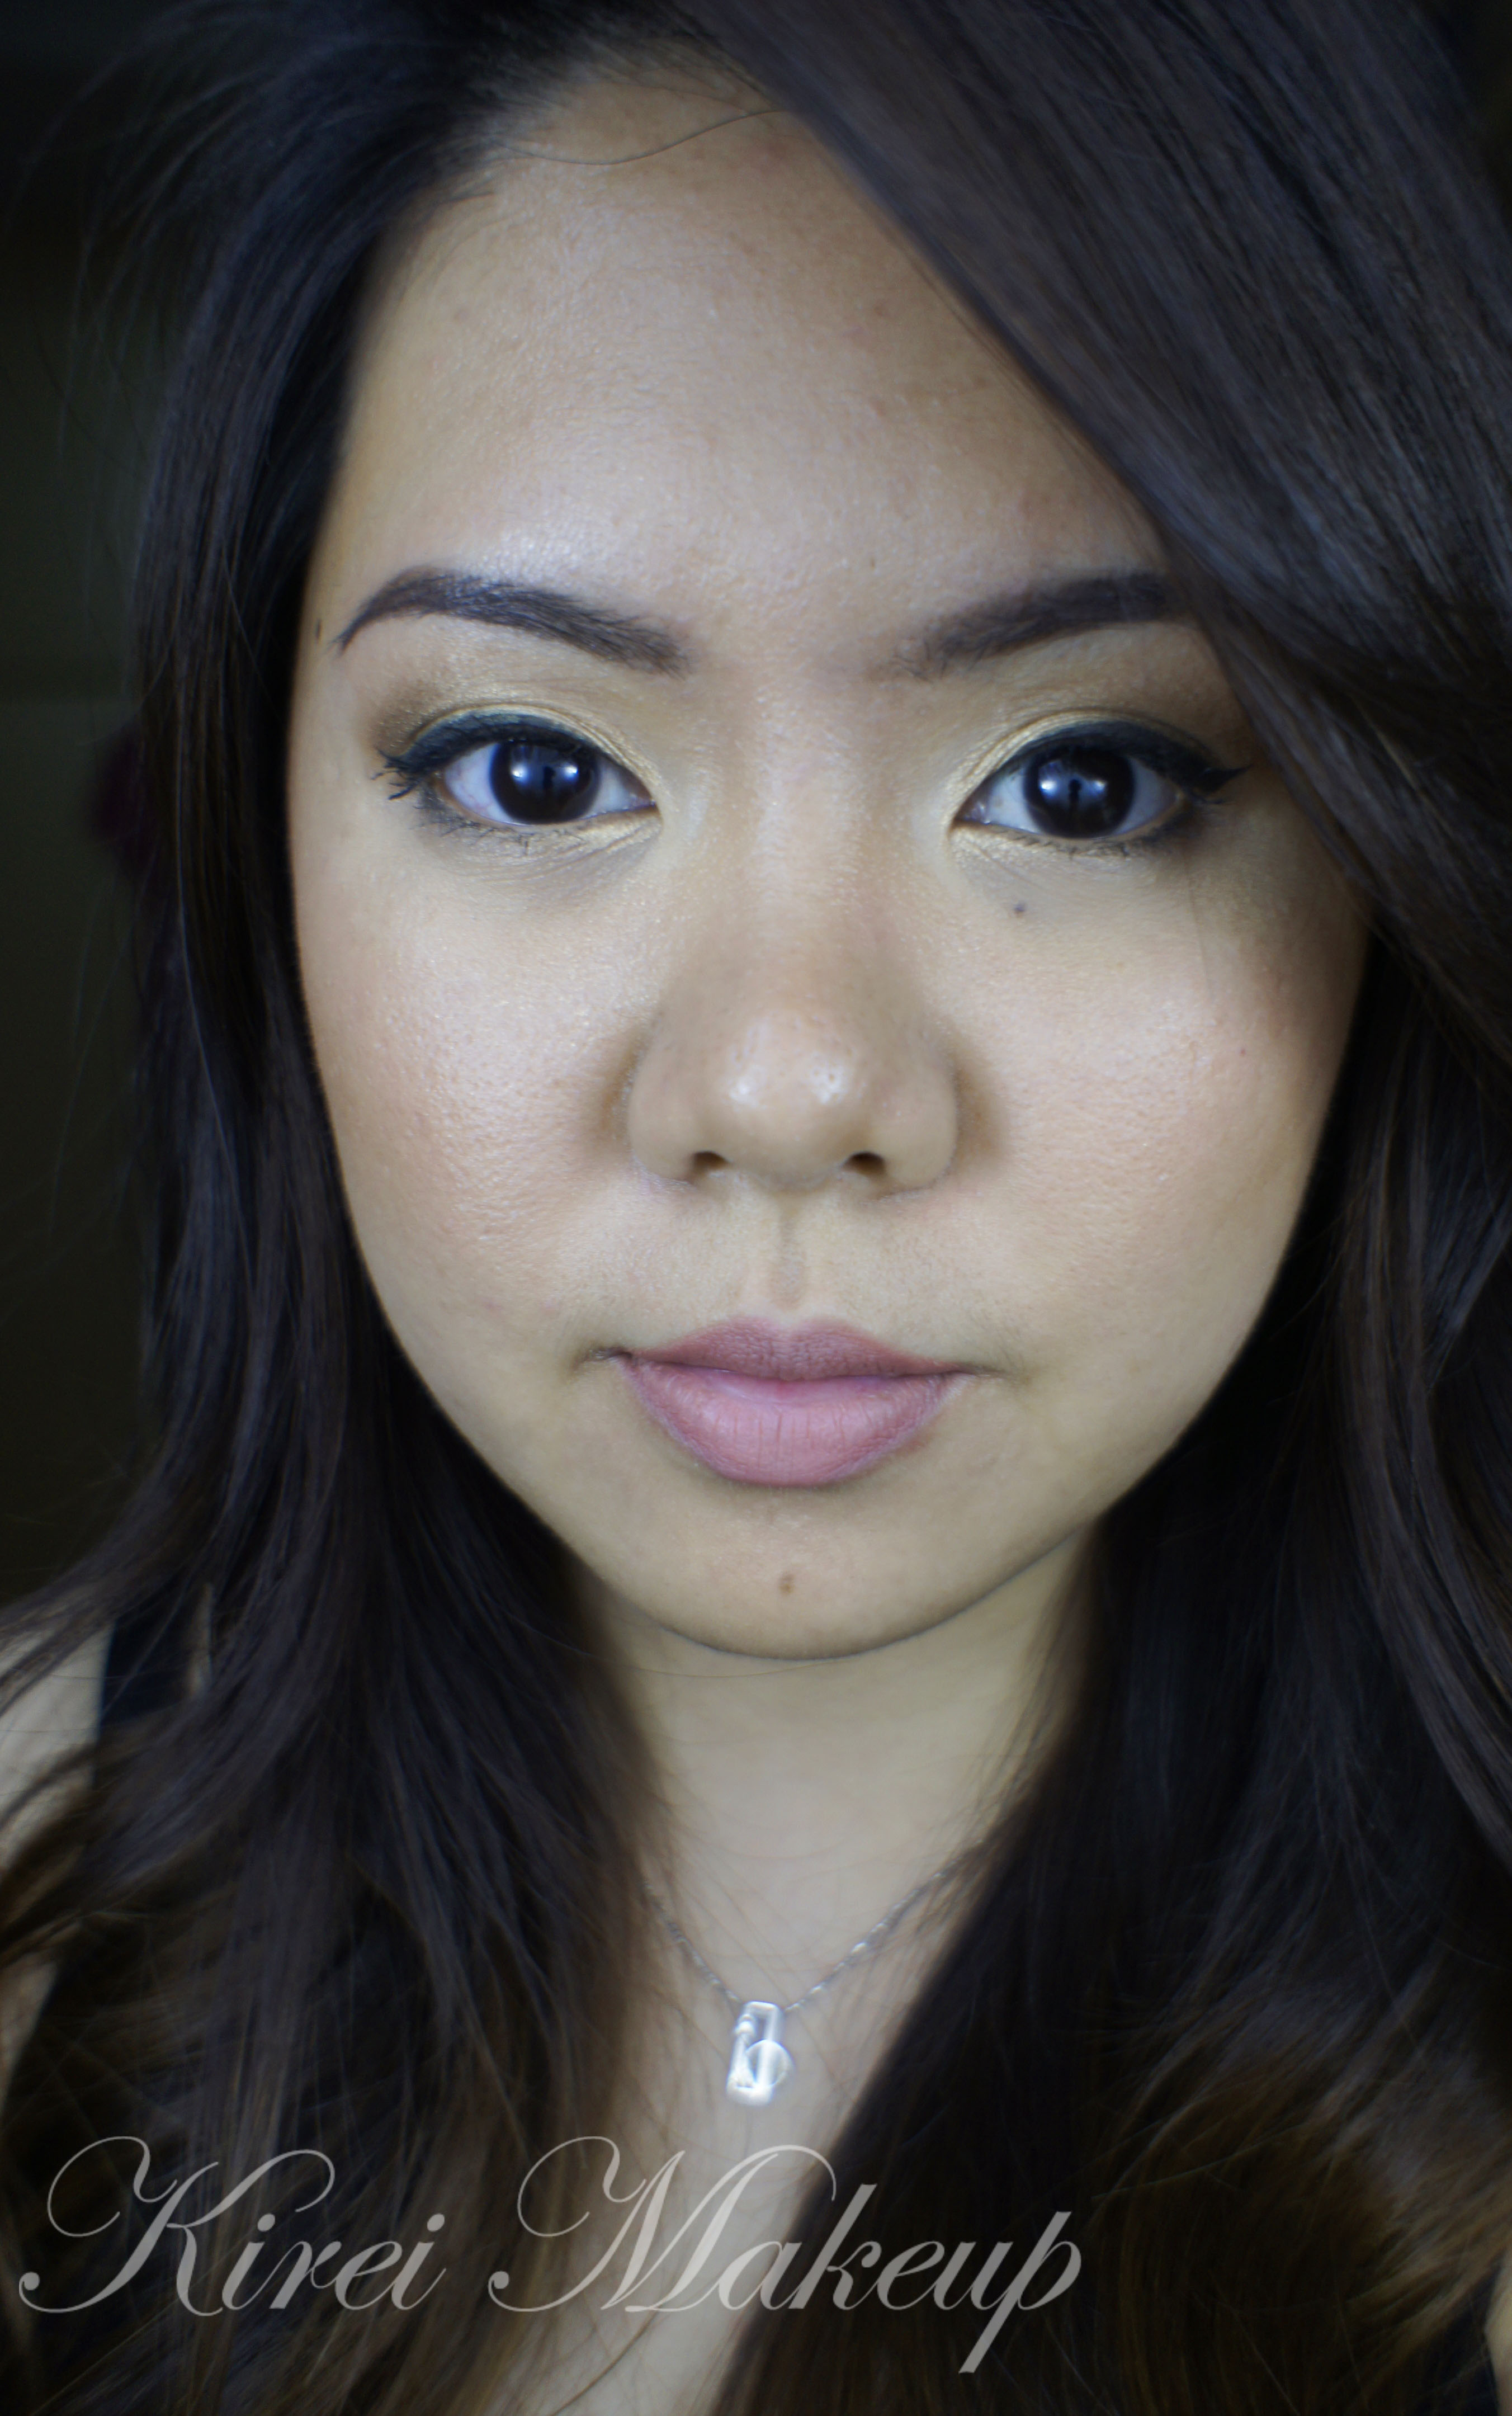
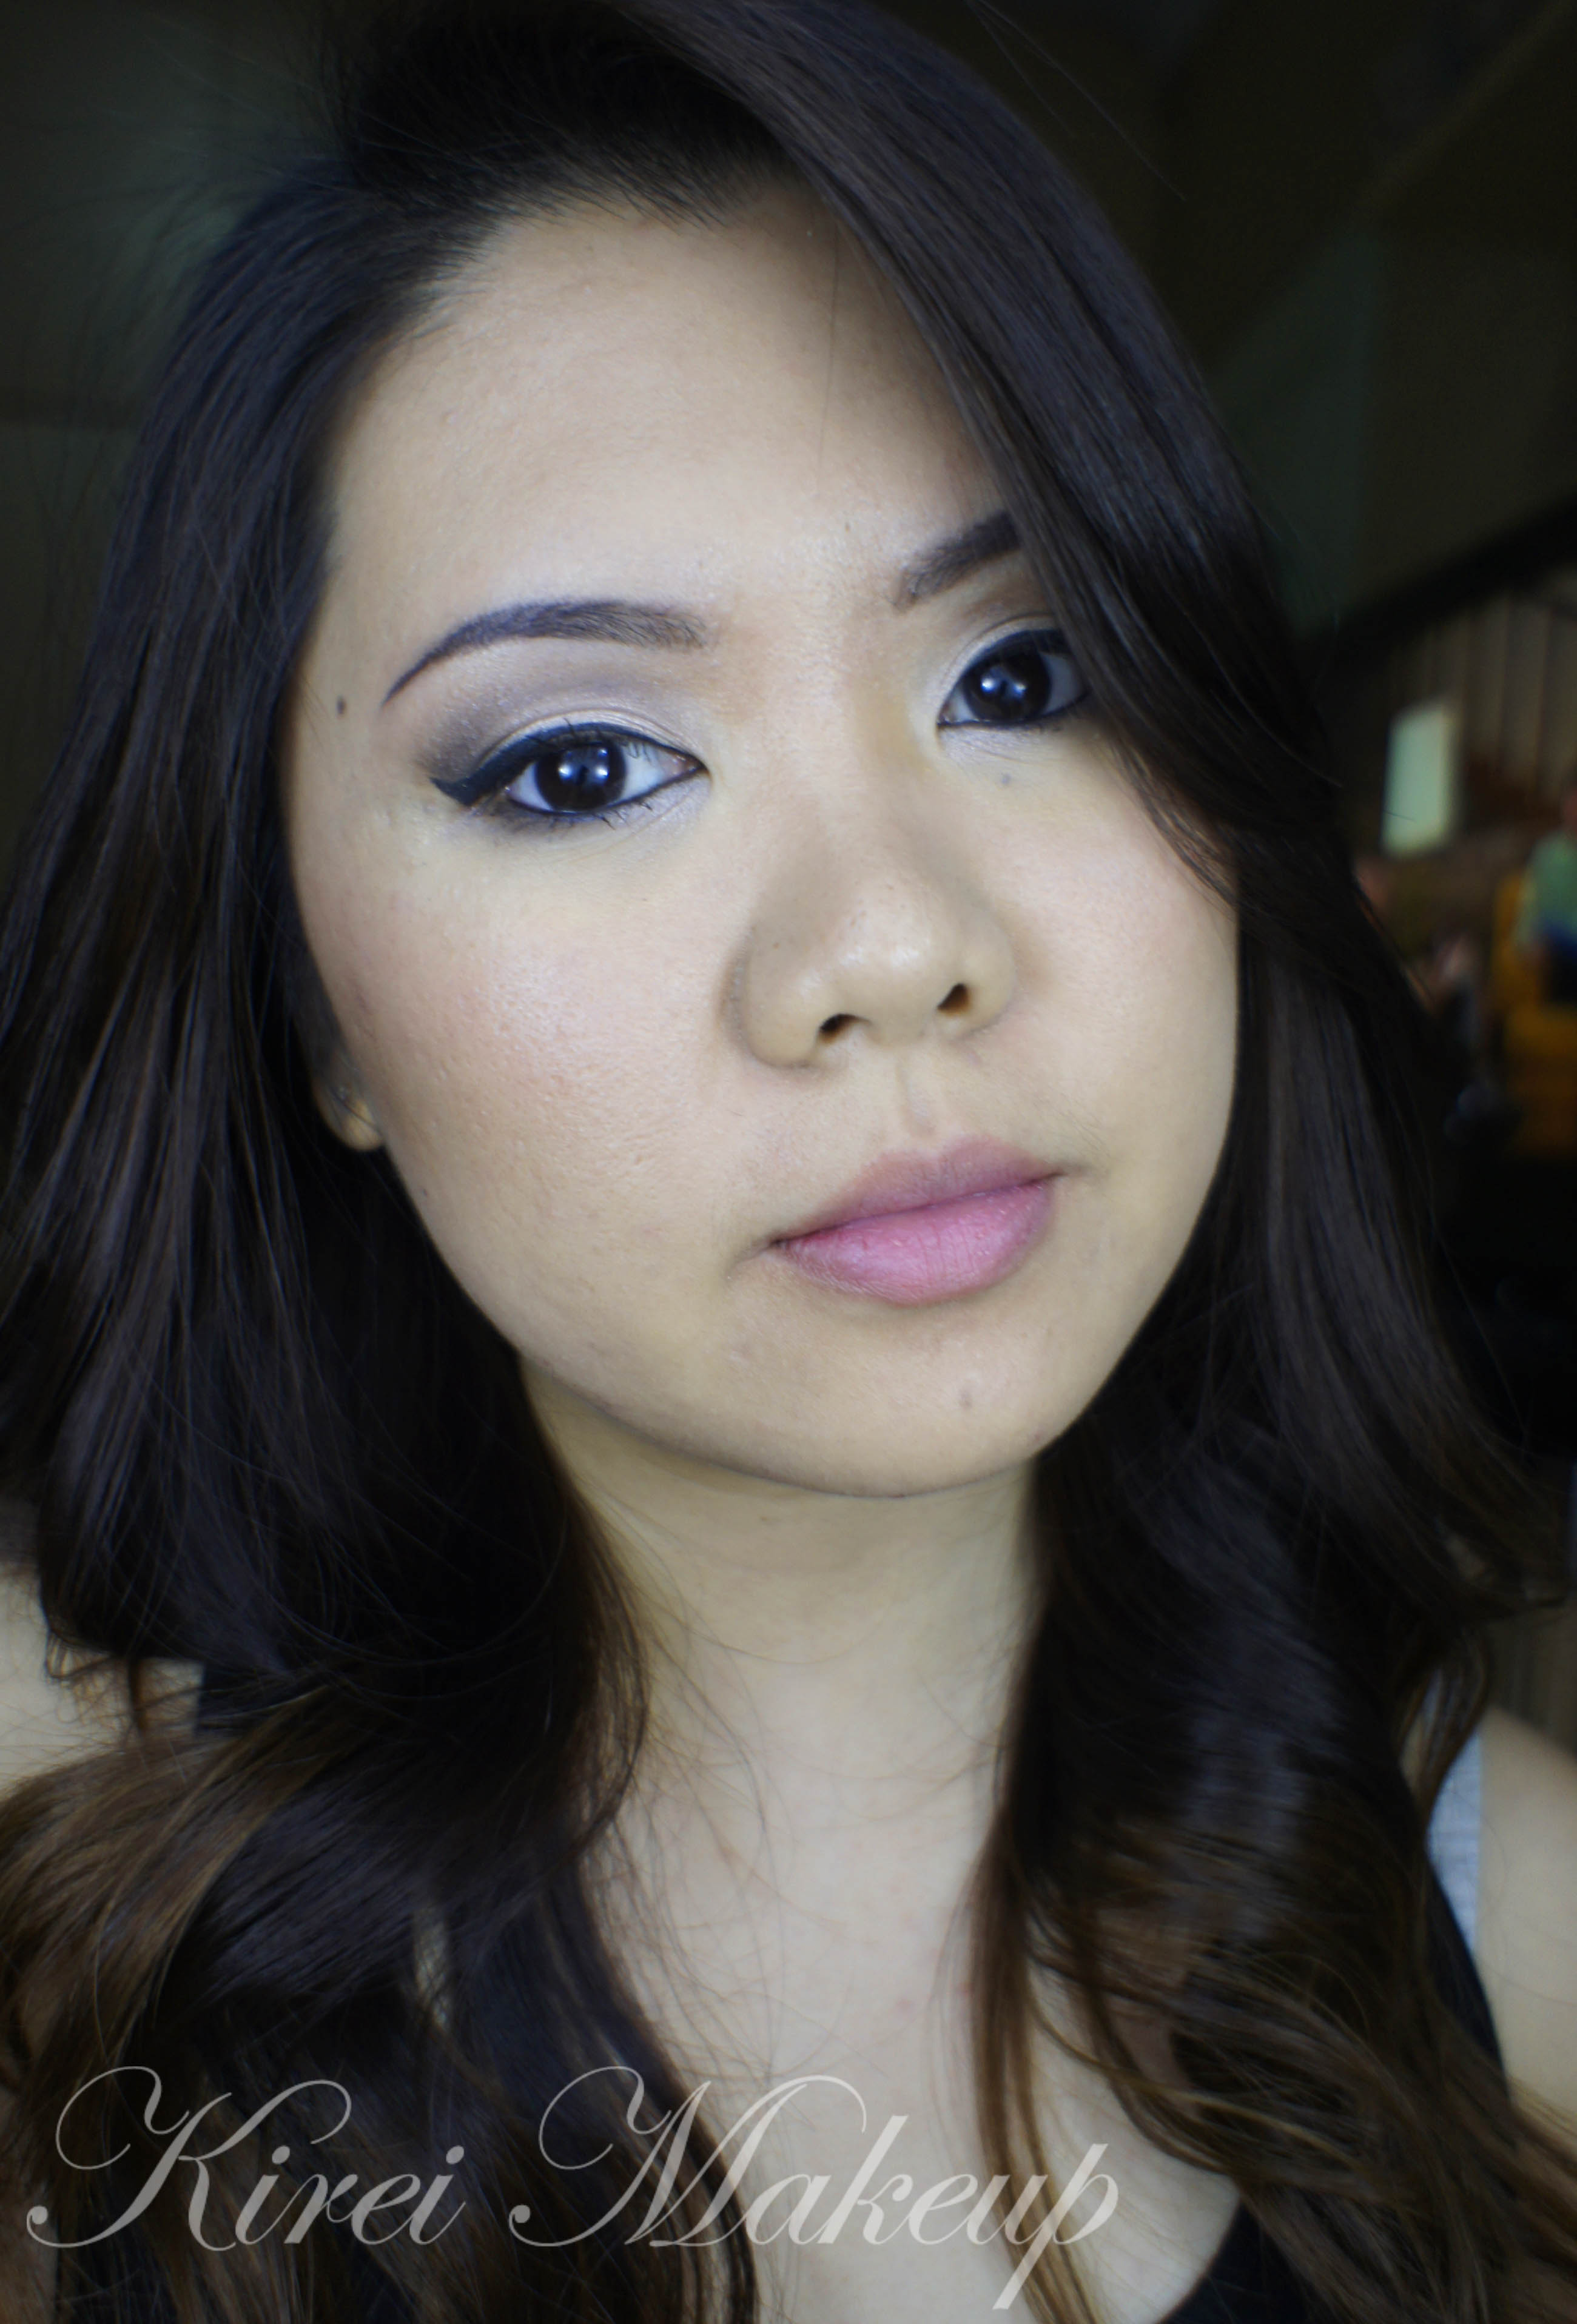
I prepped my eyes using MAC Paint Pot in Soft Ochre.

How-to:

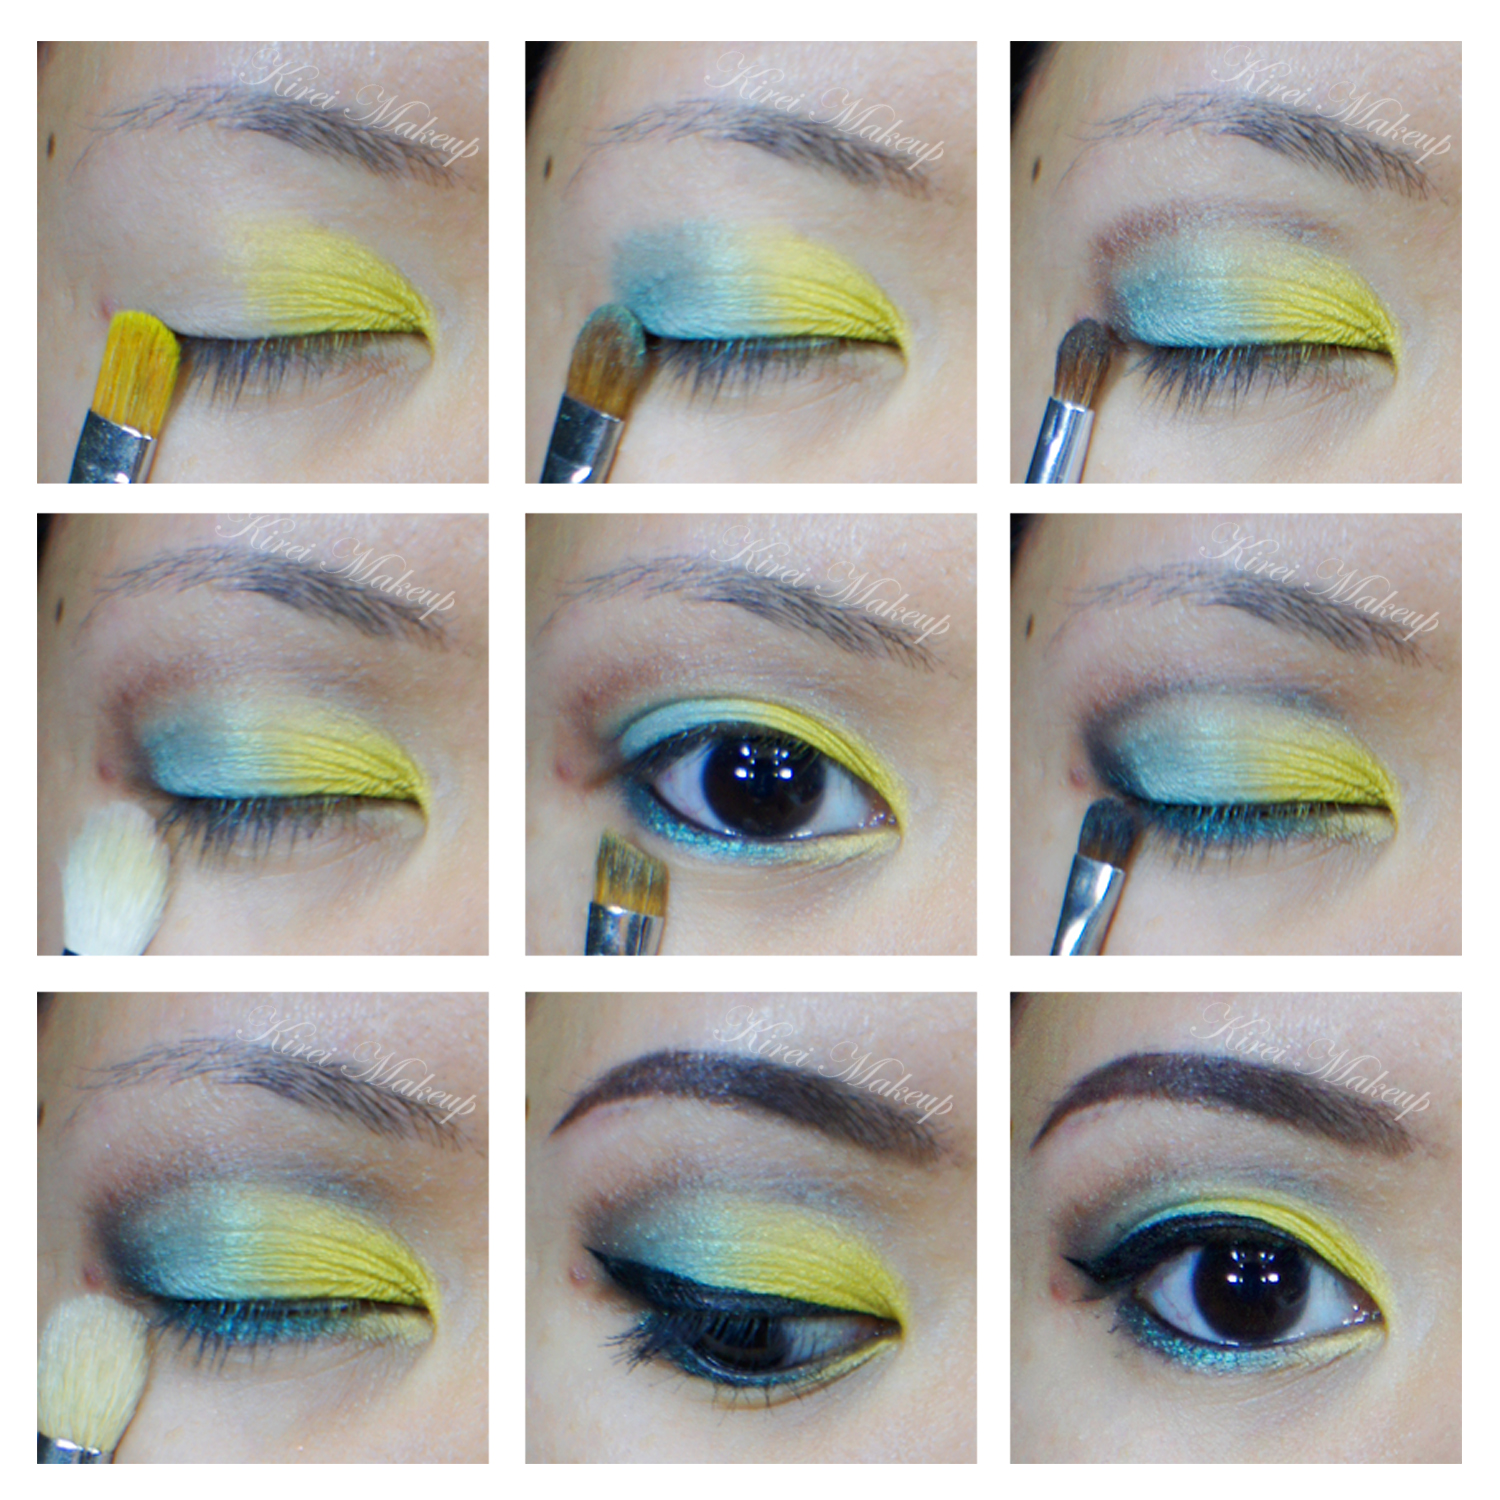
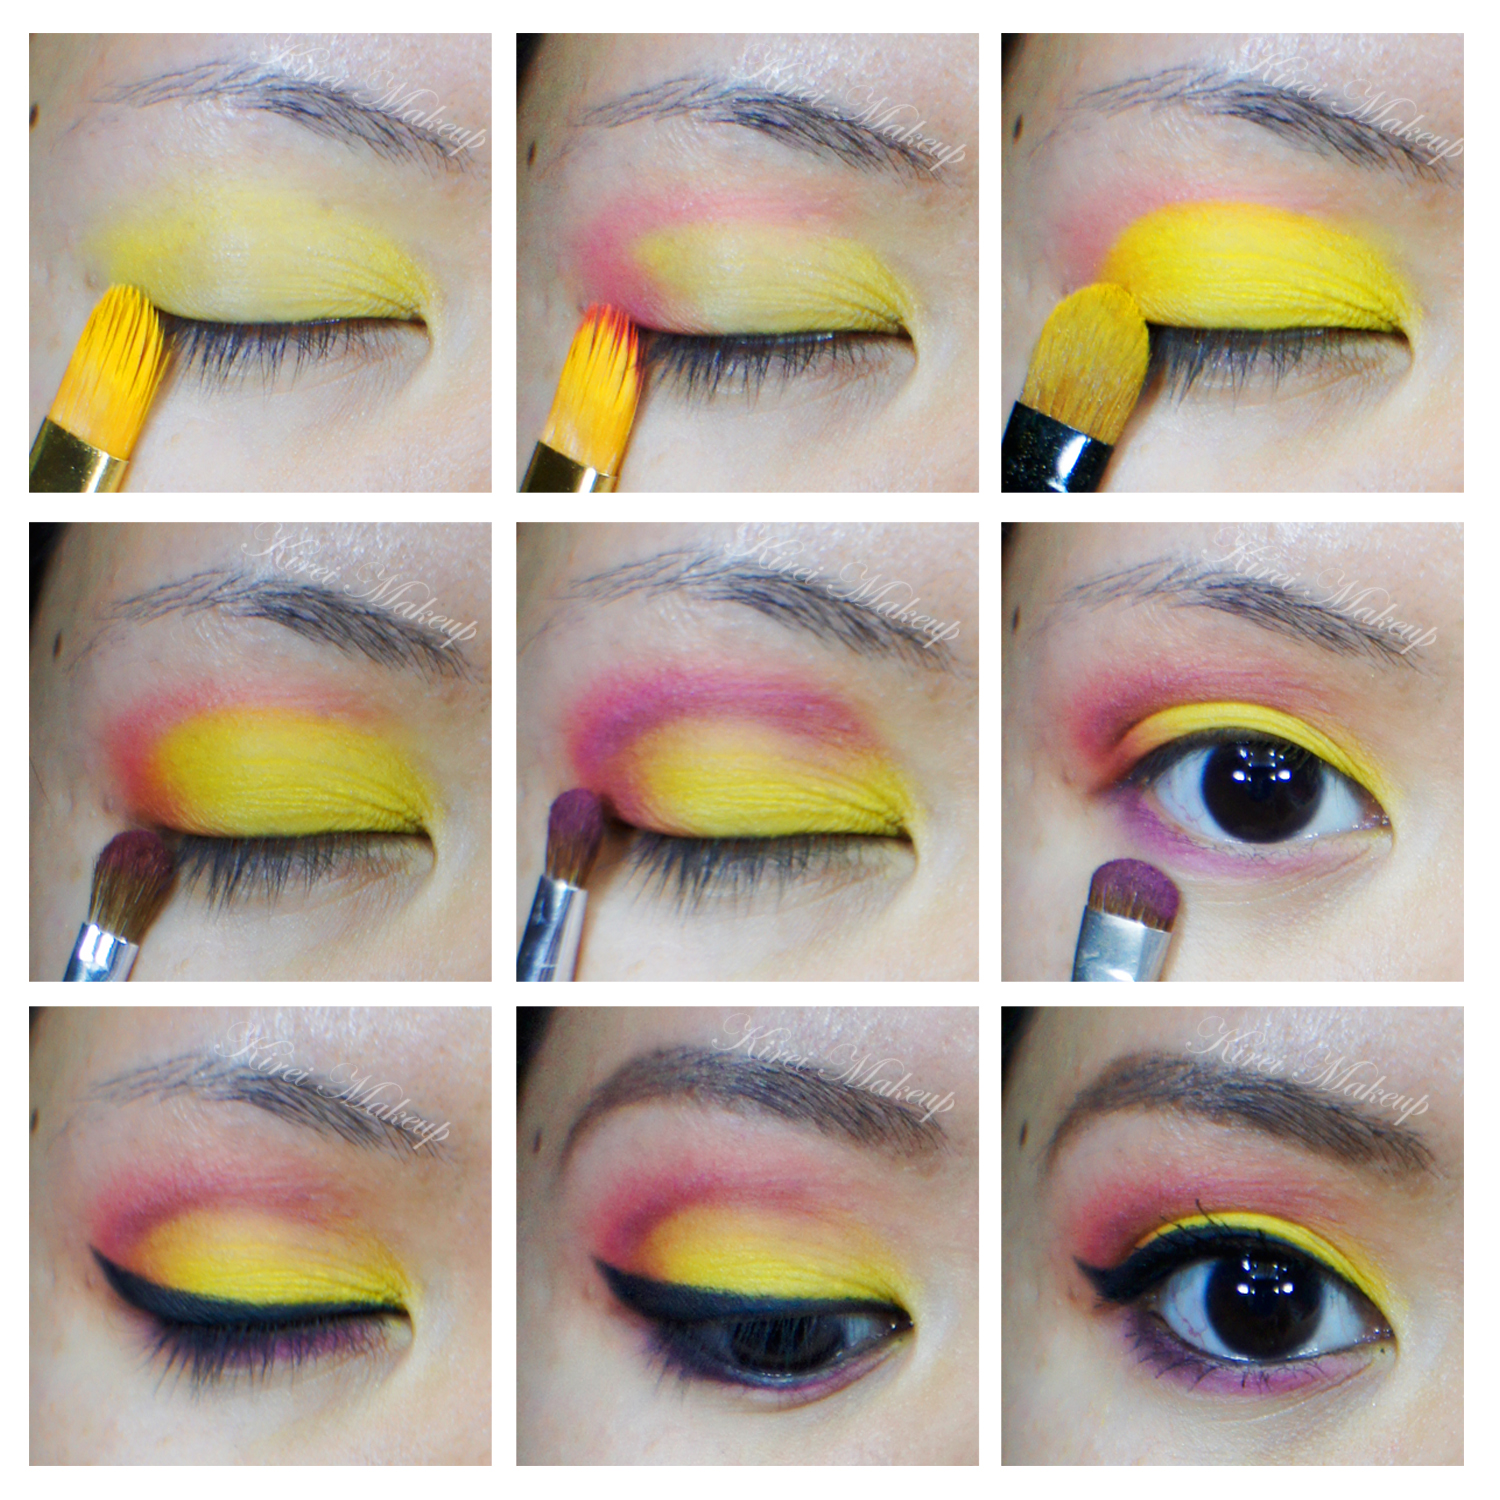
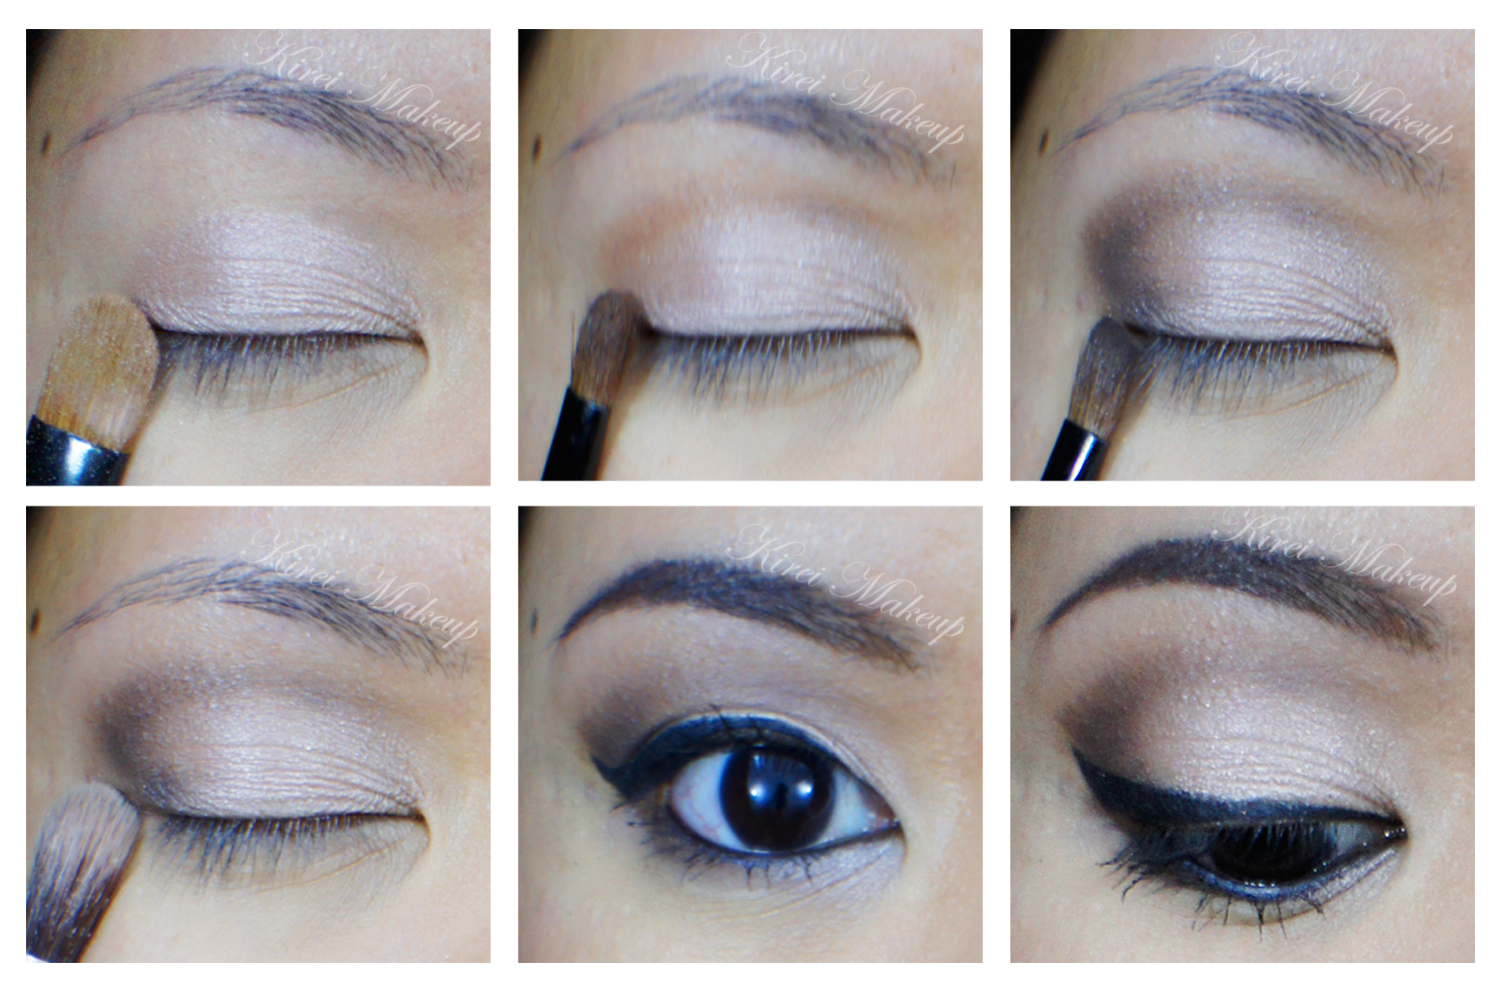
1. I applied a cranberry eyeshadow (darkest pink from the palette) all over my lid using a flat eyeshadow brush.

2. Using a fluffy blending brush, I blended the edge out. (Optional step)

3. Using a small fluffy brush, I applied a black eyeshadow from the palette on the outer corner to the crease.

4. Using a clean blending brush, I blended the edge until there’s no harsh line on the crease. (sorry for the blurry picture)

5. Using a wet wipe, I cleaned the outer edge of my eyelid to create a diagonal clean line.

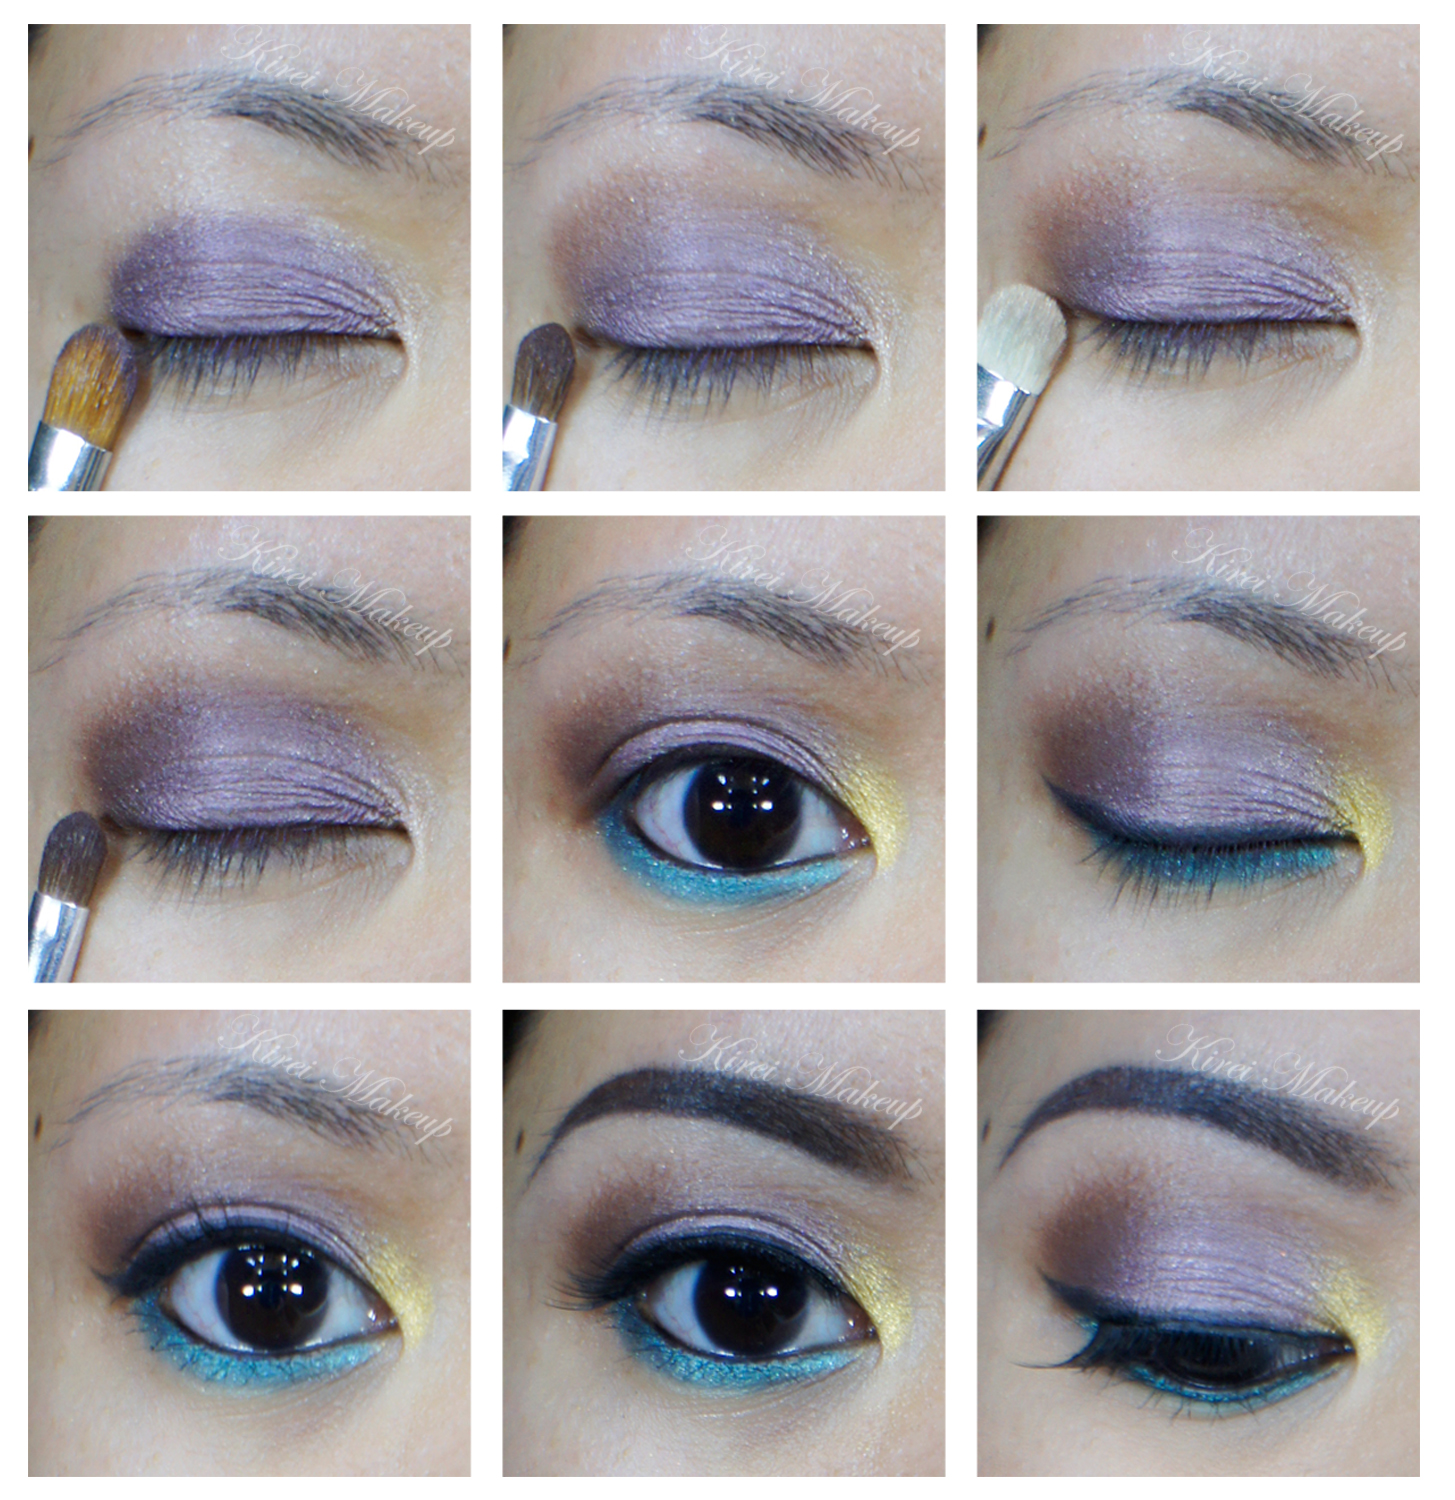
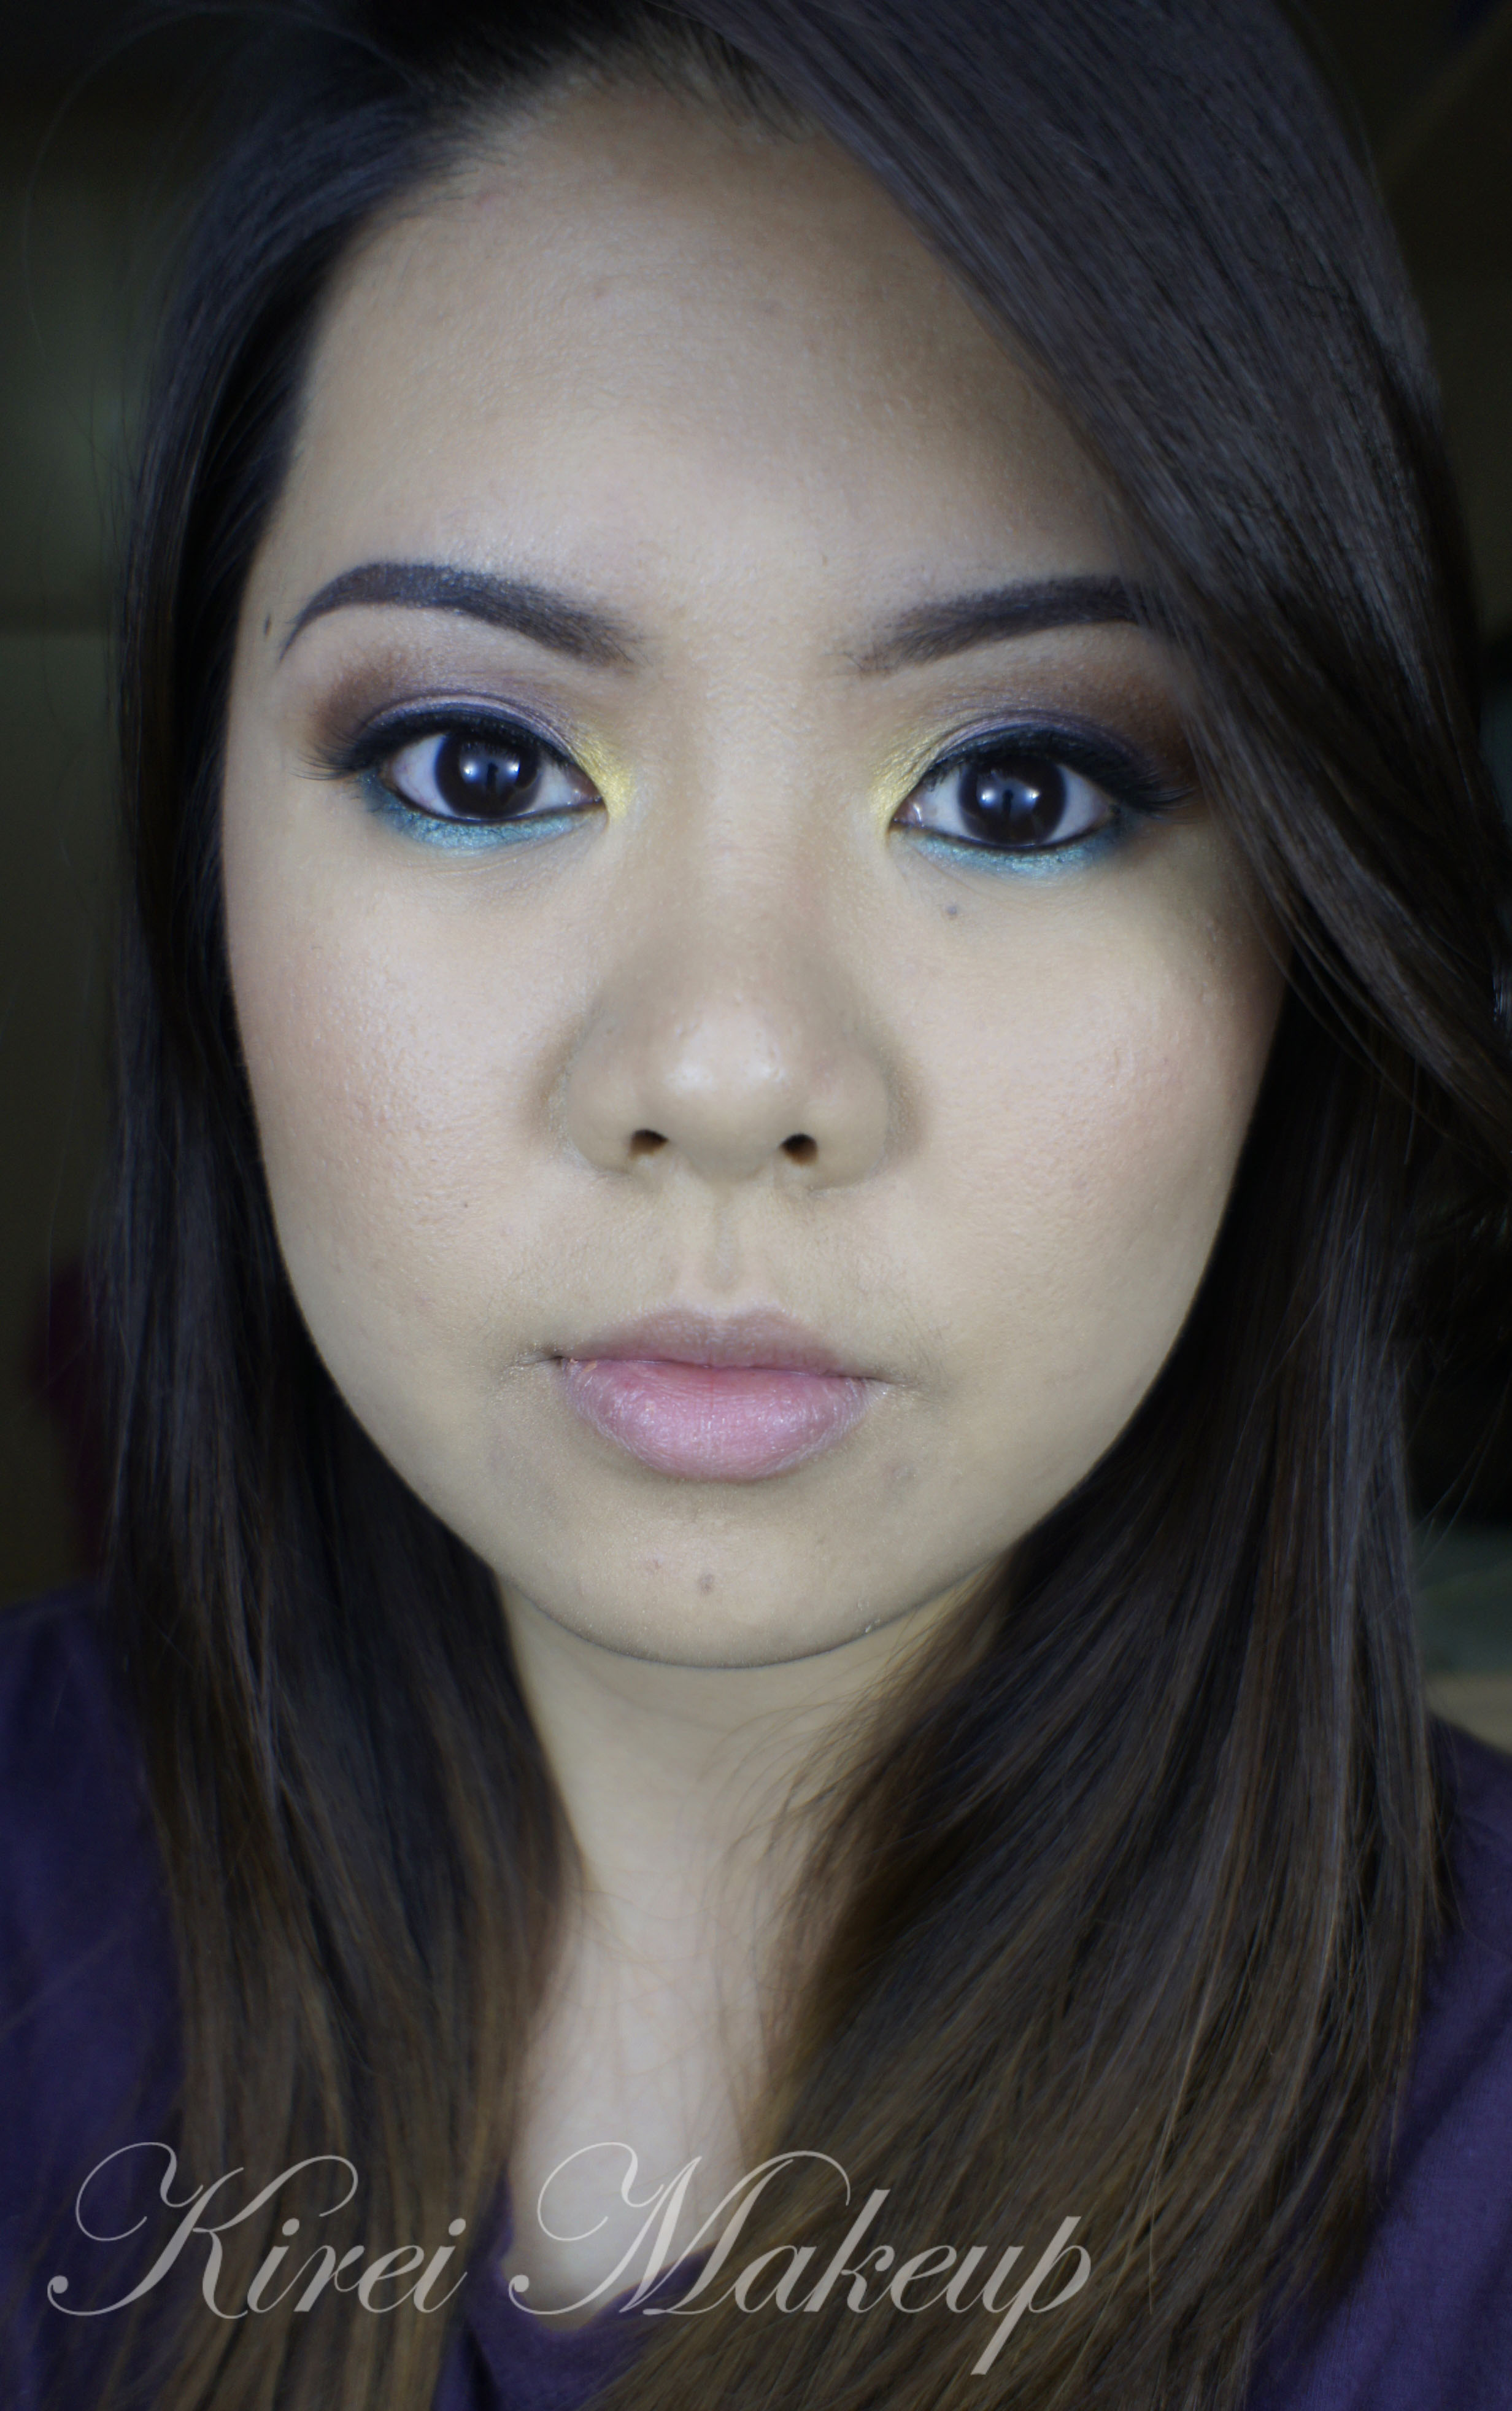
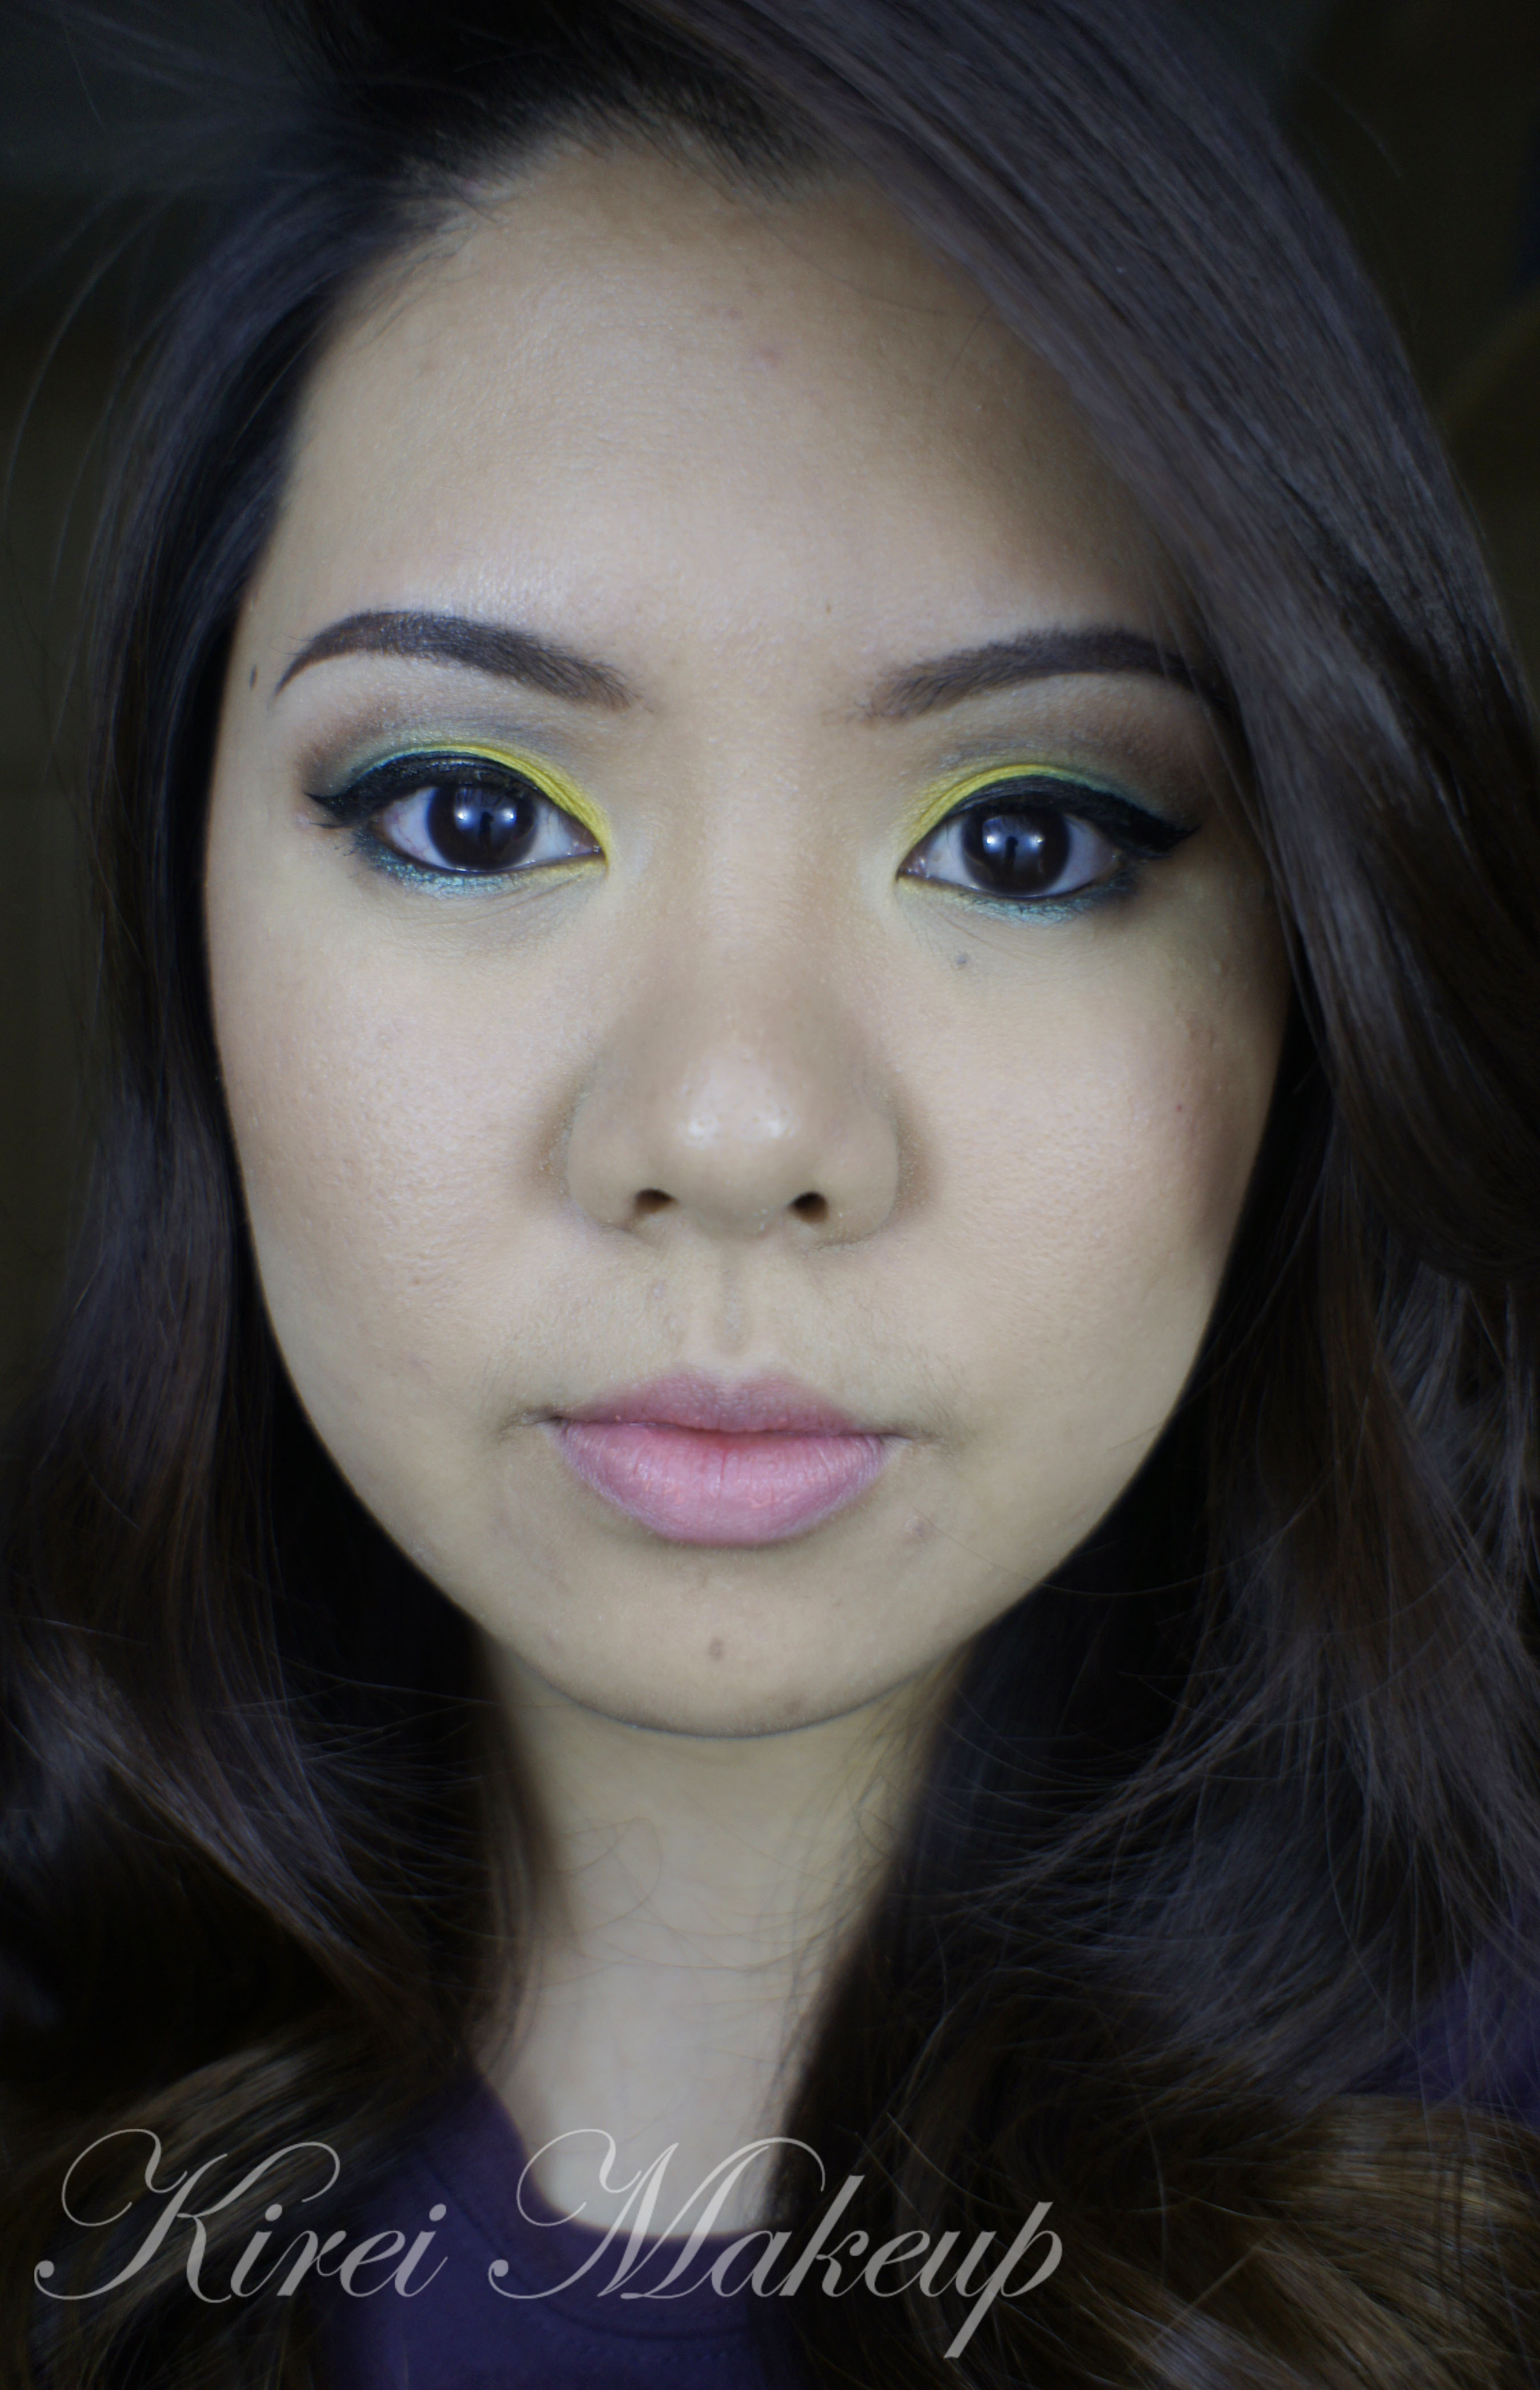
6. I also applied MUFE Aqua Liner in black on the outer half of the waterline. I also applied a gold eyeshadow from Sleek iDivine Storm on the inner corner of the lid, and a blue eyeshadow on the rest of the lower lid.

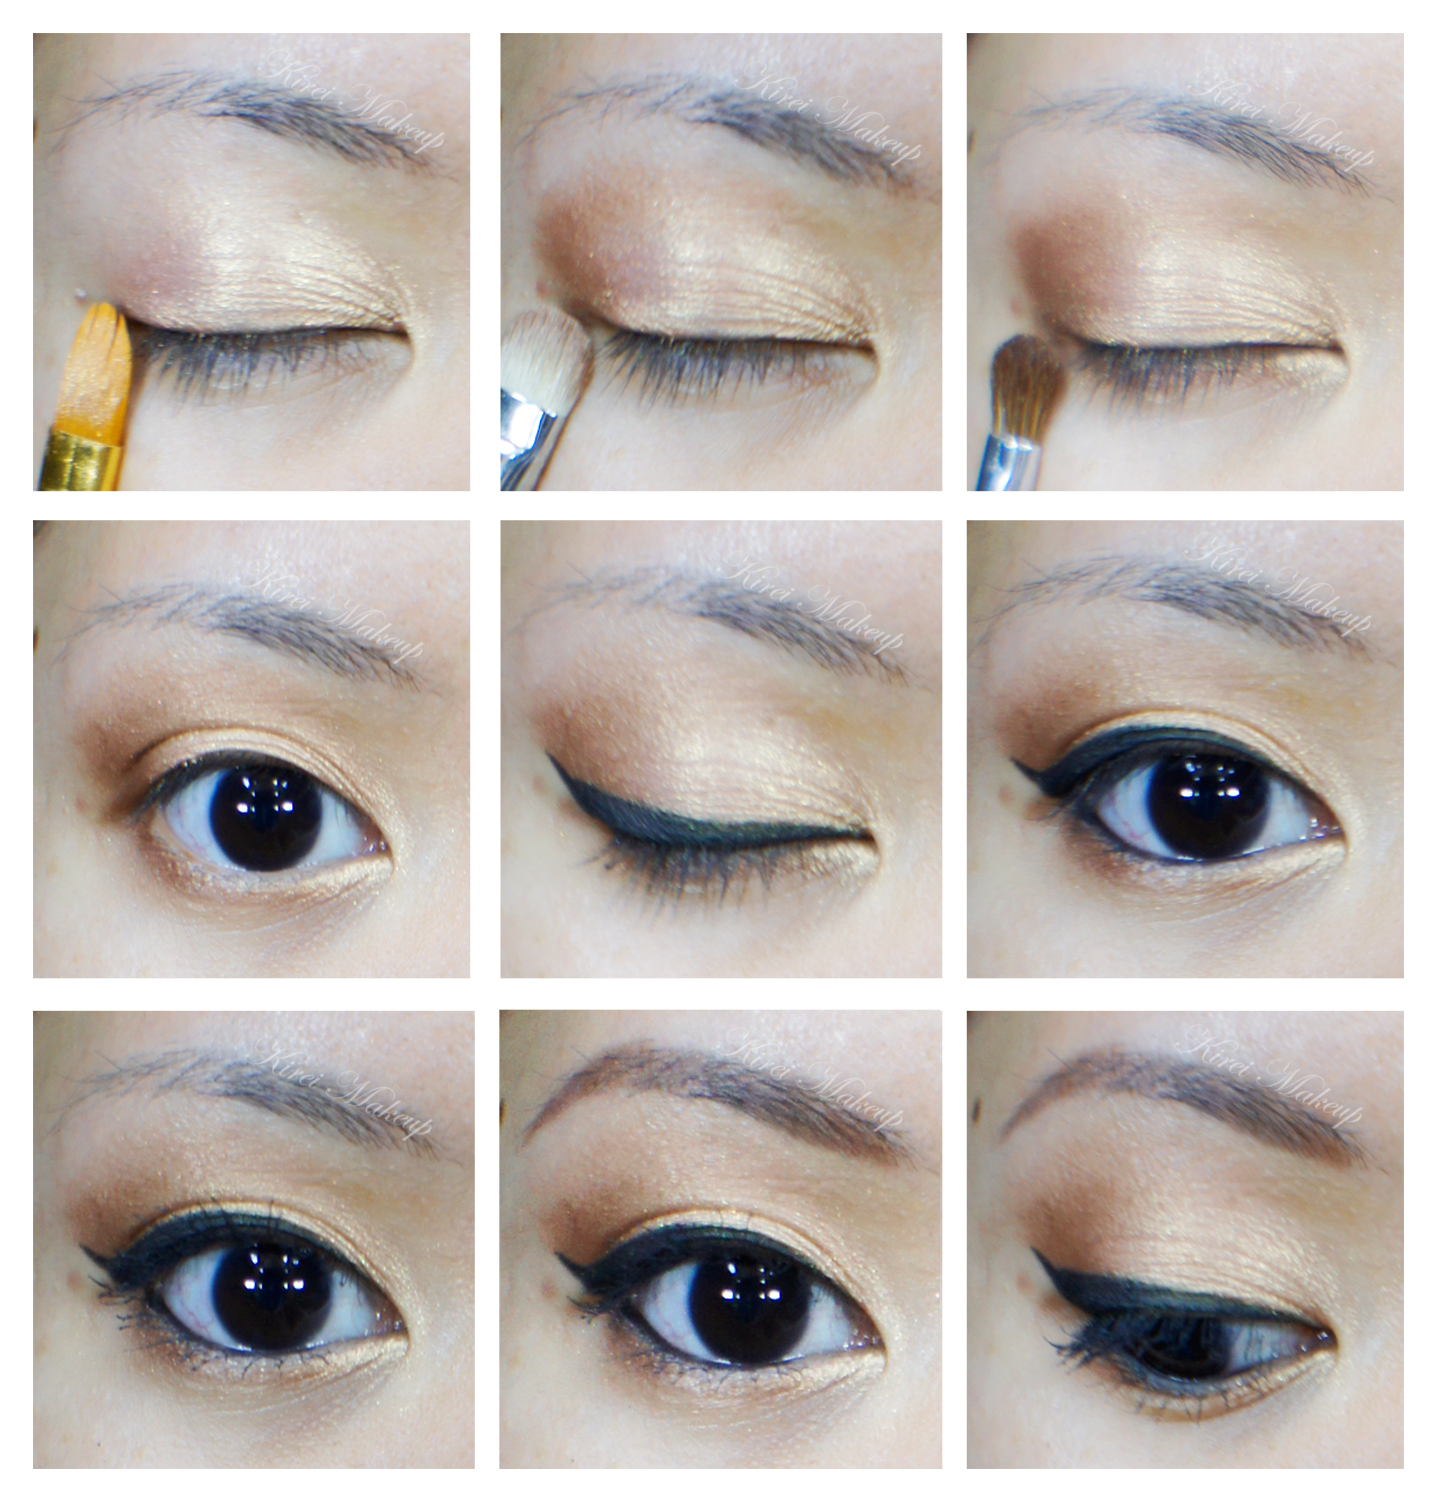
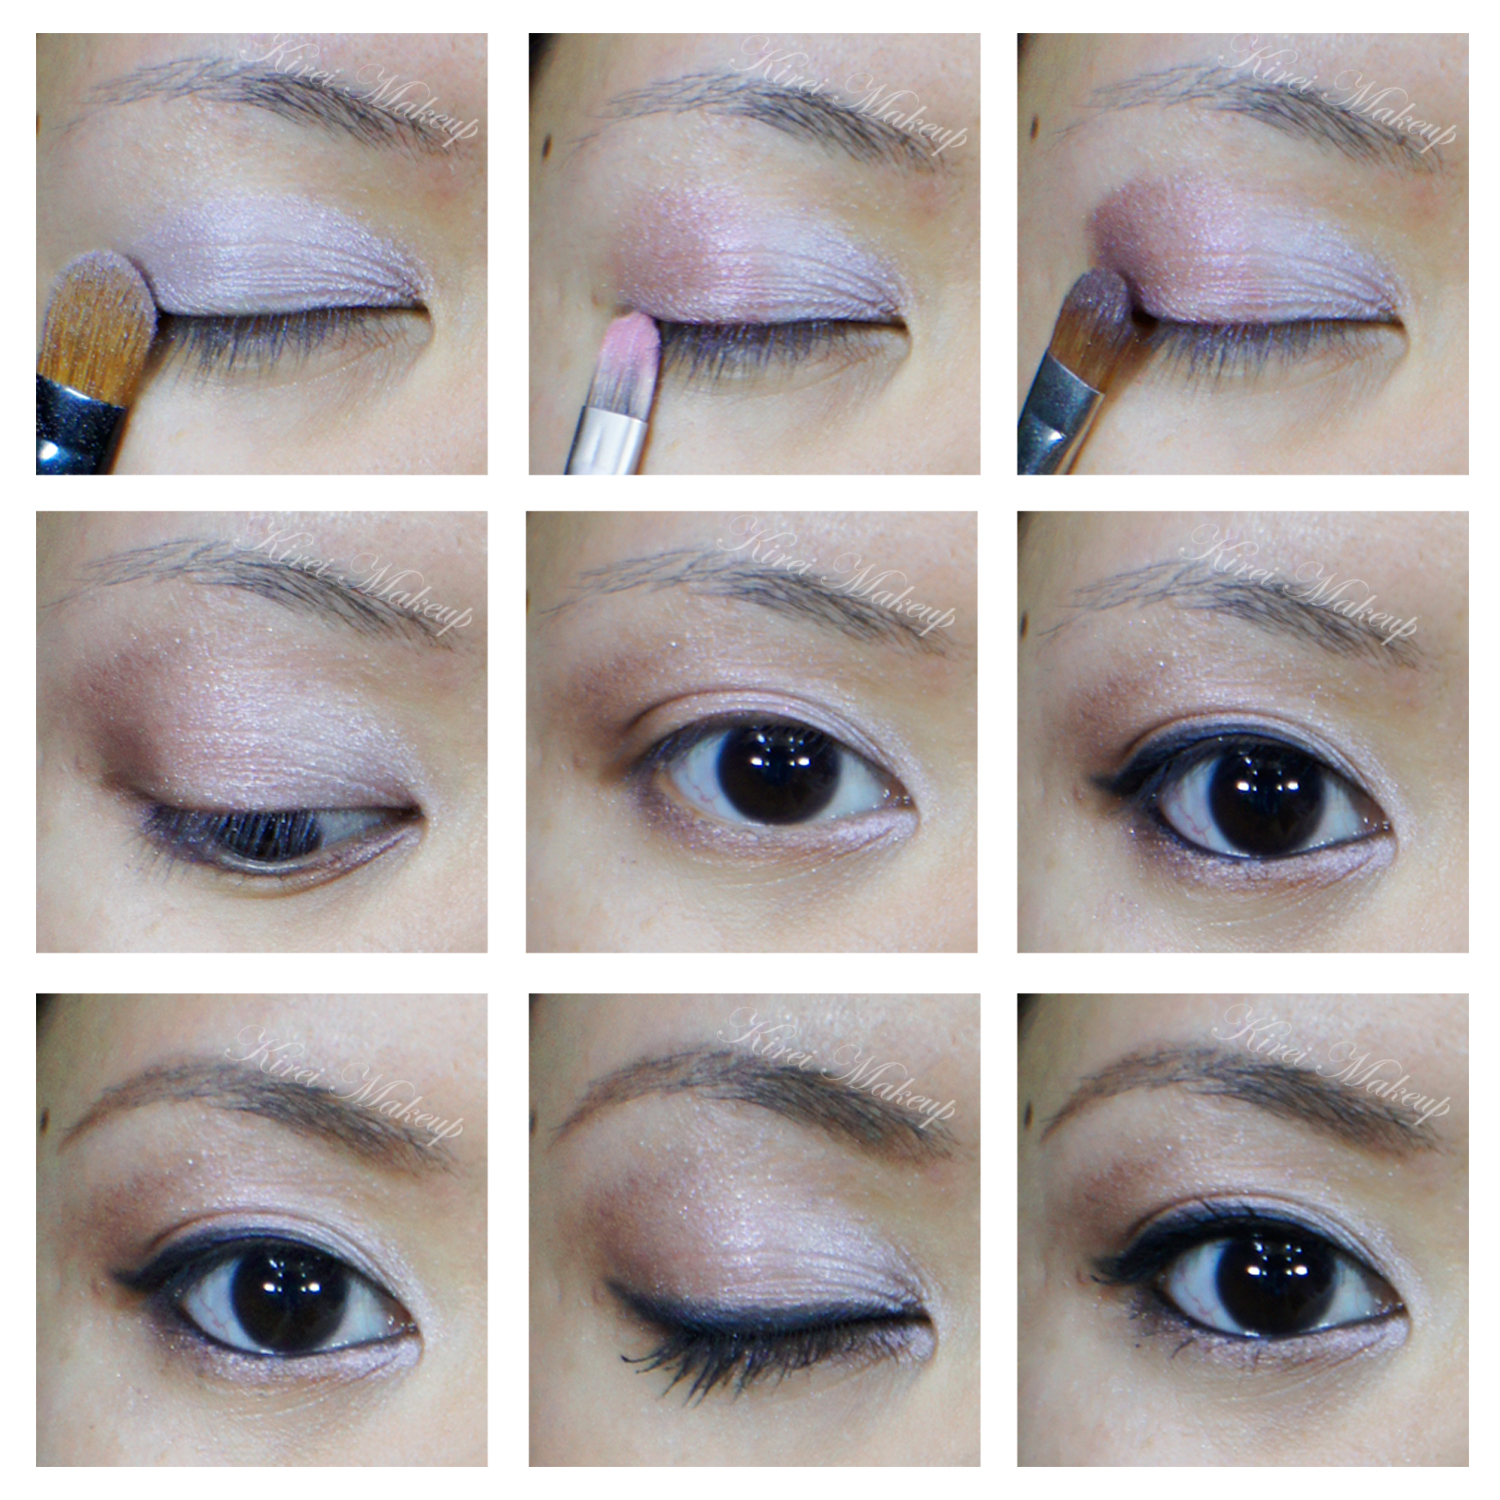
7. I created winged liner/cat-eye liner/feline flick along the upper lash line using Kanebo Kate Super Sharp eyeliner.

8. I applied MAC Brule under the brow bone.

9. I curled my lashes and applied L’oreal Double Curl Extension mascara on both upper and lower lashes.

10.ย  I filled my brows using Shu Uemura Hard Formula 9.

11. I also applied Ardell individual short flare eyelashes on my top lashes to make them look thicker.sleek idivine storm

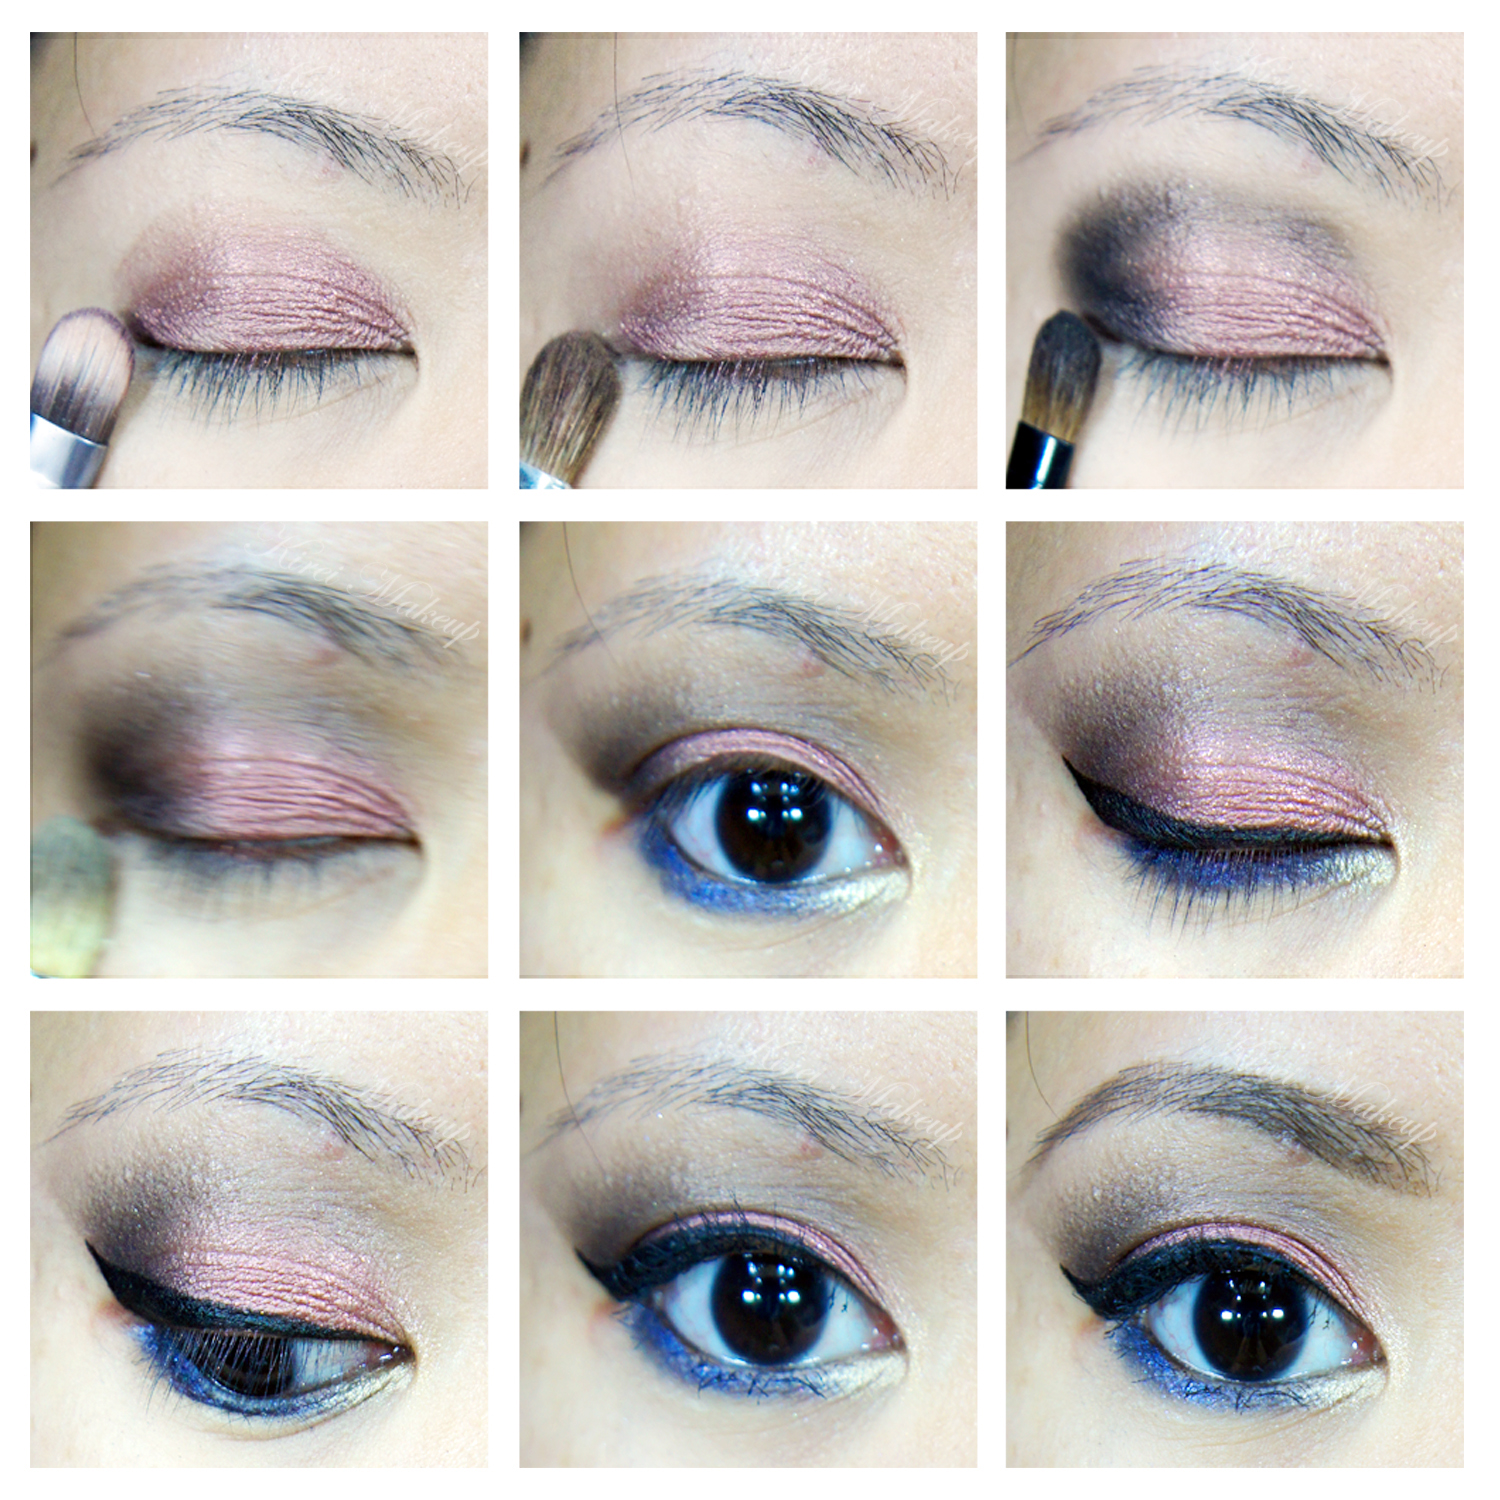
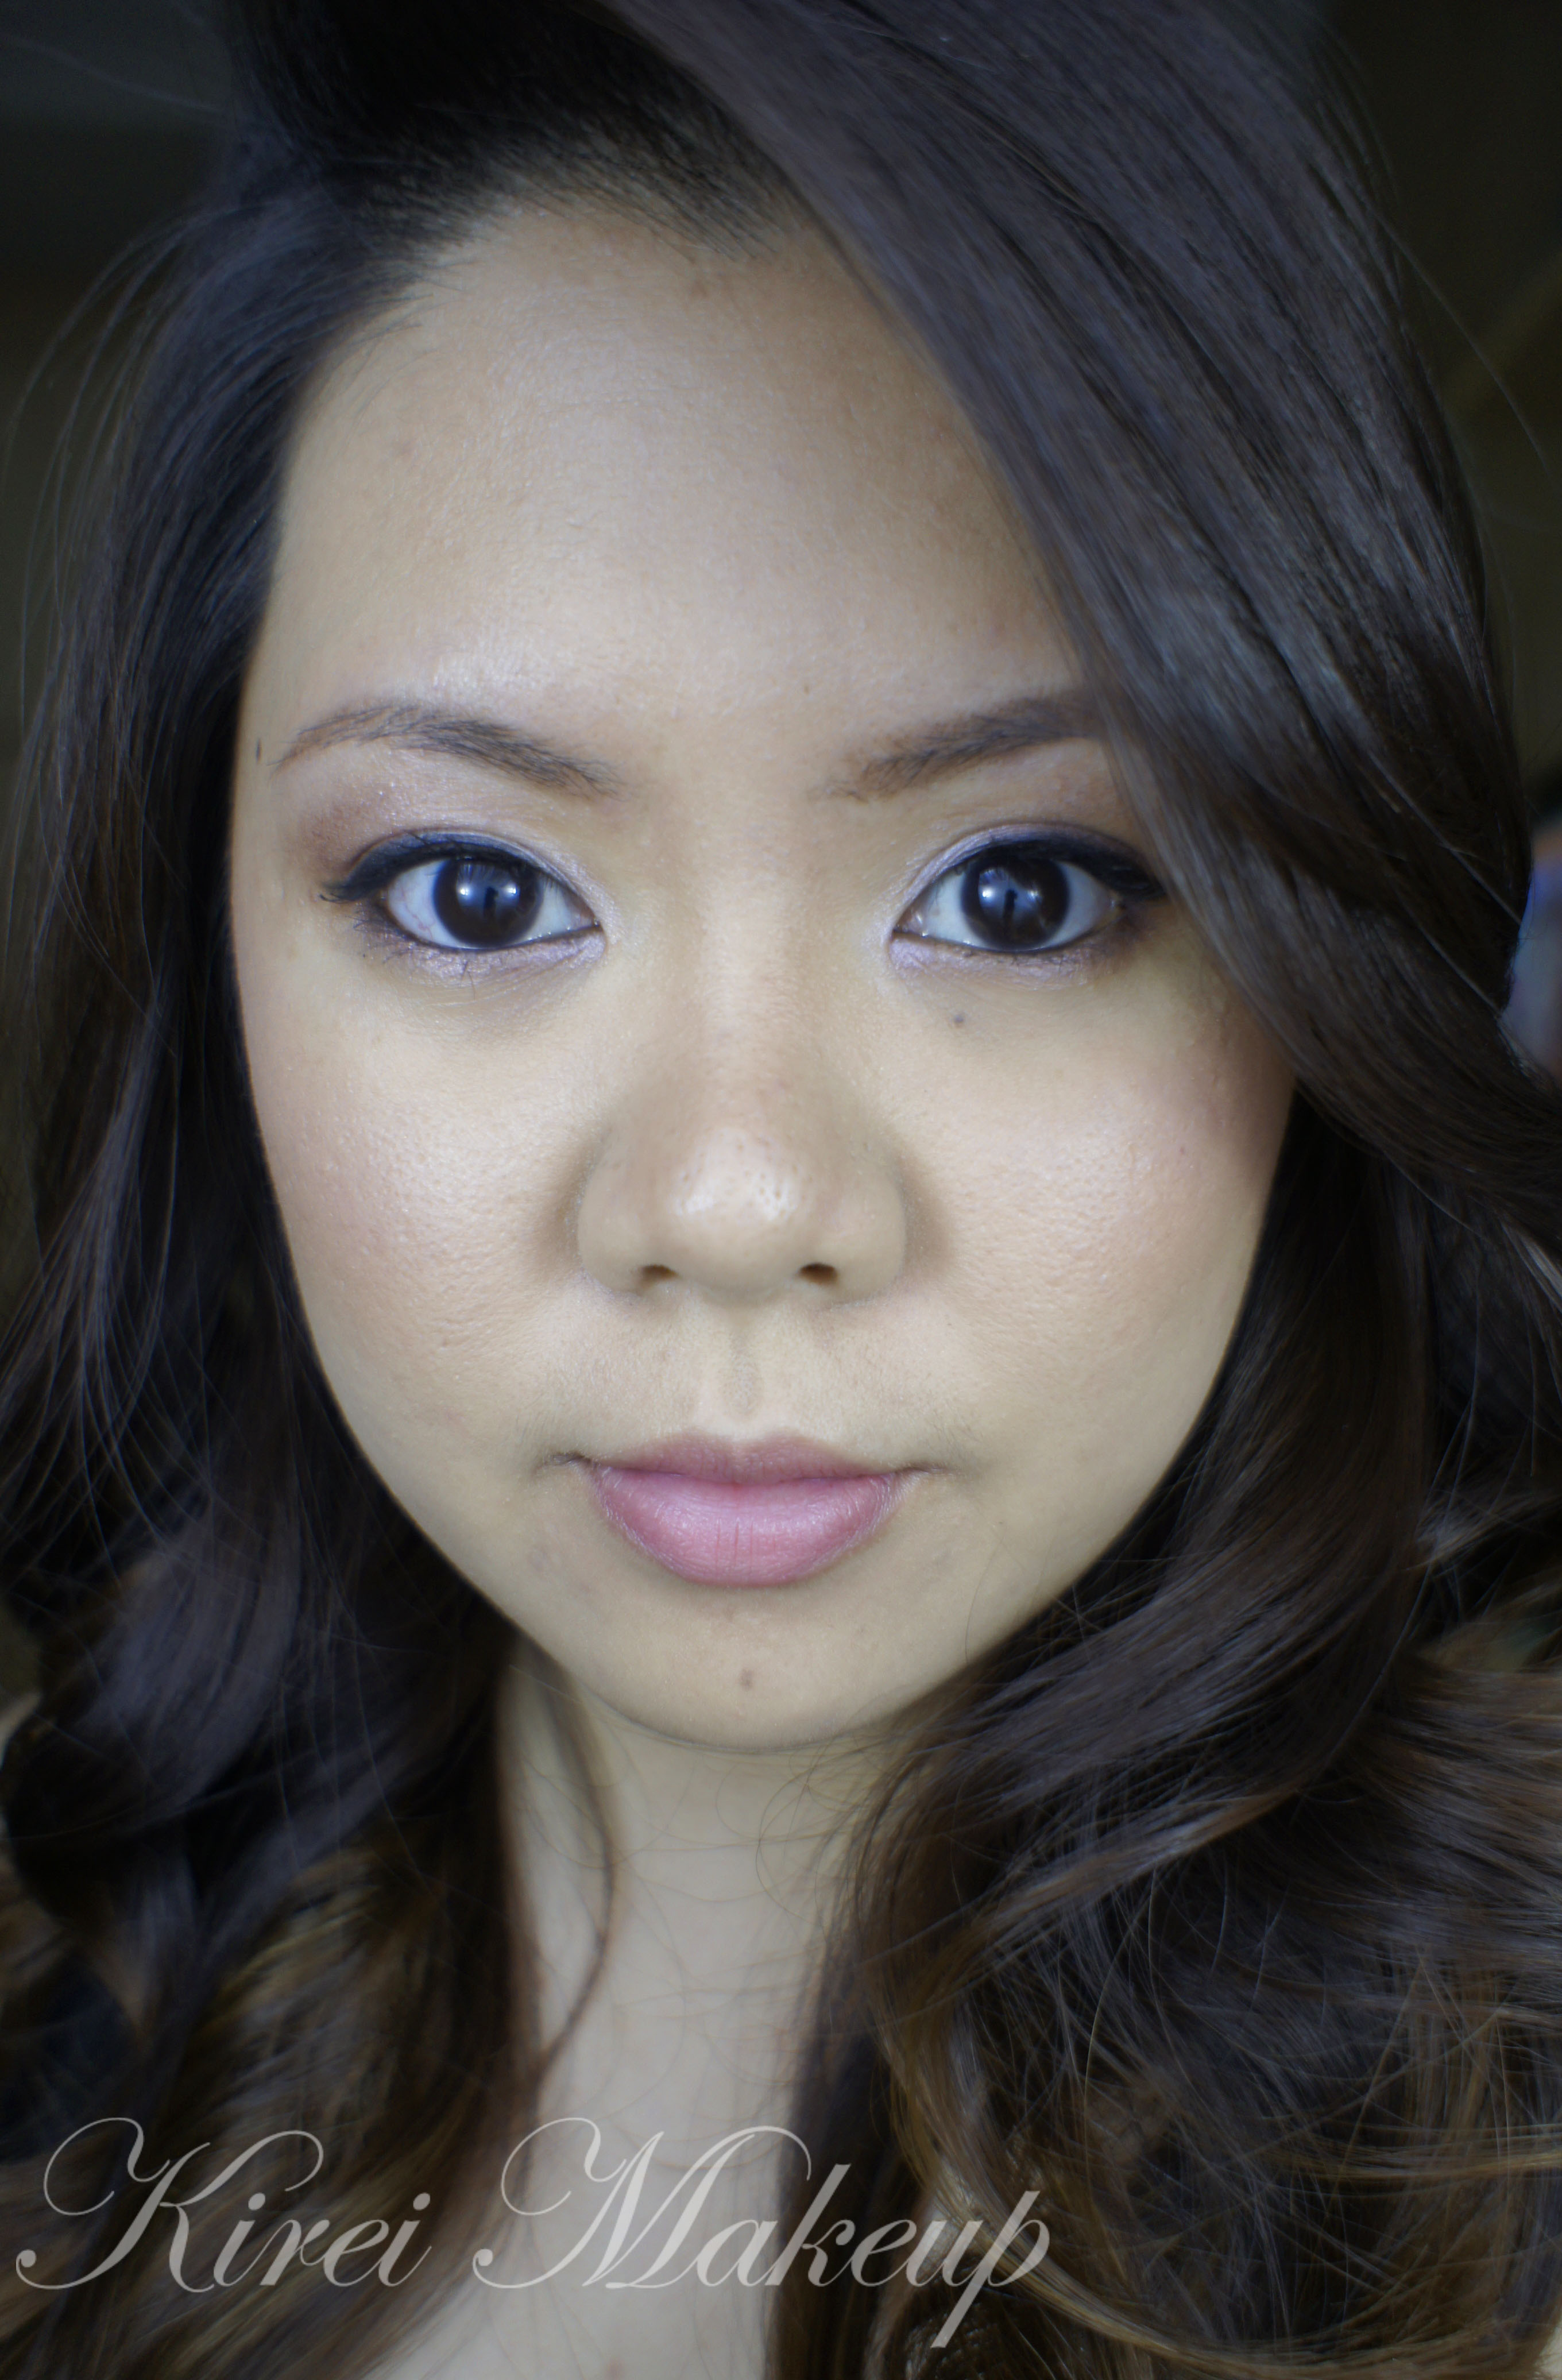
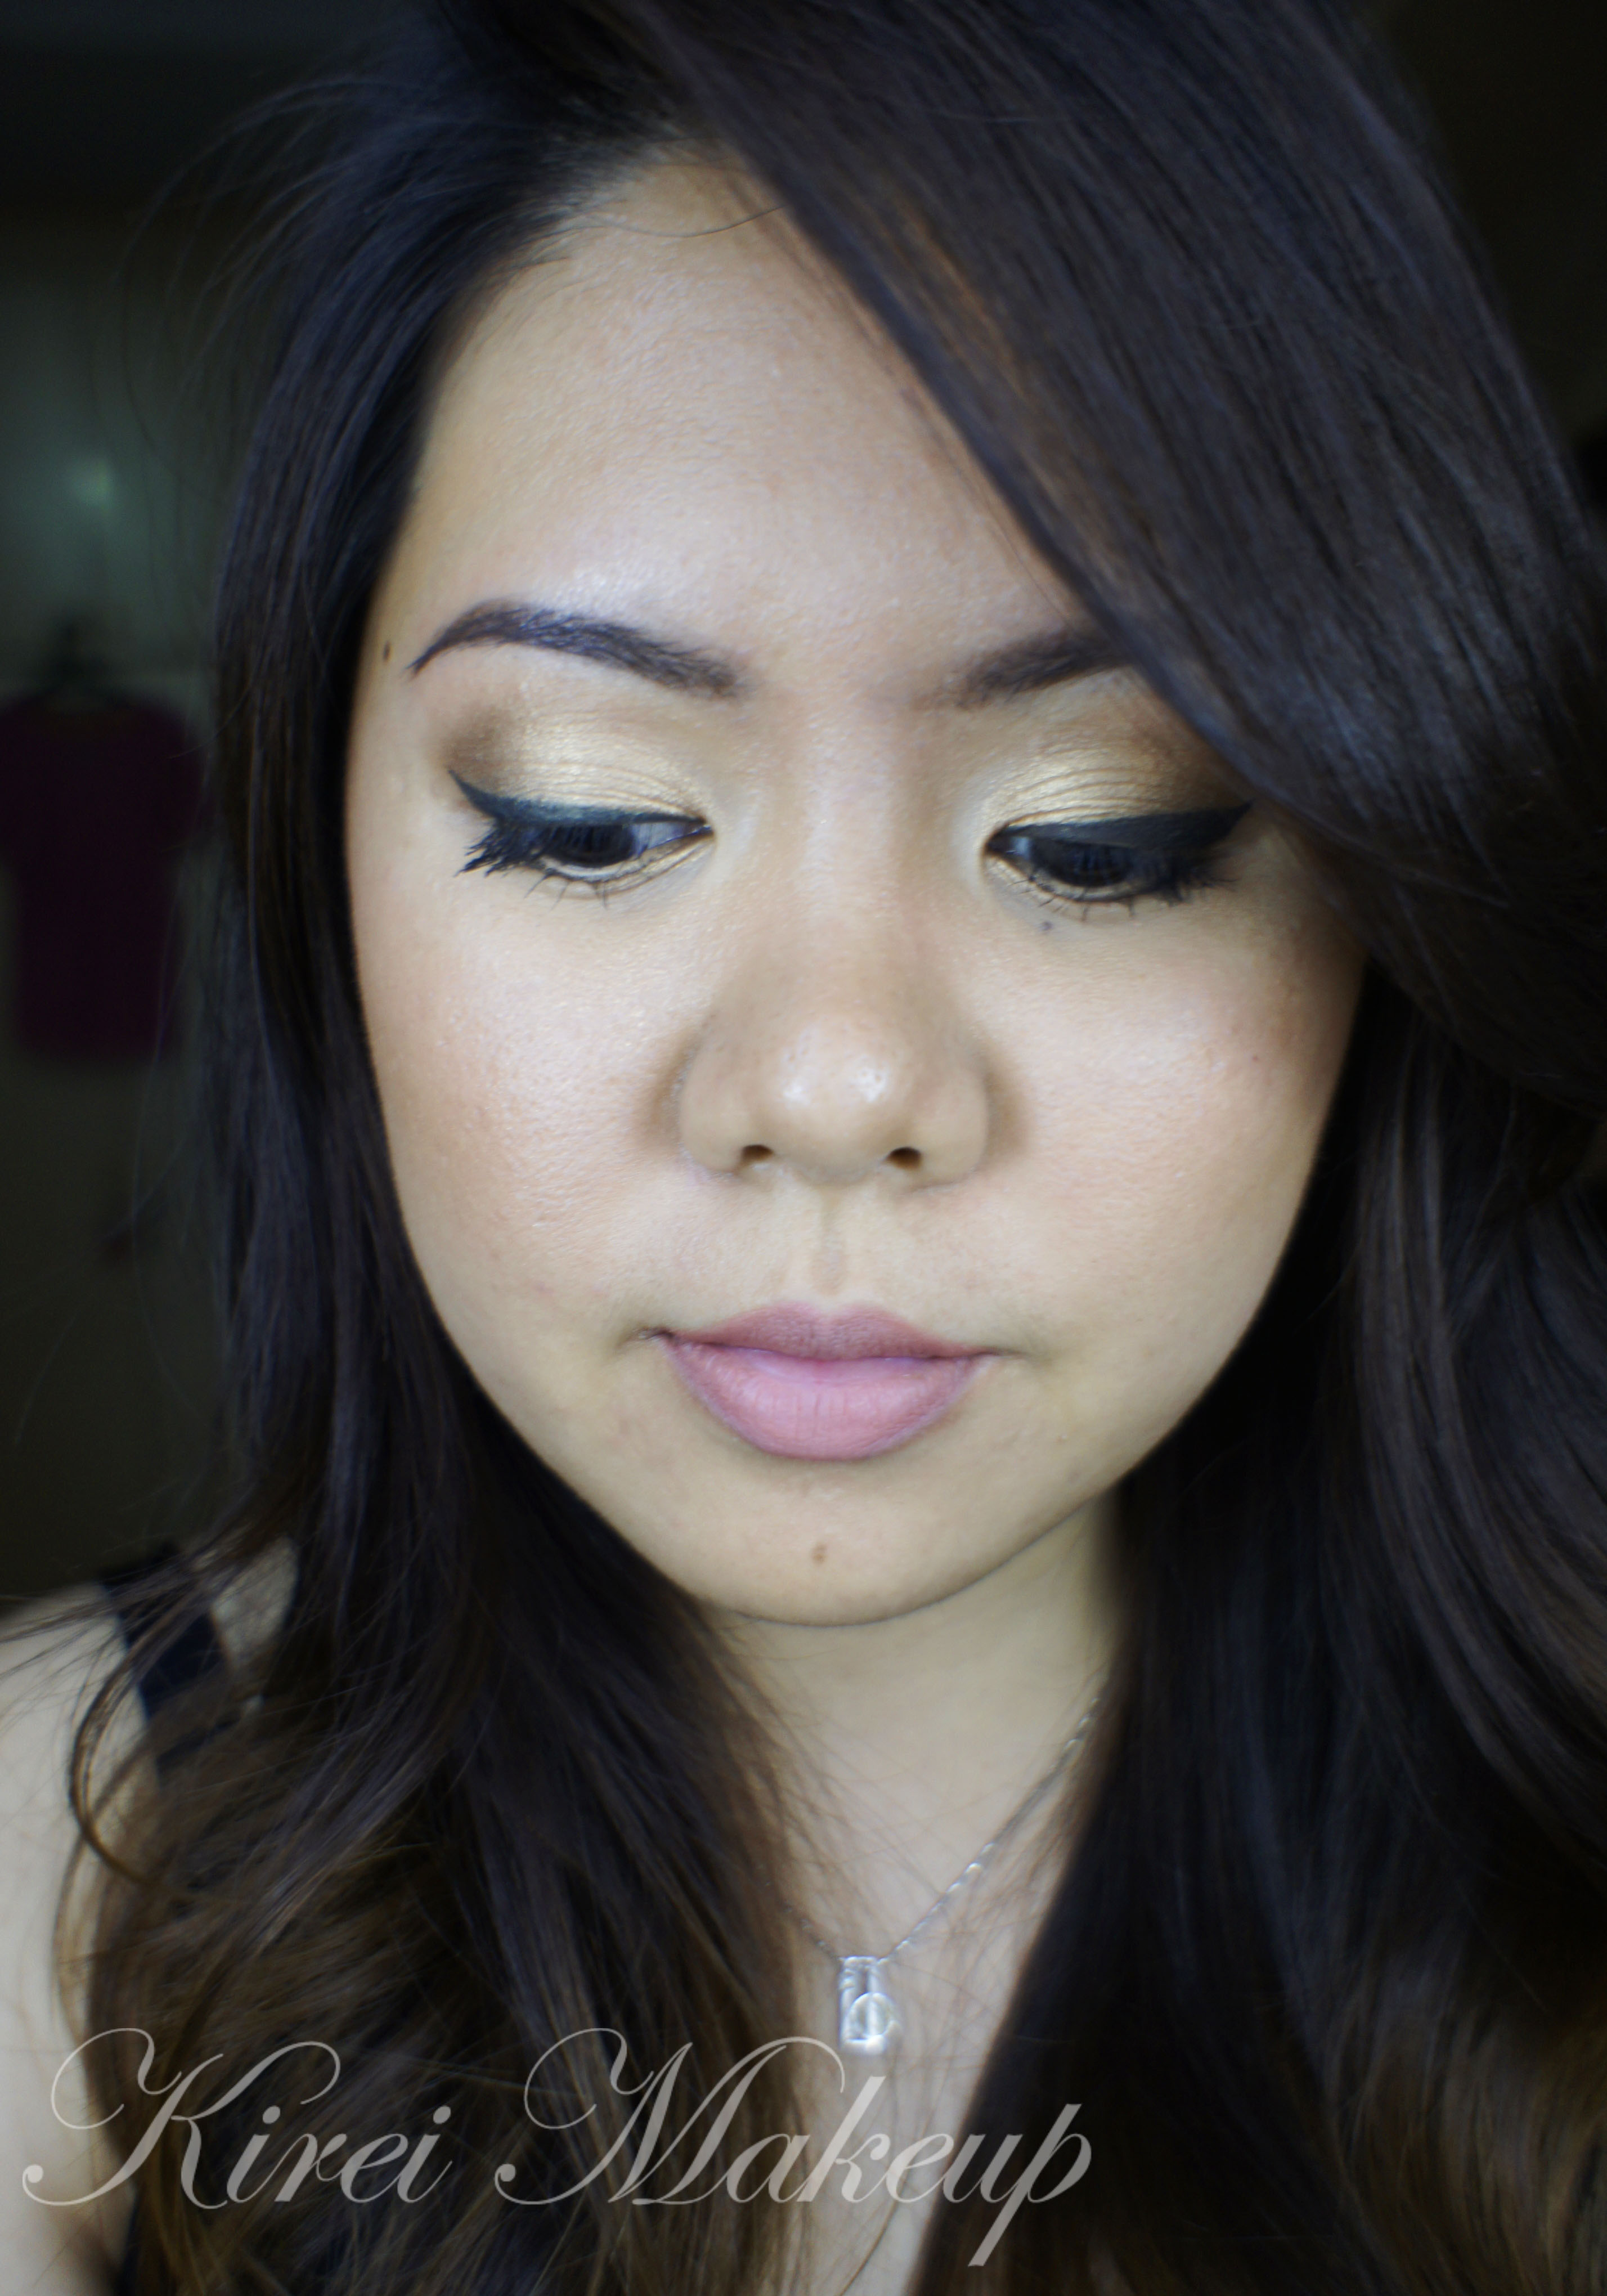
12. On the face, I applied MUFE HD Foundation, and under the eyes I applied MUFE HD concealer.

13. I powdered my face using Cinema Secret loose powder.

14. I applied MAC Cubic on my cheeks as blush.

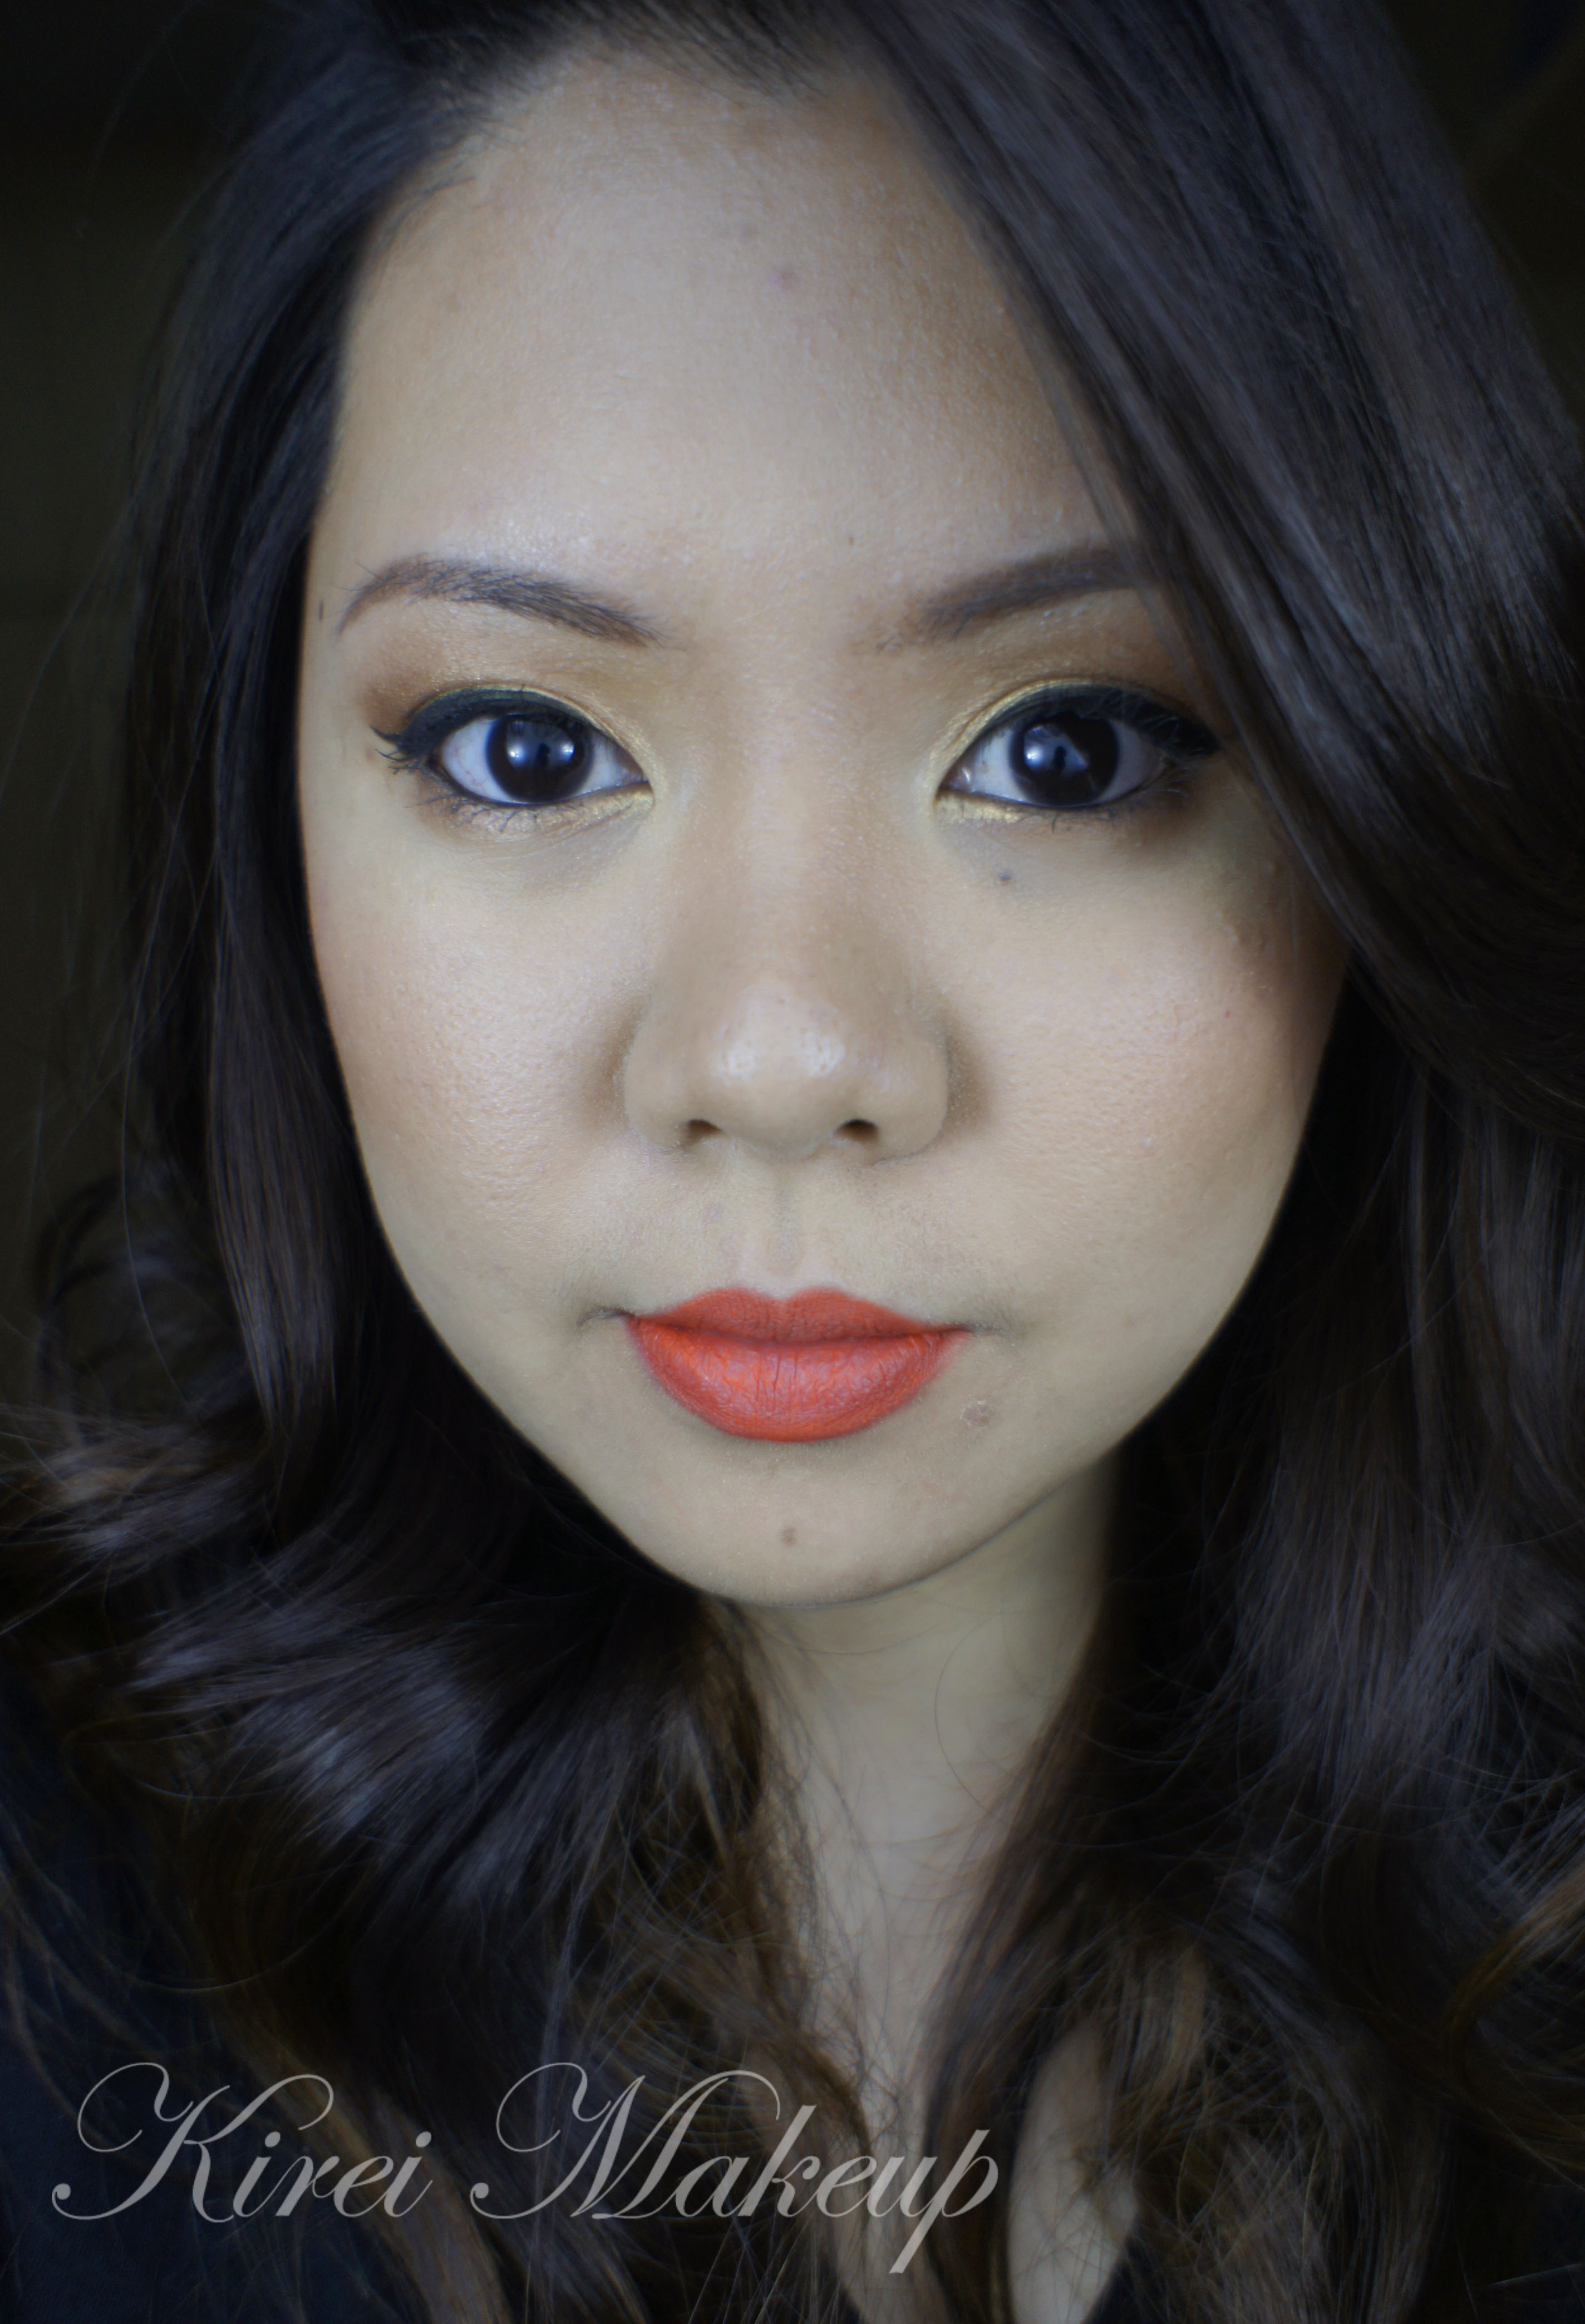
15. On the lips, I applied some lipstick that I’ve melted and forgot to label it…(sorry)

Anything that can go wrong on this tutorial went wrong. I mean, I couldn’t get the lights to work like normal for some reason, may be they are dying. Then, my skin was so dry that day, and I ran out of moisturizer. So, apologies if my foundation looks slightly cakey (or a lot). On top of that, my palette fell from the table because I accidentally tripped – when I was trying to break the fall by holding onto the table, my hand hit the palette. Ah, what a day ๐Ÿ™‚ hahahaha…

ย Sleek iDivine Storm

Red Invasion [Collaboration]

Lately, my Twitter has been flooded with chats between several Indonesian Beauty Bloggers and myself. These bloggers are: Yonna Kairupan, Iva Asih Era Chrysta, Lauren Renturquise, Sha Aullia, and Riyanti Teressa. So, we decided to do a little collaboration and we wanted to paint the town red ๐Ÿ˜‰ By town, I mean the Indonesian Beauty Bloggers Facebook page.

Anyhow, we decided to do red lips look, and Yonna had posted hers on her youtube page. I decided to post mine next and the obvious choice for me was to use MAC Russian Red (again). I can never get tired of MAC Russian Red, it’s just so gorgeous! It’s definitely my favorite.

For the eyes, I think I wanted to pack more punch on it, so I did a slightly more smoky look than the other tutorial in MAC Russian Red post. I also added a set of false eyelashes on me lashes, since I bought a new one. I don’t love the falsies, but I don’t mind it. Not long enough and not thick enough. Oh well! I also used my new Sleek Makeup iDivine Storm palette, but there’s no name for each shade for this palette. So, I named the shades on the tutorial below based on the hue of each eyeshadow. If you’re confused, just leave the question below ๐Ÿ™‚

How-to:

1. I applied MUFE Aqua Shadow in 28E all over the lid.

2. Using a clean fluffy brush, I applied the matte light brown from Sleek Makeup iDivine Storm palette.

3. Using another clean fluffy brush, I applied matte dark brown from Sleek Makeup iDivine Storm palette.

4. I applied the champagne shade from Sleek Makeup iDivine Storm palette on top of the MUFE Aqua Shadow 28E with a flat eyeshadow brush.

5. Using another blending brush, I applied black from Sleek Makeup iDivine Storm palette.

6. I applied both champagne (inner corner) and black (outer corner) from Sleek Makeup iDivine Storm palette on the lower lid using an angled brow brush.

7. Using Kanebo Kate Super Sharp eyeliner, I created a feline flick/cat-eye liner/winged liner on the upper lash line.

8. I curled my lashes and applied Maybelline Volume Express Turbo Boost mascara on both top and bottom lashes.

9. I lined the outer half of my waterline using L’oreal Voluminous Smoldering eyeliner.

10. I applied DUP eyelashes in 906 on the top lashes.

11. For the brows, I applied MUFE Aqua Brow Gel.

sleek makeup storm

12. On my face, I applied Urban Decay Naked Skin foundation.

13. I applied MUFE HD concealer to cover my blemishes and under eye circles.

14. I powdered my face using Cinema Secret loose powder.

15. I contoured my face using NARS Kabuki Ita brush and MAC Shadowy powder.

16. I applied MAC Fleur Power on my cheeks.

17. I lined and filled my entire lips with MAC Redd lip liner.

18. I, then, applied MAC Russian Red on my lips.

asian red lips

P.A.C Merak Kasmaran

I purchased the PAC Cantika Jawa Timur 2009 Color Trend. The trio is called Merak Kasmaran, which means Peacock in Love. This is a trio shadow palette – golden yellow, deep purple and teal. The colors aren’t so peacock-y, considering that there’s a lot of blue, green, yellow and bronze in peacock’s feathers, but it’s quite pretty. I bought this for IDR 48,000 at Martha Tilaar store in Pluit Village Mall.

I’m not too crazy how this ended up, but I had to post it! I’m lacking in posts since I’ve been busy going on adventures with Liz. So, I’m so sorry if I’m going missing for couple more weeks. Follow me on Instagram for updates.

How-to

1. I applied the purple eyeshadow from PAC Merak Kasmaran all over my lid using a flat eyeshadow brush.

2. Using a medium brown eyeshadow (no-name brand, a gift from working at the IMATS booth couple years back) and a small brush, I applied the shadow on the crease.

3. I used a shader brush and blended the edge of the crease.

4. I also applied MAC Swiss Chocolate on the outer V.

5. Using a clean flat eyeshadow brush, I applied the gold yellow shadow from PAC Merak Kasmaran on the inner corner of the lid.

6. I applied the Teal shadow from PAC Merak Kasmaran on the lower lid using an angled eyebrow brush.

7. I lined my waterline and tightline using MUFE Aqua liner in black.

8. Using the same eyeliner, I created winged/cat-eye liner along the upper lash line.

9. I curled my lashes and applied Maybelline Express Volume mascara on the upper and lower lashes.

10. I wanted to try out a new set of falsies I bought in Japan, so I applied Fleur Fleur in 201. I had to cut the ends since they were too long. I know they were purposely made long to give a droopy eye effect, but me no like that effect and thus I cut it.

11. I filled my brows using MUFE Aqua Brow Gel.

PAC Merak Kasmaran

12. For the face, I applied UD Naked foundation using a foundation brush.

13. I applied MUFE HD Concealer under the eyes.

14. I also applied MAC Cubic blush on the cheeks, and Sephora Hello Kitty lipstick in Peach.

ps: I felt like the crease on my right eye (left in photo) is a bit unblended for some reason, which probably is because I was rushing, so please ignore that. I was rushing to go out after the tutorial.

PAC Merak Kasmaran


Summer Splash

This look today is one of my fav. summer makeup. It doesn’t matter where I am in the summer, somehow I always seem to resort back to this look. It’s very light and bright, and of course you can always eliminate some of the steps below to make it easier and to suit your own look. Most of the time, I only used the MAC Melon pigment on my lid with mascara, skipping the liner and the contour colors altogether.

Anyways, the 2nd look to this post used an orange lip liner. I don’t know where my orange lipstick is, so I only used the lip liner to fill my entire lip. Of course you can change the lips to whatever color you want, red, pink, or even nude. No rules, just fun playful makeup.

How-to:

1. Using a synthetic brush, I dipped the brush in water and then dipped it in MAC Melon pigment. I mixed it at the back of my hand to turn it into a paste form and applied this paste to my lid, and on the inner corner of the lower lid.

2. Using a shader brush, I applied MAC Bronze eyeshadow on the outer V and on the crease. I used whatever left on the brush and ran it through the lower lid.

3. Using a clean fluffy brush, I blended the crease to remove any harsh edge.

4. I applied Smashbox Deep Golden Brown on the outer corner, blending it inwards. I focused most of the color on the outer V of the lid.

5. Using whatever left on the brush, I applied it on the lower lid.

6. Using an angled eyeliner brush and MUFE Aqua Black, I created a winged liner along the upper lash line.

7. I lined my waterline using whatever product remained on the brush from step 6.

8. I curled my lashes and applied Maybelline Express Volume Turbo Boost mascara on both top and bottom lashes.

9. I filled my brows in using Shu Uemura Hard Formula 9 brow pencil.

natural makeup

10. I applied UD Naked foundation all over my face using a foundation brush.

11. I contoured my face using MAC Studio Tech in NW 55. (If you want to know how I contour my face, check out this post for powder contouring or here for cream contouring)

12. I applied MAC Peaches blush on the cheeks.

13a. For the lips, I applied YSL Pur Couture rouge no. 17 using a lip brush.

natural bridal makeup

13b. For the orange lips, I lined and filled my lips using MAC Entertain Me lipliner.

orange lips

Cat-itude

Have you guys watched The Croods? I just watched it not too long a go, and I love the cute sabertooth tiger! I drew inspiration from his fur colors! I love how it turned out. The eyeshadows I used are my favorites bright colors – chartreuse and teal. I’ve never thought that these 2 colors will work together, but I ended up loving it. MAC Bitter is so gorgeous, it’s been a while since I play with the eyeshadow and I can see myself using it more frequently in the near future.

How-to:

1. I applied MAC Bitter on the inner half of the lid using a flat eyeshadow brush.

2. Using another flat eyeshadow brush, I applied MAC Birds and Berries on the outer half.

3. Using a small fluffy brush, I applied MAC Club on the outer V and on the crease.

4. I blended out MAC Club using a fluffy blending brush.

5. Using an angled eyebrow brush, I applied MAC Bitter on the inner corner of the lower lid and MAC Birds and Berries on rest of the lower lid.

6. I also lined my waterline using L’oreal Voluminous Smoldering eyeliner.

7. Using a small shader brush, I applied UD Perversion eyeshadow on the outer V and along the crease.

8. I blended the eyeshadow out using a fluffy blending brush.

9. Along the upper lid, I created a winged liner using Kat Von D Trooper eyeliner.

10. I curled my lashes and applied Maybelline Volume Express Turbo Boost mascara on both upper and lower lashes.

11. I filled my brows in using MUFE Aqua Brow Gel.

mac rated r

11. For my face, I applied MUFE HD Foundation and foundation brush.

12. I applied MAC Shadowy as contour and MAC Cubic as blush.

13. On the lips, I applied MUFE Soft Apricot Rouge Artist Natural.

mac r rated

Fiery

As mentioned previously and on twitter, I’m having a breakout on my face and so I decided to do just a tutorial for the eyes. I apologize, but there were 2 very persistent ones right above my lips and 1 on the cheek that’s super painful. Anyhow, I hope those pesky pimples will be gone soon. I also just ran out of my benzoyl peroxide (I bought one from Canada), and couldn’t find a replacement for it in Jakarta yet. If anyone has any recommendation, let me know.

For the tutorial, I wanted to use my Sleek Makeup Ultra Matte Brights v1 palette since I find it quite hard to use this palette. I find a difficult time blending the eyeshadow from this palette, and since the colors are matte, I also find it quite hard to create depth for my eyes. However, I actually think I quite nailed this look. I love the combination of the yellow and the bright pink. I know this might not be a wearable look since it’s extremely bright, but I had a fun time doing it. Might work for Halloween or for whoever love wearing bright makeup.

How-to:

1. Using a synthetic brush, I applied PAC face paint cream in Yellow all over my eyelid.

2. I applied PAC face paint cream in Shocking Pink on the outer V and on the crease using a synthetic art brush.

3. Using a flat eyeshadow brush, I applied Bammi from Sleek Makeup iDivine v1 palette on the eyelid.

4. Using a small fluffy brush, I applied Pucker from the same palette on the outer V and on the crease lightly.

5. Using a smaller more dense brush (similar to a small shader brush), I applied Sugarlite from the palette on the crease only.

6. I applied Sugarlite on the lower lid using a smudge brush.

7. (not in picture), I also applied a black matte eyeshadow brush on the outer corner of the lower lid using an angled brush.

8. Using Sigma eyeliner brush, I applied MUFE Aqua Black along the upper lash line creating a winged liner.

9. I lined my waterline using L’oreal Voluminous Smoldering eyeliner pencil.

10. I filled in my brows using Shu Uemura Hard Formula 9 Brow Pencil.

11. I curled my lashes and applied Maybelline Volume Express Turbo Boost on both upper and lower lashes.

ย Sleek Makeup Matte Brights v1

Lily Cole Bodyshop Shimmer Cube Look #2

I wanted to do another tutorial using the Lily Cole BodyShop Shimmer Cube that I bought in April. I’ve done a review in this post Body Shop Lily Cole Shimmer Cube, and a tutorial in this Spring Lilac post. I really love the eyeshadow combination, and wanted to create another look that’s wearable and not too over the top, yet at the same time there’s still a play of colors on the eyes.

I decided to use the eyeshadows dry for a sheer wash of color. If you like a more intense color, feel free to apply the eyeshadows wet. I like how this look ends up to be very light and just enough. I think it’s perfect for the Summer, esp. since the weather is getting really hot in Jakarta.

How-to:

1. I applied the Live Lilac eyeshadow from BodyShop Lily Cole Shimmer cube using a flat eyeshadow brush all over my lid.

2. Next, I applied Think Pink eyeshadow from Bodyshop Lily Cole Shimmer cube on the outer half of the lid using a flat eyeshadow brush.

3. On the outer corner only, I applied Go Violet using a flat eyeshadow brush.

4. Using a clean blending brush, I blended Go Violet on the crease.

5. I applied Think Pink on the lower lid, as well as Go Violet on the outer corner of the lower lid using a small shader brush.

6. I dabbed Live Lilac on the inner corner of the lower lid using a pencil brush.

7. Using L’oreal Voluminous Smoldering eyeliner, I lined my waterline, tightline and along the upper lash line creating a small flick at the outer corner.

8. I filled my brows using Shu Uemura Hard Formula 9 eyebrow pencil.

9. I curled my lashes and applied Maybelline Volume Express Turbo Boost mascara.

Lily Cole Bodyshop Shimmer Cube

10. For the face, I applied Urban Decay Naked foundation using foundation brush.

11. On the cheeks, I applied Benefit Hervana.

12. I completed the look by applying Clinique Chubbystick Lip pencil in Bountiful Blush.

Lily Cole Bodyshop Shimmer Cube

Golden Bronze

This week is like my non-colorful week! Today’s look used Urban Decay Naked Palette, and it’s perfect for daytime and bridal makeup. It’s packed with bronze goodness. The colors are perfect for every eye-colors and skintones. Very flattering, very warm and it’s really easy to achieve this look.

I love wearing this look for the summer. It might look like it’s a lot, but once you complete the face, the eyes look pretty natural looking. It really do brighten up the face too. This is my fav. way of wearing bronze eyeshadow. You can immediately turn this makeup to a night look just by adding black liner along the upper lashline and waterline, turning it into a smoky look.

For tutorial on how to fill-in brows, please visit “Product of The Week: MUFE Aqua Brow“. For a smokier version of this look please visit “Baked It Up!

urban decay naked palette

How-to:

1. Using a flat eyeshadow brush, I applied UD Half-Baked all over the lid.

2. Using a flat fluffy brush, I applied UD Buck lightly on the crease and the outer V.

3. Using a fluffy blending brush, I applied a mixture of UD Smog + Snakebite on the outer half of the lid, blending in towards Half-Baked.

4. I applied UD Half-Baked on the inner corner of the lower lid, and UD Smog + Snakebite on the outer half using a small shader brush.

5. I created a winged liner along my upper lashline using Bobbi Brown Caviar Ink cream liner.

6. Using whatever is left on the brush, I applied the liner along the outer corner of the lower lid.

7. I curled my lashes and applied MUFE Smoky Lash mascara on both upper and lower lashes.

8. I filled my brows in using MUFE Aqua Brow.

urban decay naked palette

9. For my face, I applied Tarte Amazonian Clay BB Tinted Moisturizer.

10. I applied Benefit Dallas on my temples, the tip of my nose, my chin and my cheeks.

11. I also applied MAC Peaches on the cheeks.

12. For the lips, I applied Lโ€™oreal Colour Riche Lip Liner in Beyond Pink.urban decay naked palette

Neutral

I wanted to do a pretty makeup, something that will be good for brides, or prom goers, or just for anyone who wants an extra something something..bahahahaha..anyways! I love how it ended up and I think this look is perfect for brides, if they don’t want anything too smoky.

Anyways, I love how I’ve been using UD Naked palette more lately. I think I might do more tutorials using the Naked and Naked 2 palettes. Also, how do you like my brows? I managed to fix it today. Lately, I’ve played around with the MUFE Aqua Brow gel and I have to say, I’m loving it! More on that later on during the week.

How-to:

1. I applied UD Sin eyeshadow all over the lid using a flat eyeshadow brush.

2. On the crease, I applied UD Buck eyeshadow using a small blending brush.

3. Using the same brush, I applied MAC Brun on the outer V.

4. I clean the edge of the crease using a clean blending brush.

5. Using a small shader brush, I applied Sin on the inner corner of the lower lid and MAC Brun on the outer corner.

6. I created a winged liner along the upper lashline using MUFE Aqua Black gel liner and an angled eyeliner brush.

7. I lined my waterline using L’oreal Voluminous Smoldering eyeliner.

8. For my lashes, I applied MUFE Smoky Lash mascara on both top and lower lashes.

9. I filled my brows in using MUFE Aqua Brow.

natural makeup with urban decay naked palette

10. For the face, I applied UD Naked foundation using a foundation brush.

11. Under the eyes, I applied MAC Pro Conceal/Correct concealer in Medium.

12. I applied MAC Shadowy as a light contour and then MAC Cubic on my cheeks as blush.

13. For the lips, I filled it in using MAC Dervish lipliner.

asian bridal makeup

Color Crush

I have a crush on the MUFE Aqua Cream no. 52. The color is just so pretty! I just want to use it on every tutorial…Anyways, I did this look just to play around with colors. I think I might do another look with the green cream shadow. We’ll see. I had a lot of fun playing around with this color.

How-to:

1. Using a synthetic brush, I applied MUFE Aqua cream no. 52 Pearly Green Dragon on the outer half of my lid.

2. Using MUFE Aqua Shadow stick in Pearly Peach on the inner half of the lid. I used my finger to blend the colors.

3. I used a flat eyeshadow brush and applied Smashbox Admire Me Soft Shimmering Coral on the inner half of the lid and UD Kush on the outer half.

4. Using a small shader eyeshadow brush, I applied UD Perversion on the outer V and the crease.

5. I cleaned the small shader brush on a tissue and use the brush to blend the harsh line.

6. I applied MUFE no. 92 eyeshadow on the crease lightly using a blending brush.

7. Using wet wipe, I cleaned the outer edge of my eye to clean up and sharpen the edge.

8. I also applied UD Foxy eyeshadow under the brow.

9. Using an angled eyebrow brush, I applied MUFE no. 92 eyeshadow on the lower lid. I applied UD Bordello on the inner corner of the lower lid.

10. I lined my waterline using L’oreal Voluminous Smoldering eyeliner and lined the upper lashline using Kanebo Kate Super Sharp liner.

11. I curled my lashes and applied Dior Overcurl mascara.

12. I filled my brows using MUFE Aqua Brow gel no. 40 and an angled eyeliner brush.

13. I brushed my brows using a clean spooly.

mufe aqua cream 22

14. For the face, I applied MUFE HD Foundation using a foundation brush.

15. I applied MAC Cubic blush and MAC Bronzer on the cheeks.

16. I contoured the sides of my nose using MAC Shadowy.

17. On the lips, I applied Clinique Bountiful Blush chubby stick.

bright colorful makeup

orange and green makeup