Smashbox Full Exposure Palette Review

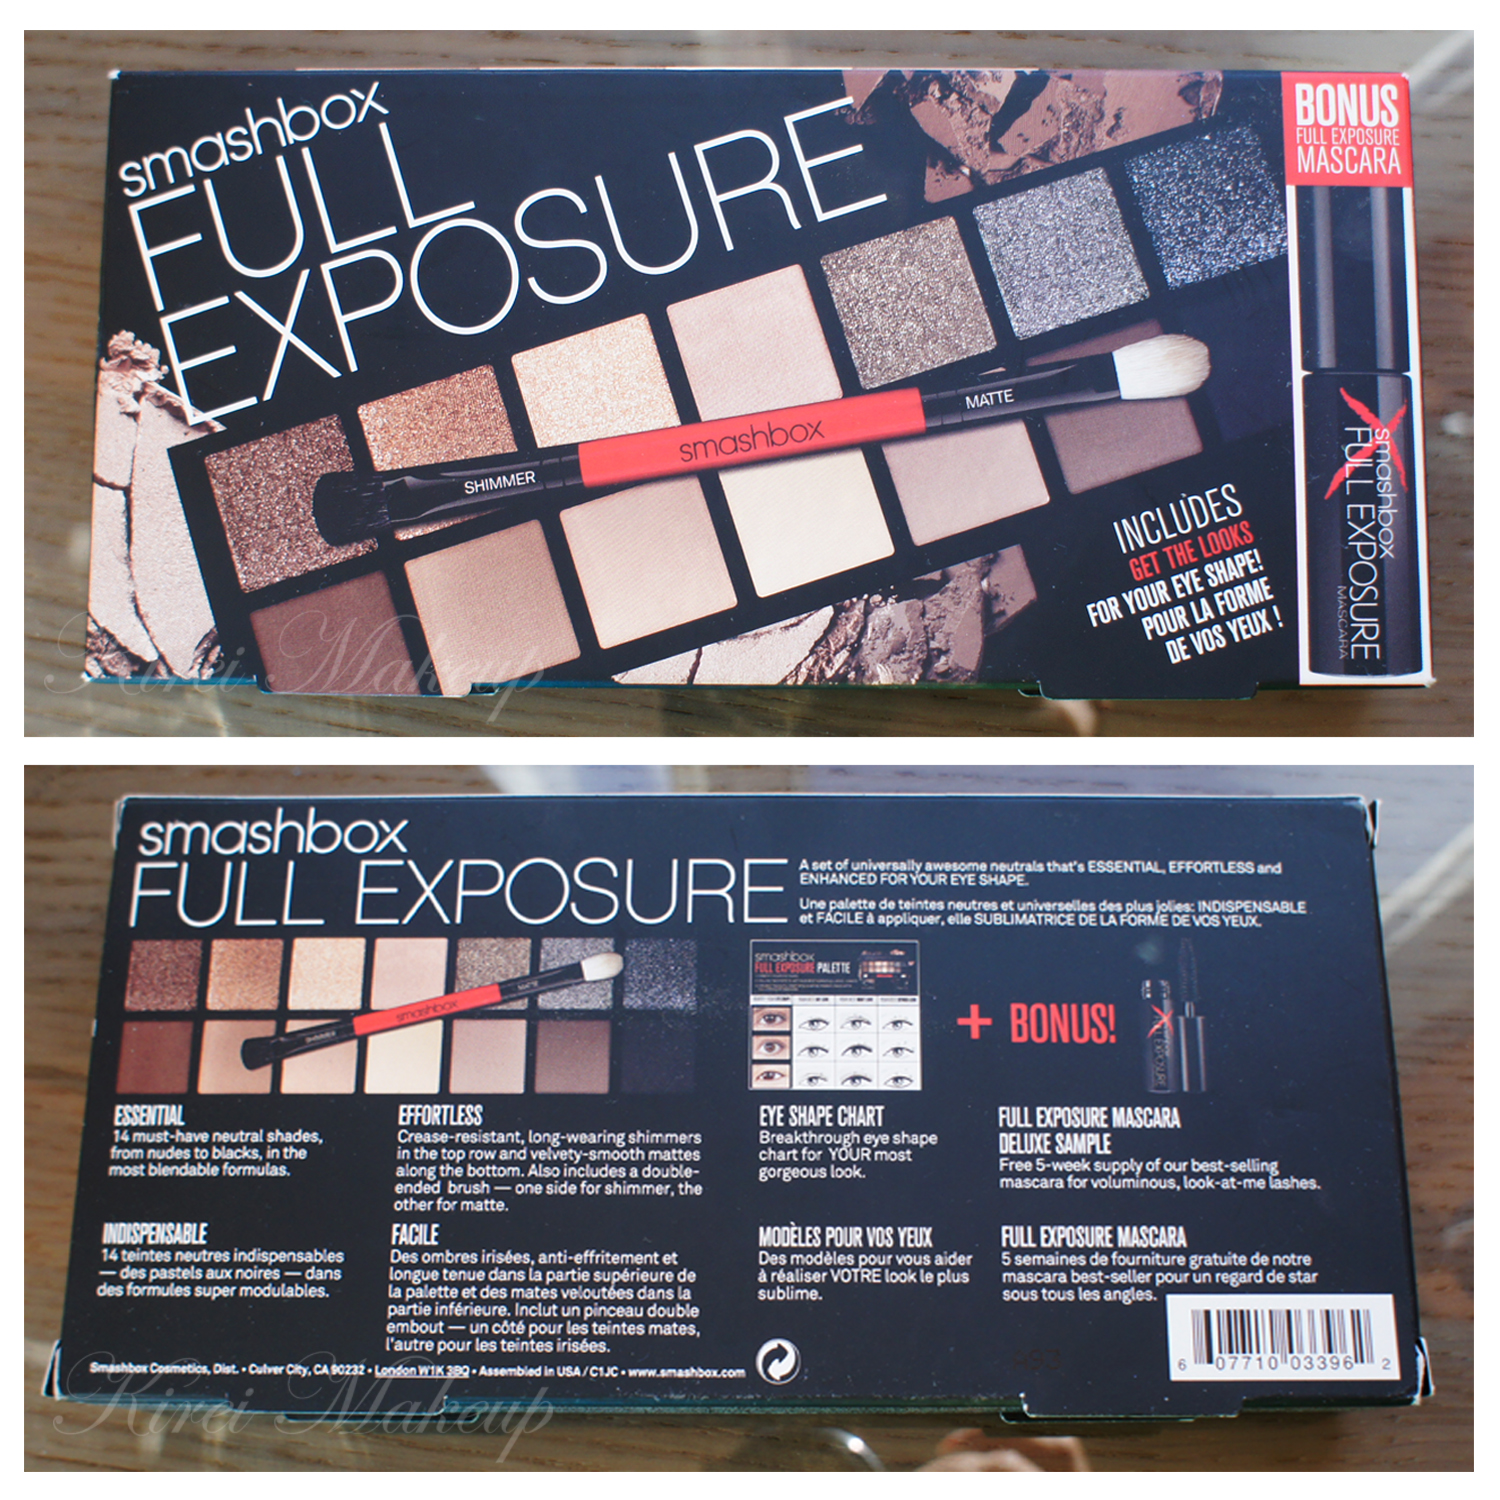
As promised, today I wanted to share my new favorite palette – the Smashbox Full Exposure palette. This palette would make a really great Christmas gift! I wanted to post this next week as my Product of The Week, but I really want to post this today because I’ve been teasing you all with tutorials using this palette. So, I’ll categorize this under Product of The Week even though I do not put it up on the title.

*Update (Feb. 23, 2015) – I have a Smashbox Double Exposure Palette review for you!*

What is Smashbox Full Exposure Palette?

“A set of universally awesome neutrals that’s essential, effortless, and enhanced for your eye shape. […] This totally versatile palette is organized with crease-resistant, long-wearing shimmers in the top row and velvety smooth mattes along the bottom. Fourteen essential neutral shades include a range of nudes, blacks, shimmers, and mattes. Use the brilliant eye shape chart, dual-ended brush, and Full Exposure Mascara to complete any look.

[…] Smashbox has taken the guesswork out of application with a cool, new dual-ended brush. There’s a fluffy end perfect for blending matte shades and a flat end to easily lay down the shimmer shades without sparkle overload. Plus, it’s double-sided with black bristles on one side and white on the other, so you’ll never accidentally dip a light shade into a dark shade.”

Sephora, 2013

Smashbox Full Exposure Palette ReviewAt first look, I was attracted to the huge flecks of glitters in the top row of the Smashbox Full Exposure palette. They did say it’s actually shimmer, but I feel that the light-reflecting particles are definitely too big to be considered as shimmer. I was, also, quite skeptical regarding how well the glitters would stay on the lid when being used dry since I’ve negative experience with other brands.

When I swatched the eyeshadows on my hand in Sephora, I was very surprised and happy that the glitters stayed really well at the back of my hand. That sealed the deal for me! I took the beautiful palette and paid for it.

I know quite a few reviews in Sephora website said that they hated this palette because the glitters couldn’t stick well to the skin. Well, I didn’t have this issue at all, perhaps because I applied the glitters in a different way. First of all I applied eyeshadow primer on my eyelid. Then, I used a dense flat eyeshadow brush to apply it.

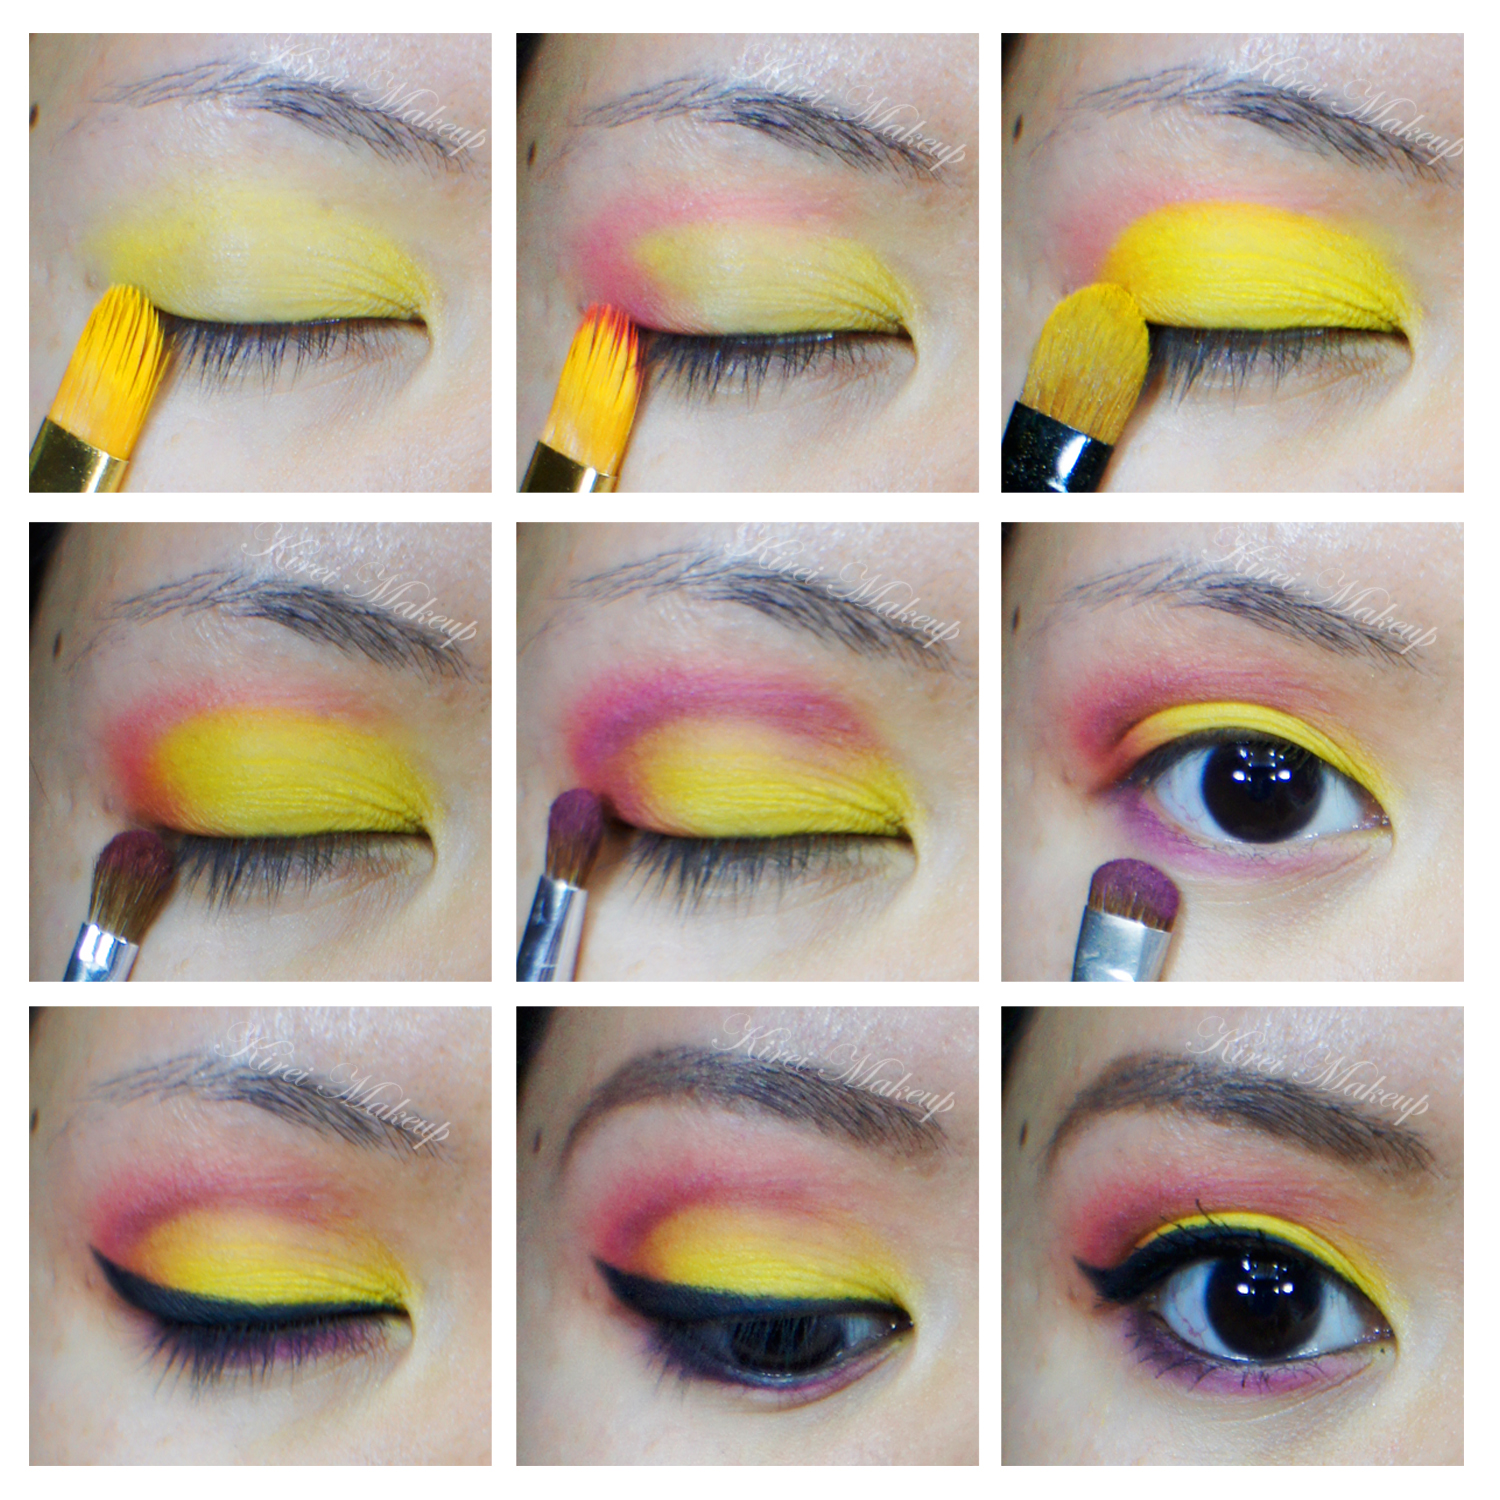
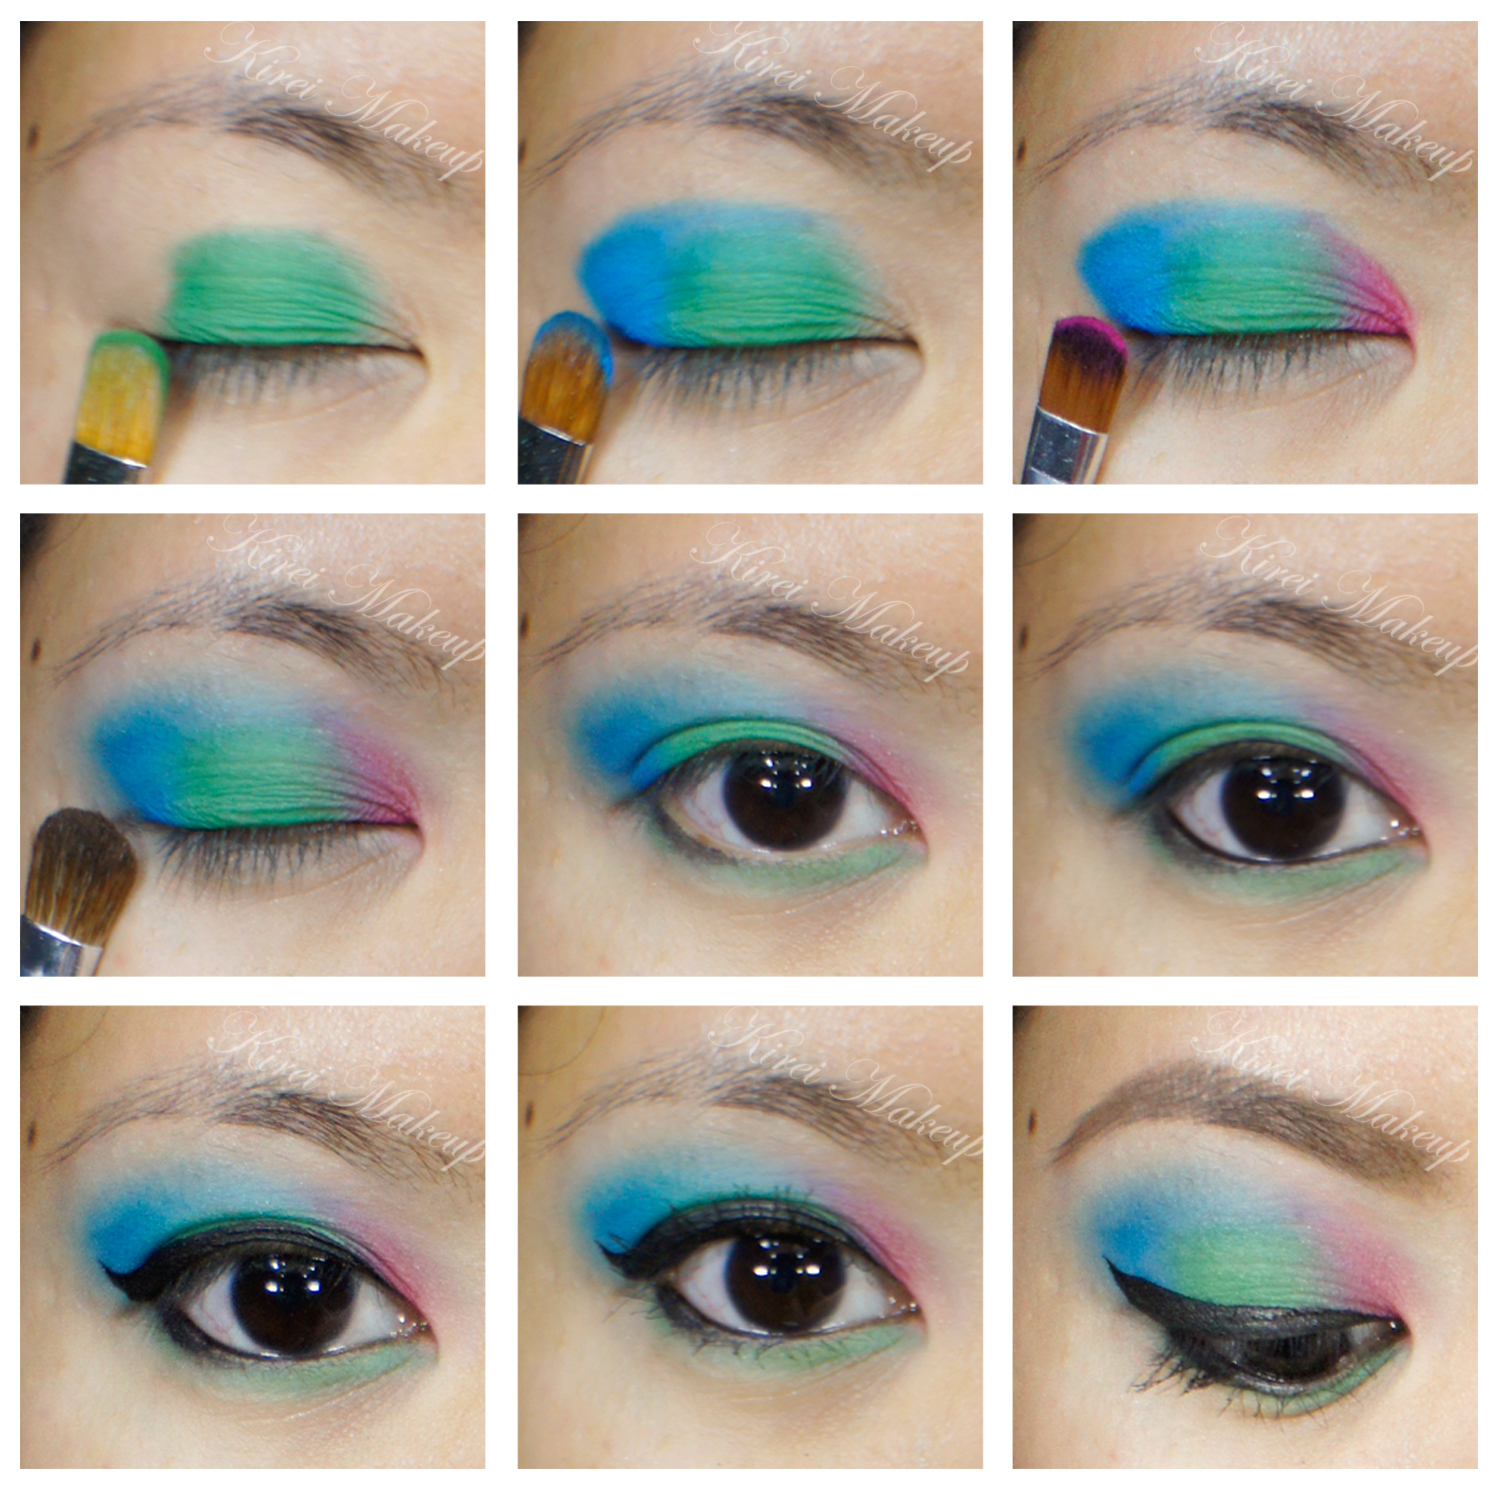
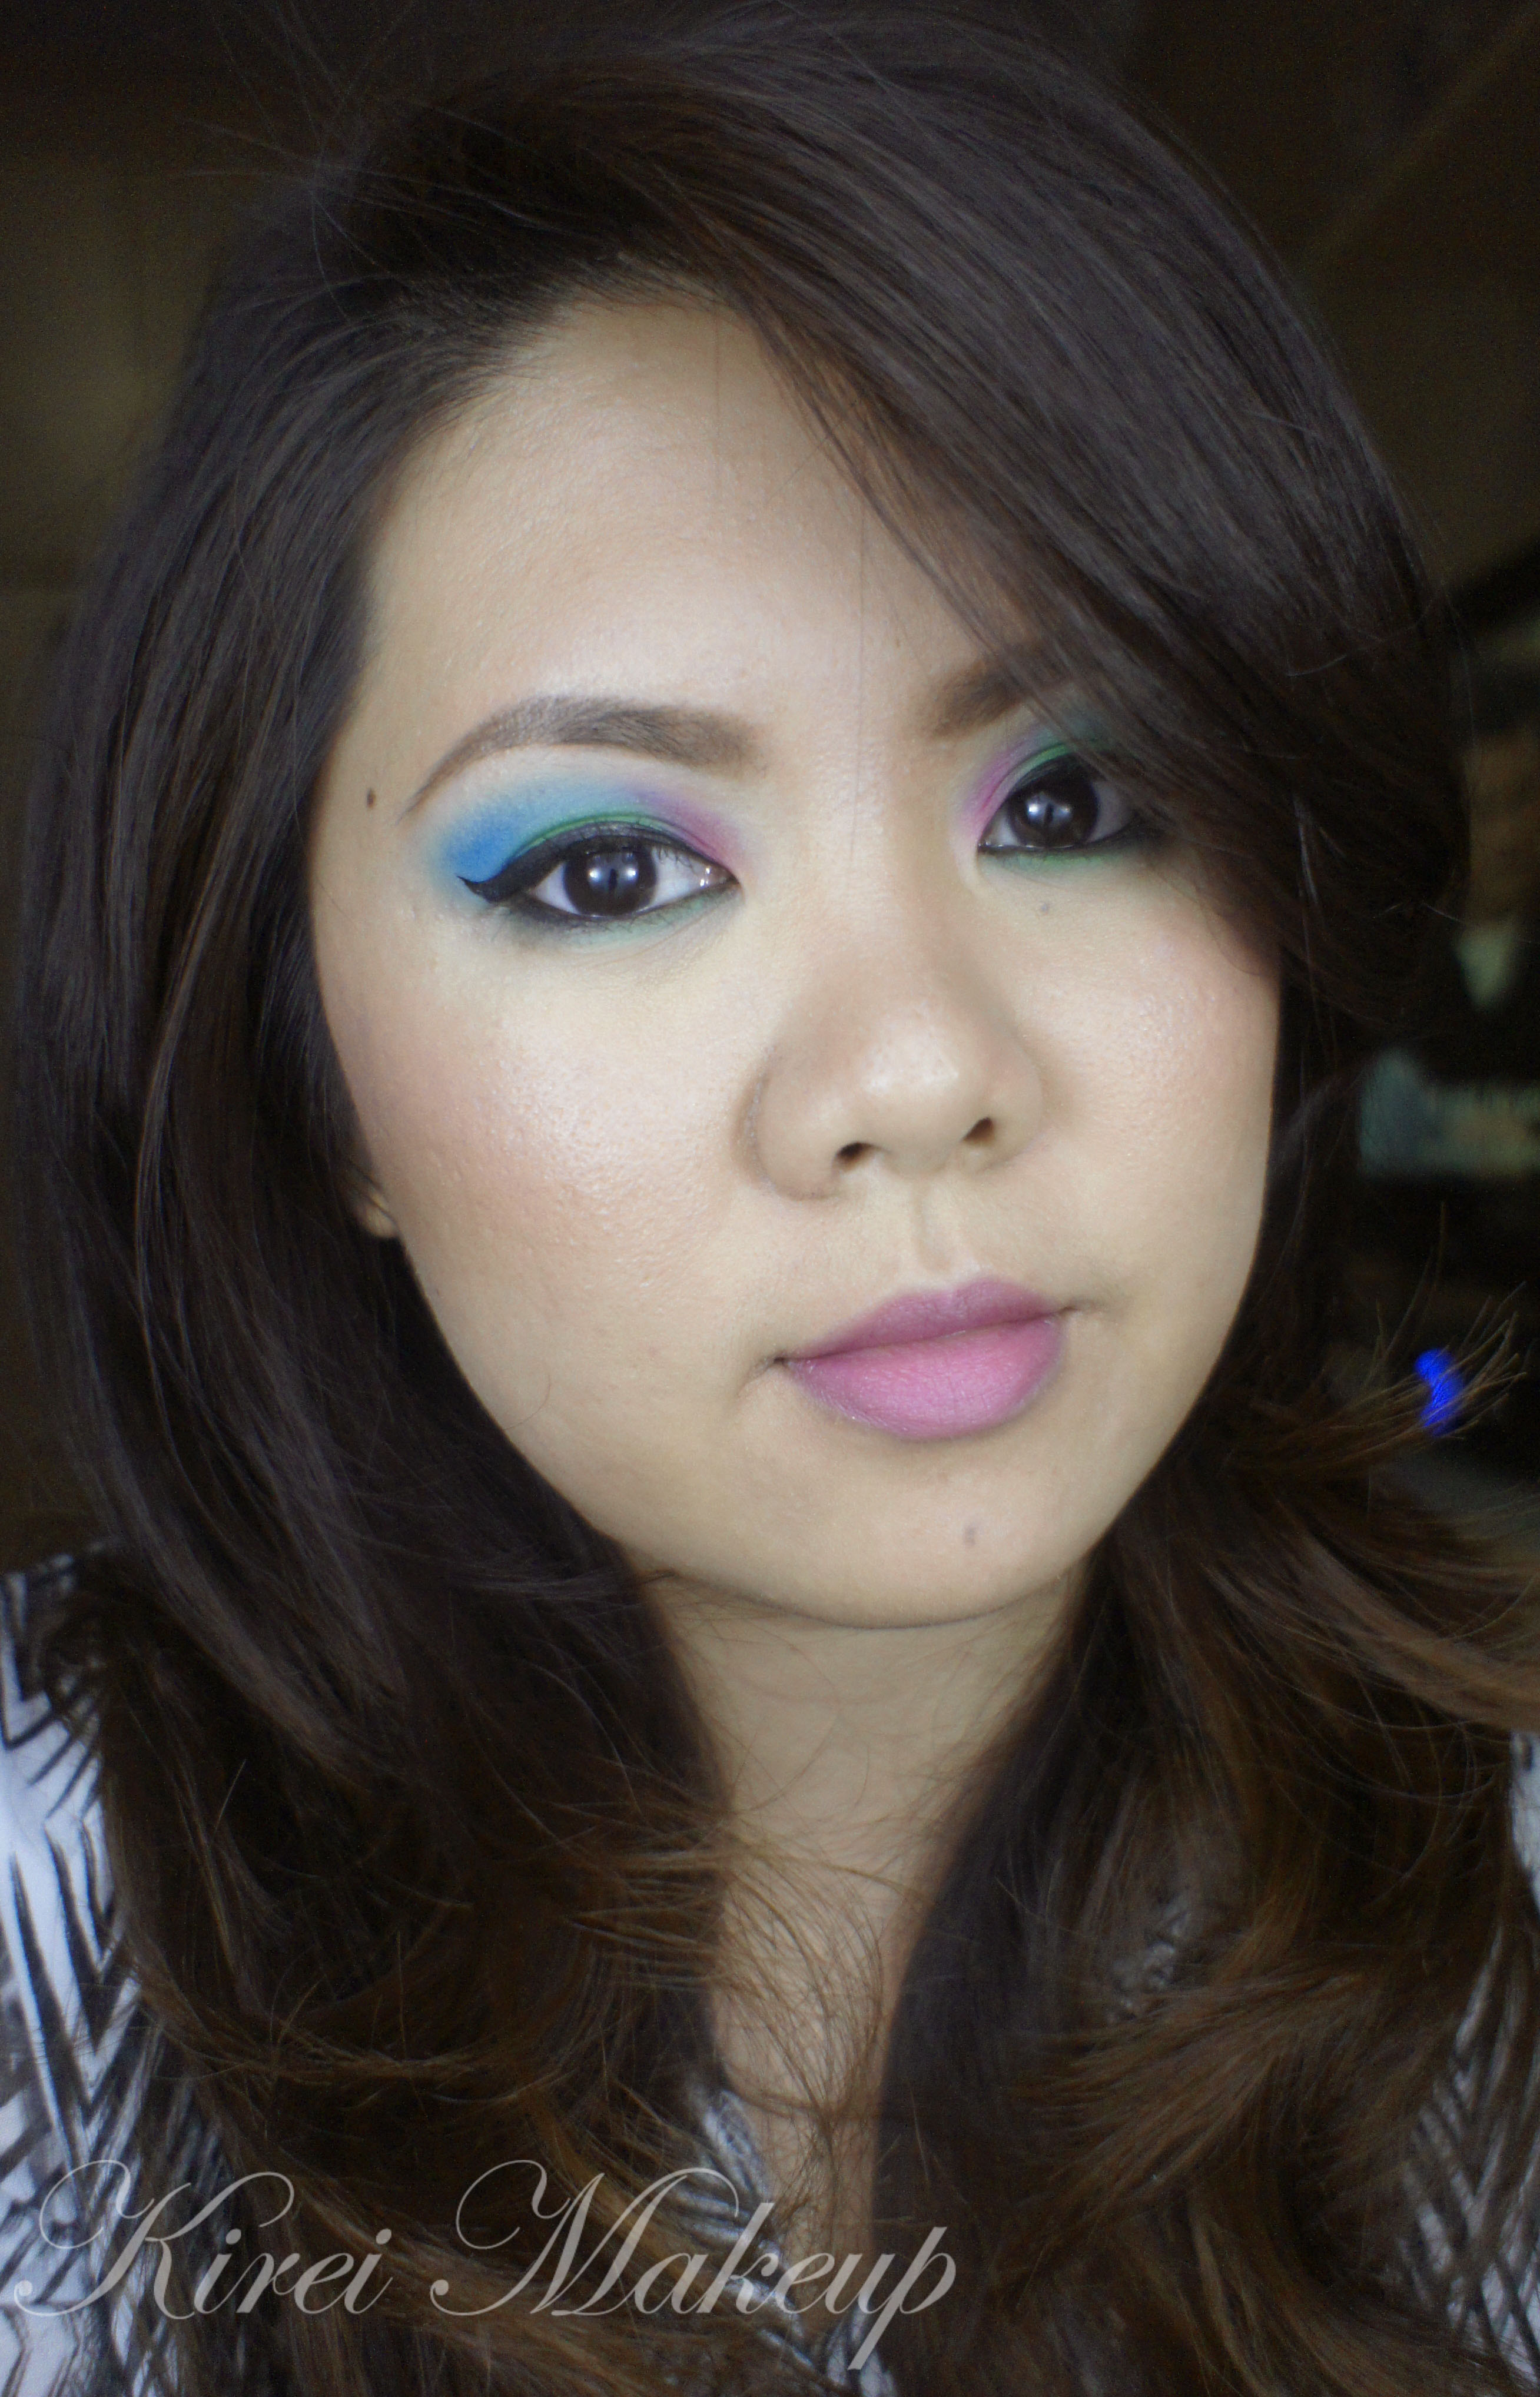
If you want to see samples on how I applied the “shimmer” eyeshadow from the Smashbox Full Exposure palette, please check my posts in Smashbox Full Exposure Look #1 and Holiday Look using MAC Diva.

Smashbox Full Exposure Palette

Packaging

A black sleek carton packaging. 14 eyeshadows  in a square (yay) pan. The Smashbox Full Exposure Palette also contains 1 sample-size Full Exposure mascara tube, a double-ended split-fiber eyeshadow and fluffy blending brush, as well as a large sheet (folded in the picture) of eye makeup tutorial.

The eye chart sheet shows information on how to create several looks based on your eye shape.

Longevity

I’ve yet to wear this palette without a primer underneath. With Urban Decay Primer Potion, the Smashbox Full Exposure palette proves to be quite resilient. It lasted for 8hrs without creasing.

Smashbox Full Exposure Palette Review

Finish

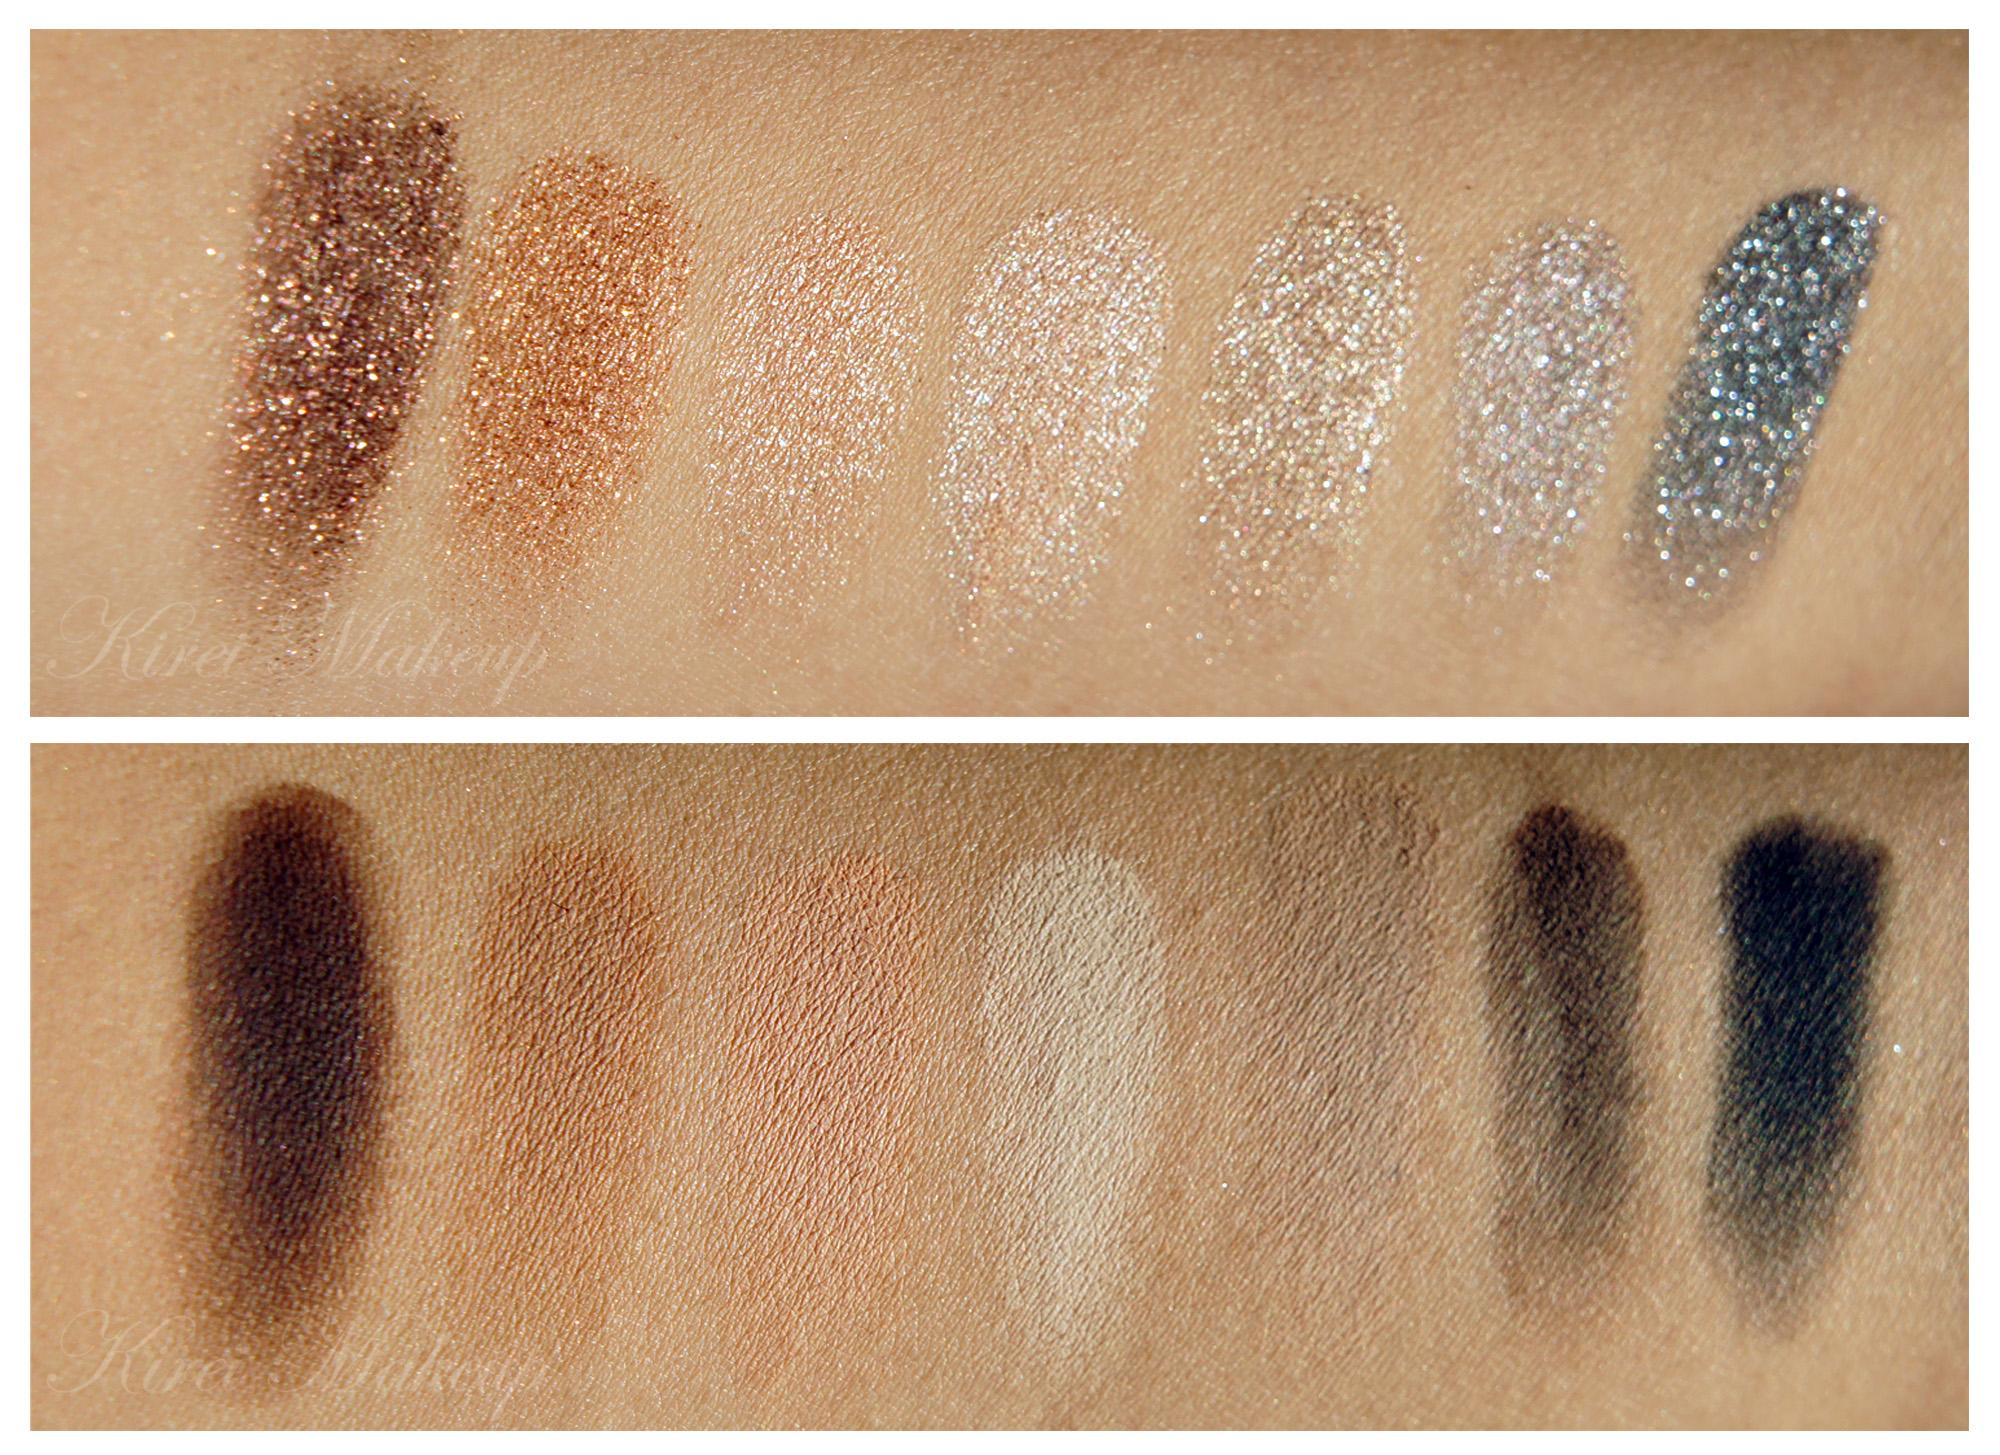
Top row: shimmer (S1-S7); Bottom row: matte (M1-M7)

  • S1 – Chocolate Brown with Golden Pearl
  • S2 – Deep Golden Brown with Gold Pearl
  • S3 – Soft Gold with Gold and Silver Pearl
  • S4 – Light Tan with Gold and Silver Pearl
  • S5 – Golden Wheat with Gold Pearl
  • S6 – Midtone Slate with Silver Pearl
  • S7 – Rich Grey with Multicolor and Silver Pearl
  • M1 – Matte Warm Chocolate Brown
  • M2 – Matte Midtone Brown
  • M3 – Soft Matte Midtone Tan
  • M4 – Creamy Matte Beige
  • M5 – Soft Light Taupe
  • M6 – Ashy Dark Brown
  • M7 – Suede Black

Price

CA$58 (before tax) for 0.035oz x 14 eyeshadows, double-ended makeup brush, mascara and eye chart.

Smashbox Full Exposure Palette Swatches

Pros:

  • Excellent colors – browns, nudes, and greys.
  • You get 2 different textures – shimmer and matte.
  • Great pigment pay-off.
  • Glitters stick well to the skin if you pack the eyeshadow with a flat and dense eyeshadow brush.
  • Matte eyeshadows are not chalky, it has quite a velvet finish to it.
  • You can mix the matte eyeshadows to be used for the brows.
  • Palette have a great range of colors, which is great for different skin tones.
  • Great eye chart for inspiration.
  • Awesome brush and mascara.
  • Not too pricy – considering it’s around $5/eyeshadow when you break it down individually.
  • Makes for a great bridal palette!

Cons:

  • The flat split-fiber eyeshadow brush does not pack the glitter on the eyelid that well. You might have to use another brush for the glitters.
  • Quite a fall-out from the “shimmer” rows, so watch out! Try to do your eye makeup first before your base.

Fiery

As mentioned previously and on twitter, I’m having a breakout on my face and so I decided to do just a tutorial for the eyes. I apologize, but there were 2 very persistent ones right above my lips and 1 on the cheek that’s super painful. Anyhow, I hope those pesky pimples will be gone soon. I also just ran out of my benzoyl peroxide (I bought one from Canada), and couldn’t find a replacement for it in Jakarta yet. If anyone has any recommendation, let me know.

For the tutorial, I wanted to use my Sleek Makeup Ultra Matte Brights v1 palette since I find it quite hard to use this palette. I find a difficult time blending the eyeshadow from this palette, and since the colors are matte, I also find it quite hard to create depth for my eyes. However, I actually think I quite nailed this look. I love the combination of the yellow and the bright pink. I know this might not be a wearable look since it’s extremely bright, but I had a fun time doing it. Might work for Halloween or for whoever love wearing bright makeup.

How-to:

1. Using a synthetic brush, I applied PAC face paint cream in Yellow all over my eyelid.

2. I applied PAC face paint cream in Shocking Pink on the outer V and on the crease using a synthetic art brush.

3. Using a flat eyeshadow brush, I applied Bammi from Sleek Makeup iDivine v1 palette on the eyelid.

4. Using a small fluffy brush, I applied Pucker from the same palette on the outer V and on the crease lightly.

5. Using a smaller more dense brush (similar to a small shader brush), I applied Sugarlite from the palette on the crease only.

6. I applied Sugarlite on the lower lid using a smudge brush.

7. (not in picture), I also applied a black matte eyeshadow brush on the outer corner of the lower lid using an angled brush.

8. Using Sigma eyeliner brush, I applied MUFE Aqua Black along the upper lash line creating a winged liner.

9. I lined my waterline using L’oreal Voluminous Smoldering eyeliner pencil.

10. I filled in my brows using Shu Uemura Hard Formula 9 Brow Pencil.

11. I curled my lashes and applied Maybelline Volume Express Turbo Boost on both upper and lower lashes.

 Sleek Makeup Matte Brights v1

Tropical Punch

Another look from the Sleek Makeup palette, this time I tried the iDivine Ultra Mattes V1 Brights. I’m not sure how I feel about this palette. The colors are absolutely breathtaking, the pigments were amazing, yet there’s something missing. I’m not quite sure how to put it. I mean, the color glides like a butter, but when it’s time to blend, the eyeshadow seems to just disappear into the abyss. I mean, it’s just gone gone gone. I’ve to re-apply and re-blend the blue eyeshadow (on the crease) over and over again, even so I still am not too happy with the end result.

Anyways, for swatches and close-up pictures on just the palette itself, please click on this post Sleek Makeup iDivine Swatches.

I think I might give this palette another try some time soon. Anyways, don’t forget if you want to buy anything from Luxola, esp. the Sleek Makeup iDivine palettes, go to the LUXOLA website and put LXBLOG when you check out to get 15% off! (any underlined and bold words will lead you to luxola website, or to another post of mine).

How-to:

1. Using a flat eyeshadow brush, I applied MAC Paint Pot in Soft Ochre all over my eyelid up to the brow bone (not in picture).

2. Using a clean flat eyeshadow brush, I applied Sleek Makeup DragonFly eyeshadow on the center of my eyelid in a patting motion. Watch out for fallout, kids!

3. Using another flat eyeshadow brush, I applied Bolt from the same palette on the outer corner of the lid and slightly on the crease.

4. Using another clean flat eyeshadow brush, I applied Pucker from the same palette on the inner corner of the lid.

5. I use a fluffy blending brush to blend the edge of the blue eyeshadow to remove any harsh line.

6. I used a clean small fluffy brush just to blend it so there’s no harsh lines separating the 3 different eyeshadows.

7. I applied Dragonfly on the lower lid using a small shader brush.

8. Using an angled eyeliner brush, I applied Smashbox Blackout eyeshadow on just the outer corner of the lower lid. I applied this eyeshadow right along my lower lash line.

9. I lined my waterline and tightline using L’oreal Voluminous Smoldering eyeliner.

10. Using Kate Sharp eyeliner, I created a large winged eyeliner along my upper lashline.

11. I curled my lashes and applied Maybelline Express Volume Turbo Boost mascara on both top and bottom lashes.

12. I filled my brows in using an angled eyebrow brush, as well as a mixture of MAC Omega and MAC Brun eyeshadow.

13. I applied Pow from the iDivine V1 palette under the brow and on the inner corner of the eyes.

matte brights eyeshadow

14. I applied Urban Decay Naked foundation using a foundation brush from the center of my face, blending it outwards.

15. Under the eyes, I applied MAC Pro Conceal/Correct concealer in Medium.

16. I powdered my face using CoverFX translucent powder.

17. I applied MAC Blunt as a contour on the hollows of the cheeks and sides of the nose.

18. I applied Benefit Coralista on the cheeks and completed the look by applying Tarte Lipsurgence in Hope.

idivine ultra mattes v1 brights makeup

Sleek Makeup i-Divine Swatches

If you have been on my Twitter or Instagram, you should know that I’ve just received my Sleek Makeup palettes that I purchased from Luxola. I got my hands on it this weekend when I was in Bali, so I have yet to play with it. I wanted to swatch these palettes first before I do any tutorials with them. I’ve heard so much raves about these palettes on the blogsphere and youtube, that I was so excited when I get received them!

First of all, let me mention how great the Staff at Luxola are! I am affiliated with Luxola, but what I’m going to tell you guys is 100% based on my experience. You guys should know by now that I would never recommend anything that, in my personal and professional opinion, is below standard and expectations. Let me tell you what happened before we proceed to the swatches itself.

I bought (yes, bought! with my own money) several products from Luxola website. I’ve checked out and paid for all the items in my cart at end of March. I was told that my products would arrive between 5-8 business days. I was happy and excited to get the products before my trip to Japan. 8 days later, my shipment was nowhere to be found! I contacted Luxola, checked my tracking number and found out that my shipment was stuck at Indonesian customs! I tried calling Indonesian post to find out what’s going on, even went on their twitter asking questions but no answer.

I was devastated. I contacted Luxola regarding the issue and they tried to help me by contacting the courier service that they’ve used over in Singapore. Luxola Staff patiently replied to every single one of my emails promptly. I went to Japan, came back just to find out that customs isn’t releasing my shipment. No letters, no contact information, nothing to assist me to get the shipment out of customs! I almost gave up. That’s $100 worth of products that I’m not going to receive ever.

However, an email came through from Luxola. They messaged me saying that they will ship a new set of products (of whatever that I’ve bought) to my bff in Singapore. I was so thrilled when I read the message!

I was so happy! To be honest, I had the same issue with another online store at the same time, and they weren’t even as helpful or offered any assistance like Luxola. By this time, I was jumping up and down, and told my bff to keep the package for me till we meet again. Not even 2 days after, my package arrived at my bff’s and she was holding it for me! I mean, talking about fast and amazing services! So, thank you Luxola for the great service and assistance that you’ve offered.

Ok, let’s get on the swatches!

I bought 3 Sleek Makeup palettesSparkle 2, Snapshots and Ultra Mattes V1 Brights.

Sleek Makeup palettes

sleek sparkle palette

It comes in a black casing. Very light and small. The boxes above actually remind me of chocolate bars for some reason. Oh just to let you guys know, the reason why I bought these 3 palettes is because these 3 cannot be shipped to U.S.A or Canada (according to Sleek Makeup website). I wanted to buy them when I was in Canada, but since it cannot enter the country, I decided to buy them here.

Each palette costs IDR Rp. 157,000. From Sleek Makeup website it costs £7.99/palette.

sleek makeup

sleek makeup

The Sparkle 2 palette is a limited edition palette. My first impression when I opened the palette was “that’s a lot of sparkle”..well it is called the Sparkle palette. I didn’t expect the sparkle to be so huge! I’m a little afraid that the sparkle might be rough and hurt my eyelid. I’m also a bit skeptical on how much sparkles going to stay on the lid. I’ve worked with glitters and sparkles before, I find that I’ve to use some sort of “adhesive”, let it be cream or liquid to make it stick to the skin. I guess I just have to try it, right? 😉

sleek sparkle 2 palette

The Sparkle 2 Palette comes with 12 shades. 4 of which are shimmery, while the other 8 has glitter/sparkles in them. The 4 shimmery eyeshadows are Chocolate Penny, Gold Ribbon, Truffle and Tinsel. The 8 glittery ones are Festive, Blue Spruce, Mulled Wine, Glitz & Glamour, Mistletoe, Twinkle, Illusion and Starry Night.

sleek sparkle 2 palette

On the top part (L-R)

  • Chocolate Penny – golden bronze.
  • Blue Spruce – a turquoise with silver sparkles. Feels dry when touch, and surprisingly does not swatch very well considering how vivid the color is.
  • Mulled Wine – crimson with gold glitter.
  • Truffle – deep rich chocolate metallic color. Very buttery and has a lot of pigments.
  • Mistletoe – forest green with silver glitter.
  • Illusion – an eggplant purple eyeshadow with silver glitter.

On the bottom part (L-R)

  • Festive – plum eyeshadow with silver glitter (the only one you can see with sparkles on the swatch below)
  • Gold Ribbon – bright golden yellow with shimmer.
  • Glitz & Glamour – grey with silver sparkles.
  • Tinsel – silver shimmery eyeshadow.
  • Twinkle – navy blue with silver sparkles.
  • Starry Night – black with silver glitters.

sleek sparkle 2 palette swatch

The Snapshot palette is one that I really wanted to get. It has a combination of matte and shimmer eyeshadows. It has a whole loads of bright eyeshadows, and some neutral ones. I absolutely love and adore this palette.

In this palette there’s 5 matte eyeshadows and 7 shimmer eyeshadows. The 5 matte ones are Summer Breeze, Sand Walker, Washed Ashore, Purple Haze and Magenta Madness. The 7 shimmery ones are Martini, Kiwi Flower, Sunset, Lotus Folower, Green Iguana, Humming Bird and Tequila Sunrise.

Sleek snapshot palette

During the swatching process, I found that Sand Walker does not show up on my arm because, it’s pretty much the same color as my skin. That shadow probably would work as a great base for my eyelid.

I also find that the shades on this palette turns out to be more on the medium shades range on my skintone. Nothing too dark for contour or crease color. Perhaps using a primer/base under the eyeshadows will make the shades brighter.

Sleek snapshot palette

From the Top (L-R):

  • Summer Breeze – matte cyan.
  • Martini – shimmery vanilla.
  • Kiwi Flower – shimmery chartreuse green.
  • Lotus Flower – shimmery lavender.
  • Humming Bird – shimmery deep turquoise blue.
  • Tequila Sunrise – shimmery orange.

On the bottom (L-R):

  • Sand Walker – matte beige nude shade.
  • Washed Ashore – matte light orange.
  • Sunset – shimmery copper.
  • Green Iguana – green teal shimmer.
  • Purple Haze – matte purple with cool undertone.
  • Magenta Madness – fuschia pink matte shade.


Sleek snapshot palette swatch

The last palette is the Ultra Mattes V1 Brights, which is a very popular palette. I’ve heard raves about this palette on how great the colors were even though they are mattes. When I first opened the palette, my eyes immediately went to Dragon Fly shade. It’s soooo beautiful! It’s bright, it’s gorgeous and it’s so creamy when touched. The shades just seem to glide on the skin smoothly.

sleek ultra mattes V1 brights


sleek ultra mattes V1 brights

All the colors on this palette are matte. It does not feel chalky at all, instead it has a creamy, velvety texure to it. Most of the colors look pretty good without a primer when swatched. Even the lighter ones like pink, grey and white, though it might look light and chalky, you can still see the slight difference in hue on my arm.

On the top layer (L-R):

  • Chill  – aqua blue.
  • Pout – hot pink.
  • Sugarlite – purple with red undertone.
  • Dragonfly – jungle green (yes, it is a color, I did not make this up).
  • Pucker- another hot pink shade. I think this shade is very similar to Pout, but slightly lighter.
  • Bammi – true yellow.

On the bottom layer (L-R):

  • Cricket – grass green.
  • Bolt – electric blue.
  • Strike – orange (similar to that in Pantone’s).
  • Floss – ballerina pink
  • Crete – soft grey.
  • Pow – vanilla.sleek ultra mattes V1 brights swatch

All in all, I think all 3 palettes are pretty awesome. It’s a tad more expensive than the original price from Sleek, but I still think it’s a good price by Luxola. I’m one happy gal!

Iris Inspired

I found a picture of an Iris flower on google image on a website by jaiart, and I fell completely in love with the colour combination of the Iris flower. I’m also lucky that the 3 MUFE eyeshadows that I happened to own are in the colors that are similar to the Iris – yellow (71), purple (92) and pink (75). These 3 shadows are matte. It’s extremely pigmented and easily blendable.

The key with this tutorial is that you’ll need 2 blending brushes – 1 to apply the pink on the crease, the other 1 to blend the pink out to nothingness so there’s no harsh edge. I recommend something similar to the MAC 217 blending brush.

You also need to be patient in packing the colors on so that it is still intense and yet blended out at the same time.

How-to:

1. I dipped one side of a flat eyeshadow brush in MUFE 92 eyeshadow and applied it to the crease and outer corner. The side of the brush with the eyeshadow is facing up towards the eyebrow. Use little at first.

2. Using a blending brush (I used Urban Decay’s), I applied MUFE 75 eyeshadow just slightly above the crease in a small circular motion. Using a clean blending brush, I blended the pink shadow to make sure there’s no harsh edge.

3. At this point the purple started to fade out, so I added the purple eyeshadow again on the crease lightly. I still want the pink to show through just above the crease.

4. Using a small shader brush, like the MAC 228, I applied rMAC Noir Plum from the Mega Metal collection right on the crease.

5. Using the flat shadow brush that I used on step 1, I blended the dark plum shadow slightly so that the purple shows through.

6. Using a clean flat eyeshadow brush, I applied MUFE 71 on the crease.

7. I applied MUFE 71 on the inner lower lid using a pencil brush, as well as MUFE 92 on the outer half.

8. I lined my upper lashline using a small angled eyeliner brush and Bobbi Brown Caviar Ink gel liner, creating a winged liner. I also lined my waterline using whatever is left on the brush.

9. I filled my brows in using Anastasia Beauty Express Kit.

10. Using a fluffy blending brush, I applied the highlighter from the Anastasia Beauty Express Kit under the brow bones.

11. I curled my lashes, applied L’oreal Voluminous in Carbon Black and false eyelashes.

MUFE 75

12. For the face, I want it to be flawless, clean and fresh. I applied Urban Decay Naked foundation using Shiseido foundation brush all over my face.

13. Under the eyes, I applied L’oreal Magic Touche concealer and blended it with my fingers.

14. I applied L’oreal Super Blendable Concealer Crayon in Medium Deep on the places I wanted to contour (side of nose and hollows of the cheeks). I blended the contour using a clean foundation brush.

15. I powdered my face lightly and applied NARS Matahari blush using MAC Stipling brush on the cheeks.

16. For the lips, I applied Revlon Kiss Me Coral very very very lightly for a little stain.

MUFE 71