Wearable Purple Eye Makeup

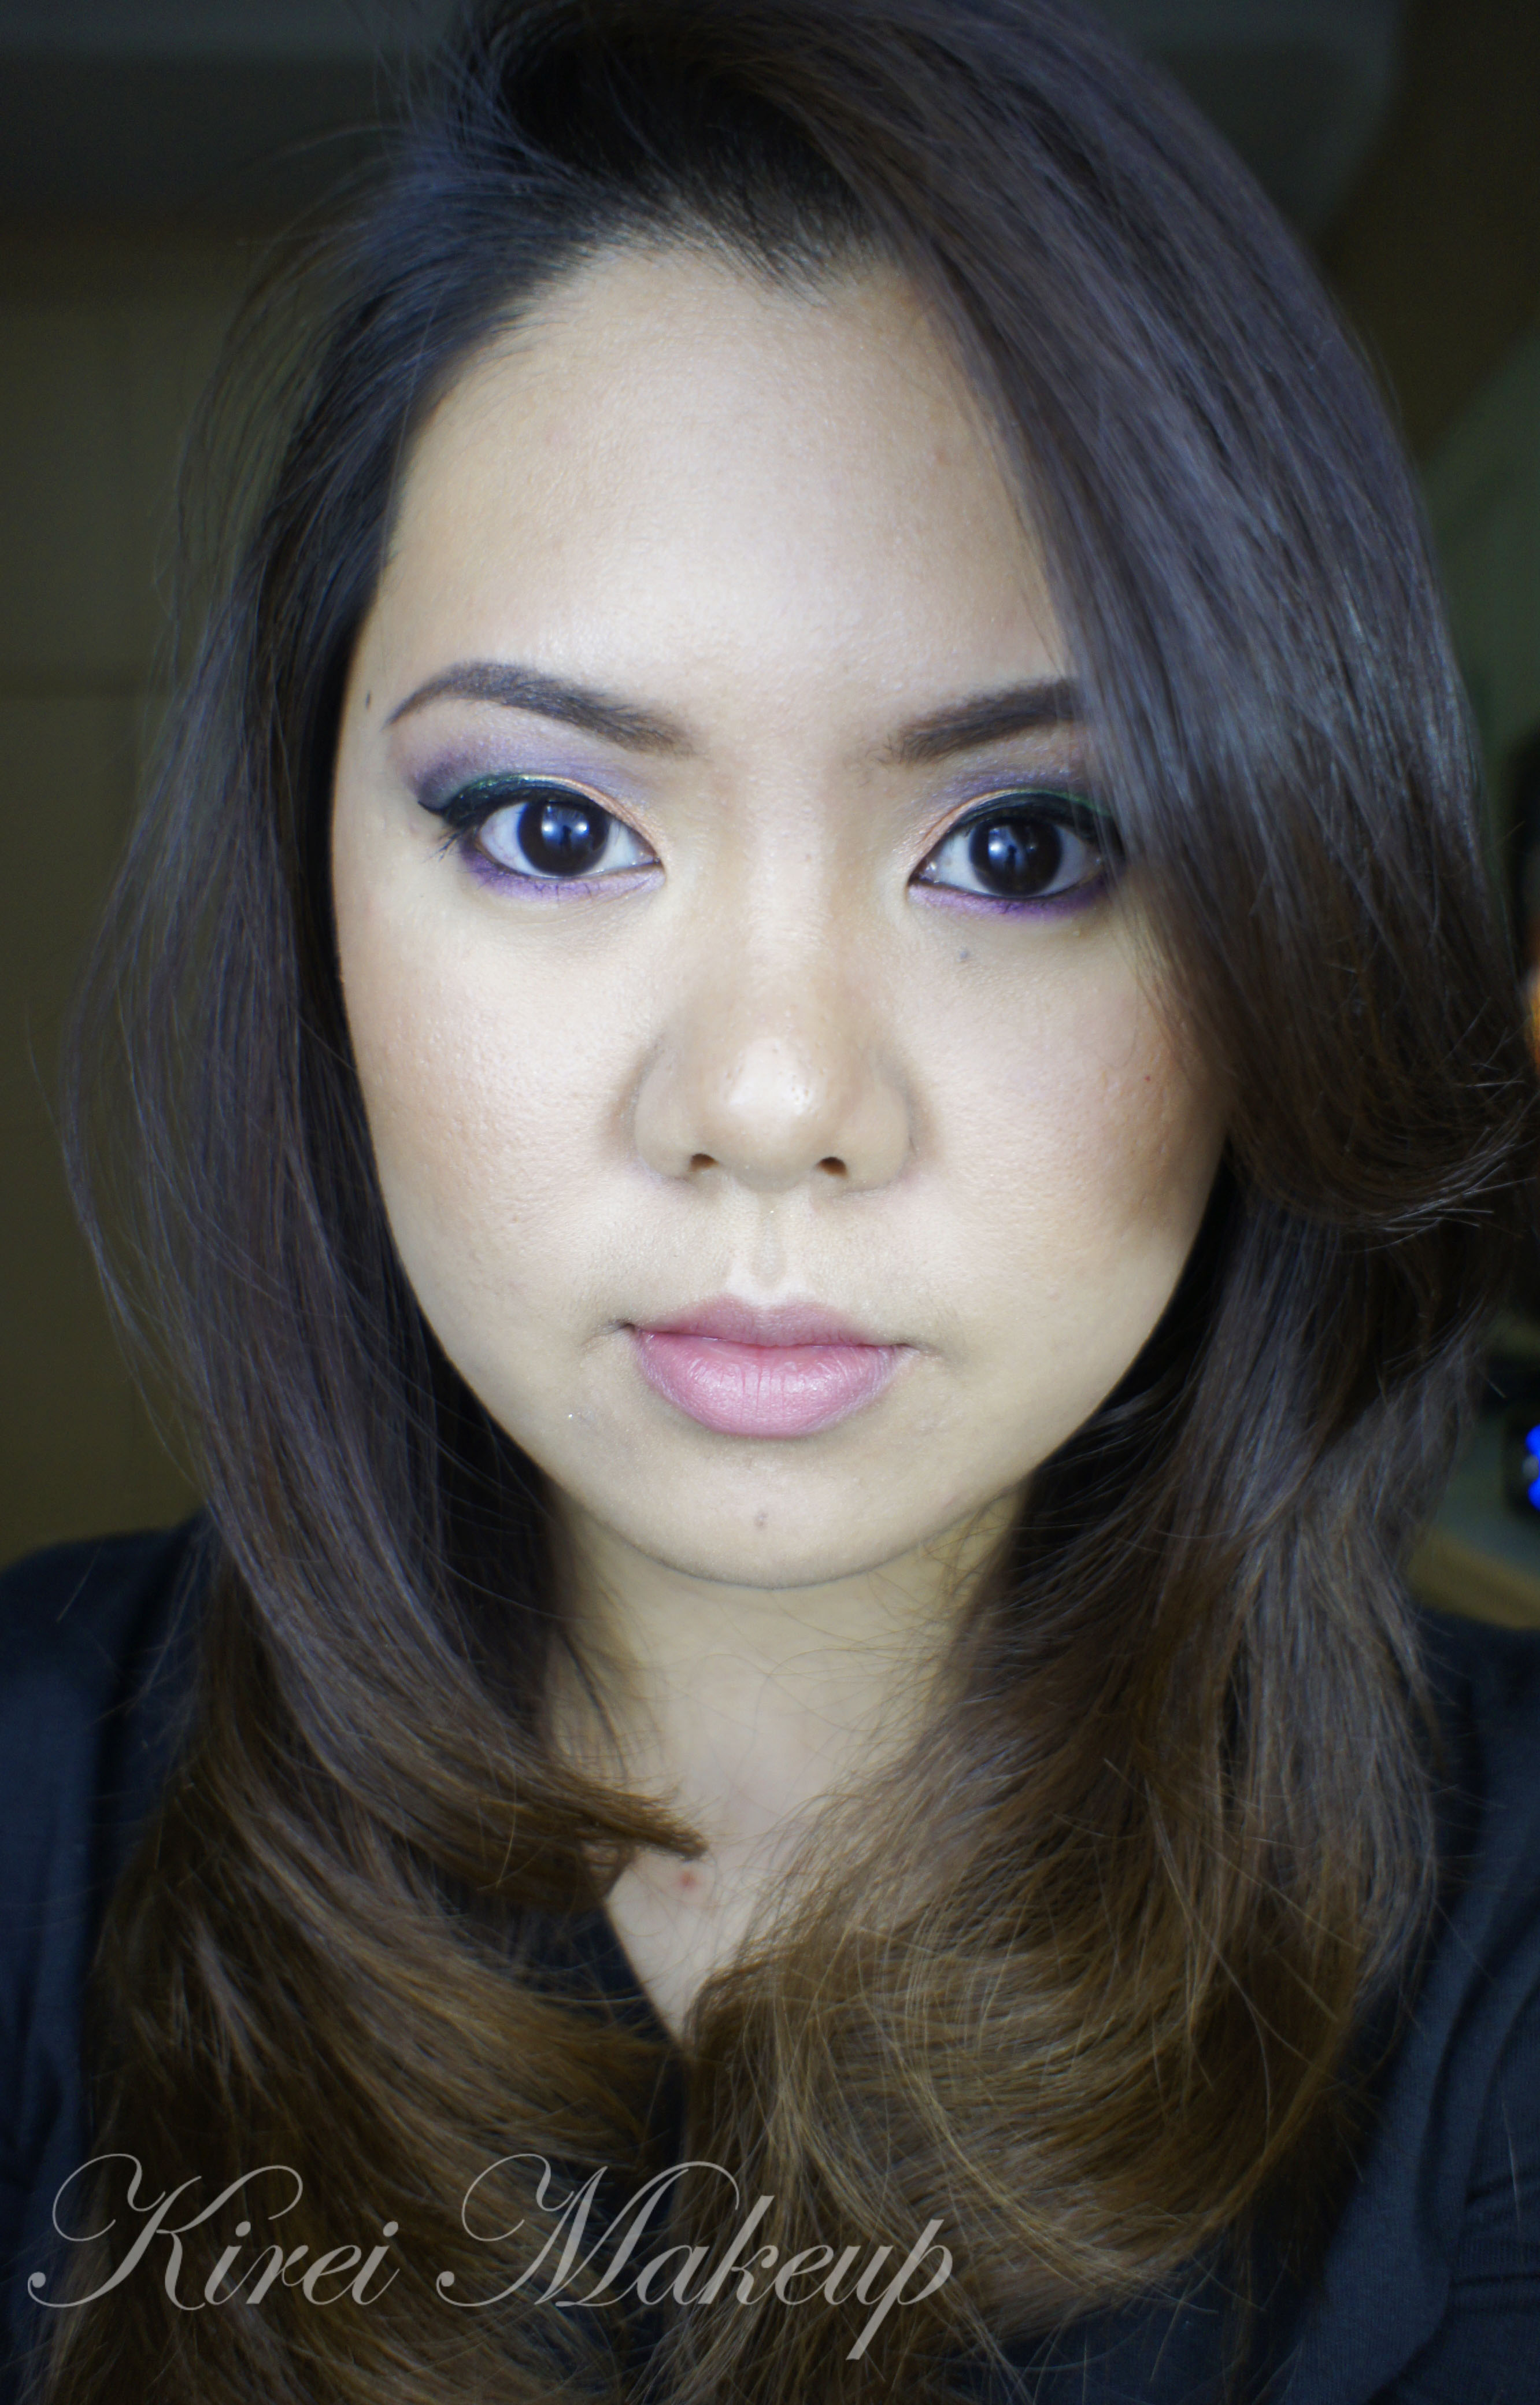
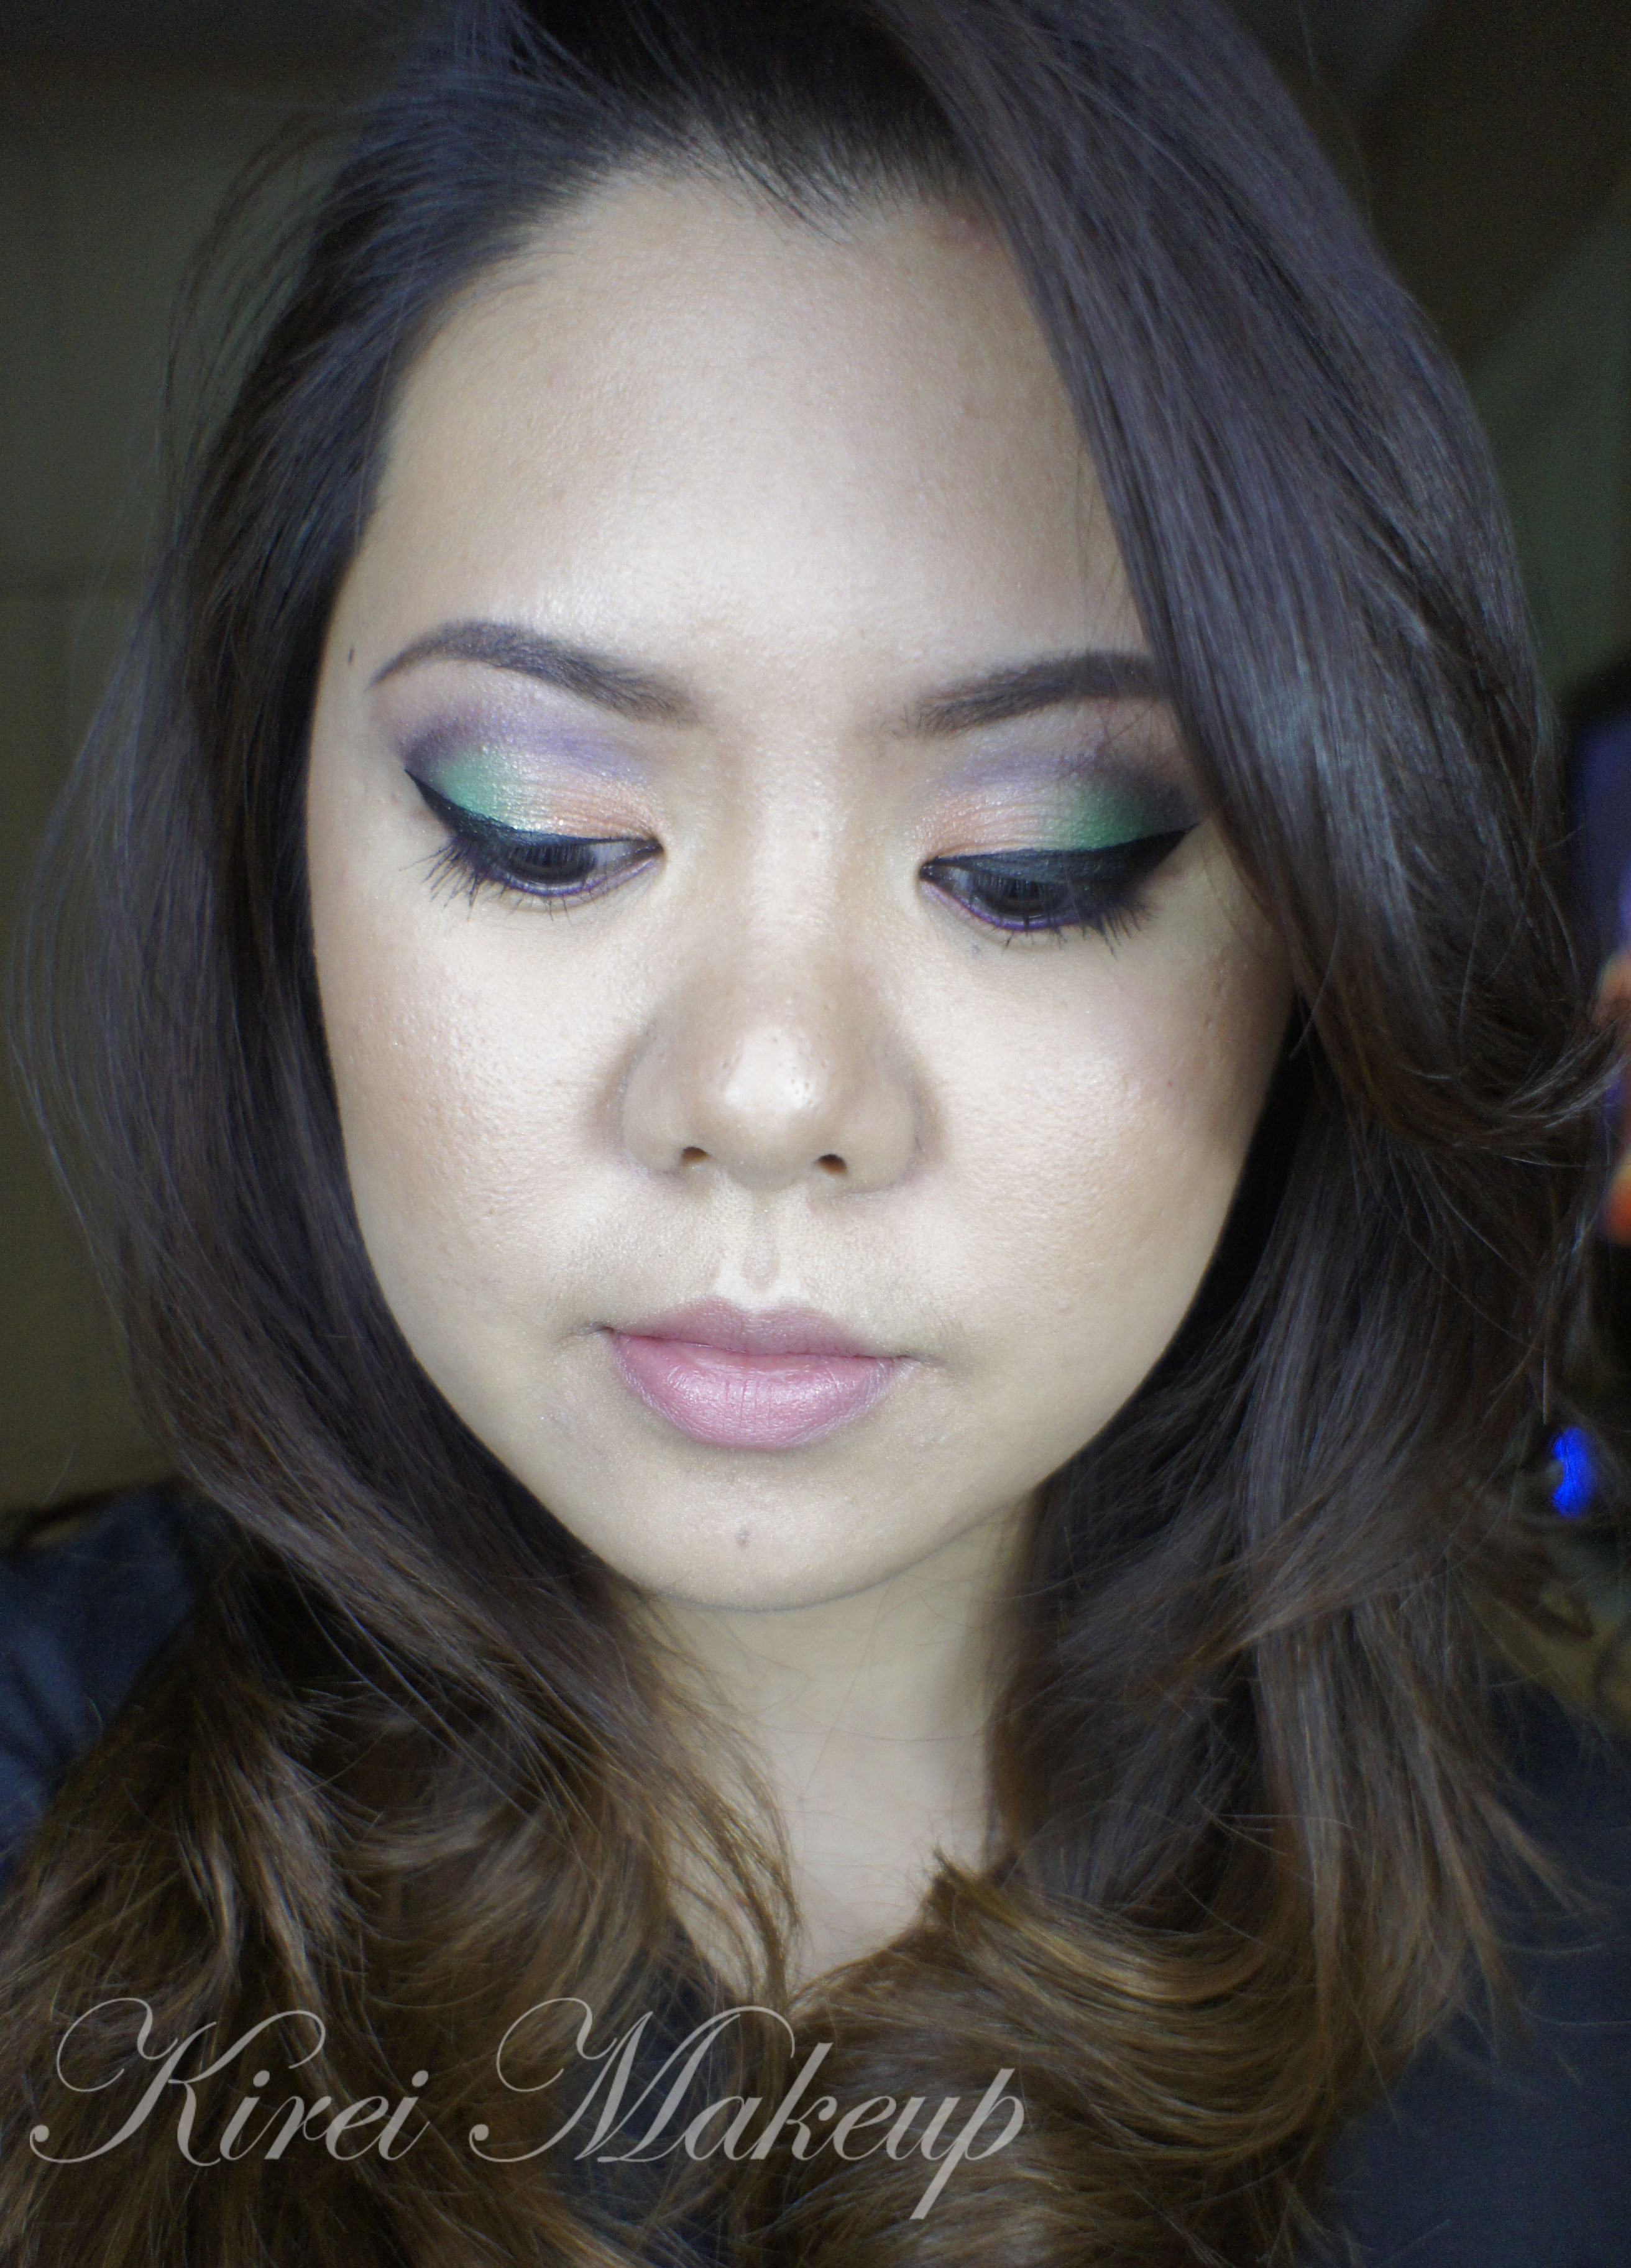
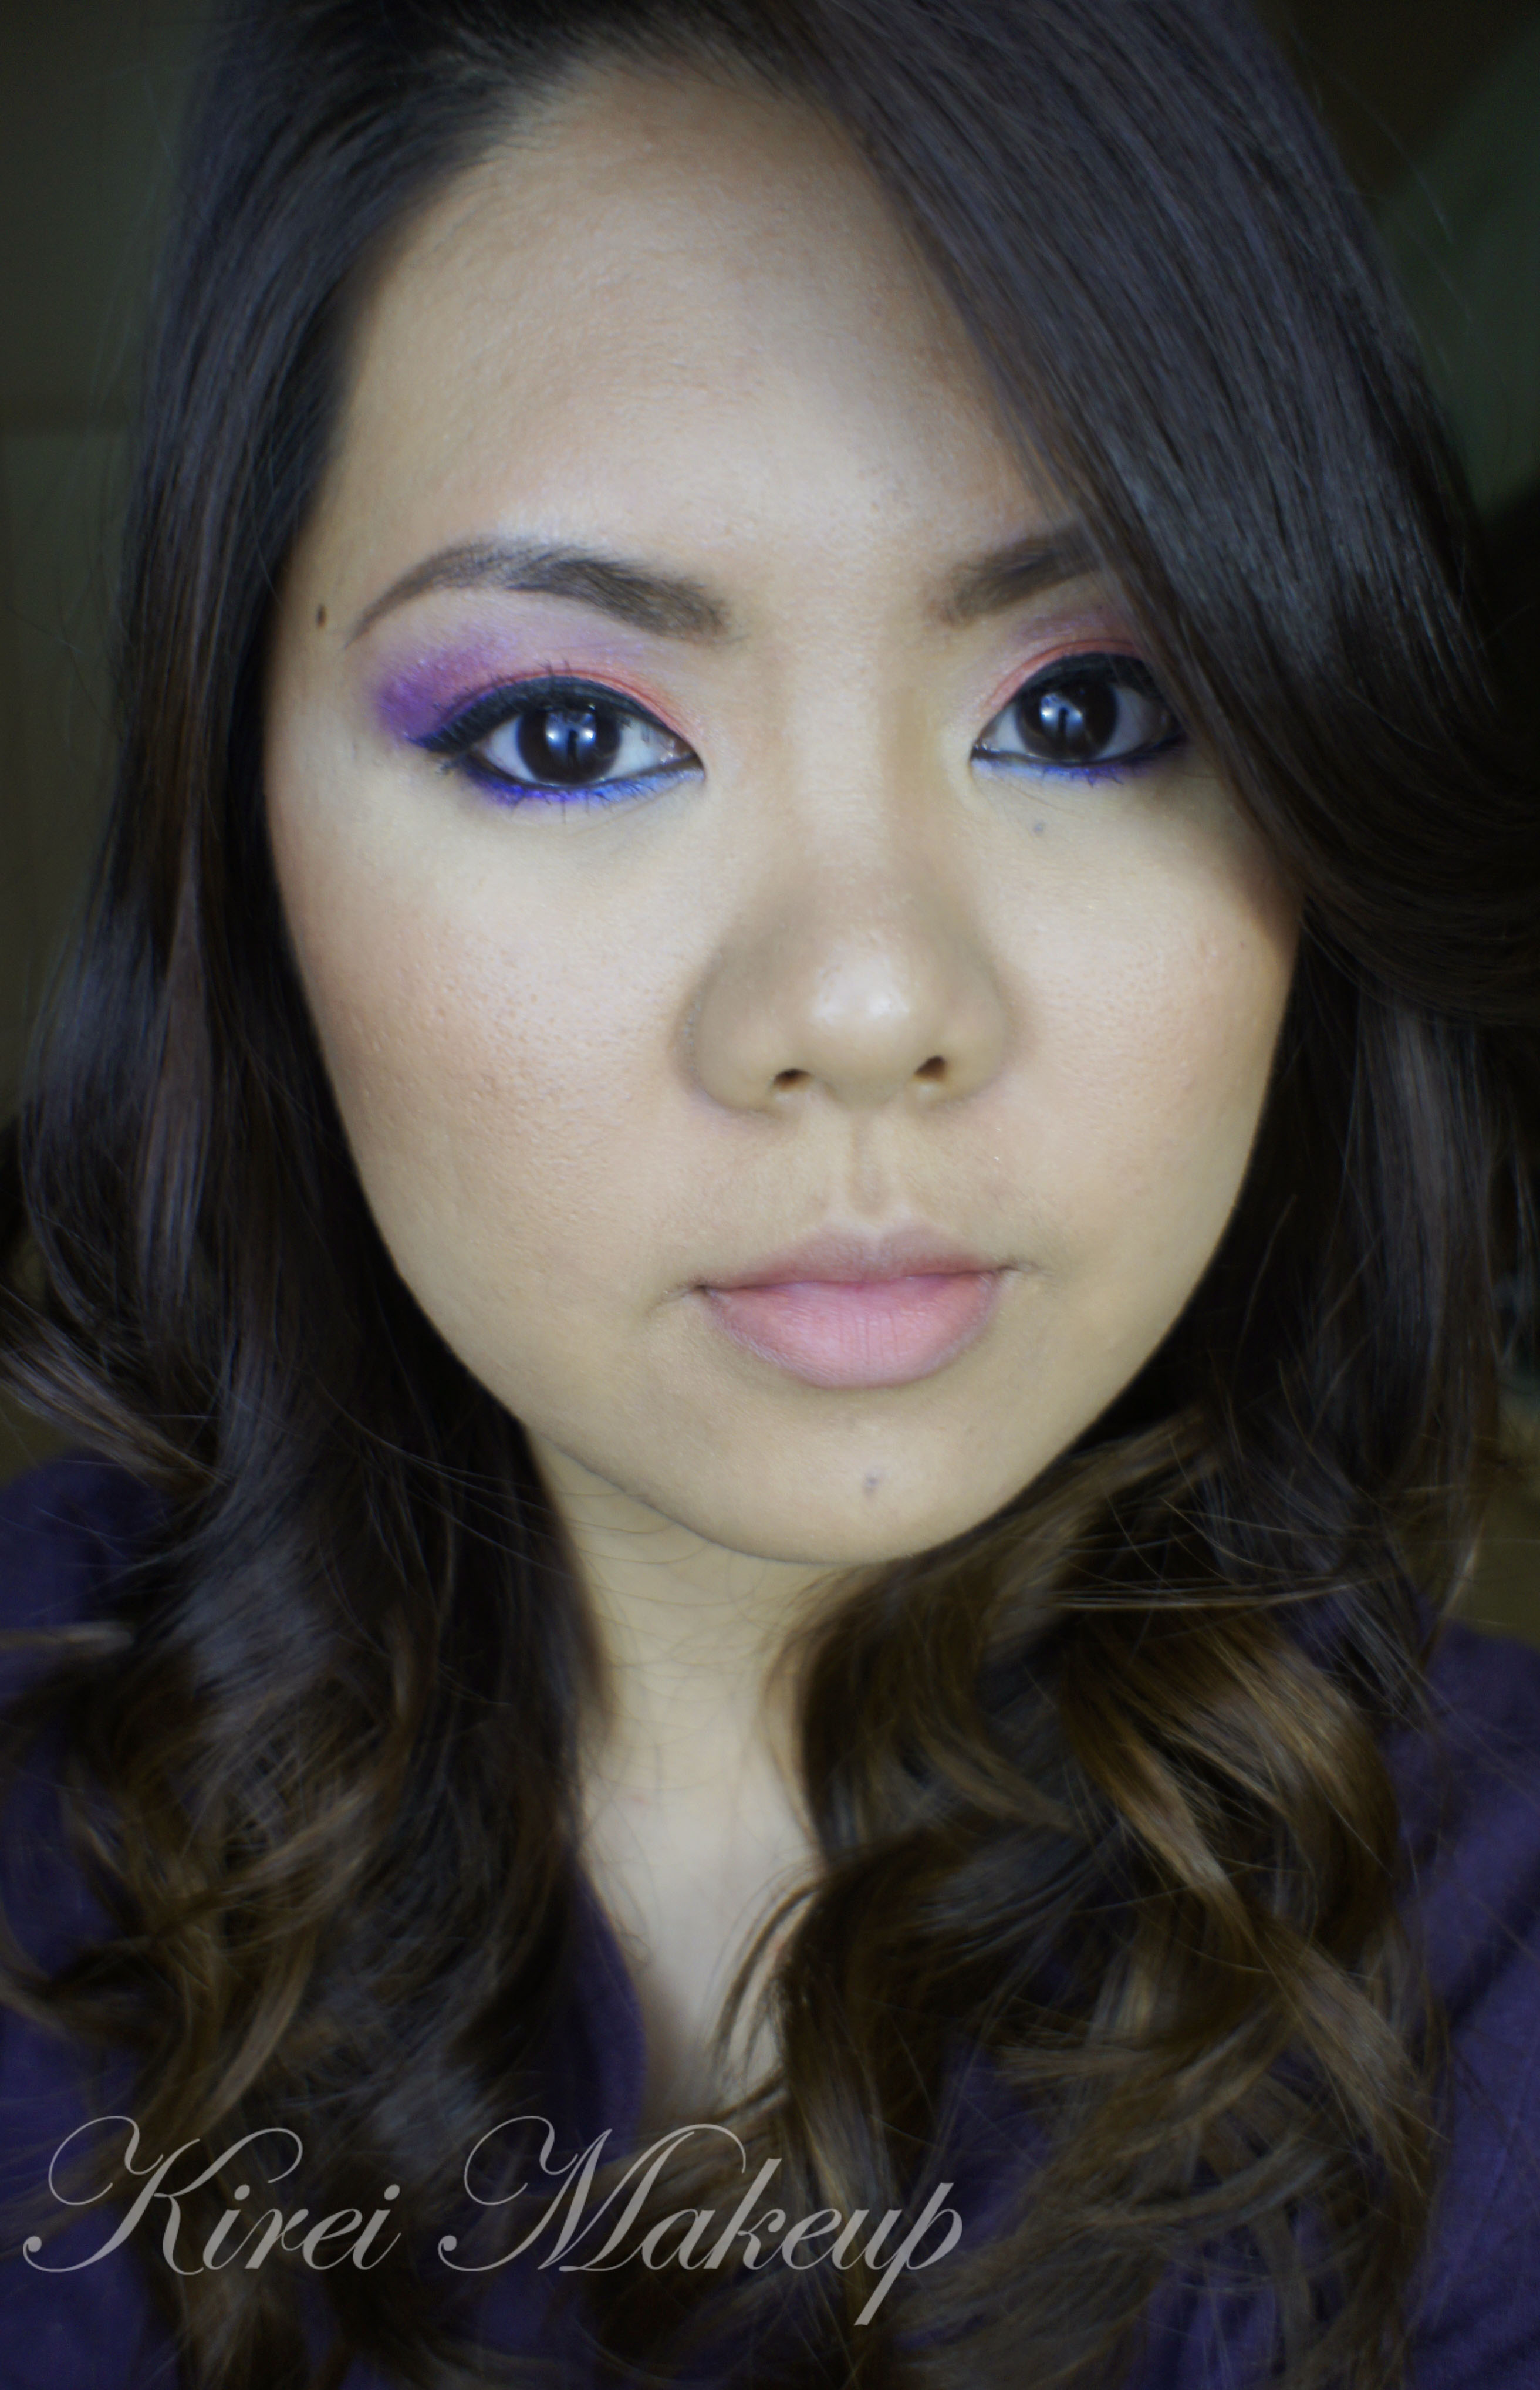
How is everyone this week? It’s been really cold here in Canada! If you are anywhere in the colder region, keep yourself warm, yes?! Anyways, due to the cold gloomy weather, I wanted to create a look in which I incorporated a little bit of colour. I’ve decided to do a wearable purple eye makeup. It’s super simple and easy, you can use any colour of your liking on the crease. I chose purple just because I think it’ll look great on every eye colours.

The trick to this light colored eye makeup is to use a black mascara and eyeliner to tie the whole look together. Black mascara and eyeliner are a must with this look since the eyeshadows used in this tutorial is quite light, and I didn’t use any contour colour on the crease.
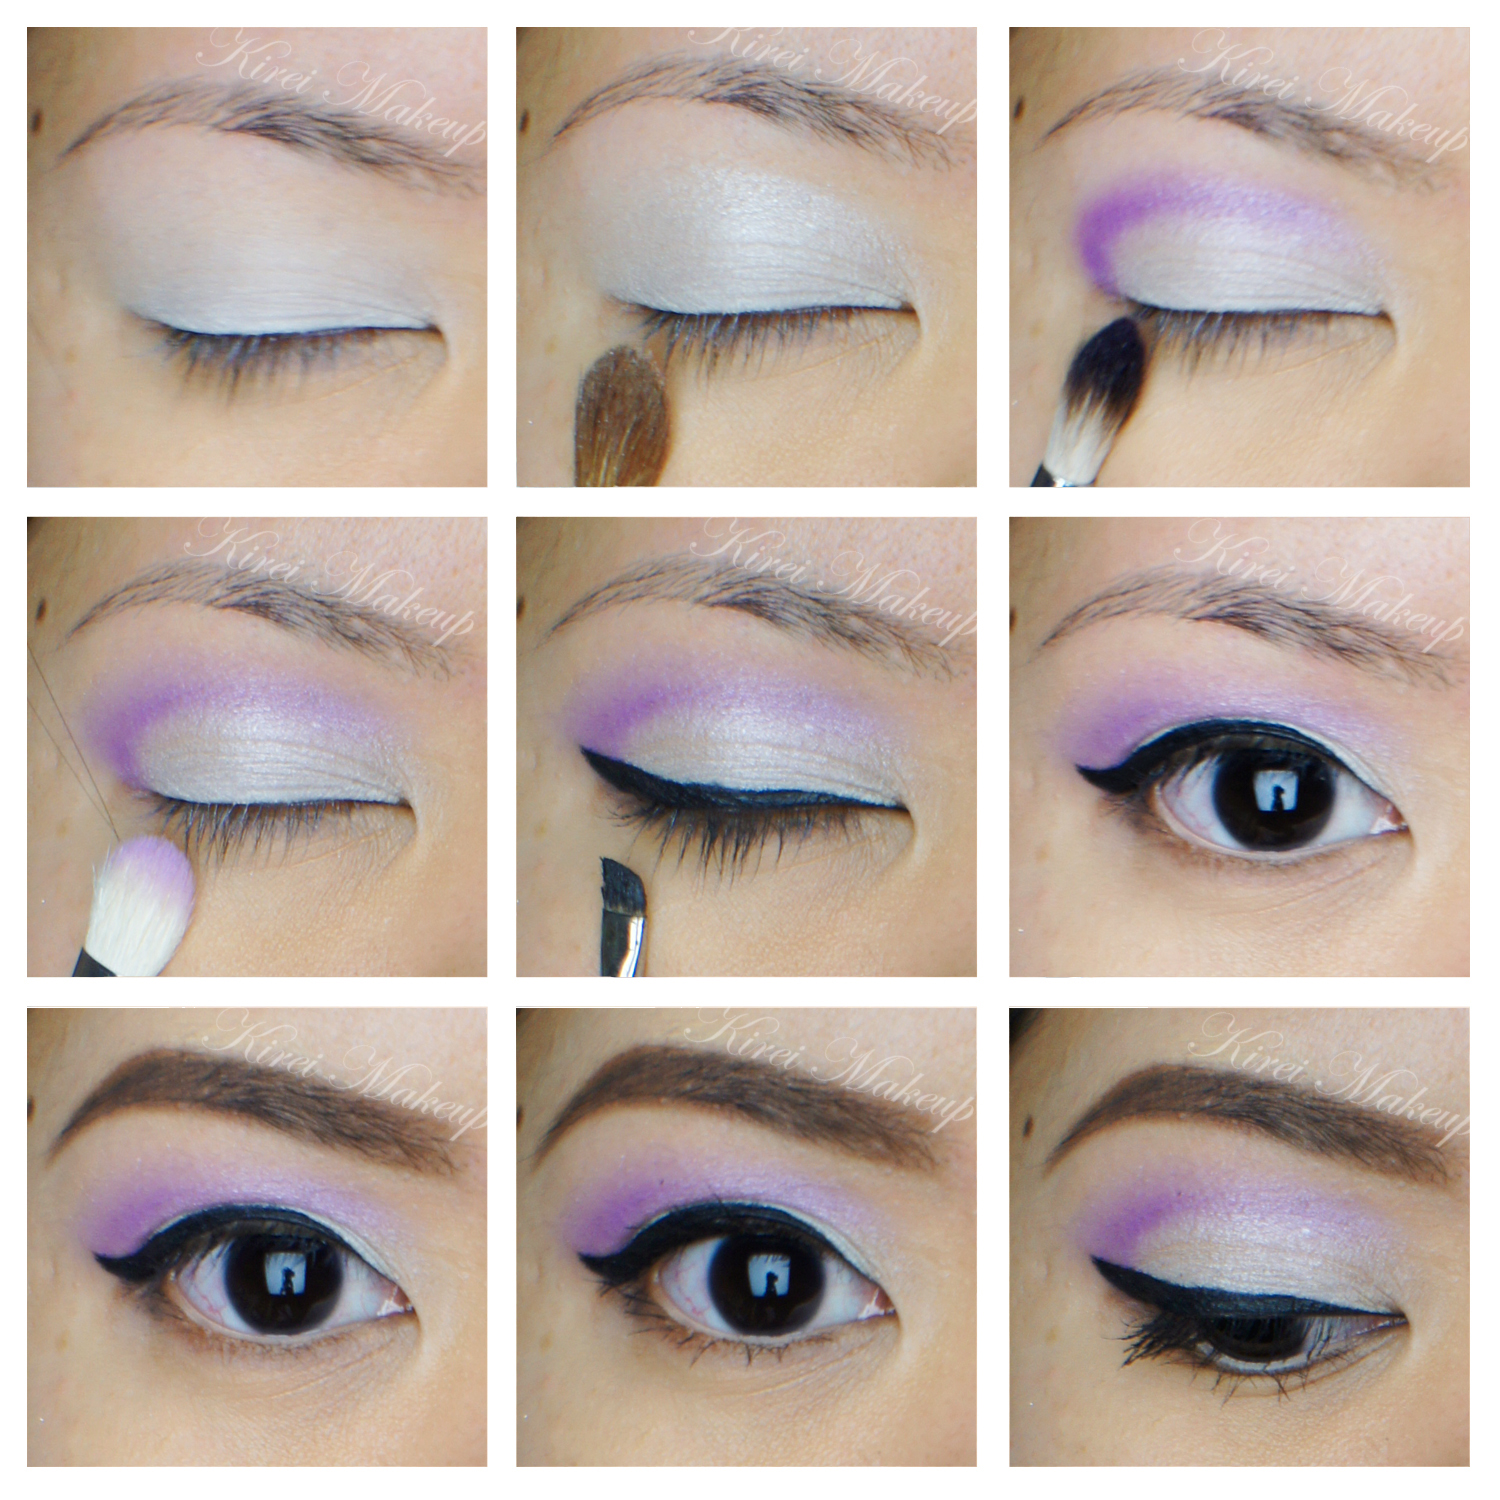
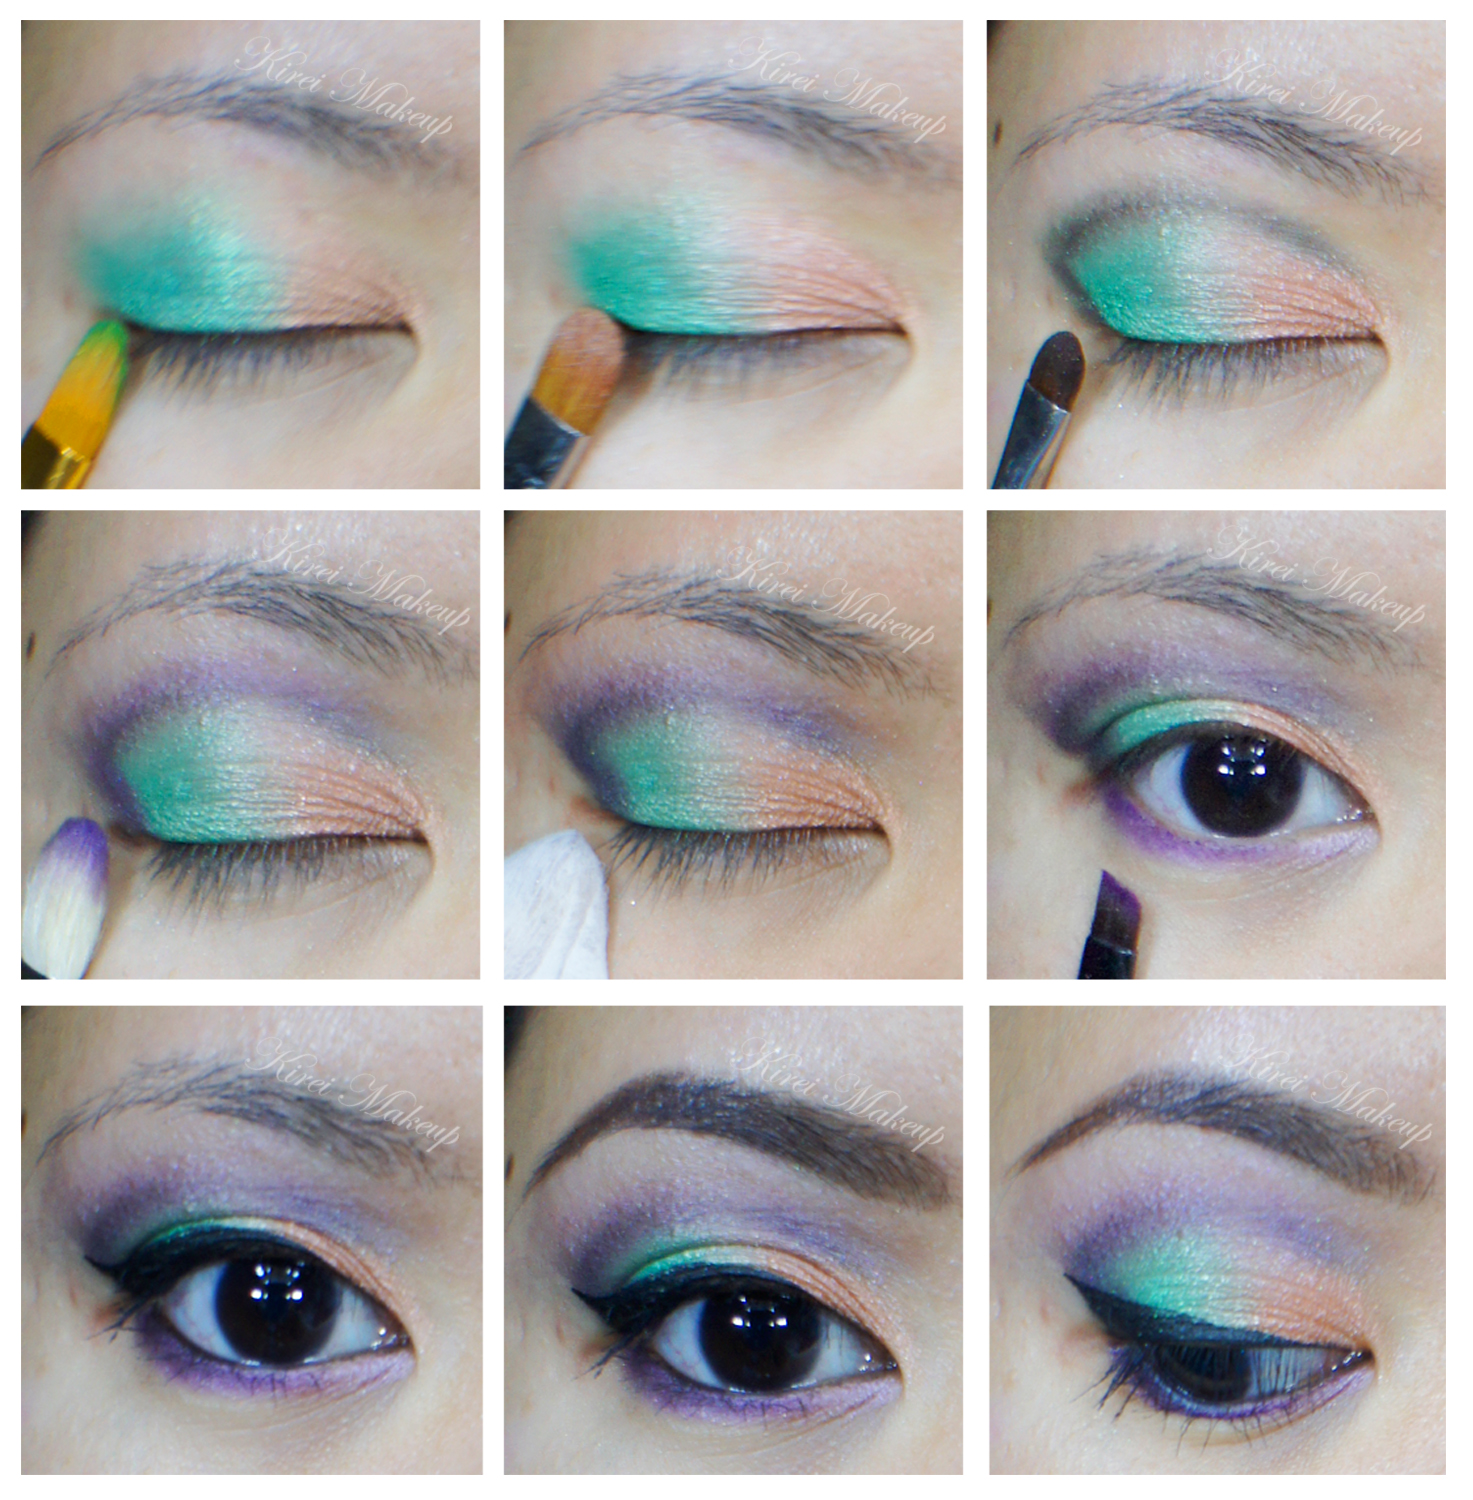
Wearable purple makeup

How-to:

1. I applied NYX jumbo eyeshadow pencil in Milk all over my eyelid using my finger.

2. Using a fluffy blending brush (or you can use a flat eyeshadow brush), I applied Bad Girl from Sleek Makeup Showstoppers palette all over the lid.

3. Using a clean fluffy crease brush, I applied MUFE purple eyeshadow no. 92 on the crease.

4. I blended the purple eyeshadow slightly using a clean blending brush, blending the eyeshadow upwards above the crease.

5. I created a winged eyeliner using an angled eyeliner brush and L’oreal Infallible Gel Lacquer Liner in Blackkest Black.

6. Using a clean angled eyeliner brush, I applied UD Faint eyeshadow along the lower lash line.

7. I also lined my waterline using MAC Chromagraphic pencil eyeliner in NC15.

8. I filled my brows using Anastasia Duo Brow Powder in Brunette.

9. I curled my lashes, and applied Clinique High Impact Mascara on both upper and lower lashes.

Feel free to add false eyelashes to make your eyes look more wide awake. I ran out of falsies, so I didn’t apply any.

Jlo american idol sf audition makeup

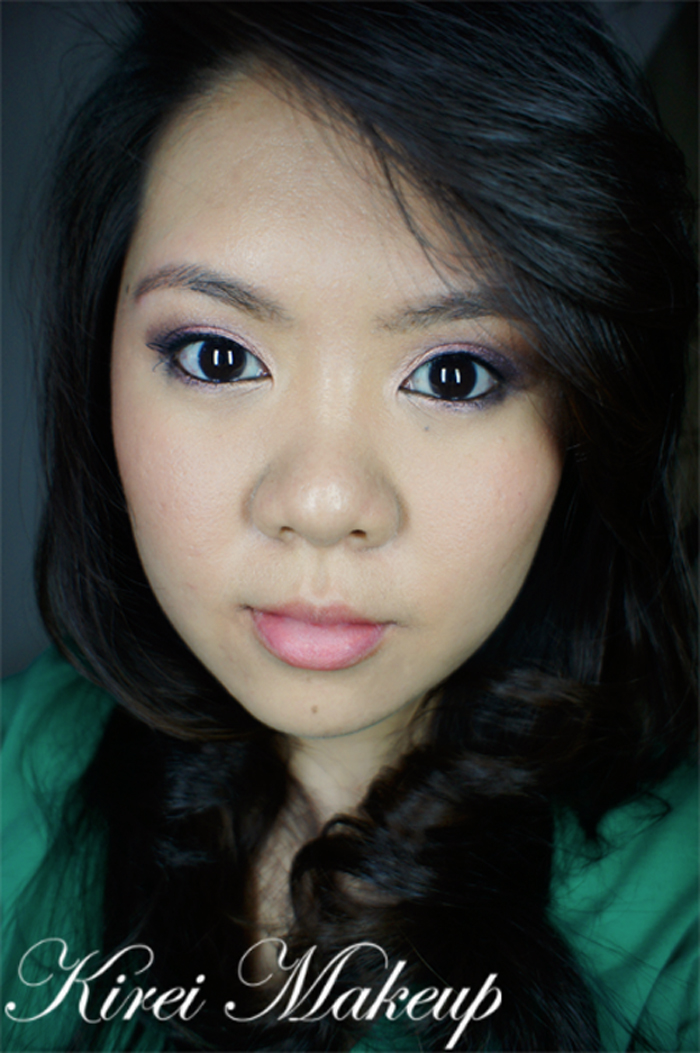
10. On my face, I applied Smashbox Halo foundation all over using Sigma Flat Kabuki brush.

11. I applied MAC Pro Conceal/Correct palette in yellow corrector under my eyes, and on the bridge of my nose.

12. I lightly contour my face using MAC Skinfinish natural in Medium Deep.

13. I applied MAC Dainty blush on my cheeks.

14. On my lips, I applied Revlon Colorstay Ultimate Suede lipstick in Socialite, and added a few dabs of YSL Glossy Stain in Peche Cerra-Colla (27).

Color Crush

I have a crush on the MUFE Aqua Cream no. 52. The color is just so pretty! I just want to use it on every tutorial…Anyways, I did this look just to play around with colors. I think I might do another look with the green cream shadow. We’ll see. I had a lot of fun playing around with this color.

How-to:

1. Using a synthetic brush, I applied MUFE Aqua cream no. 52 Pearly Green Dragon on the outer half of my lid.

2. Using MUFE Aqua Shadow stick in Pearly Peach on the inner half of the lid. I used my finger to blend the colors.

3. I used a flat eyeshadow brush and applied Smashbox Admire Me Soft Shimmering Coral on the inner half of the lid and UD Kush on the outer half.

4. Using a small shader eyeshadow brush, I applied UD Perversion on the outer V and the crease.

5. I cleaned the small shader brush on a tissue and use the brush to blend the harsh line.

6. I applied MUFE no. 92 eyeshadow on the crease lightly using a blending brush.

7. Using wet wipe, I cleaned the outer edge of my eye to clean up and sharpen the edge.

8. I also applied UD Foxy eyeshadow under the brow.

9. Using an angled eyebrow brush, I applied MUFE no. 92 eyeshadow on the lower lid. I applied UD Bordello on the inner corner of the lower lid.

10. I lined my waterline using L’oreal Voluminous Smoldering eyeliner and lined the upper lashline using Kanebo Kate Super Sharp liner.

11. I curled my lashes and applied Dior Overcurl mascara.

12. I filled my brows using MUFE Aqua Brow gel no. 40 and an angled eyeliner brush.

13. I brushed my brows using a clean spooly.

mufe aqua cream 22

14. For the face, I applied MUFE HD Foundation using a foundation brush.

15. I applied MAC Cubic blush and MAC Bronzer on the cheeks.

16. I contoured the sides of my nose using MAC Shadowy.

17. On the lips, I applied Clinique Bountiful Blush chubby stick.

bright colorful makeup

orange and green makeup

Sunset Inspired

I’ve been wanting to do a sunset inspired makeup for a while, but couldn’t find the right colors to do it. Well, ever since I got my hands on that MUFE Aqua Cream no. 9, I couldn’t resist playing with that color. I think it’s probably one of my favorite colors so far. I just want to use it all the time!

If you see anything that’s underlined and bold in the sentences below, it means that I’ve link it to another tutorial/review that I’ve done in this blog. The links are not spam nor will it lead you to another site.

How-to:

1. I applied MUFE Aqua Cream Shadow no. 9 all over my lid using my finger. (for other tutorials using this color please refer to Coral and Blue, and Candiliscious)

2. Using a flat eyeshadow brush, I applied Smashbox Soft Shimmering Coral from the Admire Me palette on top of the aqua cream.

3. Using Smashbox bullet brush, I applied purple eyeshadow from Sariayu’s Karimunjawa palette.

4. I blended the edge of the shadow using a clean blending brush.

5. Using an angled eyebrow brush, I applied Lancome All Made Up eyeshadow on the inner corner of the lower lid, and the purple eyeshadow from step 3 on the outer half.

6. Using a Kate Super Sharp liquid eyeliner (bought from a Japanese drugstore during my trip), I created a winged liner along the upper lash line.

7. I lined the outer third of my lower lid using the same eyeliner and used an angled brush to smudge the liner slightly.

8. I filled my brows using a mixture of MAC Omega and MAC Brun using an angled eyeliner brush.

9. I curled my lashes and applied L’oreal Double Extender Curl mascara.

10. I applied my face powder right below my brows.

coral and purple makeup

11. Under the eyes, I applied the yellow corrector from MAC Pro Conceal/Correct palette in Medium.

12. On my face, I applied MUFE HD foundation using a Sigma Round Kabuki brush.

13. I powdered my face using Cinema Secret loose powder.

14. I applied MAC Shadowy to contour my face and MAC Peaches blush on my cheeks (for my contouring tutorial please refer to Subtle Contour/Highlight/Blush).

15. On my lips, I applied Revlon Mauve It Over lipstick.

sunset makeup

Pretty in Pink and Purple

Hola! Today’s tutorial is perfect for Valentine’s Day. The pink and purple combination spells romance and it’s wearable enough to be worn on a date. The look turned out better than expected. The purple blends very nicely into the pink and I took may be about 30mins to complete the whole makeup.

How-to:

1. I applied Urban Decay Primer Potion all over my lid.

2. For the pink eyeshadow, I used the Burgundy from Smashbox Flash palette on my lid with a flat eyeshadow brush.

3. On the outer V, I gently pat L’oreal Infallible eyeshadow in Purple Obsession using a flat eyeshadow brush.

4. Using a clean blending brush, I blended the crease ensuring there’s no harsh line.

5. Using a small angled brush, I applied Purple Obsession on the outer half of the lower lid and Peachy from Smashbox Flash palette on the inner half of the lower lid.

6. I also applied Peachy lightly on the inner corner of the upper eyelid.

7. Using L’oreal Voluminous Smoldering eyeliner on the waterline and tightline.

8. I curled my lashes using Shu Uemura eyelash curler and applied L’oreal Voluminous Carbon Black mascara on both top and bottom lashes.

9. I filled my brows lightly using Anastasia Brow Wiz in Brunette.

L'oreal Infallible eyeshadow

10. For the face, I applied L’oreal Magic Lumi foundation all over my face using Shiseido foundation brush.

11. For under the eyes, I applied Smashbox Camera Ready Full Coverage stick concealer.

12. I applied MAC Fleur Power on the cheeks and applied Revlon Just Bitten in Charmed on my lips to complete the look.

pink and purple makeup

Purple Haze

So, I’m having a difficulty taking the close up pictures since the lights aren’t ready for use yet, which explains why the pictures are of different colours. I tried my best to adjust the colours without affecting the eyeshadow colours.

Anyways, I actually wasn’t quite sure how this look would turn out since I mixed warm purple with cool purple. But, the final result turns out to be quite pretty don’t you think? It’s wearable too. 🙂

Eyes:

1. I prepped my eyes by applying MAC Beige-ing paint stick all over my eyelid.

2. Using a flat eyeshadow brush, I applied NYX Frosted Lilac on the inner corner of my lid.

3. Next, I added NYX Deep Purple lightly in the middle lid.

4. Using a clean blending brush, I applied Makeup Forever #92 on the outer corner and crease lightly.

5. I applied a purple eyeliner from Makeup Forever on my lower lid.

6. Using a clean small shader brush (or you can use a pencil brush), I smudged the liner slightly.

7. Using the same brush as step 6, I applied MAC Stars ‘n Rockets on my lower lid.

8. Then, I decided to deepen the crease shade by applying MUFE #92 using the same brush as step 6 and 7.

9. Using an angled eyeliner brush, I applied winged liners using a black gel liner from MUFE.

10. I lined my waterline using whatever is left on the eyeliner brush, and applied mascara on both top and lower lashes.

Makeup For Ever purple eyeshadow

Face:

1. I applied MAC Studio Tech foundation all over my face using Sigma Round Kabuki brush.

2. Then, I applied MAC Cubic blush on my cheeks.

3. I completed the look by applying a sheer lip balm.


Purple smoky eyes with MUFE 92