Lily Cole Bodyshop Shimmer Cube Look #2

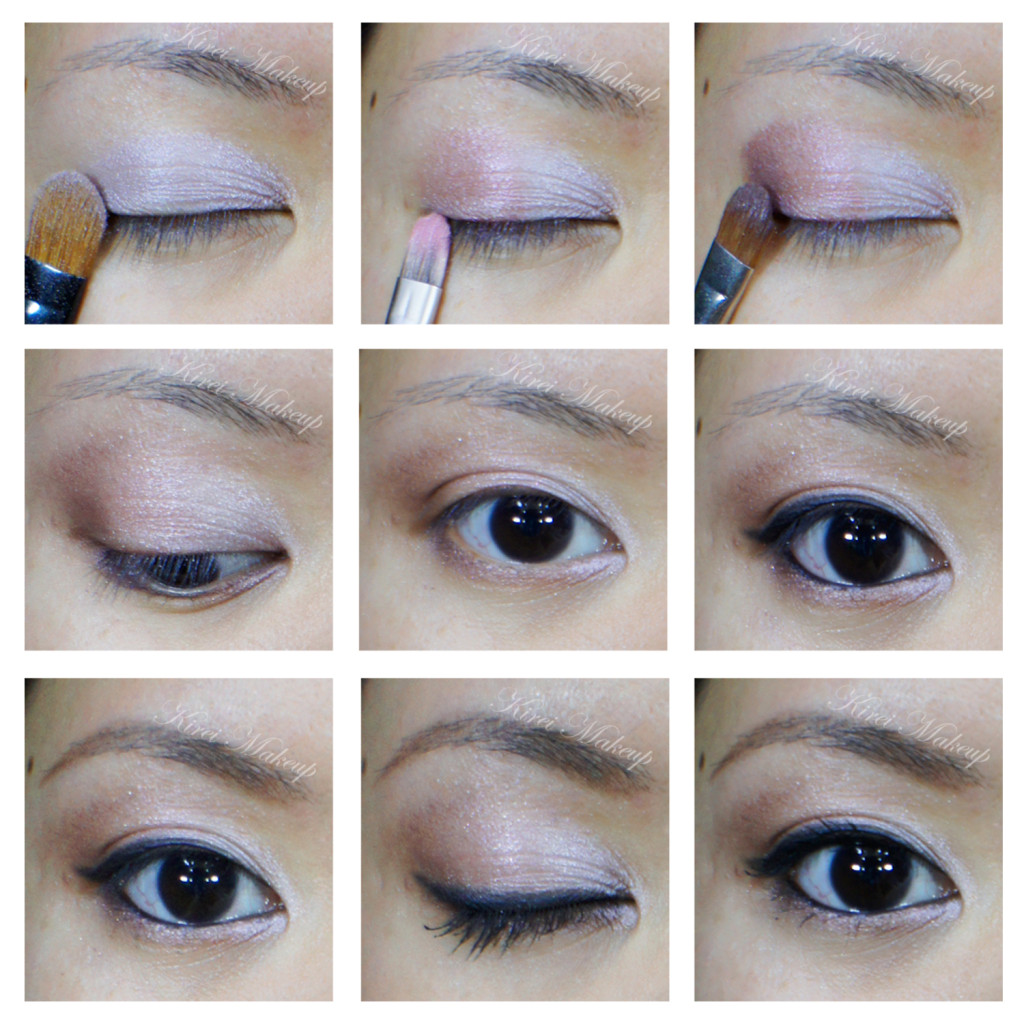
I wanted to do another tutorial using the Lily Cole BodyShop Shimmer Cube that I bought in April. I’ve done a review in this post Body Shop Lily Cole Shimmer Cube, and a tutorial in this Spring Lilac post. I really love the eyeshadow combination, and wanted to create another look that’s wearable and not too over the top, yet at the same time there’s still a play of colors on the eyes.

I decided to use the eyeshadows dry for a sheer wash of color. If you like a more intense color, feel free to apply the eyeshadows wet. I like how this look ends up to be very light and just enough. I think it’s perfect for the Summer, esp. since the weather is getting really hot in Jakarta.

How-to:

1. I applied the Live Lilac eyeshadow from BodyShop Lily Cole Shimmer cube using a flat eyeshadow brush all over my lid.

2. Next, I applied Think Pink eyeshadow from Bodyshop Lily Cole Shimmer cube on the outer half of the lid using a flat eyeshadow brush.

3. On the outer corner only, I applied Go Violet using a flat eyeshadow brush.

4. Using a clean blending brush, I blended Go Violet on the crease.

5. I applied Think Pink on the lower lid, as well as Go Violet on the outer corner of the lower lid using a small shader brush.

6. I dabbed Live Lilac on the inner corner of the lower lid using a pencil brush.

7. Using L’oreal Voluminous Smoldering eyeliner, I lined my waterline, tightline and along the upper lash line creating a small flick at the outer corner.

8. I filled my brows using Shu Uemura Hard Formula 9 eyebrow pencil.

9. I curled my lashes and applied Maybelline Volume Express Turbo Boost mascara.

Lily Cole Bodyshop Shimmer Cube

10. For the face, I applied Urban Decay Naked foundation using foundation brush.

11. On the cheeks, I applied Benefit Hervana.

12. I completed the look by applying Clinique Chubbystick Lip pencil in Bountiful Blush.
Lily Cole Bodyshop Shimmer Cube

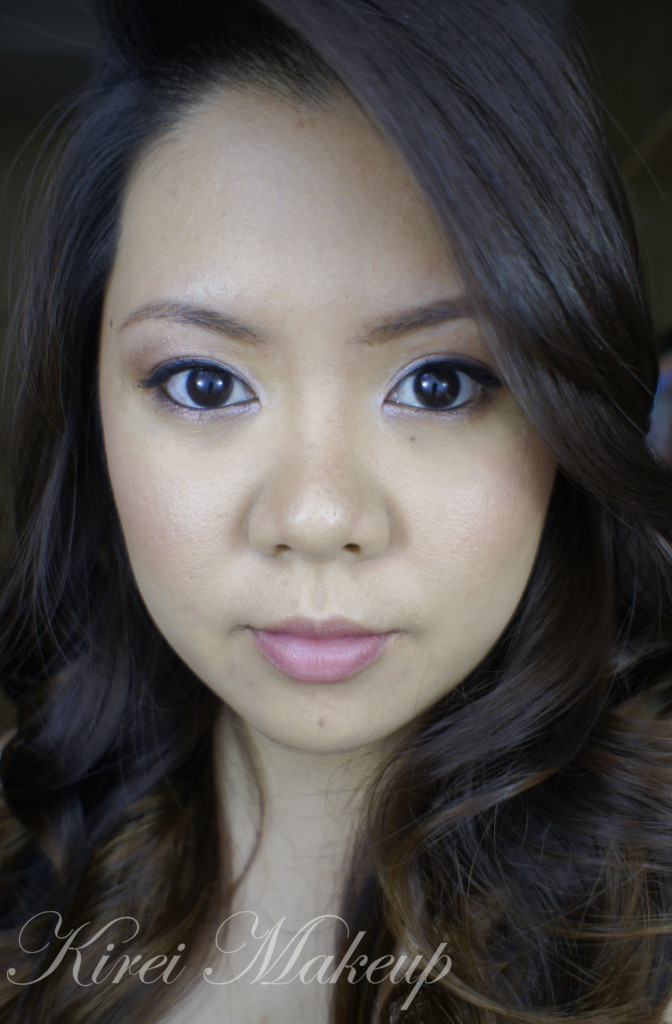
Dark Forest

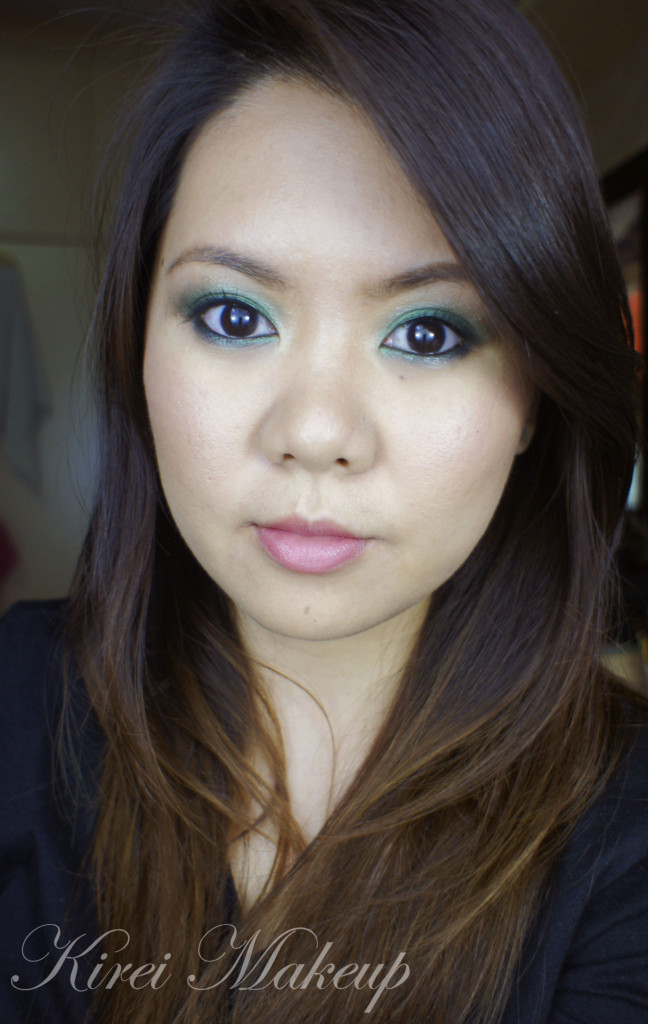
I wanted to do a smoky look just for a night-out on the weekend, and decided to go with green eyeshadow instead of my usual purple. I wanted a dark smoky eyes, but at the same time I want color in it. I was just a very fussy person..hahaha..anyways, I did this look in less than 30mins. Very easy and simple smoky eyes. If you prefer the darker, smokier version, skip the last 3 steps and just apply mascara (and/or false eyelashes).

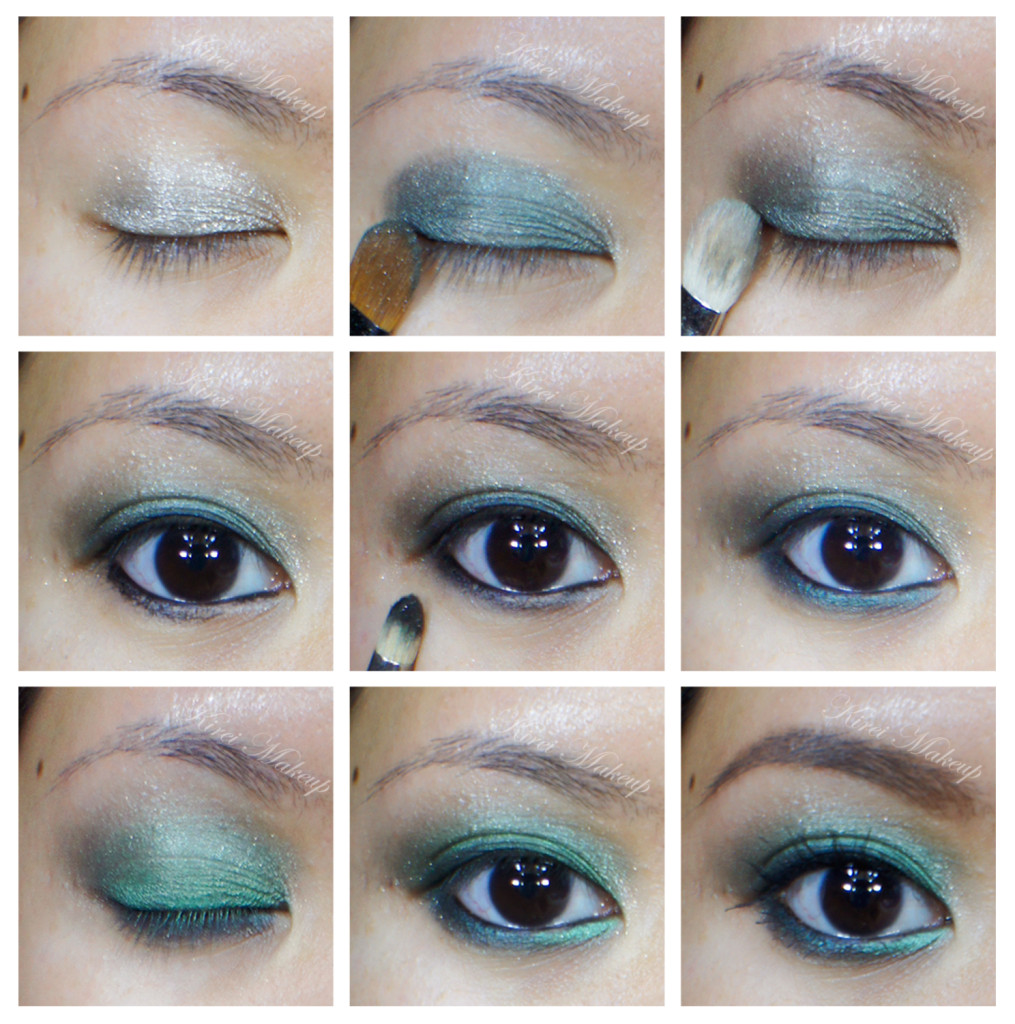
How-to:

1. I applied Chanel Illusion D’ombre in Epatant all over my lid using my finger.

2. Using a flat eyeshadow brush, I applied Lancome Strut eyeshadow on the lid.

3. Using a clean fluffy blending brush, I blended the crease.

4. I lined my waterline, tightline, upper lash line and lower lash line using L’oreal Voluminous Smoldering eyeliner. Smudged the liner a little to my lower lid as well.

5. I used my pencil brush and smudged the liner on the lower lid.

6. Using an angled eyebrow brush, I applied Lancome Strut eyeshadow on the lower lid.

7. *optional* I applied the green eyeshadow from Sariayu Karimunjawa palette on my eyelid using a flat eyeshadow brush. I also added a little bit of this eyeshadow on the inner corner of the lower lid.

8. I applied black eyeshadow along the upper lashline, curled my lashes and applied mascara.

9. I filled my brows in using Anastasia Brow powder.

emerald smoky eyes

10. Since I found the brows to be a bit too bold, I decided to tone it down a little by brushing it upwards using a clean spooly (a.k.a mascara brush).

11. For the face, I applied MUFE HD Foundation using my fingers.

12. On the cheeks, I applied L’oreal Visible Lift blush in Rose Gold.

13. I powdered lightly using translucent powder on my T-zone.

14. On the lips, I applied Clinique Chubby Lip pencil in Curvy Candy.

green smoky eyes

Dahlia

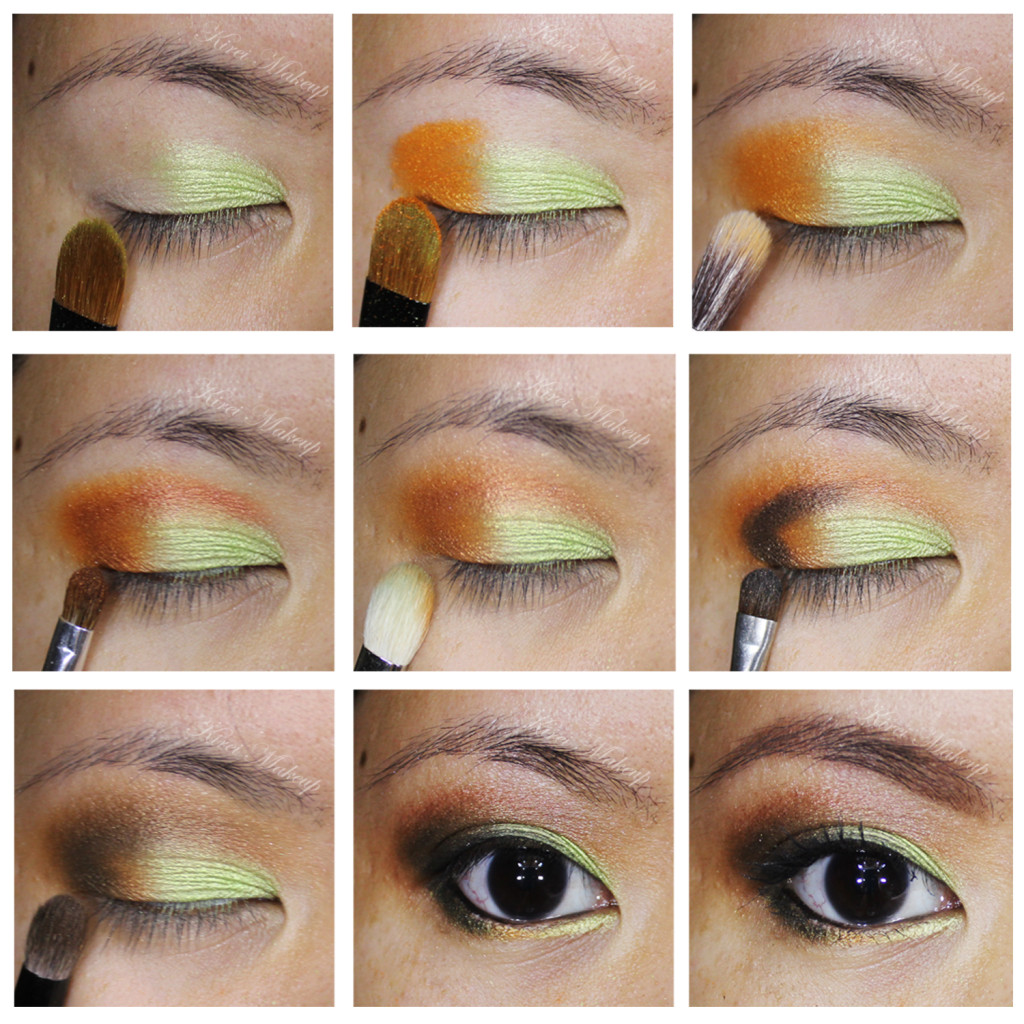
I love this combo! Green and orange are so pretty together. Anyways, I did not do a full face makeup for this tutorial since I was just playing with my Sleek Makeup iDivine Snapshot palette. However, I do thought it was pretty, so I decided to post this up.

My lid was prep using MAC Soft Ochre paint pot.

How-to:

1. I applied Kiwi Flower all over my eyelid using a flat eyeshadow brush.

2. I used the other side of the brush and applied Tequila Sunrise on the outer half.

3. Using a clean fluffy brush, I blended the orange just slightly above the crease.

4. I applied Sunset right on the crease using a small fluffy brush.

5. Using a clean blending brush, I blended the edge of the orange eyeshadow.

6. I use a small shader brush, I applied UD Blackout eyeshadow on the outer V.

7. I blended the black eyeshadow using a Smashbox Bullet brush.

8. I applied Kiwi Flower on the inner half of the lower lid, and Tequila Sunrise on the outer half using a small shader brush.

9. I also applied UD Blackout on the outer third of the lower lid using a small shader brush.

10. I lined my tightline and waterline using L’oreal Voluminous Smoldering eyeliner.

11. I filled my brows using Shu Uemura brow pencil.

12. I curled my lashes and applied L’oreal Double Extender Curl mascara on both top and bottom lashes.

orange and mint makeup

Under the Sea

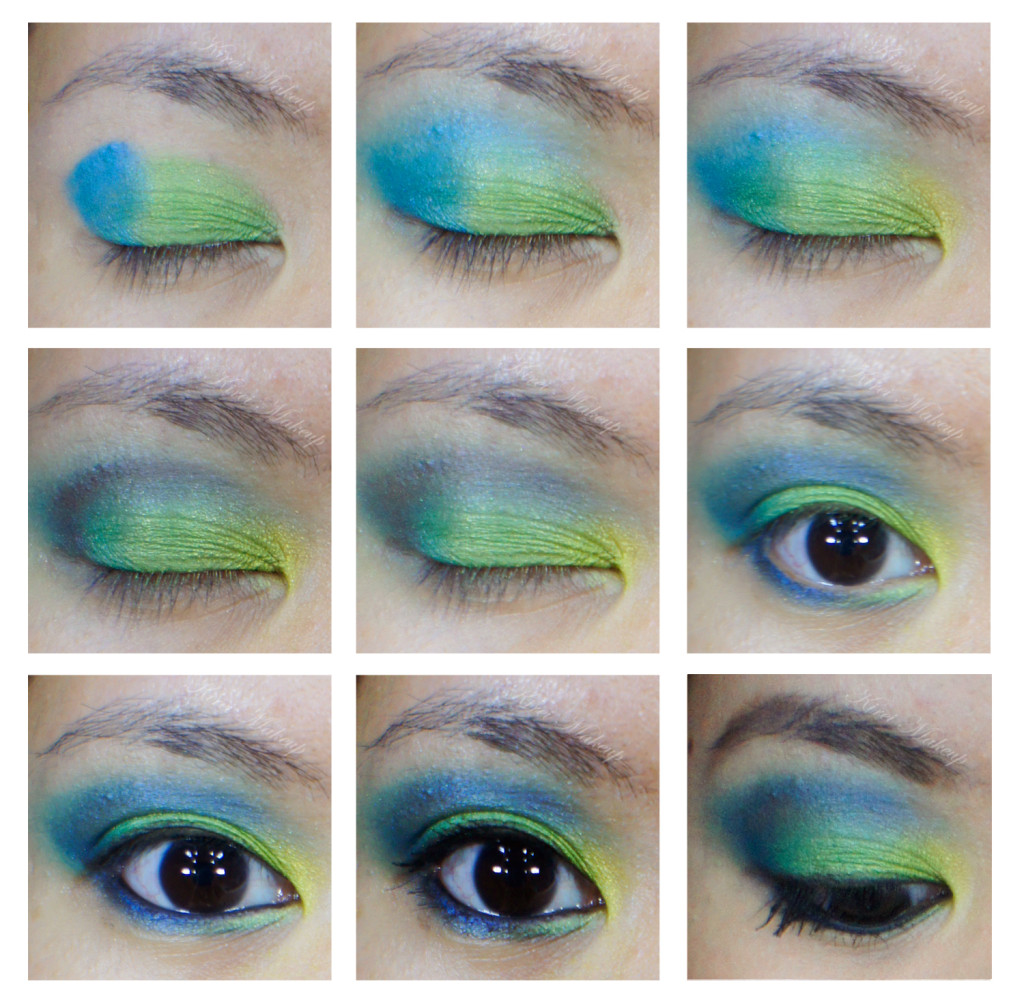
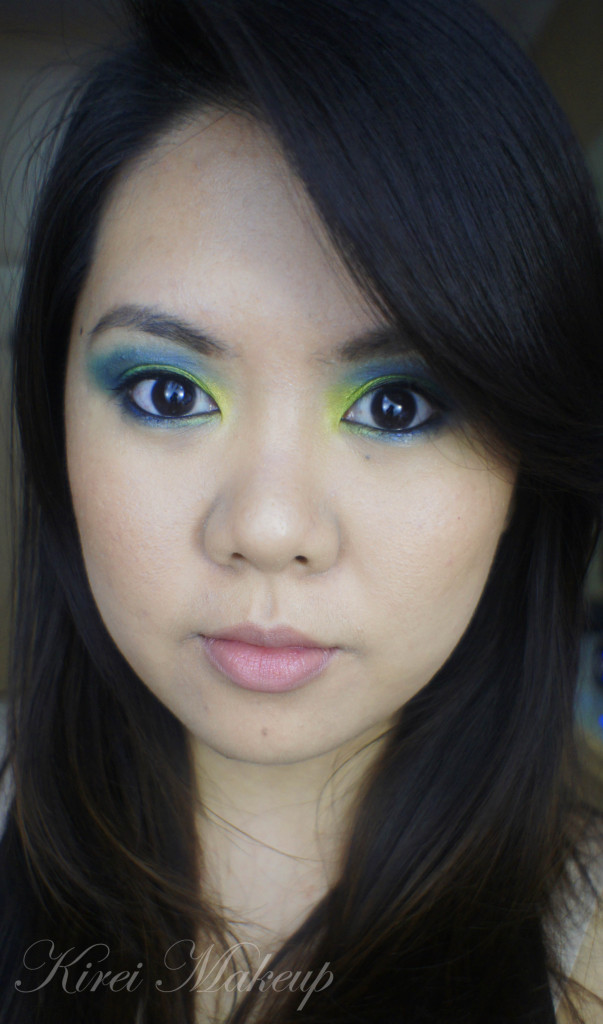
The start of this week has been quite upsetting! Anyways, to cheer myself up I decided to do a tutorial with uber bright colors! Since I’ve been using lots of purple lately, I’ve decided to use blue and greens. The eyeshadow on the inner corner showed up as yellow for some reason, even though it’s actually a chartreuse colored eyeshadow.

Anyhow, I don’t really quite enjoyed how this turned up, may be because I think I winged the blue way too far than usual. Nevertheless, I still love how the colors turned out! Bright and pretty, just the way I like it.

How-to:


1. I applied Sariayu K. Karimunjawa green eyeshadow on the inner half of the eyelid and Ben Nye Cosmic Blue eyeshadow on the outer half of the eyelid.

2. Using a blending brush, I blended the eyeshadow.

3. Using a small shader brush, I applied MAC Rated R on the inner corner of the eyes.

4. Using a small shader brush, I also applied Celestial Blue from Ben Nye on the crease.

5. Using a small blending brush, I blended the color on the crease.

6. I applied Ben Nye Cosmic Blue, Sariayu K. Karimunjawa green eyeshadow on the lower lid using a pencil brush.

7. I lined my waterline and tightline using MAC Smolder eyeliner pencil.

8. I curled my lashes and applied Dior Overcurl mascara on both top and bottom lashes.

9. I filled in my brows using a mixture of MAC Brun and Omega.

MAC R-rated

10. For the face, I applied Estee Lauder Double Wear Light foundation all over my face.

11. I applied MAC Peaches blush on the cheeks.

12. For the lips, I applied Revlon Mauve It Over and a tiny dab of vaseline.

green smoky eyes

Product of the Week: Sariayu K. Karimunjawa

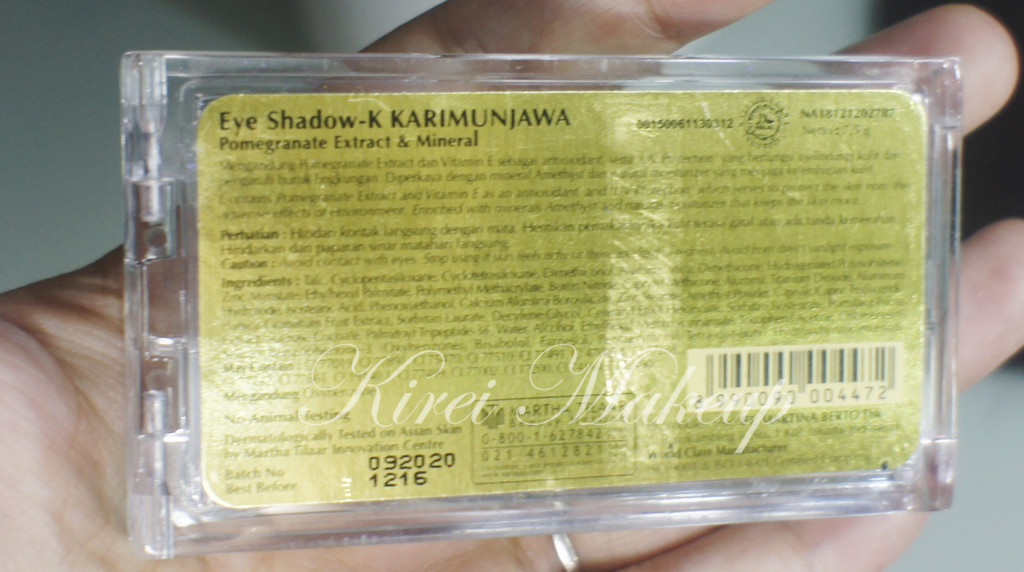
This week in Product of the Week installment, I’m presenting another Sariayu eyeshadows! I’m loving this Indonesian makeup brand so much. It’s affordable, pigmented and widely available. Martha Tilaar’s other brand, which is P.A.C is actually designed for makeup artist, but I find that Sariayu (also by Martha Tilaar) has the same quality as P.A.C eyeshadows. I also love the fact that Sariayu products are not tested animals!

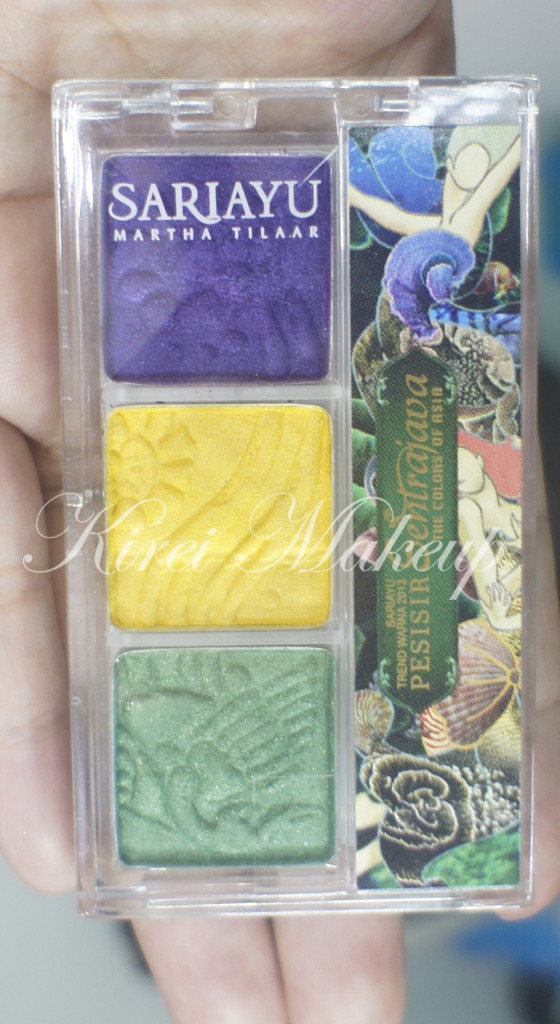
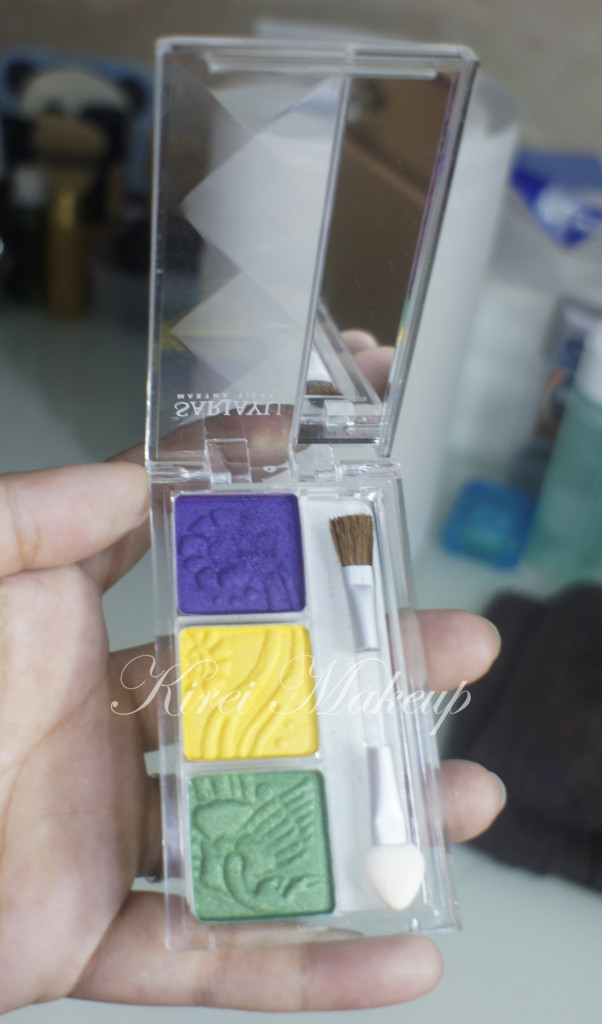
Anyways, let’s talk about this trio palette! This palette is called K. Karimunjawa, and it’s one of the latest products from Sariayu latest collection – Sariayu Trend Warna 2013 Pesisir Sentrajava. I bought mine in a Martha Tilaar store in the malls for IDR Rp. 45,000 (about USD $4.50). If I’m not wrong, when I went to Carrefour on the weekend, they were selling this at IDR Rp. 38,500.

The inspiration of the Karimunjawa palette comes from the Northern coast of Central Java, whereby there’s 27 little islands of Karimunjawa with the brightest ocean. Karimunjawa is a great home of the beautiful coral reefs. A place for almost 400 oceanic species, including 242 ornamental fishes that live there. As a National Park, Karimunjawa has developed and becomes a Marine Park attraction for both local and international tourists (Martha Tilaar Group, 2013).

Sariayu eyeshadows

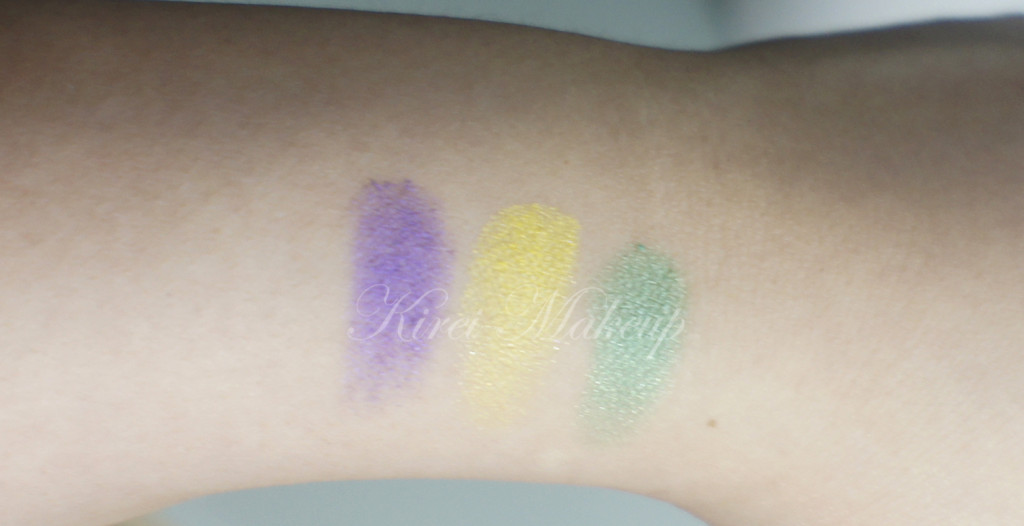
The colors are amazingly pigmented, and easily blendable. All the colors have shimmers in them, but I do find that the yellow isn’t as shimmery as the green or the purple. The purple might look dark in pictures, but it’s not that dark when you apply it to the skin. The consistency is very buttery. I find it very easy to blend the colors without having to lose the intensity.


sariayu k karimunjawa

I’ve done a tutorial using this palette in my Northern Lights post. I’ve received a lot of compliments on that look. A lot of people seems to like the yellow eyeshadow since it pops out a lot in pictures.

In general, the color combination works and I think this is an awesome palette, especially for the price that I bought it at.

Sariayu

Sariayu K Karimunjawa

Of course, there’s more than just this shadow from Sariayu trend warna 2013. With the Karimunjawa line, they also carried 2 lip products and a Glow Powder which I did not buy. On their website, they also show the 3 different ways to wear the Karimunjawa trio shadow palette, so do check them out!

Will I buy this product again? Most definitely! I love all 3 colors and for that price, of course I’ll buy it again. I give this palette 5 winks out of 5! I have yet to find something that I don’t like from it. I love love love love it!


Northern Lights

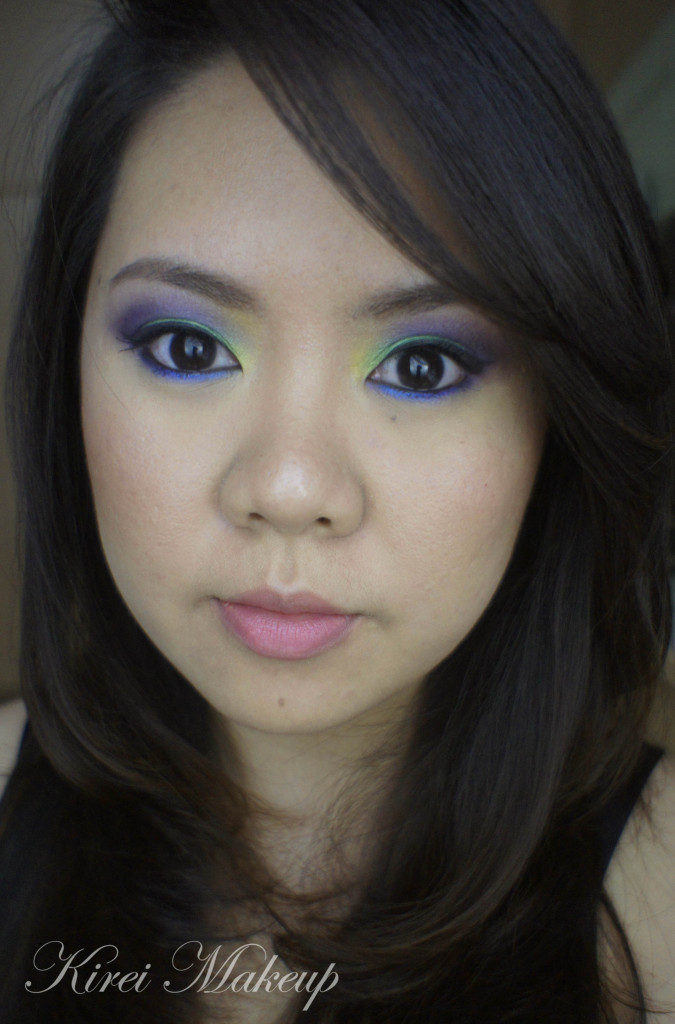
Today’s look was inspired by a photography of the Nothern Lights by Phillipe Moussette. The colors in the photo were so beautiful and breathtaking. Also, since I just bought a new palette, I wanted to try the colors from that palette, so the green isn’t exactly the same as the green in the inspiration photo.

I love how this look turned out. Make sure you keep 2-3 blending brush handy!

How-to:

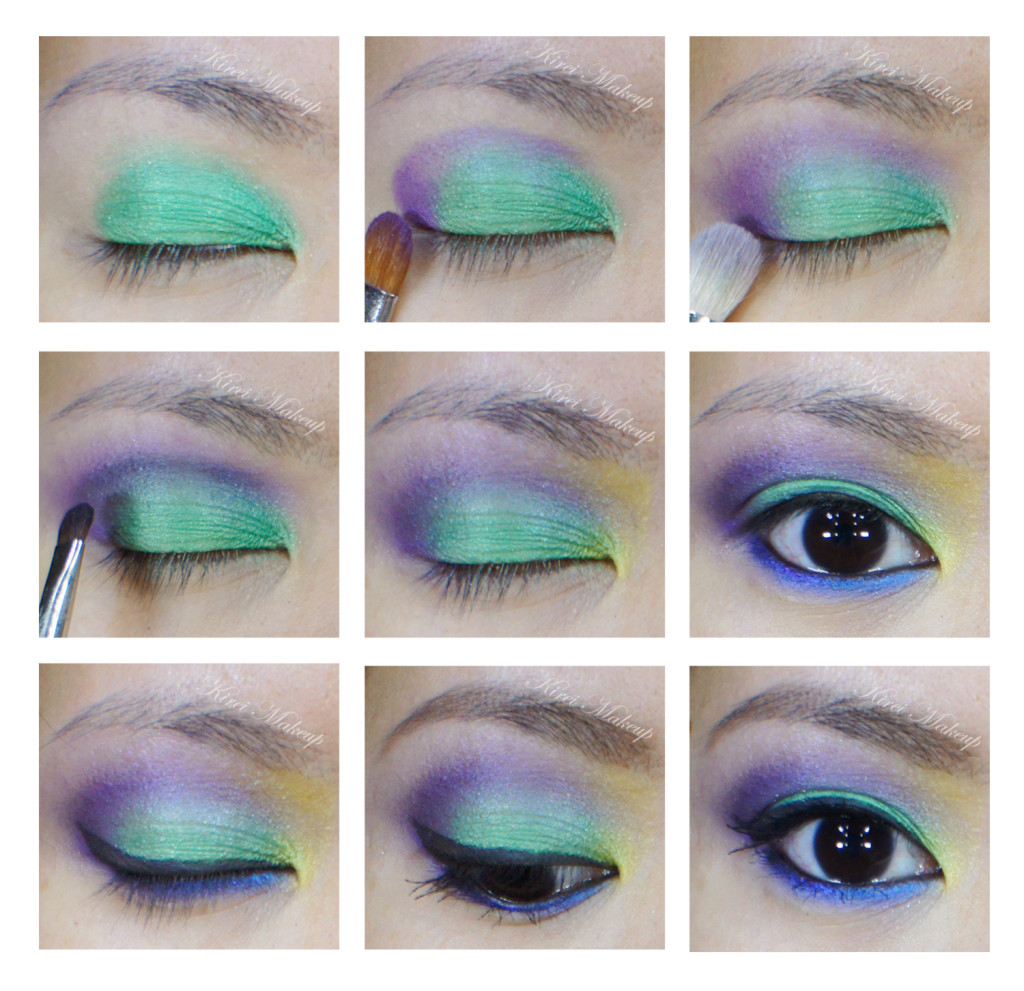
1. I applied the green shadow from Sariayu K Karimunjawa palette on my eyelid, leaving out just a tiny bit of area on the outer corner.

2. Using a flat eyeshadow brush, I applied the purple shadow from Sariayu K. Karimunjawa palette on the outer corner and on the crease.

3. Using a blending brush, I blended the purple so there’s no harsh line.

4. Using a small shader brush, I applied MAC Black Tied on the crease only.

5. Using a blending brush, I blended the black so it disappeared into the purple.

6. I also applied the yellow shadow from the Sariayu K. Karimunjawa palette on the inner corner of the eyelid using a pencil brush. I blended the color up reaching the bottom of my brows.

7. Using an angled eyeliner brush, I applied Lancome All Made Up eyeshadow on the lower lid. I also run the purple shadow that I used on the crease on the outer corner of the lower lid, on top of the blue shadow.

8. I lined my waterline and tightline using Annabelle kohl pencil liner in black.

9. I lined my upper lashline using Bobbi Brown Gel liner in Caviar Ink and made a winged liner.

10. Curled my lashes and applied L’oreal Voluminous Carbon Black mascara on both upper and lower lashes. I filled in my brows using a mixture of MAC Omega and MAC Brun.

maleficent inspired makeup

11. For the face, I applied Giorgio Armani Silk foundation using Shiseido foundation brush.

12. On the cheeks, I applied contour using MAC Blunt, and I applied MAC Cubis on the cheeks as blush.

13. I also contoured my nose using MAC Blunt.

14. For the lips, I applied Lancome Absolu Nu in 201.

green and purple eyeshadow