Fun and Colorful Makeup using Urban Decay Electric

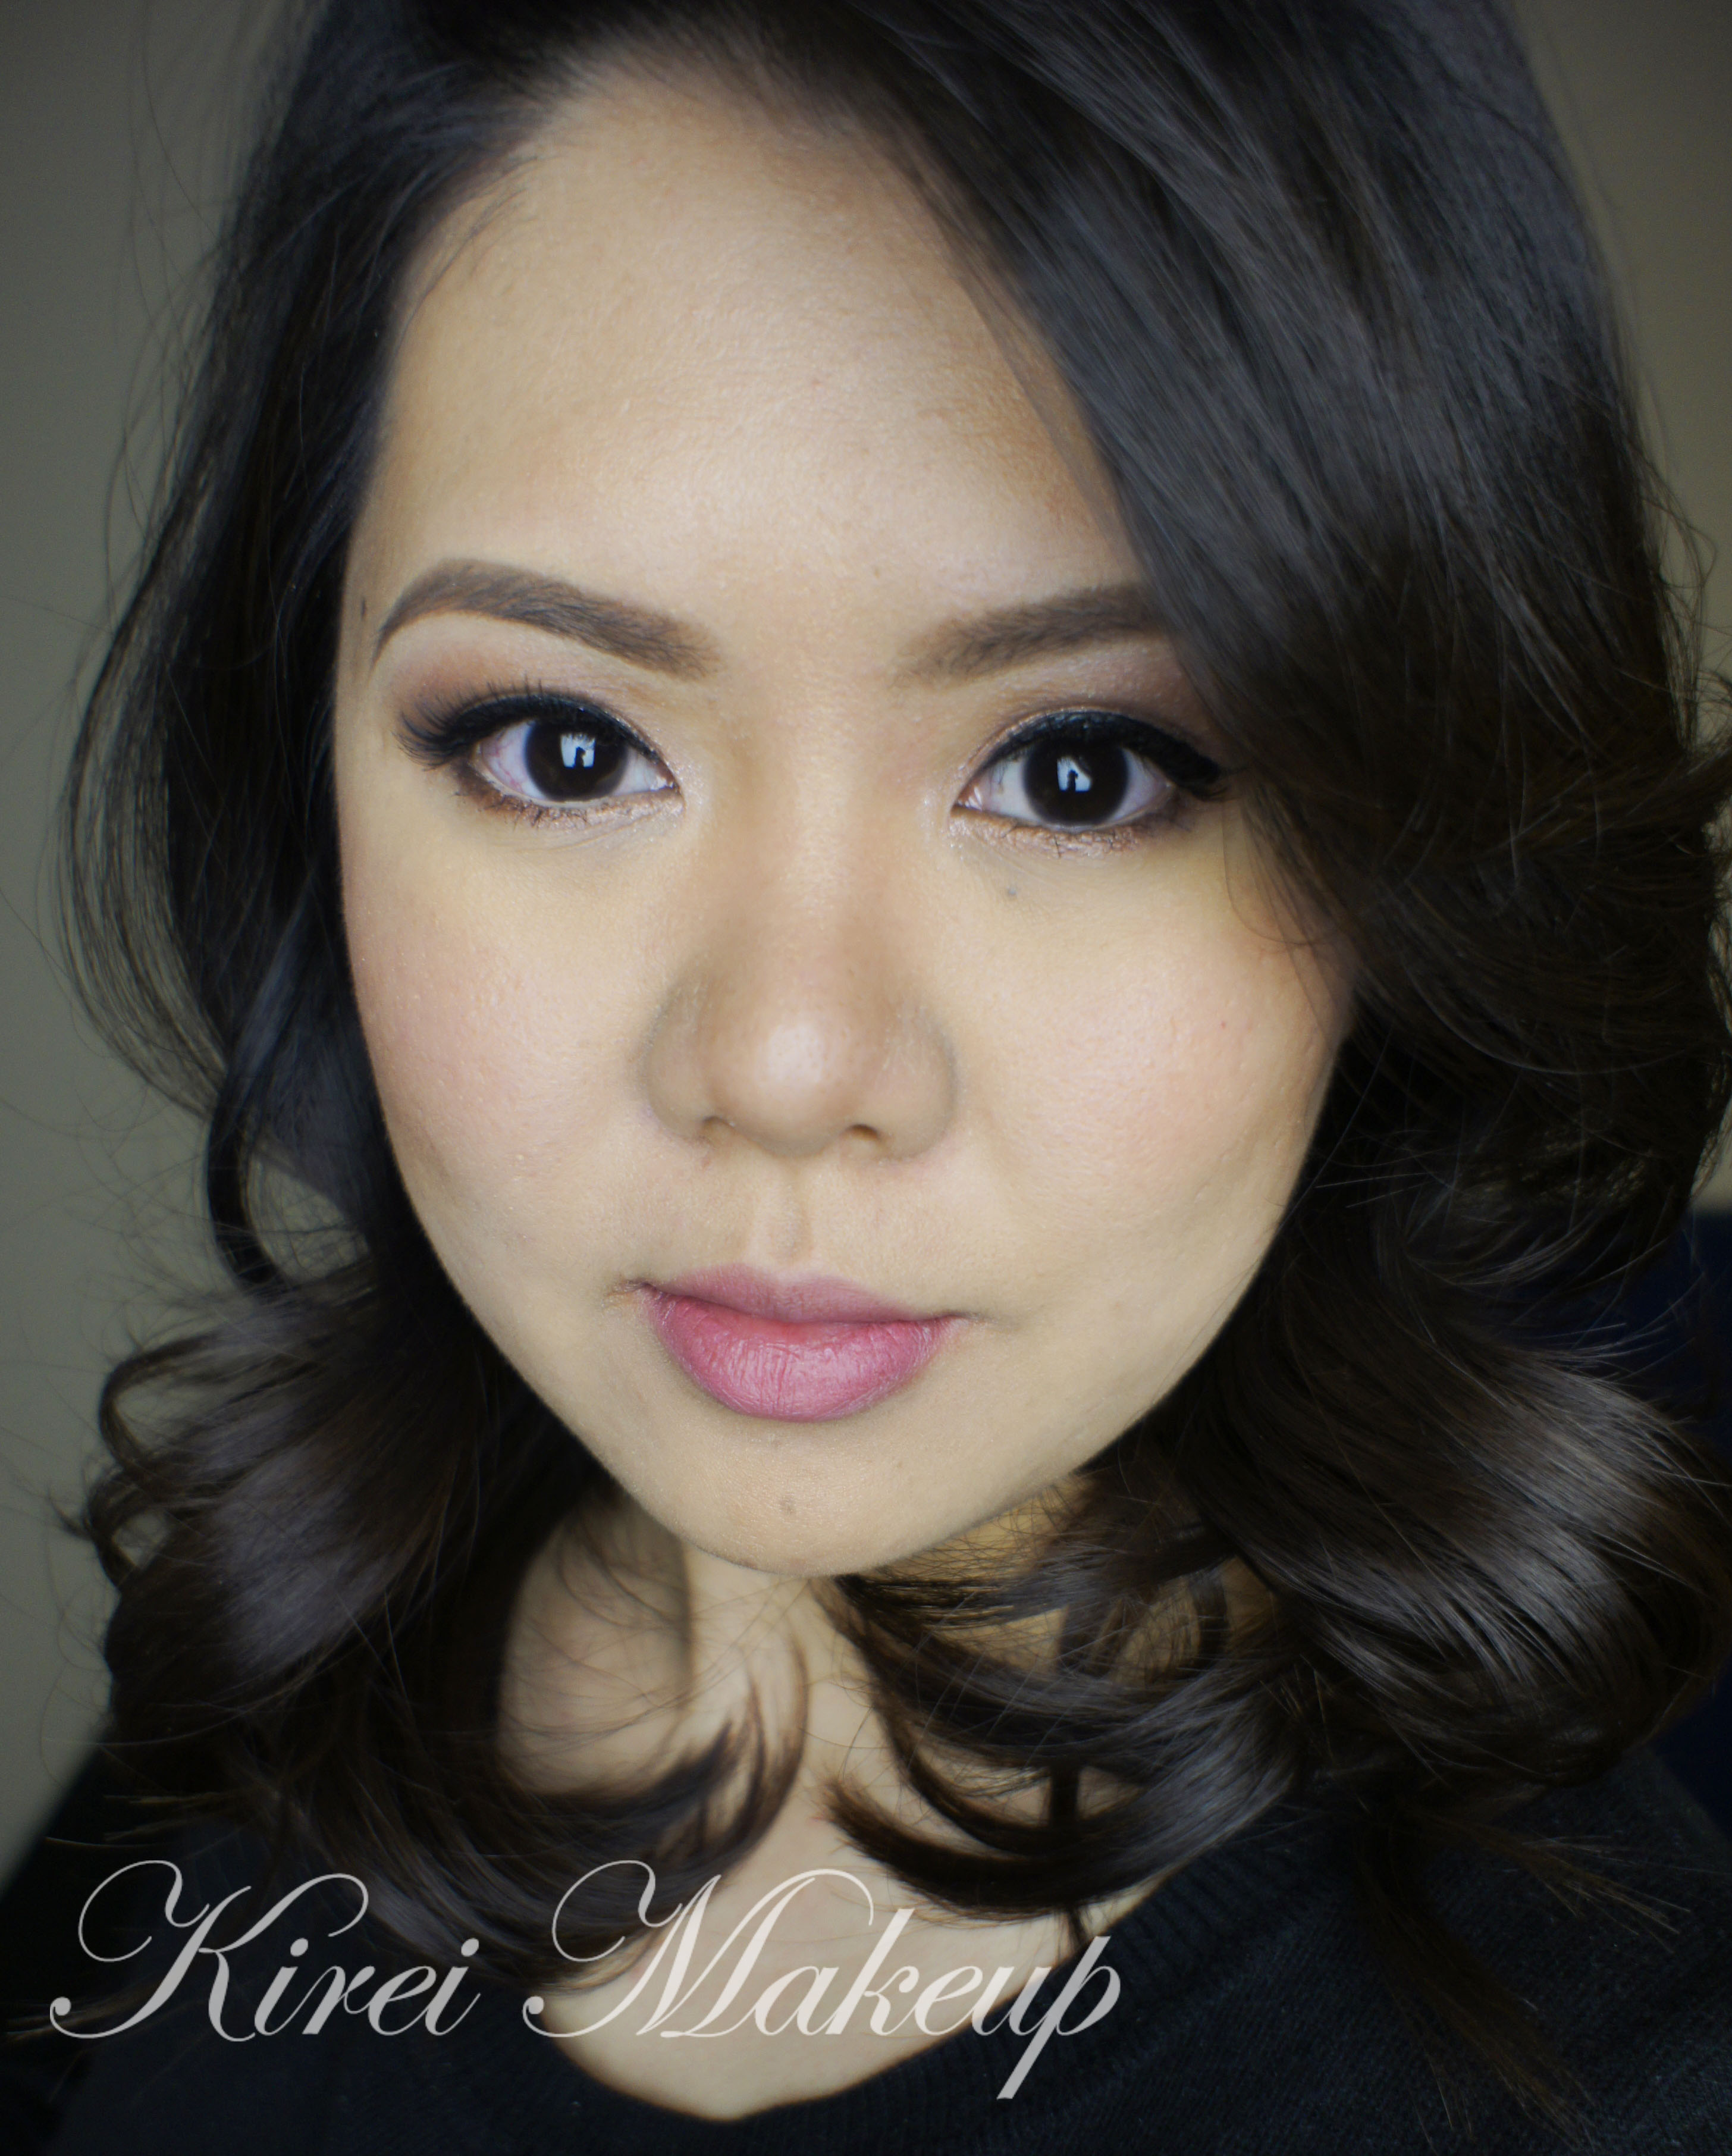
Hello, Jakarta! I’m home!!! How is everyone doing? Finally I’m able to post a new tutorial! Today’s tutorial is a fun, colorful, bright look using the new Urban Decay Electric palette! I bought this palette when I was in Toronto just last week, and I couldn’t wait to give it a try. Anyways, I’ll try to do a review of this palette next week.

Anyhooow, I just recently changed my camera to the Canon SL1, so I’m still trying to adjust the setting of the camera, and not to mention the way I take my selfie. So, if I do look awkward in the portrait photo, I do apologize. Not to mention, I’m not too happy with my haircut (my fringe especially), and have yet to go to my hairstylist here to get it fixed! If you are interested in the whole hair story please check my Instagram!

urban decay electric palette tutorial

How-to:

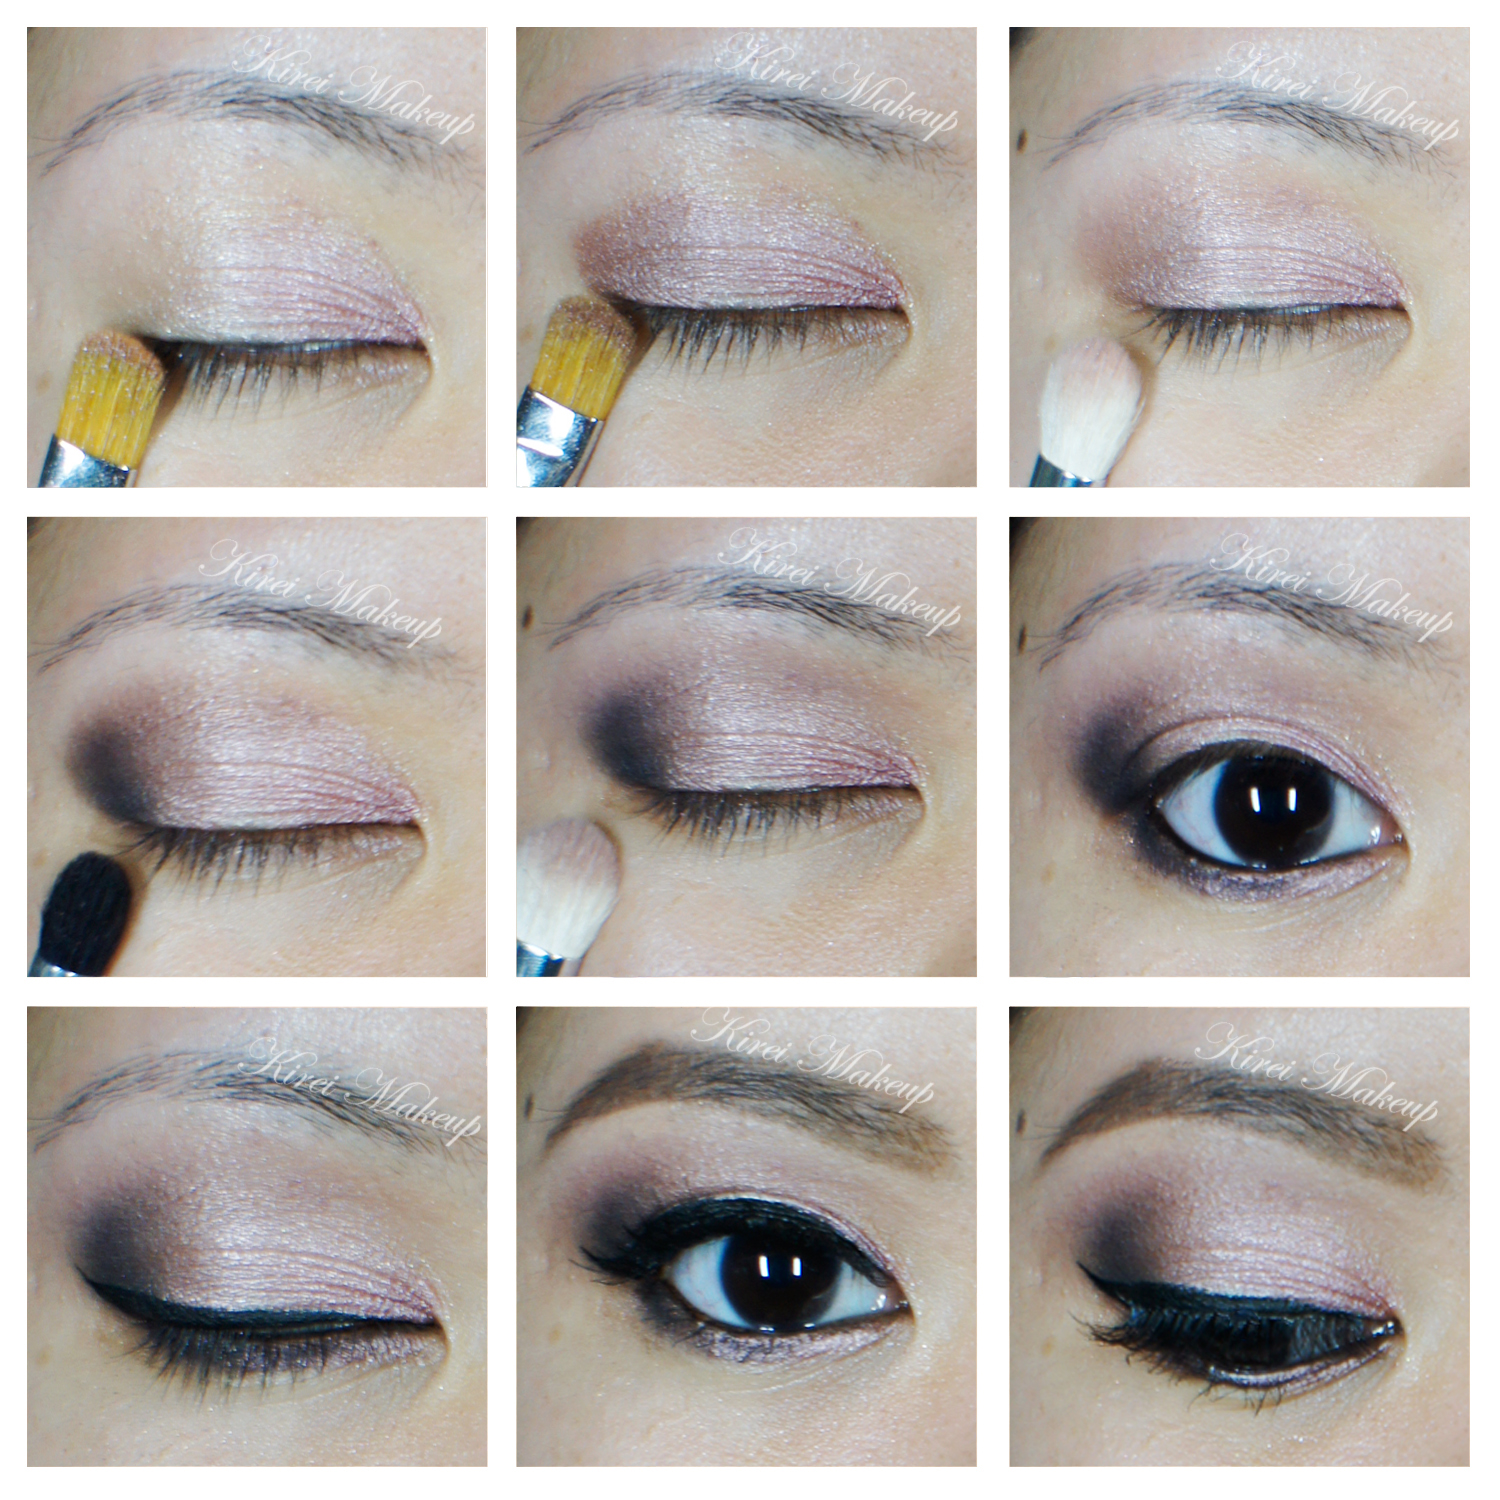
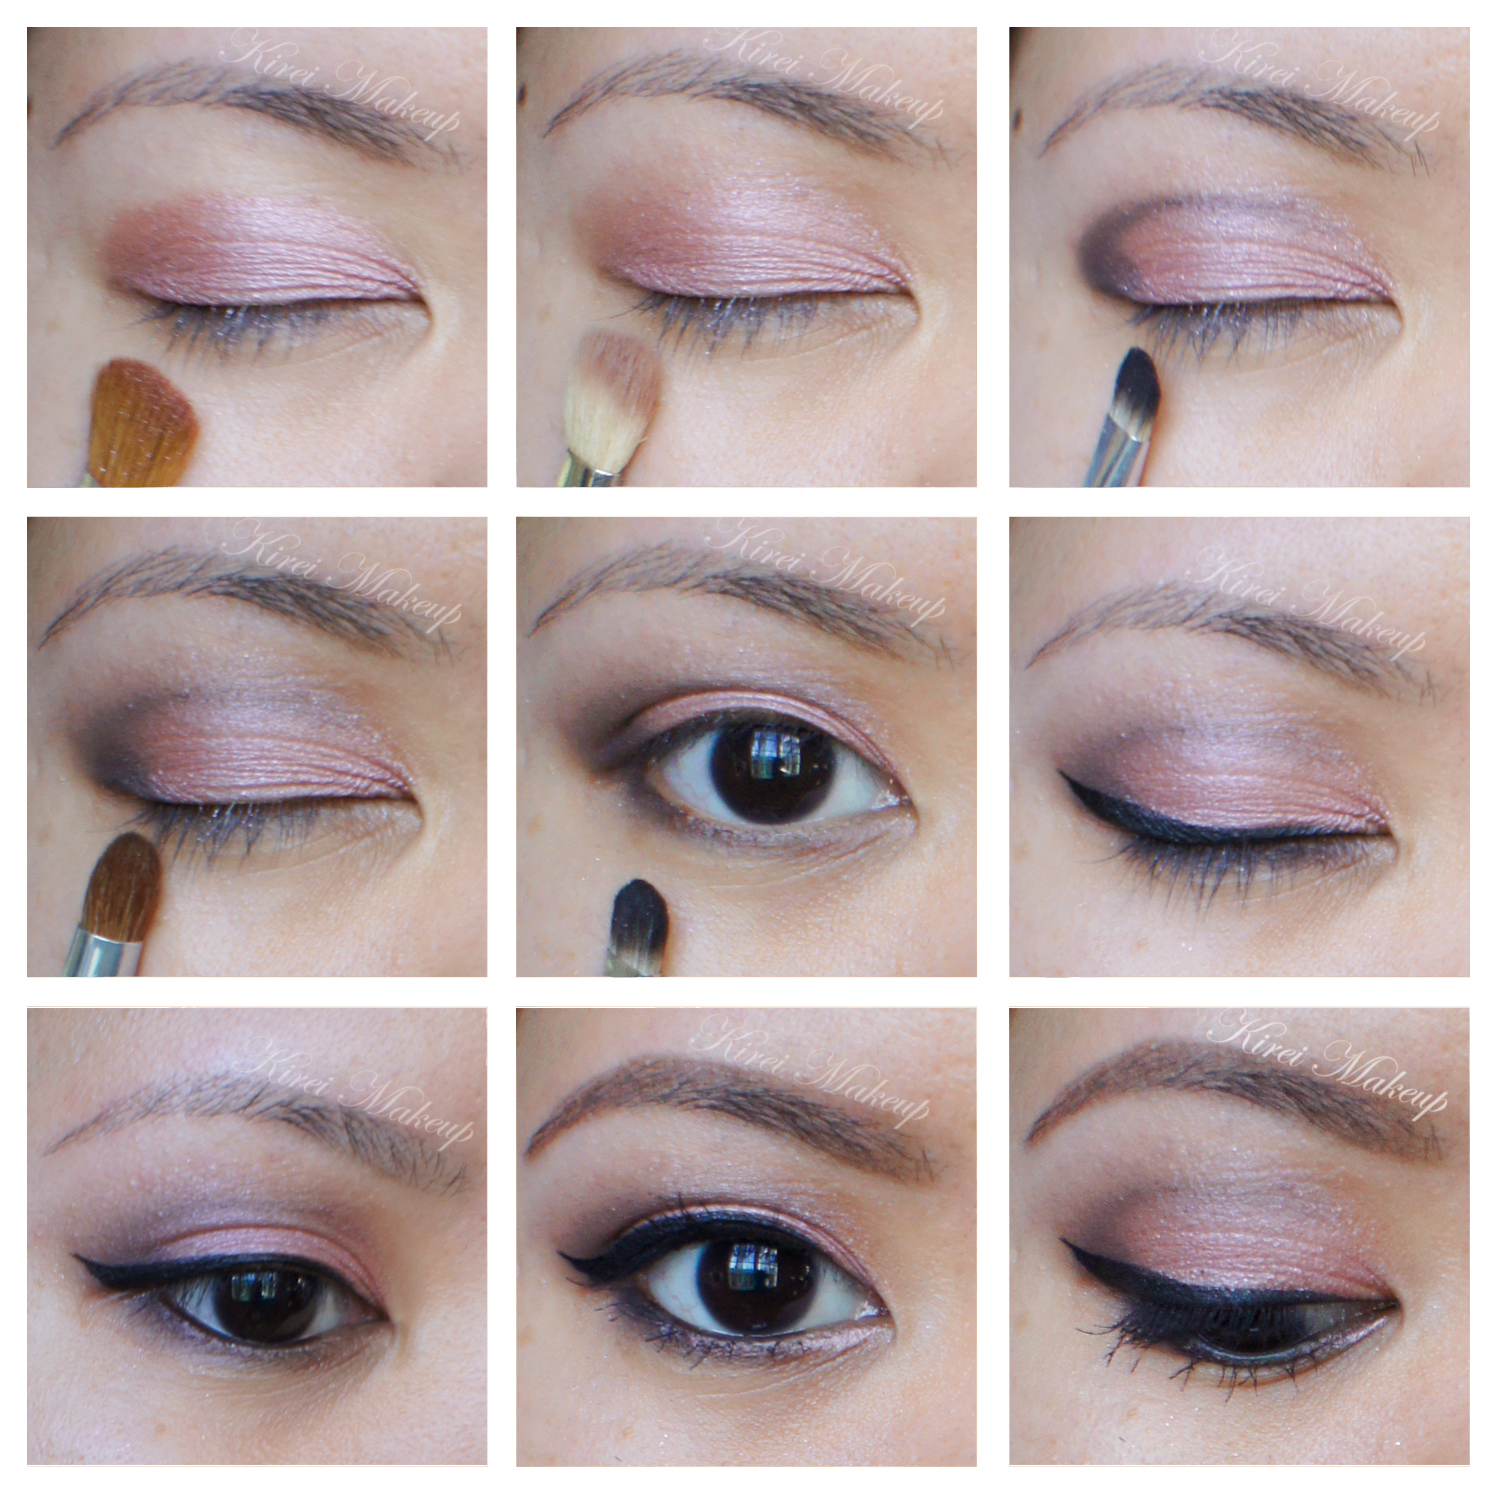
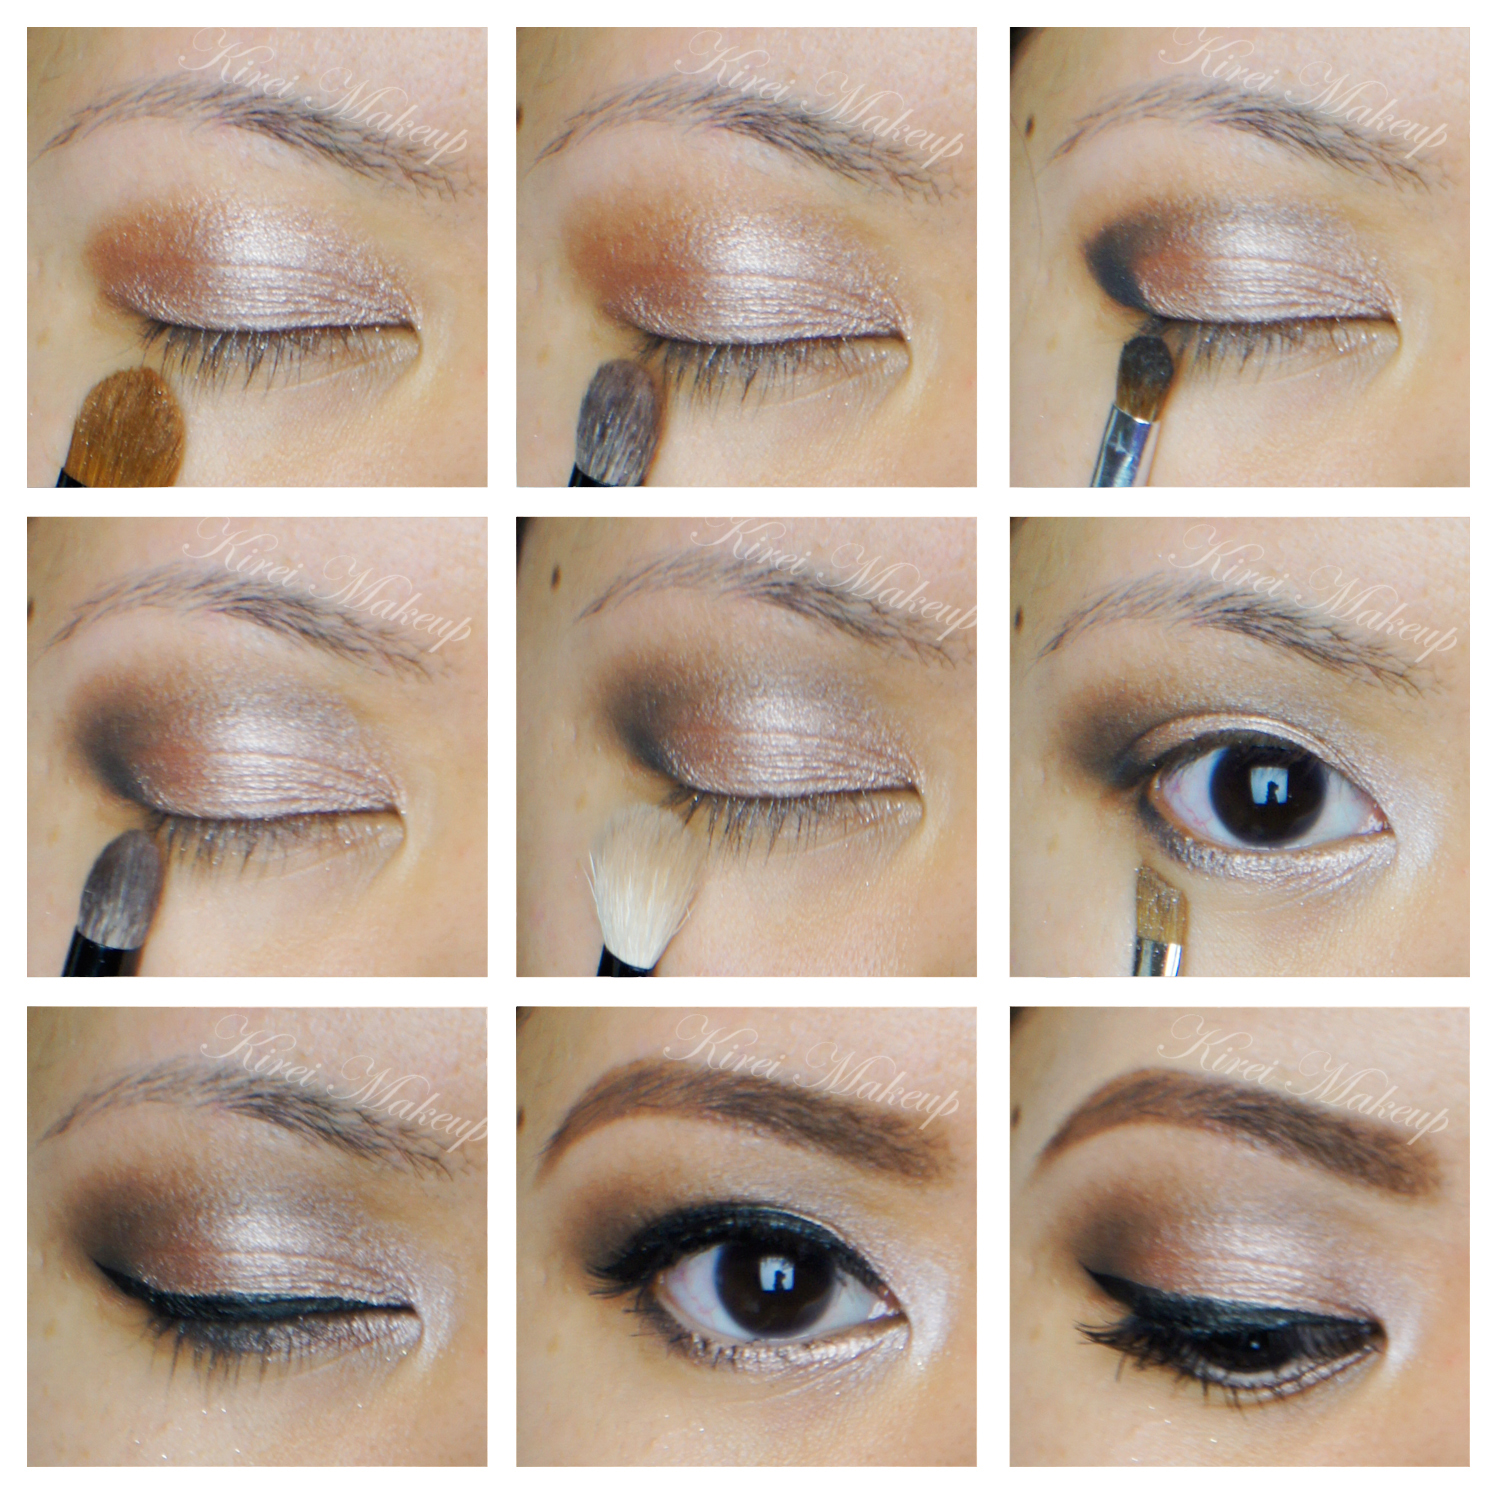
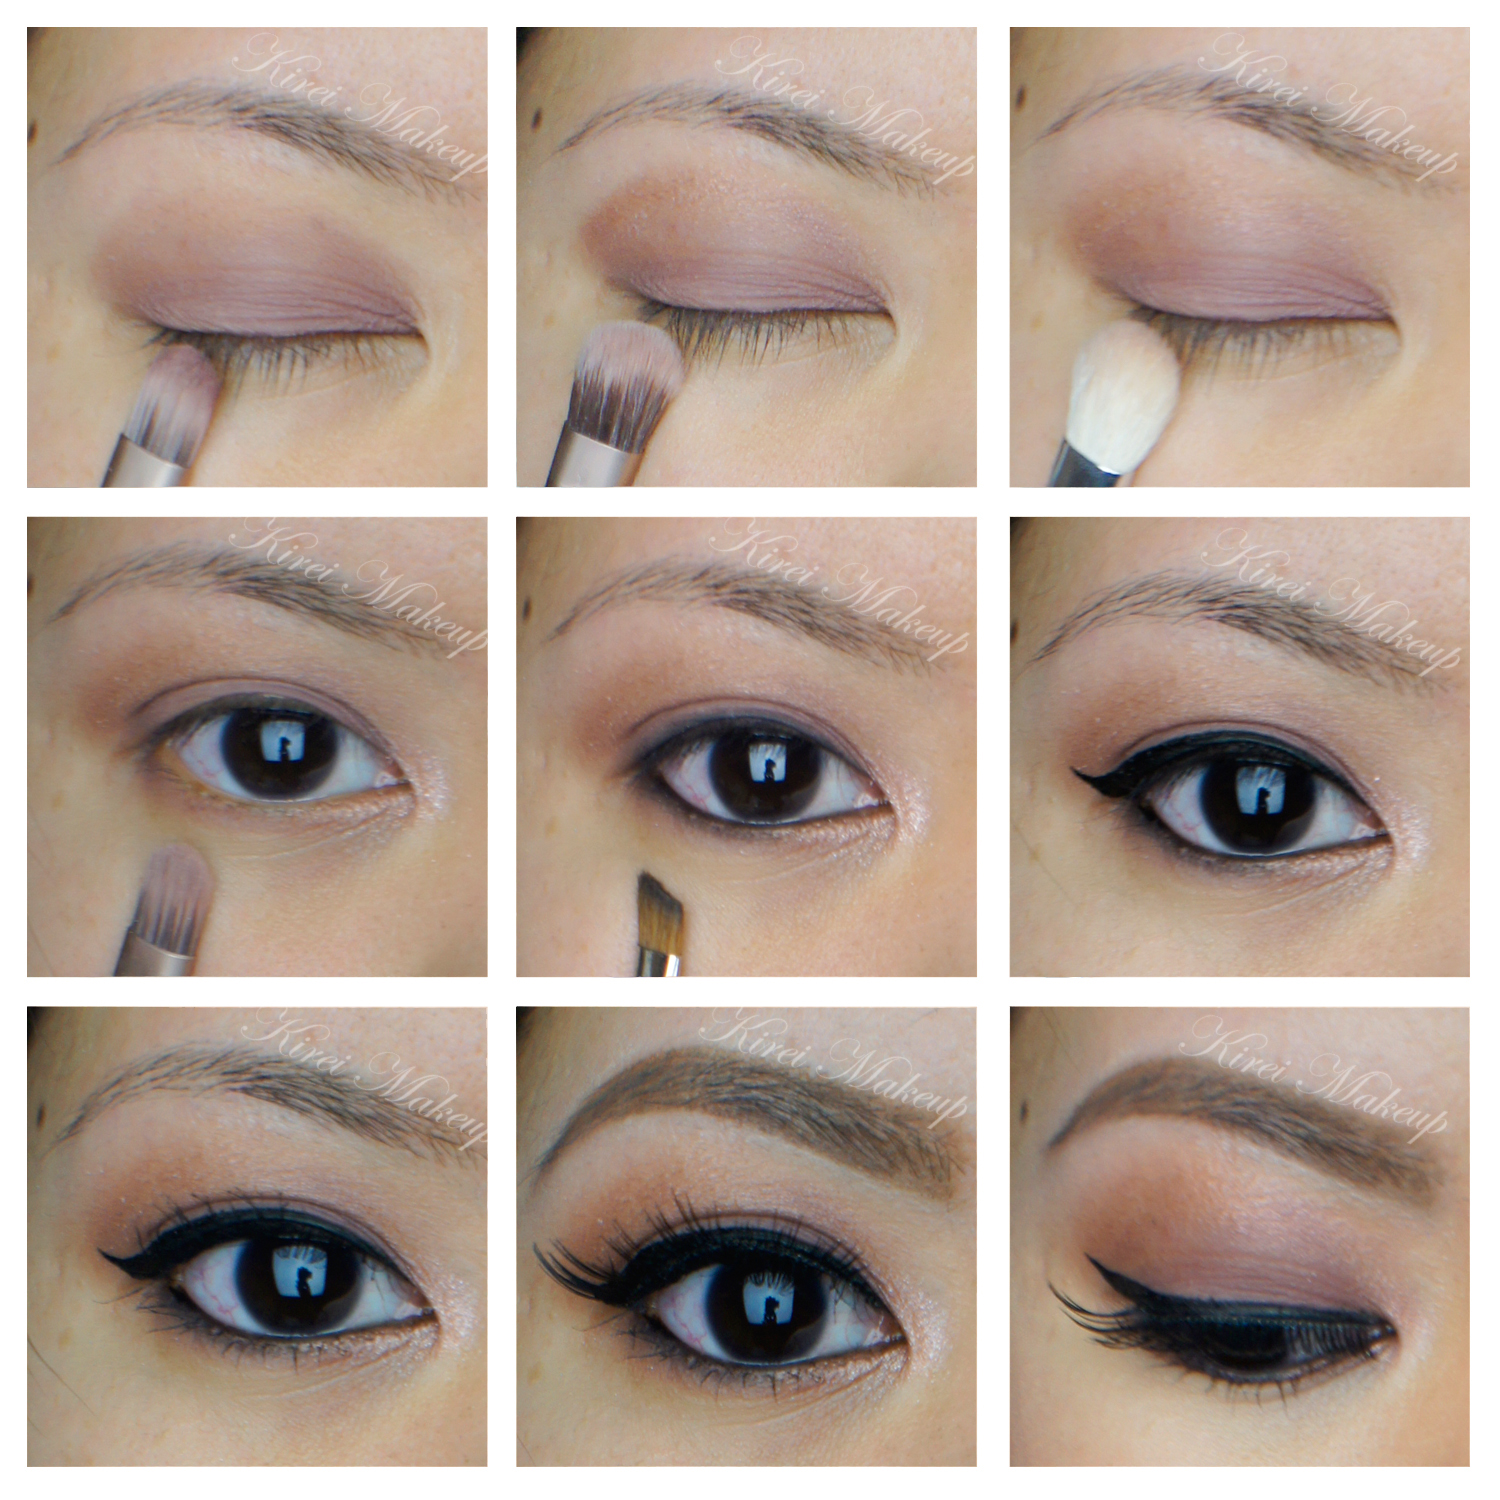
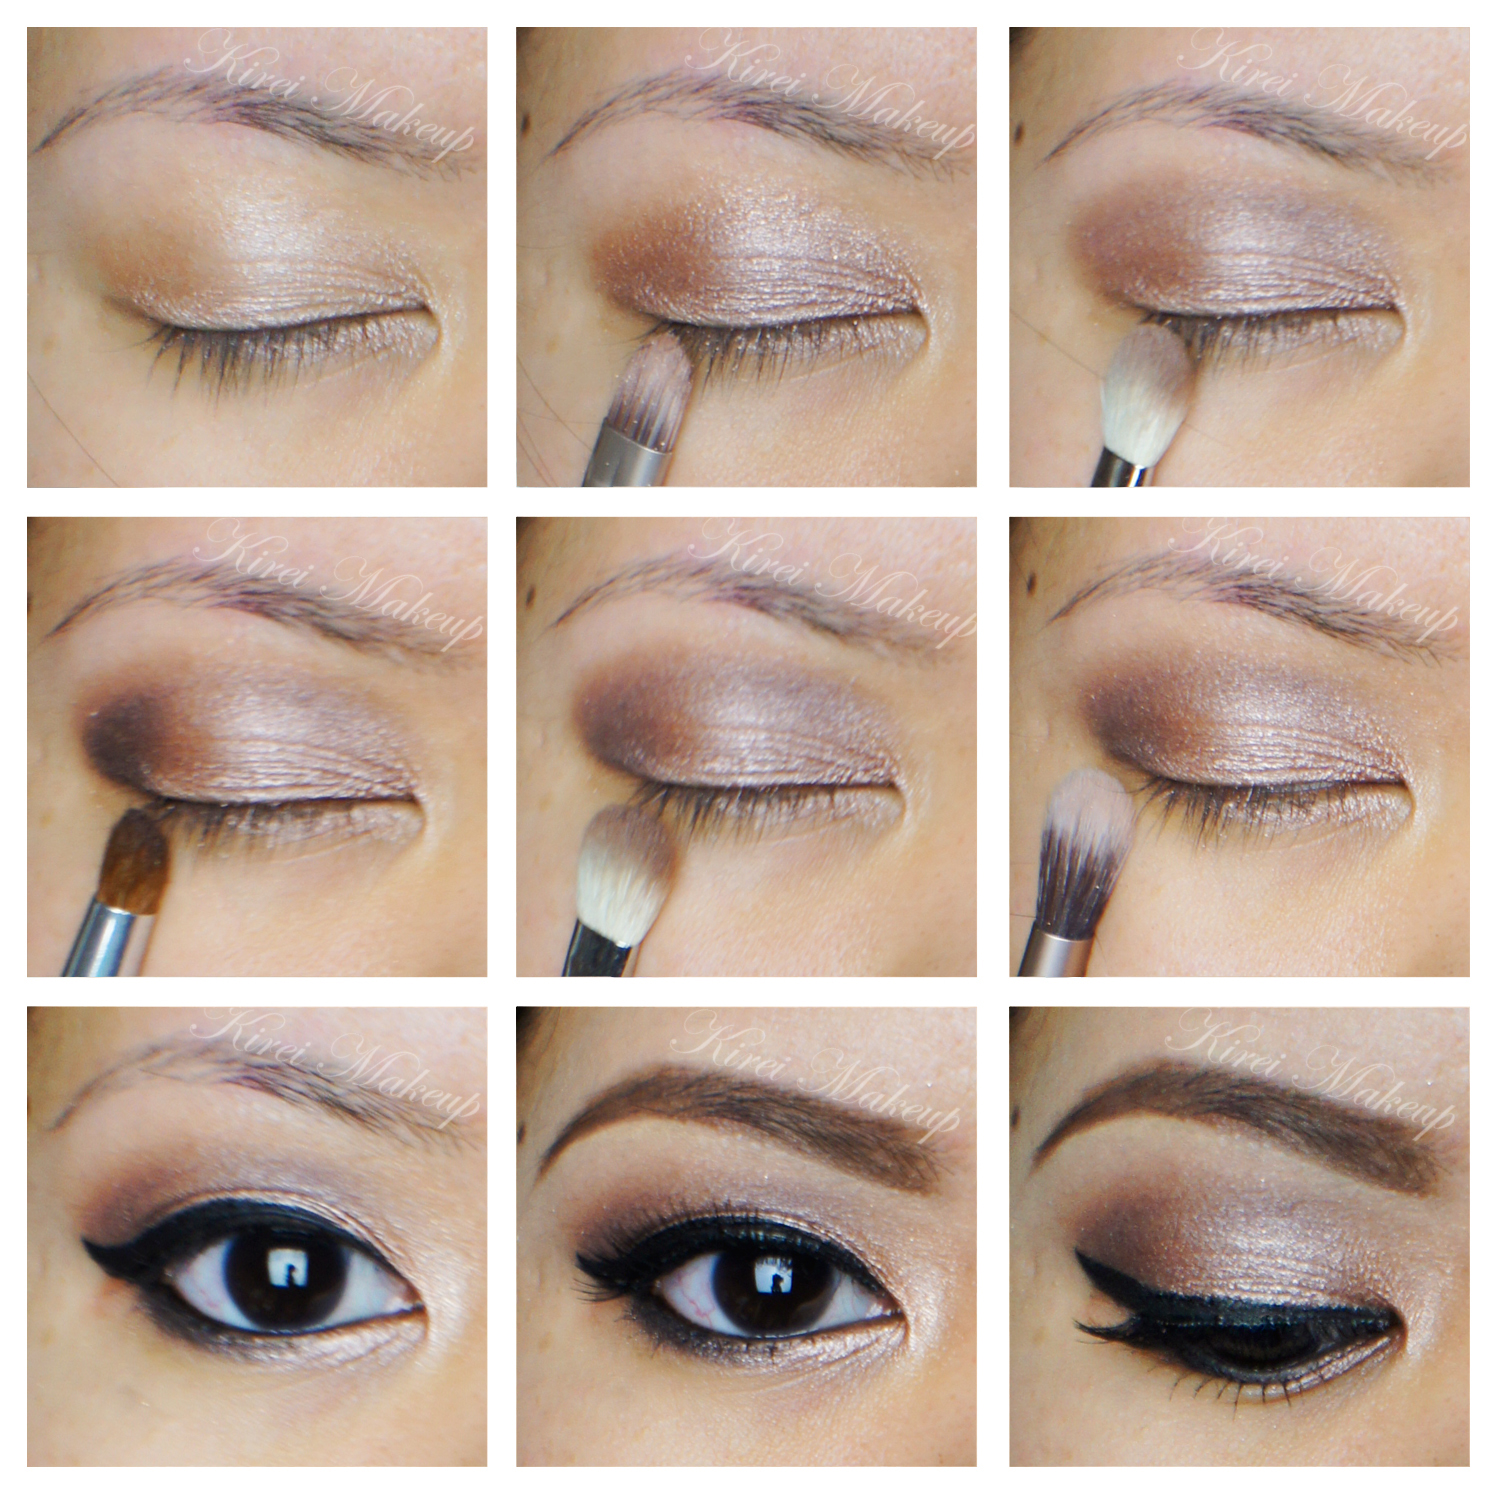
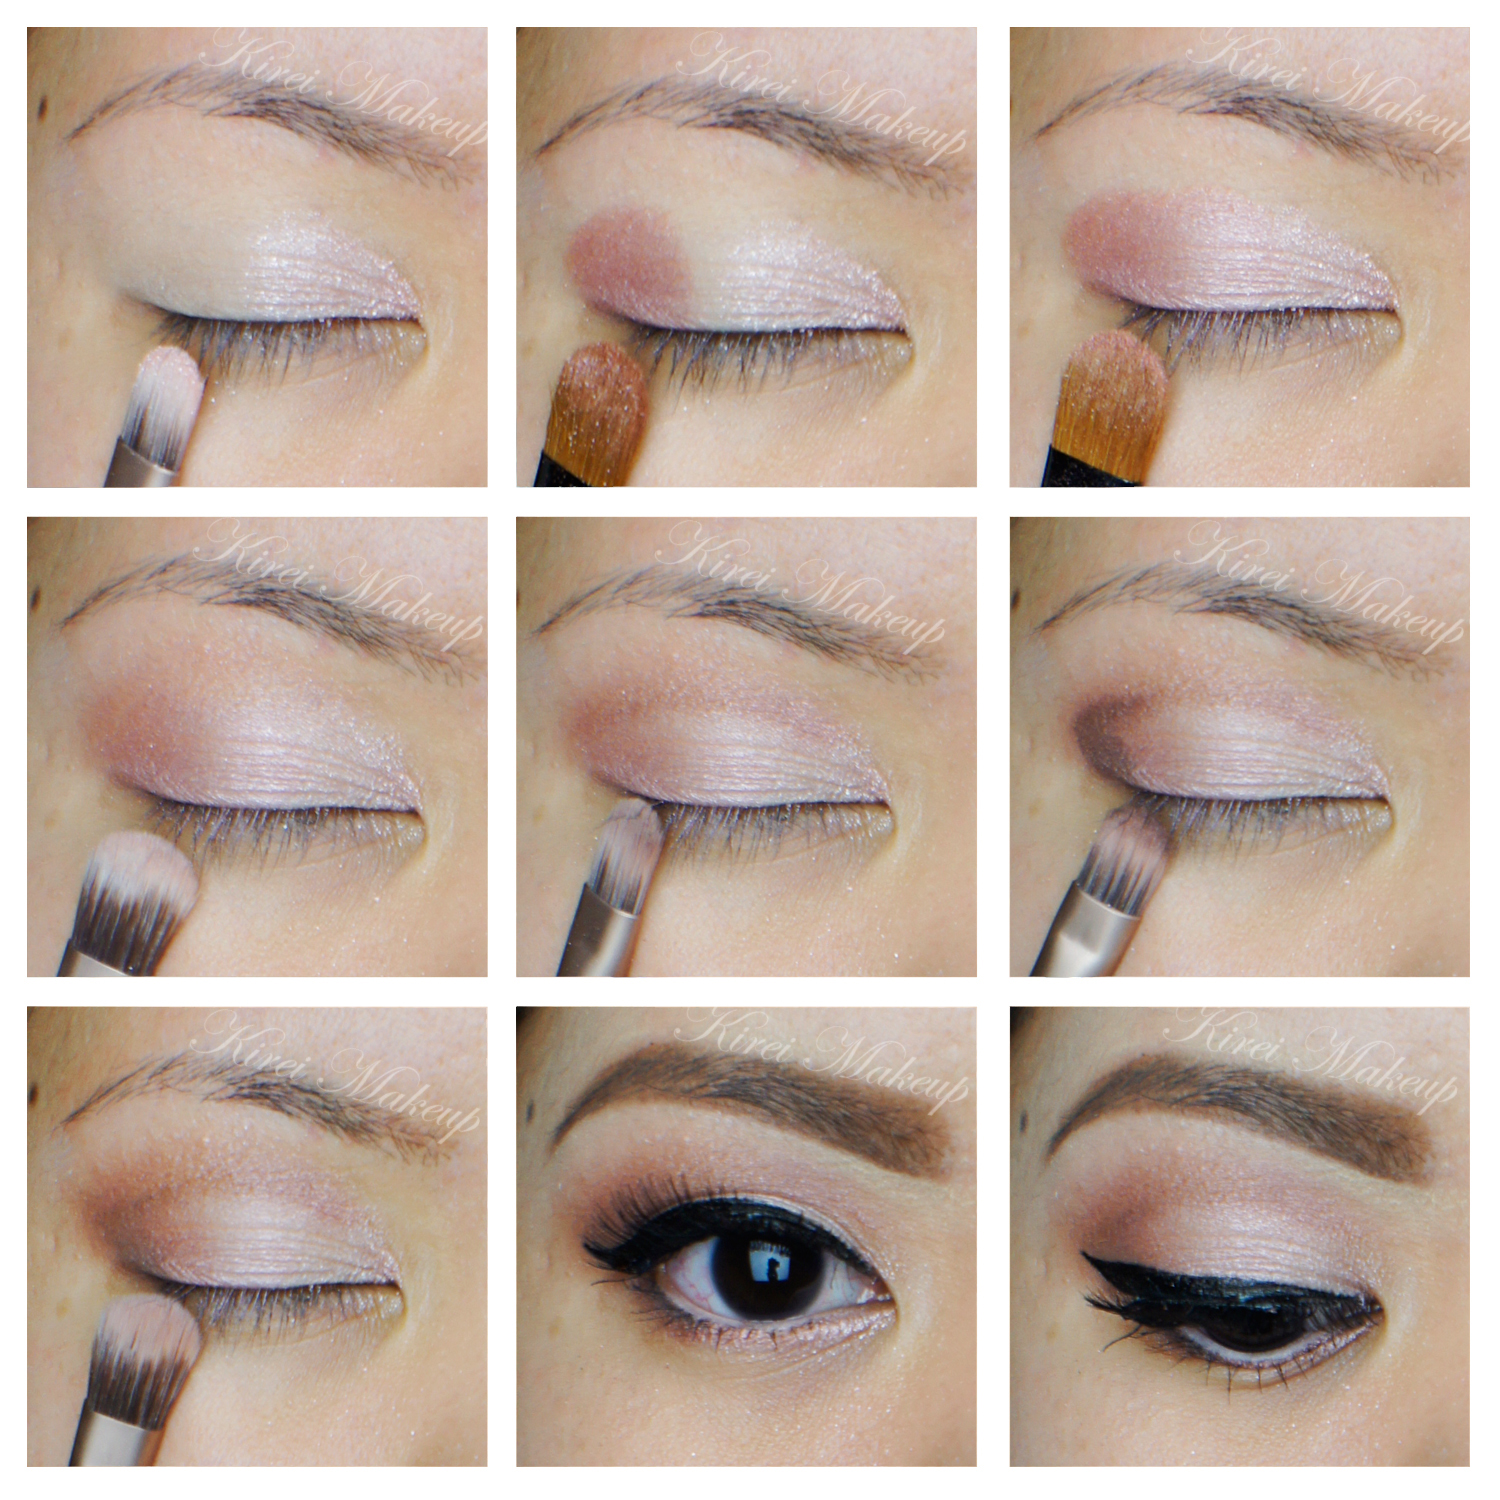
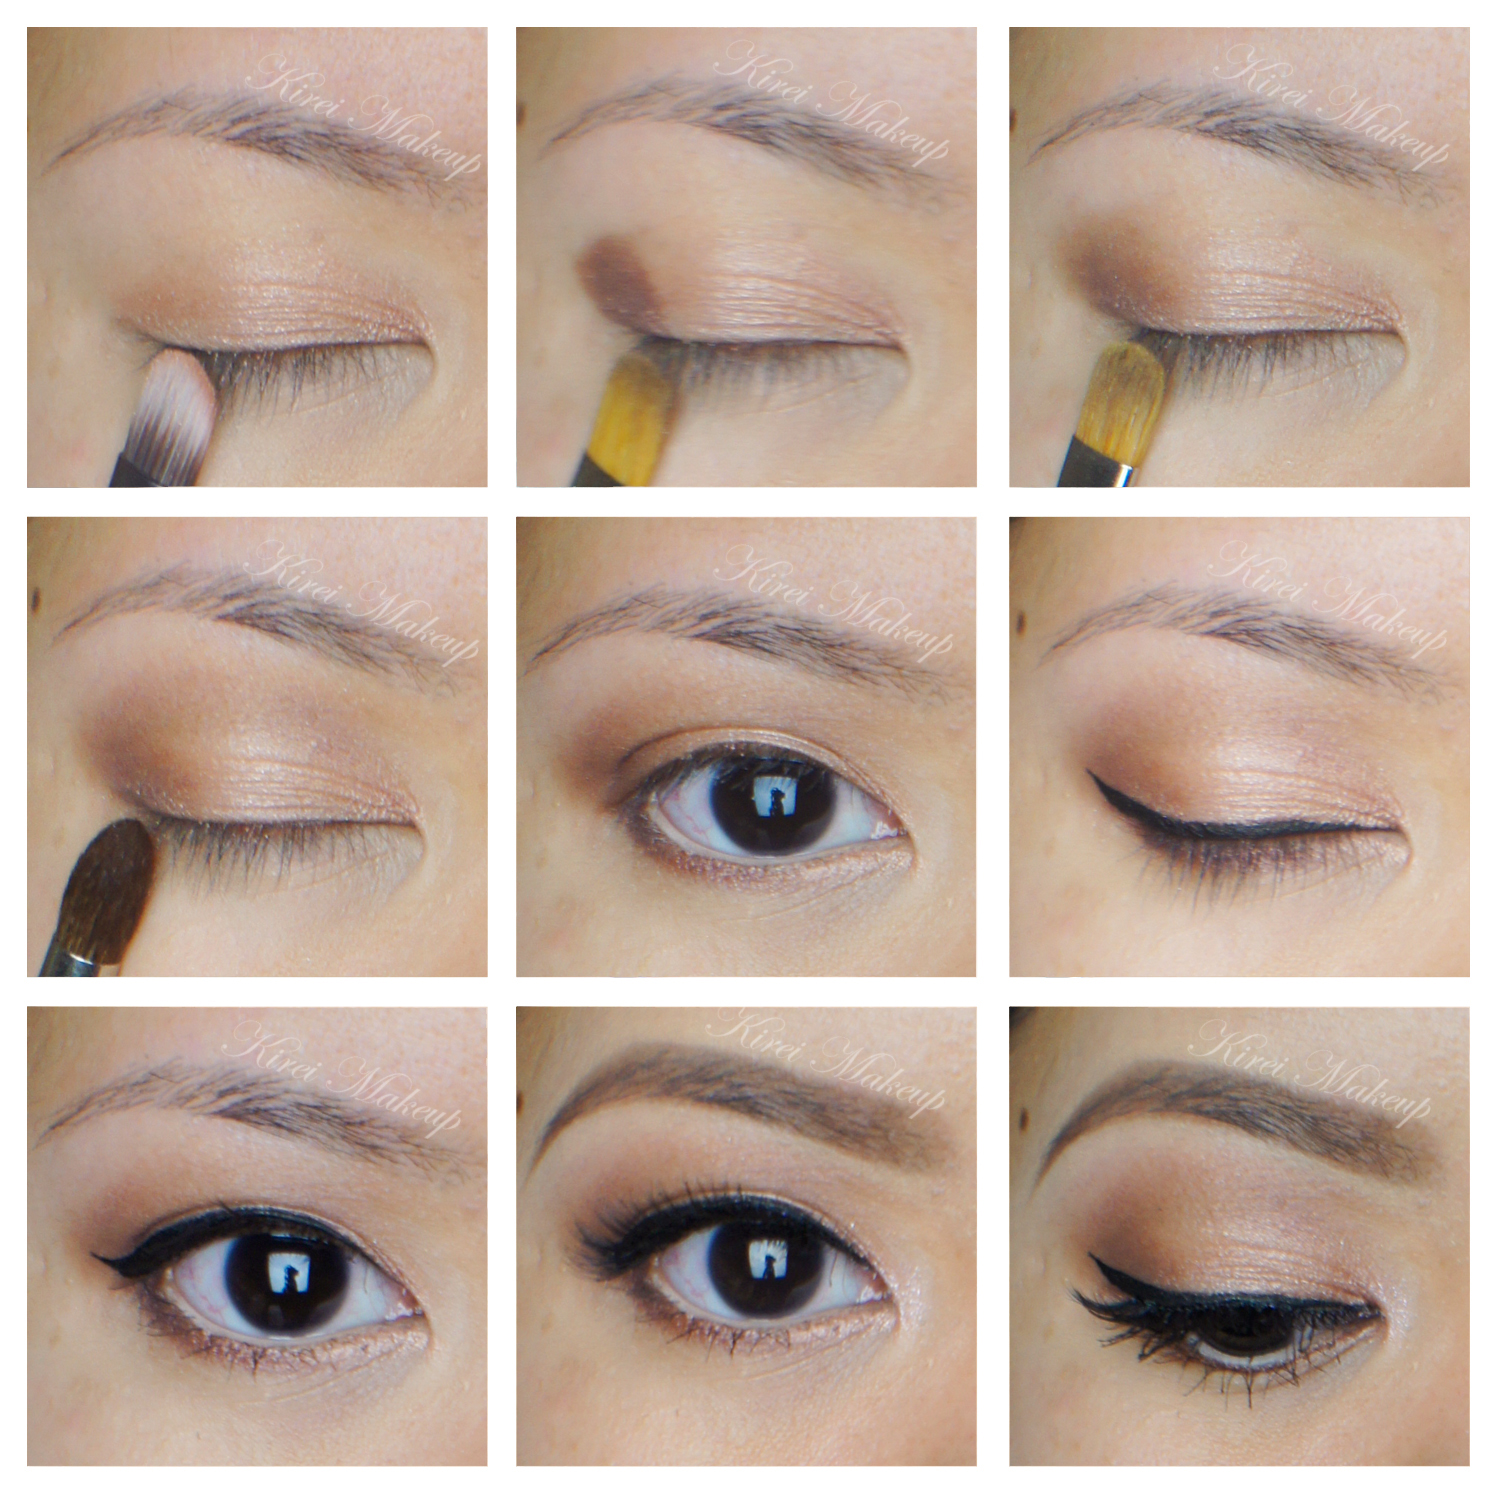
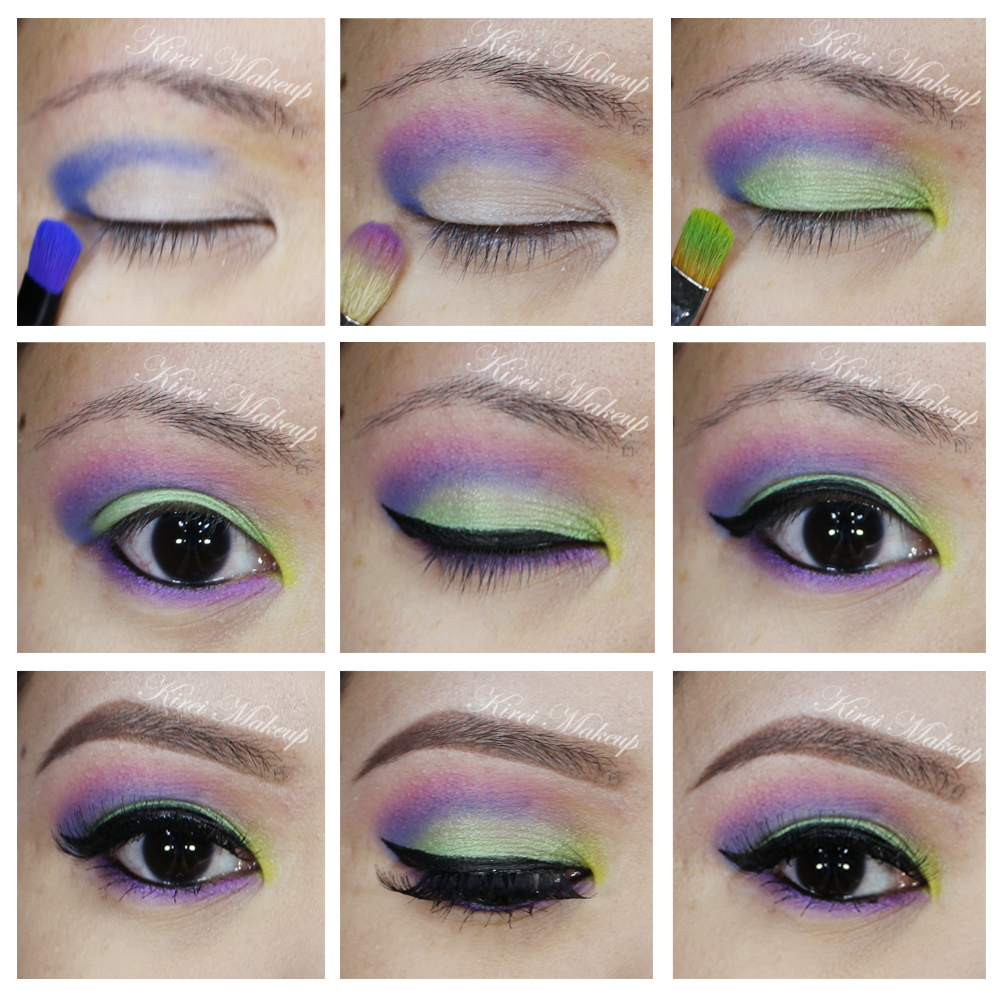
1. I prepped my lids using NYX Milk Jumbo Eyeshadow pencil. Then, using the brush that came with the palette, I applied  Chaos on the outer V and the crease.

2. Using a blending brush, I applied Savage just slightly above Chaos.

3. Using a flat eyeshadow brush, I applied Freak on the eyelid, and Thrash on the inner corner of the lid.

4. On the lower lid, I applied Urban using a the small shader brush that came with the palette.

5. I lined my waterline using L’oreal Voluminous Smoldering Eyeliner.

6. On the upper lash line, I applied a winged eyeliner using Kanebo Kate Super Sharp eyeliner.

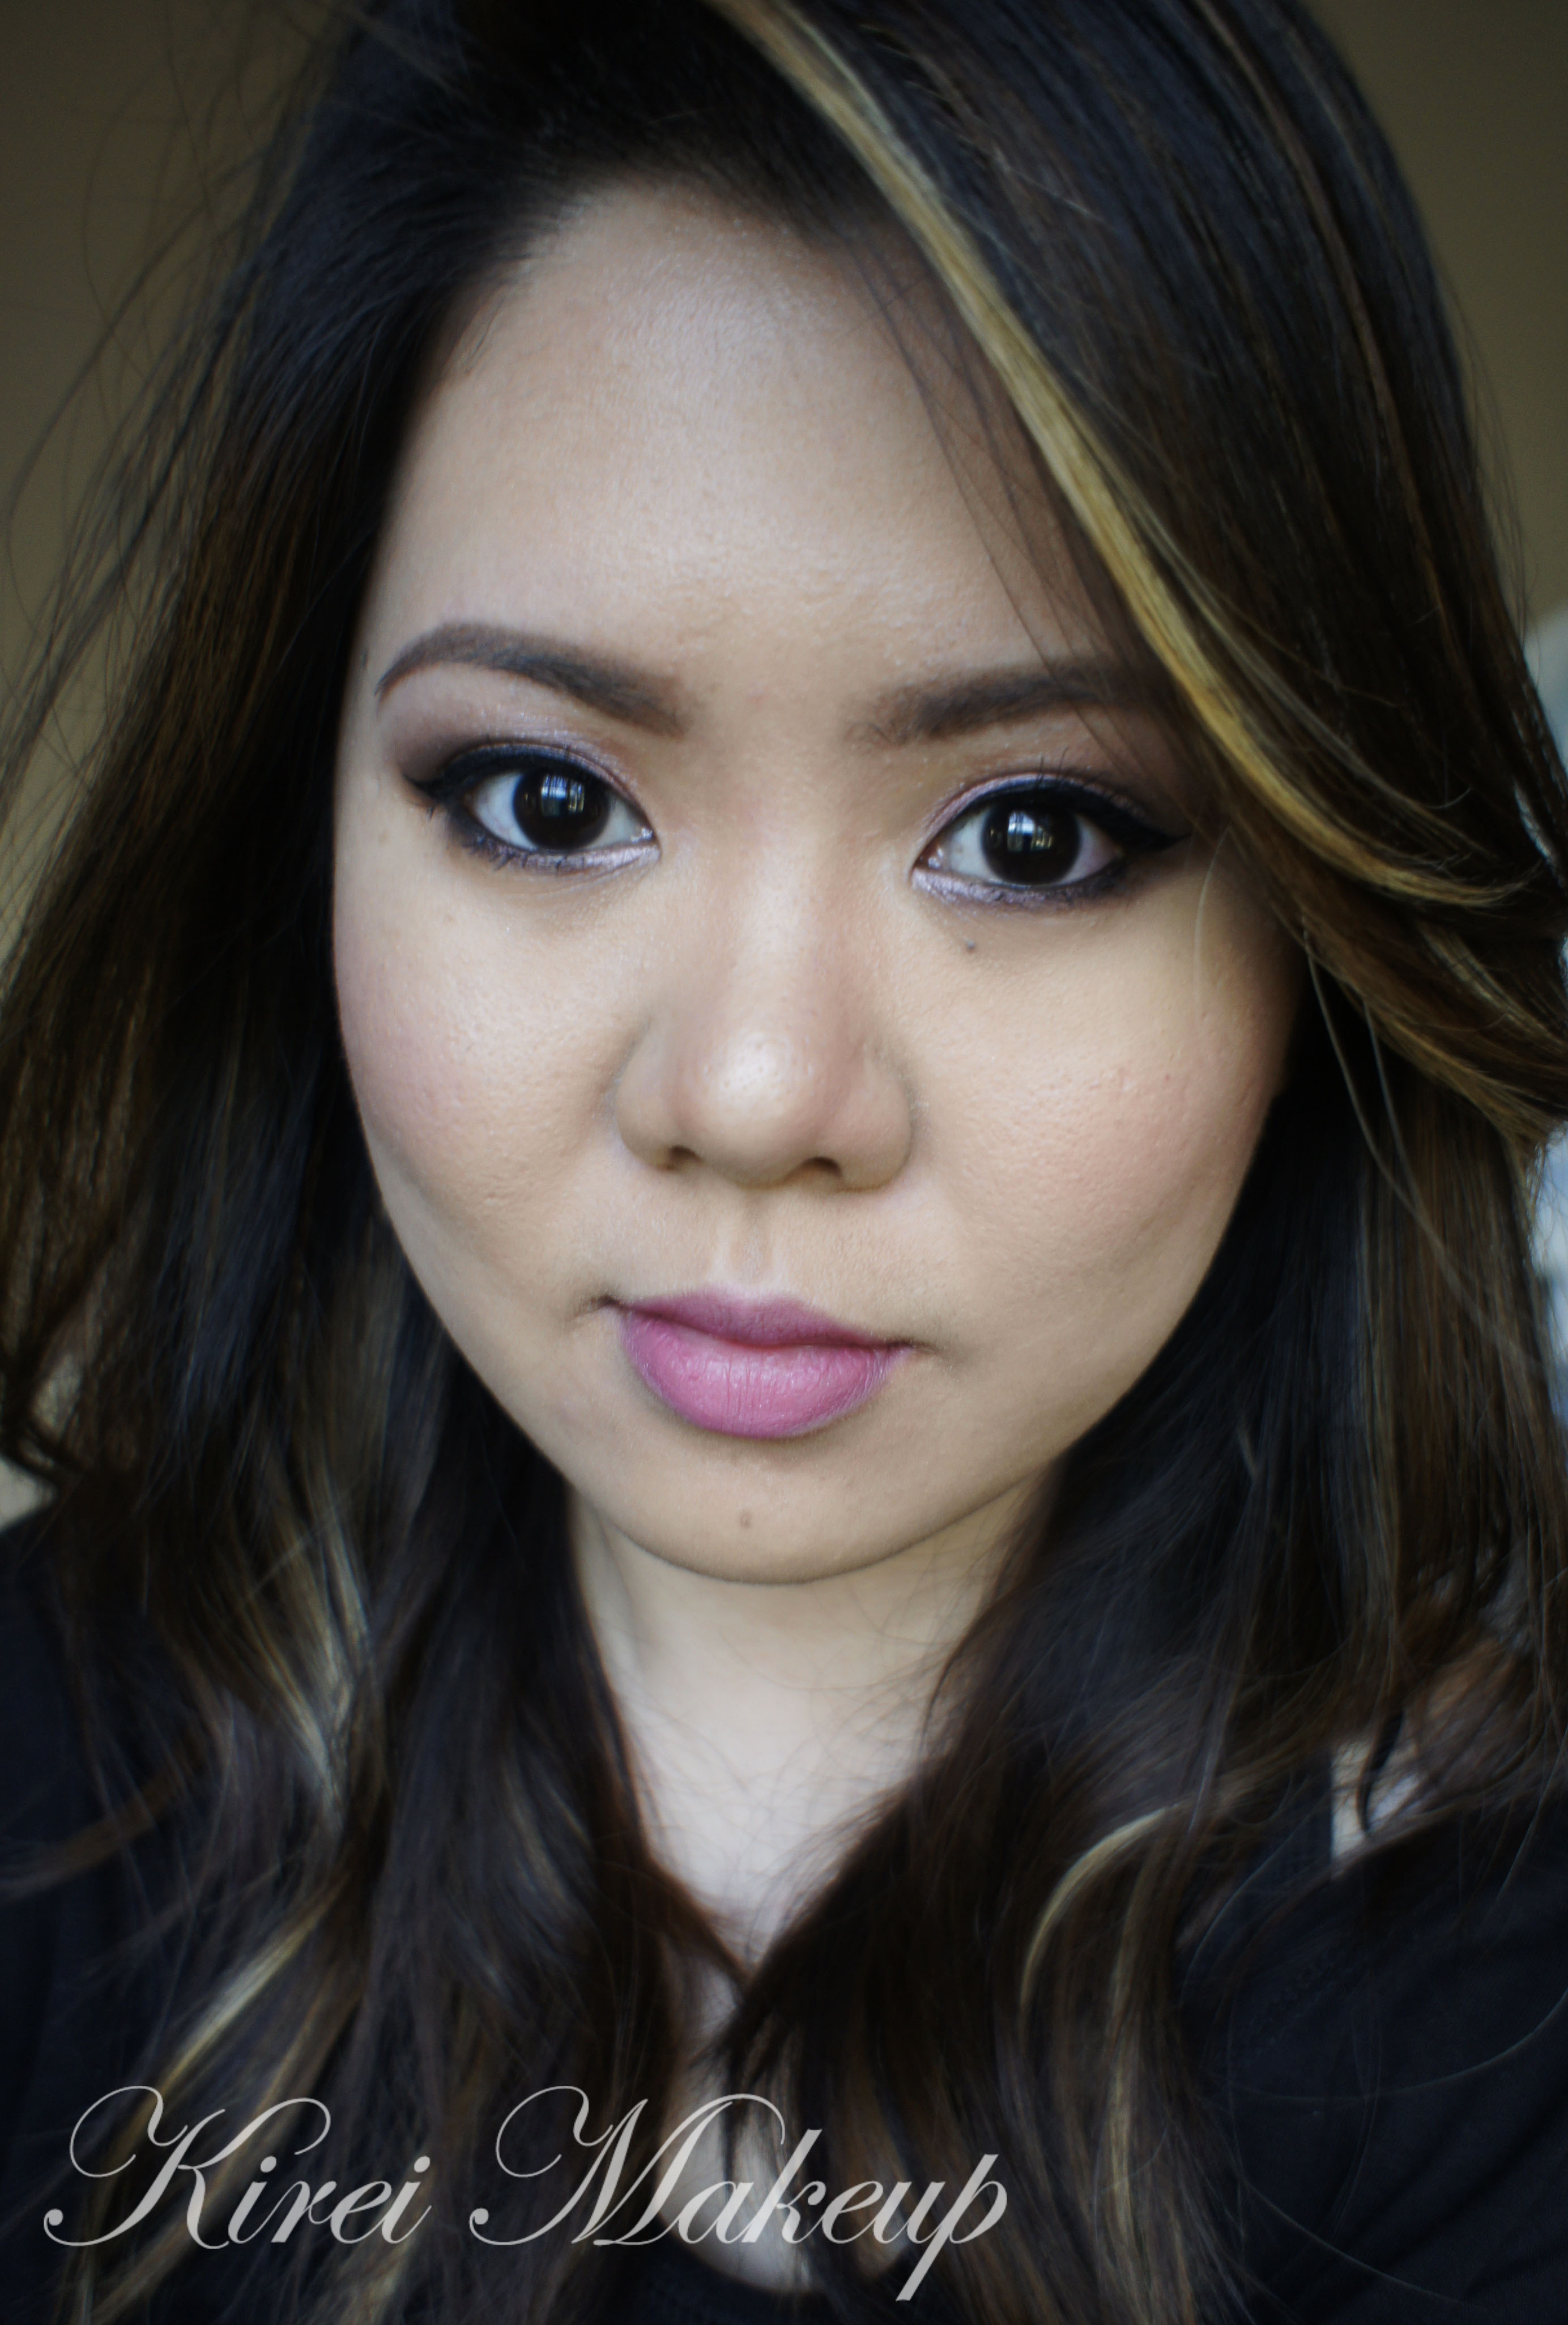
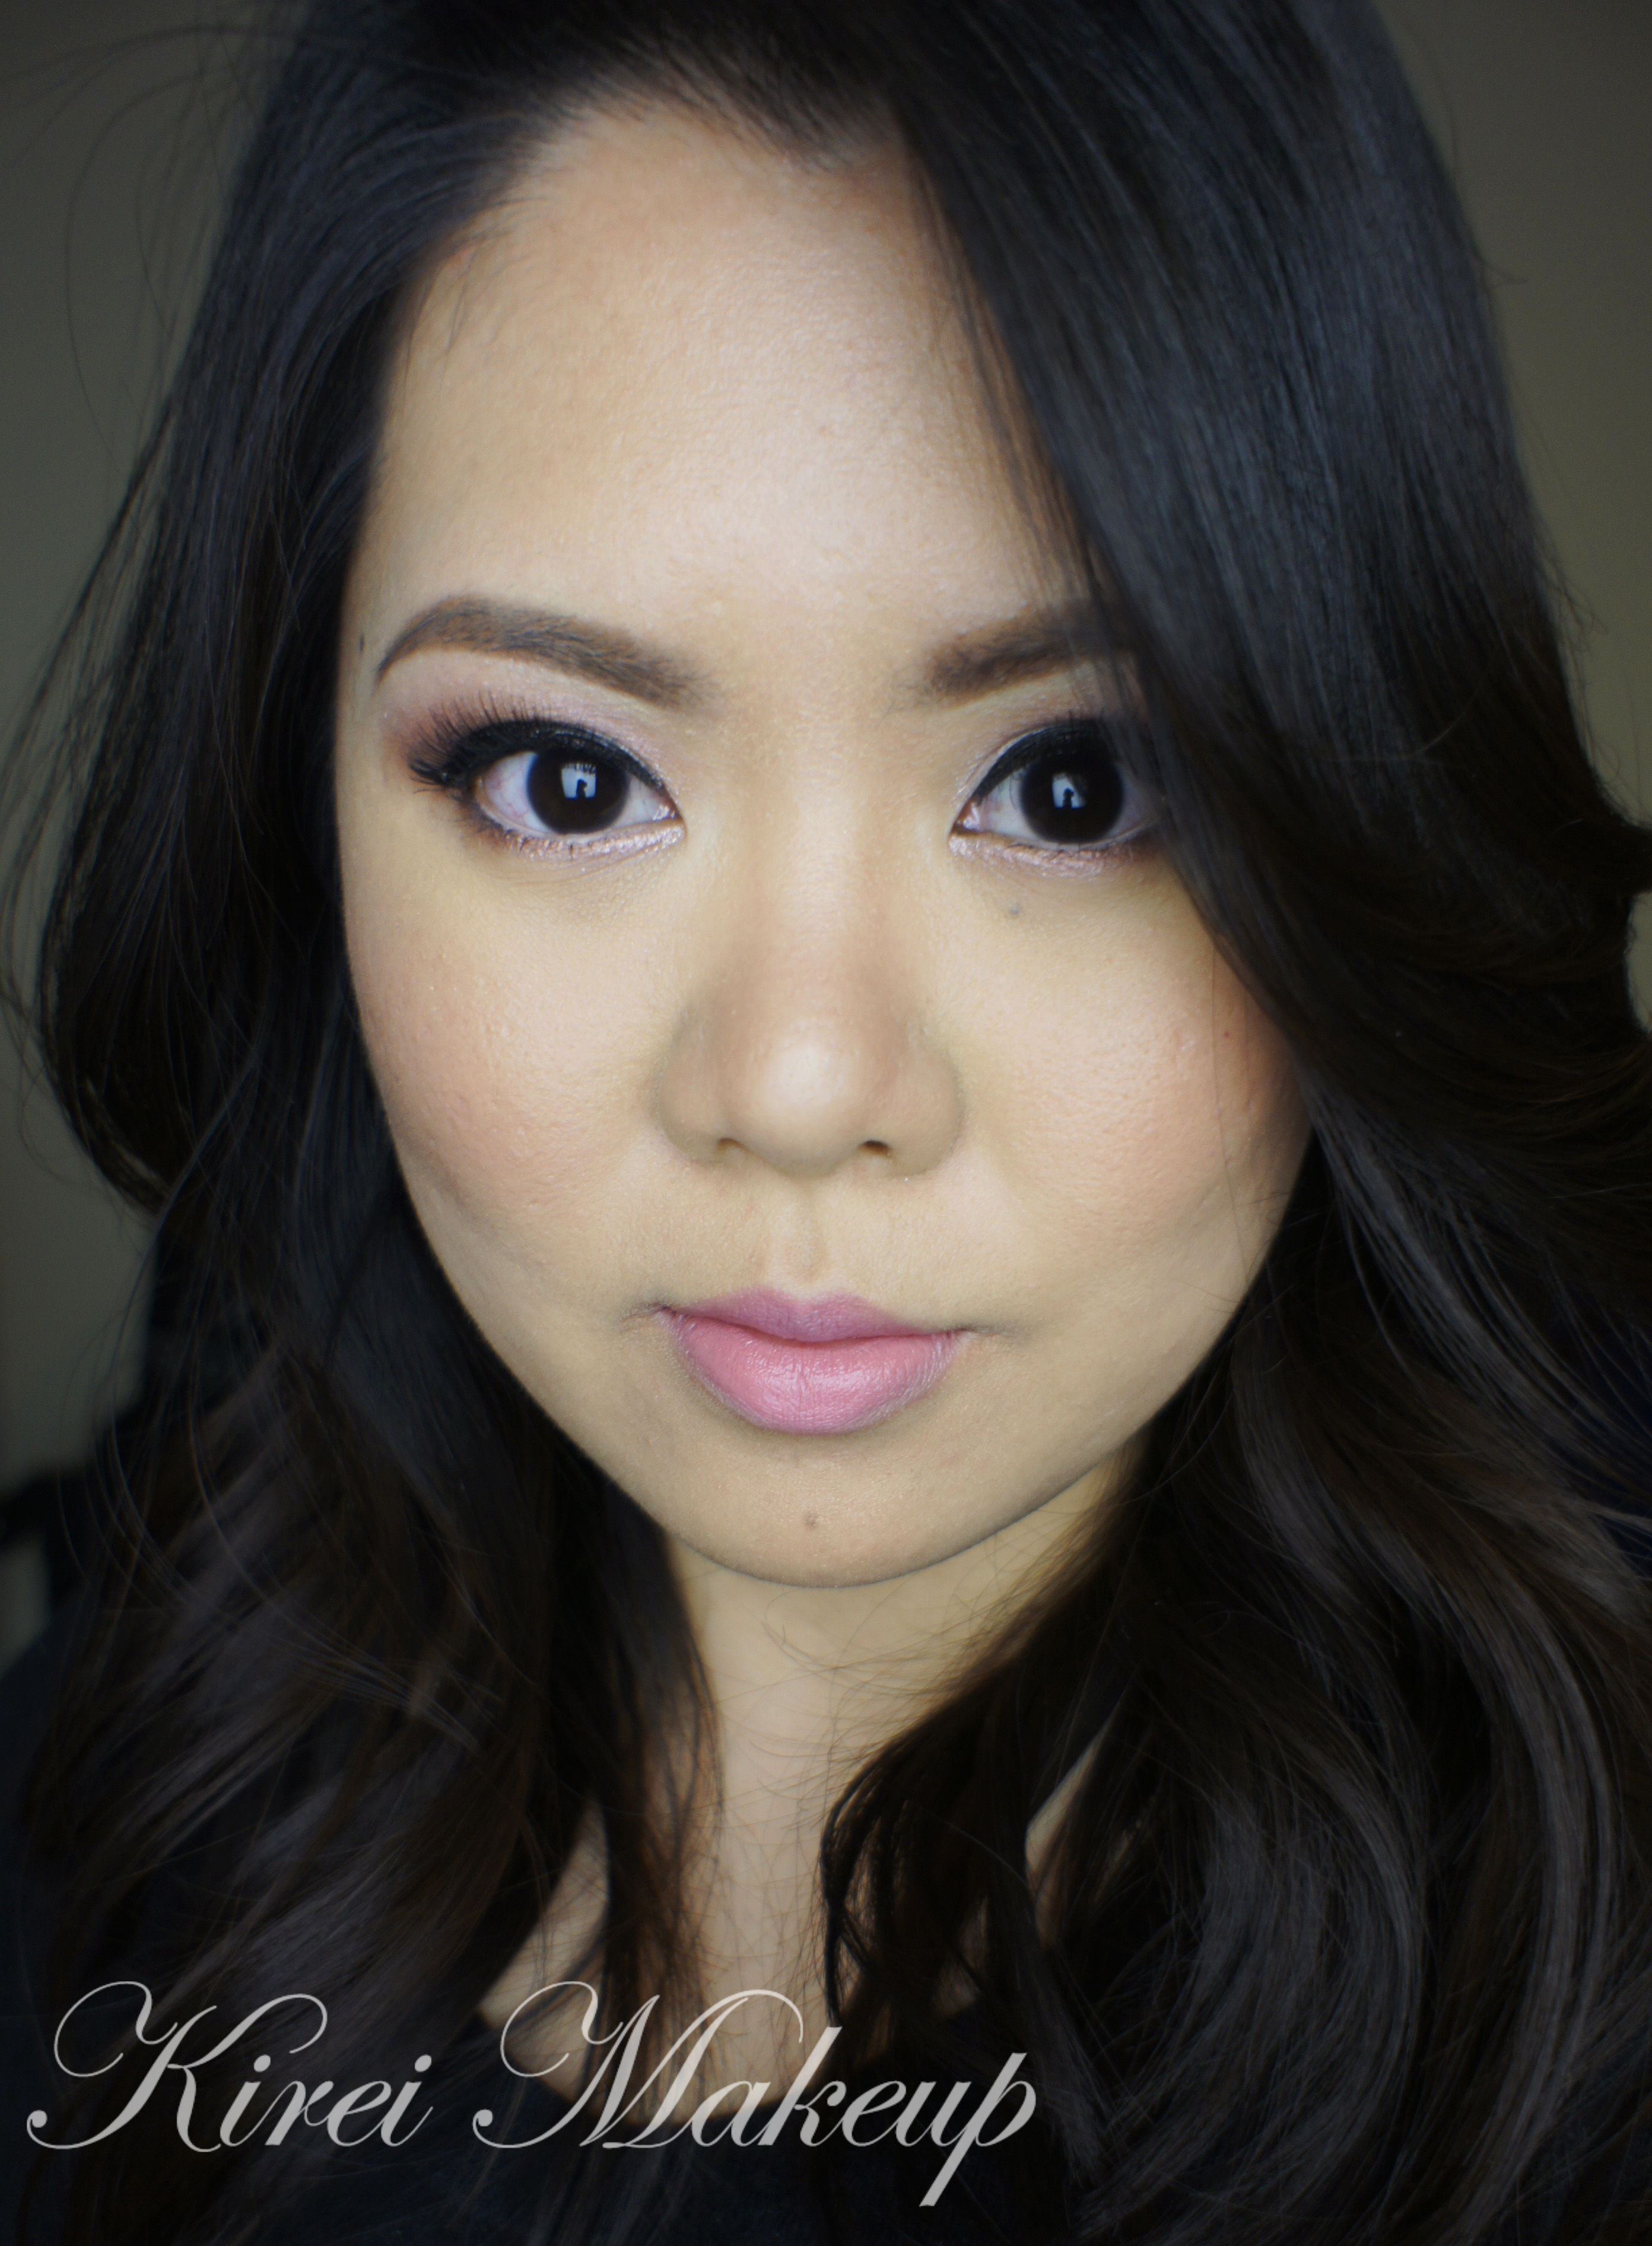
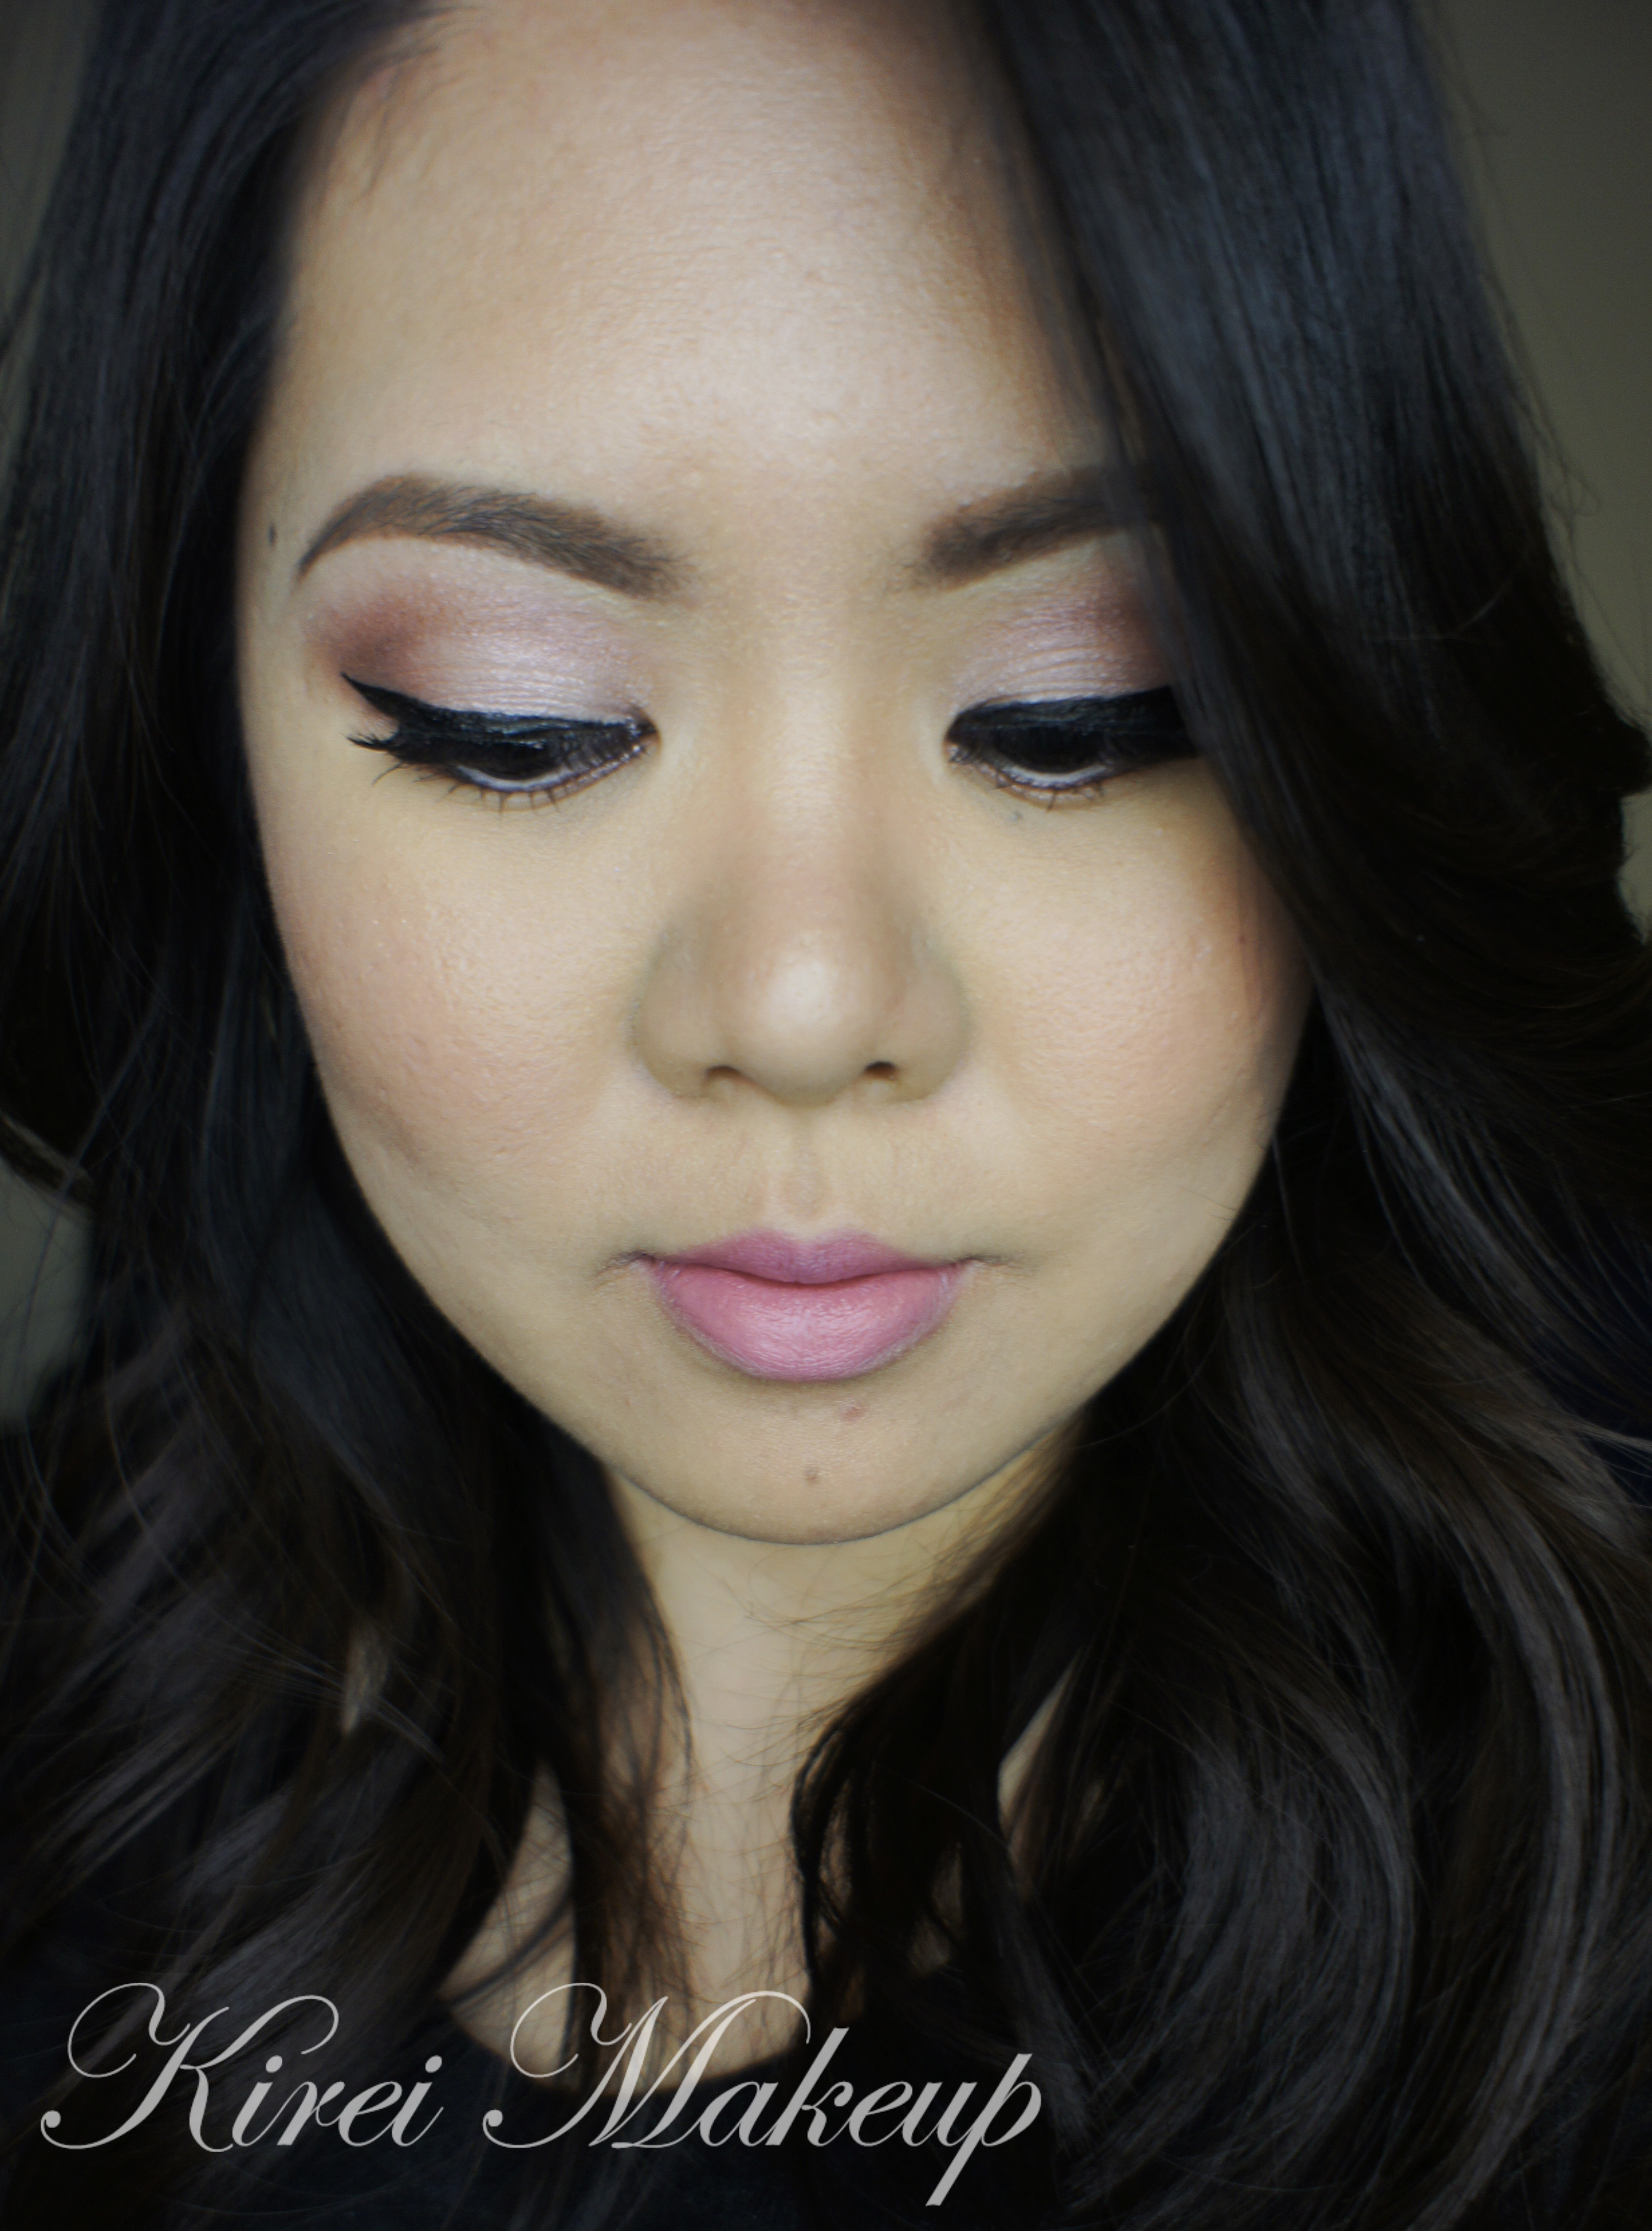
7. I curled my lashes, and applied a sample mascara from Estee Lauder on both my upper and lower lashes.

8. I also applied Ardell Demi Wispies lashes.

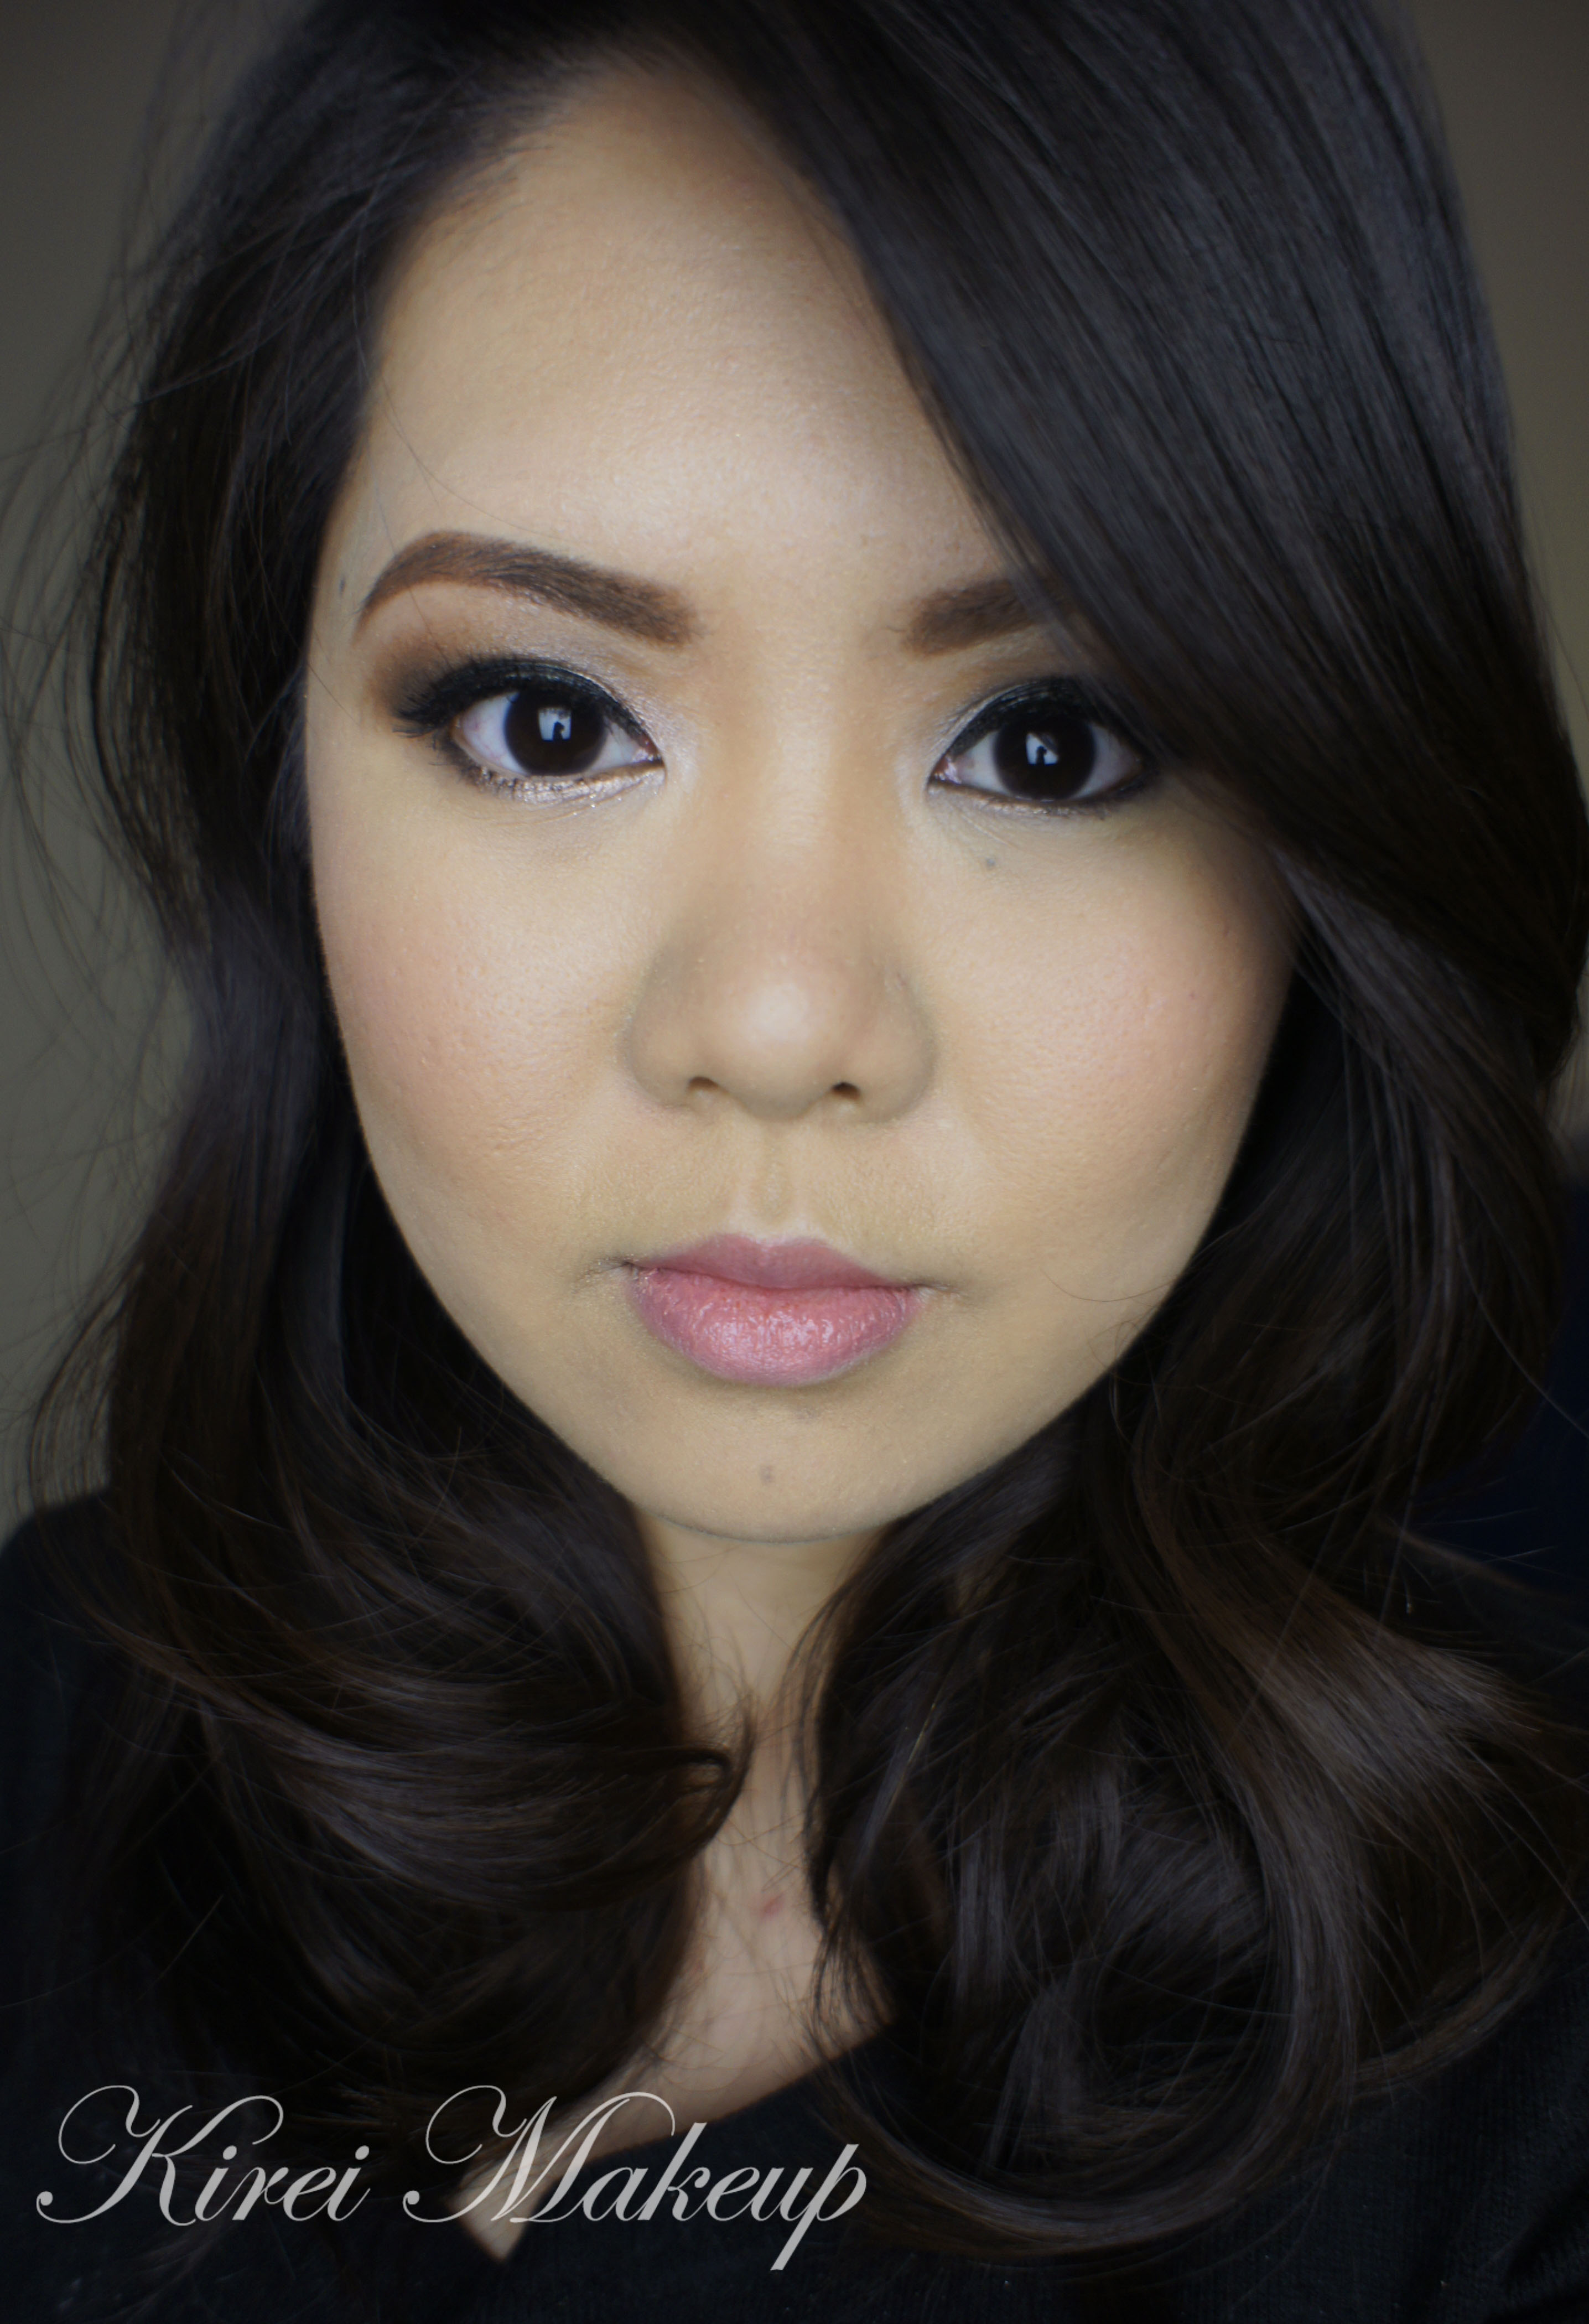
9. I filled my brows using Anastasia Brow Wiz in Medium Ash.
urban decay electric palette

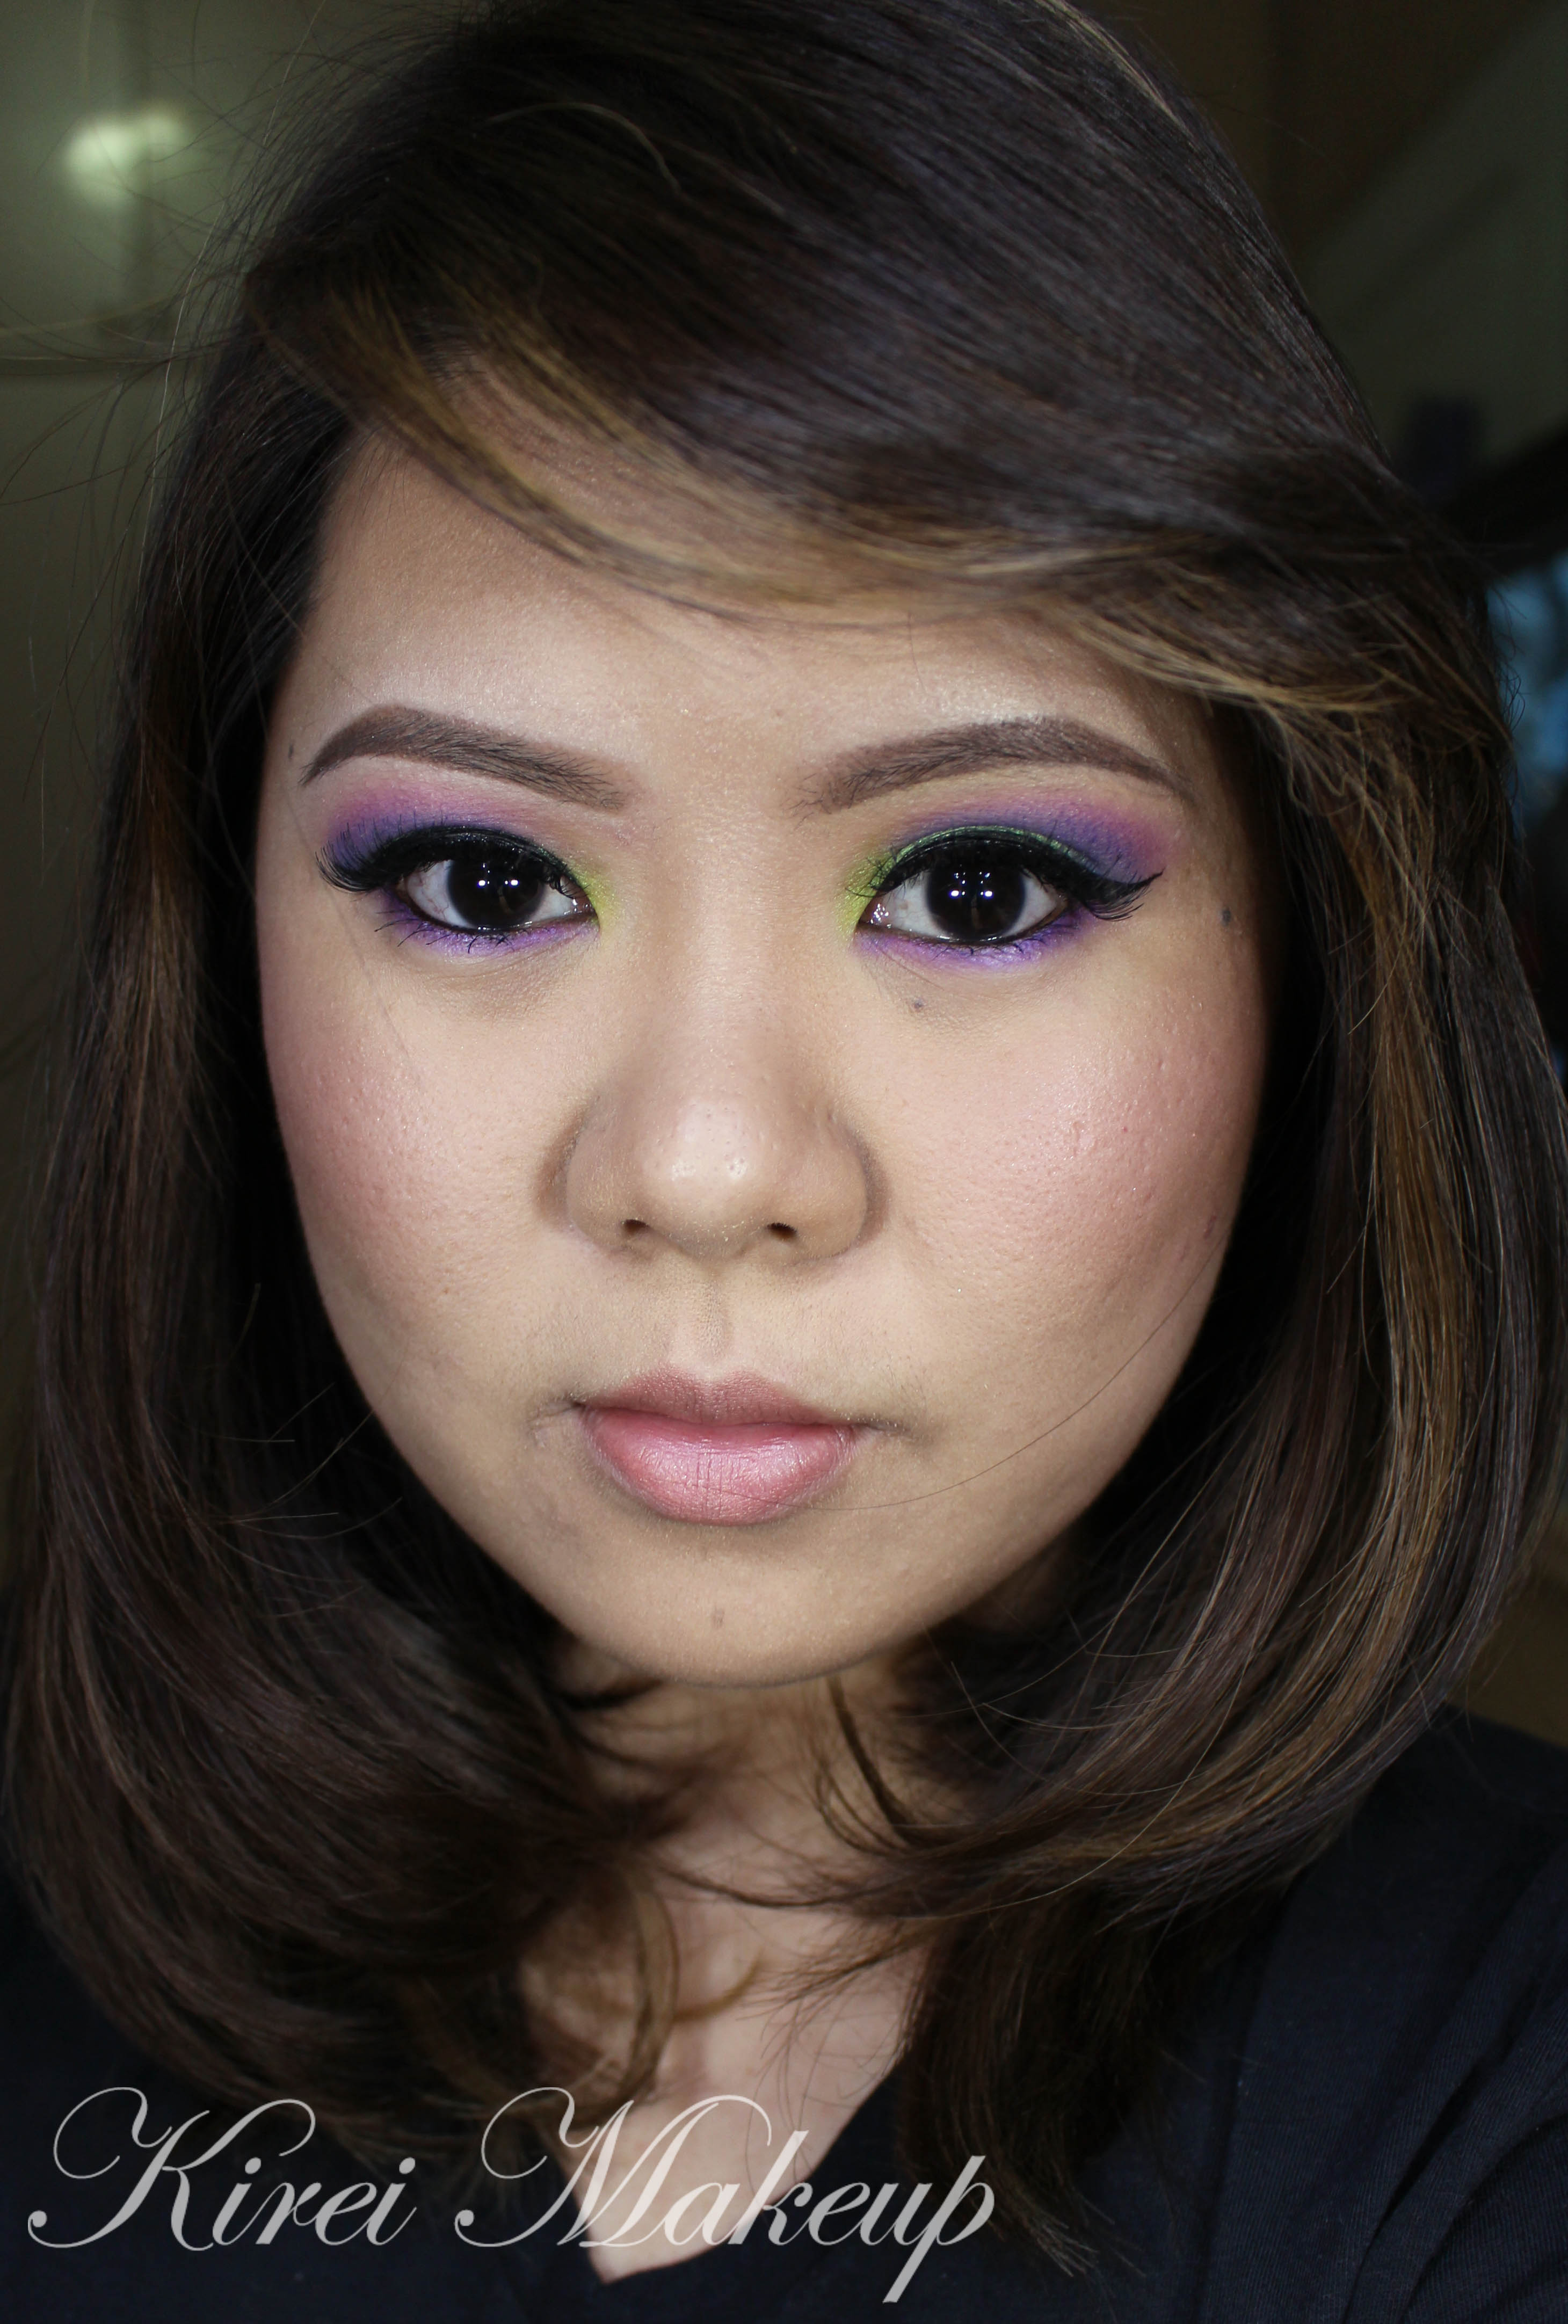
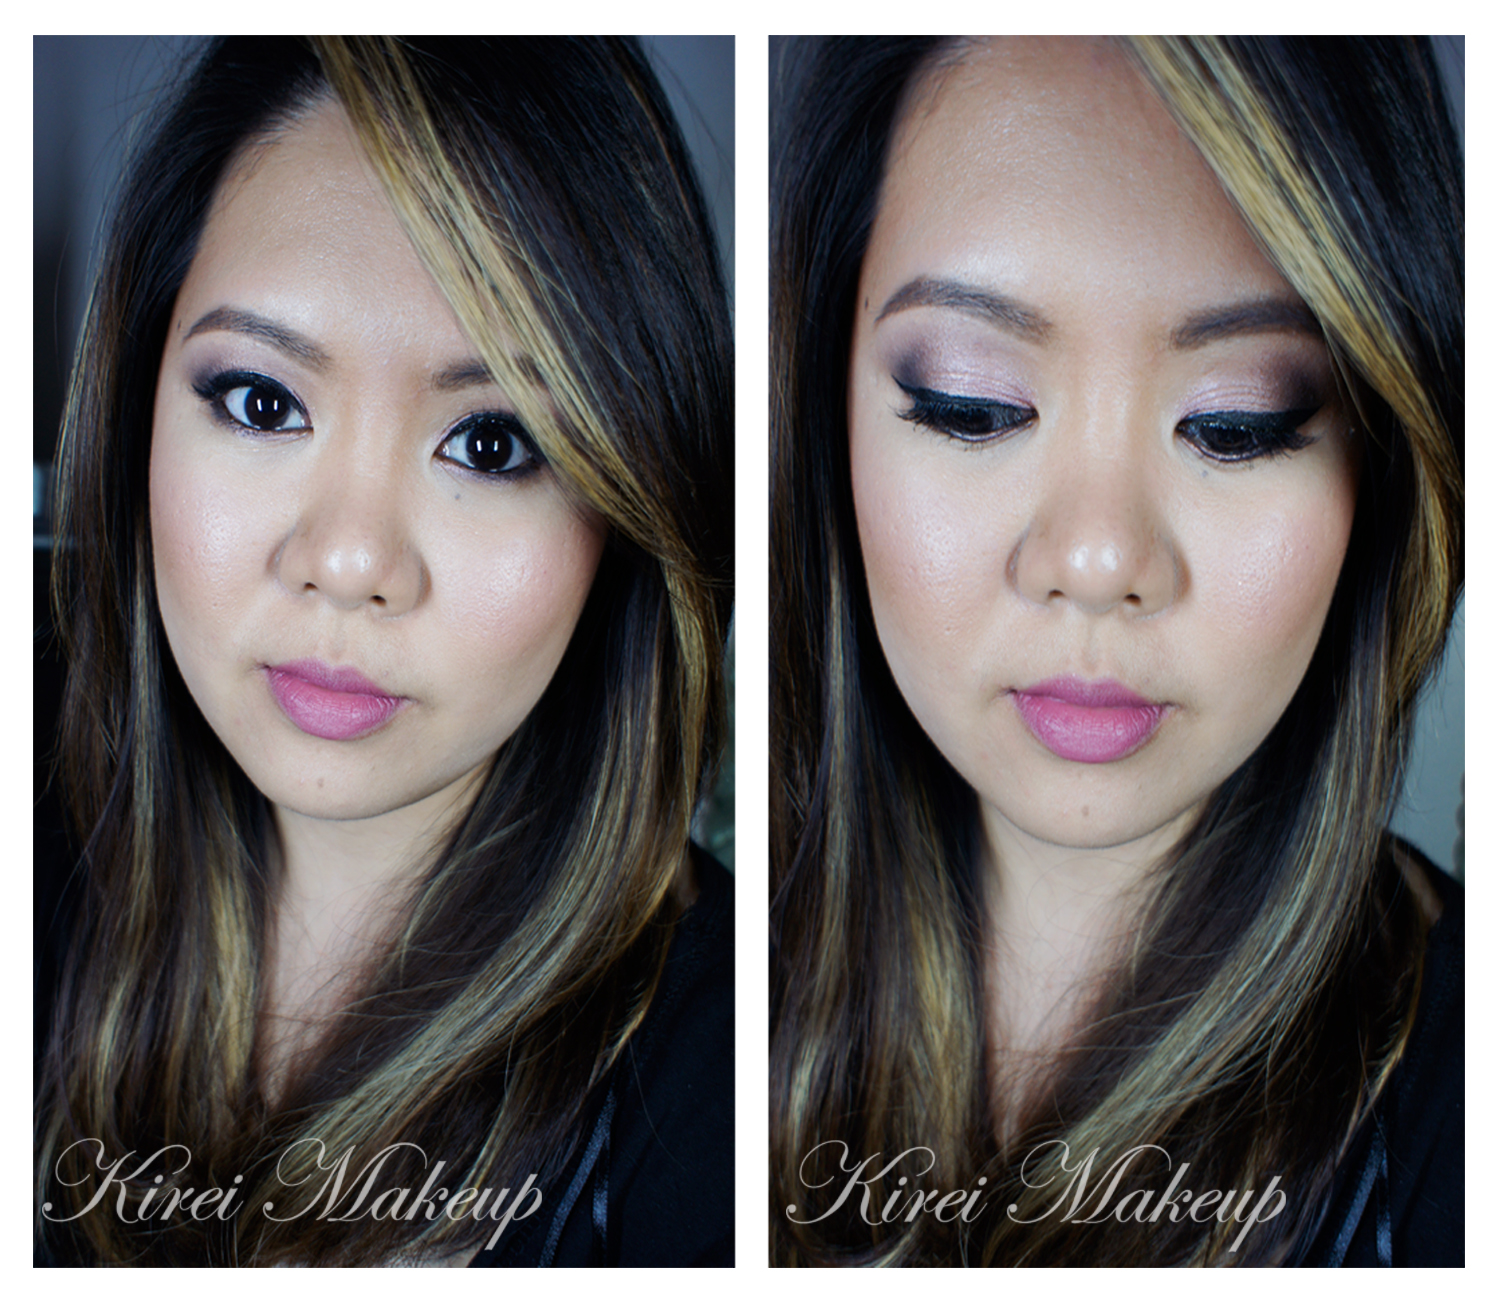
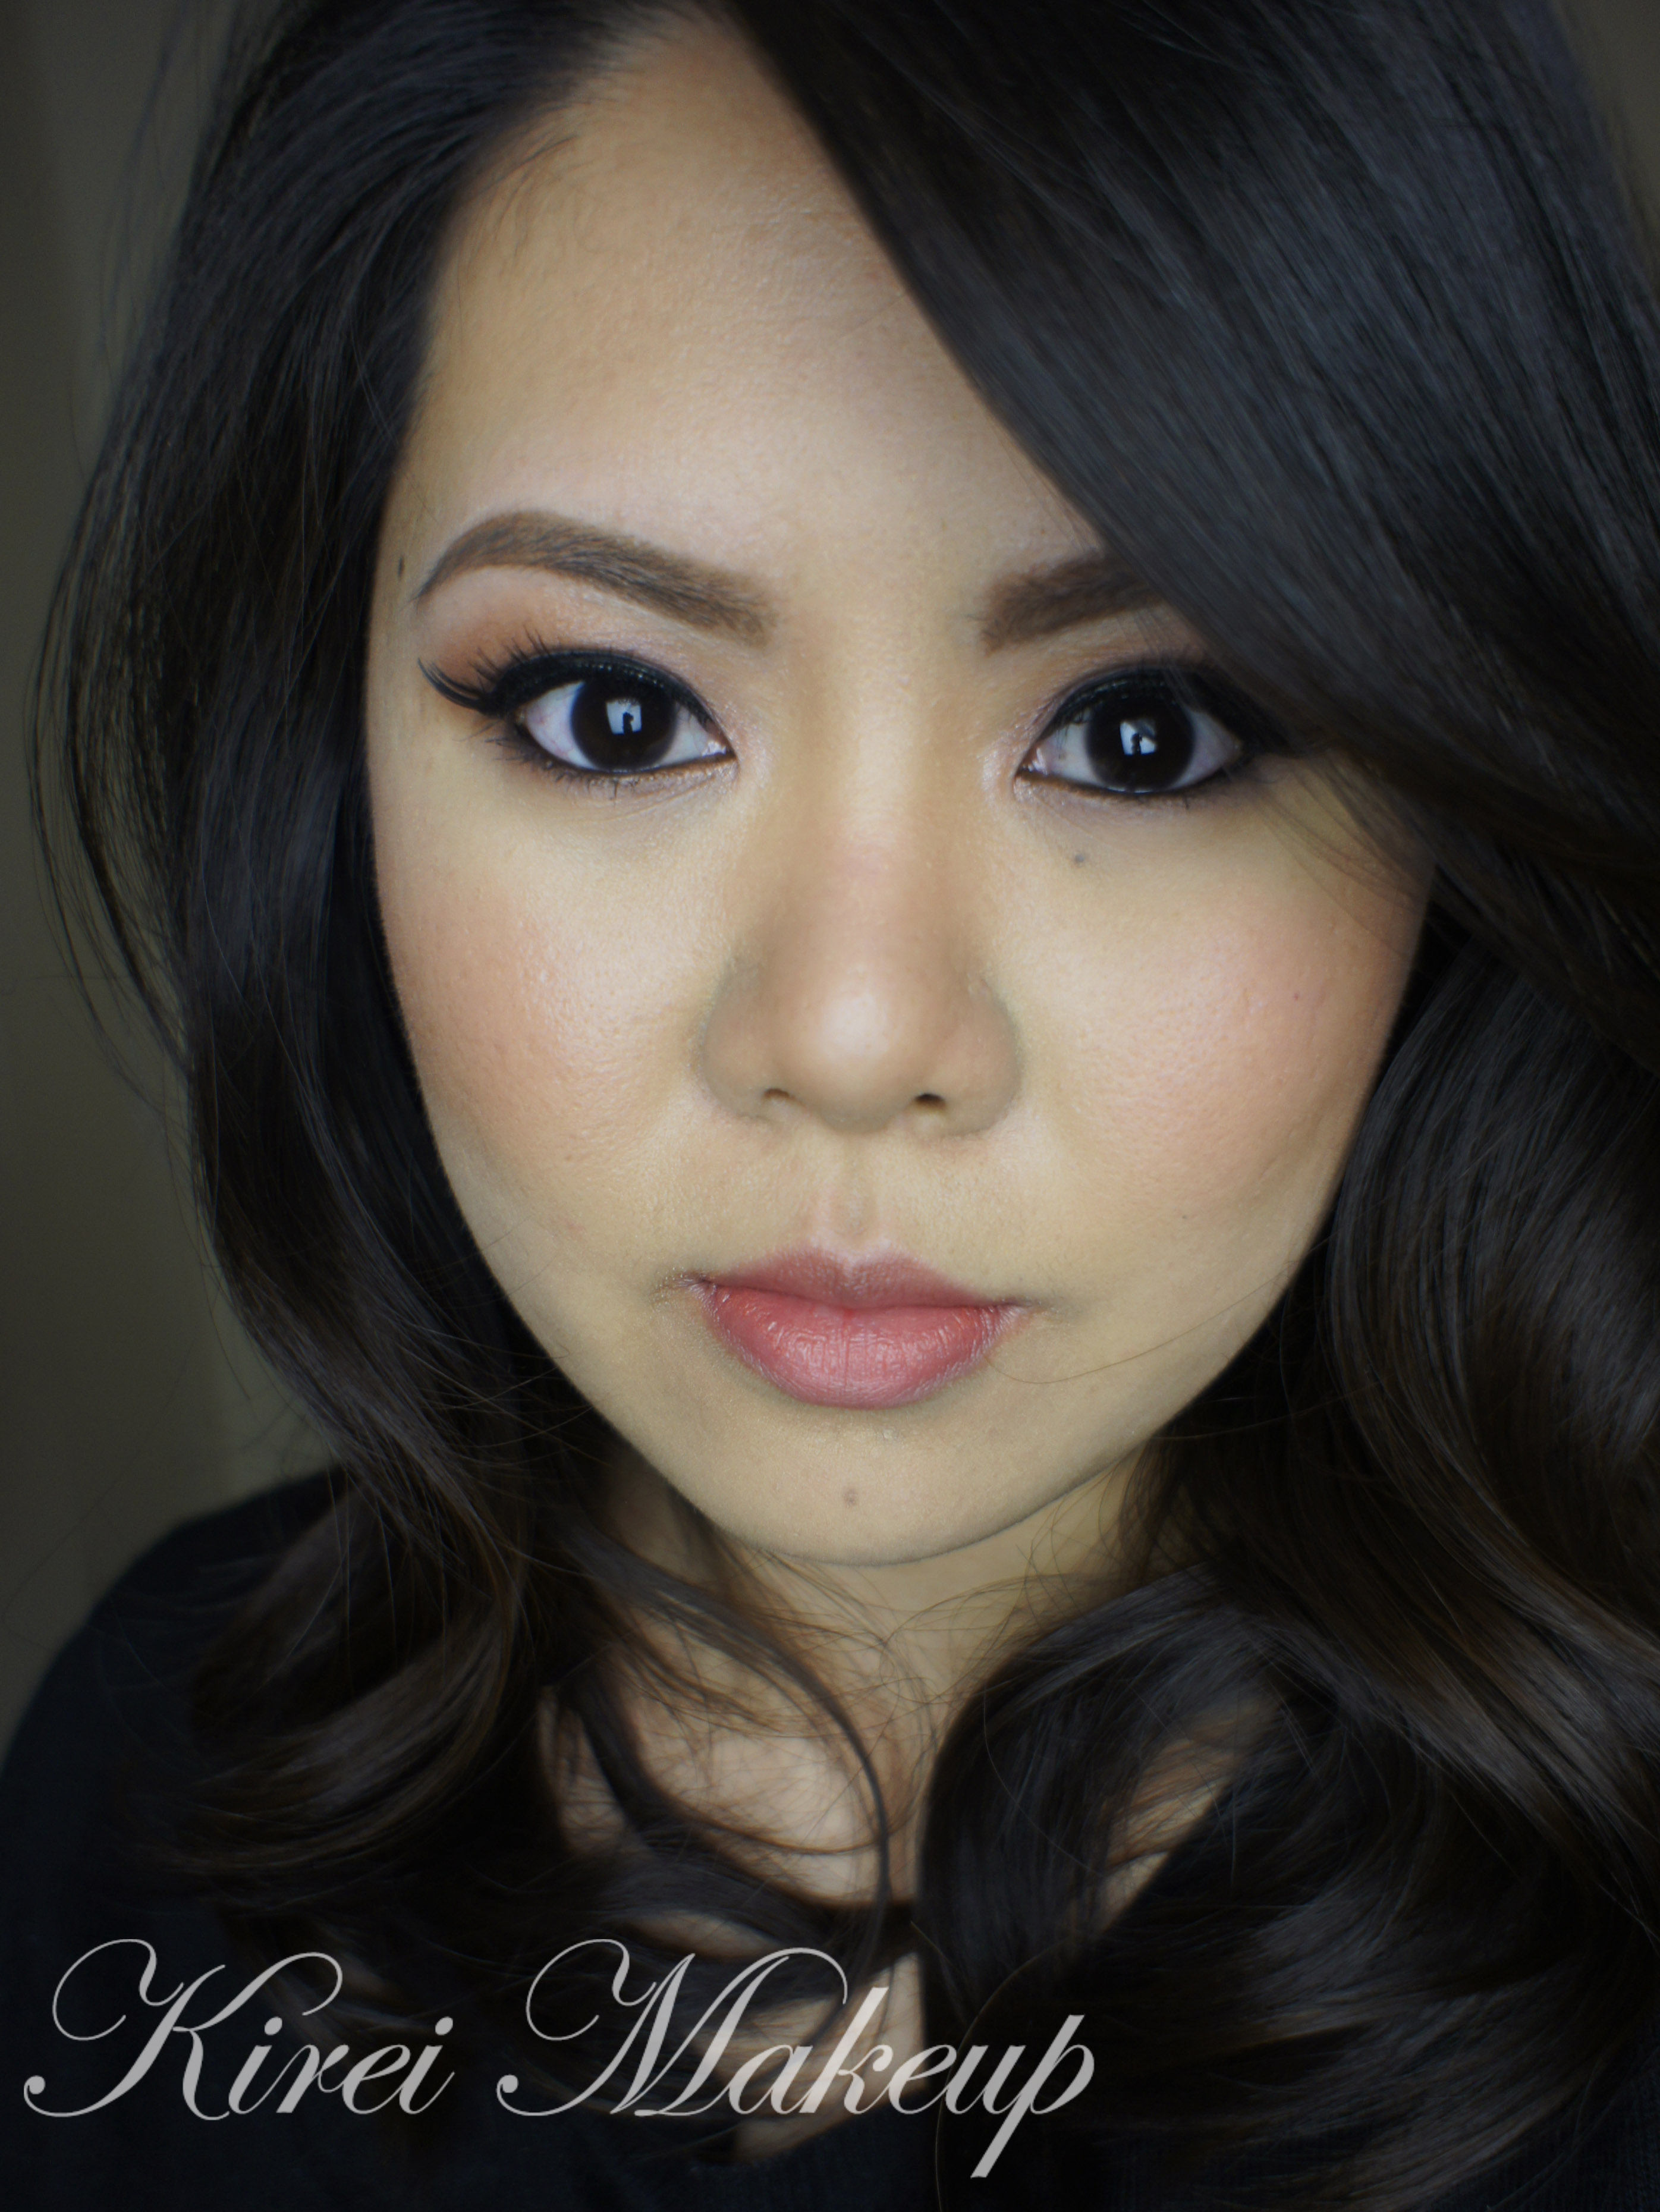
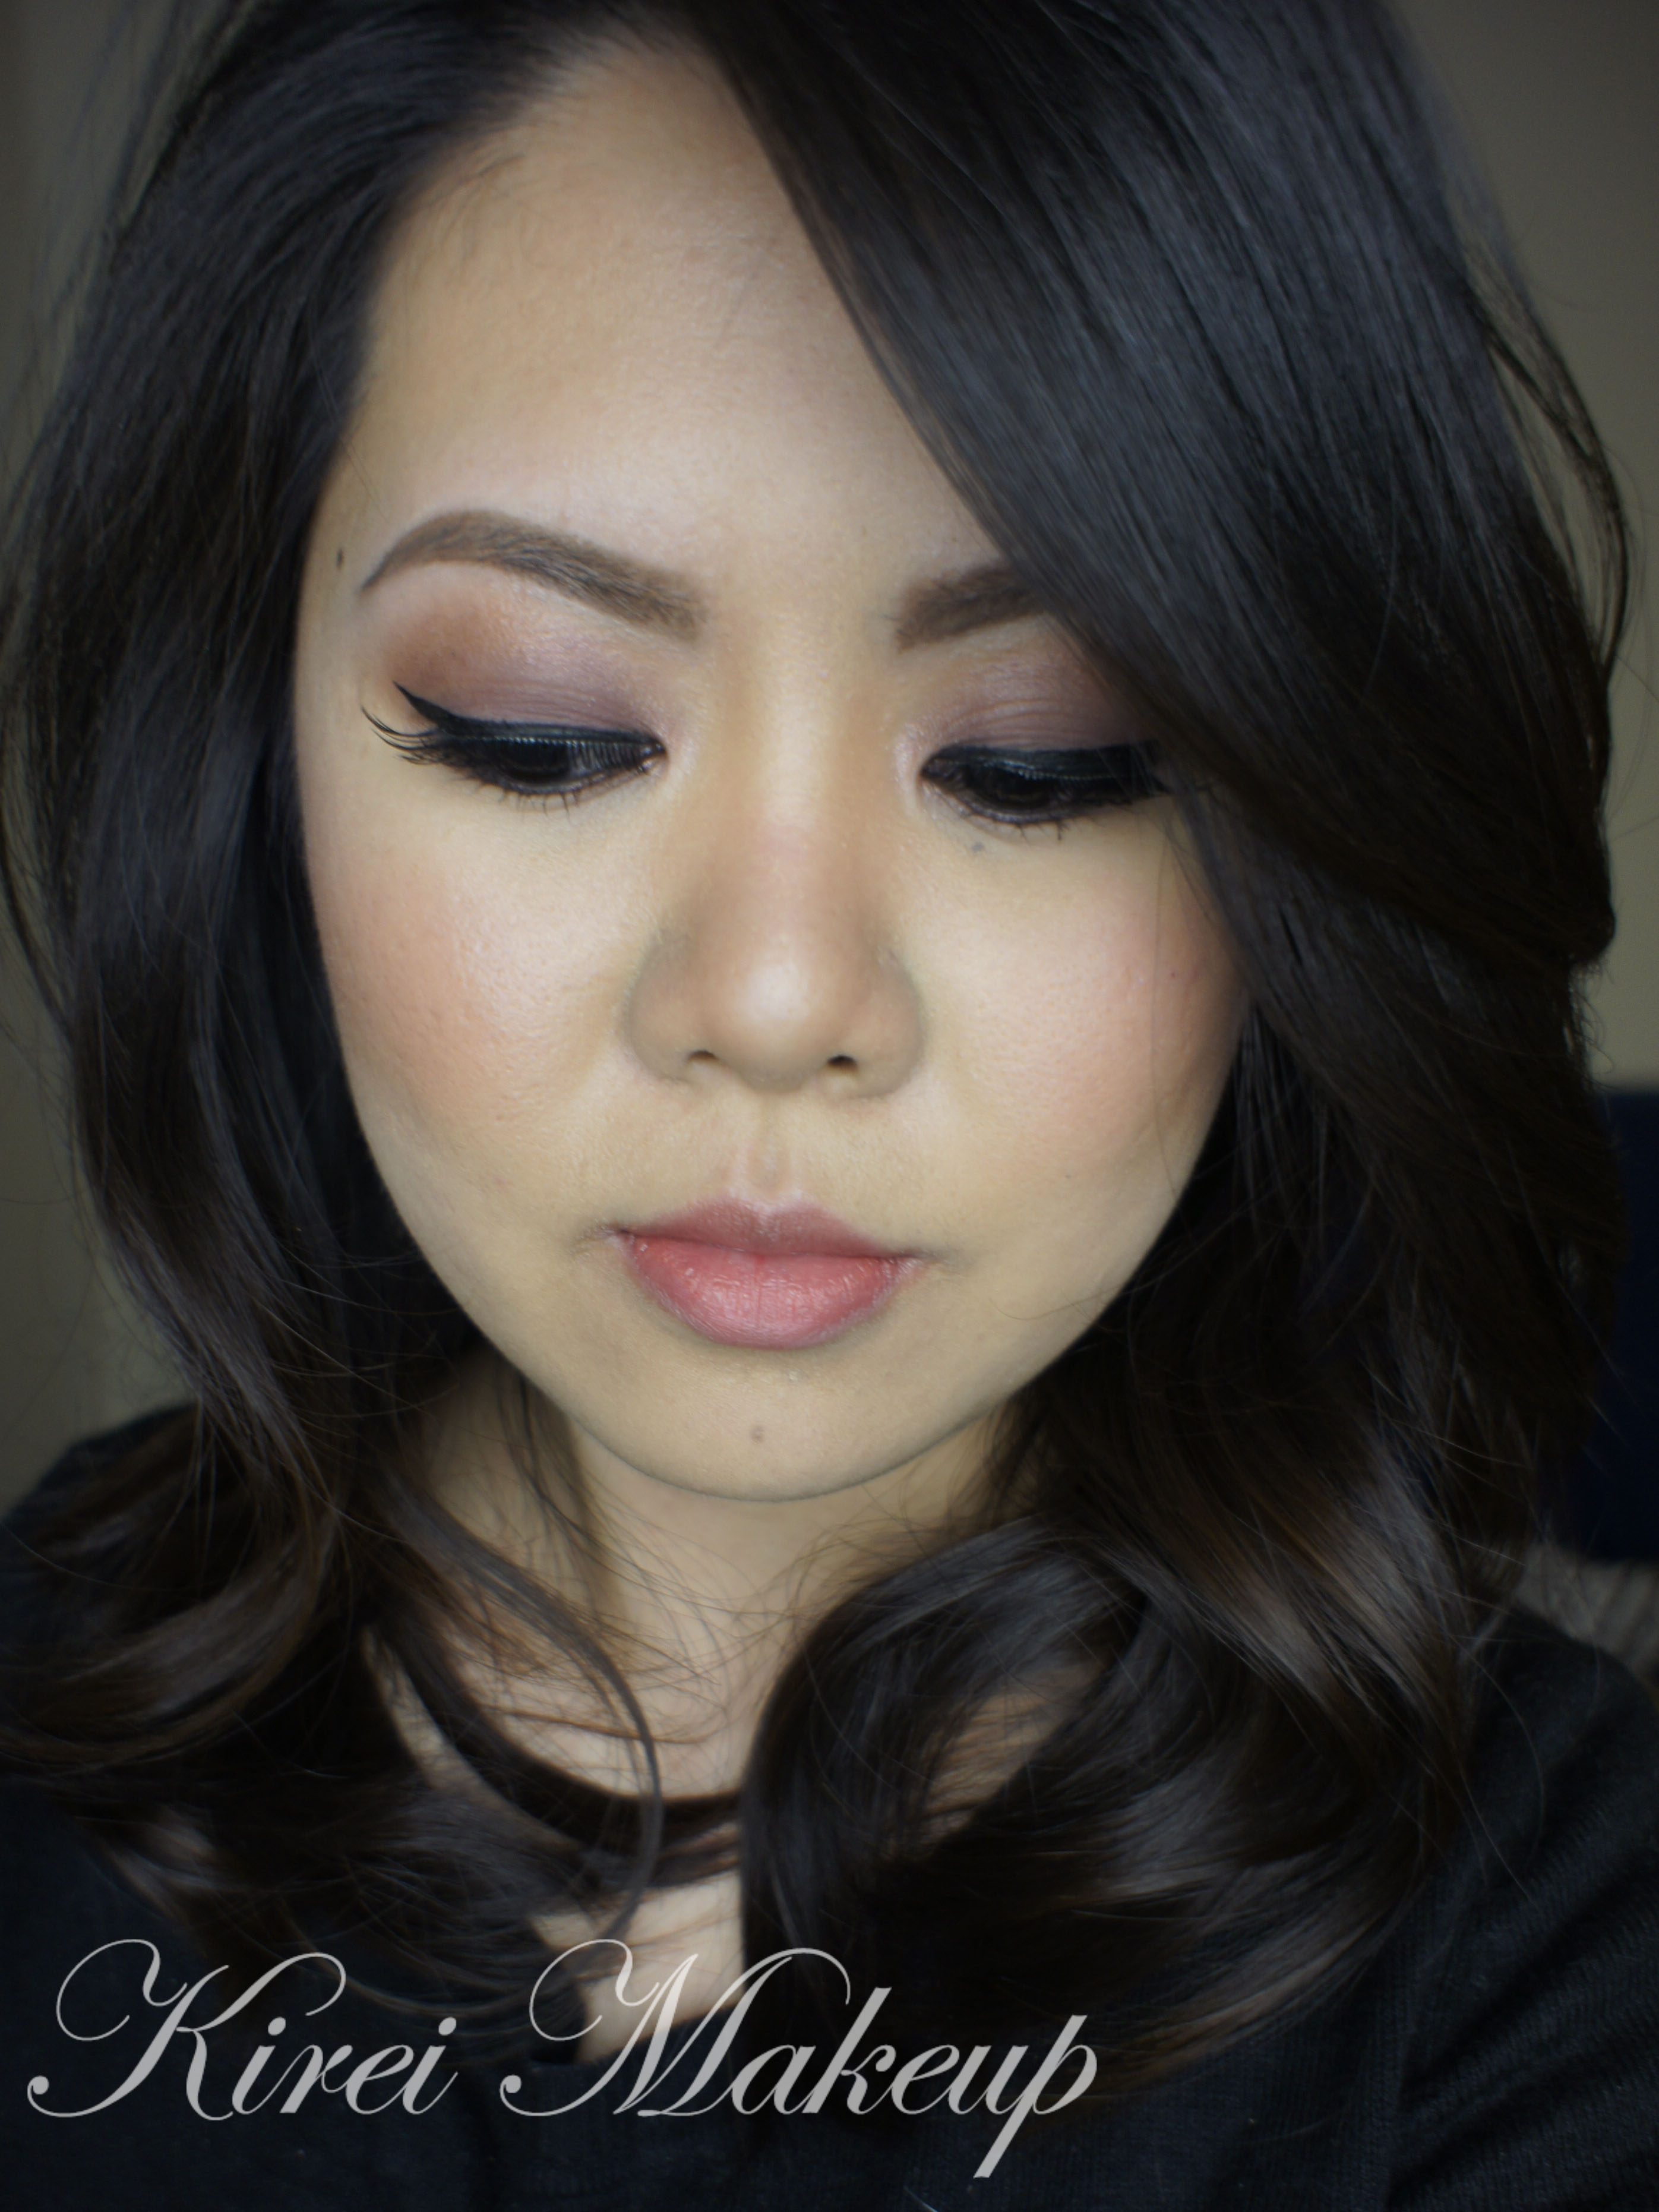
10. On my face, I applied Hourglass Immaculate foundation (not a big fan of this one..may be i shouldn’t have gotten the one for oily skin..lol)

11. I also applied a concealer from Motives Ice palette  below and above my eyebrows.

12. I lightly contoured my face using Motives Ice palette as well.

13. I applied MAC Dainty on my cheeks.

14. On my lips, I applied Revlon Flashing Lights colorstay ultimate suede lipstick.


Products used

Eyes – NYX Milk Jumbo Eyeshadow pencil; Urban Decay Electric palette (Outer V/crease – Chaos, above crease – Savage, lid – Freak, inner corner – Thrash, lower lid – Urban) ; Kanebo Kate Super Sharp eyeliner; L’oreal Voluminous Smoldering eyeliner; Ardell Demi Wispies false eyelashes; Anastasia Brow Wiz in Medium Ash.

Face – Hourglass Immaculate foundation; Motives Ice palette; MAC Dainty.

Lips – Revlon Flashing Lights lipstick.


Soft Rose Smokey Eyes tutorial using UD Naked 3

Here I am with a new Soft Rose Smoky Eyes tutorial using UD Naked 3 (again)! I do apologize for missing for almost a week without any tutorials. I’ve been having some difficulties with the internet at home. However, if you do follow me on Twitter or Instagram, you’d have gotten a little bit of update here and there every day.

In another news, I was very excited to find out that Urban Decay has used one of my pictures that I did on their email newsletter! I’m not sure if you guys subscribe to their mailing list, but I was so surprised to see my face on it. It’s small, but I’m so happy! If you want to recreate that look, please take a look at my Rose Smoky III tutorial.

Don’t forget to check out my other UD Naked 3 tutorials (pictorials and video)!

Urban Decay

So, for today’s tutorial, I wanted to use my Urban Decay Naked 3 again to create a much softer rosy smoky eyes, something that most people can recreate and do it on themselves. This look would be great for those with medium to darker skin tone as well. If you like a very light eyelid, you can apply Burnout or Dust instead of Buzz.

Scrolls all the way down if you want to skip the how-to, and go straight to the product list.

urban decay naked 3 rose smoky

How-to:

  1. I prepped my eyelids using Urban Decay Primer Potion in Sin.
  2. I applied Buzz on the inner half of my upper eyelid, and Liar on the outer half, using a flat eyeshadow brush.
  3. On the crease, I lightly applied Limit using a blending brush.
  4. Using a bullet crease brush, I applied Blackheart on the outer V.
  5. I blended out the outer V using the same blending brush I used on Step 3.
  6. On the lower lid, I applied Blackheart using an angled brow brush.
  7. I also applied Buzz on the inner corner of the lower lid.
  8. I lined my waterline using L’oreal Voluminous Smoldering eyeliner.
  9. I applied a winged eyeliner along the upper lash line using Kanebo Kate Super Sharp eyeliner.
  10. I curled my lashes, and applied Clinique High Impact mascara. Then, I added false lashes.
  11. I outlined my brows using Anastasia Brow Wiz in Ash Blonde, and filled it with Anastasia Brow Powder in Brunette.

urban decay naked 3 makeup tutorial

  1. I applied Cover FX cream foundation in G20 under my eyes, on the bridge of my nose, chin, and forehead using a clean foundation brush.
  2. I then applied Cover FX cream foundation in N110 on my temples, sides of my nose, on the hollows of my cheeks and on my jawline using a clean foundation brush.
  3. I blended the 2 foundation using a damped sponge.
  4. I set my face using Cover FX translucent powder.
  5. I applied Chanel Blush de Horizon on my cheeks.
  6. On my lips, I applied Tarte Lipsurgence in Lively.


Products used

Eyes – Urban Decay Naked 3 (eyelid: Buzz & Liar, crease: Limit, outer V: Blackheart); L’oreal Voluminous Smoldering eyeliner; Kanebo Kate Super Sharp eyeliner; Ardell false lashes no. 109; Anastasia Brow Wiz in Ash Blonde; Anastasia Duo Brow Powder in Brunette.

Face – Cover FX cream foundation in G20 & N110; Cover FX translucent powder; Chanel Blush de Horizon.

Lips – Tarte lipsurgence in Lively.

Orange Lips with MAC Lady Danger

Today I want to share this orange lips makeup with you as we welcome the arrival of Spring, or if you’re in the tropics, then to welcome the heat wave…lol… I do have to say that this MAC Lady Danger lipstick might go into my favorite lipstick collection. The color is so pretty, and it will look great on any skin tone. Definitely something that you should look into if you want a bold lip look. It’s a great alternative to the usual red lips, or pink lips.

Let me just, also, tell you that today’s tutorial is full of sweat and screams of frustration due to power outage, and the Sun’s sudden disappearance from the sky. I can’t tell you how much I want my lights with me, but oh well, that’s what happened when I travel so much. So, please forgive me for the quality of the step-by-step picture.

Anyways, I was watching Kat Von D video on the Sephora’s youtube channel, and I wanted to recreate the way she create her eyeliner. I love how it looks! It’s so different, yet at the same time, so very wearable. I think I might re-do the eyeliner next time.

Scroll all the way to the bottom for full  product list.

Urban Decay naked 2 daytime makeup

How-to:

1. I applied MAC Groundwork paint pot all over my lid using my ring finger.

2. Using a flat eyeshadow brush, I applied Suspect from UD Naked 2 palette all over my eyelid.

3. Using a blending brush, I applied Busted from UD Naked 2 on the crease.

4. Using a flat eyeshadow brush, I applied Blackout from UD Naked 2 on the outer V.

5. I blended out Blackout using a clean blending brush.

6. I applied Chopper from UD Naked 2 on the eyelid using a flat eyeshadow brush.

7. I applied Half-Baked on the inner part of the lower lid, and Snakebite on the outer part using an angled eyebrow brush.

8. On the upper lid, I created a triangle-shaped eyeliner using Kanebo Kate Super Sharp Eyeliner.

9. I filled my brows using UD Faint eyeshadow and an angled eyeliner brush.

10. I curled my lashes and applied Cover Girl Lash Blast mascara on the upper and lower lashes.MAC Lady Danger

11. I applied UD Naked Skin foundation using a damped sponge.

12. I contoured my face very lightly using MAC Blunt.

13. I applied MAC Dainty blush on my cheeks.

14. I applied MAC Entertain Me lip liner on my lips first, and then applied MAC Lady Danger lipstick on top of it. If you want to find out how I fill my lips, please check my How-to Apply Lipstick post.

If you want to see the other lip makeup looks that I’ve created please check my Lips Tutorials.

For other UD Naked 2 tutorials, please use the search bar on the right side bar.

Products used

Eyes – MAC Groundwork paint pot; UD Naked 2 (eyelid: Suspect and Chopper, crease: Busted, outer V: Blackout, lower lid: Half-Baked and Snakebite); Kanebo Kate Super Sharp Eyeliner; Faint eyeshadow from UD Naked Basic; Cover Girl Lash Blast mascara.

Face – UD Naked Skin foundation; MAC Blunt; MAC Dainty.

Lips – MAC Entertain Me lip liner; MAC Lady Danger.

Urban Decay Naked 3 Rosy Eye Makeup Revisited

Hello, everyone! Finally I’m back with a post after a week of hiatus. I’m actually in Jamaica at the moment, so yay me! What a beautiful place, with nice people, great food and loads of sun. At this moment, I’ll be staying in Jamaica for an indefinite period of time, so follow me on Twitter and Instagram to find out what I’m up to, and where I’m heading next. My life has been a great adventure so far, and I’m so thankful for all these opportunities to travel to different countries.

Anyways, since today was a really great day, I wanted to do a quick tutorial. However, since I’ve been living out of my luggage, I couldn’t find my palettes (all buried underneath my clothes probably). The few palettes that were on my sight were the Naked (1, 2, 3, and basic). Obviously, I’ve to pick the Urban Decay Naked 3 palette for today’s makeup.

My original Rose Smoky Eyes post have received 4,000++ repins on Pinterest and I’m so thankful for that! However, upon looking back at the tutorial, I wasn’t too thrilled with the result. So, I wanted to re-do that post in a slightly different manner. This Rosy eye makeup can be worn as a day makeup, or night makeup. It’s one of those looks that goes really well for anytime!

Please note that all the pictures below are taken using natural daylight, thus might look different than my usual pictures.

urban decay naked 3 makeup tutorial

How-to:

1. I prepped my eyelid using UD Primer Potion (original).

2. Using a flat eyeshadow brush, I applied Buzz from UD Naked 3 all over my eyelid.

3. Using a fluffy blending brush, I applied Nooner from UD Naked 3 on the crease.

4. I applied Blackheart from UD Naked 3 on the crease and outer V using a small shader brush.

5. I blended Blackheart using a clean crease bullet brush.

6. I applied Blackheart on the lower lid using a small shader brush.

7. I lined my upper lash line using Kate Kanebo Super Sharp Eyeliner. I also lined my waterline using L’oreal Voluminous Smoldering eyeliner.

8. I curled my lashes and applied Cover Girl Lash Blast mascara on both upper and lower lashes.

9. I filled my brows using Anastasia Brow Wiz in Brunette.

urban decay naked 3 makeup tutorial

10. On my face, I applied Urban Decay Naked Skin foundation using Sigma Round Kabuki brush.

11. I contoured my face using NARS Ita kabuki brush and MAC Blunt powder.

12. On my cheeks, I applied MAC Dainty blush.

13. Finally, on my lips I applied Tarte Lipsurgence in Lively.

urban decay naked 3 makeup tutorial

For this last picture (above), N actually took it for me outdoor since the sun was setting, and we couldn’t resist to snap a few shots. I decided to add YSL Glossy Stain no. 27 on my lips for the shot. Just ignore my eye bags, I was trying to hold my laughter.

Product used:

Eyes – Urban Decay Primer Potion; Urban Decay Naked 3 (eyelid: buzz, crease: nooner, outer v: blackheart); Kanebo Kate Super Sharp Eyeliner; L’oreal Voluminous Smoldering eyeliner; Cover Girl Lash Blast mascara; Anastasia Brow Wiz.

Face – Urban Decay Naked foundation; MAC Blunt powder; MAC Dainty blush; Tarte Lipsurgence in Lively.

Disclaimer: some of the links provided on this post link back to my other posts. However, the links on Sigma Beauty products are affiliated links, therefore if you click on the link I might be compensated for it. Please note that any sort of compensation that I received from affiliated links will go to the maintenance of this website.

Neutral Smokey Eyes using Urban Decay Naked Palette

Another Urban Decay Naked palette post again?! Yes it is! I’ve been showcasing my love for the Urban Decay Naked 3, and I did a tutorial using the Naked 2, so I though that it was time to get in touch with the original Naked palette. For this tutorial, I wanted to do a neutral smokey eyes tutorial, which is perfect for any occasion from party, night-out, date (for Valentine’s) etc.

How-to:

1. I prepped my eyelids using Urban Decay Primer Potion in Sin.

2. Using a flat eyeshadow brush, I applied Sidecar all over the eyelid.

3. I applied Buck on my crease using Smashbox Bullet Crease brush.

4. Using a small shader brush, I applied Creep on the outer V and lightly dragging it to the crease.

5. Using the same Smashbox Bullet Crease brush that I used on step 3, I blended my crease.

6. I applied Naked lightly under the brow, and Sin on the inner corner of my eyes.

7. I applied Creep on the outer half of my lower lid, and Sidecar on the inner half using an angled eyeliner brush.

8. I created a winged eyeliner using Kanebo Kate Super Sharp eyeliner. On my waterline, I used MAC Chromagraphic eyeliner in NC15.

9. I filled my brows using Anastasia Duo Brow Powder in Brunette.

10. I curled my lashes, and applied Buxom Lash mascara on both top and bottom lashes.

11. I also applied Gwiyomi Gillian false eyelashes.

urban decay naked tutorial

12. For my face, I applied CoverFX Cream foundation in G40 using CoverFX cream foundation brush.

13. On my cheeks, I applied Chanel Blush de Horizon.

14. On my lips, I applied Revlon Socialite lipstick.

coverfx cream foundation review g40Products used

Eyes – Urban Decay Primer Potion Sin, Urban Decay Naked palette, Kanebo Kate Super Sharp eyeliner, Buxom Lash mascara, Anastasia Brow Powder Brunette, Gwiyomi Gillian false eyelashes.

Face – Cover FX Cream foundation, Chanel Blush de Horizon, Revlon Socialite lipstick.

Rosy Mauve Makeup using Urban Decay Naked 3

Today’s tutorial is a requested look from one of my followers on Instagram through direct message. She wanted an Urban Decay Naked 3 look that’s not too smoky. I created this rosy mauve makeup using Urban Decay Naked 3 for her, so I hope everyone will enjoy it!

The look is very simple. However, I decided to add the winged liner and Gwiyomi lashes for some added drama for the camera. I also, recently, just bought CoverFX cream foundations, so I decided to play around with it for highlighting and contouring as well. I’m going to do a review soon for the CoverFX products.

Anyways, let’s get the tutorial started! You can skip the winged liner and eyelashes, feel free to omit some of the steps to make it suitable for you!

soft makeup using ud naked 3

How-to:

1. I prepped my eyelid using UD Primer Potion. Then, I applied Nooner on my eyelid using the flat eyeshadow brush that comes with the UD Naked 3 palette.

2. I applied Liar on the crease using the blending brush end from the Naked 3 palette.

3. Using Crown Brush Pro Blending Fluff C433, I blended out the edge of Liar so there’s no harsh edge.

4. Using the tip of the flat eyeshadow brush from UD Naked 3 palette, I applied Nooner on the lower lid. I also applied Trick on the inner corner of my eyes.

5. I lined my waterline, tightline, and upper lash line using Urban Decay  24/7 Glide-on Eyeliner in Perversion.

6. Using an angled eyeliner brush, I applied Blackheart along the upper and lower lash line. If I wear this makeup to go out I definitely would stop here and go on to mascara and my eyebrows.

7. I created a winged eyeliner using L’oreal Super Liner Ultra Sharp Tip.

8. I curled my lashes and applied Cover Girl Lash Blast mascara on both top and bottom lashes.

9. I applied Gwiyomi Sarah false eyelashes, and filled in my brows using Anastasia Brow Wiz in Ash Blonde and Brunette.soft makeup using ud naked 3

10. On my face, I applied CoverFX Cream Foundation in G40 using their cream foundation brush.

11. I highlight using CoverFX G20, and contoured using N110 (will do a tutorial on how to do this next time).

12. I set my face using NARS Setting Powder.

13. I applied Benefit Hervana on my cheeks as blush.

14. On my lips, I applied Clinique Chubby Stick Lip Balm in Mega Melon.

urban decay naked 3 tutorial

Products used

Eyes – UD Naked 3 palette, UD 24/7 Glide-on eyeliner in Perversion, L’oreal Super Liner Ultra Sharp Tip, Cover Girl Lash Blast mascara, Gwiyomi Sarah false eyelashes, and Anastasia Brow Wiz (Ash Blonde+Brunette)

Face – CoverFX Cream foundation (G40, G20, N110), NARS Setting Powder, Benefit Hervana blush, and Clinique Chubby Stick Lip Balm Mega Melon.

Soft Smokey Eyes using Urban Decay Naked 2

Happy Lunar New Year, everyone! I hope this year will bring more luck, health, and prosperity for you! Oh, how I miss being home for Lunar New Year, all those yummy food and family gathering together!

Anyways, for this tutorial, I wanted to use my Urban Decay Naked 2 palette to create a soft smokey eyes. Ever since I’ve been using my Naked 3, I felt that the Naked 2 and 1 were being left out in the corner, crying for my attention.

I also wanted to practice some contouring and highlight using my Kryolan HD Foundation palette, and I do have to say the foundation is so creamy and it blends so nicely into the skin. If you don’t like the heavy makeup on this tutorial, feel free to skip the contour/highlight part.

easy smoky eyes for asian

How-to:

1. I applied MUFE Aqua Shadow in 28E all over my lid, blending it out using my finger.

2. Using a flat eyeshadow brush, I applied YDK from UD Naked 2 on my eyelid.

3. Using a fluffy blending brush, I applied Tease from UD Naked 2 on my crease.

4. I applied Busted from UD Naked 2 on the outer V using a crease brush.

5. I blended Busted using the brush I used on step 3.

6. Using a clean blending brush, I applied Foxy from UD Naked 2 under the brow.

7. On my lower lid, I applied Chopper from UD Naked 2 on the inner half and UD Blackout on the outer half.

8. I lightly applied Verve from UD Naked 2 on the inner corner of my eyelid using a clean fluffy blending brush.

9. I created a winged liner using L’oreal Infallible Gel Lacquer Liner in Blackkest Black.

10. I lined my waterline using L’oreal Voluminous Smoldering eyeliner.

11. I curled my lashes and applied Cover Girl Lash Blast mascara on both upper and lower lashes.

12. I applied Gwiyomi false eyelashes (sold in Jakarta, please check my Instagram)

13. I filled my brows using Anastasia Duo Brow Powder.

urban decay naked 2 tutorial

14. On my face, I applied Urban Decay Naked Skin foundation using a Sigma Round Kabuki Brush.

15. I contoured and highlight my face using Kryolan HD Foundation palette.

16. I applied MAC Fleur Power on my cheeks.

17. For the lips, I applied Revlon Mauve It Over matte lipstick, and dabbed L’occitane clear lip balm on top of it.

Products used:

Eyes – MUFE Aqua Shadow 28 E, UD Naked 2, L’oreal Infallible Gel Lacquer Liner in Blackkest Black, L’oreal Voluminous Smoldering Eyeliner, Cover Girl Lash Blast mascara, Gwiyomi False Eyelashes, Anastasia Brow Powder.

Face – UD Naked Skin foundation, Kryolan HD Foundation palette, MAC Fleur Power blush, Revlon Mauve it Over lipstick, L’Occitane lip balm.

Valentine’s Day Makeup using UD Naked 3

Update Jan. 13, 2016: I have a new Valentine’s day tutorial on youtube using UD Gwen Stefani palette! Come check THIS VIDEO OUT if you haven’t already.

Happy mid-week, everyone! Valentine’s day is just a few weeks away, and I wanted to create a soft, feminine makeup using UD Naked 3. This Valentine’s Day makeup is girly, warm, and rose-hued. The eyes are made to look bigger and brighter. I’ll do another smoky eyes tutorial using UD Naked 3 for Valentine’s day next time.

I know I’ve been using UD Naked 3 a lot, but I can’t help it! It’s so pretty and gorgeous, how can I resist it?! It’s one of those palettes that does not have much browns and grey, but at the same time it’s neutral enough to be used daily and in different ways.

I’ve done several different tutorials using UD Naked 3, and you can find it here: Rose Smoky Eyes, Look#2, Rose Smoky Eyes 3, Soft and Romantic, as well as a review in Product of the Week.

I’ve also added a Youtube Video tutorial using UD Naked 3 palette!

valentine's day makeup

I prepped my eyelids using UD Primer Potion.

How-to:

1. Using a flat eyeshadow brush, I applied Dust on the inner half of the lid.

2. Using a clean flat eyeshadow brush, I applied Buzz on the outer half of the lid, leaving the middle part empty if you’d like. If not, that’s fine as well.

3. Using a flat eyeshadow brush, I applied Burnout to the middle of the eyelid. This will act as a good transition color between Dust and Buzz.

4. Using the tip of a flat eyeshadow brush, I applied Liar on the crease to create a bit of depth without going smoky.

5. I applied Factory on the outer V, and blended it out using a blending brush.

6. On the lower lid, I applied Dust on the inner corner, Buzz in the middle, and applied Factory on the outer half using an angled eyeliner brush.

7. I created a winged eyeliner on the upper lash line using L’oreal Super Liner Ultra Sharp Tip.

8. On the waterline, I applied white end of Revlon Photoready Kajal eyeliner in Cleopatra. I applied the black end of this eyeliner on the outer third of my lower lash line.

9. I curled my lashes and applied Cover Girl Lash Blast mascara. I also applied false eyelashes from Gwiyomi boutique (Indonesia-based).

10. I filled my brows using Anastastia Brow Wiz in Ash Blonde and Brunette.

urban decay naked 3 tutorial

11. On my face, I applied UD Naked Skin foundation using a Sigma Round Kabuki Brush.

12. I lightly contour my face using MAC Shadowy powder and NARS Ita Kabuki Brush.

13. I applied MAC Cubic on my cheeks.

14. On my lips, I applied MAC Please Me lipstick.

valentine's day makeup

Products used:

  • Eyes – UD Primer Potion, UD Naked 3 palette, Revlon Photoready Kajal Intense Eyeliner in Cleopatra, L’oreal Super Liner Ultra Sharp Tip, Cover Girl Lash Blast mascara, Anastasia Brow Wiz in Ash Blonde/Brunette.
  • Face – UD Naked Skin foundation, MAC Shadowy powder, MAC Cubic, MAC Please Me.

Soft Romantic Makeup using UD Naked 3

I’m sure you guys are getting tired of my UD Naked 3 obsession, but I have to share this look with you just to show how versatile this palette is. Today tutorial, I’m using UD Naked 3 to create a soft romantic makeup which can be used for daily makeup, date makeup, and even bridal makeup.

This look is very pretty and natural looking. The eyes are made to look brighter and bigger looking, while the rest of the face is kept fresh and slightly flushed. I also skip the glossy lips, and opt for a natural looking lip color. Everything about this makeup is about keeping everything to the minimal.

I’ve done something similar to this look in my Chanel Kaska Beige re-visited post. If you prefer a stronger, more intense eye look, please do check my other tutorials using the UD Naked 3 palette

I’ve also added a Youtube Video tutorial using UD Naked 3 palette!

urban decay naked 3

My eyes are prepped using UD Primer Potion, and my face is prepped using Smashbox foundation primer.

How-to:

1. I applied Trick all over my eyelid using a flat eyeshadow brush.

2. Using another clean flat eyeshadow brush, I patted Factory on the outer third of my eyes.

3. I removed excess from the flat eyeshadow brush I used on step 2, and blended Factory towards the center part of the eyes.

4. Using a clean blending brush, I applied Nooner on the crease.

5.  I applied Factory along the lower lash line using an angled eyeliner brush.

6. I also applied Dust on the inner corner of the lower lash line using an angled eyeliner brush.

7. I lined my waterline using MAC Chromagraphic pencil eyeliner in NC 15.

8. On my upper lash line, I created a winged eyeliner using Kanebo Kate Super Sharp eyeliner.

9. I curled my lashes and applied Maybelline Great Lash mascara on both upper and lower lashes.

10. I added false eyelashes on the upper lashes to make my eyes appear open and larger.

11. I filled my brows using Anastasia Brow Wiz in a mix of Ash Blonde and Brunette.

ud naked 3

12. On my face, I applied Giorgio Armani Maestro foundation and blended it using my fingers.

13. I lightly contoured my face using MAC Shadowy powder.

14. On my cheeks, I applied MAC Well Dressed blush.

15. I added Smashbox Halo wand highlighter in Gold as highlighter.

16. On my lips, I applied Revlon Colorstay Ultimate Suede Lipstick in Socialite.

bridal romantic makeup

Product of The Week: UD Naked 3 Review

Finally, I get the chance to do the UD Naked 3 review! As you all know, I LOVE this Naked 3 palette. I’ve done several tutorials with this palette- Rose Smoky Eyes, UD Look#2, Berry lips, and Rose Smoky Eyes 3. I do owned the other 3 palettes, Naked 1, Naked 2, and Naked Basics.

Anyways, I do have to say that this is by far my favorite Naked palette! I absolutely recommend this palette for everyone. The UD Naked 3 palette consists of such soft, rose and gold colored hues. I absolutely love it!

ud naked 3 swatch

What is the UD Naked 3 palette

“Naked3 debuts 12 insanely beautiful rose-hued neutrals in an impressive range of shades—from pale, shimmery pink to deep black matte with red microglitter—in ultrasmooth matte, pearl, and glimmering metallic finishes. Each shadow features Urban Decay’s Pigment Infusion System™, the proprietary blend of ingredients that gives every shade its velvety texture, rich color, serious staying power, and blendability.”

(Sephora, 2013)

Packaging

Gold letters embossed on a rose-colored tin case. The eyeshadows are in a rectangular pan, with mirror on the other side.

Longevity

I’ve never worn this eyeshadow without a primer, since I know I do have oily lids. So, with UD Primer Potion primer, the eyeshadows last up to 8-hour with no creasing.

ud naked 3 swatch

Finish

From Left – Right

  • Strange: pale neutral pink matte (satin)
  • Dust: pale metallic pink shimmer w/iridescent micro glitter (glitter)
  • Burnout: light pinky-peach (satin)
  • Limit: light dusty rose (matte)
  • Buzz: metallic rose shimmer w/silver microglitter (glitter)
  • Trick: light metallic pinky-copper shimmer w/tonal microsparkle (shimmer)
  • Nooner: medium pinky-brown (matte)
  • Liar: medium metallic mauve (shimmer)
  • Factory: pinky-brown (satin)
  • Mugshot: metallic taupe shimmer w/slight pink shift (shimmer)
  • Darkside: deep taupe-mauve (satin)
  • Blackheart: smoky black matte w/rosy red microsparkle (matte with sparkle)

Price

CA$52 in Sephora, for 0.05oz x 12 eyeshadows, double-ended makeup brush, and 4 primer potion samples.

ud naked 3 swatch

Pros:

  • Beautiful rose-colored shades
  • You get the best of all textures – matte, shimmer, metallic, glitter, and satin
  • Great pigment pay-off
  • You get neutral shades, so it’s wearable for daily use
  • 12 eyeshadows in 1 case!
  • You get highlight, medium, contour and eyeliner colors
  • Excellent double-ended brush
  • 4 primer potion samples that last for up to a week for each
  • Works for any skin tones

Cons:

  • Blackheart is not dark enough. I find UD Blackout from Naked 2 is a better black eyeshadow than Blackheart
  • Dust tends to have a lot of fallout