Lavender Grey using NARSissist Palette

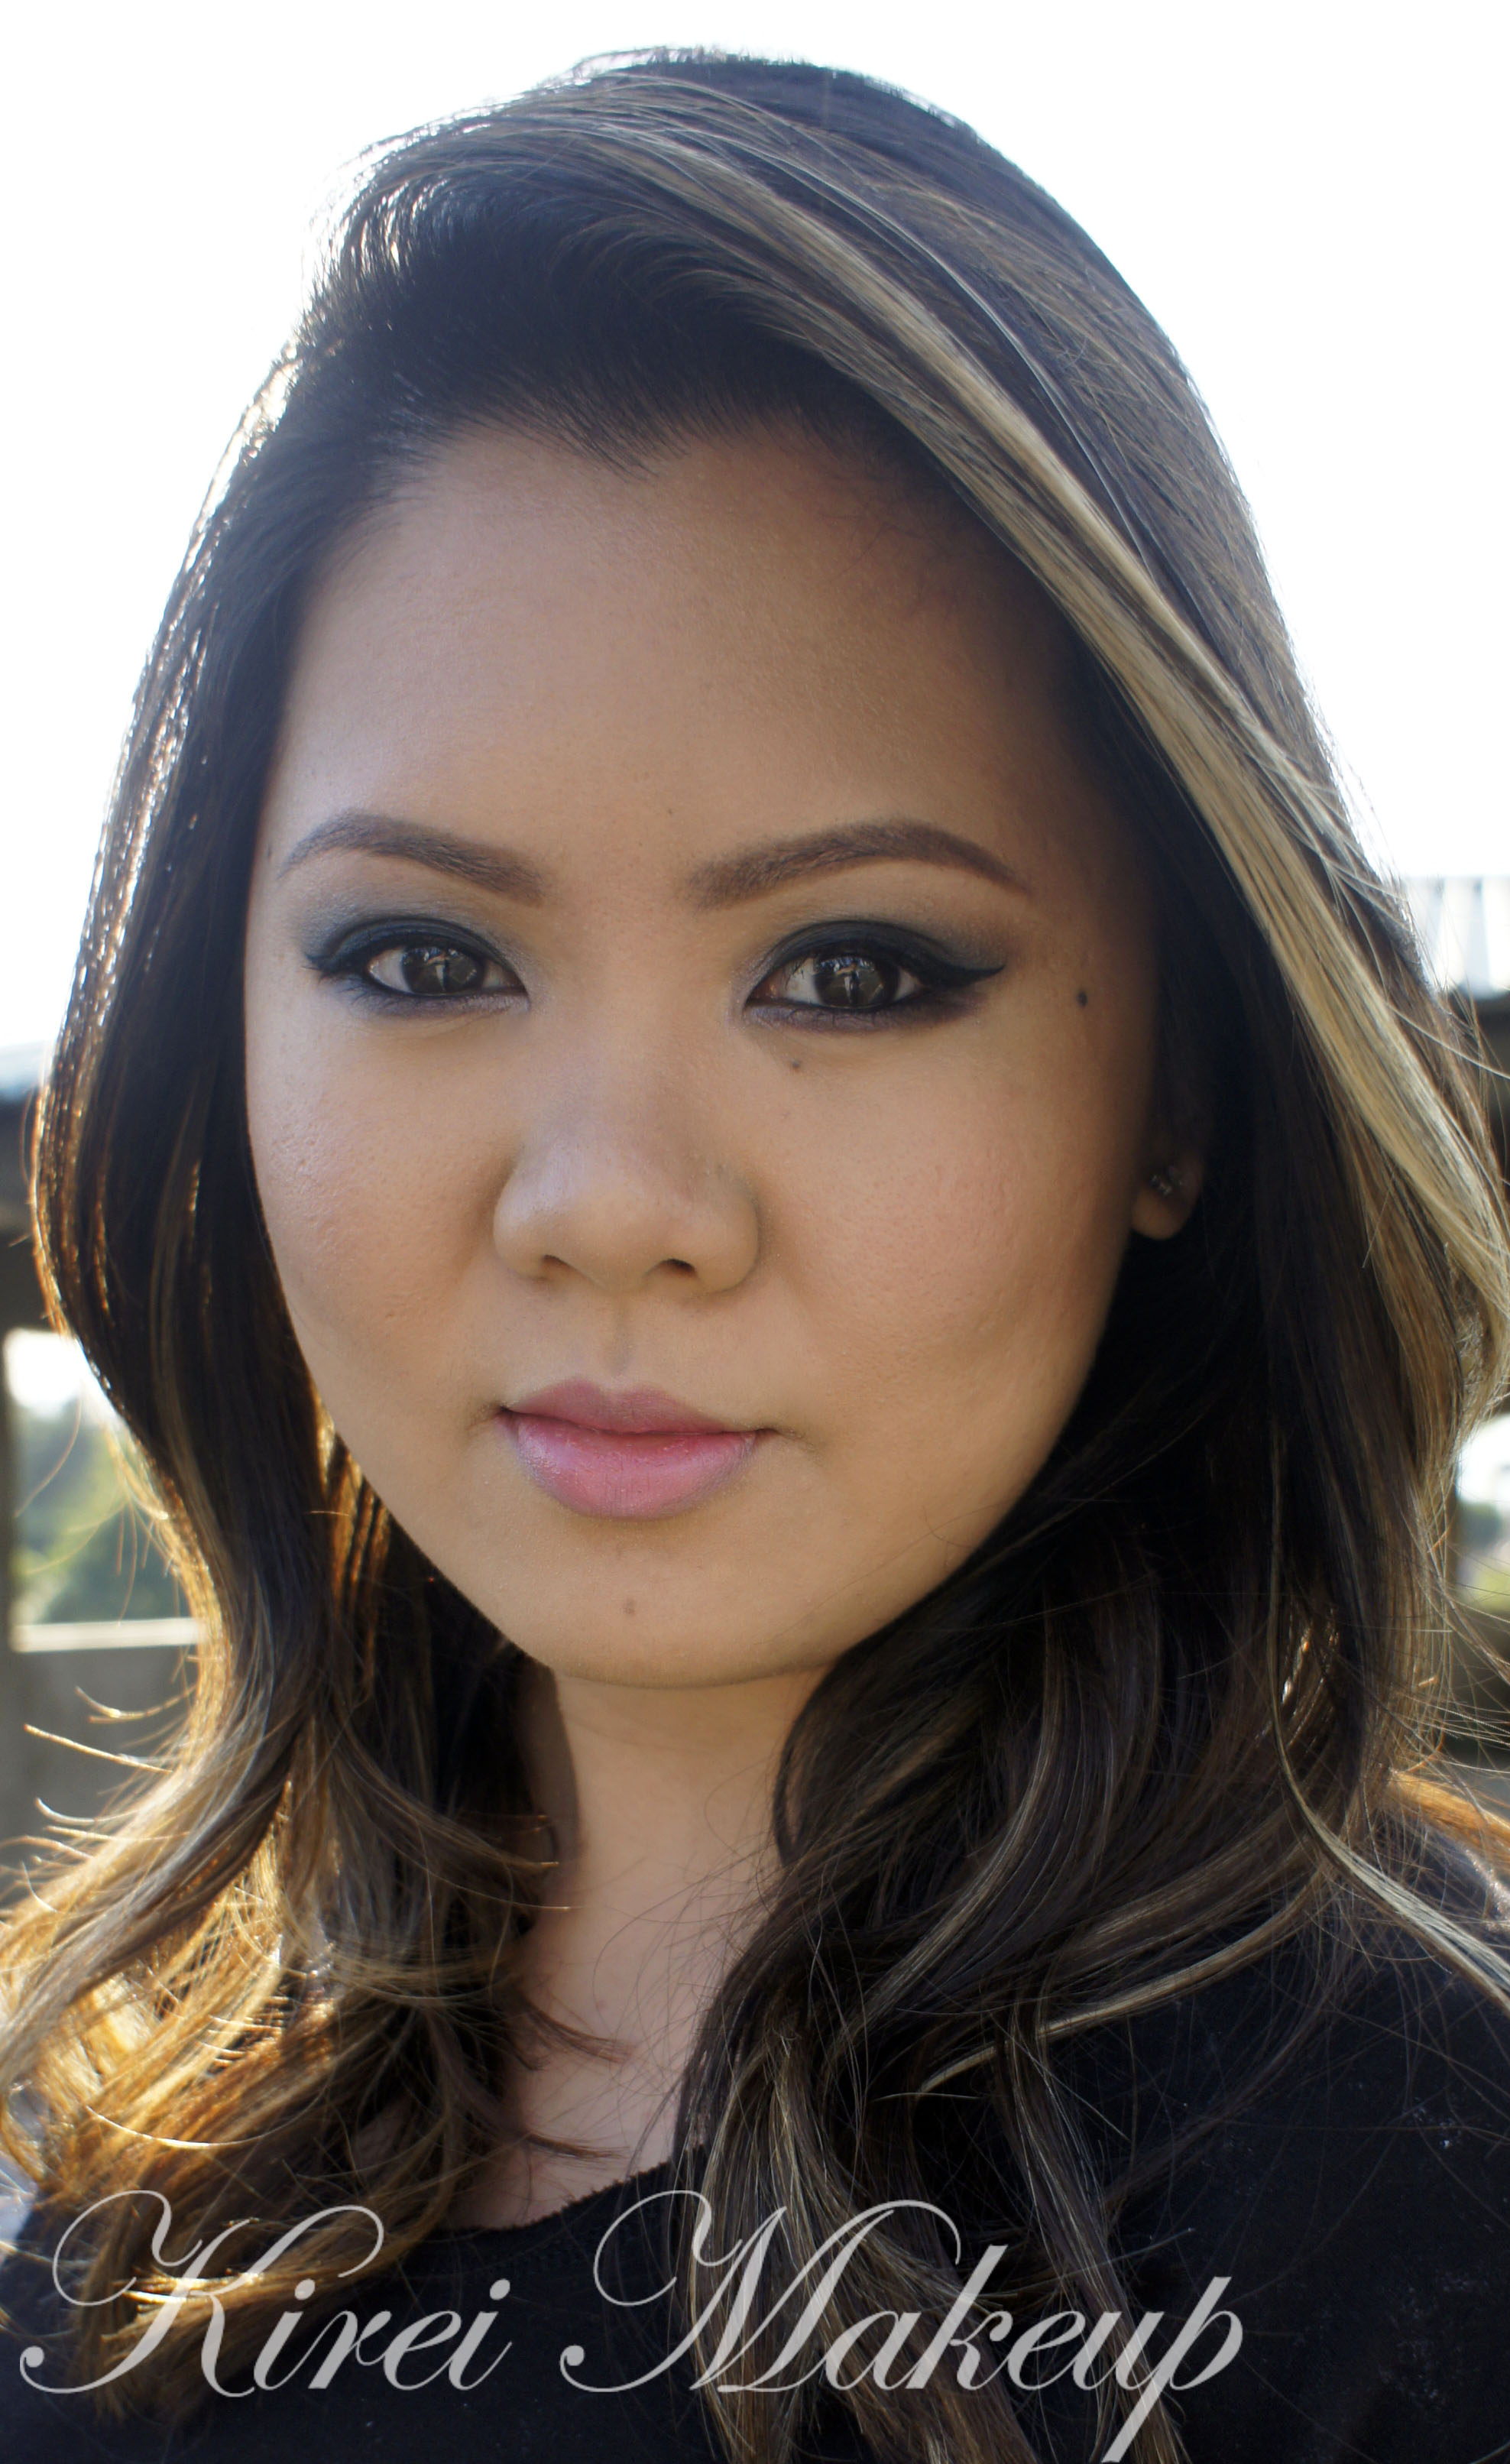
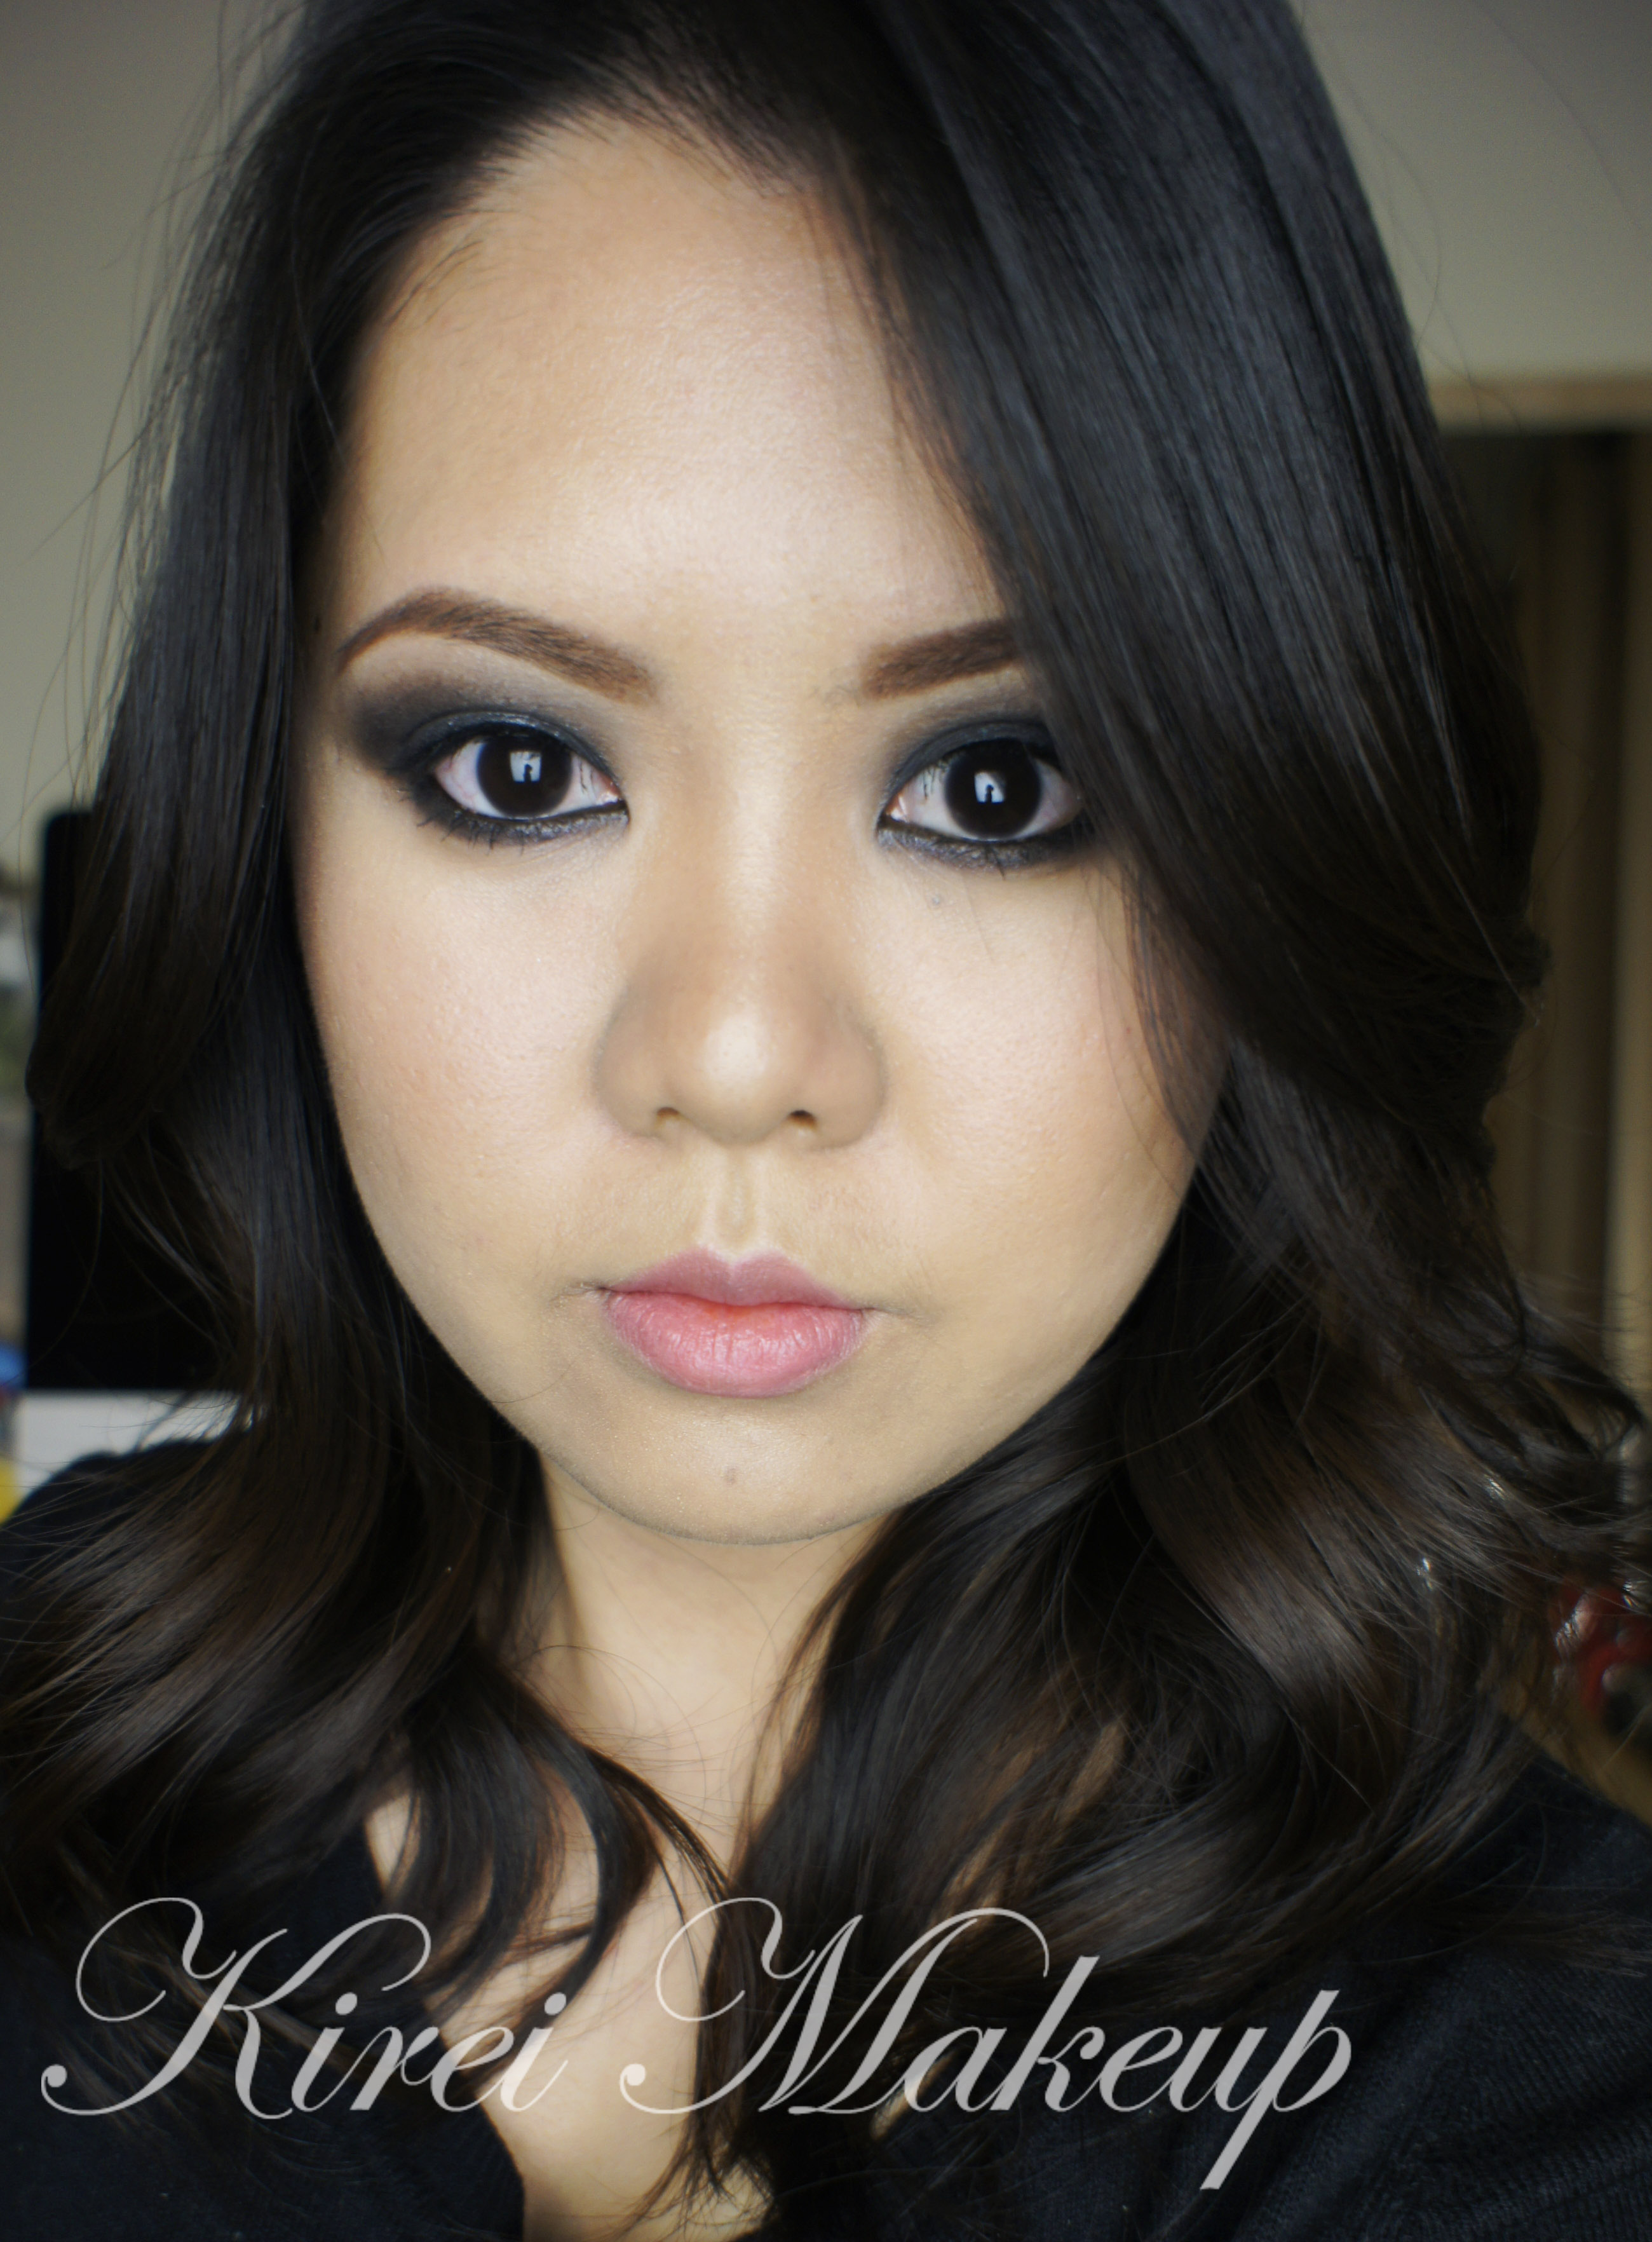
For this week’s tutorial, I decided to use my NARSissist Palette again! I fell in love with this palette all over again. I feel like it’s such a great palette with a more mature color option. For today’s tutorial, I picked out my favorite shades which were in the range of grey, lavender, and violet. I know the picture doesn’t show much of the lavender/violet on the lid, but I assure you it’s such a pretty grey with very subtle hint of lavender/violet in it. If you’re one not to wear color, and prefer a much neutral option, this would be a great addition to your makeup wardrobe.

Oh, just to let you guys know, I have been trying to update my Instagram daily. I’m going to try to do a weekly “Monday Makeup Inspiration”, and regram/repost-ing every look that YOU guys do if you FOLLOW me (@kireimakeup) and add #kireimakeup to your Instagram pictures! I’d love to see your makeup and/or your re-creation of any of my looks!
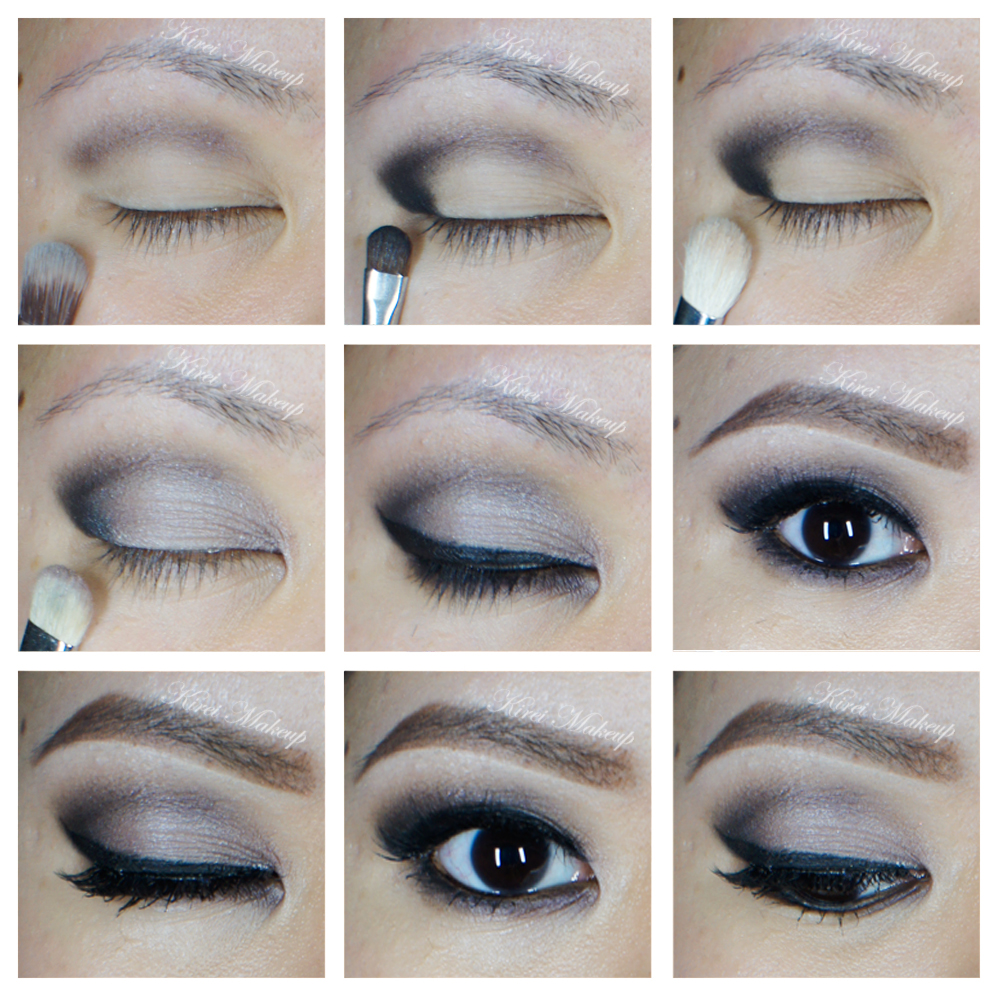
narsissist smoky eyes

How-to:

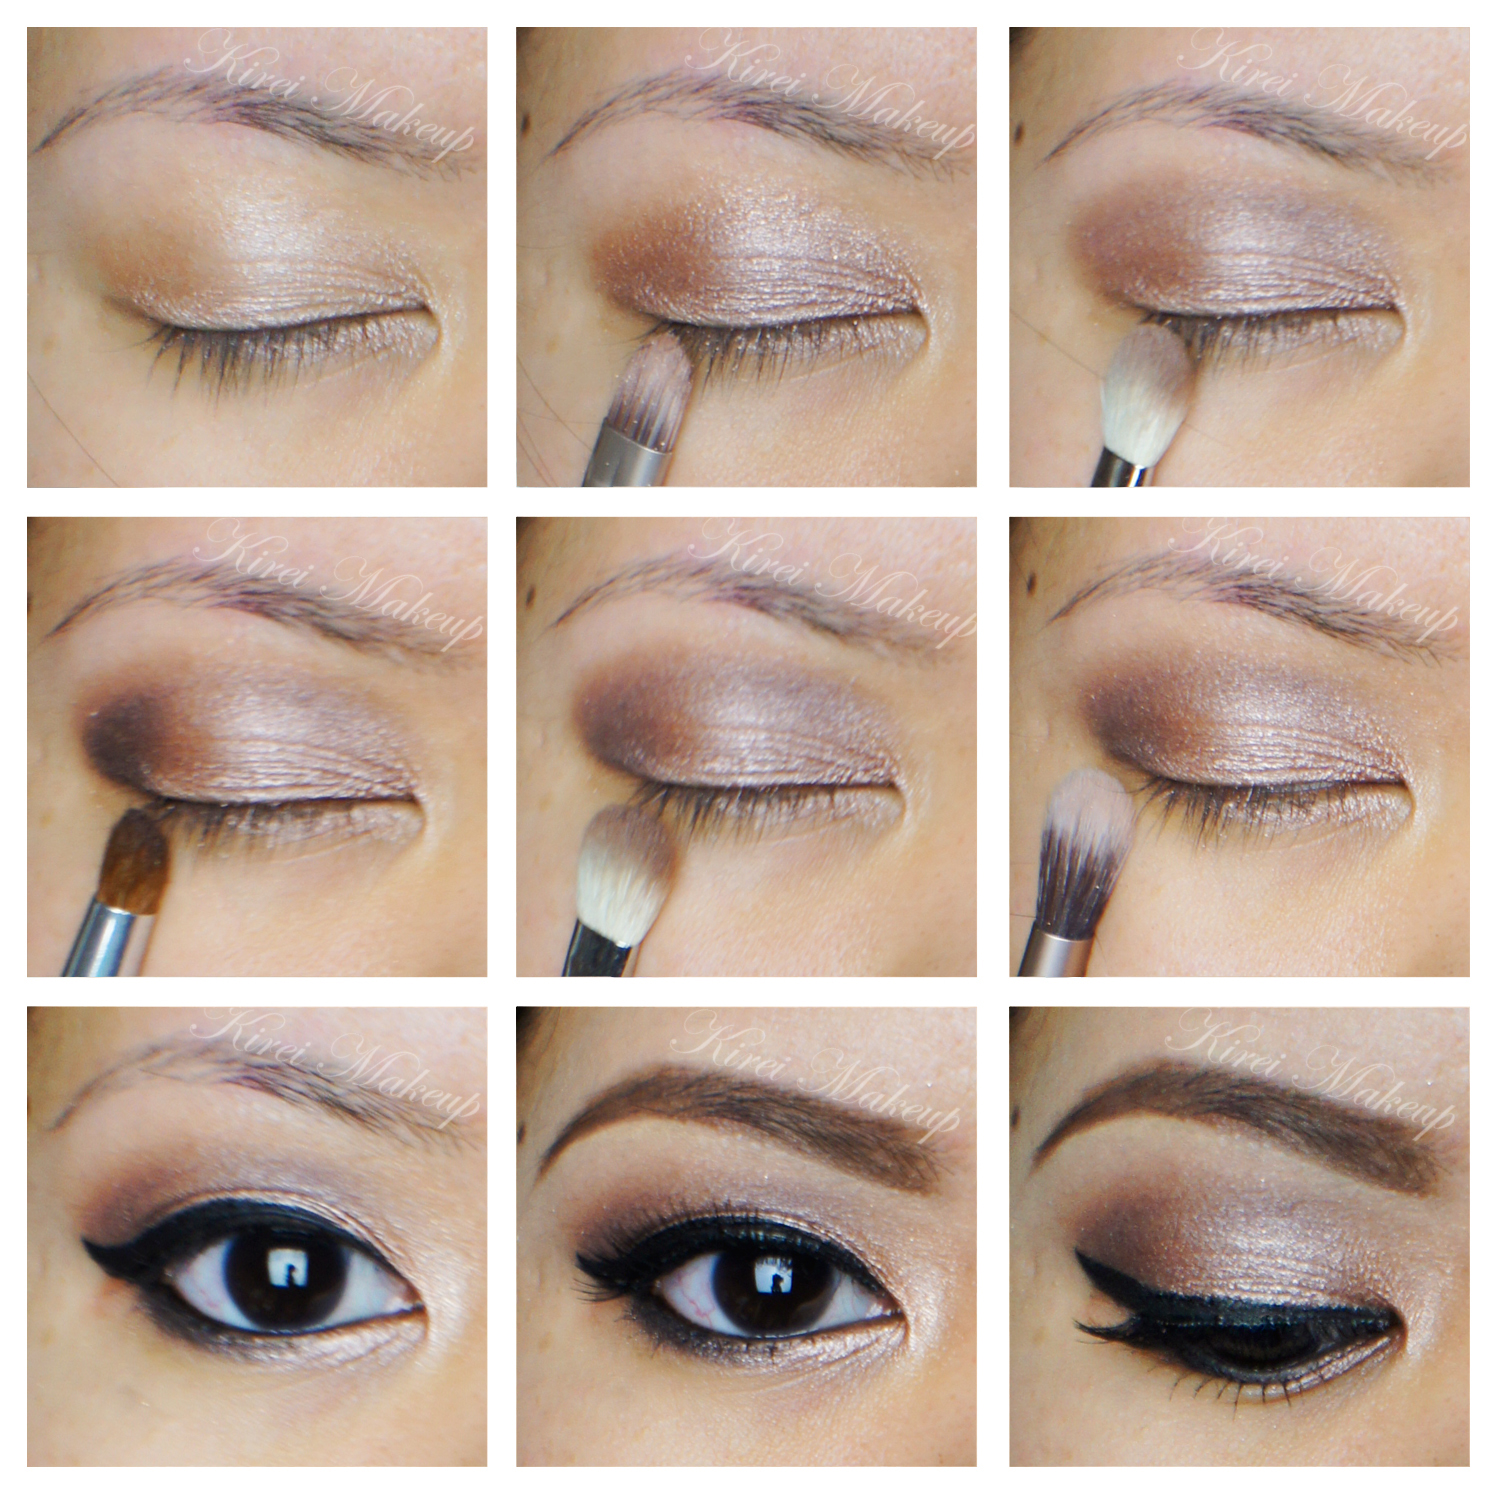
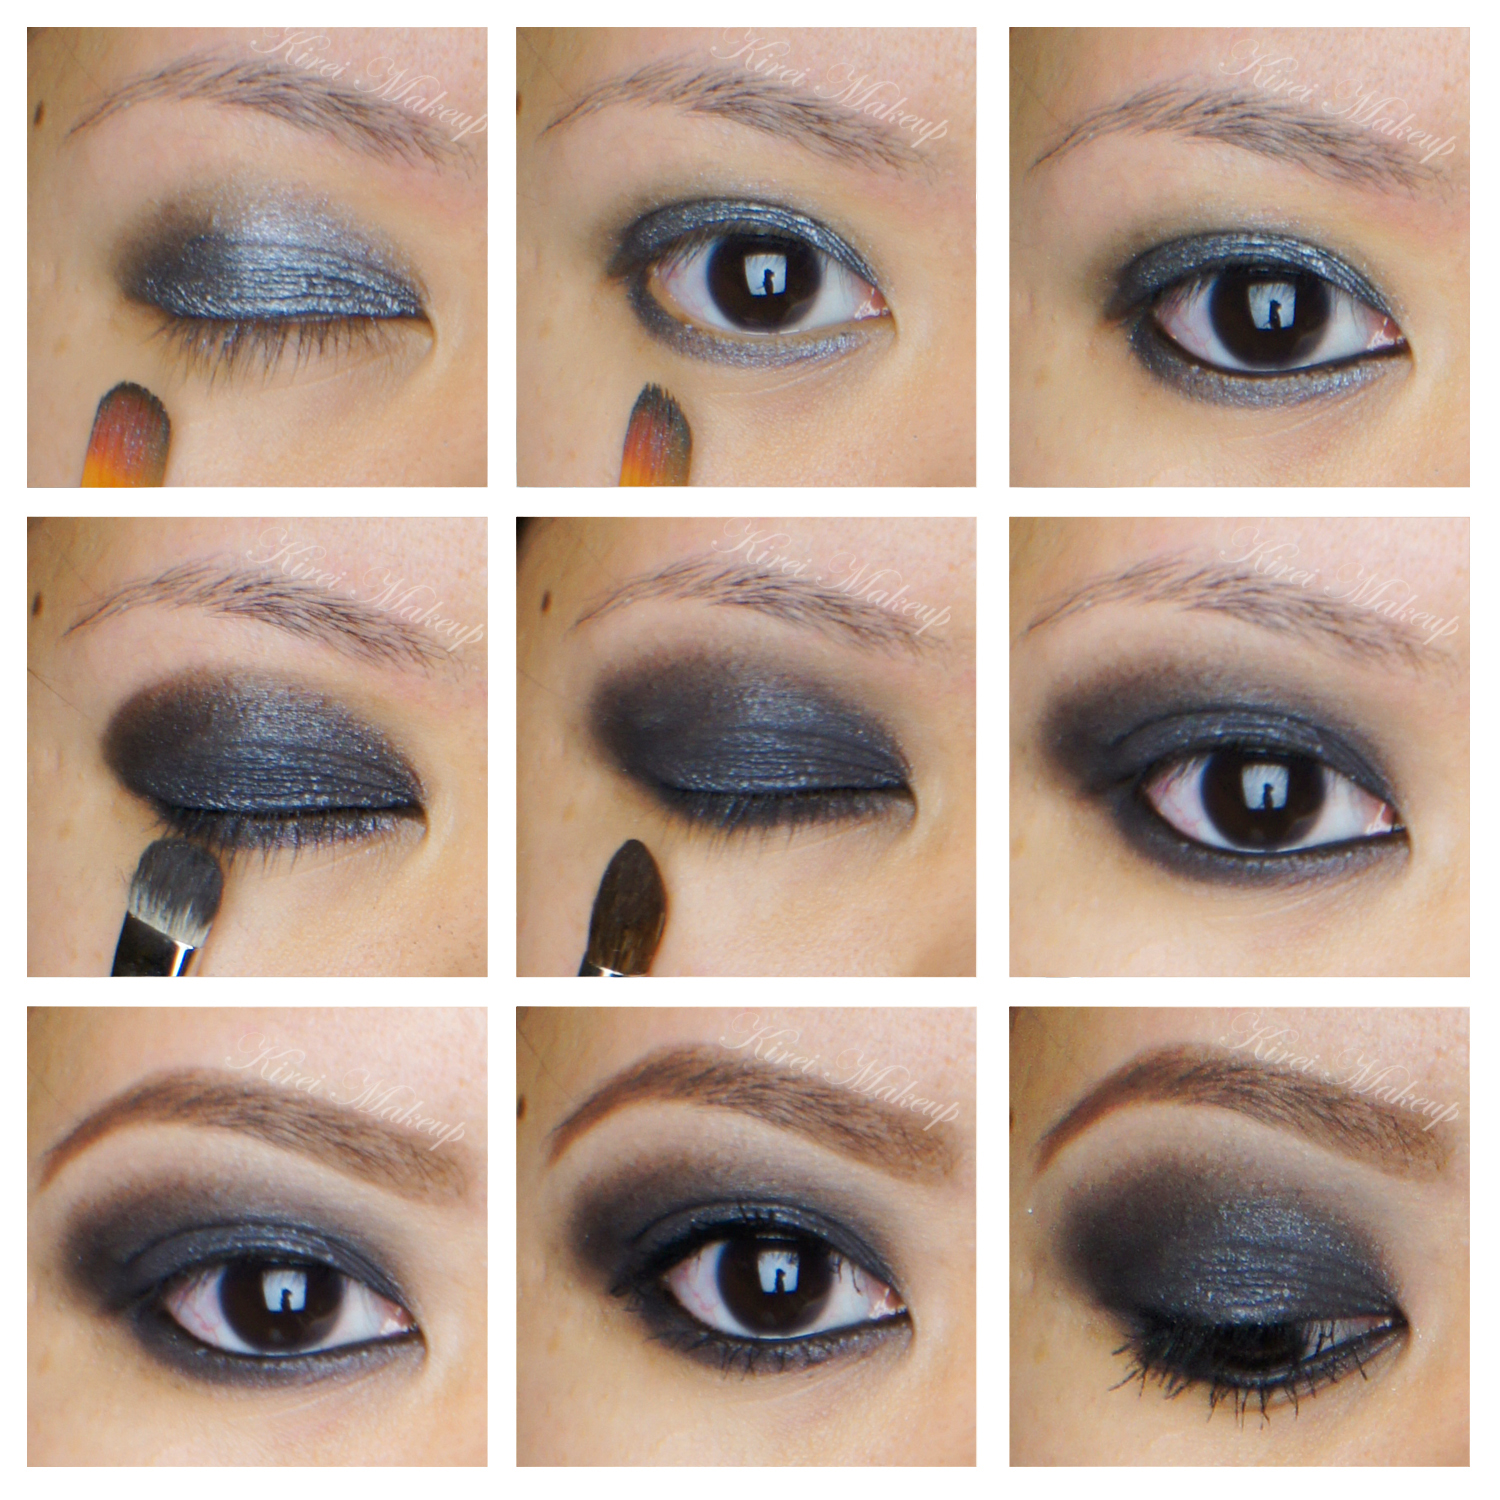
1. I’ve prepped my eyelid using Urban Decay Primer Potion in original. Using a blending brush (from UD Naked 3 palette), I applied NARS Brousse II on my crease.

2. Using a small shader brush, I applied NARS Pandora II on the outer V of my eyelid.

3. I blended my crease by applying NARS Madrague I using a clean blending brush. I used this shade as a transition color.

4. I applied NARS Ashes to Ashes on my entire eyelid using a flat eyeshadow brush. I also added a little bit of NARS Lhasa on top of it.

5. I created a winged liner along my upper lash line using L’oreal Infallible Gel Lacquer 24hr in Blackest Black and an angled eyeliner brush. Using whatever was left on the brush, I ran it along the lower lash line, and waterline.

6. I also used a small shader brush and applied NARS Ashes to Ashes along my lower lid.

7. I filled my brows using Anastasia Brow Wiz in Ash Blonde and Brunette. I cleaned up the edges of my brows using Cover FX G20 cream foundation. If you want to know how I fill my brows, please check my brow tutorial.

8. I curled my lashes and applied Cover Girl Lash Blast mascara. I also applied falsies (Korean’s falsies, not sure what it’s called since the brand is not in English).

NARSissist Lavender Grey smoky eyes

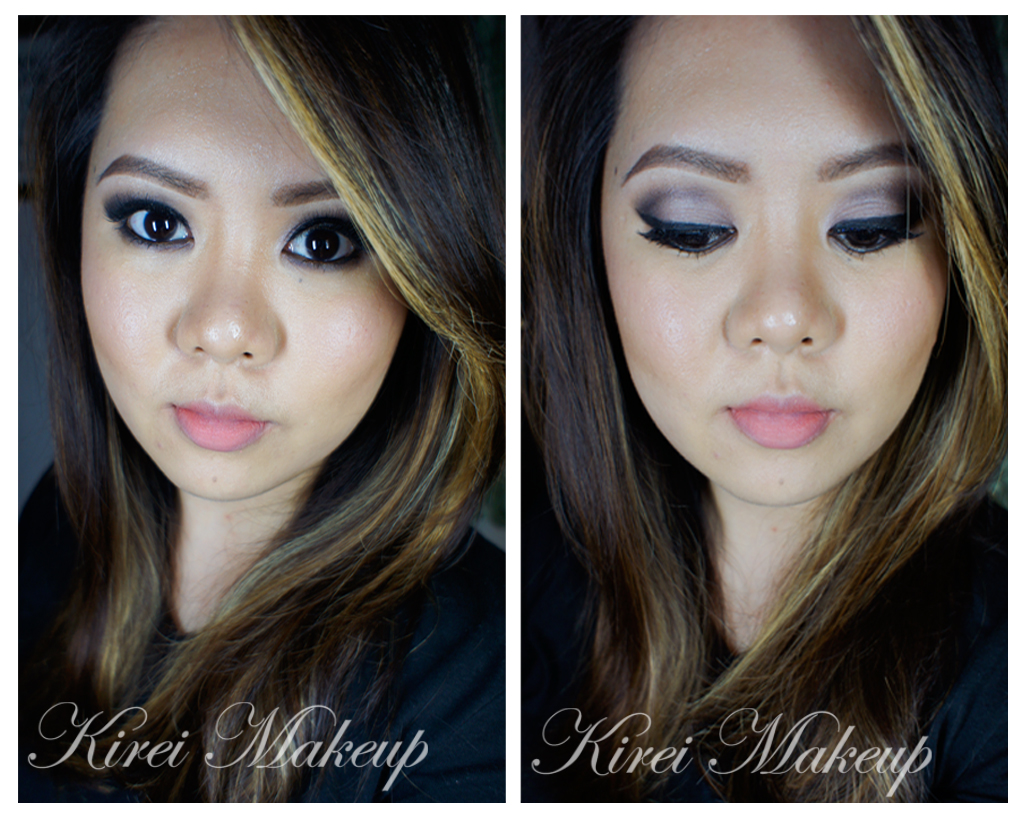
9. On my face, I applied Cover FX Cream Foundation in G40 using MAC Masterclass Brush Oval 6.

10. I lightly applied highlight and contour using CoverFX cream foundations in G20 & N110. Check out my BACON post to find out how I used CoverFX to do my highlight and contour.

11. On my cheeks, I applied Revlon cream blush in Pinched.

12. On my lips, I applied Revlon Mauve it Over matte lipstick.

Smokey Eyes using NARSissist Eyeshadow Palette

Alright, as promised, a tutorial using NARSissist Eyeshadow Palette! Also, don’t forget to check out my NARSissist eyeshadow palette review if you haven’t! For today’s tutorial I wanted to create a smoky eyes, because let’s face it, who doesn’t love a good smoky eye makeup, eh?!

My favorite type of smoky eye is one where it’s really dark around the lash line area, and it smokes out to grey and then to nothingness. I also like to keep the brows pretty natural looking since the eyes are so strong, and the rest of the face is simple and easy. For this tutorial, I added a dark purple on the lower lash line, to make it slightly chic and to compliment my eye color (purple looks great on any eye colors!).

About the lighting – since my lights are not with me (I’m in Jamaica at the moment), I do take all my pictures with natural daylight. As you can see on the final picture, this look is very light with emphasize on the eyes. I want to show you that you can still rock that dark smoky eyes with very minimal face makeup.

Personally, I don’t like wearing a lot of makeup – aka heavy contouring, heavy foundation, drawn in eyebrows. Not that there’s anything wrong with heavy makeup (which I do too for tutorials, and for special occasions). So I hope this type of tutorial will work for those who have similar preference like me.

Narssissist makeup tutorial

Scroll all the way down if you want to skip the tutorial, and only interested in getting the list of products used.

How-to:

1. I applied L’oreal Voluminous Smoldering eyeliner on my upper and lower lash lines, as well as waterline. Don’t worry if it is messy!

2. Using a flat eyeshadow brush, I applied NARS Dogon II all over my eyelid. Don’t go all the way to the crease, stop it just below the crease.

3. Using a shader brush, I applied NARS Bad Behavior on the crease.

4. I applied NARS Madrague II as a transition color (just slightly above the crease) using a Smashbox Bullet Crease brush.

5. On the lower lid, I applied NARS Brousse II using the tip of a flat eyeshadow brush.

6. Using a small shader brush, I applied Madrague I on the inner corner of the lid just to brighten up my eyes a little bit.

7. I created a winged liner along the upper lash line using Kanebo Kate Super Sharp eyeliner (optional).

8. I curled my lashes, and applied Make Up For Ever Smoky Extravagant mascara on both upper and lower lashes.

9. I filled my brows very lightly using Anastasia Brow Wiz in Ash Blonde and Brunette.Narsissist makeup tutorial

10. On my face, I applied Smashbox Halo foundation using Sigma Round Kabuki Brush.

11. I lightly contoured my face using MAC Blunt.

12. On the cheeks, I applied MAC Dainty.

13. On my lips, I applied Tarte Lipsurgence in Lively.

Products used:

Eyes – NARSisisst eyeshadow palette (Dogon II – eyelid, Bad Behavior – crease, Madrague II – transition, Brousse – lower lid, Madrague I – inner corner); L’oreal Voluminous Smoldering eyeliner; Kanebo Kate Super Sharp eyeliner; MUFE Smoky Extravagant mascara; Anastasia Brow Wiz.

Face – Smashbox Halo foundation; MAC Blunt; MAC Dainty.

Lips – Tarte Lipsurgence.

Disclaimer: clicking on the Sigma link will take you to my Sigma affiliate page. Any purchase you make on Sigma from my website will help in this blog’s maintenance. Rest assured, I only recommend products that I honestly love and use on myself. Thank you for your support!

Soft Smokey Eyes using Urban Decay Naked 2

Happy Lunar New Year, everyone! I hope this year will bring more luck, health, and prosperity for you! Oh, how I miss being home for Lunar New Year, all those yummy food and family gathering together!

Anyways, for this tutorial, I wanted to use my Urban Decay Naked 2 palette to create a soft smokey eyes. Ever since I’ve been using my Naked 3, I felt that the Naked 2 and 1 were being left out in the corner, crying for my attention.

I also wanted to practice some contouring and highlight using my Kryolan HD Foundation palette, and I do have to say the foundation is so creamy and it blends so nicely into the skin. If you don’t like the heavy makeup on this tutorial, feel free to skip the contour/highlight part.

easy smoky eyes for asian

How-to:

1. I applied MUFE Aqua Shadow in 28E all over my lid, blending it out using my finger.

2. Using a flat eyeshadow brush, I applied YDK from UD Naked 2 on my eyelid.

3. Using a fluffy blending brush, I applied Tease from UD Naked 2 on my crease.

4. I applied Busted from UD Naked 2 on the outer V using a crease brush.

5. I blended Busted using the brush I used on step 3.

6. Using a clean blending brush, I applied Foxy from UD Naked 2 under the brow.

7. On my lower lid, I applied Chopper from UD Naked 2 on the inner half and UD Blackout on the outer half.

8. I lightly applied Verve from UD Naked 2 on the inner corner of my eyelid using a clean fluffy blending brush.

9. I created a winged liner using L’oreal Infallible Gel Lacquer Liner in Blackkest Black.

10. I lined my waterline using L’oreal Voluminous Smoldering eyeliner.

11. I curled my lashes and applied Cover Girl Lash Blast mascara on both upper and lower lashes.

12. I applied Gwiyomi false eyelashes (sold in Jakarta, please check my Instagram)

13. I filled my brows using Anastasia Duo Brow Powder.

urban decay naked 2 tutorial

14. On my face, I applied Urban Decay Naked Skin foundation using a Sigma Round Kabuki Brush.

15. I contoured and highlight my face using Kryolan HD Foundation palette.

16. I applied MAC Fleur Power on my cheeks.

17. For the lips, I applied Revlon Mauve It Over matte lipstick, and dabbed L’occitane clear lip balm on top of it.

Products used:

Eyes – MUFE Aqua Shadow 28 E, UD Naked 2, L’oreal Infallible Gel Lacquer Liner in Blackkest Black, L’oreal Voluminous Smoldering Eyeliner, Cover Girl Lash Blast mascara, Gwiyomi False Eyelashes, Anastasia Brow Powder.

Face – UD Naked Skin foundation, Kryolan HD Foundation palette, MAC Fleur Power blush, Revlon Mauve it Over lipstick, L’Occitane lip balm.

Black Smokey Eye Tutorial

Today black smokey eye tutorial is a requested look by  Nurina, who asked for a Taylor Momsen look. I decided to do Taylor’s signature look – the black smokey eyes. Anyways, I’ve done something similar to this look in my Classic Smoky Eyes using UD Naked post.

Since this tutorial is a bit more intense, I brought the black eyeshadow up above the crease. Taylor Momsen signature smoky eyes look is very messy, very dark and sometimes she paired it with red lips. You can pair it with red lips, or dark red lips to make it more goth-like.  However, I prefer to go with a peachy lips instead, keeping the focus just on the eyes.

Keep in mind this is an inspired look, so I’ve modify it to suit my face as well as my style. Taylor Momsen’s smoky eye sits too low on the lower lid to my liking. Be warn if the black eyeshadow is very low on the lid, it might make you look older, or it can make you look like you have panda eyes! As cute as pandas are, I’m sure you don’t want to look like you have panda eyes, right?!

black smoky eyes

How-to:

1. I applied MUFE Aqua Cream #1 Anthracite using a synthetic paint brush on both upper and lower lid. I’ve decided to use this so I can get interesting texture on the eyes. If you want to use a matte eyeshadow only, please check my Classic Smoky Eyes post.

2. I lined my waterline and tightline using a black kohl pencil eyeliner by Annabelle.

3. Using a shader brush, I applied Crave eyeshadow from UD Naked Basics palette on top of my eyelid. I extended the eyeshadow to slightly above the crease.

4. Using a clean blending brush, I applied Foxy eyeshadow from UD Naked Basics right at the edge of the black eyeshadow.

5. I applied Crave eyeshadow from UD Naked Basics palette on the lower lid.

6. I filled my brows using Shu Uemura Hard Formula brow pencil, and then set it using Anastasia Brow Powder in Brunette.

7. I curled my lashes and applied L’oreal Carbon Black mascara on both lower and upper lashes.

taylor momsen makeup tutorial

8. I applied UD Naked Skin foundation using a Sigma Flat Top Kabuki Brush.

9. I contoured and highlight my face using Smashbox Contour kit.

10. I applied Chanel Blush de Horizon very lightly on my cheeks.

11. On my lips, I applied Revlon Colorstay Ultimate Suede lipstick in Socialite, and add a few dabs of YSL Glossy Stain in Pêche Cerra-Cola (27).