Smoky Eyes using MAC Rose Gold Pigment

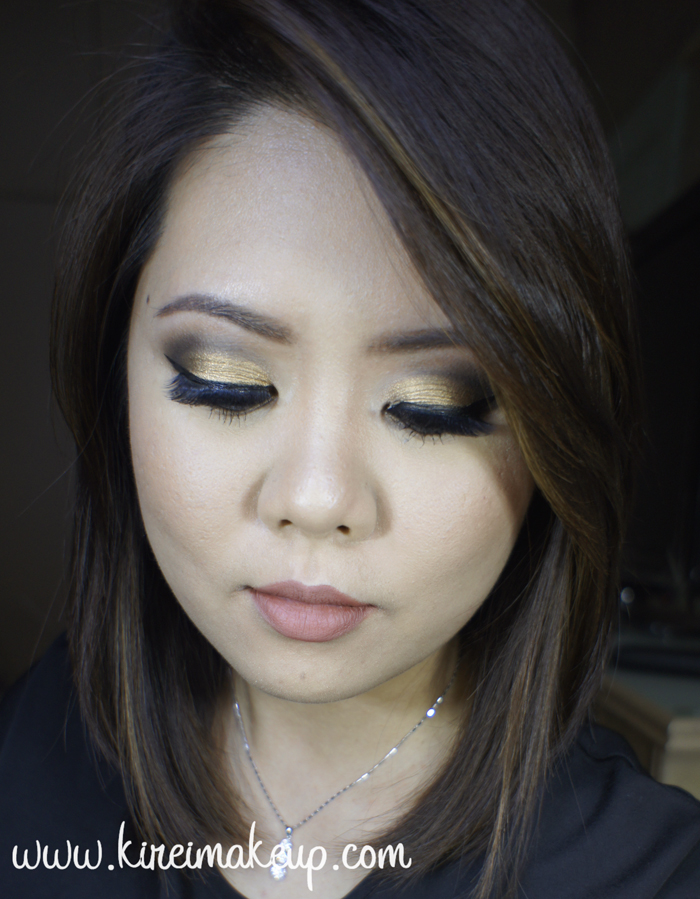
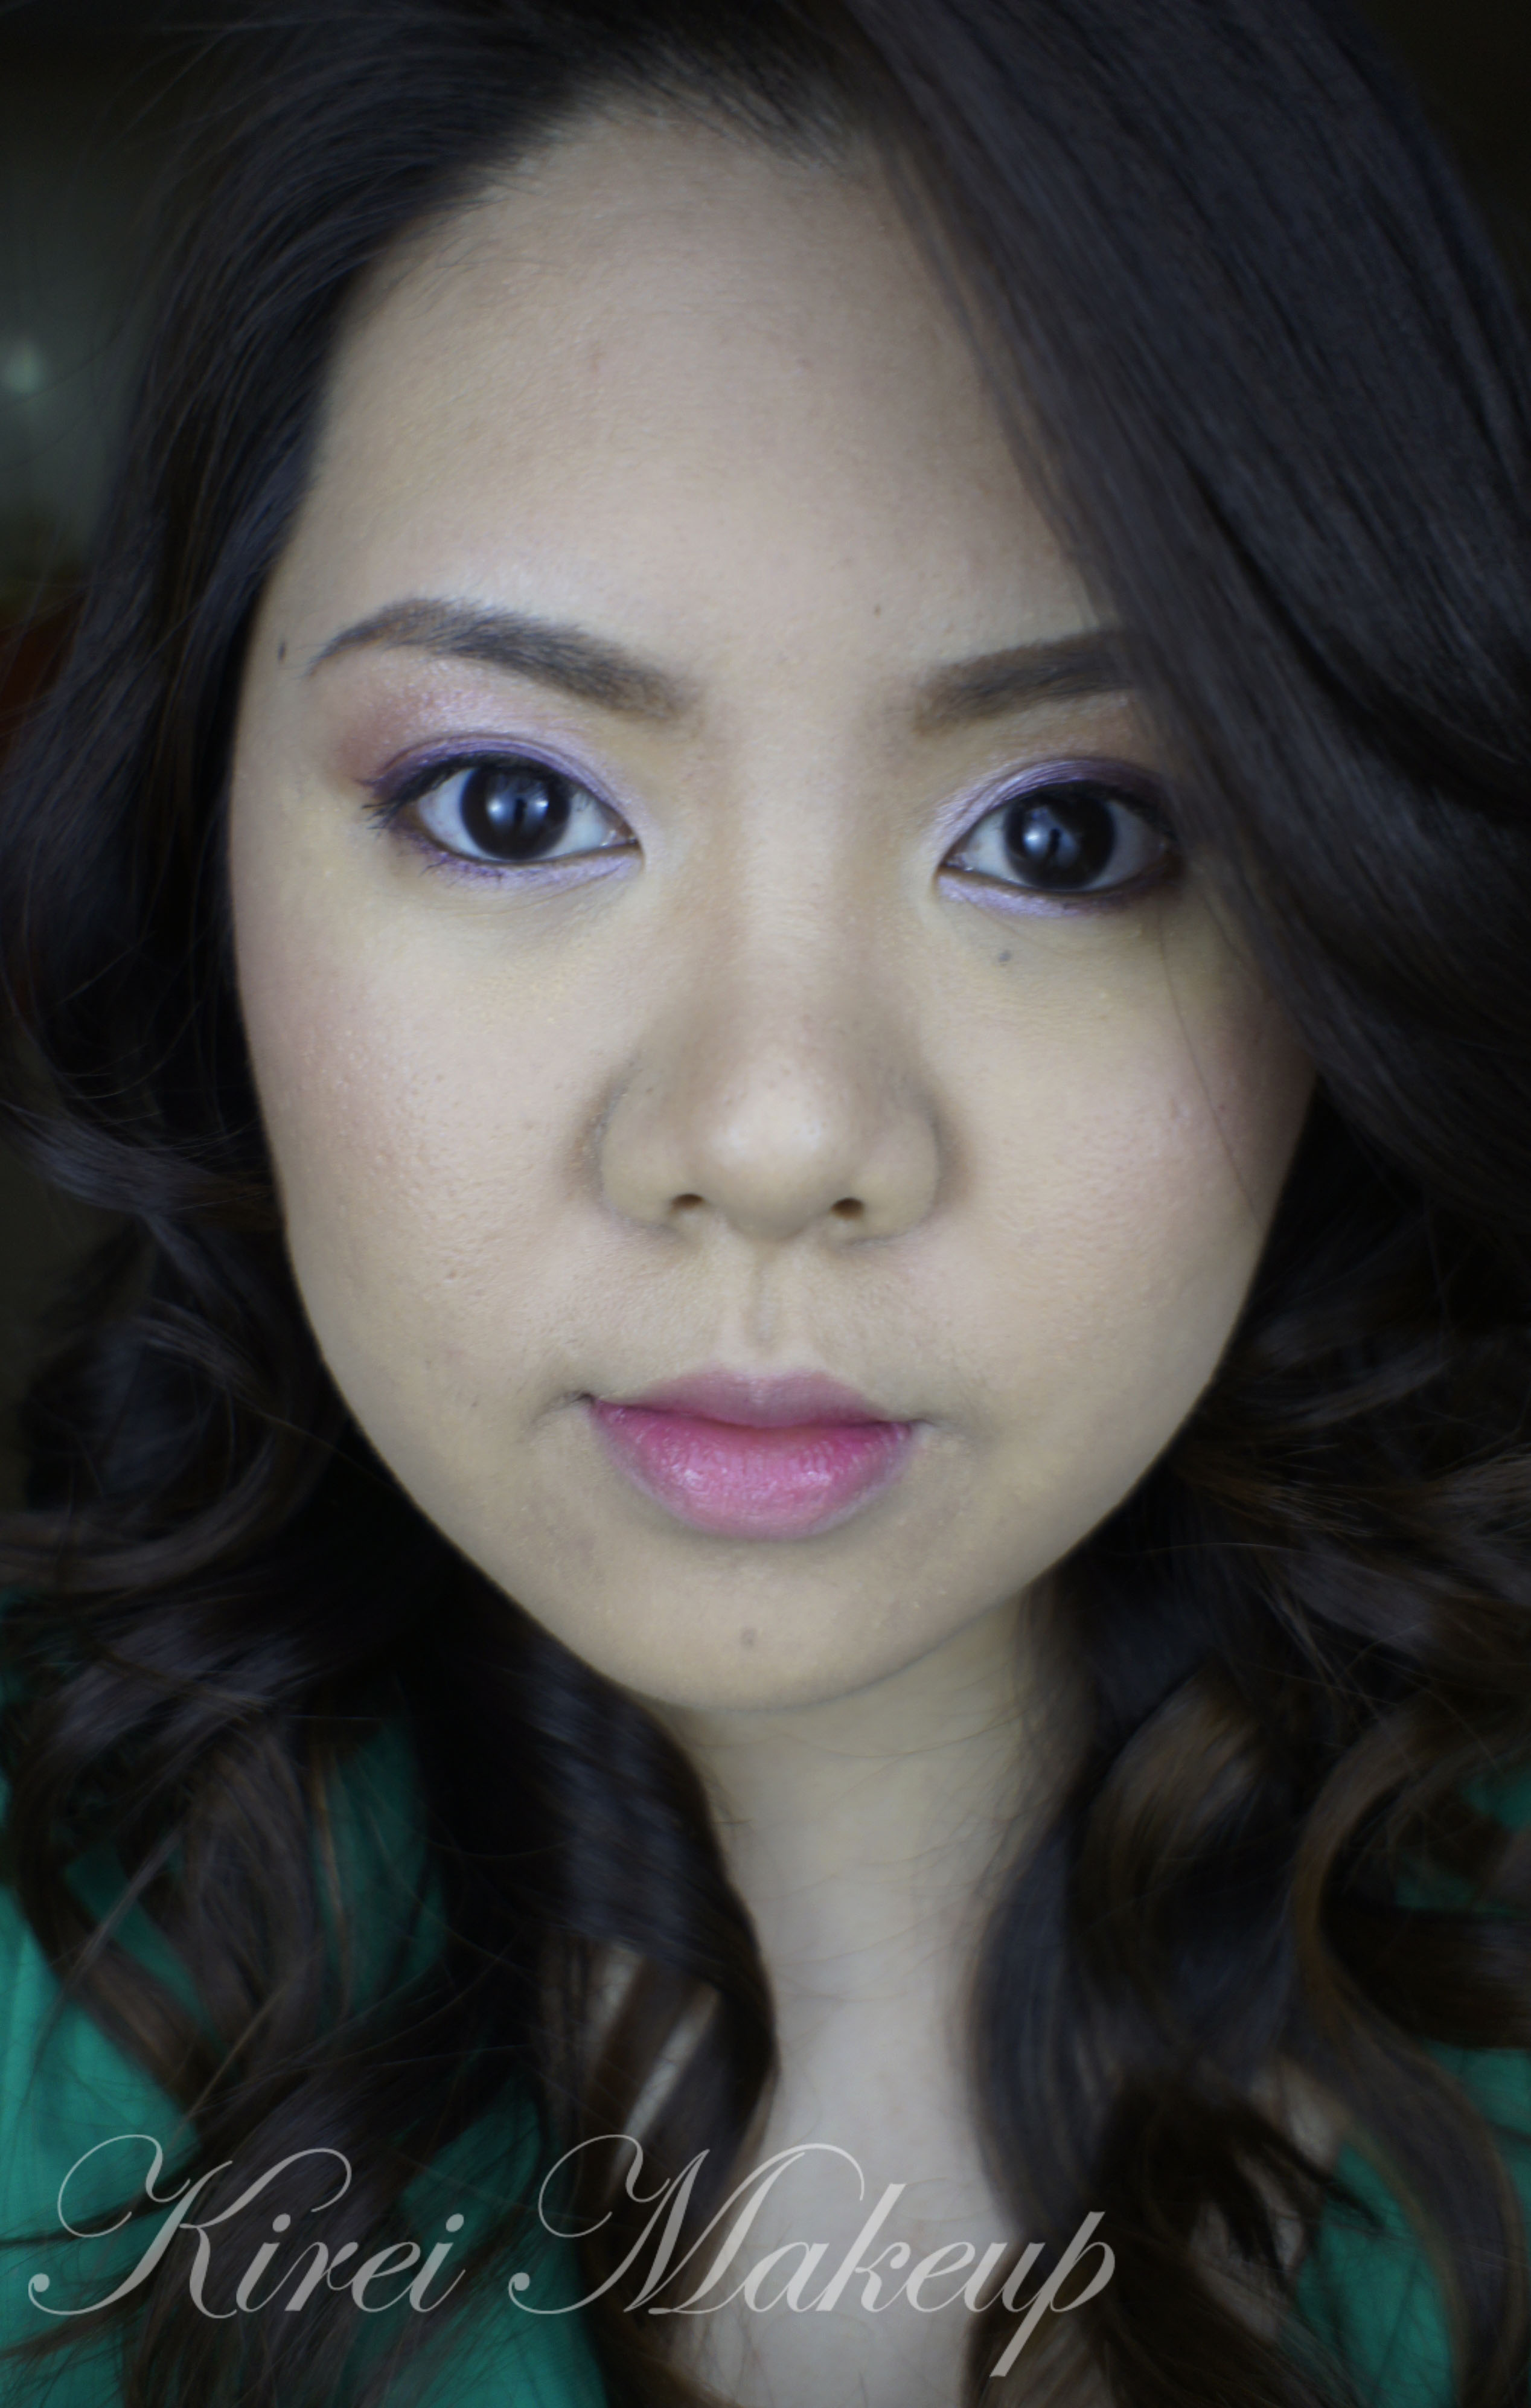
At one point some time last year, I was crazy about anything Rose Gold. In fact, I am still obsessed with anything Rose Gold. Anyhow, I was browsing  around and saw this MAC Rose Gold pigment on their website. I bought it, and played with it. To be honest, when it first came, I was quite disappointed how it does not look anything rose-colored. I should’ve paid more attention to the description. On the MAC website it was described as “smooth, tarnished gold with a touch of rose”. Not sure where the “touch of rose” comes from, I think this pigment is a lot more “tarnished gold”.

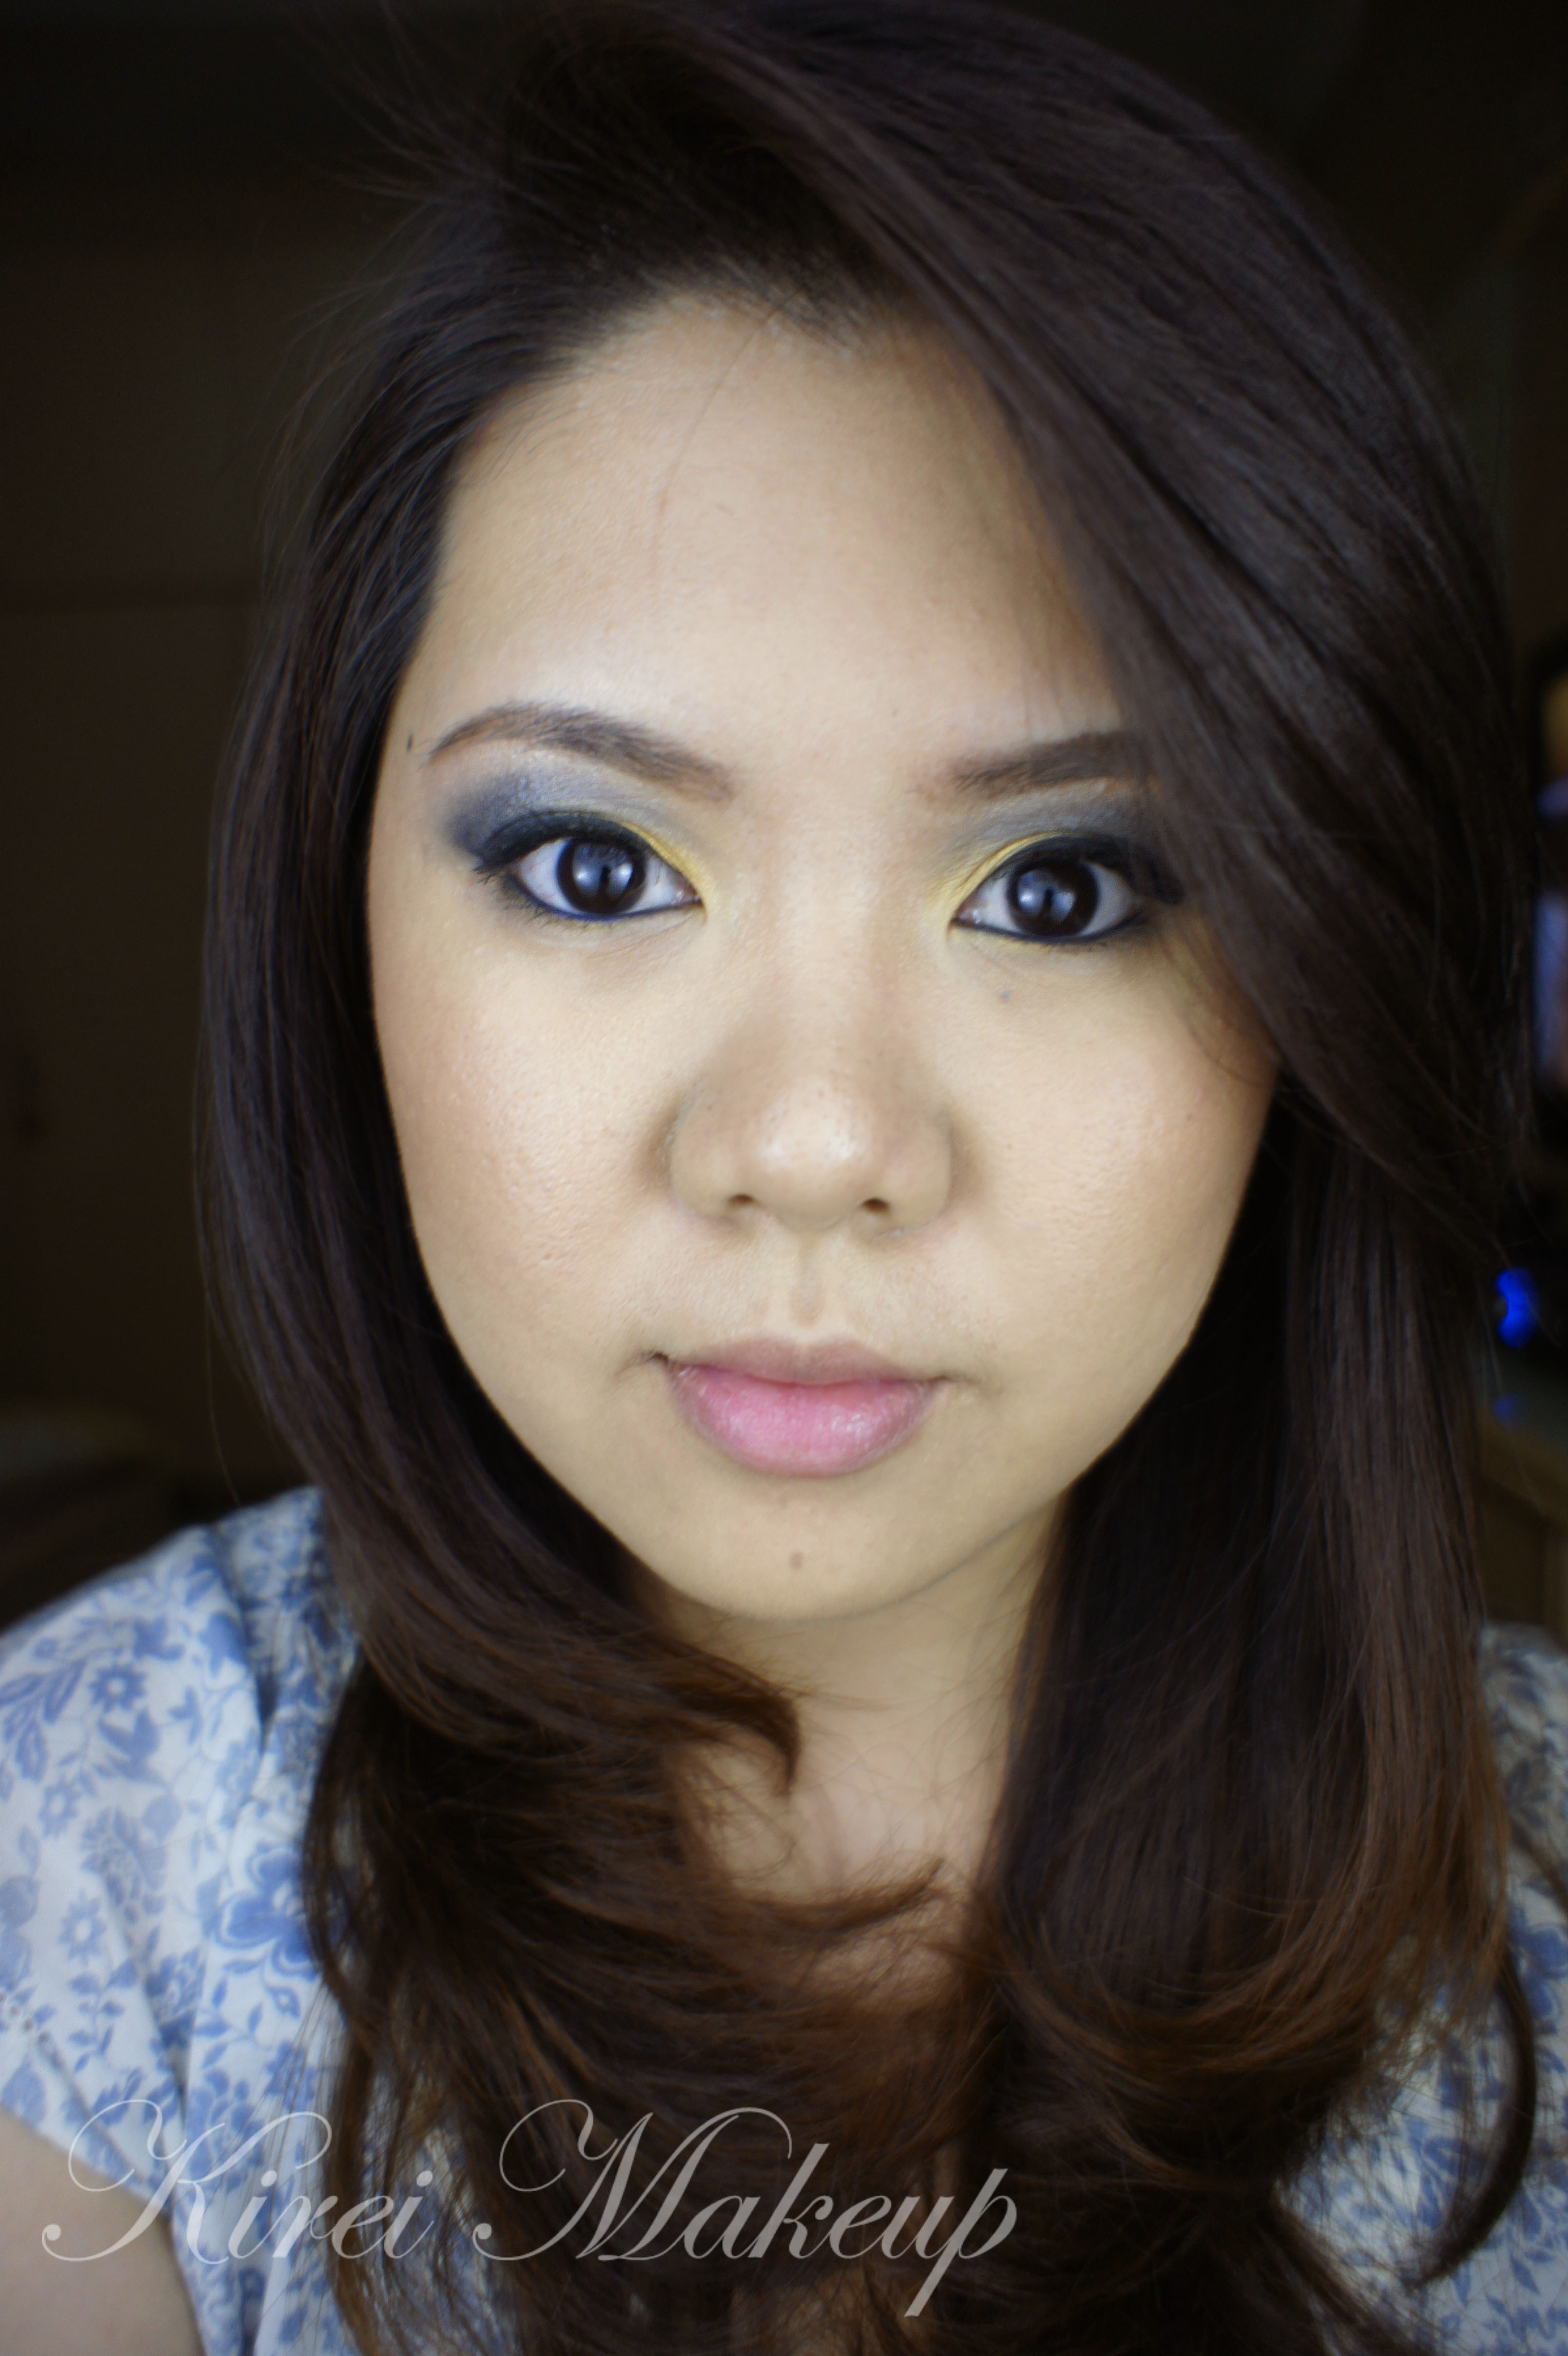
Anyways, I actually love this pigment. It has amazing pigment pay-off, and it’s super smooth! I have used this pigment before on my New Year makeup post. I think the hardest part of using this pigment is actually finding a combination of color that will match it. I’m not that crazy on the result for this tutorial, I feel like the pigment should’ve been paired with a warmer shade. May be I’ll re-do this look in the future.
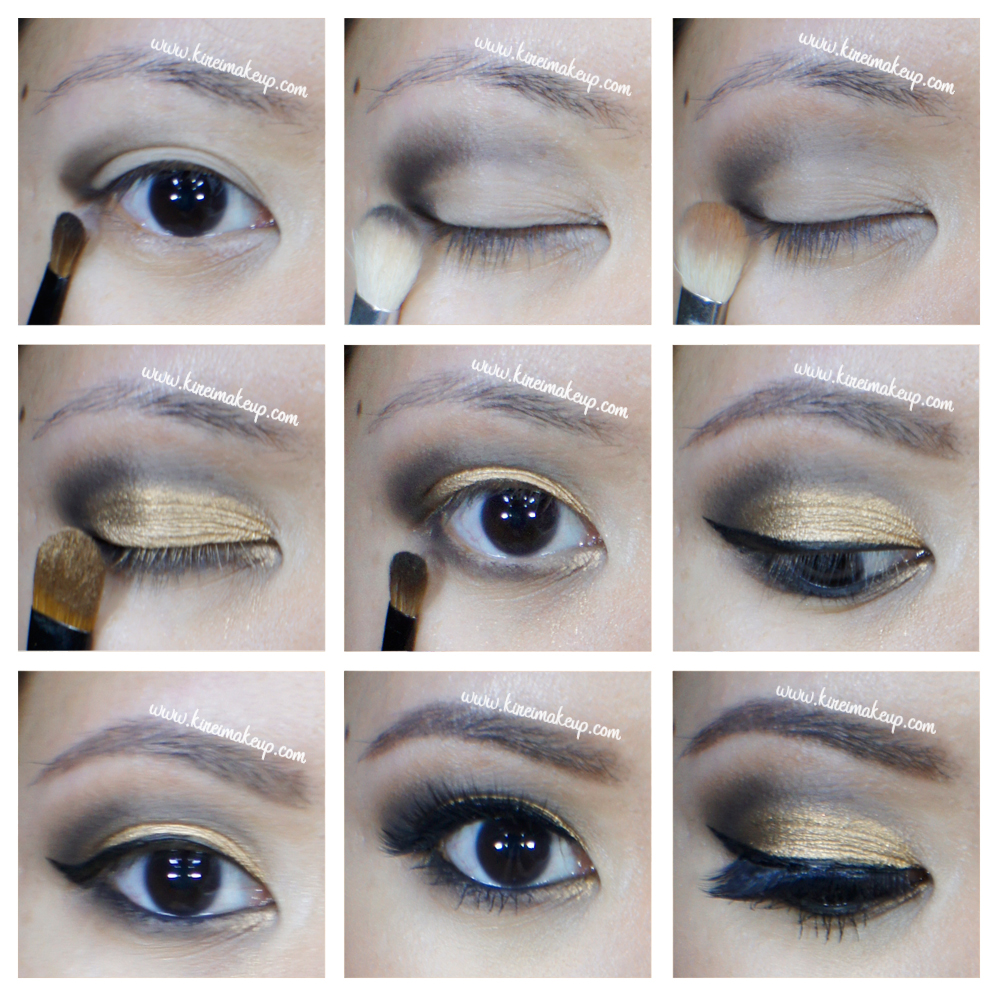
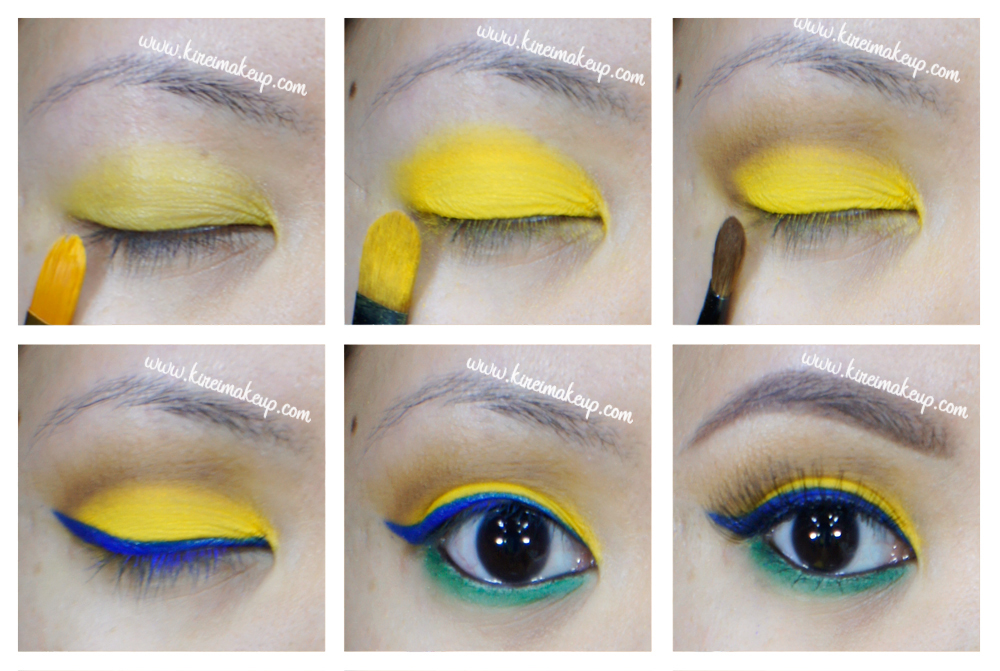
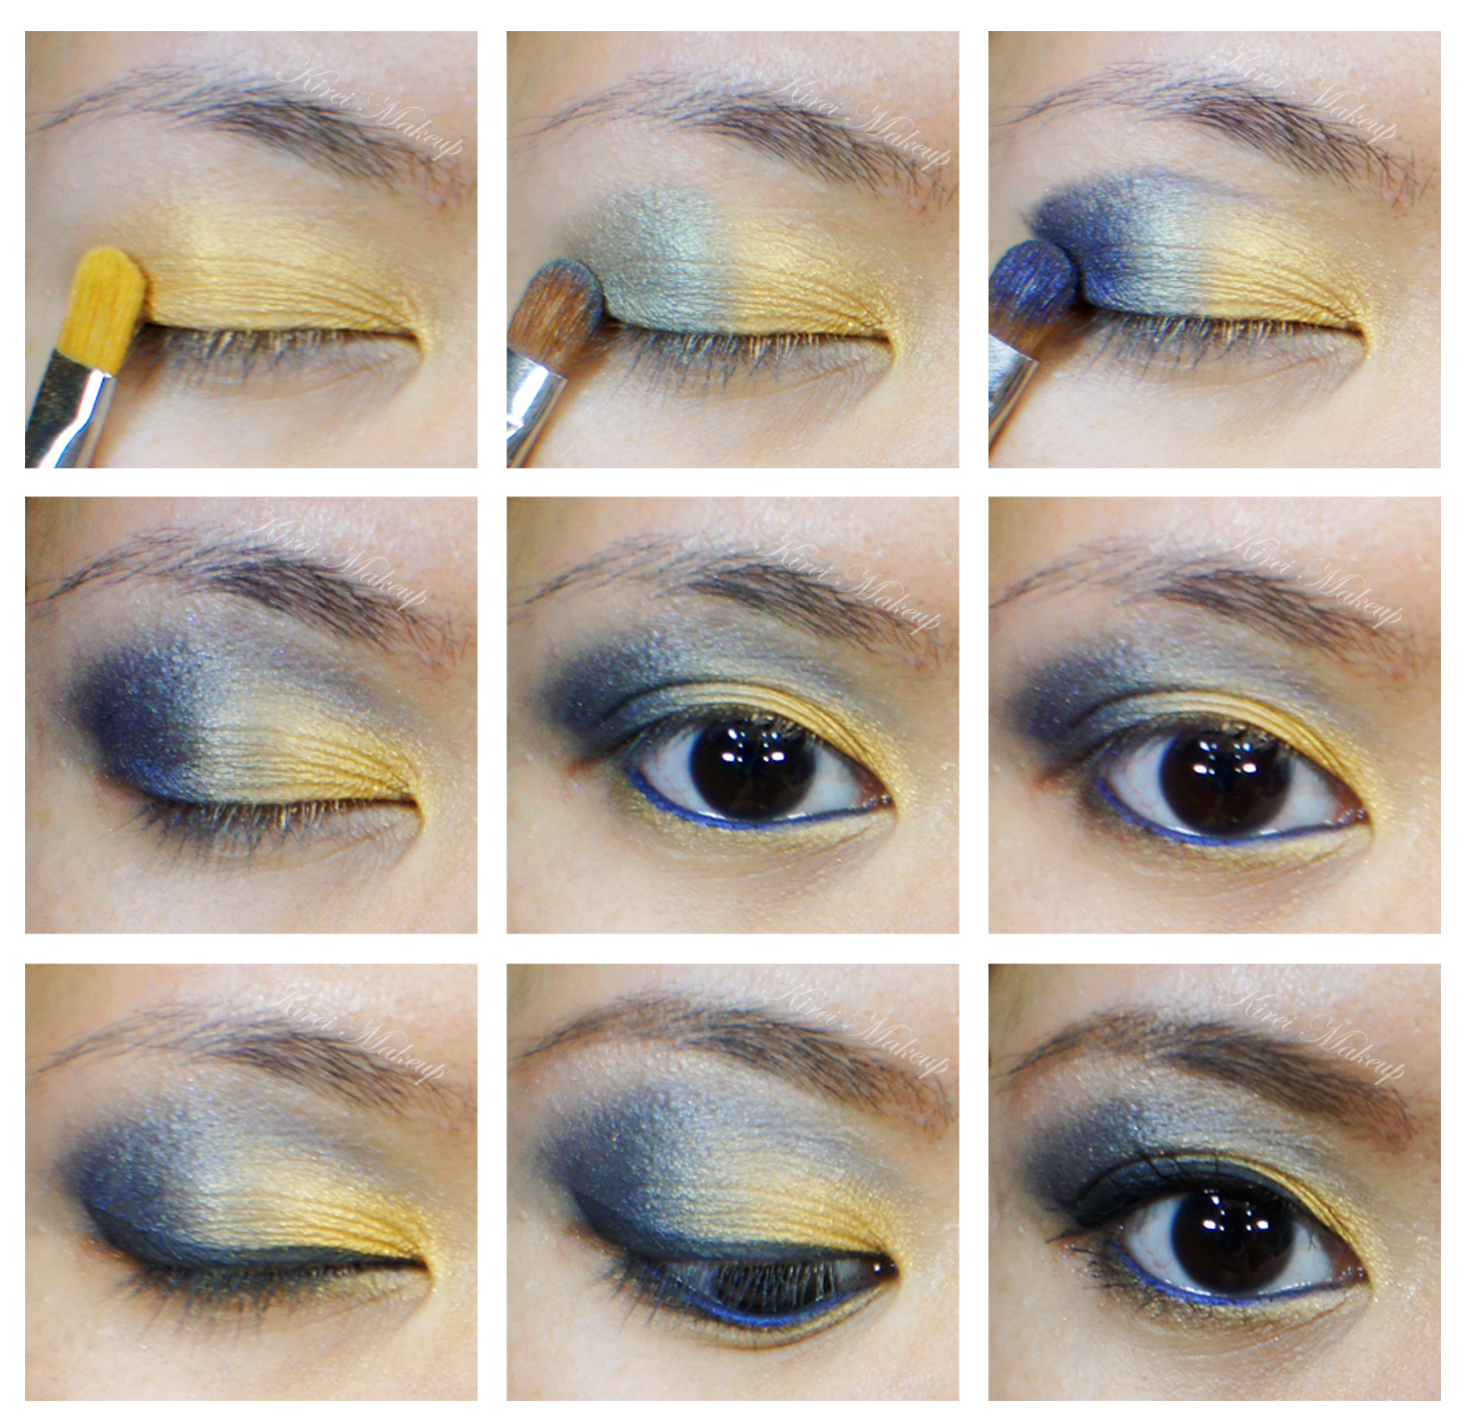
bronze smoky eyes

How-to:

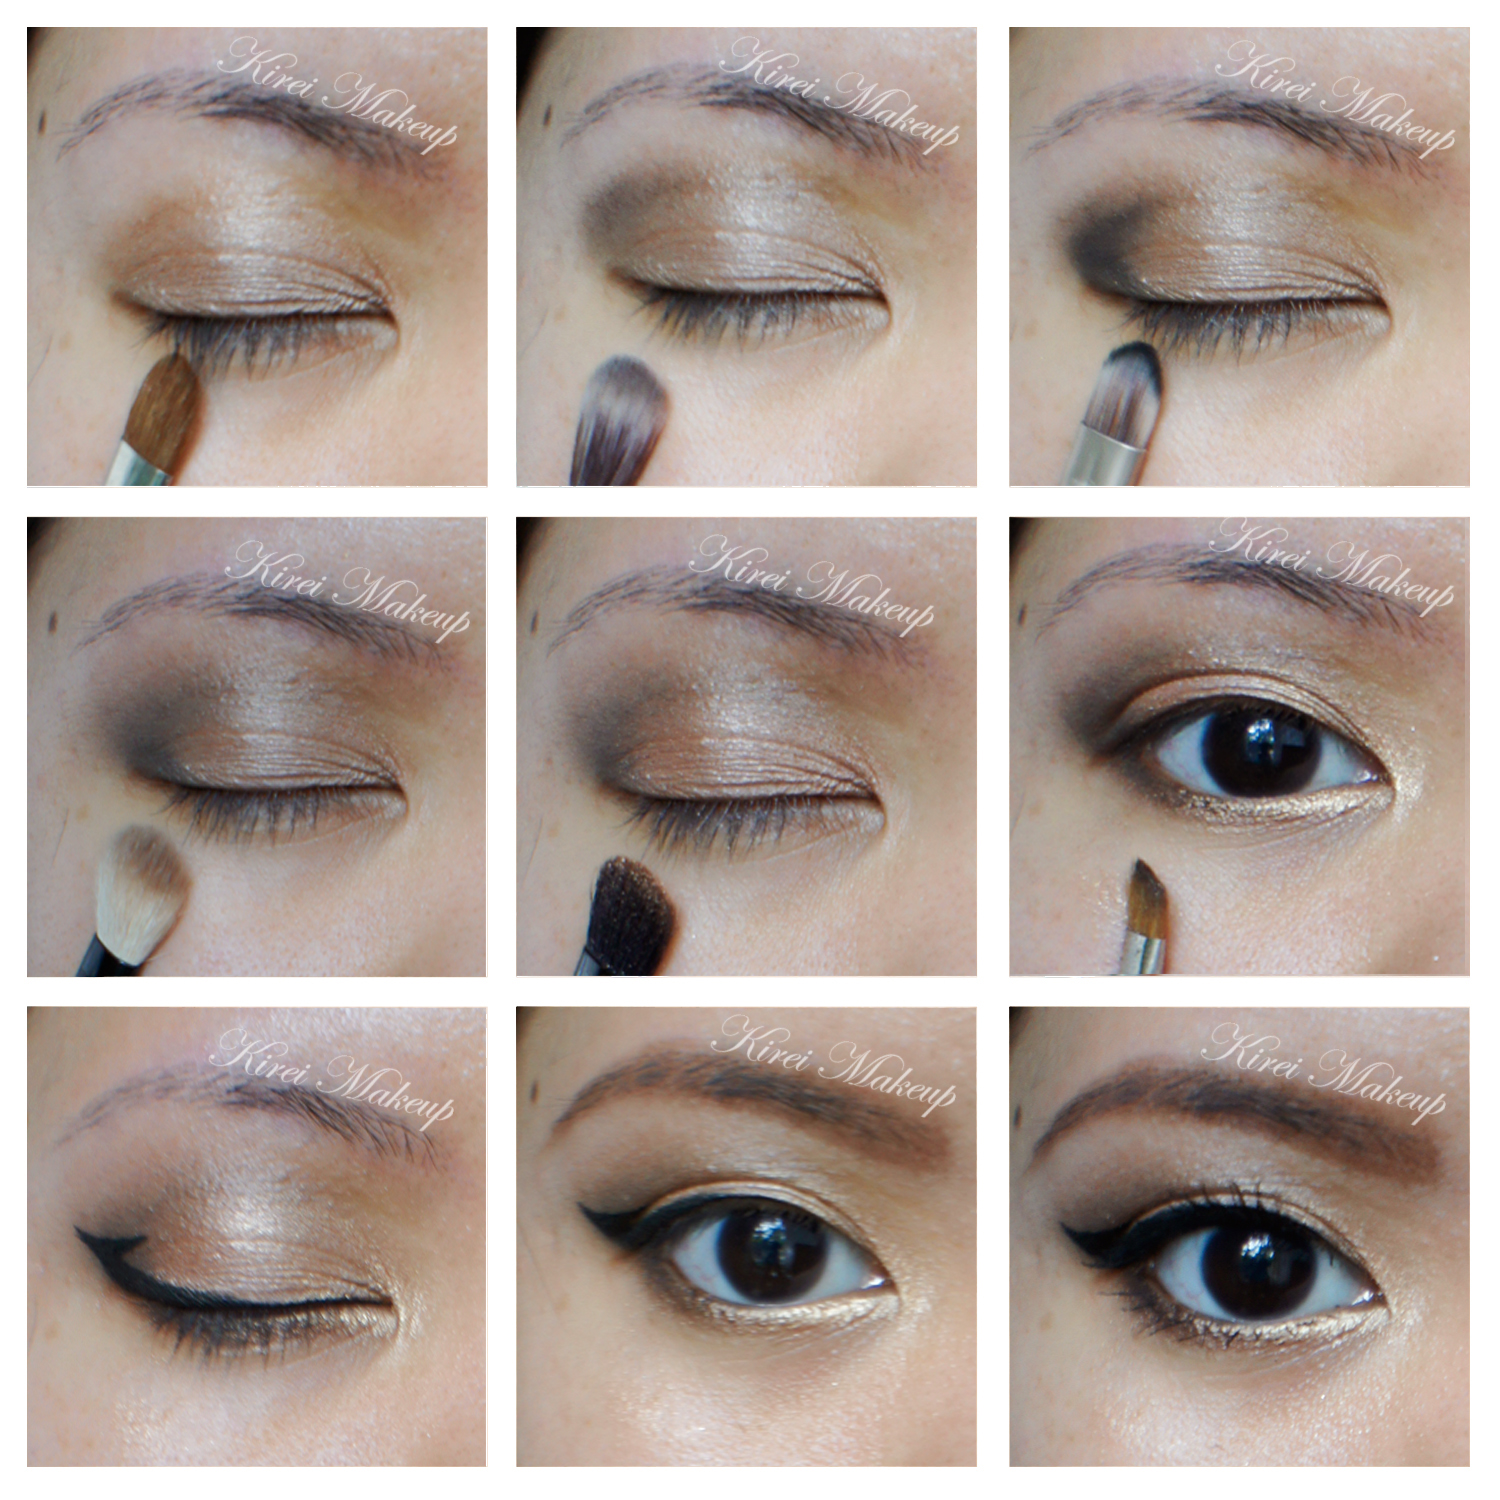
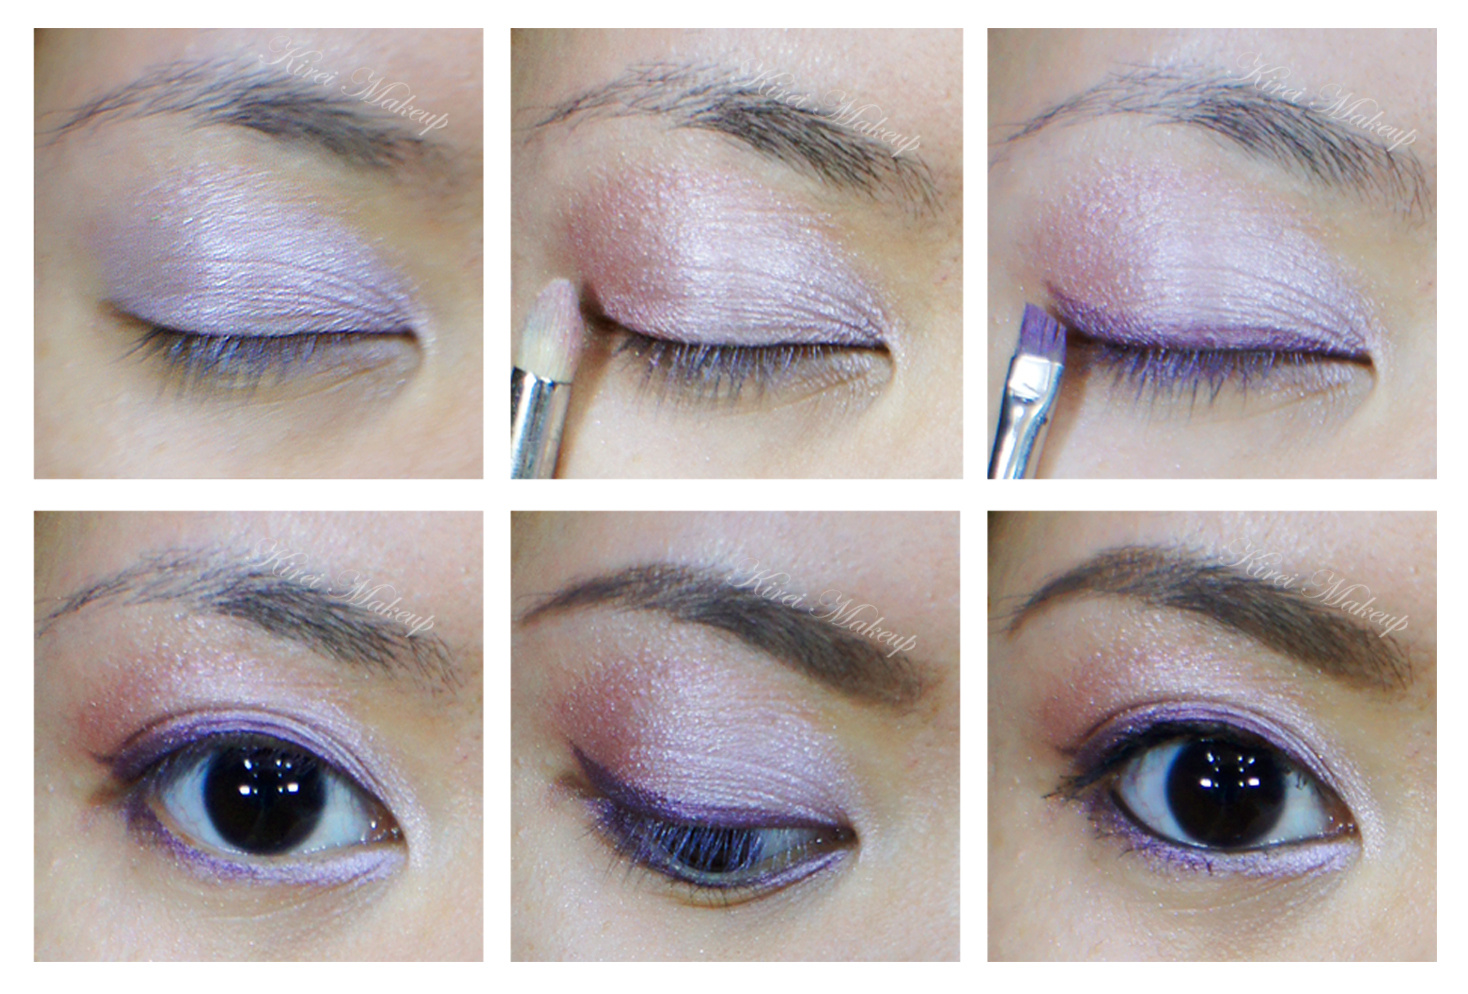
1. I prepped my eyelids using Urban Decay Primer Potion.

2. Using a small fluffy blending brush, I applied Ultra Mattes V2 from Sleek Makeup iDivine Showstopper on my outer V. If you have a monolid, or droppy/hooded eyelids, apply this eyeshadow with your eyes open.

3. I blended out the crease using a clean fluffy blending brush. I added a little bit of the same black eyeshadow to create more depth.

4. I wanted to add a bit more warmth, so I ran a little bit of bronzer, from the Smashbox contour palette, just above the crease.

5. I applied MAC Rose Gold pigment on my eyelid using a flat eyeshadow brush.

6. Using the same brush as no. 2, I applied Ultra Mattes v2 on my lower lid. I applied a little bit of the pigment just on the inner corner of the lower lid.

7. I created a winged liner using Kanebo Super Sharp eyeliner. I also applied a little bit on my waterline.

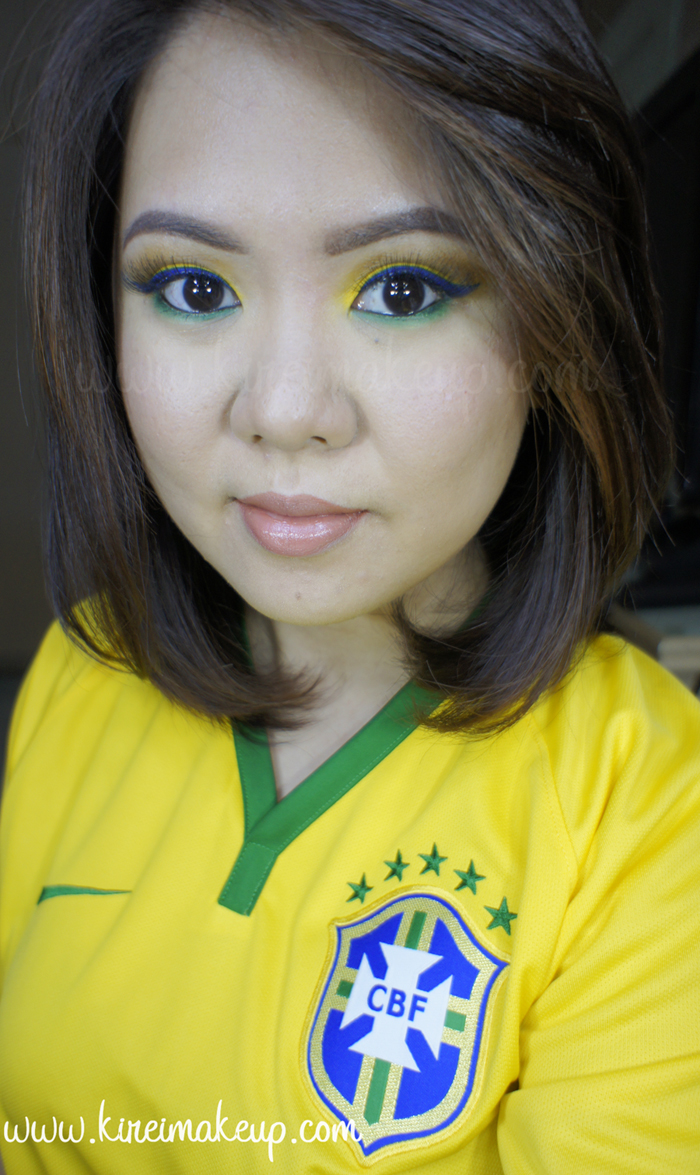
8. I filled my brows using Anastasia Brow Wiz in Medium Ash. Then, I feathered in Brunette a bit more.

9. I curled my lashes, and applied Gwiyomi Boutique false eyelashes in Annabelle.

mac rose gold pigment

10. On my face, I applied MAC Pro Longwear foundation using MAC Masterclass Oval 6 brush.

11. I applied the concealer from MAC Pro conceal/correct palette under my eyes.

12. I set my face using Cover FX translucent powder.

13. I lightly contoured and highlight my face using Smashbox contour palette.

14. I applied MAC Cubic blush on my cheeks.

15. For my lips, I lined and filled it in using MAC Spice lip liner.

smoky eyes for asian

World Cup 2014 Brazil Inspired Makeup

Are you guys following FIFA World Cup 2014?! I sure did, and I’m rooting for Brazil! Go Brazil!!! Anyways, since I’m showing my support for Brazil, I decided to do this Brazil Inspired Makeup. I’d probably do a World Cup inspired makeup series for the next couple weeks just for fun! I wanted to post this tomorrow, but decided to do it today.

Anyhow, for this Brazil Inspired Makeup tutorial, I wanted to create a wearable look that uses the colors of the team’s jersey – mainly yellow, a little bit of green and blue (as you can see from the jersey that I wore for today’s tutorial). I love the result, and I especially love that blue eyeliner! If you do re-create this look please TAG ME on twitter or instagram, and hashtag your work with #kireimakeup.

Since the eyes are so bright and bold, I decided to tone it down on my face. My face is kept very minimal, no contouring. My lips, I decided to go with a nude lip, with my new favorite lip pencil, MAC Spice. Since my lips were quite dry, I added Clinique Heaping Hazelnut chubby lip balm to keep it moist. I do apologize if my face doesn’t look that flawless, you can see a bit of breakout here and there, since my immune system is currently down. As you can see, I do not airbrush my face, so what you see is what I actually look like! 😉

brazil inspired makeup

How-to:

1. I applied a yellow cream face paint as a base all over my eyelid. For this tutorial, I used PAC , an Indonesian brand, but you can use any yellow cream base (e.g. MUFE Flash Palette), OR a white base (e.g. NYX Milk Jumbo Pencil in Milk). A good base is necessary so the yellow pops even more.

2. Using a flat eyeshadow brush, I applied MUFE eyeshadow no. 71 all over my eyelid.

3. Using a small blending brush, I applied Urban Decay Buck on outer V and extended it into the crease.

4. Using a dark blue cream face paint from PAC and an angled eyeliner brush, I created a winged liner along the upper lash line.

5. *VERY IMPORTANT STEP* I SET the cream eyeliner using Urban Decay Chaos with another clean eyeliner brush. If you don’t set your cream face paint, it’ll crease.

6. On the bottom lash line, I applied Dragon Fly from Sleek Makeup iDivine Ultra Matte V1 Brights.

7. I lined my tightline and waterline using L’oreal Voluminous Smoldering eyeliner.

8. I curled my lashes, applied mascara, and applied Ardell Demi Luvies falsies.

9. I filled my brows using Anastasia Brow Wiz in Medium Ash.

world cup inspired makeup brazil

10. For my face, I decided to keep it simple. I applied Marc Jacobs Gel foundation using CoverFX cream foundation brush.

11. I applied a little bit of yellow corrector from MAC Conceal/Correct palette in Medium under my eyes.

12. I dusted MAC Mineralized Skinfinish powder all over my face.

13. I applied Smashbox Halo Blush powder in In Bloom.

14. I lined and filled my lips using MAC Spice lip liner. On top of it, I applied Clinique Chubby lip balm in Heaping Hazelnut.

brazil inspired makeup


Orange Lips with MAC Lady Danger

Today I want to share this orange lips makeup with you as we welcome the arrival of Spring, or if you’re in the tropics, then to welcome the heat wave…lol… I do have to say that this MAC Lady Danger lipstick might go into my favorite lipstick collection. The color is so pretty, and it will look great on any skin tone. Definitely something that you should look into if you want a bold lip look. It’s a great alternative to the usual red lips, or pink lips.

Let me just, also, tell you that today’s tutorial is full of sweat and screams of frustration due to power outage, and the Sun’s sudden disappearance from the sky. I can’t tell you how much I want my lights with me, but oh well, that’s what happened when I travel so much. So, please forgive me for the quality of the step-by-step picture.

Anyways, I was watching Kat Von D video on the Sephora’s youtube channel, and I wanted to recreate the way she create her eyeliner. I love how it looks! It’s so different, yet at the same time, so very wearable. I think I might re-do the eyeliner next time.

Scroll all the way to the bottom for full  product list.

Urban Decay naked 2 daytime makeup

How-to:

1. I applied MAC Groundwork paint pot all over my lid using my ring finger.

2. Using a flat eyeshadow brush, I applied Suspect from UD Naked 2 palette all over my eyelid.

3. Using a blending brush, I applied Busted from UD Naked 2 on the crease.

4. Using a flat eyeshadow brush, I applied Blackout from UD Naked 2 on the outer V.

5. I blended out Blackout using a clean blending brush.

6. I applied Chopper from UD Naked 2 on the eyelid using a flat eyeshadow brush.

7. I applied Half-Baked on the inner part of the lower lid, and Snakebite on the outer part using an angled eyebrow brush.

8. On the upper lid, I created a triangle-shaped eyeliner using Kanebo Kate Super Sharp Eyeliner.

9. I filled my brows using UD Faint eyeshadow and an angled eyeliner brush.

10. I curled my lashes and applied Cover Girl Lash Blast mascara on the upper and lower lashes.MAC Lady Danger

11. I applied UD Naked Skin foundation using a damped sponge.

12. I contoured my face very lightly using MAC Blunt.

13. I applied MAC Dainty blush on my cheeks.

14. I applied MAC Entertain Me lip liner on my lips first, and then applied MAC Lady Danger lipstick on top of it. If you want to find out how I fill my lips, please check my How-to Apply Lipstick post.

If you want to see the other lip makeup looks that I’ve created please check my Lips Tutorials.

For other UD Naked 2 tutorials, please use the search bar on the right side bar.

Products used

Eyes – MAC Groundwork paint pot; UD Naked 2 (eyelid: Suspect and Chopper, crease: Busted, outer V: Blackout, lower lid: Half-Baked and Snakebite); Kanebo Kate Super Sharp Eyeliner; Faint eyeshadow from UD Naked Basic; Cover Girl Lash Blast mascara.

Face – UD Naked Skin foundation; MAC Blunt; MAC Dainty.

Lips – MAC Entertain Me lip liner; MAC Lady Danger.

Product of the Week: Maybelline Express Volume Turbo Boost Mascara

Finally I get the chance to upload my Product of The Week! In this week’s installment, I’d like to present my favorite mascara at the moment. My favorite mascara of all time was actualy L’oreal Carbon Black mascara, but since I can’t find it here in Indonesia, I’ve to go look for another mascara to replace my Carbon Black.

I was at Carrefour and decided to get the Maybelline Express Volume Turbo Boost macara. Actually, I’ve tried the Maybelline Volume Express Hypercurl mascara last year, but it didn’t do anything much to me. So, I was a bit skeptical about the Maybelline Express Volume Turbo Boost mascara, but after my first try, I fell in love with it.

I bought the mascara for IDR Rp. 63,300 at Carrefour in Jakarta.

 maybelline volume express turbo boost mascara

From Maybelline Indonesia website:

Tebal dalam sekejap, tanpa gumpalan

  • Untuk hasil bulu mata 5x lebih tebal dalam sekejap dan tanpa gumpalan.
  • Super tebal, super cepat, bulu mata menakjubkan.
  • Waterproof

From Maybelline Canada website:

• Long-lasting waterproof turbo-boost formula and patented Anti-Clump Brush quickly thicken lashes for up to 5x more volume
• Contact lens safe, ophthalmologist-tested
• Waterproof, also available in Washable

For Best Result

Sweep brush upwards from root to tip to build instant volume. Do not let dry between coats. Removes easily with Expert Eyes® Moisturizing Eye Makeup Remover.

maybelline volume express turbo boost mascara

I found that the instruction from Maybelline Canada website is very useful. I applied this mascara as per instruction (sweep upwards and not to let it dry between coats) to get the best out of this mascara. Even when I did let it dry between application, there’s something about the bristle of the mascara that doesn’t let the product to get clumpy.

I love the fact that this mascara holds my curl all day long! Not only curls, it definitely gave me extra length on my lashes. However, it was not as volumizing as it promises. I don’t really mind it. I like my lashes to be more feathery and soft to touch, so this mascara is perfect for me. I’ve been using the mascara for the last few tutorials last week if you’d like to see more pictures.

You can apply the mascara lightly just for curls and length for a day makeup, or you can layer several coats of the mascara for a more intense, dramatic lashes. You can definitely layer this mascara and get maximum length, curl and a bit more volume. I personally like it the way I wore it in the picture below for daily use.

I’ve worn this mascara for a good 6 hours without smudging in Indonesia. However, keep in mind that I was inside an air-conditioned environment most of the time. I’m not sure how long this mascara will last if I was outdoor.

maybelline volume express turbo boost mascara

Will I buy this mascara again? ABSOLUTELY!

I gave this mascara 4.5 winks out of 5. It’s missing 0.5 because it does not give 5x the volume (compared to my bare lashes).

Spring Lilac

Aye, if you’ve read my previous post, you know this tutorial is coming, right? Right! As I’ve said previously, the colors from this Bodyshop Lily Cole Shimmer Cube are a lot more pigmented when applied with a flat eyeshadow brush. So, don’t be surprised when you see that the colors here are a lot more pigmented than the ones that I swatched on my hand.

Now, I added an extra full front photo of myself with my eyes looking down. You might notice that the eyeliner on the other eye is way thicker, that’s because one of my eye is smaller than the other one. So, I have to draw a thicker eyeliner on the other eye so when I opened both eyes, the eyeliner looked equal. Also, the bigger eye has a lot more folds/lines. The small eye has an almond shape while the bigger one is more rounded. Ugh, there’s a reason why I have the bangs covering that eye! hahaha..Anyways, doesn’t matter. I can’t really help it, so I just make the best out of it!

Repeat after me, people: my imperfections make me perfect and unique 😉

So this look will suit almost everyone! I’m not sure how this will show up on those with darker skin than mine. I think darker skin might be able to use the 2 dark colors, but might not be able to use the lighter ones. This cube works for any eye colors! The look is very spring. It’s a great look if you dare to wear colors during the day.

Anyhow, let’s get the tutorial started! I prep my eyelids by applying Maybelline Inked in Pink 24hr Color Tattoo.

Lilac makeup

How-to:

1. Using a flat eyeshadow brush, I applied Live Lilac all over the lid.

2. With a pencil brush, I applied Think Pink on the outer V and on the crease.

3. I blended the crease by applying a clean blending brush.

4. Using an angled eyeliner brush, I dipped the brush in water and then to Go Violet eyeshadow. I created a winged liner on the upper lid. I also lined my waterline using black eyeliner from Annabelle.

5. Using whatever is left on the brush, I applied Go Violet on the lower lashline. I also applied Live Lilac on the inner corner of the lower lid.

6. I filled in my brows using Anastasia Brow Powder in Brunette.

7. I curled my lashes and applied L’oreal Curl Impact Collagen mascara on both top and lower lashes.

bodyshop lily cole shimmer cube

8. I applied MAC Matchmaster foundation on my face using MAC Stippling brush. This foundation is quite matte, and I purposely chose it because the eyes are quite frosty.

9. I powdered my T-zone using a loose powder.

10. I contoured the side of my nose and the hollow of the cheeks using MAC Shadowy.

11. For the cheeks, I applied MAC Well Dressed blush.

12. For the lips, I applied Revlon Just Bitten lip balm in Crush on the center of the lid and blended it outwards using my finger. On top of it, I applied a clear lipgloss and blot excess off.

spring makeup 2013

Golden Blue

As mentioned on the previous tutorial, I wanted to do a look using gold and blue eyeshadow. I think the beautiful gold eyeshadow compliments the blue eyesadow nicely. It helps when blue and yellow are complimentary colors too 😉

This look will work well for those who don’t like to put dark shadows on the lower lid. The gold eyeshadow really opens up the eyes. The blue liner on the waterline also helps to make the white part of the eyes look whiter. This will look great on any eye colors.

How-to:

1. I applied Smashbox 24k eyeshadow on the eyelid using a flat eyeshadow brush.

2. Using another flat eyeshadow brush, I applied MAC Birds and Berries on the outer half of the lid.

3. Using a flat eyeshadow brush, I applied L‘oreal Infallible eyeshadow in All Night Blue on the outer V and a tiny bit on the crease.

4. Using a clean blending brush, I blended the darkest blue towards the gold and blended the crease. Add more blue eyeshadow to make it as dark as you like.

5. I lined my waterline using MAC Technakohl liner in Auto-de-Blu and stamped L’oreal All Night Blue infallible eyeshadow on top of the liner using an angled eyeliner brush.

6. Using a clean angled eyeliner brush, I applied Smashbox 24k eyeshadow along the lower lashline.

7. Using the same angled brush, I applied Smashbox Sienna eyeshadow on the outer half of the lower lashline.

8. I created a winged liner along the upper lashline using Clinique Gel Liner in black and a small angled eyeliner brush.

9. I filled in my brows using Anastasia Brow Powder in Brunette.

10. I curled my lashes and applied Maybelline Volum Express Turbo mascara on both top and bottom lashes.

blue and gold eyeshadow

11. For the face, I applied Giorgio Armani Silk foundation using MAC Stippling Brush. Stippled it on my face for an airbrush finish.

12. For the cheeks, I applied MAC Cubic blush along my cheekbones.

13. For the lips, I applied L’occitane clear lipgloss since my lips are uber chapped. Blot the excess so it’s not sticky and gooey.

loreal infallible all night blue

Product of The Week: Urban Decay Naked Skin Foundation

The famous Urban Decay Naked Skin Foundation. I wanted it so bad last year, but alas it was released after I left Canada. As soon as I get the chance to step into Sephora when I arrived couple months a go, this was the first thing that I grabbed from the shelf.

Did it live up to my expectations? Absolutely! Just from the name itself, Naked Skin Weightless Ultra Definition Liquid Makeup, I expected this foundation to be more like Chanel Aqua Vitalumiere. From the website:

“Coverage without compromise. Our weightless formula blurs imperfections for a flawless finish that feels invisible, but looks professionally retouched.” (Urban Decay)

My first reaction when I saw this foundation was whether or not I should grab the Good Karma brush along with the foundation. I decided not to. The brush looked like Sigma Kabuki Round brush, and since I’ve so many brushes I decided not to buy it.

First impression of the foundation: watery consistency (just like Chanel Aqua Vitalumiere), love the packaging – sleek bottle, excellent undertones especially for my yellow Asian skin, very weird shade numbers. With the shades, anything that ends in a .0 is warm/yellow undertone, and anything with a .5 is cool/pink undertone. If you’re in between yellow and pink (aka neutral/beige), ask for samples for both foundation. Yellow undertones might be good to knock off some redness.

I’ve worn this foundation for tutorials and to go out in the winter weather. I’ve to say this is not a foundation for those with dry skin. Since my skin is combination, and since it’s winter here in Canada, my dry patches weren’t doing so great with this foundation. Probably I need to moisturize the skin a bit more. This foundation lasted a good 6hrs without powder (in the winter). I will give another update once I’m in Indonesia (warmer country).

The foundation feels extremely light, kinda like MAC Face and Body. However, unlike the MAC Face and Body, this foundation does not become thicker the more you rub it in to the skin, which I prefer. I like how it spreads thin on the face, and I can build more on it if needed.

The finish is not matte, surprisingly. I find this foundation to be more on a silky finish. It definitely knocked off all my redness, and somehow my pores seem smaller.

Pros:

  • Lightweight
  • Sheer to medium coverage
  • Excellent range of colors
  • Watery consistency
  • There’s a ball inside the bottle so you can give it a good shake before using it
  • Great for oily skin
  • NO SPF means no flashback!

Cons:

  • Pricy – cad$45 (excl. tax) in Canada
  • NO SPF means you need to apply SPF before foundation if you’re planning to go out in the sun

I’m wearing shade 4.0. For your reference, I’m MAC C3 on Face and Body, MAC NC27 on Studio Tech, mix of MAC NC 25 and 30 on Studio Fix Fluid, Smashbox 15-hours foundation in 2.3, and L’oreal a mix of W2 and W4 in Tru Match liquid foundation. I’m one of those people who don’t really have a perfect match on the MAC foundation, and I’m always in between colors. On top of that my face is darker than my neck and chest. So, I’m very happy that this foundation in 4.0 is pretty good for my color.

Urban Decay Naked Skin foundation

Sugar and Spice

Halloween is almost here! As much as I’d like to do a zombie tutorial, I’ve yet to find a large amount of liquid latex here. I’ve done a small one, and I posted the photo on my instagram and twitter! Please follow me on instagram (handle: KireiMakeup)/twitter if you haven’t already done so.

I’ve decided to do 2 looks in this tutorial. One look is more on the pretty and wearable, the other look is more vampy and goth. I wanted to re-do the eye makeup from my published work at Coco magazine (here) on myself since I fell madly in love with a super thick black cat eyeliner. The cat eyeliner made me reached for my contact lenses and I decided to put it on just for fun. Oh also, this extreme winged/cat-eye liner has been seen on Rihanna too!

For this tutorial, I used a pink eyeshadow on the eyes and cheeks called Sweet Strawberry from L’oreal Infallible eyeshadow collection to show my support for Breast Cancer Awareness month! I believe I’ve received a very “pink” package from L’oreal Canada but I’ve yet to open it since I’m not in Canada at the moment, but since I have this shadow, I decided to use it first.

Also, this tutorial will show you how easy it is to get the perfect winged/cat-eye liner in this tutorial. For the winged/cat-eye liner you’ll need: 1) tape (or in my case, I used a labeling sticker), 2) small angled brush (I used MAC 263) and 3) Gel liner (I used MUFE Aqua Black).

Let’s get this rolling!

How-to:

1. Stick the tape to your hand and release it. Repeat this step several times until the tape isn’t too sticky. If it is too sticky, it might pull your skin.

2. Find an imaginary line from the outer corner of your eye to the tip of the brow. Place the tape and try to match the angle of the tape on the other eye.

3. Once you’re satisfied with the angle of the tape, prep your eyes with primer if needed.

4. I applied MAC Pearl cream base all over my eyelid all the way up to the brow bone.

5. Using a flat eyeshadow brush, I applied MAC Hush eyeshadow on the inner half of the eyelid.

6. Using the same eyeshadow brush, I applied L‘oreal Infallible eyeshadow in Sweet Strawberry on the outer half of the eye up to the crease.

7. Now, for the fun part:

  • Using the angled eyeliner brush and gel liner, apply eyeliner on the upper lashline as you’d usually do with a pencil liner.
  • Once you are satisfied with the line, flip your brush and make sure the LONGER side is facing up. Your brush should be parallel to the tape.
  • Place your brush right against the tape and pull it to the middle of the lid. You should end up with a triangle.
  • Fill the triangle up and re-do the liner according to the thickness to your liking.
  • Pull the tape off your face and you’ll end up with a perfect straight line!
  • confusing? may be I should do a video tutorial? (leave comments below)

8. Once the upper liner is completed, I used Urban Decay Perversion eyeliner on the tightline and waterline.

9. Using the same angled brush, I used whatever is left on the brush and created a thick liner on the lower lash-line. I connected this lower liner to the “wing”.

10. I curled my lashes and applied mascara on top and bottom lashes. Also filled in my brows using a clean angled brush and mixture of MAC Omega and MAC Brun eyehadows.

11. For the goth/vampy look, I applied fake lashes on both top and bottom lashes.

extreme cat eyeliner

12. For the face, I applied L’oreal Magic Lumi Foundation all over my face using Sigma Round Kabuki brush.

13. Using a MAC 129 brush, I applied L’oreal Sweet Strawberry shadow on my cheeks.

14. Using MAC 109 brush, I applied MAC Blunt contour shadow on the hollows of the cheeks, jawline and the side of my nose.

15. For the wearable/pretty look, I applied whatever is left on the foundation brush on my lips and applied a clear lipgloss. If you want this to be on the “prettier” side, you can apply a pink/peach/mauve/rose lipstick instead of going nude lips.

high fashion cat eyeliner

16. For the vampy/goth look, I lined my lips using a red lipliner from Complections (that’s my old makeup school).

17. Then I applied a red lipstick by Revlon called Ravish Me Red all over the lips.

18. To make the center of the lips darker, I applied a black lipstick from MAC. I don’t know what it’s called since I put this on a lip palette and I didn’t put the name on it. If you do not have a black lipstick, apply a black pencil liner in the center of the lips and blend it with the red lipstick.

19. Then I applied a clear lipgloss over the lips to complete the look.

20. If you’re oily, apply powder to set the face.

dark glossy red lips

All That Glitters

Lights are still not up :(…Last week was a busy week for me with work and all that. I’ve decided to de-activate my Twitter account for personal reasons, so that’s the reasons as to why you might not be able to find me on twitter anymore. Please follow me on Pinterest or Like my Facebook Page for updates.

I’m also still working on moving my blog to a self-hosted site, and working on a new header image. If anyone is interested in taking makeup classes, please feel free to contact me at jilly.ijoe@gmail.com.

Anyhow! Let’s get back to makeup. Today’s tutorial I wanted to use my old MAC Reflect pigment. I loved this glitter! It has a teal undertone, so if you put a dark base underneath it, you can see the teal shining so prettily. I paired it with an earthy crease so to not overpower the glitter. The brown colour on the crease is there to add depth to the eyes. I think this is the perfect look if you want to play with glitter but not go overboard with it.

How-to:

1. I applied L’oreal Magique Concealer underneath my eyes and all over the eyelid to prep the eyes.

2. Using a clean blending brush, I applied Urban Decay Darkhorse on my crease.

3. Using a clean flat eyeshadow brush, I applied MAC Reflect Transparent Teal on the eyelid, pressing it slowly to the lid.

4. Taking Urban Decay eyeliner in Perversion, I ran this liner on my waterline and tightline.

5. Using a pencil brush, I smudged the liner on the bottom lid.

6. I applied MAC Reflect Transparent Teal on the lower lid using a small angled brush.

7. I curled my lashes and applied several coats of Cover Girl Lash Blast 24-hr mascara.

8. I filled my brows using Anastasia Express Brow Kit.

9. Once I completed my eyes, I proceeded in applying MAC Face and Body foundation all over my face using Sigma Round Kabuki Brush.

10. I applied Benefit Hervana lightly on my cheeks and top my lips off by applying Tarte Lipsurgence in Hope.

MAC Reflect TealTeal Glitter Makeup

Base 101

Hi all! How are you guys doing today? I’ll be flying out to Indonesia soon and I’d like to apologize first if there won’t be any tutorial for the next couple days. I will still continue with my blog, and I will try my best to update it as regularly as possible. I’ll let you guys know how it is once I’ve settled down in Jakarta.

Today’s tutorial is just a quick base how-to. Whenever I’m doing foundation/primer, I called this as a “base”. Just like a painter who needs to prepare his canvas before painting, I prepared my base to make it as flawless as possible before any makeup application. This is just a quick how-to to show you how easy it is to achieve a good base. Your fingers are your best tools if you are applying this to yourself. If you want your base to look like your skin, then I do suggest strongly to apply your base using your fingers or a damped sponge, esp. if you’re a beginner. A brush might picked up too much product if you are not careful.

I do tend to apply my base using my fingers on myself. On my clients, I used different brushes (foundation, kabuki, angled etc) or sponges. This is quick and easy if you need to get ready in a few minutes.

How-to:

1. Prime your face (if needed) – if you have an oily/combination skin, I suggest priming your face after moisturizer. Primer will keep your foundation from breaking (or melting). A little primer goes a long way! I like using Estee Lauder Idealist Even Skintone Illuminator. My faves also include: NARS Pro-Prime, Smashbox Foundation Primer and L’oreal Magic Lumi.

2. Foundation – I prefer liquid/cream foundation since it blends to the skin seamlessly if you choose the right product. In this tutorial, I chose the new L’oreal Lumi Magique foundation in W4. I applied it to the center of my face and blend it outwards using my fingers. You can use foundation brush or a damped sponge. Layer the foundation thinly to achieve that dewy look and avoid a cake-on look. Again, a little goes a long way! My faves include L’oreal Tru Match, NARS Sheer Glow, Chanel Teint Innocence, Lancome Teint Miracle and Chanel Aqua Vitalumiere.

3. Concealer THIN layer is the key for concealing. To cancel out under eye circles, I tend to look for a warm undertone concealer (yellow/orange/salmon).  A trick I learnt in my Film & TV class is to use a warm concealer instead of those that are lighter. I also prefer a warmer concealer under the eyes. I’ve seen girls using concealer that are too light under their eyes and they ended up looking like a racoon in pictures (with flash on). I think this is a trick that is also used by Scott Barnes in his book. For blemishes, look for a yellow-based concealer to cancel any redness. I, personally, match the concealer for blemishes to the foundation and skin so that the texture/bumps can look a little bit more flattened. Remember that lighter concealer will highlight the bumps even more. I’m using L’oreal Touche Magique concealer pen.

4. Blush, Eyes and Lips – Applying blush in different location on your cheeks can affect the way you look. If you apply it on the apples, it might look a bit droopy for most people. I tend to apply in a bit higher, on the cheekbones itself. I love cream blushes! They blend seamlessly to the skin. I am using Maybelline Dream Bouncy Blush in Pink Plum for the tutorial.

Once my base is completed, I applied my eye makeup and lips. However, there are times that I applied my eye makeup first and then my base. Nevertheless, I still use the same steps as above when doing my base 🙂

Yes, I do apply highlighter and bronzer/contour if I go to parties or do tutorials, but if it is just daily makeup, I tend to skip it. Less is more! Let your skin shine through.