Smokey Winged Eyeliner

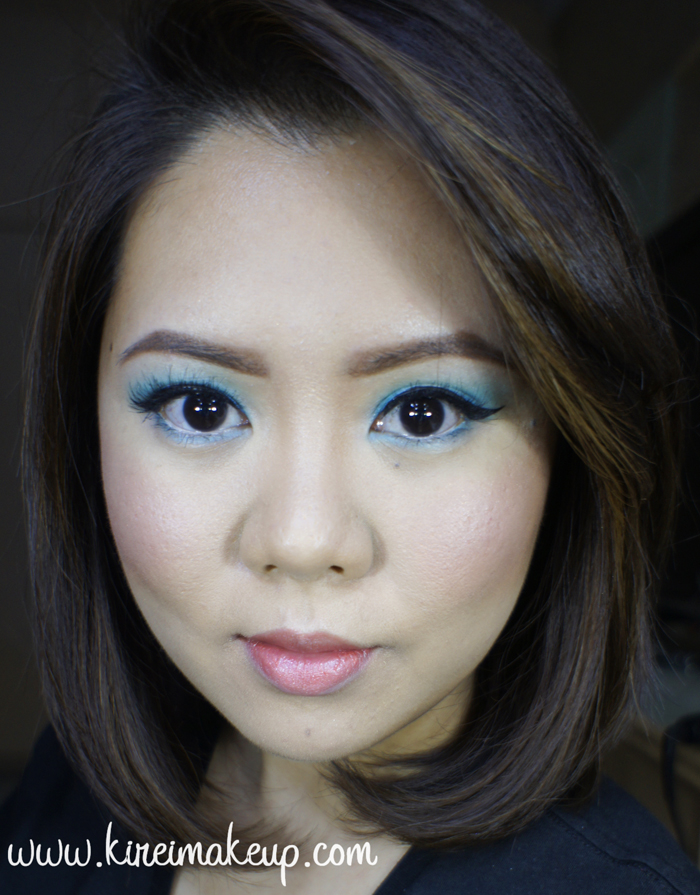
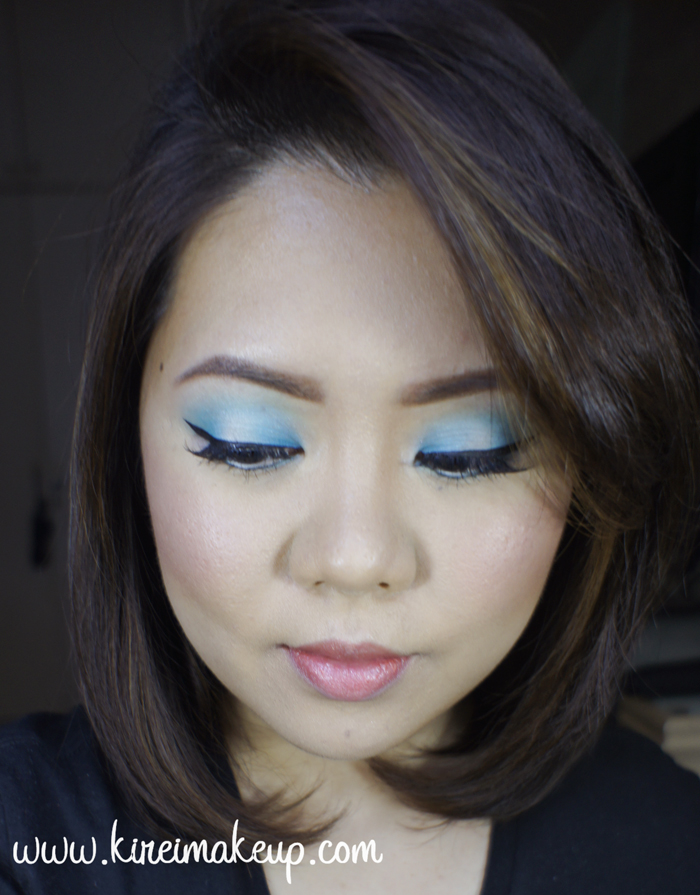
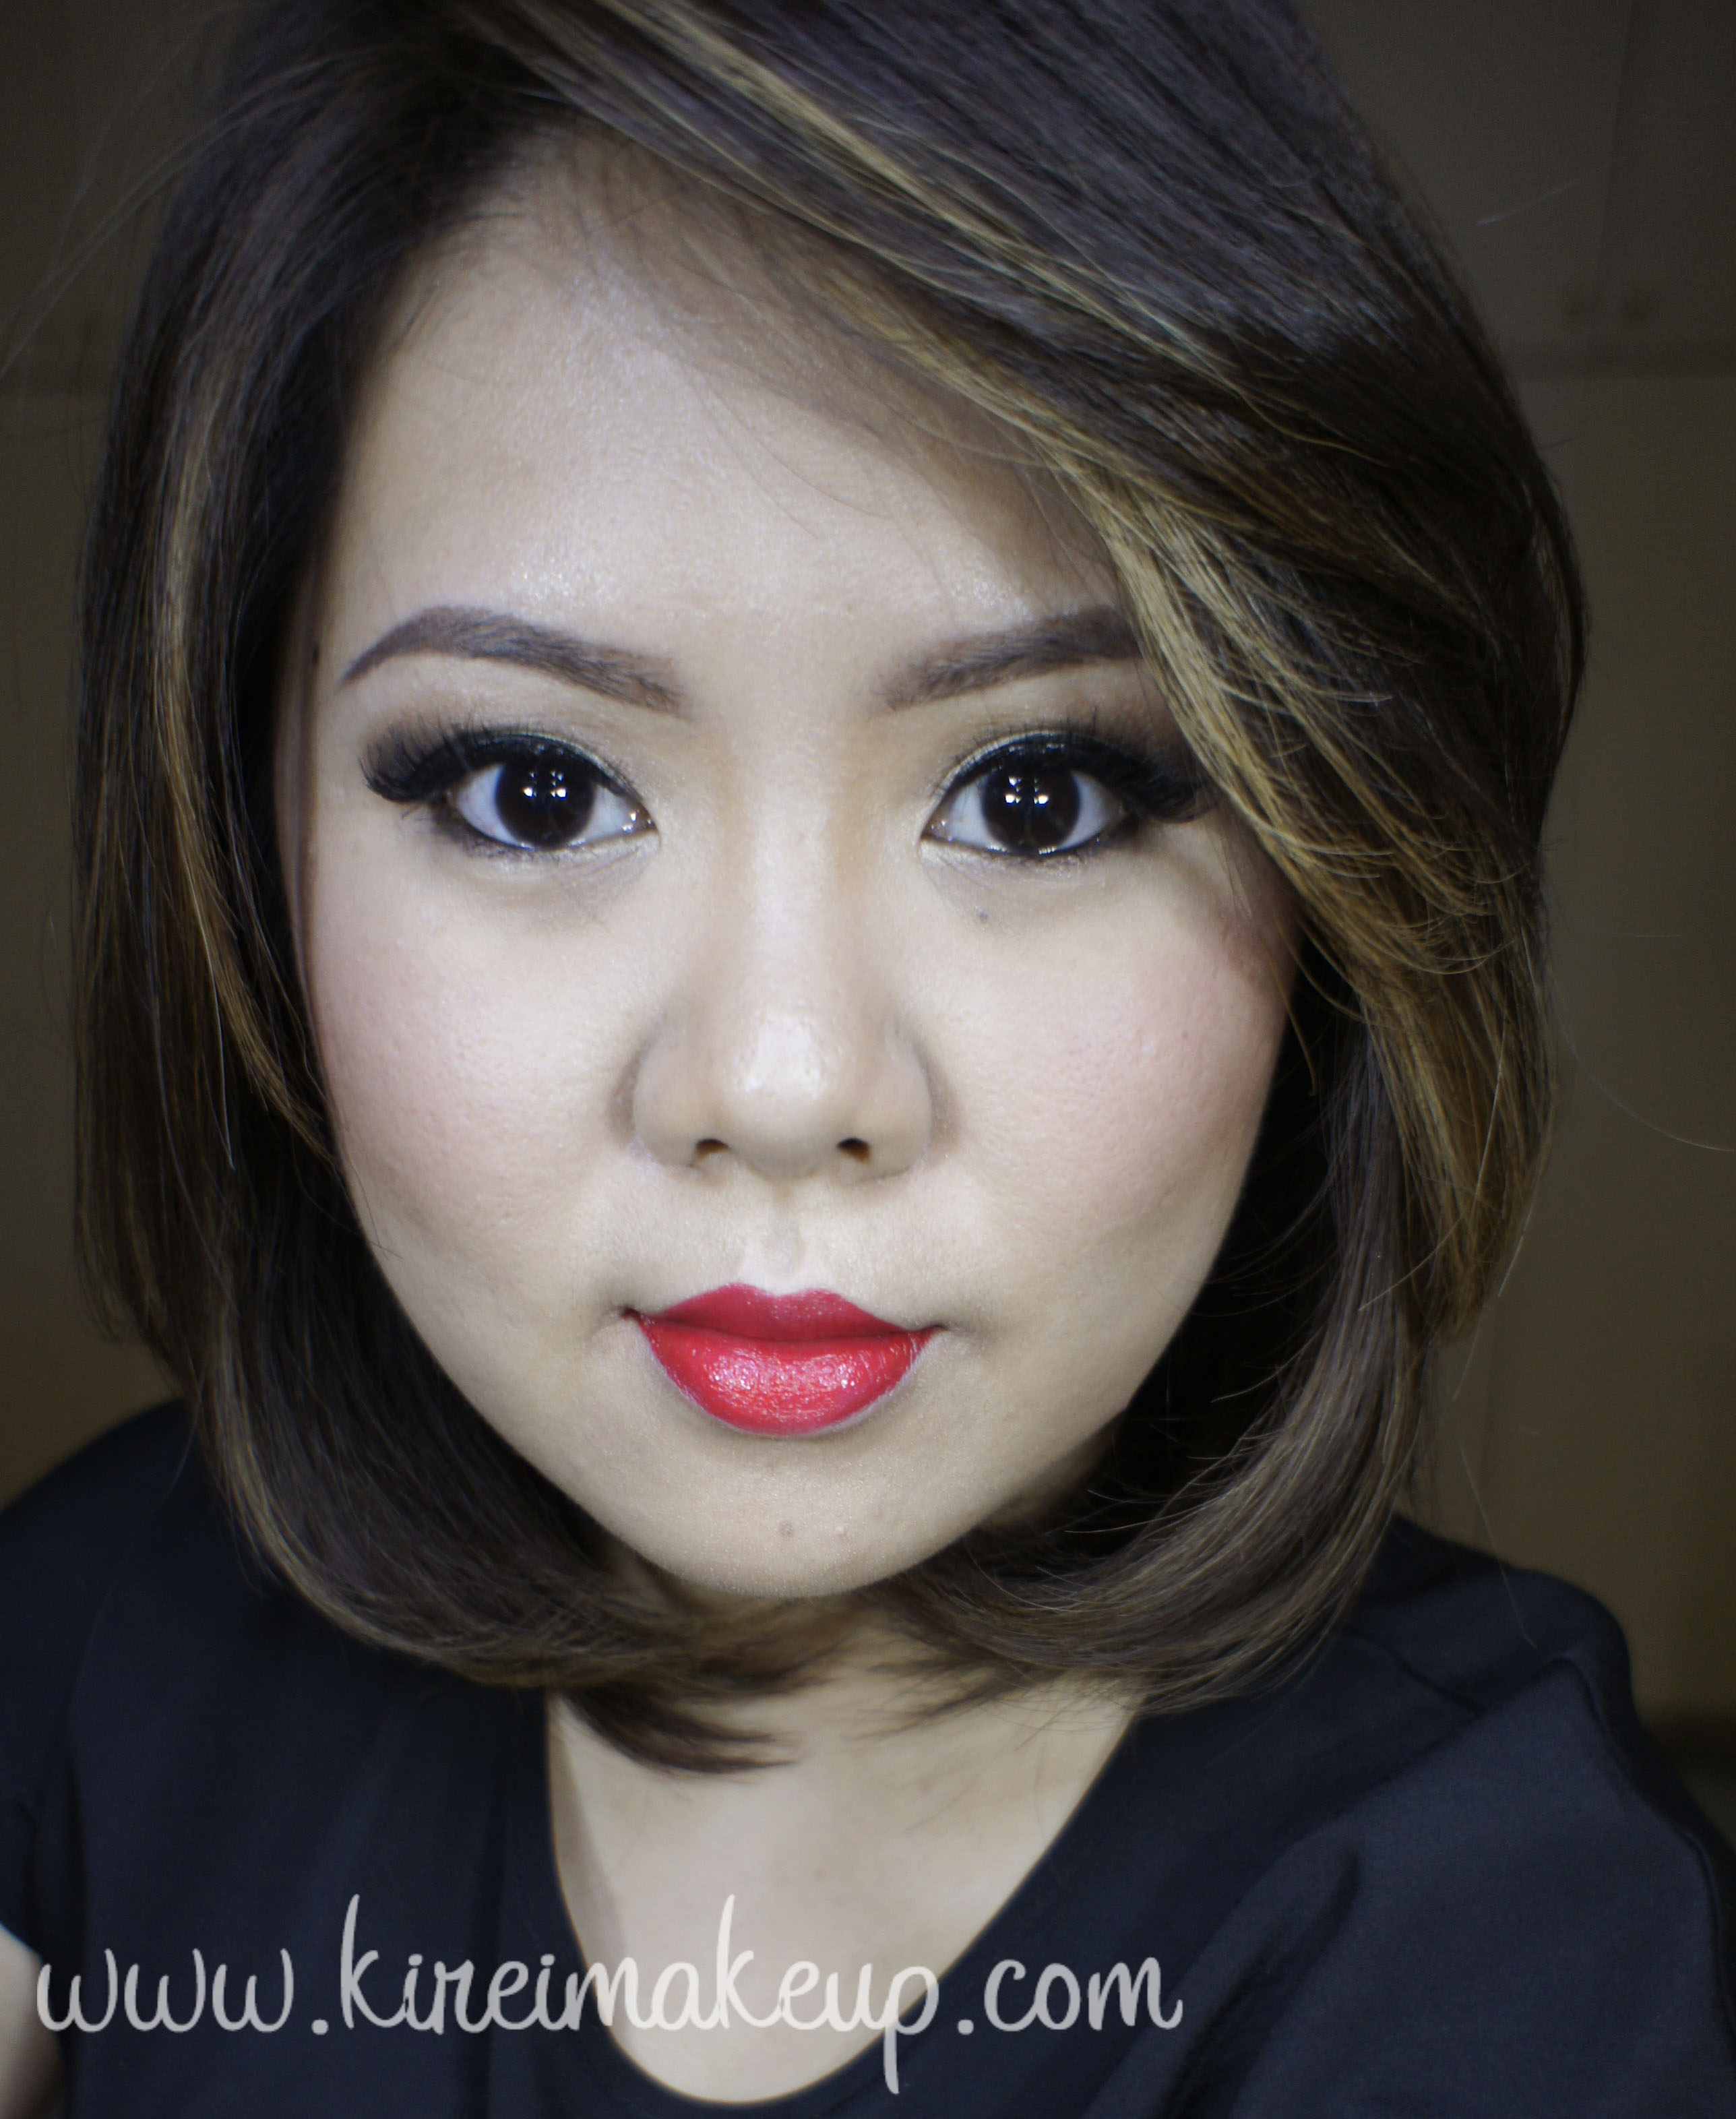
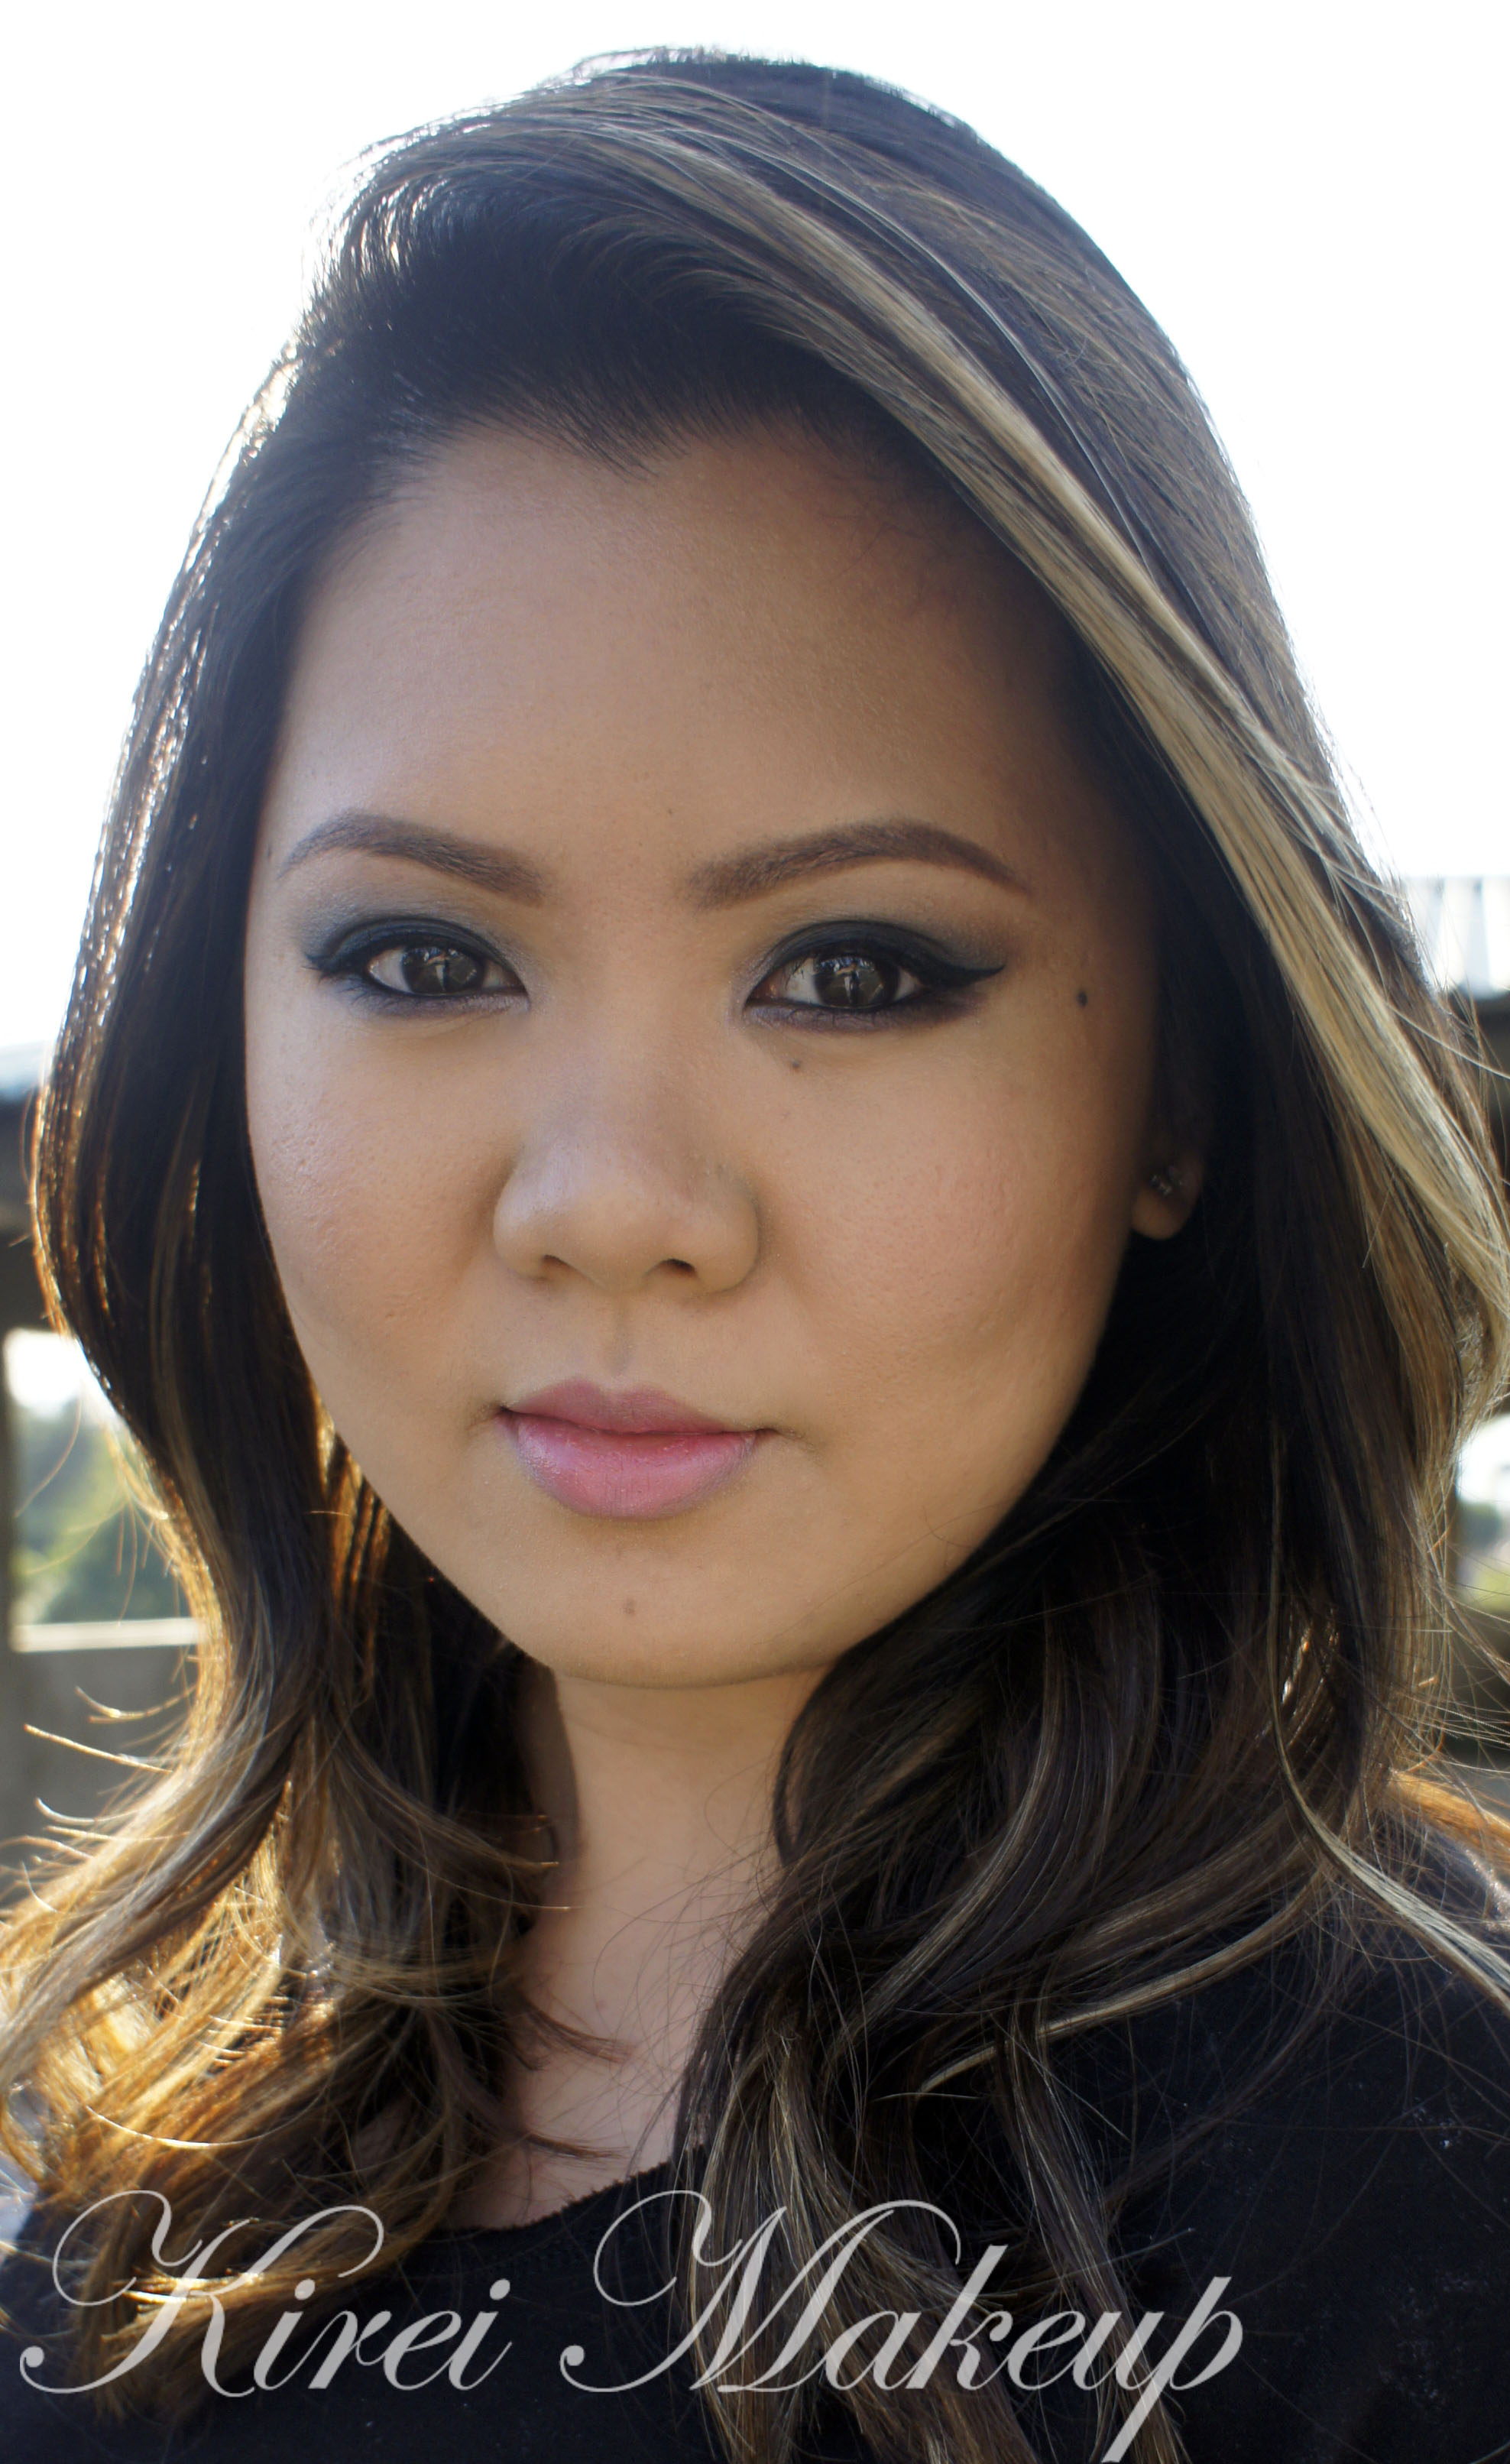
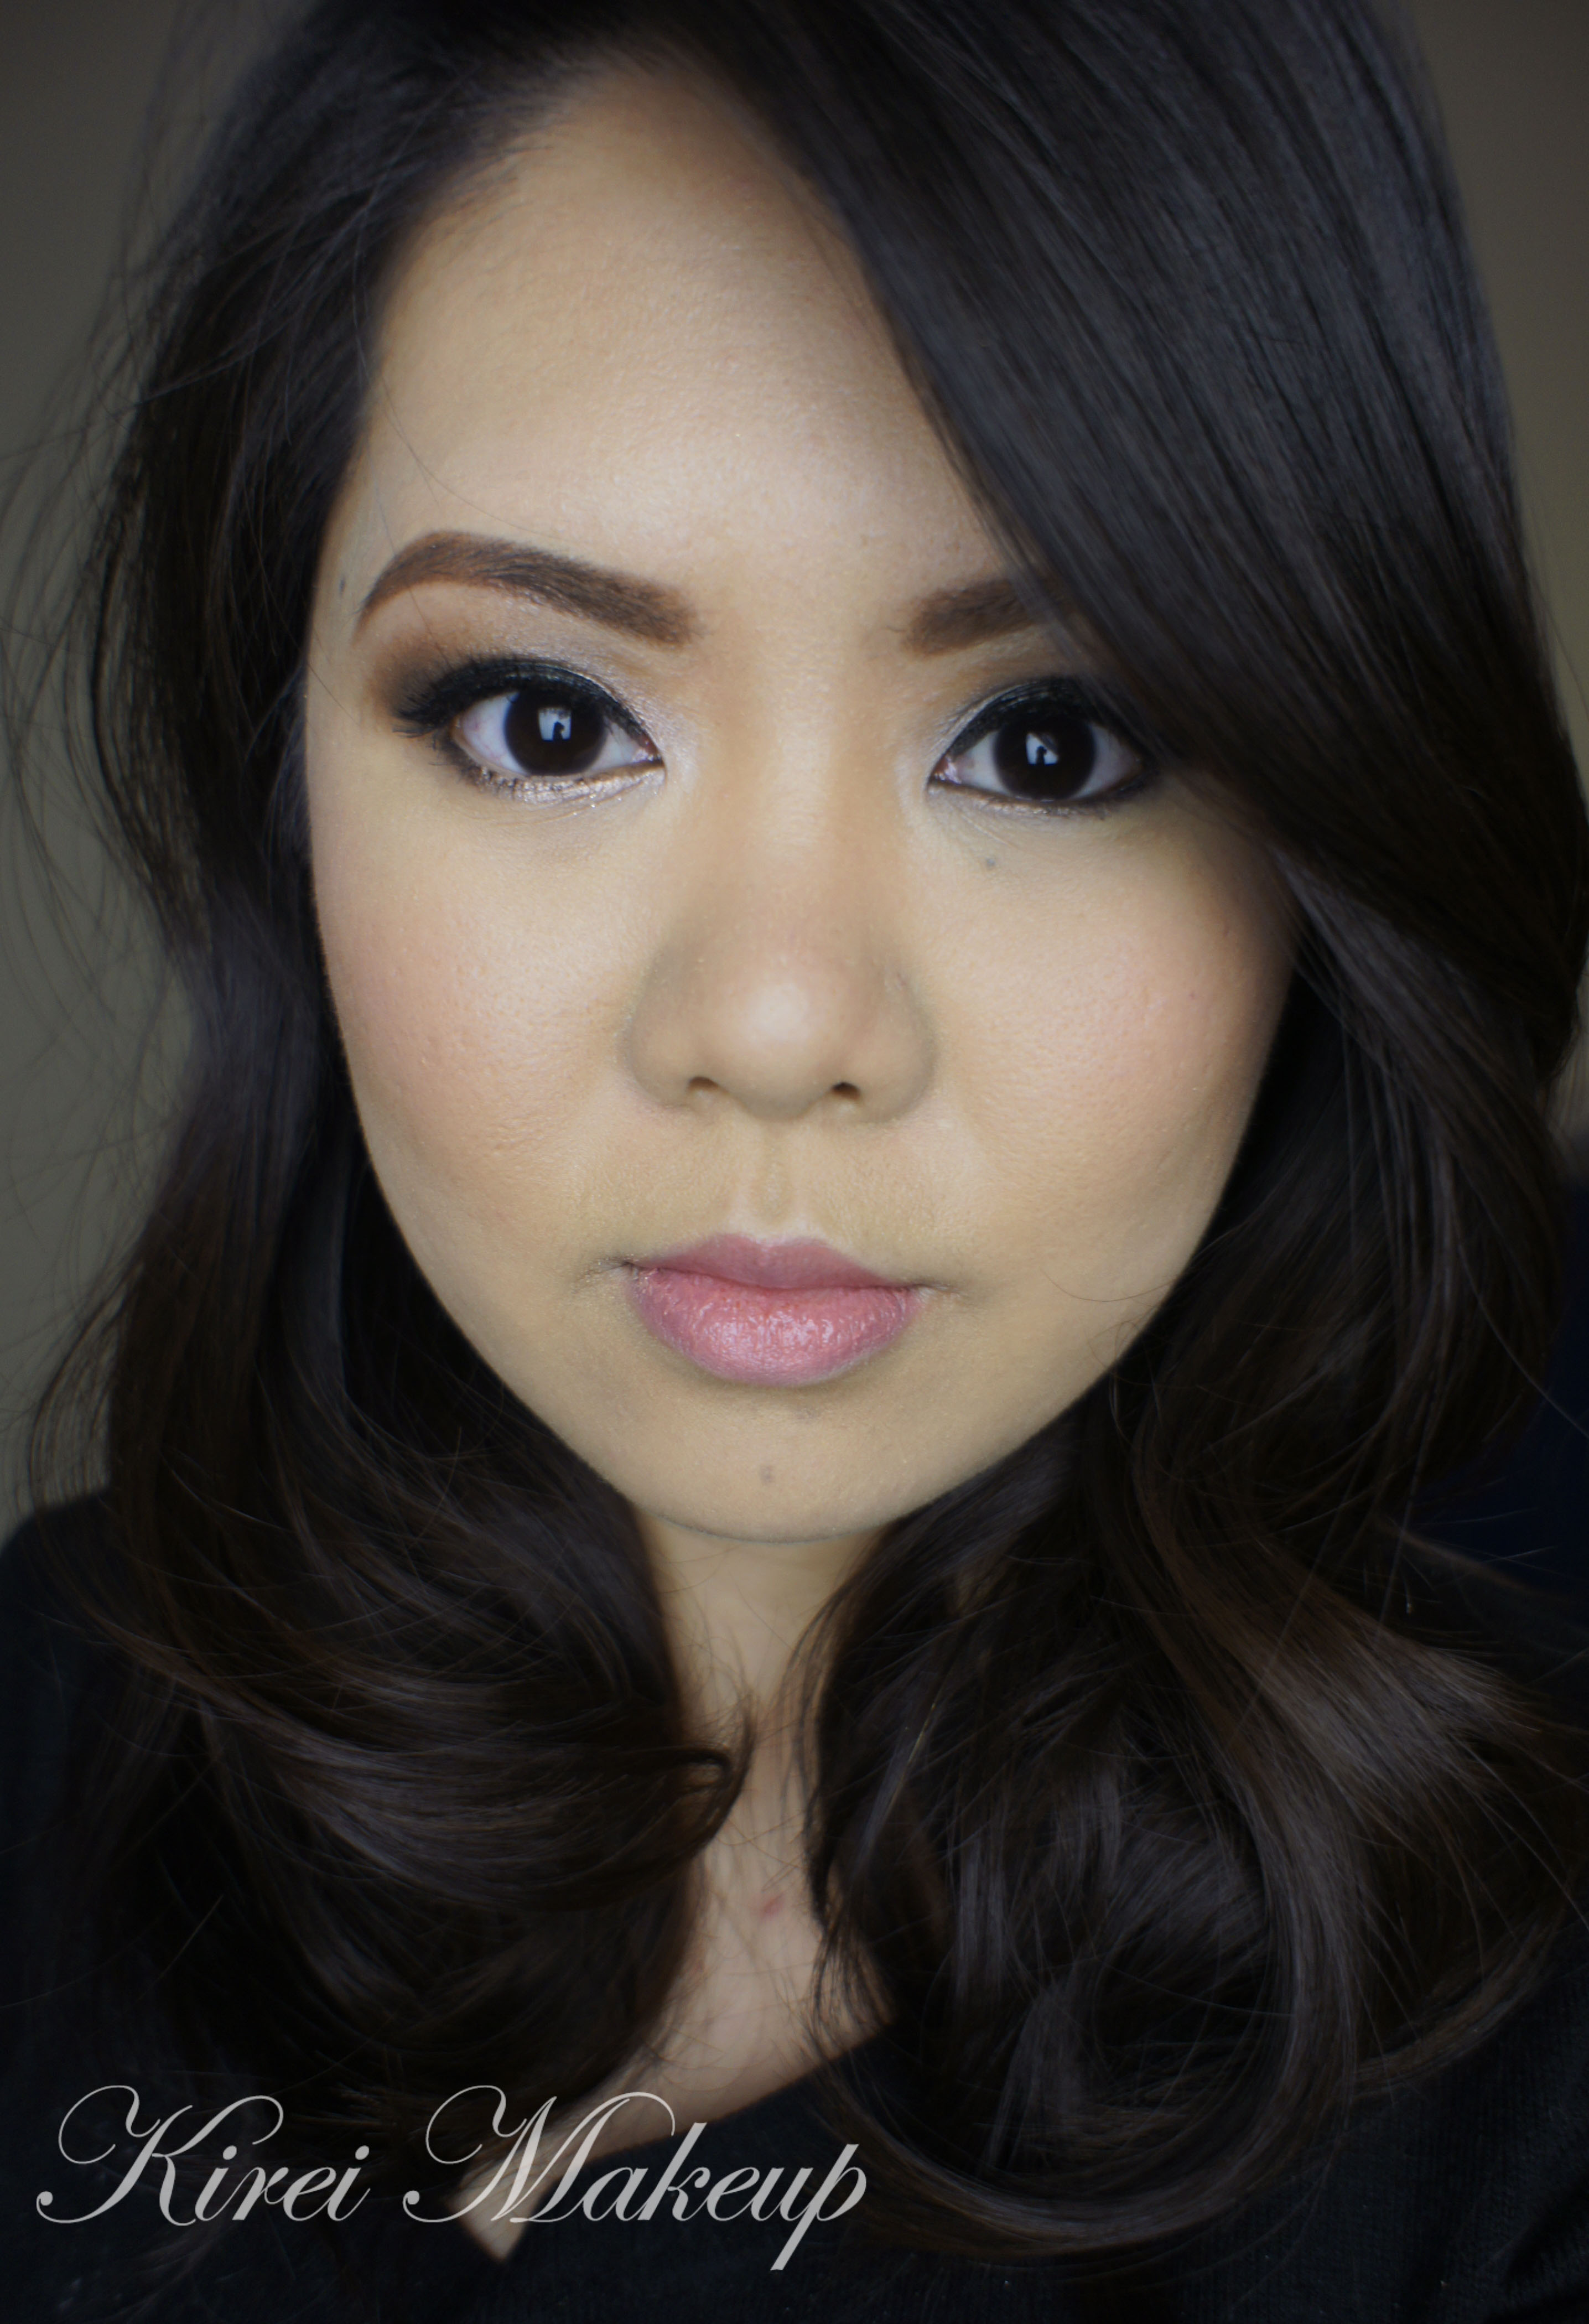
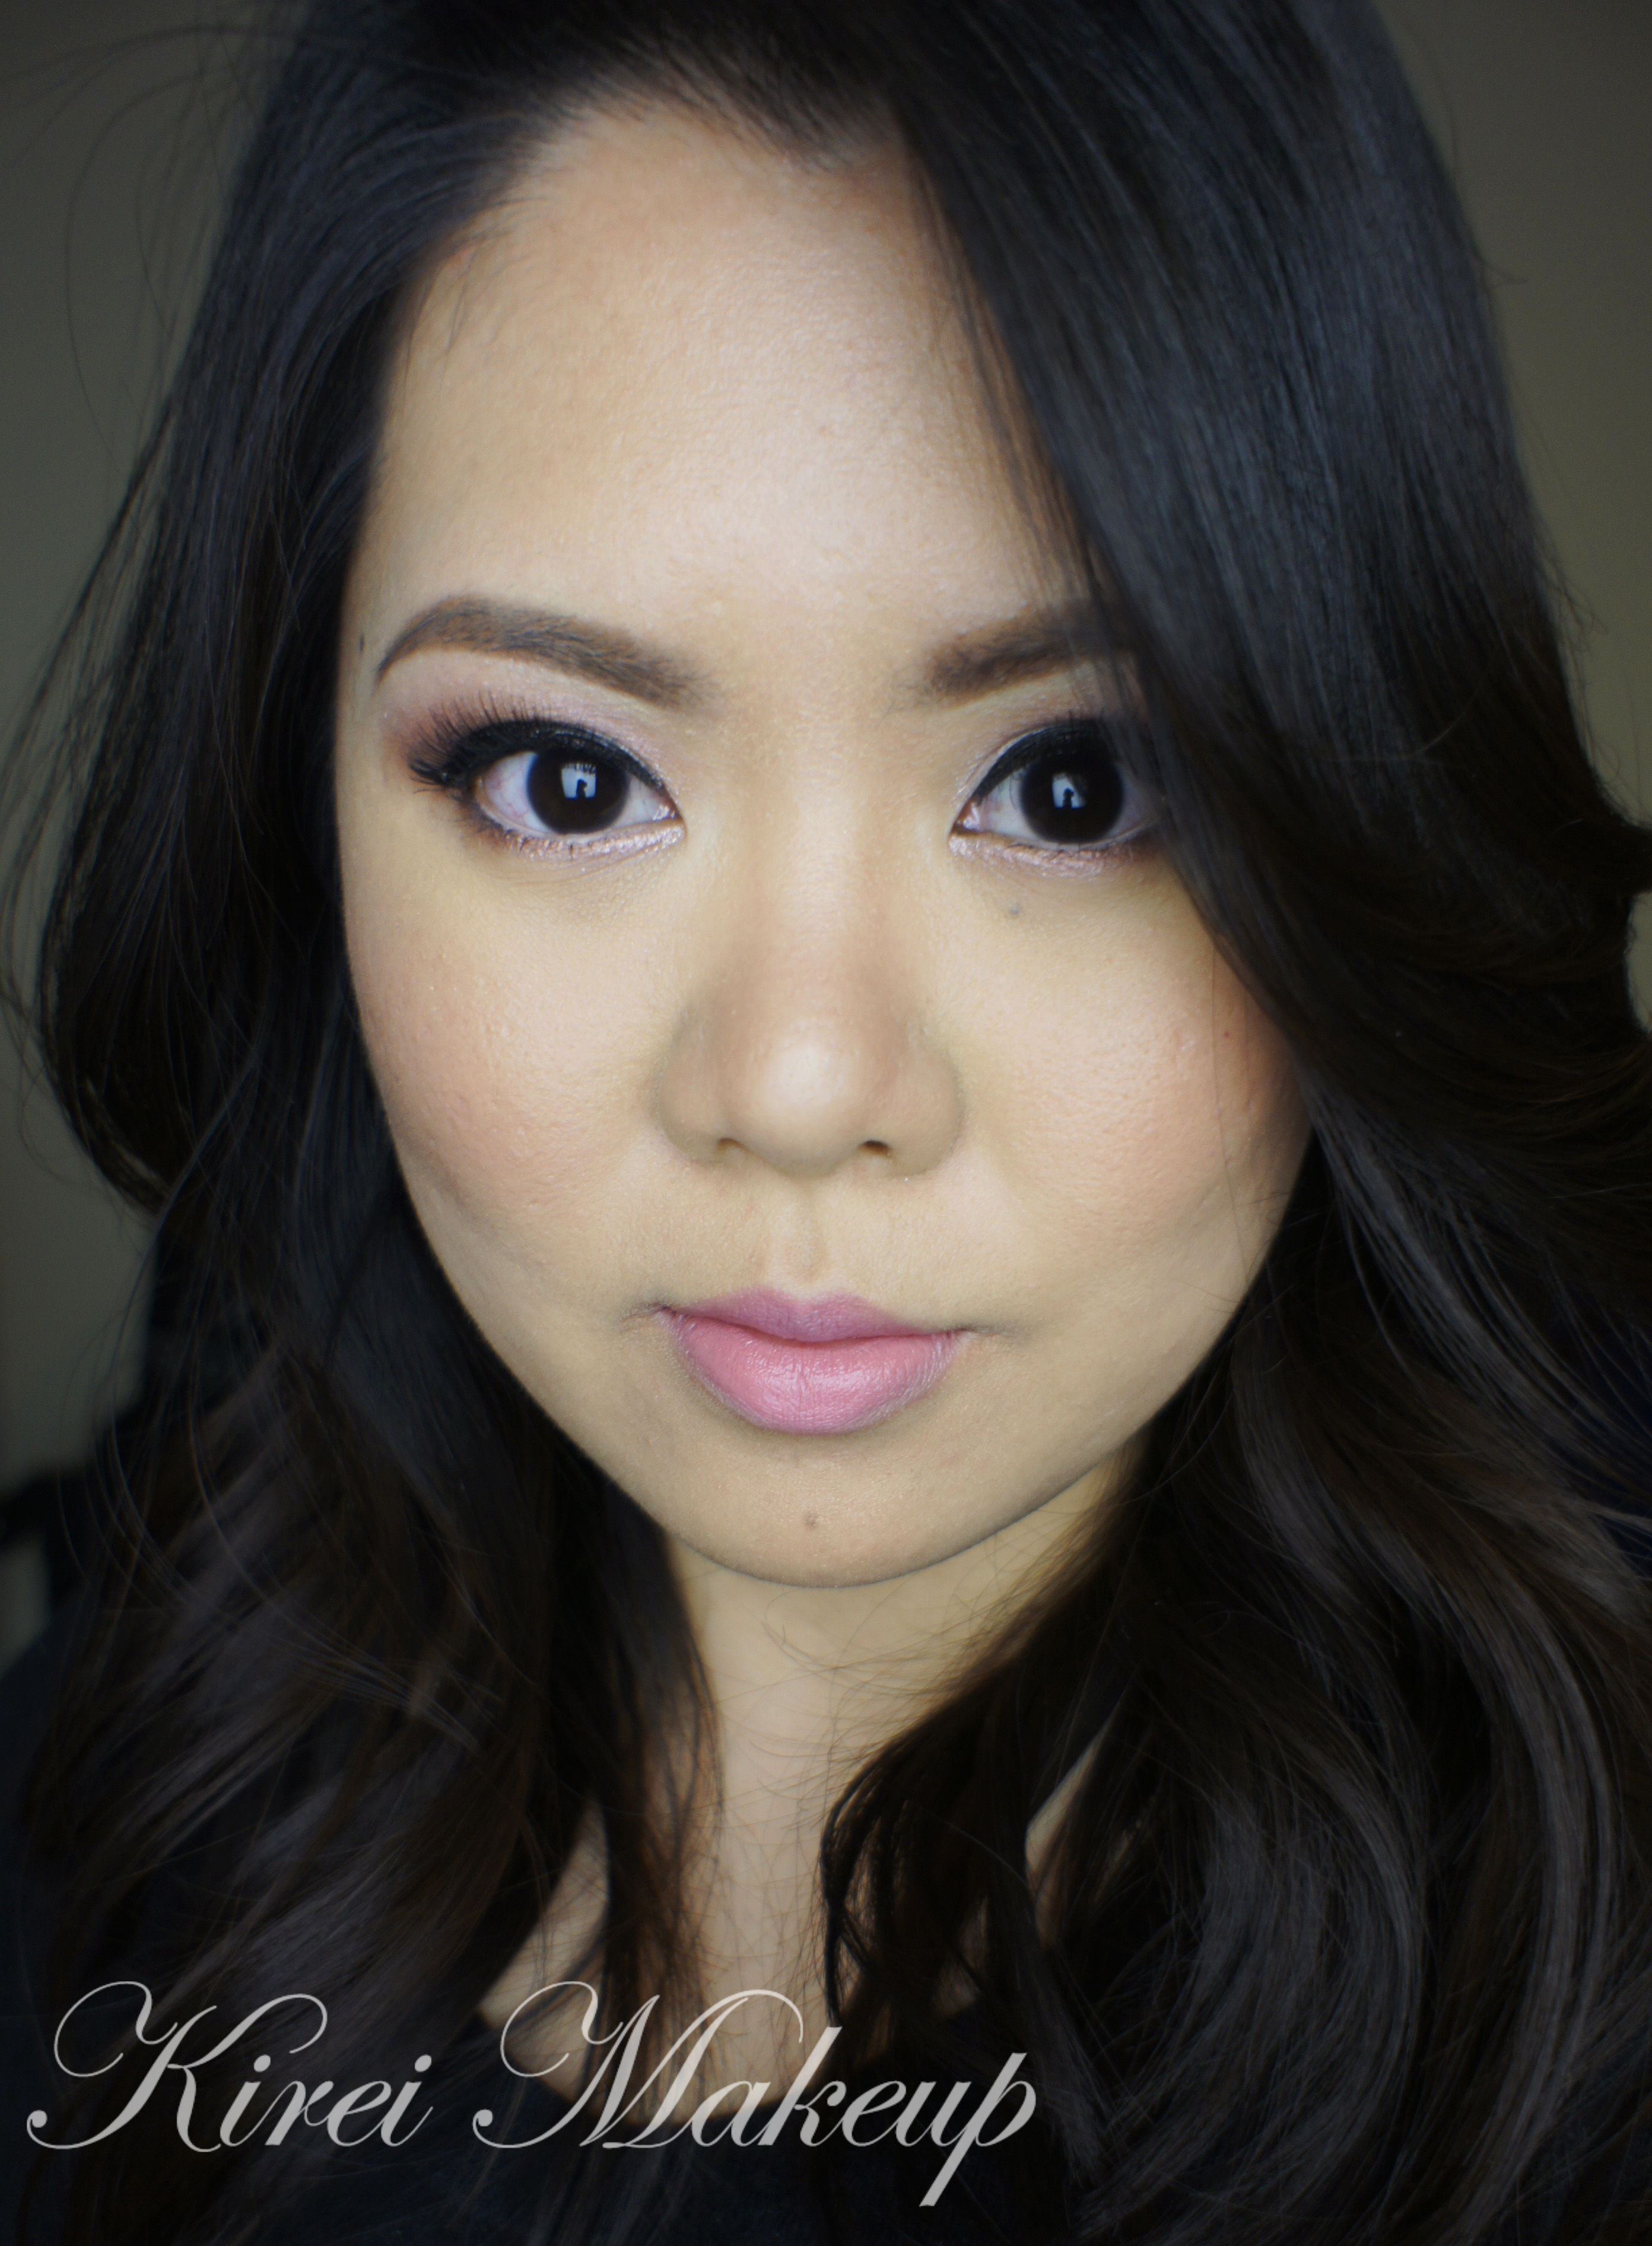
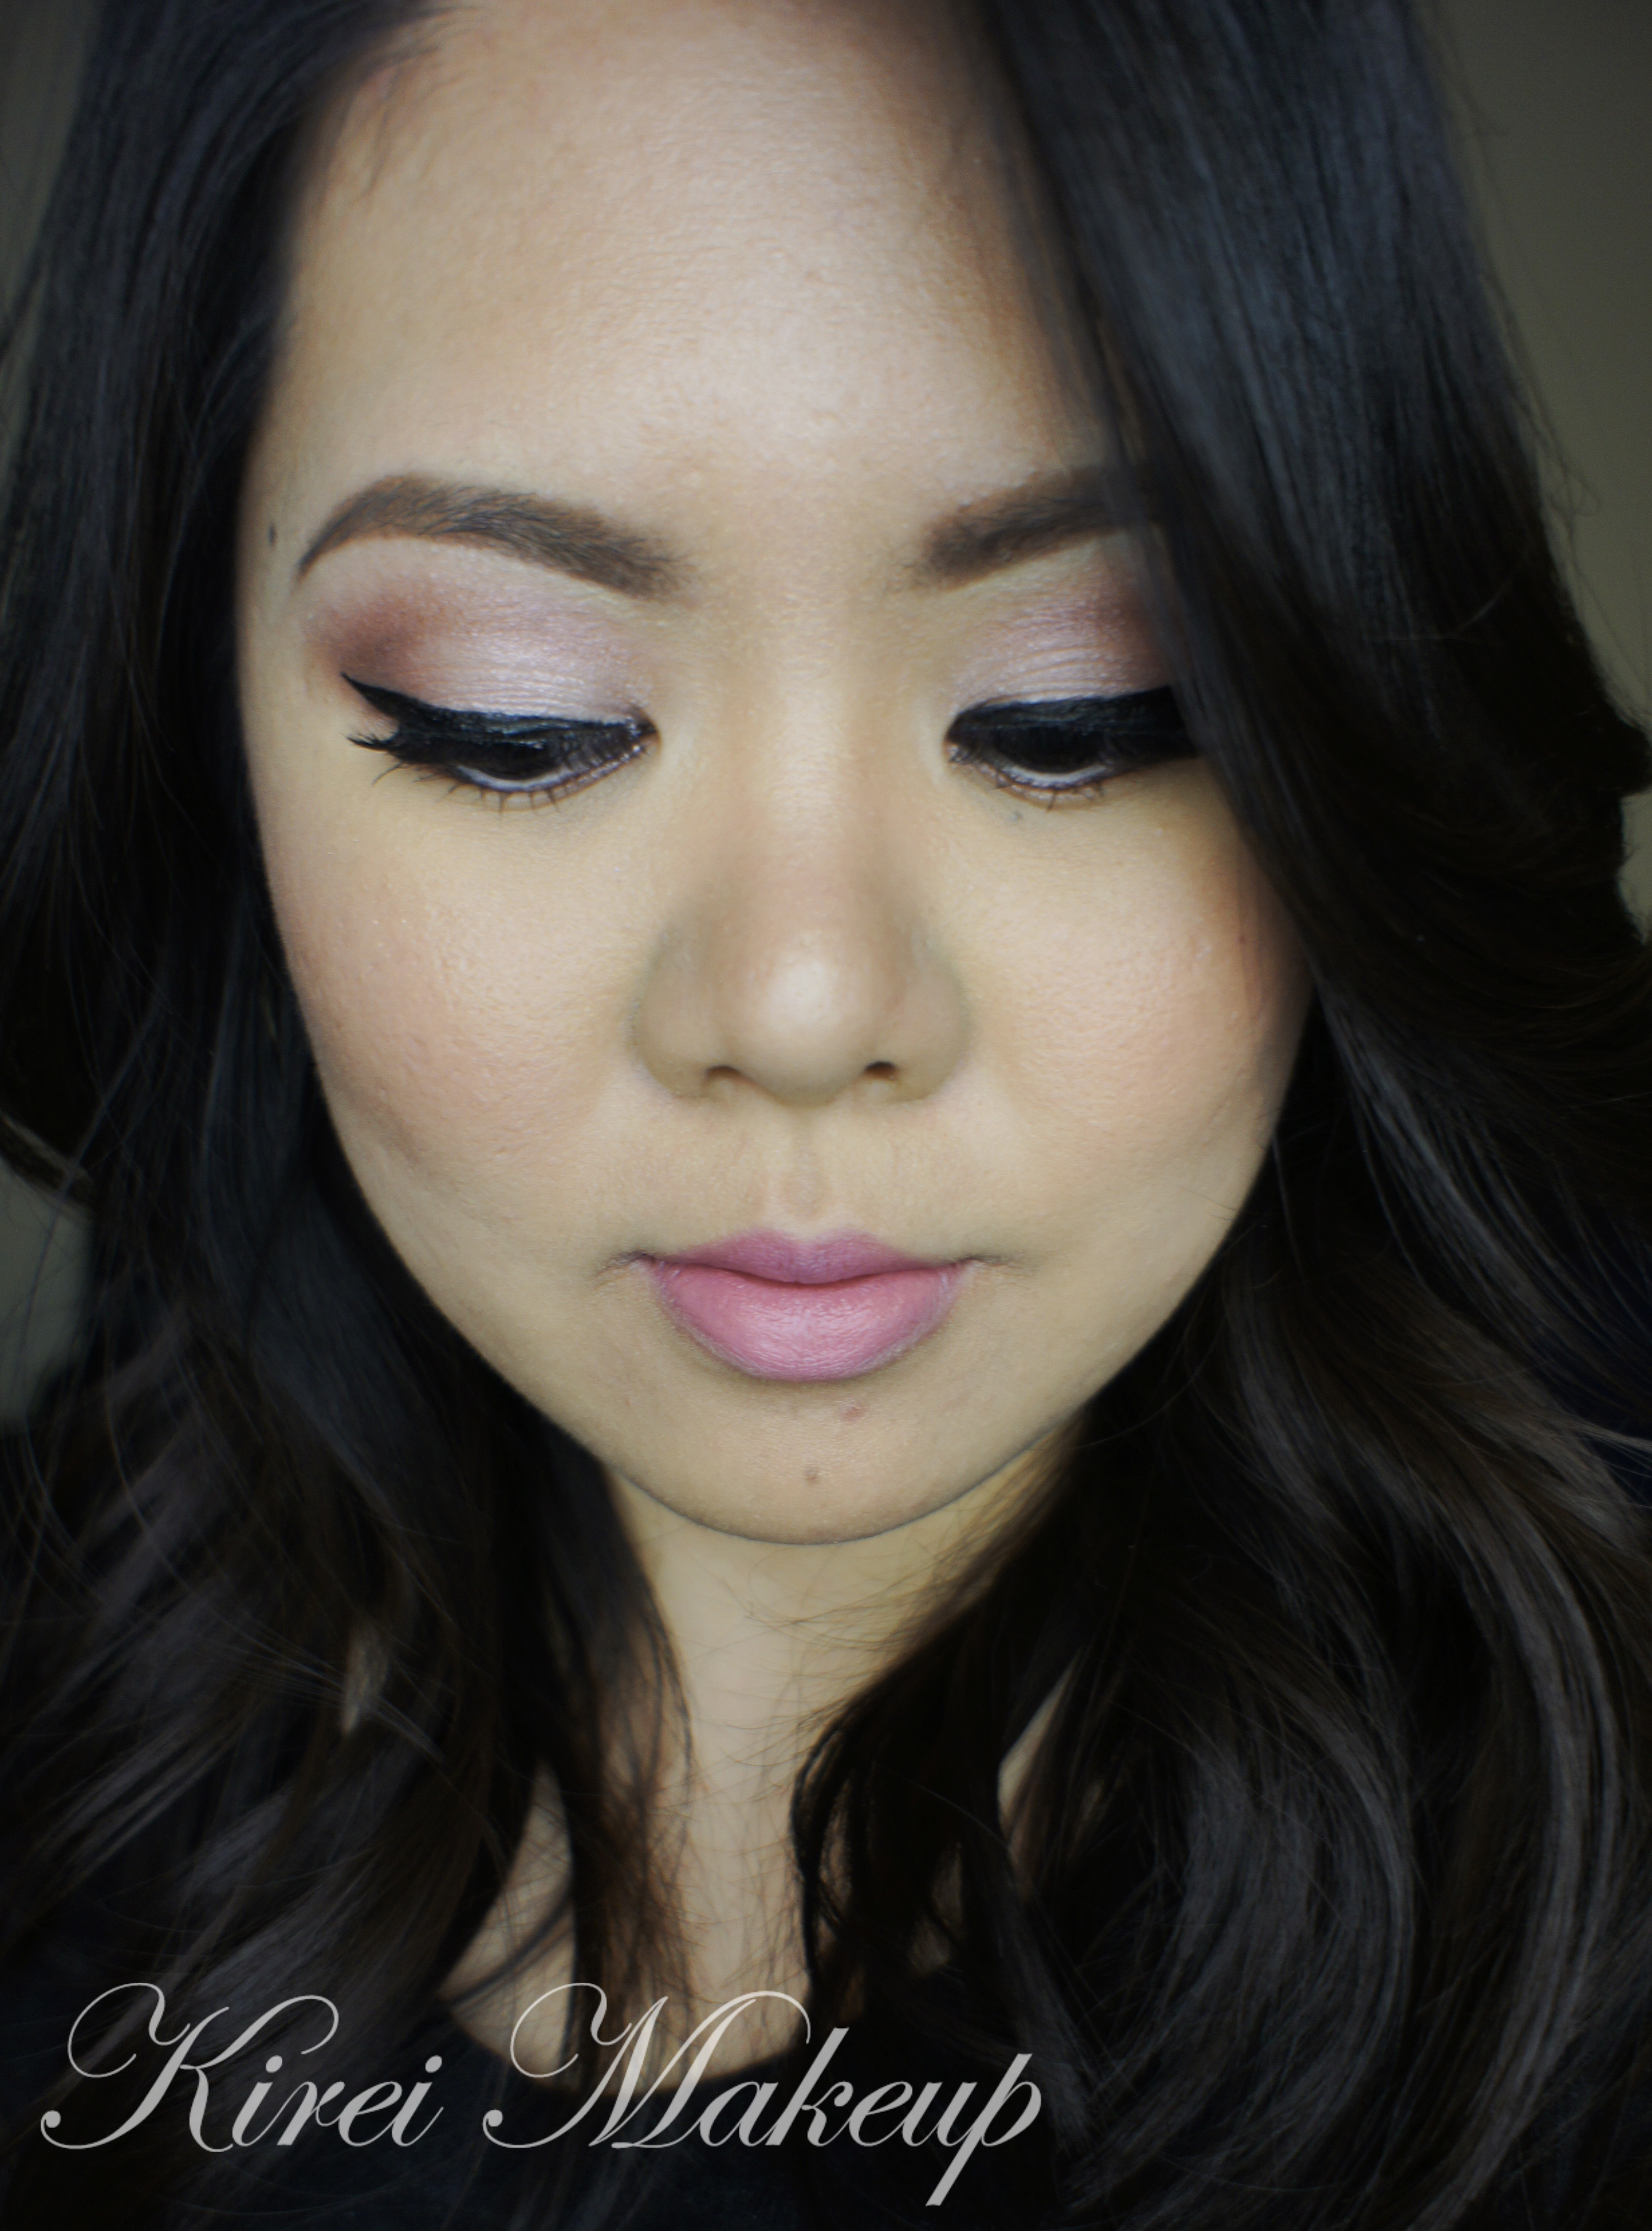
I’ve been wearing trying out a new look last week, and this smokey winged eyeliner look seems to have gotten quite a lot of compliments. I followed quite a few beauty gurus on Instagram and Youtube, and Samantha from Batalash posted a smokey eyeliner video. I loved how it ended up, and I re-created this look. Her technique is slightly different than mine, but the result is not bad I think. I’ve re-done this look when I had to attend the GlamGlow event, and I absolutely love it.

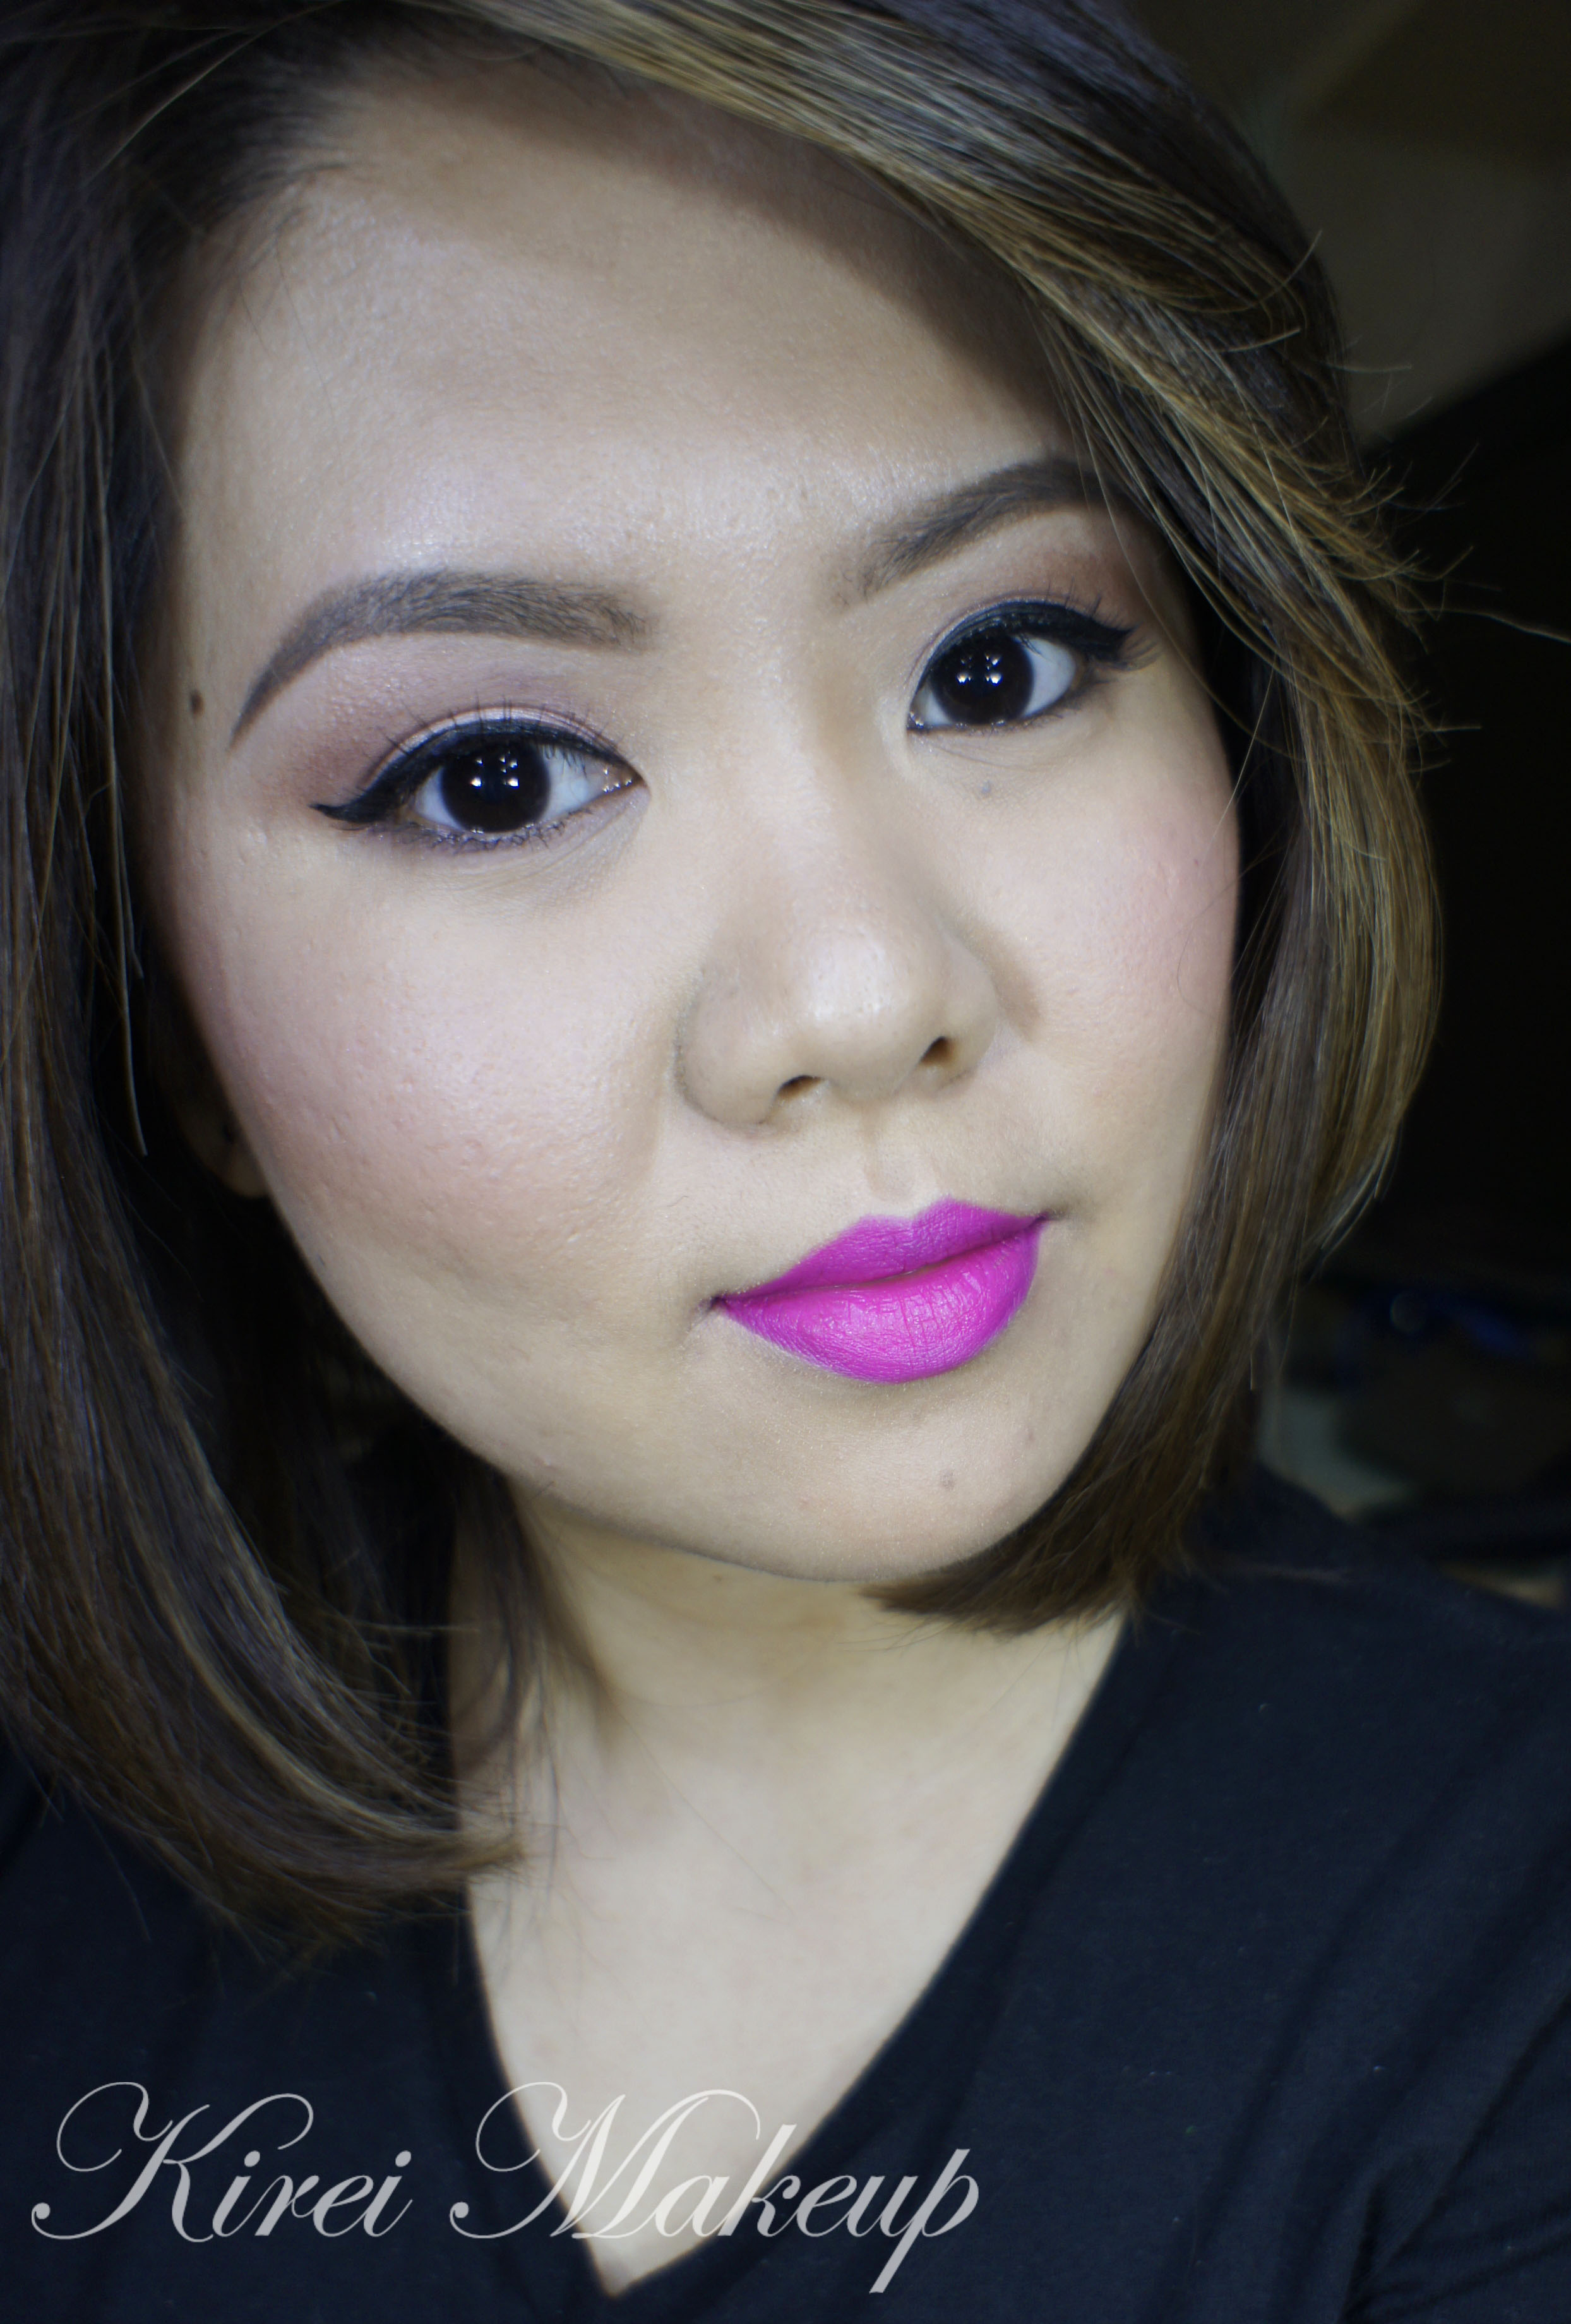
Anyhow, for the rest of the eye makeup, it’s pretty basic nothing fancy. I do not wear this falsies to the GlamGlow event, I actually wore a smaller one. However, for this tutorial I did wear wispy lashes because I wanted to accentuate the wings. Nevertheless, you can opt to wear lashes or not, it’s totally up to you.

You can also pair this look with a simple soft peachy lips like mine or you can pair it with a bold lip color – red, maroon, orange, pink, purple, black etc.

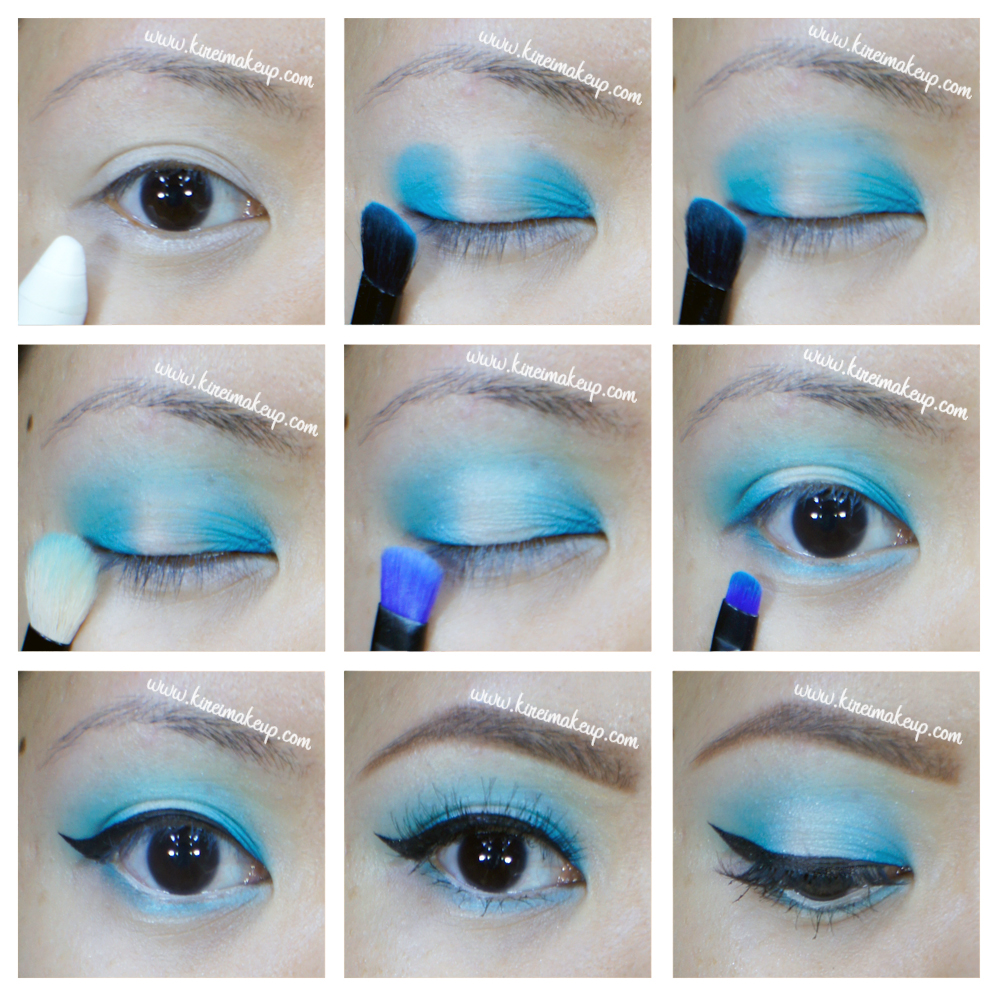
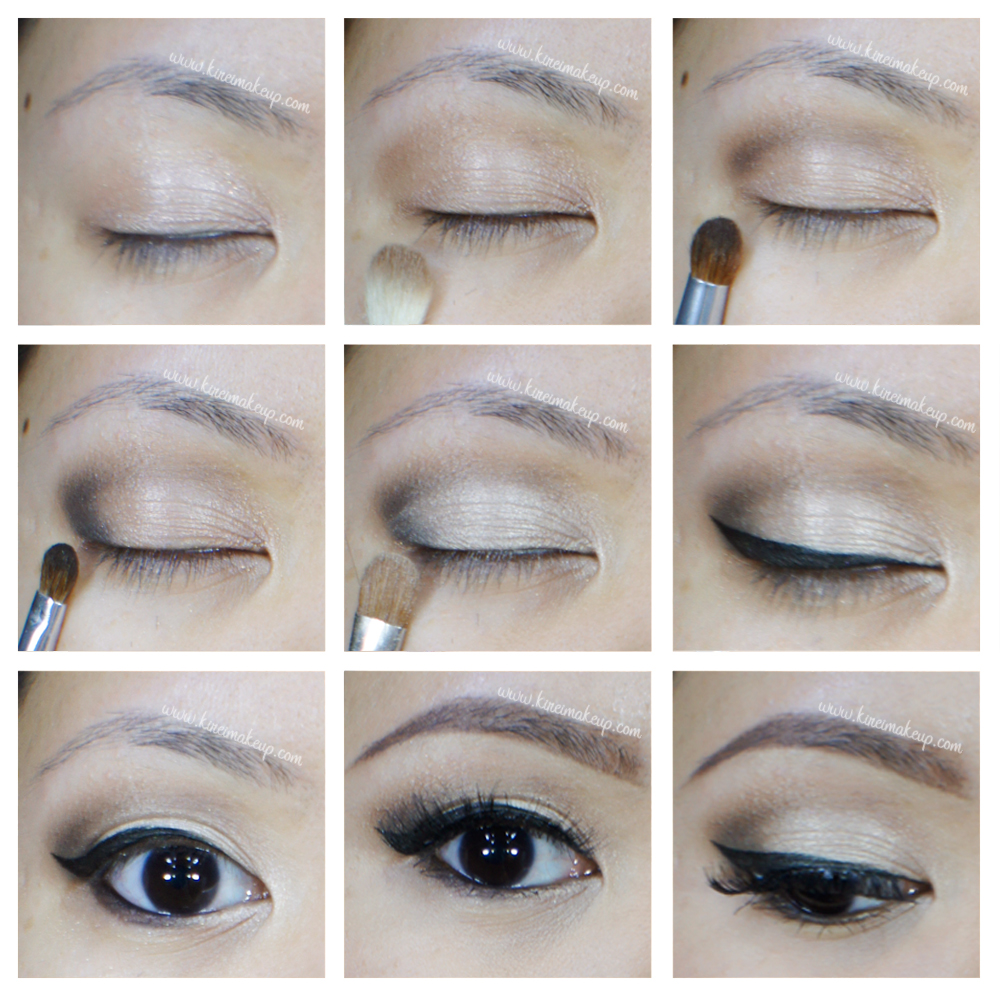
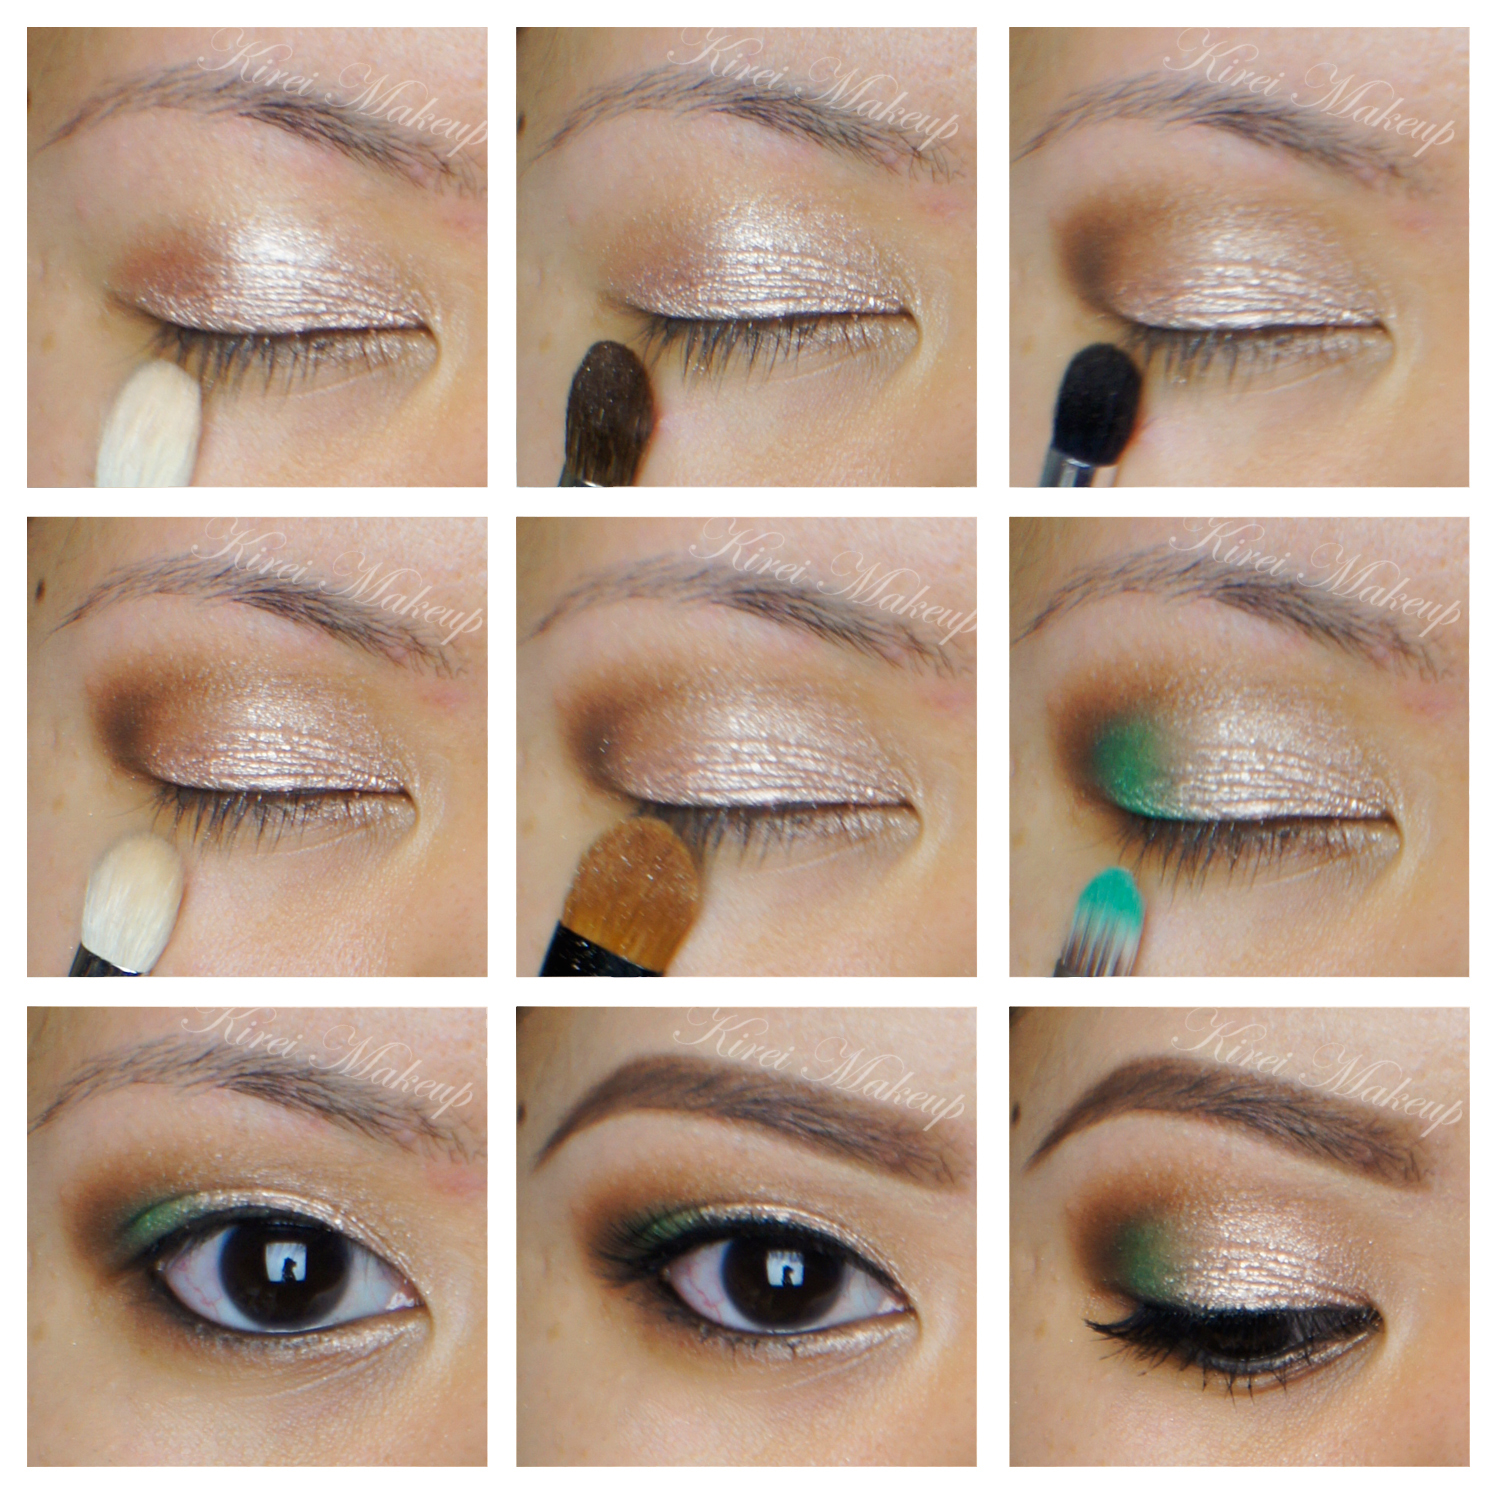
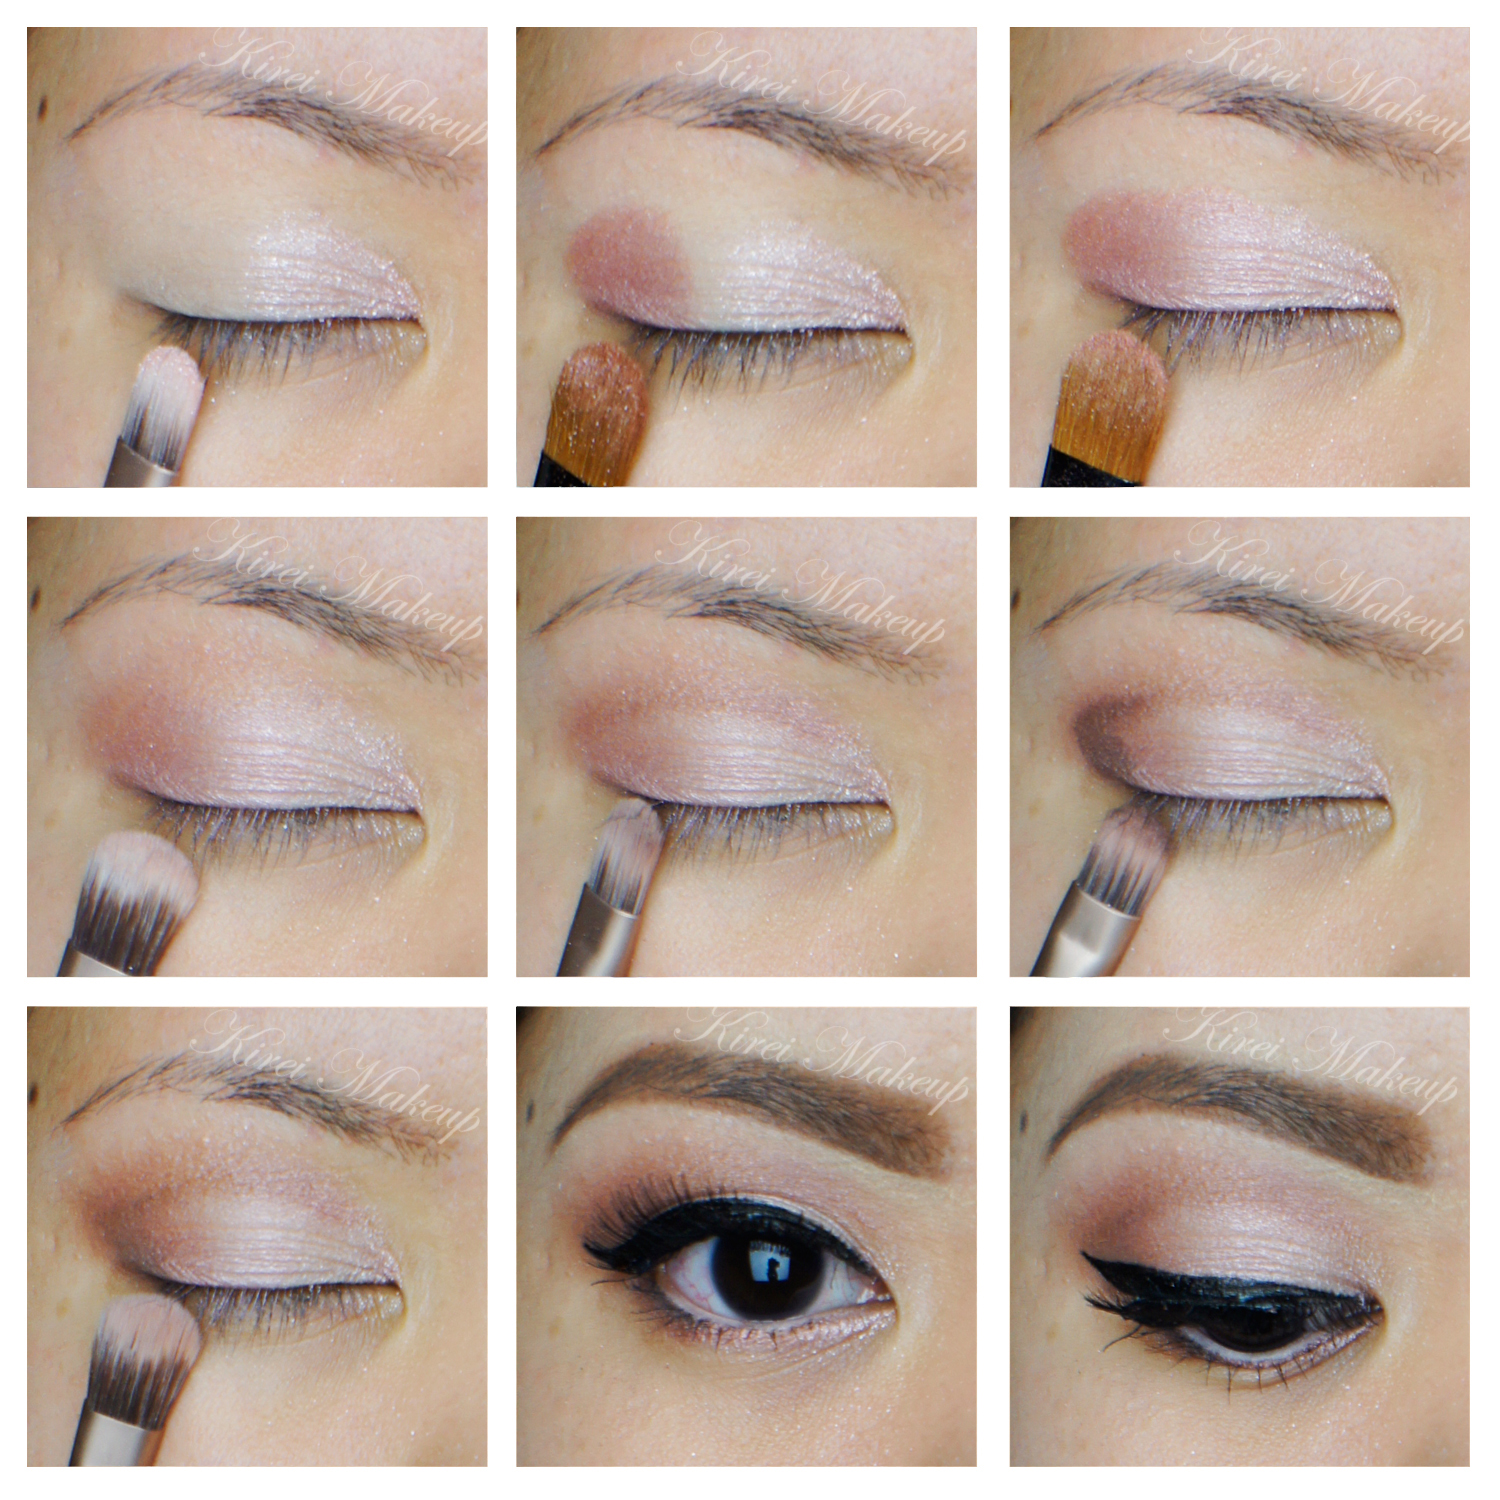
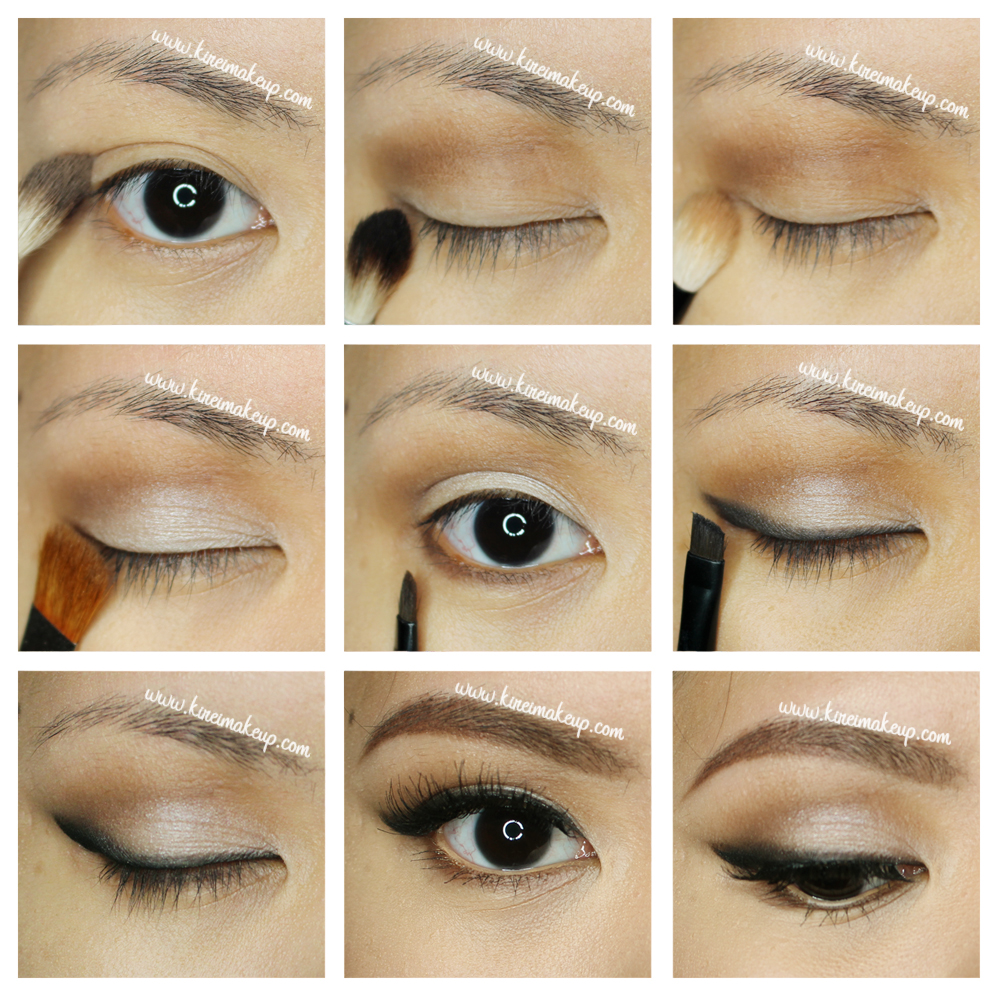
I would like to mention that someone on instagram commented on how she wanted to know how I apply my eyeshadow to my crease. This is how I do it (first photo on top left corner) –

  • When I want to apply my crease color, I looked directly on the mirror and marked where I want the shadow to be.
    • By doing so, I can make sure the eyeshadow color can be seen when my eyes are open, since I’ve quite a hooded lid.
  • Then, I tilted my head back slightly so it looked like I was looking down at the mirror and apply my crease color.

smokey winged liner

List of products used are at the bottom of the page. All eyeshadows used are from Urban Decay Naked Basic palette unless stated otherwise.

My eyelids are prepped with Urban Decay Primer Potion.
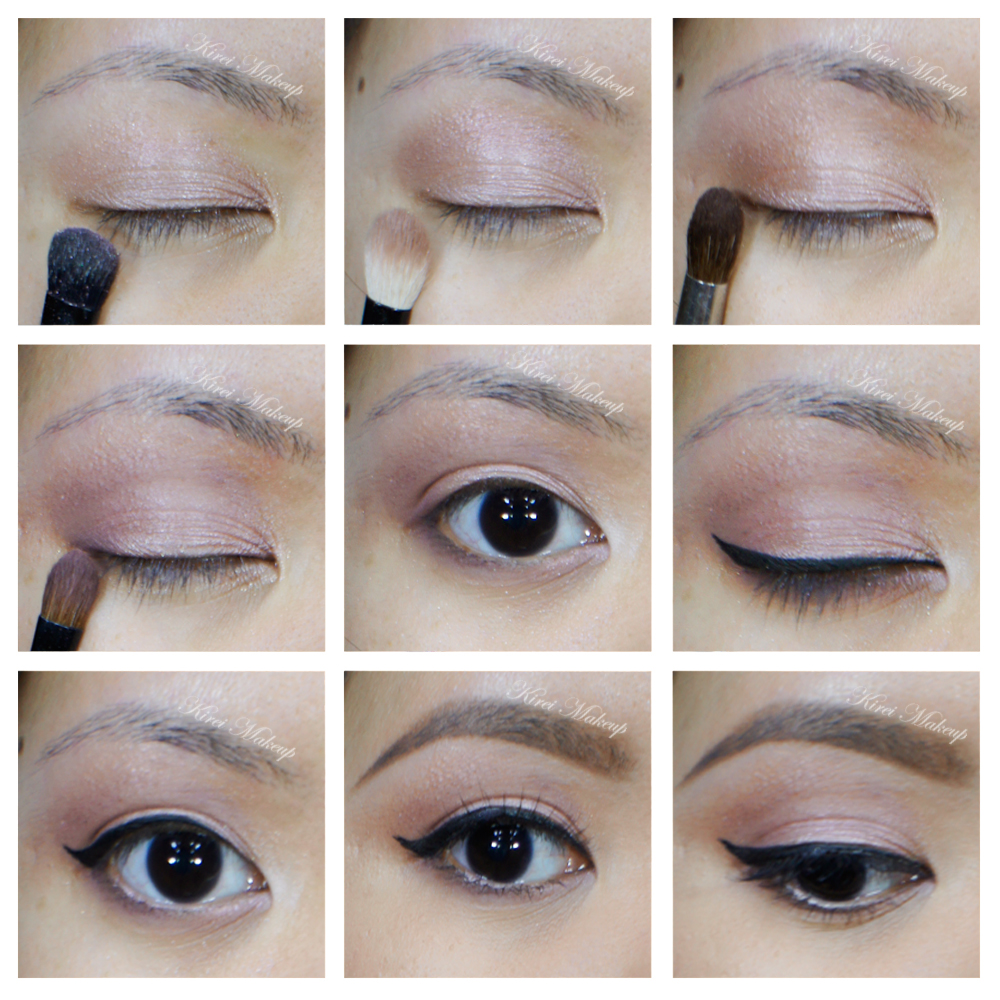
How-to:

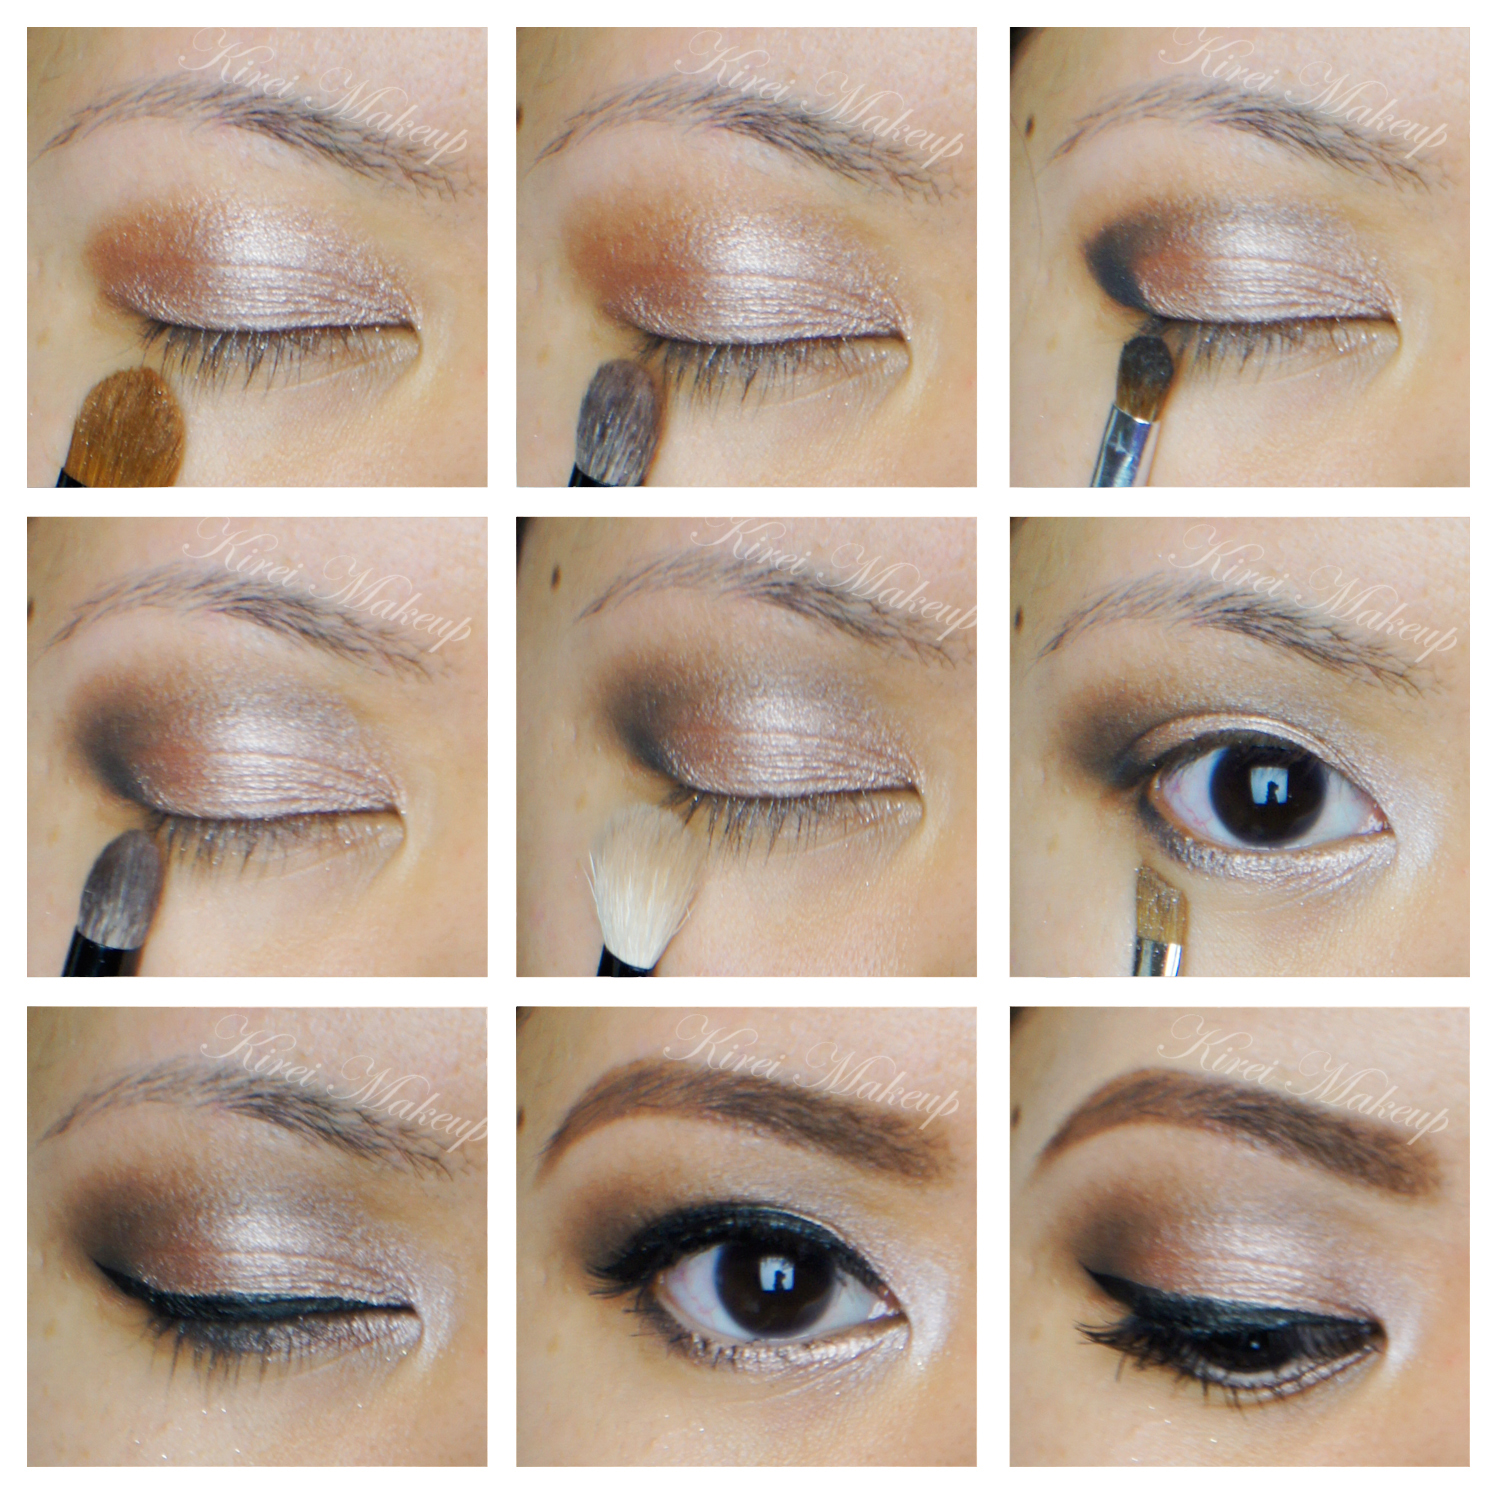
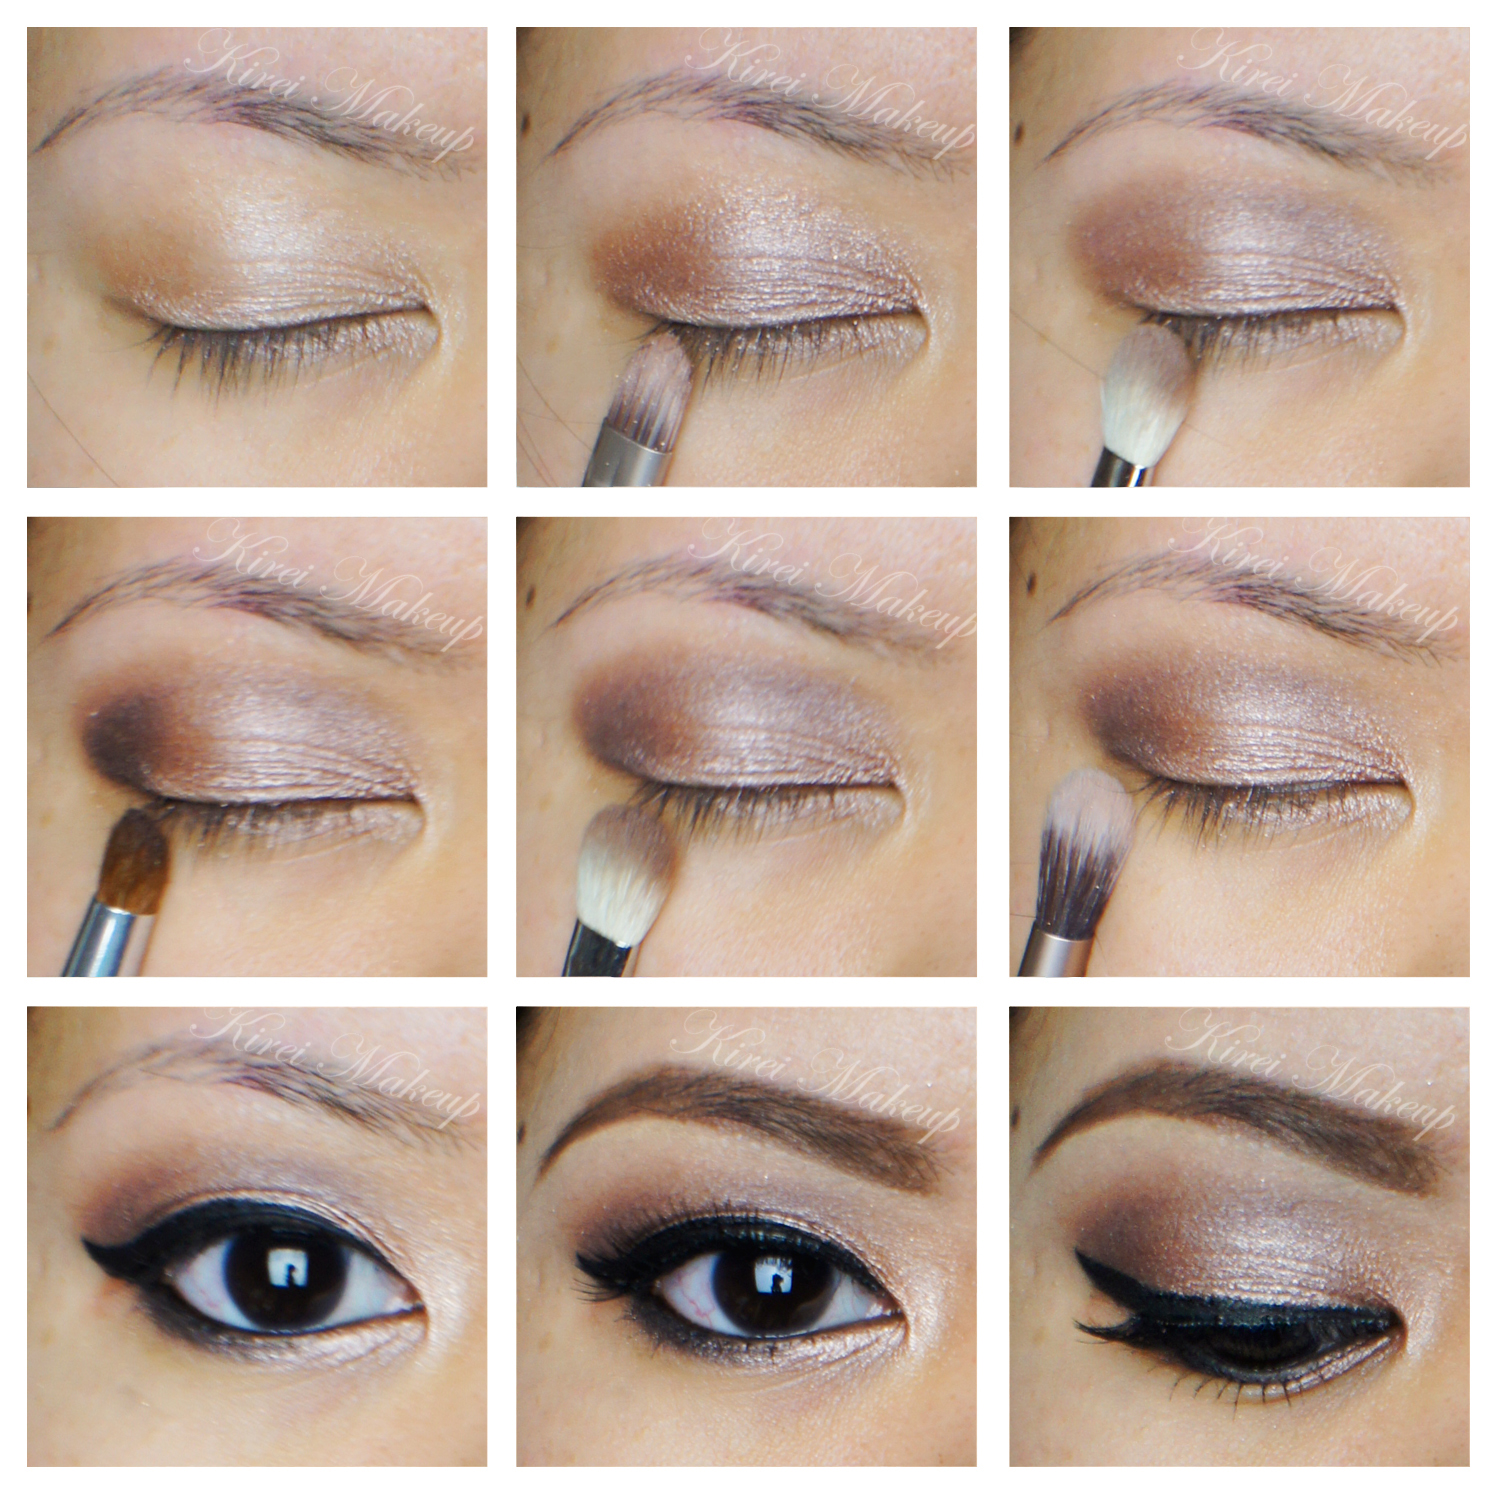
1. I applied a mix of Urban Decay Faint and Naked 2 on the crease using a crease brush

2. Using a fluffy blending brush, I blended the edge of the crease to avoid harsh line.

3. Using a flat eyeshadow brush, I applied Urban Decay Venus on my eyelid.

4. I lined my lower lash line using Urban Decay Faint using an angled eyebrow brush.

5. Using the same angled eyebrow brush, I applied Urban Decay Crave eyeshadow on the upper lash line creating a winged eyeliner. I focused most of the eyeshadow near the roots of my lashes.

6. I used a pencil brush to smudge the line slightly.

7. Using Kat Von D Trooper eyeliner, I lined just the bottom part of the eyeliner – very close to the roots of the lashes, and the bottom part of the “wing”.

8. I used the same brush and eyeshadow as step 5, and run it through the winged eyeliner again.

9. I filled my brows with Anastasia Beverly Hills Brow Wiz in Taupe and Brunette.

10. I applied Gwiyomi no. 3 false lashes.

11. I applied MAC Chromagraphic eyeliner pencil in NC30.

smokey winged eyeliner

12. For my face, I applied Shu Uemura Oleopact foundation using the sponge that comes with it.

11. I lightly dust my face using MUFE Pro Finish powder in 118.

12. I applied Benefit Hervana on my cheeks.

13. On my lips, I filled it in using L’oreal Color Riche lipliner in Rose, then applied YSL Glossy Stain in Peche Cerra-Colla (27)
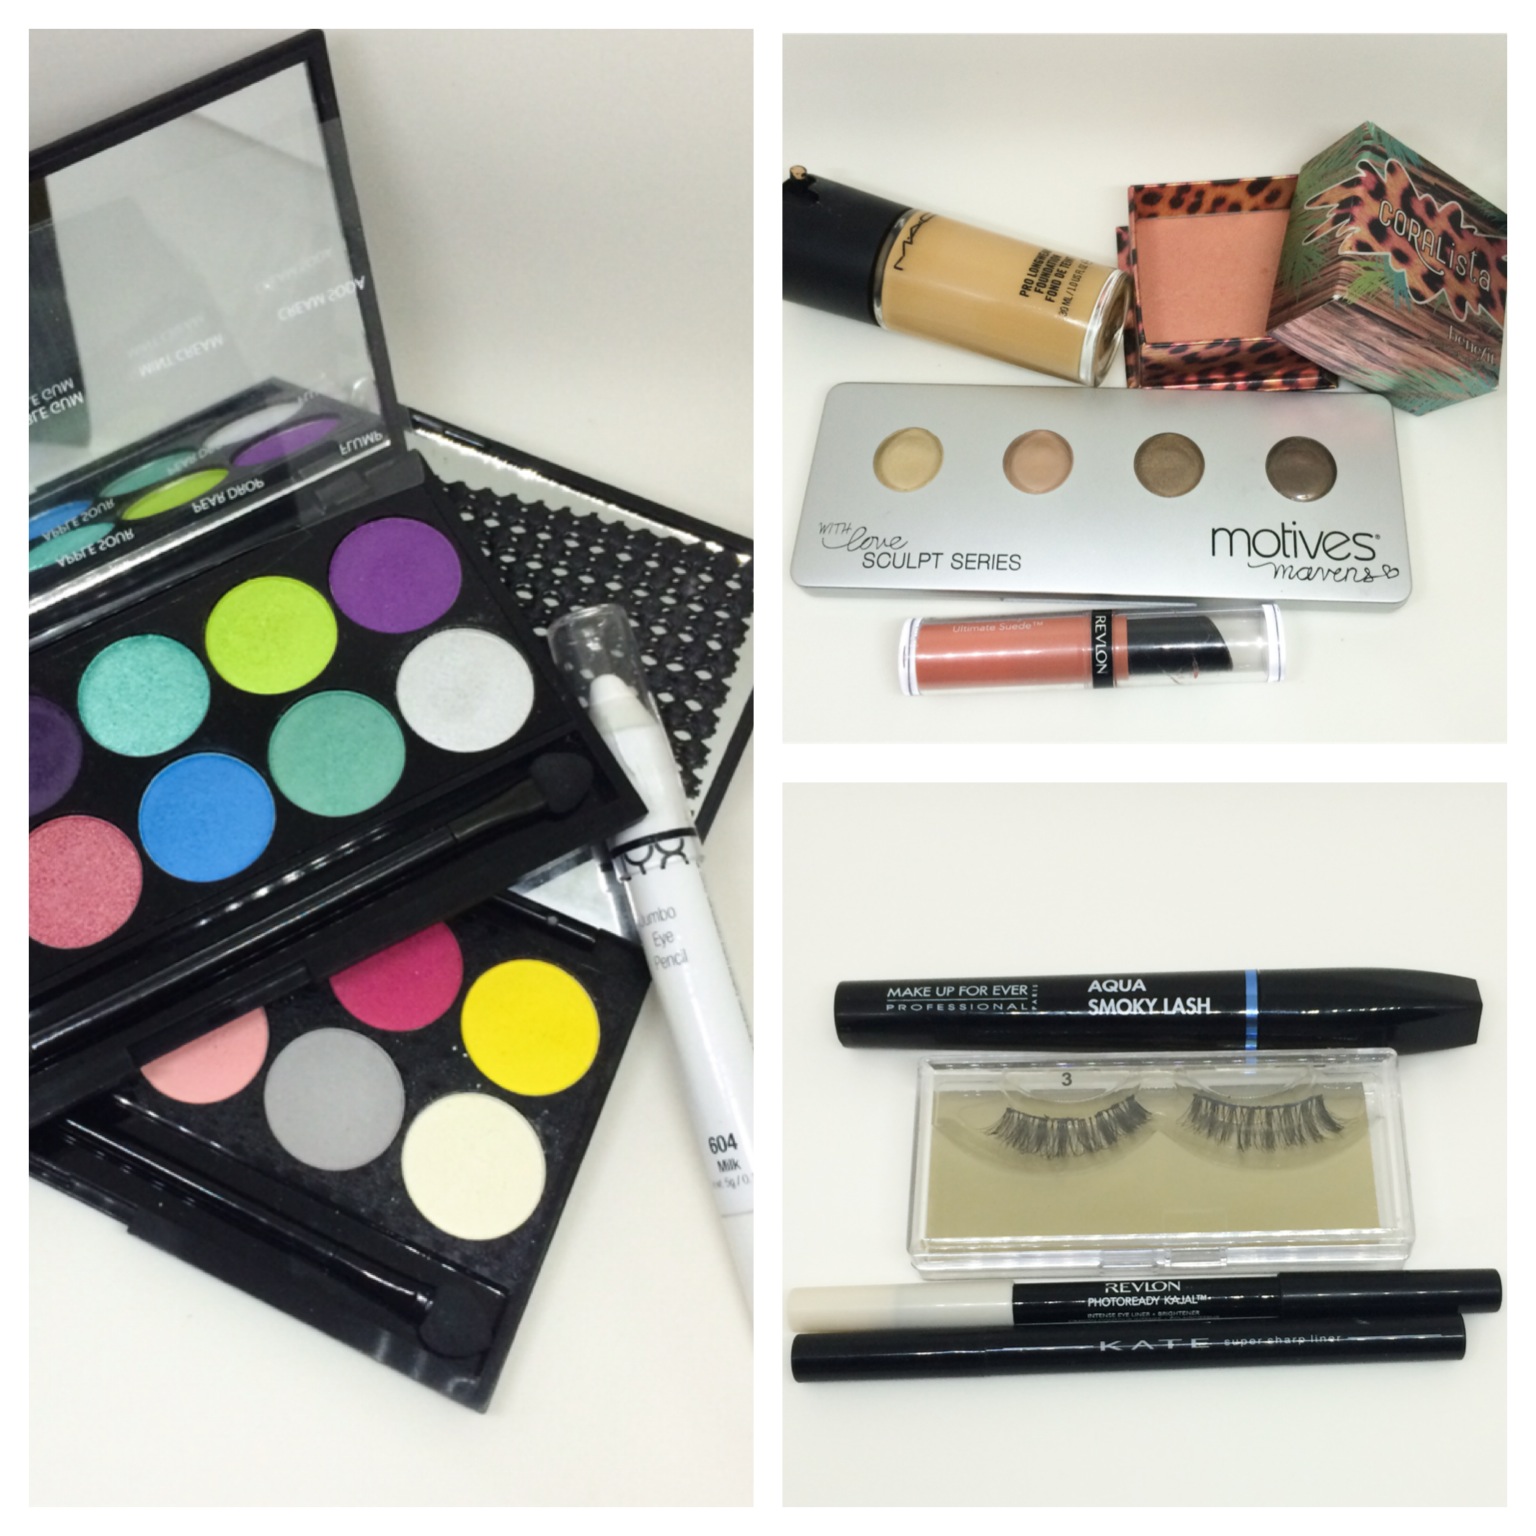
 

Products used

Eyes – Urban Decay Primer Potion (original); Urban Decay Naked Basics (crease: Faint/Naked2, lid: Venus, liner: Crave); Kat Von D Trooper eyeliner; Anastasia Beverly Hills Brow Wiz in Taupe/Brunette; Gwiyomi false lashes no. 3

Face – Shu Uemura Oleopact foundation; MUFE Pro Finish (118)

Cheeks – Benefit Hervana

Lips – L’oreal Color Riche lipliner in Rose; YSL Glossy Stain in Peche Cerra-Colla (27)

World Cup 2014 Argentina Inspired Makeup

We are almost at the end of the World Cup 2014. Today I’m going to do Argentina inspired makeup, which consists mainly of light blue and white. I find it difficult to combine this shade with the rest of my makeup. I had to change my lip colors a few times before I was satisfied (and I’m still not that satisfied, btw..). I think I should’ve went with a cooler lip color, instead. Oh well…

Anyways, I actually found a little bit of difficulty when doing the tutorial since I kept coughing (yes, my cough returned…-__-lll). As you can see on the second pic (top middle), the blue shadow smudged a little to the center of the lid, even though I wanted to keep it bare. That’s because when I was doing the inner part, I coughed and the brush slide to the center of my eyelid. So, please if you decide to recreate this look, keep the middle part of the eyelid free of any blue shadow.

For the other World Cup 2014 makeup series, please check my Brazilian Inspired Makeup post and Netherlands Inspired Makeup. For the use of Sleek Makeup iDivine Candy palette, please check my Psychedelic and Very Purple tutorials.

world cup argentina makeup

How-to:

1. I applied NYX Jumbo Eyeshadow Pencil in Milk all over the eyelids.

2. Using a flat shader brush, I applied Bubble Gum from Sleek Makeup Candy palette on the outer and inner third of the eyelid, keeping the middle part free of any eyeshadow (see note above)

3. I used whatever was left on the brush on my crease.

4. Using a clean blending brush, I blended my crease so there’s no harsh line.

5. I applied Cream Soda from Sleek Makeup Candy palette in the middle part of my eyelid using a flat eyeshadow brush. I also added Pow from Sleek Makeup Ultra Matte v1 Brights palette on top of Cream Soda.

6. Using a small stiff shader brush, I applied Bubble Gum along the lower lash line.

7. I lined my waterline using Revlon Photoready Kajal eyeliner in Carbon Cleopatra.

8. I created a winged liner along the upper lash line using Kanebo Kate Super Sharp eyeliner.

9. I curled my lashes and applied MUFE Aqua Smoky Lash. I also applied Gwiyomi false eyelashes #3.

10. I filled my brows using Shu Uemura Brow Pencil.

argentina inspired makeup

11. I applied MAC Pro Longwear foundation on my face using MAC Masterclass Brush Oval 6.

12. I contoured and highlight my face using Motives Fire sculpt palette.

13. On my cheeks, I applied Benefit Coralista.

14. On my lips, I applied Revlon Colorstay Ultimate Suede Lipstick in Flashing Lights.

argentina inspired makeup

Products used:

Eyes – NYX Jumbo Eyeshadow Pencil in Milk; Sleek Makeup iDivine Candy palette (outer and inner eyelid/lower lash line: Bubblegum; center of eyelid: Cream Soda); Sleek Makeup iDivine Ultra Matte V1 Brights (center of eyelid: Pow); Kanebo Super Sharp Eyeliner; Revlon Photoready Kajal eyeliner in Carbon Cleopatra; MUFE Aqua Smoky Lash; Gwiyomi False lashes #3

Face – MAC Pro Longwear foundation; Motives Fire sculpt series palette; Benefit Coralista blush.

Lips – Revlon Flashing Lights colorstay ultimate suede lipstick.motives fire sculpt palette

World Cup 2014 Brazil Inspired Makeup

Are you guys following FIFA World Cup 2014?! I sure did, and I’m rooting for Brazil! Go Brazil!!! Anyways, since I’m showing my support for Brazil, I decided to do this Brazil Inspired Makeup. I’d probably do a World Cup inspired makeup series for the next couple weeks just for fun! I wanted to post this tomorrow, but decided to do it today.

Anyhow, for this Brazil Inspired Makeup tutorial, I wanted to create a wearable look that uses the colors of the team’s jersey – mainly yellow, a little bit of green and blue (as you can see from the jersey that I wore for today’s tutorial). I love the result, and I especially love that blue eyeliner! If you do re-create this look please TAG ME on twitter or instagram, and hashtag your work with #kireimakeup.

Since the eyes are so bright and bold, I decided to tone it down on my face. My face is kept very minimal, no contouring. My lips, I decided to go with a nude lip, with my new favorite lip pencil, MAC Spice. Since my lips were quite dry, I added Clinique Heaping Hazelnut chubby lip balm to keep it moist. I do apologize if my face doesn’t look that flawless, you can see a bit of breakout here and there, since my immune system is currently down. As you can see, I do not airbrush my face, so what you see is what I actually look like! 😉

brazil inspired makeup

How-to:

1. I applied a yellow cream face paint as a base all over my eyelid. For this tutorial, I used PAC , an Indonesian brand, but you can use any yellow cream base (e.g. MUFE Flash Palette), OR a white base (e.g. NYX Milk Jumbo Pencil in Milk). A good base is necessary so the yellow pops even more.

2. Using a flat eyeshadow brush, I applied MUFE eyeshadow no. 71 all over my eyelid.

3. Using a small blending brush, I applied Urban Decay Buck on outer V and extended it into the crease.

4. Using a dark blue cream face paint from PAC and an angled eyeliner brush, I created a winged liner along the upper lash line.

5. *VERY IMPORTANT STEP* I SET the cream eyeliner using Urban Decay Chaos with another clean eyeliner brush. If you don’t set your cream face paint, it’ll crease.

6. On the bottom lash line, I applied Dragon Fly from Sleek Makeup iDivine Ultra Matte V1 Brights.

7. I lined my tightline and waterline using L’oreal Voluminous Smoldering eyeliner.

8. I curled my lashes, applied mascara, and applied Ardell Demi Luvies falsies.

9. I filled my brows using Anastasia Brow Wiz in Medium Ash.

world cup inspired makeup brazil

10. For my face, I decided to keep it simple. I applied Marc Jacobs Gel foundation using CoverFX cream foundation brush.

11. I applied a little bit of yellow corrector from MAC Conceal/Correct palette in Medium under my eyes.

12. I dusted MAC Mineralized Skinfinish powder all over my face.

13. I applied Smashbox Halo Blush powder in In Bloom.

14. I lined and filled my lips using MAC Spice lip liner. On top of it, I applied Clinique Chubby lip balm in Heaping Hazelnut.

brazil inspired makeup


Red Lips with Revlon Fire and Ice

Another lips look, as mentioned, but this time I’ve decided to use this gorgeous shade – Revlon Fire and Ice. Apparently, this shade was first launched in the 50s, so of course I have to have it!To find out more about the history of this iconic shade, feel free to read about it in Fire and Ice, and Everything Nice.

The best part about this shade is the fact that it is a neutral red – it has both warm and cool undertone, which makes it the perfect shade for everyone. To be honest, I personally find this shade to be slightly on the brighter side compared to the other red lipsticks that I owned, but I don’t mind it. On myself, the shade looks slightly on the coral side. However, this shade might look different depending on your own skin tone, which I think is great since it’ll be a unique color to each person.

I applied the lipstick without any lip liner, and straight from the tube. I didn’t blot and powder it for this tutorial so you can see its true shade and texture. Revlon Fire and Ice is a super lustrous lipstick, which means it’s slightly more on the creamier side. I don’t find this shade to be drying at all.

Also, if you noticed, I’ve been switching my makeup from eyes to lips lately. I actually rocked a red lip last weekend to attend a friend’s wedding (after doing her makeup and hair). Curious to see which red lips I wore last weekend? Check out my Instagram!

For my eyes, I’m using the Kat Von D Monarch palette. I’ve done a tutorial using this palette before in Kat Von D Monarch Palette makeup tutorial.

kat von d monarch palette look

How-to:

1. I prepped my eyelids using Urban Decay Primer Potion in Sin.

2. On my crease, I applied Buck from Urban Decay using a fluffy blending brush.

3. Using a small crease brush, I defined my crease a bit more using Shadow Box from Kat Von D Monarch palette.

4. I applied Deadhead from Kat Von D Monarch palette on the outer V using a small shader brush.

5. On the eyelid, I applied Telepathy using a flat eyeshadow brush.

6. I created a winged liner using L’oreal Infallible Gel Lacquer in Blackest Black.

7. I lined my lower lid using L’oreal Voluminous Smoldering eyeliner.

8. On the lower lid, I applied Deadhead on the outer half and Telepathy on the inner corner.

9. I also lightly dust Entomology from the Kat Von D palette on the inner corner of my eyes.

10. I curled my lashes and appied Ardell demi wispies falsies.

11. On my brows, I applied Anastasia Brow Wiz in Medium Ash.

Red Lips on asian

12. For my face, I applied MUFE HD Foundation in 120.

13. I contoured my face using Cover FX N110 cream foundation.

14. On my cheeks, I applied NARS Mata Hari.

15. On my lips, I applied Revlon Fire and Ice lipstick.

Summer Lips with NARS Schiap

I posted a picture of this look on Instagram, and asked if anyone would like to see it since I don’t actually love how it turned out. However, lots of my followers on Instagram commented to post this tutorial, to my surprise. I think my mistake with this look is with the eyes. May be for future look using NARS Schiap lipstick, I wouldn’t be using the NAKED 3 on my eyes.

Since my Instagram followers love the result, I want to post this up for them! I’d suggest skipping the eyeshadow entirely and just use the winged liner on the eyes to complement the lips. If you want to figure out how to apply winged eyeliner, please check my how-to winged liner post!

I’m just going to skip the step-by-step on the eyes, and instead will list all the products used below.

urban decay naked 3 tutorial

Products used

Eyes – Urban Decay Naked 3 palette (Lid: Buzz, Above crease: Factory, Crease/lower lid: Nooner); L’oreal Super Liner Ultra Sharp Tip; Anastasia Brow Wiz in Medium Ash; Ardell false eyelashes in 110.

Face – Cover FX cream foundation in G40 as base; Cover FX N110 as contour.

Blush – NARS Matahari.

Lips – NARS Schiap.nars schiap

Smokey Eyes using NARSissist Eyeshadow Palette

Alright, as promised, a tutorial using NARSissist Eyeshadow Palette! Also, don’t forget to check out my NARSissist eyeshadow palette review if you haven’t! For today’s tutorial I wanted to create a smoky eyes, because let’s face it, who doesn’t love a good smoky eye makeup, eh?!

My favorite type of smoky eye is one where it’s really dark around the lash line area, and it smokes out to grey and then to nothingness. I also like to keep the brows pretty natural looking since the eyes are so strong, and the rest of the face is simple and easy. For this tutorial, I added a dark purple on the lower lash line, to make it slightly chic and to compliment my eye color (purple looks great on any eye colors!).

About the lighting – since my lights are not with me (I’m in Jamaica at the moment), I do take all my pictures with natural daylight. As you can see on the final picture, this look is very light with emphasize on the eyes. I want to show you that you can still rock that dark smoky eyes with very minimal face makeup.

Personally, I don’t like wearing a lot of makeup – aka heavy contouring, heavy foundation, drawn in eyebrows. Not that there’s anything wrong with heavy makeup (which I do too for tutorials, and for special occasions). So I hope this type of tutorial will work for those who have similar preference like me.

Narssissist makeup tutorial

Scroll all the way down if you want to skip the tutorial, and only interested in getting the list of products used.

How-to:

1. I applied L’oreal Voluminous Smoldering eyeliner on my upper and lower lash lines, as well as waterline. Don’t worry if it is messy!

2. Using a flat eyeshadow brush, I applied NARS Dogon II all over my eyelid. Don’t go all the way to the crease, stop it just below the crease.

3. Using a shader brush, I applied NARS Bad Behavior on the crease.

4. I applied NARS Madrague II as a transition color (just slightly above the crease) using a Smashbox Bullet Crease brush.

5. On the lower lid, I applied NARS Brousse II using the tip of a flat eyeshadow brush.

6. Using a small shader brush, I applied Madrague I on the inner corner of the lid just to brighten up my eyes a little bit.

7. I created a winged liner along the upper lash line using Kanebo Kate Super Sharp eyeliner (optional).

8. I curled my lashes, and applied Make Up For Ever Smoky Extravagant mascara on both upper and lower lashes.

9. I filled my brows very lightly using Anastasia Brow Wiz in Ash Blonde and Brunette.Narsissist makeup tutorial

10. On my face, I applied Smashbox Halo foundation using Sigma Round Kabuki Brush.

11. I lightly contoured my face using MAC Blunt.

12. On the cheeks, I applied MAC Dainty.

13. On my lips, I applied Tarte Lipsurgence in Lively.

Products used:

Eyes – NARSisisst eyeshadow palette (Dogon II – eyelid, Bad Behavior – crease, Madrague II – transition, Brousse – lower lid, Madrague I – inner corner); L’oreal Voluminous Smoldering eyeliner; Kanebo Kate Super Sharp eyeliner; MUFE Smoky Extravagant mascara; Anastasia Brow Wiz.

Face – Smashbox Halo foundation; MAC Blunt; MAC Dainty.

Lips – Tarte Lipsurgence.

Disclaimer: clicking on the Sigma link will take you to my Sigma affiliate page. Any purchase you make on Sigma from my website will help in this blog’s maintenance. Rest assured, I only recommend products that I honestly love and use on myself. Thank you for your support!

Adding Color to Eye Makeup

Hello, everyone! I hoped you guys had a great Valentine’s and Family day weekend, yes? I had quite a blast this weekend, so I do wish that all of you had an awesome time too! I just want to let you guys know that I might not be able to update my blog this week. I’ll be traveling again, and if you want to find out where’s my next destination, follow me on Instagram!

For today’s post, I want to show you how you can add color to your eye makeup. I’ve done a “pop of color” tutorials throughout my blog – using eyeliner, on the inner corner, or on the lower lid. This time, I added the color on the outer part of my eyelid. I think it’s cute, and different, totally  unexpected! This look would be great for those who would like to try out colored eyeshadow, but doesn’t want to go full on colors with it.

For the neutral shades, I used my Smashbox Full Exposure palette, but obviously you can use any palettes you’d like. In addition, for the face makeup, I actually used it to do my Highlight, Blush, Contour (bacon) post. So, head over there to find out how I contour my face.

Scroll all the way to the bottom to find out which products I’ve used for this post – this is a new thing I’m trying to do, so you don’t have to read the step-by-step list to figure out what I’m using.

neutral smoky eyes with color

How-to:

1. I applied MUFE Aqua Cream no. 13 on my eyelid using my finger. Then I buffed the cream eyeshadow out using a clean fluffy blending brush.

2. I applied M3 eyeshadow from Smashbox Full Exposure palette on my crease using a crease blending brush.

3. Using Sephora bullet crease brush, I applied M1 from Smashbox Full Exposure palette on the outer V, dragging it ever so slightly towards the crease.

4. Using a clean blending brush, I blended out any harsh edge.

5. I applied S3 from Smashbox Full Exposure palette on my eyelid using a flat eyeshadow brush.

6. Using a clean flat eyeshadow brush (I used UD eyeshadow brush), I applied Dragon Fly from Sleek Makeup Ultra Mattes V1 Brights next to M1. I patted this eyeshadow on the outer corner, carefully blending it towards S3.

7. I lined my waterline and tightline using L’oreal Voluminous Smoldering eyeliner.

8. I applied M1 on the outer part of the lower lid, and S3 on the inner part.

9. I curled my lashes and applied Buxom Lash mascara on both upper and lower lashes.

10. I filled in my brows using Anastasia Brow Wiz.

day smoky eyes with color

11. I applied CoverFX Cream foundation in G40 as base, G20 as highlight, and N110 as contour.

12. On my cheeks, I applied Maybelline Master Glaze in Make a Mauve.

13. I set my face using CoverFX Translucent Loose powder.

14. On my lips, I applied Clinique Chubby Stick lip pencil in Bountiful Blush.

Products used:

Eyes – Smashbox Full Exposure Palette in M3 (crease), M1 (outer V), S3 (eyelid); Sleek Makeup Ultra Mattes V1 Bright (Dragonfly); L’oreal Voluminous Smoldering eyeliner; Buxom Lash Mascara; Anastasia Brow Wiz in Brunette and Ash Blonde.

Face – Cover FX Cream foundation in G20, G40, N110; Maybelline Master Glaze in Make a Mauve; Cover FX Translucent Loose Powder; Clinique Chubby Stick Lip Pencil in Bountiful Blush.

Neutral Smokey Eyes using Urban Decay Naked Palette

Another Urban Decay Naked palette post again?! Yes it is! I’ve been showcasing my love for the Urban Decay Naked 3, and I did a tutorial using the Naked 2, so I though that it was time to get in touch with the original Naked palette. For this tutorial, I wanted to do a neutral smokey eyes tutorial, which is perfect for any occasion from party, night-out, date (for Valentine’s) etc.

How-to:

1. I prepped my eyelids using Urban Decay Primer Potion in Sin.

2. Using a flat eyeshadow brush, I applied Sidecar all over the eyelid.

3. I applied Buck on my crease using Smashbox Bullet Crease brush.

4. Using a small shader brush, I applied Creep on the outer V and lightly dragging it to the crease.

5. Using the same Smashbox Bullet Crease brush that I used on step 3, I blended my crease.

6. I applied Naked lightly under the brow, and Sin on the inner corner of my eyes.

7. I applied Creep on the outer half of my lower lid, and Sidecar on the inner half using an angled eyeliner brush.

8. I created a winged eyeliner using Kanebo Kate Super Sharp eyeliner. On my waterline, I used MAC Chromagraphic eyeliner in NC15.

9. I filled my brows using Anastasia Duo Brow Powder in Brunette.

10. I curled my lashes, and applied Buxom Lash mascara on both top and bottom lashes.

11. I also applied Gwiyomi Gillian false eyelashes.

urban decay naked tutorial

12. For my face, I applied CoverFX Cream foundation in G40 using CoverFX cream foundation brush.

13. On my cheeks, I applied Chanel Blush de Horizon.

14. On my lips, I applied Revlon Socialite lipstick.

coverfx cream foundation review g40Products used

Eyes – Urban Decay Primer Potion Sin, Urban Decay Naked palette, Kanebo Kate Super Sharp eyeliner, Buxom Lash mascara, Anastasia Brow Powder Brunette, Gwiyomi Gillian false eyelashes.

Face – Cover FX Cream foundation, Chanel Blush de Horizon, Revlon Socialite lipstick.

Soft Smokey Eyes using Urban Decay Naked 2

Happy Lunar New Year, everyone! I hope this year will bring more luck, health, and prosperity for you! Oh, how I miss being home for Lunar New Year, all those yummy food and family gathering together!

Anyways, for this tutorial, I wanted to use my Urban Decay Naked 2 palette to create a soft smokey eyes. Ever since I’ve been using my Naked 3, I felt that the Naked 2 and 1 were being left out in the corner, crying for my attention.

I also wanted to practice some contouring and highlight using my Kryolan HD Foundation palette, and I do have to say the foundation is so creamy and it blends so nicely into the skin. If you don’t like the heavy makeup on this tutorial, feel free to skip the contour/highlight part.

easy smoky eyes for asian

How-to:

1. I applied MUFE Aqua Shadow in 28E all over my lid, blending it out using my finger.

2. Using a flat eyeshadow brush, I applied YDK from UD Naked 2 on my eyelid.

3. Using a fluffy blending brush, I applied Tease from UD Naked 2 on my crease.

4. I applied Busted from UD Naked 2 on the outer V using a crease brush.

5. I blended Busted using the brush I used on step 3.

6. Using a clean blending brush, I applied Foxy from UD Naked 2 under the brow.

7. On my lower lid, I applied Chopper from UD Naked 2 on the inner half and UD Blackout on the outer half.

8. I lightly applied Verve from UD Naked 2 on the inner corner of my eyelid using a clean fluffy blending brush.

9. I created a winged liner using L’oreal Infallible Gel Lacquer Liner in Blackkest Black.

10. I lined my waterline using L’oreal Voluminous Smoldering eyeliner.

11. I curled my lashes and applied Cover Girl Lash Blast mascara on both upper and lower lashes.

12. I applied Gwiyomi false eyelashes (sold in Jakarta, please check my Instagram)

13. I filled my brows using Anastasia Duo Brow Powder.

urban decay naked 2 tutorial

14. On my face, I applied Urban Decay Naked Skin foundation using a Sigma Round Kabuki Brush.

15. I contoured and highlight my face using Kryolan HD Foundation palette.

16. I applied MAC Fleur Power on my cheeks.

17. For the lips, I applied Revlon Mauve It Over matte lipstick, and dabbed L’occitane clear lip balm on top of it.

Products used:

Eyes – MUFE Aqua Shadow 28 E, UD Naked 2, L’oreal Infallible Gel Lacquer Liner in Blackkest Black, L’oreal Voluminous Smoldering Eyeliner, Cover Girl Lash Blast mascara, Gwiyomi False Eyelashes, Anastasia Brow Powder.

Face – UD Naked Skin foundation, Kryolan HD Foundation palette, MAC Fleur Power blush, Revlon Mauve it Over lipstick, L’Occitane lip balm.

Valentine’s Day Makeup using UD Naked 3

Update Jan. 13, 2016: I have a new Valentine’s day tutorial on youtube using UD Gwen Stefani palette! Come check THIS VIDEO OUT if you haven’t already.

Happy mid-week, everyone! Valentine’s day is just a few weeks away, and I wanted to create a soft, feminine makeup using UD Naked 3. This Valentine’s Day makeup is girly, warm, and rose-hued. The eyes are made to look bigger and brighter. I’ll do another smoky eyes tutorial using UD Naked 3 for Valentine’s day next time.

I know I’ve been using UD Naked 3 a lot, but I can’t help it! It’s so pretty and gorgeous, how can I resist it?! It’s one of those palettes that does not have much browns and grey, but at the same time it’s neutral enough to be used daily and in different ways.

I’ve done several different tutorials using UD Naked 3, and you can find it here: Rose Smoky Eyes, Look#2, Rose Smoky Eyes 3, Soft and Romantic, as well as a review in Product of the Week.

I’ve also added a Youtube Video tutorial using UD Naked 3 palette!

valentine's day makeup

I prepped my eyelids using UD Primer Potion.

How-to:

1. Using a flat eyeshadow brush, I applied Dust on the inner half of the lid.

2. Using a clean flat eyeshadow brush, I applied Buzz on the outer half of the lid, leaving the middle part empty if you’d like. If not, that’s fine as well.

3. Using a flat eyeshadow brush, I applied Burnout to the middle of the eyelid. This will act as a good transition color between Dust and Buzz.

4. Using the tip of a flat eyeshadow brush, I applied Liar on the crease to create a bit of depth without going smoky.

5. I applied Factory on the outer V, and blended it out using a blending brush.

6. On the lower lid, I applied Dust on the inner corner, Buzz in the middle, and applied Factory on the outer half using an angled eyeliner brush.

7. I created a winged eyeliner on the upper lash line using L’oreal Super Liner Ultra Sharp Tip.

8. On the waterline, I applied white end of Revlon Photoready Kajal eyeliner in Cleopatra. I applied the black end of this eyeliner on the outer third of my lower lash line.

9. I curled my lashes and applied Cover Girl Lash Blast mascara. I also applied false eyelashes from Gwiyomi boutique (Indonesia-based).

10. I filled my brows using Anastastia Brow Wiz in Ash Blonde and Brunette.

urban decay naked 3 tutorial

11. On my face, I applied UD Naked Skin foundation using a Sigma Round Kabuki Brush.

12. I lightly contour my face using MAC Shadowy powder and NARS Ita Kabuki Brush.

13. I applied MAC Cubic on my cheeks.

14. On my lips, I applied MAC Please Me lipstick.

valentine's day makeup

Products used:

  • Eyes – UD Primer Potion, UD Naked 3 palette, Revlon Photoready Kajal Intense Eyeliner in Cleopatra, L’oreal Super Liner Ultra Sharp Tip, Cover Girl Lash Blast mascara, Anastasia Brow Wiz in Ash Blonde/Brunette.
  • Face – UD Naked Skin foundation, MAC Shadowy powder, MAC Cubic, MAC Please Me.