Glitter Holiday Makeup

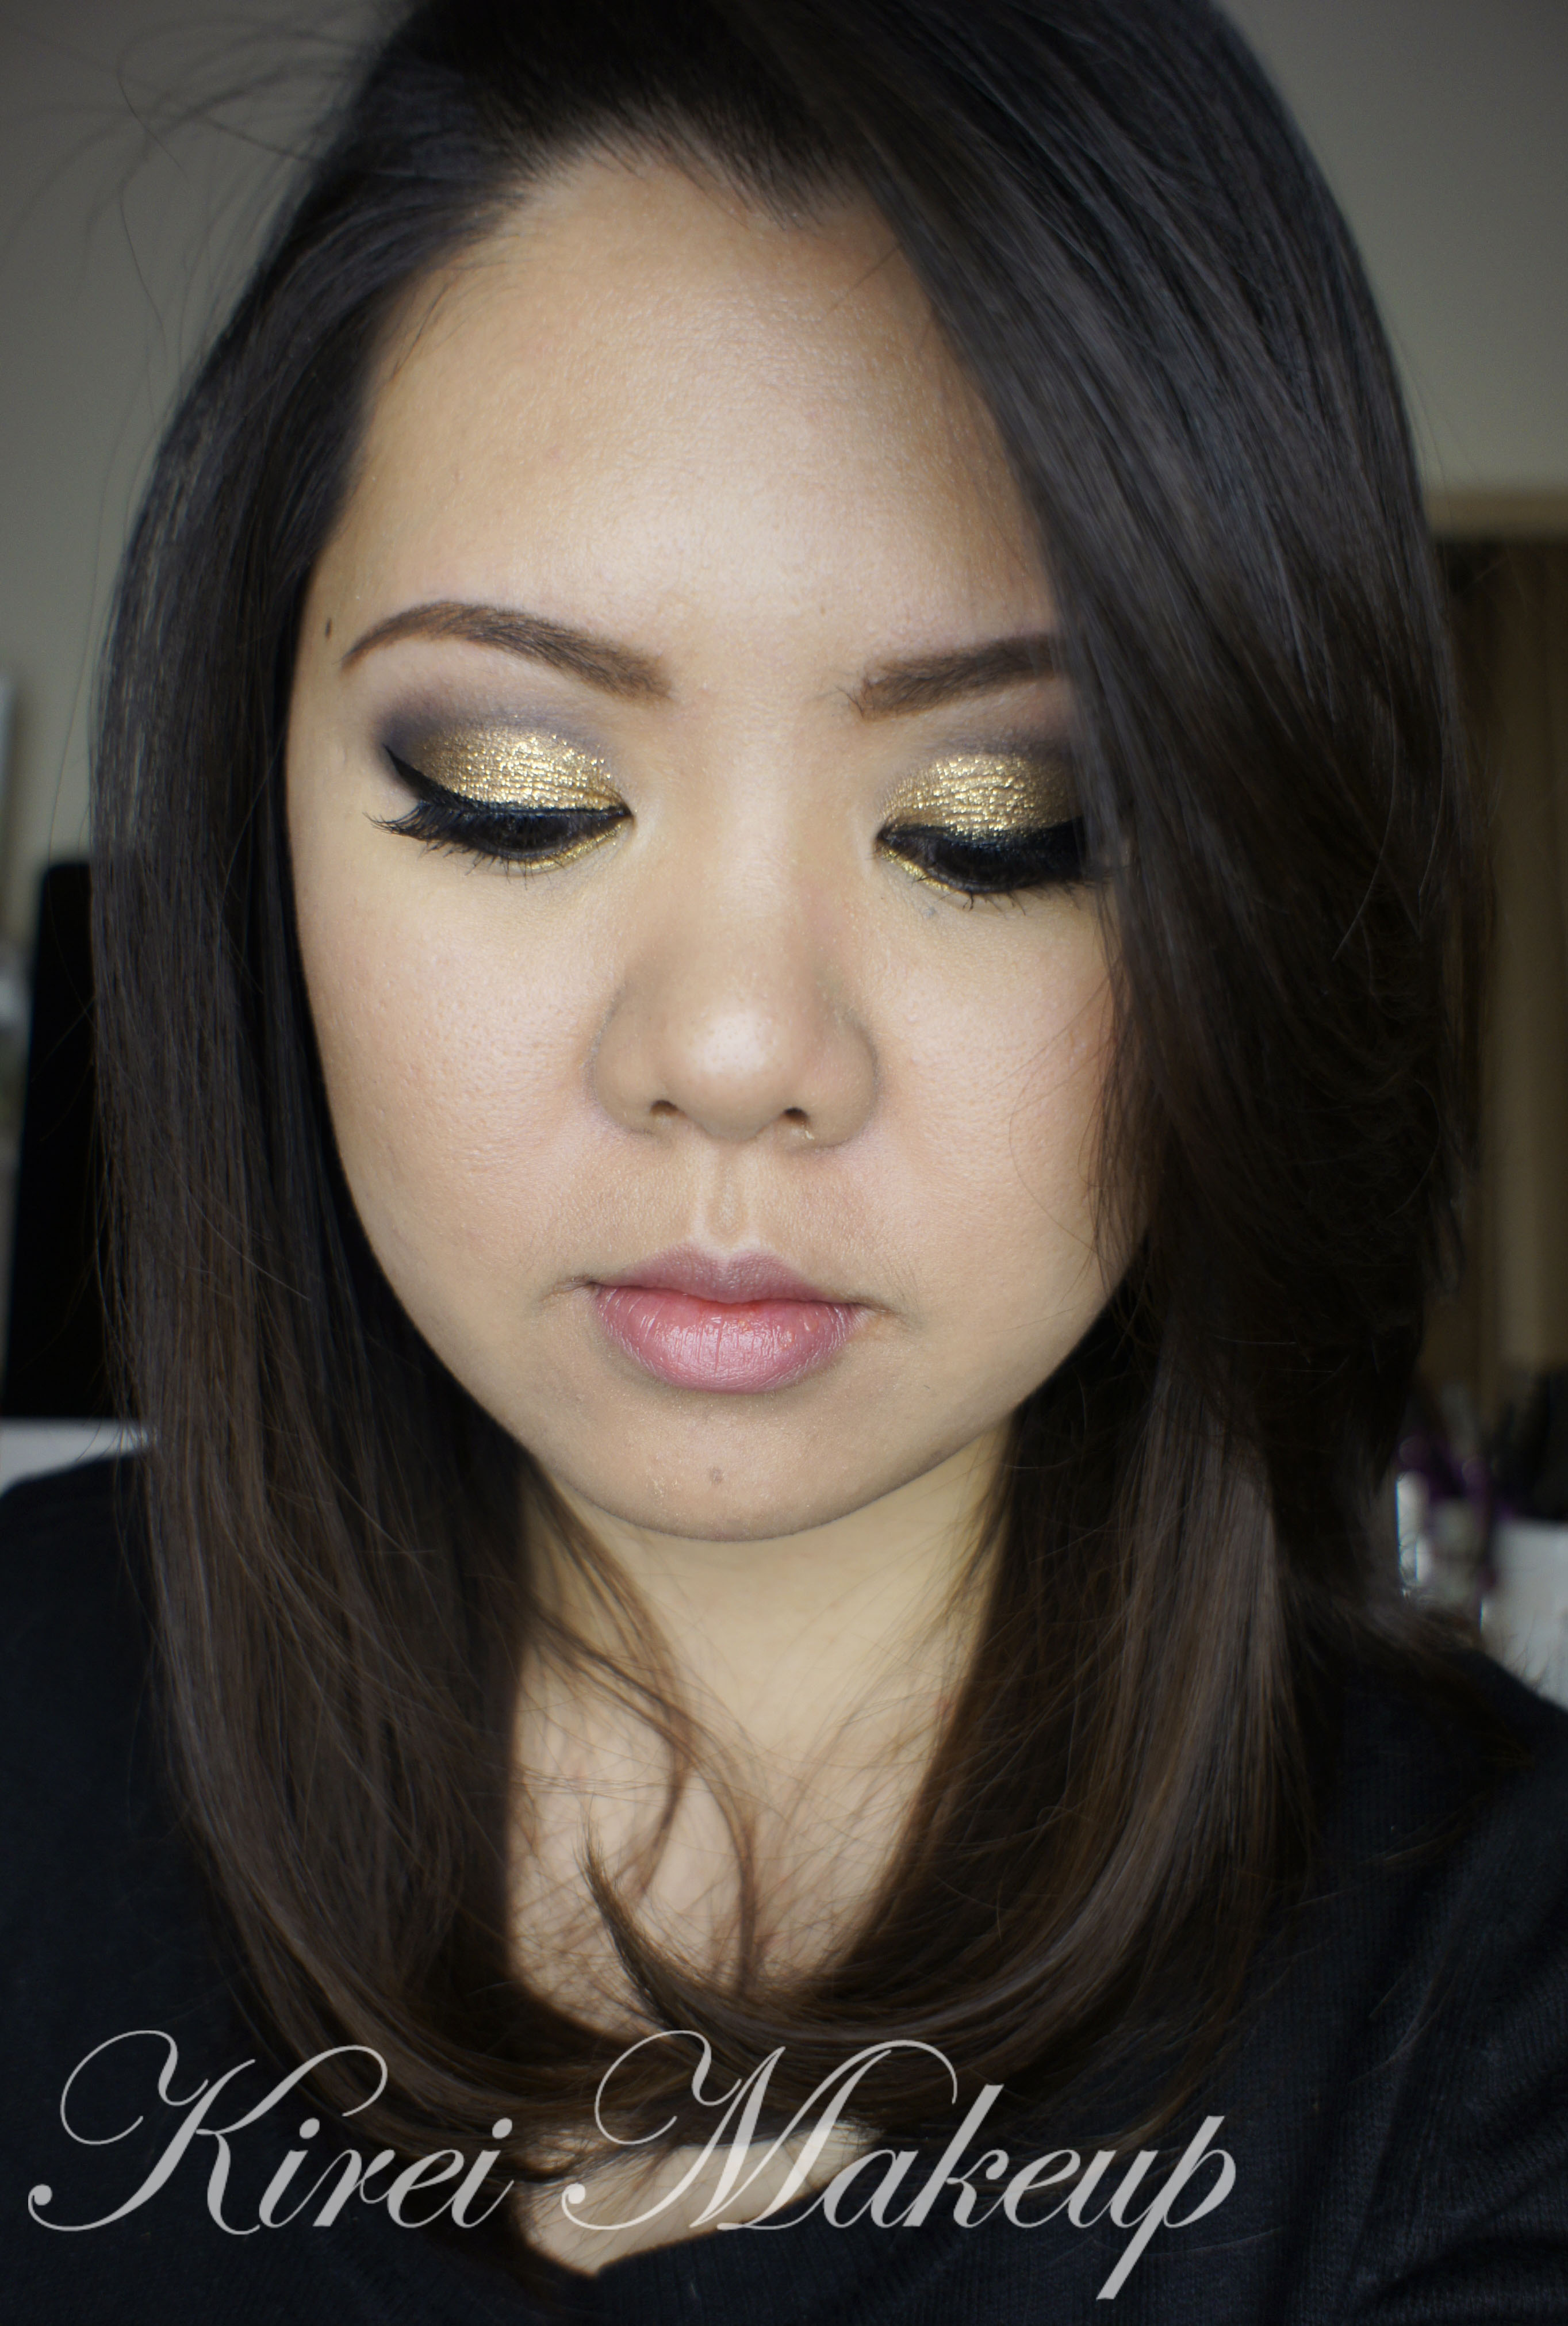
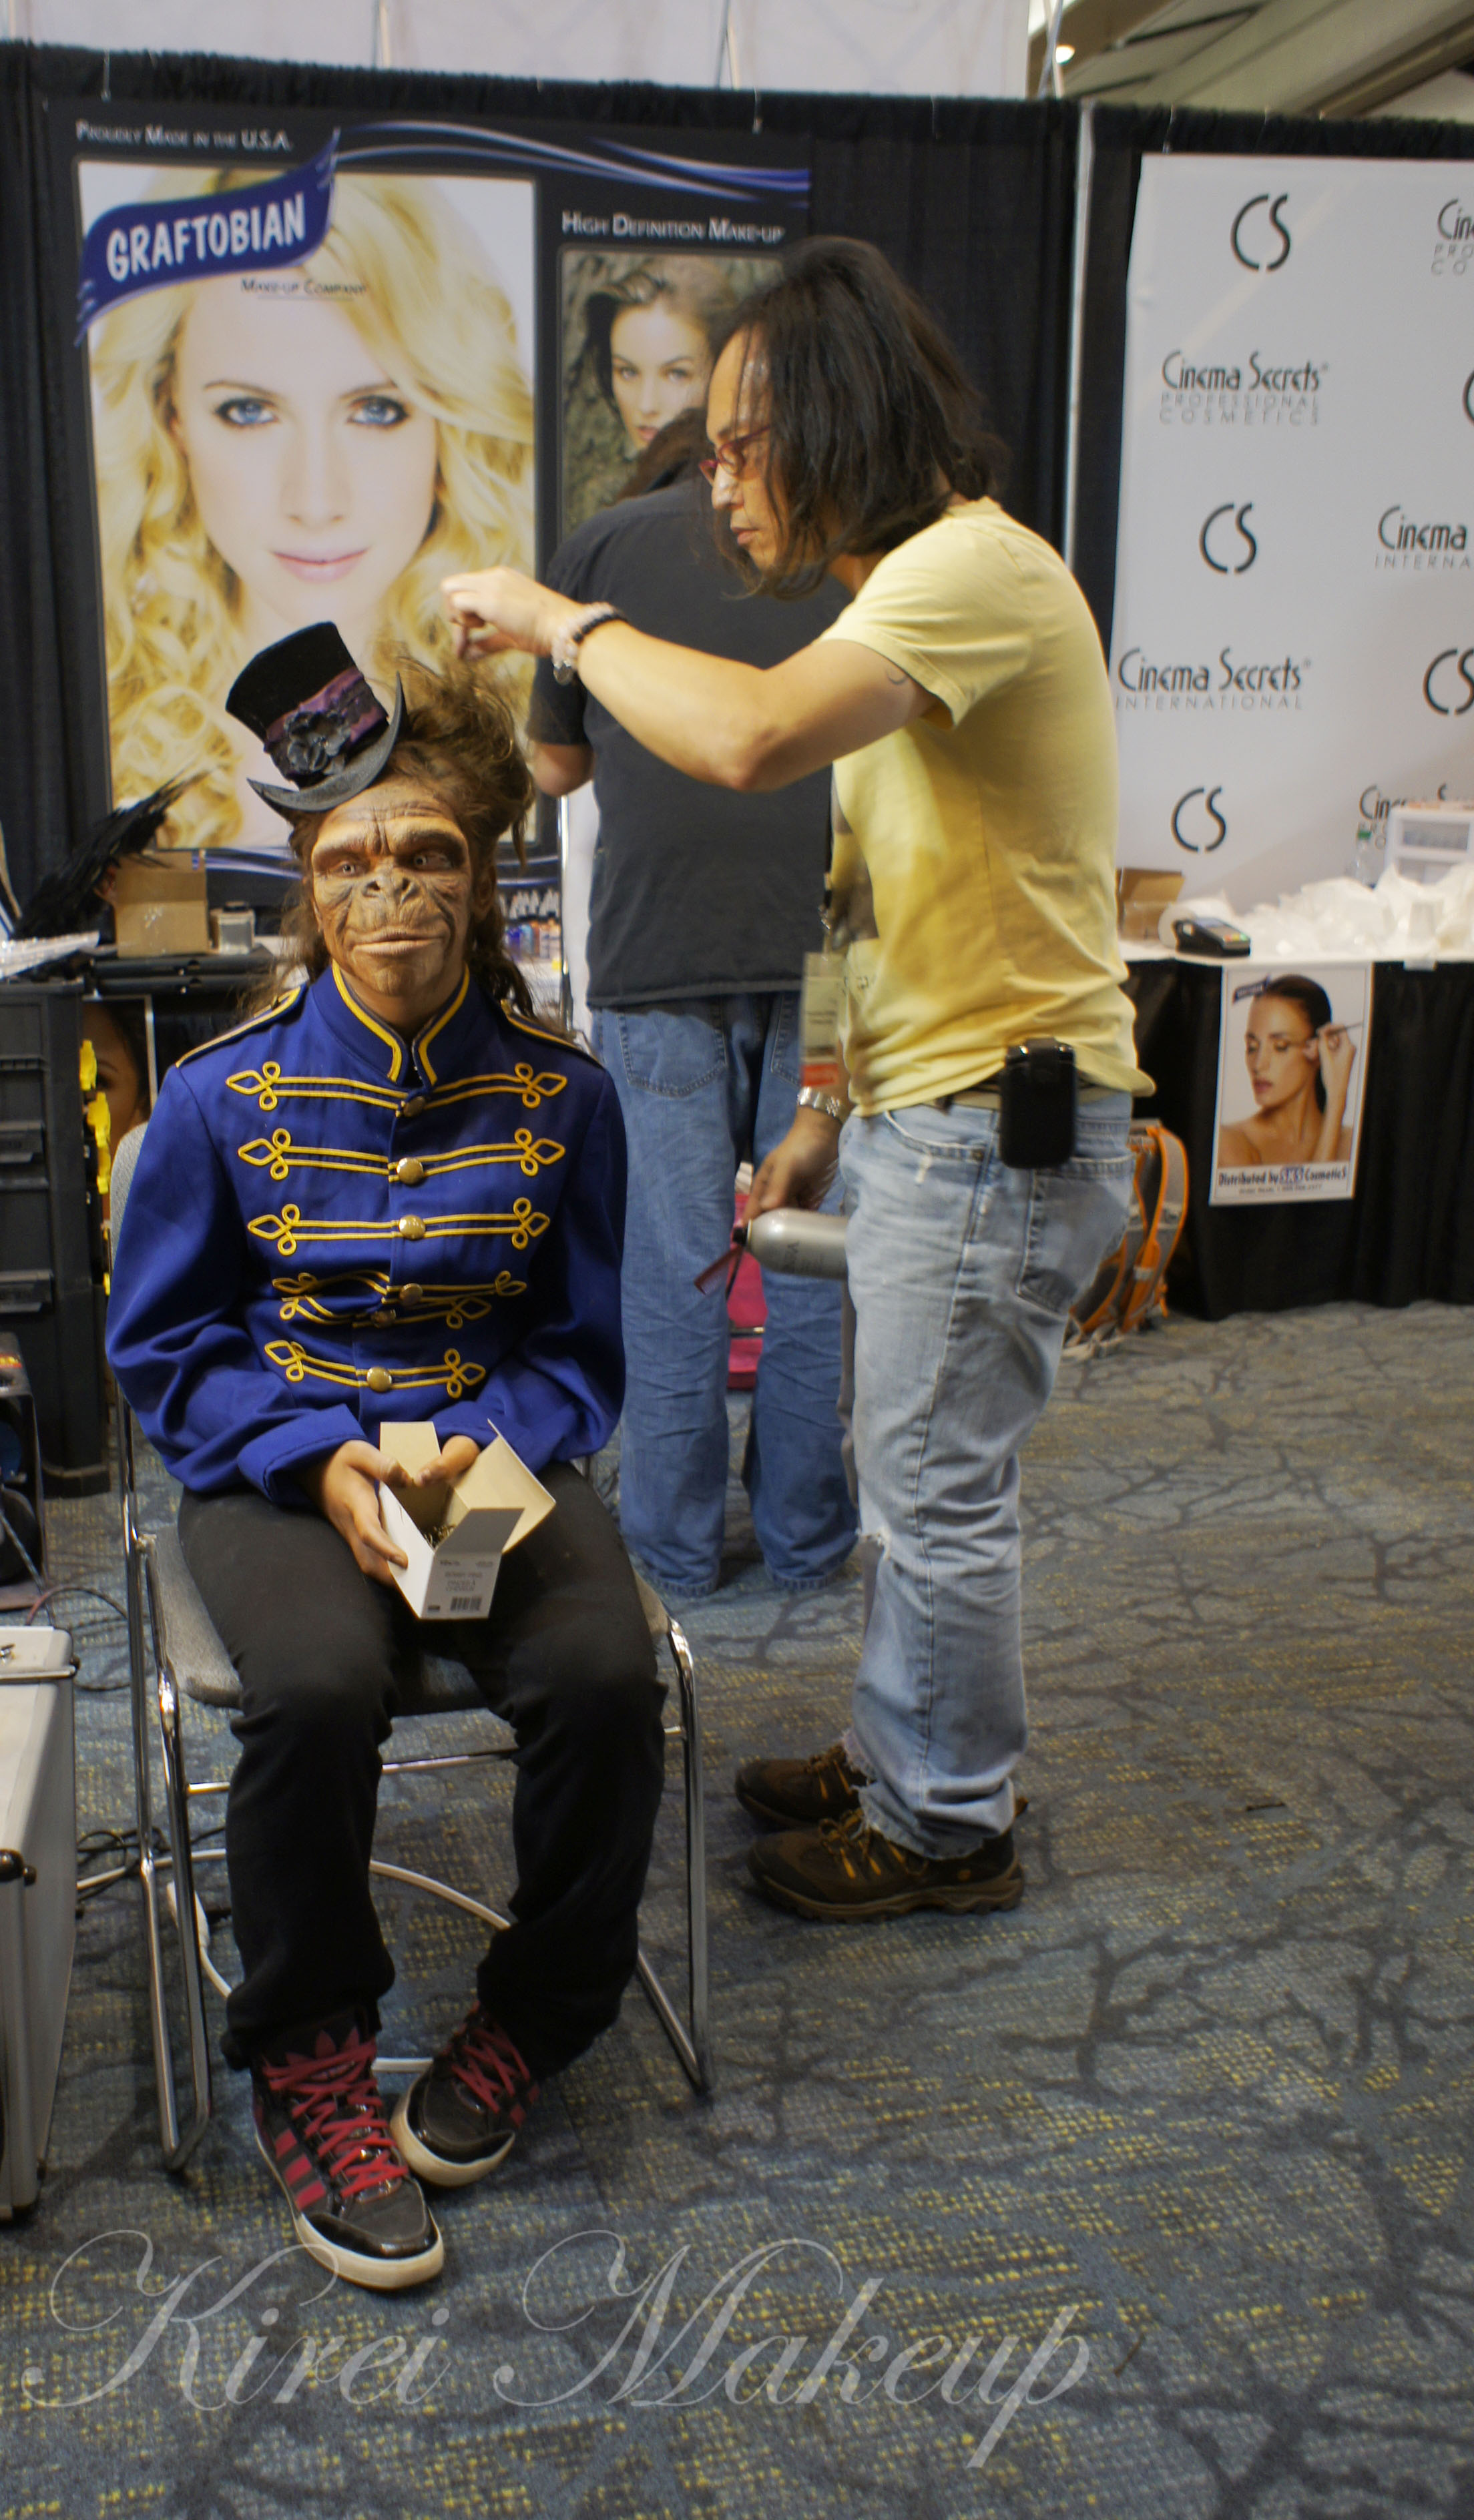
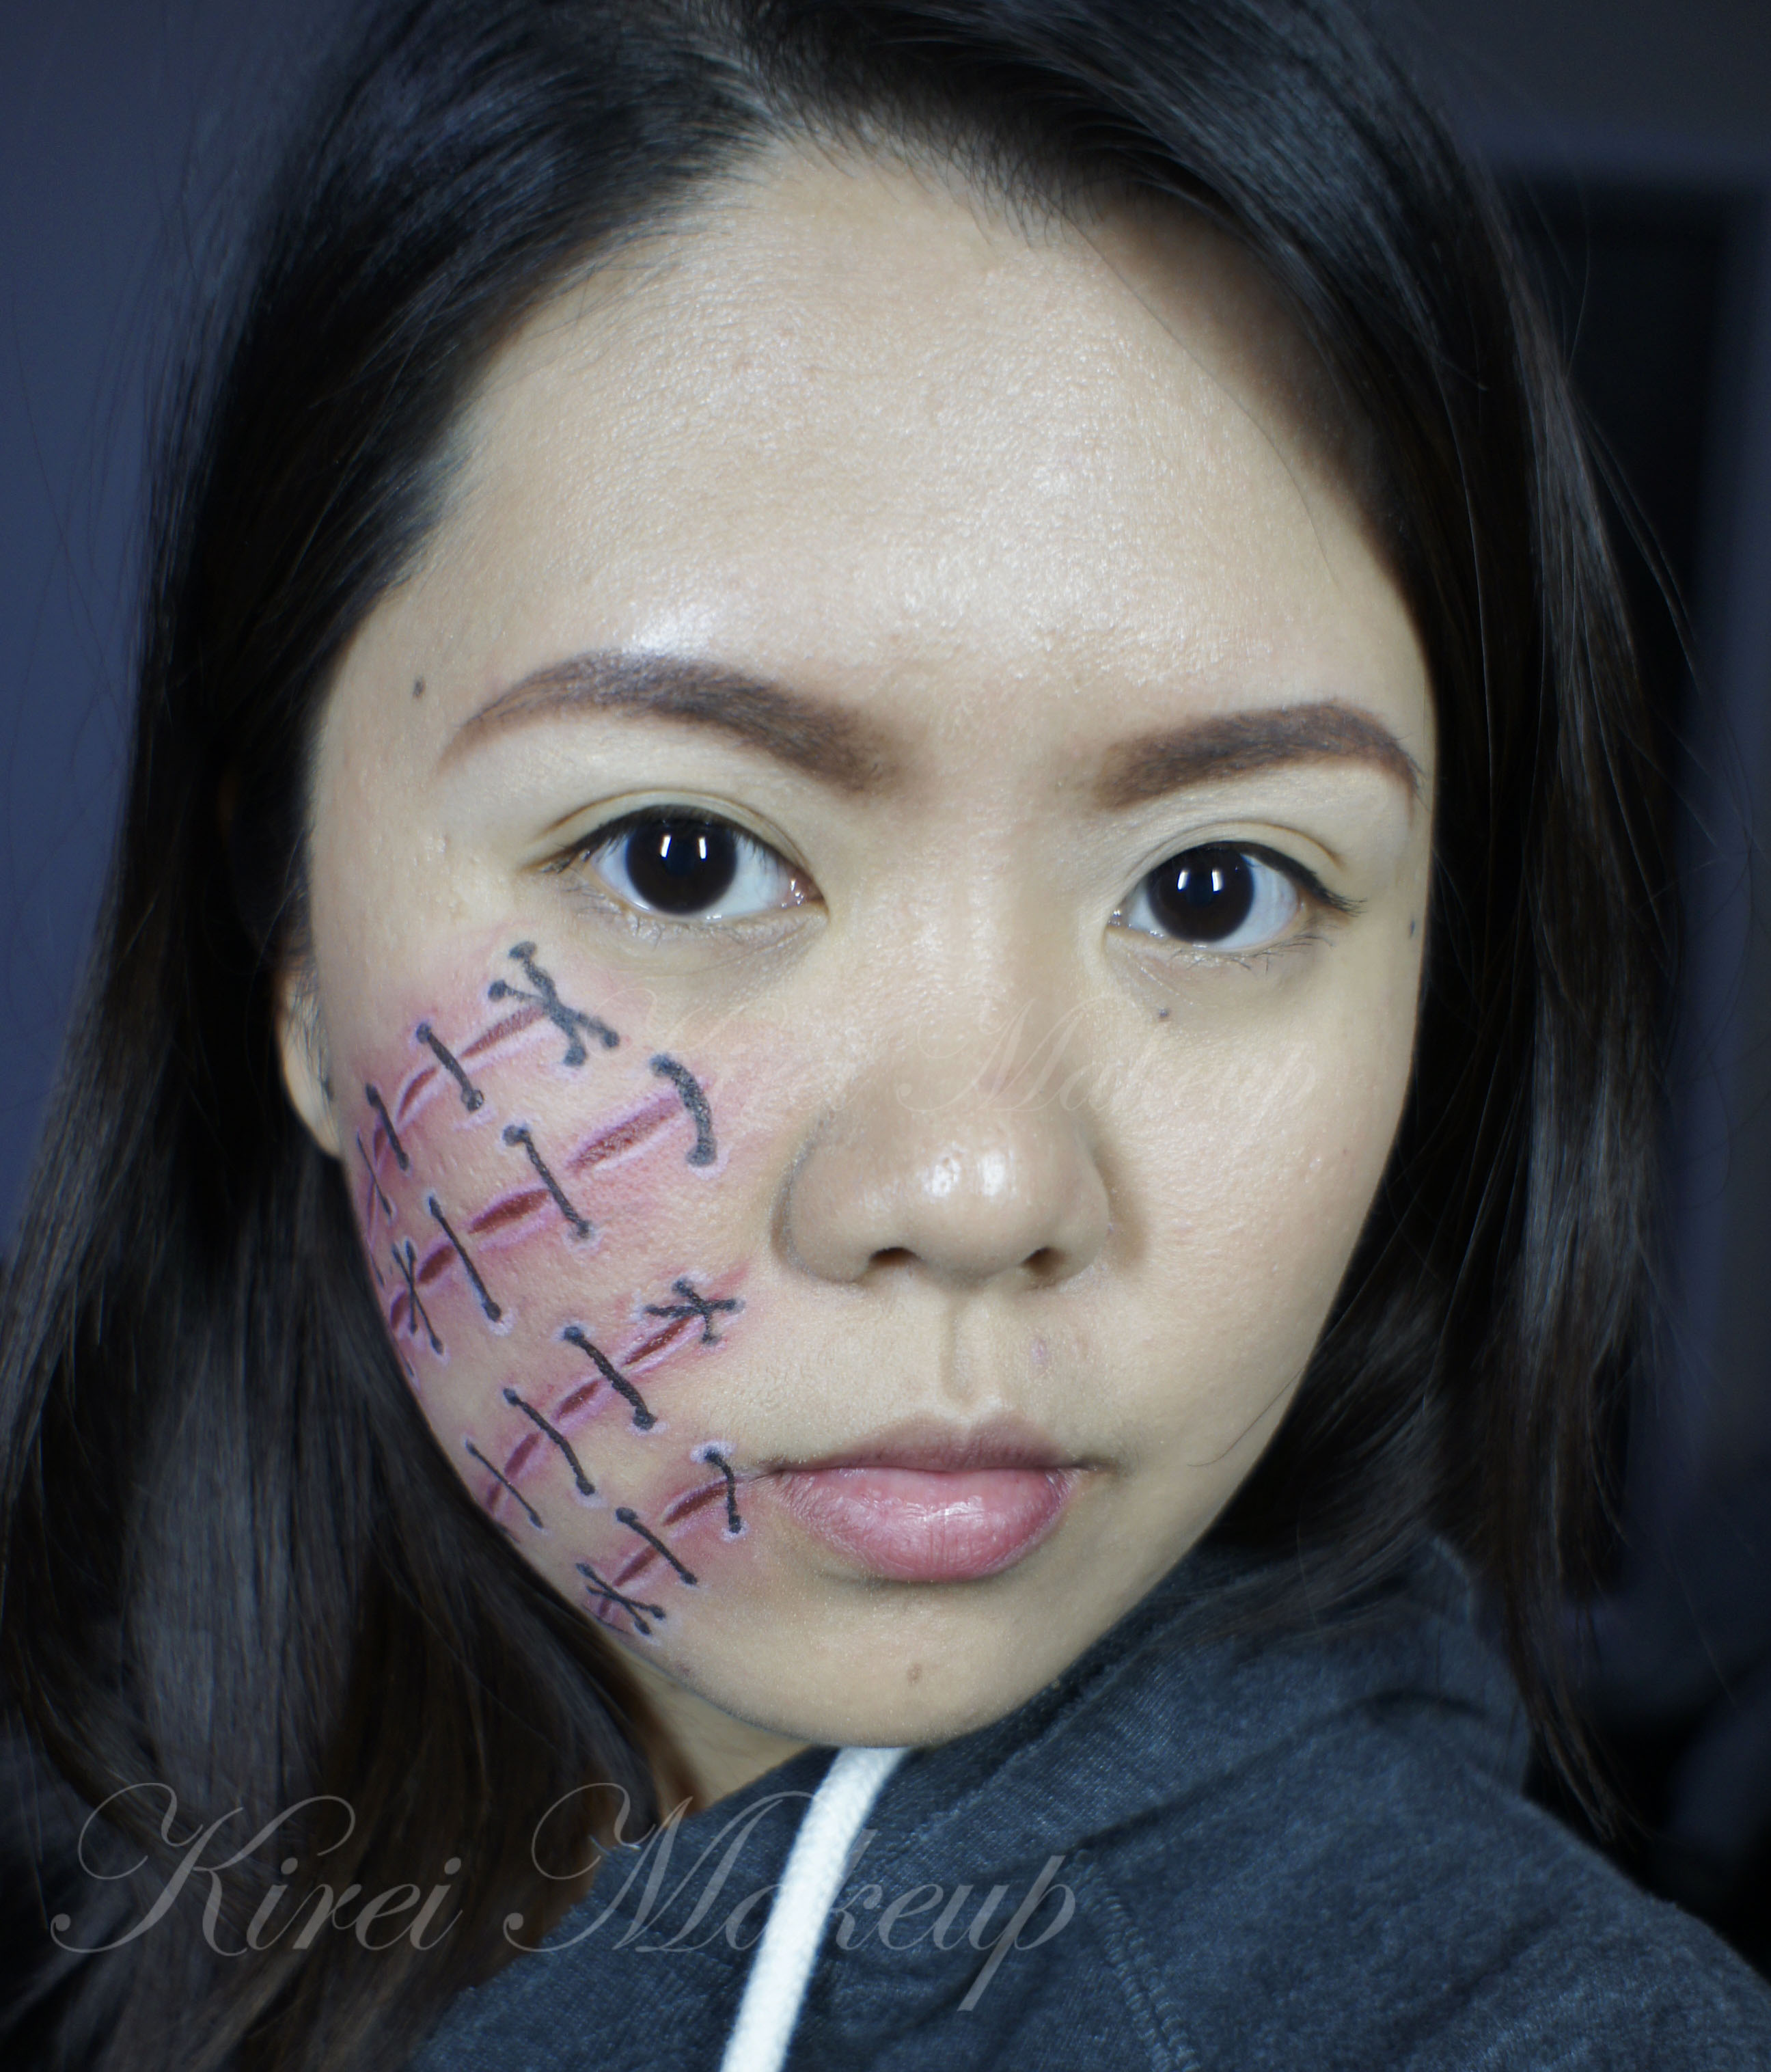
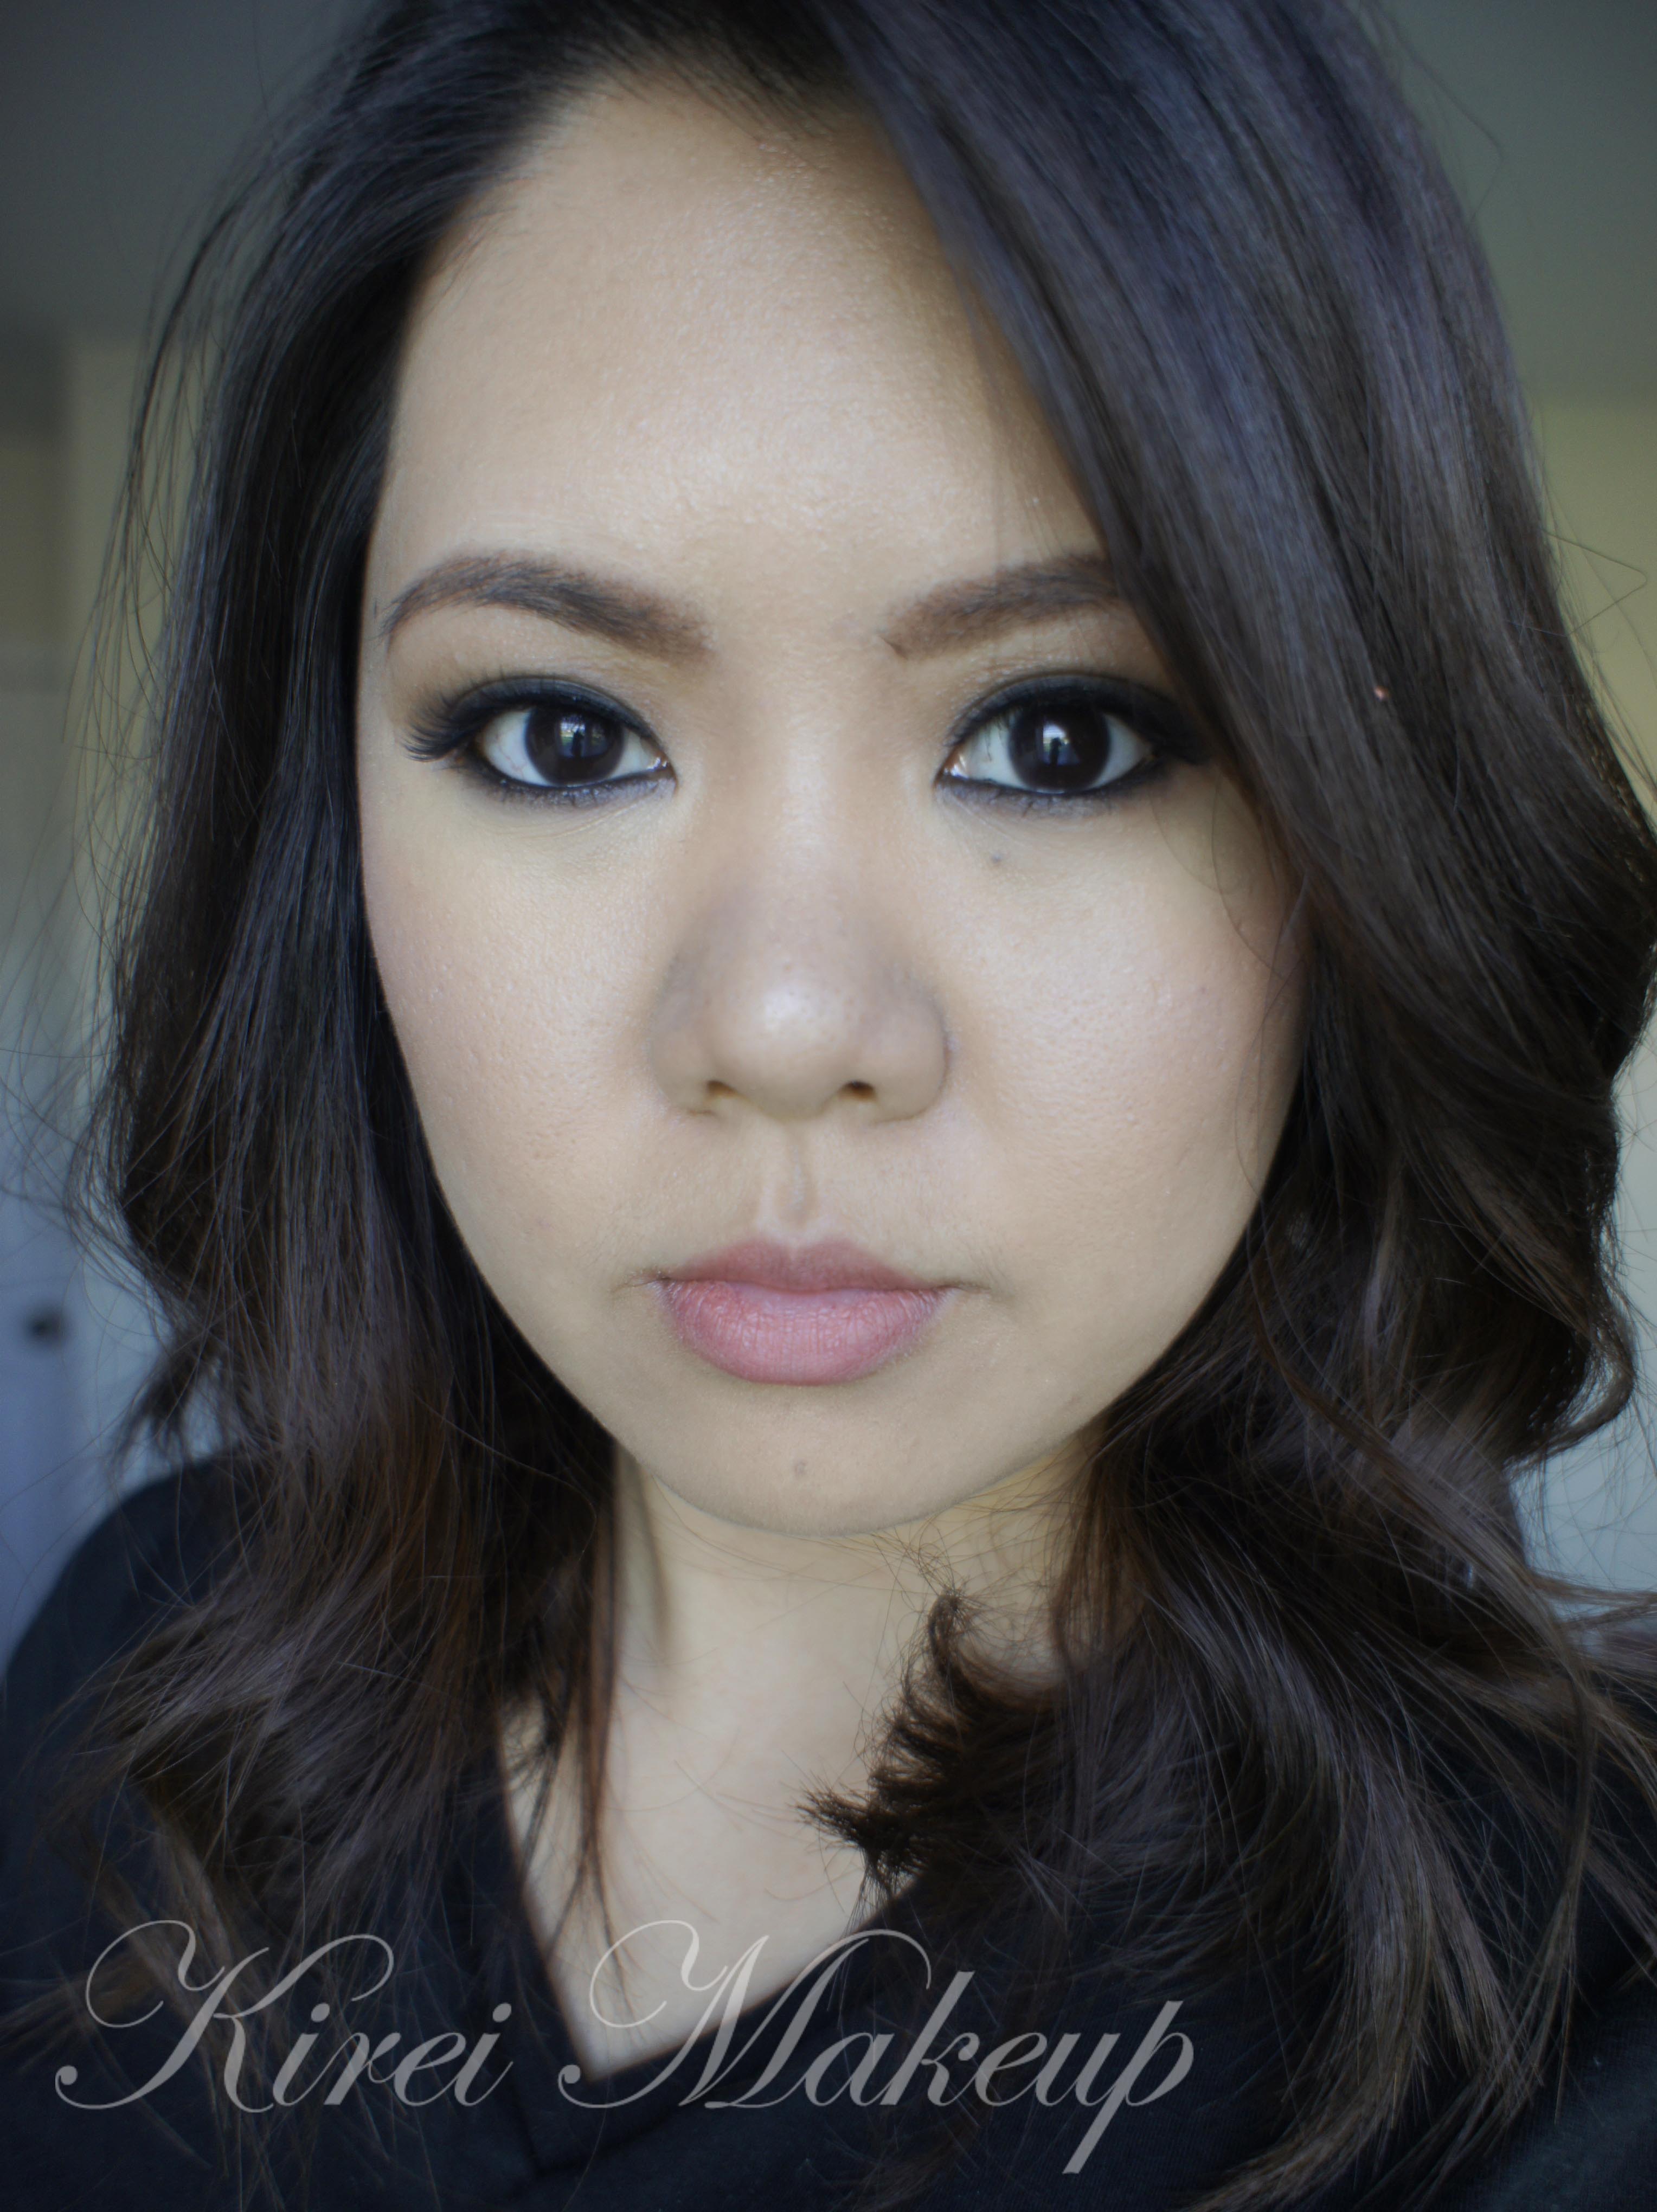
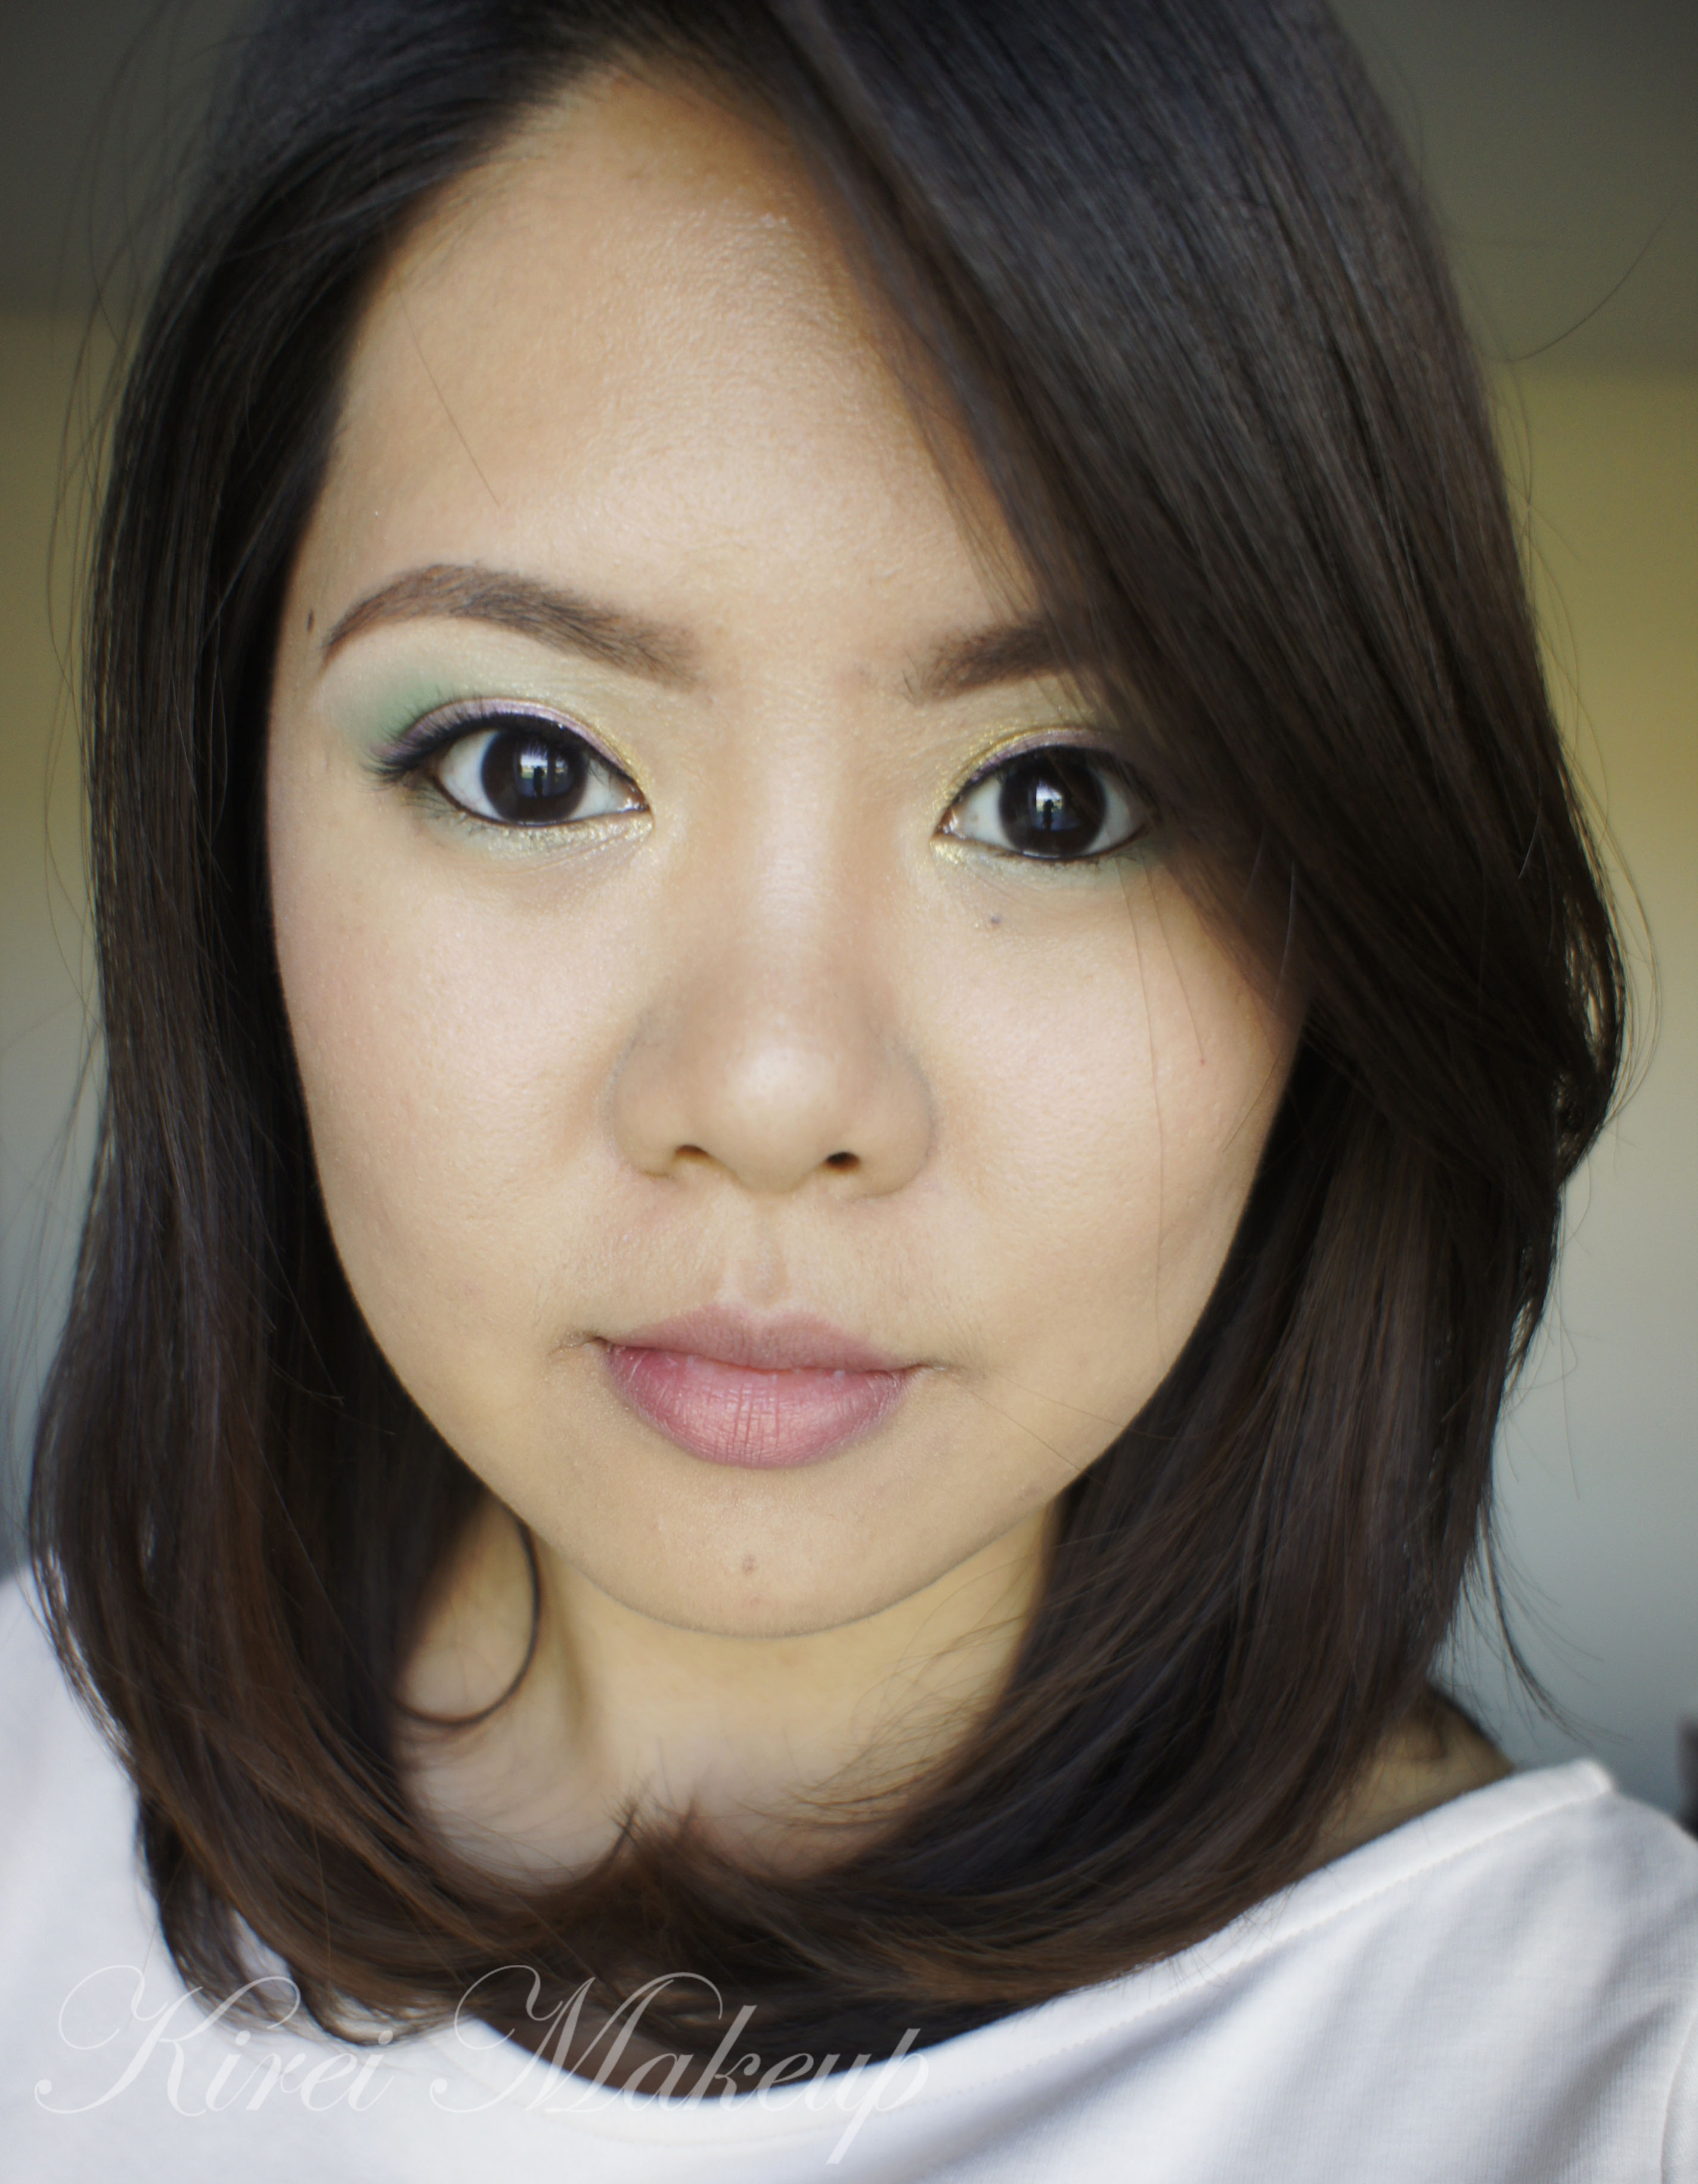
As Christmas approaches fairly quickly, I decided that it is a tradition to do a glitter holiday makeup! Last year, I did a gold glitter eyeliner, this year I decided to do more glitter all over the eyelid. I just love how it sparkleees! Don’t you?

Oh, a word of warning, if glitter fall all over your face, you can get rid of it by using a clean mascara wand – use the tip of the wand to pick the glitter. You can also use masking tape (the sticky side, obviously) and carefully stick it to your face to remove the glitter.

The trick to avoid fall-out from the glitter is to apply it with a damped brush. That way, the glitter sticks itself to the brush. You packed on that glitter on the eyelid and voila! Minimal to no fall-out.

Glitter eye makeup

How-to:

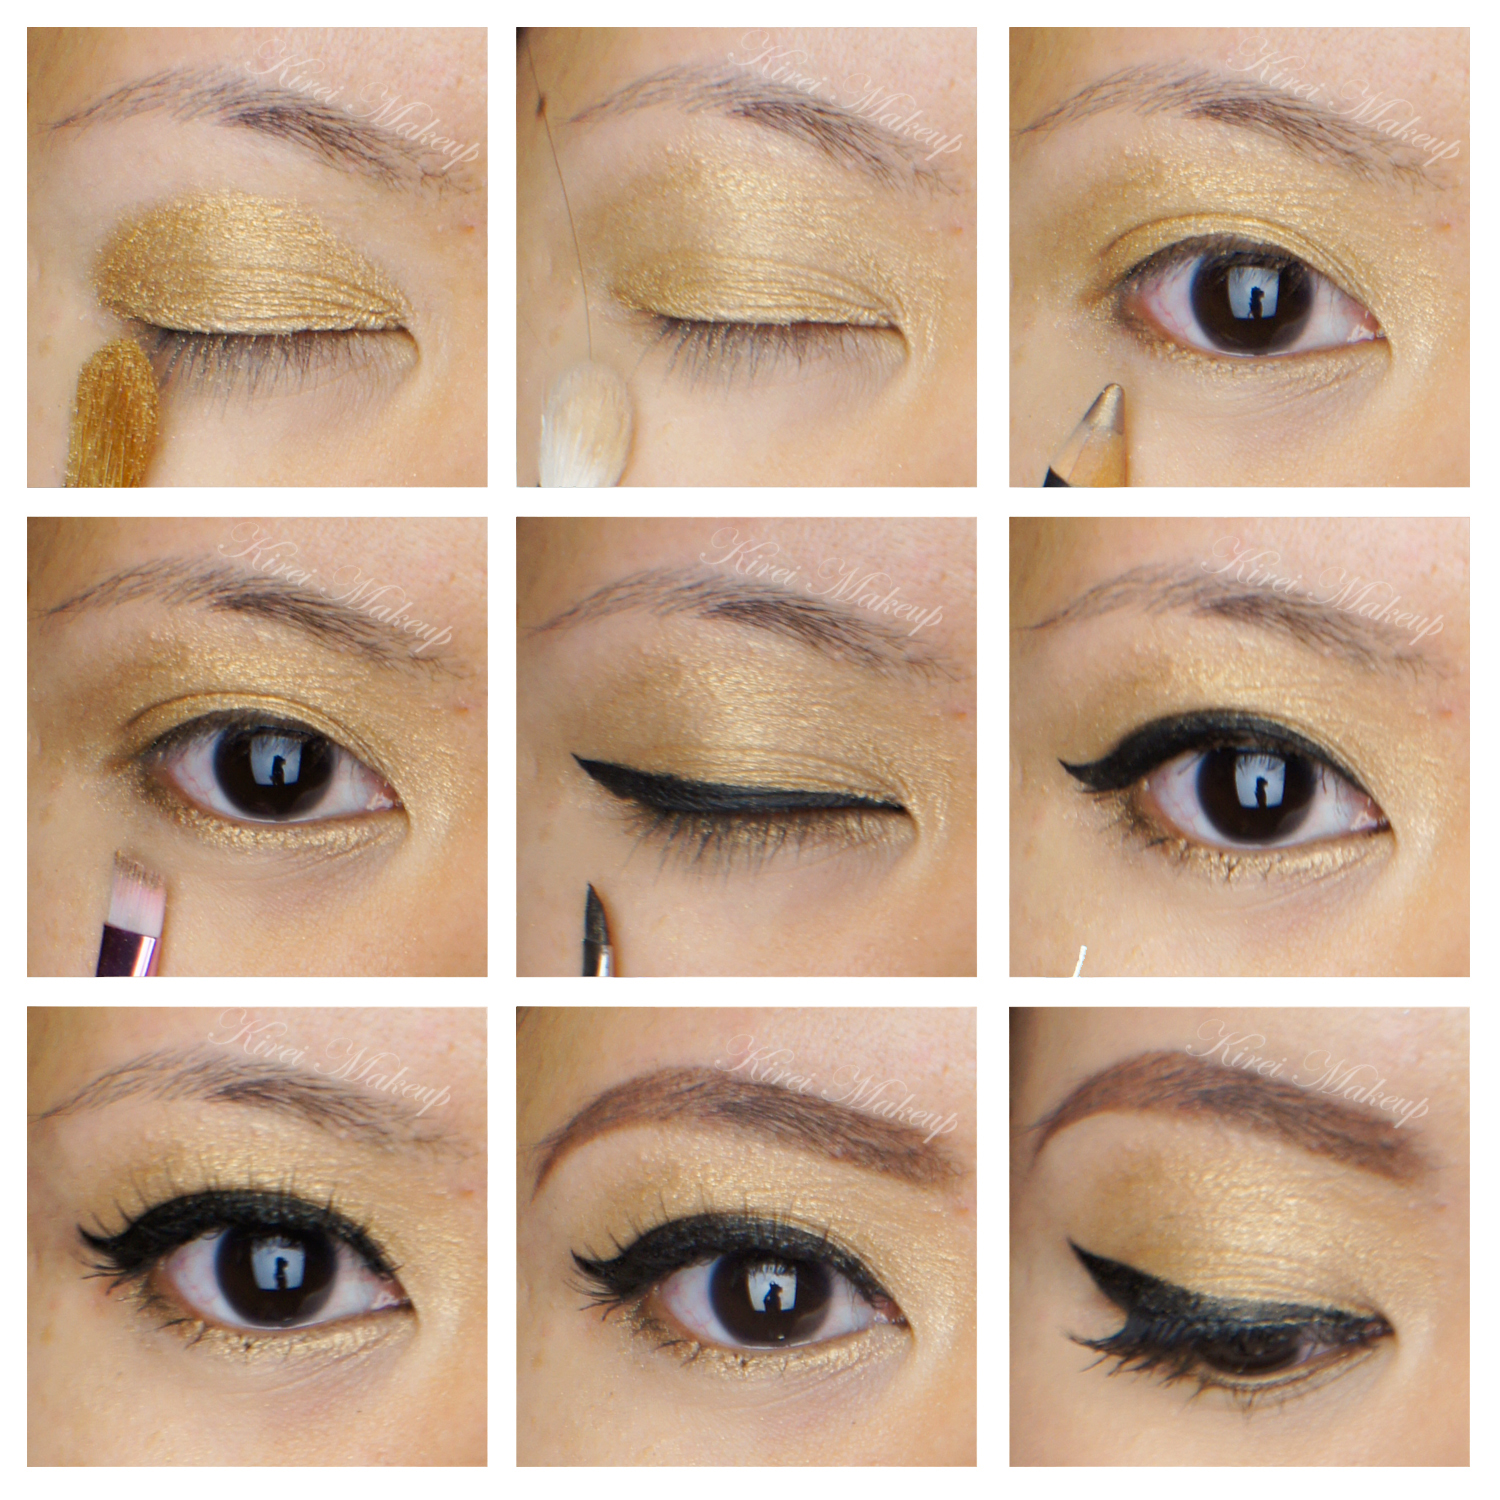
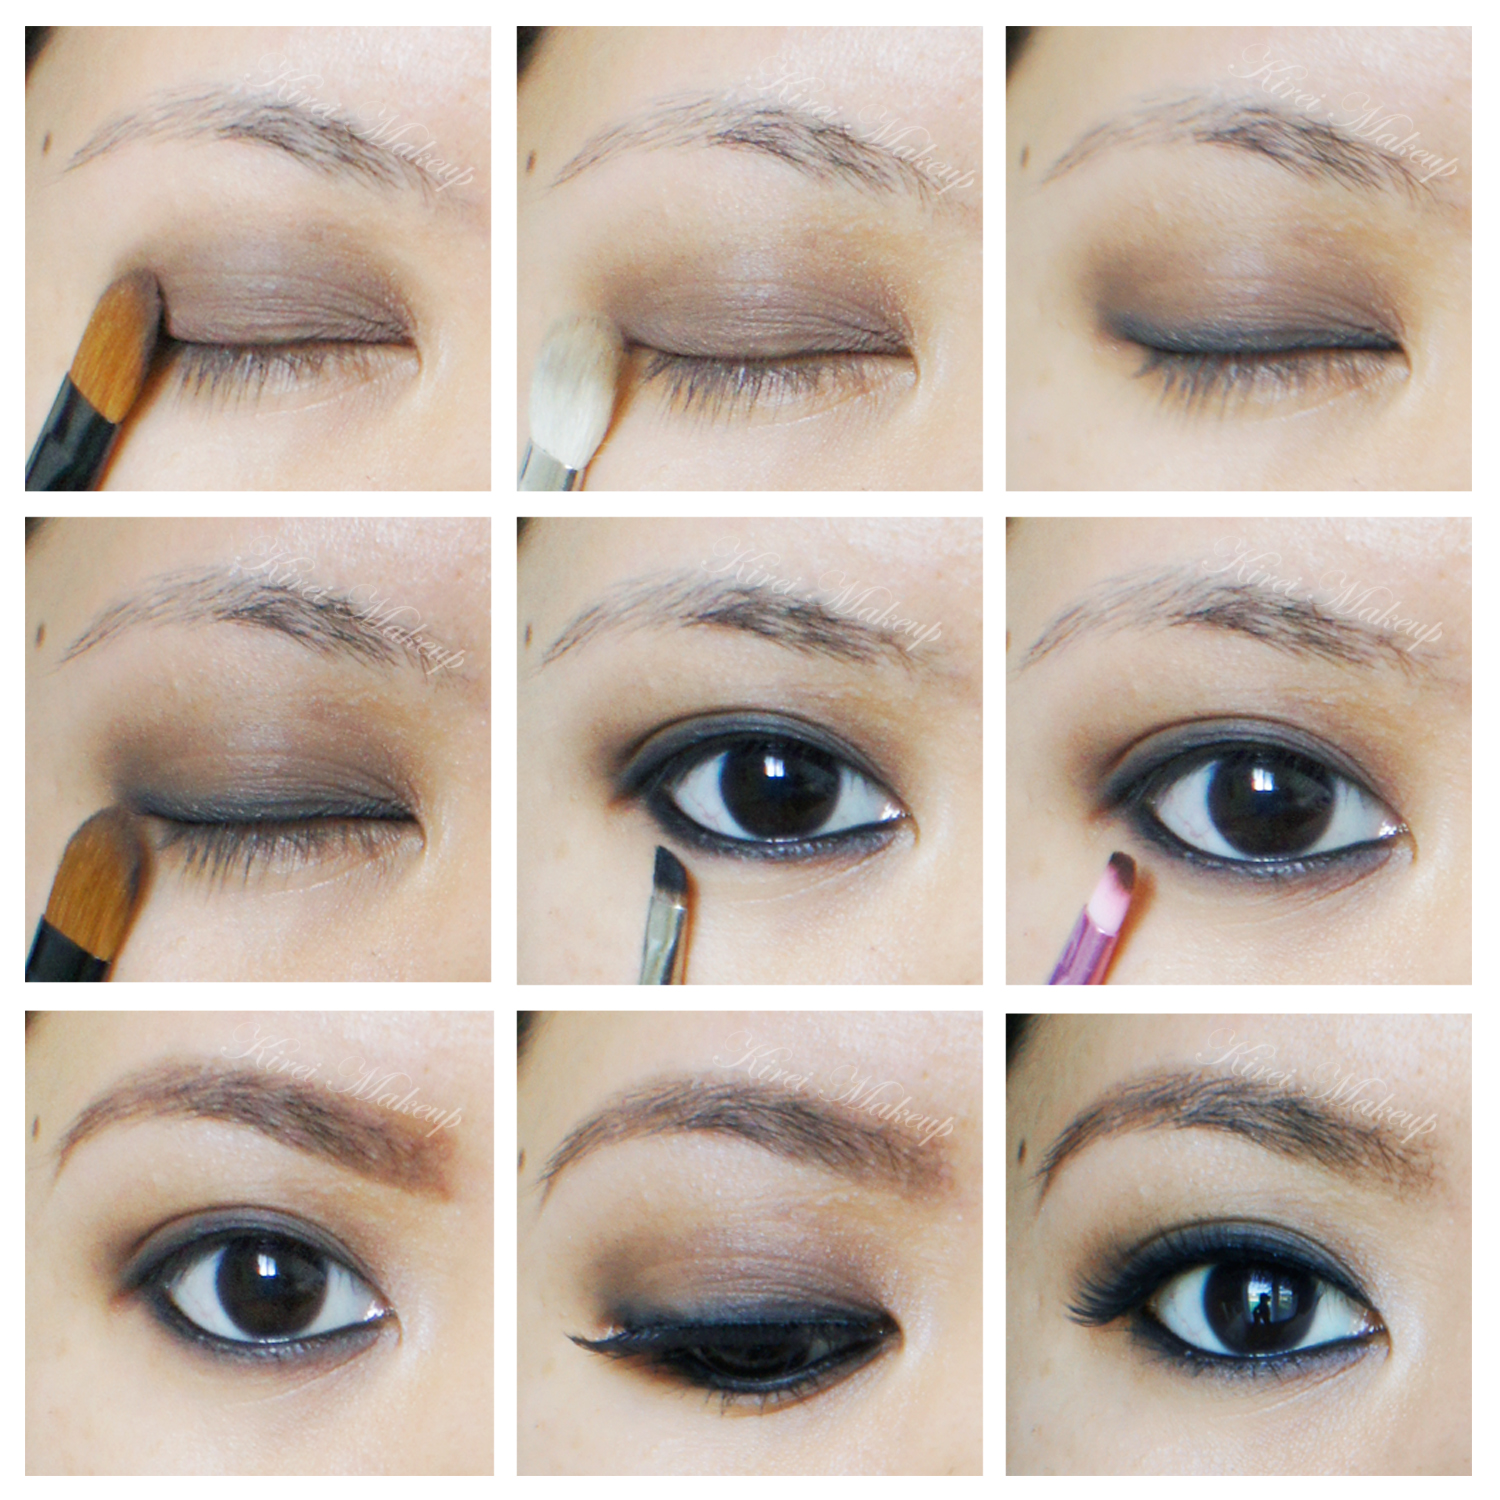
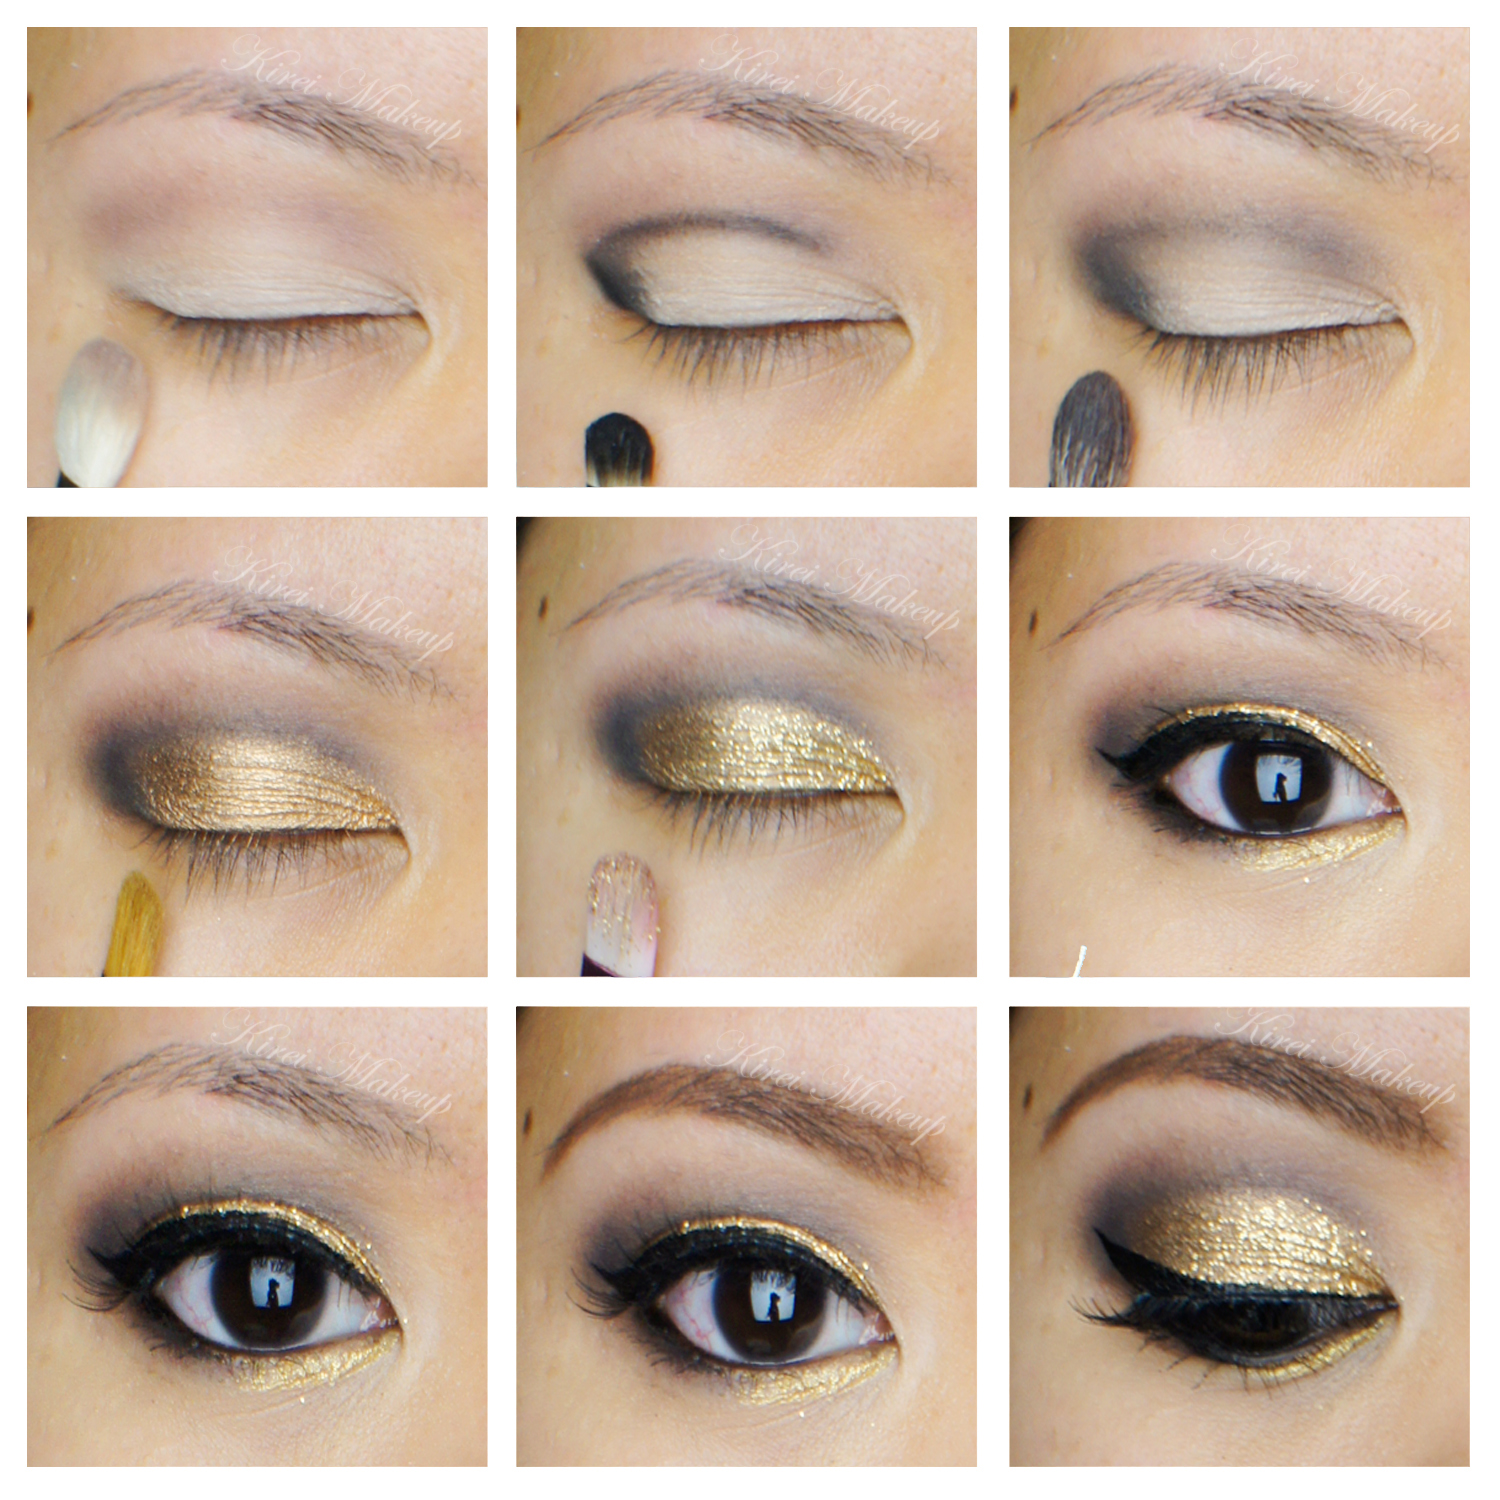
1. I applied UD Tease eyeshadow slightly above the crease using a fluffy blending brush.

2. I applied UD Blackout eyeshadow on the crease using a small shader brush.

3. Using a clean Smashbox Bullet brush (or any blending brush), I blended UD Blackout to soften the edge.

4. Using a flat eyeshadow brush, I applied MAC Rose Gold loose pigment on the eyelid.

5. I applied  gold glitter from Faces glitter stack on a wet flat eyeshadow brush.

6. I created a winged liner on the upper lash line using Kanebo Kate Super Sharp Liner.

7. On the lower lid, I applied the same glitter as step 5 using a wet angled eyeliner brush on the inner half.

8. On the outer half of the lower lid, I applied UD Blackout eyeshadow using a clean dry angled eyeliner brush.

9. I also lined my waterline using L’oreal Voluminous Smoldering eyeliner.

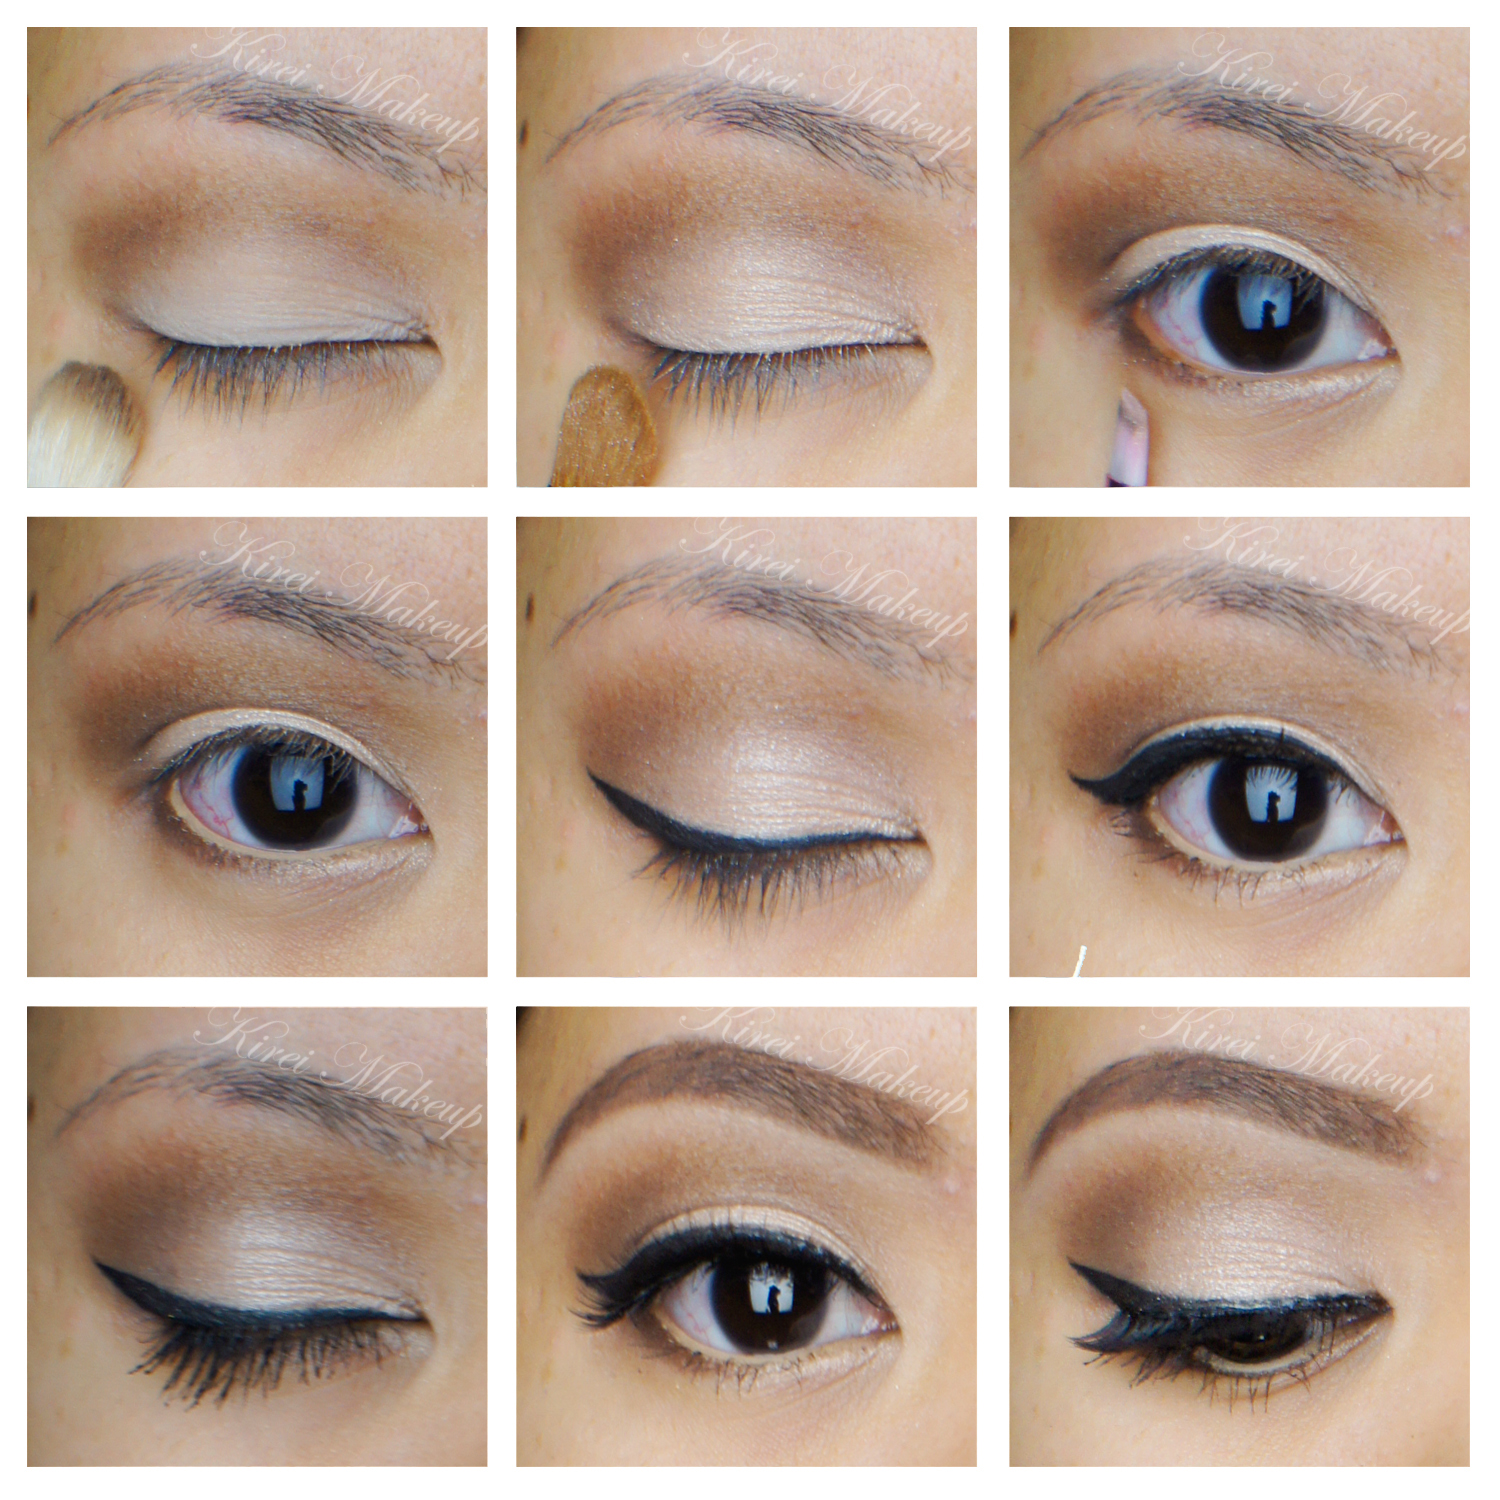
10. I curled my lashes and applied Buxom mascara on both upper and lower lashes.

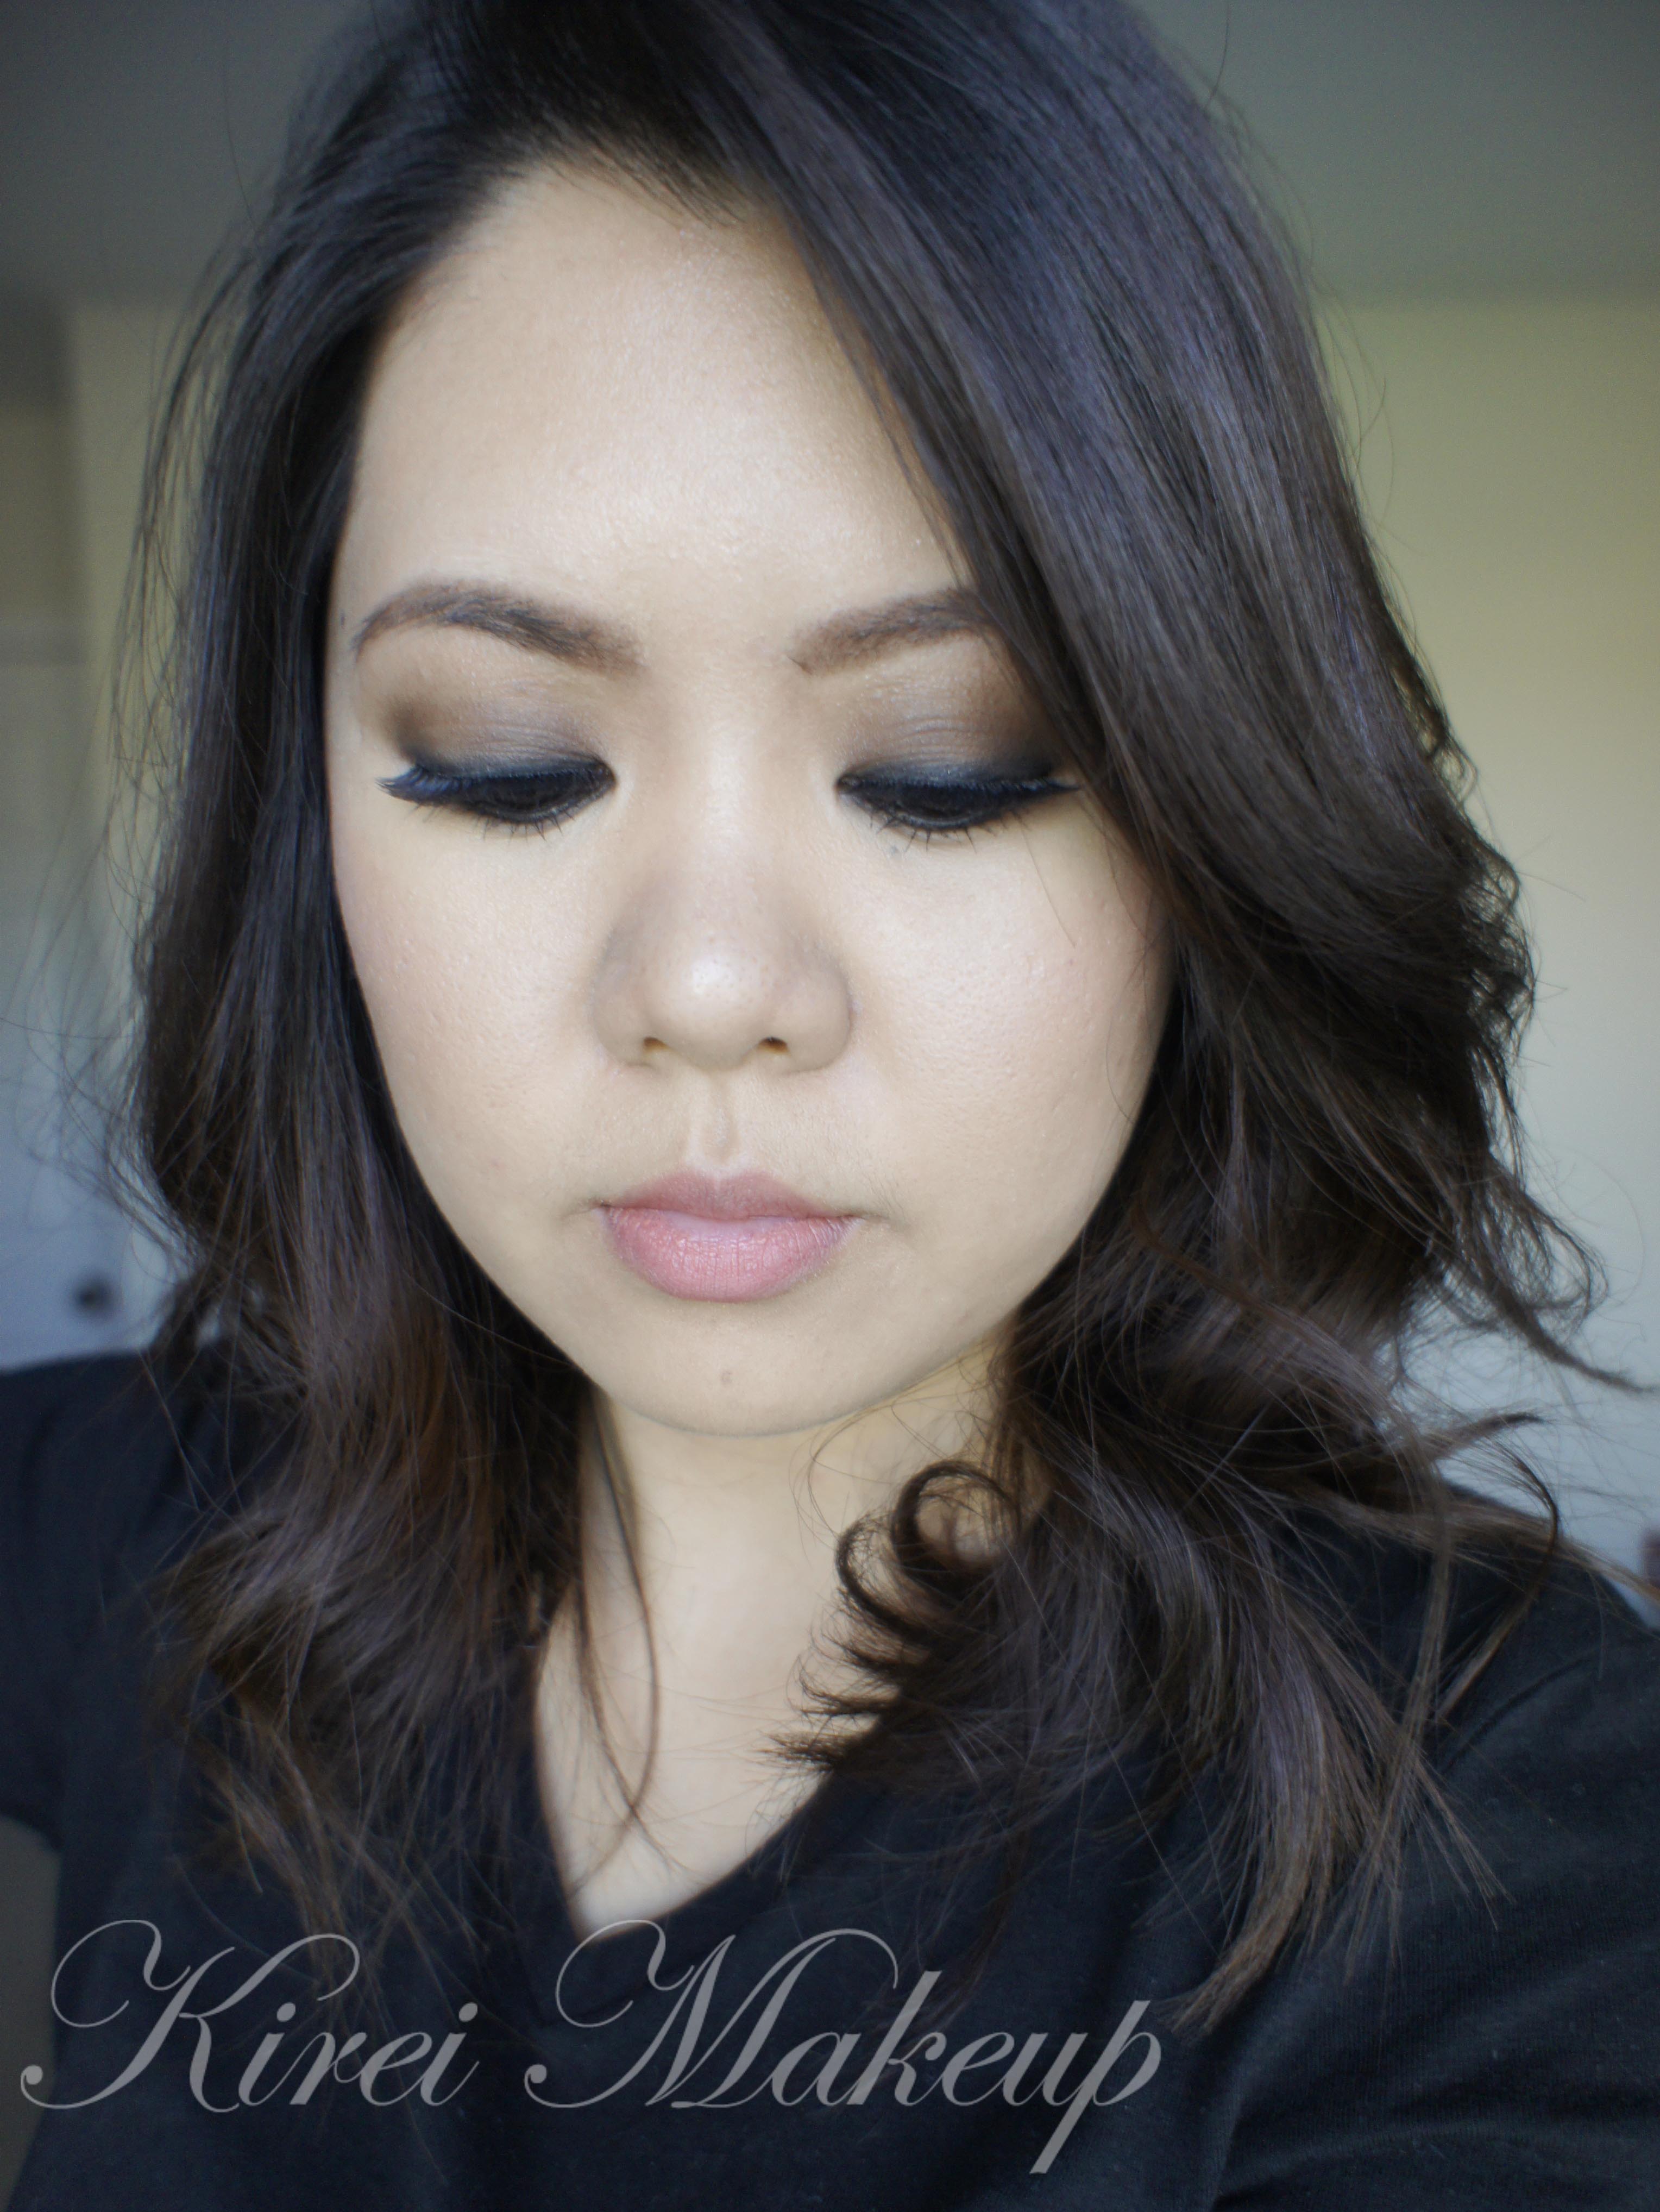
11. I applied Ardell 109 false eyelashes just for an extra touch.

12. My brows were filled using Anastasia Duo Brow Powder in Brunette.

13. Under the brows, I applied UD Foxy eyeshadow using a fluffy blending brush.

Holiday Makeup 2013

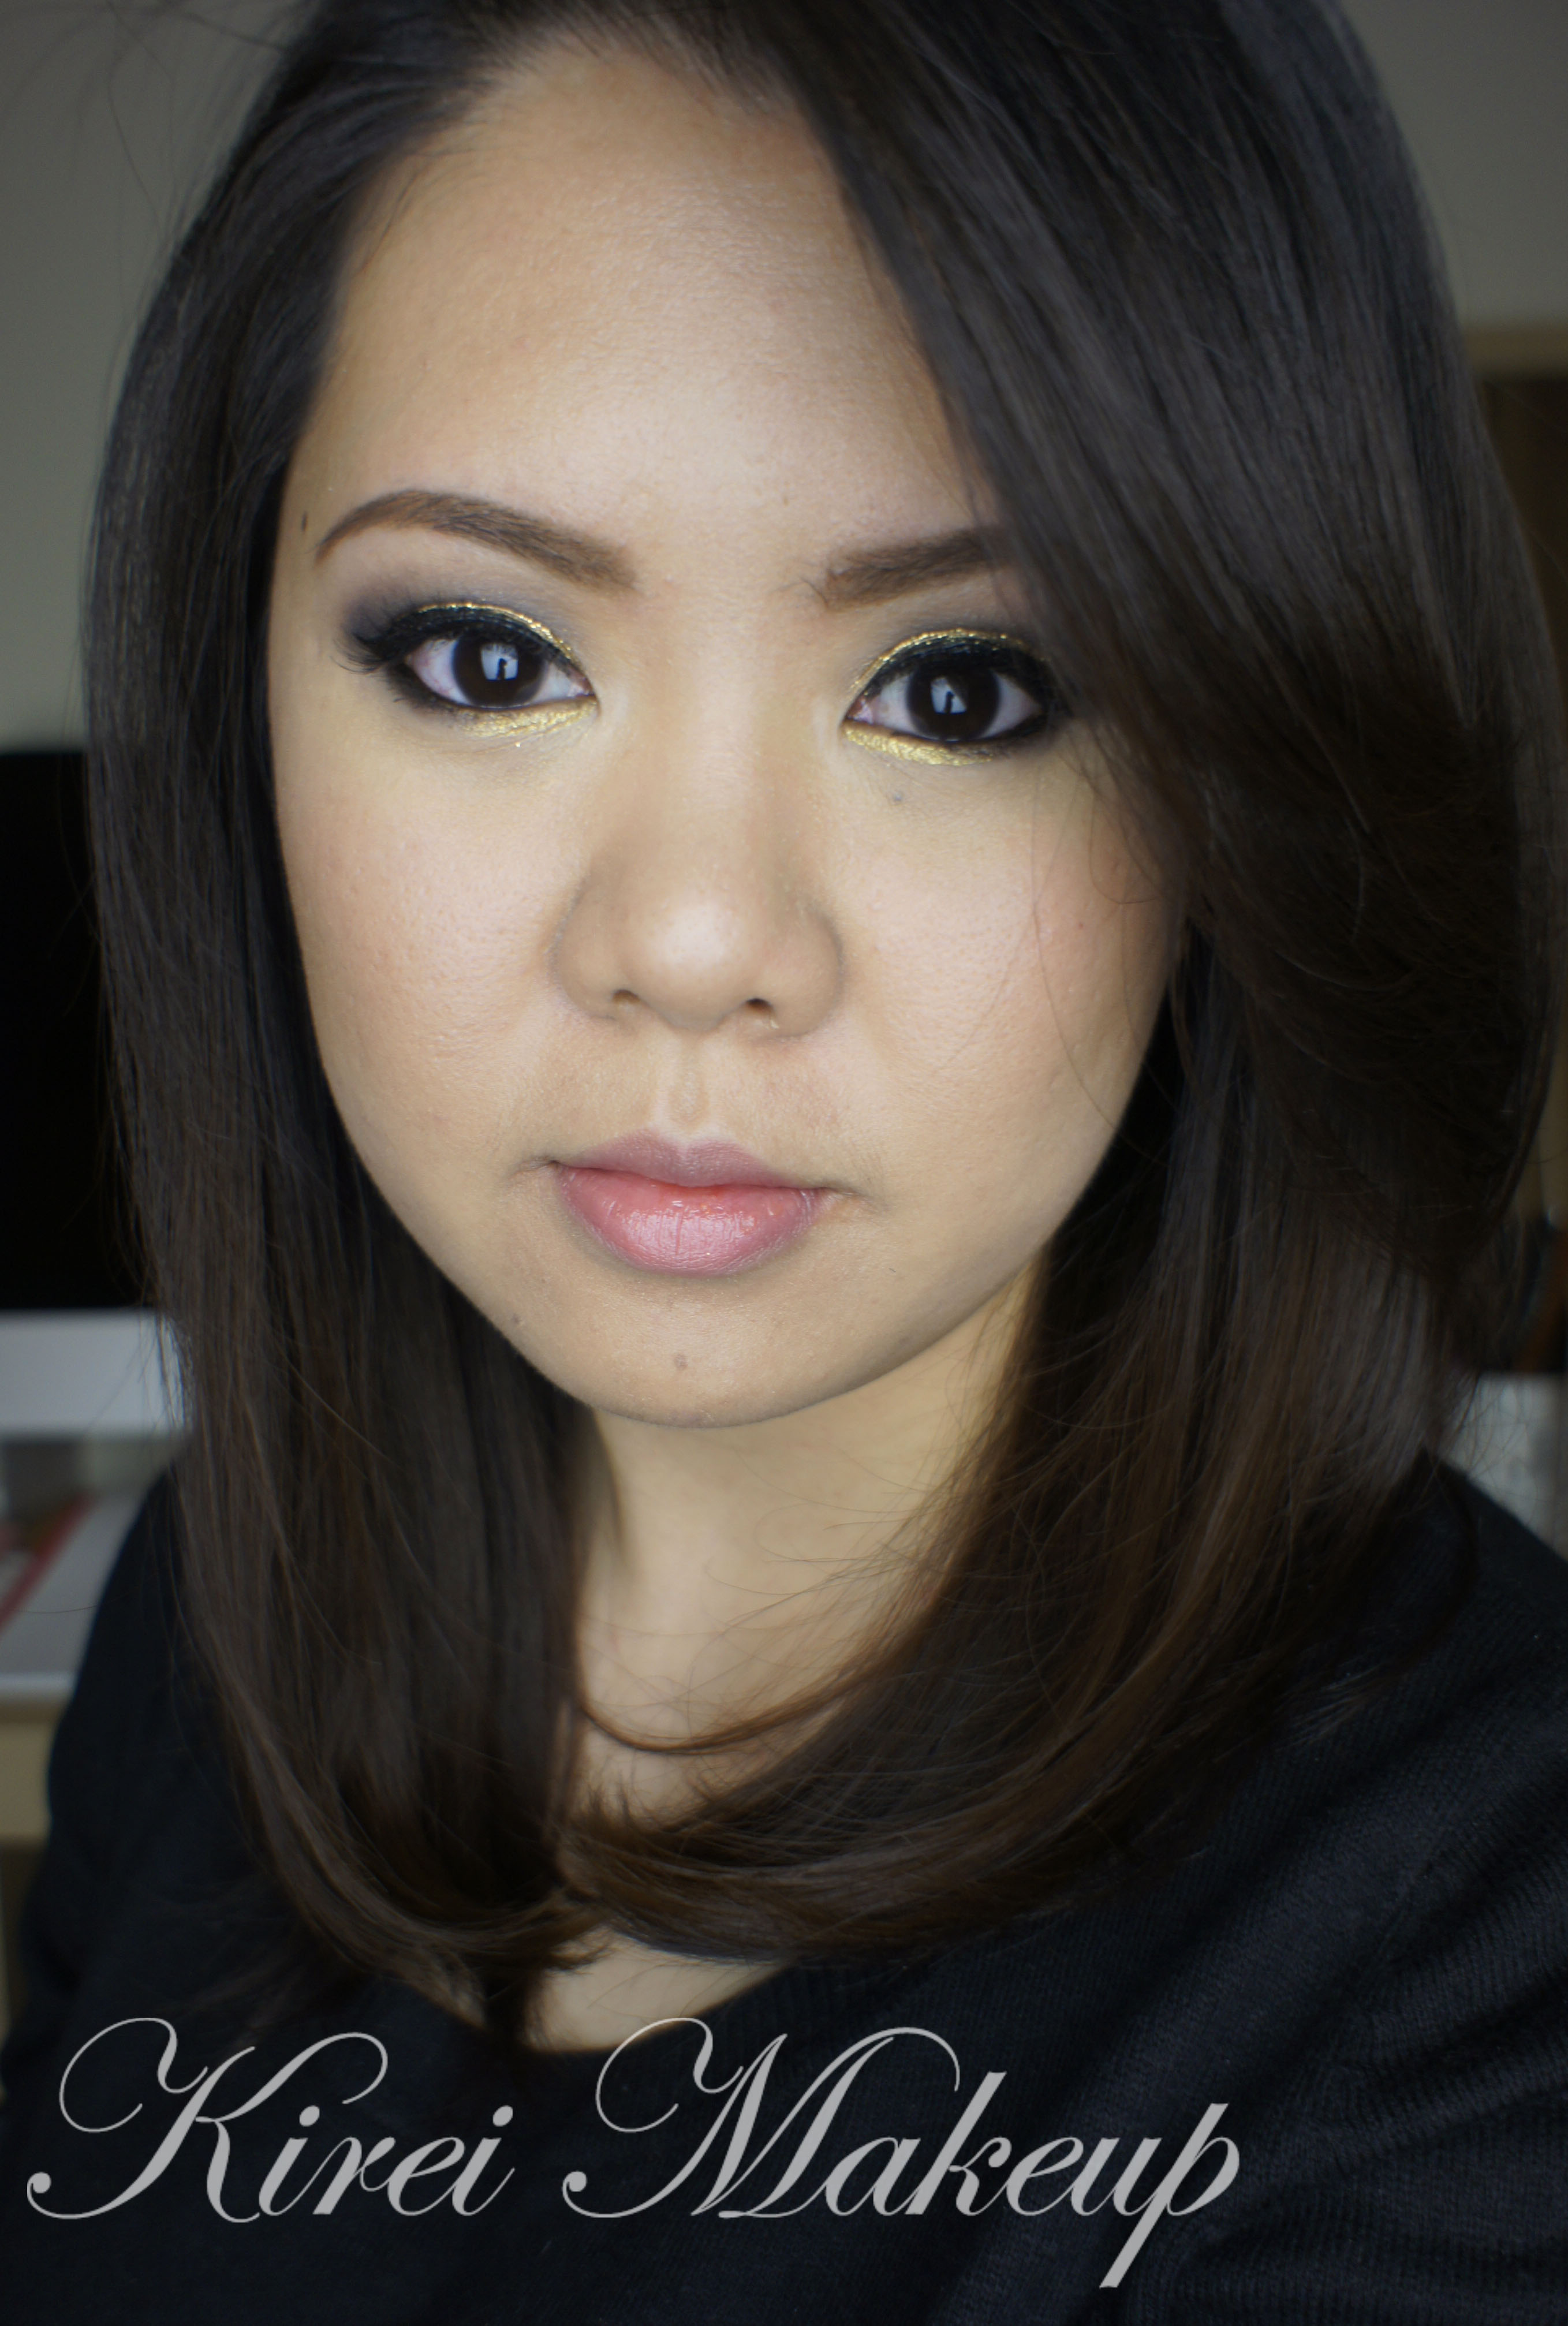
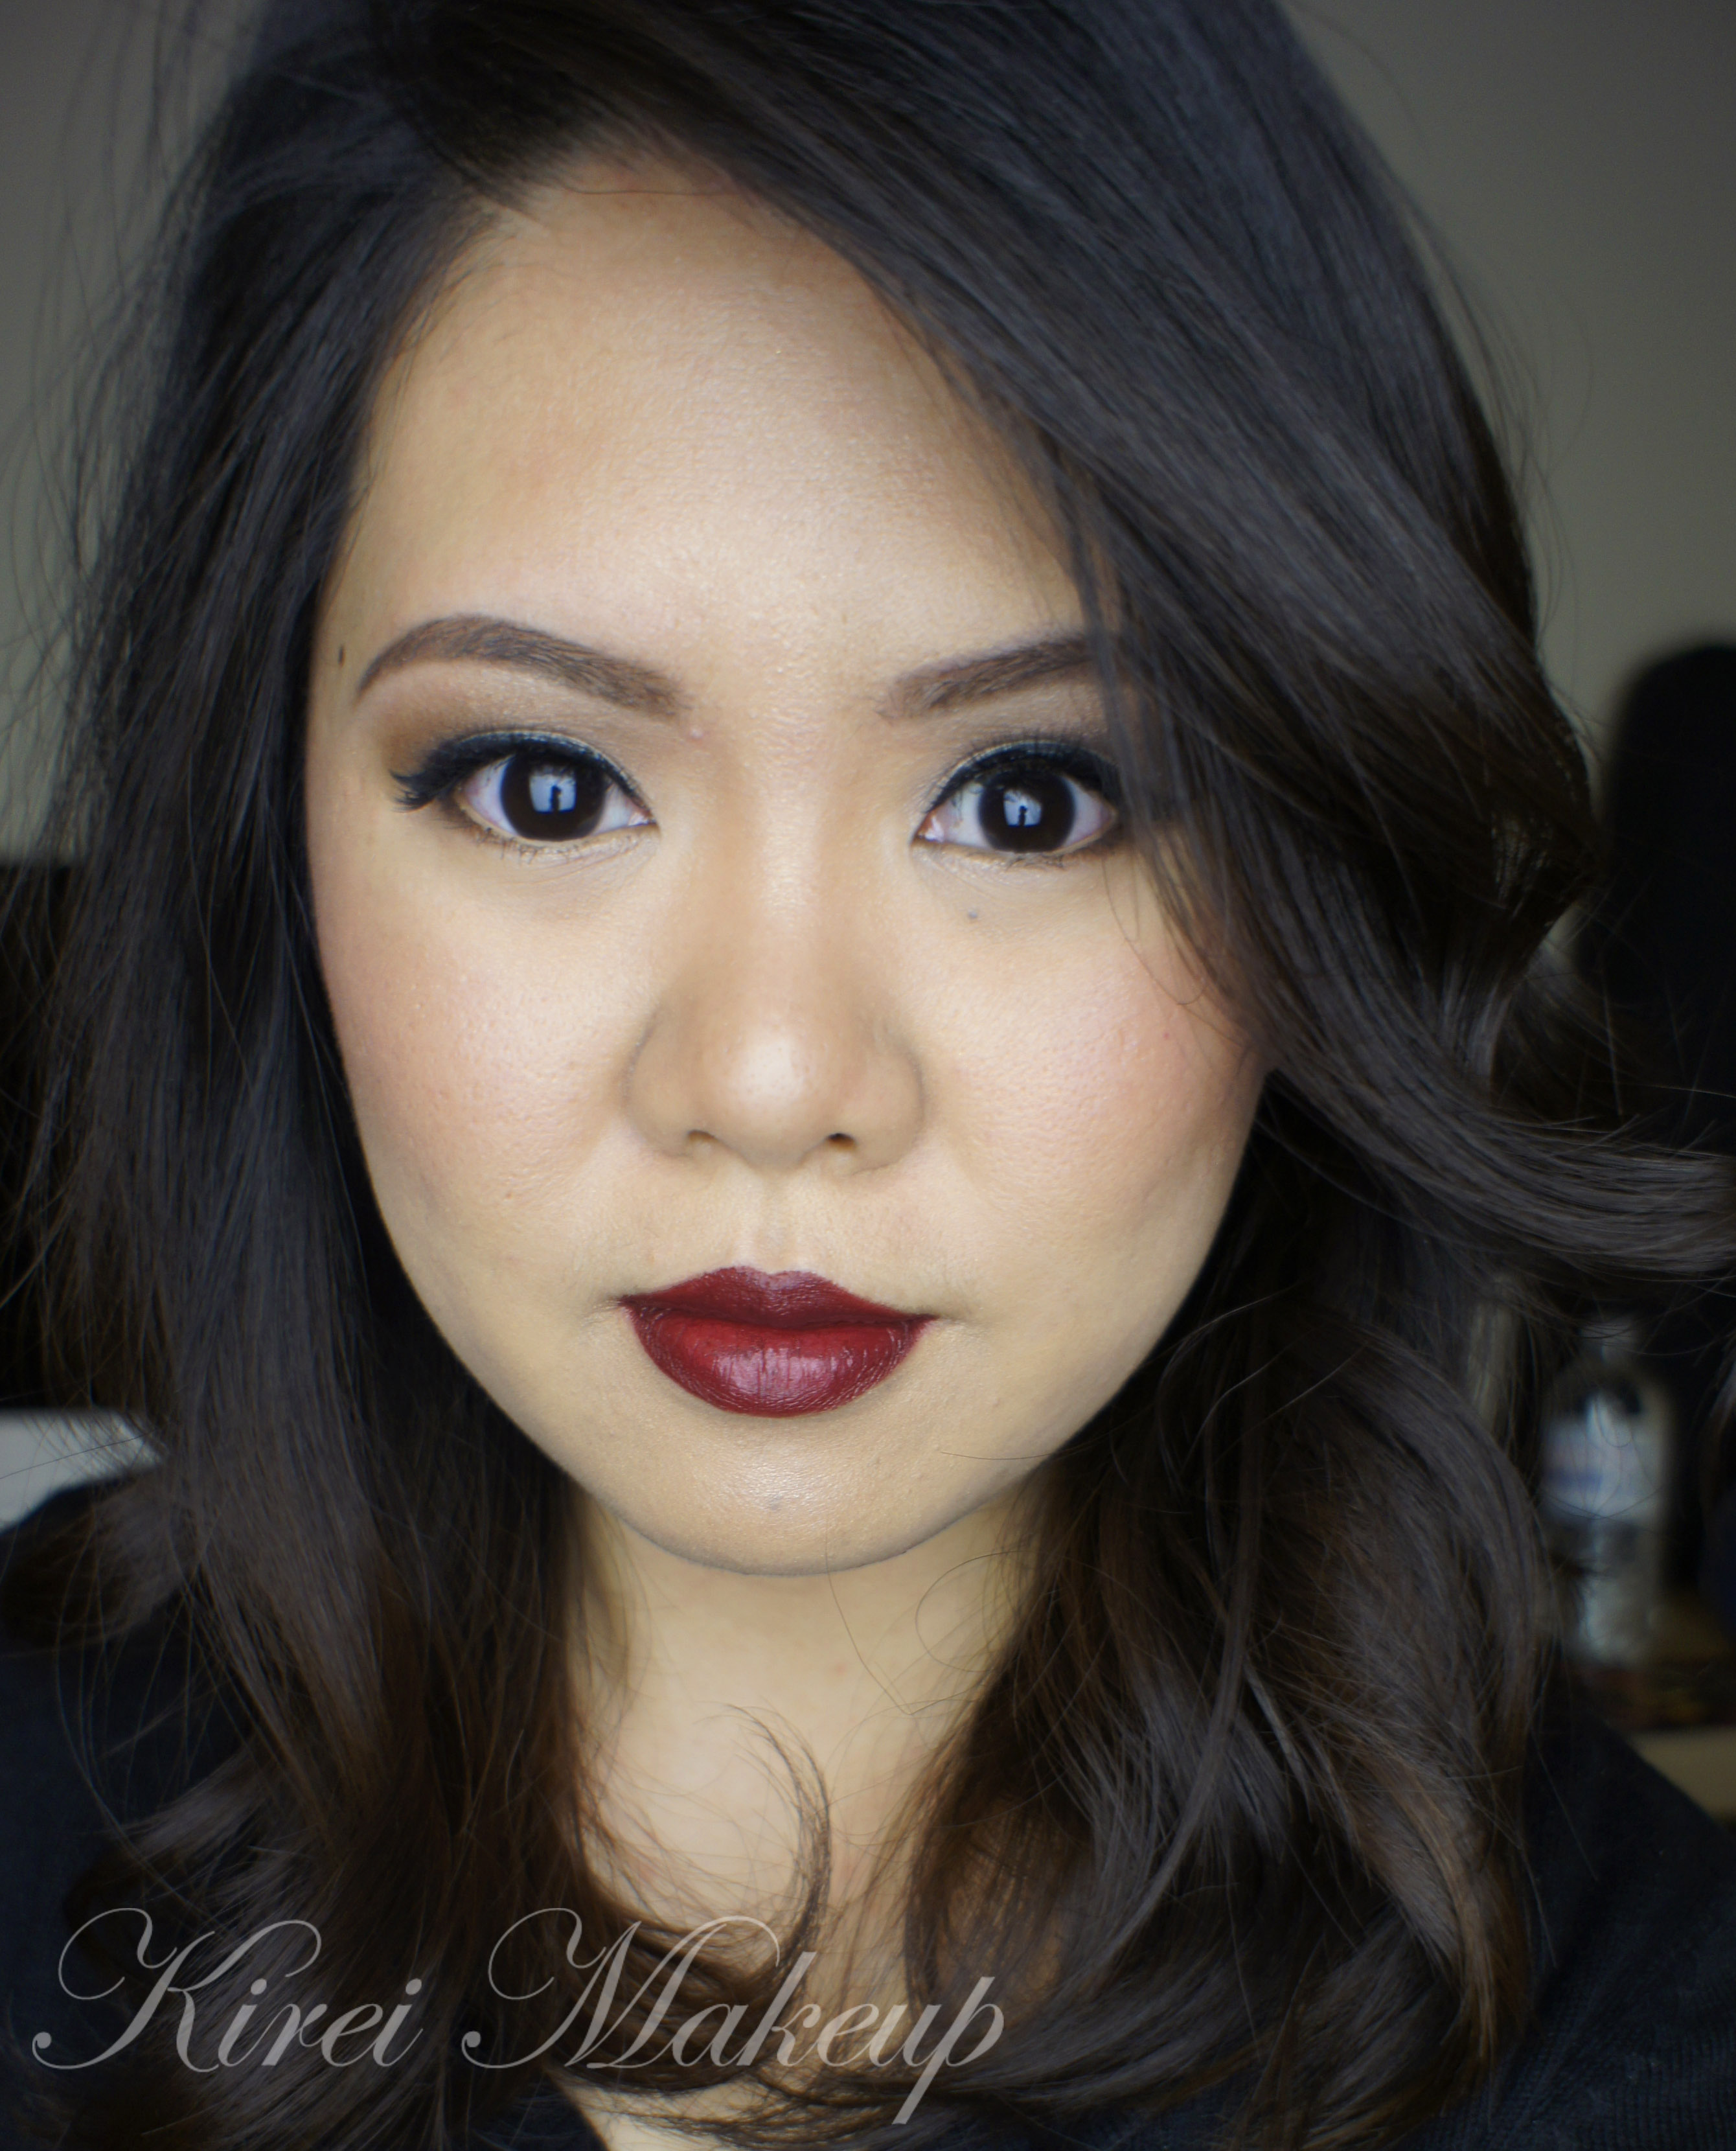
14. For my face, I applied L’oreal Magique Lumi Foundation in W3 using CoverFX Cream Foundation brush.

15. On the cheeks, I applied MAC Cubic blush.

16. I filled my lips using MAC Dervish lip liner, and then lightly dabbed YSL Glossy Stain in Pêche Cerra-Cola (27) on top of it.Gold glitter makeup

Fresh Dewy Makeup Look

Having a bold makeup is always nice, but I usually wear this type of makeup on my daily life. I barely wear makeup on a day-to-day basis, because I used to have a really bad case of acne and I just get used to not wear makeup at all. However, when I do feel like wearing makeup, I usually go for the easiest look. I used to wear this look a lot when I was younger, and I don’t even know why I stopped wearing it. It’s so easy, and the only thing that take time is the eyeliner. However, once you master the winged liner, it’s so fast and simple.

This look is really good for beginners who want to practice blending and creating the cat-eyeliner (or also called winged liner). The gold eyeshadow in this tutorial can be replaced with any eyeshadow color. I chose NARS Etrusque because I just love the color, and it has just enough shimmers to brighten up your eyes.

The rest of the face is kept very fresh and dewy, afterall it is called Fresh Dewy Makeup look! This face is super simple, the keys are to use cream products, and to lightly powder the oily areas only. For me, I powdered under my eyes to set my concealer only for this tutorial. Why, you ask? That’s because my skin in the winter is quite dry and doesn’t actually get oily at all. If you are oily, just powder the oily areas (usually T-zone or just the cheeks). If you’re oily everywhere, feel free to powder your face, and use a powder highlighter to create the dewy look.

I just feel so young and fresh! I also love the blush I used for this tutorial. I added a touch more than I usually does, just to make my cheeks look like it’s flushing from the inside. I think the blush helps with the whole youthful appearance. This look is so appropriate for everything, from day makeup to party makeup! If you’re planning to wear it during the day, you can create a thinner line or even skip in altogether. If you like it smokier, add black eyeliner on the tightline. It’s so versatile!

Ok, enough of my rambling, let’s get on it!

NARS Etrusque

How-to:

1. I prepped my eyelids using UD Primer Potion (original).

2. I applied NARS Etrusque eyeshadow all over my eyelid using a flat eyeshadow brush.

3. Using a clean fluffy brush, I blended the eyeshadow so there’s no harsh edge.

4. I lined my waterline, and lower lash line using MAC Powersurge pencil eyeliner. (You can use black, white, beige eyeliner if you like)

5. I applied NARS Etrusque on the lower lash line using an angled eyeliner brush.

6. Using a clean angled eyeliner brush, I applied L’oreal Infallible Lacquer Liner 24Hr in Blackest Black on the upper lash line creating a winged eyeliner.

7. I curled my lashes and applied Tarte Lights, Camera and Flashes mascara on both upper and lower lashes.

8. I applied false eyelashes (sample) on my upper lashes.

9. I filled my brows in using Anastasia Brow Wiz in Brunette.

Fresh, dewy makeup

10. For the face, I applied MAC Pro Longwear foundation in NC30 using CoverFX cream foundation brush.

11. I applied the concealer from MAC Pro Correct/Conceal palette in Medium under my eyes, as well as below the brows.

12. I set the concealer using CoverFX translucent powder.

13. I contoured my face very lightly using Smashbox contour powder palette (discontinued).

14. I applied Revlon Charmed Cream Blush on my cheeks using a clean foundation brush, and then blending it to my skin using my finger.

15. I highlighted the bridge of my nose, chin, cupid’s bow and top of cheekbones using Benefit Moon Beam.

16. I filled my lips using MAC Dervish lip liner, and then YSL Glossy Stain in Pêche Cerra-Cola (27) on top of it.

Burgundy Lips

Quick tutorial today, since I wanted to try out my new L’oreal Color Riche lipliner in Truly Burgundy as well as L’oreal Infallible Lacquer Liner 24Hr in Blackest Black. To be honest, I wasn’t sure where I was going with the tutorial since I started out lining my lips first. I just wanted to play around, but I think it turned out to be not bad. If you’re one who’d like to try the bold lips look, give this lip color a try. I, personally, feel the burgundy lips look is perfect for this cold season. What do you think?

For the eyes, you can skip this whole contouring on the crease altogether if you prefer a simpler look. I just wanted to compliment the warmth of the lips with warm eyes.

Let’s get on the tutorial!

How-to:

1. I applied the brown (second darkest color) eyeshadow from Ombres Matelassees De Chanel Charming on my crease using a fluffy blending brush.

2. Using a flat eyeshadow brush, I applied Smashbox Full Exposure palette in s3 on my eyelid area.

3. (not in picture) Using another fluffy blending brush, I applied the bronze eyeshadow (middle color) from Ombres Matelassees De Chanel Charming just slightly above the crease.

4. Using an angled eyeliner brush, I applied eyeshadow in step no. 1 on the outer corner of my lower lid, and S3 on the inner corner.

5. I applied MAC Chromagraphic eyeliner in NC30 on my waterline.

6. I created a winged eyeliner using L’oreal Infallible Lacquer Liner 24Hr in Blackest Black.

7. I curled my lashes and applied L’oreal Butterfly mascara on both upper and lower lashes.

8. I also applied a set of false eyelashes (again, sample from a friend) to thicken up my lashes.

9. I filled my brows using Anastasia Brow Wiz in Brunette.

10. I applied a little bit of concealer under my brows. If you want to know how I fill my brows, please check my Shu Uemura Brow Pencil post.

asian eye makeup

11. For the face, I applied MAC Pro Longwear foundation in NC30 using CoverFX Cream Foundation brush.

12. I contoured my face using MAC Blunt powder and NARS ITA Kabuki brush.

13. On the cheeks, I applied MAC Breezy Sheertone Shimmer Blush.

14. I highlighted my face using Diorskin Shimmer Star Amber Diamond.

15. I lined and filled my lips using L’oreal Colour Riche in Truly Burgundy. On top of that, I applied a thin layer of Revlon Wine Not matte lipstick.

If you want to find out how I do my lips, please check my How-to Apply [Red] Lipstick

Revlon Wine Not

Smashbox Full Exposure Palette Review

As promised, today I wanted to share my new favorite palette – the Smashbox Full Exposure palette. This palette would make a really great Christmas gift! I wanted to post this next week as my Product of The Week, but I really want to post this today because I’ve been teasing you all with tutorials using this palette. So, I’ll categorize this under Product of The Week even though I do not put it up on the title.

*Update (Feb. 23, 2015) – I have a Smashbox Double Exposure Palette review for you!*

What is Smashbox Full Exposure Palette?

“A set of universally awesome neutrals that’s essential, effortless, and enhanced for your eye shape. […] This totally versatile palette is organized with crease-resistant, long-wearing shimmers in the top row and velvety smooth mattes along the bottom. Fourteen essential neutral shades include a range of nudes, blacks, shimmers, and mattes. Use the brilliant eye shape chart, dual-ended brush, and Full Exposure Mascara to complete any look.

[…] Smashbox has taken the guesswork out of application with a cool, new dual-ended brush. There’s a fluffy end perfect for blending matte shades and a flat end to easily lay down the shimmer shades without sparkle overload. Plus, it’s double-sided with black bristles on one side and white on the other, so you’ll never accidentally dip a light shade into a dark shade.”

Sephora, 2013

Smashbox Full Exposure Palette ReviewAt first look, I was attracted to the huge flecks of glitters in the top row of the Smashbox Full Exposure palette. They did say it’s actually shimmer, but I feel that the light-reflecting particles are definitely too big to be considered as shimmer. I was, also, quite skeptical regarding how well the glitters would stay on the lid when being used dry since I’ve negative experience with other brands.

When I swatched the eyeshadows on my hand in Sephora, I was very surprised and happy that the glitters stayed really well at the back of my hand. That sealed the deal for me! I took the beautiful palette and paid for it.

I know quite a few reviews in Sephora website said that they hated this palette because the glitters couldn’t stick well to the skin. Well, I didn’t have this issue at all, perhaps because I applied the glitters in a different way. First of all I applied eyeshadow primer on my eyelid. Then, I used a dense flat eyeshadow brush to apply it.

If you want to see samples on how I applied the “shimmer” eyeshadow from the Smashbox Full Exposure palette, please check my posts in Smashbox Full Exposure Look #1 and Holiday Look using MAC Diva.

Smashbox Full Exposure Palette

Packaging

A black sleek carton packaging. 14 eyeshadows  in a square (yay) pan. The Smashbox Full Exposure Palette also contains 1 sample-size Full Exposure mascara tube, a double-ended split-fiber eyeshadow and fluffy blending brush, as well as a large sheet (folded in the picture) of eye makeup tutorial.

The eye chart sheet shows information on how to create several looks based on your eye shape.

Longevity

I’ve yet to wear this palette without a primer underneath. With Urban Decay Primer Potion, the Smashbox Full Exposure palette proves to be quite resilient. It lasted for 8hrs without creasing.

Smashbox Full Exposure Palette Review

Finish

Top row: shimmer (S1-S7); Bottom row: matte (M1-M7)

  • S1 – Chocolate Brown with Golden Pearl
  • S2 – Deep Golden Brown with Gold Pearl
  • S3 – Soft Gold with Gold and Silver Pearl
  • S4 – Light Tan with Gold and Silver Pearl
  • S5 – Golden Wheat with Gold Pearl
  • S6 – Midtone Slate with Silver Pearl
  • S7 – Rich Grey with Multicolor and Silver Pearl
  • M1 – Matte Warm Chocolate Brown
  • M2 – Matte Midtone Brown
  • M3 – Soft Matte Midtone Tan
  • M4 – Creamy Matte Beige
  • M5 – Soft Light Taupe
  • M6 – Ashy Dark Brown
  • M7 – Suede Black

Price

CA$58 (before tax) for 0.035oz x 14 eyeshadows, double-ended makeup brush, mascara and eye chart.

Smashbox Full Exposure Palette Swatches

Pros:

  • Excellent colors – browns, nudes, and greys.
  • You get 2 different textures – shimmer and matte.
  • Great pigment pay-off.
  • Glitters stick well to the skin if you pack the eyeshadow with a flat and dense eyeshadow brush.
  • Matte eyeshadows are not chalky, it has quite a velvet finish to it.
  • You can mix the matte eyeshadows to be used for the brows.
  • Palette have a great range of colors, which is great for different skin tones.
  • Great eye chart for inspiration.
  • Awesome brush and mascara.
  • Not too pricy – considering it’s around $5/eyeshadow when you break it down individually.
  • Makes for a great bridal palette!

Cons:

  • The flat split-fiber eyeshadow brush does not pack the glitter on the eyelid that well. You might have to use another brush for the glitters.
  • Quite a fall-out from the “shimmer” rows, so watch out! Try to do your eye makeup first before your base.

IMATS Toronto 2013

Again, this year, I managed to show up for IMATS in Toronto. It was held in the Metro Convention Center. I attended the event on Saturday only. This year IMATS was definitely more packed and busy than last year. Please check my post on IMATS Toronto 2012 if you want to see my last year event coverage.

I wasn’t expecting anything from the IMATS. I actually went there without any intention of buying anything. I just wanted to see if they have good deals on certain products.

IMATS Toronto

Anyways, it was a makeup trade show, so there was a lot of brands that were present to sell their products. I think MUFE had one of the best booths there. The body paintings done by MUFE makeup artists were amazing! They have quite a great deal too: 50% off makeup brushes, certain deals on a set of foundation/concealers/primers/powder/blush etc. However, there was a HUGE line up for the MUFE booth, and I just couldn’t bring myself to line up for hours…ok may be not hours, but you get my point…

IMATS Toronto

There were several body painters in the show for their own booths, one of which was the makeup artist from Blur booth. Below, you can see the model from Blur. That was one of the most amazing body paintings I’ve ever seen.

IMATS Toronto

So, I walked around the whole exhibition hall, and bought some makeup brushes from Crown Brush. It was such an awesome deal! Some of the brushes were only $4, others were $7.50. Pretty great, no?!

Besides Crown Brush, I also bought 8 nail polishes: 6 OPI for $30 and 2 Essie for $3.50/each. You probably would have seen the picture of the brushes and nail polishes if you followed me on Twitter or Instagram.

IMATS Toronto

Besides the shopping, a very amazing event took place! Ok, so N was sitting down while I was shopping around looking at all the different booths (kudos to IMATS for providing chairs all around the hall for people to take a short rest).  While I was all skipping down the aisle getting my brushes, N was asked by a lady if she can sit beside him. He said yes, and took a glimpse at her name tag. Guess who??? RAE MORRIS! (the makeup artist, not the singer)

So, N immediately send me a message “you’ll never believe who sat beside me? where are you? come dowwn! it’s Rae Morris!”

Unfortunately, when I went to his seat, she already left to do some judging for the competition. So, N and I decided to stalk her..hahahahaha…Anyways, we managed to catch her after the competition, and we managed to chat and take a picture with the world famous Rae Morris! She was so nice and kind!

Below is pictures of us with Rae Morris. Yep, that’s my N right there! 😀

Rae Morris

Stitched Up (face paint only)

Last minute Halloween idea using very simple products:

  1. Dark red lip liner (or face paint) – I used the dark red from Kryolan Bruised Wheel palette, and an angled eyebrow brush.
  2. Light red lip liner – I used MAC Brick lip liner.
  3. A small flat eyeshadow brush.
  4. White pencil eyeliner.
  5. Liquid eyeliner – I used L’oreal Infallible Super Slim Liquid Eyeliner.

No latex, no glue, no special equipment needed. Everything is face paint, and it’s easy to achieve. You can get all these products from Wal-Mar, Shopper’s Drug mart etc. Very easy to make!

Should you decide to wear this look out, you might want to apply your makeup first and then create the face paint.

stitched face paint

How-to:

1. Create dashes along your face using a dark red lip liner, or using face paint with an angled brush.

2. Using a lighter red lip liner, smudge it beside the lines that you’ve created.

3. Using the flat eyeshadow brush, blend out the lighter red lip liner to create pink tenderness on the face.

4. Lightly line the outside perimeter of the “dashes” to highlight it. This will make your wound look swollen.stitched up makeup

6. Using the black liquid eyeliner to create the “stitches”. Create dots at the end of the stitches.

7. (Optional) You can use the white pencil eyeliner to highlight the ends of the stitches.

halloween stitched up stitched face paint

Basic Smoky

Another tutorial using Urban Decay Naked Basics palette! Don’t forget to check a more neutral, day-makeup tutorial using UD Naked Basics palette on my last post. This time I decided to do my go-to smoky eyes makeup! This look is so simple and easy. I tend to do very simple makeup on myself because I’m quite lazy, to be honest. This palette is perfect for me, since I do like matte finish for my go-to smoky eyes.

Everyone can do this look! You don’t even have to have the same palette, just use whatever products you already have. All you need is 1 eyeshadow and a black eyeliner. It’s so simple, yet the result is so chic! If you’re a beginner, this would be a perfect look to create your very first smoky eyes makeup. I get asked all the time “how can I not look like I’ve a black eye when I do smoky eyes?”. Here’s the answer!

Tip no. 1: Use black eyeliner only to frame your eyes – meaning on the waterline, tightline, lower lashline and upper lashline.

Tip no. 2: Invest in a good blending brush.

Remember: Less is More!


Smoky eyes using urban decay naked basics

How-to:

1. Using a flat eyeshadow brush, I applied UD Faint all over my eyelid, up to the crease.

2. Using a CLEAN blending brush, I blended out the crease very lighty.

3. I lined my upper lashline using L’oreal Voluminous Smoldering eyeliner.

4. Using whatever is left on the brush from Step no. 1, I patted the eyeshadow on top of the eyeliner.

5. I lined my waterline and lower lash line using L’oreal Voluminous Smoldering eyeliner. I blended the eyeliner on the lower lid using an angled brush.

6. Using a small shader brush, I applied UD Faint on top of the black eyeliner on the lower lid.

7. I filled my brows using Shu Uemura Hard Formula 9.

8. I curled my lashes and applied false eyelashes. If you are not comfortable with applying false eyelashes yet, you can omit this step.

9. Using a clean blending brush, I applied UD Venus under the brow and on the inner corner of the eyes very lightly.

matte smoky eyes

10. For the face, I applied UD Naked foundation all over using a foundation brush.

11. I also applied yellow corrector under my eyes using MAC Pro Correct/Conceal palette in Medium.

12. I set my foundation using MUFE Pro Finish powder.

13. I applied Benefit Coralista on my cheeks as blush.

14. On the lips, I applied Revlon Just Bitten Kissable lip balm in Charmed.

ud naked basics tutorial

L’oreal Neon Skirt

Finally! A tutorial to be posted. I do have to say, I’m not really loving how this look ends up. I used L’oreal Neon Skirt Color Riche quad eyeshadow that I recently purchased (posted on Instagram and Twitter). I love the colors that come with this quad, but…*sigh here comes the but*…I feel that one of the shadows is quite difficult to blend. May be it’s my fault for not priming my eyelid since  I can’t find my primers because I’m not totally unpacked yet.

Anyhooow, I just wanted to do a quick tutorial so I don’t go missing for another week or so, leaving the blog empty. Hmm, what do you guys think? I followed the instruction from the back of the quad for this look. I feel that the green color wasn’t blended properly. I wanted a sheer wash of color, so I tried blending it out, but it doesn’t look that great, eh…Also, I don’t know how I feel about the purple eyeliner. It’s not intense enough for me to be an eyeliner. Also, there’s a lot of fall out from the purple, so watch out for it.

Nevertheless, I think this can be a great look if you want to try to wear colors to go out. It’s very sheer and kinda look like watercolors, no? Oh, I love the vanilla highlighter in the middle of the lid! It makes the eyes look so pretty when you blink.

How-to:

1. I applied the gold eyeshadow from L’oreal Neon Skirt quad on the inner half of the lid using a flat eyeshadow brush.

2. Using a clean blending brush, I applied the green shadow from the same quad on the outer half of the lid.

3. (you can skip this step) I blended out the green eyeshadow towards the brow bone, leaving a little bit of color concentration in mostly the outer V of the eyelid.

4. Using my ring finger, I lightly tapped the vanilla eyeshadow from the quad to the middle of the lid.

5. Using an angled brush, I applied the purple eyeshadow of the L’oreal Neon Skirt quad along the upper lashline.

6. I applied the green along the lower lash line using a pencil brush. I dabbed a tiny bit of gold in the inner corner of the lower lid using a small shader brush.

7. I also lined the waterline and tightline using L’oreal Voluminous Smoldering eyeliner.

8. I curled my lashes and applied L’oreal Carbon Black mascara on both upper and lower lashes. I also applied EyeMe false eyelashes (free sample from a friend) on the upper lashes.

9. I filled my brows in using Anastasia Brow Wiz in Brunette.

L'oreal Neon Skirt

10. For the face, I applied MUFE HD Foundation in 118 using a foundation brush.

11. I set the foundation using MUFE Pro Finish powder.

12. I contoured my face and nose slightly using MAC Shadowy.

13. On the cheeks, I applied MAC Dainty blush.

14. I filled my lips in using MAC Dervish lip liner.

L'oreal Neon Skirt

ps: Pictures are taken using natural light.

pps: Like my new hair? hahaha 😛


Product Review: Arte Stile [sponsored]

Hello, everyone!!! Has the week been treating you well? Again, I apologize for the lack of tutorials, but I’m sure if you follow my Twitter and/or Instagram account, you’ll find snippets of what’s going on in my life right now. Anyhow, if you’ve followed my Instagram account, you’d probably already know that I received a sample from ArteStile!

What is ArteStile?

“Originally created for beauty experts, each ArteStile piece is handcrafted in Italy with the finest grade surgical steel for lasting performance.The tips and blades are hand-filed and perfectly aligned to effectively grab even the smallest hairs.

The ArteStile Collection is a unique line of tools with a patented baked enamel finish for a luxurious in hand feel and a perfect grip for at home use. The collection is available in different colours and patterns and is designed to be stylish and chic without compromising the professional quality ArteStile prides itself on. The ArteStile Collection is the perfect balance between luxurious artistry and expert quality making each piece an ideal beauty tool.”

ArteStile, 2013

tweezers

The best part about this brand is:

“[…] our products are crafted in Italy by small family businesses that are subjected to third party audits to secure all compliances are met. Our lead free implements may cost a little more but when you purchase one you can be assured we have remained true to this policy. There are NO harmful labour processes involved in creating our products. ArteStile is proud to stand behind this promise and it is something you can count on!”

ArteStile, 2013

I’d like to say a big thank you to Nick for sending me the tweezers and nail scissors! They are so adorable. You know how I like to put “xoxo” in a lot of my tweets and/or insta comments?! These 2 products are the “Hugs and Kisses” edition! Ah, perfection! I love the cute details on it.

arte stile

To be honest, I’m a big fan of Tweezerman’s tweezers. I owned several, and I thought nothing could replace those. They are the best tweezers in the whole wide world. Yet, after trying the ArteStile tweezer, I think I might have to change my opinion. Don’t get me wrong, my Pointed Slant-Tip Tweezerman will always be the one. However, the slant-tip tweezer by Arte Stile is actually better than my Slant Tweezers by Tweezerman! I find that the one by ArteStile graps my fine eyebrow hair better, and it doesn’t slip. The tip feels thinner and grips my individual eyebrow hair better.

I love it! This will go on my kit, for sure. This specific ArteStile Hugs and Kisses tweezer costs CA$24.97.

arte stile tweezers

The ArteStile Nail Scissors is slightly curved. The use of the nail scissors is obviously to cut or trim your nails. I usually used it to cut my cuticles or any hangnail.

Another use of the nail scissors, esp. the one like the ArteStile Nail Scissors is to actually cut the eyelid tape. As most East Asians know, if you have monolids, you probably have used eyelid tape to create a lid. My fellow Indonesian Bloggers and Makeup Artists most definitely have tried to cut and create their own eyelid tape. This scissors is perfect in creating those eyelid tape because of the curvature of the blade.

The other possible use of this nail scissors is to trim your eyebrows (in conjunction with eyebrow brush/spooly). Please be very careful when using this to trim your eyebrows as the tips are very sharp.

This ArteStile Hugs and Kisses Nail Scissors cost CA$24.97 as well.arte stile nail scissors

You can get all these products from their website ArteStile.ca ! They have an amazing collections, like the super adorable glitter tweezers, nail scissors, c0lorful eyelash curlers and more. So, what are you waiting for? Go check them out!

Metallic Storm

A new tutorial using my brand new Sleek Makeup iDivine Storm Palette. I actually been wanting to buy the palette for a while, and I couldn’t made up my mind because I had a bad experience with Indonesian custom not releasing my palettes. So, I was extremely happy when Luxola finally has an office in Jakarta. That makes online shopping in Luxola so much easier. My palette arrived in 2 days after I purchased it. So fast and quick! If you do click on my Luxola banner or links, you’ll get a 15% off. I am affiliated with Luxola and do earn commission in store credit form. However, I have to buy my palettes out of my own pocket.

Anyways, In the Storm palette, there’s a lot of metallic colors, and I’m sure you all know that Metallics are in again this Fall 2013. There is no individual shades name from the palette (which is super weird), but I hope you get the idea.

I prepped my eyes using MAC Paint Pot in Soft Ochre.

How-to:

1. I applied a cranberry eyeshadow (darkest pink from the palette) all over my lid using a flat eyeshadow brush.

2. Using a fluffy blending brush, I blended the edge out. (Optional step)

3. Using a small fluffy brush, I applied a black eyeshadow from the palette on the outer corner to the crease.

4. Using a clean blending brush, I blended the edge until there’s no harsh line on the crease. (sorry for the blurry picture)

5. Using a wet wipe, I cleaned the outer edge of my eyelid to create a diagonal clean line.

6. I also applied MUFE Aqua Liner in black on the outer half of the waterline. I also applied a gold eyeshadow from Sleek iDivine Storm on the inner corner of the lid, and a blue eyeshadow on the rest of the lower lid.

7. I created winged liner/cat-eye liner/feline flick along the upper lash line using Kanebo Kate Super Sharp eyeliner.

8. I applied MAC Brule under the brow bone.

9. I curled my lashes and applied L’oreal Double Curl Extension mascara on both upper and lower lashes.

10.  I filled my brows using Shu Uemura Hard Formula 9.

11. I also applied Ardell individual short flare eyelashes on my top lashes to make them look thicker.sleek idivine storm

12. On the face, I applied MUFE HD Foundation, and under the eyes I applied MUFE HD concealer.

13. I powdered my face using Cinema Secret loose powder.

14. I applied MAC Cubic on my cheeks as blush.

15. On the lips, I applied some lipstick that I’ve melted and forgot to label it…(sorry)

Anything that can go wrong on this tutorial went wrong. I mean, I couldn’t get the lights to work like normal for some reason, may be they are dying. Then, my skin was so dry that day, and I ran out of moisturizer. So, apologies if my foundation looks slightly cakey (or a lot). On top of that, my palette fell from the table because I accidentally tripped – when I was trying to break the fall by holding onto the table, my hand hit the palette. Ah, what a day 🙂 hahahaha…

 Sleek iDivine Storm