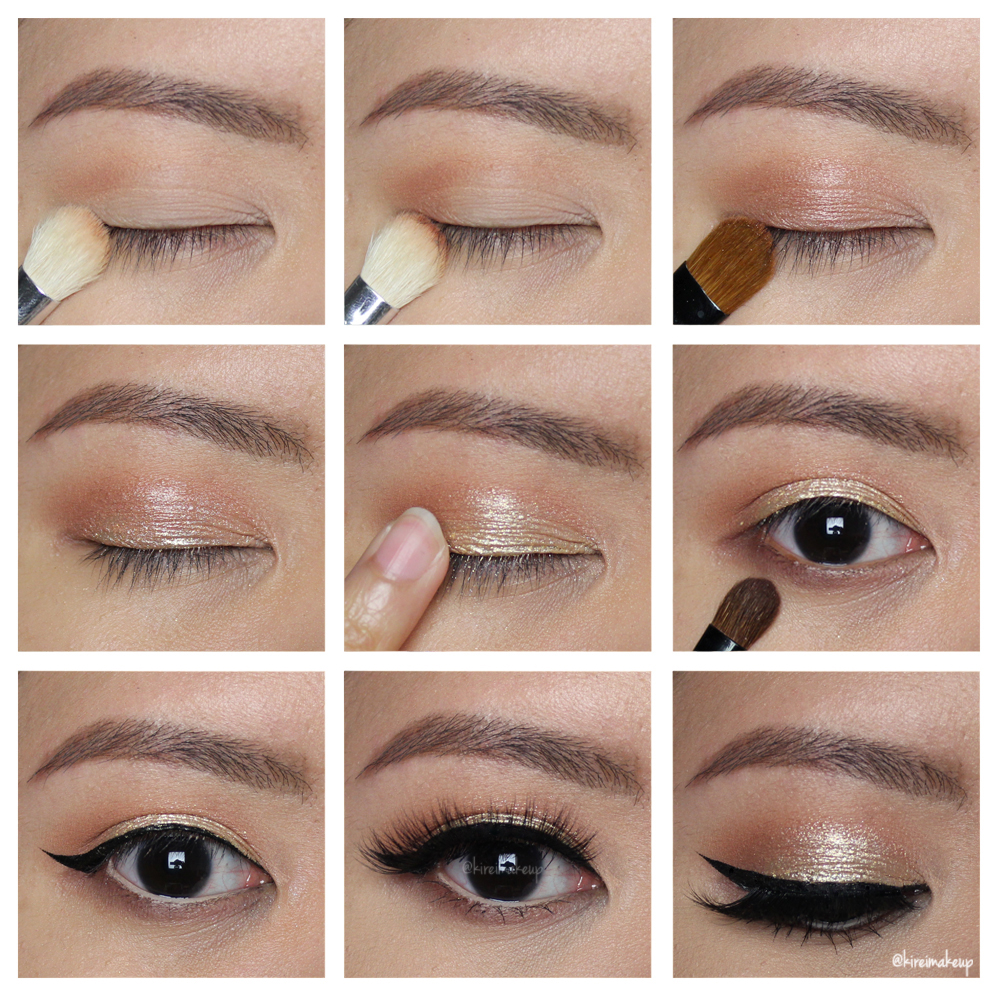
 Today’s Gold New Year Party Makeup tutorial would by my last post for 2015. Almost time for 2016, and so I shall end 2015 with a gold sparkly makeup. This look is super simple, and it doesn’t require much. It’s sparkly, it’s light, it’s super pretty for the New Year. I, myself, prefer this kind of look to attend parties and such.
Tag: new year makeup
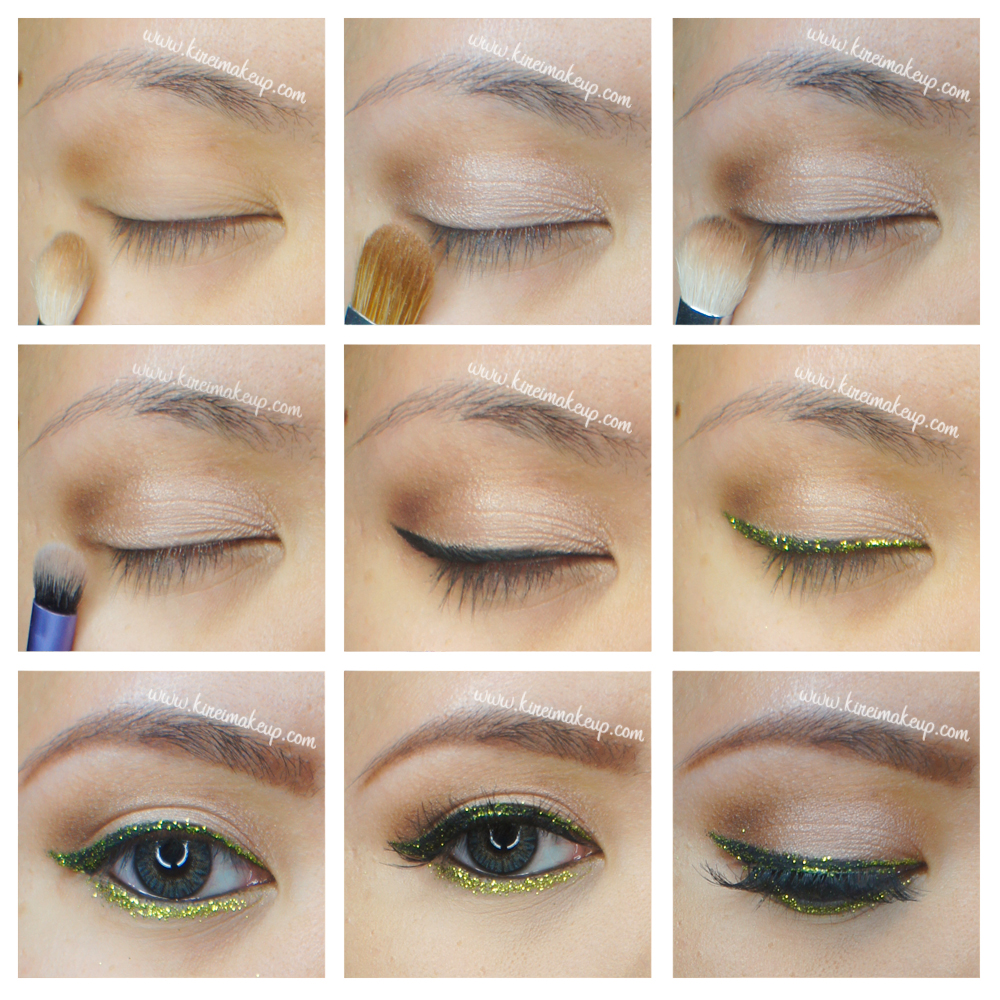
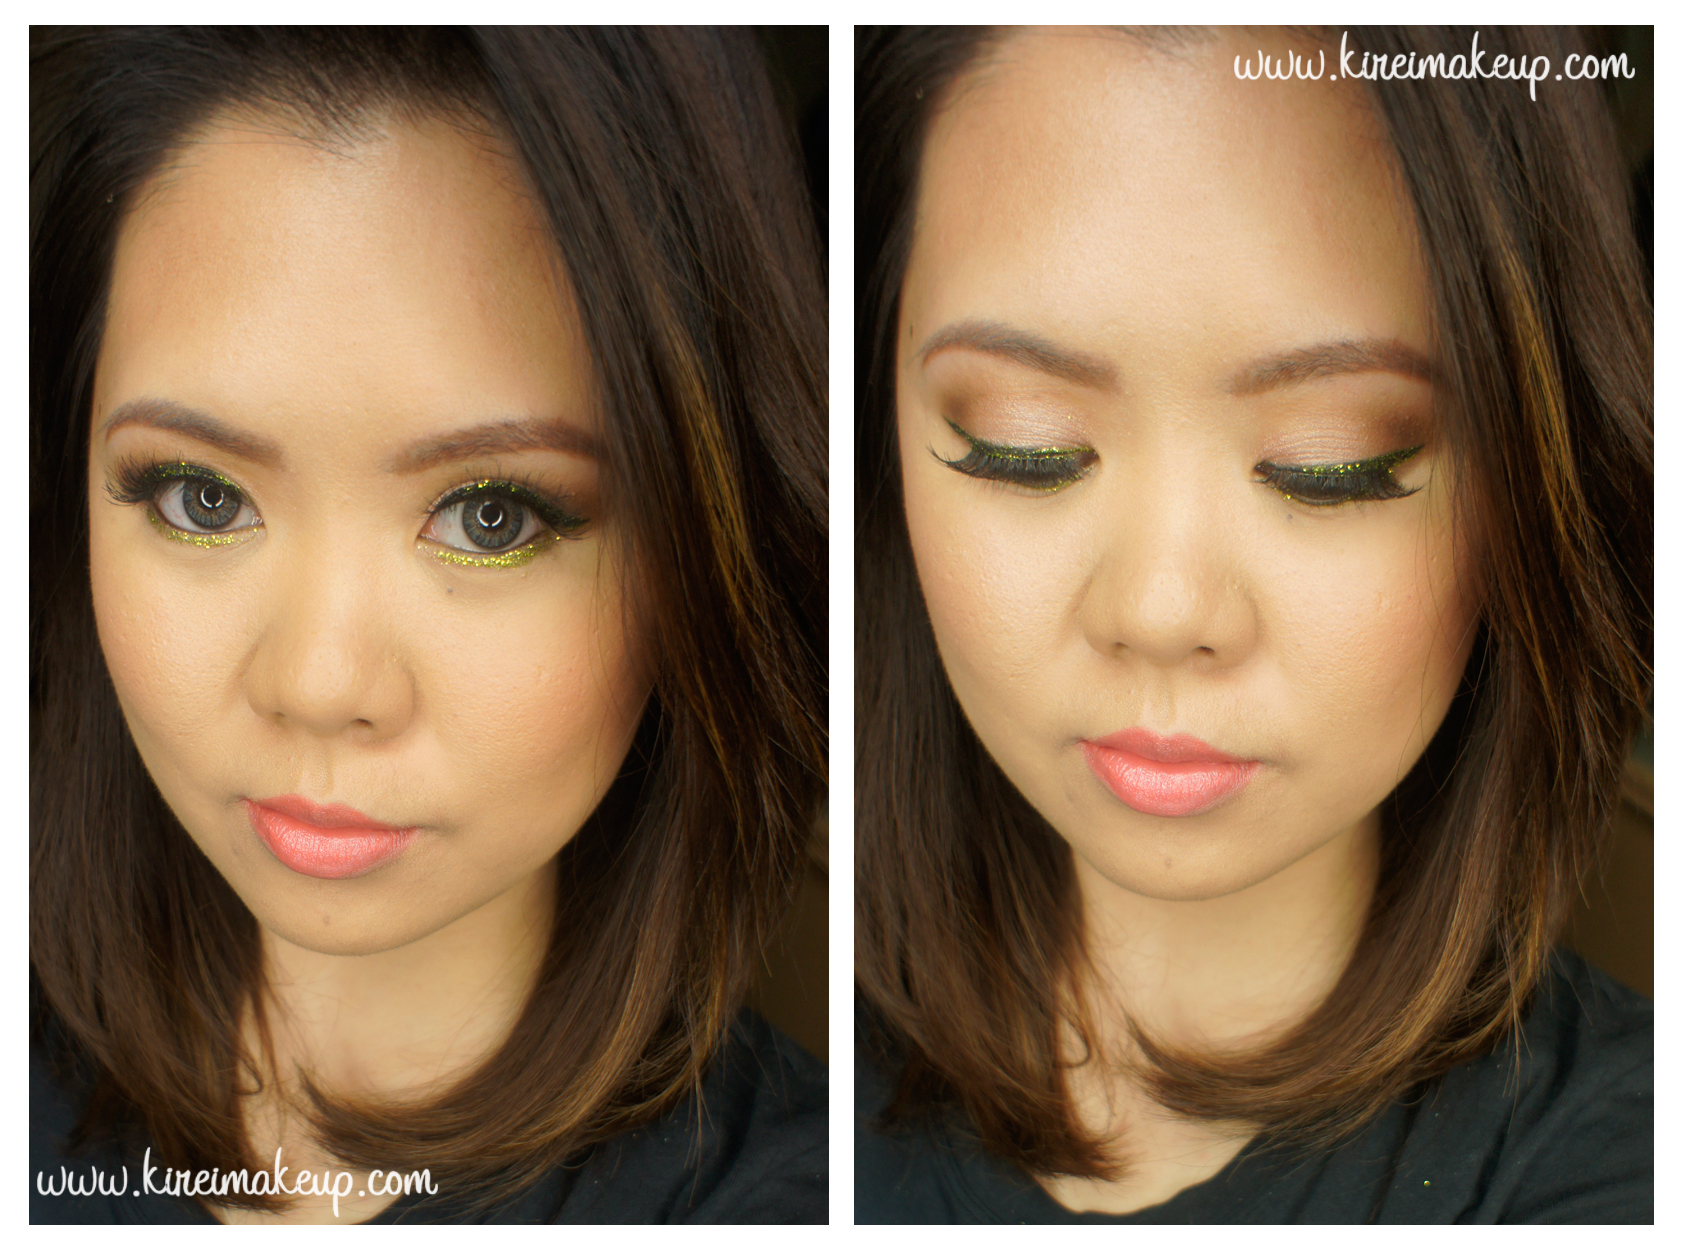
Holiday Party Makeup #4 – Glitter Liner Tutorial
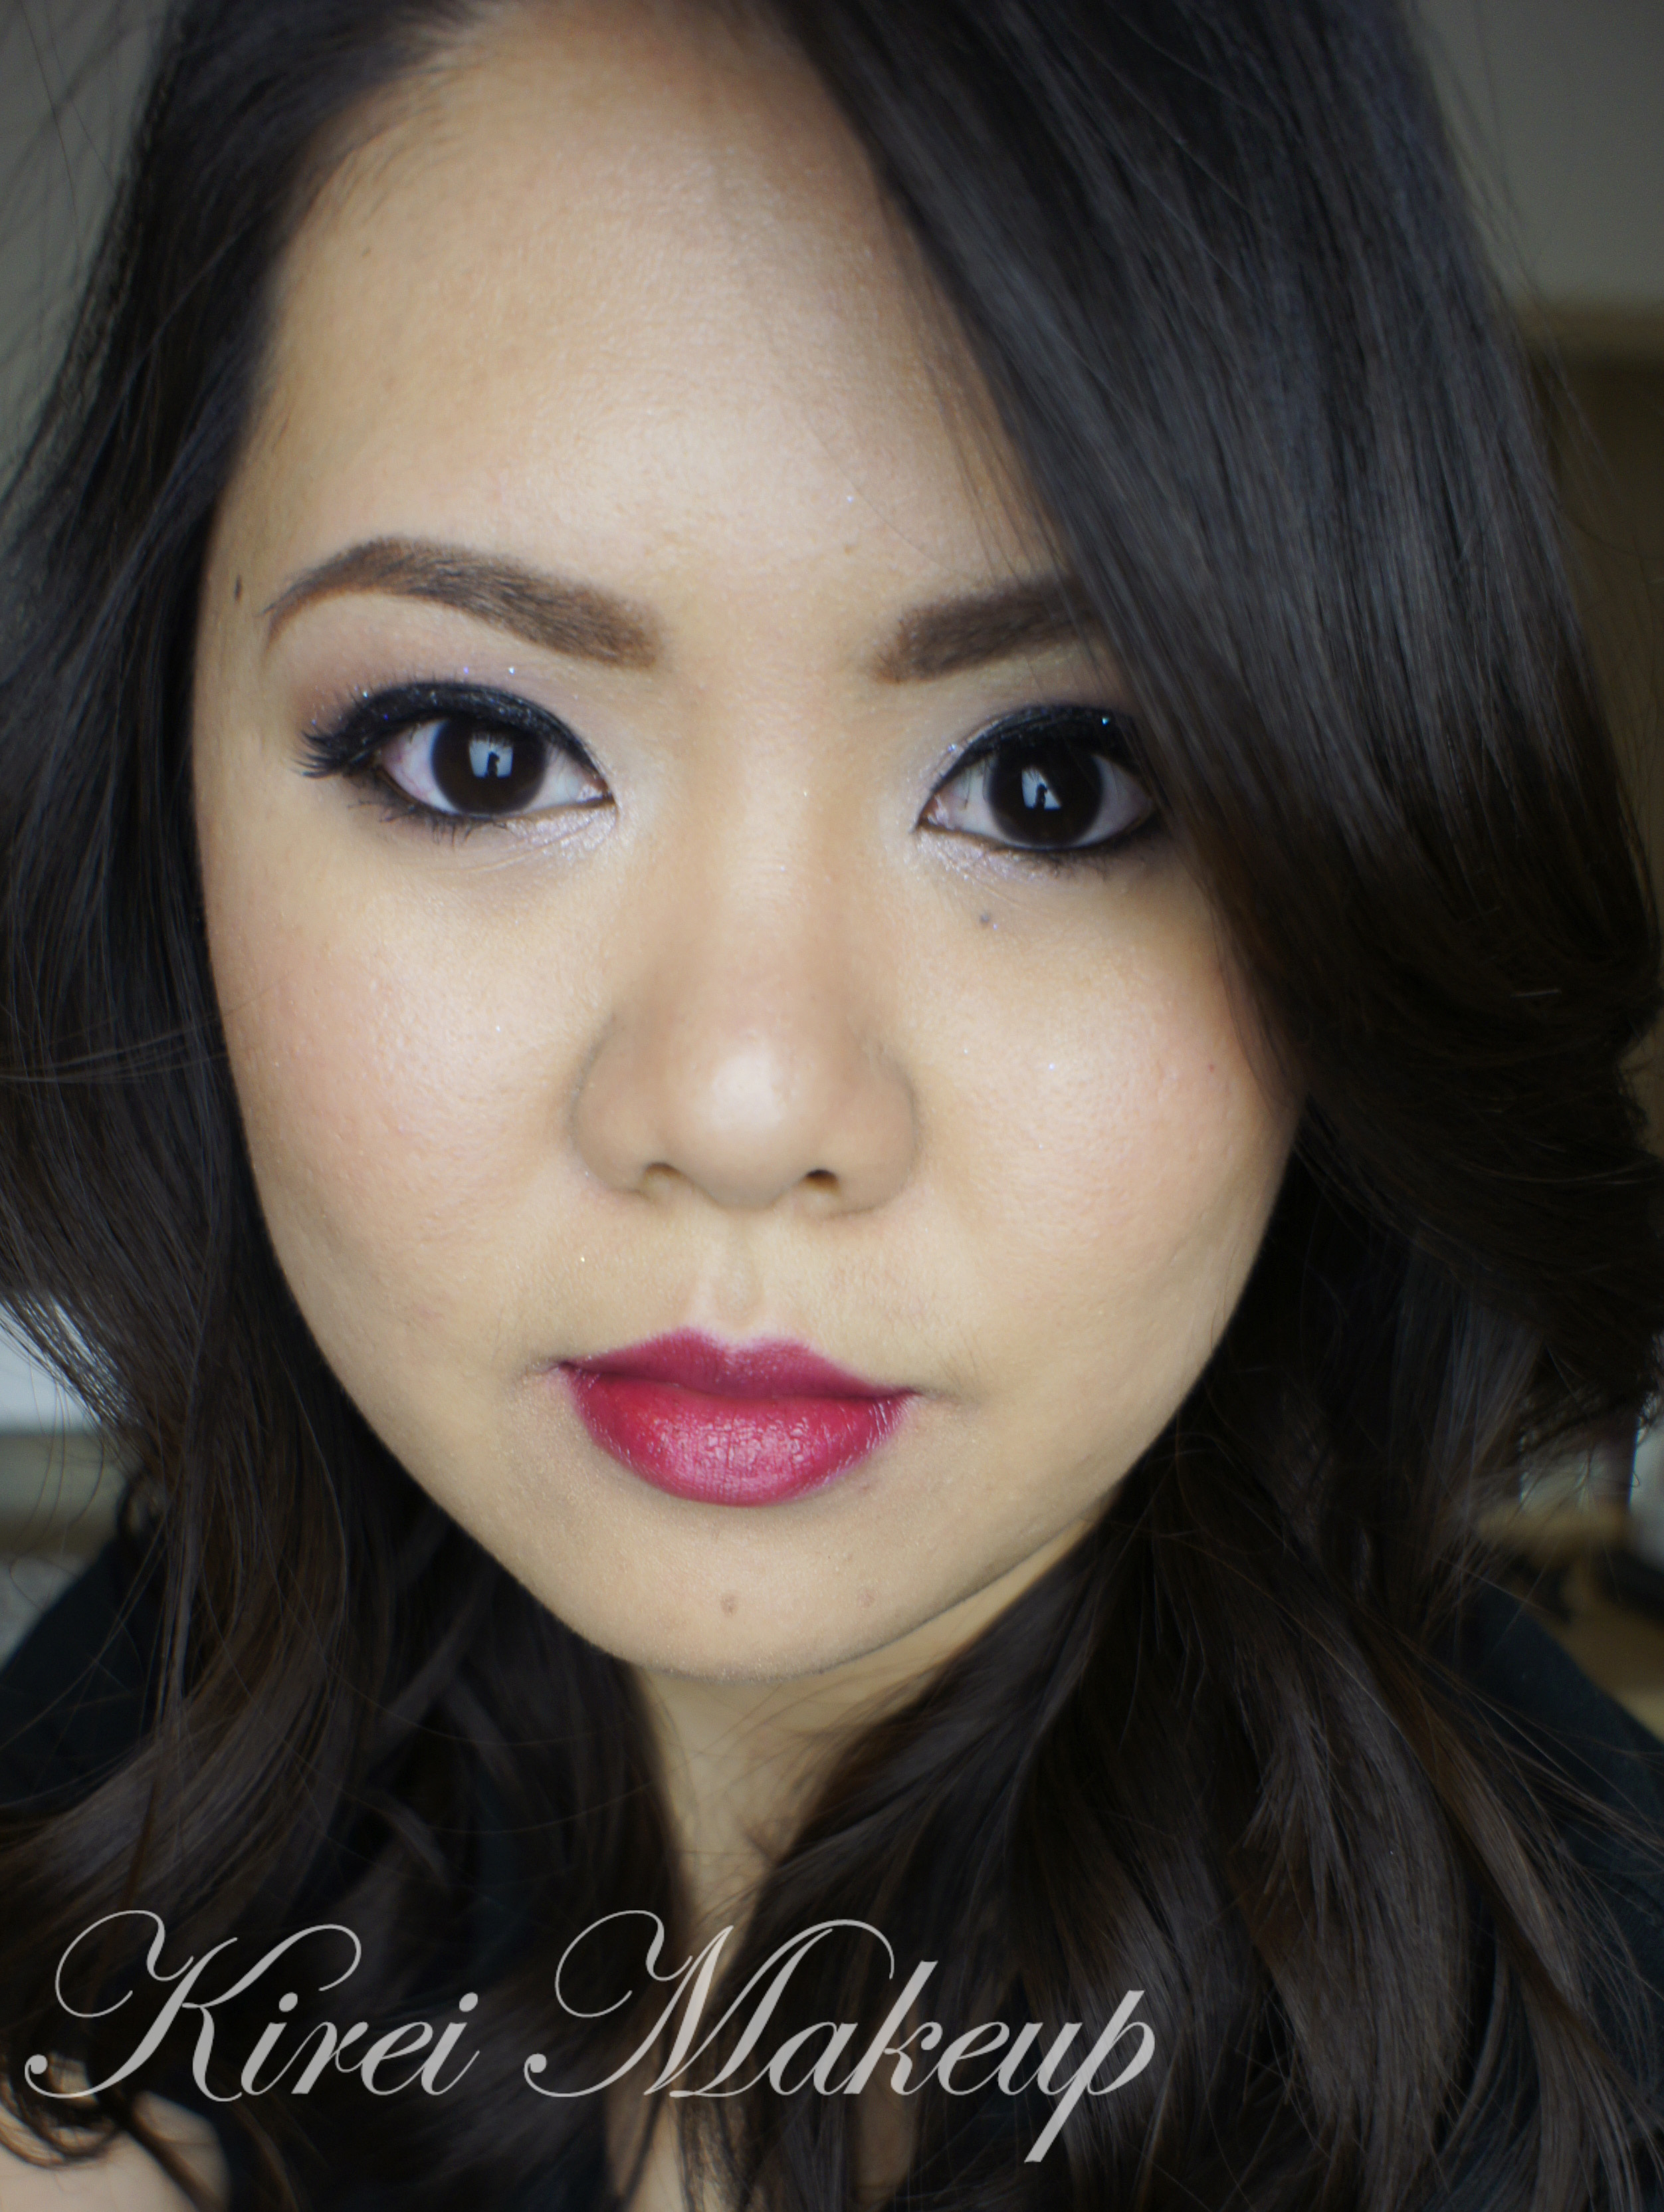
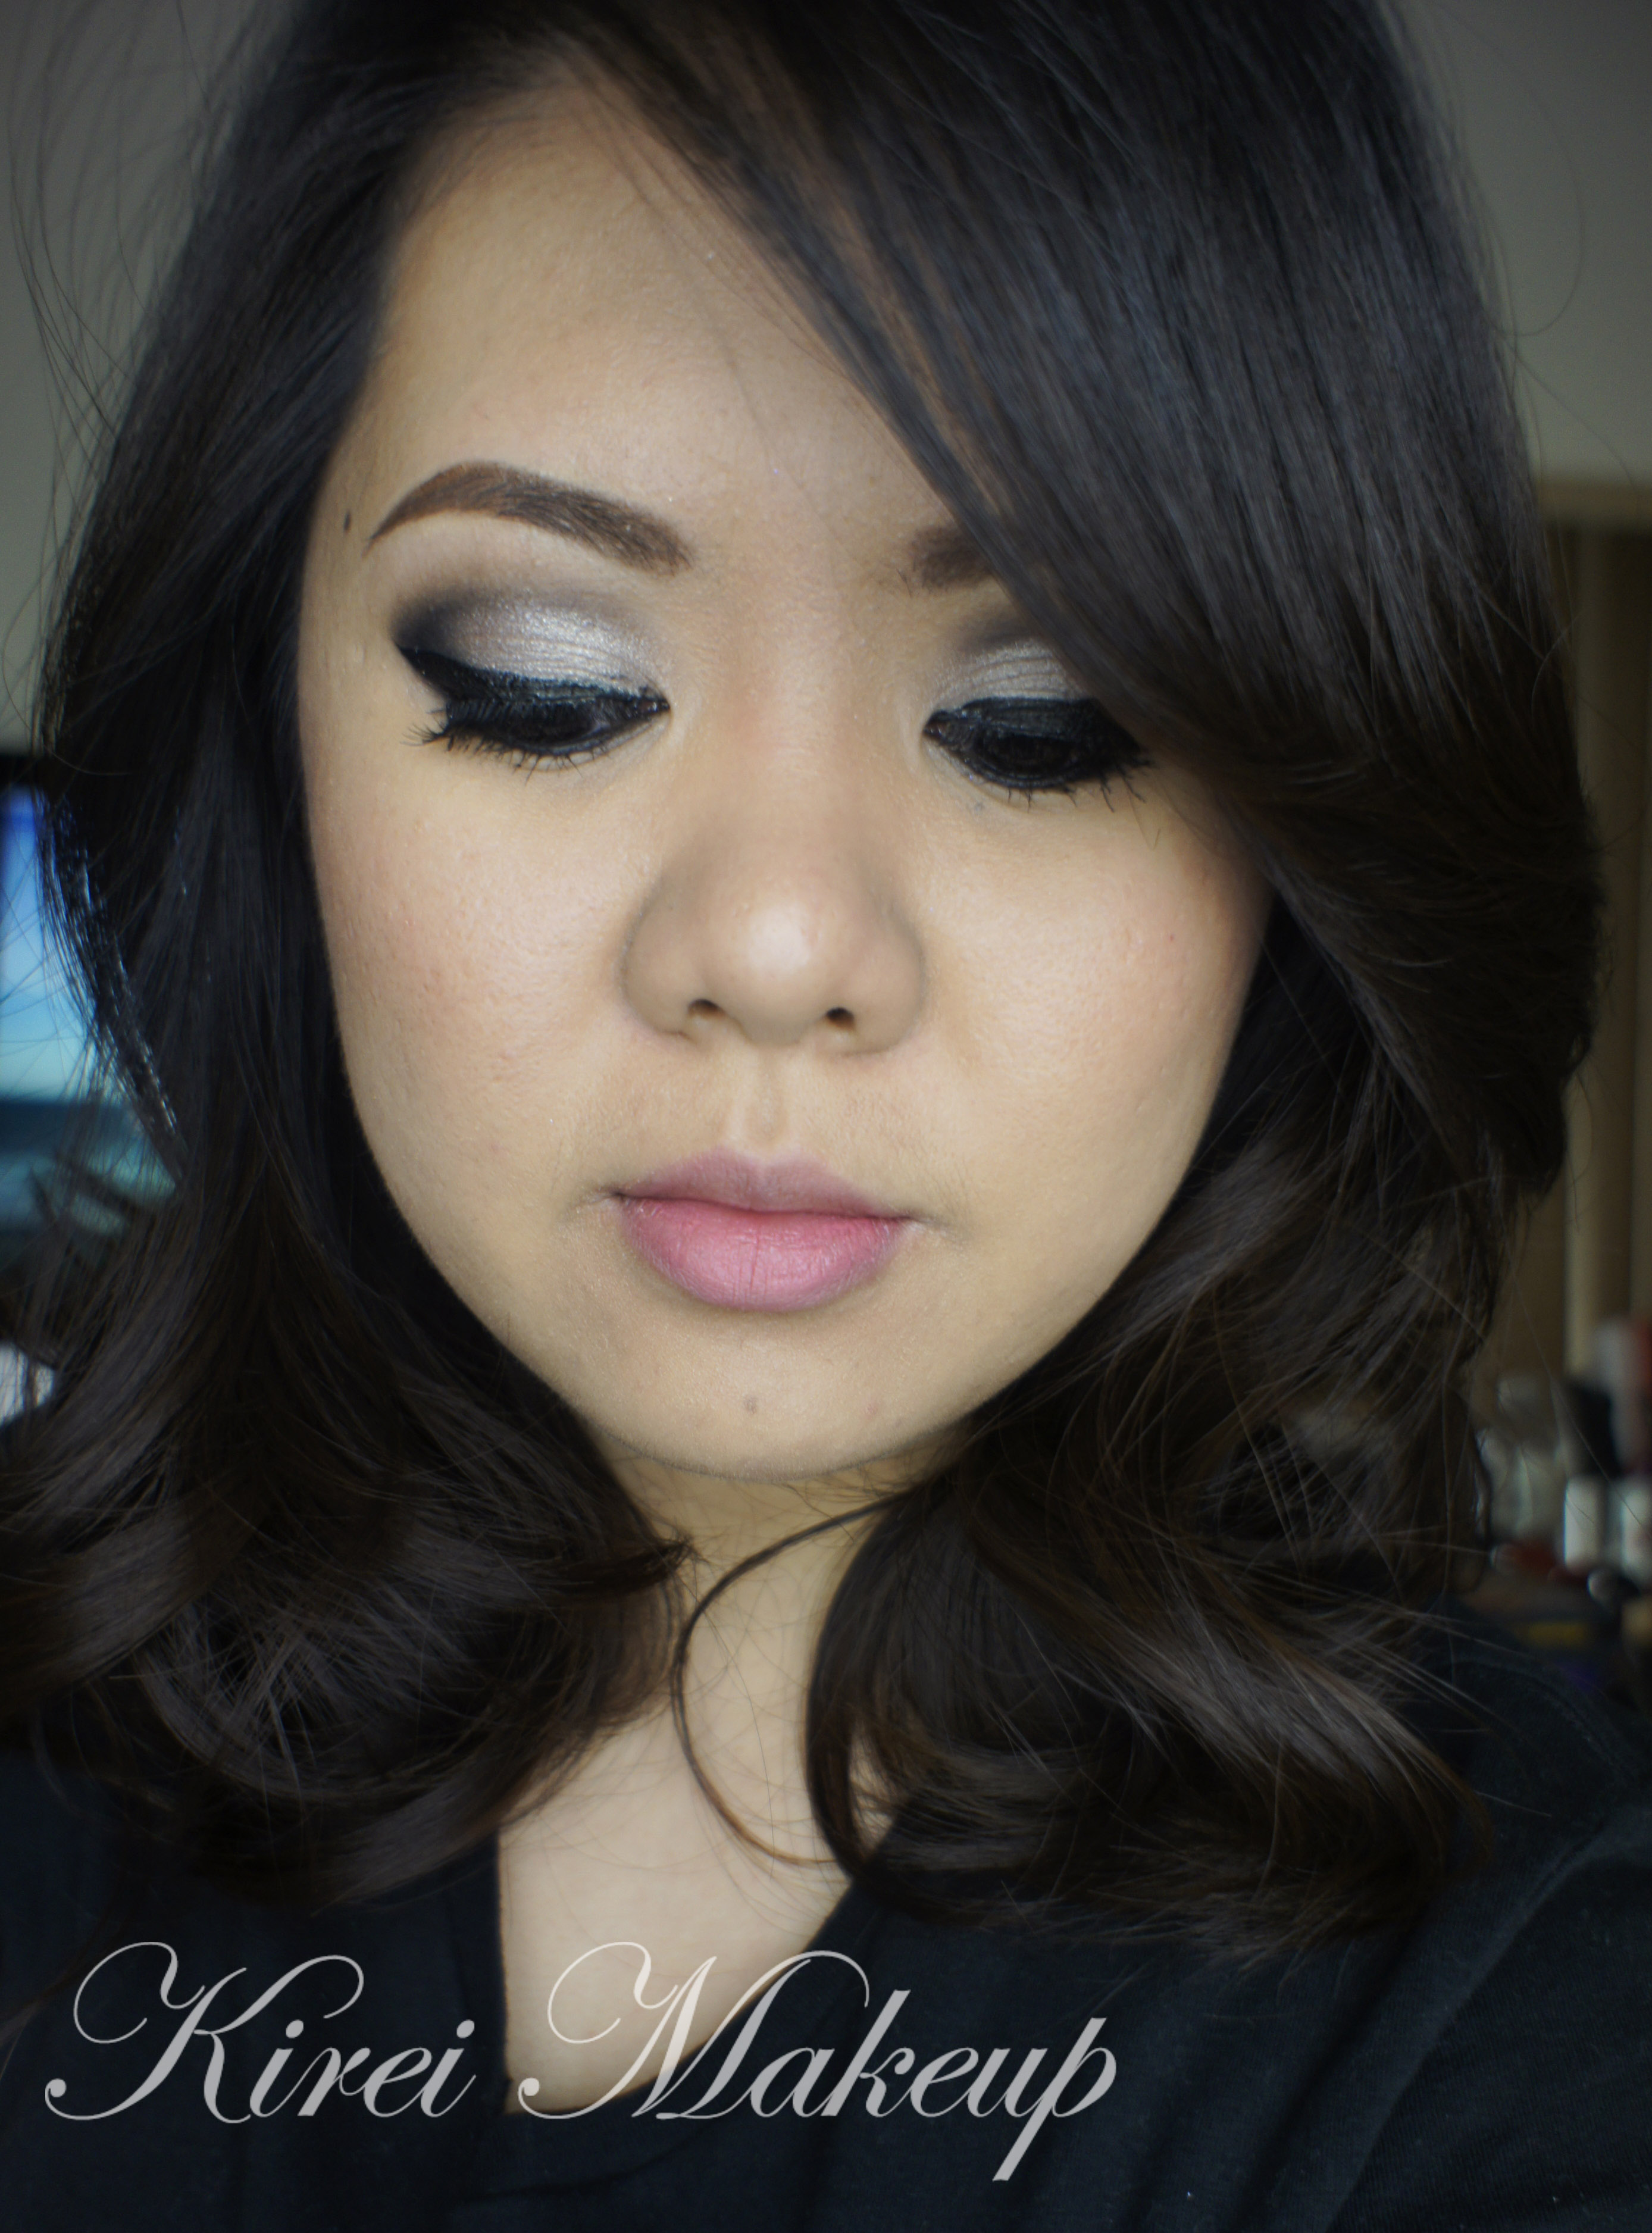
Almost NEW YEAR! I wish everyone a great year ahead! 2014 was fun, it was a bit rocky for me, but nevertheless a good year. 2014 has passed, and here to a great 2015! Hopefully in 2015 everything will go even better! I cannot wait to start 2015, and I have a feeling it’ll be an awesome year! Anyways, since the New Year is almost here, this is my last post of 2014 – a glitter liner tutorial. Last year, for NYE, I did a silver smoky makeup, this time I opted for more glitter!
I wanted to do a slightly more silver glitter, but couldn’t find any, so I decided to do this neon green glitter. Keep in mind that some glitters are not meant for the eye area! The one that I used for this tutorial actually is NOT for the eye area. I decided to use it because I know it won’t irritate my eyes. If you are not sure whether to use glitter or not, please consult the makeup artist/sales person who’s selling you the glitter. Also please be careful if you’re wearing contacts and using glitter on your eyes!
As I said in my previous post, I will not be posting the step-by-step instruction, instead you’ll get the usual photos and product list only. This is a scheduled post, so for any questions, go to my Instagram if you need a quick response.
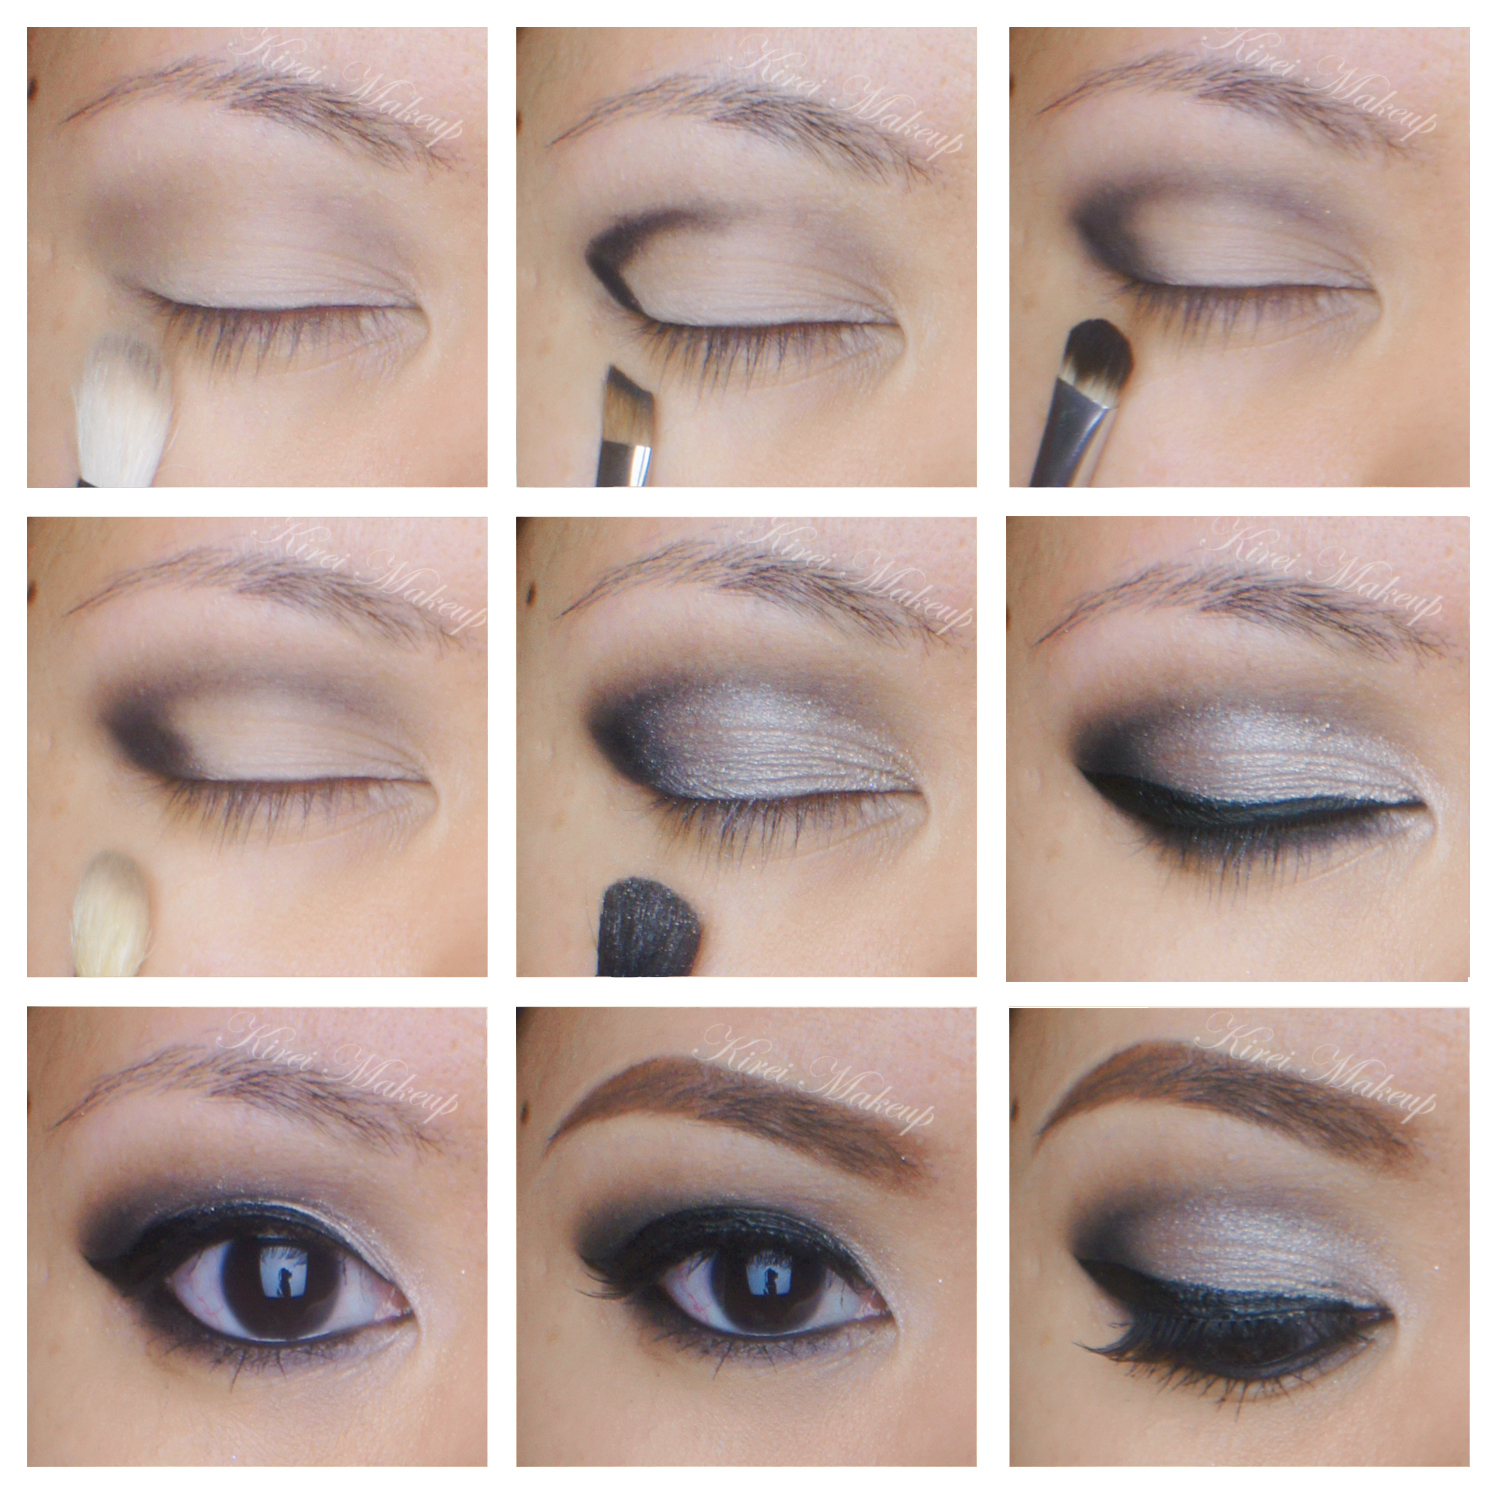
For the glitter, I applied it onto my eyes using a wet angled eyeliner brush. However, if you can find a mixing medium (e.g. MAC), that’d probably be better since I found that when the water evaporated from the glitter, it became apparent that the glitter started to fall all over my lashes and then to my face.
Another tip when using glitter and it falls on your face, use a tape to pick it up – just press it lightly to your face and it’ll pick up all the fallen glitters. If you have no tape around, use a CLEAN SPOOLY (aka mascara wand) to get rid of the glitter – just brush it in places where the glitter has fallen, use the tip of the wand if it is a stubborn one.
 Please check out my how-to winged eyeliner tutorial if you need help. I also have another glitter eyeliner tutorial that’s slightly easier and simpler.
If you prefer a full on glitter makeup, please check out my Christmas inspired makeup, and last year’s gold glitter makeup tutorial.
Products used
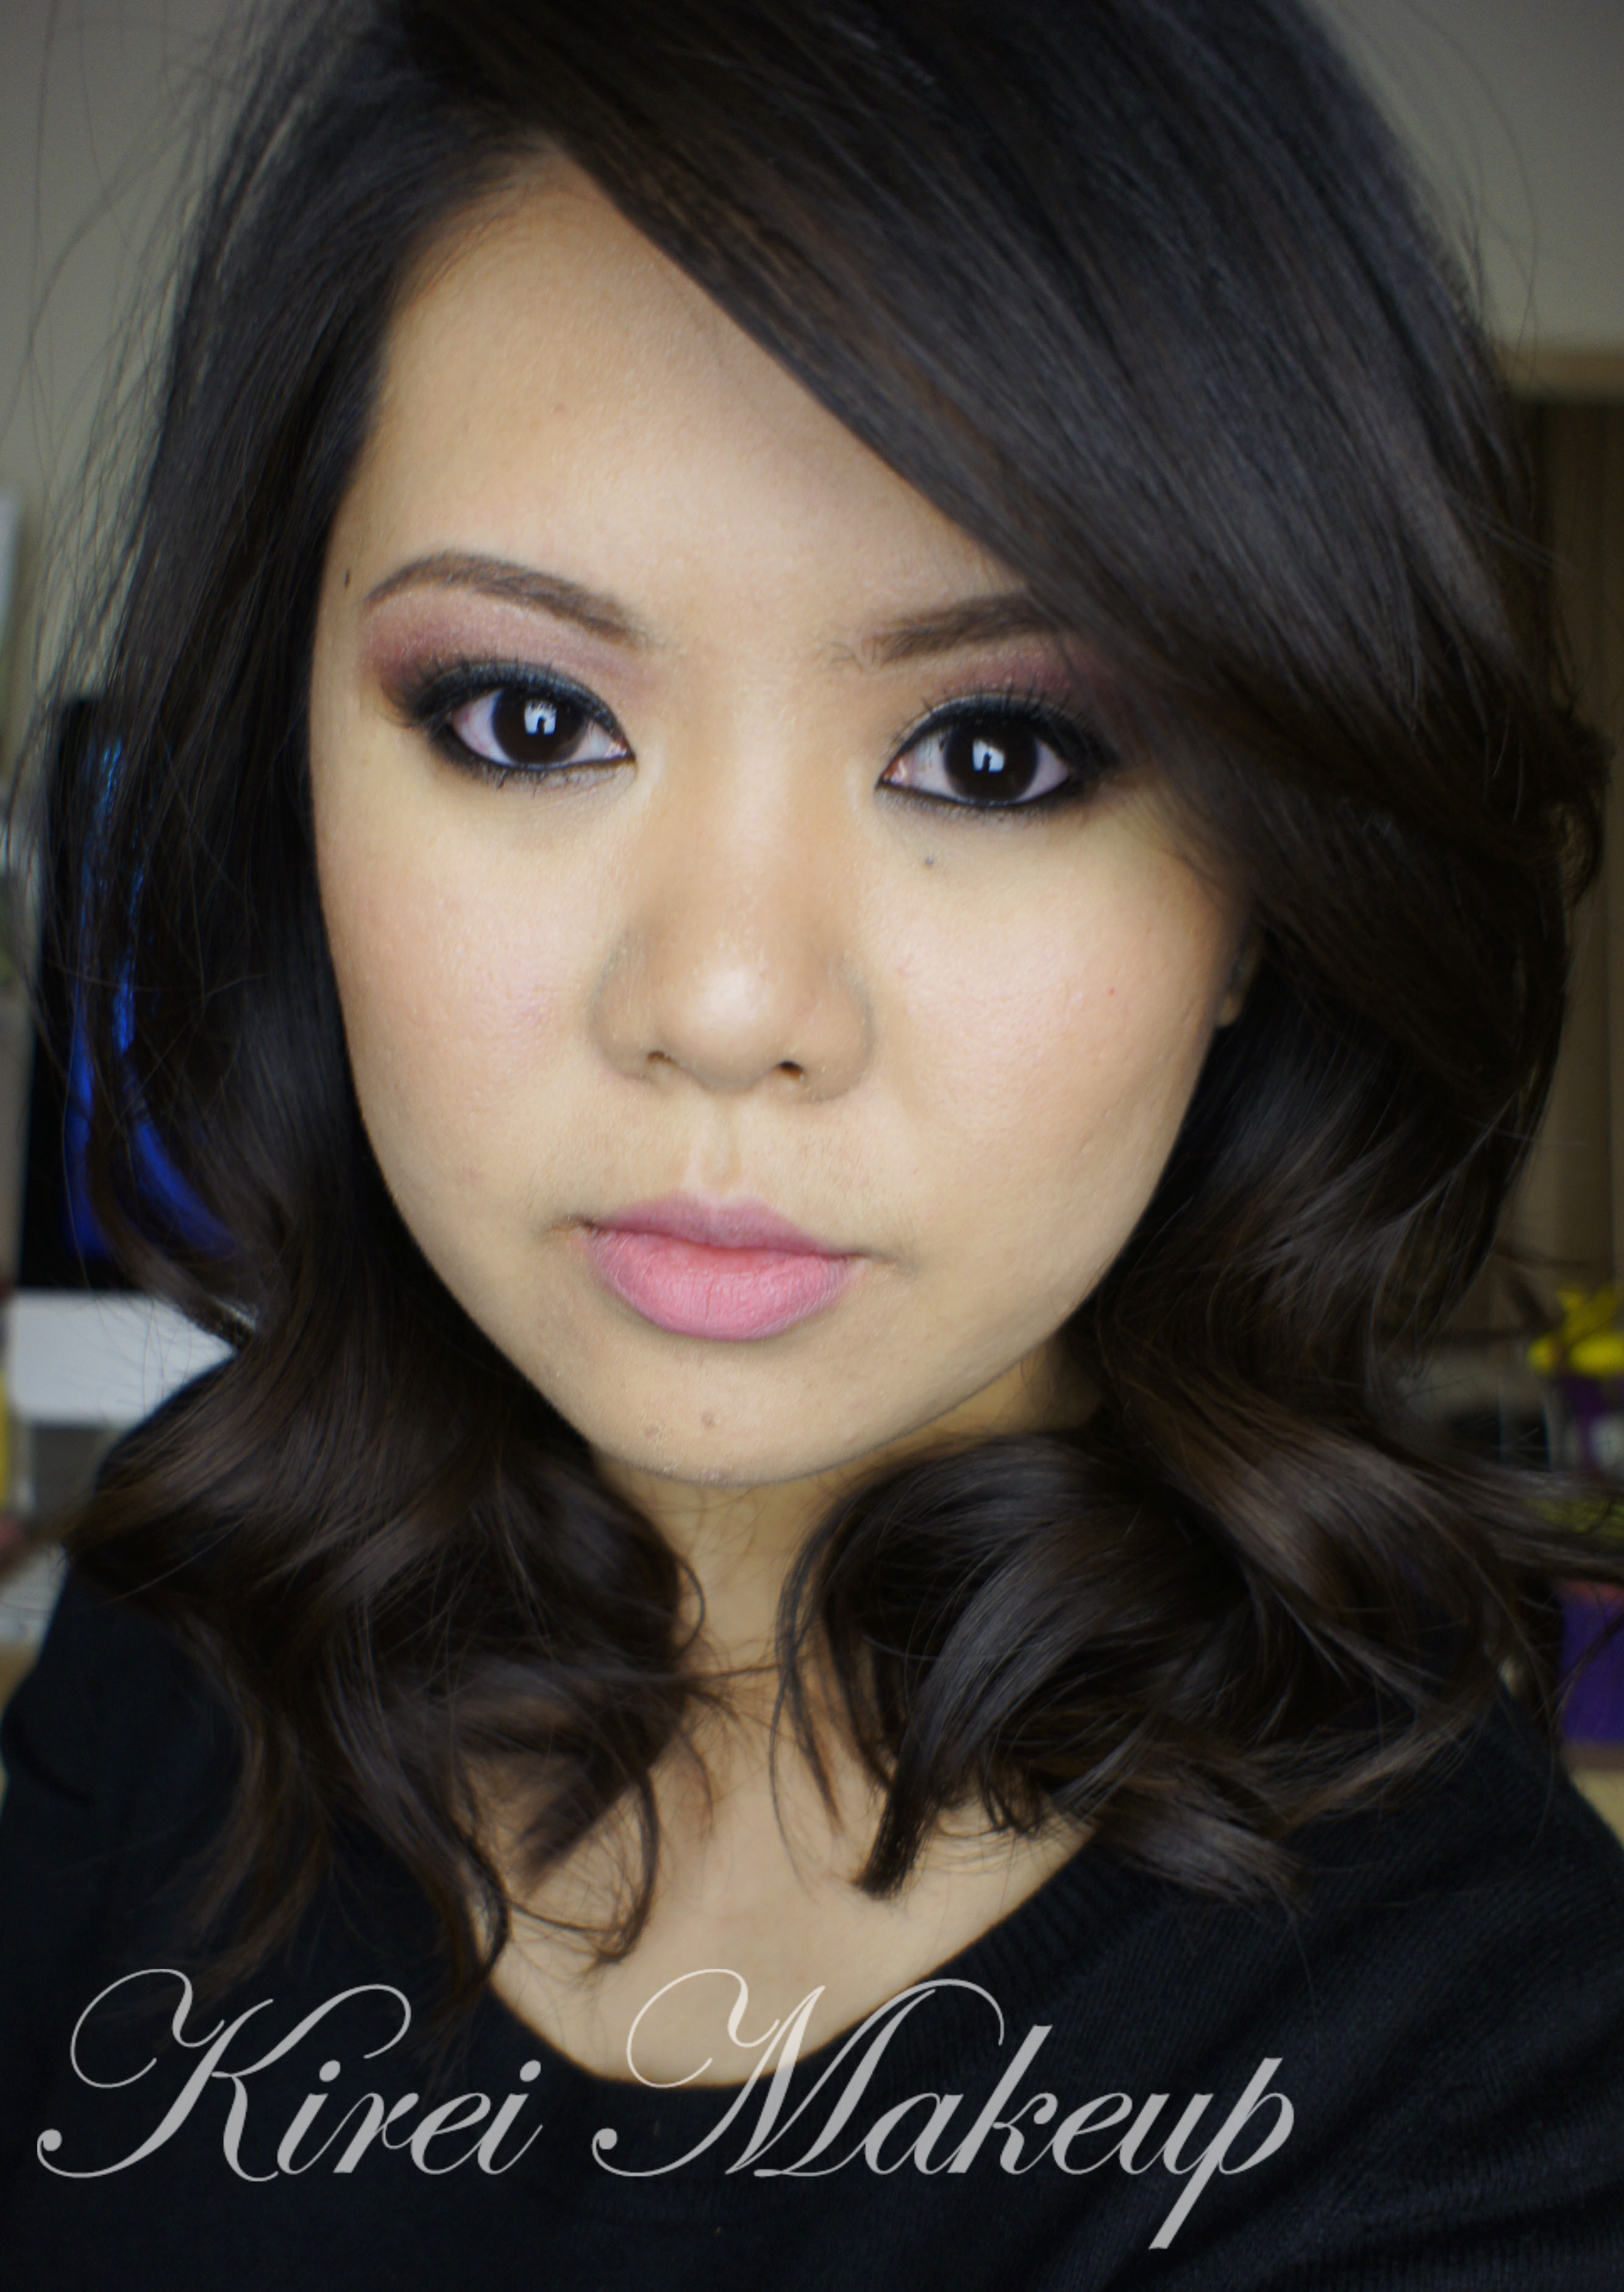
Eyes – Urban Decay Primer Potion; Make-Up Store Smog eyeshadow (crease), Make-Up Store Desert eyeshadow (transition color); Too Faced Chocolate Bar Palette (outer v – Triple Fudge); MUFE Aqua Black; L’oreal Voluminous Smoldering eyeliner; Make-Up Store Northern Lights glitter; Gwiyomi False Eyelashes; Chanel brow pencil
Face – MAC Pro Long-Wear foundation and concealer; MUFE Pro Finish powder.
Cheeks – Chanel Universal Bronzer; Smashbox Halo Blush in In Bloom.
Lips – MUFE Aqua lip pencil #18C
Berry Lips with Revlon Smitten Balm Stain
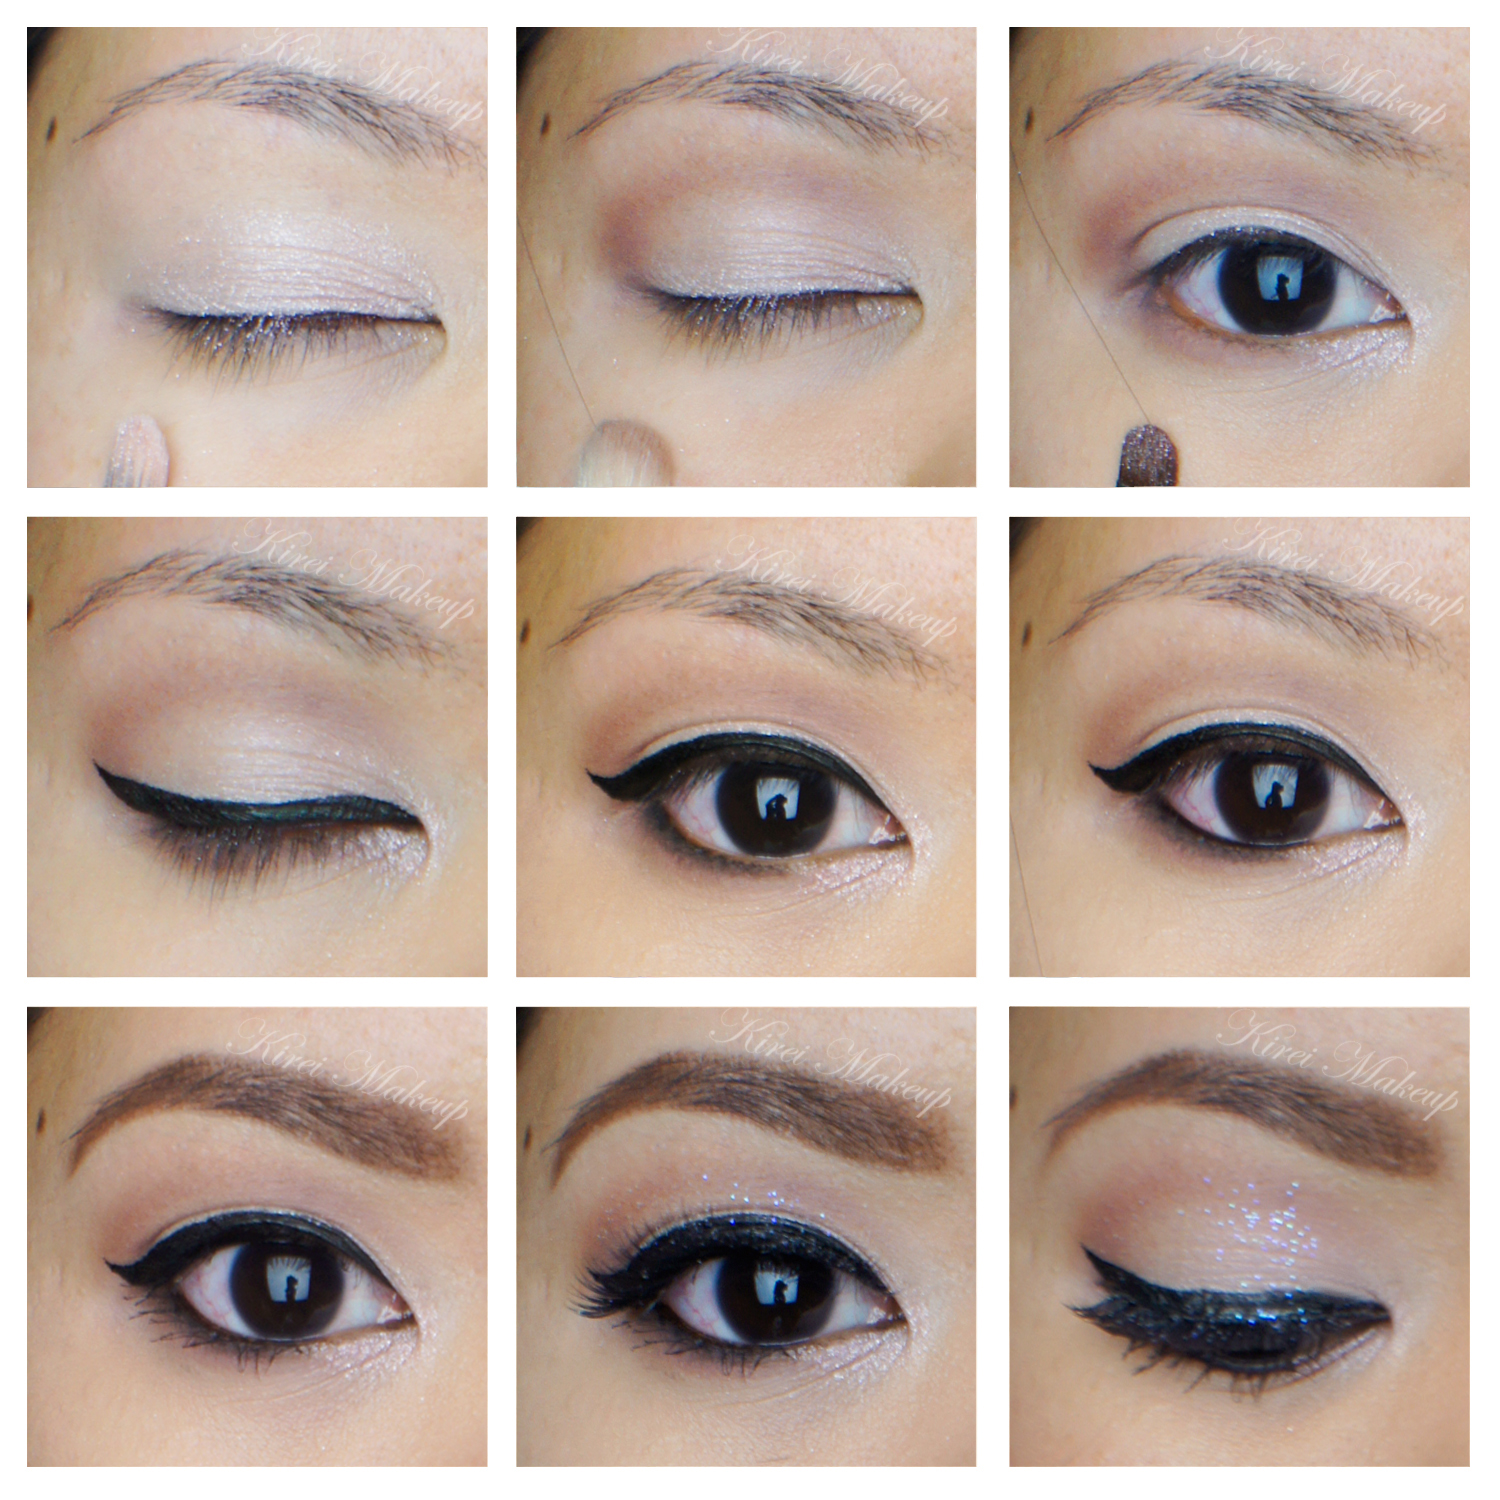
Happy New Year 2014, everyone! I hope this year would be an even greater and much more awesome year than 2013! I wanted to post this Berry Lips look since I wore it for NYE, and I think it’ll be a good tutorial to start of 2014. This look is very simple and easy, and no matter where you are you can definitely wear it. I added a little touch of glitter on the eyes for an extra playfulness, after all glitter is so fabulous!
For my eyes, I used UD Naked 3, which as you all know, has been my fav.! I’ve done 2 other tutorials prior to this post using Naked 3 in Rose Smoky Eyes and UD Naked 3 look #2. The other 2 geared more on the smoky side, while on this one it’s more natural looking.
For the berry lips, I decided to skip my usual red, pink, and burgundy. Instead, I decided to wear a berry lip stain to keep my lips moisturized and not having to worry about having to touch up throughout the night, or stain anything. It was low maintenance, and I just love how the Revlon Just Bitten Kissable Balm Stain keep my lips moist without feeling sticky.
How-to:
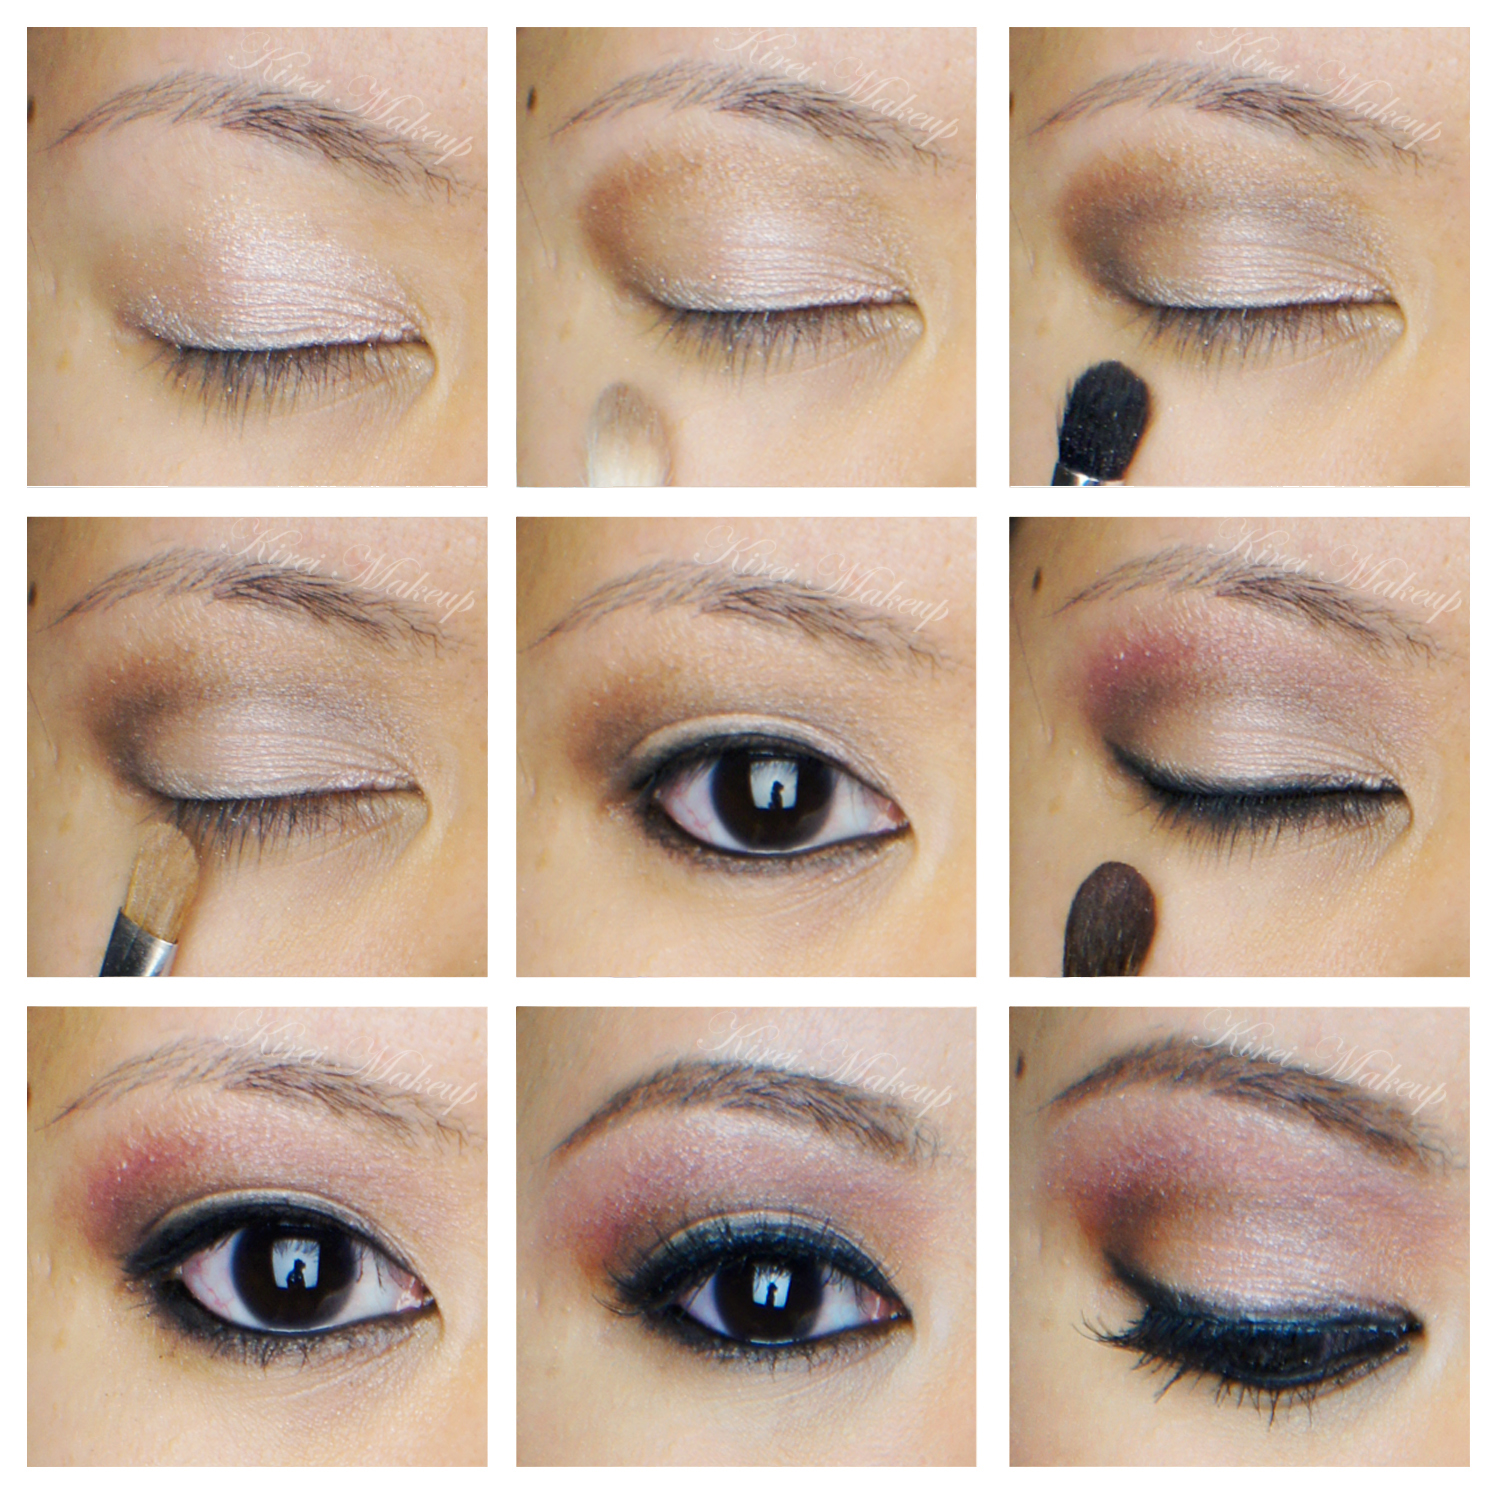
1. I prepped my lids by applying UD Primer Potion, and then applied Dust from UD Naked 3 with a flat eyeshadow brush.
2. Using a fluffy blending brush, I applied Nooner from UD Naked 3.
3. I ran Nooner along the lower lash line using a small shader brush. I also applied Dust on my tear duct.
4. I created a winged liner using Kanebo Kate Super Sharp eyeliner.
5. I lined my lower lash line, very close to the lashes, using Crave from UD Naked Basics.
6. I lined my waterline using L’oreal Voluminous Smoldering eyeliner. (you can use beige or white if you prefer)
7. I curled my lashes and applied Clinique High Impact mascara on both upper and lower lashes. I also added falsies for fun.
8. I filled my brows using Anastasia Brow wiz in Brunette, and then the brow powder.
9. Using a dry synthetic brush, I applied white glitter on my eyelid for extra shine. If you want to pack the glitter on like in my Glitter Holiday Makeup, use a wet damp brush.
10. On my face, I used Giorgio Armani Foundation. I applied it using a foundation brush.
11. I contoured my face using Smashbox Contour palette.
12. On my cheeks, I applied MAC Dainty.
13. On my lips, I applied Revlon Just Bitten Kissable Balm Stain in Smitten. I dabbed excess off using my ring finger.
NYE Makeup Using Smashbox Full Exposure Palette
For this NYE Makeup tutorial, I decided to use my Smashbox Full Exposure palette, which I love! I’ve done a review/swatch post on Smashbox Full Exposure Palette Review. I’ve also done a few tutorial using the same palette in Smashbox Full Exposure Look #1 and Smokey Eyes using Smashbox Full Exposure Palette.
I wanted to create a more cat-eye effect with this smoky eye look, so if you want to create a more rounded smoky eyes please check my Glitter Holiday Makeup. My step-by-step picture looks slightly out of focus, that’s because I did not realize that my lens was dirty! So, my apologies if the pictures are not clear.
How-to:
1. I prepped my lids using UD Primer Potion.
2. I applied M6 on the crease using a blending brush.
3. Using an angled eyebrow brush, I applied M7 on the outer V.
4. Using a clean small shader brush, I blended M7 towards the inner part of the eyes.
5. I repeated step 3 and 4 until I get that outer V really dark.
6. Using a fluffy blending brush, I applied M5 slightly above the crease.
7. Using a flat eyeshadow brush, I applied S6 on the eyelid, and S4 just on the inner tear duct.
8. I created a thick winged eyeliner using Kanebo Kate Super Sharp eyeliner.

9. Using an eyeliner brush, I lined my lower lid using M7.
10. I lined my waterline using L’oreal Voluminous Smoldering eyeliner.
11. I curled my lashes and applied Tarte Lights, Camera, Flashes mascara on both upper and lower lashes. I also applied false eyelashes.
12. I filled my brows using Anastasia Brow Powder in Brunette.
13. I applied Marc Jacobs Gel Foundation on my face using CoverFX Cream Foundation.
14. I applied MAC Dainty blush on my cheeks.
15. I also applied Revlon Socialite lipstick on my lips.
New Year 2014 Makeup #1
Today’s tutorial is not really intended to be a tutorial. I just bought a bunch of makeup products from Sephora and MAC – foundation and lipstick, so I wanted to play around with it.
As you all know, this coming Spring 2014 Pantone Color of the Year is Radiant Orchid. For my look #1 New Year 2014 Makeup, I wanted to incorporate a little bit of purple into the look, but still want to make it very wearable. I used Sleek Makeup iDivine Showstopper in Sparkle just very lightly above my crease to add the color.
*A note about Sleek Makeup Showstoppers palette: the names of the eyeshadows that come with my palette somehow do not match the eyeshadow colors itself. So, I googled up this palette and it seems that other bloggers have, what I feel, is the correct match. For this reason, I’m going to follow the “correct” name instead of the ones that came on my palette.
I actually didn’t plan to add the purple color above my crease, but I decided to at the very last minute. If you decide to use this look, feel free to change the second step from this tutorial – use purple instead of the brown.
How-to:
1. I prepped my lids using Chanel Illusion d’Ombre in Emerveille. You can use any primer you like.
2. Using a fluffy blending brush, I applied the bronze (middle color) eyeshadow from Ombres Matelassees de Chanel – Charming just slightly above the crease.
3. Using Sephora Pro Visionary Bullet Crease, I applied the 2nd darkest color from Ombres Matelassees de Chanel – Charming on the outer V and on my crease.
4. Using a flat eyeshadow brush, I applied the lightest color from Ombres Matelassees de Chanel – Charming on my eyelid.
5. I lined my waterline, tightline, upper and lower lashline using L’oreal Voluminous Smoldering eyeliner.
6. Using a clean fluffy blending brush, I applied Sparkle eyeshadow from Sleek Makeup Showstopper right above my crease.
7. Using a large angled eyebrow brush, I applied Noir eyeshadow from Sleek Makeup Showstopper on the lower lash line.
8. I curled my lashes and applied L’oreal Carbon Black mascara on both upper and lower lashes.
9. I applied Ardell 109 false eyelashes on the upper lash line.
10. I filled my brows using Anastasia Brow Wiz in Brunette.
11. Under my brows (not in picture), I applied the lightest color from Ombres Matelassees de Chanel – Charming using a clean blending brush. I did this to blend out the purple eyeshadow.
12. My hair is set using velcro rollers.
12. I applied Giorgio Armani Maestro foundation all over my face using a Sigma Round Kabuki Brush.
13. I contoured my face using Smashbox Contour/Highlight trio palette (discontinued), and I applied MAC Dainty blush on the cheeks.
14. On my lips, I applied MAC Please Me lipstick.
For a different look using the Sleek Makeup iDivine Showstopper palette, you can check my Smoky Purple Tutorial.