Marylin Inspired

Hellow! I’m back this week with a 50s inspired makeup! Actually there’s a beauty blogger challenge this month in which the theme was Dazzling like Marylin. I’m not sure if I’m gonna join the challenge, I was just running out of some inspiration for tutorials, thus why I made this tutorial..hahaha.. 😛

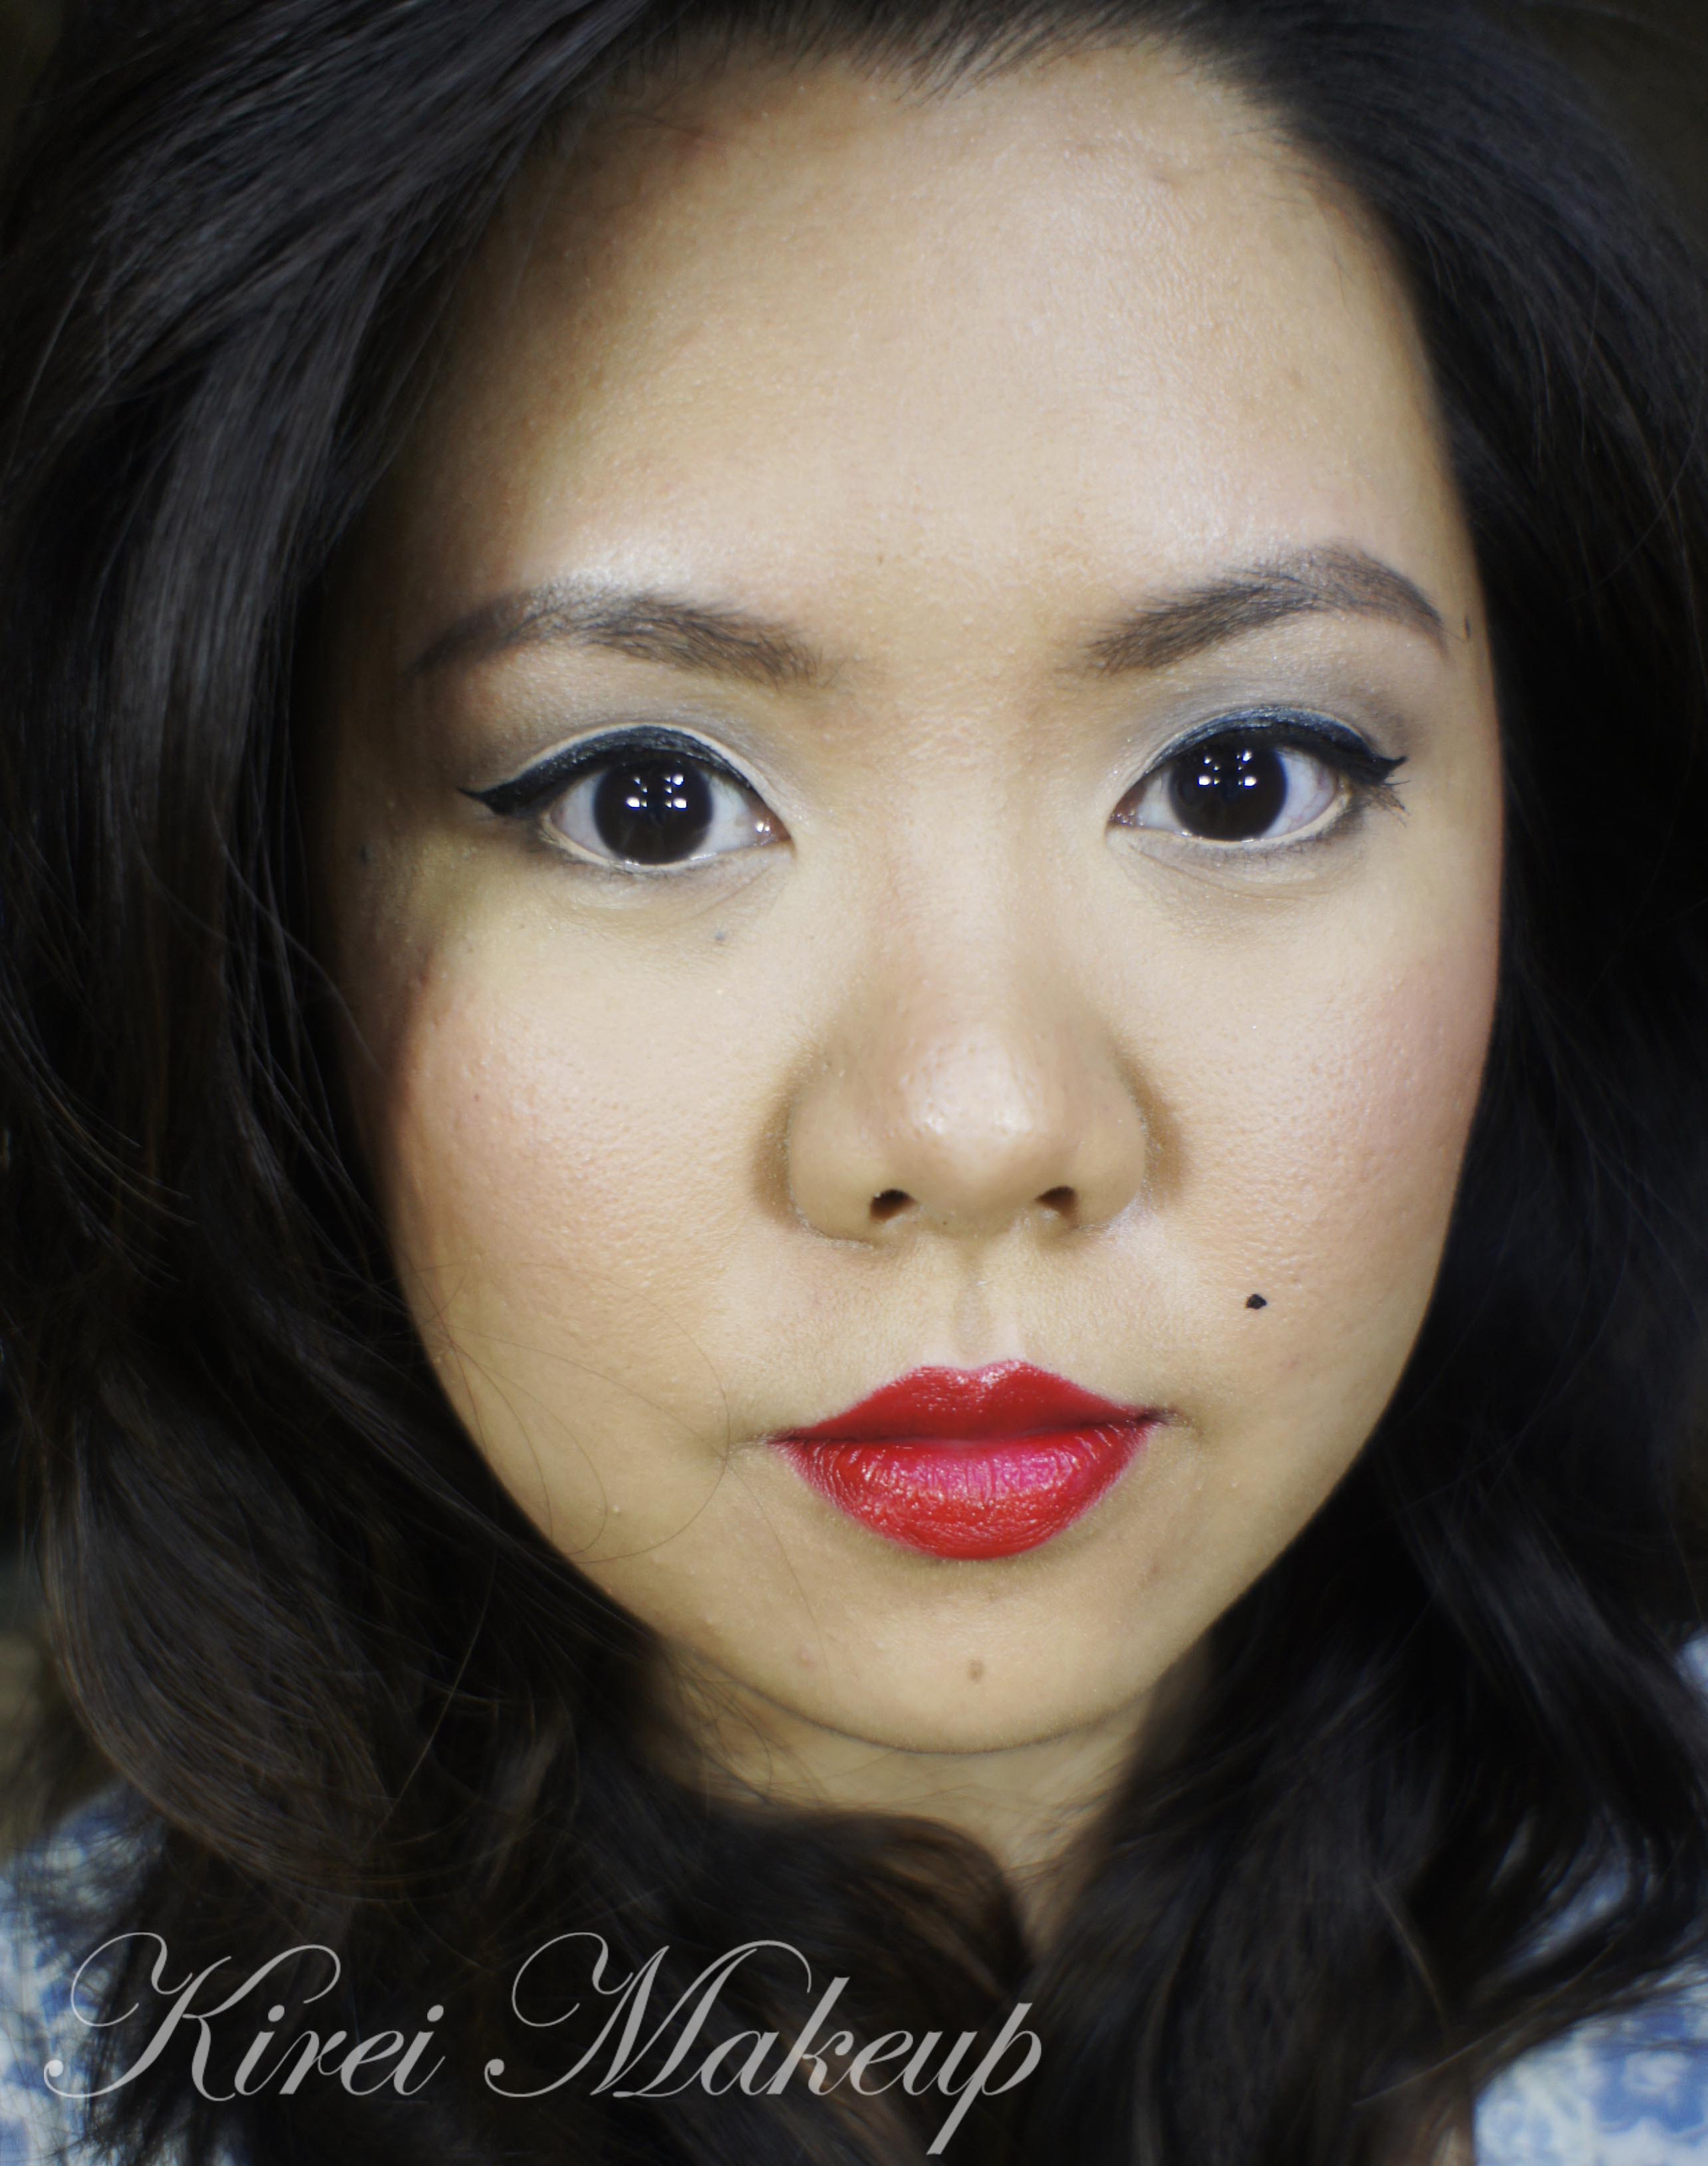
Anyways, as we all know Marylin Monroe is an icon. The first image that comes to mind when someone said Marylin is probably her gorgeous smile, red lips and those sleepy eyes, and obviously her blonde hair. OBVIOUSLY, I’m not Marylin, nor do I look like her. This is an inspired makeup, not supposed to look exactly like her. I’ve to adjust the makeup to suit my face.

I wanted to do the falsies with individual lashes, but I’ve run out of it, so I had to use this one with long wispy corner at the end from Make Up For Ever. The brows in the 50s are more triangular shaped, so I had to re-shape my brows a little since mine aren’t angular.

How-t0:

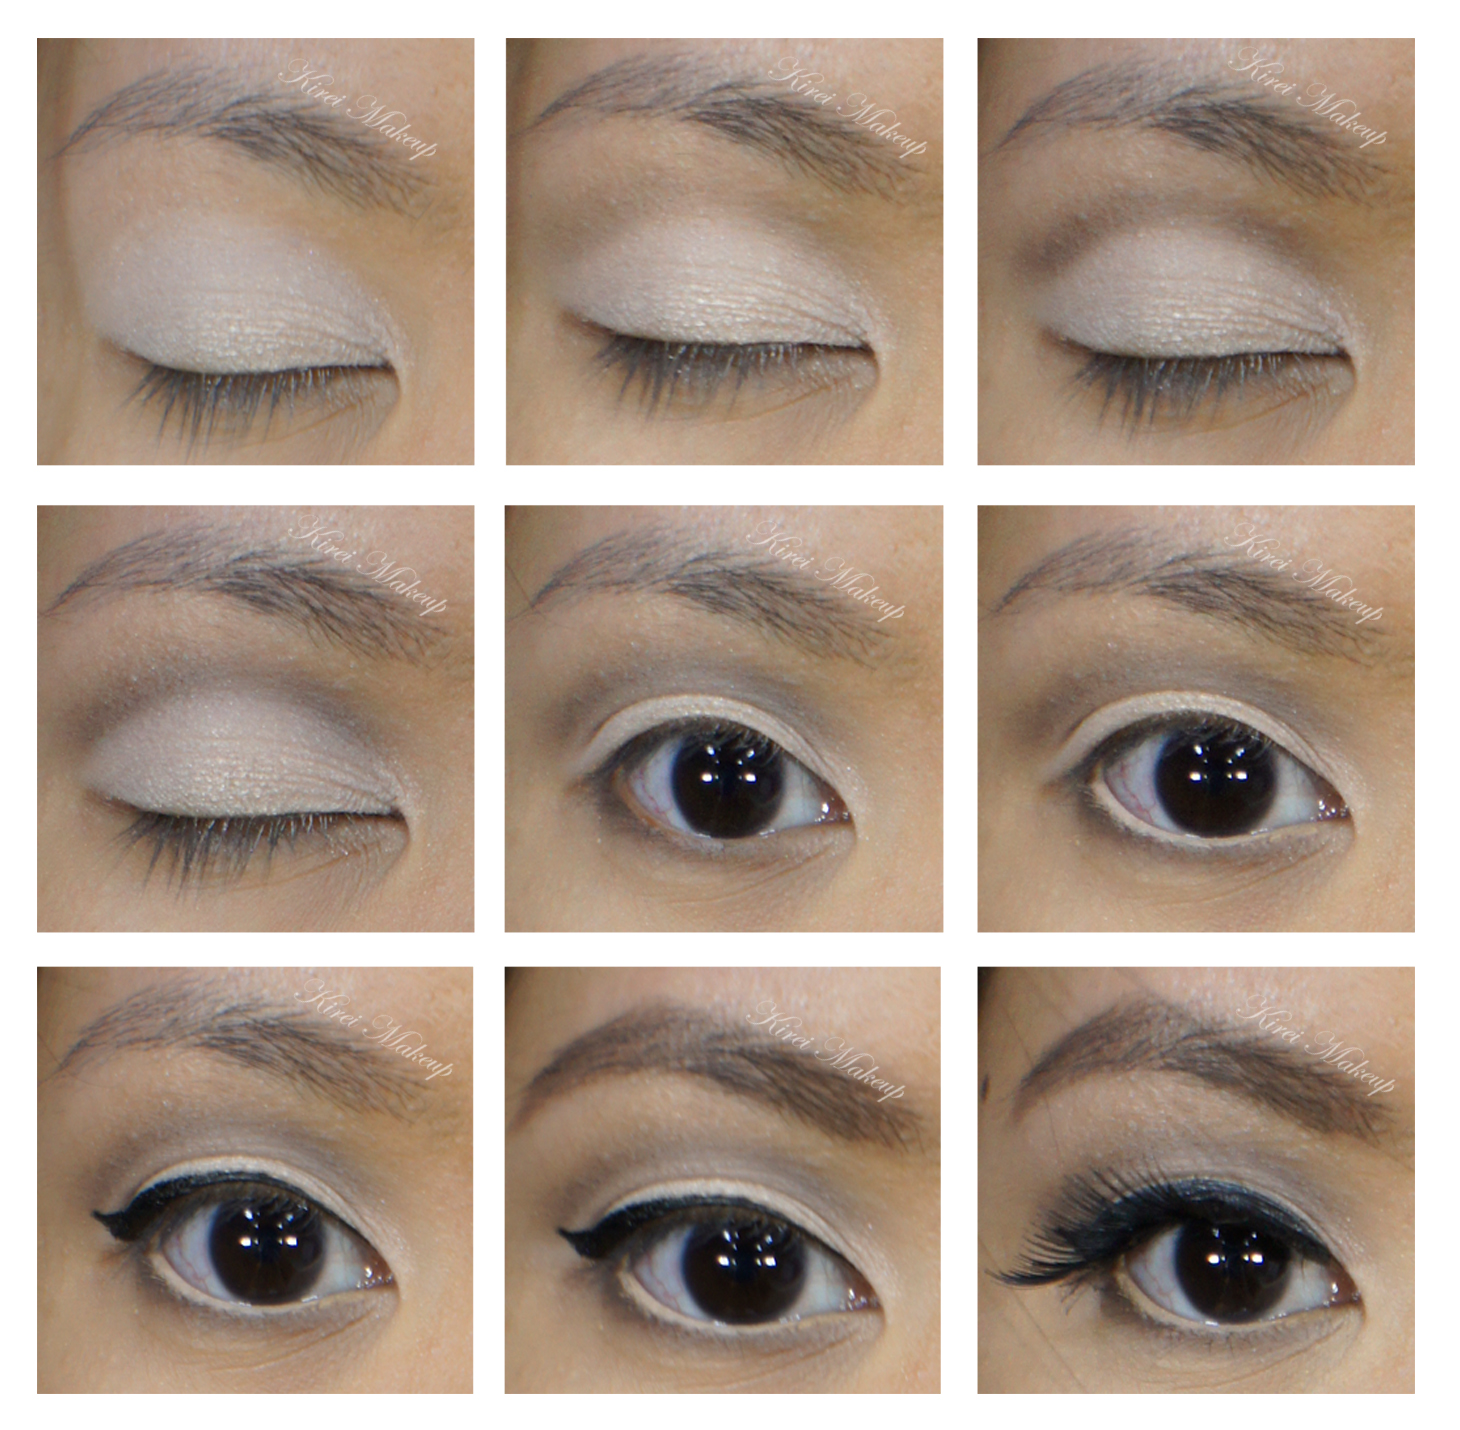
1. I applied MAC Blanc Type all over my eyelid using a flat eyeshadow brush.

2. Using a clean blending brush (MAC 217), I applied MAC Omega just slightly above the crease lightly.

3. Using a small blending brush, I applied MAC Brun on the crease.

4. With a MAC 217, I blended out MAC Brun on the crease so it blends out.

5. I applied MAC Brun on the lower lid using a small angled eyeliner brush.

6. For the waterline, I applied MAC Chromagraphic eyeliner in NC30.

7. I lined my upper lashline using Kat Von D Trooper liquid liner.

8. Lashes are curled and I applied L’oreal Voluminous Carbon black mascara on both top and bottom lashes.

9. I applied Make Up For Ever falsies 125 on upper lashes.

10. I filled my brows using a mixture of MAC Omega and MAC Brun, filled them in with an angled brow brush.

cat liner

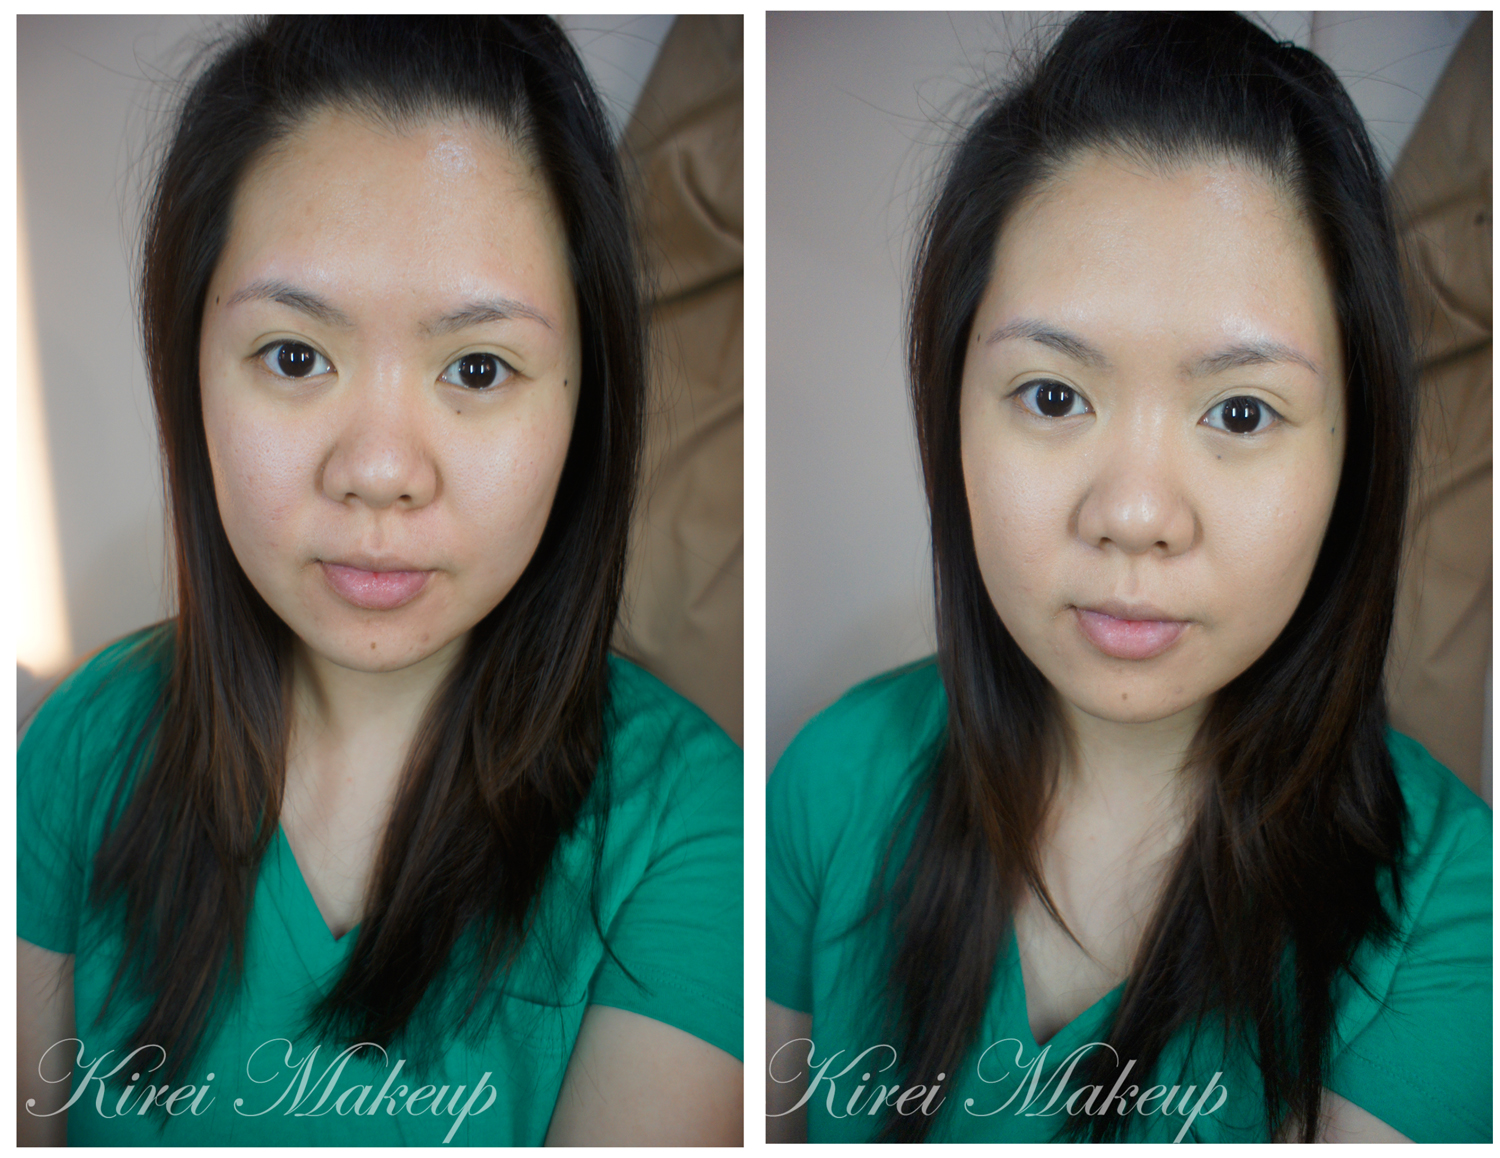
11. For the face, I applied Make Up For Ever Pro Finish in 118 all over my face using a round kabuki brush from Sigma.

12. For under the eyes, I applied MAC studio finish concealer in NC30.

13. For contour, I used MAC Blunt blush on the hollows of the cheeks, temples and sides of the nose.

14. For the cheeks, I applied NARS Matahari on the apples lightly. Blush intensity is adjusted after I applied red lips to ensure my face does not look washed off.

15. For the lips, I filled it in with MAC Redd lipliner and applied OCC Stalker lip tar on top of it.

16. For the fake mole, I dotted my face using Kat Von D Trooper eyeliner.

marylin monroe makeup

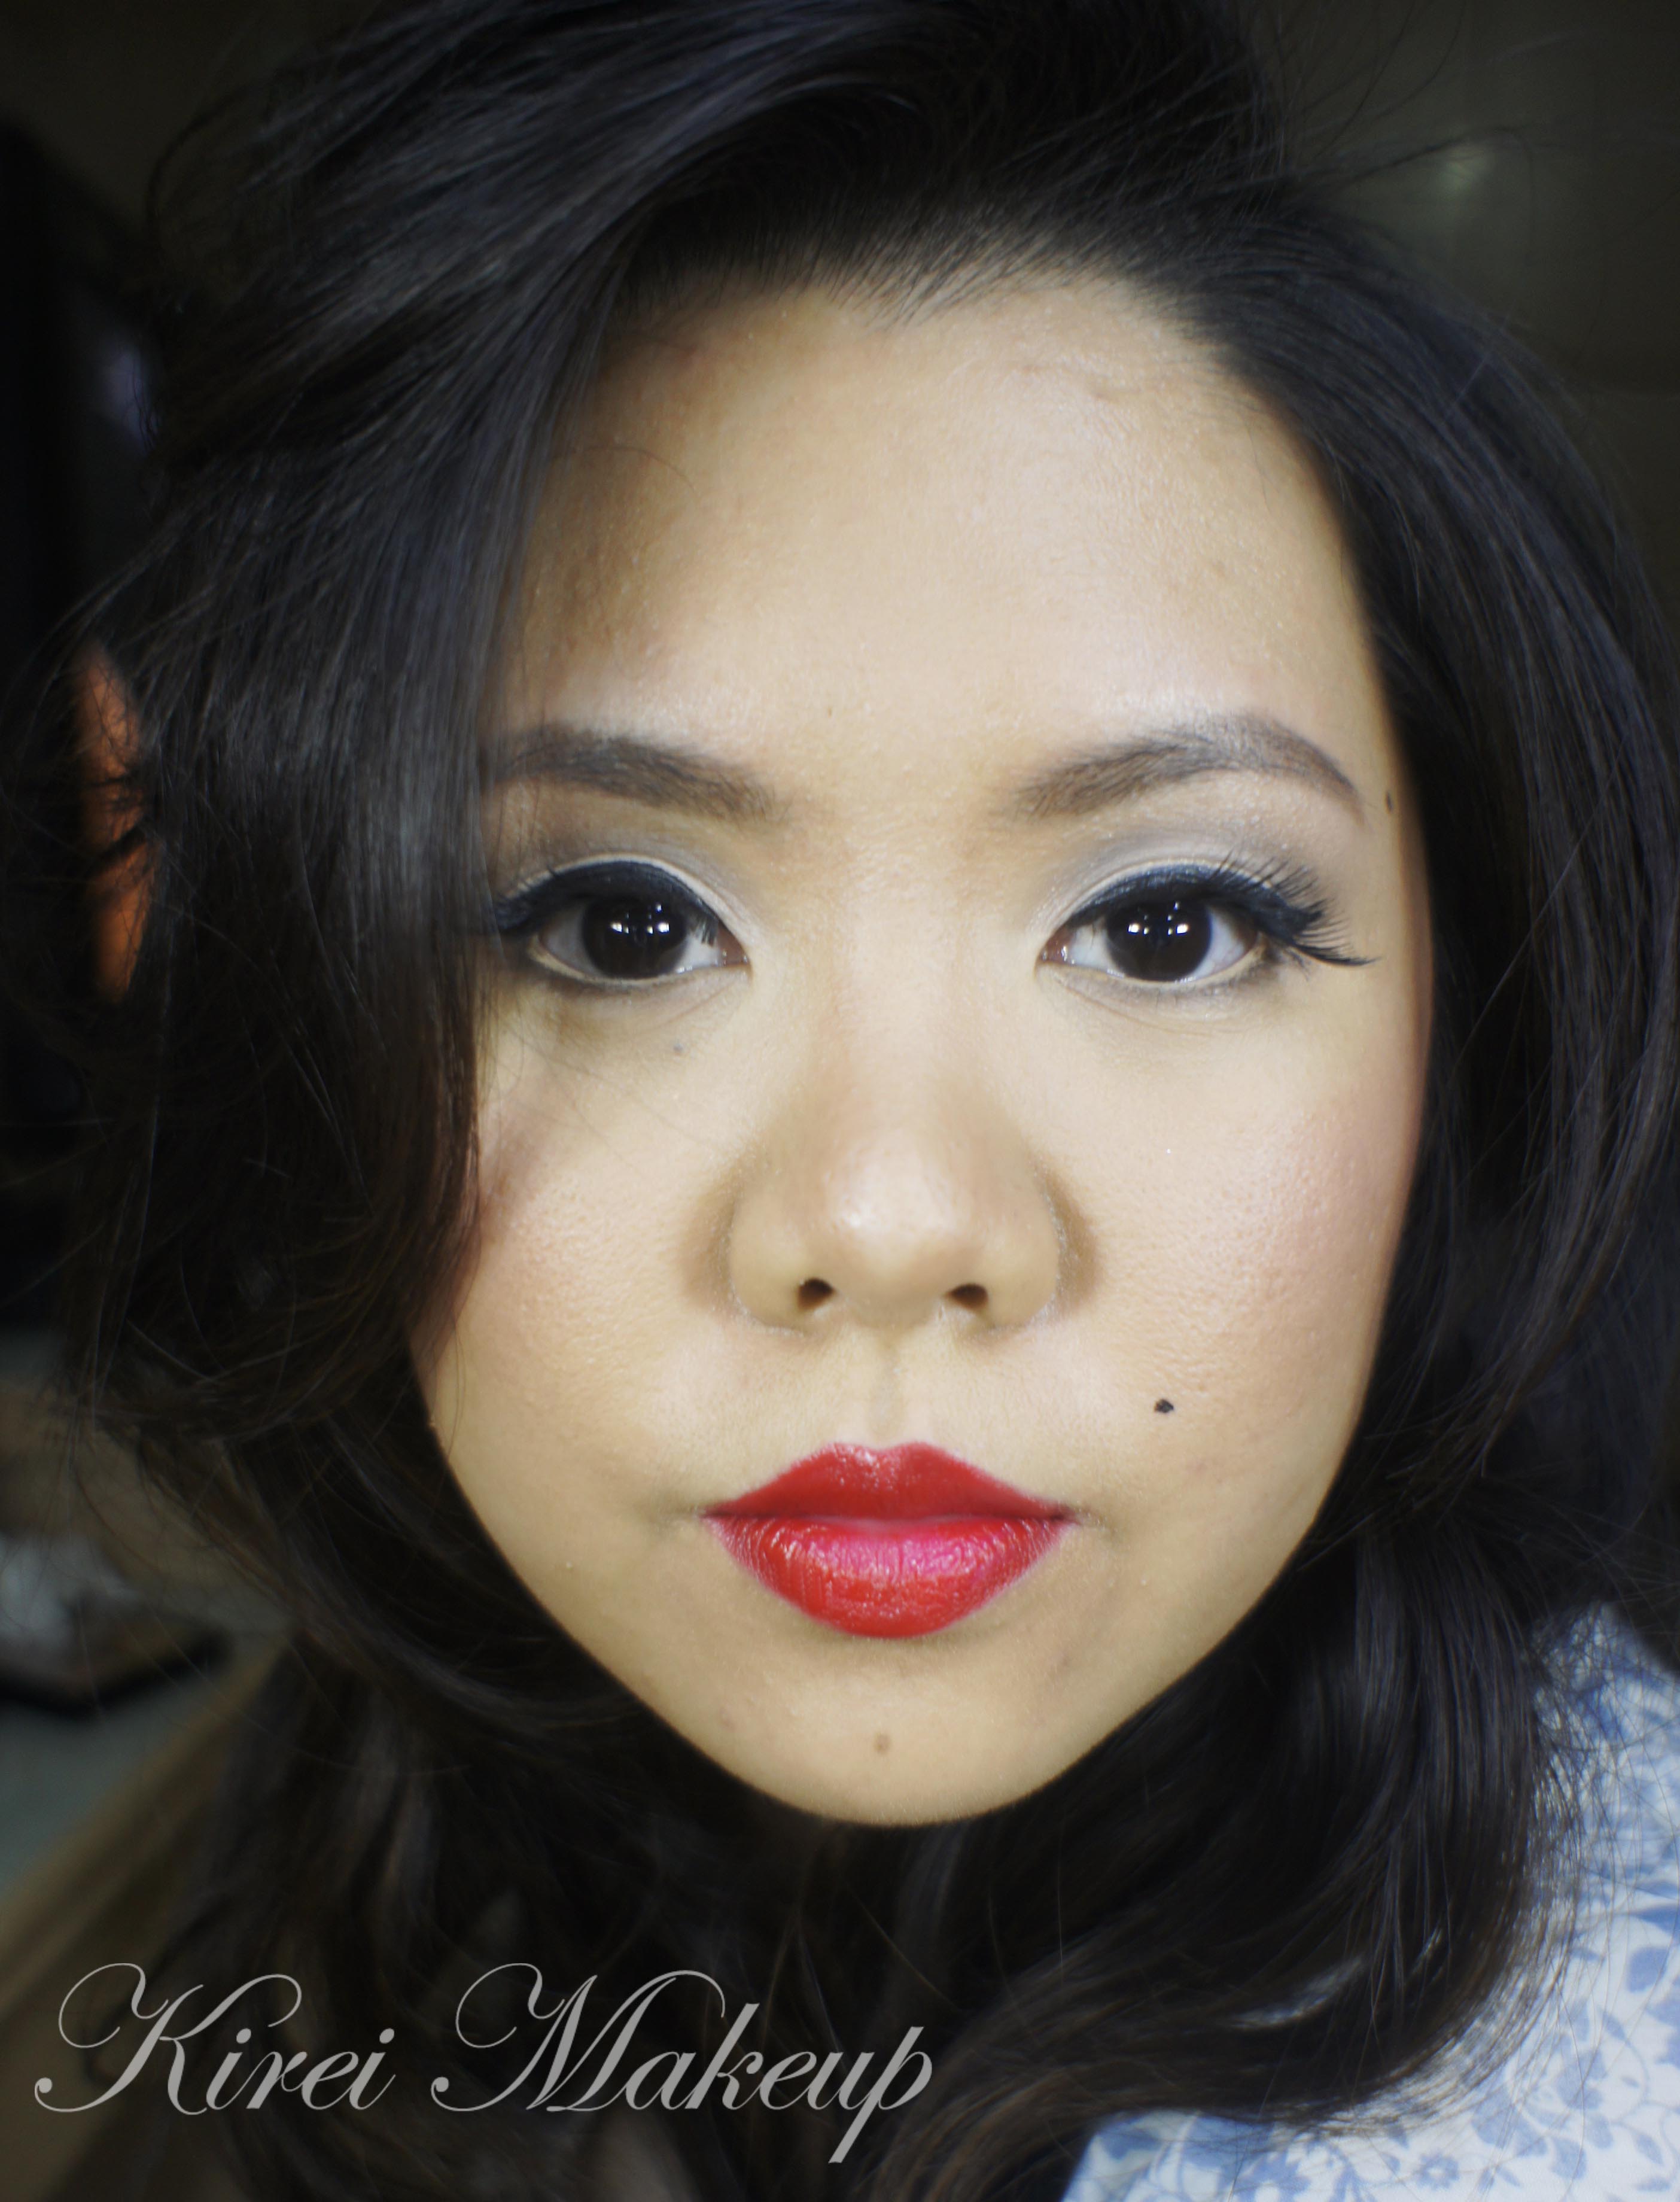
Photo below is without the falsies. Quite wearable, don’t you think? For parties, may be? 😀

marylin monroe makeup

Product of The Week: Urban Decay Naked Skin Foundation

The famous Urban Decay Naked Skin Foundation. I wanted it so bad last year, but alas it was released after I left Canada. As soon as I get the chance to step into Sephora when I arrived couple months a go, this was the first thing that I grabbed from the shelf.

Did it live up to my expectations? Absolutely! Just from the name itself, Naked Skin Weightless Ultra Definition Liquid Makeup, I expected this foundation to be more like Chanel Aqua Vitalumiere. From the website:

“Coverage without compromise. Our weightless formula blurs imperfections for a flawless finish that feels invisible, but looks professionally retouched.” (Urban Decay)

My first reaction when I saw this foundation was whether or not I should grab the Good Karma brush along with the foundation. I decided not to. The brush looked like Sigma Kabuki Round brush, and since I’ve so many brushes I decided not to buy it.

First impression of the foundation: watery consistency (just like Chanel Aqua Vitalumiere), love the packaging – sleek bottle, excellent undertones especially for my yellow Asian skin, very weird shade numbers. With the shades, anything that ends in a .0 is warm/yellow undertone, and anything with a .5 is cool/pink undertone. If you’re in between yellow and pink (aka neutral/beige), ask for samples for both foundation. Yellow undertones might be good to knock off some redness.

I’ve worn this foundation for tutorials and to go out in the winter weather. I’ve to say this is not a foundation for those with dry skin. Since my skin is combination, and since it’s winter here in Canada, my dry patches weren’t doing so great with this foundation. Probably I need to moisturize the skin a bit more. This foundation lasted a good 6hrs without powder (in the winter). I will give another update once I’m in Indonesia (warmer country).

The foundation feels extremely light, kinda like MAC Face and Body. However, unlike the MAC Face and Body, this foundation does not become thicker the more you rub it in to the skin, which I prefer. I like how it spreads thin on the face, and I can build more on it if needed.

The finish is not matte, surprisingly. I find this foundation to be more on a silky finish. It definitely knocked off all my redness, and somehow my pores seem smaller.

Pros:

  • Lightweight
  • Sheer to medium coverage
  • Excellent range of colors
  • Watery consistency
  • There’s a ball inside the bottle so you can give it a good shake before using it
  • Great for oily skin
  • NO SPF means no flashback!

Cons:

  • Pricy – cad$45 (excl. tax) in Canada
  • NO SPF means you need to apply SPF before foundation if you’re planning to go out in the sun

I’m wearing shade 4.0. For your reference, I’m MAC C3 on Face and Body, MAC NC27 on Studio Tech, mix of MAC NC 25 and 30 on Studio Fix Fluid, Smashbox 15-hours foundation in 2.3, and L’oreal a mix of W2 and W4 in Tru Match liquid foundation. I’m one of those people who don’t really have a perfect match on the MAC foundation, and I’m always in between colors. On top of that my face is darker than my neck and chest. So, I’m very happy that this foundation in 4.0 is pretty good for my color.

Urban Decay Naked Skin foundation