Night Out Makeup Tutorial

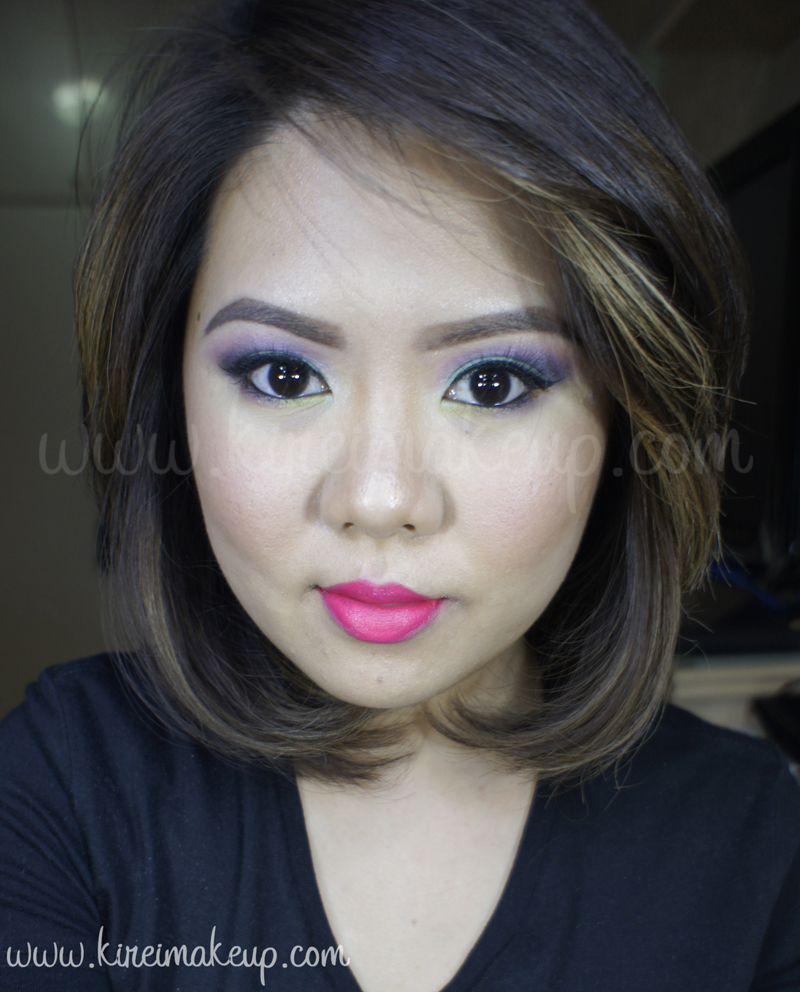
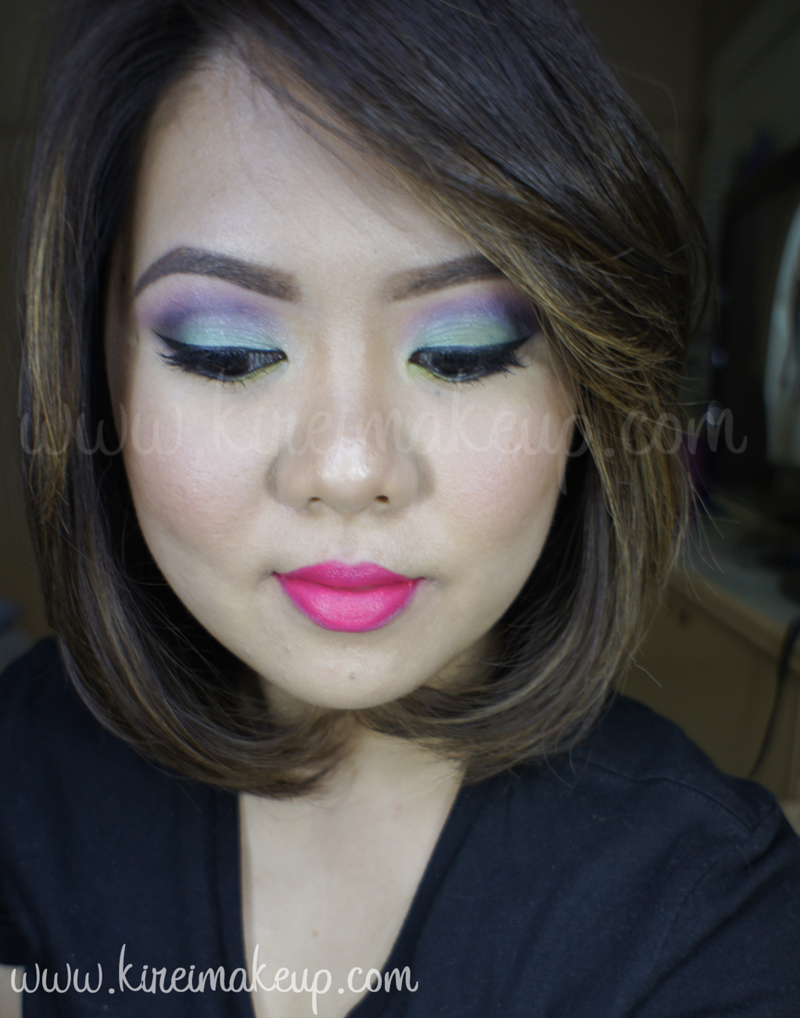
Today’s Night Out Makeup tutorial is a collaboration with Aria Resort in Las Vegas. I was approached by them to create a look for a night out in town. I took a look at pictures of their beautiful resort, and was inspired to do this gorgeous metallic smoky eyes. So, I used the picture below to create today’s look. I wanted to add more color, but decided to create something that’s more wearable instead. Perhaps next time, I’ll do a different look for Aria again.

Aria Resorts Las Vegas

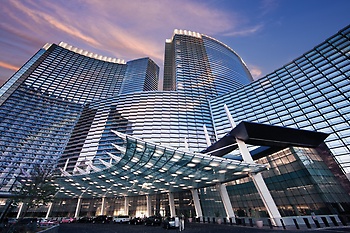
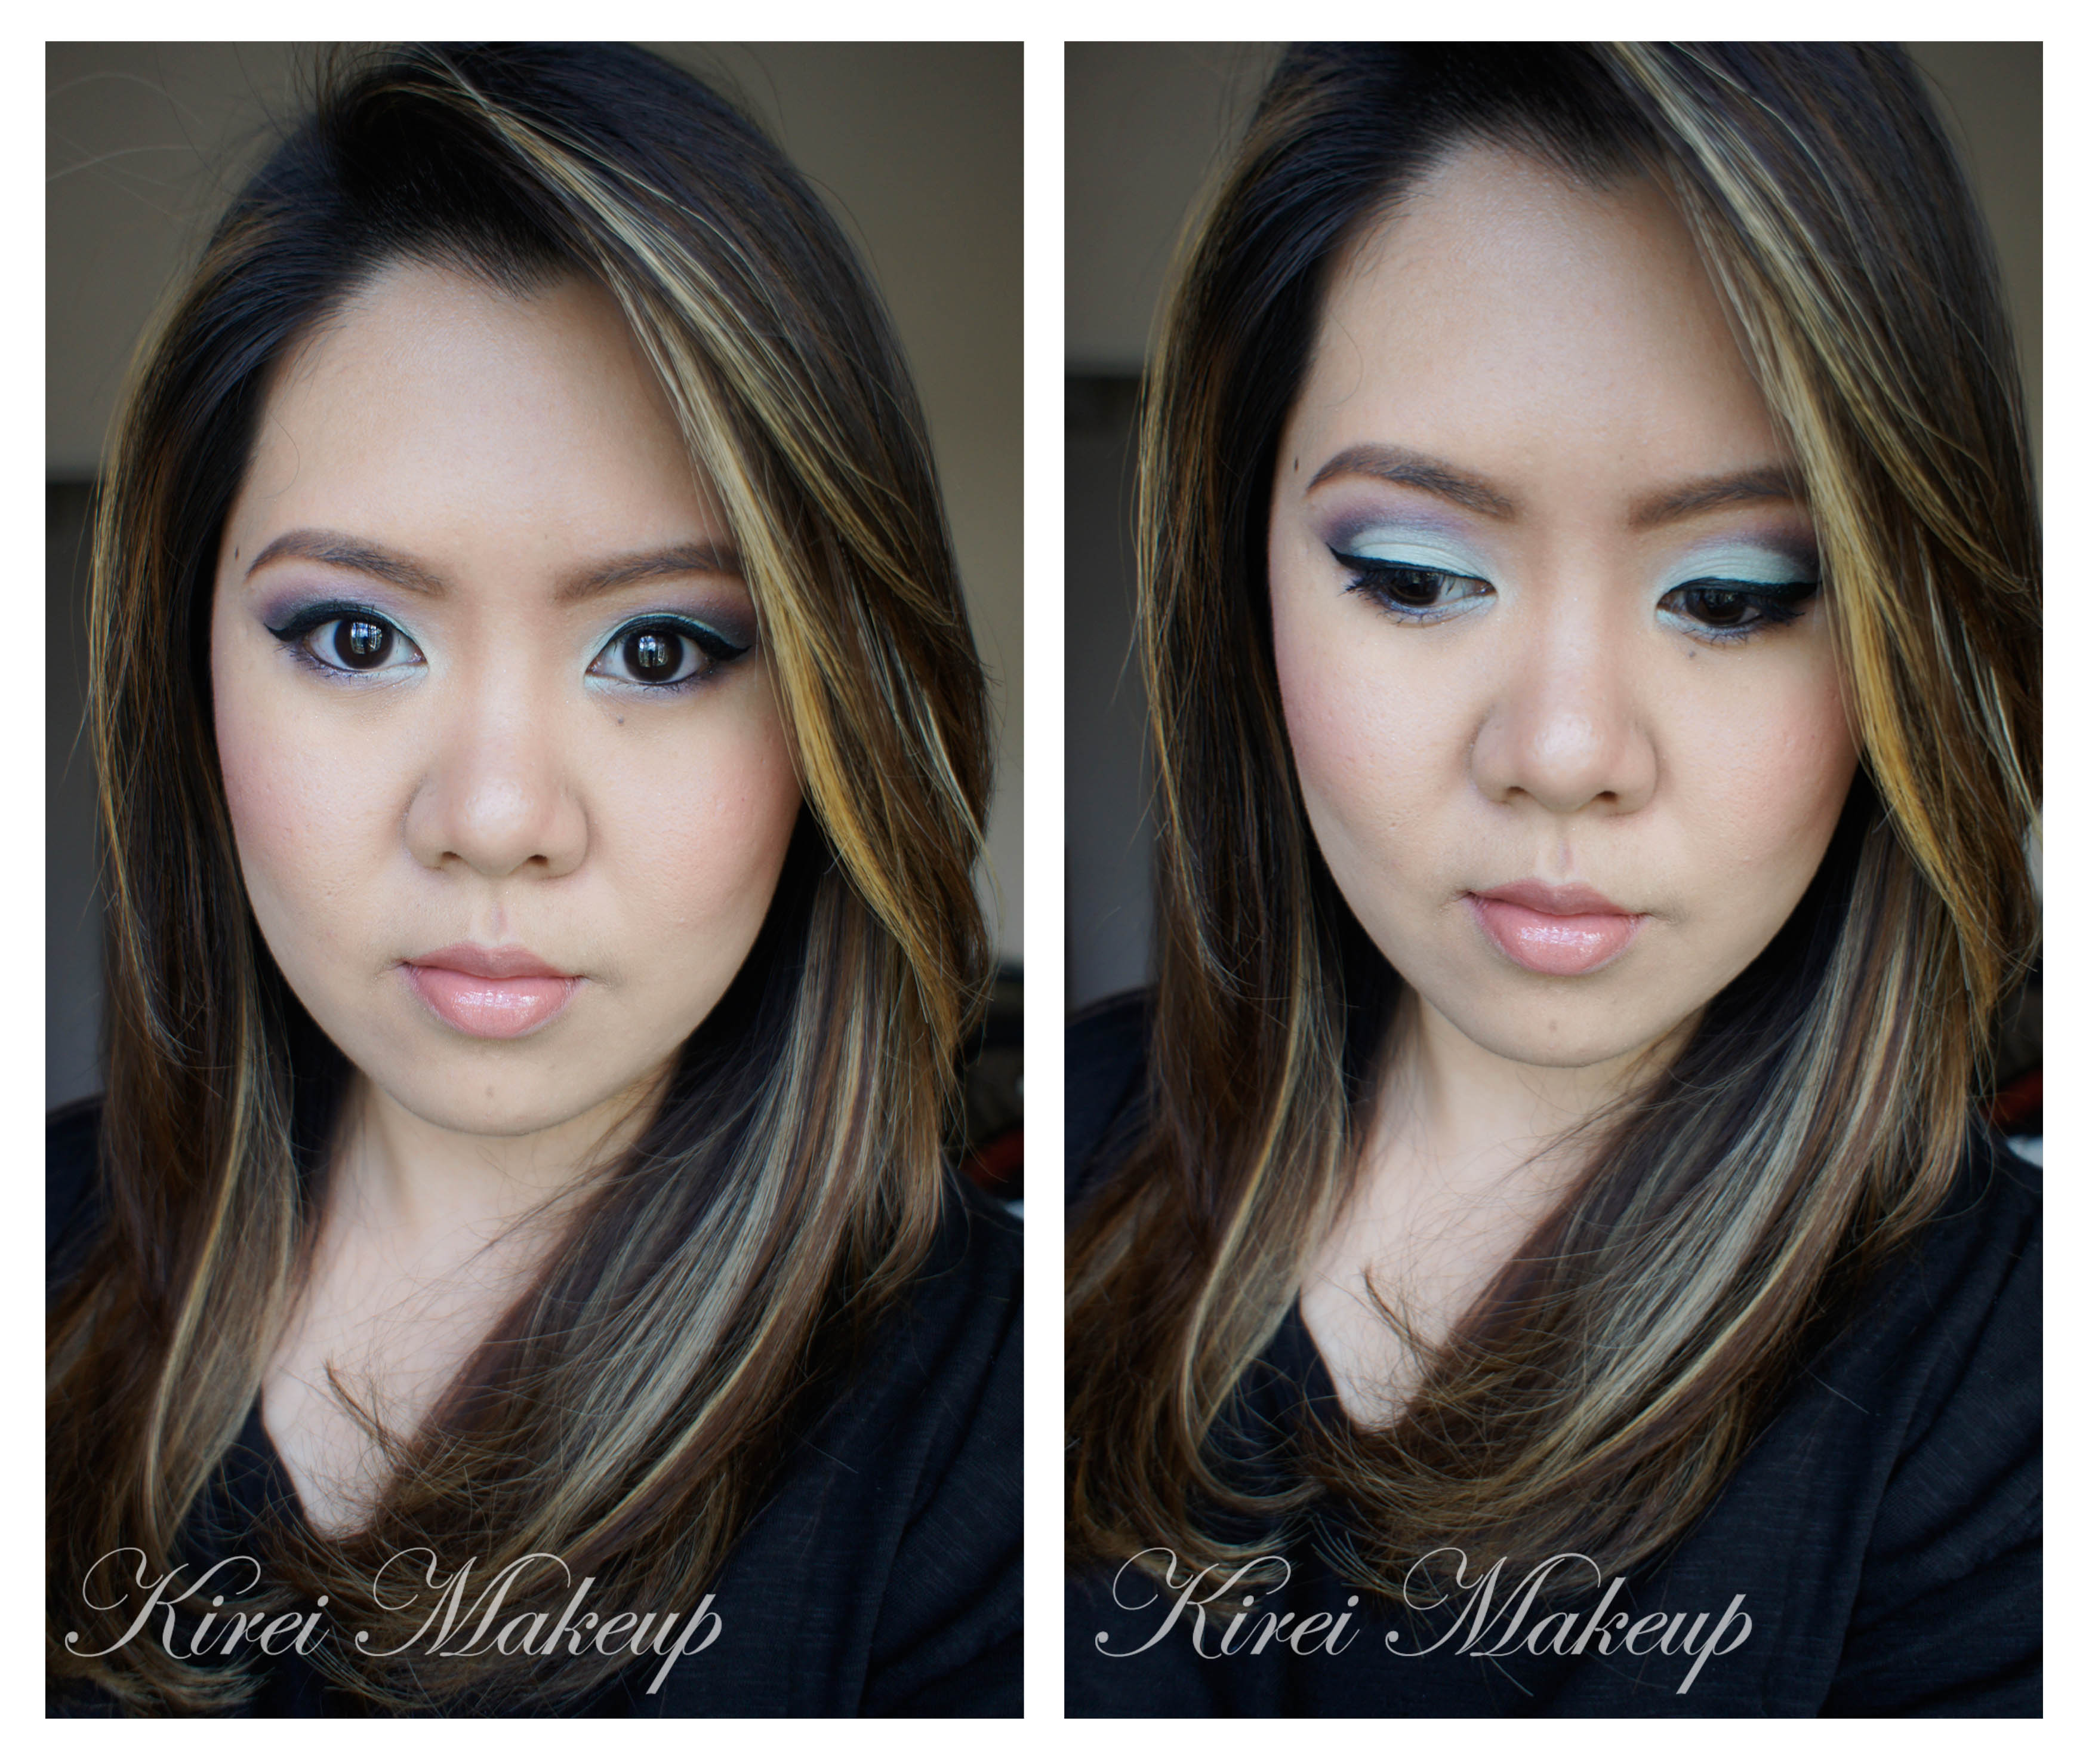
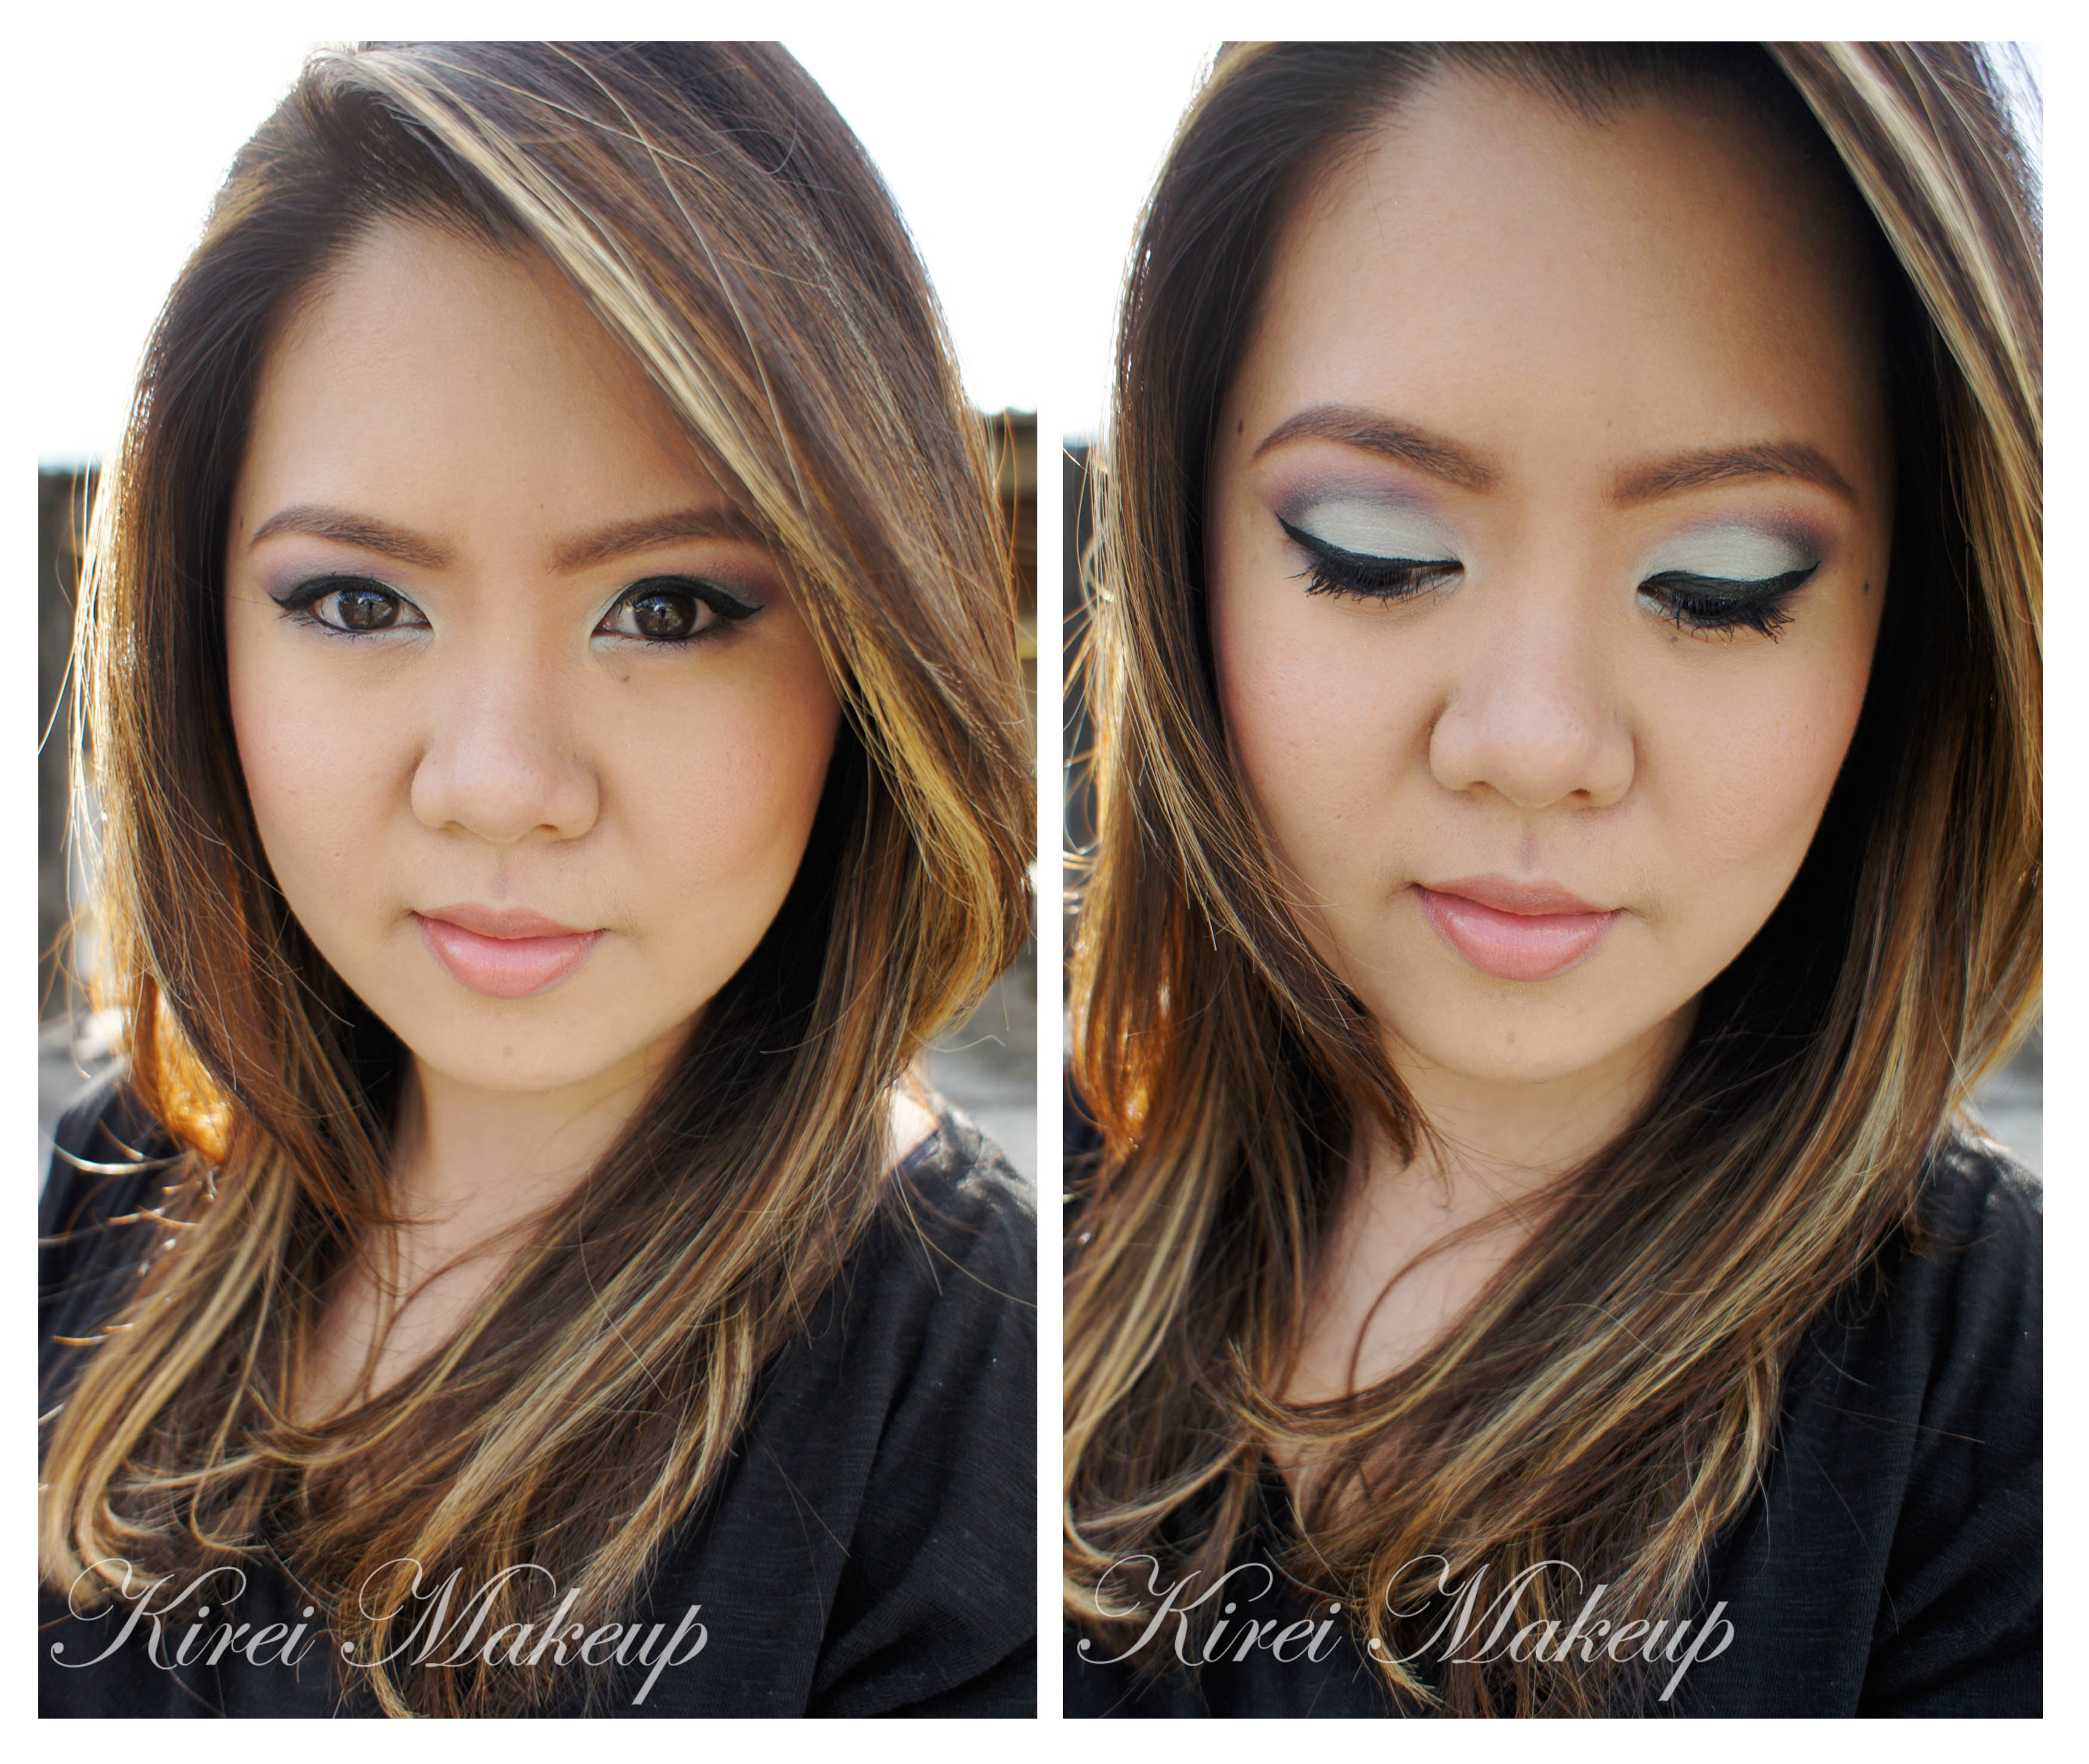
Inspired by the glass windows of Aria Resort’s building, and of course the awesome lights in Vegas, I decided I want to create a smoky eyes with a hint of sparkles. So, I took out my MAC Blue-Brown pigment, and MAC Raindrops crushed metallic pigment for this look.

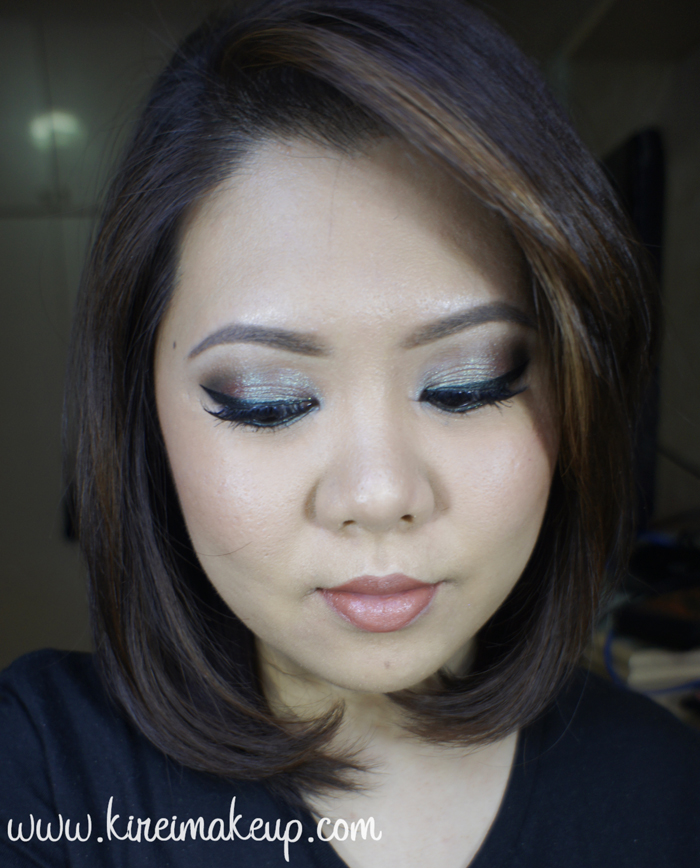
This look is a little bit over the top if you aren’t used to wearing makeup. Of course you can always take it down a notch, but hey, it’s Vegas, baby! Go big or go home, yes? hahaha..

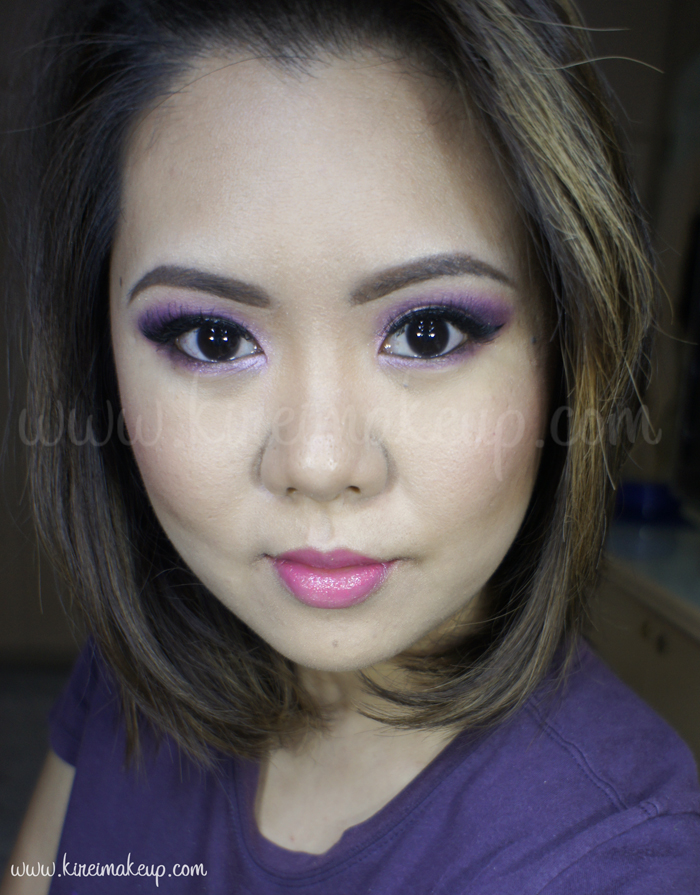
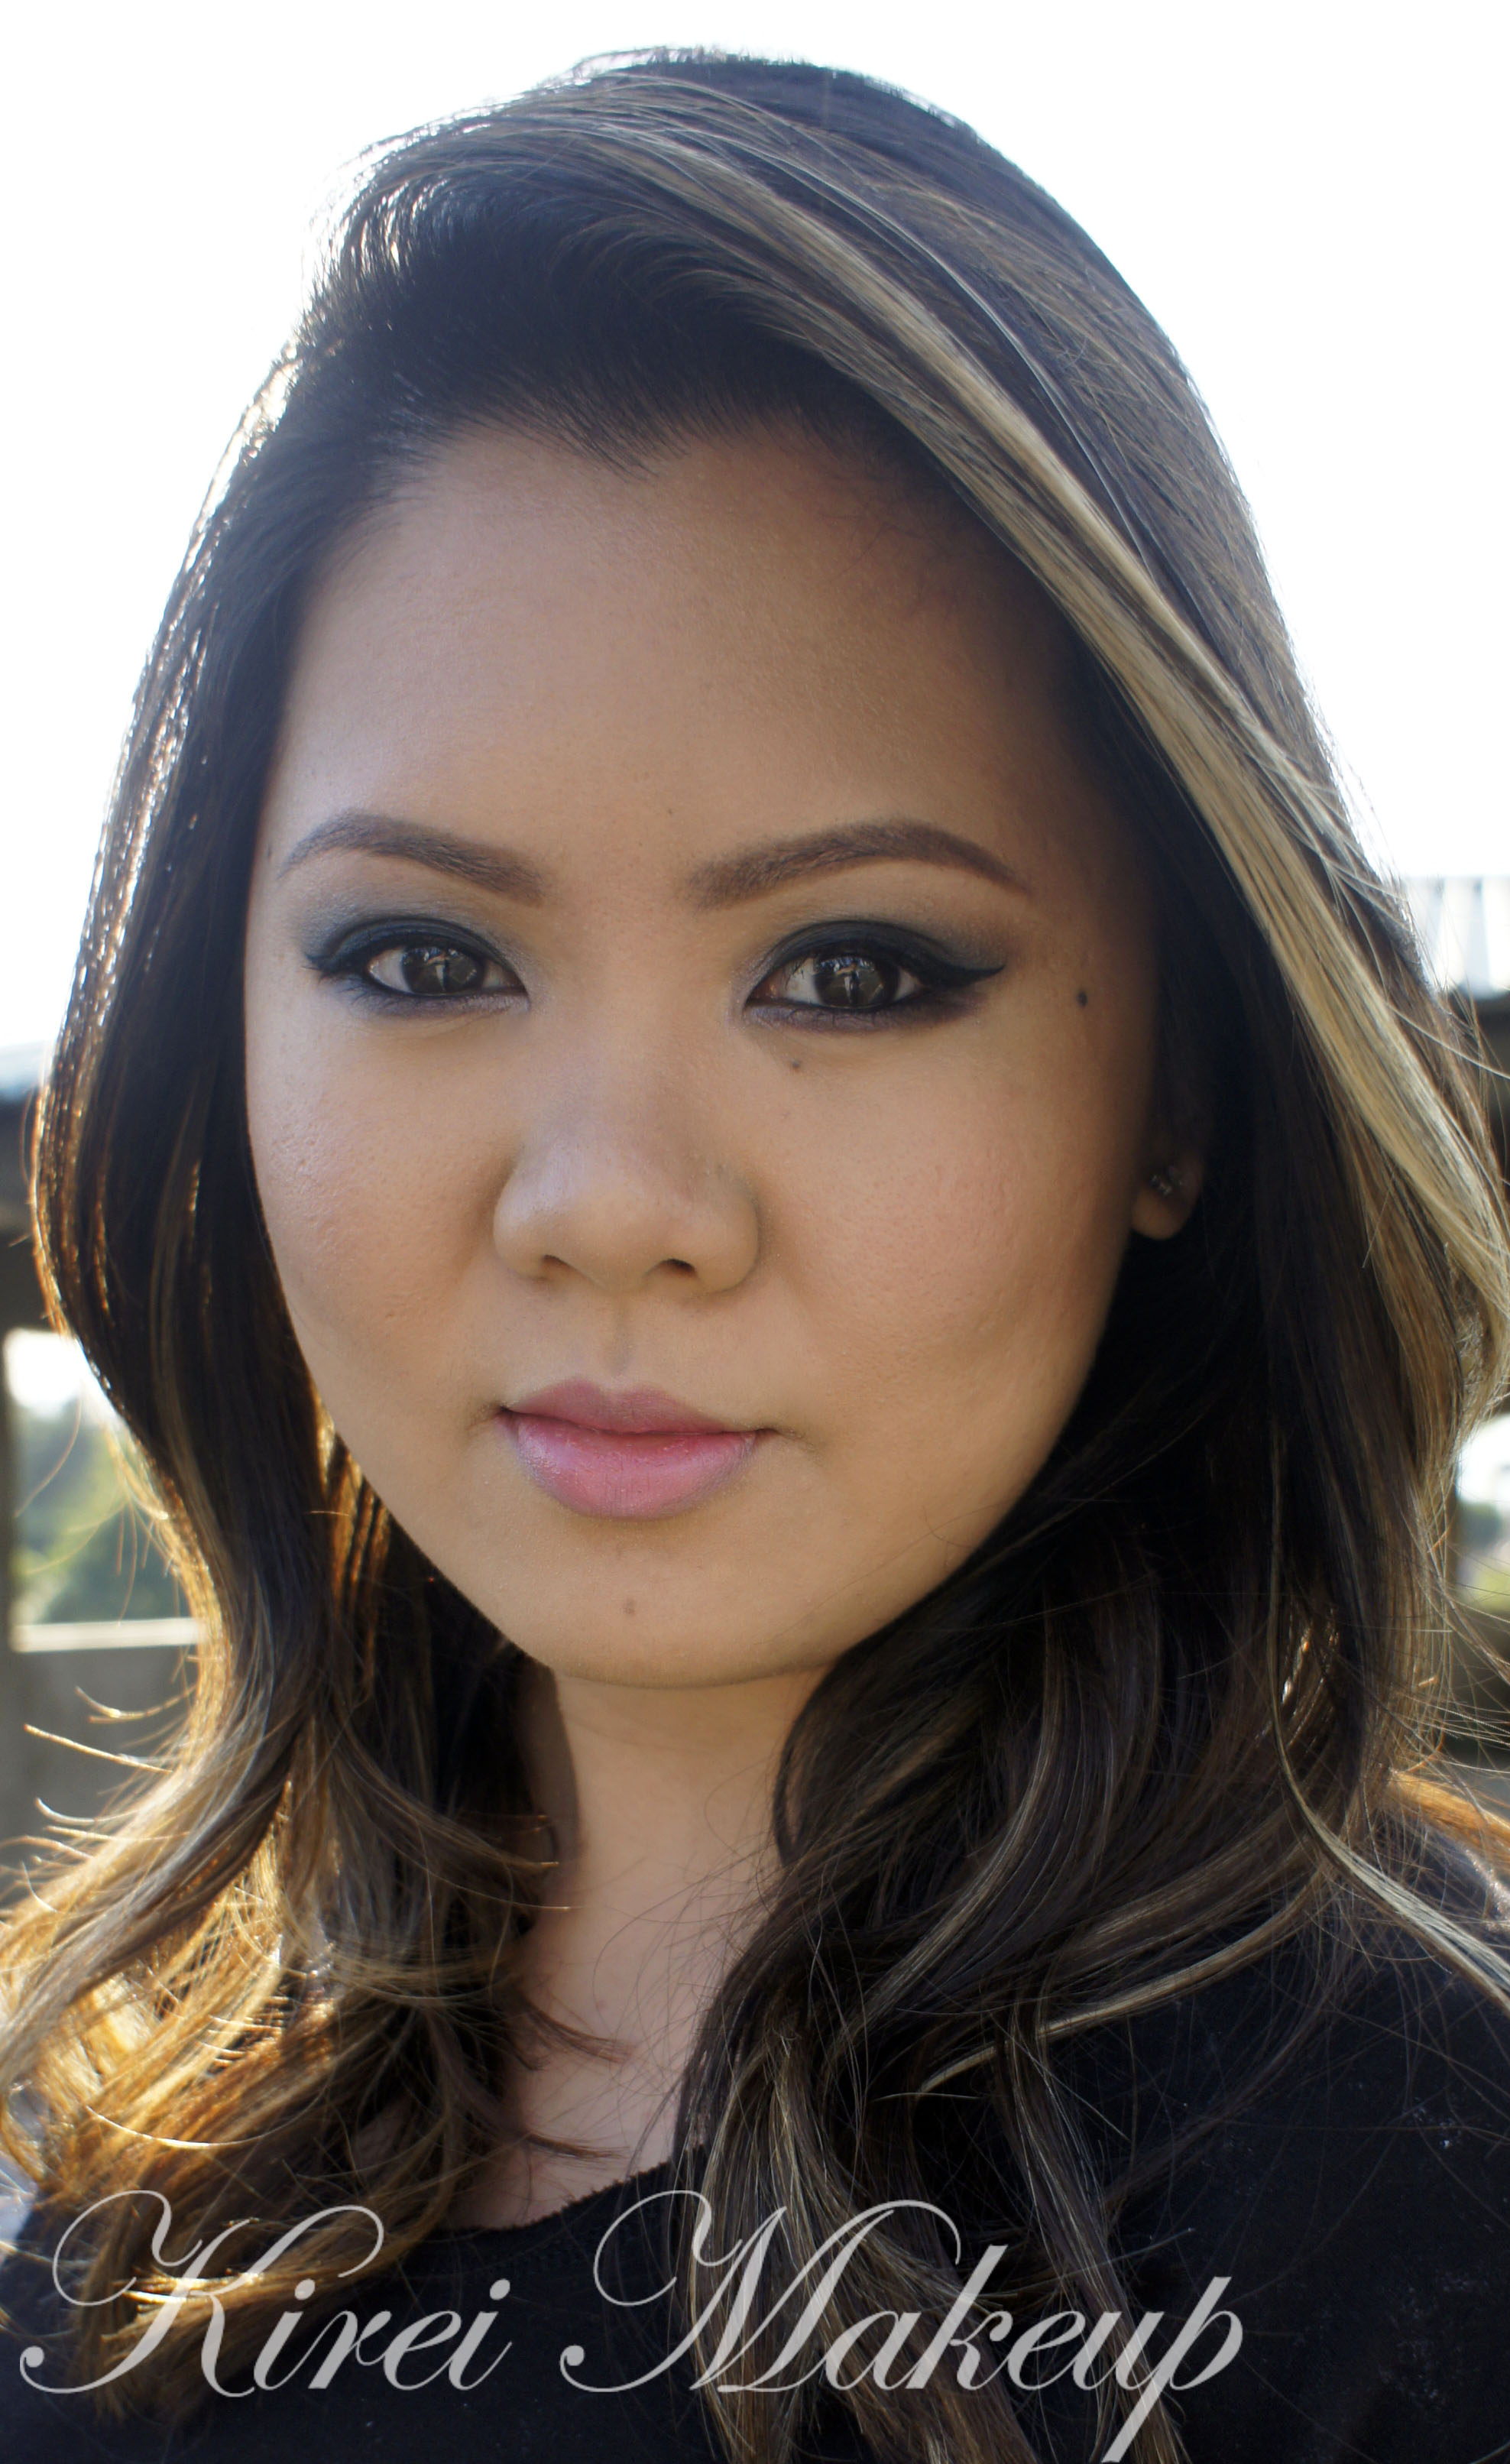
For the face, I didn’t want to do anything too much since the eyes are already quite dramatic. Of course, you can contour and highlight to your heart’s content. I, personally, prefer a fresh dewy face look over a heavily contoured face to balance out the eyes, since it is a wearable look. You can wear this for a night-out, or to go clubbing. Whenever you blink, the shades will create beautiful sparkles when lights hit them.

Scroll all the way down for product list!
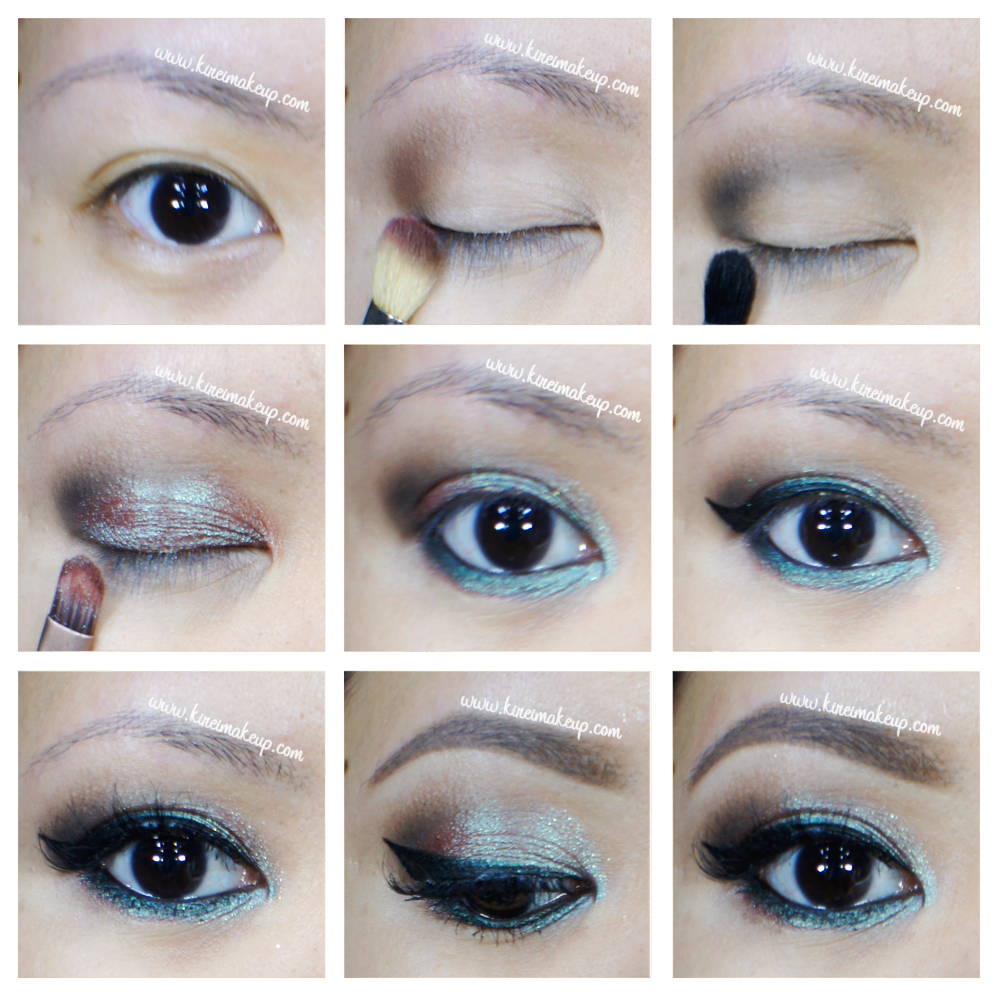
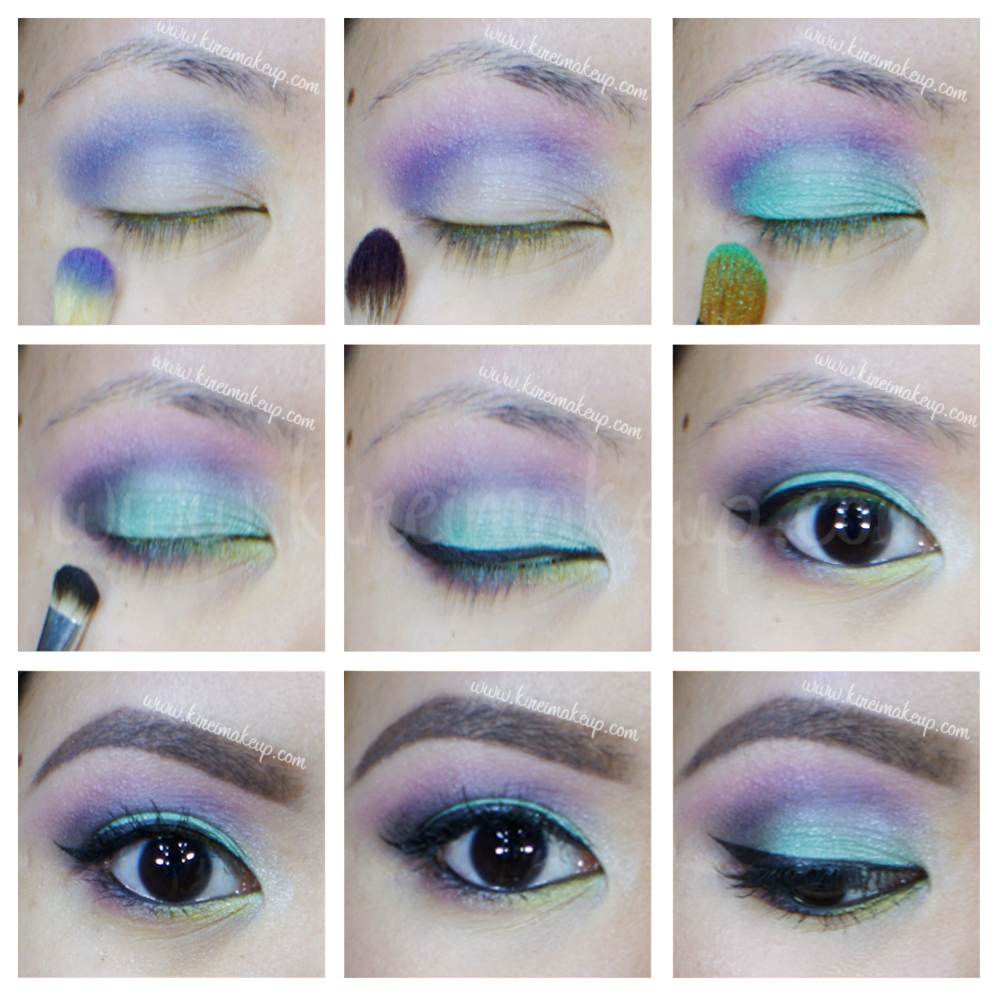
 

wearable blue smoky eyes

How-to:

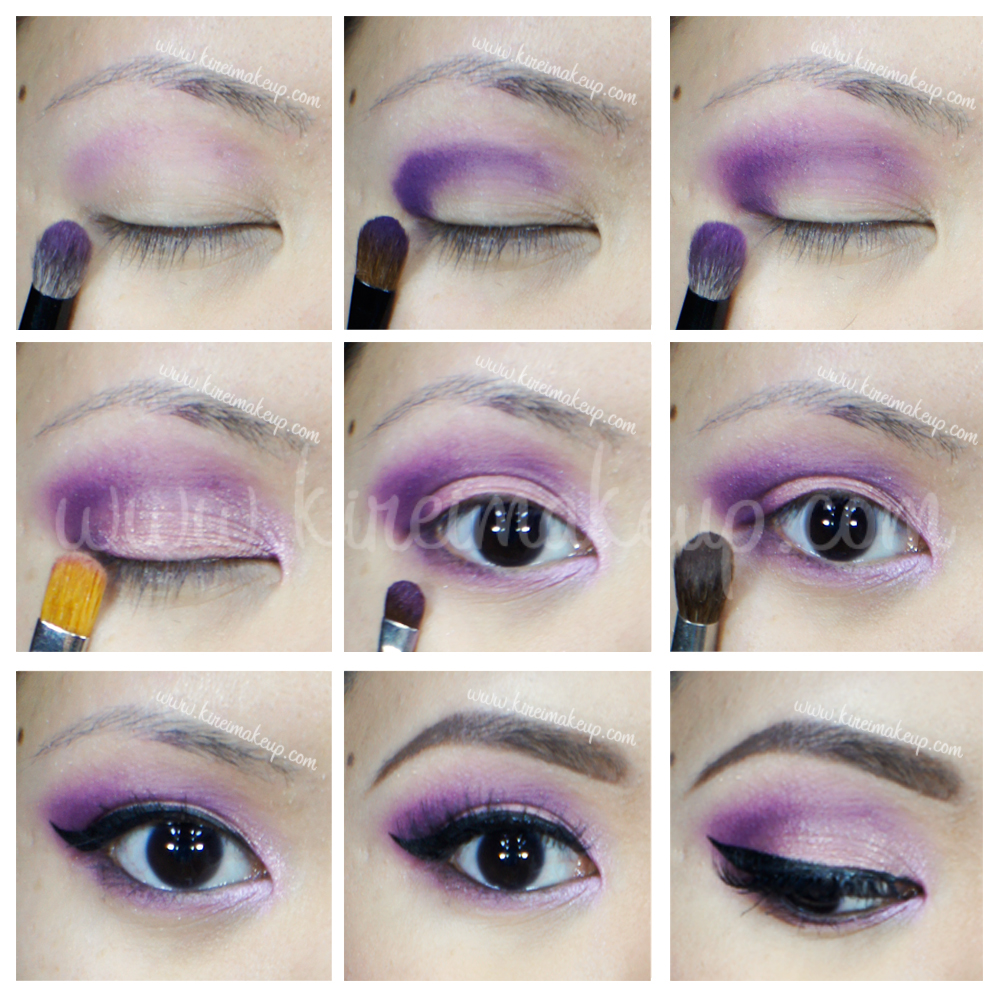
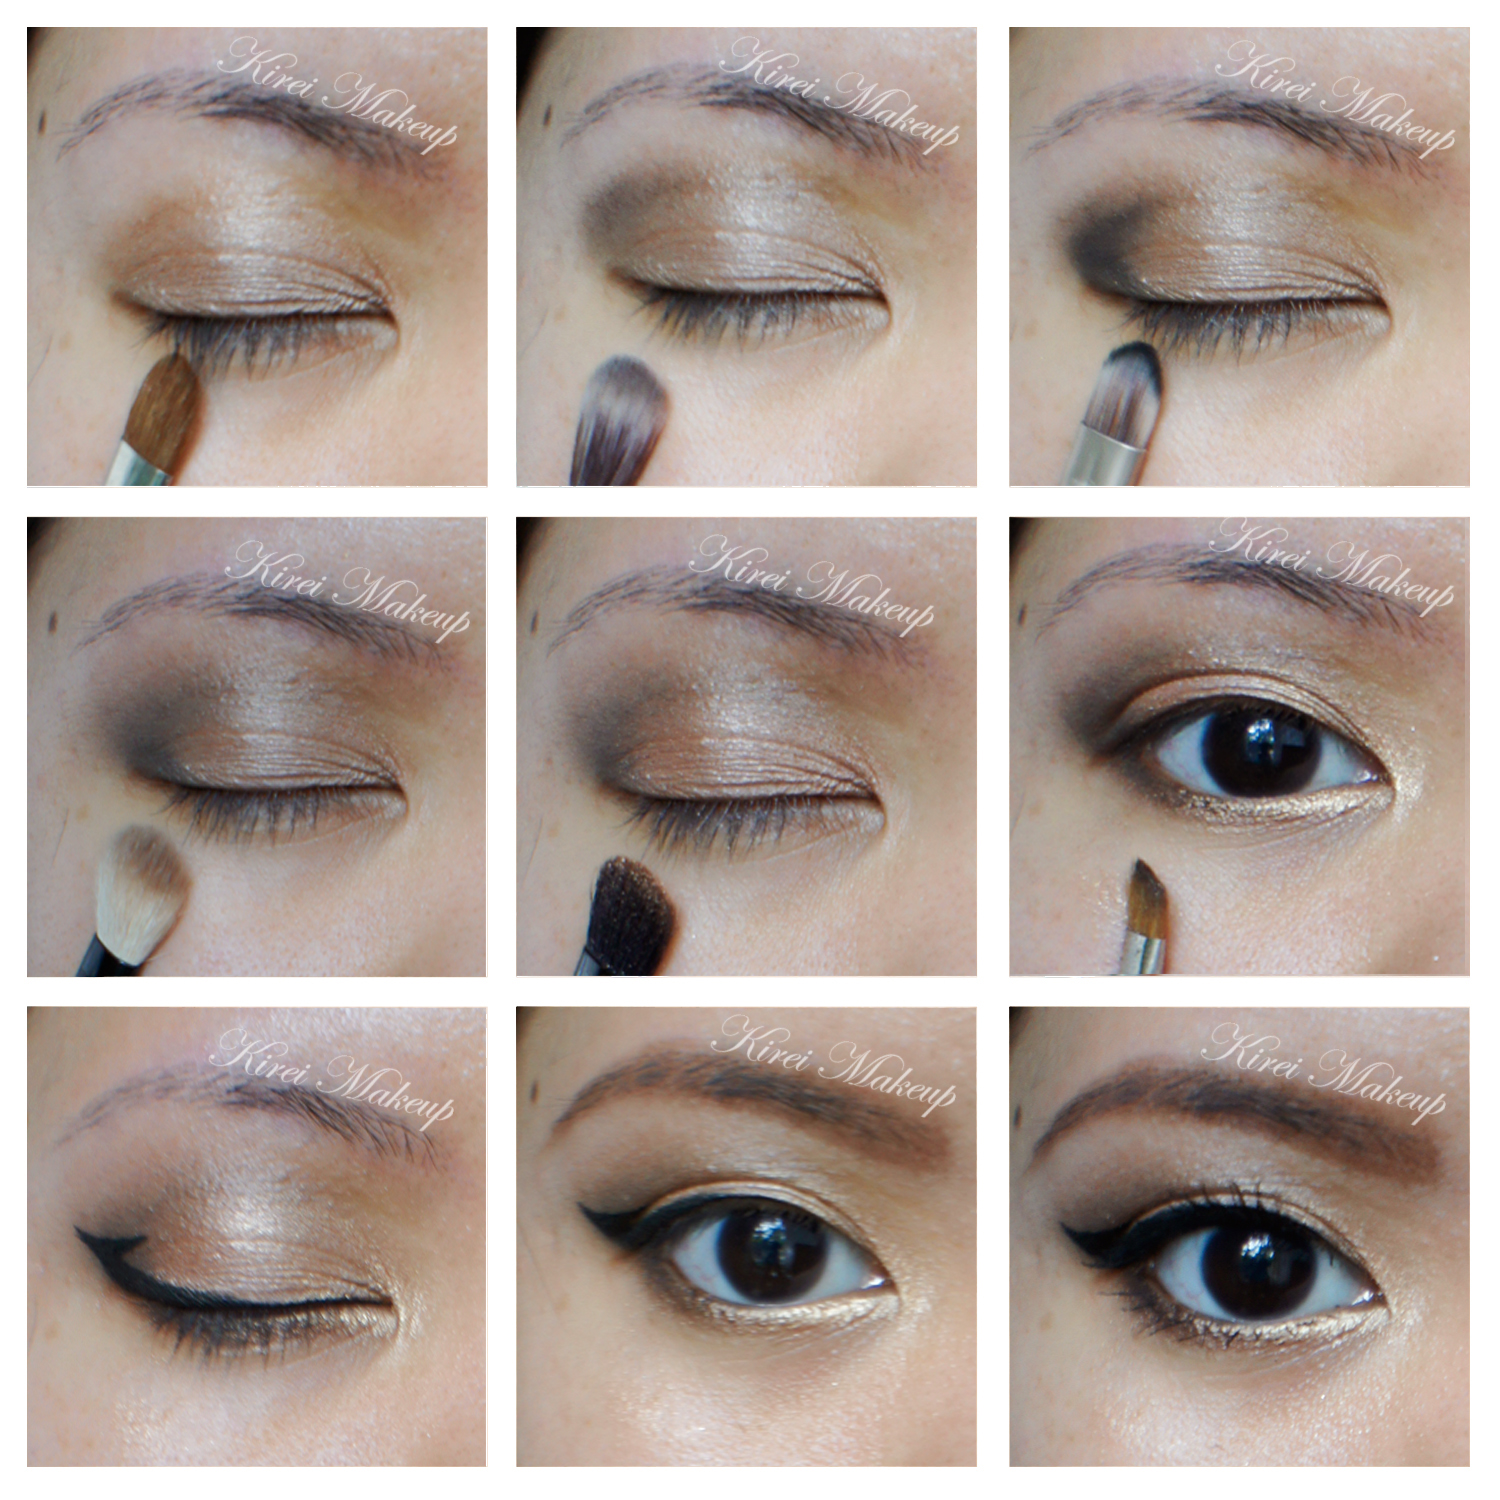
1. I prepped my eyelid using Urban Decay Primer Potion in Eden.

2. Using a fluffy blending brush, I applied Shadow Box from Kat Von D Monarch palette on my crease.

3. Using a bullet crease brush, I applied Deadhead from Kat Von D Monarch palette on the outer V, blending it to the crease.

4. I applied (dry) MAC Blue-Brown pigment using a flat eyeshadow brush. You can apply this pigment wet if you want a more intense look.

5. On the waterline and lower lid, I smudged L’oreal Voluminous Smoldering eyeliner.

6. Then, I applied MAC Raindrops crushed metallic pigment on top of the smudged liner on the lower lash line. I also applied this pigment on the inner corner of my eyes, and just a tiny bit in the center of my eyelid.

7. I created a winged liner using Kanebo Kate Super Sharp eyeliner.

8. I curled my lashes and applied MUFE Aqua Smoky Lash mascara. I also applied Lavie Lash false eyelashes in Fleur.

9. For the brows, I filled it in using Anastasia Brow Wiz in Ash Blonde and Brunette.

night out makeup tutorial

10. On my face, I applied Marc Jacobs Gel foundation using Cover FX cream foundation brush.

11. Under my eyes, I applied MUFE HD concealer.

12. I applied Benefit Moon Beam highlighter on top of my cheekbones, bridge of my nose, and cupid’s bow.

13. I set my foundation using MAC Mineralized skin finish in Medium.

14. I lightly contoured the hollows of my cheeks and sides of my nose using MAC Mineralized Skin Finish in Deep.

15. On my cheeks, I applied Smashbox Halo Blush in In Bloom.

16. I lined and filled my lips using MAC Lip Liner in Spice. On top of it, I applied Vaseline to keep it moist.

mac blue brown

Products used:

Eyes – Urban Decay Primer Potion in Eden; Kat Von D Monarch Palette (crease: Shadow Box, outer V: Deadhead); MAC Blue-Brown loose pigment; MAC Raindrops crushed metallic pigment; Make Up For Ever Aqua Smoky Lash; Lavie Lash in Fleur, Anastasia Brow Wiz (Ash Blonde, Brunette).

Face – Marc Jacobs Gel foundation; Make Up For Ever HD Concealer; Benefit Moon Beam highlighter, MAC Mineralized Skin Finish (setting powder: Medium, contour: Deep); Smashbox Halo Blush in In Bloom.

Lips – MAC Spice lip liner; Vaselinelavie lash

World Cup 2014 Brazil Inspired Makeup

Are you guys following FIFA World Cup 2014?! I sure did, and I’m rooting for Brazil! Go Brazil!!! Anyways, since I’m showing my support for Brazil, I decided to do this Brazil Inspired Makeup. I’d probably do a World Cup inspired makeup series for the next couple weeks just for fun! I wanted to post this tomorrow, but decided to do it today.

Anyhow, for this Brazil Inspired Makeup tutorial, I wanted to create a wearable look that uses the colors of the team’s jersey – mainly yellow, a little bit of green and blue (as you can see from the jersey that I wore for today’s tutorial). I love the result, and I especially love that blue eyeliner! If you do re-create this look please TAG ME on twitter or instagram, and hashtag your work with #kireimakeup.

Since the eyes are so bright and bold, I decided to tone it down on my face. My face is kept very minimal, no contouring. My lips, I decided to go with a nude lip, with my new favorite lip pencil, MAC Spice. Since my lips were quite dry, I added Clinique Heaping Hazelnut chubby lip balm to keep it moist. I do apologize if my face doesn’t look that flawless, you can see a bit of breakout here and there, since my immune system is currently down. As you can see, I do not airbrush my face, so what you see is what I actually look like! 😉

brazil inspired makeup

How-to:

1. I applied a yellow cream face paint as a base all over my eyelid. For this tutorial, I used PAC , an Indonesian brand, but you can use any yellow cream base (e.g. MUFE Flash Palette), OR a white base (e.g. NYX Milk Jumbo Pencil in Milk). A good base is necessary so the yellow pops even more.

2. Using a flat eyeshadow brush, I applied MUFE eyeshadow no. 71 all over my eyelid.

3. Using a small blending brush, I applied Urban Decay Buck on outer V and extended it into the crease.

4. Using a dark blue cream face paint from PAC and an angled eyeliner brush, I created a winged liner along the upper lash line.

5. *VERY IMPORTANT STEP* I SET the cream eyeliner using Urban Decay Chaos with another clean eyeliner brush. If you don’t set your cream face paint, it’ll crease.

6. On the bottom lash line, I applied Dragon Fly from Sleek Makeup iDivine Ultra Matte V1 Brights.

7. I lined my tightline and waterline using L’oreal Voluminous Smoldering eyeliner.

8. I curled my lashes, applied mascara, and applied Ardell Demi Luvies falsies.

9. I filled my brows using Anastasia Brow Wiz in Medium Ash.

world cup inspired makeup brazil

10. For my face, I decided to keep it simple. I applied Marc Jacobs Gel foundation using CoverFX cream foundation brush.

11. I applied a little bit of yellow corrector from MAC Conceal/Correct palette in Medium under my eyes.

12. I dusted MAC Mineralized Skinfinish powder all over my face.

13. I applied Smashbox Halo Blush powder in In Bloom.

14. I lined and filled my lips using MAC Spice lip liner. On top of it, I applied Clinique Chubby lip balm in Heaping Hazelnut.

brazil inspired makeup


Psychedelic w/ Sleek Makeup Candy Palette

Another tutorial using the Sleek Makeup Candy Palette (for the first tutorial check it out here), and if you don’t already know, I have a GIVEAWAY going on! Check out my Sleek Makeup Candy Palette Giveaway page to find out how you can win this beautiful gorgeous palette!

For today’s tutorial, I named in Psychedelic because of the amount of colors and how bold this look is. I, also, wanted to make full use of the palette’s beautiful color selections and this is the result that I came up with. I’ve done a lot of bold, bright colors tutorials, but I’ve never combined them together before. Well, today shall be the day where I combined both looks – colorful eyes and bright lips.

sleek makeup candy palette tutorial

Eyelids were prepped using Urban Decay Primer Potion in Eden. All eyeshadows are from Sleek Makeup iDivine Candy palette.

How-to:

1. I applied Blue Fizzle on my crease using a blending brush.

2. Using a tapered blending brush, I applied Strawberry Sherbet just slightly above Blue Fizzle, and blending it with Blue Fizzle, creating a beautiful hue of purple.

3. Using a flat eyeshadow brush, I applied Apple Sour all over my eyelid.

4. I applied Liquorice  on the outer V.

5. I created a winged eyeliner using L’oreal Super Liner Ultra Sharp Tip along the upper lash line. I lined my waterline using L’oreal Voluminous Smoldering eyeliner.

6. On the lower lash line, I applied Pear Drop on the inner half, and Parma Violet on the outer half. I also applied Cream Soda very lightly on the inner tear duct.

7. I curled my lashes and applied 4 coats of MUFE Smoky Extravagant mascara on the upper lashes, and a coat on the bottom lashes.

8. I applied Ardell 110 falsies.

9. Filled my brows using Anastasia Brow Wiz in Medium Ash and Brunette.

revlon matte balm unapologetic

10. For my face, I applied Cover FX cream foundation as base, highlight and contour (g40, g20, & n110)

11. On my cheeks, I applied NARS Mata Hari blush.

12. On my lips, I applied Revlon Colorburst Matte Balm in Unapologetic.

revlon matte balm unapologetic

Products used

Eyes – Sleek Makeup Candy Palette (lid: Apple Sour, crease: Blue Fizzle, above crease: Strawberry Sherbet, lower lid: Pear Drop/Parma Violet, outer V: liquorice, tear duct: Cream Soda); L’oreal Super Liner Ultra Sharp Tip; L’oreal Voluminous Smoldering Eyeliner; MUFE Smoky Extravagant mascara; Ardell false eyelashes 110; Anastasia Brow Wiz (Medium Ash/Brunette).

Face – Cover FX Cream foundation (base: G40, highlight: G20, Contour: N110)

Cheeks – NARS Mata Hari

Lips – Revlon Colorburst Matte Balm Unapologetic


Very Purple with Sleek Makeup Candy Palette

As mentioned in my previous post, I wanted to share this tutorial with you guys! Today’s look uses Sleek Makeup Candy Palette (Limited Edition) that I bought from Luxola! Don’t worry, the palette that I’m giving away is totally brand new, and unused!

Oh, you didn’t know about the giveaway that’s going on? Check out my Sleek Makeup Candy Palette Giveaway post for details! This giveaway will last until Thursday (June 12, 2014) at 11.59pm.So, hurry up and check out that post for more info!

I also want to mention that since my images were getting used without my permission nor credits, I’m putting a huge watermark in the middle of all my pictures from here onwards. I do apologize if the watermark is bothering the picture, but I have to protect my work. I do want to thank all of you who have been kind enough to let me know whenever someone used my pictures (aka plagiarism). I appreciate all your kindness! A big thank you, hugs, and kisses for you who have been supporting me!

Anyways, let’s get the tutorial started!

sleek makeup idivine candy paletteEyelids are prepped using Urban Decay Primer Potion in Eden. All shades for the eyes are from Sleek Makeup iDivine Candy Palette.

How-to:

1. Using Smashbox bullet crease brush, I applied Flump slightly above my crease.

2. Using a small blending brush, I applied Parma Violet on the outer V and the crease. You can apply this using a small shader brush for a more precise application.

3. Using the same bullet crease brush as step 1, I blended out Parma Violet to remove any harsh edge on the crease. I also slightly winged the outer part.

4. Using a flat eyeshadow brush, I applied Aniseed all over my eyelid.

5. Using a small shader brush, I applied Bon Bon on the inner corner of my eyes, and then I applied Parma Violet along the lower lash line.

6. I used my face powder (MUFE 118 Pro Finish) and a blending brush under my brows, blending it into the purple shades slightly to remove any harsh edge.

7. I lined my upper lash line using Kanebo Kate Super Sharp Eyeliner. On the waterline, I applied black eyeliner pencil.

8. I curled my lashes, applied mascara, and then applied Ardell Demi Wispies lashes. (As you can see, Ardell demi wispies falsies are my current favorite lol).

9. For the brows, I applied Anastasia Brow Wiz in Medium Ash. I lightly set it with Anastasia Brow Powder duo in Brunette.

sleek makeup candy tutorial

10. For my face, I applied Motives Fire highlight/contour palette. I applied the lightest highlight color on the high planes of my face – cheekbones, bridge of the nose, cupid’s bow, forehead, chin, below hollows of the cheeks, and under my eyes. I applied the darkest contour color on the hollows of my cheeks, sides of my nose, and temples. I blended them out using a damped beauty blender sponge and MUFE HD Foundation in 118.

11. For my cheeks, I applied Smashbox Halo blush in In Bloom.

12. For the lips, my new favorite, I applied L’oreal Color Riche Extraordinaire Liquid Lipstick in Rose Symphony

Available for Bookings in Jakarta, Indonesia

Hi all!

I just wanted to share my current works with you, while I’m in Jakarta. Just to let you know, I am available for makeup, eyelash extension, as well as beauty workshop bookings in Indonesia.

If you have followed me on Instagram, and Facebook, you’d probably already seen these pictures! If you want to find out what’s the story behind each of these lovely ladies, and which products I used for their makeup, please check my Instagram page! It’s all in the description box.

Again, I’m available in Jakarta for bookings! For more pictures of my work please check my Photos page.

jakarta makeup artist

jakarta makeup artist

mature skin makeup makeup artist jakarta

Urban Decay Electric Palette Review

Finally, I managed to upload this Urban Decay Electric Palette review! Since my week starts on Monday, this is still counted as being posted on this week! I tried to upload it earlier today, but my internet at home wasn’t working. Anyways, let’s get back to this review, shall we?!

From Urban Decay website

“Chaos-inducing color—in ten VELVETY shades. Inspired by Chaos (a brilliant matte blue from The Vice Palette), we created the ultimate fix for color addicts—packed with ten of the brightest, most amazing shades you’ve ever laid eyes on, plus a double-ended brush. In addition to Chaos (yes, it’s back!), this palette marks the return of Revolt (a silver standout from our Anarchy Face Case). All the other shades are NEW!

From ultra-smooth mattes to highly dimensional shimmers, each VELVETY shade delivers insane color payout. Why do a Pressed Pigment Palette? Using pressed pigments was the only way we could create heavily saturated brights with the intense pigment load we craved. Traditional pressed pigment formulas just wouldn’t cut it. To achieve shades like these, we had to develop an entirely new formula!

We carefully crafted the formula on every shade to make sure each one would apply with a soft and creamy texture and deliver serious color payout. Each shade features our Pigment Infusion System™, the proprietary blend of ingredients that gives each shade its velvety texture, rich color, serious staying power and blendability.

The case is as cool as the shades inside. Emblazoned with “ELECTRIC,” this slim, sleek palette features a vivid, dimensional, multilayered smoke-screen print reminiscent of the shades inside. And the mirror is huge!

Electric Pressed Pigment Palette also includes a cruelty-free, double-ended pressed pigment brush (an all-black brush with bright purple synthetic brush fibers). On one end: a compact precision brush that’s perfect for applying color with amazing control. On the other end: a small pigment brush.

(WARNING: Slowburn, Savage, Jilted and Urban contain a colorant that is not approved for the eye area in the US, Canada and Brazil.)

UD Electric palette review

Packaging

I absolutely hate the packaging. I love the cover, and its beautiful artwork, however I hate the bulkiness of it. This is one of the bigger, heavier palette in my kit. Not to mention, this one doesn’t have a latch/clasp when the palette is closed. I can’t actually place one of my little kitchen mat to protect the eyeshadows when I travel – the magnet is not strong enough to hold the palette together when I placed the mat in between.

Longevity/Blendability/Pigmentation

Worn with Urban Decay primer or NYX Milk Jumbo pencil, the shades last for around 8-hour with very minimal creasing. Colors stay well on the lid with primer on. I’ve never tried it with no primer, so I can’t say anything about that.

All of the eyeshadows blend very well, very smooth, and I have no problem whatsoever. They are so pigmented, that even with no primer, you can still get the true colors on your eyelids. However, I find that the matte shades are slightly thinner than the shimmers. The matte shades need a real good packing if you don’t use primer underneath (check out my swatches below to see what I mean).

Also, just FYI, a few of my blending brushes (my MAC 217s) are now permanently stained with Savage and Slowburn. I’ve washed them several times with a Beauty Blender solid soap, no luck in getting rid of those stain. Oh well, just know that you’ve been warned!

UD Electric palette review

Shades & Finish

Top row (L-R)

  • Revolt – bright metallic silver shimmer w/silver glitter.
  • Gonzo – bright turquoise matte w/ floating tonal pearl.
  • Slowburn – bright red-orange matte w/floating pearl.
  • Savage – bright hot pink matte.
  • Fringe – bright metallic teal.

Bottom Row (L-R)

  • Chaos – bright blue matte w/floating tonal pearl.
  • Jilted – bright metallic fuchsia w/blue shift.
  • Urban – bright metallic purple.
  • Freak – bright green w/gold shift.
  • Thrash – bright lime green matte w/floating gold pearl.

(All shades/finish info is taken from Urban Decay, 2014)

UD Electric palette review

Price

USD$49 for 10 shades (0.04oz)

Pros

  • Great pigmentation
  • Smooth and easily blendable
  • Bright, bold, fun colors
  • Can be used as hair-chalking pigment
  • Long lasting
  • Colors stay true (what you see is what you get)
  • You get a good mix of matte and shimmer
  • Price is pretty good compared to other UD eyeshadows

Cons

  • 4 out of the 10 shades cannot be used on the eyes
  • Packaging is not optimal for travel
  • A little bit pricy compared to other brand

So, I know everyone has been raving about this UD Electric Palette, even I was raving about it before the palette was released. When I finally bought it couple weeks a go when I was in Toronto, I thought it was an over-hype. I saw the colors, and I thought to myself that there’s a lot of other companies that make similar palettes to this, for example, the Sleek Makeup iDivine Snapshot palette, which honestly cost a lot less than the UD Electric palette. You can definitely find similar shades in other brands, like MAC, Sleek Makeup, NYX etc.

If you can’t get this palette, don’t worry too much about it. You can definitely find similar shades by other brands. If you are a fan of Urban Decay’s products, then by all means get this palette, esp. if you love bright, bold colors.

My personal opinion is that this is a great palette (plus it’s cruelty-free) to have if you have the extra cash. Not necessarily needed, but nice to own. Since 4 out of the 10 shades on the palette aren’t recommended for eyelid application, really and truly, if you are worried, I say don’t bother getting it. Go to MAC, and you’ll find eyeshadows that are very similar in shade with this.


Urban Decay Electric Makeup Look #2

Another look using Urban Decay Electric palette! I will do a review and swatch the shades this week, promise! I was just playing with the colors for today’s look, and decided to post this tutorial up. I was expecting the orange shade, Slow Burn, to be a little bit lighter. However, it turned up to be quite dark, and has a lot more red in it. I think this color combo – green and orange, is a little bit different than I expected, but looks good nevertheless. I just love how easy it is to blend the shadows.

As always, scroll all the way to the bottom to skip the how-to, and get on the product list.ud electric makeup looks


How-to:

1. I prepped my eyelids using Urban Decay Primer Potion in Eden.

2. I applied Urban Decay Slow Burn all over my entire eyelid using a flat eyeshadow brush.

3. Using a shade brush, I applied Urban Decay Freak on my crease.

4. Using a small shader brush, I applied Lancome Strut on the outer V, blending the color in between the edge of Slowburn and Freak.

5. I applied Urban Decay Freak on the lower lid, and Lancome Strut on the outer half of the lower lid. I used an angled eyebrow brush for this.

6. I created a winged liner using Kanebo Kate Super Sharp eyeliner. On the waterline, I applied L’oreal Voluminous Smoldering eyeliner.

7. I filled my brows using Anastasia Brow Wiz in Medium Ash.

8. I curled my lashes, and applied L’oreal Carbon Black Mascara.

9. I also applied Ardell Demi Wispies falsies.

ud electric makeup looks

10. On my face, I applied CoverFX cream foundation in G40 (base), G20 (highlight), and N110 (contour).

11. On the cheeks, I applied Benefit Hervana blush.

12. I applied Clinique Mega Melon chubby lip tint.


Products used

Eyes – Urban Decay Electric palette (eyelid: Slowburn, crease and lower lid: Freak); Lancome Strut color design eyeshadow (outer V); Kanebo Kate Super Sharp eyeliner; L’oreal Voluminous Smoldering eyeliner; L’oreal Carbon Black mascara; Ardell Demi Wispies; Anastasia Beverly Hills Brow Wiz in Medium Ash.

Face – CoverFX cream foundation (G40: base, G20: highlight, N110: contour)

Cheeks – Benefit Hervana Blush.

Lips – Clinique Mega Melon chubby lip pencil.

Orange Lips with MAC Lady Danger

Today I want to share this orange lips makeup with you as we welcome the arrival of Spring, or if you’re in the tropics, then to welcome the heat wave…lol… I do have to say that this MAC Lady Danger lipstick might go into my favorite lipstick collection. The color is so pretty, and it will look great on any skin tone. Definitely something that you should look into if you want a bold lip look. It’s a great alternative to the usual red lips, or pink lips.

Let me just, also, tell you that today’s tutorial is full of sweat and screams of frustration due to power outage, and the Sun’s sudden disappearance from the sky. I can’t tell you how much I want my lights with me, but oh well, that’s what happened when I travel so much. So, please forgive me for the quality of the step-by-step picture.

Anyways, I was watching Kat Von D video on the Sephora’s youtube channel, and I wanted to recreate the way she create her eyeliner. I love how it looks! It’s so different, yet at the same time, so very wearable. I think I might re-do the eyeliner next time.

Scroll all the way to the bottom for full  product list.

Urban Decay naked 2 daytime makeup

How-to:

1. I applied MAC Groundwork paint pot all over my lid using my ring finger.

2. Using a flat eyeshadow brush, I applied Suspect from UD Naked 2 palette all over my eyelid.

3. Using a blending brush, I applied Busted from UD Naked 2 on the crease.

4. Using a flat eyeshadow brush, I applied Blackout from UD Naked 2 on the outer V.

5. I blended out Blackout using a clean blending brush.

6. I applied Chopper from UD Naked 2 on the eyelid using a flat eyeshadow brush.

7. I applied Half-Baked on the inner part of the lower lid, and Snakebite on the outer part using an angled eyebrow brush.

8. On the upper lid, I created a triangle-shaped eyeliner using Kanebo Kate Super Sharp Eyeliner.

9. I filled my brows using UD Faint eyeshadow and an angled eyeliner brush.

10. I curled my lashes and applied Cover Girl Lash Blast mascara on the upper and lower lashes.MAC Lady Danger

11. I applied UD Naked Skin foundation using a damped sponge.

12. I contoured my face very lightly using MAC Blunt.

13. I applied MAC Dainty blush on my cheeks.

14. I applied MAC Entertain Me lip liner on my lips first, and then applied MAC Lady Danger lipstick on top of it. If you want to find out how I fill my lips, please check my How-to Apply Lipstick post.

If you want to see the other lip makeup looks that I’ve created please check my Lips Tutorials.

For other UD Naked 2 tutorials, please use the search bar on the right side bar.

Products used

Eyes – MAC Groundwork paint pot; UD Naked 2 (eyelid: Suspect and Chopper, crease: Busted, outer V: Blackout, lower lid: Half-Baked and Snakebite); Kanebo Kate Super Sharp Eyeliner; Faint eyeshadow from UD Naked Basic; Cover Girl Lash Blast mascara.

Face – UD Naked Skin foundation; MAC Blunt; MAC Dainty.

Lips – MAC Entertain Me lip liner; MAC Lady Danger.

Kat Von D Esperanza Tutorial #1

If you guys follow me on Instagram (you should, btw!), you would know that I’ve posted a little sneak peek on today’s tutorial there. Today, I wanted to do my first Kat Von D Esperanza tutorial, using the mint eyeshadow as the main focus. If you are wondering why the pictures on the step-by-step is a bit off in terms of the color, it’s because the Sun was playing hide and seek with me today. Luckily, the sky cleared up, and I managed to get good shots for the final looks!

I’ll try to post a review for this palette some time this week. I prepped my eyelids using UD Primer Potion, which I think didn’t work too well for this look. May be for future tutorial, I might use a white-colored base (i.e. NYX Jumbo Pencil in Milk) OR a mint-colored base for the lid. I feel that the mint eyeshadow that I used doesn’t have much color on it, and look slightly chalky.

All eyeshadows mention are from Kat Von D Esperanza palette. If you want to find out the product I used and skip the how-to, scroll all the way down.

How-to:

1. After prepping my lid using UD Primer Potion, I applied Archangel using a flat eyeshadow brush.

2. Using Sigma E25 Blending Brush, I applied Placebo slightly above the crease.

3. Using the tip of a flat eyeshadow brush (like the Sigma E54 Medium Shader brush), I applied Santeria on the crease and outer V.

4. Using the same Sigma E25 blending brush that I used on step 2, I blended out Santeria.

5. Using a fluffy blending brush (like the Sigma E38 Diffused Crease brush), I applied South under the brow. I also buffed South slightly on to my crease.

6. Using a small shader brush, I applied Archangel on the inner corner of the lower lid, and Selena on the outer corner.

7. (not in picture), I applied Danglo on top of Archangel using a flat eyeshadow brush.

8. I created a winged eyeliner using Kanebo Kate Super Sharp eyeliner, and lined my waterline using L’oreal Voluminous Smoldering eyeliner.

9. I curled my lashes and applied Cover Girl Lash Blast Mascara.

10. I filled my brows using Anastasia Brow Wiz in Ash Blonde, and then I set it using Faint eyeshadow from the Naked Basic palette.

Kat Von D Esperanza makeup tutorial

11. On my face, I applied UD Naked Skin foundation using a damped makeup sponge.

12. I set my face using NARS Setting Powder.

13. I lightly contoured my face and nose using MAC Blunt.

14. On my cheeks, I applied Chanel Blush de Horizon.

15. Lastly, on my lips, I applied L’oreal Color Riche lipliner in Beyond Pink, top it off with Revlon Socialite suede lipstick and a little tiny bit of clear lip balm from L’occitane.Kat Von D Esperanza eye makeup

I took the pictures above in a room with big windows and natural day light. For the pictures below, I actually stepped out of the house and took the pictures outdoor with the Sun somewhat behind me. As you can see, in both pictures, my makeup is not heavy at all, esp. for the face. The focus is still on the eyes, while the skin is left pretty natural looking.

If you are curious about my hair, please check my post on Highlights for Brunette.

Kat Von D Esperanza tutorial

Products used:

Eyes – Kat Von D Esperanza palette; Kanebo Kate Super Sharp eyeliner; L’oreal Voluminous Smoldering eyeliner; Cover Girl Lash Blast Mascara; Anastasia Brow Wiz in Ash Blonde; Faint eyeshadow (Naked Basic palette).

FaceUD Naked Skin foundation; NARS Setting Powder; MAC Blunt; Chanel Blush de Horizon.

Lips – L’oreal Color Riche lipliner in Beyond Pink; Revlon Socialite suede lipstick; clear lip balm from L’occitane.

Recommended Sigma brushes – Sigma E25 Blending Brush; E54 Medium Shader brush; Sigma E38 Diffused Crease brush.

Disclaimer: clicking on the Sigma link will take you to my Sigma affiliate page. Any purchase you make on Sigma from my website will help in this blog’s maintenance. Rest assured, I only recommend products that I honestly love and use on myself. Thank you for your support!

Smokey Eyes using NARSissist Eyeshadow Palette

Alright, as promised, a tutorial using NARSissist Eyeshadow Palette! Also, don’t forget to check out my NARSissist eyeshadow palette review if you haven’t! For today’s tutorial I wanted to create a smoky eyes, because let’s face it, who doesn’t love a good smoky eye makeup, eh?!

My favorite type of smoky eye is one where it’s really dark around the lash line area, and it smokes out to grey and then to nothingness. I also like to keep the brows pretty natural looking since the eyes are so strong, and the rest of the face is simple and easy. For this tutorial, I added a dark purple on the lower lash line, to make it slightly chic and to compliment my eye color (purple looks great on any eye colors!).

About the lighting – since my lights are not with me (I’m in Jamaica at the moment), I do take all my pictures with natural daylight. As you can see on the final picture, this look is very light with emphasize on the eyes. I want to show you that you can still rock that dark smoky eyes with very minimal face makeup.

Personally, I don’t like wearing a lot of makeup – aka heavy contouring, heavy foundation, drawn in eyebrows. Not that there’s anything wrong with heavy makeup (which I do too for tutorials, and for special occasions). So I hope this type of tutorial will work for those who have similar preference like me.

Narssissist makeup tutorial

Scroll all the way down if you want to skip the tutorial, and only interested in getting the list of products used.

How-to:

1. I applied L’oreal Voluminous Smoldering eyeliner on my upper and lower lash lines, as well as waterline. Don’t worry if it is messy!

2. Using a flat eyeshadow brush, I applied NARS Dogon II all over my eyelid. Don’t go all the way to the crease, stop it just below the crease.

3. Using a shader brush, I applied NARS Bad Behavior on the crease.

4. I applied NARS Madrague II as a transition color (just slightly above the crease) using a Smashbox Bullet Crease brush.

5. On the lower lid, I applied NARS Brousse II using the tip of a flat eyeshadow brush.

6. Using a small shader brush, I applied Madrague I on the inner corner of the lid just to brighten up my eyes a little bit.

7. I created a winged liner along the upper lash line using Kanebo Kate Super Sharp eyeliner (optional).

8. I curled my lashes, and applied Make Up For Ever Smoky Extravagant mascara on both upper and lower lashes.

9. I filled my brows very lightly using Anastasia Brow Wiz in Ash Blonde and Brunette.Narsissist makeup tutorial

10. On my face, I applied Smashbox Halo foundation using Sigma Round Kabuki Brush.

11. I lightly contoured my face using MAC Blunt.

12. On the cheeks, I applied MAC Dainty.

13. On my lips, I applied Tarte Lipsurgence in Lively.

Products used:

Eyes – NARSisisst eyeshadow palette (Dogon II – eyelid, Bad Behavior – crease, Madrague II – transition, Brousse – lower lid, Madrague I – inner corner); L’oreal Voluminous Smoldering eyeliner; Kanebo Kate Super Sharp eyeliner; MUFE Smoky Extravagant mascara; Anastasia Brow Wiz.

Face – Smashbox Halo foundation; MAC Blunt; MAC Dainty.

Lips – Tarte Lipsurgence.

Disclaimer: clicking on the Sigma link will take you to my Sigma affiliate page. Any purchase you make on Sigma from my website will help in this blog’s maintenance. Rest assured, I only recommend products that I honestly love and use on myself. Thank you for your support!