Very Purple with Sleek Makeup Candy Palette

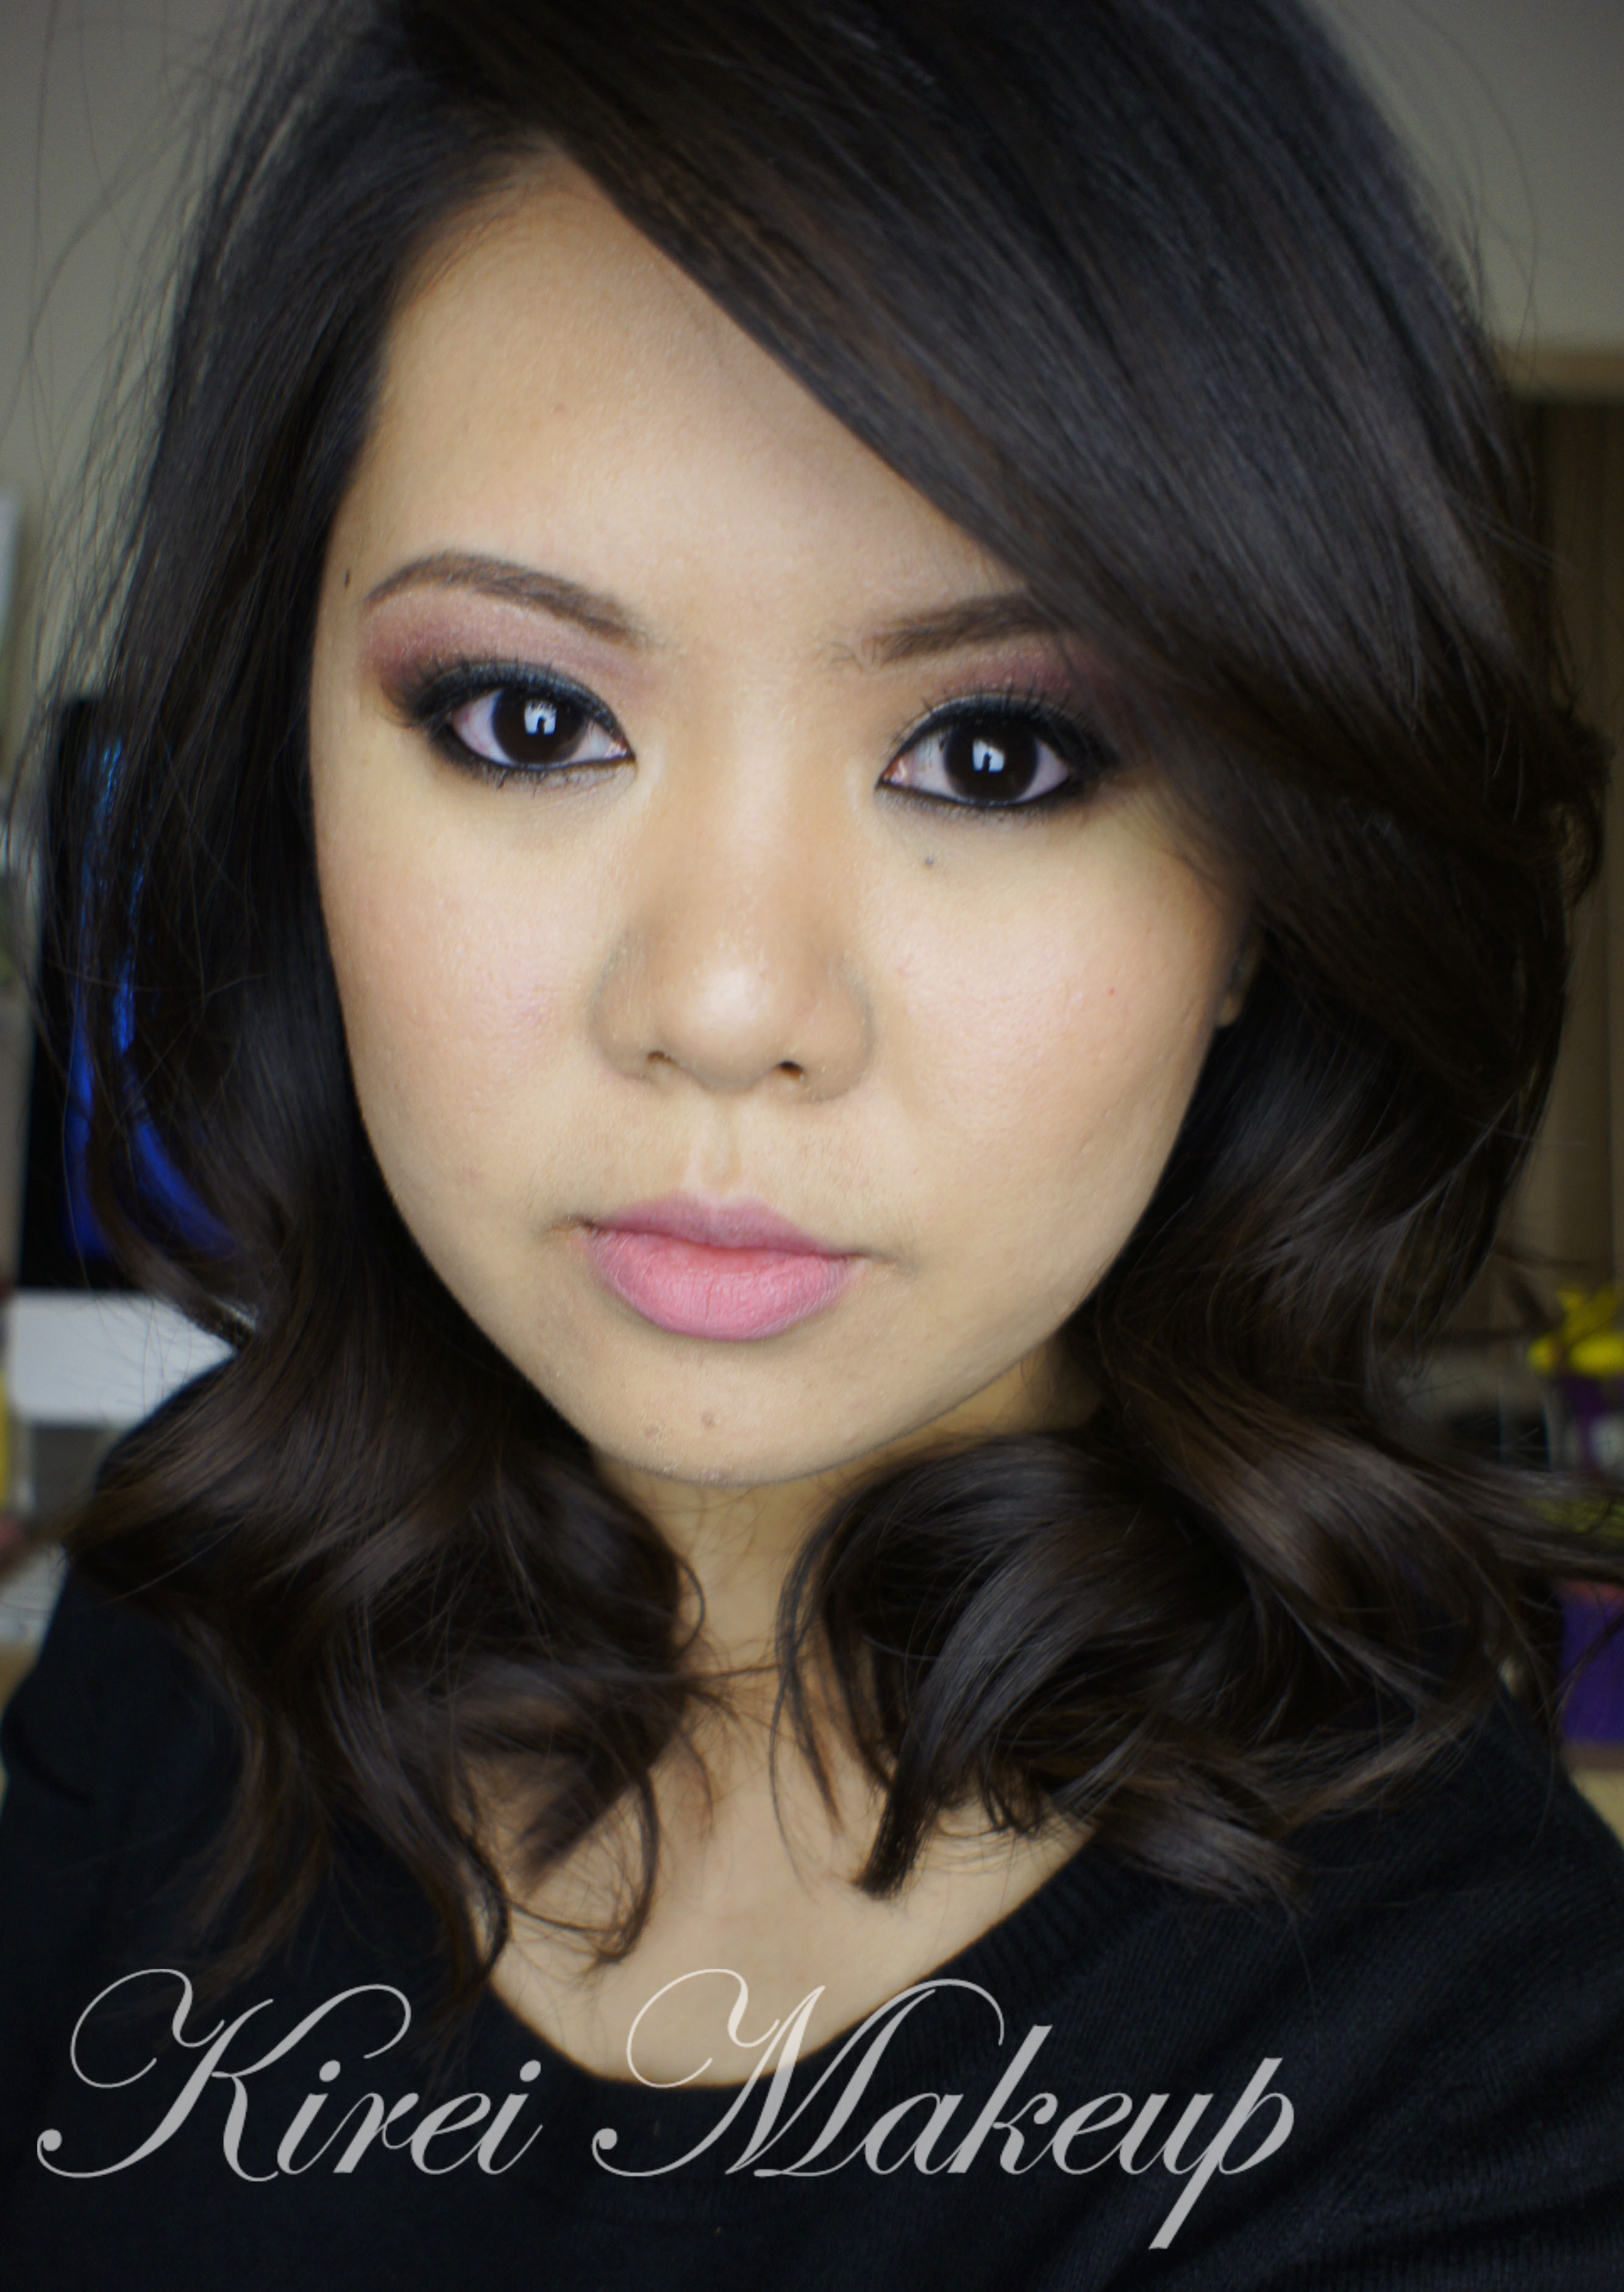
As mentioned in my previous post, I wanted to share this tutorial with you guys! Today’s look uses Sleek Makeup Candy Palette (Limited Edition) that I bought from Luxola! Don’t worry, the palette that I’m giving away is totally brand new, and unused!

Oh, you didn’t know about the giveaway that’s going on? Check out my Sleek Makeup Candy Palette Giveaway post for details! This giveaway will last until Thursday (June 12, 2014) at 11.59pm.So, hurry up and check out that post for more info!

I also want to mention that since my images were getting used without my permission nor credits, I’m putting a huge watermark in the middle of all my pictures from here onwards. I do apologize if the watermark is bothering the picture, but I have to protect my work. I do want to thank all of you who have been kind enough to let me know whenever someone used my pictures (aka plagiarism). I appreciate all your kindness! A big thank you, hugs, and kisses for you who have been supporting me!

Anyways, let’s get the tutorial started!

sleek makeup idivine candy palette
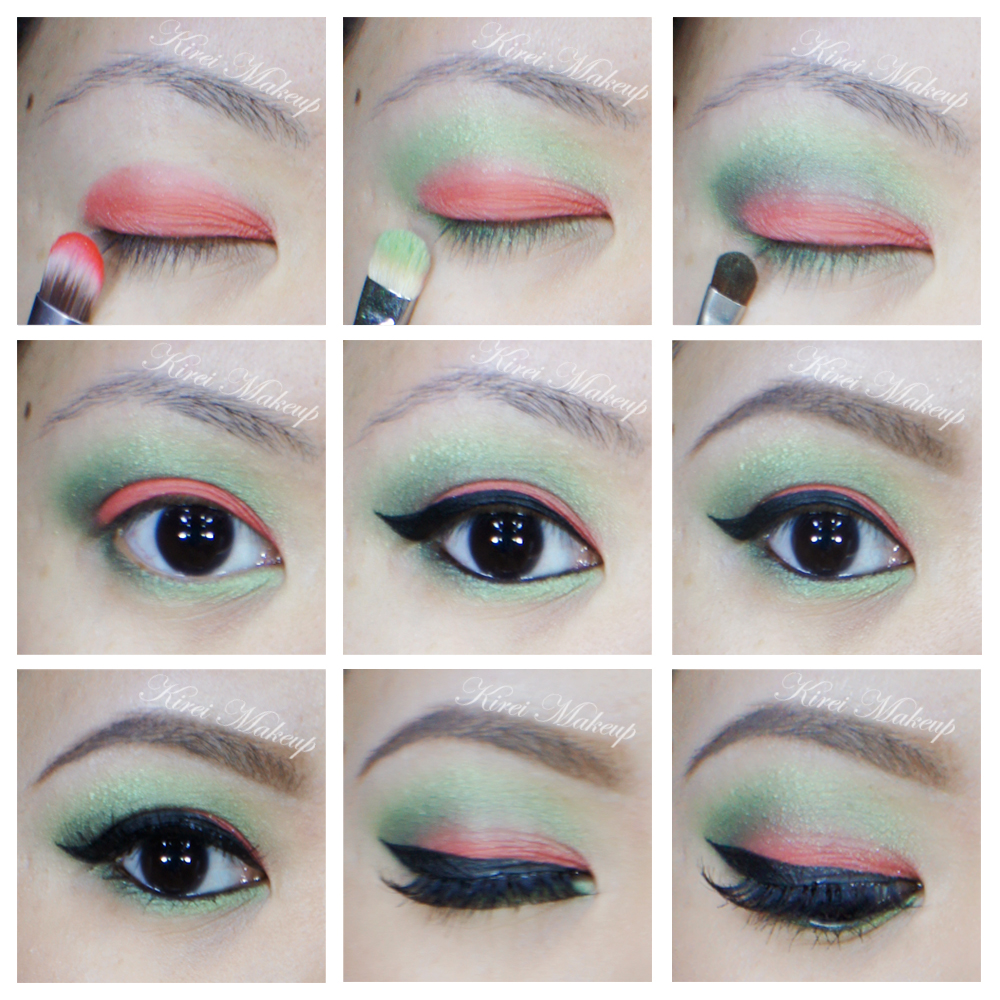
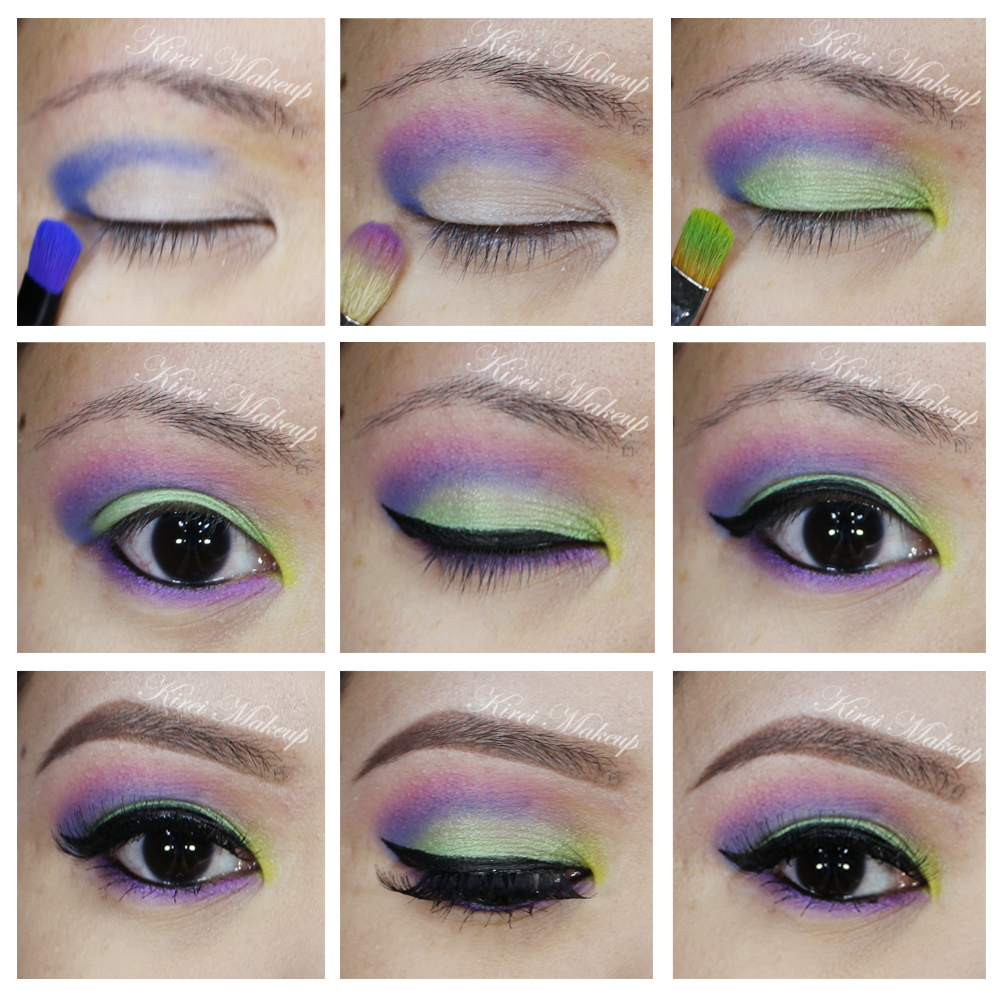
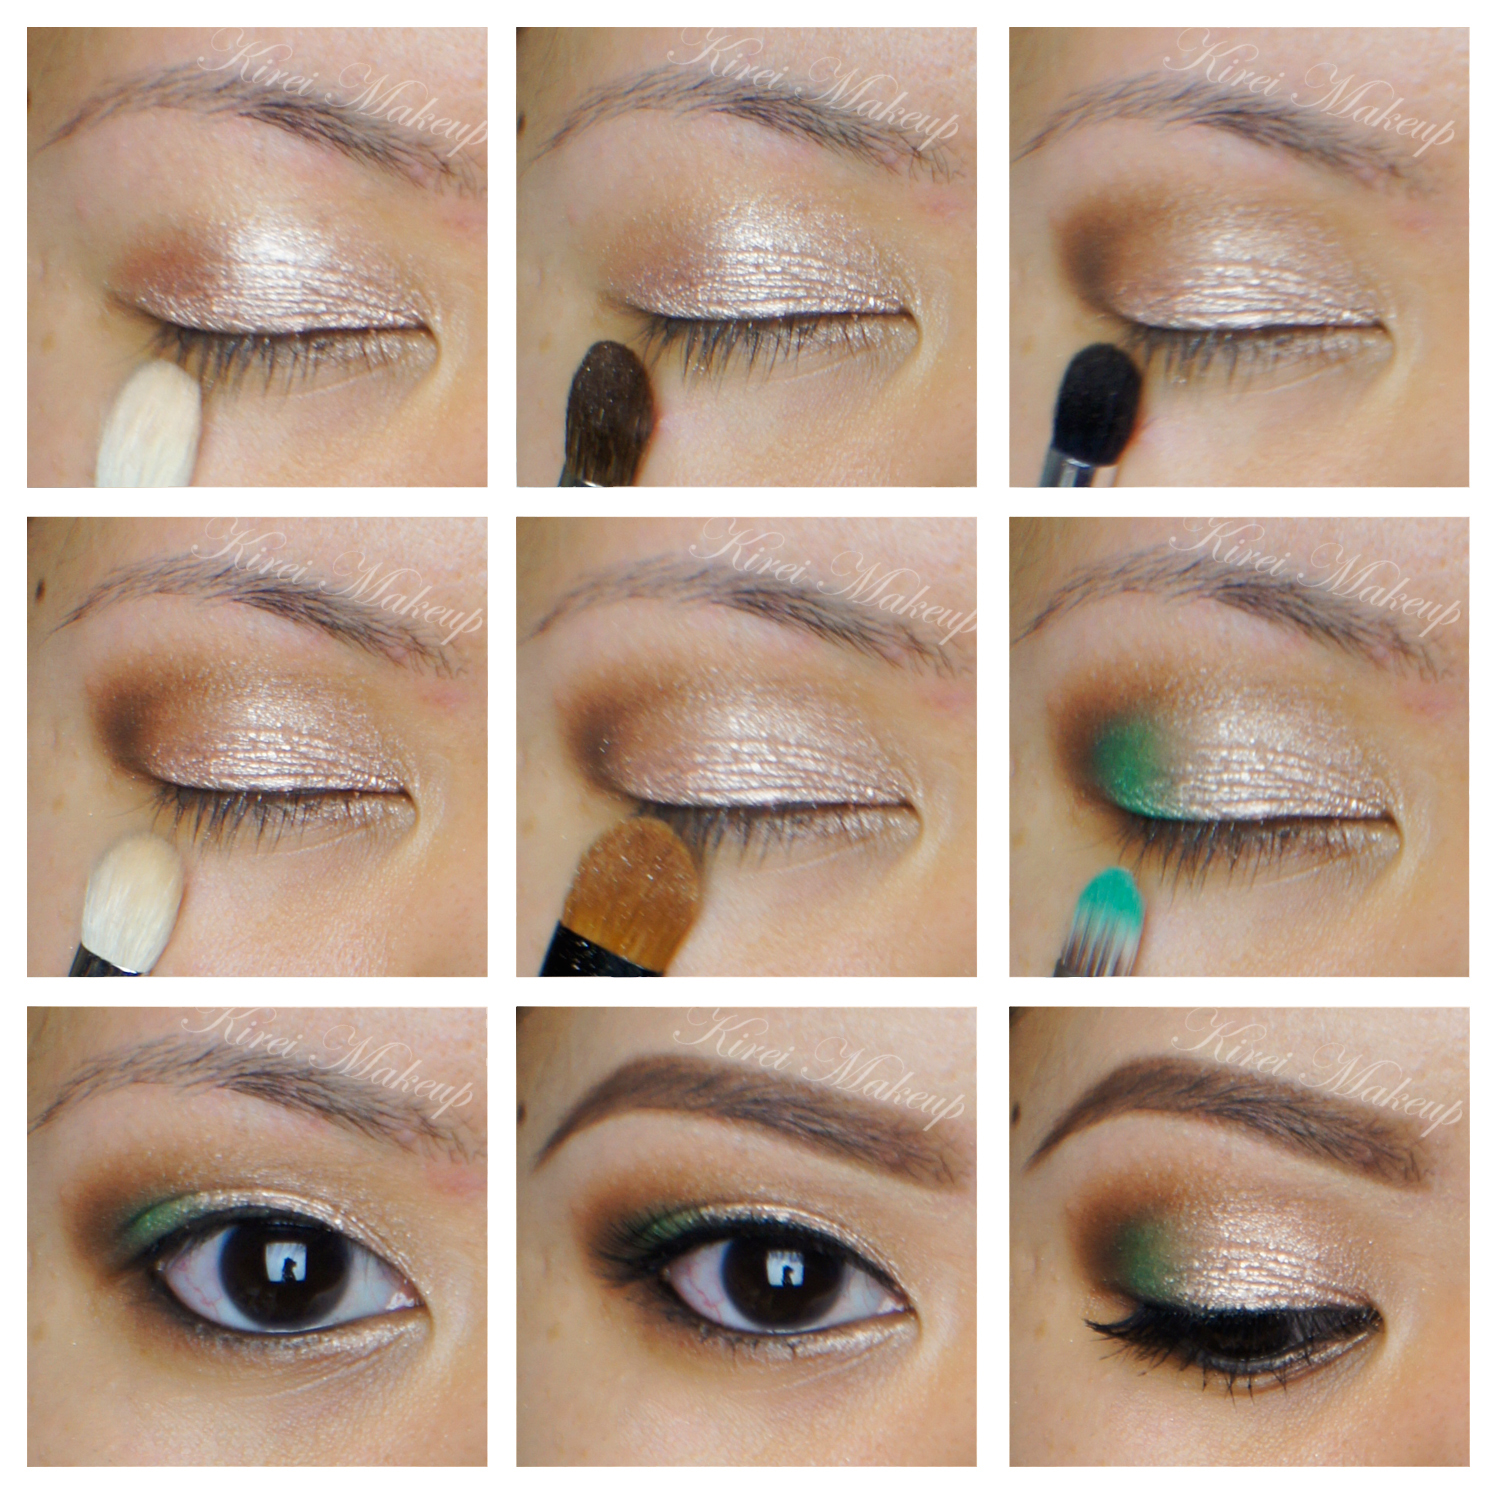
Eyelids are prepped using Urban Decay Primer Potion in Eden. All shades for the eyes are from Sleek Makeup iDivine Candy Palette.
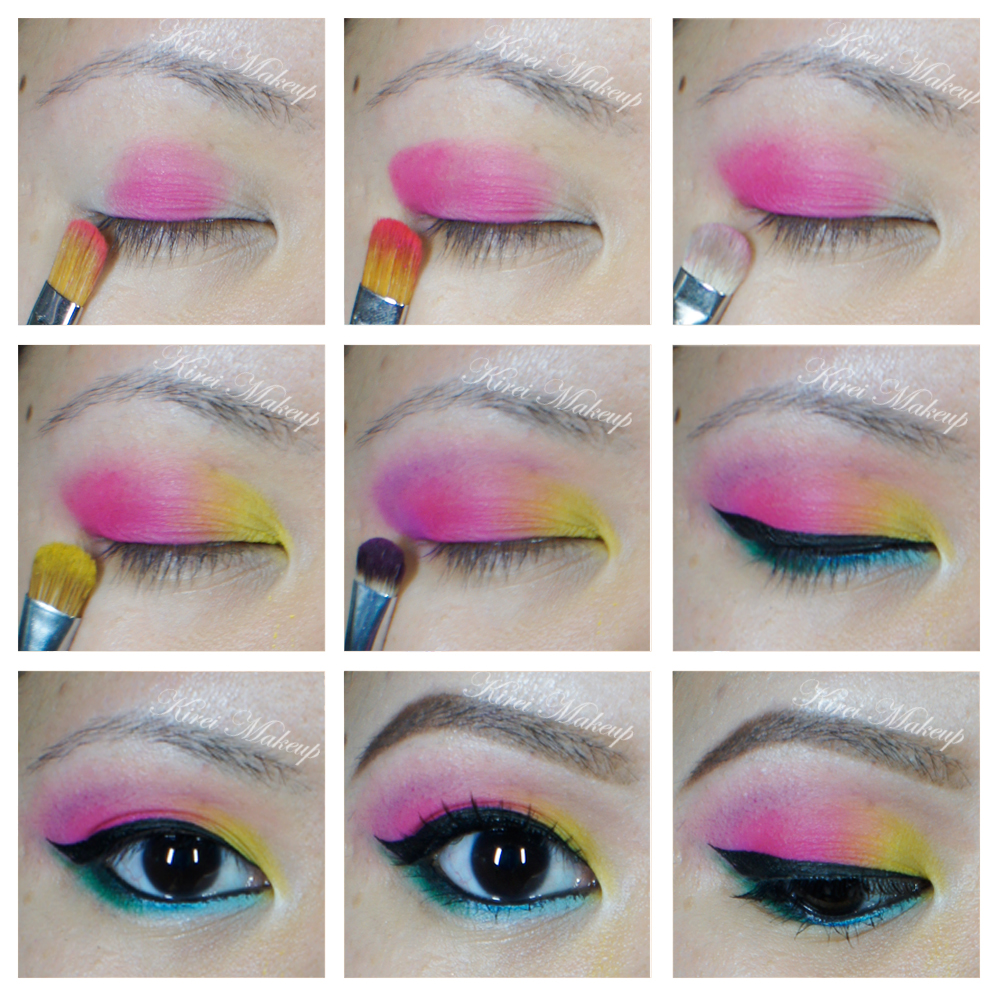
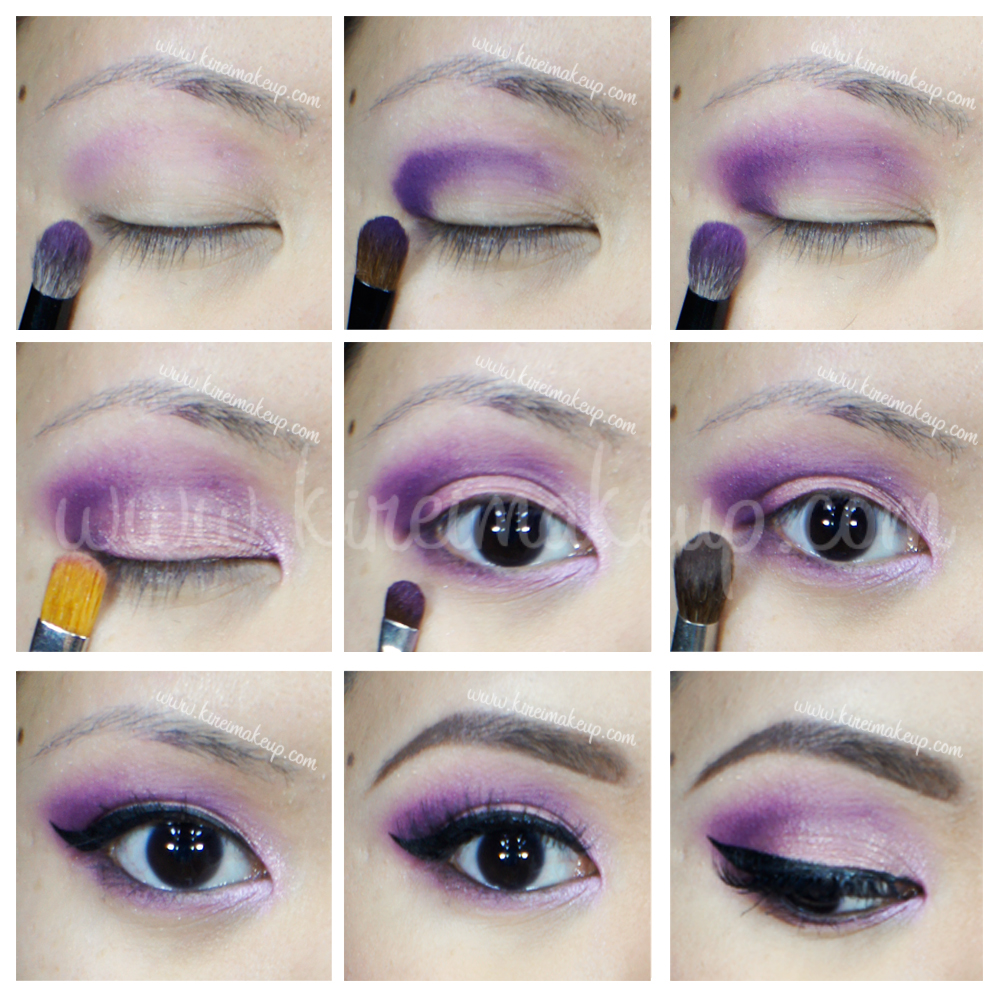
How-to:

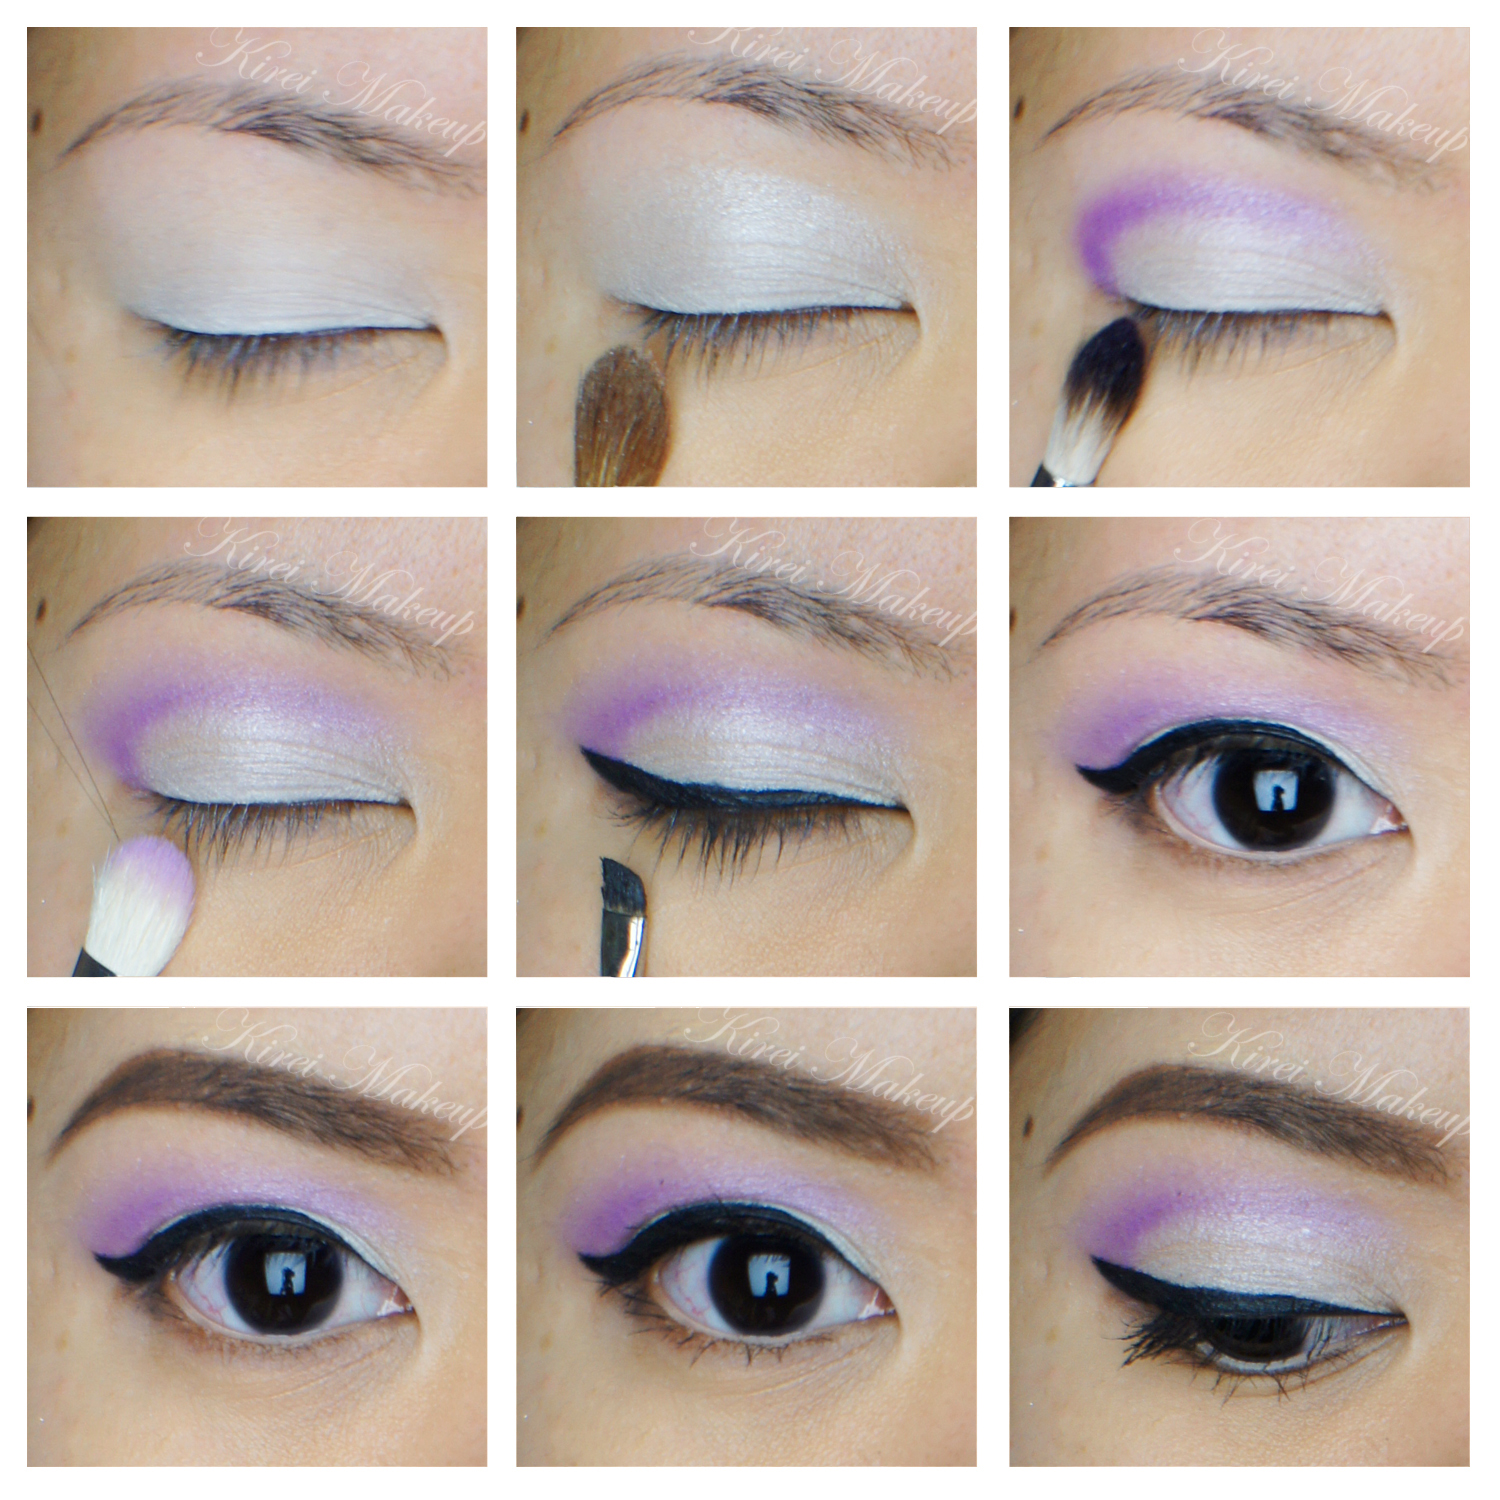
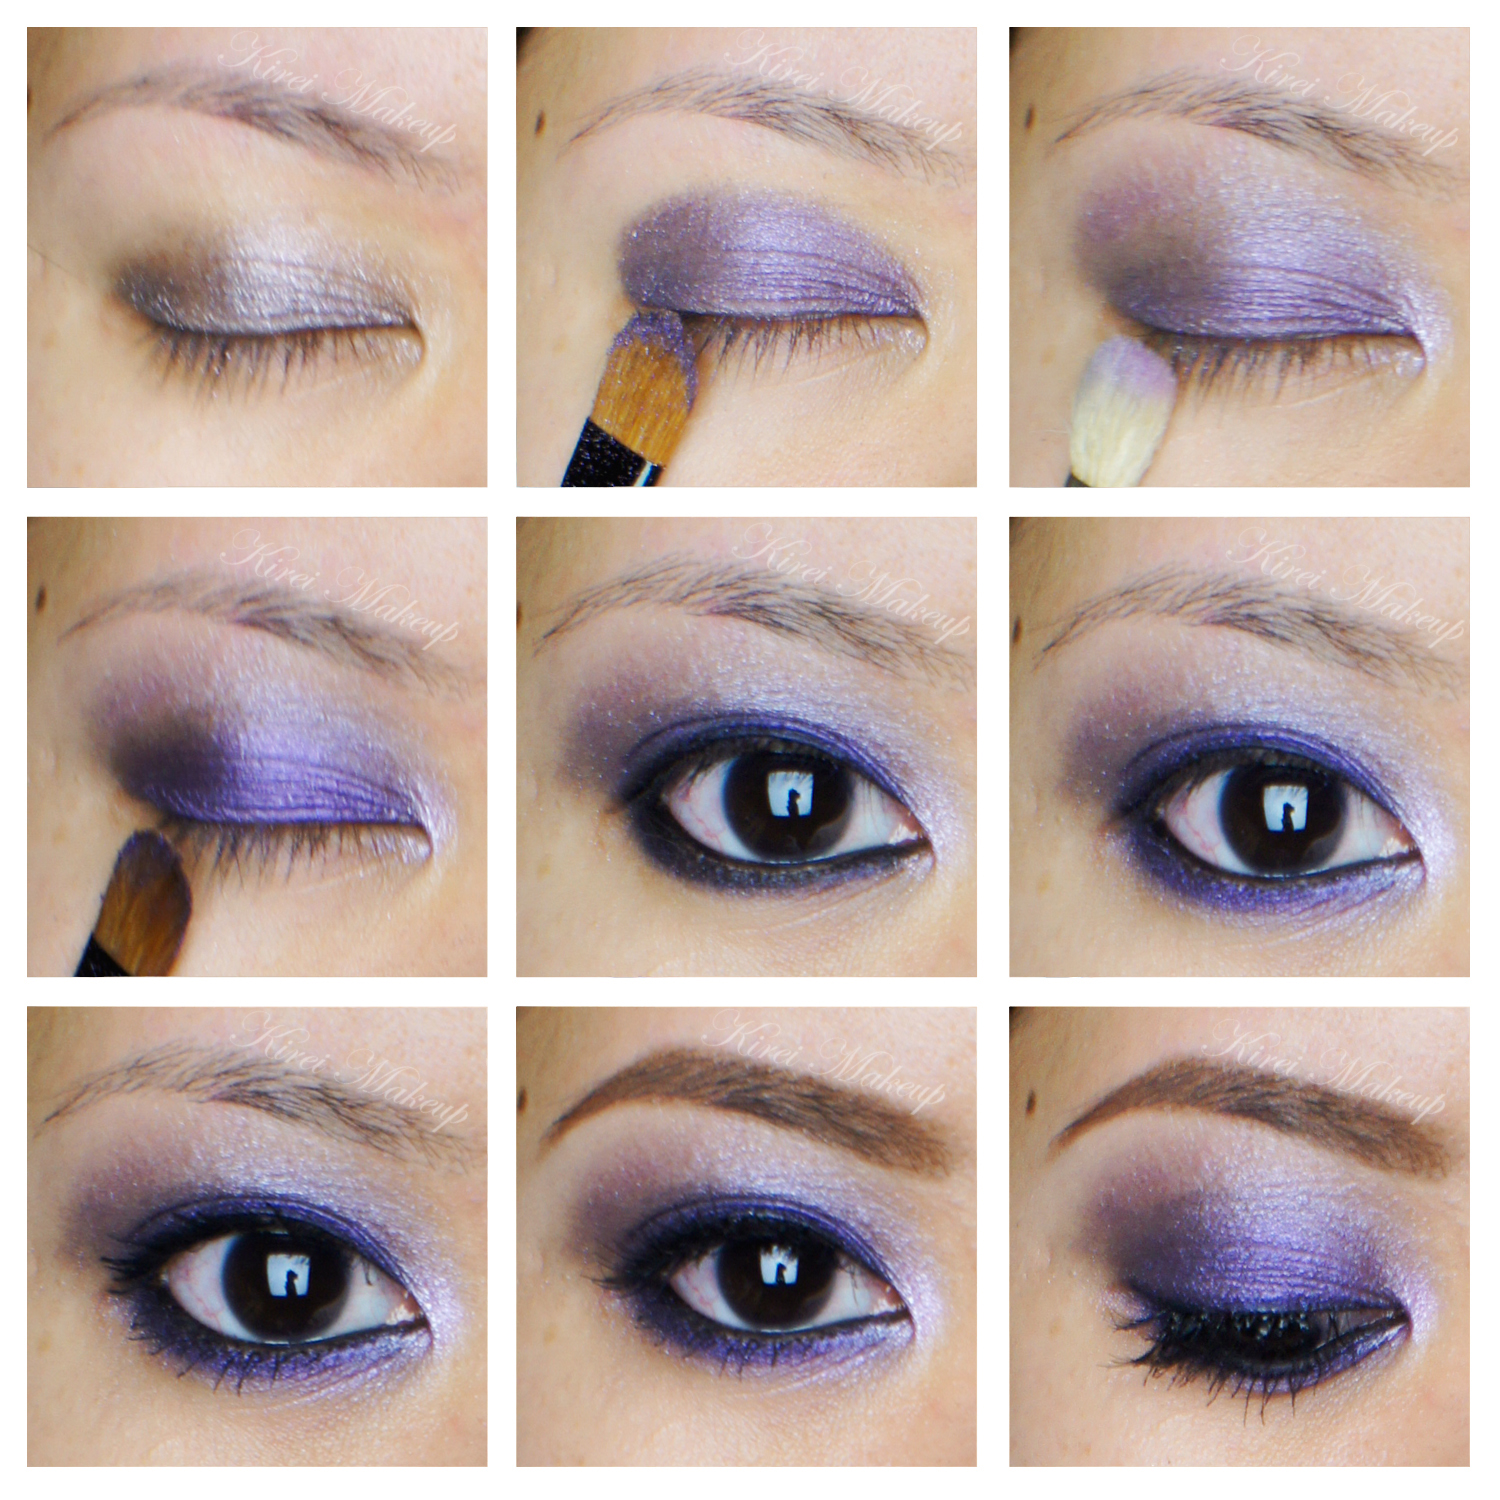
1. Using Smashbox bullet crease brush, I applied Flump slightly above my crease.

2. Using a small blending brush, I applied Parma Violet on the outer V and the crease. You can apply this using a small shader brush for a more precise application.

3. Using the same bullet crease brush as step 1, I blended out Parma Violet to remove any harsh edge on the crease. I also slightly winged the outer part.

4. Using a flat eyeshadow brush, I applied Aniseed all over my eyelid.

5. Using a small shader brush, I applied Bon Bon on the inner corner of my eyes, and then I applied Parma Violet along the lower lash line.

6. I used my face powder (MUFE 118 Pro Finish) and a blending brush under my brows, blending it into the purple shades slightly to remove any harsh edge.

7. I lined my upper lash line using Kanebo Kate Super Sharp Eyeliner. On the waterline, I applied black eyeliner pencil.

8. I curled my lashes, applied mascara, and then applied Ardell Demi Wispies lashes. (As you can see, Ardell demi wispies falsies are my current favorite lol).

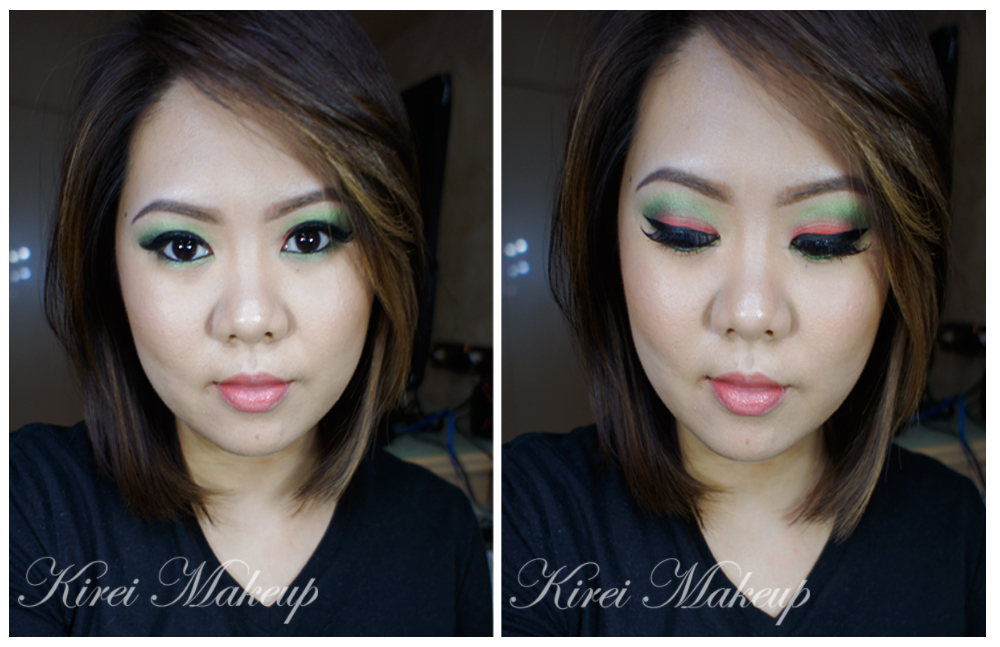
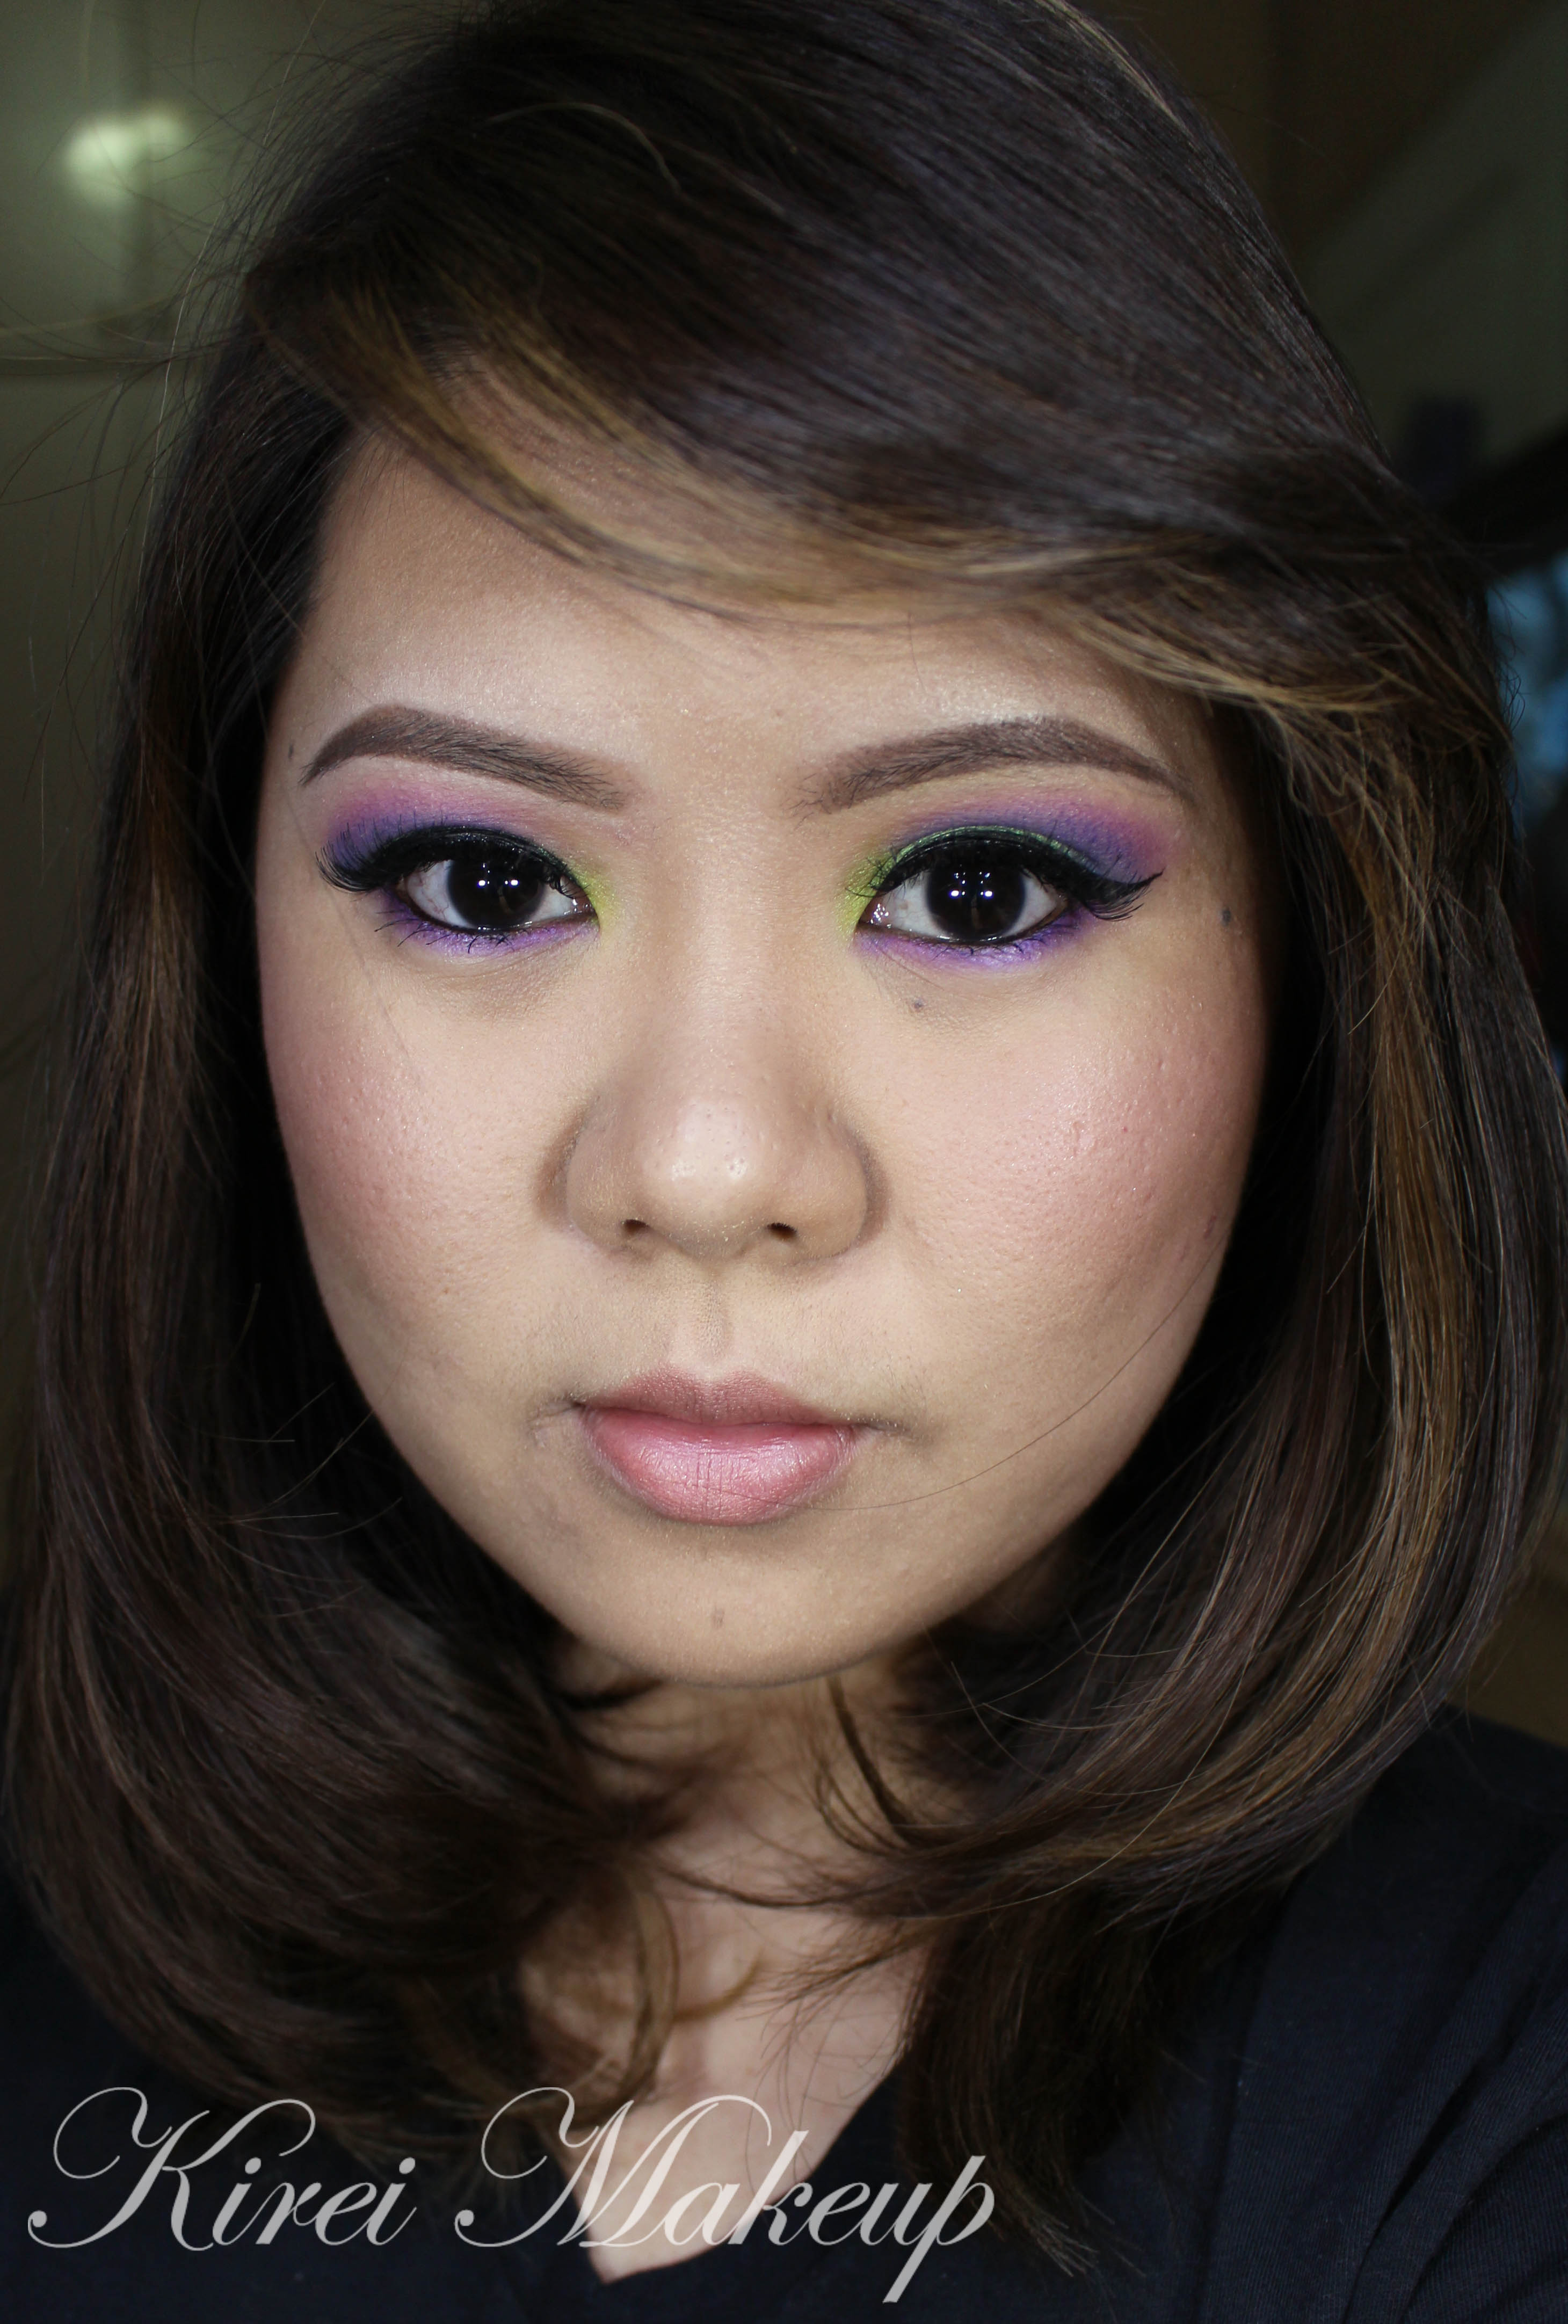
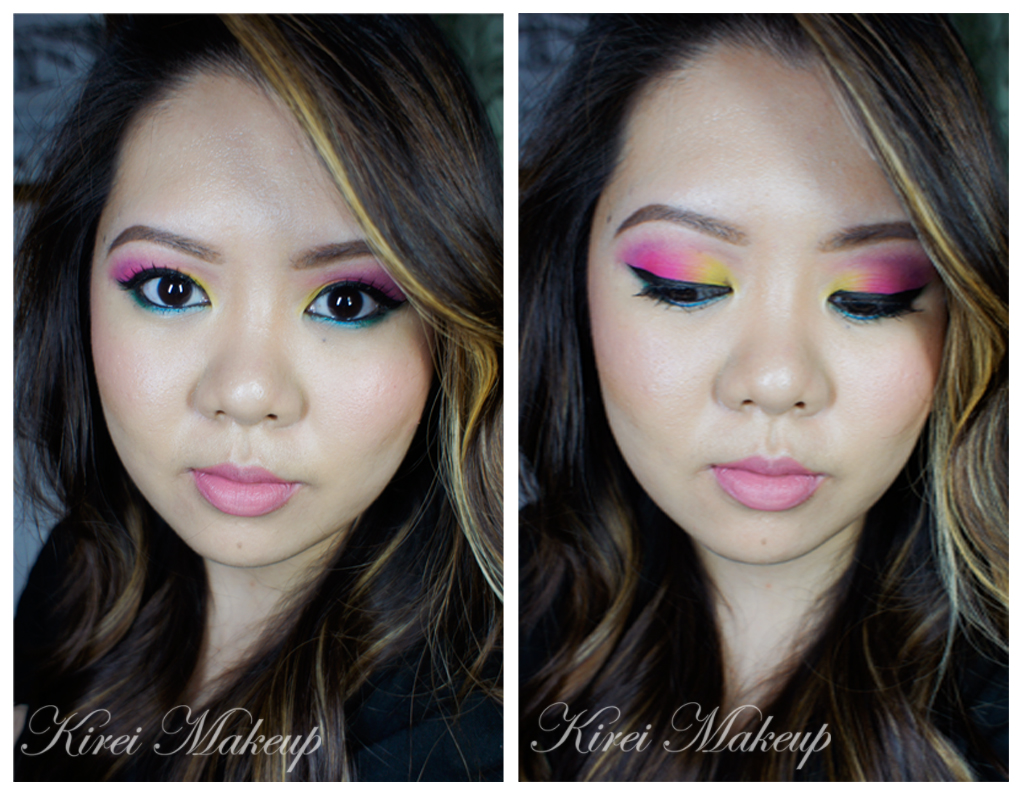
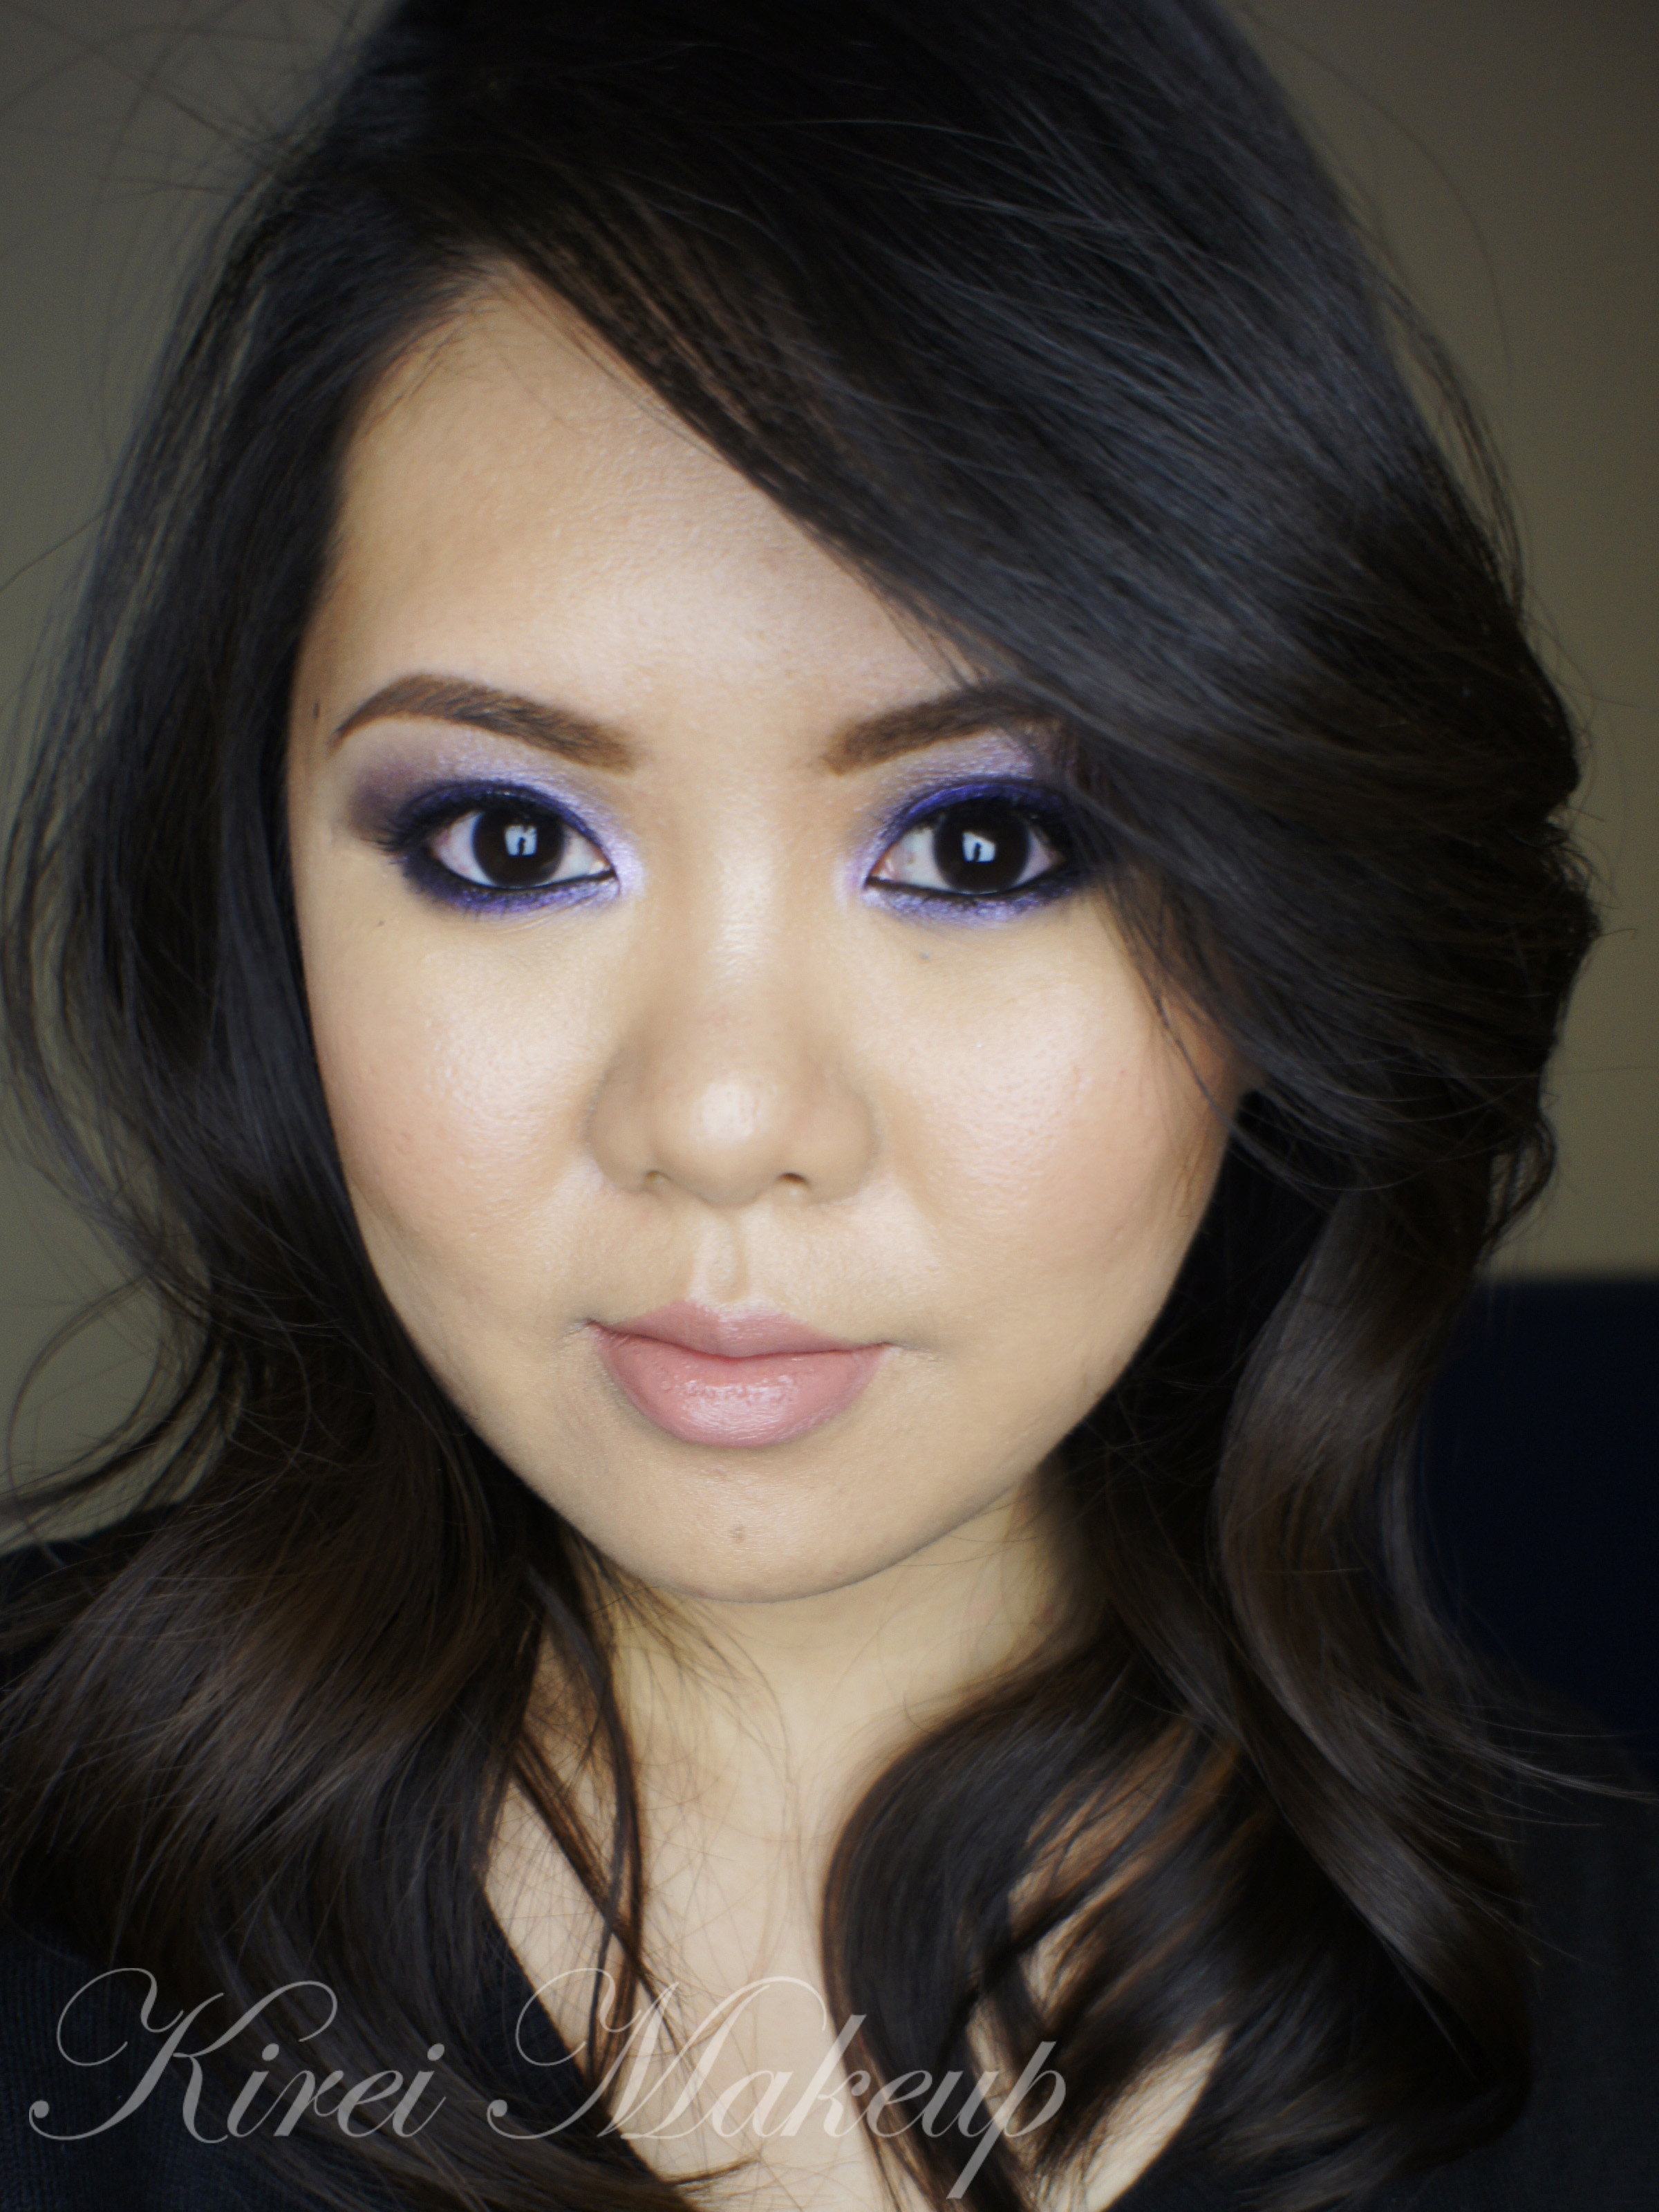
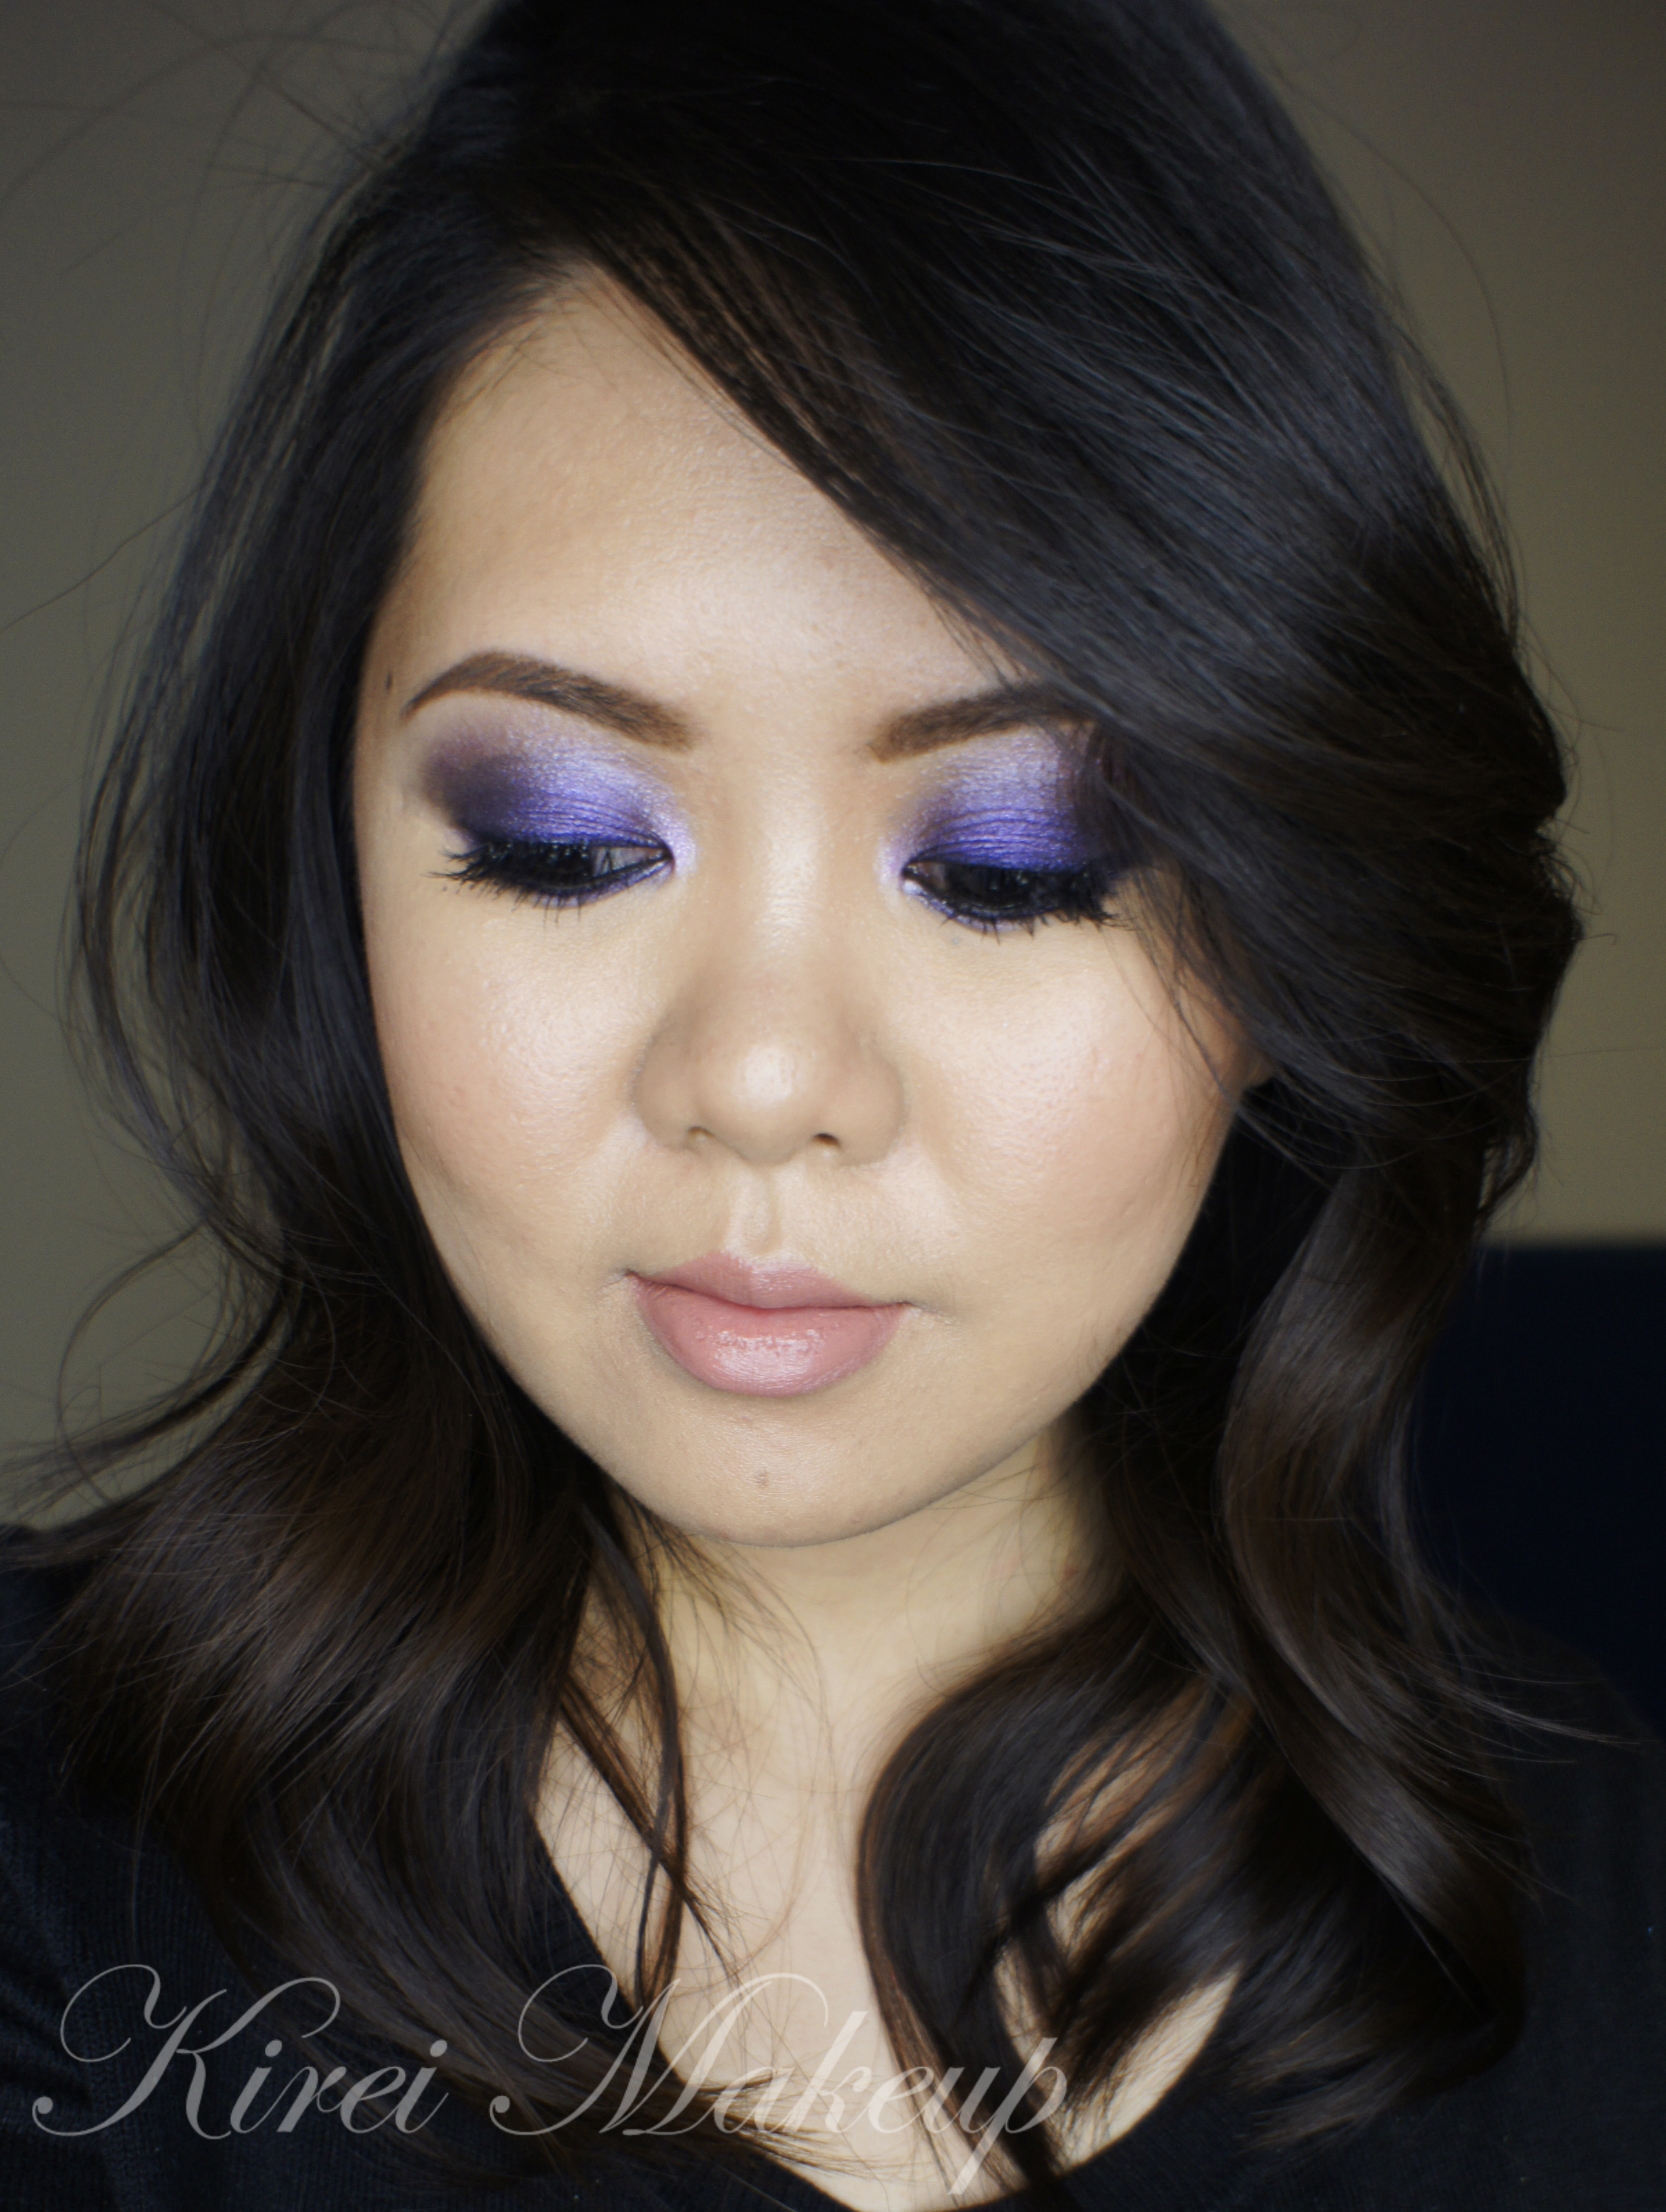
9. For the brows, I applied Anastasia Brow Wiz in Medium Ash. I lightly set it with Anastasia Brow Powder duo in Brunette.

sleek makeup candy tutorial

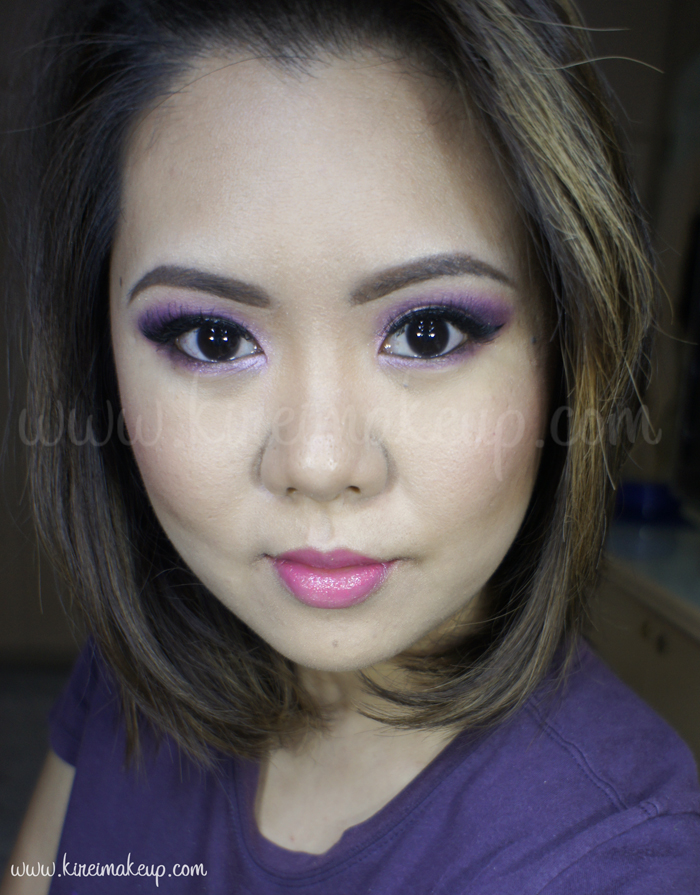
10. For my face, I applied Motives Fire highlight/contour palette. I applied the lightest highlight color on the high planes of my face – cheekbones, bridge of the nose, cupid’s bow, forehead, chin, below hollows of the cheeks, and under my eyes. I applied the darkest contour color on the hollows of my cheeks, sides of my nose, and temples. I blended them out using a damped beauty blender sponge and MUFE HD Foundation in 118.

11. For my cheeks, I applied Smashbox Halo blush in In Bloom.

12. For the lips, my new favorite, I applied L’oreal Color Riche Extraordinaire Liquid Lipstick in Rose Symphony

Urban Decay Electric Makeup Look #2

Another look using Urban Decay Electric palette! I will do a review and swatch the shades this week, promise! I was just playing with the colors for today’s look, and decided to post this tutorial up. I was expecting the orange shade, Slow Burn, to be a little bit lighter. However, it turned up to be quite dark, and has a lot more red in it. I think this color combo – green and orange, is a little bit different than I expected, but looks good nevertheless. I just love how easy it is to blend the shadows.

As always, scroll all the way to the bottom to skip the how-to, and get on the product list.ud electric makeup looks


How-to:

1. I prepped my eyelids using Urban Decay Primer Potion in Eden.

2. I applied Urban Decay Slow Burn all over my entire eyelid using a flat eyeshadow brush.

3. Using a shade brush, I applied Urban Decay Freak on my crease.

4. Using a small shader brush, I applied Lancome Strut on the outer V, blending the color in between the edge of Slowburn and Freak.

5. I applied Urban Decay Freak on the lower lid, and Lancome Strut on the outer half of the lower lid. I used an angled eyebrow brush for this.

6. I created a winged liner using Kanebo Kate Super Sharp eyeliner. On the waterline, I applied L’oreal Voluminous Smoldering eyeliner.

7. I filled my brows using Anastasia Brow Wiz in Medium Ash.

8. I curled my lashes, and applied L’oreal Carbon Black Mascara.

9. I also applied Ardell Demi Wispies falsies.

ud electric makeup looks

10. On my face, I applied CoverFX cream foundation in G40 (base), G20 (highlight), and N110 (contour).

11. On the cheeks, I applied Benefit Hervana blush.

12. I applied Clinique Mega Melon chubby lip tint.


Products used

Eyes – Urban Decay Electric palette (eyelid: Slowburn, crease and lower lid: Freak); Lancome Strut color design eyeshadow (outer V); Kanebo Kate Super Sharp eyeliner; L’oreal Voluminous Smoldering eyeliner; L’oreal Carbon Black mascara; Ardell Demi Wispies; Anastasia Beverly Hills Brow Wiz in Medium Ash.

Face – CoverFX cream foundation (G40: base, G20: highlight, N110: contour)

Cheeks – Benefit Hervana Blush.

Lips – Clinique Mega Melon chubby lip pencil.

Fun and Colorful Makeup using Urban Decay Electric

Hello, Jakarta! I’m home!!! How is everyone doing? Finally I’m able to post a new tutorial! Today’s tutorial is a fun, colorful, bright look using the new Urban Decay Electric palette! I bought this palette when I was in Toronto just last week, and I couldn’t wait to give it a try. Anyways, I’ll try to do a review of this palette next week.

Anyhooow, I just recently changed my camera to the Canon SL1, so I’m still trying to adjust the setting of the camera, and not to mention the way I take my selfie. So, if I do look awkward in the portrait photo, I do apologize. Not to mention, I’m not too happy with my haircut (my fringe especially), and have yet to go to my hairstylist here to get it fixed! If you are interested in the whole hair story please check my Instagram!

urban decay electric palette tutorial

How-to:

1. I prepped my lids using NYX Milk Jumbo Eyeshadow pencil. Then, using the brush that came with the palette, I applied  Chaos on the outer V and the crease.

2. Using a blending brush, I applied Savage just slightly above Chaos.

3. Using a flat eyeshadow brush, I applied Freak on the eyelid, and Thrash on the inner corner of the lid.

4. On the lower lid, I applied Urban using a the small shader brush that came with the palette.

5. I lined my waterline using L’oreal Voluminous Smoldering Eyeliner.

6. On the upper lash line, I applied a winged eyeliner using Kanebo Kate Super Sharp eyeliner.

7. I curled my lashes, and applied a sample mascara from Estee Lauder on both my upper and lower lashes.

8. I also applied Ardell Demi Wispies lashes.

9. I filled my brows using Anastasia Brow Wiz in Medium Ash.
urban decay electric palette

10. On my face, I applied Hourglass Immaculate foundation (not a big fan of this one..may be i shouldn’t have gotten the one for oily skin..lol)

11. I also applied a concealer from Motives Ice palette  below and above my eyebrows.

12. I lightly contoured my face using Motives Ice palette as well.

13. I applied MAC Dainty on my cheeks.

14. On my lips, I applied Revlon Flashing Lights colorstay ultimate suede lipstick.


Products used

Eyes – NYX Milk Jumbo Eyeshadow pencil; Urban Decay Electric palette (Outer V/crease – Chaos, above crease – Savage, lid – Freak, inner corner – Thrash, lower lid – Urban) ; Kanebo Kate Super Sharp eyeliner; L’oreal Voluminous Smoldering eyeliner; Ardell Demi Wispies false eyelashes; Anastasia Brow Wiz in Medium Ash.

Face – Hourglass Immaculate foundation; Motives Ice palette; MAC Dainty.

Lips – Revlon Flashing Lights lipstick.


Colorful Carnival Makeup

As Easter is approaching this weekend, and Carnival next weekend, I wanted to do a tutorial that incorporates super bright and really fun colors onto my makeup. This Colorful Carnival Makeup look is inspired by the ladies in Jamaica, who are unafraid to wear bright eyeshadows!

I used Sleek Makeup Ultra Matte Brights V1 for the eyeshadows since I really wanted to use matte eyeshadows for this look. If you do decide to use this palette for your makeup, I suggest that you use a white base (i.e. NYX Jumbo pencil in Milk) so the colors pop even more.

Again, don’t forget to check my Instagram for daily updates since I’ll be away from my laptop this weekend! Remember to TAG your work with #KIREIMAKEUP so I can see and get inspired by YOU! 😉

Scroll all the way down for products list.

sleek makeup matte bright tutorial

All eyeshadows used in this tutorial is from Sleek Makeup Ultra Matte Brights V1. If you are in Asia, and you want to buy this palette, please check Luxola website! Use the code LXBLOG for 15% off!

How-to:

1. I prepped my eyelid using NYX Jumbo Pencil Shadow in Milk on both upper and lower lid.

2. I applied Pucker in the middle of my eyelid using a flat eyeshadow brush.

3. Using the same brush, I applied Pout on the outer part of my eyelid.

4. Using a clean shader brush, I blended out the edge of Pucker and Pout to remove any harsh edge.

5. I applied Bammi on the inner corner of the eyelid using a flat eyeshadow brush.

6. (Optional) I applied Sugarlite on my crease using a small shader brush. Optional step since the purple isn’t dark enough.

7. (Not in picture) I applied Floss on the crease using a blending brush as a transition color.

8. I lined my upper lash line with Kanebo Kate Super Sharp Eyeliner. On my waterline, I applied L’oreal Voluminous Smoldering eyeliner.

9. On the lower lid I used an angled eyebrow brush and  applied Chill on the inner corner, Bolt in the middle, and Dragonfly on the outer part.

10. I curled my lashes and applied Cover Girls Lash blast mascara on both upper and lower lashes.

11. I also applied Gwiyomi “Yuki” False Eyelashes (Indonesian store, check my Instagram if you want to buy).

12. I filled my brows using Anastasia Brow Wiz in Ash Blonde and Brunette.rainbow makeup

13. On my face, I applied Cover FX cream foundation in G40 using MAC Masterclass Brush Oval 6.

14. Very lightly, I applied Cover FX cream foundation in G20 under my eyes. I set my base using CoverFX translucent powder.

15. On my cheeks, I applied MAC Dainty blush.

16. I lined my lips using L’oreal Color Riche Lip Liner in Beyond Pink, and applied MAC Please Me Lipstick using a lip brush.


Products used

Eyes – NYX Jumbo Pencil Shadow in Milk; Sleek Makeup iDivine Ultra Matte V1 Brights; Kanebo Kate Super Sharp eyeliner; L’oreal Voluminous Smoldering eyeliner; Cover Girl Lash Blast mascara; Gwiyomi “Yuki” false eyelashes; Anastasia Brow Wiz in Ash Blonde and Brunette.

Face – CoverFX cream foundation in G40 (base) and G20 (under eyes); CoverFX translucent powder; MAC Dainty blush.

Lips – L’oreal Color Riche Lip Liner in Beyond Pink; MAC Please Me lipstick.

Kat Von D Esperanza Tutorial #1

If you guys follow me on Instagram (you should, btw!), you would know that I’ve posted a little sneak peek on today’s tutorial there. Today, I wanted to do my first Kat Von D Esperanza tutorial, using the mint eyeshadow as the main focus. If you are wondering why the pictures on the step-by-step is a bit off in terms of the color, it’s because the Sun was playing hide and seek with me today. Luckily, the sky cleared up, and I managed to get good shots for the final looks!

I’ll try to post a review for this palette some time this week. I prepped my eyelids using UD Primer Potion, which I think didn’t work too well for this look. May be for future tutorial, I might use a white-colored base (i.e. NYX Jumbo Pencil in Milk) OR a mint-colored base for the lid. I feel that the mint eyeshadow that I used doesn’t have much color on it, and look slightly chalky.

All eyeshadows mention are from Kat Von D Esperanza palette. If you want to find out the product I used and skip the how-to, scroll all the way down.

How-to:

1. After prepping my lid using UD Primer Potion, I applied Archangel using a flat eyeshadow brush.

2. Using Sigma E25 Blending Brush, I applied Placebo slightly above the crease.

3. Using the tip of a flat eyeshadow brush (like the Sigma E54 Medium Shader brush), I applied Santeria on the crease and outer V.

4. Using the same Sigma E25 blending brush that I used on step 2, I blended out Santeria.

5. Using a fluffy blending brush (like the Sigma E38 Diffused Crease brush), I applied South under the brow. I also buffed South slightly on to my crease.

6. Using a small shader brush, I applied Archangel on the inner corner of the lower lid, and Selena on the outer corner.

7. (not in picture), I applied Danglo on top of Archangel using a flat eyeshadow brush.

8. I created a winged eyeliner using Kanebo Kate Super Sharp eyeliner, and lined my waterline using L’oreal Voluminous Smoldering eyeliner.

9. I curled my lashes and applied Cover Girl Lash Blast Mascara.

10. I filled my brows using Anastasia Brow Wiz in Ash Blonde, and then I set it using Faint eyeshadow from the Naked Basic palette.

Kat Von D Esperanza makeup tutorial

11. On my face, I applied UD Naked Skin foundation using a damped makeup sponge.

12. I set my face using NARS Setting Powder.

13. I lightly contoured my face and nose using MAC Blunt.

14. On my cheeks, I applied Chanel Blush de Horizon.

15. Lastly, on my lips, I applied L’oreal Color Riche lipliner in Beyond Pink, top it off with Revlon Socialite suede lipstick and a little tiny bit of clear lip balm from L’occitane.Kat Von D Esperanza eye makeup

I took the pictures above in a room with big windows and natural day light. For the pictures below, I actually stepped out of the house and took the pictures outdoor with the Sun somewhat behind me. As you can see, in both pictures, my makeup is not heavy at all, esp. for the face. The focus is still on the eyes, while the skin is left pretty natural looking.

If you are curious about my hair, please check my post on Highlights for Brunette.

Kat Von D Esperanza tutorial

Products used:

Eyes – Kat Von D Esperanza palette; Kanebo Kate Super Sharp eyeliner; L’oreal Voluminous Smoldering eyeliner; Cover Girl Lash Blast Mascara; Anastasia Brow Wiz in Ash Blonde; Faint eyeshadow (Naked Basic palette).

FaceUD Naked Skin foundation; NARS Setting Powder; MAC Blunt; Chanel Blush de Horizon.

Lips – L’oreal Color Riche lipliner in Beyond Pink; Revlon Socialite suede lipstick; clear lip balm from L’occitane.

Recommended Sigma brushes – Sigma E25 Blending Brush; E54 Medium Shader brush; Sigma E38 Diffused Crease brush.

Disclaimer: clicking on the Sigma link will take you to my Sigma affiliate page. Any purchase you make on Sigma from my website will help in this blog’s maintenance. Rest assured, I only recommend products that I honestly love and use on myself. Thank you for your support!

Adding Color to Eye Makeup

Hello, everyone! I hoped you guys had a great Valentine’s and Family day weekend, yes? I had quite a blast this weekend, so I do wish that all of you had an awesome time too! I just want to let you guys know that I might not be able to update my blog this week. I’ll be traveling again, and if you want to find out where’s my next destination, follow me on Instagram!

For today’s post, I want to show you how you can add color to your eye makeup. I’ve done a “pop of color” tutorials throughout my blog – using eyeliner, on the inner corner, or on the lower lid. This time, I added the color on the outer part of my eyelid. I think it’s cute, and different, totally  unexpected! This look would be great for those who would like to try out colored eyeshadow, but doesn’t want to go full on colors with it.

For the neutral shades, I used my Smashbox Full Exposure palette, but obviously you can use any palettes you’d like. In addition, for the face makeup, I actually used it to do my Highlight, Blush, Contour (bacon) post. So, head over there to find out how I contour my face.

Scroll all the way to the bottom to find out which products I’ve used for this post – this is a new thing I’m trying to do, so you don’t have to read the step-by-step list to figure out what I’m using.

neutral smoky eyes with color

How-to:

1. I applied MUFE Aqua Cream no. 13 on my eyelid using my finger. Then I buffed the cream eyeshadow out using a clean fluffy blending brush.

2. I applied M3 eyeshadow from Smashbox Full Exposure palette on my crease using a crease blending brush.

3. Using Sephora bullet crease brush, I applied M1 from Smashbox Full Exposure palette on the outer V, dragging it ever so slightly towards the crease.

4. Using a clean blending brush, I blended out any harsh edge.

5. I applied S3 from Smashbox Full Exposure palette on my eyelid using a flat eyeshadow brush.

6. Using a clean flat eyeshadow brush (I used UD eyeshadow brush), I applied Dragon Fly from Sleek Makeup Ultra Mattes V1 Brights next to M1. I patted this eyeshadow on the outer corner, carefully blending it towards S3.

7. I lined my waterline and tightline using L’oreal Voluminous Smoldering eyeliner.

8. I applied M1 on the outer part of the lower lid, and S3 on the inner part.

9. I curled my lashes and applied Buxom Lash mascara on both upper and lower lashes.

10. I filled in my brows using Anastasia Brow Wiz.

day smoky eyes with color

11. I applied CoverFX Cream foundation in G40 as base, G20 as highlight, and N110 as contour.

12. On my cheeks, I applied Maybelline Master Glaze in Make a Mauve.

13. I set my face using CoverFX Translucent Loose powder.

14. On my lips, I applied Clinique Chubby Stick lip pencil in Bountiful Blush.

Products used:

Eyes – Smashbox Full Exposure Palette in M3 (crease), M1 (outer V), S3 (eyelid); Sleek Makeup Ultra Mattes V1 Bright (Dragonfly); L’oreal Voluminous Smoldering eyeliner; Buxom Lash Mascara; Anastasia Brow Wiz in Brunette and Ash Blonde.

Face – Cover FX Cream foundation in G20, G40, N110; Maybelline Master Glaze in Make a Mauve; Cover FX Translucent Loose Powder; Clinique Chubby Stick Lip Pencil in Bountiful Blush.

Coral Eyes with Sleek Makeup Showstoppers

Alright! So, I’ve been wanting to do another tutorial using Sleek Makeup Showstoppers palette (if you are in Southeast Asia region, you can buy it from Luxola). I wanted to use the coral shade since it’s so pretty! I’ve done another tutorial using the same palette in my Smoky Purple post.

Oh also, I’ve done some research regarding the names of the eyeshadows in this palette. Apparently, there was a misprint on the labels that came inside this palette. The correct names for each shade is as the picture below. Thanks to Gloria from Beautiful with Brains for clarifying it on her blog!

sleek-makeup-Showstoppers-Shades

Please note that on picture in the bottom left corner, my eyeliner might look weird but I can assure you it is not. It’s because the camera couldn’t focus on my eyelashes, which is so frustrating! Anyways, I might have to invest in a better lens.

Anyways, my eyelids are prep using Smashbox eyelid primer.

How-to:

1. I applied Oh So Special all over my eyelid using a flat eyeshadow brush.

2. Using a clean blending brush, I applied Sunset above my crease.

3. I packed on Noir on the outer V using an angled eyeshadow brush. Lightly, I dragged Noir on to my crease.

4. Using another clean blending brush, I blended Noir out using a small circular motion.

5. I applied Noir using an angled eyebrow brush on the outer half of my lower lash line. I also applied Sunset on the lower lash line on the inner half.

6. Using a small shader brush, I applied Storm on the inner corner of my eyes.

7. I also created a winged eyeliner using Kanebo Kate Super Sharp eyeliner.

8. I lined my waterline using L’oreal Voluminous Smoldering eyeliner.

9. I curled my lashes and applied Cover Girl Lash Blast mascara, and applied false eyelashes.

10. I filled my brows using Anastasia Brow Wiz in Brunette.

sleek showstoppers makeup

11. On my face, I applied Smashbox Halo foundation using Sigma Round Kabuki brush.

12. I concealed my under eyes using MUFE Concealer palette no. 3 – the salmon colored shade.

13. I applied contour on my nose and under my cheeks using L’oreal Super-Blendable Crayon Concealer in W6-7-8. I blended it out using CoverFX cream foundation brush.

13. On my cheeks, I applied Maybelline Face Studio Master Glaze in Make a Mauve, blending it out using my finger.

14. I set my face using MUFE Pro finish powder.

15. I applied Revlon Mauve It Over matte lipstick on my lips.

sleek showstoppers makeup

Wearable Purple Eye Makeup

How is everyone this week? It’s been really cold here in Canada! If you are anywhere in the colder region, keep yourself warm, yes?! Anyways, due to the cold gloomy weather, I wanted to create a look in which I incorporated a little bit of colour. I’ve decided to do a wearable purple eye makeup. It’s super simple and easy, you can use any colour of your liking on the crease. I chose purple just because I think it’ll look great on every eye colours.

The trick to this light colored eye makeup is to use a black mascara and eyeliner to tie the whole look together. Black mascara and eyeliner are a must with this look since the eyeshadows used in this tutorial is quite light, and I didn’t use any contour colour on the crease.

Wearable purple makeup

How-to:

1. I applied NYX jumbo eyeshadow pencil in Milk all over my eyelid using my finger.

2. Using a fluffy blending brush (or you can use a flat eyeshadow brush), I applied Bad Girl from Sleek Makeup Showstoppers palette all over the lid.

3. Using a clean fluffy crease brush, I applied MUFE purple eyeshadow no. 92 on the crease.

4. I blended the purple eyeshadow slightly using a clean blending brush, blending the eyeshadow upwards above the crease.

5. I created a winged eyeliner using an angled eyeliner brush and L’oreal Infallible Gel Lacquer Liner in Blackkest Black.

6. Using a clean angled eyeliner brush, I applied UD Faint eyeshadow along the lower lash line.

7. I also lined my waterline using MAC Chromagraphic pencil eyeliner in NC15.

8. I filled my brows using Anastasia Duo Brow Powder in Brunette.

9. I curled my lashes, and applied Clinique High Impact Mascara on both upper and lower lashes.

Feel free to add false eyelashes to make your eyes look more wide awake. I ran out of falsies, so I didn’t apply any.

Jlo american idol sf audition makeup

10. On my face, I applied Smashbox Halo foundation all over using Sigma Flat Kabuki brush.

11. I applied MAC Pro Conceal/Correct palette in yellow corrector under my eyes, and on the bridge of my nose.

12. I lightly contour my face using MAC Skinfinish natural in Medium Deep.

13. I applied MAC Dainty blush on my cheeks.

14. On my lips, I applied Revlon Colorstay Ultimate Suede lipstick in Socialite, and added a few dabs of YSL Glossy Stain in Peche Cerra-Colla (27).

L’oreal Infallible Purple Obsession

I was watching Lisa Eldridge Purple Glitter youtube video, and wanted to re-create that look on myself. It definitely looks amazing, and since I do own a pot of purple glitter I wanted to give it a shot. I do not have all the products that she used on the video, so I had to improvise with whatever I owned. I also modify it so it suits me.

Anyways, halfway through my tutorial, I realized I couldn’t open up my glitter. The purple glitter is at the bottom container of my glitter stack, and I guessed I didn’t close it properly last time. So, I omitted the glitter out of the equation.

So, to make the purple pops even more, I decided to apply L’oreal Infallible Purple Obsession eyeshadow with a wet brush. I love using the L’oreal Infallible eyeshadows wet. It gives such great intensity and has a nice sheen to it!

purple smoky eyes

How-to:

1. I applied Chanel Illusion d’Ombre in Illusoire on my eyelid using my finger.

2. Using a flat eyeshadow brush, I applied L’oreal Infallible eyeshadow in Purple Obsession.

3. Using a fluffy blending brush, I applied Lotus Flower from Sleek Makeup iDivine Snapshot above the crease and on the inner corner of the lid.

4. At this point, I realized I couldn’t open my purple glitter, so I decided to wet my flat eyeshadow brush and re-applied L’oreal Infallible Purple Obsession eyeshadow on the lid.

5. I lined my upper and lower lashline, as well as waterline using L’oreal Infallible Gel Lacquer Liner in Blackest Black (using the brush that comes with it).

6. Using a pencil brush, I applied L’oreal Infallible Purple Obsession on the lower lid.

7. I curled my lashes, and applied L’oreal Voluminous Carbon Black mascara on both top and lower lashes.

8. I applied several individual false eyelashes (camera didn’t pick those lashes) on the upper lashes.

9. I filled my brows using Anastasia Brow Powder in Brunette.

L'oreal Infallible Purple Obsession

10. On my face, I applied L’oreal Magic Lumi foundation using a foundation brush.

11. I applied YSL Cream Blush no. 2 on the cheeks.

12. I also applied MAC Pearl cream base using my finger on the bridge of my nose, on top of my cheekbones, cupid’s bow and chin.

13. On my lips, I applied L’oreal Color Riche lipliner in Beyond Pink, and added L’oreal Color Caresse Shine Stain in Eternally Nude. (I feel like this makes lips look bigger than usual..lol)

purple smoky eyes

New Year 2014 Makeup #1

Today’s tutorial is not really intended to be a tutorial. I just bought a bunch of makeup products from Sephora and MAC – foundation and lipstick, so I wanted to play around with it.

As you all know, this coming Spring 2014 Pantone Color of the Year is Radiant Orchid. For my look #1 New Year 2014 Makeup, I wanted to incorporate a little bit of purple into the look, but still want to make it very wearable. I used Sleek Makeup iDivine Showstopper in Sparkle just very lightly above my crease to add the color.

*A note about Sleek Makeup Showstoppers palette: the names of the eyeshadows that come with my palette somehow do not match the eyeshadow colors itself. So, I googled up this palette and it seems that other bloggers have, what I feel, is the correct match. For this reason, I’m going to follow the “correct” name instead of the ones that came on my palette.

I actually didn’t plan to add the purple color above my crease, but I decided to at the very last minute. If you decide to use this look, feel free to change the second step from this tutorial – use purple instead of the brown.

new year makeup look

How-to:

1. I prepped my lids using Chanel Illusion d’Ombre in Emerveille. You can use any primer you like.

2. Using a fluffy blending brush, I applied the bronze (middle color) eyeshadow from Ombres Matelassees de Chanel – Charming just slightly above the crease.

3. Using Sephora Pro Visionary Bullet Crease, I applied the 2nd darkest color from Ombres Matelassees de Chanel – Charming on the outer V and on my crease.

4. Using a flat eyeshadow brush, I applied the lightest color from Ombres Matelassees de Chanel – Charming on my eyelid.

5. I lined my waterline, tightline, upper and lower lashline using L’oreal Voluminous Smoldering eyeliner.

6. Using a clean fluffy blending brush, I applied Sparkle eyeshadow from Sleek Makeup Showstopper right above my crease.

7. Using a large angled eyebrow brush, I applied Noir eyeshadow from Sleek Makeup Showstopper on the lower lash line.

8. I curled my lashes and applied L’oreal Carbon Black mascara on both upper and lower lashes.

9. I applied Ardell 109 false eyelashes on the upper lash line.

10. I filled my brows using Anastasia Brow Wiz in Brunette.

11. Under my brows (not in picture), I applied the lightest color from Ombres Matelassees de Chanel – Charming using a clean blending brush. I did this to blend out the purple eyeshadow.

12. My hair is set using velcro rollers.

new year makeup 2014

12. I applied Giorgio Armani Maestro foundation all over my face using a Sigma Round Kabuki Brush.

13. I contoured my face using Smashbox Contour/Highlight trio palette (discontinued), and I applied MAC Dainty blush on the cheeks.

14. On my lips, I applied MAC Please Me lipstick.

For a different look using the Sleek Makeup iDivine Showstopper palette, you can check my Smoky Purple Tutorial.