Coral Eyes with Sleek Makeup Showstoppers

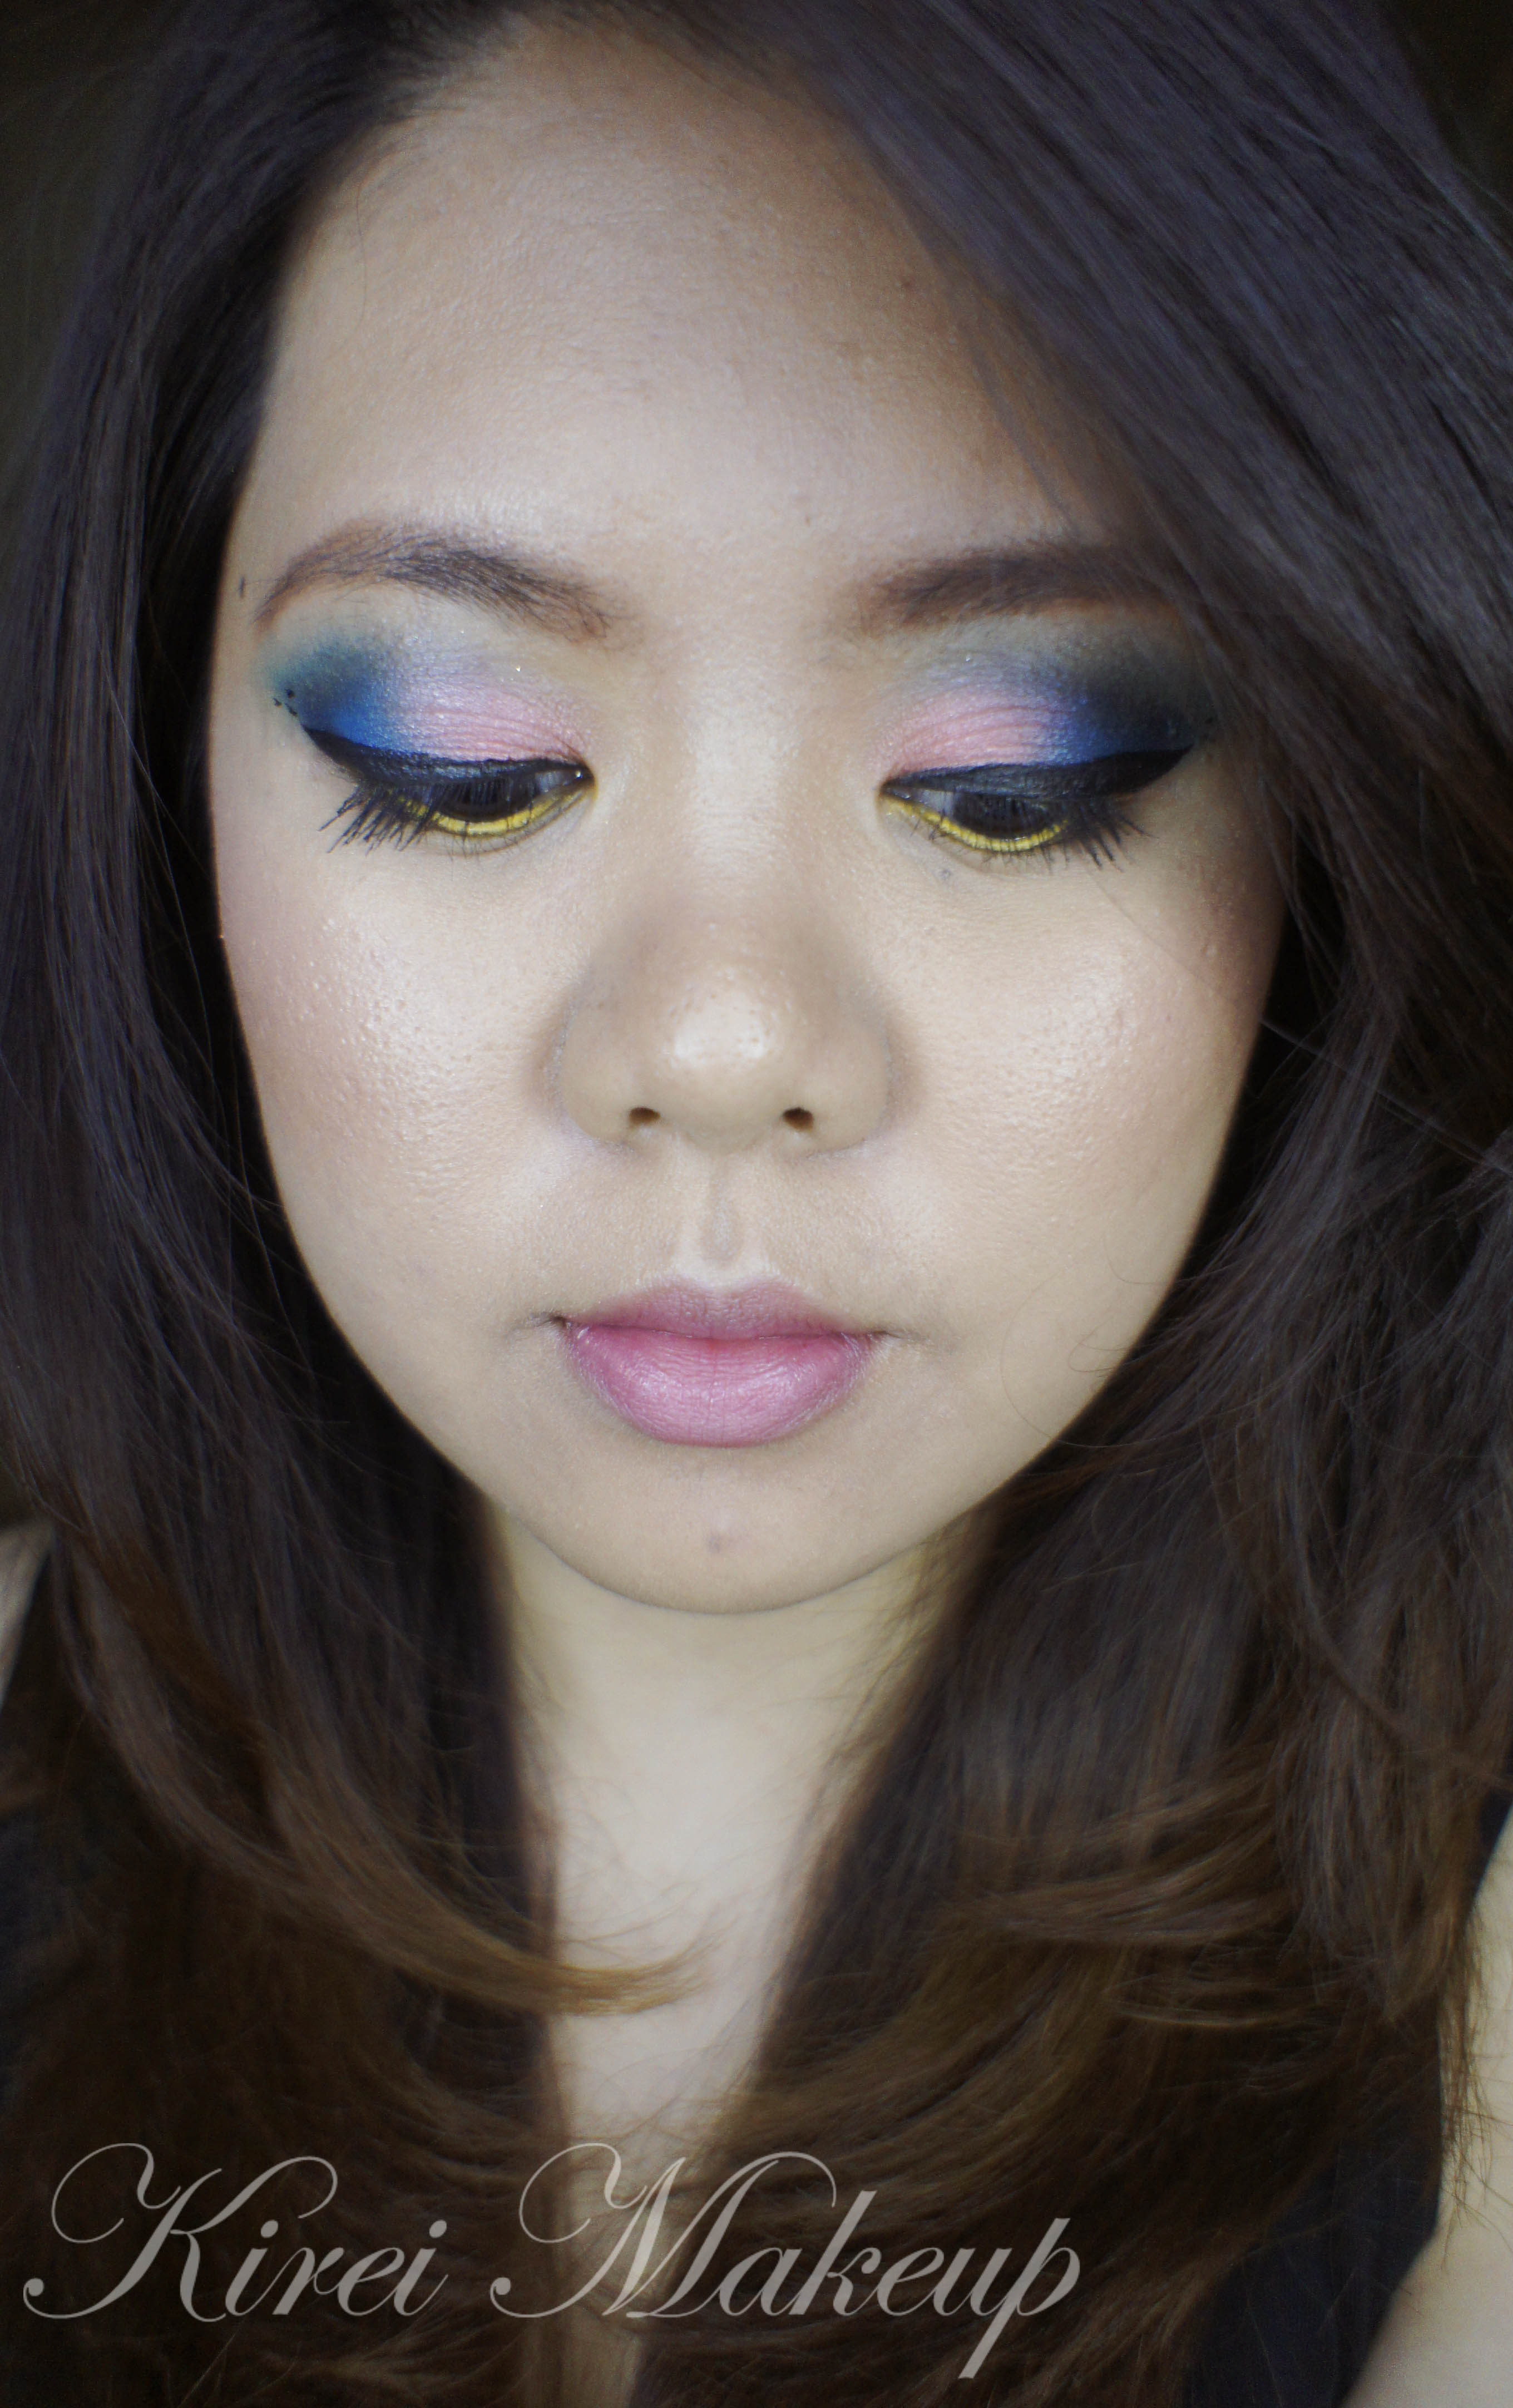
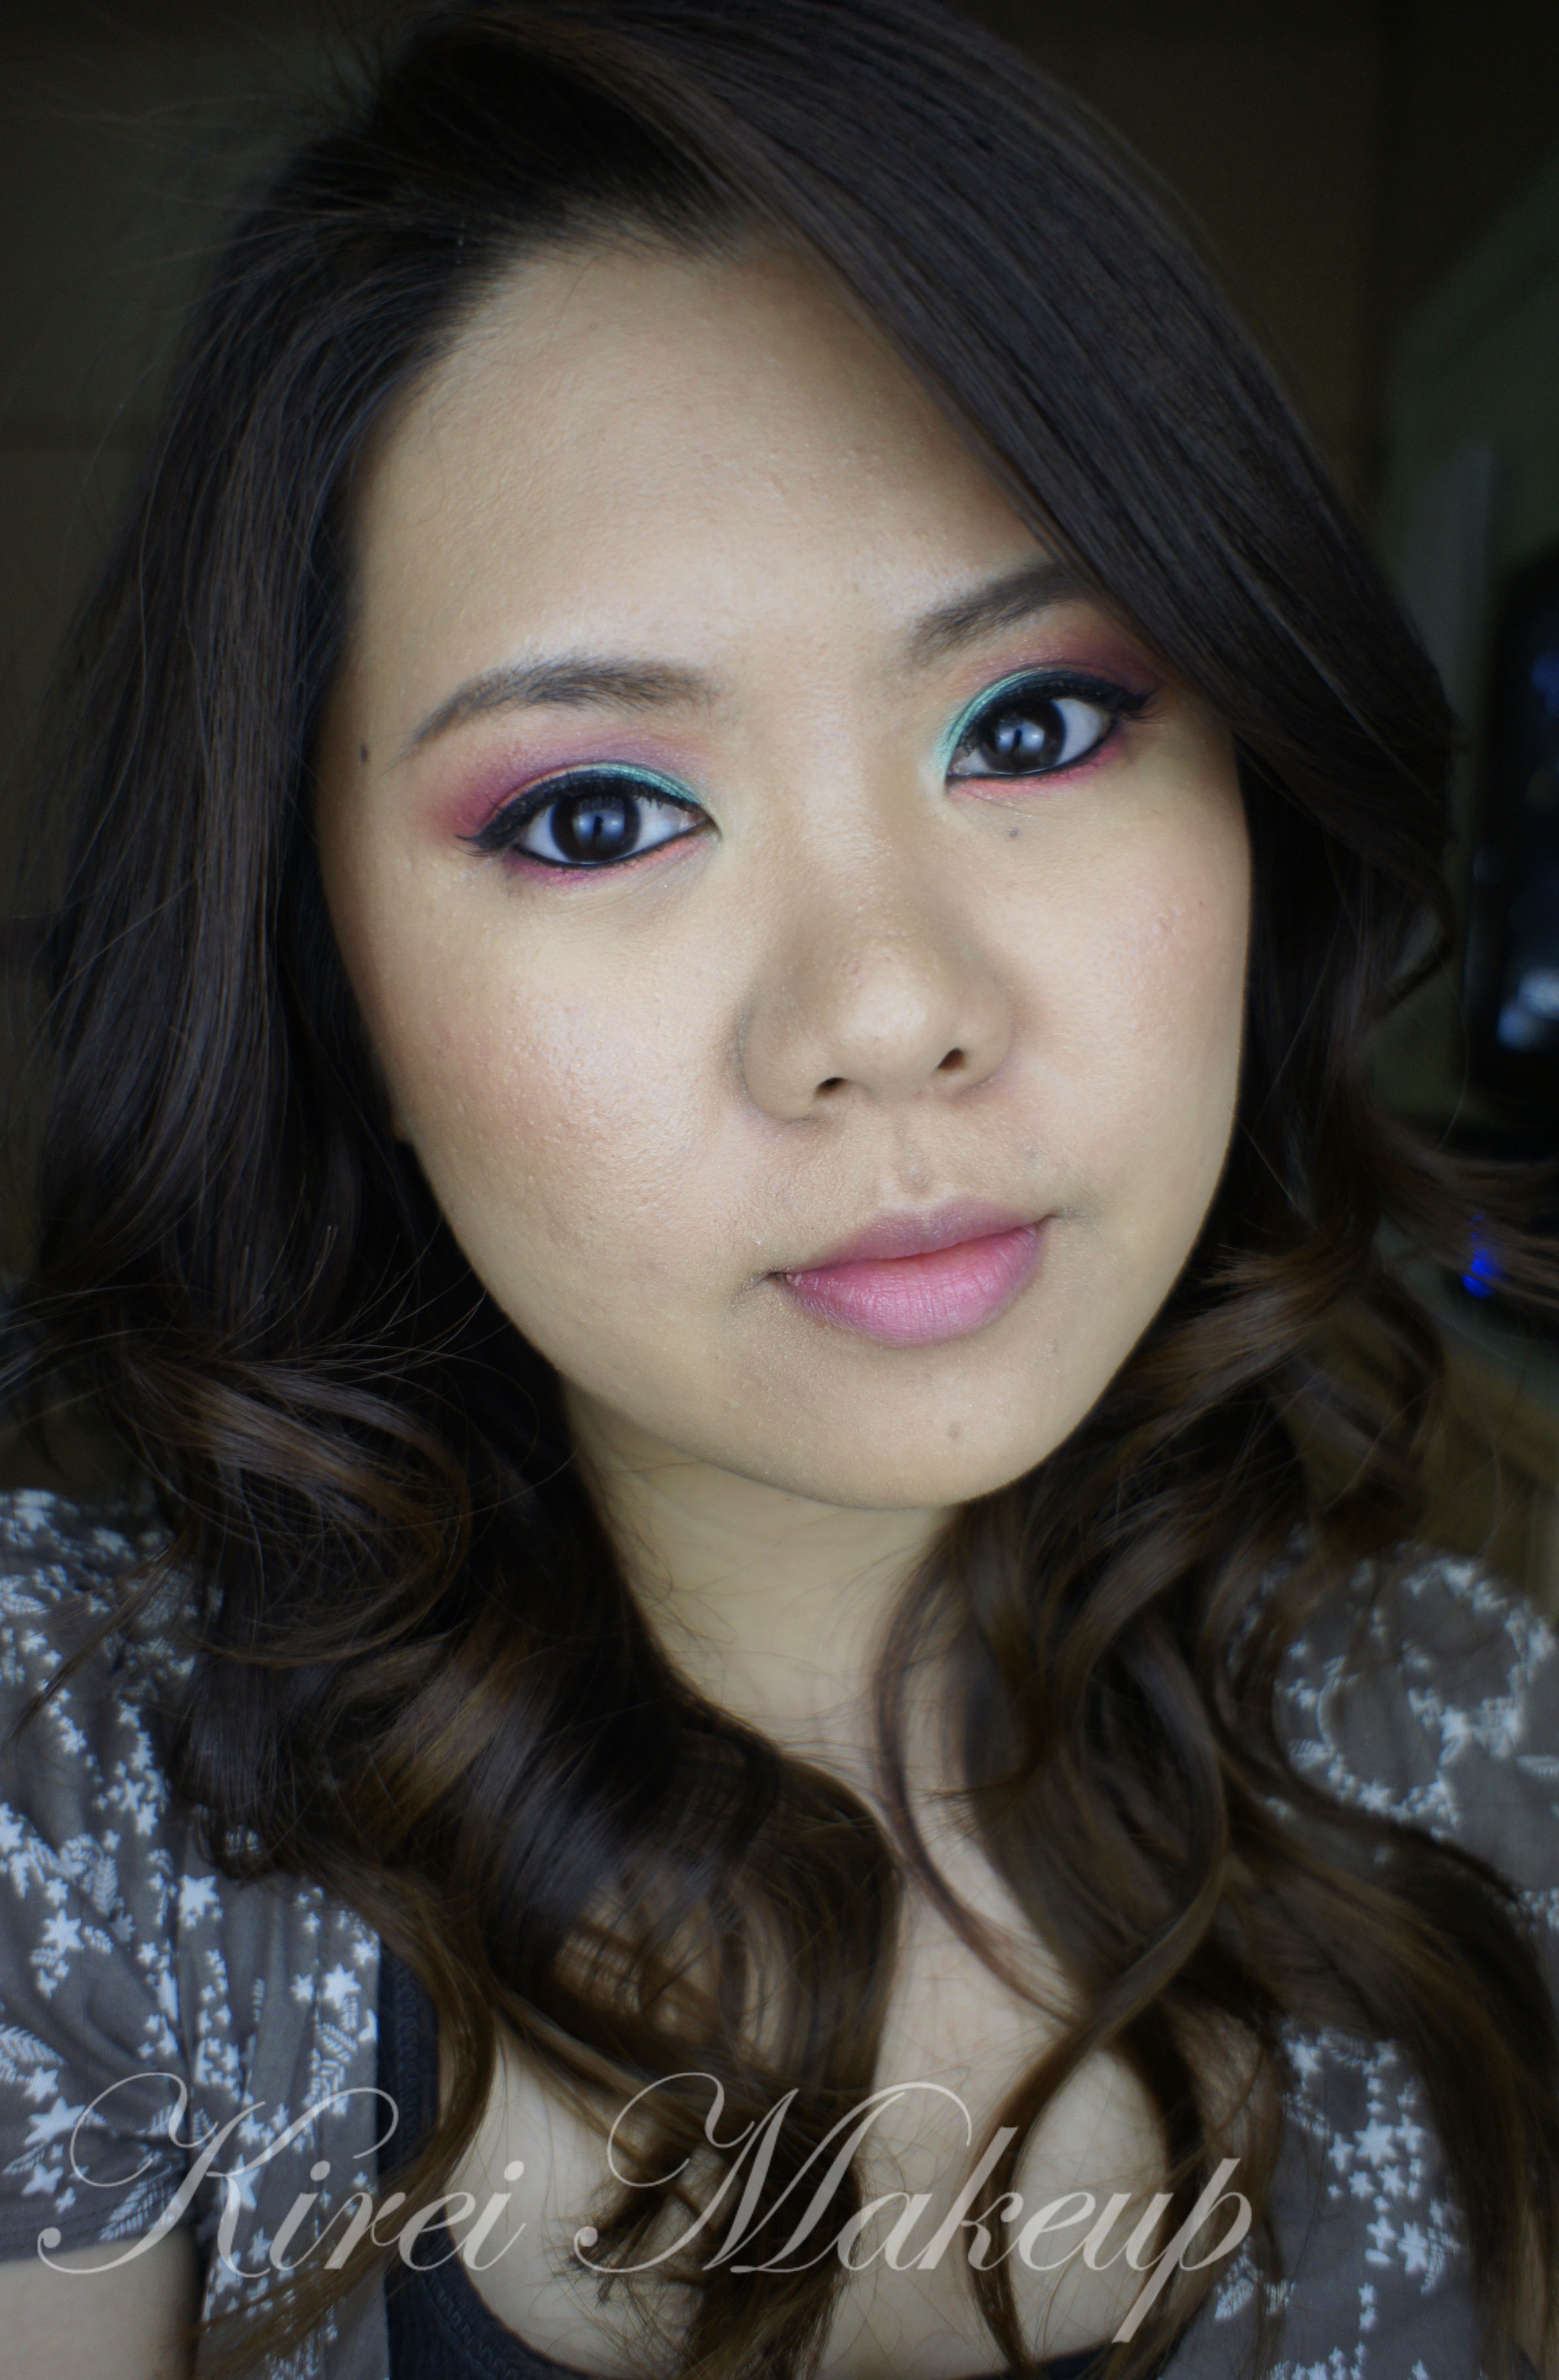
Alright! So, I’ve been wanting to do another tutorial using Sleek Makeup Showstoppers palette (if you are in Southeast Asia region, you can buy it from Luxola). I wanted to use the coral shade since it’s so pretty! I’ve done another tutorial using the same palette in my Smoky Purple post.

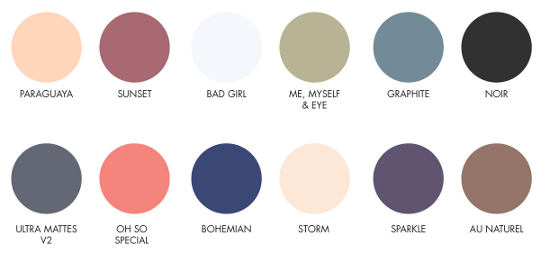
Oh also, I’ve done some research regarding the names of the eyeshadows in this palette. Apparently, there was a misprint on the labels that came inside this palette. The correct names for each shade is as the picture below. Thanks to Gloria from Beautiful with Brains for clarifying it on her blog!

sleek-makeup-Showstoppers-Shades

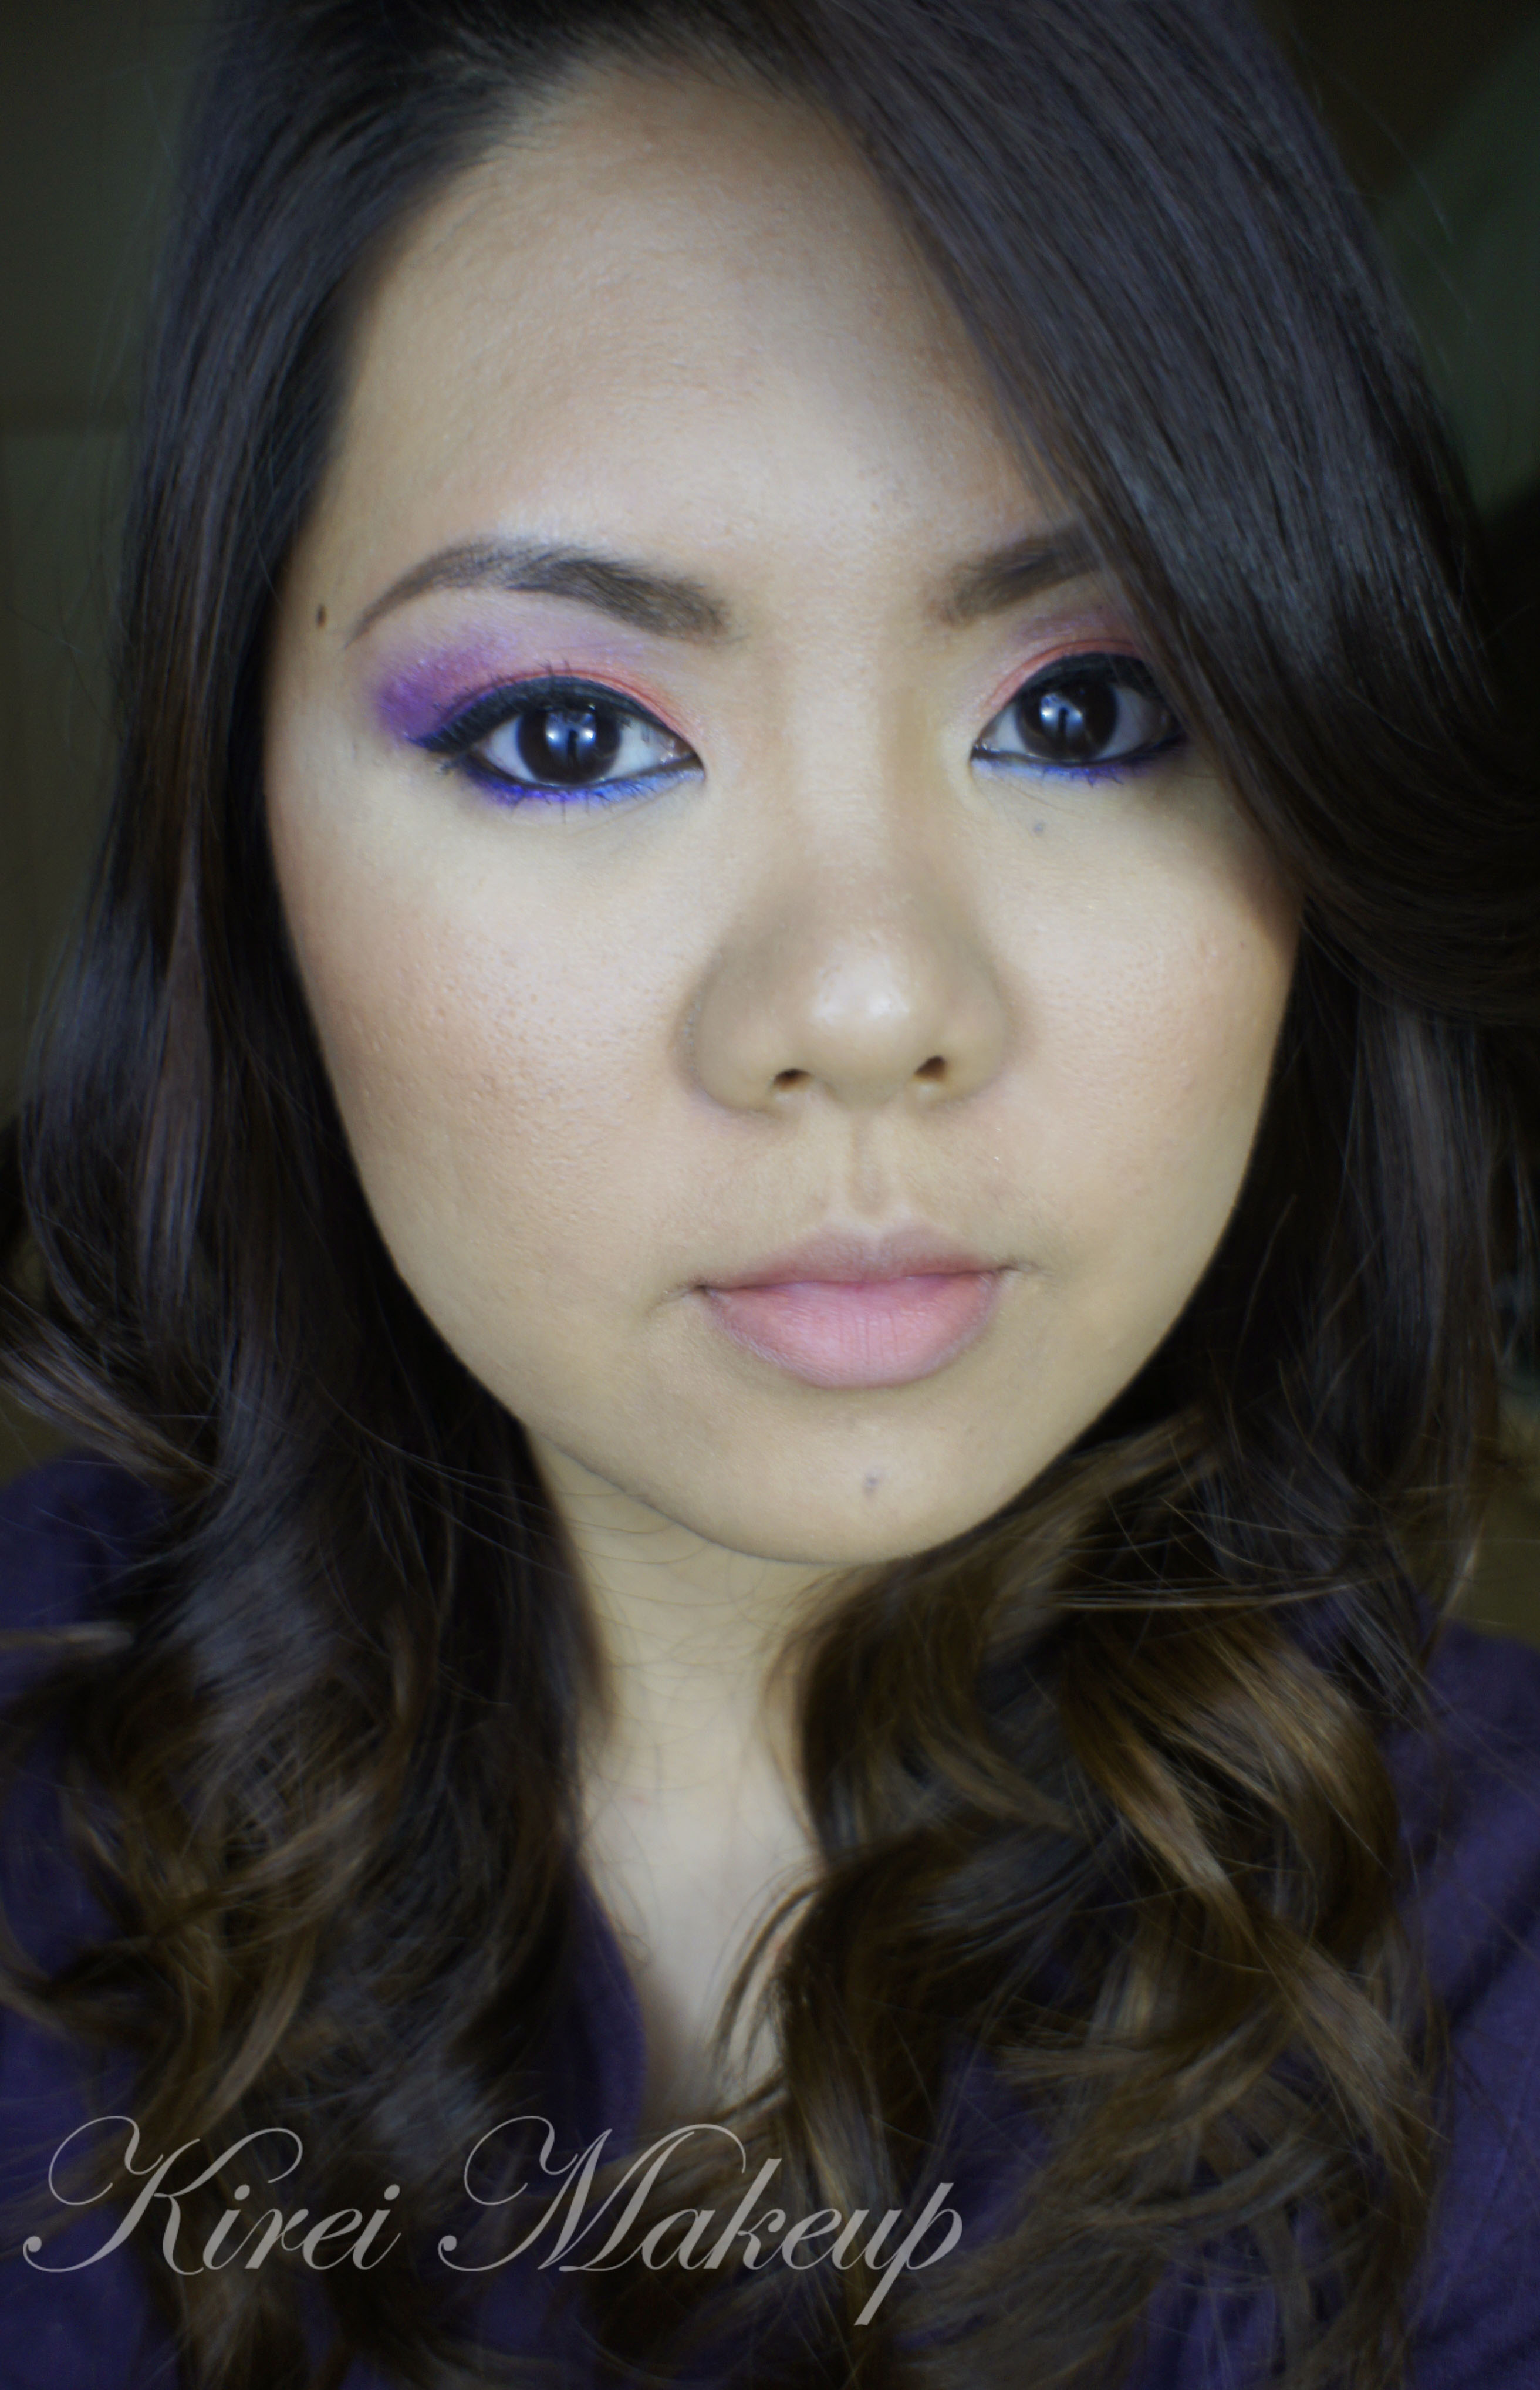
Please note that on picture in the bottom left corner, my eyeliner might look weird but I can assure you it is not. It’s because the camera couldn’t focus on my eyelashes, which is so frustrating! Anyways, I might have to invest in a better lens.

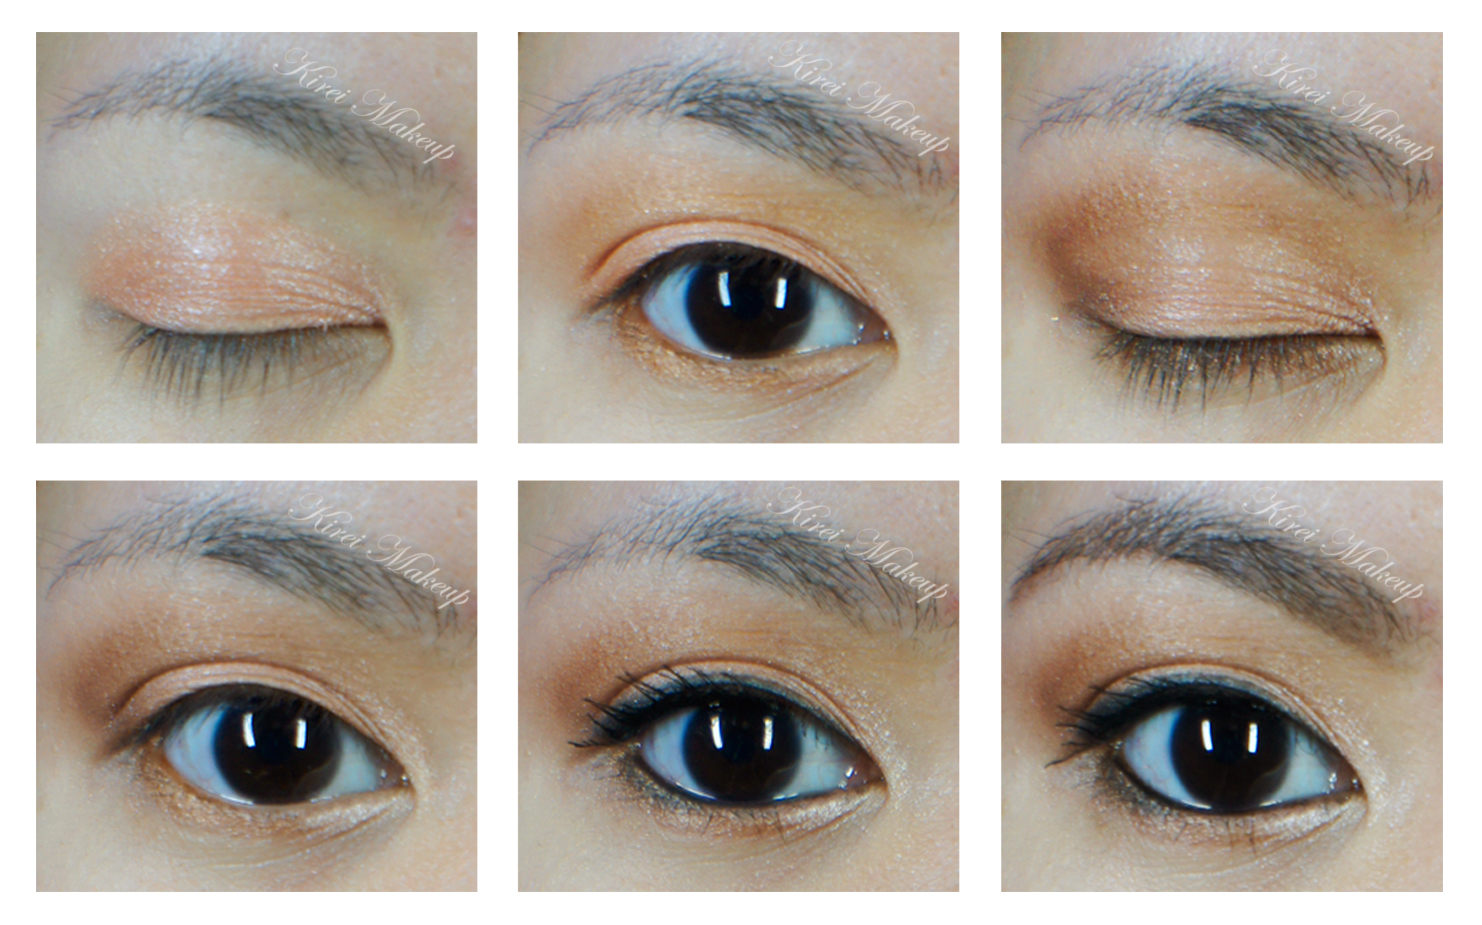
Anyways, my eyelids are prep using Smashbox eyelid primer.
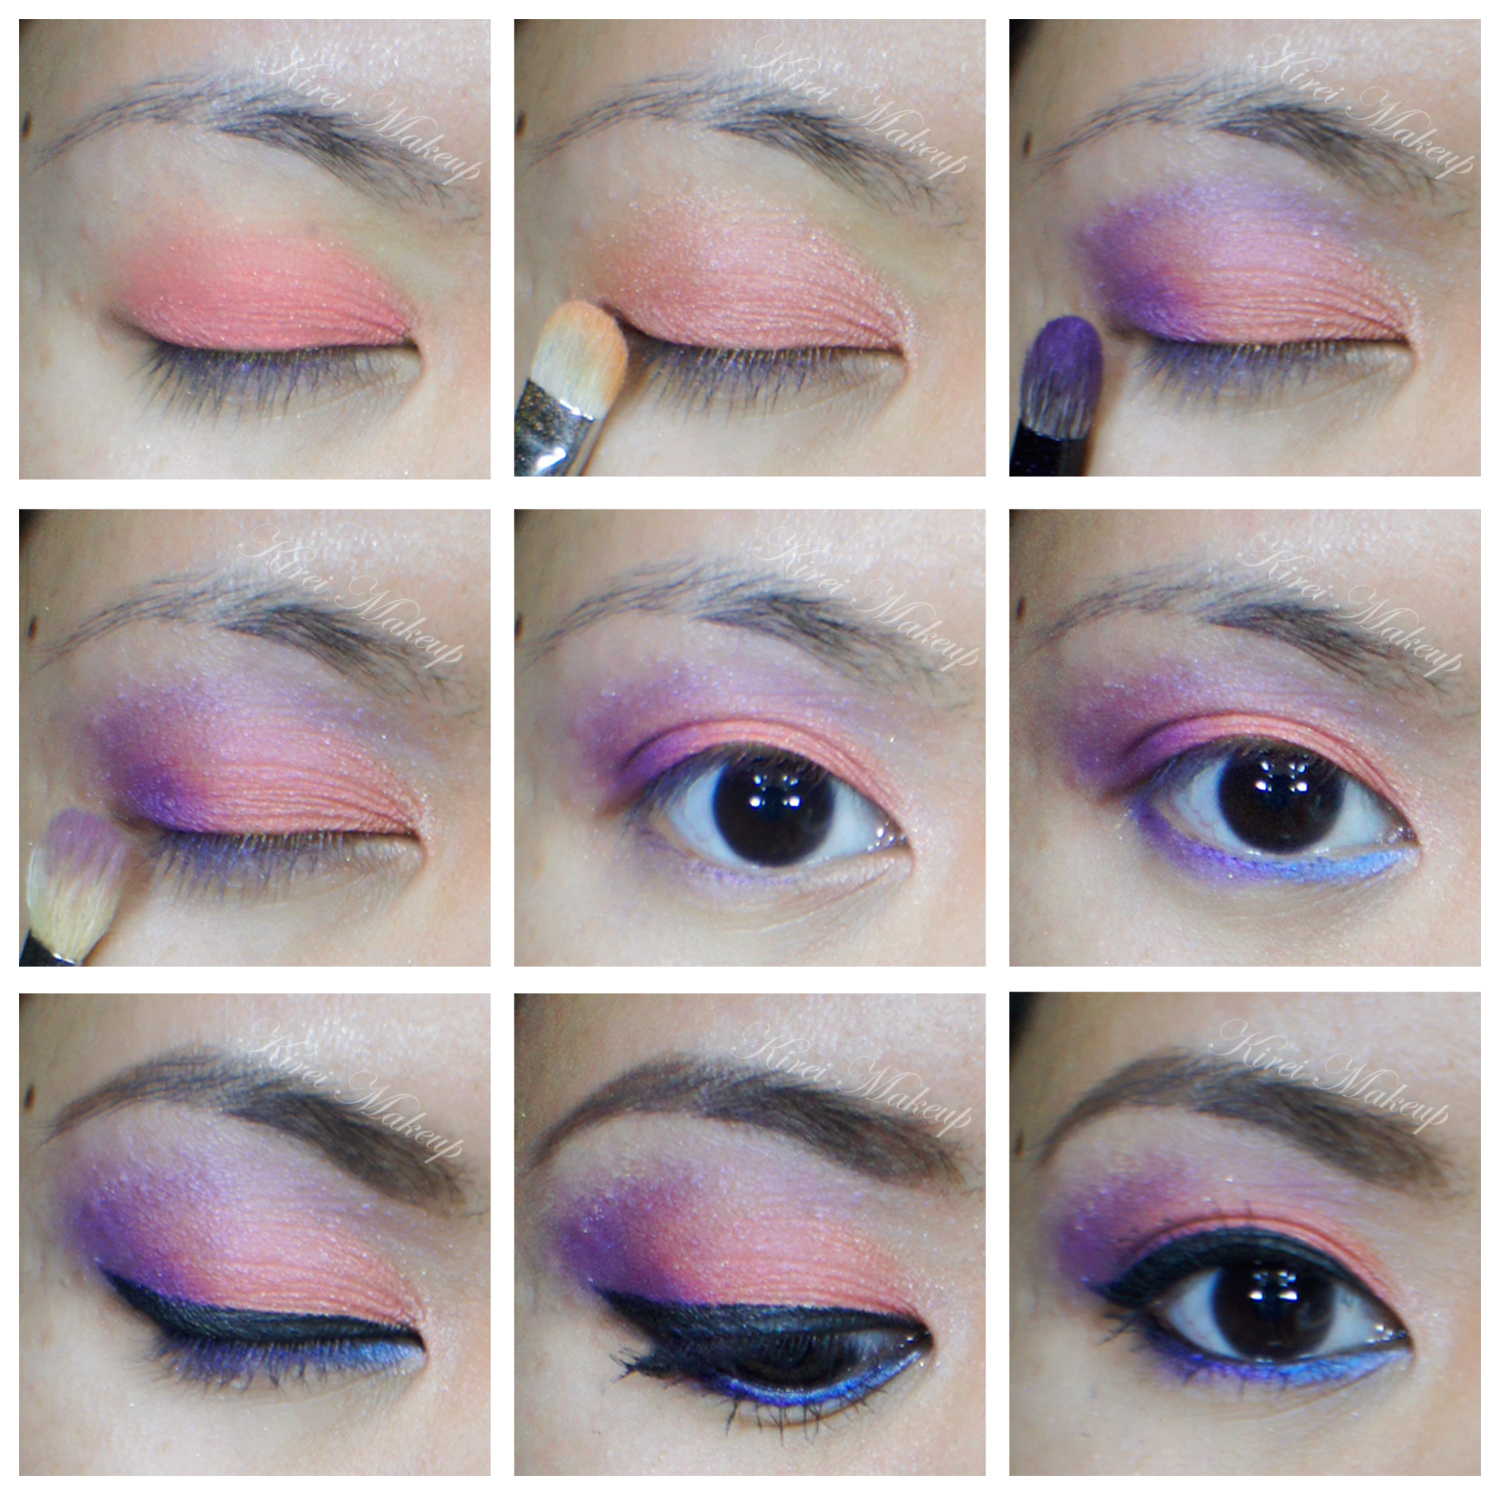
How-to:

1. I applied Oh So Special all over my eyelid using a flat eyeshadow brush.

2. Using a clean blending brush, I applied Sunset above my crease.

3. I packed on Noir on the outer V using an angled eyeshadow brush. Lightly, I dragged Noir on to my crease.

4. Using another clean blending brush, I blended Noir out using a small circular motion.

5. I applied Noir using an angled eyebrow brush on the outer half of my lower lash line. I also applied Sunset on the lower lash line on the inner half.

6. Using a small shader brush, I applied Storm on the inner corner of my eyes.

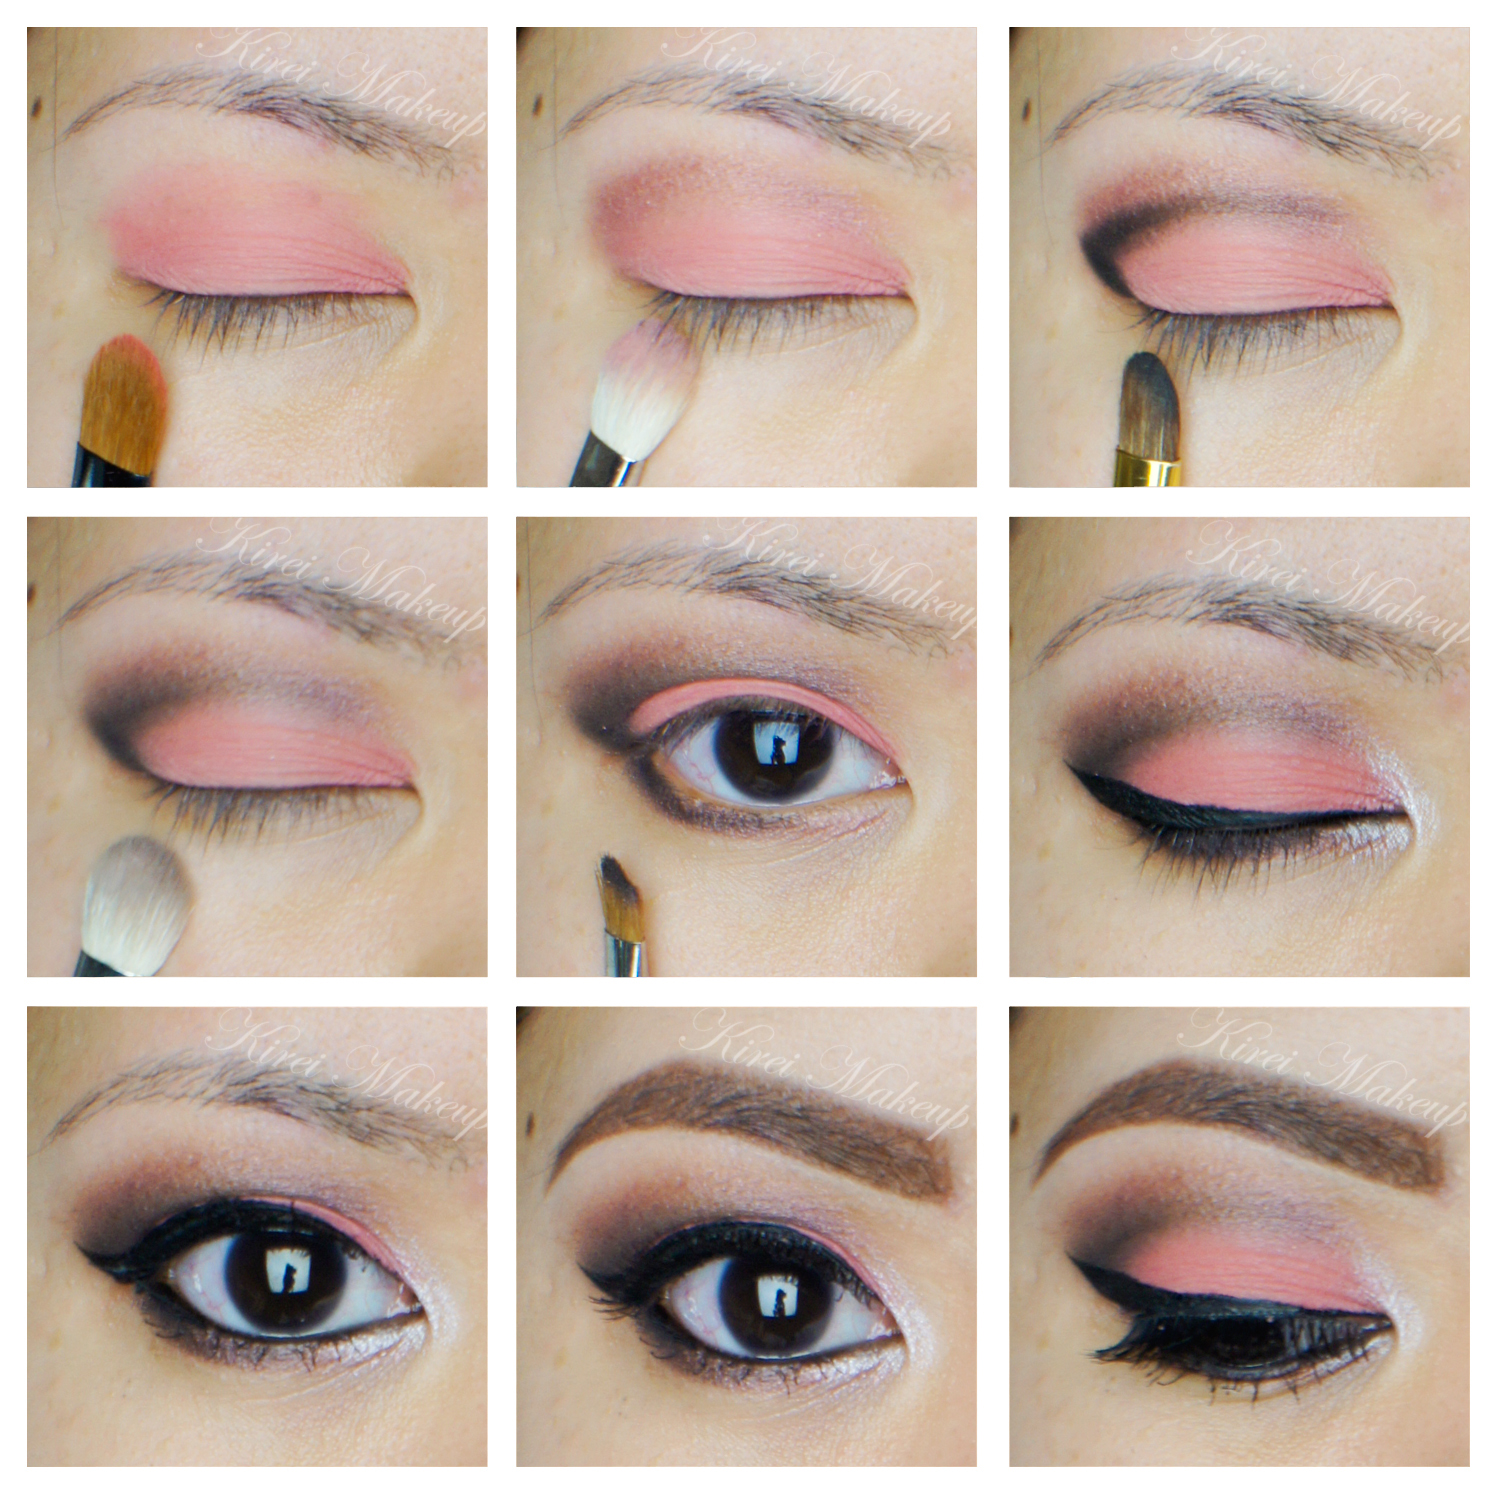
7. I also created a winged eyeliner using Kanebo Kate Super Sharp eyeliner.

8. I lined my waterline using L’oreal Voluminous Smoldering eyeliner.

9. I curled my lashes and applied Cover Girl Lash Blast mascara, and applied false eyelashes.

10. I filled my brows using Anastasia Brow Wiz in Brunette.

sleek showstoppers makeup

11. On my face, I applied Smashbox Halo foundation using Sigma Round Kabuki brush.

12. I concealed my under eyes using MUFE Concealer palette no. 3 – the salmon colored shade.

13. I applied contour on my nose and under my cheeks using L’oreal Super-Blendable Crayon Concealer in W6-7-8. I blended it out using CoverFX cream foundation brush.

13. On my cheeks, I applied Maybelline Face Studio Master Glaze in Make a Mauve, blending it out using my finger.

14. I set my face using MUFE Pro finish powder.

15. I applied Revlon Mauve It Over matte lipstick on my lips.

sleek showstoppers makeup

Sunset Inspired

I’ve been wanting to do a sunset inspired makeup for a while, but couldn’t find the right colors to do it. Well, ever since I got my hands on that MUFE Aqua Cream no. 9, I couldn’t resist playing with that color. I think it’s probably one of my favorite colors so far. I just want to use it all the time!

If you see anything that’s underlined and bold in the sentences below, it means that I’ve link it to another tutorial/review that I’ve done in this blog. The links are not spam nor will it lead you to another site.

How-to:

1. I applied MUFE Aqua Cream Shadow no. 9 all over my lid using my finger. (for other tutorials using this color please refer to Coral and Blue, and Candiliscious)

2. Using a flat eyeshadow brush, I applied Smashbox Soft Shimmering Coral from the Admire Me palette on top of the aqua cream.

3. Using Smashbox bullet brush, I applied purple eyeshadow from Sariayu’s Karimunjawa palette.

4. I blended the edge of the shadow using a clean blending brush.

5. Using an angled eyebrow brush, I applied Lancome All Made Up eyeshadow on the inner corner of the lower lid, and the purple eyeshadow from step 3 on the outer half.

6. Using a Kate Super Sharp liquid eyeliner (bought from a Japanese drugstore during my trip), I created a winged liner along the upper lash line.

7. I lined the outer third of my lower lid using the same eyeliner and used an angled brush to smudge the liner slightly.

8. I filled my brows using a mixture of MAC Omega and MAC Brun using an angled eyeliner brush.

9. I curled my lashes and applied L’oreal Double Extender Curl mascara.

10. I applied my face powder right below my brows.

coral and purple makeup

11. Under the eyes, I applied the yellow corrector from MAC Pro Conceal/Correct palette in Medium.

12. On my face, I applied MUFE HD foundation using a Sigma Round Kabuki brush.

13. I powdered my face using Cinema Secret loose powder.

14. I applied MAC Shadowy to contour my face and MAC Peaches blush on my cheeks (for my contouring tutorial please refer to Subtle Contour/Highlight/Blush).

15. On my lips, I applied Revlon Mauve It Over lipstick.

sunset makeup

Coral and Blue

I wanted to do another look with the MUFE Aqua Cream no. 9. I had to find a good reason to buy it right? Hahaha…I decided to incorporate some blue and yellow. I found inspiration from my trip to Bali couple months a go. The performers in Bali use a lot of blue, pink and gold. In my own twist, I decided to use coral, blue and yellow (and a tiny bit of bronze). When I used to perform(Balinese traditional dance) back when I was a kid, they used to put the 3 dots using a toothpaste (applied using toothpick). For this look, I added 3 tiny dots at the end of the eyeliner to replace the toothpaste.

I’ve found an issue with the MUFE Aqua cream no. 9. You have to work really2 fast to blend it. If you want a lot of colors on your lid, you have to apply it thinly first and then layer it as soon as you can. Speed is your friend when using this product.

Let me tell you my sad story. Ah, talking about it made me so angry! Anyways, so as you guys know I owned Maybelline 24hr Color Tattoo in Edgy Emerald, Tenacious Teal and Inked in Pink. I always made sure that any of my cream products are closed tightly. However, for some reason, I guess may be when I was rushing since I have been traveling a lot these couple months, my Tenacious Teal wasn’t properly stored! The lid was loose and guess what! It’s drying out!!! *sigh* Oh the horror! The worse part is that I can only get them in Canada since it’s not sold in Asia yet! *cry*

Anyways…I have to go get alcohol soon so I can revive my Tenacious Teal to its original state. So, do forgive me if the Tenacious Teal isn’t looking so tenacious in this tutorial.

Let’s get down to business now, shall we? ๐Ÿ™‚

mufe aqua cream no. 9

How-to:

1. Using a synthetic brush, I applied 2-3 layers of MUFE Aqua Cream shadow in no. 9 on the lid, focusing most of the products on the center of my eyelid.

2. Using another synthetic brush I applied Maybelline Tenacious Teal 24hr Tattoo on the outer half of the lid. I blended the edge of the crease using a blending brush.

3. Using a flat eyeshadow brush, I applied Ben Nye Cosmic Blue on top of Maybelline Tenacious Teal. I blended the color on the crease using a fluffy blending brush.

4. I applied L’oreal Pepsy Coral infallible eyeshadow on the inner half of the lid.

5. Using a small fluffy brush, I applied Smashbox Blackout eyeshadow on the outer V and I blended the shadow using a clean blending brush.

6. I also blended the L‘oreal Pepsy Coral towards the blue using a clean blending brush.

7. I lined my waterline using NYX Jumbo pencil in Milk.

8. Using a small shader brush, I applied MUFE eyeshadow no. 71 on top of the white eyeliner.

9. I applied Smog eyeshadow from NAKED 1 palette along the lower lash line using an angled eyeliner brush.

10. I created a winged eyeliner along the upper lash line using Kat Von D Trooper eyeliner. I also created 3 tiny dots at the end of the eyeliner using the same product.

11. I curled my lashes and applied mascara on top and lower lashes.

12. I filled my brows in using Chanel Mistre brow pencil.

maybelline 24hr tattoo tenacious teal

13. For the face, I applied Estee Lauder Double Wear Light foundation with a foundation brush.

14. I applied YSL Touche Eclat under the eyes, my cheekbones, bridge of the nose and on my cupid’s bow.

15. I applied Benefit Coralista blush on the cheeks and Chanel Confidentielle lipstick on the lips.

yellow eyeliner

Candiliscious

Sooo, as you guys know, I posted a sneak preview of today’s tutorial on Instagram and Twitter. If you didn’t check it out, follow me on both account (handle name: @KireiMakeup). I also mentioned on my tweet that I went to Plaza Indonesia to shop at Make-Up For Ever. I bought this gorgeous aqua cream shadow in no. 9, which is a beautiful shimmery coral color. I knew the moment I laid my eyes on it, I wanted to do a bright look. Thus, I paired the deliciously bright coral with a minty green. I love how this look turns out! So very summer-y! Kinda looks like candies, no?

I think this MUFE Aqua Cream no. 9 is actually for the lips, so you might want to test it out first if there’s any reaction when you apply it to your eyes. I had no sensitivity or negative reaction towards it, so I proceeded to apply it to my eyes.

I also filled in my brows slightly different this time since I’m trying to grow my brows out so I can re-shape them again. Instead of the usual arch, I drew the brows slightly lower this time, which helped with the overall look. I think the softer, lower brows make the look more wearable and framed the face softer.

The key to this look is to quickly blend the cream shadows before they dry out. Once the creams dry, you might have a difficult time blending it. The look works with just the cream shadows alone, but I like to set it with eyeshadows to make it last longer and for the colors to look even brighter.

How-to:

1. Using a synthetic brush (mine is an art brush from a bookstore), I applied Maybelline Color Tattoo 24-hr in Edgy Emerald on the inner half of the lid.

2. Using a flat eyeshadow brush, I applied Make Up For Ever Aqua Cream Shadow in no. 9 on the outer half, blending it towards the Edgy Emerald and on the crease slightly. I used a clean fluffy blending brush from Urban Decay to blend the crease.

3. Using a clean flat eyeshadow brush, I applied a mint green eyeshadow from Gosh Spring Passion (limited ed.) on top of Maybelline Edgy Emerald.

4. I also applied L’oreal Pepsy Coral infallible eyeshadow on top of MUFE no. 9 aqua cream shadow. I blended the color towards the mint so there’s no harsh line separating the 2 shadows.

5. Using a small fluffy brush (mine was given by a chinese-based brush company), I mixed MAC Passionate and MAC Vibrant Grape at the back of my hand, then I applied it lightly on the crease.

6. I applied MUFE Aqua Cream no. 9 on the lower lid using a clean angled eyeliner brush.

7. On top of that, I also applied the same mix of MAC Passionate and MAC Vibrant Grape on the outer half of the lower lid. I also added L’oreal Pepsy Coral infallible eyeshadow on the inner corner of the lower lid.

8. Using an angled eyeliner brush, I created a thin winged liner along the upper lashline using MUFE Aqua Black gel liner. I lined my waterline using whatever that was left on the brush.

9. I filled in my brows using Dollywink brow pencil.

10. I curled my lashes, applied L’oreal Curl Impac Collagene mascara on the upper and lower lashes.

11. For some extra fun, I applied Ardell no. 110 false eyelashes and squeezed both fake and real lashes together so there’s no separation. At this time, I found that the liner on my waterline wasn’t black enough, so I applied Physician’s formula black eyeliner on it.

12. I applied MAC Brule eyeshadow under the brows.

coral and mint makeup

13. For the face, I applied MUFE HD Foundation using a Sigma Round Kabuki brush.

14. For concealer, I used L’oreal Magic Touche concealer under the eyes.

15. I applied Chanel Universal bronzer on the cheeks, temples and jawline.

16. For the cheeks, I applied MAC Cubic blush.

17. Lastly, I applied Tarte Lipsurgence in Hope on my lips.

mufe cream shadow

Smashbox Admire Me from Love Me Collection

I think I like this palette. Like I’ve said on my “Entice Me” post, the eyeshadows are creamy and buttery, blend very easily. The Admire Me palette has warmer shadows, very bronzy, very summer-y. It has 5 colors: Bronze (left most), Soft Shimmering Coral (top left), Champagne (bottom), Matte Nude (top right) and Deep Golden Brown (right most).Smashbox Admire Me

Picture courtesy of Smashbox

The colors will probably look more intense, leaning towards smoky for those with lighter skin tone (lighter than NC 30), and will be more on the neutral-earthy colors for those with medium to dark skin tone. I really do believe this is a great palette for those with really dark skin tones who are looking for a natural/neutral/nude eyeshadow palette.

This palette on me works as neutral as well as smoky. For this tutorial, I wear it on a lighter side and coralish. ๐Ÿ™‚ I kept the rest of the face on the same color palette – coral-orange toned.

How-to:

1. I applied Soft Shimmering Coral using a flat eyeshadow brush all over my eyelid.

2. Using a soft blending brush, I applied Bronze lightly on the crease.

3. I also applied Bronze on the lower lid using a large eye angled brush.

4. Using a smaller blending brush, I applied Deep Golden Brown on the outer V lightly.

5. I applied Champagne to the inner corner of the eye.

6. I lined my waterline and tightline using L’oreal Voluminous Smoldering eyeliner.

7. My lashes are curled using Shu Uemura eyelash curler and I applied L’oreal Voluminous Carbon Black on both top and bottom lashes.

8. I filled my brows using Anastasia Brow Wiz in Brunette.

Smashbox Admire me

9. For my face, I applied Revlon Colorstay foundation using Shiseido foundation brush.

10. For cheeks I applied MAC Utterly Game and for the lips I applied Revlon Just Bitten in Charmed.

Love Me Smashbox