Shop Kitsu in Hamilton (Life Update)

Hi all! I’m so sorry I haven’t update the blog for a while. I’m not sure if you guys know, but I recently open a store called Kitsu in Hamilton, Ontario. The store’s concept is a lifestyle boutique, and we carry apparels for Men & Women, makeup, skincare, accessories and home decor products.

The store is also available online (yay) and we ship worldwide! You can use this code KIREI15 to get 15% off your purchase at Kitsu’s online store. Read more to see what’s in store for you (makeup related)

Read More

Glitters & Smudges ft. UD Moondust Palette

Today I’m doing a little bit different than usual. I’m creating a more creative look for today’s tutorial using UD Moondust palette as well as some mascaras. You can skip smudging the mascara for a more wearable look. Anyways, read more below for product info and step-by-step pictorial!

https://youtu.be/KjY4XWXSJ9g

Read More

Valentine’s Day Makeup – Plum Smoky Eye

https://youtu.be/__UwisH8LNs

Are you guys still looking for inspiration for Valentine’s day makeup? I created this smoldering plum smoky look using Tarte Light of the Party palette. The eyeshadows in this palette are very soft and sheer, and it’s probably not everyone’s cup of tea but I love it. I would say this look would be a pretty look for Valentine’s day, if you’re looking to do smoky eyes.

Read More

Shu Uemura x Maison Kitsune Look #3

Another day, another look using Shu Uemura x Maison Kitsune Holiday collection 2015! I’ve done 2 smoky eyes using Shu Uemura x Maison Kitsune Indigo palette (Grey Smoky & Blue Smoky), and this will be my third look. I’ll try to do a review and swatches of the Indigo palette next week.

For this look, I wanted to create a simple soft smoky liner makeup, which is an alternative way to glam up your party makeup. If you are not comfortable doing smoky eyes, give this look a try. For the rest of my face, everything is simple, no contouring. Most of the products used are Shu Uemura products, which I’ve been loving lately. It’s a really great line, especially for Oriental skin. Anyways, please scroll down for more pictures and product details.

*Please check out my other Maison Kitsune for Shu Uemura tutorials*

shu uemura x maison kitsune

Products used

Eyes

  • Base – Shu Uemura cream eyeshadow “Ivory”
  • Eyelid – Shu Uemura Maison Kitsune Indigo Palette “Deep Pink”
  • Outer third/crease – Shu Uemura Maison Kitsune Indigo Palette “Glow On Blush Pink”
  • Upper lash line – Shu Uemura Maison Kitsune Indigo Palette “Black”
  • Lower lash line – Shu Uemura Maison Kitsune Indigo Palette “Navy”
  • Waterline – Shu Uemura Maison Kitsune Play & Remix Drawing pencil “Indigo”
  • Lashes – Ardell falsies “Demi Wispies”
  • Brows – Shu Uemura Brow Sword


shu uemura x maison kitsune

Face

  • Base – Shu Uemura Tsuya Bouncy-Fine Cream
  • Foundation – Shu Uemura Lightbulb foundation
  • Concealer – NARS Radiant Creamy Foundation “Custard”
  • Setting Powder – Laura Mercier “Invisible Setting Powder”

Cheeks

  • Blush – Shu Uemura Maison Kitsune Indigo Palette “Glow On Blush Pink”

Lips

maison kitsune for shu uemura

Grim Reaper Halloween Makeup

Another Halloween makeup look for today’s post! I have been wanting to do a skull makeup, so I created this Grim Reaper Halloween makeup look. I wanted to created a more evil, creepy skull look, so I googled up “Grim Reaper” and used the image I found as a reference.

*For my other Halloween makeup tutorials, please check out “Halloween” category*

The_Grim_Reaper

I sooo need to practice on my blending, as well as the teeth. It’s really hard to do the teeth, so note to self – practice drawing skull and teeth! I also should have leave the teeth outline after I colored it bone colored. So, if you want an easier to do the teeth, color it first before outlining the teeth! Also, for the “bone” part, I mixed beige cream product with white. I wanted an off white color, not a stark white.

skull makeup step by step


Anyways, let’s get on the tutorial!

  1. I drew outlines of bones using an angled eyebrow brush and a matte black eyeshadow.
  2. Mixing a beige cream with white, I applied this “bone” color on the areas where the bones are.
  3. You can set the cream product with an eyeshadow or translucent powder.
  4. For the darker areas, I filled it using a black face paint. I left the eye sockets last since I have to put my contacts in, and I didn’t want to get it messy.
  5. Using a white cream product (you can use white face paint), I filled in the teeth dragging the color upwards towards the face for the upper teeth, and down towards the chin for the lower teeth.
  6. I put my contacts in, and filled my eye sockets with black face paint.
  7. For shading around the bone areas, I used brown eyeshadow first then grey to deepen the shadows. All I can say about this part is to have the areas shaded as detailed as you can. I added some eyebrow creases as well to make the whole look a bit more evil looking.

skull makeup

Products used

  • MUFE Flash Palette #902
  • MAQPRO primary palette “white”
  • Kat Von D Shade + Light eye palette
  • Wolfe face paint “black”

grim reaper makeup


Valentine’s Day Soft Makeup

Valentine’s day is just around the corner, and here’s my Valentine’s Day Soft Makeup look! I used my brand new Smashbox Double Exposure Palette for this look, and couple other new products which I just recently bought. Don’t forget to check out my Instagram to see what else I got besides the palette!

Anyways, for this look, I wanted a soft subtle feminine makeup. The eyes are peachy plum, and defined using black liquid liner. I absolutely love how this turned out! I wore this look out for lunch, and I’m really happy with it. The look isn’t overdone at all, you still look like yourself but slightly better. There’s no bold colors, no overdrawn brows, just a nice pretty simple makeup.

Just FYI, I’m using daylight for my pictures since I don’t have my lights with me. Oh, you guys like my “heart” sweater? I thought I’d wore it for the tutorial since it’s a valentine’s day makeup post.

Check out my other Smashbox Full Exposure palette tutorials, and other Valentine’s day makeup posts!

valentine's day makeupAll products used are listed at the end of the page

How-to:

1. I prepped my eyelids using Urban Decay Primer potion.

2. I applied Fig on my crease using a blending brush (from Smashbox Full Exposure palette).

3. Using the flat eyeshadow brush from the Smashbox Double Exposure palette, I applied Quartz all over my eyelid.

4. I used the angled brush end from the Double Exposure palette, I applied Espresso on the outer V to deepen the crease.

5. I also applied Fig on the lower lash line using the angled brush. I applied Quartz on the inner half of the lower lid.

6. I lined the outer half of my waterline using L’oreal Voluminous Smoldering eyeliner. On my upper lash line, I created a winged liner using Kat Von D Trooper tattoo liner.

7. I curled my lashes, and applied Smashbox Full Exposure mascara on both upper and lower lashes.

8. I applied Gwiyomi False lashes no. 3 to open up my eyes.

9. I filled my brows using Anastasia Brow Wiz in Taupe.

10. On my face, I applied Becca Shimmering Perfector in Moonstone, then I applied Kat Von D Lock-It Tattoo foundation.

11. On my cheeks, I applied NARS Mata Hari blush.

12. I lined and filled my lips using MUFE Aqua lip pencil #18c.

smashbox double exposure palette tutorial

Products used

Eyes

  • Smashbox Double Exposure Palette (crease/lower lash line: Fig, lid/inner corner: Quartz, outer V: Espresso)
  • L’oreal Voluminous Smoldering eyeliner (waterliner)
  • Kat Von D Trooper tattoo liner (winged liner)
  • Smashbox Full Exposure mascara (upper and lower lashes)
  • Gwiyomi False lashes #3
  • Anastasia Beverly Hills Brow Wiz in Taupe

Face

  • Becca Shimmering Skin Perfector in Moonstone (base)
  • Kat Von D Lock-It Tattoo Foundation (foundation)

Cheeks

  • NARS Matahari

Lips

  • Make Up For Ever aqua lip pencil #18C

smashbox double exposure tutorial


Beauty Restore Hydrating MaskerAide

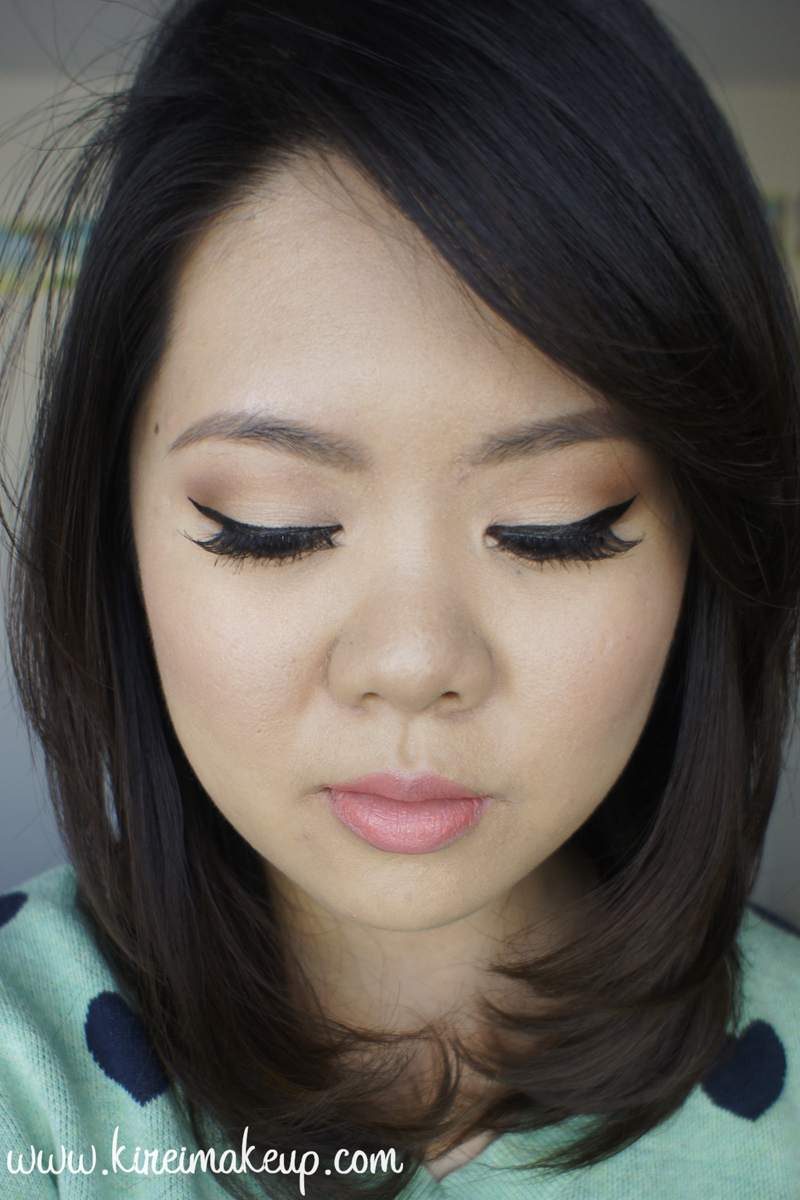
Hello readers! It’s been a while, eh? I have gotten over my jet lag, snow storm, and flu. It was quite a tough week to handle since I was feeling super weak! Anyways, have you guys been following my Instagram? If you haven’t please do follow me there to get in touch or to stay updated with my daily antics. If you have, you’re awesome! Anyways, if you are on my Instagram, you’d know that I’ve tried out a new face mask by MaskerAide recently. I’d like to thank Obsessed Canada (division of Nail Polish Canada) for sending me these awesome facial masks for me to try on.

I received 3 MaskerAide facial sheet masks to try on (you can see all 3 on my Instagram account), but I wanted to share with you guys my review on the Beauty Restore Hydrating Facial Sheet Mask by Masker Aide.  I’ll do the other masks review soon since each mask has a different function, so I want to review it separately.

Anyways, let me talk about the mask a bit more!

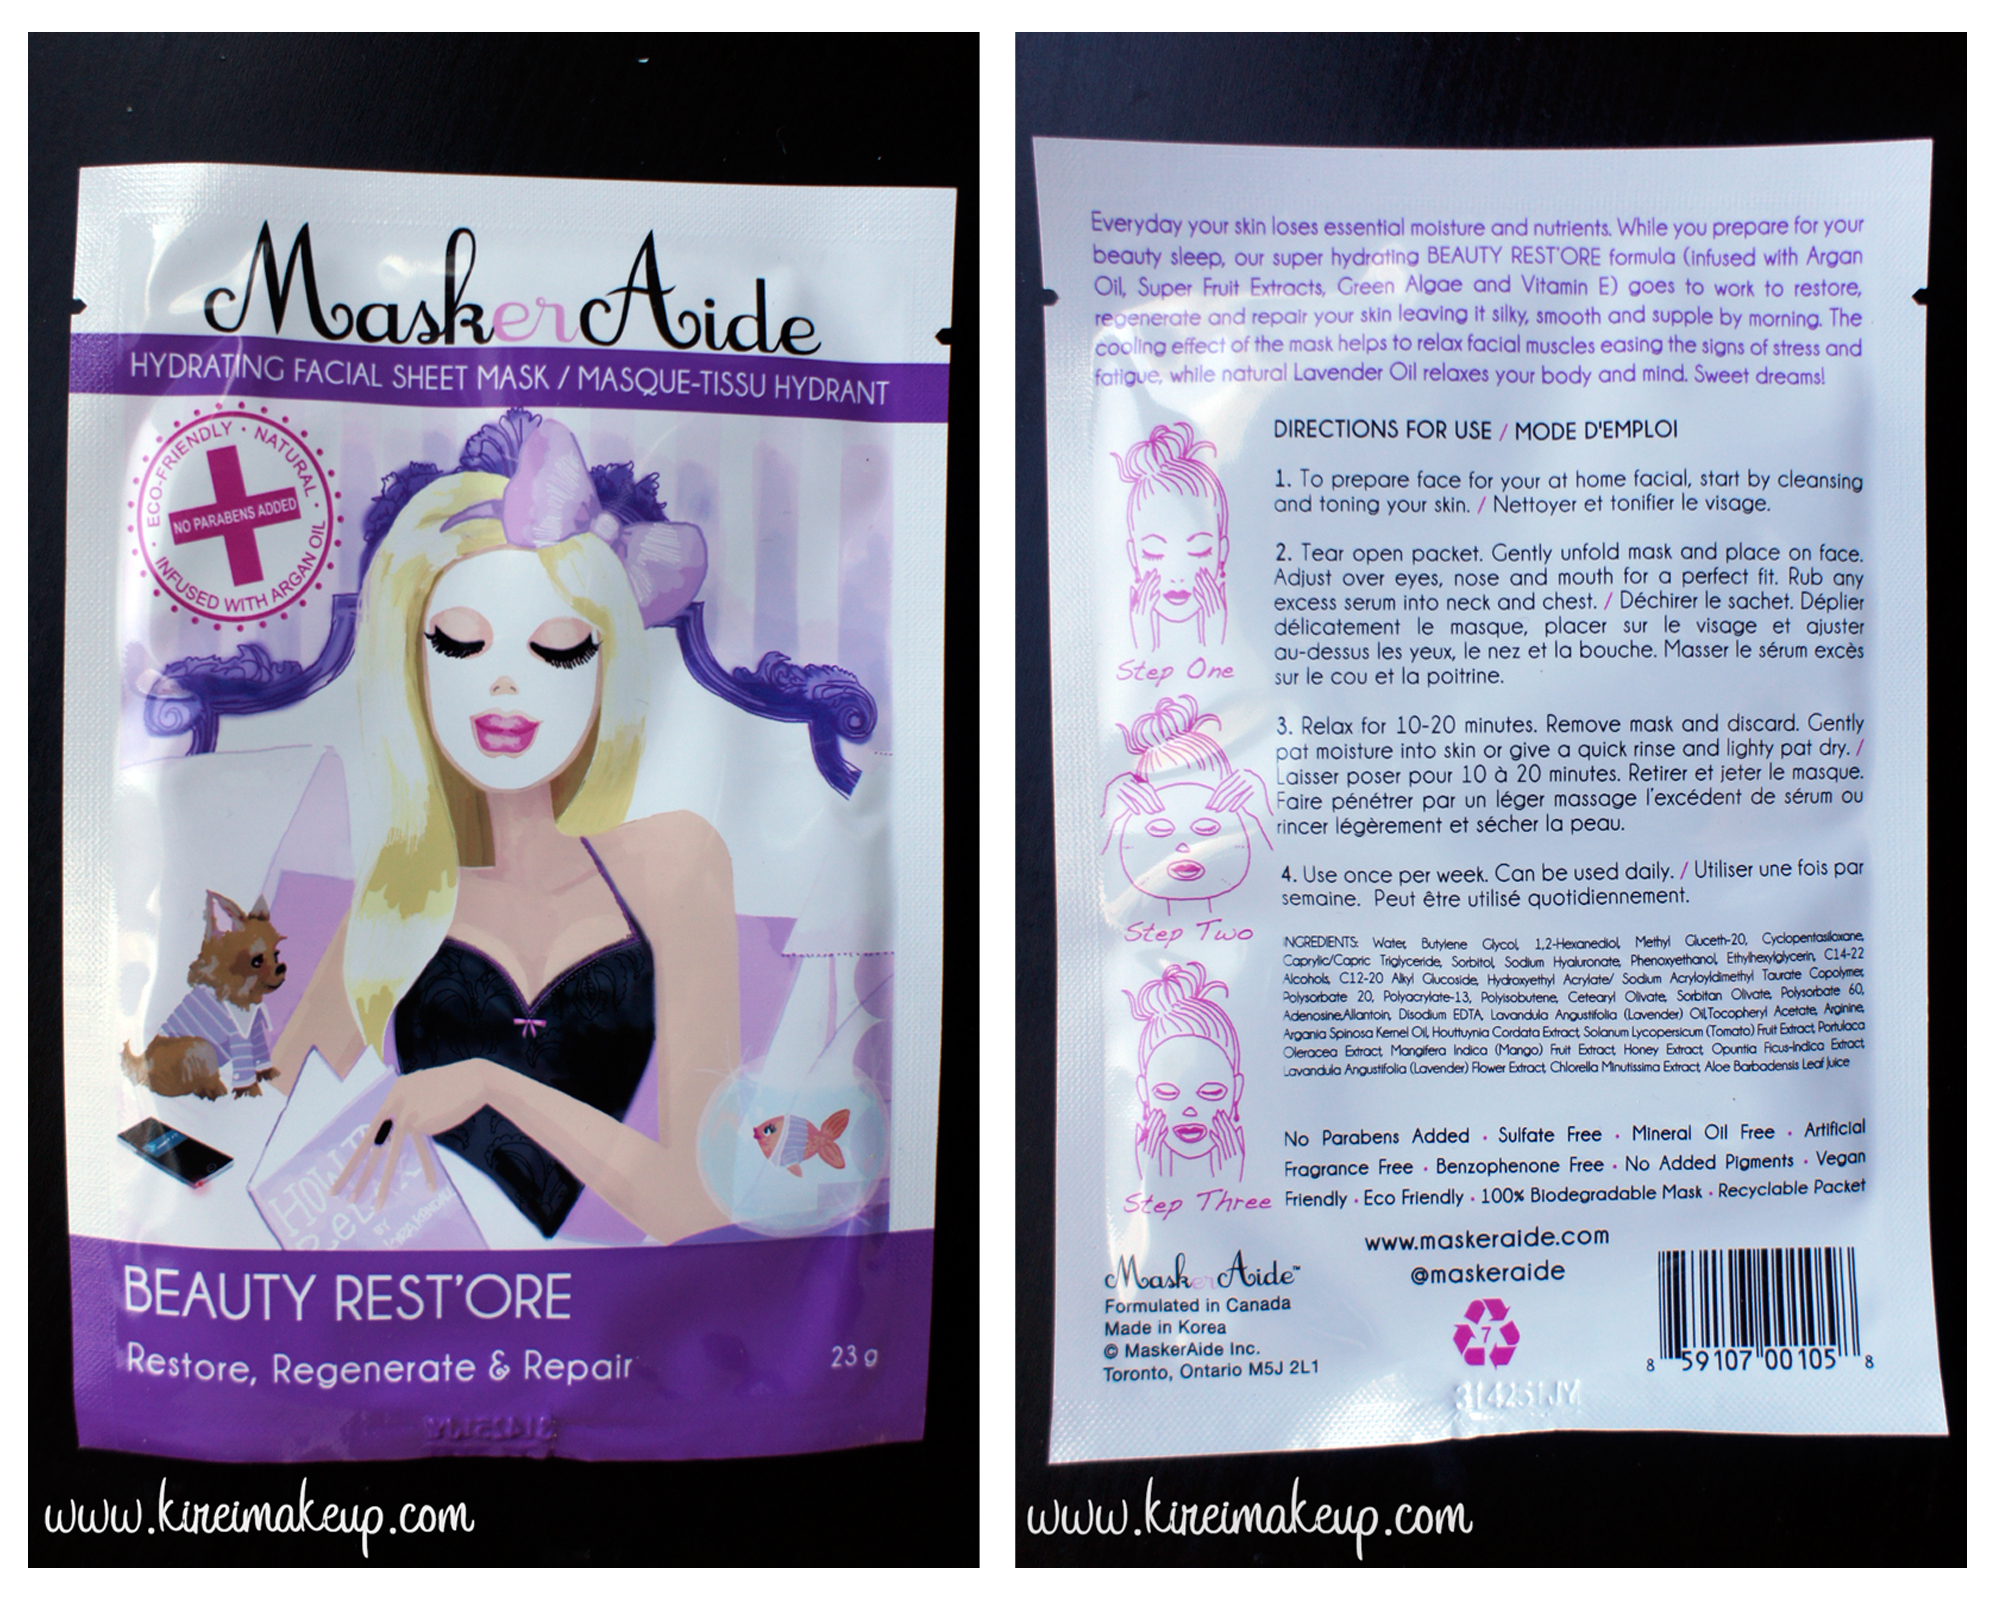
What is Beauty Restore Hydrating Facial Sheet Mask?

Everyday your skin loses essential moisture and nutrients. While you prepare for your beauty sleep, our super hydrating BEAUTY REST’ORE formula (infused with Argan Oil, Super Fruit Extracts, Green Algae and Vitamin E) goes to work to restore, regenerate and repair your skin leaving it silky, smooth and supple by morning. The cooling effect of the mask helps to relax facial muscles easing the signs of stress and fatigue, while natural Lavender Oil relaxes your body and mind. Sweet dreams!

DIRECTIONS FOR USE

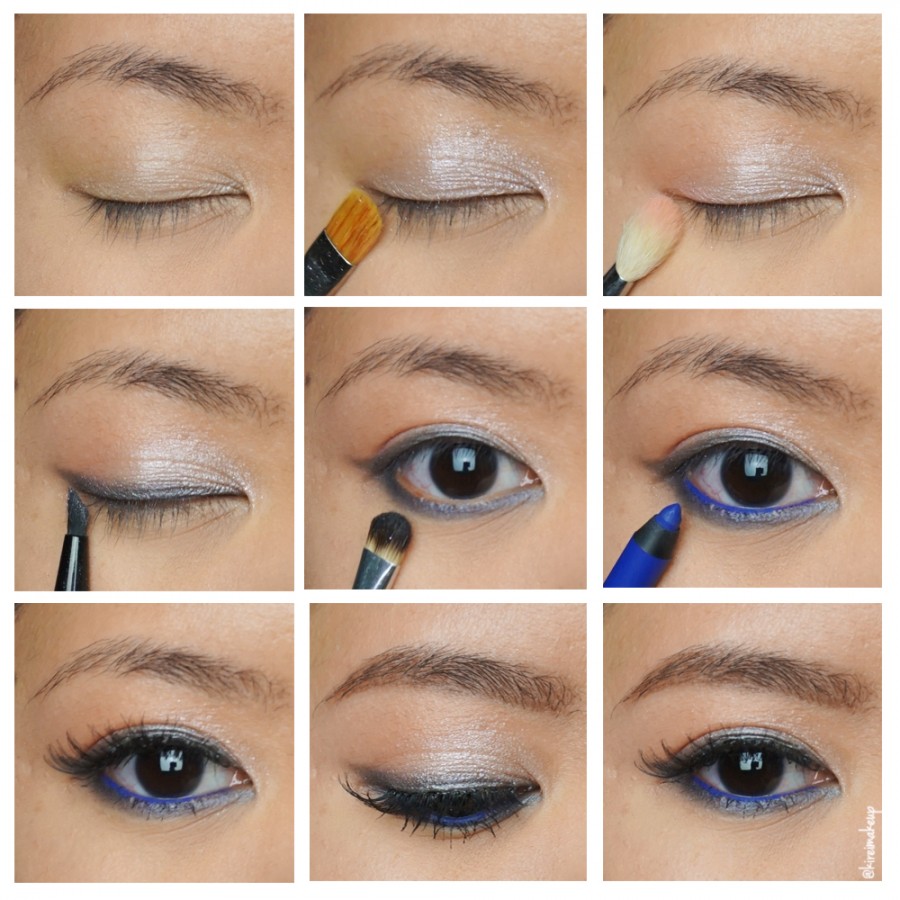
1. To prepare face for your at home facial, start by cleansing and toning your skin.

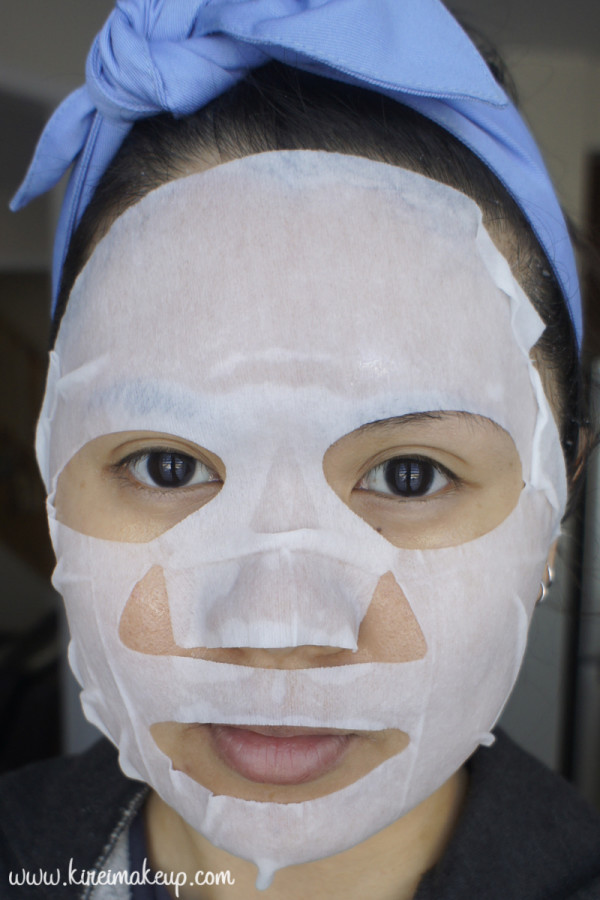
2. Tear open packet. Gently unfold mask and place on face. Adjust over eyes, nose and mouth for a perfect fit. Rub any excess serum into neck and chest.

3. Relax for 10-20 minutes. Remove mask and discard. Gently pat moisture into skin or give a quick rinse and lightly pat dry.

4. Use once per week. Can be used daily.

Obsessed Canada, 2015

Beauty Restore Hydrating MaskerAide

Ok, so if you don’t know what a facial sheet mask is, it is basically a mask. Usually, a face mask is like one of those gel-like or mud-like product where you slap on your face, let it on for a few minutes or until it dries, and you rinse your face afterwards. That’s like the traditional masks, for example the Glam Glow Mud Mask, one I’ve reviewed before.

A facial sheet mask comes with a sheet of mask. This sheet of mask is soaked in the skincare product that it comes with, in this case, a hydrating serum – Vit. E, Argan oil etc. You leave in on your face for 10-20 minutes and then discard the mask afterwards. There isn’t a need to rinse if you don’t want to. You can use it daily or once a week. Facial sheet masks are pretty much a concentrated version of night cream.

Facial sheet masks are very popular in Asia, especially Korea and Japan. I usually use SK II face masks, it was especially helpful during long flights from CGK-YYZ (or vice versa). It gives my skin the extra moisture I need when the humidity is low.

MaskerAide review

Facial sheet masks are usually used at night after your nightly skincare routine. I’m not sure if you use it before or after your night cream, since I don’t use any. I do use it after my skincare regime (wash, tone, moisturize). After the 20-minute is up, I just rub any excess serum on to my skin and go to bed. For this review, I did it during the day since I need the day light for pictures. I prefer doing the mask after moisturizer since I usually discard the sheet and go to bed, but I think you can do it before your moisturizer too if you want.

Pros

  • Extra moisture for the dry parched skin
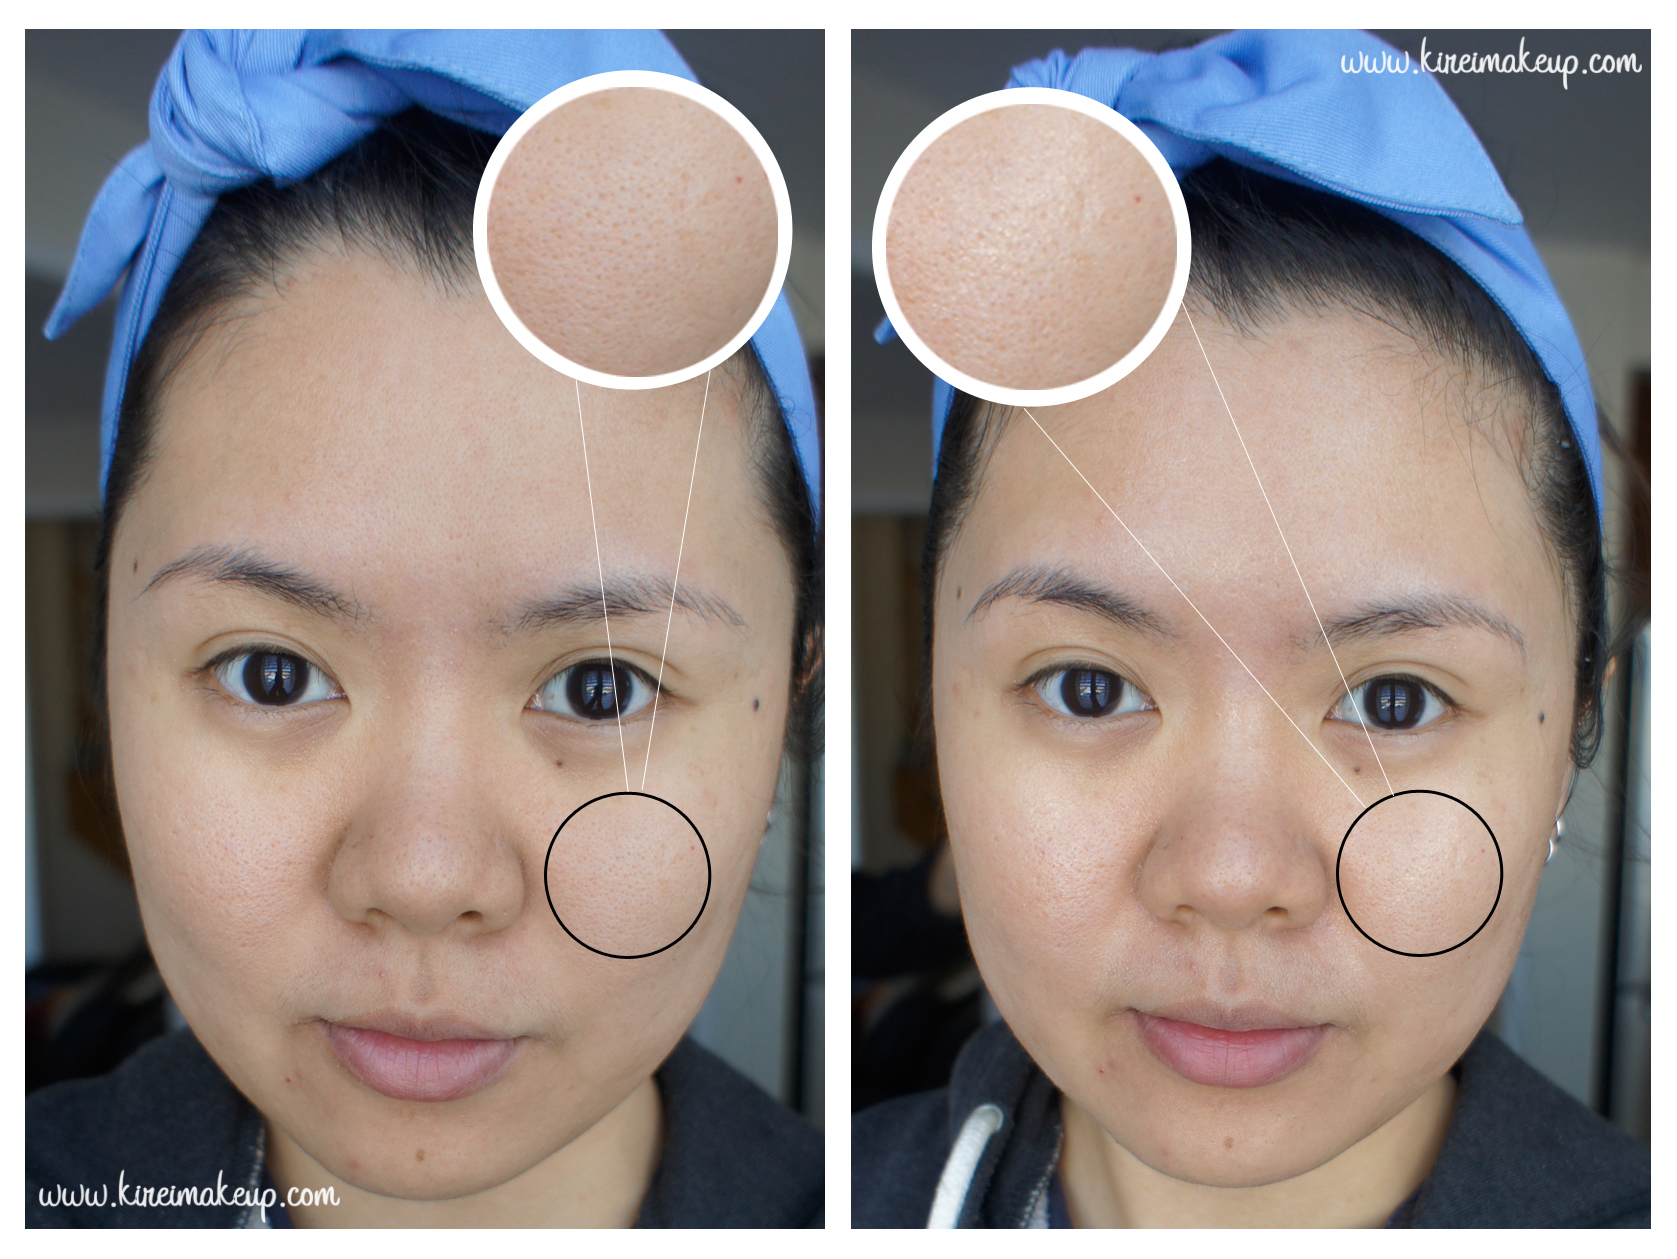
  • Effect can be seen immediately (look at before and after pictures below)
  • Skin feels plump, moistened, and look dewy
  • Smells great!
  • Excess serum can be used on neck and decolletage
  • Affordable – CA $6/each (compared to SK II – CA $168/10 masks)

Cons

  • Not for those with oily skin, especially in humid countries (i.e. Indonesia)
  • Face mask was too big for my face – certain areas of my face didn’t get covered properly
  • Excessive serum can get drippy and messy

Facial mask review
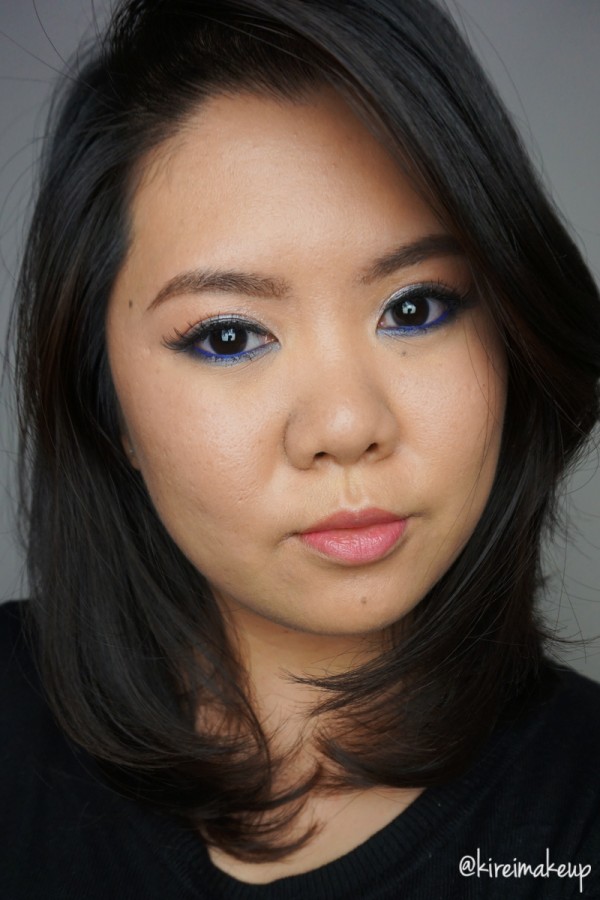
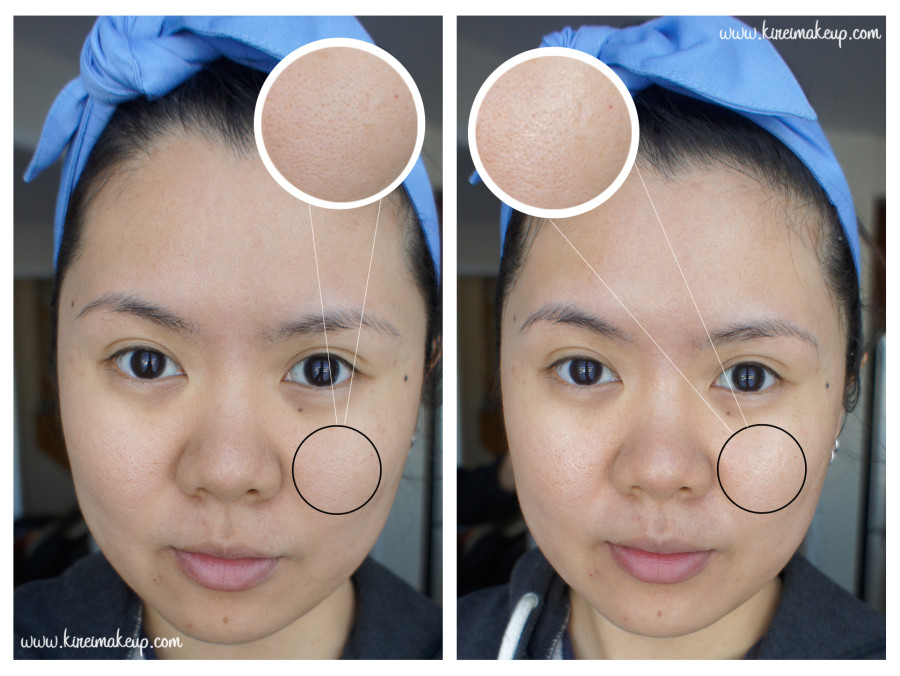
Before (Left) and After (Right)

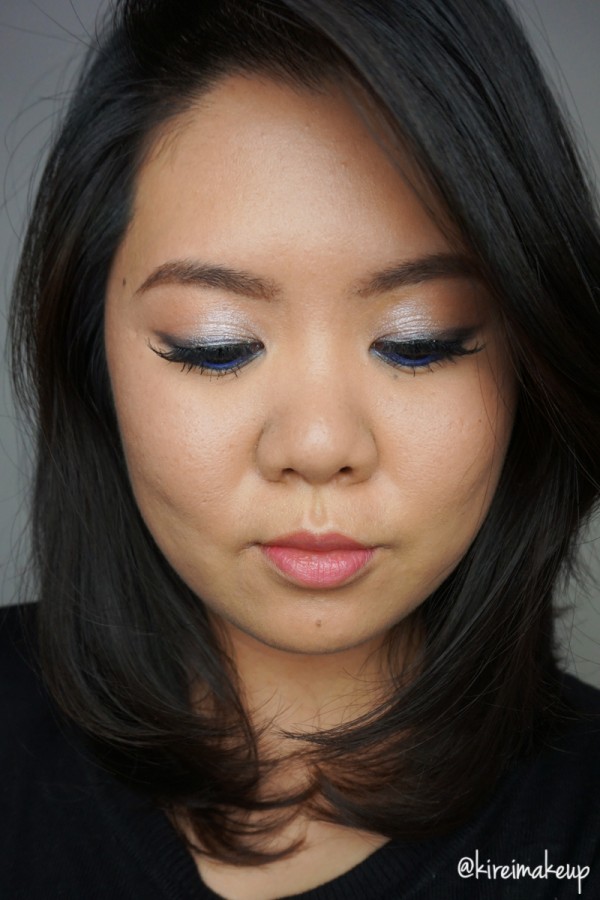
Disclaimer: The Beauty Restore Hydrating facial sheet mask by MaskerAide was sent to me by Obsessed Canada. However, my review is based purely out of my own opinion. I do not earn any money nor credits if you click on the Obsessed Canada and Nail Polish Canada links.

Halloween – 3D Spider Face Painting

Today’s tutorial is a good option for a last minute Halloween makeup idea! If you still haven’t decide what to do for Halloween, you can try to do this quick 3D Spider Face Painting look! Let me tell you that I have no background whatsoever in Art, and I managed to complete this look in about 20-minute. It’s fast, easy, and you don’t need many tools to create this 3D spider. You can also do it anywhere on your face/body. Actually my sister wanted me to do this on her face for Halloween when I showed it to her. So, there you go! A last minute Halloween idea without the need to wear any costumes!

So, I googled “Black Widow Spider” and also “realistic spider tattoo” to be used as reference for this look. You’ll see a tons of images on the web, so just pick one you like, and put it in front of you when you’re doing this. It’s a lot easier to create this look when you have a visual right in front of you.

All you need for this tutorial is:

  1. Image of spider (or tattoo)
  2. Brown eyeliner or eyebrow pencil (optional)
  3. Black liquid pen eyeliner – the easiest to work with. Try to find a pen-type liquid eyeliner so you can use it like you would use a marker.
  4. Red face paint or lip liner or lipstick
  5. White face paint or eyeliner
  6. Black pencil eyeliner

For brands I used, please check out the list of products at the end of the tutorial.

How-to:

1. I began by sketching out the outline of the spider on my arm using a brown eyebrow pencil.

2. Using the same brown pencil, I also sketched out where the shadows of the legs and body going to be. Make sure the “shadows” are thinner (use less pressure on the pencil). This way, you won’t mistook the legs from the shadow.

3. Using a black eyeliner pen, I thickened the body and legs of the spider.

  • The spider legs have 3 parts – upper thigh, middle thigh, and the long thin thigh. These thighs are separated by 2 joints. The easiest way to imagine the way their legs work is to look at your finger, or just use your reference photo as a sample.
  • To draw the thigh, just create a long almond-ish shape (look at photo below to see what I mean).

4. I created the red marking of the “Black Widow” spider using a red face paint, then I filled out the rest of the body using a black liquid eyeliner.

5. I filled in the gap on the thighs using the same black liquid pen eyeliner.

6. I cleaned up any excess of the sketch from step 1 using Maybelline Clean Express Mineral Water and cotton bud (i.e. q-tip).

  • For example, you can see that I made the top front leg slightly shorter with the black eyeliner than my initial sketch using brown eyeliner.

7. You can skip this step if you want to, but I darken the shadow of the legs and body slightly using a black pencil eyeliner.

  • Make sure all the shadows of the legs touched the tip of the spider’s “real” leg where it touches your body. This will create that 3D effect, where it looks like the spider is on your body.

8. Lastly, using the tip of an eyeliner brush and a white face paint, I applied some highlight on the legs of the spider and 4 dots on the head, and VOILA! DONE!

Don’t forget to check the rest of my Halloween tutorials!

realistic spider face paint

Products used:

  1. Brown eyebrow pencil – Chanel eyebrow pencil
  2. Black liquid pen eyeliner – Shu Uemura Calligraphy:ink eyeliner pen
  3. Red face paint – Snazaroo classic red face paint
  4. Black eyeliner pencil – Revlon photoready eyeliner pencil in Carbon Cleopatra
  5. White face paint – Snazaroo classic white face paint

Don’t forget to check the rest of my Halloween tutorials!

Smokey Eyes using Smashbox Full Exposure Palette

Another look using Smashbox Full Exposure Palette! I’ve created a natural warm-toned look using this palette in Smashbox Full Exposure Look #1, and I’ve also created a more glam look in Holiday Makeup using MAC Diva.

This time, I wanted to create a smokey eyes makeup with the palette, and so, I created this look! This look is a mixed of both the matte and shimmer eyeshadows from the Full Exposure palette.

Since it is smokey eyes look, you might want to do your eye makeup first before the rest of your face in case of fall-out.

How-to:

1. My eyelids were prep using Urban Decay Primer Potion.

2. Using a fluffy brush, I applied Smashbox Full Exposure eyeshadow in S6 slightly above the crease of my eyes.

3. Using a Smashbox bullet brush, I applied Smashbox Full Exposure eyeshadow in S7 on the outer V and on the crease.

4. Using the black side of the split-fiber brush from the palette, I applied Smashbox Full Exposure eyeshadow in M6.

5. Using a brush used in step 2, I blended the crease of my eyelid.

6. Using a small shader brush (MAC 228), I applied Smashbox Full Exposure eyeshadow in M5 on the inner corner of the eyes, and S7 on the rest of the lower lash line.

7. I lined my upper lash line, tightline and waterline using L’oreal Voluminous Smoldering eyeliner.

8. I applied Gwiyomi eyelashes in 8042 on the upper lashes. (Gwiyomi eyelashes are sold in Jakarta through my friend)

9. I filled my brows using Anastasia Brow Wiz in Medium Ash and Brunette.

silver smoky eyes

10. On the face, I applied Urban Decay Naked foundation using MAC Oval 6 brush.

11. I contoured my face using MAC Mineralized Skin Finish in Dark Deep.

12. On the cheeks, I applied Benefit Hervana blush.

13. I applied Chanel Lipgloss levres scintillantes glossimer (165).

Smashbox Full Exposure palette

Holiday Makeup using MAC Diva

I’m on a mission to use my new Smashbox Full Exposure palette as much as I can, and in as many tutorials as possible. I will mention that I’ll be doing Smashbox Full Exposure palette review and swatches in my next post!

I’ve recently bought MAC Diva lipstick, which is a retro matte dark red lipstick. So, I wanted to start creating a holiday makeup tutorial that has a little bit of a classic look, with a modern twist. I decided to do this tutorial, which consisted of dark red lips and shimmery cat eyeliner.

Keep in mind that the glitters from Smashbox Full Exposure palette S7 eyeshadow might create a lot of fall-out. You might want to do your eye makeup first before doing the rest of the face.

If you want to see a tutorial using the Smashbox Full Exposure palette, please check my Smashbox Full Exposure Look #1 post. If you want to find out how to apply red lipstick, please check my How-To Apply [red] Lipstick post.

cat eyeliner

How-to:

1. I applied Urban Decay Primer Potion all over my eyelid using my ring finger.

2. Using Smashbox Full Exposure palette M5 eyeshadow, I applied it all over my lid using a flat eyeshadow brush.

3. I created a cat-eyeliner along the upper lash line using MAC 266 brush and Smashbox Full Exposure palette S7 eyeshadow.

4. Using the same brush and eyeshadow from Step 3, I applied the eyeshadow on my lower lash line.

5. I used L’oreal Voluminous Smoldering eyeliner on my waterline and tightline.

6. I filled my brows using MUFE Aqua Brow gel and a clean MAC 266 brush.

7. I curled my lashes and applied Physician’s Formula Organic mascara on both upper and lower lashes.

8. Then, I applied Eyeme false eyelashes on the upper lashes.

Holiday Makeup Tutorial

9. I applied MAC Pro Longwear foundation in NC30 all over my face.

10. I applied Benefit Erase Paste under my eyes.

11. I set the base using Cover FX Translucent powder.

12. Using Diorskin Shimmer Star Amber Diamond as highlighter.

13. I used MAC Shadowy as contour, and NARS Mata Hari on the cheeks.

14. On the lips, I applied MAC Brick lip liner and then applied MAC Diva on top of it.