Halloween – 3D Spider Face Painting

Today’s tutorial is a good option for a last minute Halloween makeup idea! If you still haven’t decide what to do for Halloween, you can try to do this quick 3D Spider Face Painting look! Let me tell you that I have no background whatsoever in Art, and I managed to complete this look in about 20-minute. It’s fast, easy, and you don’t need many tools to create this 3D spider. You can also do it anywhere on your face/body. Actually my sister wanted me to do this on her face for Halloween when I showed it to her. So, there you go! A last minute Halloween idea without the need to wear any costumes!

So, I googled “Black Widow Spider” and also “realistic spider tattoo” to be used as reference for this look. You’ll see a tons of images on the web, so just pick one you like, and put it in front of you when you’re doing this. It’s a lot easier to create this look when you have a visual right in front of you.

All you need for this tutorial is:

  1. Image of spider (or tattoo)
  2. Brown eyeliner or eyebrow pencil (optional)
  3. Black liquid pen eyeliner – the easiest to work with. Try to find a pen-type liquid eyeliner so you can use it like you would use a marker.
  4. Red face paint or lip liner or lipstick
  5. White face paint or eyeliner
  6. Black pencil eyeliner

For brands I used, please check out the list of products at the end of the tutorial.

How-to:

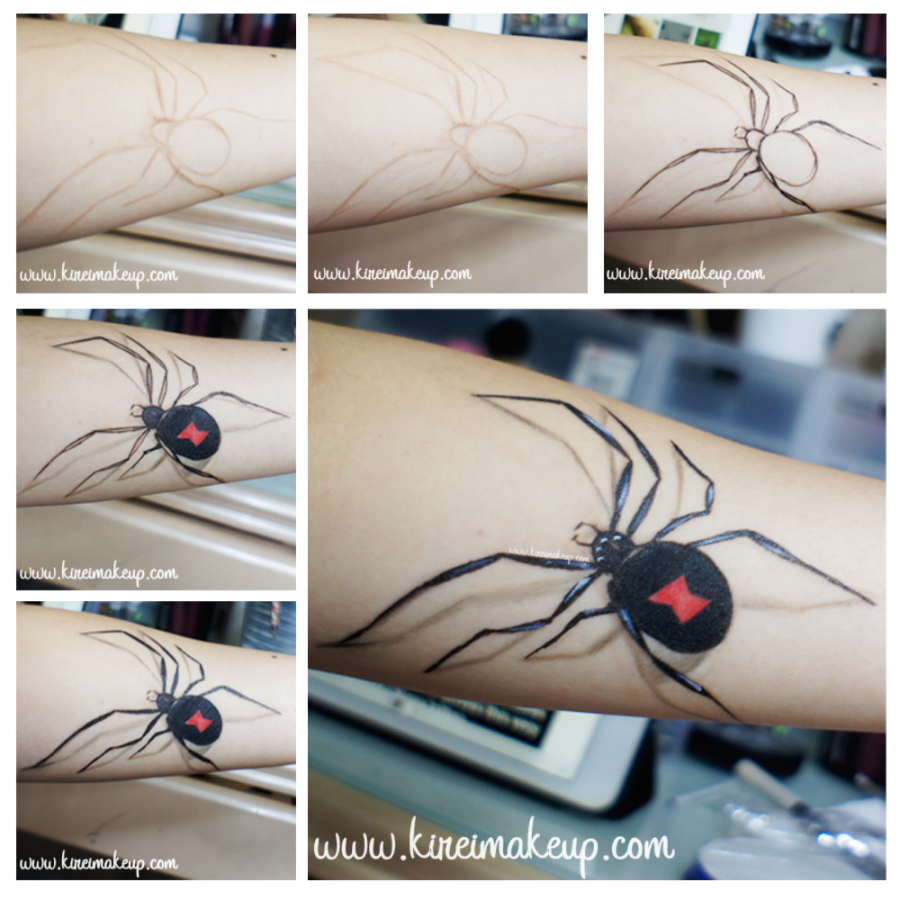
1. I began by sketching out the outline of the spider on my arm using a brown eyebrow pencil.

2. Using the same brown pencil, I also sketched out where the shadows of the legs and body going to be. Make sure the “shadows” are thinner (use less pressure on the pencil). This way, you won’t mistook the legs from the shadow.

3. Using a black eyeliner pen, I thickened the body and legs of the spider.

  • The spider legs have 3 parts – upper thigh, middle thigh, and the long thin thigh. These thighs are separated by 2 joints. The easiest way to imagine the way their legs work is to look at your finger, or just use your reference photo as a sample.
  • To draw the thigh, just create a long almond-ish shape (look at photo below to see what I mean).

4. I created the red marking of the “Black Widow” spider using a red face paint, then I filled out the rest of the body using a black liquid eyeliner.

5. I filled in the gap on the thighs using the same black liquid pen eyeliner.

6. I cleaned up any excess of the sketch from step 1 using Maybelline Clean Express Mineral Water and cotton bud (i.e. q-tip).

  • For example, you can see that I made the top front leg slightly shorter with the black eyeliner than my initial sketch using brown eyeliner.

7. You can skip this step if you want to, but I darken the shadow of the legs and body slightly using a black pencil eyeliner.

  • Make sure all the shadows of the legs touched the tip of the spider’s “real” leg where it touches your body. This will create that 3D effect, where it looks like the spider is on your body.

8. Lastly, using the tip of an eyeliner brush and a white face paint, I applied some highlight on the legs of the spider and 4 dots on the head, and VOILA! DONE!

Don’t forget to check the rest of my Halloween tutorials!

realistic spider face paint

Products used:

  1. Brown eyebrow pencil – Chanel eyebrow pencil
  2. Black liquid pen eyeliner – Shu Uemura Calligraphy:ink eyeliner pen
  3. Red face paint – Snazaroo classic red face paint
  4. Black eyeliner pencil – Revlon photoready eyeliner pencil in Carbon Cleopatra
  5. White face paint – Snazaroo classic white face paint
Don’t forget to check the rest of my Halloween tutorials!

Product of the Week: MUFE Aqua Creams

I’ve been wanting to do this review for the longest time, and finally I have the chance to do it! If you are looking for a cream shadow or a base that is smudge-proof, crease-proof, water-proof, sweat-proof, tear-proof and everything else (you get the idea), this is the products for you! The aqua cream has a great range of colors, which is definitely one of their assets in this era of cream shadow. I’ve been using this line since 2010, and have never looked back.

What is Aqua Cream?

From MUFE website:

The Aqua Cream is an ultra-pigmented, long-lasting waterproof cream. Highly concentrated in mother-of-pearl pigments, it provides an immediate color intensity with a luminous finish.
Its long-lasting formula will not crease or smudge under the most extreme conditions.

Available in 22 shades, the multipurpose Aqua Cream can be applied on your lips, cheeks and eyes.

Shades #5, 6, 7, 8, 9, 10 are formulated for the Lips & Cheeks.
Shades #1, 2, 3, 4, 11, 12, 13, 14, 15, 16, 17, 18, 20, 21, and 22 are formulated for the Eyes & Cheeks.

Formula:

Volatil oil
Filmogen polymer
Synthetic Ester
High concentration of mother-of-pearls and pigments
Kaolin mineral powder
Paraben free
Dermatologist and ophtalmologist tested

MUFE Aqua Cream

Pros

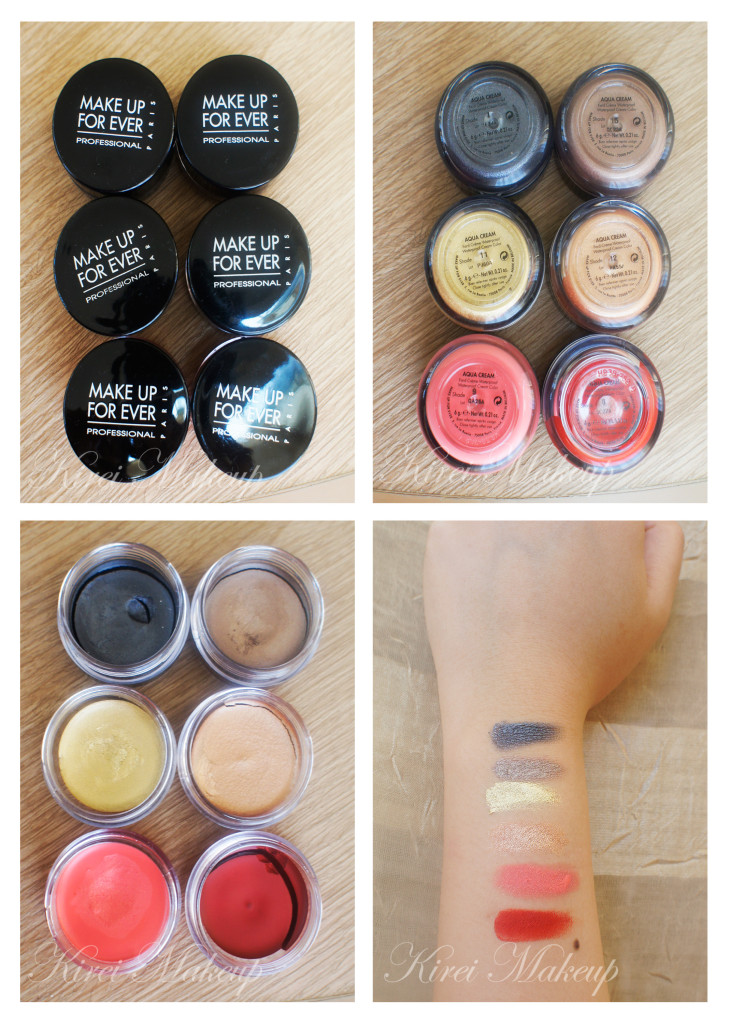
So, I owned 6 different colors (top-bottom, left-right):

  • #1 Anthracite – gunmetal with a silver sheen. The color is leaning towards dark grey than black. I love using this as a base for smoky eyes.
  • #15 Taupe – metallic medium brown with warm undertone. This will look dark brown on lighter skin tone, and light on  darker skin tone.
  • #11 Gold – metallic golden yellow.
  • #12 Golden Copper – rich copper with red undertones.
  • #9 Coral – light coral pink.
  • #8 Red (for cheeks and lips only) – red with orange undertone (think fire trucks). I feel that this product has a golden sheen to it.

Don’t mind the crack in some of them. I had to travel with it a few times (Canada-Jakarta-Bali etc).

Longevity

For all of them, I’d say they (all except #8) lasted a good 8 hours on the eyes. I’ve used this mostly on brides and photoshoots. Once it’s on, it stays ON. This product once it’s on the eyes, it will not move. Like I said, it’s crease-proof, water-proof and smudge-proof.

For #8, I used it for 4-hour and it stayed put throughout. However, when I tried to remove it, it stained my lips pretty much the whole day. It has a velvety finish to it when it dried, so if you prefer a glossy finish, you can apply a clear gloss.

Finish

Out of the 6 that I owned, 4 has a metallic finish (#1, #15, #11 and #12). #9 has a gold shimmer and #8 has a golden sheen to it.

Coverage

You can apply this as a wash of color, or you can build it up in layers.

Packaging

Plastic container with a screw on lid. Very light, made it very easy to travel with.

Price

The product cost CAD$28 for 6 gram in Canada (Sephora). In Jakarta, when I bought #9, it cost me Rp. 250,000 for 6 gram. It’s cheaper in Jakarta than in Canada..(that’s a first!). Since it is cheaper in Jakarta, I might go over and buy a few more colors..hehehee *update as of June 2, 2013* MUFE Indonesia is selling their aqua creams at Rp. 300,000 each. Now, for price-wise, it’s similar to the Canadian counterpart.

Cons

Again, I’ve to repeat this: work fast with this product and in thin layers. The product dries very fast and once it dries, there’s no way of blending it. If you apply this product too thick on your first few layers, you might see a build-up of products on the skin. There’s no way of re-blending it once it becomes lumpy.

Also, for that price, you are better off buying Maybelline Color Tattoo 24-hour gel shadow which cost CAD$6.95! However, the color range might not be as much as the Aqua Cream. On top of that, the color tattoo line is not available in Indonesia.

I’m giving the Aqua Cream 4 winks out of 5!

p.s.: for tutorials using the aqua creams, please check the links below:

Smoky Eyes and Red Lips

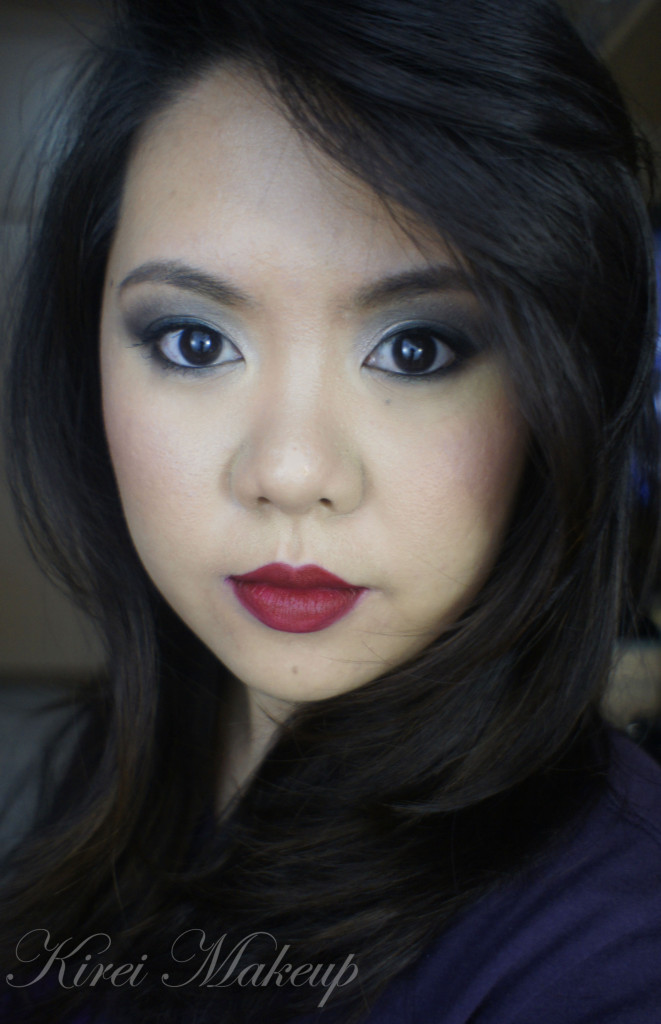
Since I’ve been doing quite a few bright colored tutorials, I wanted to do a dark look…I love smoky eyes and red lips, and even though usually I don’t wear both at the same time, I did it anyways..hahaha..Lately this combination of smoky eyes and red lips are making a comeback. What used to be a faux pas, seems to be the new trend. Smoky eyes and red lips were the look in 1920s (think Betty Bop, Flapper dancers etc). However, I obviously made it to suit my own style and liking!

I wanted to find my own red lips hue, so I’ve to mix it myself. If you like the color of the lips, continue reading for the tutorial! 🙂

How-to:

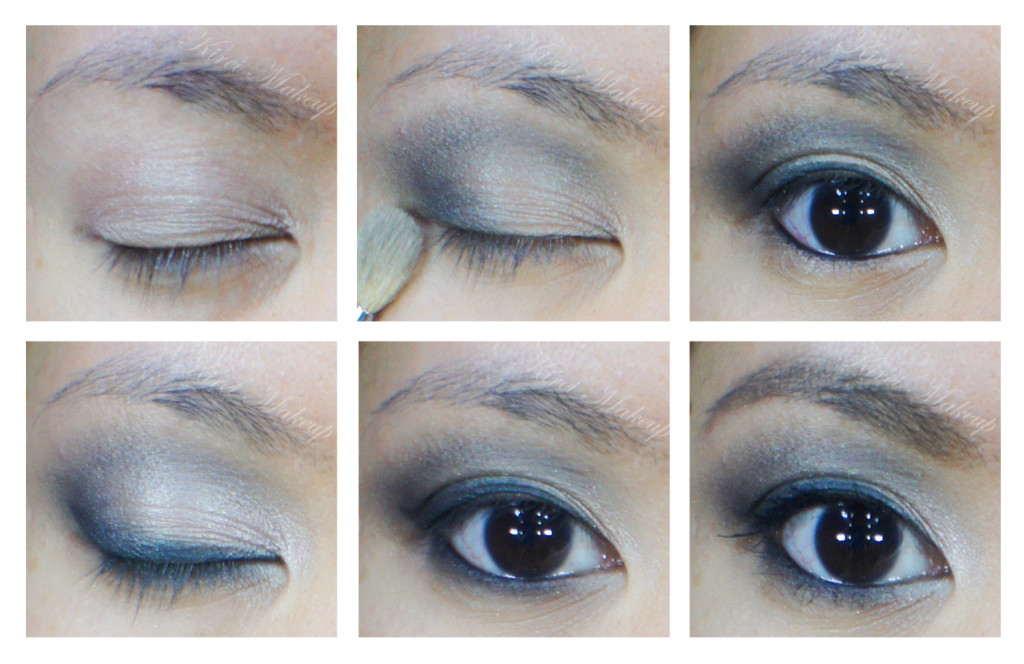
1. I applied the lighter shade (silverish brown) from NARS Dogon duo eyeshadow using a flat eyeshadow brush all over my eyelid.

2. Using a blending brush, I applied the darker side (bluish charcoal) from NARS Dogon duo eyeshadow on the crease and outer V.

3. I lined my waterline and tightline using L’oreal Voluminous Smoldering eyeliner.

4. Using MAC Blacktied, I applied winged liner using an angled eyeliner brush along the upper lash line.

5. I also applied the darker shade from NARS Dogon duo eyeshadow along the lower lashline.

6. I curled my lashes and applied Dior Overcurl mascara on both top and bottom lashes.

7. I applied MAC Naked Lunch on the center of the lid and the inner corner of the eyes to brighten up my eyes.

8. I filled in my brows using a mixture of MAC Omega and MAC Brun.

asian smoky eyes

9. I applied Giorgio Armani Silk foundation all over my face using my fingers.

10. I also applied MAC Pro concealer palette in Medium (NC 30) under the eyes, side of the nose, any blemishes and lightly over the lips.

11. For the lips, I applied a thin layer of Revlon Colorstay Ultimate Suede in Backstage on the lips using a lip brush.

12. Then, I applied a layer of OCC Lip Tar in Vintage on top of the Revlon Backstage lipstick.

13. I used a piece of Klenex, put it against my lips and blot away the excess lipstick.

14. Using a clean piece of Klenex, I put it against my lips lightly and applied translucent powder on top of the Klenex using a clean blush brush.

15. For the contour, I applied MAC Shadowy on the temples, hollows of the cheeks and sides of the nose.

16. For the cheeks, I applied MAC Fleur Power to complete the look.

smoky eyes and red lips

<a href=”http://www.bloglovin.com/blog/708627/?claim=npanjk37yxk”>Follow my blog with Bloglovin</a>