MAC Beautiful Iris

I recently fell in love with MAC Beautiful Iris eyeshadow, and had used it in my previous tutorial. Anyways, I just think this eyeshadow is so pretty for Spring/Summer makeup, especially for those who are not afraid of colors. If you’re on the conservative side, please take a look at Neutral Eyes with a Pop of Color on how to add a bit of color to your makeup wardrobe.

Anyhow, I decided to pair this purple eyeshadow with very soft warm brown colors, this way the makeup stays pretty soft and not too much. I used my Kat Von D Shade + Light eye contour palette for the rest of the eyes. I will try to do a review on that palette soon update: Review is up! I have so much review to do, not enough time. I’m still busy with the move, so I haven’t settle down yet. It’s kind of hard for me to do tutorials and getting back into my posting routine with all the stuff lying everywhere. *sigh*

purple eye makeup

Products used

Eyes

  • Primer – Urban Decay Primer Potion “Original”
  • Base – Kat Von D Shade + Light eye contour palette “Laetus”
  • Transition – Kat Von D Shade + Light eye contour palette “Ludwin”
  • Outer V/Crease/lower lashline – Kat Von D Shade + Light eye contour palette “Sytry”
  • Eyelid – MAC eyeshadow “Beautiful Iris”
  • Winged liner – Kanebo Kate Super Sharp eyeliner
  • Waterline – MAC Chromagraphic eyeliner “NC15”; Kat Von D Shade + Light eye contour palette “Liberatus”
  • Mascara – Lancome “Hypnose”
  • Eyebrows – Anastasia Brow Wiz “Taupe”; L’oreal Brow stylist
  • Falsies – Gwiyomi Boutique no. 3

mac beautiful iris

Face

  • Primer – Becca “Ever Matte Poreless Priming Perfector”
  • Foundation – L’oreal Infallible Pro-Matte Foundation “104 – Golden Beige”
  • Concealer – NARS Radian Creamy concealer “Custard”
  • Setting powder – CoverFX translucent powder

Cheeks

  • Contour – Kat Von D Shade + Light Contour Palette “Shadowplay”
  • Highlight – Kat Von D Shade + Light Contour Palette “Lyric”
  • Blush – NARS blush “Mata Hari”

Lips

  • Lipstick – Revlon Colorstay Ultimate Suede “Flashing Lights”
  • Lip gloss – Make Up For Ever Artist Plexi-Gloss “202 (sweet pink)”

mac beautiful iris

Neutral Eye with Pop of Color

One of my favorite way to change my makeup wardrobe is to create a neutral eye with pop of color. This is the easiest way to add colorful eyeshadow, if you are not comfortable wearing lots of colors on your eyes. There are several ways to add this pop of color – on the waterline, along the lower lash line, or as winged liner. This time, I decided to add a pop just on the inner corner of my eyes. It’s very subtle, and has a brightening effect. This is a great way for those with monolids or hooded eyes to add color to their eyes.

The eyeshadows that I used for this tutorial is from the MAC Amber times 9 palette (except for the purple). You can purchased the eyeshadow individually if you prefer. The eyeshadows on this palette is smaller than the individual ones, but I think it’s not that bad especially if you’re a beginner makeup artist who is trying to build their kit, or if you are someone who don’t wear much makeup daily but would like a versatile palette. I like this palette, it might be my go-to bridal palette, such pretty earthy tones with a good mix of matte, shimmer, frost, satin, velvet and lustre

spring makeup tutorial

Products list

Eyes

  • Primer – Urban Decay Primer Potion original
  • Base – MAC eyeshadow “Georgia Peach”
  • Transition – MAC eyeshadow “Cork”
  • Outer V/lower lash line – MAC eyeshadow “Aromatic”
  • Eyelid – MAC eyeshadow “Don’t Tell”
  • Inner corner – MAC eyeshadow “Beautiful Iris”
  • Winged liner – Kanebo Kate Super Sharp eyeliner
  • Waterline – MAC Chromagraphic eyeliner “NC15”
  • Eyebrows – Anastasia Beverly Hills Brow Wiz “Taupe”
  • Eyebrow gel – L’oreal Brow Stylist
  • Mascara – L’oreal Manga Rock mascara
  • Falsies – Gwiyomi lashes no. 3 + Gillian


mac amber times 9 makeup look

Face/Cheeks

  • Primer – La Roche Posay “Cicaplast Baume B5”
  • Foundation – Mac Pro Longwear foundation “NC25”
  • Concealer – MAC Pro Longwear concealer “NC25”
  • Setting Powder – CoverFX translucent powder
  • Contour – MAC contour powder “Sculpt”
  • Blush – MAC blush powder “Fleur Power”

Lips

  • Lipstain – Shu Uemura Lip Tint Gelatin “CR1”
  • Lip gloss – Make Up For Ever Artist Plexi-Gloss “202 (sweet pink)”

summer bronze smoky eyes


Colorful Summer Makeup

I love bright colorful makeup for summer, but I also love soft colorful shadows. I think this colorful summer makeup tutorial is not too bright, it almost has a watercolor feeling to it, don’t you think? It’s soft, but at the same time it’s colorful. Just a wash of green, orange and purple. Nothing bright, nothing out there, a soft colorful wash just the way I like it! Very wearable, but not outrageous.

Anyways, for the step-by-step tutorial I think I stood too far away from my ring light, and the purple on my lower lash line didn’t show up much. However, on the full face portrait, I stood closer to the light, so the color showed up better.

soft colorful summer makeup

Products used

Eyes

  • Primer – Urban Decay Primer Potion “Original”
  • Inner half (upper lid) – Sisley Phyto-Ombre eyeshadow “Anis 5”
  • Outer half (upper lid) – Sisley Phyto-Ombre eyeshadow “Mango 20”
  • Lower lash line – purple shade from NARS duo eyeshadow “Charade”
  • Waterline – Urban Decay Vice 3 “Bobby Dazzle”
  • Mascara – Cover Girl Lash Blast “very black”
  • Brows – Anastasia Brow Wiz “Taupe” and “Brunette”

Face/Cheeks

*How to Highlight/Contour using Powder*

Lips

  • Lipstick – YSL Rouge Pur Couture “52”
  • Lipgloss – YSL Glossy Stain “27”


colorful summer makeup look

Summer Makeup – Mint Eyeliner

As the weather is getting warmer, I wanted a lighter, and more colorful Summer makeup. I think I still haven’t had enough of mint makeup. I know the reign of mint color is over, but I couldn’t stay away from it! There’s just something about this color that’s so refreshing. So I decided to create a mint eyeliner look.

You can change the mint liner to any color you want, I think turquoise and yellow would be a great alternative for something bright. I chose to use Stila Smudge stick liner since it gives me the color pay-off I was looking for. I did tried their mint liquid liner, but it wasn’t good at all. I also set the eyeliner using a light green eyeshadow to prevent smudging – this is not necessary unless you have oily lids, just to be safe. Setting the eyeliner with powder will make it smudge-proof especially in warmer weather.

I paired this mint eyeliner with a pink lips, but you don’t have to pair it with this lips. I would pair this with a peachy lips for an alternative. I just paired it with pink lips just because I wanted to use my new lipstick. I kept everything else very simple. No falsies with this look since I don’t want it to look too glam.

mint eyeliner

Products used

Eyes

  • Primer – Urban Decay Primer Potion “original”
  • Base – Makeup Geek Cosmetics “Shimma Shimma”
  • Eyeliner – Stila Cosmetics Smudge Stick Waterproof Eye Liner “Mint Julep”
  • Eyeshadow – Make Up For Ever Diamond e/s “D316 Crystalline Pinky Green”
  • Mascara – Cover Girl Lash Blast mascara “Very Black”
  • Brows – Anastasia Brow Wiz in “Taupe” and “Brunette”

Face/Cheeks

  • Foundation – Chanel CC Cream “32”
  • Under Eye – Bobbi Brown Tinted Eye Brightener “Light to Medium Peach”
  • Highlight – The Balm “Mary-Lou Manizer”
  • Blush – MAC powder blush “Cubic”

Lips

  • Lipstick – Shu Uemura Rouge Unlimited  My Dear Matte “Allure Fuchsia”

mint liner

Urban Decay Vice 3 Tutorial for Spring Look

Have you guys find out the pro tips given by Ludovic Engrand (Shu Uemura MUA) on my Instagram yet? If not, don’t forget to check it out! Anyways, for today’s Urban Decay Vice 3 tutorial, I wanted to create a spring look using just this one palette. I realized that I haven’t used this palette much, and I don’t know why I don’t use it as much since the eyeshadows are so buttery and creamy! This look is for someone who isn’t afraid of colors!

Of course, you can skip the orange-gold eyeshadow on my eyelid for something more neutral if you feel that this look is too colorful. I’ve done other tutorials using just a pop of color and neutrals in my other posts. So, check those out – Too Faced Chocolate Bar #3Kat Von D Monarch tutorial #2 and Cobalt Blue, Adding Color to eye makeup and a Hint of Mint.

I’ve also recently purchased a Stila brow pen (All Day Waterproof Brow Color), and I used it for the first time in this look. What do you guys think? I personally find this slightly harder to use at first. I’ve used it twice now, and I’m starting to really like the end result this product gives! I’ll try to do a review soon.

UD Vice 3 tutorial

Products used

Eyes

  • Primer – Urban Decay Primer Potion “original”
  • Eyelid – Urban Decay Vice 3 “Lucky
  • Outer corner – Urban Decay Vice 3 “Reign
  • Inner corner (tear duct) – Urban Decay Vice 3 “Last Sin
  • Lower lash line & Crease – Urban Decay Vice 3 “Defy
  • Waterline – Urban Decay Vice 3 “Dragon
  • Eyeliner – Kat Von D Tattoo Liner “Trooper”
  • Brows – Stila All Day Waterproof Brow Color “Dark”
  • Mascara – Cover Girl Lash Blast
  • Falsies – Gwiyomi boutique #3 lashes

UD Vice 3 look

Face/Cheeks

  • Primer – Kat Von D foundation primer
  • Foundation – MUFE HD Foundation #120
  • Concealer – MAC Pro Longwear concealer “NC25”
  • Setting powder – CoverFX translucent setting powder
  • Contour – MAC “Sculpt” powder
  • Blush – MAC “Cubic” blush

Lips

  • L’oreal Extraordinaire Color Riche “Blushing Harmony”

UD Vice 3 tutorial

Yaz Bukey for Shu Uemura

As most of you would know, I’ve recently attended a beauty event held at Hudson’s Bay Toronto (downtown) with my friend, Lynn! She invited me to join her to attend the Yaz Bukey for Shu Uemura live appearance. Of course, I couldn’t missed this chance! I’ve shared some pictures in regard to this event over on my Instagram, so don’t forget to check them out! I’ll be posting more videos, especially the pro tips by Ludovic Engrand (Shu Uemura makeup artist and PR Manager) over on my Instagram account. So, don’t forget to follow me on Instagram!

yaz bukey

Paris-based artist and jewelery designer, Yaz Bukey, collaborated with Shu Uemura to release her makeup collection. From the live appearance q&a session hosted by David Lackie, Yaz mentioned that her collection is about “becoming the woman you want to be“. Her collection consisted of 4 different character of Yazettes – pink, blue, yellow and green. The idea behind her characters were 4 girlfriends with different personalities who are having fun, and each one of them received something special from a secret lover, Mr. Shu Shu. Yaz said “we all need Shu Shu in our lives…every women need their Shu Shu“.

Shu Uemura

Ludovic Engrand worked alongside with Yaz Bukey for more than a year! They also created a special Yaz’s signature matte red lipstick. Ludovic did say during the q&a session, that the 34 items in this collection is the most they have so far for a Shu Uemura’s collaboration. They created different textures and finish to create a palette that is suitable for all skintone and for women to have choices, to compliment Yaz’s theme of “becoming the woman you want to be”, and that “beauty has no limit.”

yaz bukey for shu uemura

David Lackie asked Yaz and Ludovic what is the must-have product from this collection, and Ludovic answered with the cult’s favorite Shu Uemura cleansing oil! Not only the cleansing oil is great for your skin, for this collection, Yaz specially designed the cleansing oil bottles to look like “4 girls in front of their mirror talking about makeup, and they come alive.”

For me, I think the must-have from this Yaz Bukey for Shu Uemura collection is Yaz’s matte red lipstick. This red lipstick is matte, and has a blue undertone. Ludovic mentioned that it’ll work for every skintone. It’s a beautiful color, and I can’t wait to swatch it for you guys! I’ll try to do a tutorial with that red lipstick soon.

I only bought the palette (which was signed by Yaz!), and the red lipstick from the collection. I have used Shu Uemura’s eyeshadows before during the Brave Beauty competition, so I know that the products will be pigmented. Pro tip from Ludovic: if you are having issues with Shu Uemura’s eyeshadow, try applying the UV base on the lid to bring out the pigments from the eyeshadows.

yaz for shu

yaz bukey

Yellow Eye Makeup Tutorial

Spring is almost here, may be? I was expecting a bright sunny week, but it’s Canada! What did I see outside couple days a go? SNOW! It was snowing, and cloudy. To cheer myself up, I decided to create this yellow eye makeup tutorial. I wanted something bright, but wearable at the same time. I also wanted to try a few new products and technique, so today’s tutorial is a bit more full on – cream + powder contour: checked, shimmer highlight: checked!

If you guys want to know more about this new technique I learnt, go over to youtube and look for Gossmakeupartist’s Buffing Technique video (if Wayne is looking at this HIIIIII!!!). Anyways, he had a video prior talking how he came about this technique, and since I’m curious, I decided to give it a try. What do you guys think? I think my skin looks pretty amazing, despite the fact that I put on quite a bit of contour and highlight products. I like how it still looks like my skin is showing through underneath, doesn’t look heavy and cakey at all.

Anyways, all products used listed below! Absolutely love how this tutorial turned out. Super simple, easy and very wearable.

1note: On my waterline, I used Matt Maloy eyeshadow because I left my white pencil liner in Jakarta. Anyways, since it’s a pressed eyeshadow, all I did was pressing it on my waterline with a small angled eyeliner brush. You can apply white eyeliner instead, if you’re not used to applying powder eyeshadow on the waterline.

Products used

Eyes

  • Primer – Urban Decay Primer Potion (original).
  • Transition – The Balm Meet Matt(e) Nude in “Matt Rosen”.
  • Crease – The Balm Meet Matt(e) Nude in “Matt Wood”.
  • Lid – MUFE eyeshadow #71.
  • Lower lash line – The Balm Meet Matt(e) Nude in “Matt Wood”.
  • Waterline – The Balm Meet Matt(e) Nude in “Matt Maloy”.
  • Eyeliner – Shu Uemura Calligraphy Ink eyeliner.
  • Mascara – Clinique High Impact mascara.
  • Falsies – Gwiyomi #3.
  • Eyebrows – Anastasia Brow Wiz in “Taupe” and “Brunette”.

3

Face/Cheeks

  • Foundation – Kat Von D Lock-it Tattoo foundation.
  • Concealer – MAC Pro Longwear concealer NC25.
  • Cream Contour – CoverFX cream foundation N110.
  • Loose powder – Shiseido Translucent Loose Powder.
  • Powder Contour – Kat Von D Shade + Light Contour Palette in “Shadowplay”.
  • Powder Highlight – Kat Von D Shade + Light Contour Palette in “Lyric”.
  • Shimmer Highlight – The Balm Mary-Lou Manizer.
  • Powder Blush – Smashbox “In Passion” Halo Blush.
  • Setting powder (to buff) – MUFE Pro Finish #118.

*Cream Contour and Highlight tutorial; Powder Contour and Highlight tutorial*

Lips

  • Lipstick – Sonia Kashuk Velvety Matte Crayon in “Pink Nude”.
  • Lipgloss – L’oreal Colour Riche Extraordinaire in “Dancing Rose” (just a dab in the center of the lips).

4


Smashbox Double Exposure Review

As promised, here’s my Smashbox Double Exposure Review post! You all know how much I love this palette already, right?! If you are in between the Full Exposure and the Double Exposure, please check out this post and my Full Exposure review to see which one is for you. They are 2 different palettes, with different shades. I’d suggest the Full Exposure for those who prefer neutral shades, and the Double Exposure for those who want to experiment with colors.

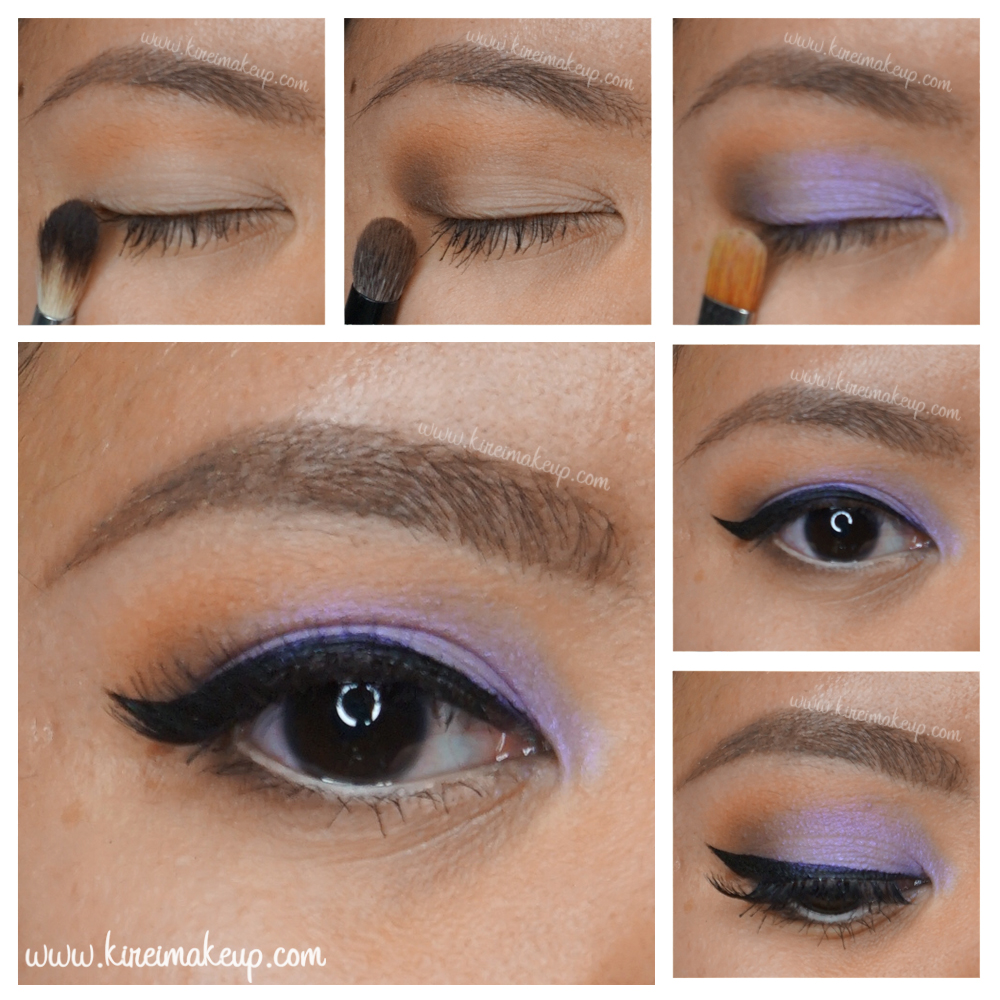
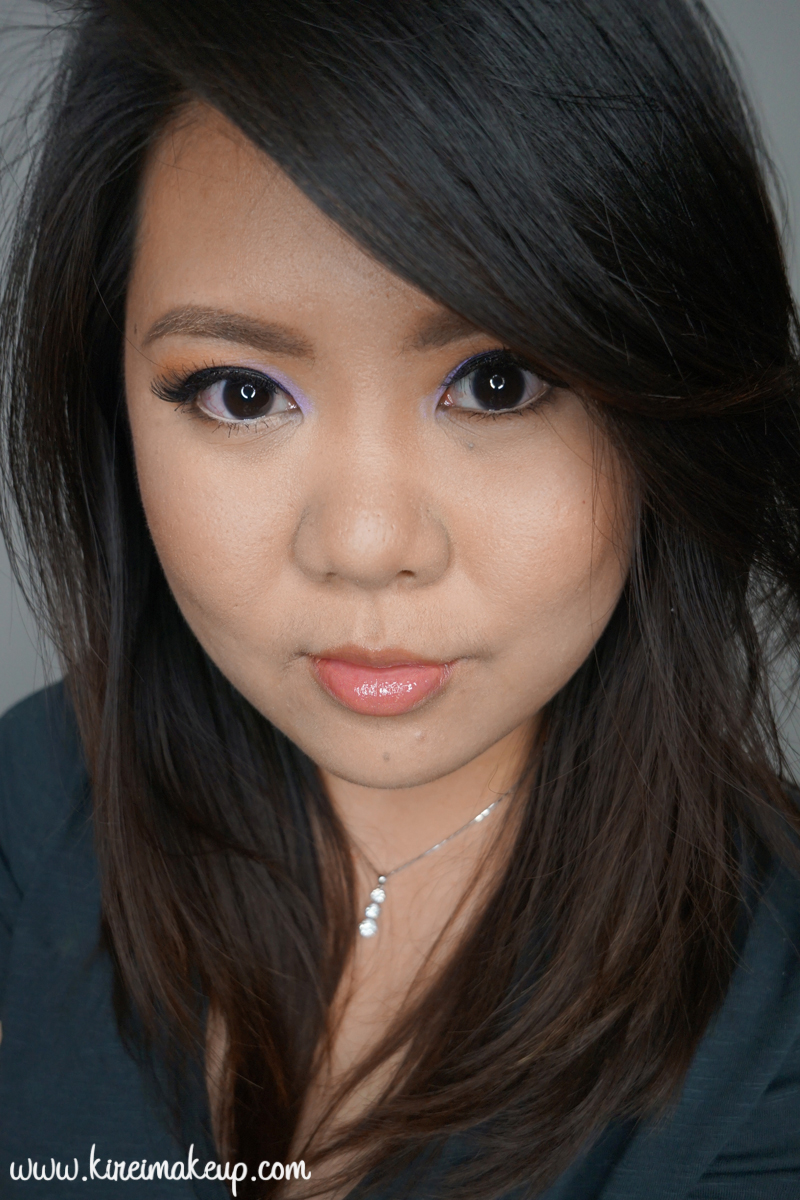
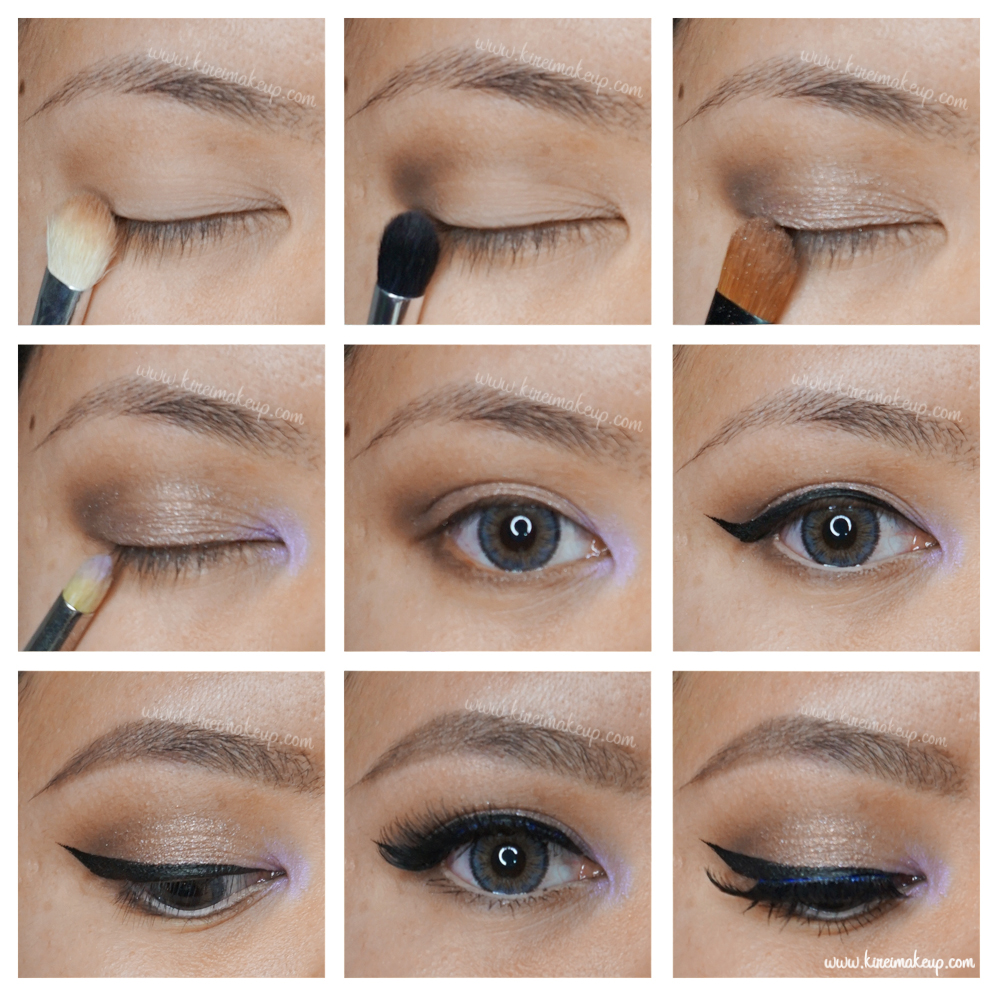
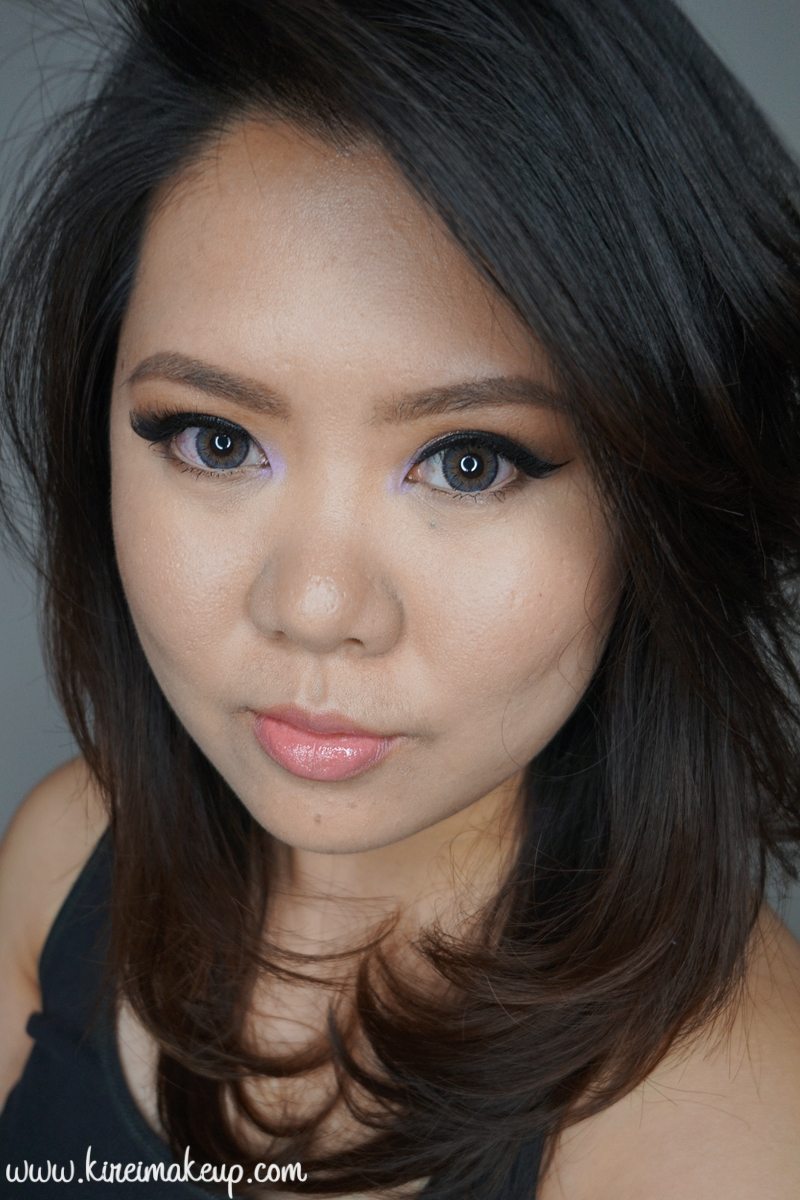
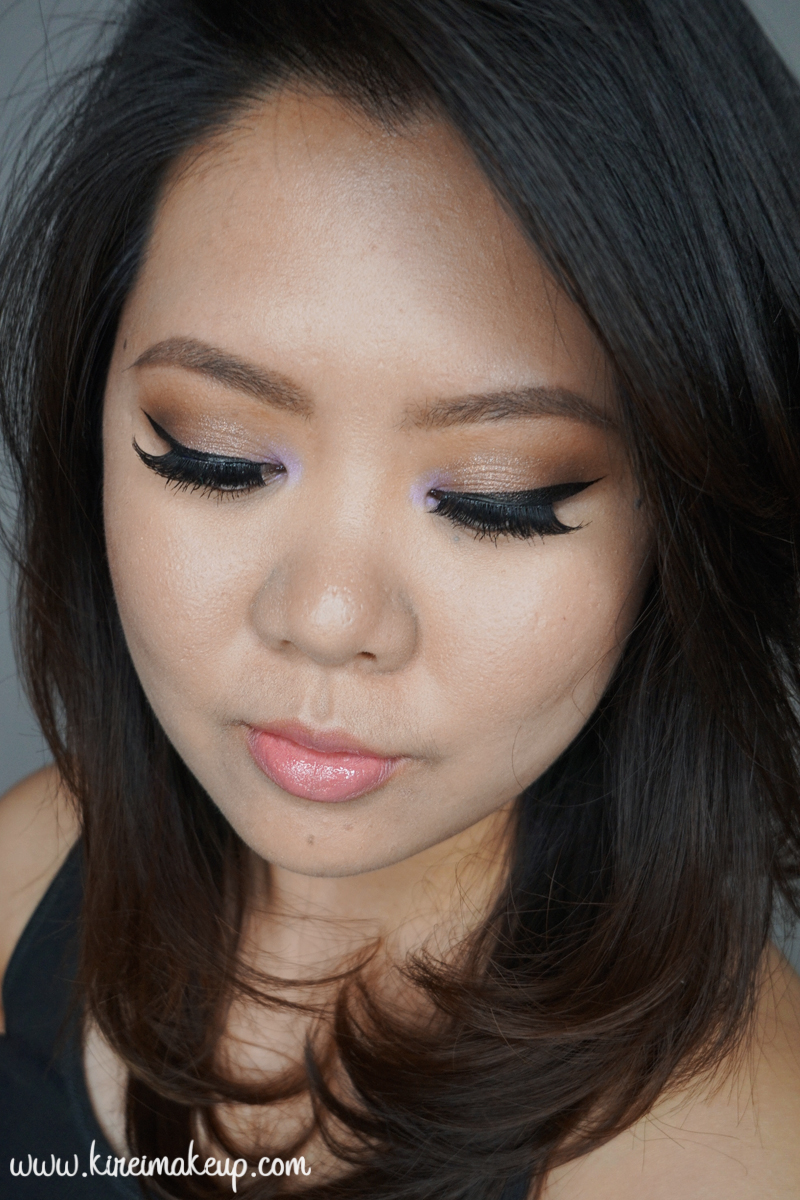
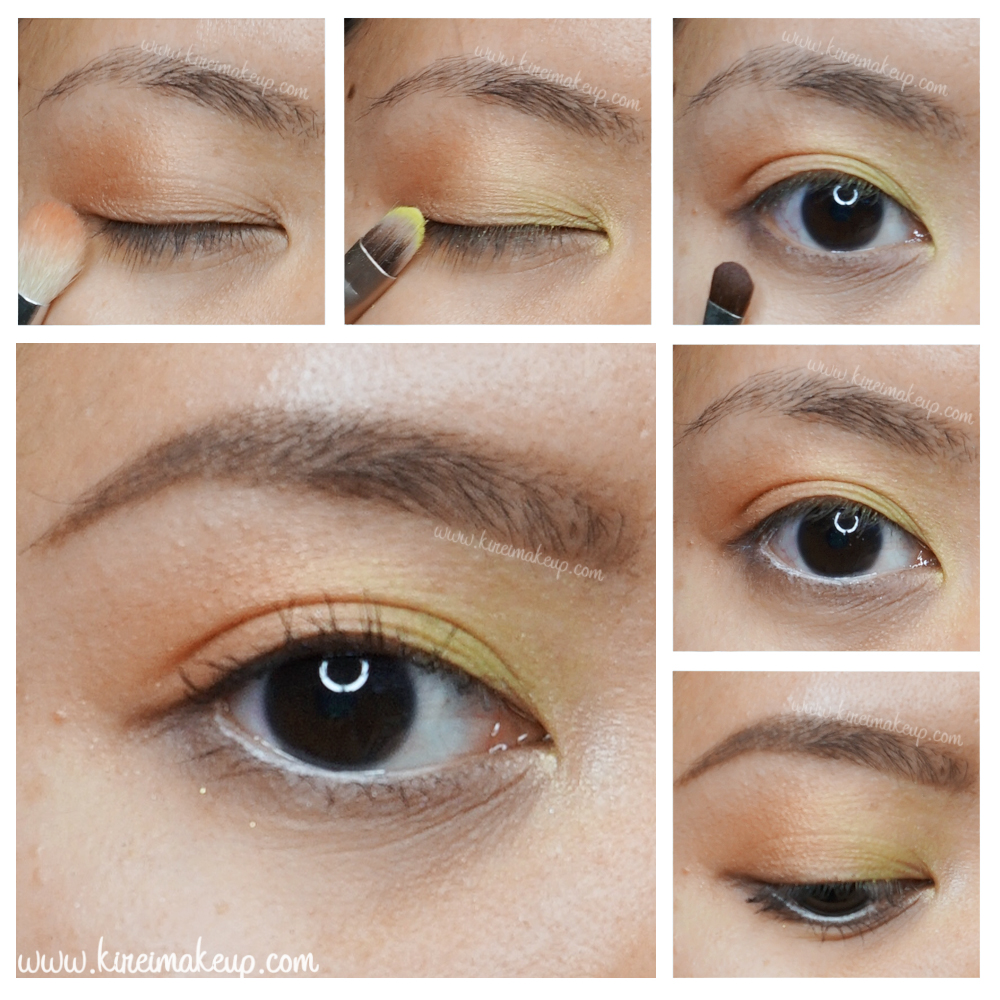
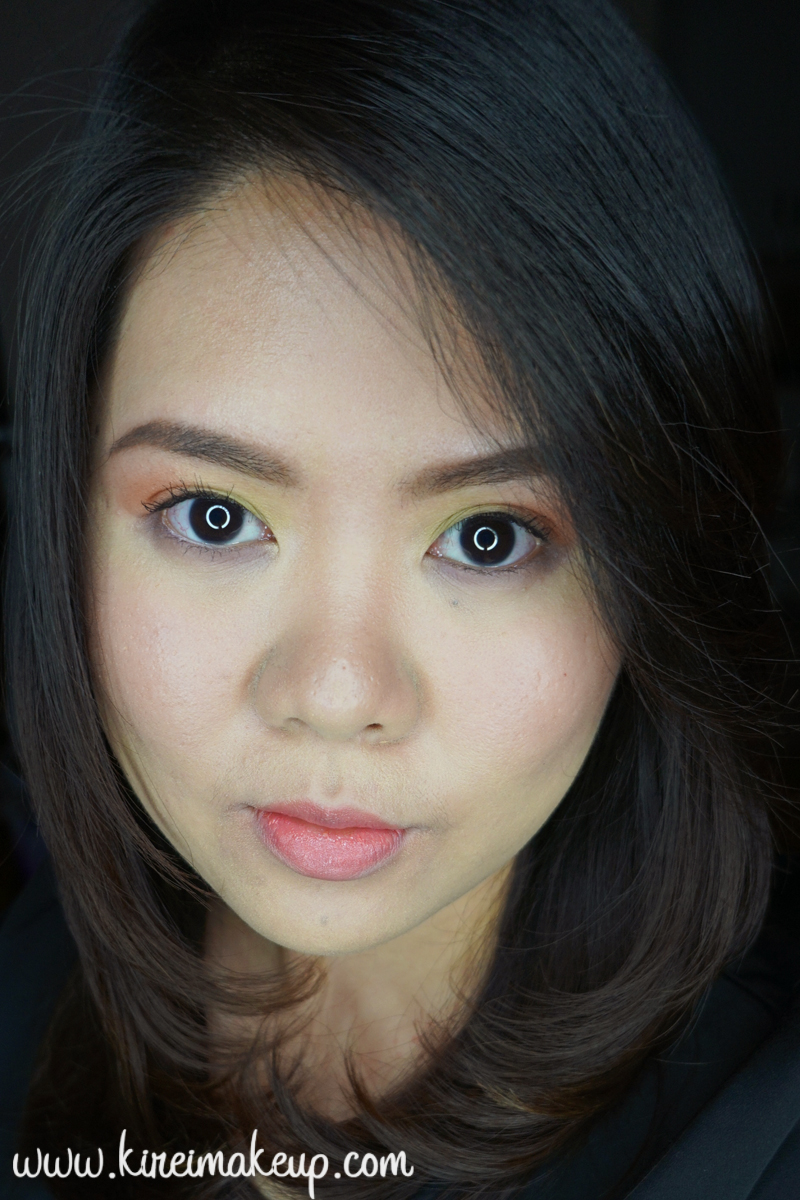
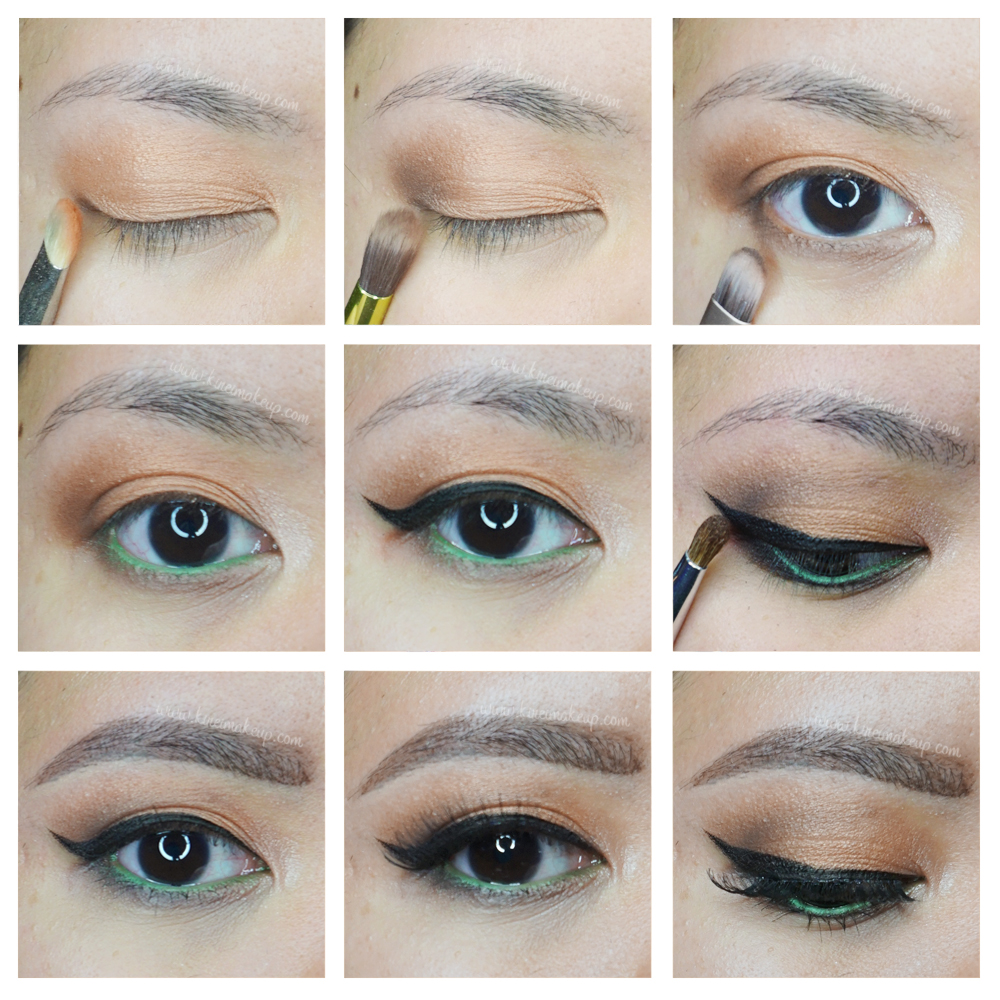
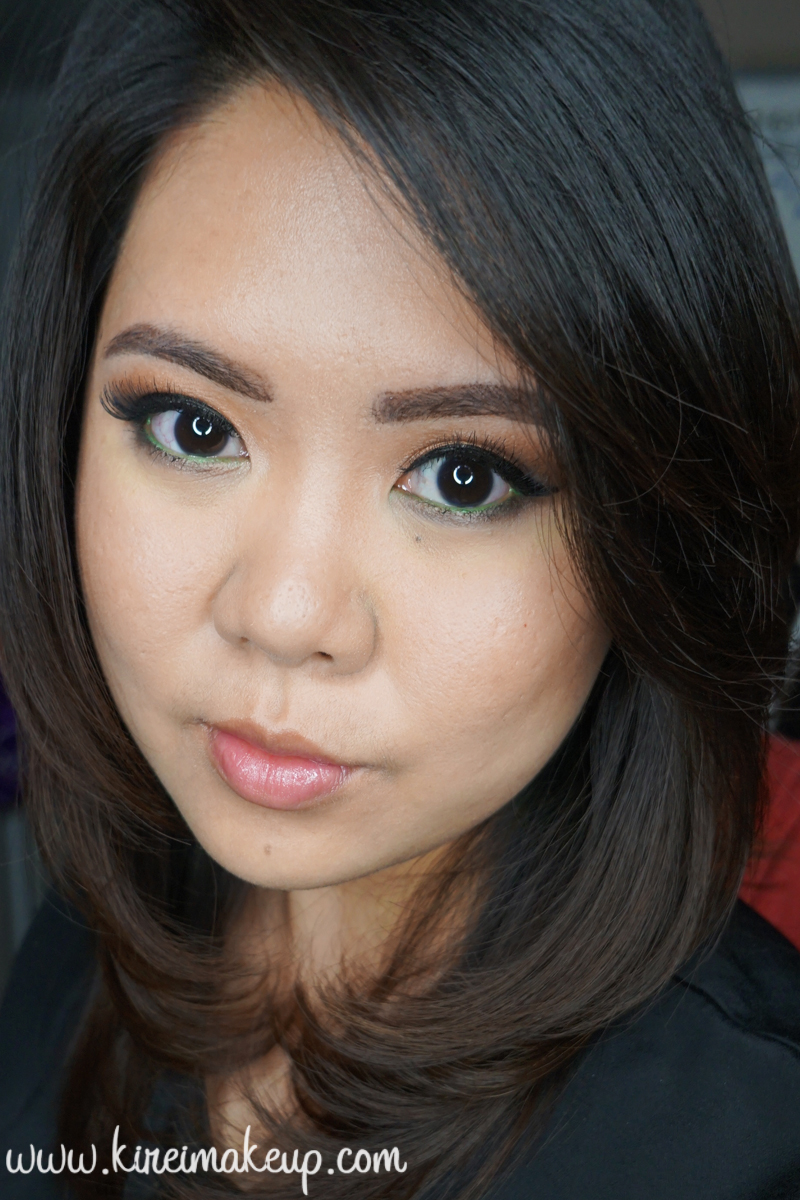
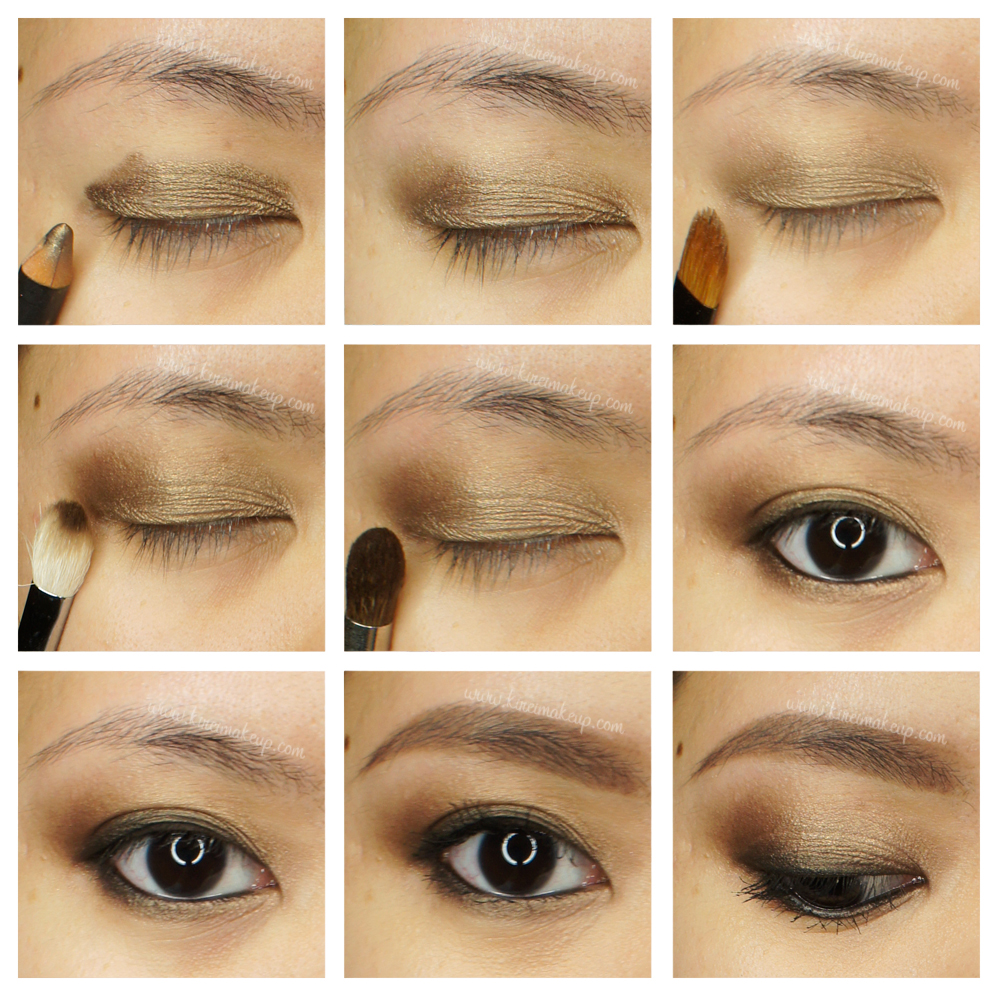
*update – another blogger mentioned that she couldn’t get a pigmentation like what I get on my previous tutorials (Valentine’s Day Soft Makeup and Smashbox Double Exposure tutorial #2). I’d like to mention that I applied Urban Decay Primer Potion (as mentioned on the product list), and I applied my eyeshadow with a dense brush (especially on the tutorial #2).*

Anyways, let’s get into the review! If you don’t care about what I write, just scroll all the way to the bottom to see the pros and cons of this palette, and my summary for it.

smashbox double exposure review

What is Smashbox Double Exposure Palette?

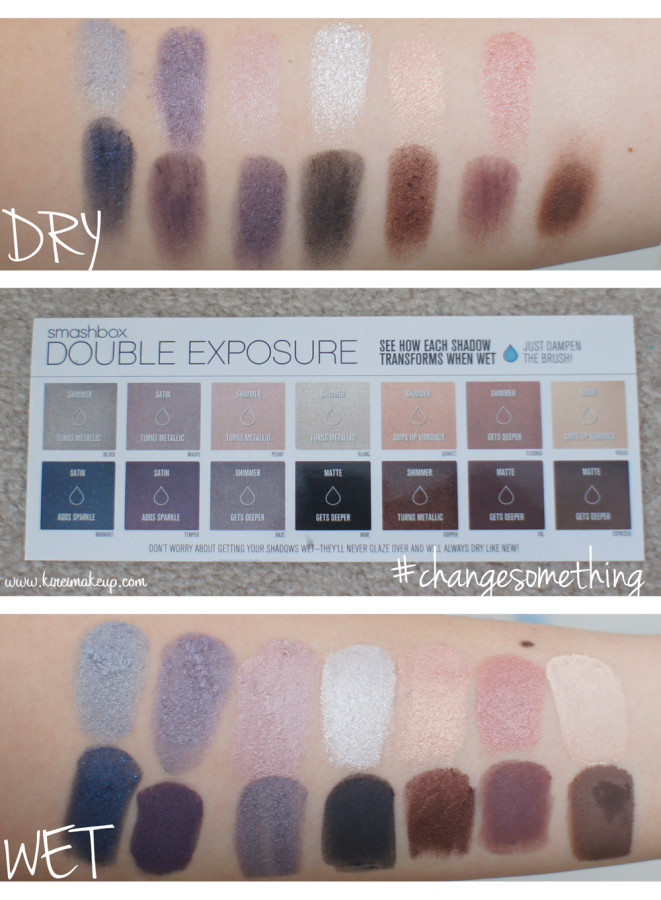
This innovative eye palette features coated pigments formulated with coating technology to create multiple effects when wet, allowing the shadows to transform in one of four ways—allowing these 14 shadows to become 28 shades in just one palette. When wet, these colors amp up vibrancy, become deeper, turn metallic, or create sparkle for endless, customizable eye looks.

Sephora, 2015

Packaging & Insert

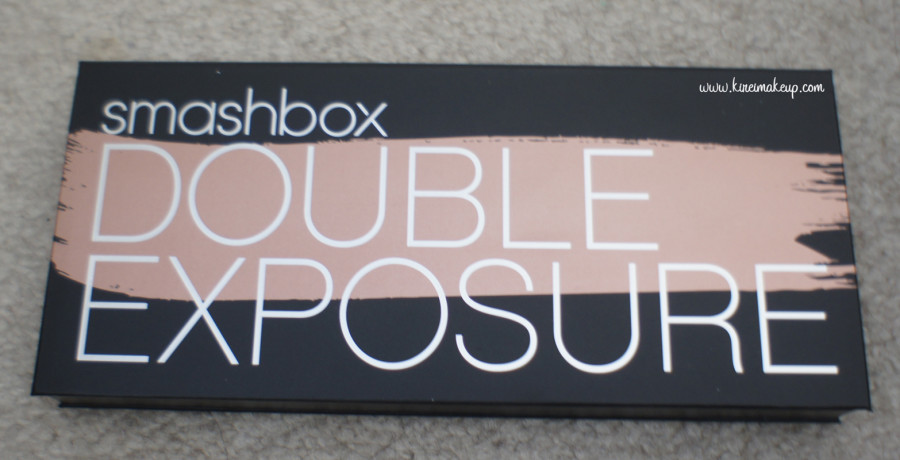
Gorgeous packaging! Beautiful rose gold cover against black background with white lettering. Similar to the Smashbox Full Exposure Palette, it seems that it’s made from a carton/box-like material. It also comes with a big mirror.

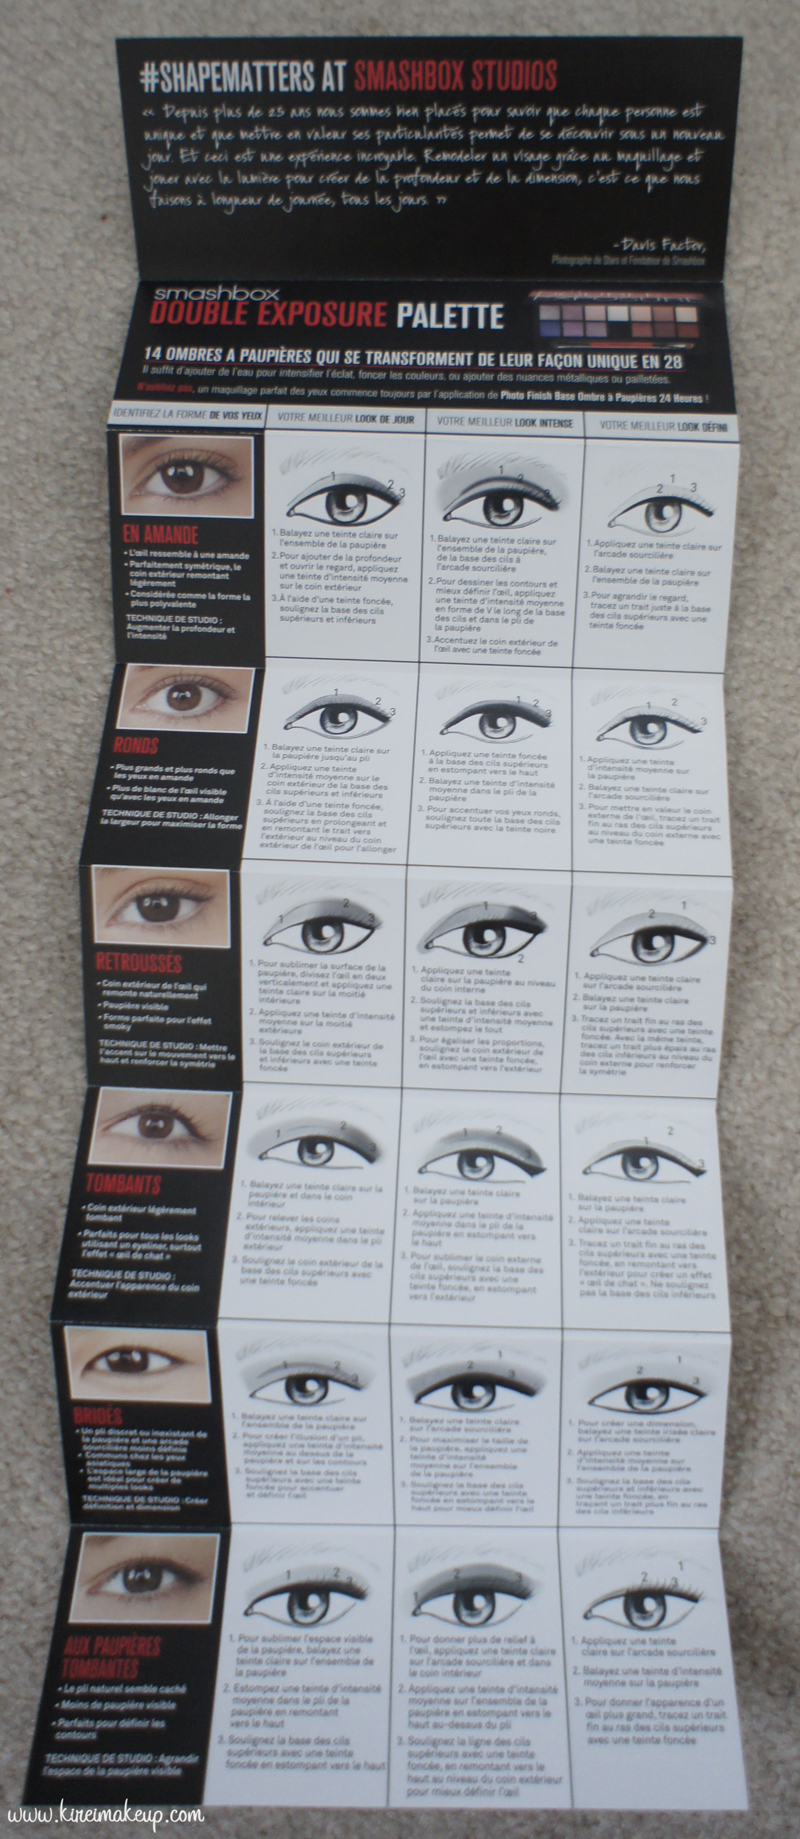
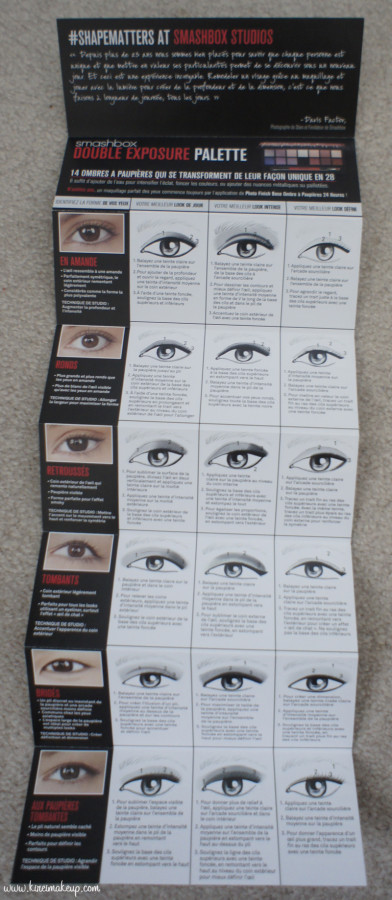
It contains 2 leaflets: 1) dry/wet eyeshadow transformation booklet, and 2) a #shapematter booklet – a leaflet that shows where to apply your eyeshadow depending on your eyeshape. It also comes with a sample size Full Exposure mascara (not in picture).

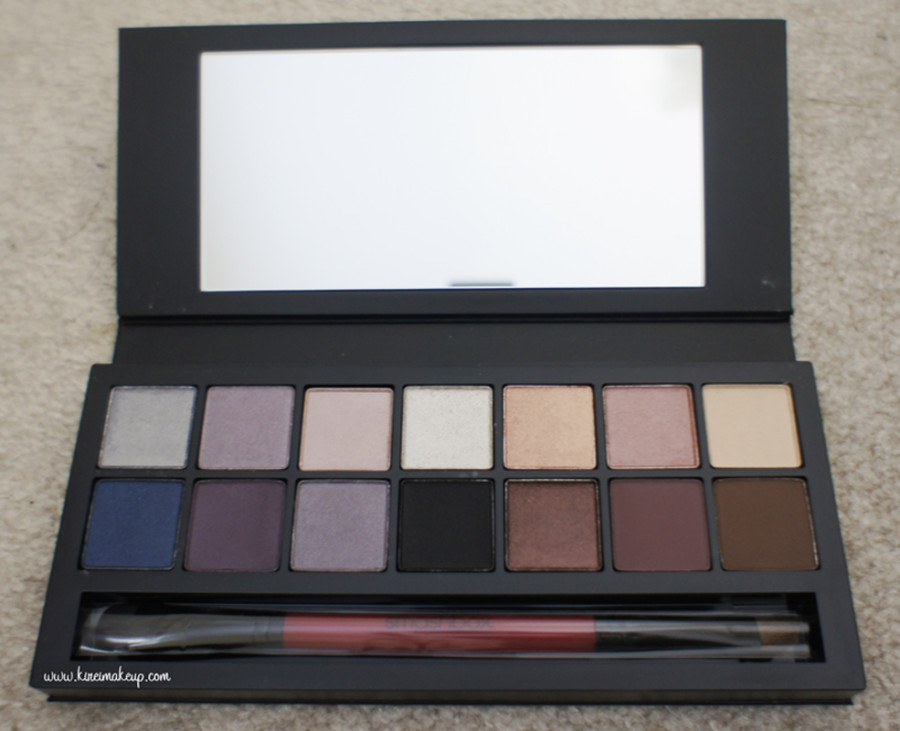
It also comes with a double-ended eye brush – flat dome eyeshadow brush and an angled “fluffy” brush. I love the flat dome brush because it does apply the eyeshadow nicely, especially when it’s wet. The angled brush, not a big fan. I expected the angled brush to be more like a blending brush, but mine was super stiff. I might have to wash it several times and see if it’ll get softer, but as of this moment I’m not liking the angled brush end.

smashbox double exposure review

Pigmentation/Blendability

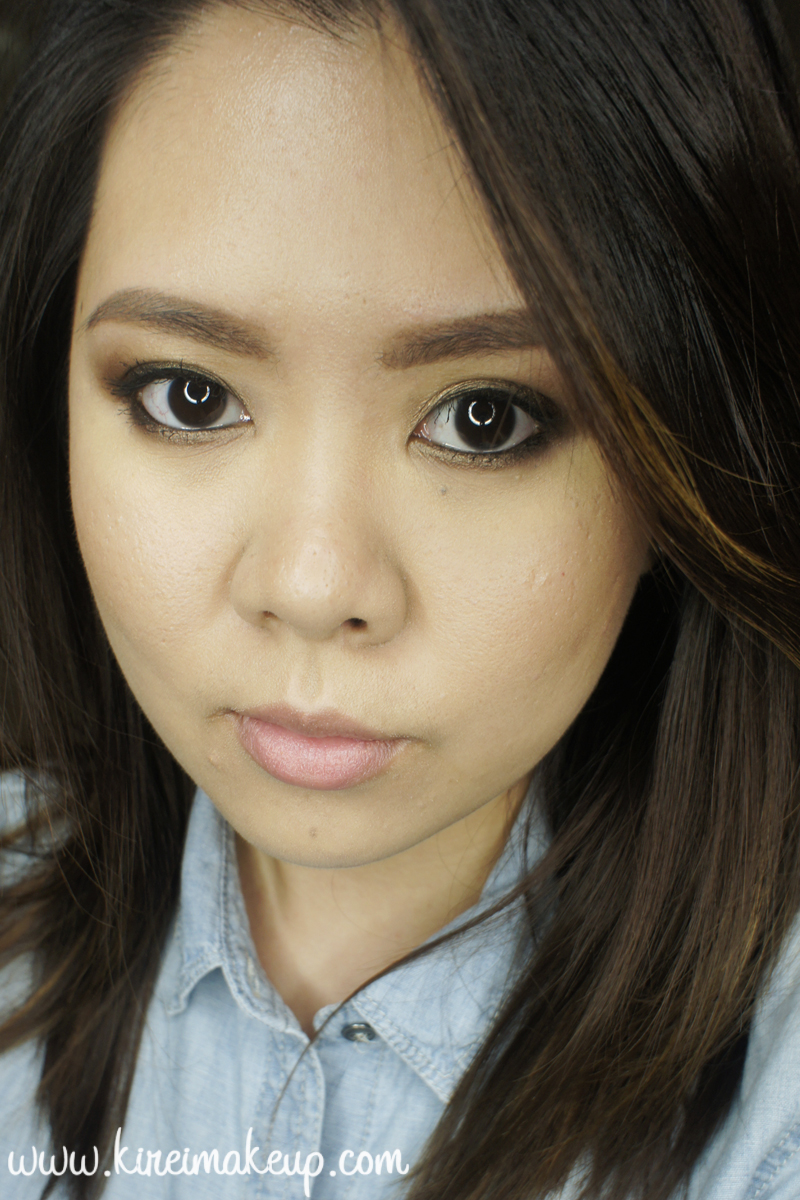
I love the shades that come in this palette, however, I do have to say that some of the shades are not impressive. I absolutely love all the shimmers, I think they have great pigment pay-off wet or dry, and they blend easily.

The satin shades are buttery and creamy, amazing colors. Veiled, however, is the same shade as my skintone, so it doesn’t really show up when I apply it dry. Veiled is a good eyeshadow for me to blend out any harsh edges.

I’m not quite sure what happen to the matte shades. Out of all the finishes, the mattes were my least favorite. They aren’t quite as pigmented when applied dry, quite sheer actually. Also, a lot of fall out. Nevertheless, it’s still workable, and blend easily.


smashbox double exposure palette review

Shades & Finish

14 eyeshadows (0.042 oz/each)

  • Top
    • Silver – shimmer (dry); metallic (wet)
    • Mauve – satin (dry); metallic (wet)
    • Peony – shimmer (dry); metallic (wet)
    • Blanc – shimmer (dry); metallic (wet)
    • Quartz – shimmer (dry); amps up vibrancy (wet)
    • Flushed – shimmer (dry); gets deeper (wet)
    • Veiled – satin(dry); amps up vibrancy (wet)
  • Bottom
    • Midnight – satin (dry); add sparkles (wet)
    • Temper – satin (dry); add sparkles (wet)
    • Haze – shimmer (dry); gets deeper (wet)
    • Noir – matte (dry); gets deeper (wet)
    • Copper – shimmer (dry); metallic (wet)
    • Fig – matte (dry); gets deeper (wet)
    • Espresso – matte (dry); gets deeper (wet)

Price

CA$60 in Sephora Canada

smashbox double exposure swatches

Pros

  • Can be applied dry and wet
  • Eyeshadows do not get glazed after wet application
  • Great mixtures of colors and texture
  • Includes both warm and cool undertone shades
  • Beautiful packaging
  • Comes with a double-ended brush and a sample size mascara
  • Reasonable price
  • Very little fall-out

Cons

  • Matte shadows have poor pigment pay-offs


Disclaimer: I’m not affiliated/endorsed by Sephora nor Smashbox. I do not earn any money from the links, and I am not paid to do this review. This palette was not sent to me. I bought this palette out of my own pocket, and my review is based entirely on my own experience with this palette. This review is honest and is based on my own opinion.

Tarnished Gold Smokey Eyes

I wanted to share with you guys my favorite way of wearing a warm smokey eyes, without having to use too many products. My Tarnished Gold Smokey eyes tutorial is warm, it’s earthy, and it doesn’t look too dark. You can add more intensity by adding black eyeshadow on the outer V, but this is how I wear my smoky eyes.

So, I’ve written a lengthy explanation regarding this tutorial, but something went wrong and everything I’ve done went down the drain. It’s missing and I can’t find it. To waste no time, I’m just going to list all the products used and I’m sure the pictorials are pretty self-explanatory. I apologize for any inconvenience and should you have any questions regarding this tutorial please feel free to leave comments below or on my social network account (preferably Instagram).

tarnished gold smoky eyes

Eyes

Face

  • Make Up For Ever HD Foundation 120 (base)
  • Bobbi Brown Peach corrector (under eyes corrector)
  • MAC Pro Longwear Concealer (under eyes concealer)
  • MAC Pro Conceal/Correct palette in Medium (blemish concealer)
  • NARS Setting powder (setting powder)

Cheeks

Lips

  • NARS Multiple Riviera

tarnished gold smokey eyes

Simple Everyday Makeup

How is everyone’s Monday going? The Holiday is approaching real soon, eh?! I wanted to share with you guys this super easy and simple everyday makeup tutorial which can be worn by everyone, especially those who don’t usually wear much makeup. I did 2 version – one with a simple peachy lips, and another with red lips.

I think this look is great for those who prefer a simple no-fuss makeup. Nothing too dark, nothing too bright, but with a bit of colors. This is also a look for those who prefer earthy brown tones over black. I probably would wear this for a brunch (with peachy lips), or even a dinner party (with red lips).

Eyeshadows used in this tutorial are from the Smashbox Full Exposure Palette.

*You can find other tutorials using this palette right HERE!*

smashbox full exposure makeup tutorial

How-to:

1. I applied MAC Groundwork paint pot on my eyelids using my ring finger.

2. Using a fluffy blending brush, I applied Smashbox Full Exposure palette in M2 above my crease.

3. Using Smashbox bullet crease brush, I applied Smashbox Full Exposure palette in M1 on the outer half of my eyelid.

4. Using a flat eyeshadow brush, I applied S1 on the inner half of the eyelid, blending it towards the outer half.

5. I applied S4 on the inner corner of my eyes using Real Technique shading brush (skip this step if you have wide-set eyes).

6. I lined my waterline and tightline using L’oreal Voluminous Smoldering eyeliner.

7. I also applied M7 along my upper lash line using an angled eyeliner brush. I applied this along the outer half of my lower lash line as well.

8. I curled my lashes and applied Maybelline Express Turbo Boost mascara on my lashes.

9. I filled my brows using Anastasia Beverly Hills Brow Duo Powder.

10. I also applied Mata Nona no. 15 falsies.

nyx monte carlo tutorial

11. On my face, I applied MAC Pro Long-Wear foundation using Real Technique Expert Face brush.

12. Under my eyes and on my blemishes, I applied MAC Pro Long-Wear concealer. I set my face using CoverFX Translucent powder.

13. On my cheeks, I applied Chanel Blush de Horizon.

14a. (left) For the peachy lips, I filled my lips using MAC Spice lip liner. Then I applied YSL Glossy Stain in Peche Cerra-Colla (27).

14b. (right) I removed the previous lip color, and then applied NYX Monte Carlo on my lips.


Products used

Eyes – MAC Groundwork paintpot; Smashbox Full Exposure Palette (crease – M2, outer lid – M1, lid – S1, inner corner – S4, liner – M7); L’oreal Voluminous Smoldering eyeliner; Maybelline Expres Turbo Volume mascara; Anastasia Beverly Hills duo brow powder; Mata Nona falsies no. 15.

Face – MAC Pro Long-Wear foundation NC30; MAC Pro Long-Wear concealer NC25; CoverFX translucent powder.

Cheeks – Chanel Blush de Horizon.

Lips – MAC Spice Lip pencil; YSL Glossy Stain no. 27; NYX Monte Carlo