UD Vice 4 Tutorial #1

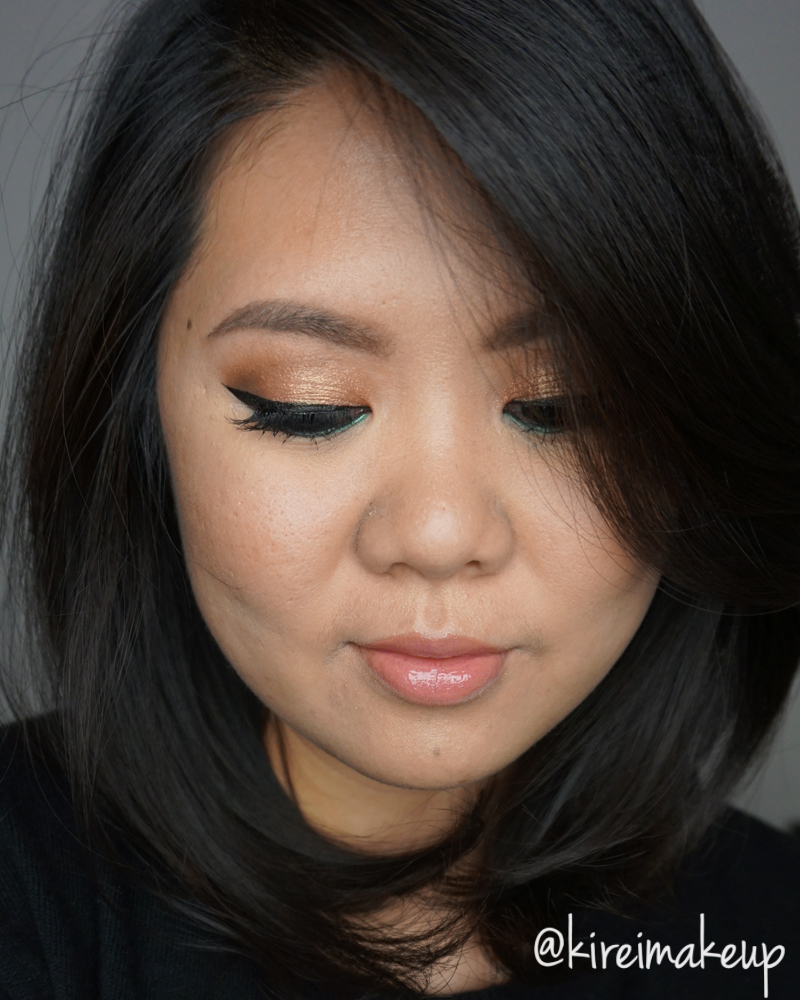
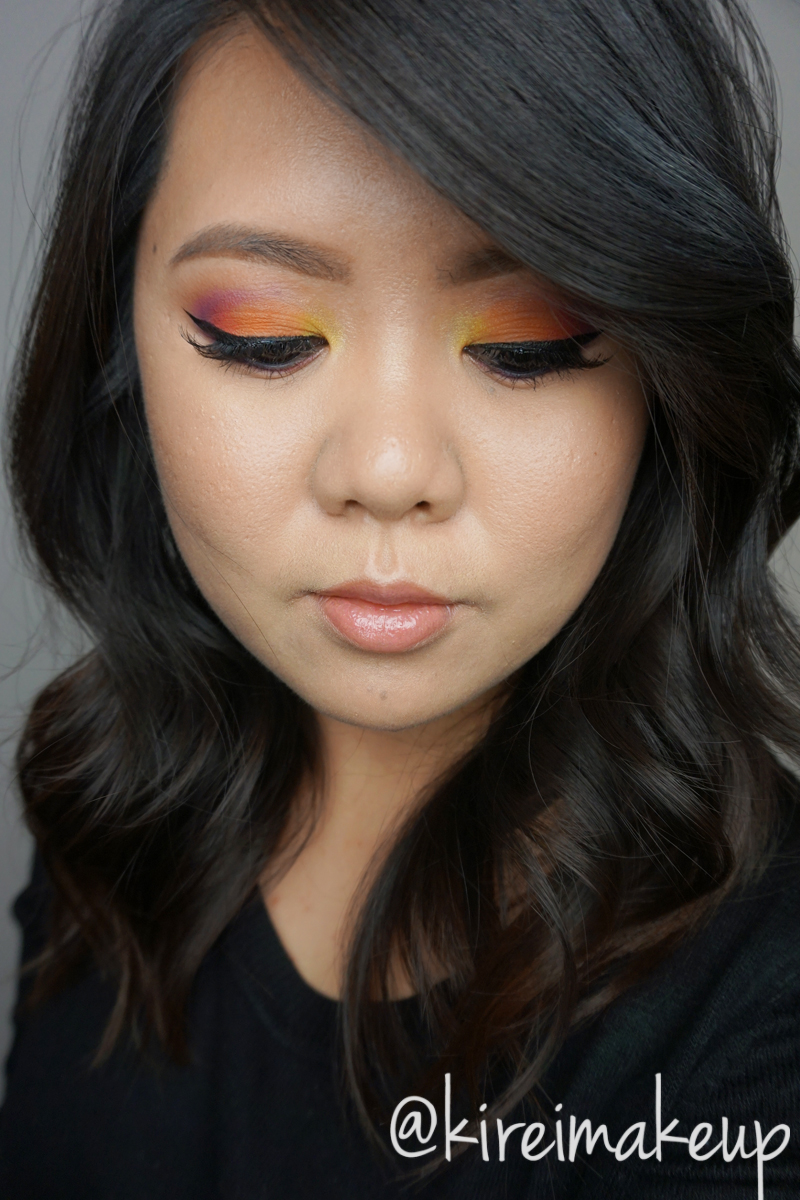
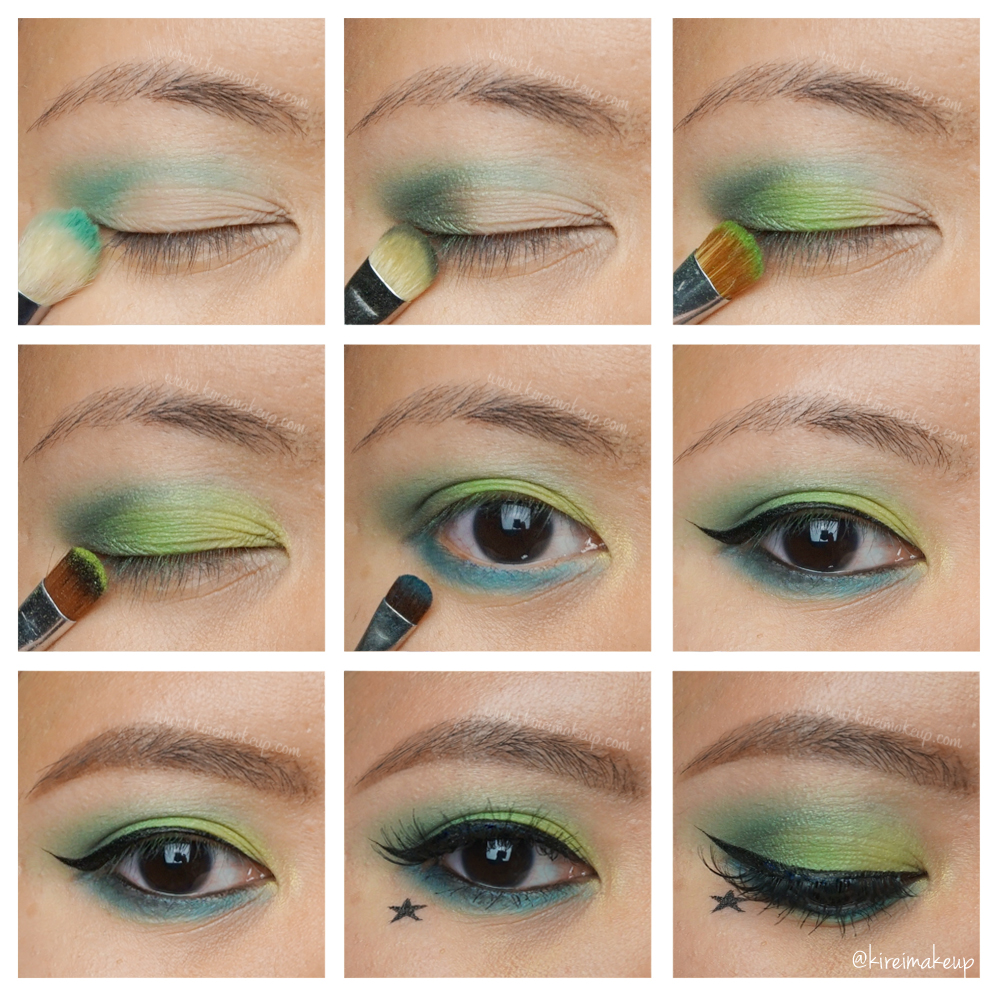
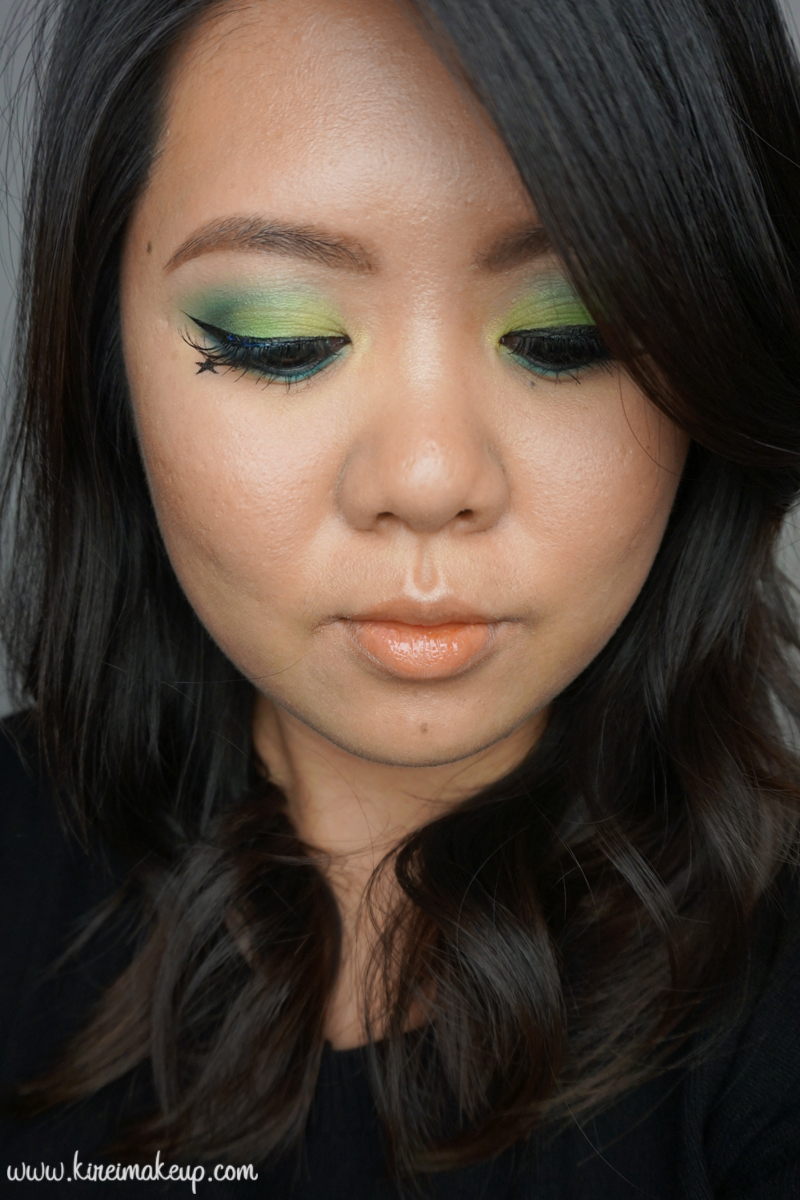
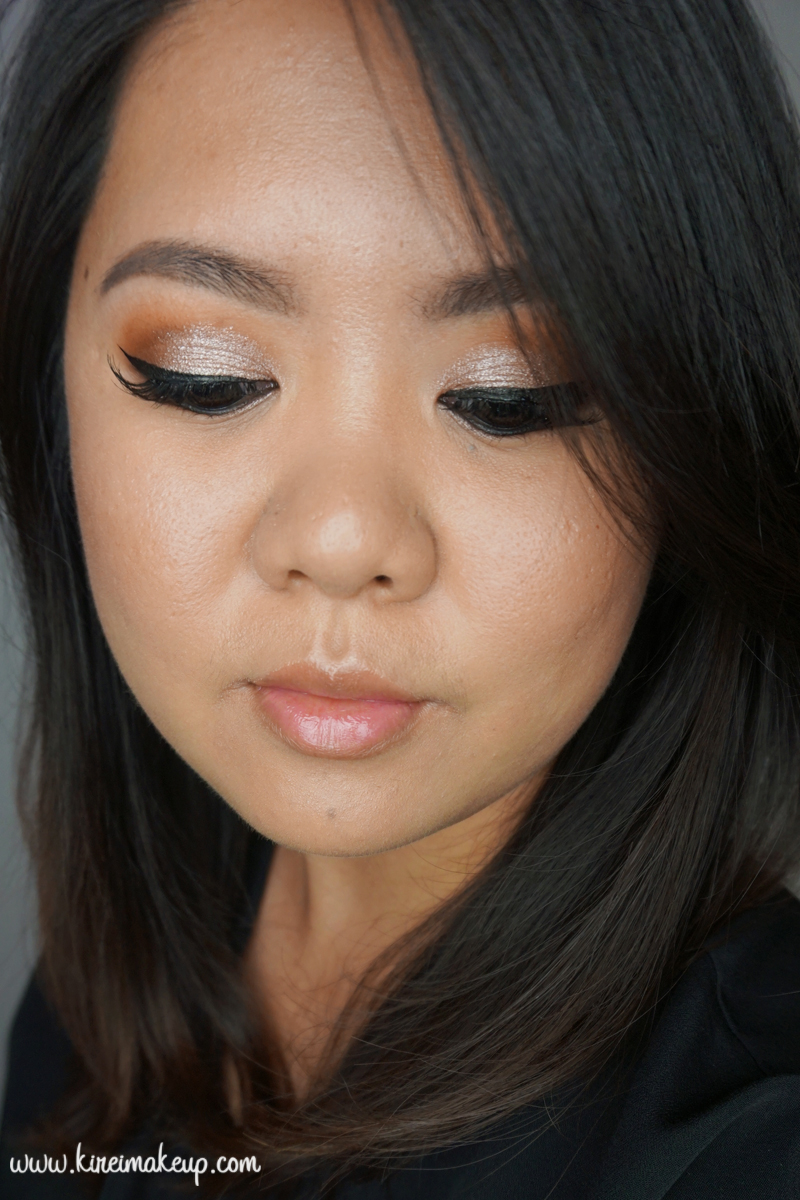
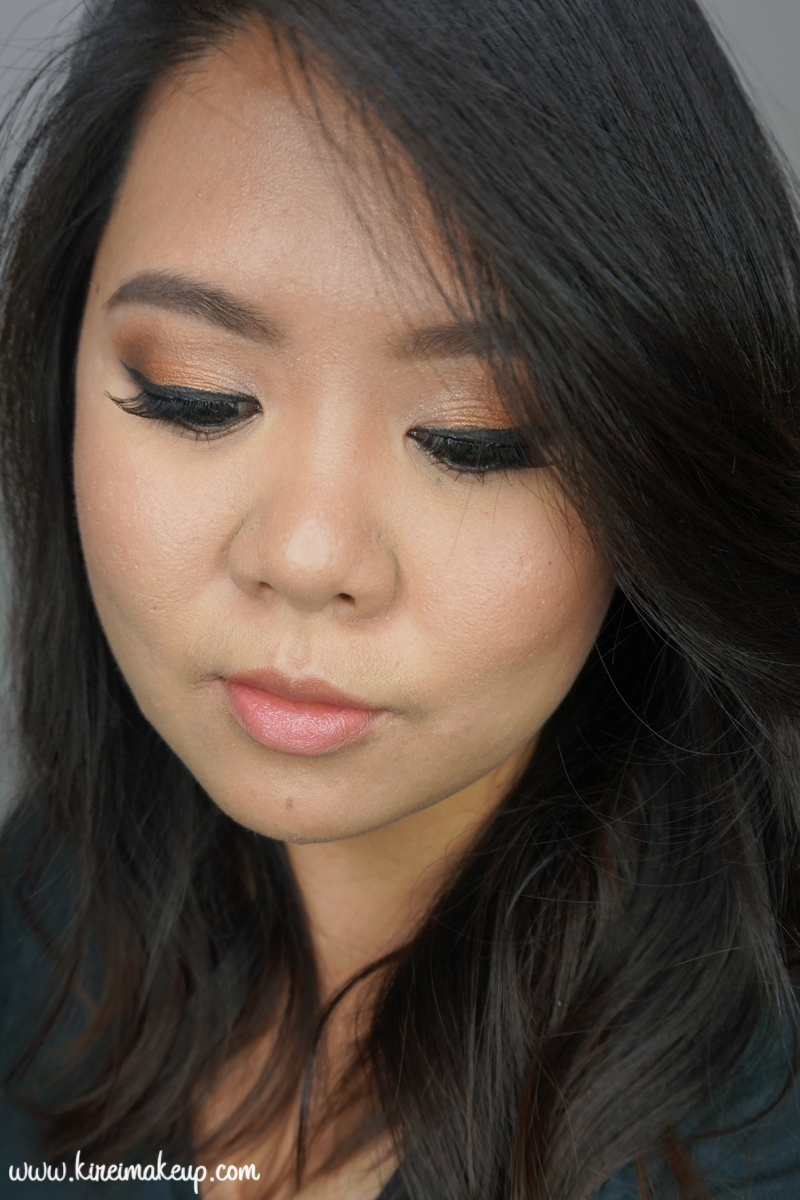
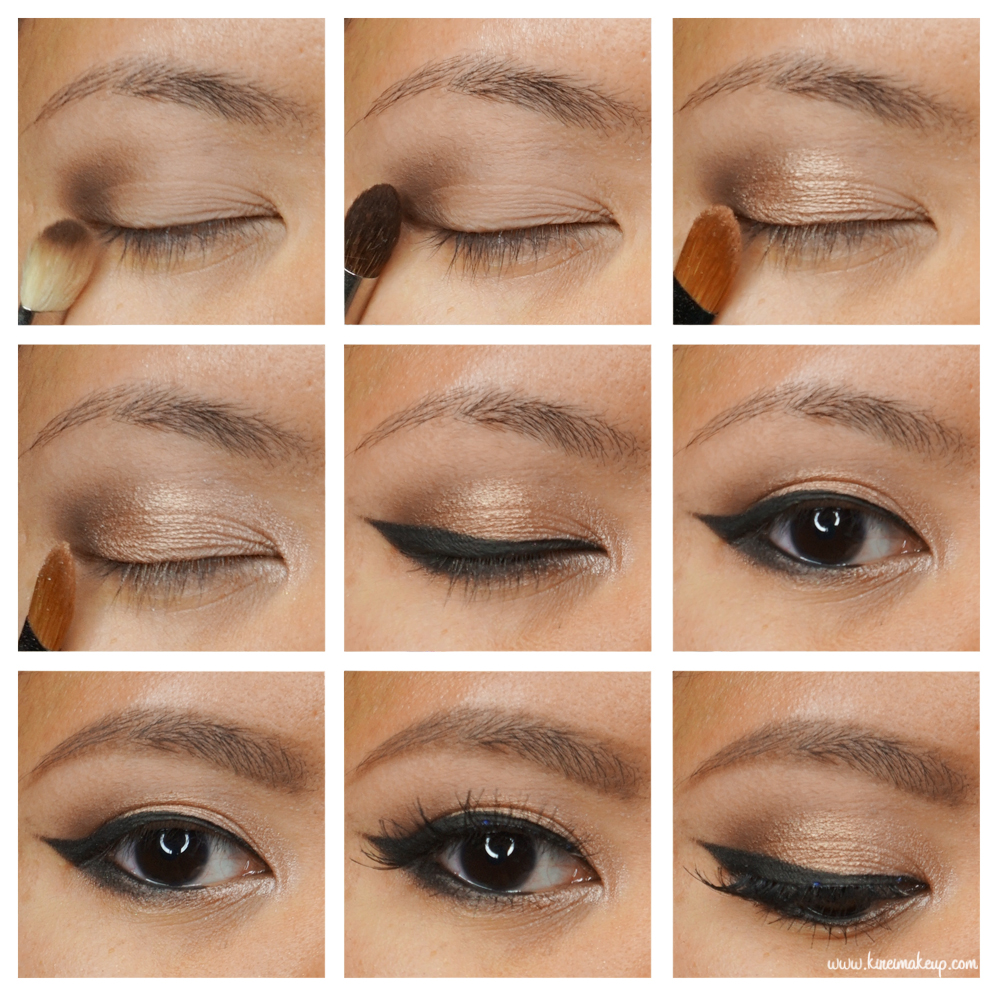
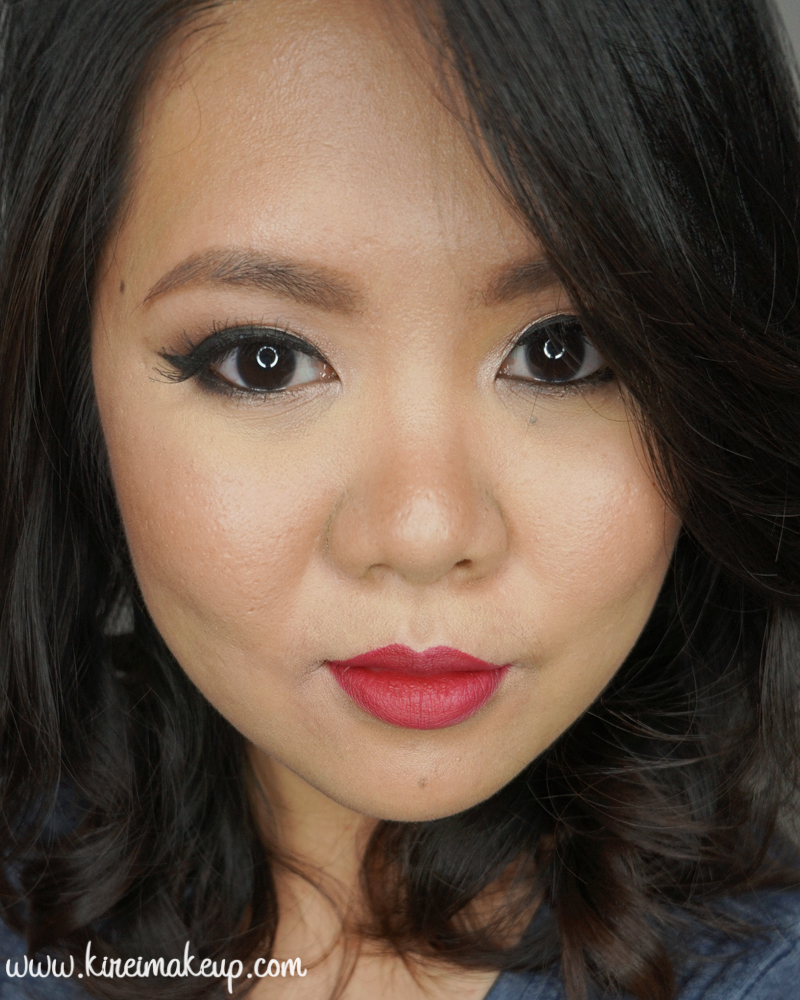
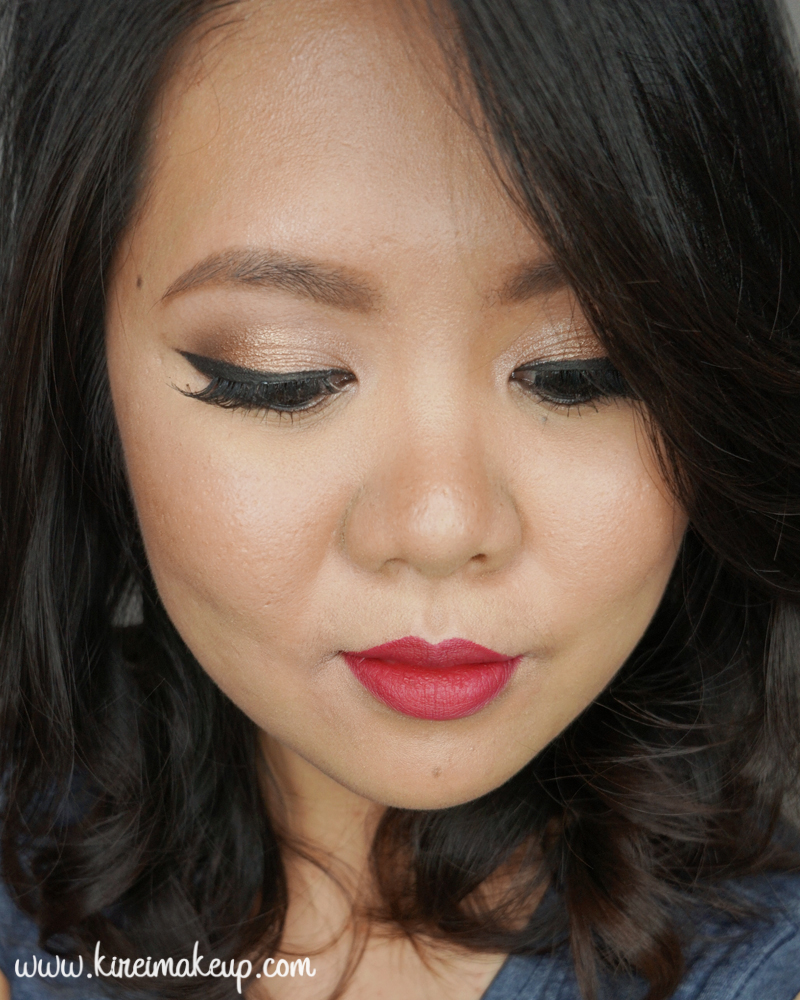
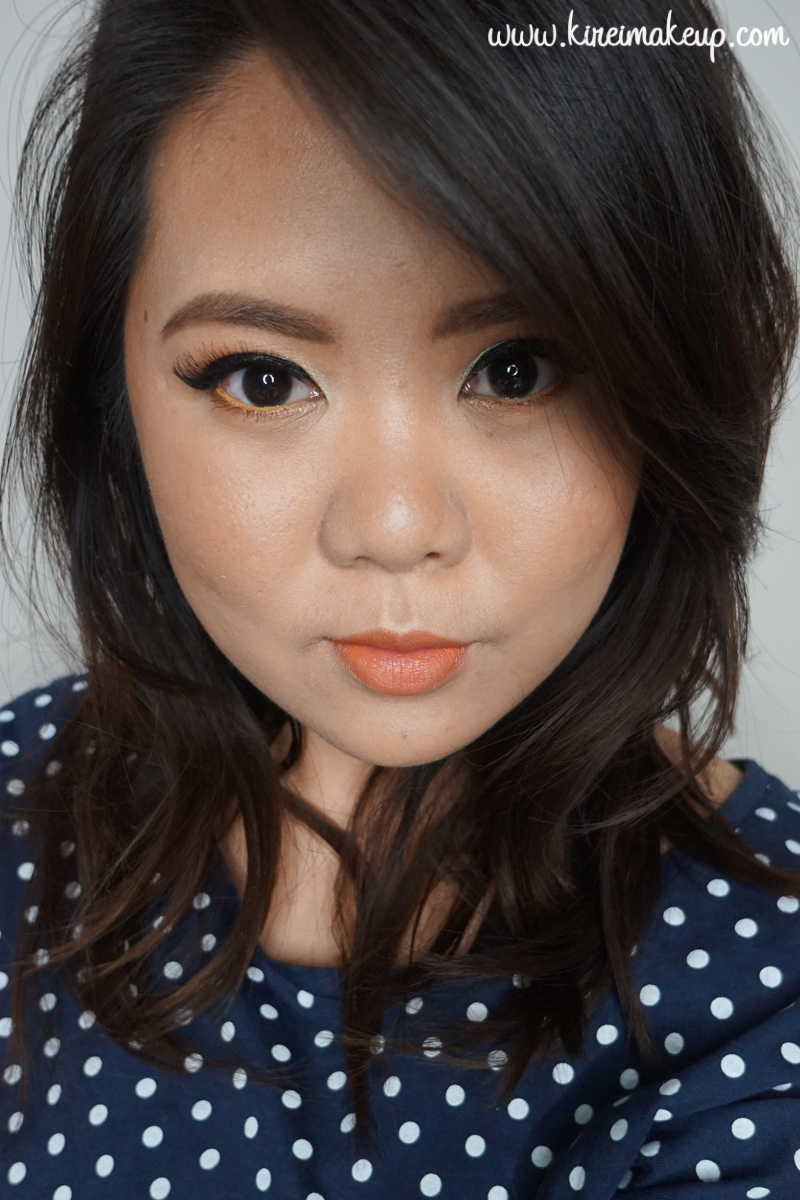
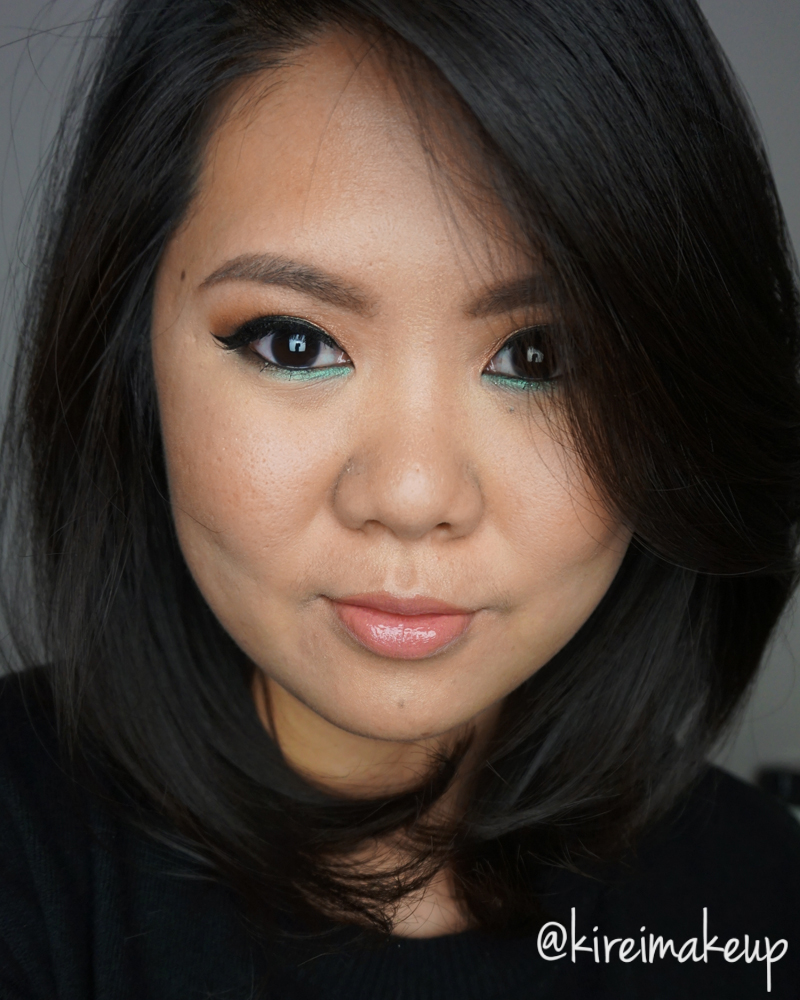
I finally have the chance to play with my UD Vice 4 palette! This UD Vice 4 tutorial is fun, and has a little bit of color. It’s a really fun look to wear especially for a party. Of course you can skip the black winged liner, and go for just a simple line along the upper lash line.

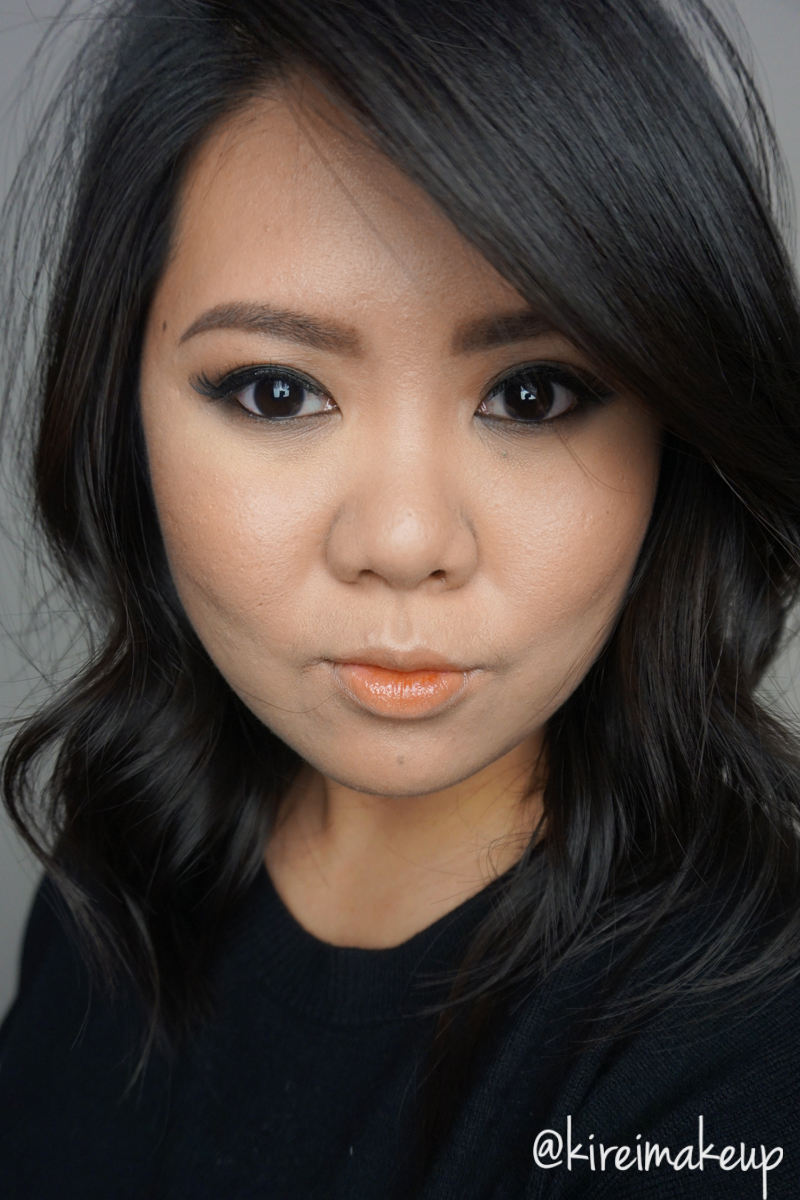
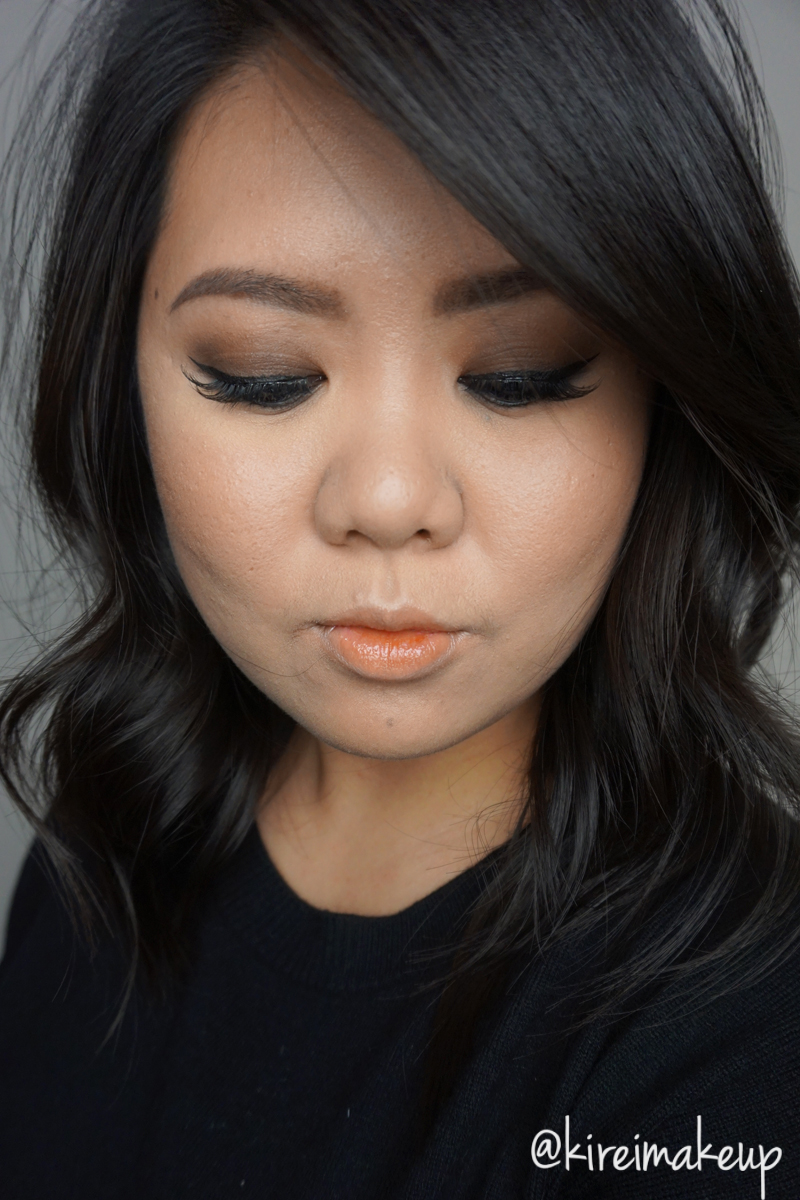
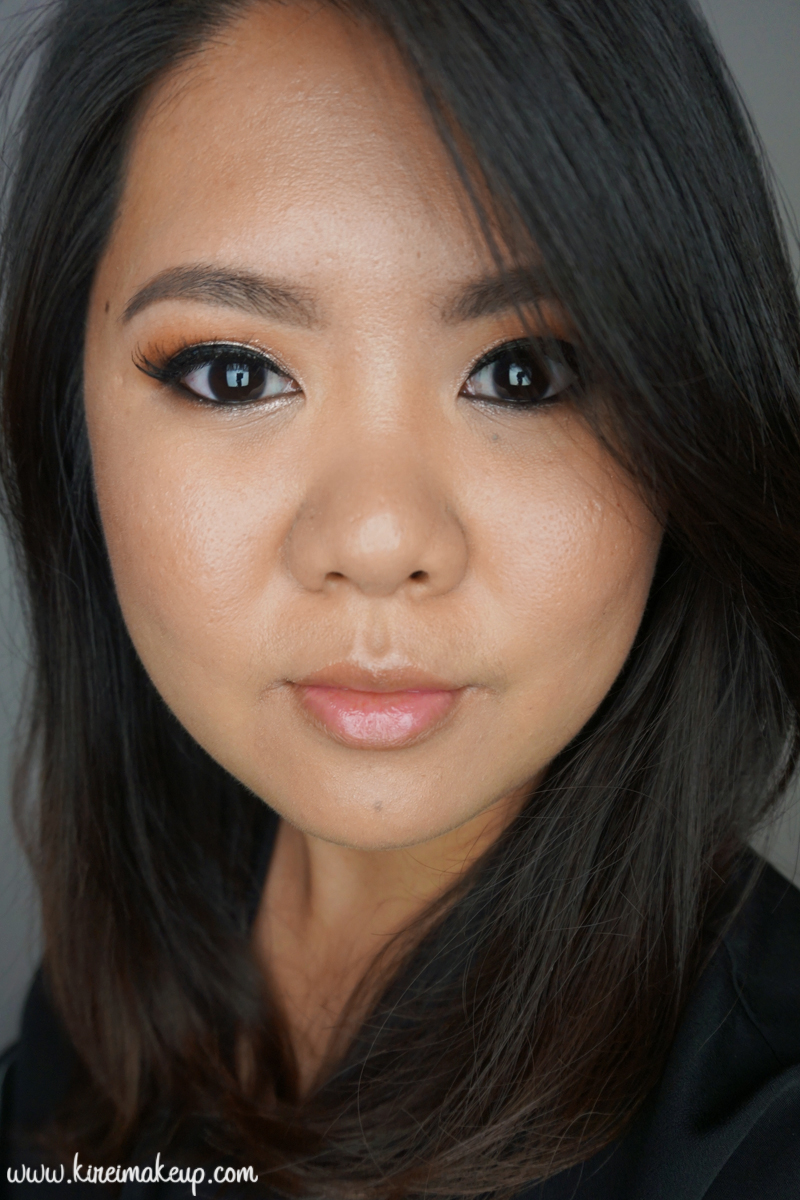
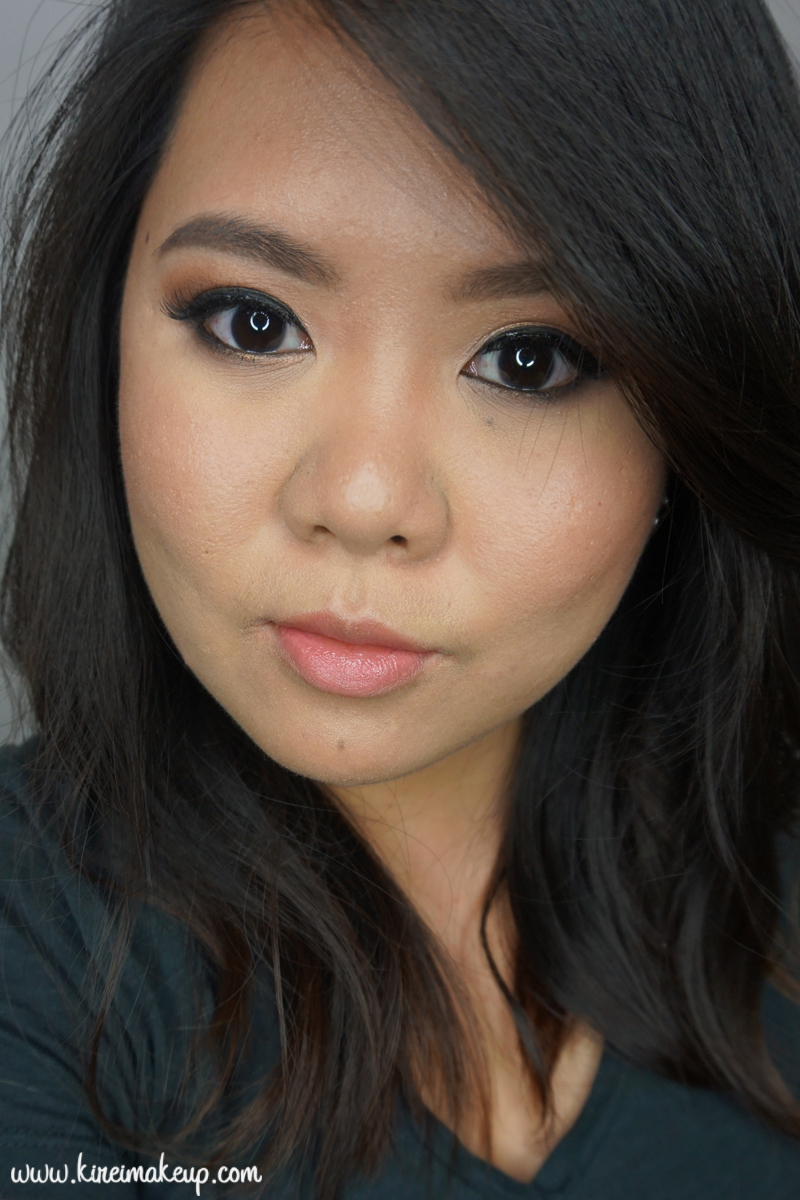
For the rest of the face, keep it simple and light. No over-contouring, no carved brows, and definitely nice soft natural lips. By keeping the rest of the face simple, you can keep the whole look youthful. Take it easy on the contouring and brows if you want to look younger. Thicker brows & rounder cheeks can make you look younger than chiseled cheekbones & overdrawn brows.

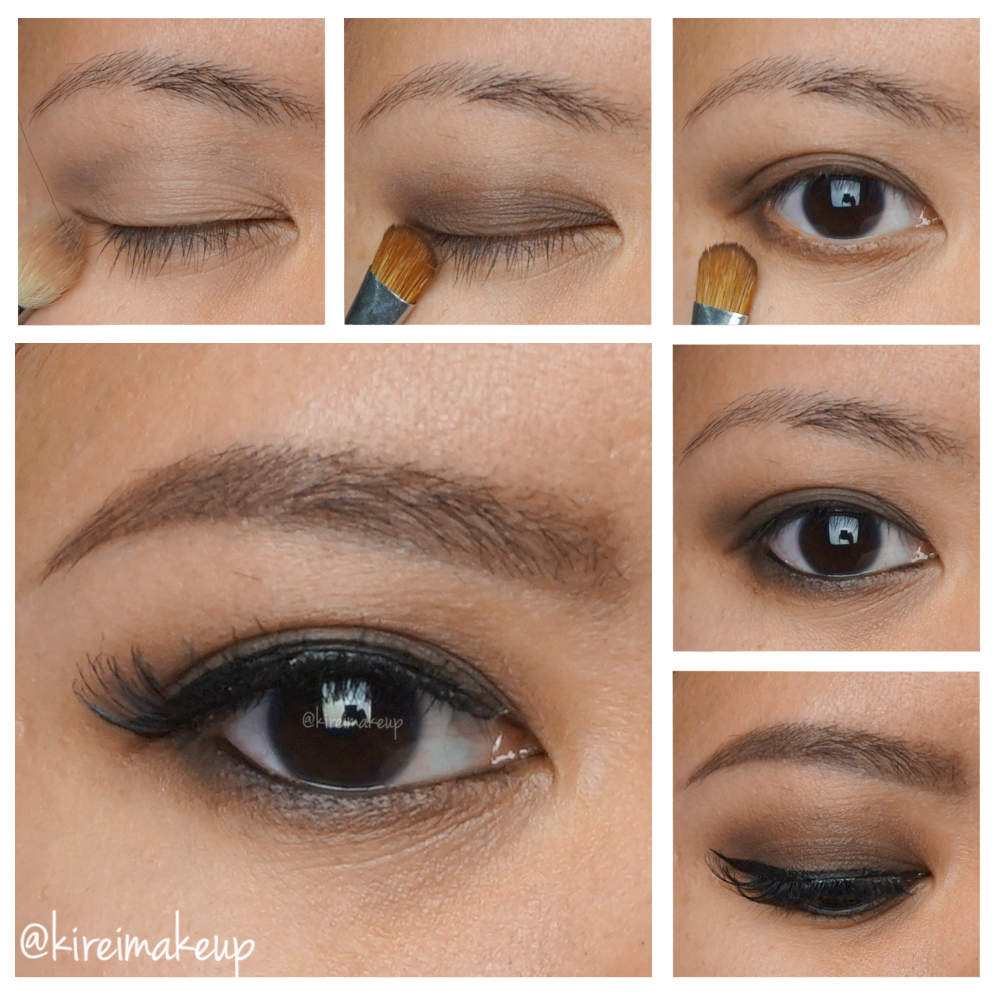
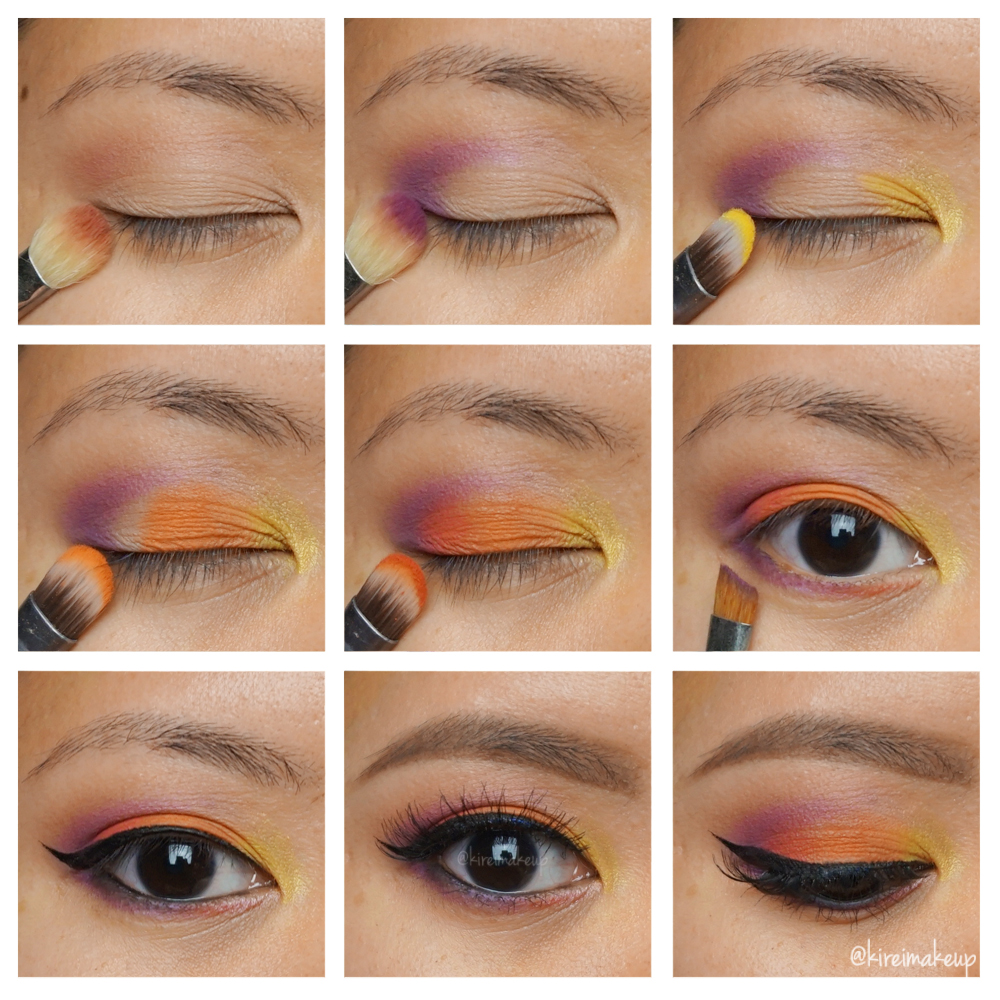
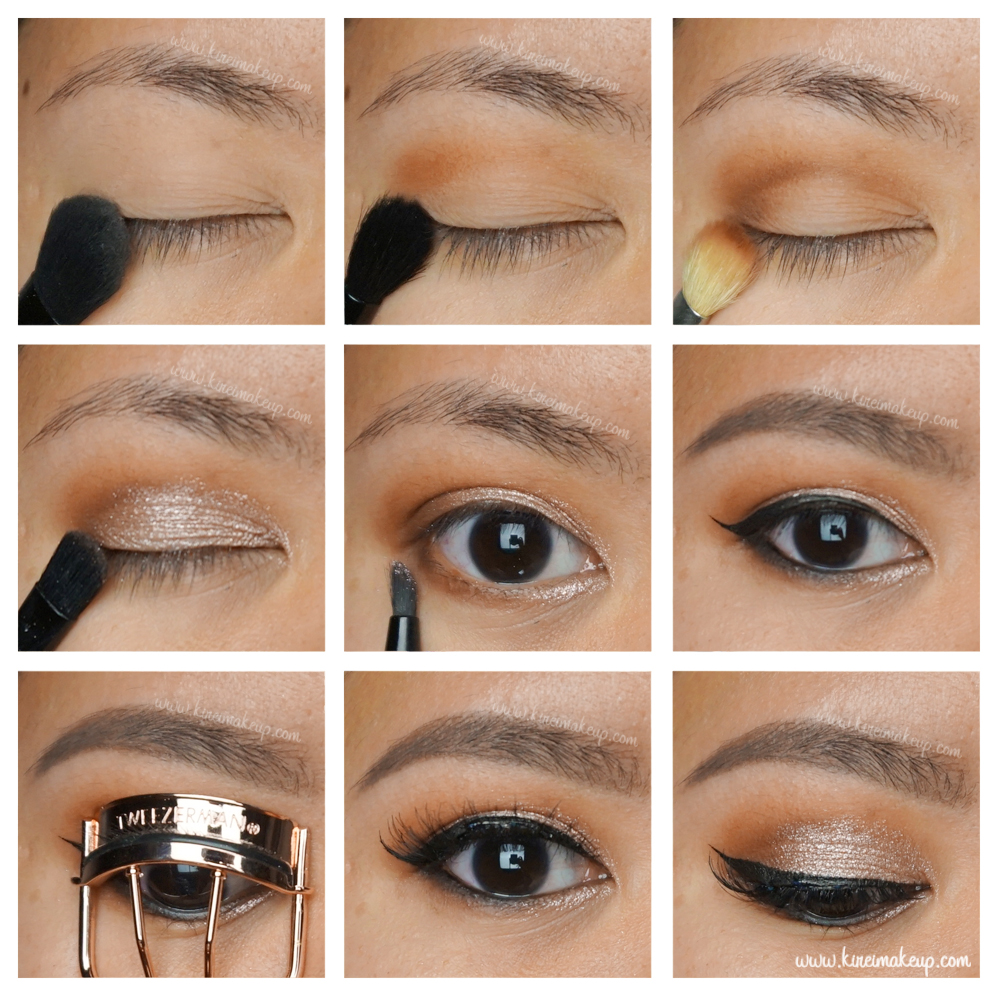
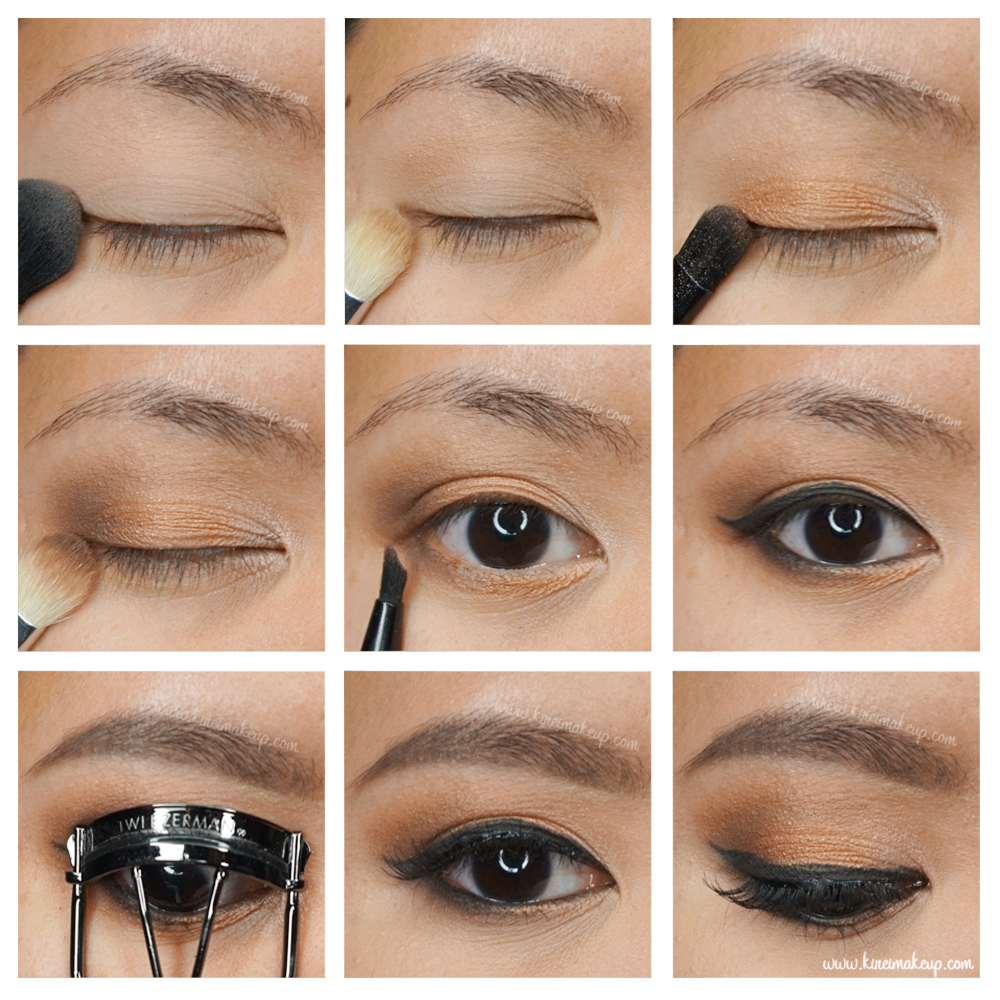
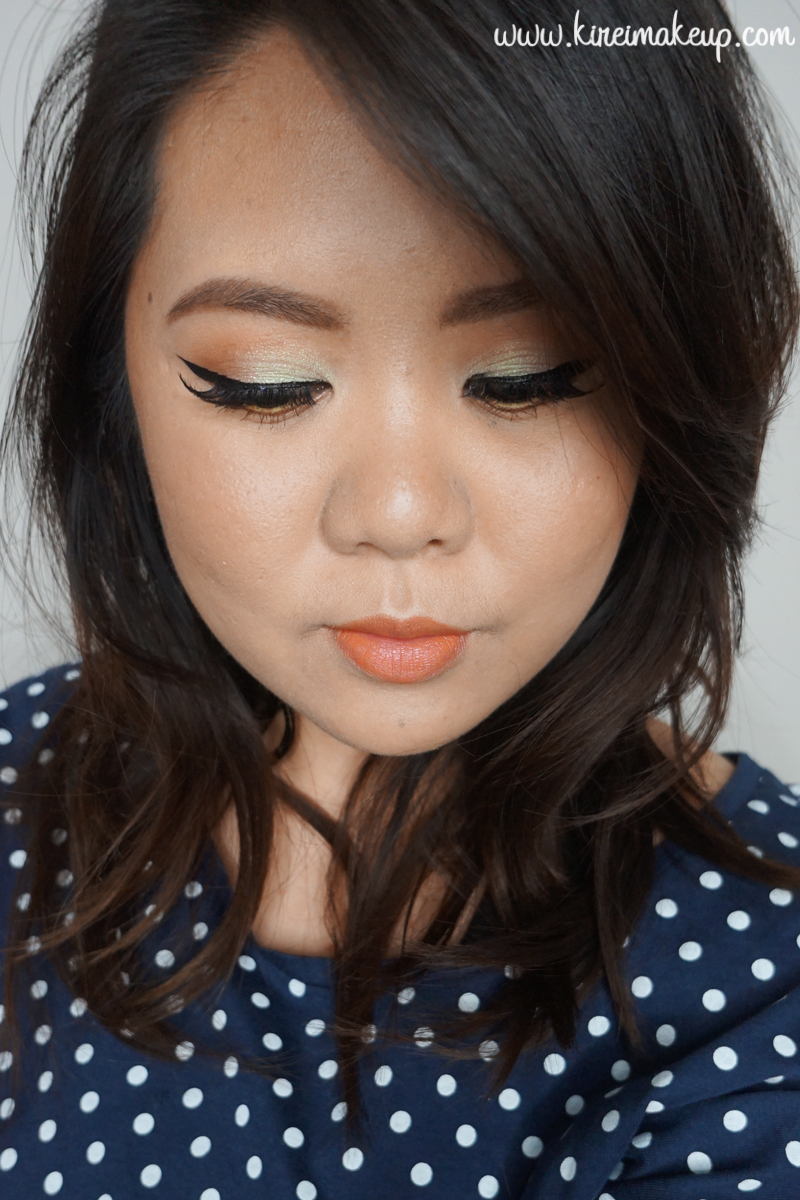
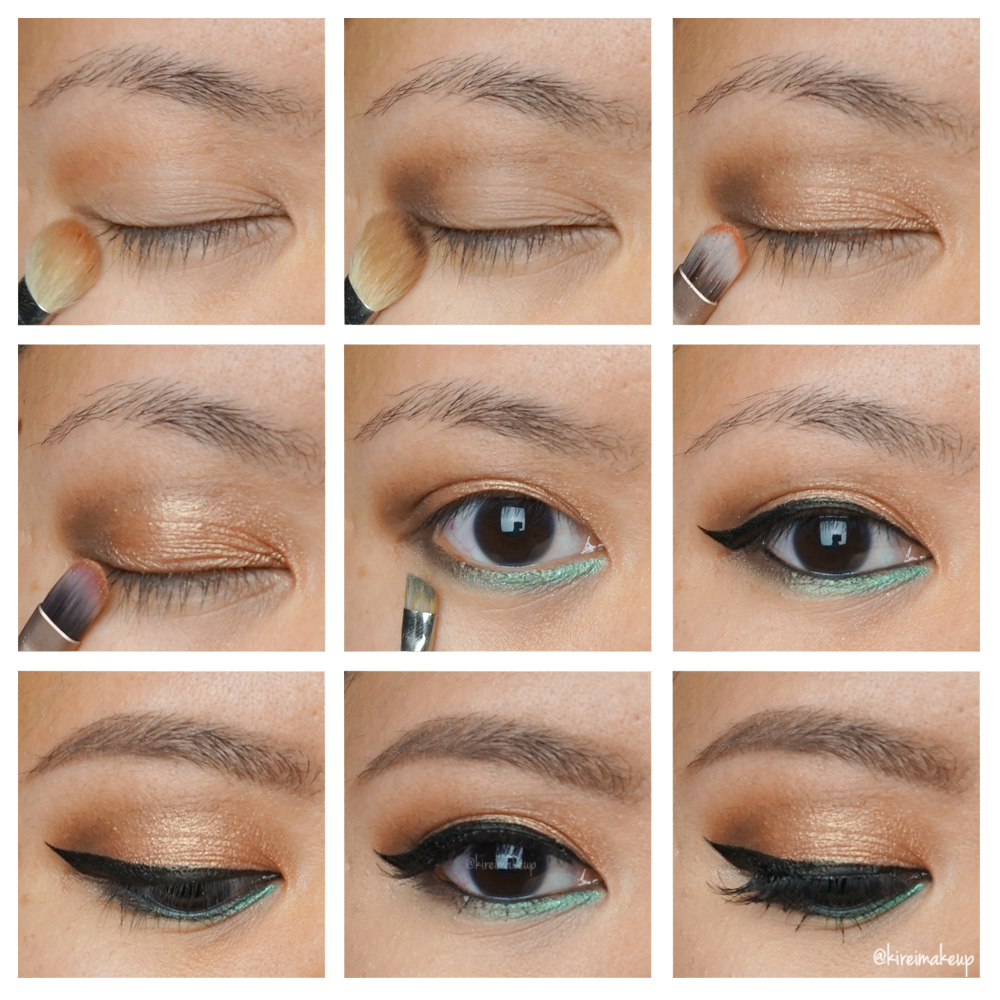
Anyways, one thing to note is that I applied “Flame” on my eyelid dry, and then I wet my brush and re-apply the same shade on the center of the lid. As you can see from the picture below, when I applied “Flame” dry it has a shimmer, but when I applied it wet it looks more shiny.

UD Vice 4 tutorial

Products used

Eyes

  • Primer – UD Primer Potion “Anti-Aging”
  • Base – UD Vice 4 “Framed”
  • Transition – UD Vice 4 “Bitter”
  • Outer V/crease – UD Vice 4 “Delete”
  • Eyelid – UD Vice 4 “Flame”
  • Lower lash line – UD Vice 4 “Delete” (outer) + “Arctic” (inner)
  • Winged liner – Kanebo “Kate Super Sharp” eyeliner
  • Waterline/tightline – MAC kohl eyeliner “Smolder”
  • Mascara – NARS “Audicious” mascara
  • Lashes – Ardell falsies “Demi Wispies”

UD Vice 4 makeup look

Face

  • Primer – The Body Shop Drops of Youth “Wonderblur”
  • Foundation – CoverFX cream foundation “G40”
  • Concealer – NARS Radiant Creamy Concealer “Custard”
  • Setting powder – CoverFX setting powder

Cheeks

  • Blush – Hourglass Ambient Lighting Blush “Vibrant Poppy”
  • Highlighter – Becca x Jaclyn Hill “Champagne Pop” highlighter

Lips

  • Lip pencil – UD lip pencil “Naked2”
  • Lipstick – Sonia Kashuk lipstick “Nude Pink”
  • Lip gloss – L’oreal Color Riche Extraordinaire “Blushing Harmony”

UD Vice 4 tutorial

Shu Uemura Sheer Shine Lipsticks

Last month, I was chosen to be one of the 20 beauty bloggers to try out Shu Uemura Sheer Shine lipsticks! I was thrilled to receive 3 of the Shu Uemura Rouge Unlimited Sheer Shine lipsticks at my door step. I’m sure you all have seen these 3 gorgeous lipsticks on my Instagram. I absolutely love these lipsticks!

Shu Uemura Sheer Shine lipsticks

So, the 3 shades that I received are RD 164 (red), PK 366 (pink), CR 350 (peach). I can’t really pick a favorite because I love them all equally! They are very vibrant, and you can layer it. If you are not used to wearing bright colored lipsticks, you should definitely give this a try. This way, you can apply it sheer at first then build it to a more opaque finish once you get used to the color, especially if you want to try the red lipstick.

The best part, for me, is the fact that these Sheer Shine lipsticks are very moisturizing, and it has a “glass-like” finish, similar to a gloss but without the stickiness. Actually the shine on these lipsticks are amazing! It’s definitely better than a gloss! If you apply the Sheer Shine lipsticks with a lip brush (I recommend the Shu Uemura lip brush), you can actually create a stain on your lips.

These lipsticks are very pigmented, don’t let the name “Sheer” fools you! So vibrant, high shine and very colorful! On top of that, this product is just like butter. Very smooth and you can apply this very easily to the lips.

Shu Uemura Sheer Shine lipsticksDisclaimer:

  • Links on this post are not affiliated links
  • These products were sent to me, however all opinions expressed are honest and were based on my experience with the products.
  • Please do your research & test patch before buying any products, I am not responsible should any irritation occurs

UD Naked Smoky “Brown Smoky Eyes”

HAPPY  (Canadian) THANKSGIVING! I promised one last post before the end of the week and here we go! I wanted to use my UD Naked Smoky palette again, since I felt that I haven’t used it enough. I created a matte brown smoky eyes look, which is simple and easy. A brown smoky eyes is softer than black, and it’s also easier for beginners. So, if you haven’t try a brown smoky eyes yet, you should! Skip the falsies and winged liner for a more casual look.

Please check out my UD Naked Smoky review, and other tutorials!

UD Naked smoky tutorial

Products used

Eyes

  • Primer – UD Primer Potion “Anti-aging”
  • Base – UD Naked Smoky “Thirteen”
  • Transition – UD Naked Smoky “Combust”
  • Crease – UD Naked Smoky “Password”
  • Eyelid/lower lid – UD Naked Smoky “Whiskey”
  • Winged liner – Kanebo Kate Super Sharp eyeliner
  • Waterline – L’oreal Voluminous Smoldering eyeliner
  • Brows – Anastasia Brow Wiz “Medium Brown”
  • Lashes – Ardell “Demi Wispies”

UD Naked smoky tutorial

Face

  • Foundation – Laneige BB Cushion “Medium”
  • Concealer – NARS Radiant Creamy Concealer “Custard”
  • Setting powder – CoverFX translucent setting powder

Cheeks

  • Blush – Hourglass Ambient Lighting blush

Lips

  • Gloss – YSL Glossy Stain in Pêche Cerra-Cola

UD Naked smoky lookUD


Kat Von D Mi Vida Loca Remix Tutorial #2

Last week, I did KVD Mi Vida Loca Remix swatches, as well as a tutorial using the greens and blues. This time, I decided to do another Kat Von D Mi Vida Loca Remix tutorial using the warmer shades! Have you guys grab this palette yet? If you haven’t take a look at my swatches’ post! I can assure you, you’ll love this palette! The colors are amazing, and I can’t rave enough about it. If you are a not a fan of colors, take a look at KVD Shade + Light eye palette, perhaps something more neutrals will suit your needs.

Since the eyes are very colorful, I have to pull the eye look together with black eyeliner. I don’t use white or beige on the waterline since it can look too clown-ish, in my opinion. I really like the contrast between the black and the colors, it makes it more wearable. It’s a very festive look, perhaps would be great for Carnivals!

Mi Vida Loca Remix makeup tutorial

Products used

Eyes

  • Primer – Urban Decay Primer Potion “Anti Aging”
  • Transition – KVD Mi Vida Loca Remix “Swoon”
  • Outer V/Crease – KVD Mi Vida Loca Remix “Anthem”
  • Inner corner – KVD Mi Vida Loca Remix “Fran” + “Legend”
  • Center lid – KVD Mi Vida Loca Remix “Analogue”
  • Outer third – KVD Mi Vida Loca Remix “Destroyer”
  • Outer half of lower lash line – KVD Mi Vida Loca Remix “Anthem”
  • Inner half of lower lash line – KVD Mi Vida Loca Remix “Destroyer”
  • Waterline – L’oreal Voluminous Smoldering eyeliner
  • Winged liner – Kat Von D Tattoo Liner “Trooper’
  • Brows – Anastasia Brow Wiz “Medium Brown” + Kat Von D Brow Tattoo “Medium”
  • Falsies – Ardell “Demi Wispies”

Mi Vida Loca Remix lookFace

  • Primer – Kat Von D “Lock-it Featherweight” primer
  • Foundation – Kat Von D “Lock-it Tattoo Foundation”
  • Concealer – NARS Radiant Creamy Concealer “Custard”
  • Setting powder – CoverFX setting powder

Cheeks

Lips

  • Lip color – L’oreal Color Riche Extraordinaire “Blushing Harmony”

Mi Vida Loca Remix makeup tutorial

KVD Mi Vida Loca Remix Tutorial #1

As mentioned in my previous post, I do have a KVD Mi Vida Loca Remix tutorial! I used mostly the greens and blues from that palette for this look. If you are interested in seeing swatches and my thoughts on it, please check out my Kat Von D Mi Vida Loca Remix palette swatches. I am loving this palette, I think I’ll try to do more looks with this palette in the future.

I do have 2 other posts lining up to be published, but since this palette was highly anticipated, I’ve decided to publish this look first. I’m going to try to publish the other 2 posts next week, so don’t forget to subscribe to my blog (subscription box is on the right side bar) so you can get an update as soon as I publish it! I’ll try to get back into regular blogging – 3x/week again.

kvd mi vida loca remix tutorial

Products used

Eyes

  • Primer – Urban Decay Primer Potion “Original”
  • Base – KVD Mi Vida Loca Remix “Moulder”
  • Crease – KVD Mi Vida Loca Remix “Hyperballad”
  • Outer V – KVD Mi Vida Loca Remix “Lemy”
  • Middle lid – KVD Mi Vida Loca Remix “Misfit”
  • Inner corner – KVD Mi Vida Loca Remix “Vinly”
  • Lower lid – KVD Mi Vida Loca Remix “Synth” (inner half); KVD Mi Vida Loca Remix “Dark Wave” (outer half)
  • Lower lash line – KVD Mi Vida Loca Remix “Black Metal”
  • Winged liner & Star – Kat Von D Tattoo Liner “Trooper”
  • Waterline – L’oreal Voluminous Smoldering eyeliner
  • Brows – Anastasia Beverly Hills Brow Wiz “Taupe”; Kat Von D Tattoo Brow “Medium Brown”
  • Mascara – Lancome “Hypnose Drama”
  • Lashes – Ardell “Demi Wispies”

kat von d mi vida loca remix palette makeup look

Face

  • Primer – Bobbi Brown “Vitamin Enriched Face Base”
  • Foundation – MAC Waterweight foundation “NC30”
  • Concealer – MAC Studio Finish concealer “NC30”
  • Setting powder – CoverFX translucent setting powder

Cheeks

  • Contour – Kat Von D Shade + Light contour palette
  • Blush – Smashbox Halo Blush powder “In Bloom”
  • Highlight – Becca Shimmering Perfector “Champagne Pop”

Lips

  • Gloss – YSL Glossy Stain in Pêche Cerra-Cola

kat von d mi vida loca remix palette tutorial


ABH Shadow Couture World Traveler Tutorial #1

Today ABH Shadow Couture World Traveler tutorial is a great look for party makeup. It’s very shimmery and warm, perfect for Fall. Anyways, I finally have the chance to get my hands on one of the Anastasia Beverly Hills (ABH) eyeshadow palettes. I wanted to know if it lives up to its hype, and it does! So smooth and pigmented, now I understand why lots of youtube and insta-beauty gurus love ABH shadows.

For this look, the focus is all in the eyes. Even though the eyes aren’t too dark, I still prefer to keep everything else on the down low since the eyelids are very shimmery. Nevertheless, feel free to add a different lip colour if you prefer, a nice classic red (e.g. MAC Russian Red), or a berry-red (e.g. MAC D for Danger), or a deep dark red (e.g. MAC Diva).

For this tutorial, I’m using several brushes and tools from Tweezerman, sent to me by Preen.me as part of their PreenMeVIP program. The brushes and tools featured are – blender brush, shader brush, line glider brush, ProCurl eyelash curler.

ABH Shadow Couture World Traveler palette

Products used

Eyes

  • Primer – Urban Decay Primer Potion “Original”
  • Base – ABH Shadow Couture World Traveler “Soft Peach”
  • Transition – ABH Shadow Couture World Traveler “Morocco”
  • Outer V/Crease/lower lid – ABH Shadow Couture World Traveler “Fudge”
  • Eyelid/inner corner of lower lid – ABH Shadow Couture World Traveler “Pink Champagne”
  • Outer half of lower lash line – ABH Shadow Couture World Traveler “Noir”
  • Winged liner – Kanebo “Kate Super Sharp liner”
  • Waterline – MAC “Smolder” kohl pencil
  • Brows – ABH Brow Pomade “Taupe” + “Medium Brown”
  • Falsies – Ardell “Demi Wispies


ABH Shadow Couture World Traveler palette

Face

Cheeks

Lips

  • Lip color – Sephora Oil Infusion Color & Care “Pink Granita”

ABH Shadow Couture World Traveler palette


Asian Bridal Makeup

Last Saturday I had the chance to do a makeup job for a wedding party. I’ve decided to share this Asian bridal makeup look, similar to what I’ve done last Saturday on today’s post. The bride was looking absolutely gorgeous, and I’ve shared a picture of her before and after on my Instagram. Today’s tutorial is not exactly the same as what I’ve done on my client, but it still uses similar shades. On my bride, I used a lot more warmer brown and darker outer V.

The focus is on the skin, where I want my skin to still look like skin but a better version of it. I really like the look of a dewy skin without making it look like I have a ton of makeup products on. This is very important to me because I really want my skin looks natural, and not cakey.

Also featured on this post are my Tweezerman brushes and eyelash curler sent to me by Preen.me as part of their PreenMeVIP program. The brushes and tools used are the blender brush, shader brush, line glider brush, and ProMaster eyelash curler. Not in picture, Tweezerman brow brush used to fill in my brows.

bridal makeup

Products used

Eyes

  • Primer – Urban Decay Primer Potion “original”
  • Base – MAC “Brule”
  • Crease – MAC “Cork”
  • Inner corner – MAC “Naked Lunch”
  • Center of lid/lower lid – MAC “Amber Lights”
  • Outer V/lower lid – MAC “Sketch” mixed with “Brun”
  • Lower lash line – MAC “Carbon”
  • Winged liner – Maybelline gel liner “Black”
  • Waterline – MAC “Smolder” kohl pencil
  • Brows – ABH Brow Pomade “Taupe” + “Medium Brown”
  • Falsies – Ardell “Demi Wispies”


bridal makeup

Face

  • Foundation – CoverFX Cream foundation “G40” (applied using a damped sponge)
  • Concealer – MAC “studio fix concealer NC30”
  • Setting Powder – Cover FX translucent powder

Cheeks

  • Contour – Becca “Lowlight Sculpting Perfector”
  • Blush – Smashbox Halo Blush powder “In Passion”
  • Highlighter – The Balm “Mary-Lou Manizer”

Lips

  • Lip pencil – MUFE Aqua Lip pencil “Vibrant Pink (15c)”
  • Lip color – Sephora Oil Infusion Color & Care “Pink Granita”

asian bridal makeup

MAC D for Danger

I have a new favorite lip color! MAC D for Danger lipstick is a gorgeous berry shade with a matte finish. I love it! I have been looking for a berry lip color for a while now, but usually it’s too purple, so I’m very excited when I found this shade. D for Danger is a permanent lipstick shade at MAC. I recently found it when I was browsing their Retro Matte collection.

Anyways, I paired UD Naked Smoky with this berry lips. I went with a winged liner, and bronze on the lids. Nothing too dark on the crease since I want the focus to be on the winged liner itself. This look is quite heavy on both eyes and lips, but I don’t quite mind it. I think this will look nice for a party. For a day look, I probably will leave the eyes bare, just mascara and groomed brows, leaving the lips to be the focus of the attention.

I have done a smoky eye look using UD Naked Smoky in my previous tutorial, please check it out!

ud naked smoky tutorial

Products used

Eyes

  • Primer – Urban Decay Primer Potion “Original”
  • Transition – UD Naked Smoky “Combust”
  • Crease/outer lid – UD Naked Smoky “Whiskey”
  • Middle lid – UD Naked Smoky “Dirtysweet”
  • Inner corner – UD Naked Smoky “High”
  • Winged liner/outer corner of lower lid – Maybelline “Eye Studio Lasting Drama Gel Liner in Black”
  • Waterline – L’oreal “Voluminous Smoldering eyeliner”
  • Brows – Anastasia Brow Wiz “Taupe” and “Medium Brown”
  • Falsies – Gwiyomi Boutique false lashes “no. 3”


MAC D for Danger

Face

Cheeks

  • Contour – Smashbox contour kit “contour” shade
  • Cheeks – NARS “Mata Hari” blush

Lips

  • Lipstick – MAC “D for Danger”

urban decay naked smoky look

Mint Summer Makeup

What is summer without a bit of mint, eh? Today’s Mint Summer Makeup look is easy, wearable, and a lot of fun! I think I could have done it without the yellow on my waterline. You could replace the yellow with beige or white if you prefer.

I decided to use coral on the lips, just to tie the whole look together since I’ve very warm brown on the eyes. However, the coral lipstick looks very orange in my picture. It doesn’t look that orange in real life, it is slightly more peach. This coral lipstick I wore for this look is exactly the same one as the one Emma Stone wore for the 2015 Oscar Award.

Summer Makeup

Products used

Eyes

  • Primer – Urban Decay Primer Potion “Original”
  • Transition – Makeup Geek Cosmetics “Peach Smoothie”
  • Crease/lower lashline – Makeup Geek Cosmetics “Cocoa Bear”
  • Outer half (upper lid) – Makeup Geek foiled eyeshadow “Grandstand”
  • Mint base – Stila Cosmetics Smudge Stick Waterproof Eye Liner “Mint Julep”
  • Eyelid – Make Up For Ever Diamond e/s “D316 Crystalline Pinky Green”
  • Waterline – MAC Chromagraphic eyeliner NC15; MUFE no. 71
  • Winged liner – Shu Uemura Calligraphy Ink eyeliner
  • Mascara – Cover Girl Lash Blast mascara “Very Black”
  • Brows – Stila All Day Waterproof brow color in Medium; Anastasia Brow Wiz in Taupe
  • Lashes – Gwiyomi Boutique no. 3 falsies


Mint Summer Makeup

Face

  • Primer – Kat Von D Featherweight primer
  • Foundation – CoverFX cream foundation G40
  • Concealer – NARS Radiant creamy concealer “Custard”
  • Setting powder – CoverFX setting powder “Light”

Cheeks

  • Bronzer – MAC Mineralized Skin Finish “Medium Deep”
  • Blush – MAC blush powder “Apricot”

Lips

  • Lipstick – Revlon HD lipstick “Tulip”

Summer Makeup

Kat Von D Lock-It Tattoo Foundation Review

One of my readers on Instagram asked me to do a Kat Von D Lock-it Tattoo foundation review. I have had this foundation since February, and mind you I was a little bit lighter back then. For me, Medium 52 still match pretty nicely since I have darker face compared to my chest.

Now, when I was looking for this foundation, I remembered I only saw Medium 52 and 54 (the ones that match my skin closely). Medium 54 was definitely too dark. I did not see a Medium 53, which I would be interested to find out if that shade would match me better, especially in the Summer. I believe Medium 53 was a newly added shade. I’m going to be on a look out for that shade next time.

Medium 52 is a medium beige undertone, while Medium 53 is a golden yellow undertone. Medium 54 has a yellow beige undertone (for medium complexion). Anyways, if you are an in-between shade like me (MAC NC25/30; MUFE HD foundation 118/120) and with yellow undertone, Medium 52/53 might be a good match for you, if you are slightly darker and closer to MAC NC35-40, Medium 54 might be a great match.

kat von d lock-it tattoo foundation reviewAnyways, let’s do a quick review!

What is Kat Von D Lock-It Tattoo foundation?

A high-pigment foundation for full coverage with a long-lasting, beautiful finish.

What it does:
Kat created this foundation to provide exceptional coverage, without compromising a smooth, striking finish. Formulated with 21 percent pigment, this powerful formula was developed to match a broad range of skintones with bold coverage—the proprietary pigments can even effectively cover tattoos. The combination of raw materials and the best siliconic elastomers and siliconic esters provide 24-hour wear with transfer resistance. Natural polymers absorb oil for a matte, soft finish and the added emollients provide a velvety texture for perfectly smooth, hydrated skin.

Sephora Canada, 2015

kvd lock it tattoo foundation nc30

Packaging

The foundation comes in a plastic bottle with beautiful art in it, just like most of Kat Von D’s products. It comes with a pump, to pump the foundation out. It also comes with a stopper.

Application

The best way to apply this foundation, for me, is to: 1) pump it ONCE, 2) apply it on the thickest part of the face and areas where there’s discoloration (for me – cheeks and chin) using finger or foundation brush, then 3) blend it with Real Technique Expert Face Brush. Lastly, 4) use whatever is left on the expert brush on the rest of the face. Add more if needed. This way, the foundation is not cakey nor heavy. It gives even coverage and natural finish

Use this foundation SPARINGLY. One pump is already too much for me, I usually use half a pump to cover my entire face. If you apply too much, you’ll end up cakey.

Longevity

I’ve worn this foundation for around 6-hour without any issue. It does last pretty good all day. My T-zone was kept in checked the whole day.

Coverage/Shade

This foundation has a full coverage. I’m not sure what to call this finish. It’s definitely not dewy nor satin nor matte.I feel like my skin looks smoother, and still looks like skin. I’d say it’s more on the natural finish On the before after picture below, the skin still reflects light – check out my forehead, cheeks and nose. It has a velvety texture.

18 shades from the lightest to the darkest, from pink to beige to yellow undertones. 18 shades! Not bad, eh?

Price

CA$42 (excl. tax) in Sephora Canada for 30mL (1oz). Price is pretty reasonable, I think.

kvd lock it tattoo foundation before after

Pros

  • Wide range of shades
  • Reasonable price
  • Does not feel heavy nor cakey
  • Full coverage
  • Great for oily skin
  • Natural finish
  • Bottle comes with a pump

Cons

  • Can be heavy and cakey if you apply too much
  • Cling on dry skin