Daytime Brown Smoky Eyes ft. UD Naked Smoky

https://youtu.be/6M0F1mgnLug


Today’s Daytime Brown Smoky Eyes makeup tutorial is a requested look by a good friend of mine, and she wanted me to create a look based on the Urban Decay Naked Smoky palette. So, I created this easy to follow brown smoky eyes tutorial for her. This look is simple and very wearable during the day. If you prefer to wear this for a daytime makeup, you can skip the falsies. If you want to wear this for a night look, you can make the smoky eyes even darker by applying Black Market on the outer V and crease.

Read More

Simple Everyday Makeup

How is everyone’s Monday going? The Holiday is approaching real soon, eh?! I wanted to share with you guys this super easy and simple everyday makeup tutorial which can be worn by everyone, especially those who don’t usually wear much makeup. I did 2 version – one with a simple peachy lips, and another with red lips.

I think this look is great for those who prefer a simple no-fuss makeup. Nothing too dark, nothing too bright, but with a bit of colors. This is also a look for those who prefer earthy brown tones over black. I probably would wear this for a brunch (with peachy lips), or even a dinner party (with red lips).

Eyeshadows used in this tutorial are from the Smashbox Full Exposure Palette.

*You can find other tutorials using this palette right HERE!*

smashbox full exposure makeup tutorial

How-to:

1. I applied MAC Groundwork paint pot on my eyelids using my ring finger.

2. Using a fluffy blending brush, I applied Smashbox Full Exposure palette in M2 above my crease.

3. Using Smashbox bullet crease brush, I applied Smashbox Full Exposure palette in M1 on the outer half of my eyelid.

4. Using a flat eyeshadow brush, I applied S1 on the inner half of the eyelid, blending it towards the outer half.

5. I applied S4 on the inner corner of my eyes using Real Technique shading brush (skip this step if you have wide-set eyes).

6. I lined my waterline and tightline using L’oreal Voluminous Smoldering eyeliner.

7. I also applied M7 along my upper lash line using an angled eyeliner brush. I applied this along the outer half of my lower lash line as well.

8. I curled my lashes and applied Maybelline Express Turbo Boost mascara on my lashes.

9. I filled my brows using Anastasia Beverly Hills Brow Duo Powder.

10. I also applied Mata Nona no. 15 falsies.

nyx monte carlo tutorial

11. On my face, I applied MAC Pro Long-Wear foundation using Real Technique Expert Face brush.

12. Under my eyes and on my blemishes, I applied MAC Pro Long-Wear concealer. I set my face using CoverFX Translucent powder.

13. On my cheeks, I applied Chanel Blush de Horizon.

14a. (left) For the peachy lips, I filled my lips using MAC Spice lip liner. Then I applied YSL Glossy Stain in Peche Cerra-Colla (27).

14b. (right) I removed the previous lip color, and then applied NYX Monte Carlo on my lips.


Products used

Eyes – MAC Groundwork paintpot; Smashbox Full Exposure Palette (crease – M2, outer lid – M1, lid – S1, inner corner – S4, liner – M7); L’oreal Voluminous Smoldering eyeliner; Maybelline Expres Turbo Volume mascara; Anastasia Beverly Hills duo brow powder; Mata Nona falsies no. 15.

Face – MAC Pro Long-Wear foundation NC30; MAC Pro Long-Wear concealer NC25; CoverFX translucent powder.

Cheeks – Chanel Blush de Horizon.

Lips – MAC Spice Lip pencil; YSL Glossy Stain no. 27; NYX Monte Carlo

Brun

I had the pleasure of having Wiwin to come over to my place and allowed me to give her a makeover. We did it just for fun, ’cause you know, I was bored and had been bugging her to let me do her pretty face 😉

We went out afterwards and ooh boy, this hot babe was the center of attention..hahahaha…Her fiance, Geoffrey, came with an arsenal of lenses and camera. He took all the photos below. Pretty amazing couple, eh?

Since we were going out, she didn’t want the makeup to be too smoky, and she wanted a bronze eyeshadow to be incorporated into the look. So, I did something similar to my “Warm Brown Smoky” tutorial, but added Urban Decay Half-Baked on the eyelid (on top of All That Glitter). On top of that instead of MAC Sketch eyeshadow, I used MAC Brun eyeshadow.

asian natural makeup

Her eyebrows were recently “shaved” by another makeup artist and it was wonky. So, I had to filled it in using Chanel brow pencil in Mistre to re-shape the brows and set it with MAC Omega eyeshadow.

No falsies applied since she didn’t want it. We didn’t want to go overboard with the look.

No black liner on waterline because I want to keep her eyes looking bigger and wide. Black eyeliner on the inner rim will close her eyes and makes the eyes look smaller. Instead, I used a beige eyeliner to brighten up her eyes and created a bigger eye illusion. I also created a winged liner along her upper lashline to lift her eyes.

asian natural makeup brida;

For her base, I prepped it with CoverFX primer and Make Up For Ever HD Foundation. I concealed any blemishes and under eyes circles using MAC Pro Conceal and Correct palette. I also applied a little bit of Chanel Universal Bronzer on her face (hollow of the cheeks and temples). For blush, I applied Revlon Rosy Glow cream blush on her cheeks.

I set everything using Cinema Secret loose powder. She wanted her nose to look higher, so I applied MAC Shadowy very lightly on the sides of her nose I also applied the same contour powder on the temples, hollows of the cheeks and her jawline. I applied MAC Fleur Power blush on her cheeks.

For the lips, I applied my favorite lipstick of all time: Revlon Mauve It Over matte lipstick, and applied a little bit of L’occitane lip balm on top of it.

asian bridal natural makeup

Her hair was set on rollers and rolled up in a bun during makeup session. Just FYI, that is her natural hair color! Beautiful, yes?

Oh, yes, that’s my family’s dog, Yorkie 😉 He made an appearance this time.

asian natural makeup

Warm Brown Smoky

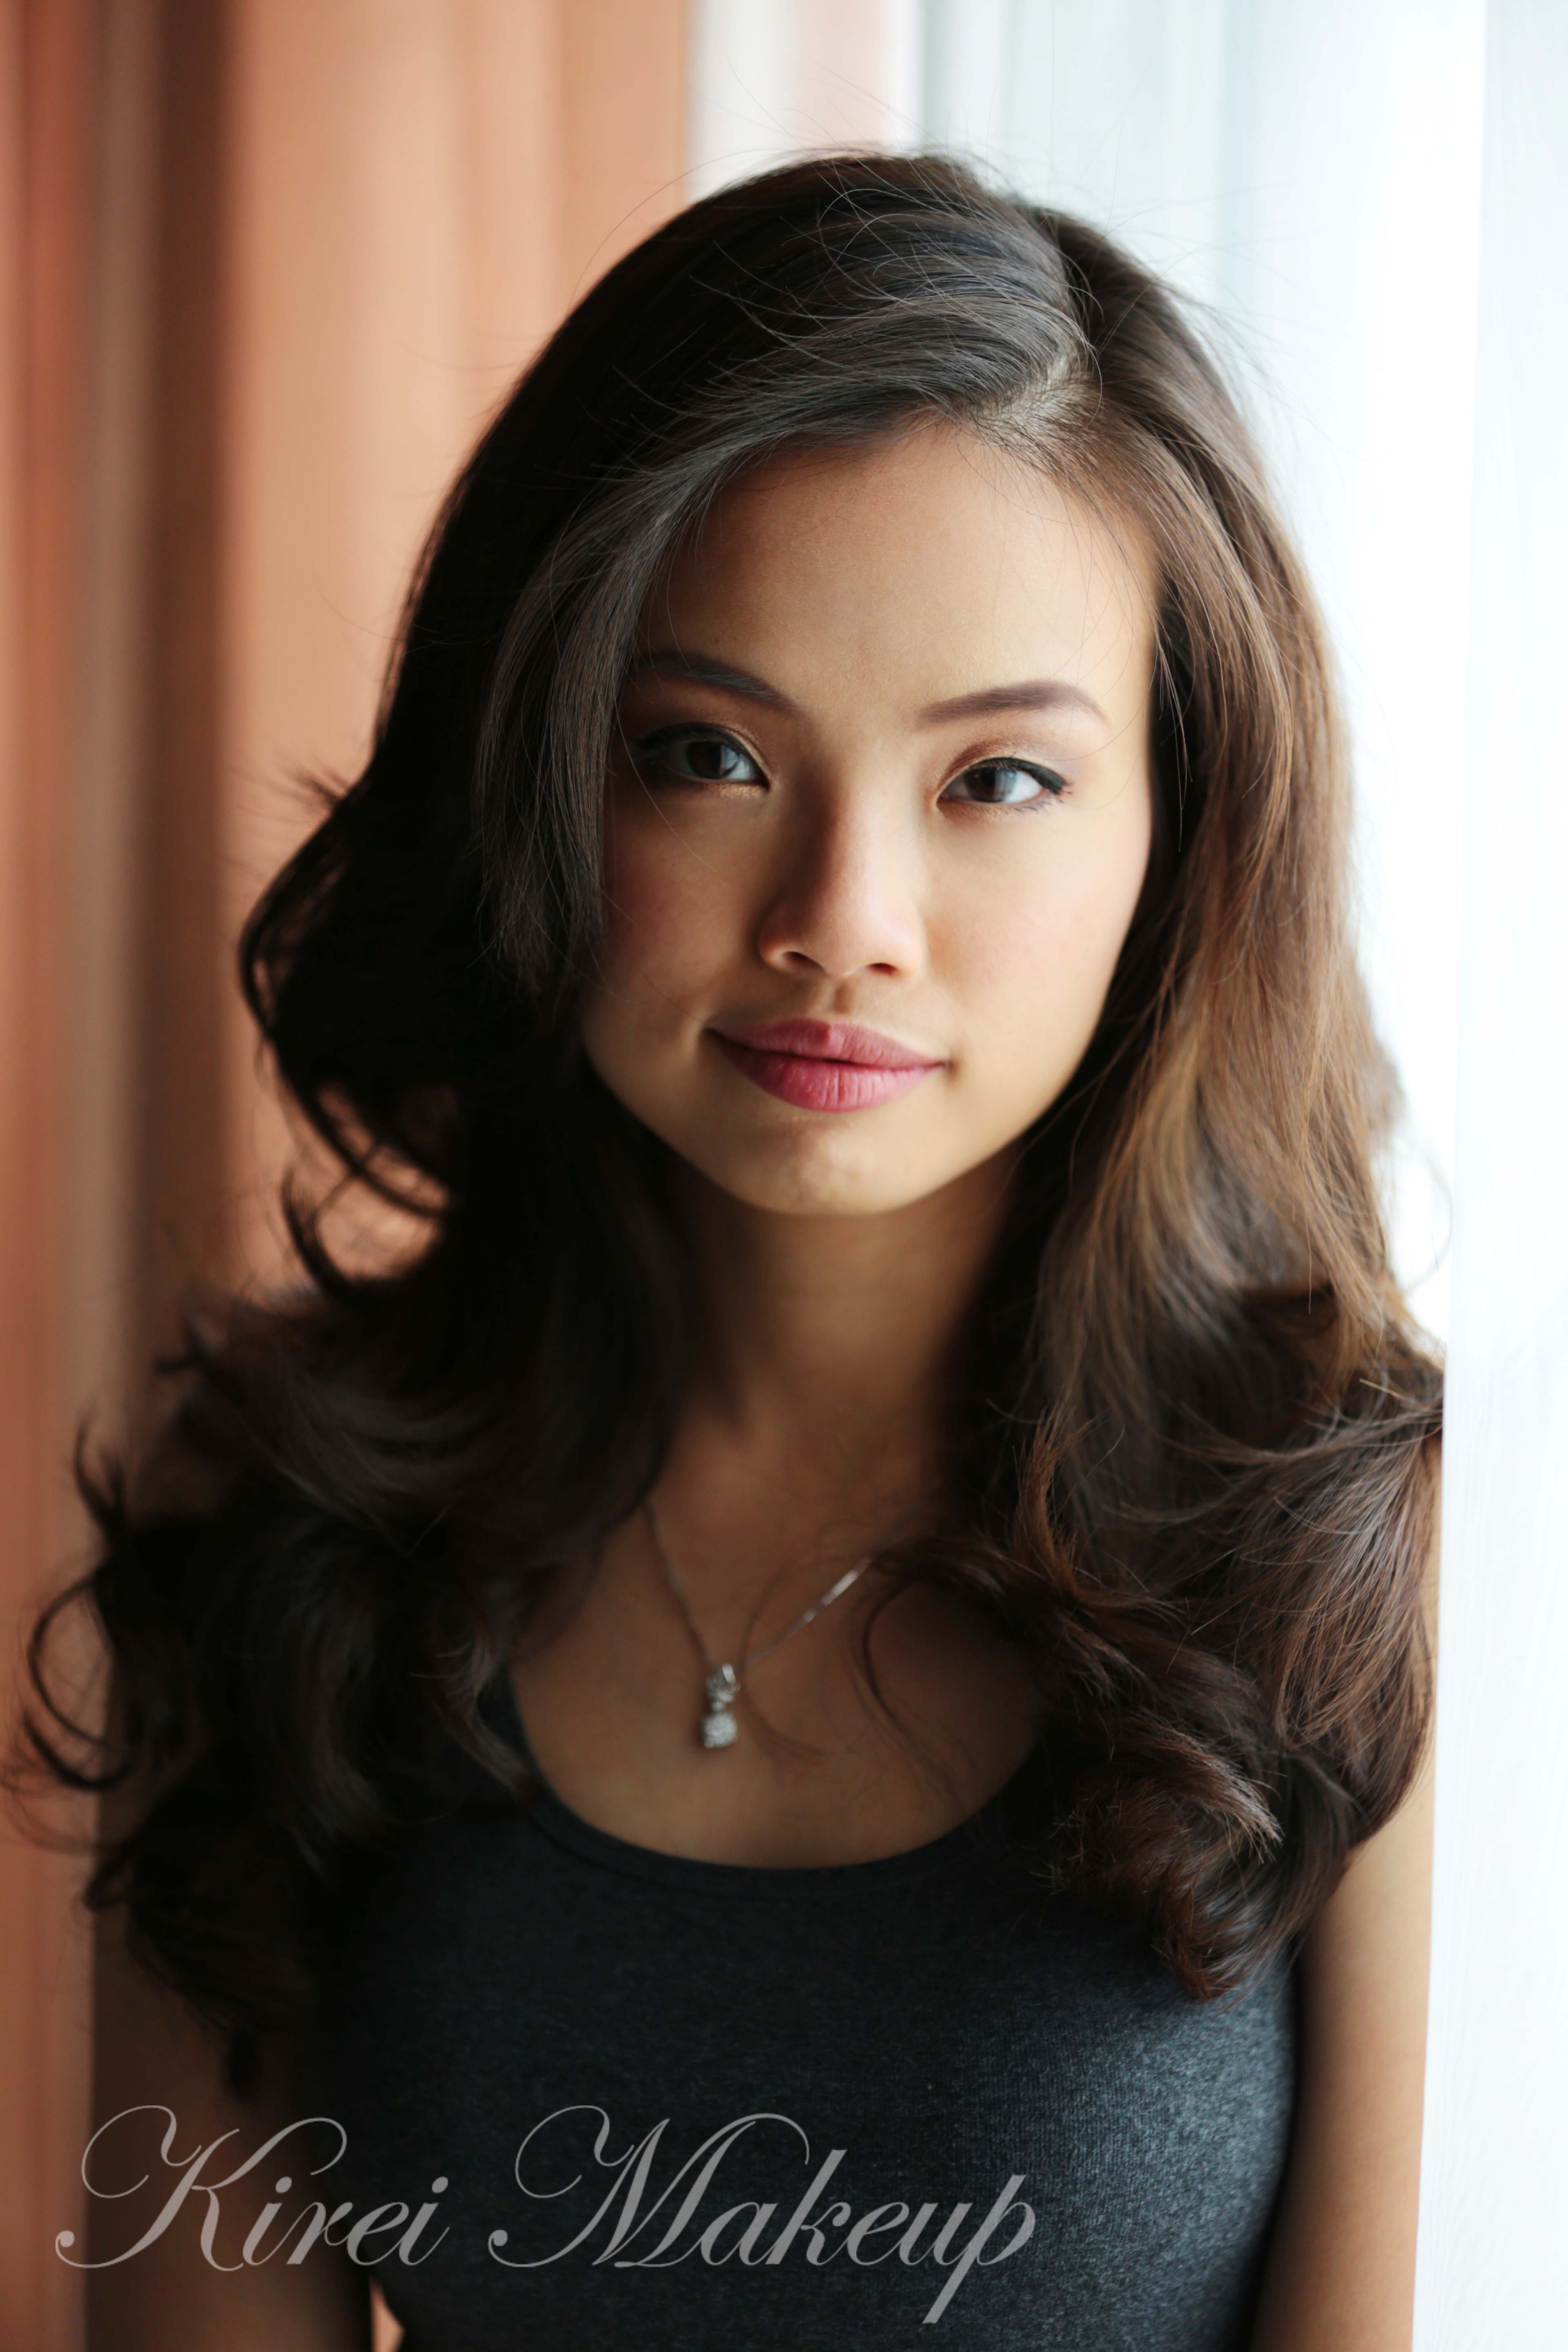
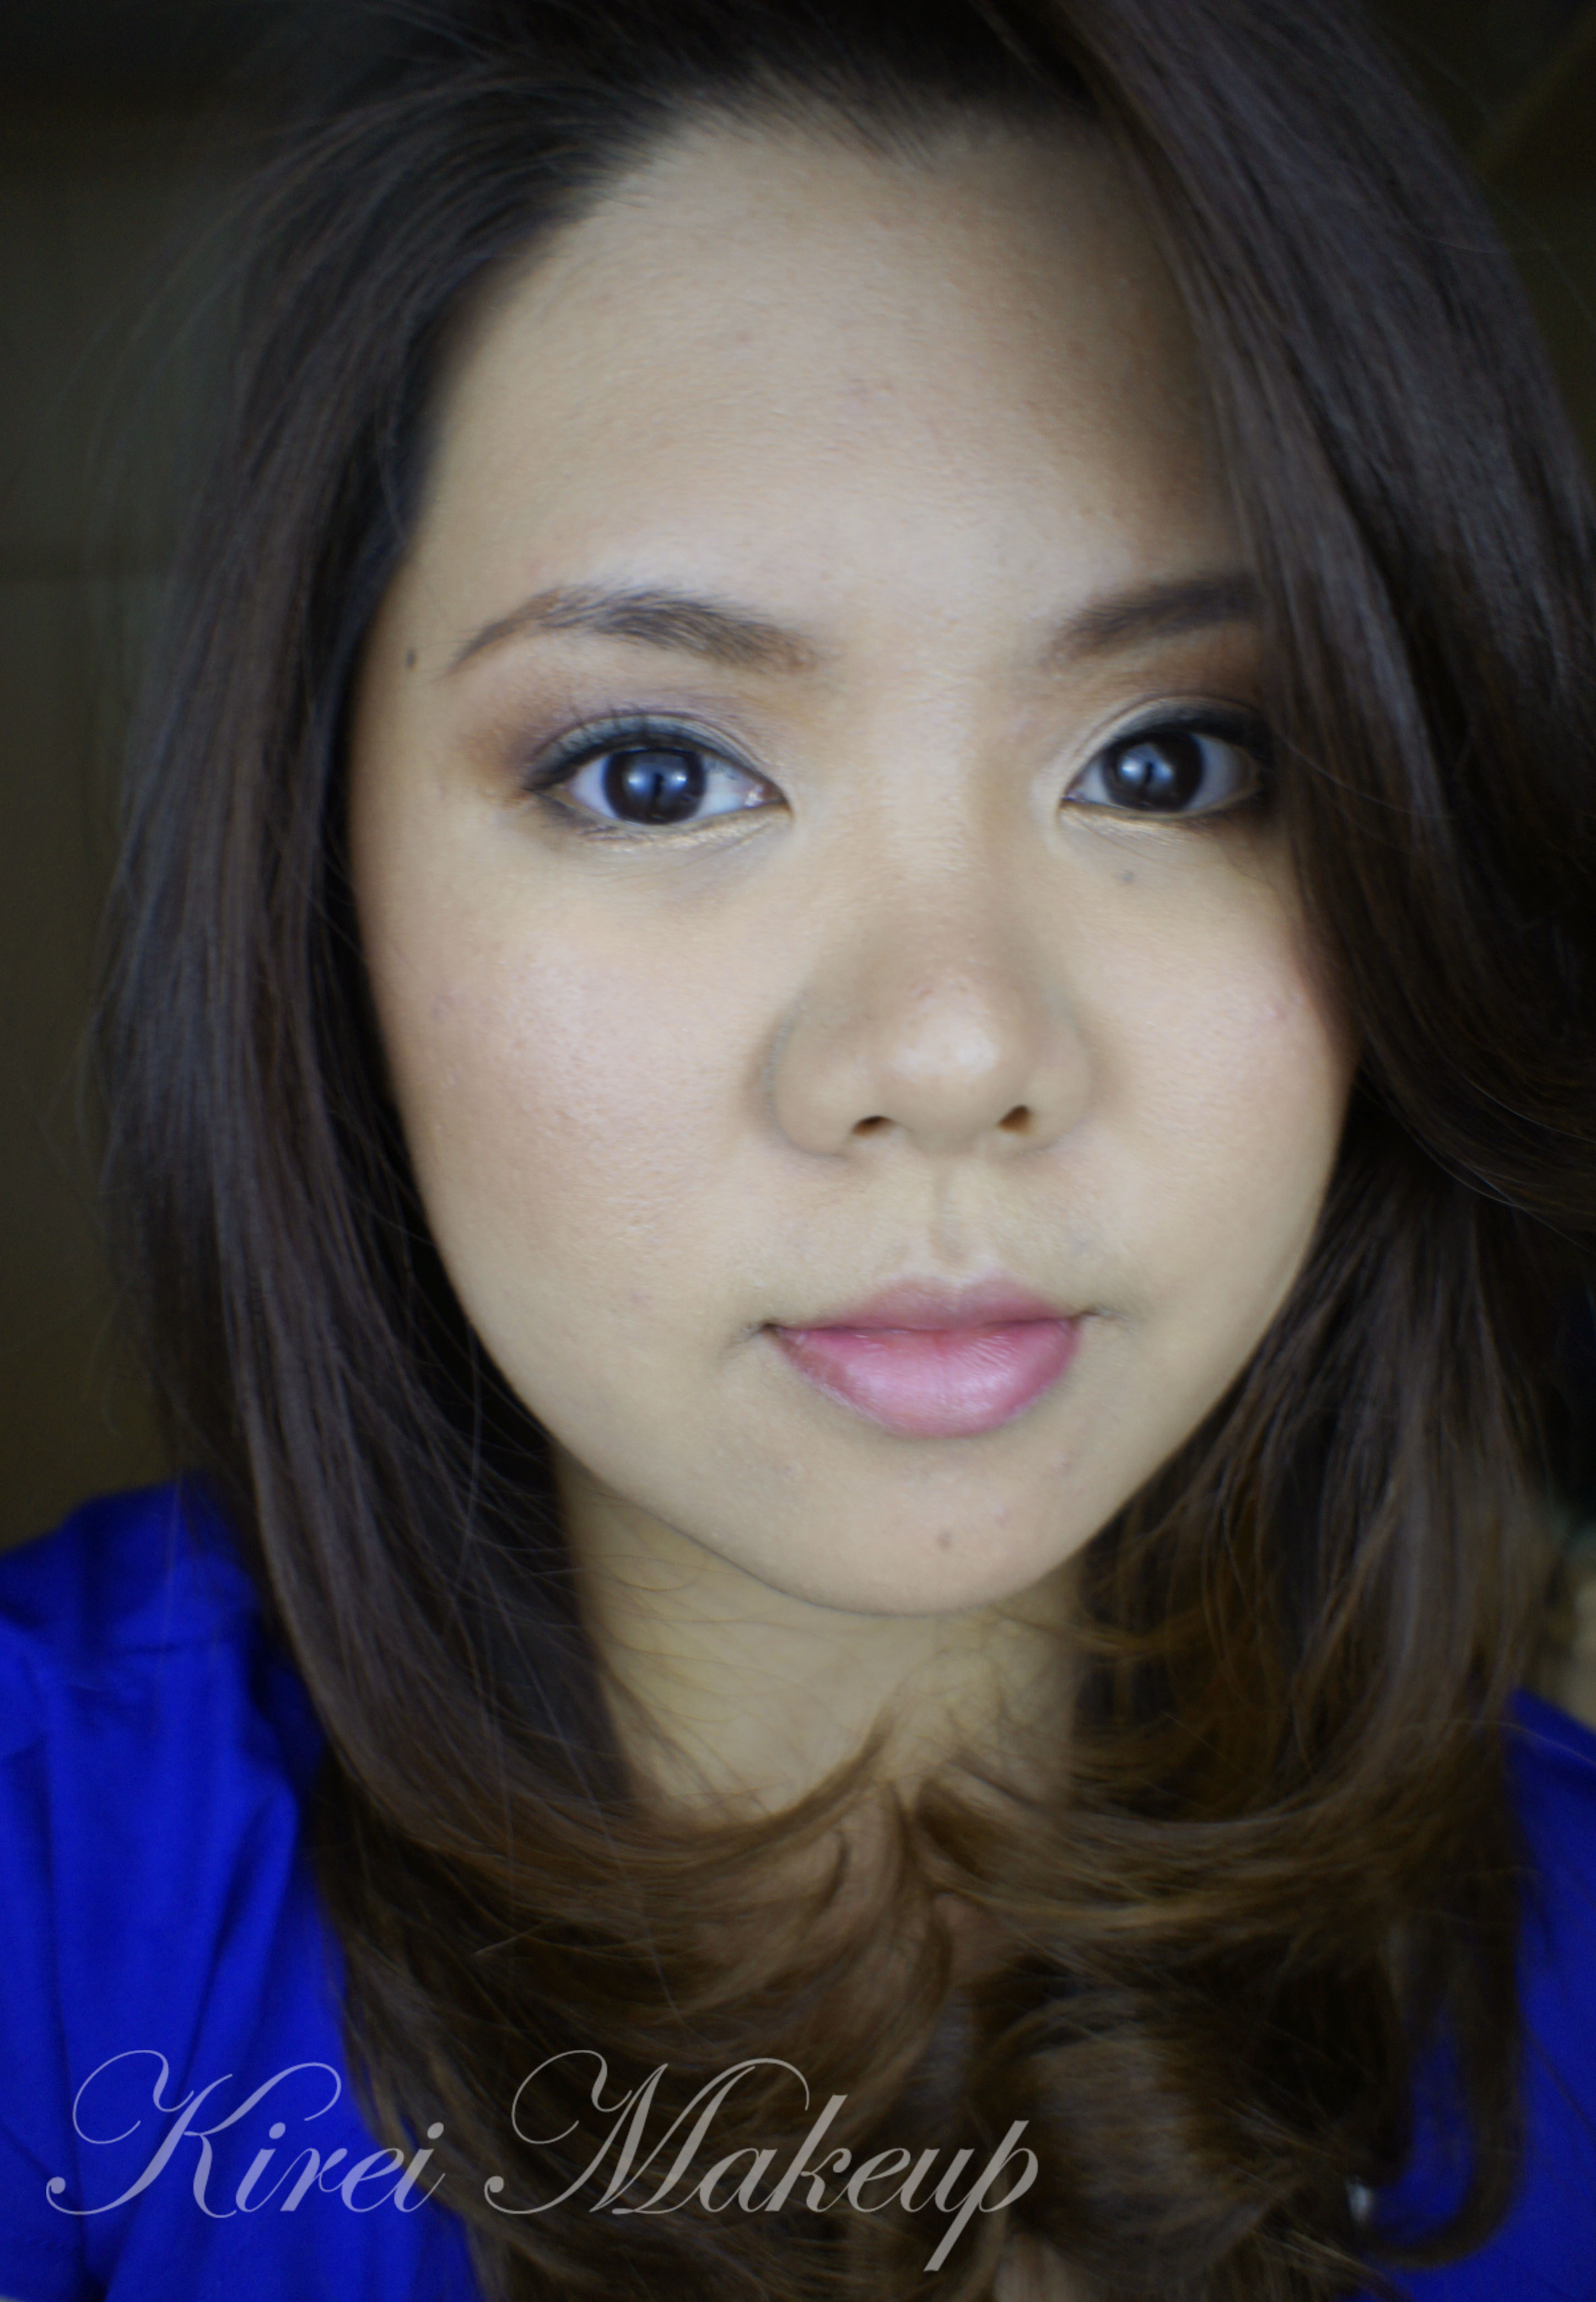
Who says we have to stick to black and grey in creating a smoky eyes look? Brown gives a more softer approach, and definitely warmed up the face. Brown smoky eyes will look great on any eye color, especially blue and green! In this tutorial, I layered a few different browns to warm up the eyes and it’s okay if it is messy! It gives that bedroom eye vibe, without looking like a panda ;). If you’re having difficulty doing a smoky eyes makeup using black, try using brown, it’s more forgiving.

Funny enough, quite a few of brides also like this type of makeup, especially for those who prefer a more natural look. I think this look goes with anything! Bridal, prom, date, night-out. It’s so simple and easy without being too overpowering.
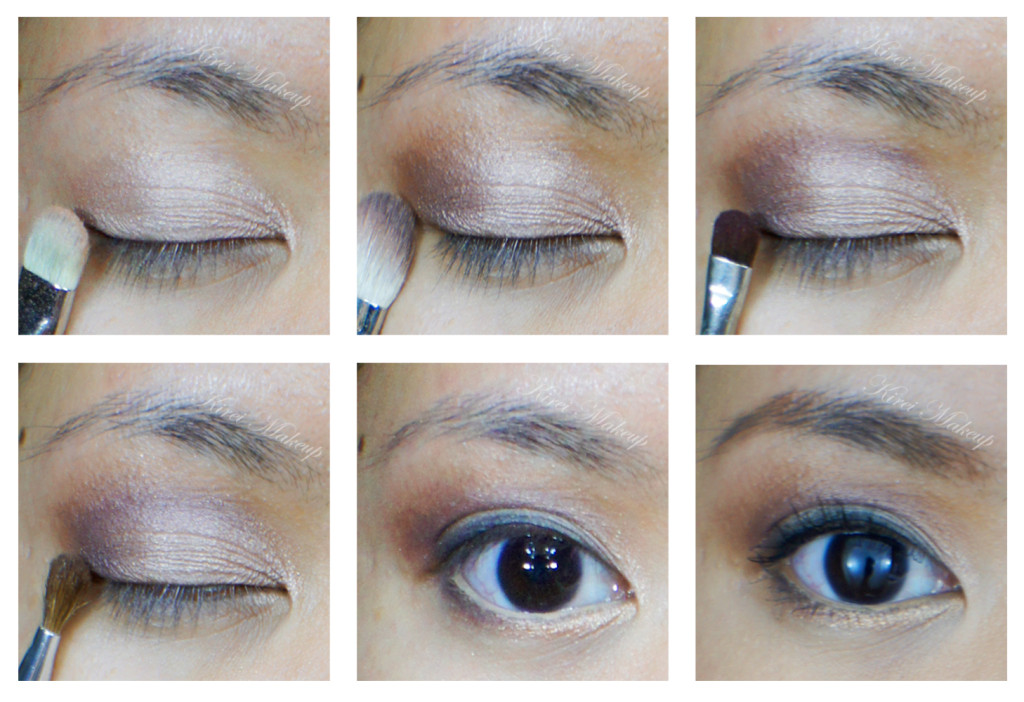
How-to:

1. Using a flat eyeshadow brush, I applied MAC All That Glitters all over the lid.

2. Using a fluffy blending brush, I applied MAC Mulch on the outer corner of the lid.

3. Using a small shader brush, I applied MAC Sketch on the outer V and crease of the eye.

4. Using a small fluggy blending brush, I dipped the brush very lightly into MAC Bronze eyeshadow and blended it on the crease.

5. I used a clean blending brush to blend the edge of the crease.

6. Using an angled eyeliner brush, I applied MAC Woodwinked on the inner corner of the lower lid and applied MAC Mulch on the outer corner of the lower lid.

7. I lined my waterline using MAC Chromagraphic eyeliner in NC30.

8. Along the upper lashline, I applied MAC Smolder eyeliner and smudged it using a  pencil brush. I also added Smashbox Blackout eyeshadow along the line to set it using an angled eyebrow brush.

9. Using a clean blending brush, I blended the edge of the outer V to erase the harsh line.

10. I filled my brows in using Chanel brow pencil in Mistre.

11. I curled my lashes and applied Maybelline Volume Express Turbo Boost mascara on the upper and lower lashes.

12. Below the brows, I applied MAC Blanc Type lightly using a flat eyeshadow brush.

bridal makeup

13. For the face, I applied MUFE HD Foundation using a Sigma Round Kabuki brush.

14. For the under eyes, I applied MUFE concealer.

15 For the contour, I applied MAC Shadowy on the hollows of the cheeks, temples and sides of the nose.

16. For the blush, I mixed MAC Well-Dressed and MAC Fleur Power and applied it on the cheeks.

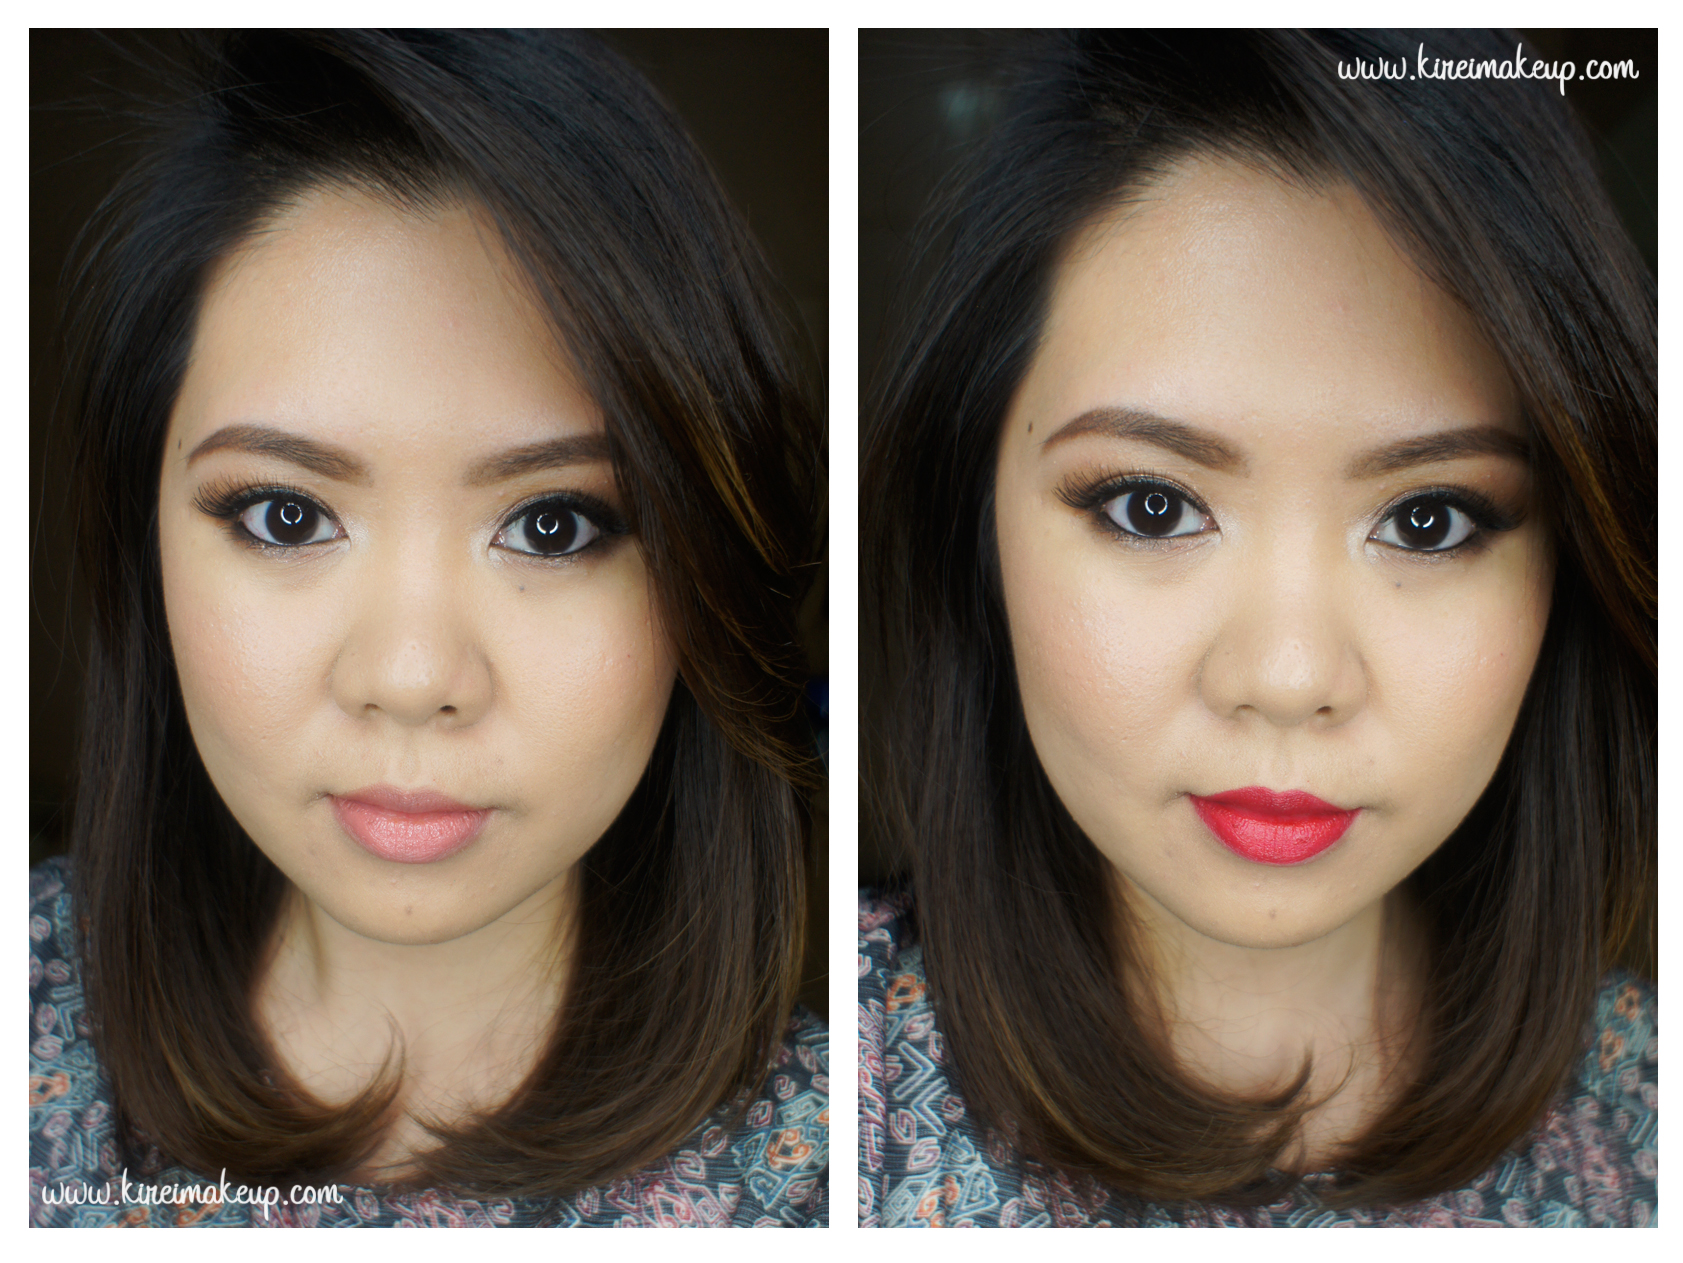
17. For the lips, I applied Chanel Levres Scintillantes Glossimer no. 165 (Volupte).

asian smoky eyes