[Updated] Brow Tutorial Video

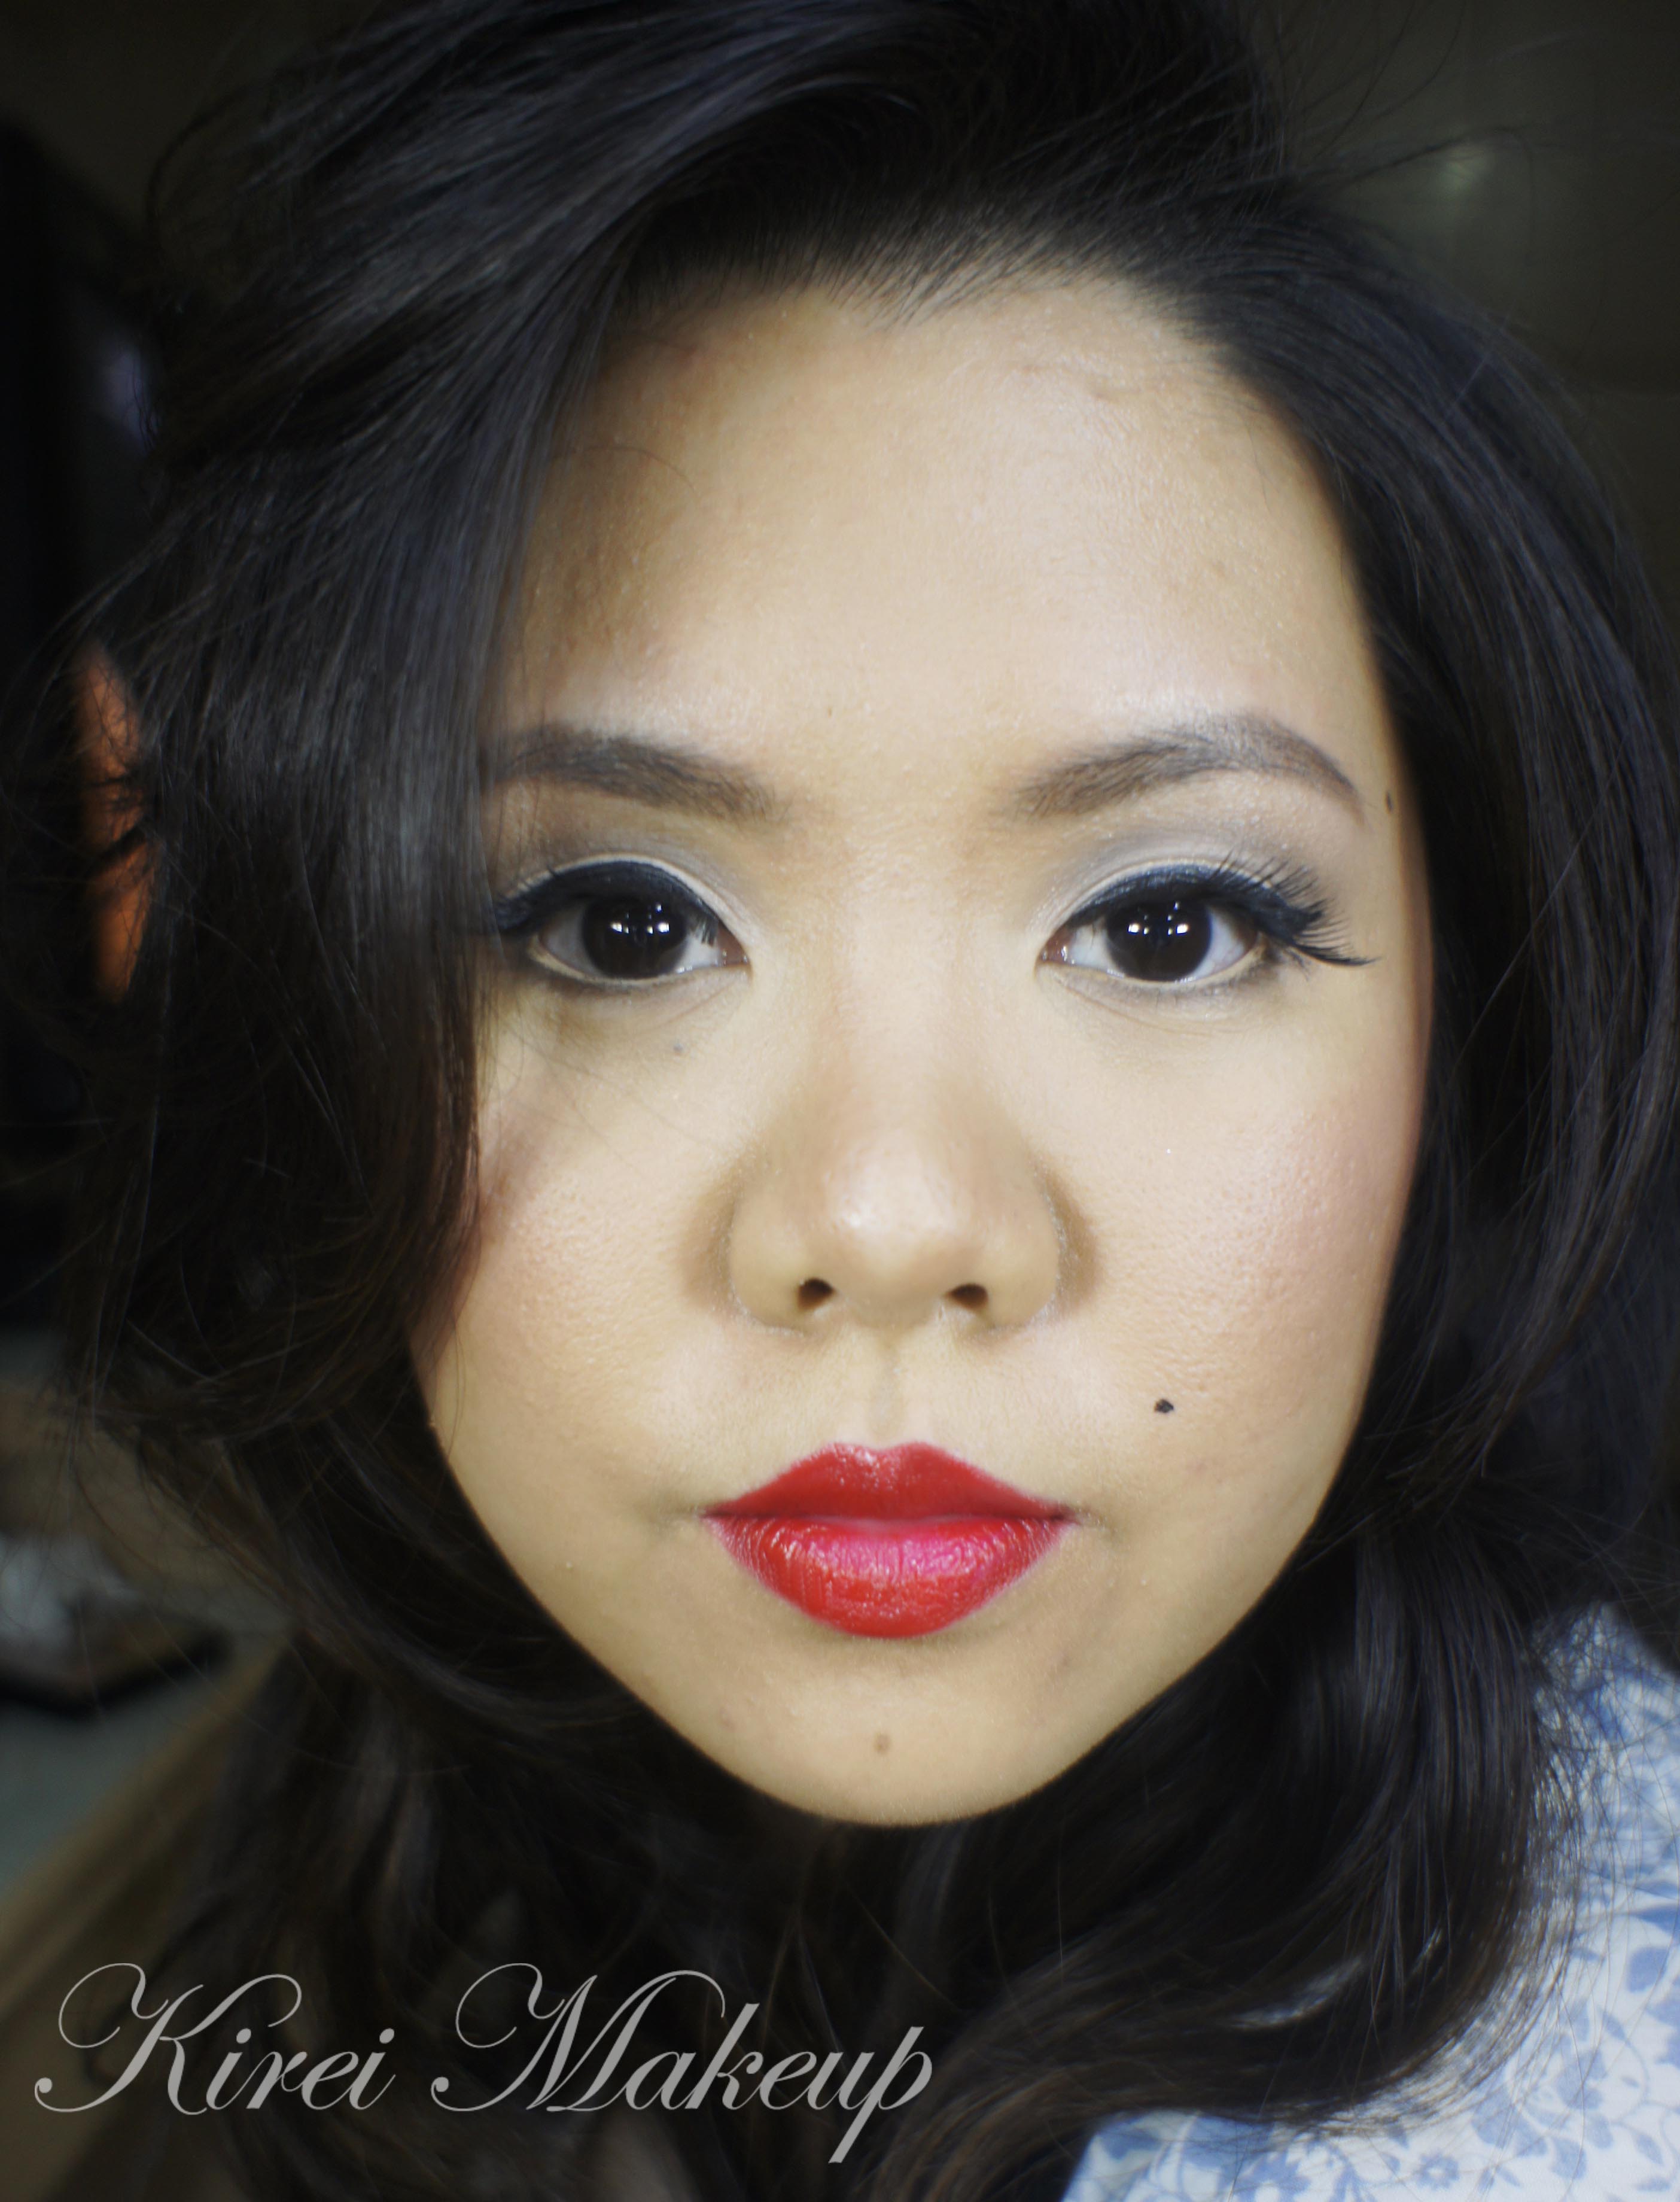
I actually wanted to post this Brow Tutorial video tomorrow, since I do have another post lining up to be published. However, I got excited since this is my first video ever using my own face. It took me a lot of years to actually pluck the courage to do a video. Anyways, the quality might not be as good as other great youtube gurus, but please take it easy with me. I’ll try to improve slowly, and I look forward to read comments from you. I did not talk or do a voice-over since I’m not comfortable doing that just yet. However, again, in the future when I get more comfortable in front of a camera, I’ll start talking or doing voice-over.

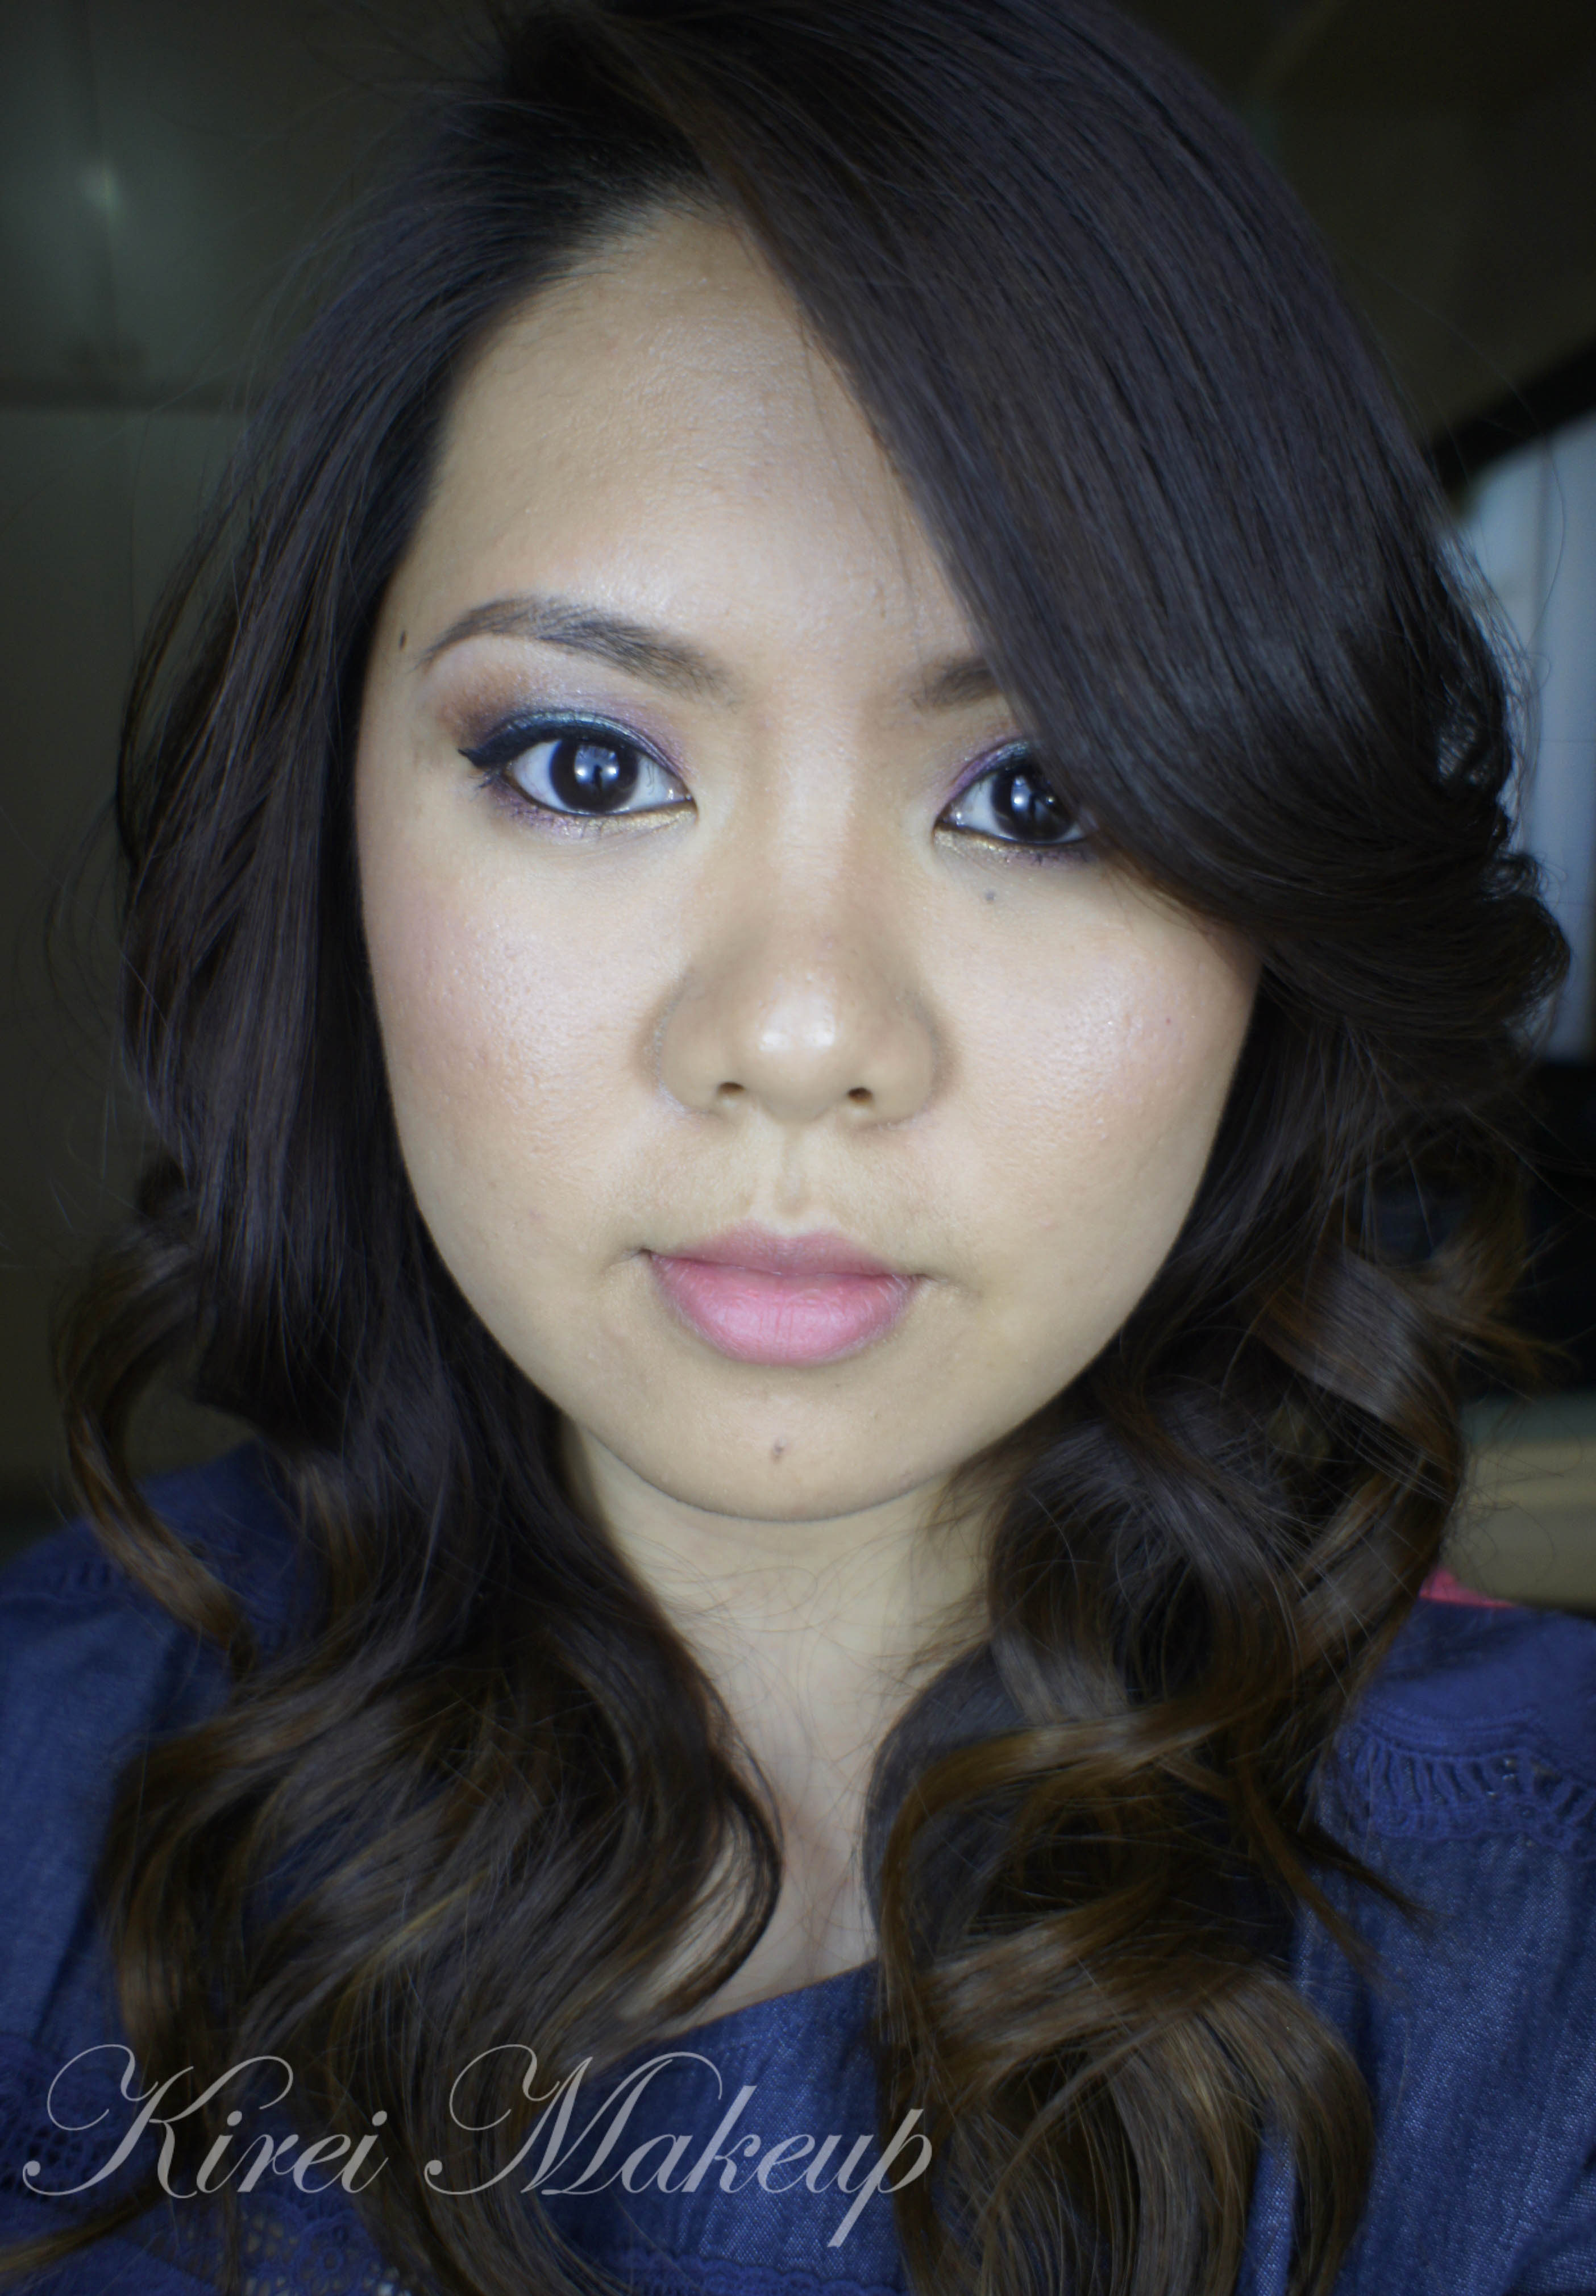
So, I asked on Instagram, what kind of tutorials would you guys like to see me do. The majority of the comments said to do a brow tutorial. I have done a brow pictorial before on my How-to Fill in Brows post, but I guess seeing picture and seeing me doing it is quite different. Just keep in mind that this is how I DO my brows.

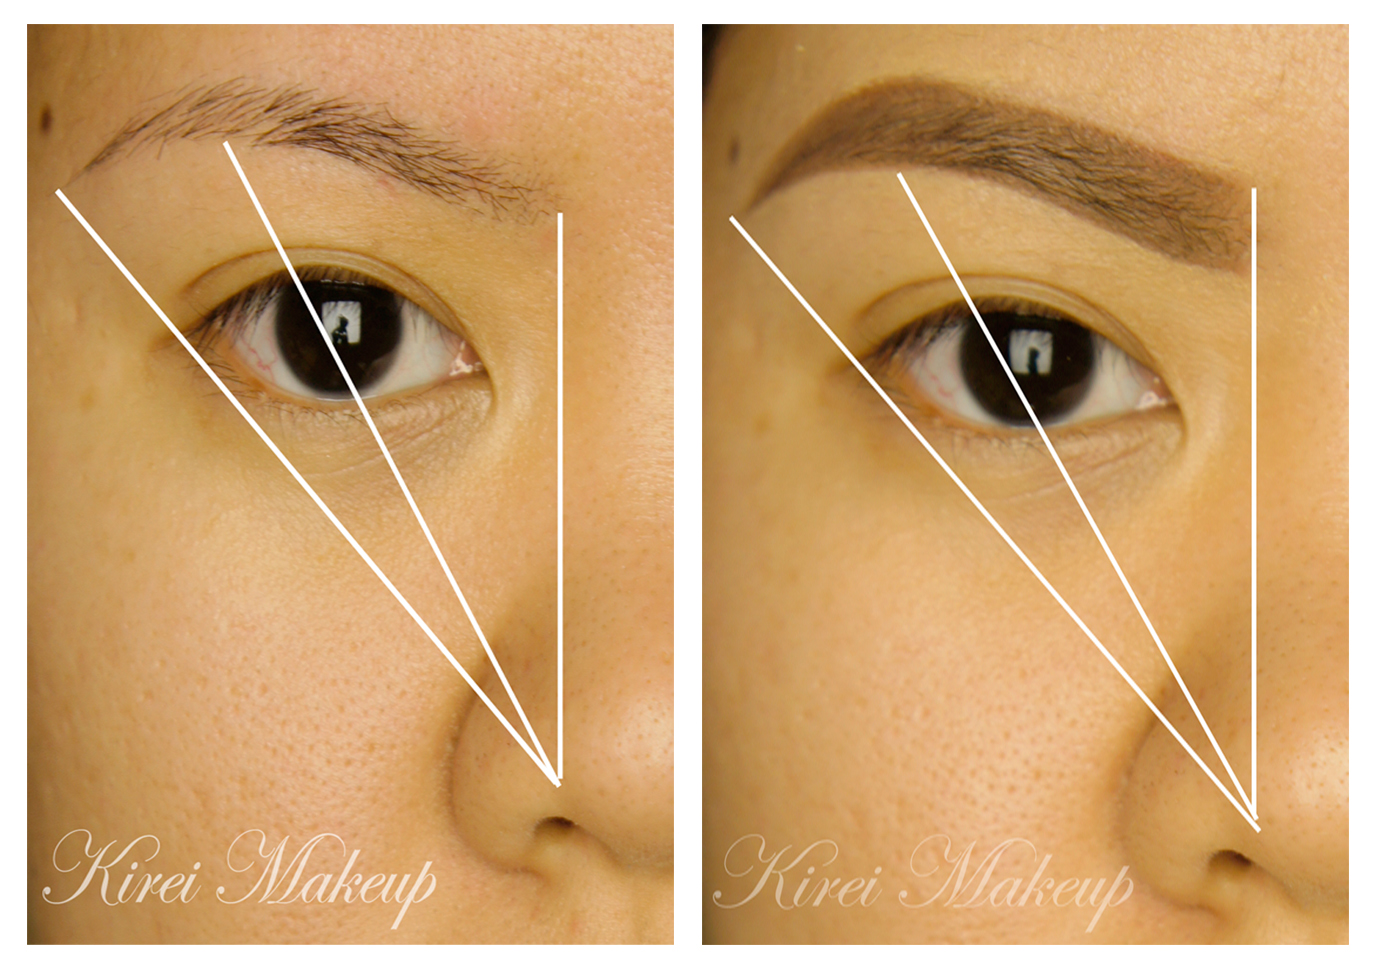
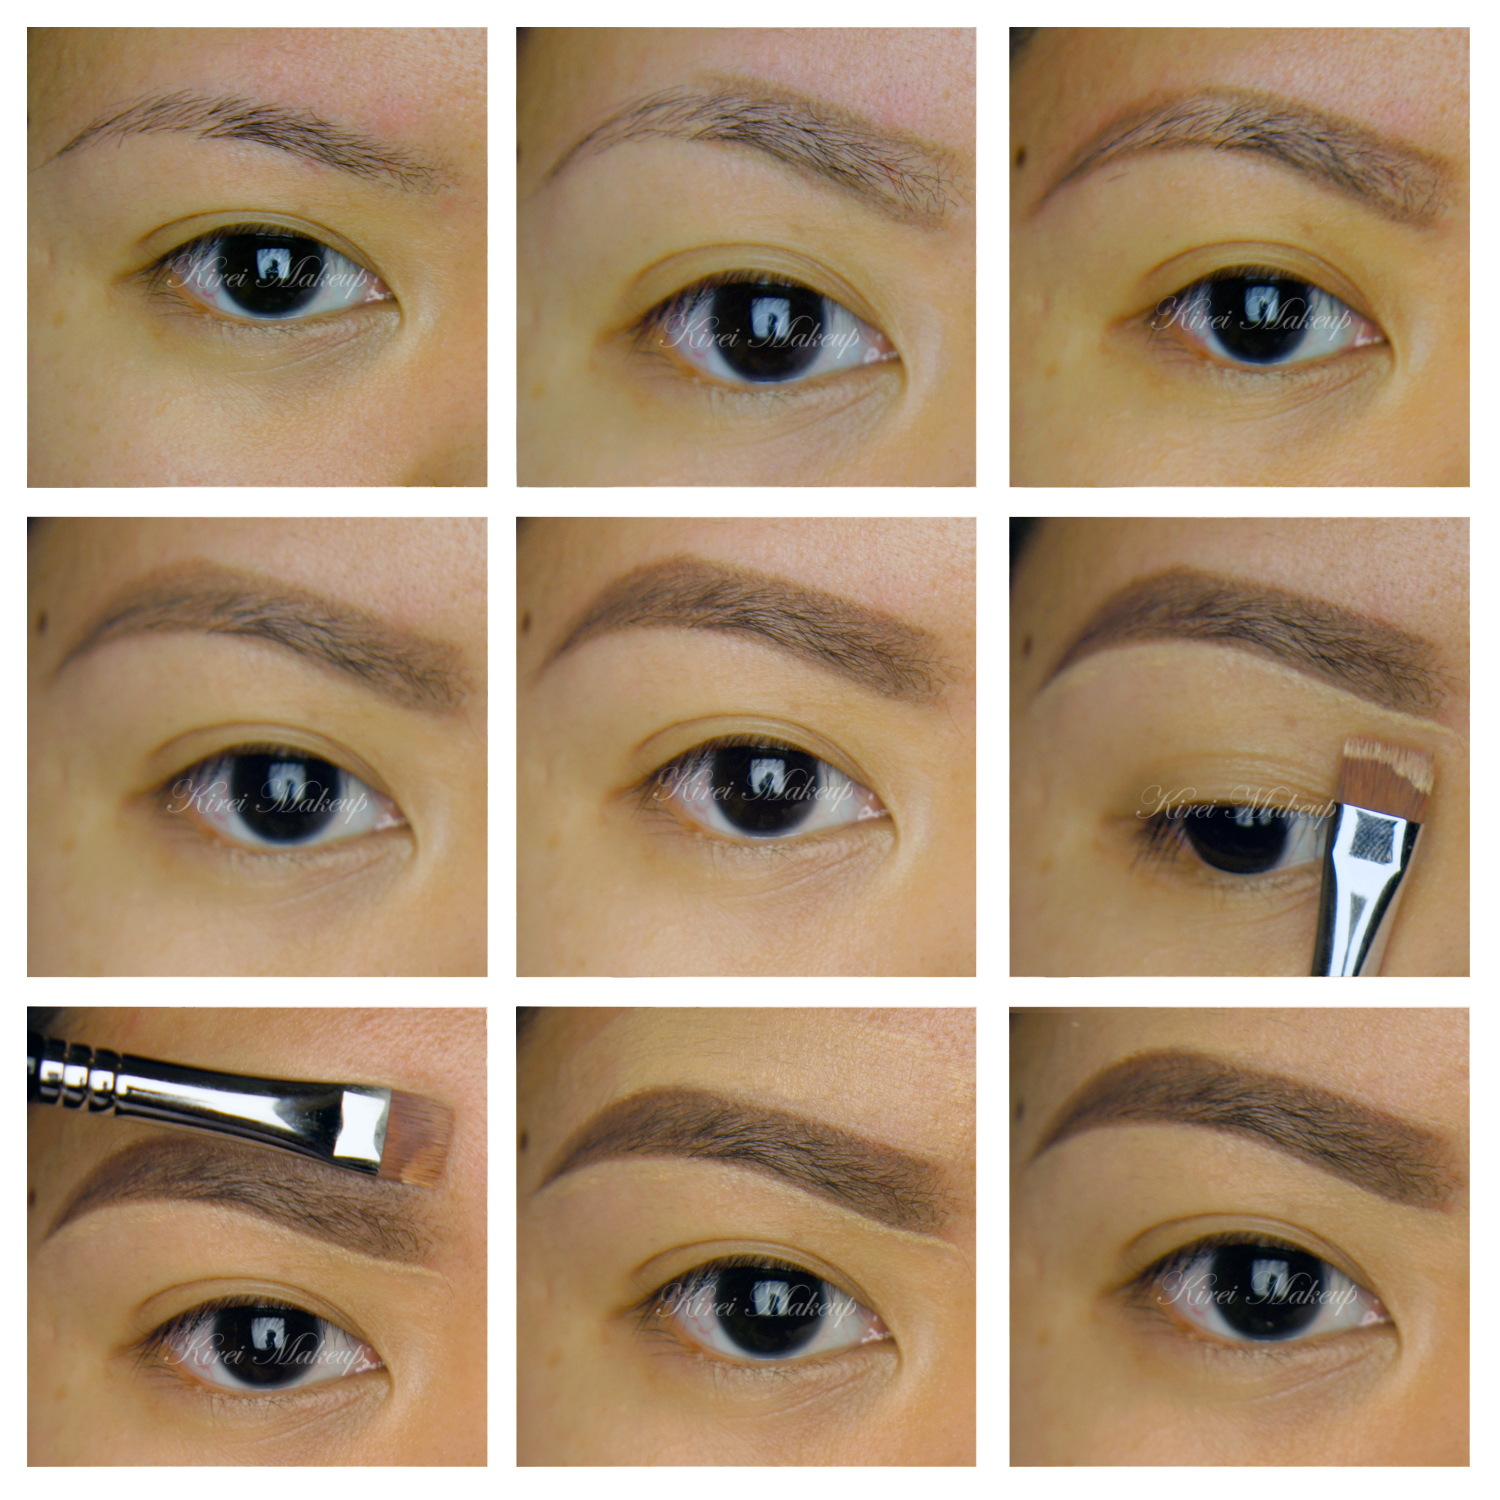
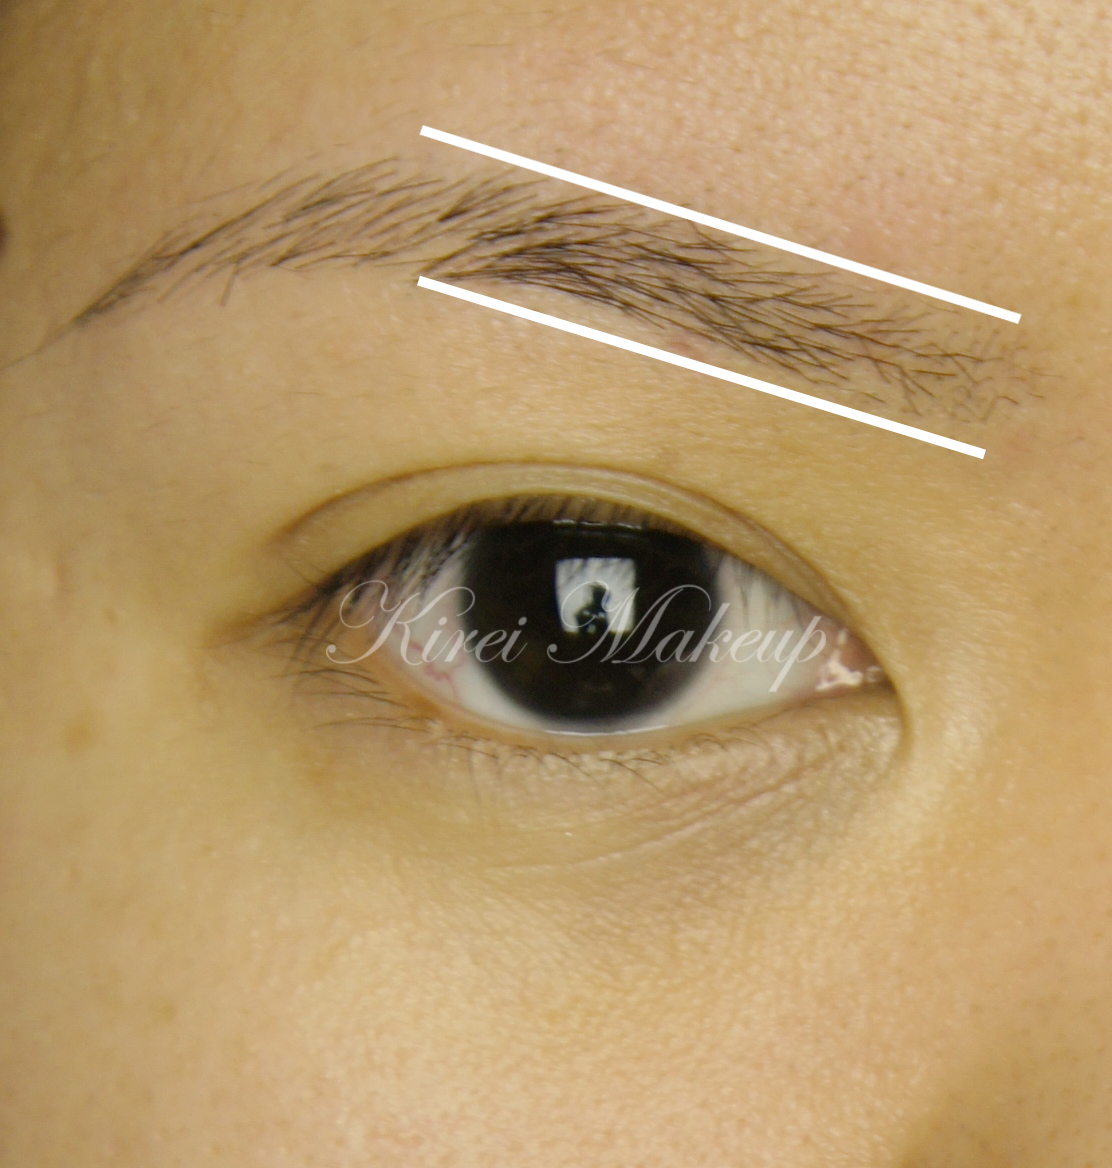
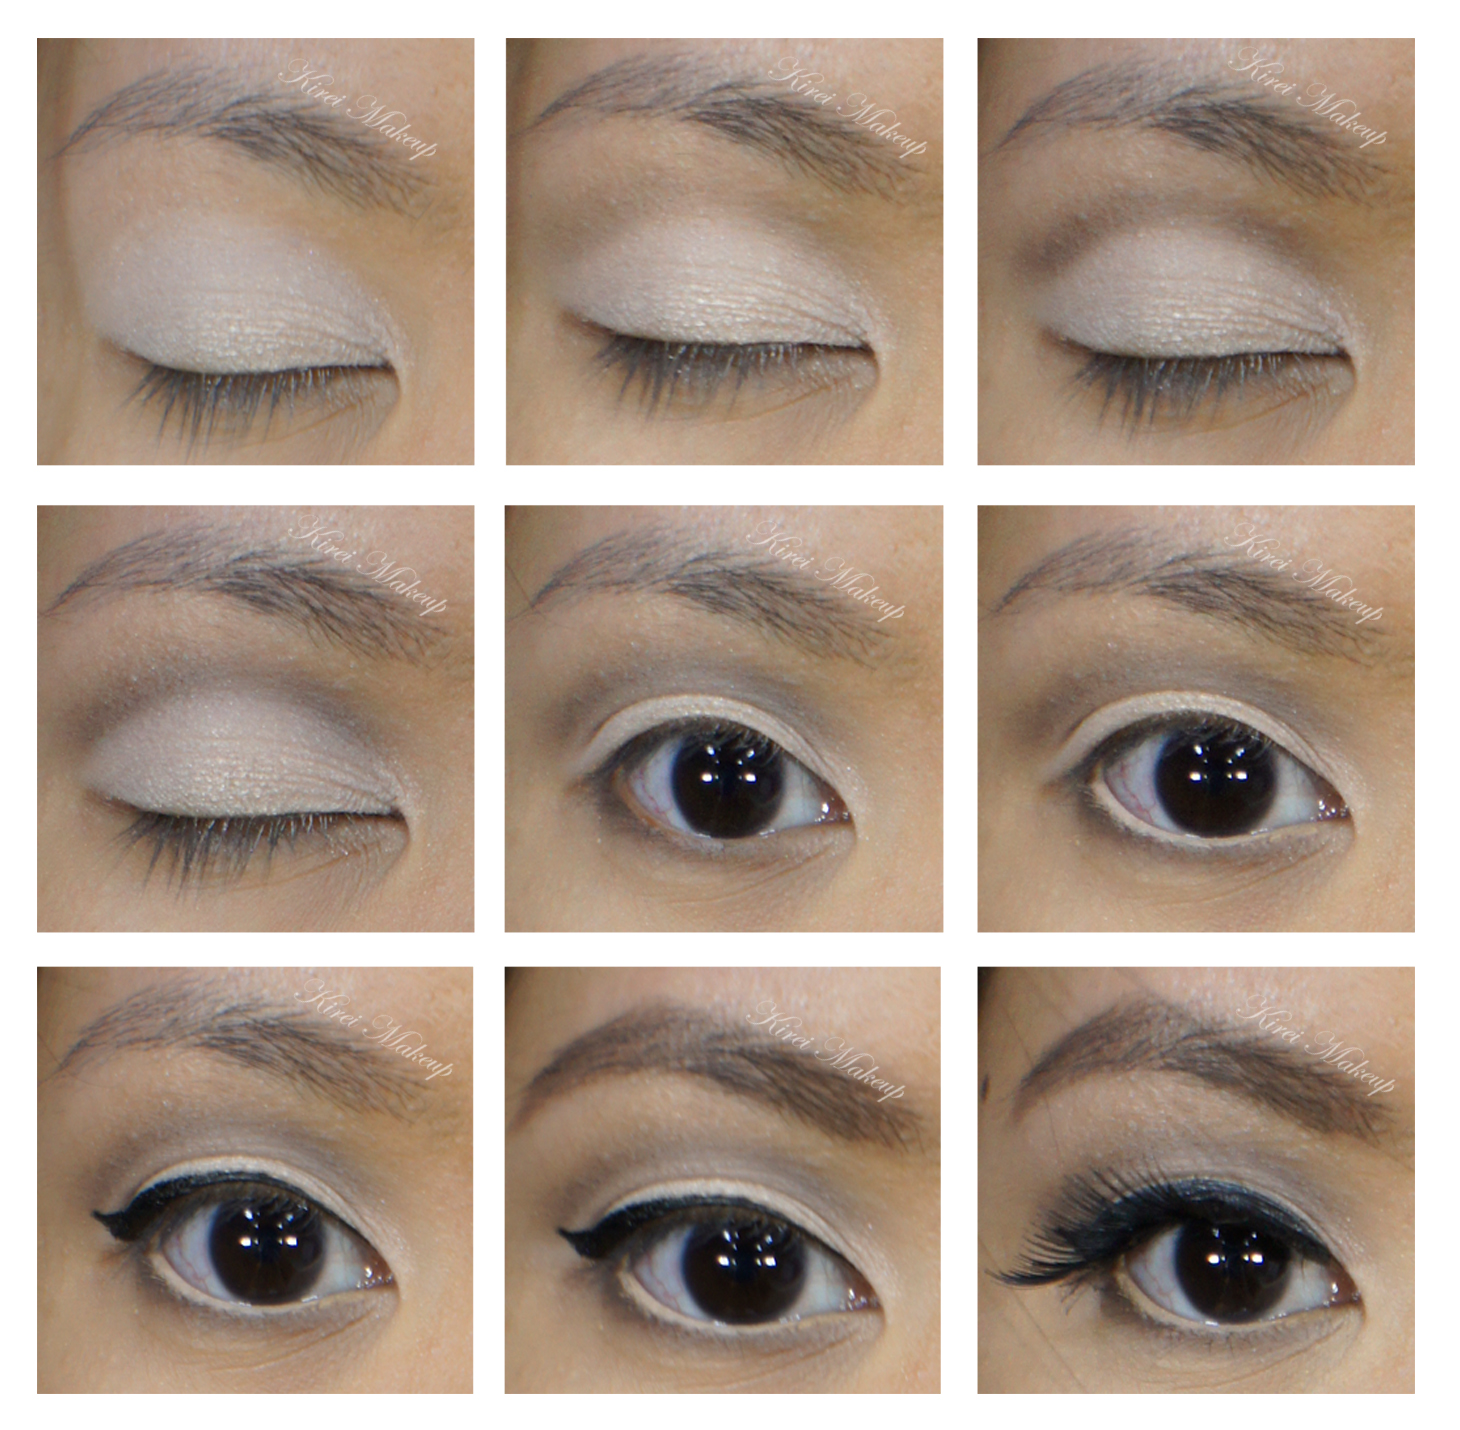
I cannot emphasize enough how each person has different shape and this might not work for you. However, what you can take from this tutorial is how I draw each hair individually. This is the most important part of filling in your brows. Light feathery stroke is the key! Try not to press too hard on your eyebrows to avoid making it look too thick.

For this tutorial, I assumed you already know or have gotten your brows shaped (waxed/tweezed/threaded). If you have not gotten your eyebrows shaped before, take a look at my Brows 101 post. If you are not allowed to shape your eyebrows, the best thing I can suggest is to trim your eyebrows using a clean spooly and a cuticle scissors. This way, you can see the brows’ shape, and fill it in lightly using brow powder, emphasize on LIGHTLY.

For a day makeup, I usually do something similar to my Shu Uemura Brow Pencil post.

Enjoy the video, and comments are welcome!


How to Fill in Eyebrows

Today’s post is a requested tutorial on how to fill in eyebrows. I was asked to do a tutorial on how I do my eyebrows for my tutorials, and how I get my edges sharp. So, here’s a tutorial on how to do it. I know I’ve done a few brows tutorial before with different products – pencil, eyebrow gel, and powder. However, in this tutorial, I’m using my all-time favorite, Anastasia Brow Wiz.

Let’s take a look at my before and after picture before we proceed to the how-to. The white lines in the pictures below is a guide on the location of the eyebrow’s head, arch, and tail.

Before:

  • Sparse eyebrow, esp. on the tail area.
  • Head of eyebrow is far from the side of my nose – this cause the bridge of my nose to look wider and bigger.
  • There’s no definite shape, thus not framing my eyes
  • Tail of eyebrows is thin, even though it ends at the right area.

After:

  • Head of eyebrow begins at the side of my nose – bridge of my nose will look slimmer. However, keep in mind that if the head of the eyebrows are too far into the center of the face, your face will look funny. Make sure it’s not too far out, nor too far it when drawing your eyebrows.
  • Eyebrows look fuller and thicker – helps with a youthful appearance.
  • Tail of eyebrow looks thicker and arch of eyebrows is more visible.
  • Eyebrow frames the eye nicely.

how to fill in eyebrows

For this look, I used:

1. Anastasia Brow Wiz – Ash Blonde and Brunette.

The reason as to why I used 2 different shade is because Ash Blonde is a perfect match to my eyebrow hair, but a tad too greyish and light for my hair. Brunette, on the other hand, is too warm (i.e. red) for my hair. Thus, I used 2 shades to create the perfect color for myself. Feel free to use just 1 shade. And yes, I do match my eyebrows to my hair color.

2. A flat edge eye brush from MAC – MAC 212.

3. Concealer – MAC Pro Correct/Conceal palette in Medium (you can use the yellow corrector to highlight under the brows, or your foundation instead).

mac pro correct/conceal palette

I assumed that everyone knows how to shape their brows, or get them professionally done. If you are a beginner, and you want to do your own eyebrows, please check my Brows 101 to see how it’s done. Remember not to overpluck! If you aren’t comfortable doing it yourself, please get them done professionally. .

How-to:

1. Brush your brows upwards using a spooly (clean mascara wand).

2. Using Anastasia Brow Wiz Ash Blonde, I framed my brows by creating parallel lines on the bottom and top of my eyebrows.

3. I continued my brow’s frame using Ash Blonde.

4. I filled my brows in using Ash Blonde.

5. Using Anastasia Brow Wiz in Brunette, I filled in my brows in the sparse area. I lightly drew each hair in to make the brows look thicker.

6. Using MAC 212 and concealer, I very lightly lined the line on the lower part of my eyebrow. Note how I used the straight edge part to create a clean line.

7. Using MAC 212 and concealer, I lined the upper part of my eyebrow. Note how I placed the brush flat against my skin.

8. Once I’m happy with how the concealer looked like, I blended the bottom part down towards my eyelid, and blended the upper part upwards toward my forehead.

9. Use a clean spooly/mascara wand, and brush your eyebrows lightly upwards.

how to fill in eyebrows

If you are confused as to what I was trying to say on Step 2, please take a look at the picture below. I created the 2 lines on the bottom and upper part of my eyebrows, just like how it’s indicated by the white lines. This way, you can get a sharp clean edge at the beginning of your eyebrows, if that’s what you prefer.

hd eyebrows

Peek a Blue

How’s everyone this weekend? I hope you guys had a blast, because I sure did! I went to Bali for a friend’s wedding. I also did her makeup/hair and couple of the other friends. It was a small, intimate wedding which was really awesome since usually weddings in Indonesia are grand and big. It was nice and refreshing. I also get to soak up the sun and enjoyed a lot of awesome seafood..bahahaha…

Anyhow, let’s get the tutorial started! I’ve been wanting to do something similar to this look (highlight in the middle of the eyes) with a more neutral shades, but oh heck why not use bright colors? 😀

You can obviously substitute all the colors below to whatever you want.

How-to:

1. I applied MUFE Aqua Cream Shadow no. 1 using a synthetic art brush on the eyelid and along the lower lashline.

2. Using a flat eyeshadow brush, I applied Burnt Red from the YSL Pure Chromatic quad no. 7. This eyeshadow turned out looking more like cranberry than burnt red when applied on top of black base.

3. I blended the edge using a fluffy blending brush.

4. Using another flat eyeshadow brush, I applied MAC Metallic Crush Pigment in Raindrop.

5. I used another blending brush to blend the lines where the 2 eyeshadows met.

6. Using an angled eyeliner brush, I applied UD Half-baked eyeshadow on the inner corner of the lower lid, and Burnt Red on the outer corner of the lid.

7. I lined my waterline and tightline using L’oreal Voluminous Smoldering eyeliner.

8. Along the upper lashline, I created a winged liner using Kate Sharp eyeliner.

9. I filled my brows using a mixture of MAC Omega and MAC Brun.

10. I curled my lashes using Shu Uemura lash curler and applied L’oreal Double Extender Curl mascara on both top and bottom lashes.

11. I also applied YSL Touche Eclat right underneath my brows.

blue makeup

12. I applied MUFE HD foundation on my face using a foundation brush from the center of my face and blending it outwards.

13. I applied YSL Touche Eclat on the bridge of my nose and underneath my eyes along to my cheekbones.

14. I contoured the sides of my nose and on the hollows of my cheeks using MAC Shadowy.

15. I applied Chanel Blush de Horizon on my cheeks.

16. I finished the look by applying YSL Rouge Pur Couture no. 7 lightly using a lip brush on my lips.

ysl pure chromatics no. 7

Marylin Inspired

Hellow! I’m back this week with a 50s inspired makeup! Actually there’s a beauty blogger challenge this month in which the theme was Dazzling like Marylin. I’m not sure if I’m gonna join the challenge, I was just running out of some inspiration for tutorials, thus why I made this tutorial..hahaha.. 😛

Anyways, as we all know Marylin Monroe is an icon. The first image that comes to mind when someone said Marylin is probably her gorgeous smile, red lips and those sleepy eyes, and obviously her blonde hair. OBVIOUSLY, I’m not Marylin, nor do I look like her. This is an inspired makeup, not supposed to look exactly like her. I’ve to adjust the makeup to suit my face.

I wanted to do the falsies with individual lashes, but I’ve run out of it, so I had to use this one with long wispy corner at the end from Make Up For Ever. The brows in the 50s are more triangular shaped, so I had to re-shape my brows a little since mine aren’t angular.

How-t0:

1. I applied MAC Blanc Type all over my eyelid using a flat eyeshadow brush.

2. Using a clean blending brush (MAC 217), I applied MAC Omega just slightly above the crease lightly.

3. Using a small blending brush, I applied MAC Brun on the crease.

4. With a MAC 217, I blended out MAC Brun on the crease so it blends out.

5. I applied MAC Brun on the lower lid using a small angled eyeliner brush.

6. For the waterline, I applied MAC Chromagraphic eyeliner in NC30.

7. I lined my upper lashline using Kat Von D Trooper liquid liner.

8. Lashes are curled and I applied L’oreal Voluminous Carbon black mascara on both top and bottom lashes.

9. I applied Make Up For Ever falsies 125 on upper lashes.

10. I filled my brows using a mixture of MAC Omega and MAC Brun, filled them in with an angled brow brush.

cat liner

11. For the face, I applied Make Up For Ever Pro Finish in 118 all over my face using a round kabuki brush from Sigma.

12. For under the eyes, I applied MAC studio finish concealer in NC30.

13. For contour, I used MAC Blunt blush on the hollows of the cheeks, temples and sides of the nose.

14. For the cheeks, I applied NARS Matahari on the apples lightly. Blush intensity is adjusted after I applied red lips to ensure my face does not look washed off.

15. For the lips, I filled it in with MAC Redd lipliner and applied OCC Stalker lip tar on top of it.

16. For the fake mole, I dotted my face using Kat Von D Trooper eyeliner.

marylin monroe makeup

Photo below is without the falsies. Quite wearable, don’t you think? For parties, may be? 😀

marylin monroe makeup