IMATS Toronto 2015 – Recap

As you all know, I went to IMATS Toronto on Saturday, and I had a blast! I’ve been to the IMATS since 2010, but last year I was back in Jakarta, so I really wanted to go this year. Fortunately, I was able to attend it with N, and I’m glad I went this year. I managed to meet my role models, my mentors, and couple friends! The meetings were even more amazing than the shopping experience!

IMATS Toronto 2015
IMATS Toronto 2015

So, this year, the IMATS were held in the North building of the Metro Toronto Convention Center, which is unusual since in the past it was held in the South building. The space was a tad smaller, but it was still pretty good. There were a lot of people who came to the tradeshow, and there were long queues everywhere! I came around 10am, but looking for parking was challenging since there were Blue Jays game and University fair. After finding parking, I checked in at around 10.30, and already long lineups as far as the eyes can see! NYX, MUFE, Benefit, MAC, Morphe, Crown, Nigel, Frends booths were packed!

Anyways, this year when I posted a picture on Instagram regarding IMATS, Michael Key commented on the picture and I promised him that I would look for him. I managed to see him (more like hunting him), and took a picture with him! If you guys don’t know who Michael Key is, you should know! Michael Key is 2-time Emmy Winning makeup artist, executive of IMATS and Makeup Artist Magazine. He is the man behind IMATS, so of course I have to take a picture and say hi to him. Such a great guy, so friendly and humble.


IMATS Toronto 2015
Michael Key & me

Then, I managed to see Kevin James Bennett while I was at Eve Pearl’s booth. As you can see on the photo collage below, I was fan girl-ing at KJB. I was like “I’m a big fan of your work!!!” *laughs* Eve Pearl was there and told him “she’s your fan!”. Unreal! I mean, KJB and Eve Pearl are like the big names in the beauty industry! I still can’t believe I managed to talk to them, and took pictures with them. It felt so surreal! They were giving out tips and tricks, chit chatting with the attendees.

Kevin James Bennett and Eve Pearl are always in the IMATS Toronto, so if you missed them this year don’t forget to look for them next year. KJB and Eve Pearl are Emmy Winning Makeup Artists, they KNOW what they are talking about! All of their classes are very informative, and they are so kind, always willing to answer questions.

Kevin James Benett
Kevin James Benett & Eve Pearl


IMATS Toronto 2015
Eve Pearl Makeup Demo

All the makeup workshops were amazing! I cannot say enough about these classes. I only managed to sit in on 2 classes this time, but it was really fun and informative. For beauty, I went to Eve Pearl makeup demo. She started out by giving us tips on how to make it in the industry, how to pack our makeup kits and how to work on clients. Then, of course, she proceeded by showing us her famous “Reverse Contouring” technique. I live tweeted during the workshop, so check out my twitter!

Eve was given an hour for her class, and within 45mins she managed to do 4 makeup while talking to us and answering our questions. I only took pictures of 3 of the attendees, but there were actually 4 whose makeup was done by her. She showed us how to do her “Reverse Contouring” technique on all skintone, just by using her Pro kit. I’ll try to apply this technique on myself in the future, so wait for the post!

IMATS Toronto 2015
Gregory Arlt

I wanted to attend Gregory Arlt beauty class, but I didn’t manage to do so since I wanted to see The Strain demo. So, I do apologize for being unable to share any tips he shared. I know a couple other bloggers who attended this class, and they might have tips on their blogs! Anyways, I managed to snap this picture of his class moments after The Strain demo, and before I saw Michael Key walking around.

The workshop that I really wanted to attende to was “The Strain” Character Demo done by Sean Samson and Neil Morrill. This demo took 1.5hr. Sean and Neil showed us how they applied the Foam Latex pieces, they also demonstrated how they colored the pieces. It was pretty great since N and I loved the show, and we really enjoyed the demonstration. They told us that during the filming, these prosthetic pieces took around 3hr to be put on the talent.

The Strain makeup
The Strain Demo
The Strain creature
The Strain Demo

Besides the workshops and meeting all these amazing makeup artist, I walked around to take a look at what the booths offer. I absolutely love how some of these amazing makeup artists took their time to talk to the attendees. As you can see on the pictures below, Sebastien Tardif and Eve Pearl were showing attendees how to correctly apply their products to enhance their beauty!

Of course there would be lots of body painting around the IMATS. Pretty, colorful, and meticulous. These body paintings took hours to complete. There were some demo on how to cover tattoo, and prosthetic application as well in some of the booths.

IMATS Toronto 2015
Sebastien Tardif & Eve Pearl
IMATS Toronto 2015
Body Painting

I, obviously, have to do some shopping around! There were some good deals on the products. I bought a smaller version of the illustrator palettes, scabs, liquid latex, and Wolfe face paint from Crown Brush/Jordane Cosmetics. I bought Eve Pearl’s Pro Kit, Invisible powder, powder puff, eyebrow razor, and finger palettes. Eve really gave great discounts! The powder puff was only $1, the Pro kit was only $100! What a steal!

Other than that, I bought a couple of spfx brushes from Bdellium, another palette from Crowne, and some other miscellaneous stuffs – MAQPro cream corrector and primary color from MUSST, mink lashes from Esquido, and color switch along with shadow shield from Nigel.

IMATS Toronto 2015
IMATS Toronto 2015 Haul

Halloween #2 Jack-O-Lantern Makeup

Are you ready for Halloween?! I sure am! So, for the second installment of my Halloween series, I decided to do a Jack-O-Lantern makeup tutorial. WHY you ask? Well, that’s because Jack-O-Lantern aka pumpkin carving is very popular in Canada during Halloween month. My sister and I actually love carving pumpkins! We love the scary face ones!

JUST FYI – I am accepting Halloween makeup jobs! If you need a makeup artist to do your scary makeup, I’m available! Contact me through email jilly@kireimakeup.com, or line – KireiMakeup!

Anyways, for this tutorial, you need:

1. Orange face paint (water or cream) – I mixed red and yellow cream face paint to create the orange base. I used a local Indonesian brand called PAC.

2. Black water based face paint – you can use cream too if you prefer cream product, or even an eyeliner.  I used Snazaroo.

3. Eyeshadow – matte black, matte orange, matte yellow for highlight and contour.

4. Brushes – I used mostly synthetic artist brushes.

  • For large area, I used an angled brush (similar to MAC 263 but slightly bigger).
  • For details like the lines and contouring, I used the Rigger type (similar to MAC 209, but with longer bristles)
  • For highlight I used a blending brush, like MAC 217

5. Contacts (optional) – you don’t have to use contacts, or you can use a brighter one than mine. I could only find this honey colored ones from Fresh Kon, since it’s pretty hard to find specialty contact lenses here in Jakarta.

halloween tutorial

How-to:

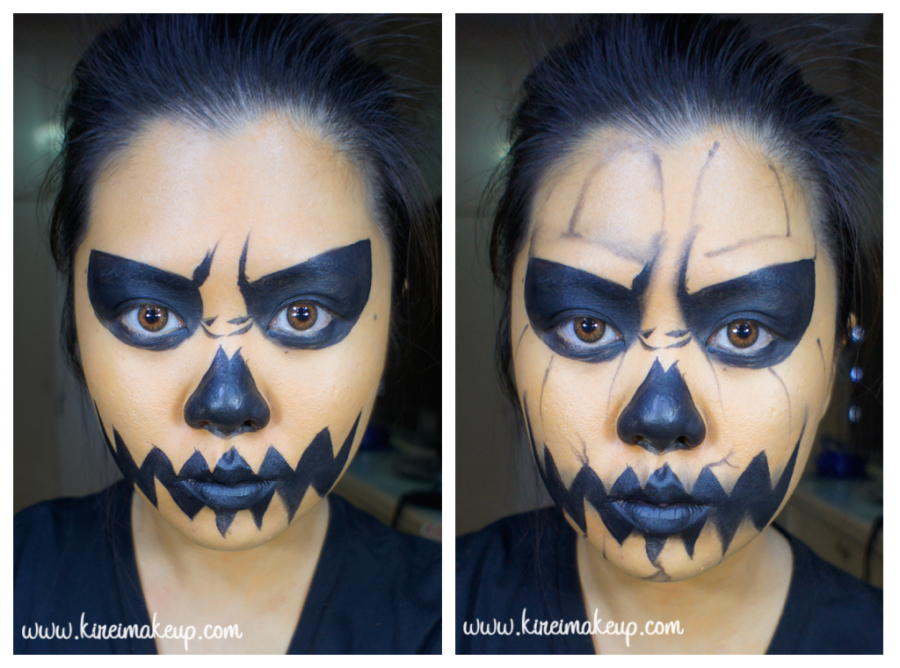
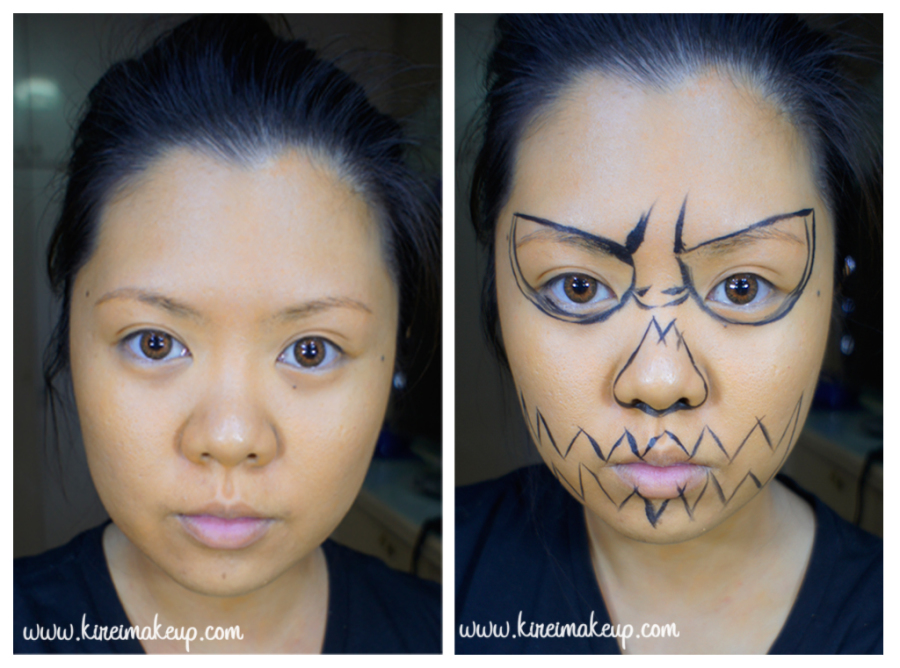
1. I applied an orange cream-based face paint all over my face using a wedged sponge. Lightly stippled it all over my face, neck, and ears for an even coverage.

2. I outlined where I want the mouth, nose, eyes, wrinkles to be using black water-based face paint.

halloween makeup tutorial

3. I filled in the areas on step no. 2 with black face paint.

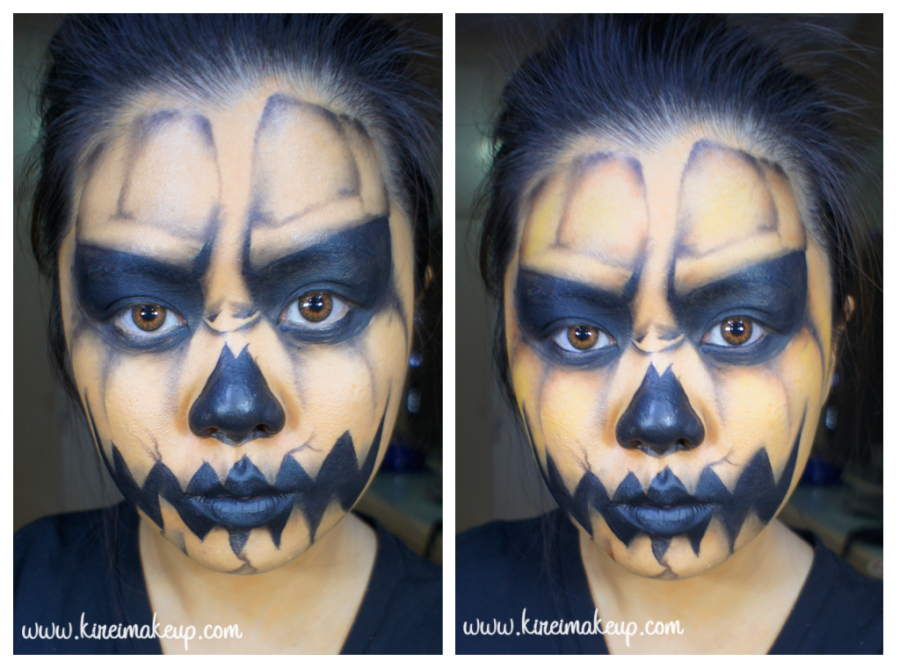
4. Then, using an eyeliner brush and a matte black eyeshadow, I lightly create lines all over the face to create the crease of the pumpkin. I also created some cracks near the mouth area.

pumpkin king makeup tutorial

5. Using a small blending brush, I blend out the edges of the lines. I also carefully added some shading on the areas where I want it to look like it’s receding.

6. On top of those black shadows, I applied a matte Orange eyeshadow (I used the orange from Sleek Makeup Ultra Mattes V1 palette).

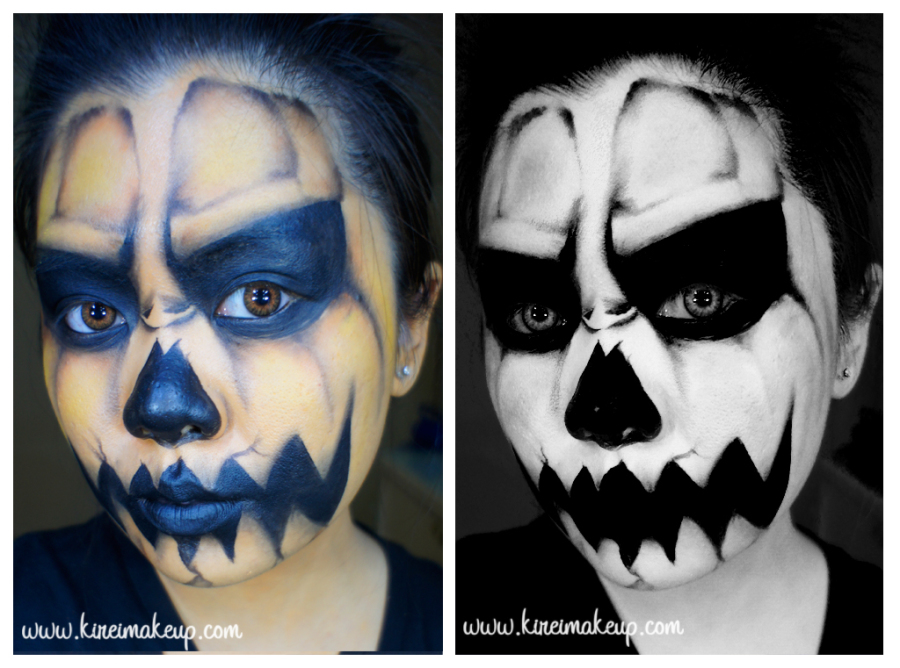
7. In the area where I want it to pop out a bit more (to mimick the shape of pumpkin), I applied a matte Yellow eyeshadow (from Sleek makeup Ultra Mattes v1 palette) with a blending brush. I put it in the middle of the “squares” on my forehead, above the eyebrows, on my cheeks area. I really want to make these areas to poof out a bit more.

creepy jack-o-lantern face paint

Voila! You are done! Looks pretty cool in black and white, but looking more like a scary clown. I love how the orange/yellow contour/highlight really helps with the whole pumpkin look!


Green Snake Inspired

A post for Chinese New Year! I know this year is the year of Snake, and when I was a kid I remembered having to watch the Tale of the White Snake. It’s a great story, and I remembered how the White Snake has a little sister, the Green Snake. The Green Snake supported her sister and saved her from danger and bla bla bla… Anyways, if you’re interested in the story, you can find it in Wikipedia 🙂

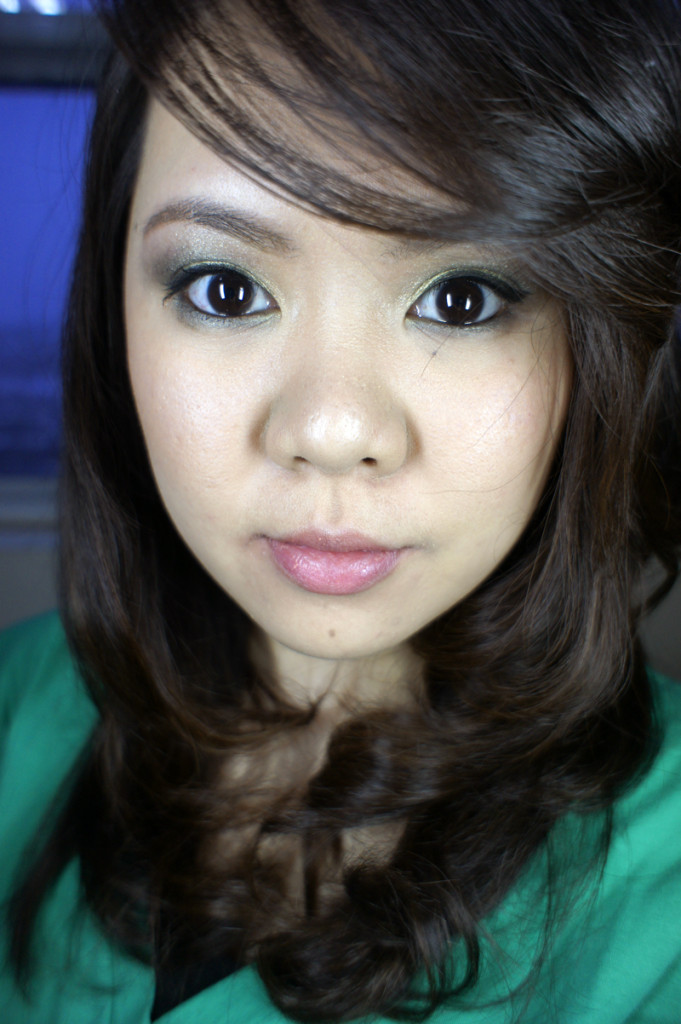
So, today’s tutorial is a bit tinker bell-ish, a bit green snake-ish..I don’t know. I just find the colors that I used to be really quite beautiful. I do have to mention that the MAC Crush Metal Pigment that I used in this tutorial is probably not available anymore, as well as the dark green eyeshadow – MAC Grey Range.

How-to:

1. I applied Chanel Illusion D’ombre in Epatant all over my lid using my fingers.

2. Using a flat eyeshadow brush, I applied the green pigment from MAC Crush Metal Pigment Stack 2!

3. Using another flat eyeshadow brush, I applied MAC Grey Range, blending it to the green and up on the crease.

4. I used a blending brush to blend any harsh edge, re-apply MAC Grey Range, blend again, apply again, blend again until I reached enough intensity to my liking.

5. I lined my waterline using L’oreal Voluminous Smoldering eyeliner, and then applied winged liner using an angled brush and gel eyeliner from Make Up For Ever Aqua Black.

6. I curled my lashes using Shu Uemura eyelash curler and applied L’oreal Voluminous Carbon Black mascara on both top & bottom lashes.

7. I filled my brows using a mix of MAC Omega + MAC Brun using an angled eye brush.

green eye makeup

8. On my face, I applied Urban Decay Naked Foundation using Shiseido foundation brush.

9. Under my eyes, I applied Smashbox Full Coverage concealer stick blending it using a concealer brush.

10. I contoured my cheeks lighty using a face fan brush and Smashbox contour powder.

11. Using a blush brush, I applied MAC Peaches on the cheeks.

12. On the lips, I applied Revlon Just Bitten lip balm in Charmed.

tinker bell inspired eye makeup