KVD Shade & Light Eye Contour Palette Review

Finally, eh?! About time I write a little something about my current favorite neutral palette. I’ve used it on my KVD Shade + Light post, and I absolutely love it! So, here is my KVD Shade & Light Eye Contour Palette review! If you are a makeup artist who works in TV/Film, this palette is one of the best product you can have in your makeup kit. The palette consists of only matte eyeshadows with neutral, cool and warm undertones!

This KVD Shade Light eye contour palette is also a great investment for everyone and makeup artists. It really is a great palette for pretty much anything involving the eyes. It can be used as base, eyeliner, contour, brows, transition shade, etc. For CA$55, you get 12 eyeshadows ranging from light to dark. This palette is one of the best investment I’ve made!

I do apologize for missing last week, if you followed me on Instagram, you’d known that I was having a terrible sinus allergy, a couple eyelash extension jobs, and a new puppy! More on that on Instagram!

kvd shade light eye palette

What is KVD Shade & Light Eye contour palette?

“It’s specially-designed for eye contouring, a groundbreaking technique once used only by beauty experts to define and enhance eyes. This palette features a gorgeous, versatile array of true contouring shades, arranged into three color quads—neutral, cool, and warm—to flatter every skintone.

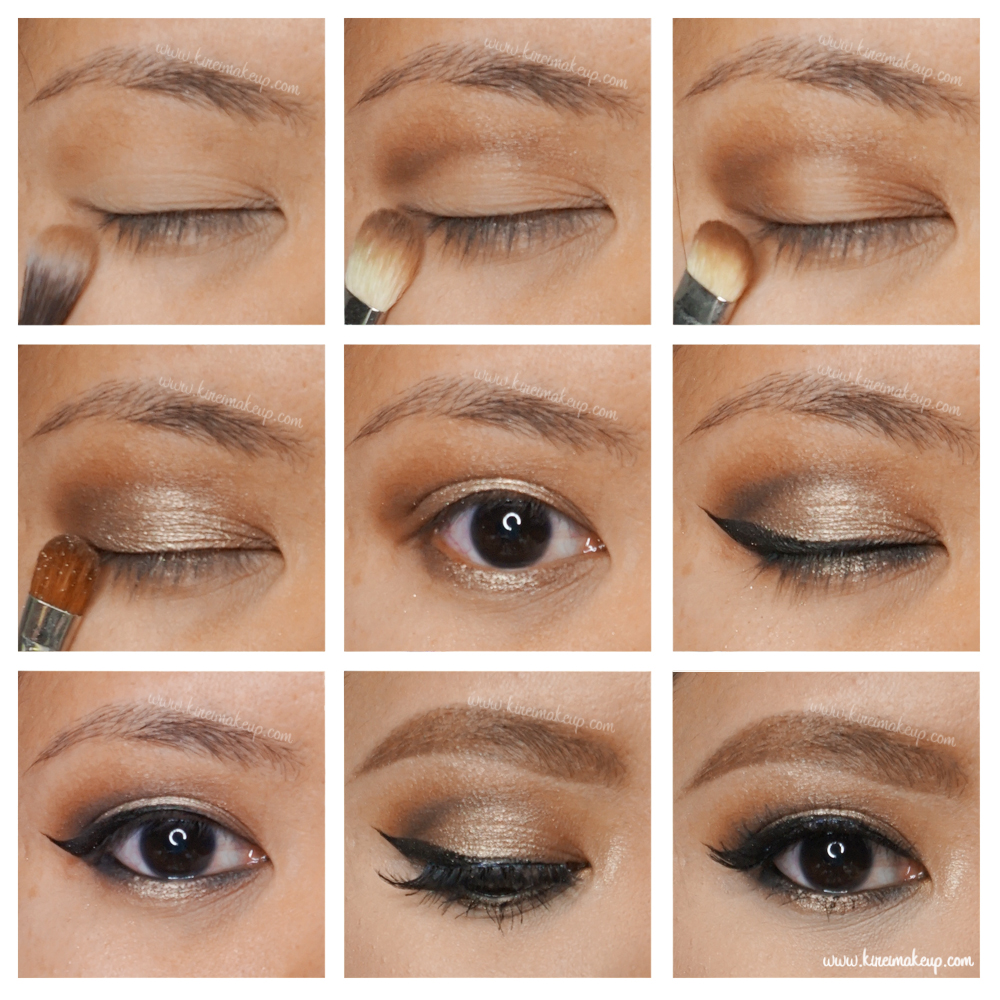
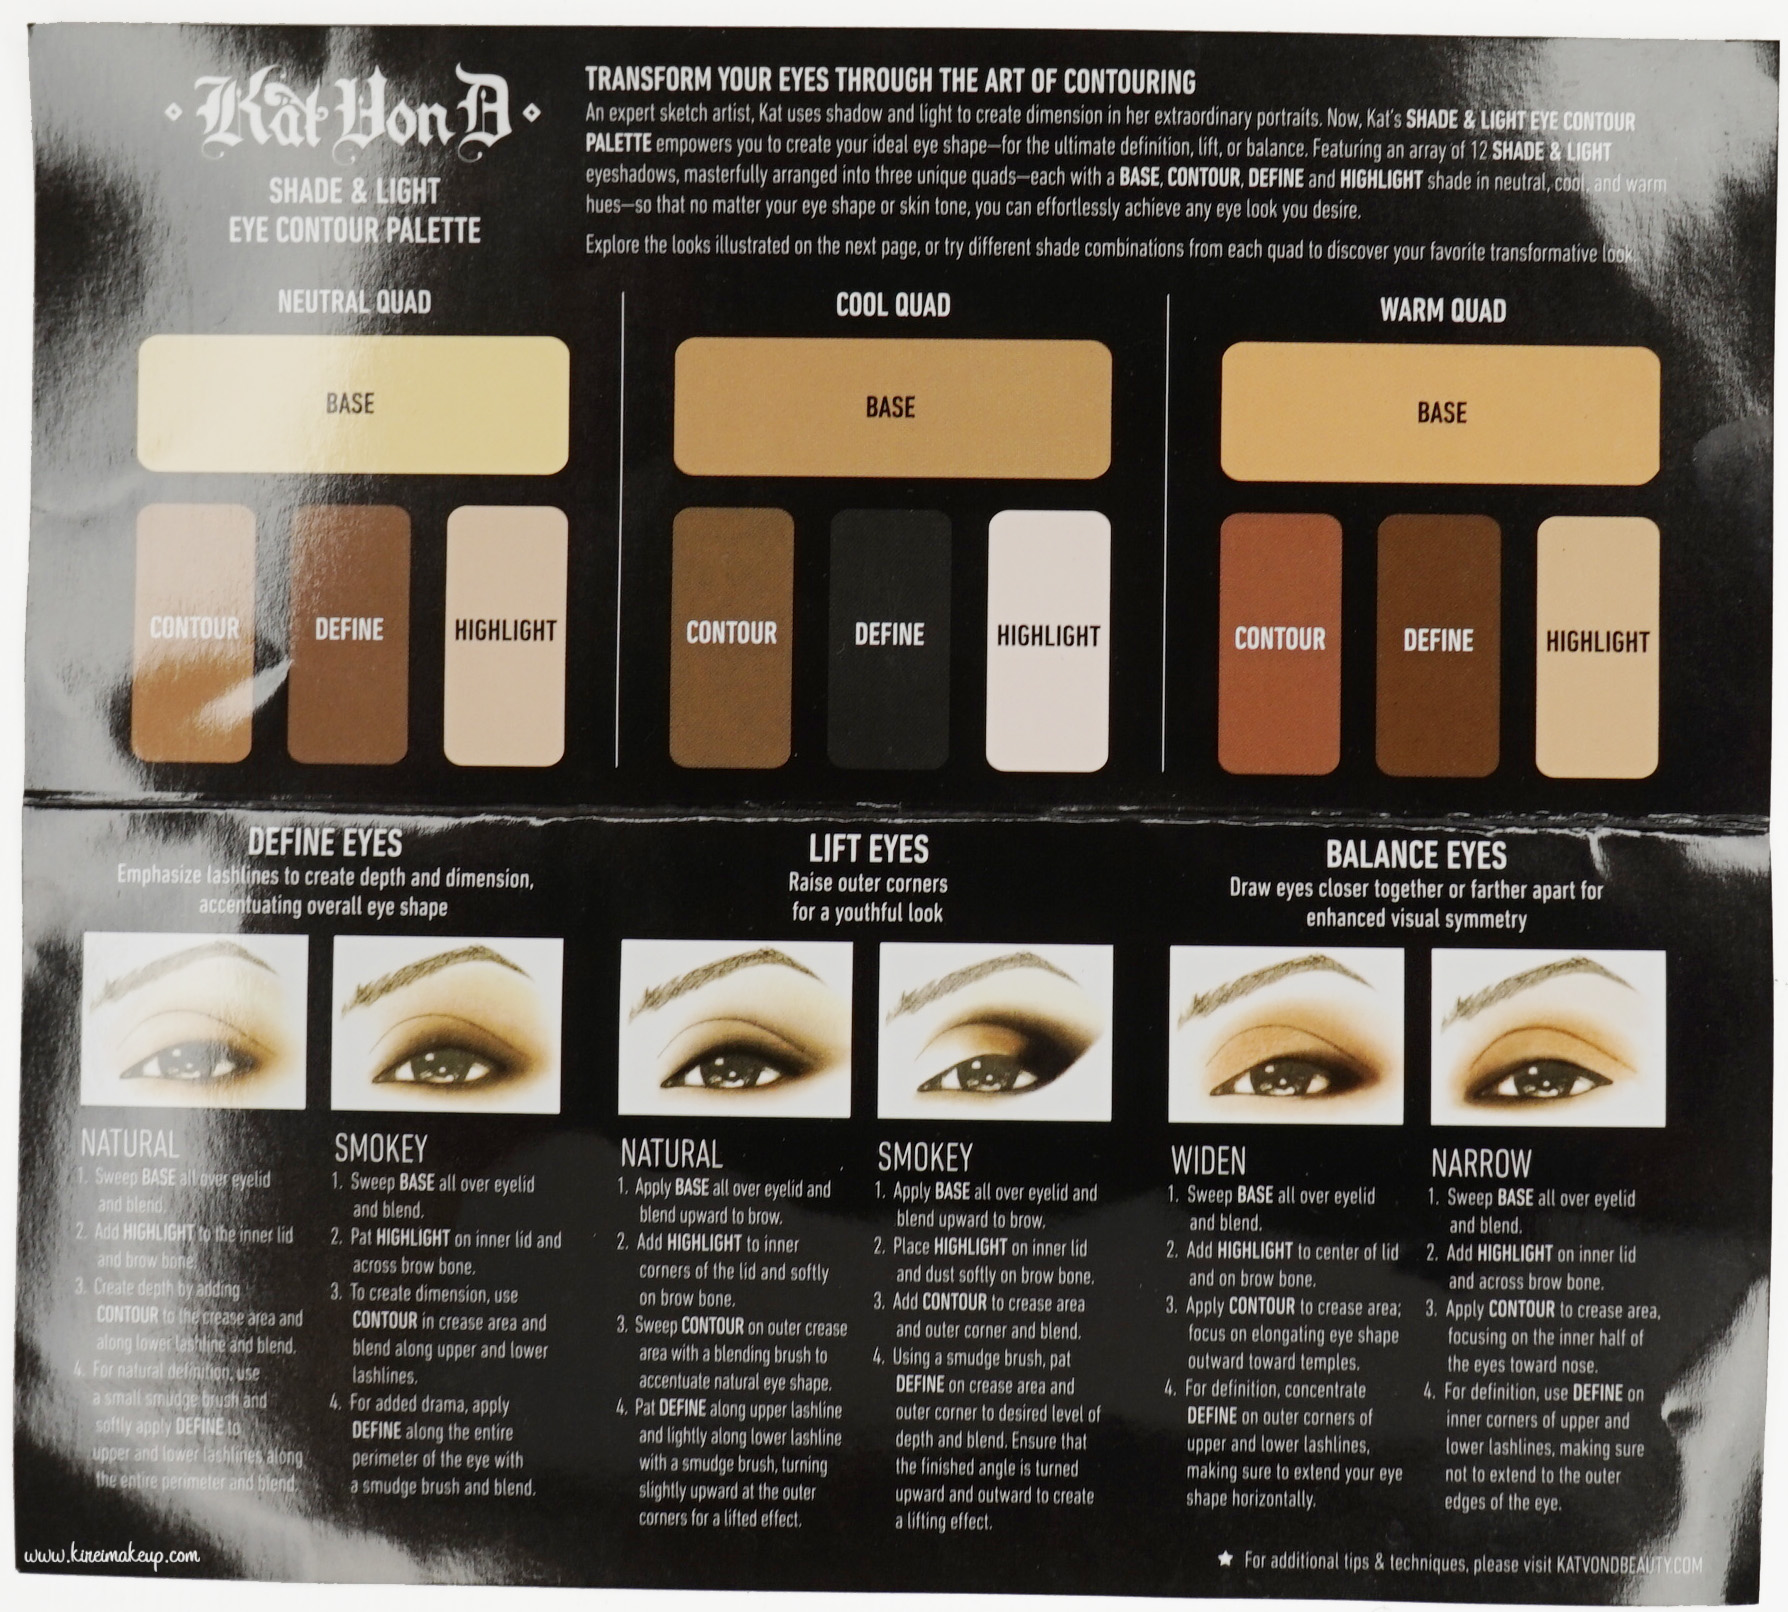
Three large base shadows are arranged above three coordinating powders for contouring, defining, and highlighting. The palette includes an easy-to-follow contouring guide with step-by-step instructions for creating three different eye-opening techniques. Each velvety powder is blendable and buildable, and it features Kat Von D’s signature high-pigment, long-wear eye shadow formula, created to deliver rich color that lasts all day and all night.”

Sephora, 2015

kvd shade light eye palette

Packaging & Content

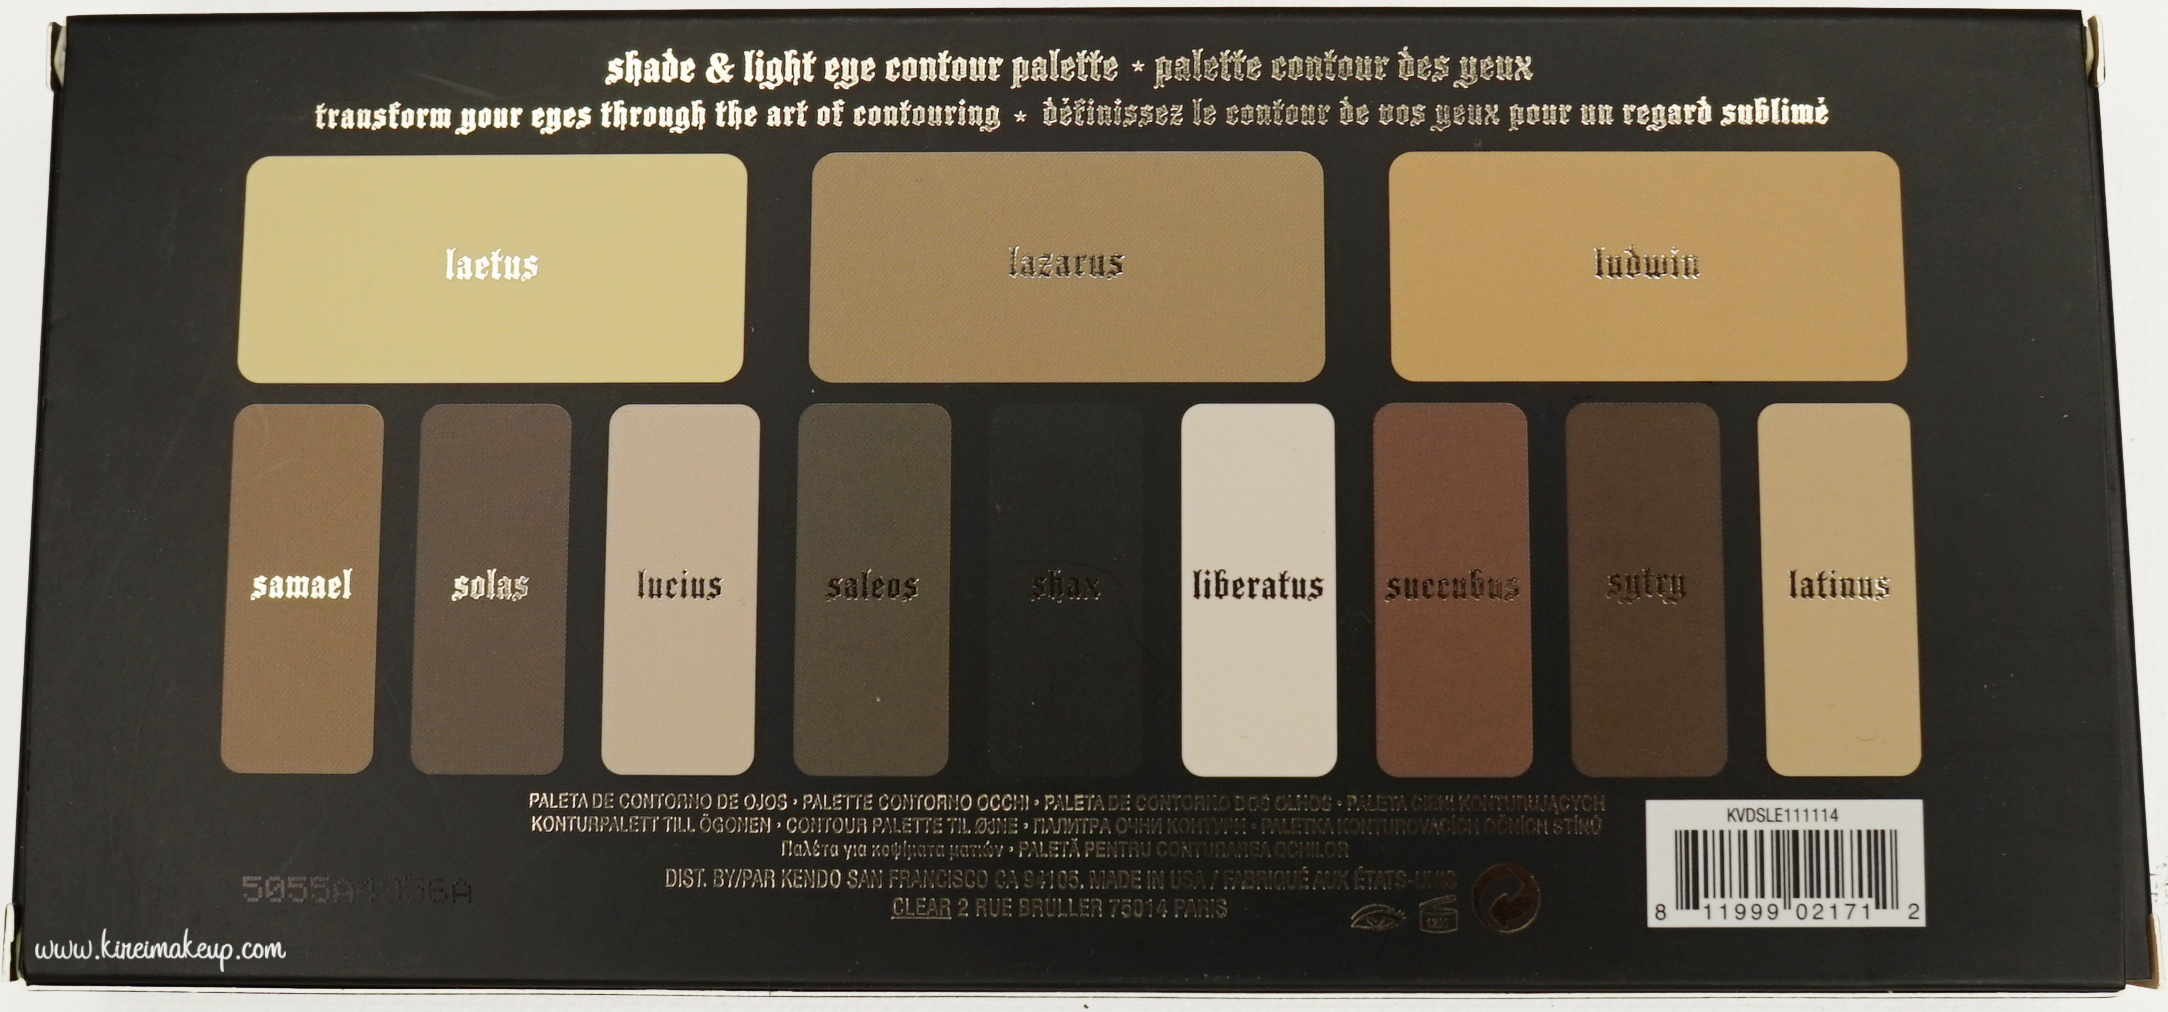
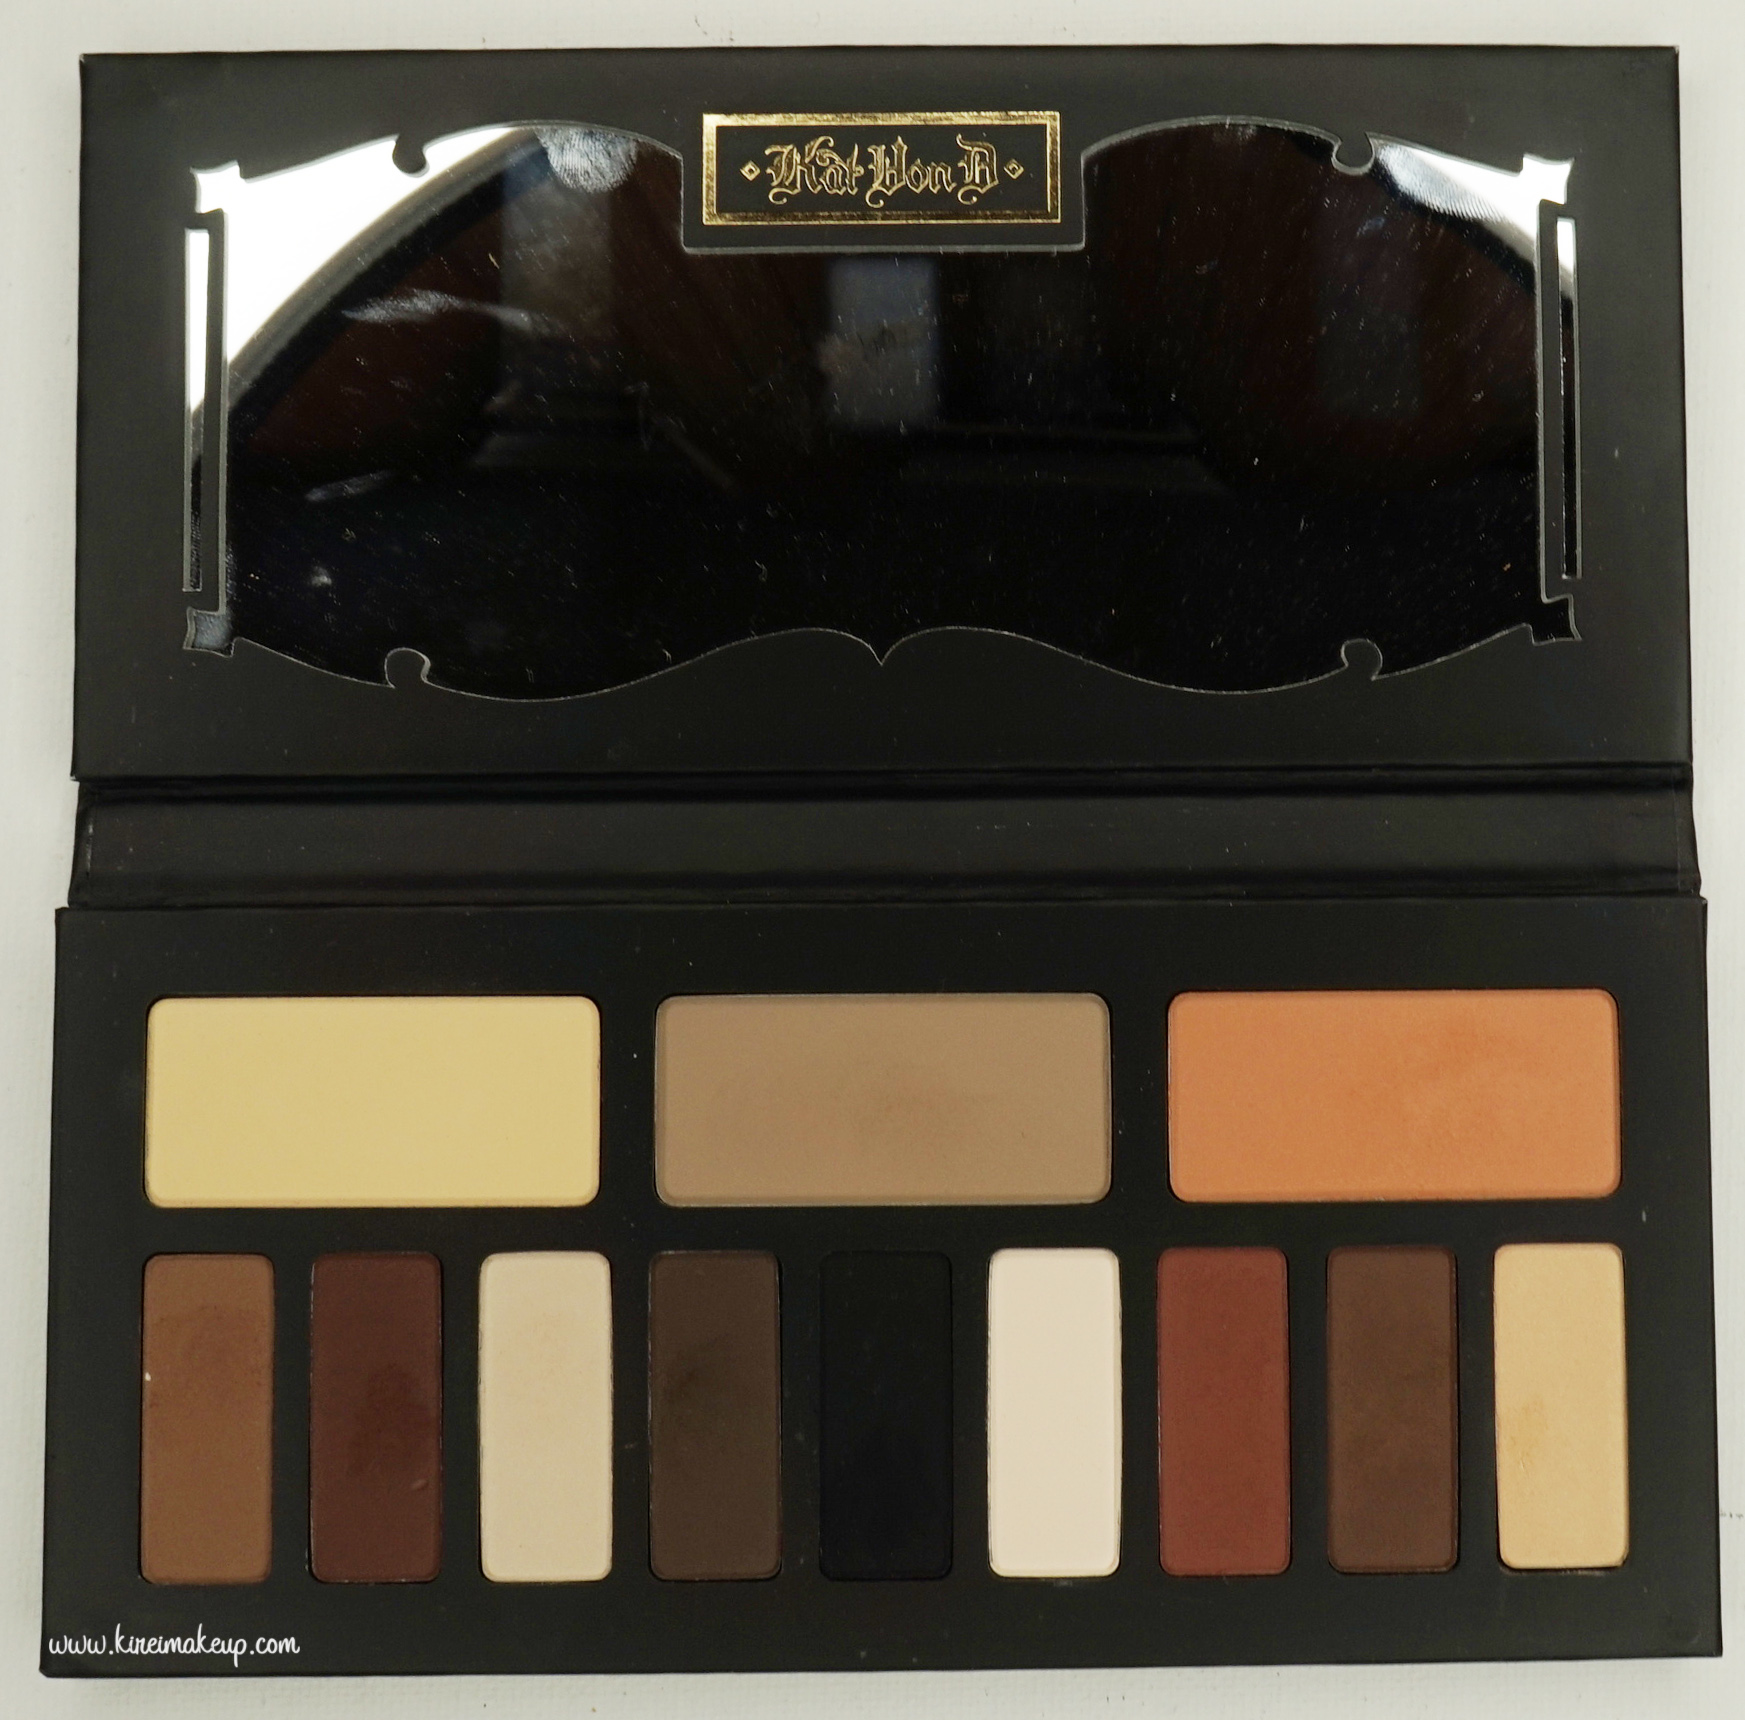
The KVD Shade & Light eye palette comes in a sleek black cardboard palette. The palette comes with a huge mirror on one side, and 12 eyeshadows on the other side. These 12 eyeshadows are divided into 3 quads – neutral quad, cool quad, and warm quad.

It also comes with an instructional pamphlet. The pamphlet shows how you can use your eyeshadows to create 2 different looks from each quad.

Pigmentation & Blendability

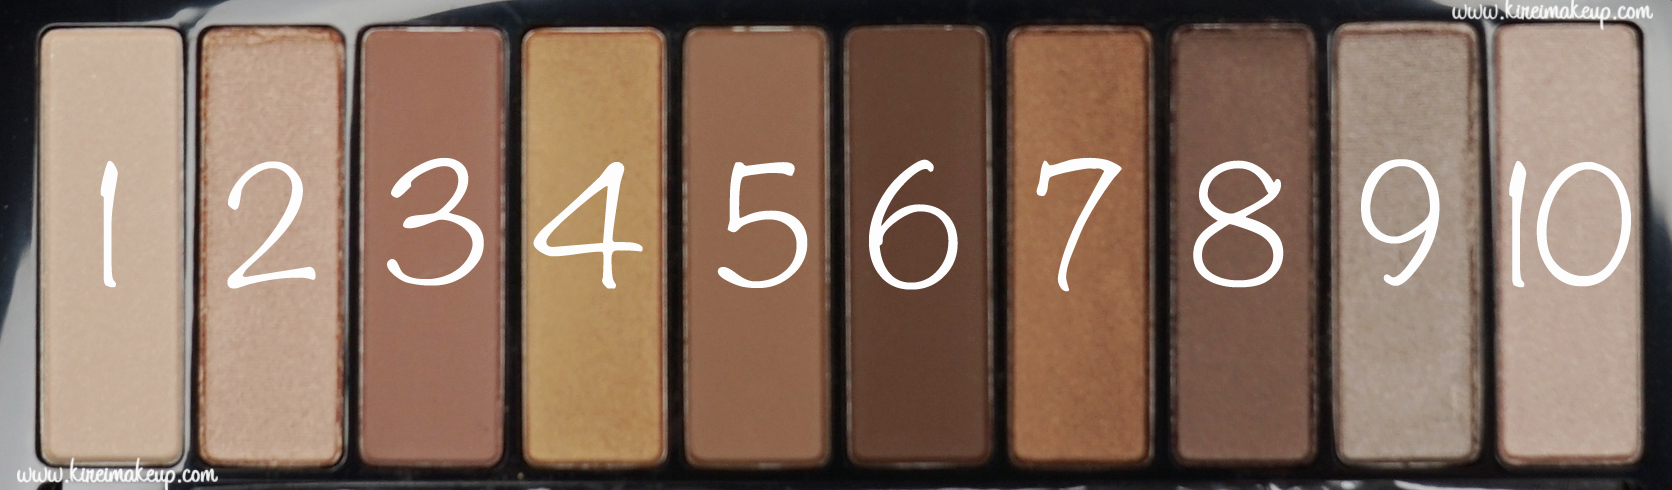
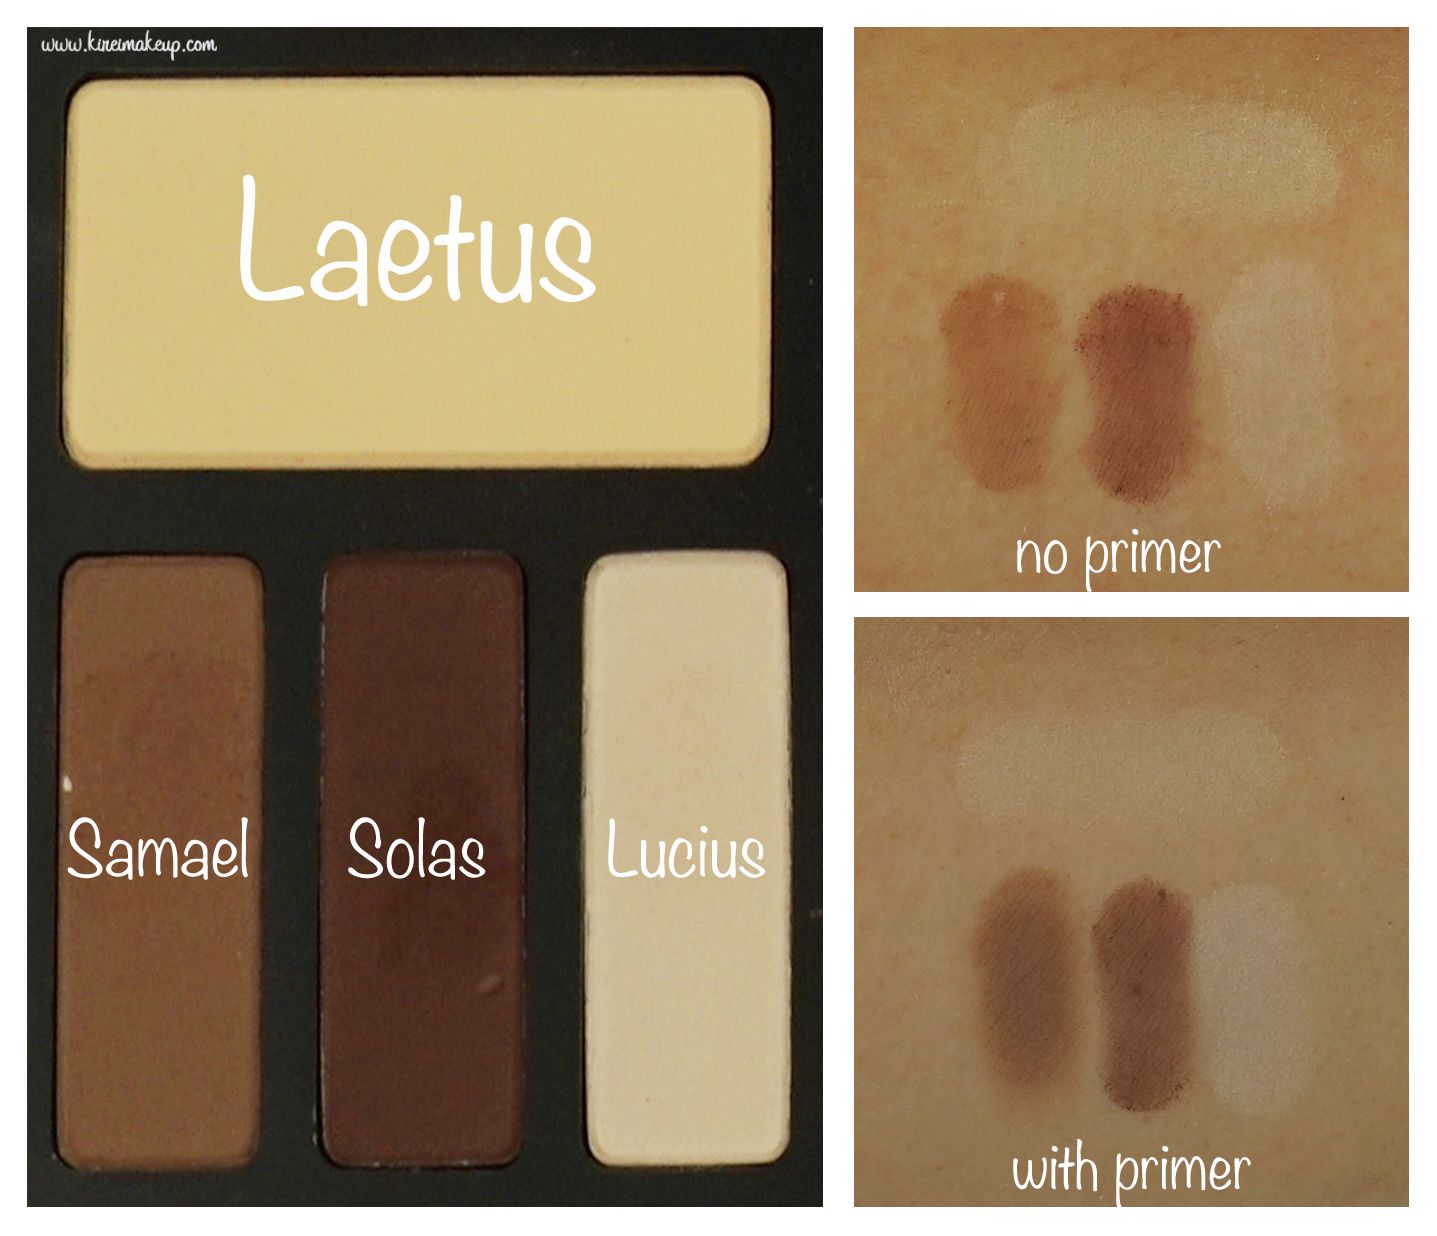
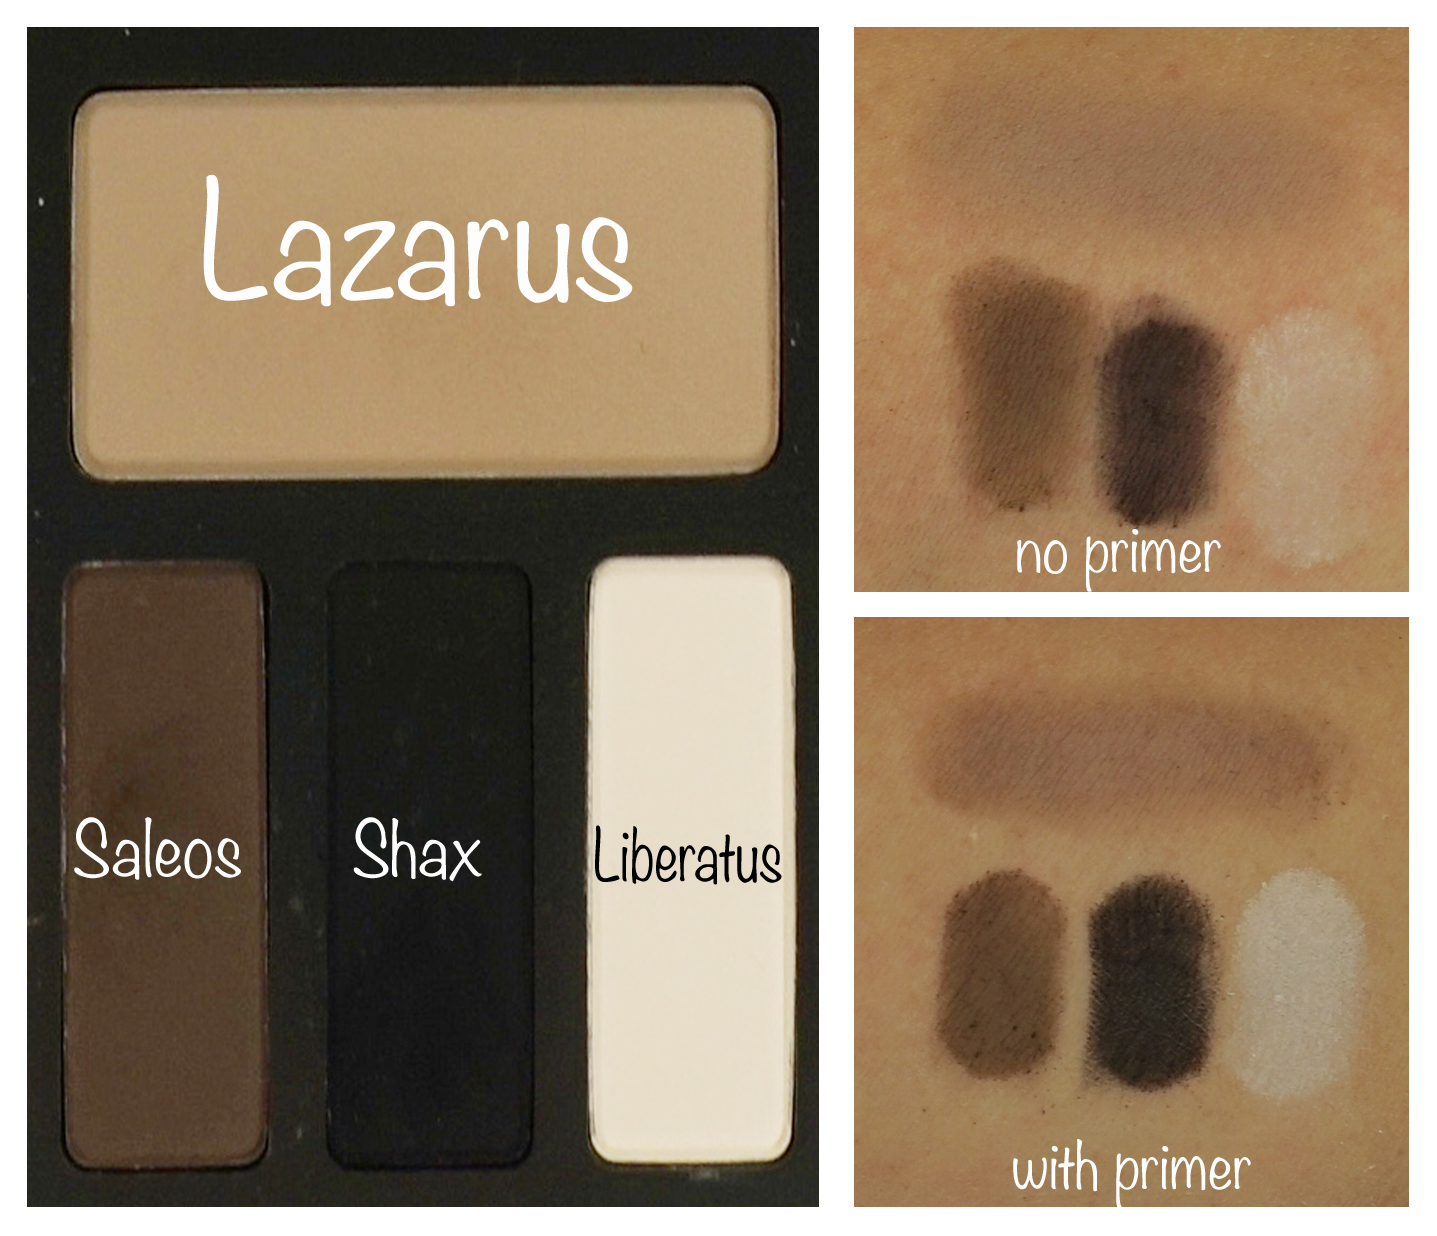
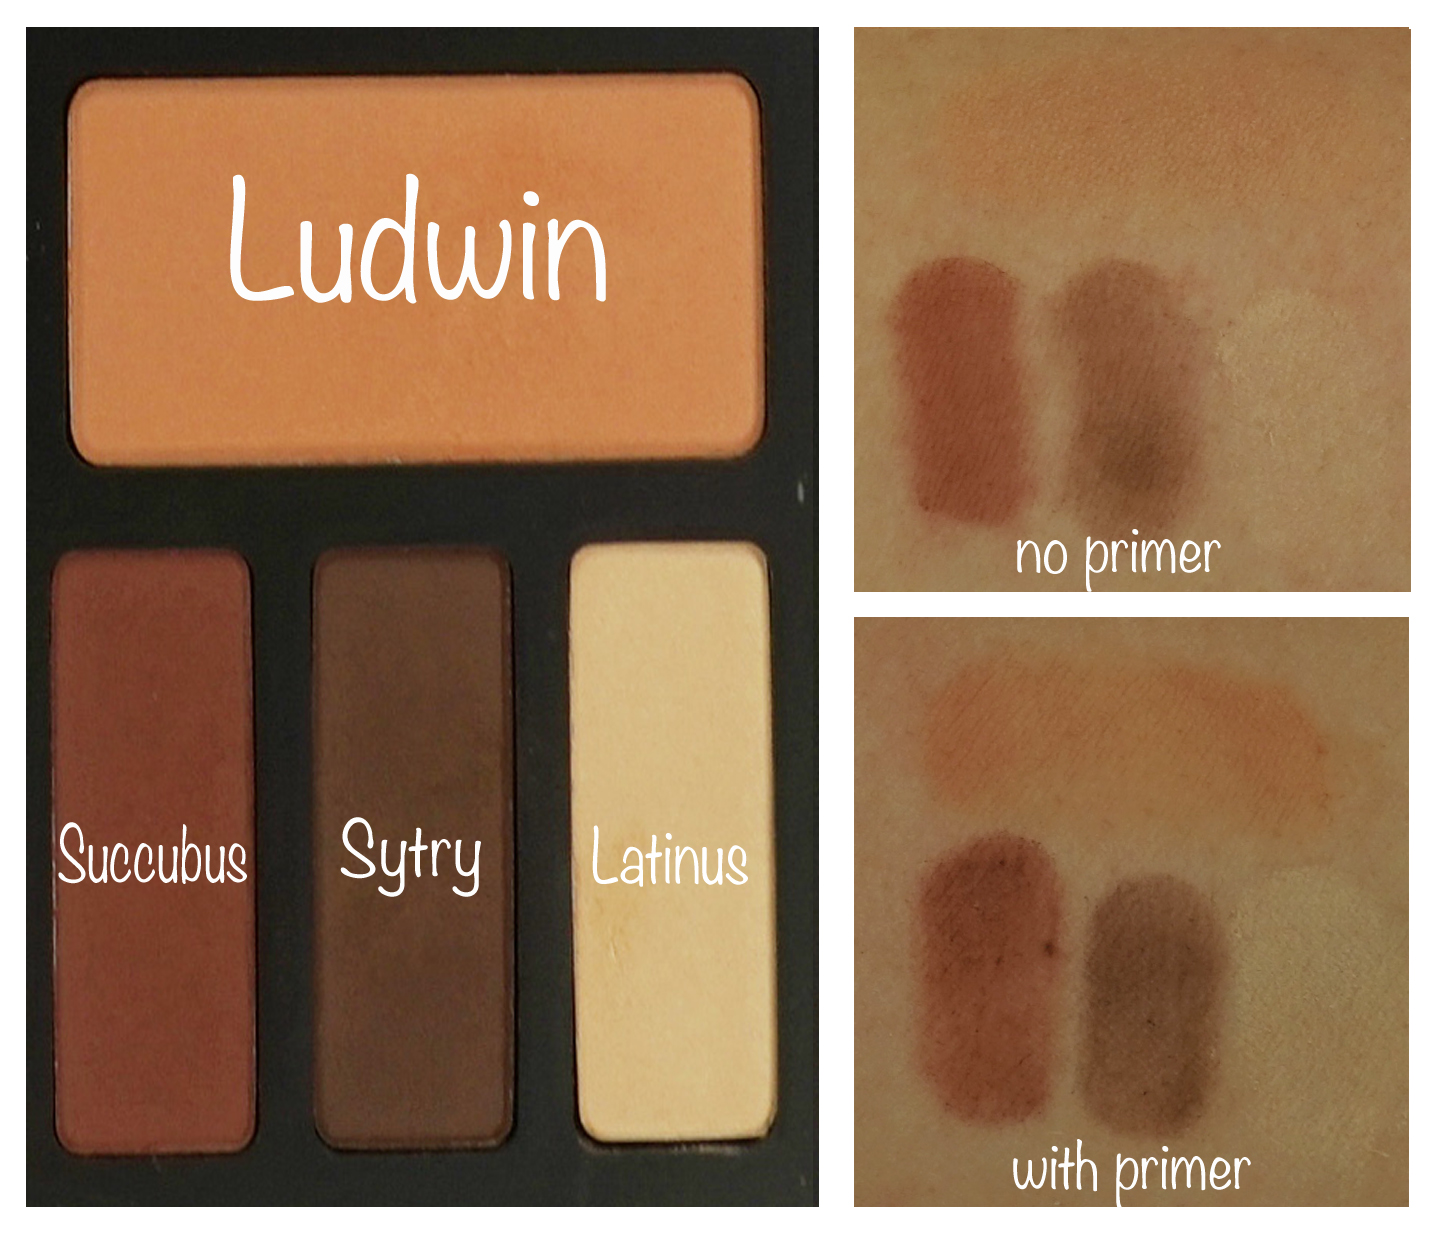
The 12 eyeshadows are very pigmented, and a dream to blend. As you can see from my swatches below from all the quads, the eyeshadows have great pigment pay-off even with no primer. I used Urban Decay Primer Potion in Original for the “with primer” swatches.

One thing to keep in mind, if you are having difficulty blending the eyeshadows with primer on, you might want to apply a base shadow first all over the entire eyelid area on top of the eyeliner. This will allow your other eyeshadows to go on smoothly and to blend easily. You can use the base eyeshadow as seen in this palette “Laetus”, “Lazarus”, or “Lucius”.

Tips: If you do not own this palette, you can still use a shadow that closely match your skin, or your face powder will do the trick as well.


kvd shade light eye palette review

Shades & Finish

There is 12 matte eyeshadows divided into 3 quads – Neutral, Cool, and Warm. Each quad consists of a “Base”, “Contour”, “Define”, and “Highlight” shades.
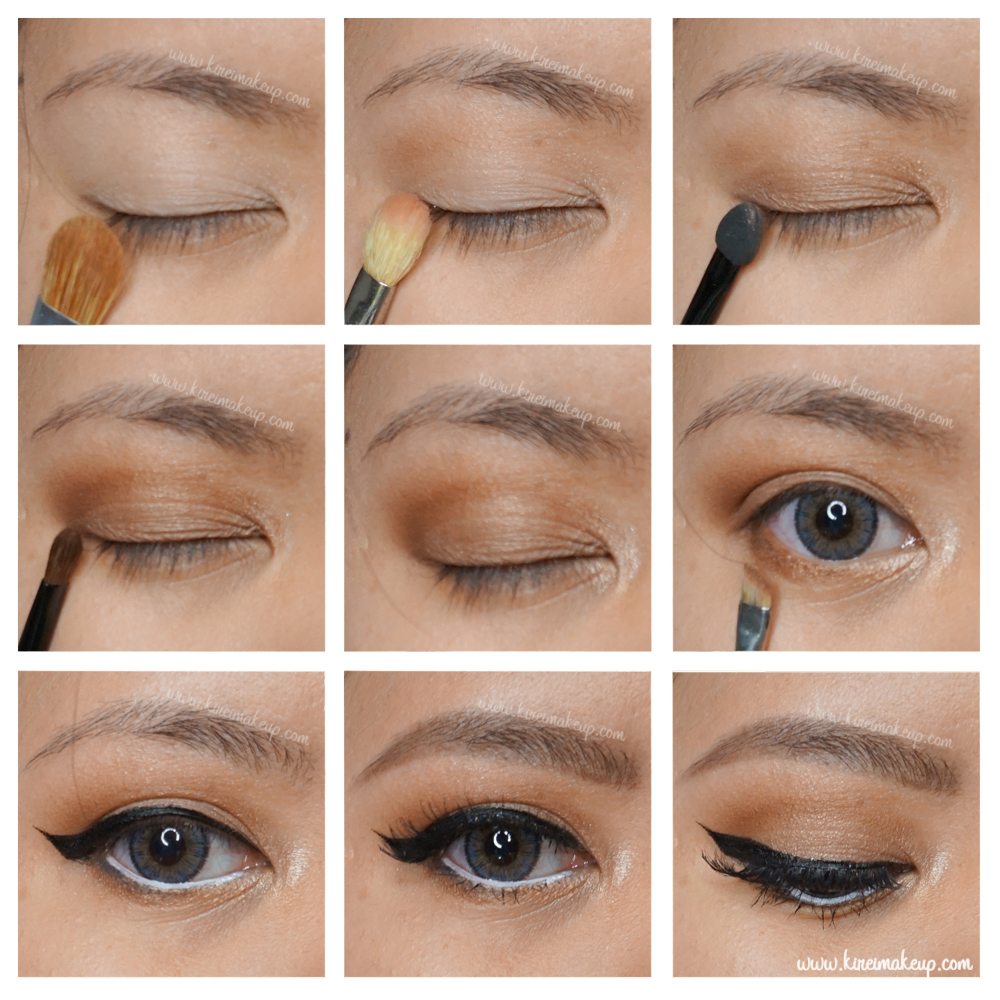
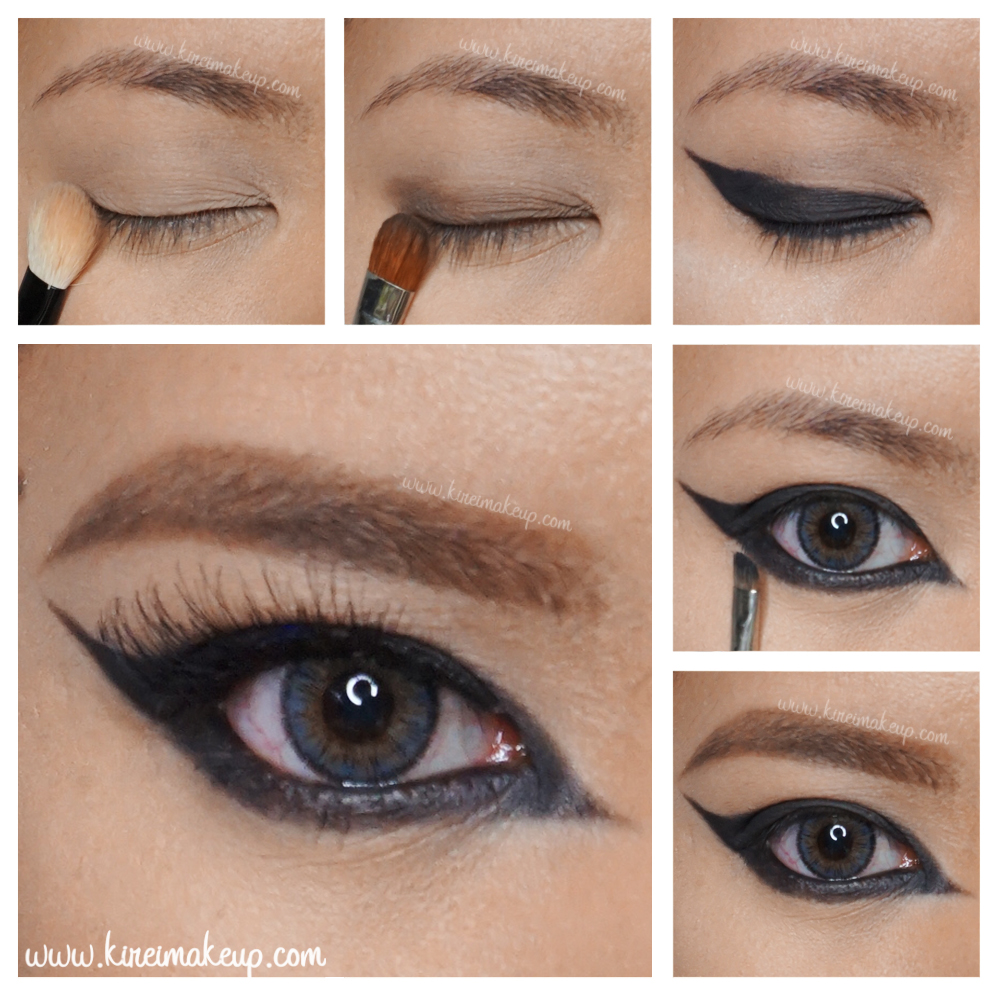
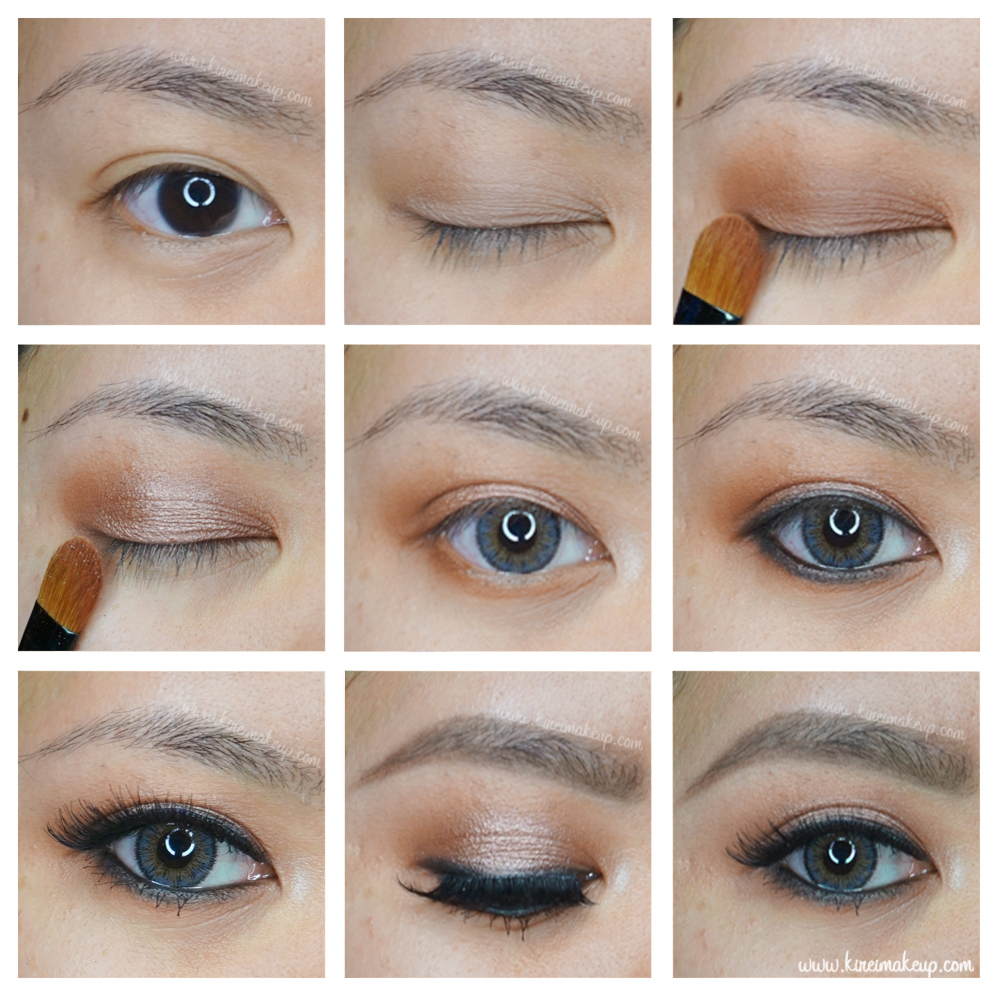
  1. Base” is what you’ll use to apply all over the entire eye area, all the way up to the brow bone if needed. Base eyeshadows for me can be used as transition shade as well, or to blend the harsh edge of the crease.
  2. Contour” is used, usually, on the outer V/C and crease area. If you have a deep darker skintone, you can also use the “Contour” shades as transition color.
  3. Define” can be used as eyeliner, or to deepen the crease even more.
  4. Highlight” is used to add light to the eyes, usually applied on the inner corner, and/or on the brow bones, or the center of the lid.

Price

CA$55 in Sephora Canada.

kvd shade light eye palette

  • Neutral Quad
    • Base – Laetus (creamy nude)
    • Contour – Samael (dusty fawn)
    • Define – Solas (espresso brown)
    • Highlight – Lucius (soft beige)

kvd shade light eye palette review

  • Cool Quad
    • Base – Lazarus (cool taupe)
    • Contour – Saleos (smoky brown)
    • Define – Shax (jet black)
    • Highlight – Liberatus (pinkish ivory)

kvd shade light eye palette swatch

  • Warm Quad
    • Base – Ludwin (peachy bronze)
    • Contour – Succubus (rich rust)
    • Define – Sytry (chocolate brown)
    • Highlight – Latinus (golden bisque)

kvd shade light eye palette review

Pros

  • Great range of shades and undertones.
  • Price wise it’s pretty reasonable ($4.50 per eyeshadow if you break it down).
  • Great pigment pay-off.
  • Easy to blend.
  • Suits every skintones.
  • Great product for those who want to learn how to contour your eyes.
  • Beautiful packaging

Cons

  • Lots of fall out if you don’t pick up the eyeshadow properly.


L’oreal Sahara Treasure

When I went to buy the L’oreal La Palette Nude 1, my eyes caught the attention of the L’oreal Sahara Treasure infallible eyeshadow. I’ve quite a collection of the La Couleur Infallible eyeshadows, so this was a great addition to my collection! Absolutely love the color, it’s a beautiful old gold shade with a creamy texture. So easy to blend, and what a great pigment pay-off!

Anyways, I decided to do a warm “halo” smokey eyes with this look. It wasn’t a great day for me to do a tutorial, I made so many mistakes at first. I also, should have used my Anastasia Brow Wiz on the brows, but no, instead I tried to be all “experimental-y” and used the brow pomade. I’m still having difficulties using the brow pomade, thus brows not on fleek for this post. So upset!

Oh, how do you guys like my new hair cut? I posted it last week on Instagram! I went to get it cut at Studio136 in Locke St, Hamilton. My stylist is Amanda, and I think she did an amazing job! All I told her was to get rid of the bulky layers at the top, and chop it off to my collar bone. I’m still contemplating if I should color my hair this year or not. What do you think?

Loreal La Palette Nude

Products used

Eyes

  • Primer – Urban Decay Primer Potion “Original”
  • Base – MUFE Pro Finish “118”
  • Transition – L’oreal La Palette Nude 1 “#5”
  • Crease – L’oreal La Palette Nude 1 “#9”
  • Outer/Inner third (upper + lower) – L’oreal La Palette Nude “6”
  • Center lid (upper + lower) – L’oreal “Sahara Treasure” infallible eyeshadow
  • Outer crease/Lower lashline – Kat Von D Eye Contour Palette “Shax”
  • Winged liner – Kat Von D Tattoo Liner “Trooper”
  • Waterline – L’oreal Voluminous Smoldering eyeliner
  • Brows – Anastasia Beverly Hills Brow Pomade “Medium Brown”
  • Lashes – Gwiyomi Boutique falsies #3
  • Inner corner – The Balm Mary-Lou Manizer highlighter


smokey eyes for asian

Face

  • Primer – The Body Shop Drops of Youth “Wonderblur” Face primer
  • Foundation – MAC Pro Longwear foundation “NC25”
  • Concealer – MAC Pro Longwear concealer “NC25”
  • Under eyes Setting Powder – CoverFX translucent powder
  • Face setting powder – MUFE Pro Finish “118”

Cheeks

  • Contour powder – Smashbox “Contour” shade from the contour kit
  • Highlighter – The Balm “Mary-Lou Manizer”
  • Blush – Smashbox Halo Powder blush “In Bloom”

Lips

  • Lip color – L’oreal Color Riche Extraordinaire “Blushing Harmony”

loreal sahara treasure

L’oreal La Palette Nude 1 Tutorial #1

I was thrilled to see L’oreal La Palette Nude 1 in Wal-Mart near my home. I had known L’oreal released this palette from their Instagram account, but didn’t have the chance to get one earlier since I was busy. Last week, I was just browsing through the makeup department in Wal-Mart while I was running errand, and I was excited to see it on the shelf. There were only 3 palettes left, so I had to grab it before it was gone.

If you have followed me on Instagram, you’d have seen half of my nude palette collection I posted last week. My obsession with nude palettes begun when I was in makeup school, where I realized on almost every single makeup jobs I had to do or assist for, most clients asked for a neutral-based makeup look whether it’s simple clean makeup or smoky eyes.

The L’oreal La Palette Nude 1 is a pretty good palette, if you’re looking for an affordable nude palette. It has a great range of shades from your highlight, medium to contour shade. The only 1 thing that’s missing from this palette is a black eyeshadow. This palette reminds me a lot of the Urban Decay Naked 1 palette.

L'oreal La Palette Nude 1
L’oreal La Palette Nude 1

Since there’s no name of each individual shade, I’ve numbered them according to the way L’oreal numbered them. Please refer to the picture above as reference for the shades used in my pictorial below.

loreal la palette nude 1 look
L’oreal La Palette Nude 1 pictorial

Products used

Eyes

  • Primer – Urban Decay Primer Potion “Original”
  • Base – L’oreal La Palette Nude 1 “#1”
  • Transition – L’oreal La Palette Nude 1 “#3”
  • Eyelid – L’oreal La Palette Nude 1 “#4”
  • Crease/lower lid – L’oreal La Palette Nude 1 “#6”
  • Inner corner – L’oreal La Palette Nude 1 “#10”
  • Winged liner – Kat Von D Tattoo Ink Liner “Trooper”
  • Lower lash line – Kat Von D Shade + Light Eye Contour Palette “Shax”
  • Waterline – Annabelle Kohl Pencil liner “White”
  • Brows – Stila All Day Waterproof Brow “Medium”; Anastasia Brow Wiz “Medium Brown”; L’oreal Brow Stylist Plumper “Light to Medium”
  • Falsies – Gwiyomi Boutique no. 3 falsies
loreal nude palette 1
L’oreal La Palette Nude 1

Face

  • Primer – Body Shop Drops of Youth “Wonderblur” Face Primer
  • Foundation – L’oreal Infallible Pro Matte Foundation “#104”
  • Concealer – NARS Radiant Creamy concealer “Custard”
  • Setting Powder – Coverfx setting powder “Light”

Cheeks

  • Bronzer – MAC Mineralized Skinfinish “Medium Deep”
  • Blush – Smashbox Halo Powder Blush “In Bloom”

Lips

  • Lips – L’oreal Color Riche Extraordinaire “Blushing Harmony”
loreal la palette nude 1 tutorial
L’oreal La Palette Nude 1

Taylor Swift Bad Blood Makeup (Inspired)

Today’s tutorial is Taylor Swift Bad Blood makeup from her music video. Her costars and herself have such great makeup on the videos, it was hard to pick. However, I decided to choose this look where she has a smoky cat eye with red lipstick. I think she looks drop dead gorgeous!

At first, I wasn’t planning to do this look, but oh well why not, right?! For the lips, I chose MAC Viva Glam I lipstick, since I thought it looked dark enough. However, when editing the pictures, I just realized the lips looked pretty bright. I can assure you it’s not that bright in real life. Nevertheless, if you prefer a darker lips, MAC Diva lipstick would do just great. I should have used MAC Diva, but it’s in one of the unpacked boxes. Ah, the joy of moving right? Anyways, hopefully I’ll be able to unpack everything by next week!

taylor swift bad blood makeup

For this look, most of the products on the eyes are from Kat Von D Shade + Light Eye palette, but you can use any matte eyeshadow. You can skip the second step – putting a dark grey eyeshadow on the lash line. I did that part because I thought I was going to do a classic smoky eye, but then decided to do the cat eye after.

For the cat eye part, since I have hooded eyelid on my right eye (left in picture), I’ve to extend the inner corner area a bit more. The cat eye is shaped using a black matte eyeshadow and an angled eyeliner brush.

taylor swift bad blood makeup

Products used

Eyes

  • Primer – Urban Decay Primer Potion “Original”
  • Base – Kat Von D Shade + Light Eye Contour “Laetus”
  • Eyelid – Kat Von D Shade + Light Eye Contour “Lazarus”
  • Upper lash line – Kat Von D Shade + Light Eye Contour “Saleos”
  • Cat eyeliner/Lower Lashline – Kat Von D Shade + Light Eye Contour “Shax”
  • Waterline – L’oreal Voluminous Smoldering eyeliner
  • Mascara – Cover Girl Lash Blast “Very Black
  • Brows – Anastasia Beverly Hills Brow Wiz “Medium Brown”; L’oreal Stylist Brow Plumper
  • Falsies – Gwiyomi Boutique no. 3

Face

  • Primer – Kat Von D Lock-it Featherweight Primer
  • Foundation – Kat Von D Lock-it Tattoo Foundation
  • Concealer – NARS Radiant Creamy concealer “Custard”
  • Setting Powder – CoverFX setting powder

Cheeks

  • Contour – Kat Von D Shade + Light contour palette “Shadowplay” + “Subconscious”
  • Blush – Smashbox Halo powder blush “In Bloom”

Lips

taylor swift bad blood makeup

MAC Beautiful Iris

I recently fell in love with MAC Beautiful Iris eyeshadow, and had used it in my previous tutorial. Anyways, I just think this eyeshadow is so pretty for Spring/Summer makeup, especially for those who are not afraid of colors. If you’re on the conservative side, please take a look at Neutral Eyes with a Pop of Color on how to add a bit of color to your makeup wardrobe.

Anyhow, I decided to pair this purple eyeshadow with very soft warm brown colors, this way the makeup stays pretty soft and not too much. I used my Kat Von D Shade + Light eye contour palette for the rest of the eyes. I will try to do a review on that palette soon update: Review is up! I have so much review to do, not enough time. I’m still busy with the move, so I haven’t settle down yet. It’s kind of hard for me to do tutorials and getting back into my posting routine with all the stuff lying everywhere. *sigh*

purple eye makeup

Products used

Eyes

  • Primer – Urban Decay Primer Potion “Original”
  • Base – Kat Von D Shade + Light eye contour palette “Laetus”
  • Transition – Kat Von D Shade + Light eye contour palette “Ludwin”
  • Outer V/Crease/lower lashline – Kat Von D Shade + Light eye contour palette “Sytry”
  • Eyelid – MAC eyeshadow “Beautiful Iris”
  • Winged liner – Kanebo Kate Super Sharp eyeliner
  • Waterline – MAC Chromagraphic eyeliner “NC15”; Kat Von D Shade + Light eye contour palette “Liberatus”
  • Mascara – Lancome “Hypnose”
  • Eyebrows – Anastasia Brow Wiz “Taupe”; L’oreal Brow stylist
  • Falsies – Gwiyomi Boutique no. 3

mac beautiful iris

Face

  • Primer – Becca “Ever Matte Poreless Priming Perfector”
  • Foundation – L’oreal Infallible Pro-Matte Foundation “104 – Golden Beige”
  • Concealer – NARS Radian Creamy concealer “Custard”
  • Setting powder – CoverFX translucent powder

Cheeks

  • Contour – Kat Von D Shade + Light Contour Palette “Shadowplay”
  • Highlight – Kat Von D Shade + Light Contour Palette “Lyric”
  • Blush – NARS blush “Mata Hari”

Lips

  • Lipstick – Revlon Colorstay Ultimate Suede “Flashing Lights”
  • Lip gloss – Make Up For Ever Artist Plexi-Gloss “202 (sweet pink)”

mac beautiful iris

UD Naked 3 Prom Makeup Look

If you have this UD Naked 3 palette lying around, you could create this UD Naked 3 Prom Makeup Look! Instead of buying new palettes, or eyeshadows, you could always use what you already have. I have done other UD Naked 3 tutorials, which you can find HERE. However, one of my most repinned UD Naked 3 tutorial is the Valentine’s Day makeup post, which is perfect if you prefer a softer look.

If you are looking for a makeup artist in Toronto or makeup artist in Hamilton for Prom, feel free to contact me at jilly@kireimakeup.com! I’m also taking bookings for eyelash extension in Hamilton.

ud naked 3 prom makeup

Products used

Eyes

Face/Cheeks

  • Foundation – Make Up For Ever HD Foundation “120”
  • Concealer – MAC Pro Longwear concealer “NC25”
  • Setting Powder – CoverFX Translucent powder
  • Blush – MAC blush powder “Fleur Power”

Lips

  • Lip Pencil – Urban Decay lip pencil “Naked 2”
  • Lip balm – L’oreal Colour Riche Extraordinaire “Blushing Harmony”


ud naked 3 prom makeup

Brown Smokey Eye Makeup Tutorial

Hello everyone! Sorry for not posting anything much last week here and on my social media sites. I’ve just recently moved to a new house, so I’ve been busy with the move. Anyways, I wanted to continue with a prom look, so I created this Brown Smokey Eye makeup tutorial for those who prefer a smokier look.

This look will be great for everyone, but especially for those with blue eyes. The warm undertone in the eyeshadows I used will bring out the blue in the eyes even more. I try to keep the “smokiness” within the rims of my eyes (waterline, and tightline). If you prefer it much more darker, feel free to add black eyeshadow on the crease. I prefer it this way – black on the lashline and smoked out to brown.

If you prefer a more understated low-key eye makeup, please check my previous tutorial “2015 Prom Makeup Look”

If you are looking for a makeup artist in Toronto (GTA), as well as Hamilton and surrounding area, please feel free to contact me! I’m taking bookings for Prom Makeup 2015.

makeup geek cocoa bear

Products used

Eyes


smoky eyes for asian

Face/Cheeks

  • Foundation – Giorgio Armani Maestro foundation
  • Cheeks – MAC blush powder “Peaches”

Lips

  • Lipstick – Revlon Colorstay Ultimate Suede Lipstick “Flashing Light”
  • Lip Balm – Kiehl’s Scented Lip Balm “Mango”

prom smokey eyes


Summer Makeup – Mint Eyeliner

As the weather is getting warmer, I wanted a lighter, and more colorful Summer makeup. I think I still haven’t had enough of mint makeup. I know the reign of mint color is over, but I couldn’t stay away from it! There’s just something about this color that’s so refreshing. So I decided to create a mint eyeliner look.

You can change the mint liner to any color you want, I think turquoise and yellow would be a great alternative for something bright. I chose to use Stila Smudge stick liner since it gives me the color pay-off I was looking for. I did tried their mint liquid liner, but it wasn’t good at all. I also set the eyeliner using a light green eyeshadow to prevent smudging – this is not necessary unless you have oily lids, just to be safe. Setting the eyeliner with powder will make it smudge-proof especially in warmer weather.

I paired this mint eyeliner with a pink lips, but you don’t have to pair it with this lips. I would pair this with a peachy lips for an alternative. I just paired it with pink lips just because I wanted to use my new lipstick. I kept everything else very simple. No falsies with this look since I don’t want it to look too glam.

mint eyeliner

Products used

Eyes

  • Primer – Urban Decay Primer Potion “original”
  • Base – Makeup Geek Cosmetics “Shimma Shimma”
  • Eyeliner – Stila Cosmetics Smudge Stick Waterproof Eye Liner “Mint Julep”
  • Eyeshadow – Make Up For Ever Diamond e/s “D316 Crystalline Pinky Green”
  • Mascara – Cover Girl Lash Blast mascara “Very Black”
  • Brows – Anastasia Brow Wiz in “Taupe” and “Brunette”

Face/Cheeks

  • Foundation – Chanel CC Cream “32”
  • Under Eye – Bobbi Brown Tinted Eye Brightener “Light to Medium Peach”
  • Highlight – The Balm “Mary-Lou Manizer”
  • Blush – MAC powder blush “Cubic”

Lips

  • Lipstick – Shu Uemura Rouge Unlimited  My Dear Matte “Allure Fuchsia”

mint liner

Too Faced Chocolate Bar Tutorial #3

Spring is almost here, and I wanted to do something lighter and with a bit more color. So, for today’s Too Faced Chocolate Bar tutorial, I created a neutral eye makeup with a bit of purple on the bottom lash. This is how I usually wear my makeup if I want a splash of color on my eyes.

I’ve done similar looks on my other tutorials – Kat Von D Monarch tutorial #2 and Cobalt Blue. For other ways to incorporate just a bit of colors into your eye makeup, please check out this other tutorials – Adding Color to eye makeup and a Hint of Mint.

For this look, I specifically wanted to only utilize Too Faced Chocolate Bar palette. I will try to create more looks with this palette, so you can see how versatile this palette is. You can check out my other tutorials using this palette as well – Holiday Makeup #2, Holiday Makeup #3, and 4 bridal makeup looks.

1

I do apologize for the unruly eyebrows. I’m trying to grow them out, but I’ll clean them up before my next tutorial, promise! Anyways, I’d like to mention that the pictures do no justice on how the eyeshadows are in real life. My room was bright when I took the first couple photos, but it get cloudy real fast yesterday. I had to deal with the Sun going in and out, so the last few pictures don’t really show how shiny and awesome the eyeshadows are.

Products used

Eyes

  • Primer – Urban Decay Primer Potion
  • Base – Too Faced Chocolate Bar “White Chocolate
  • Transition – Too Faced Chocolate Bar “Salted Caramel
  • Outer V – Too Faced Chocolate Bar “Triple Fudge
  • Eyelid – Too Faced Chocolate Bar “Marzipan
  • Middle lid – Too Faced Chocolate Bar “Hazelnut
  • Lower lash line – Too Faced Chocolate Bar “Candied Violet
  • Waterline – MAC kohl pencil liner “Smolder”
  • Eyeliner – Kat Von D Tattoo liner “Trooper”
  • EyebrowsAnastasia Beverly Hills Brow Pomade “Medium Brown”
  • False lashes – Gwiyomi false lashes #3

NARS weightless luminous foundation


Face

  • Primer – La Roche Posay Cicaplast Baume B5
  • Foundation – NARS Weightless Luminous Foundation “Punjab”
  • Concealer – MAC Pro Longwear Concealer “NC25”
  • Powder – MUFE HD Pro Finish “118”

Cheeks

  • Contour – MAC Sculpting powder “Sculpt”
  • Cheeks – MAC blush powder “Cubic”
  • Highlight – The Balm Mary-Lou Manizer

* For tutorials on how to do contouring please check out – subtle contouring; cream contouring.

Lips

  • Clinique Chubby Lip Stick “Boutiful Blush”

3


Asian Smokey Eyes

I’ve been going to this Korean restaurant in Hamilton, and in the restaurant they kept playing some sort of K-pop singers/bands performing on TV. Anyways, I was inspired by the singers from the various girl band to do this Asian smokey eyes look. I love how their skin looks absolutely flawless, with barely any contouring, and just a bit of blush.

Their smokey eyes are slightly winged, and the darker colors are mostly concentrated on the outer corner, since most of these girls don’t have a defined crease, like mine! Their eyeshadows are mostly on the lid, and on the outer half of the eyes, to elongate the eyes even more, creating a bigger eyes illusion.

For this look, I chose to pair it with a peachy lip, most of the girls in K-pop opt for a more pink or ombre pink lips. However, I prefer the peach lips especially with the warm bronze colors on the eyes. Warm tones on the eyes matched the warm tone on the lips to pull the look together.

I also wore a new foundation I recently bought (actually, exchanged for the Diorskin Nude Air). The new NARS weightless luminous foundation is pretty lovely, and I think I’ll do a review about it soon, hopefully next week! I think I might have found a new favorite foundation, guys!

Anyways, I apologize if the colors on my step-by-step pictures are a bit off (slightly cooler than real life) since I was trying out a new zoom lens. The full face pictures show the real colors, especially on the eyes. Pictures for the full face were taken using my usual lens, and with day light.

bronze smoky eyes

Products used

Eyes

  • Primer – Urban Decay Primer Potion
  • Base – MAC Brule
  • Crease – MAC Soft Brown
  • Inner corner (upper and lower lid) – MAC Honey Lust
  • Lid – MAC Mulch
  • Outer corner/Lower Lid – MAC Bronze
  • Outer lower lid – The Balm Balmsai in Righteous
  • Eyeliner – Shu Uemura Calligraphy Ink
  • Waterline – MAC Feline kohl pencil liner
  • EyebrowsAnastasia Beverly Hills Brow Pomade in Medium Brown
  • Mascara – Urban Decay Perversion mascara
  • Falsies – Gwiyomi false lashes #3


asian makeup

Face

  • Foundation – NARS weightless luminous foundation
  • Concealer/Highlighter – YSL Touche Eclat
  • Powder – MAC Magically Cool Liquid Powder

Cheeks

Lips

  • Liner – Urban Decay Naked lip pencil
  • Gloss – YSL Glossy Stain in Pêche Cerra-Cola

asian smoky eyes