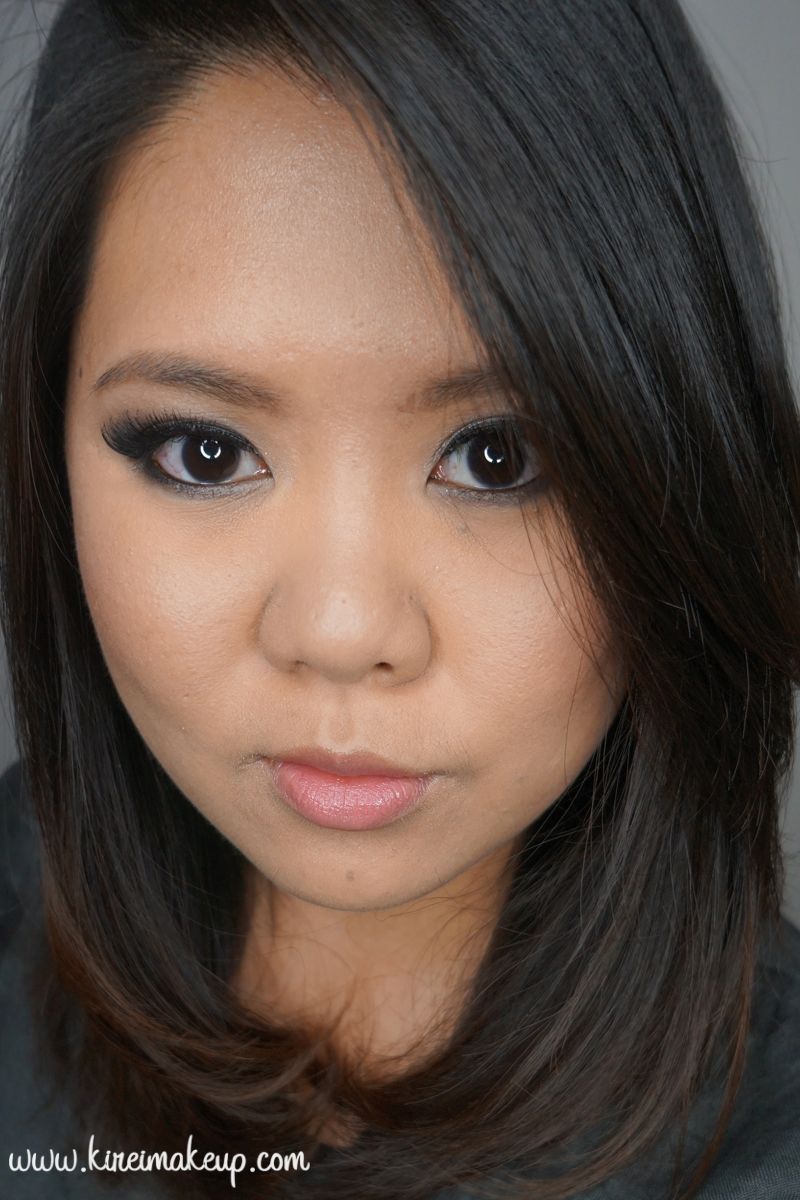
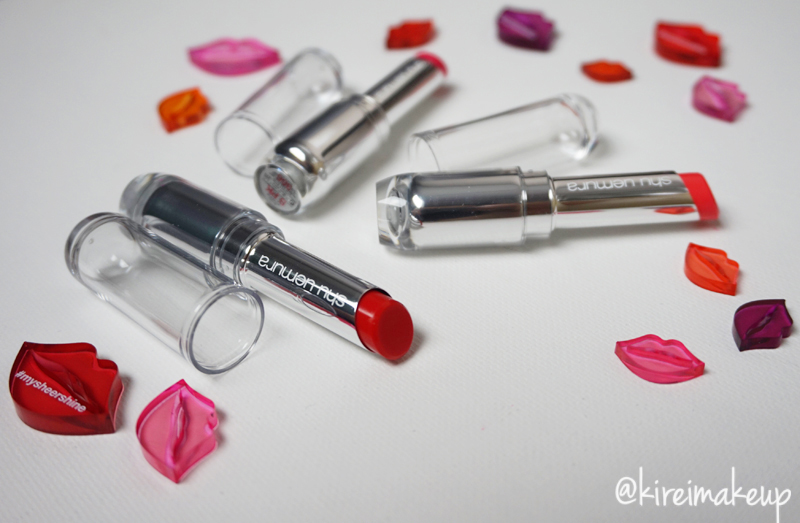
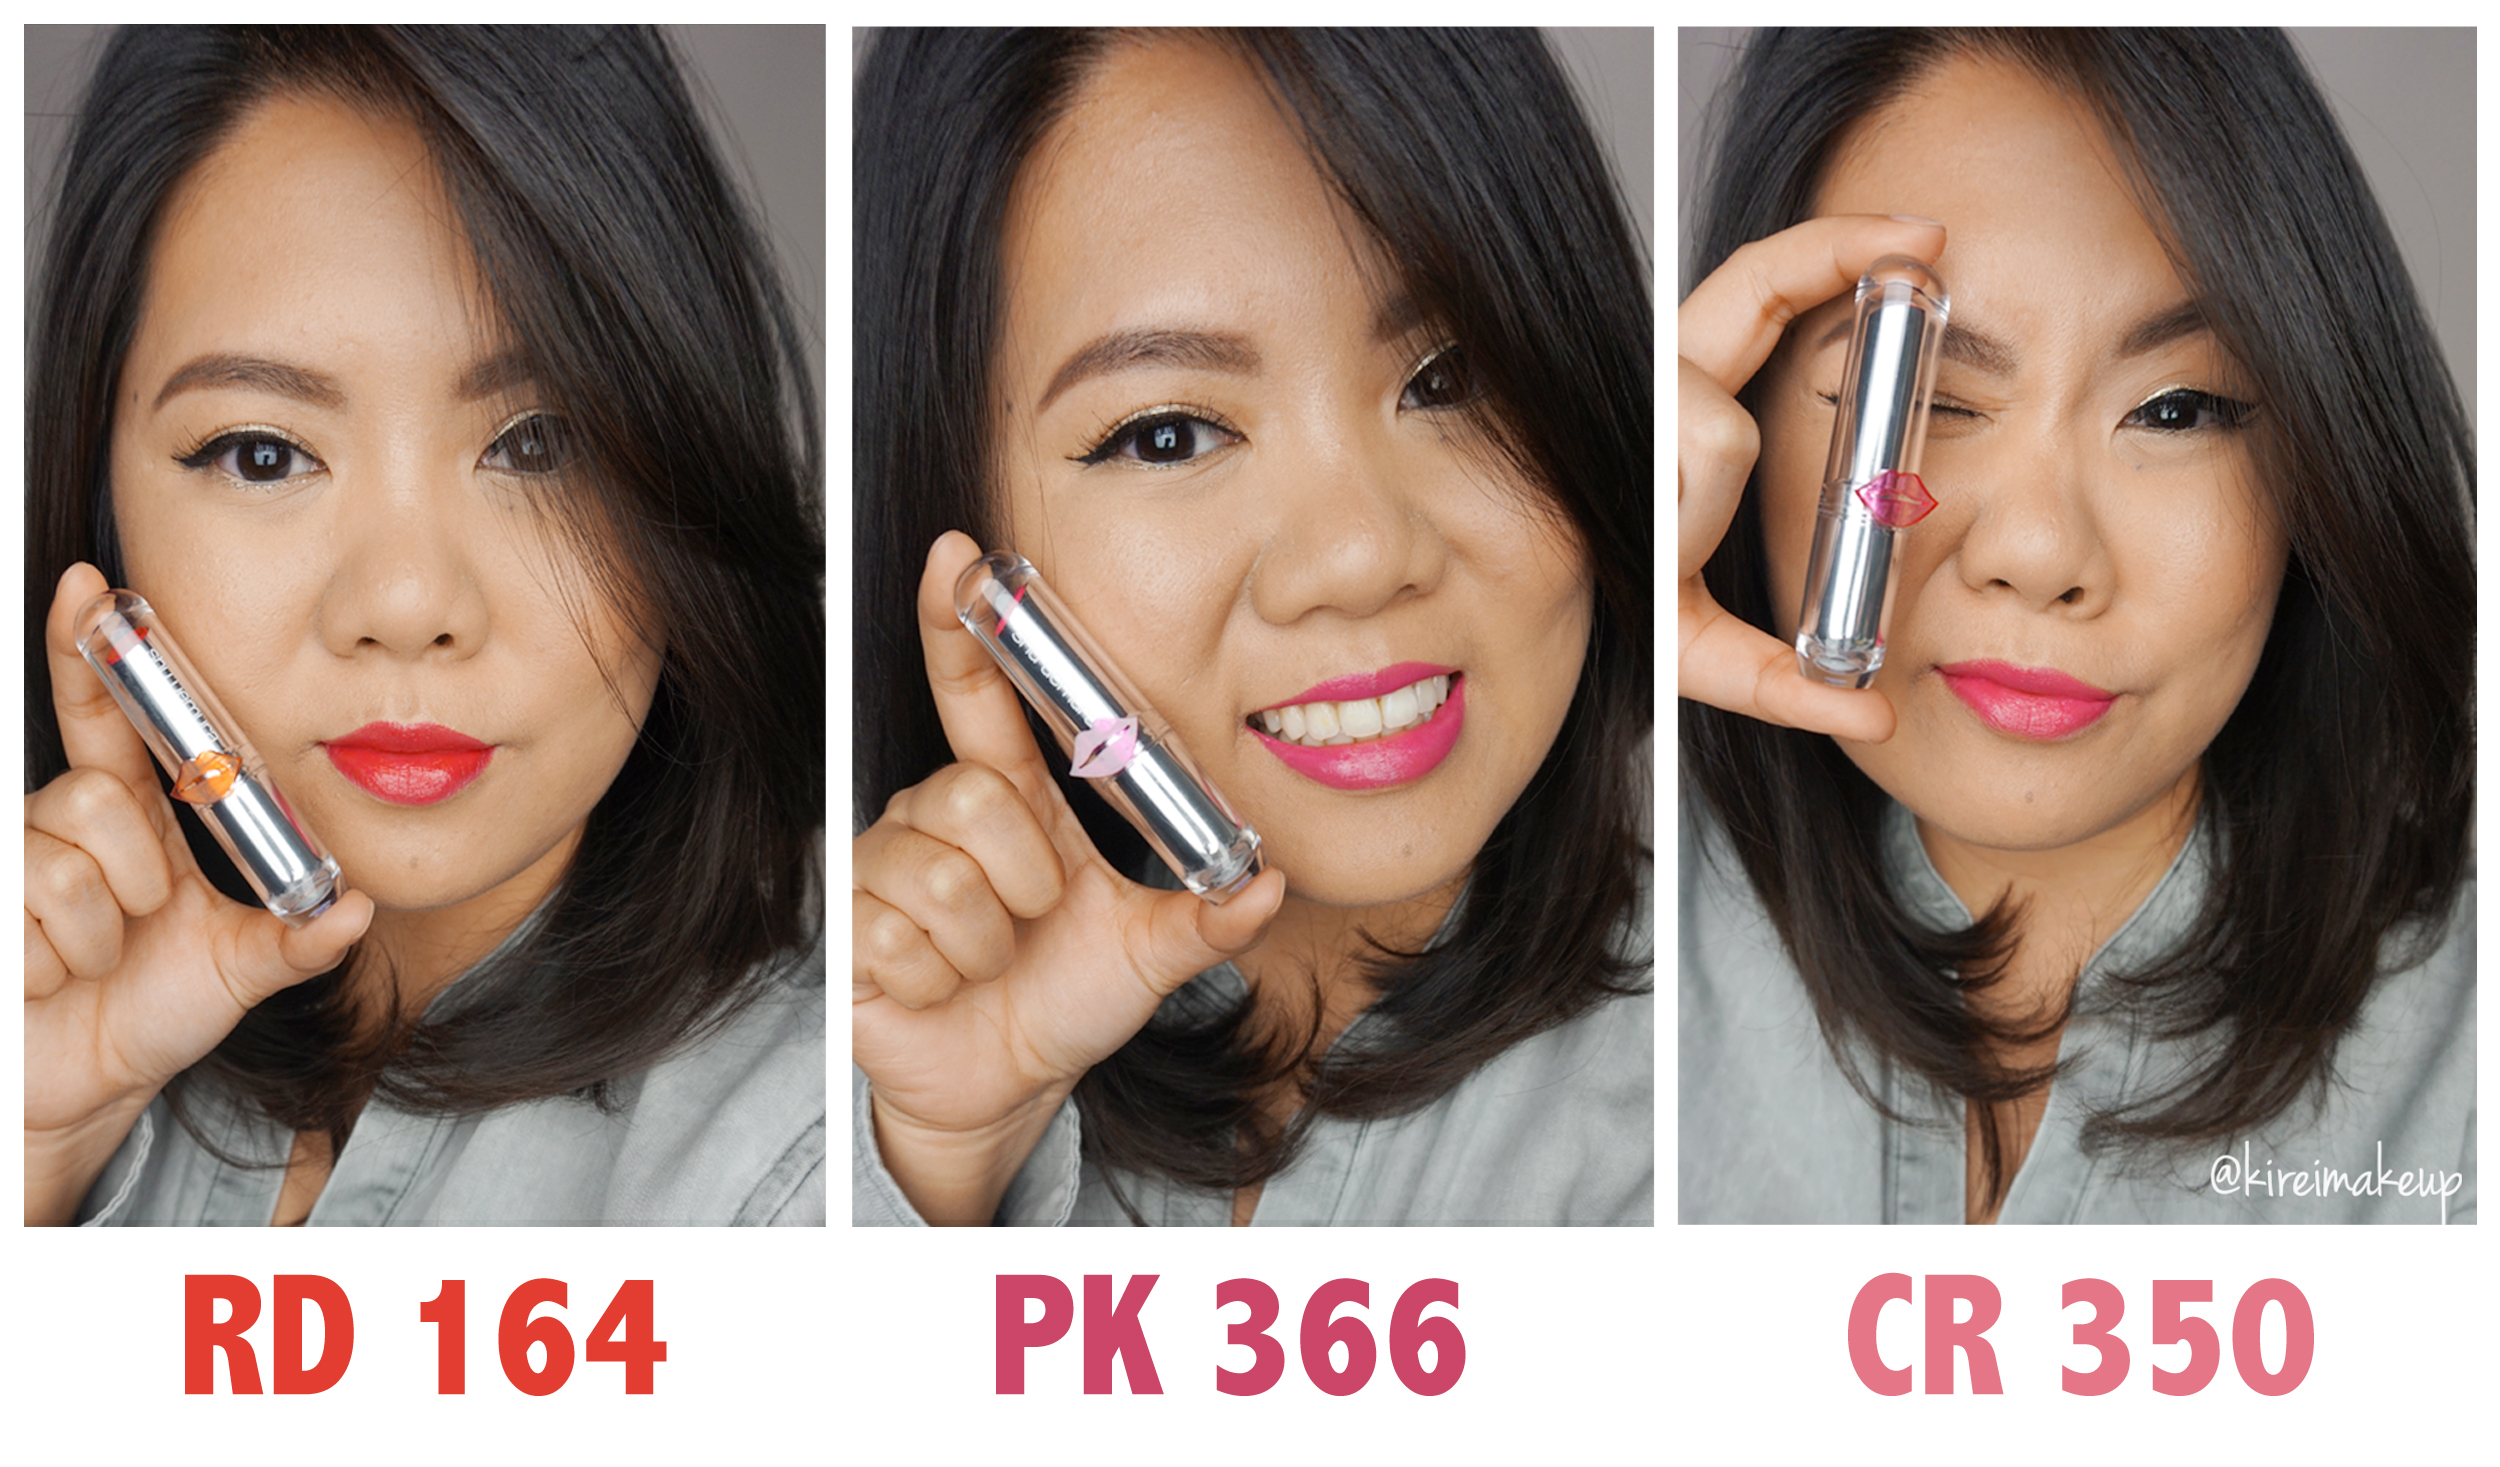
Last month, I was chosen to be one of the 20 beauty bloggers to try out Shu Uemura Sheer Shine lipsticks! I was thrilled to receive 3 of the Shu Uemura Rouge Unlimited Sheer Shine lipsticks at my door step. I’m sure you all have seen these 3 gorgeous lipsticks on my Instagram. I absolutely love these lipsticks!
So, the 3 shades that I received are RD 164 (red), PK 366 (pink), CR 350 (peach). I can’t really pick a favorite because I love them all equally! They are very vibrant, and you can layer it. If you are not used to wearing bright colored lipsticks, you should definitely give this a try. This way, you can apply it sheer at first then build it to a more opaque finish once you get used to the color, especially if you want to try the red lipstick.
The best part, for me, is the fact that these Sheer Shine lipsticks are very moisturizing, and it has a “glass-like” finish, similar to a gloss but without the stickiness. Actually the shine on these lipsticks are amazing! It’s definitely better than a gloss! If you apply the Sheer Shine lipsticks with a lip brush (I recommend the Shu Uemura lip brush), you can actually create a stain on your lips.
These lipsticks are very pigmented, don’t let the name “Sheer” fools you! So vibrant, high shine and very colorful! On top of that, this product is just like butter. Very smooth and you can apply this very easily to the lips.
Disclaimer:
Links on this post are not affiliated links
These products were sent to me, however all opinions expressed are honest and were based on my experience with the products.
Please do your research & test patch before buying any products, I am not responsible should any irritation occurs
I hope everyone is having a great week! Today I’m going to do another ABH Shadow Couture World Traveler tutorial! I’ve been doing lots of colorful look, so this time around, I wanted to do a more neutral color with a little bit of purple. I have used this palette to do another look, which you can find in my ABH Shadow Couture World Traveler tutorial #1.
Anyways, I have family members over this whole week till next week, so I do apologize if I’m running low on blog posts since I’ve been busy and running around. I do want to line up several Halloween tutorials, so hopefully I’ll be able to post it next week. I’ll try to do a post at least 1 more before the Thanksgiving (Canada) weekend.
Anyhow, for this look, I wanted to do a little bit of a cut crease and reversed winged liner. I cleaned the line up in between the purple liner and the outer corner of the upper lid using MAC Chromagraphic eyeliner in NC30. You can use any beige eyeliner, or white. I don’t really like using white pencil since I thin it’s too stark, the beige liner looks more natural.
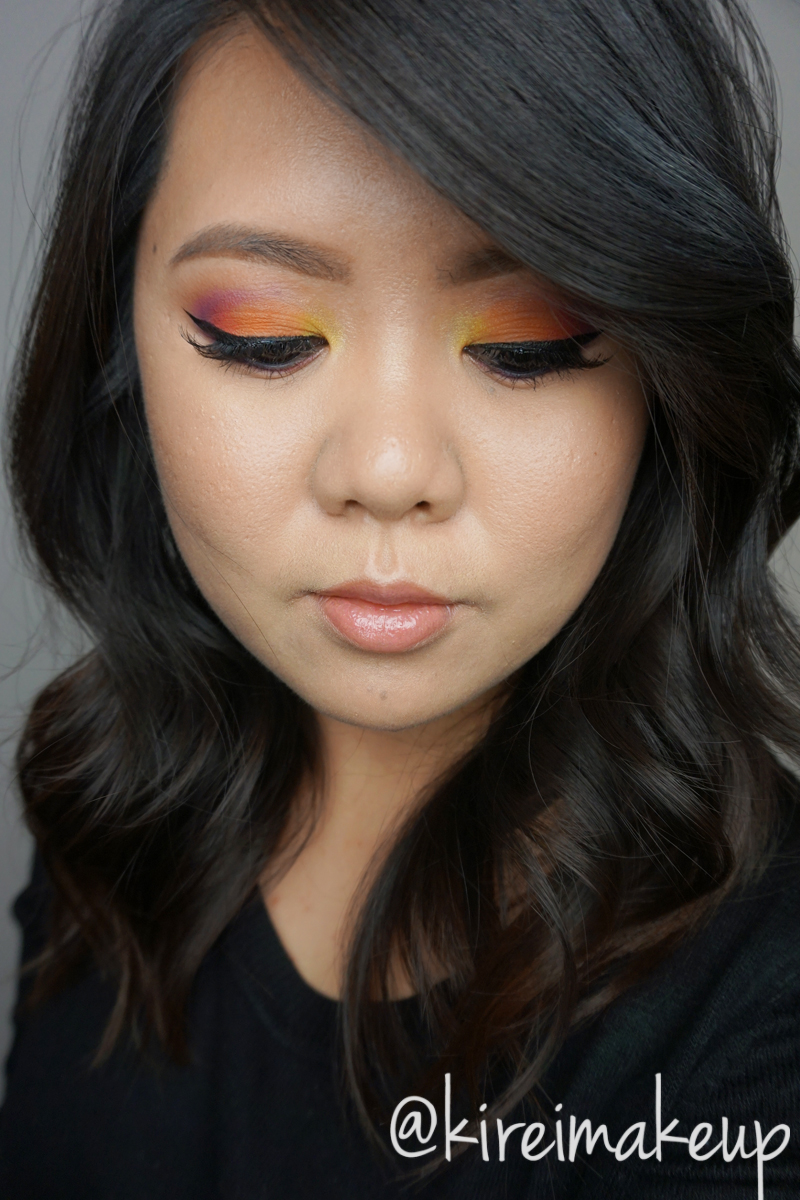
Last week, I did KVD Mi Vida Loca Remix swatches, as well as a tutorial using the greens and blues. This time, I decided to do another Kat Von D Mi Vida Loca Remix tutorial using the warmer shades! Have you guys grab this palette yet? If you haven’t take a look at my swatches’ post! I can assure you, you’ll love this palette! The colors are amazing, and I can’t rave enough about it. If you are a not a fan of colors, take a look at KVD Shade + Light eye palette, perhaps something more neutrals will suit your needs.
Since the eyes are very colorful, I have to pull the eye look together with black eyeliner. I don’t use white or beige on the waterline since it can look too clown-ish, in my opinion. I really like the contrast between the black and the colors, it makes it more wearable. It’s a very festive look, perhaps would be great for Carnivals!
Products used
Eyes
Primer – Urban Decay Primer Potion “Anti Aging”
Transition – KVD Mi Vida Loca Remix “Swoon”
Outer V/Crease – KVD Mi Vida Loca Remix “Anthem”
Inner corner – KVD Mi Vida Loca Remix “Fran” + “Legend”
Center lid – KVD Mi Vida Loca Remix “Analogue”
Outer third – KVD Mi Vida Loca Remix “Destroyer”
Outer half of lower lash line – KVD Mi Vida Loca Remix “Anthem”
Inner half of lower lash line – KVD Mi Vida Loca Remix “Destroyer”
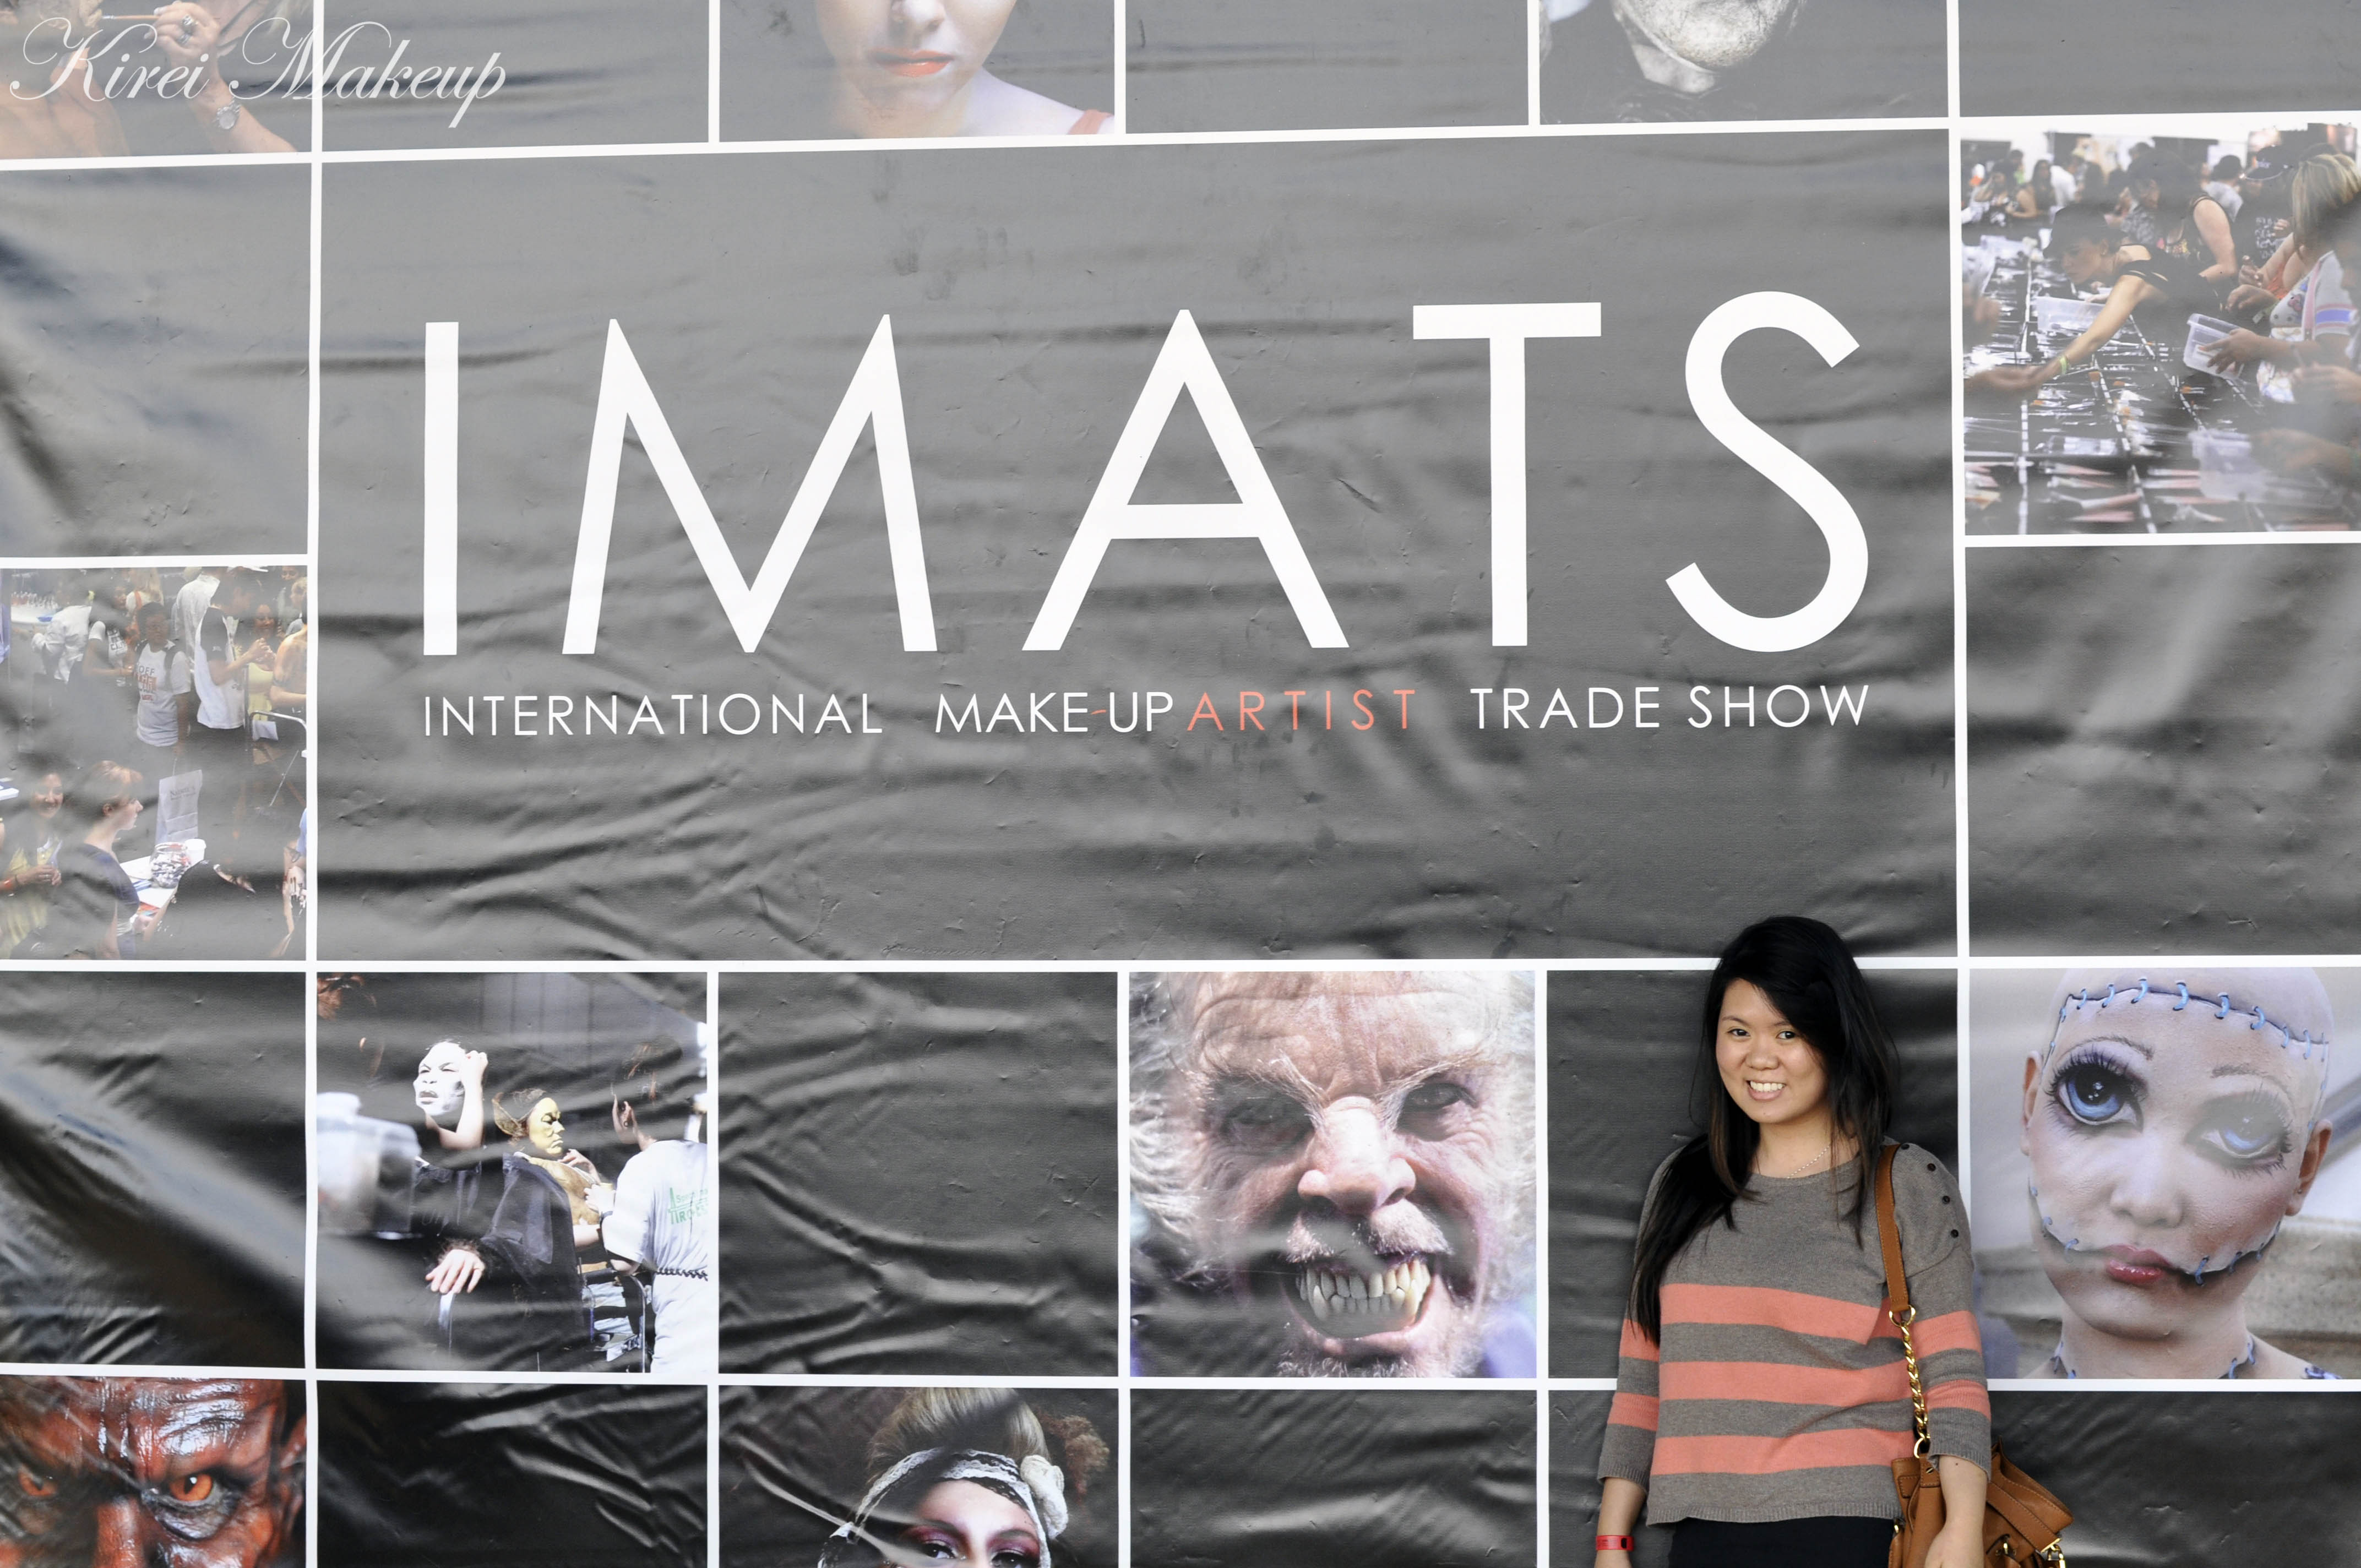
As you all know, I went to IMATS Toronto on Saturday, and I had a blast! I’ve been to the IMATS since 2010, but last year I was back in Jakarta, so I really wanted to go this year. Fortunately, I was able to attend it with N, and I’m glad I went this year. I managed to meet my role models, my mentors, and couple friends! The meetings were even more amazing than the shopping experience!
IMATS Toronto 2015
So, this year, the IMATS were held in the North building of the Metro Toronto Convention Center, which is unusual since in the past it was held in the South building. The space was a tad smaller, but it was still pretty good. There were a lot of people who came to the tradeshow, and there were long queues everywhere! I came around 10am, but looking for parking was challenging since there were Blue Jays game and University fair. After finding parking, I checked in at around 10.30, and already long lineups as far as the eyes can see! NYX, MUFE, Benefit, MAC, Morphe, Crown, Nigel, Frends booths were packed!
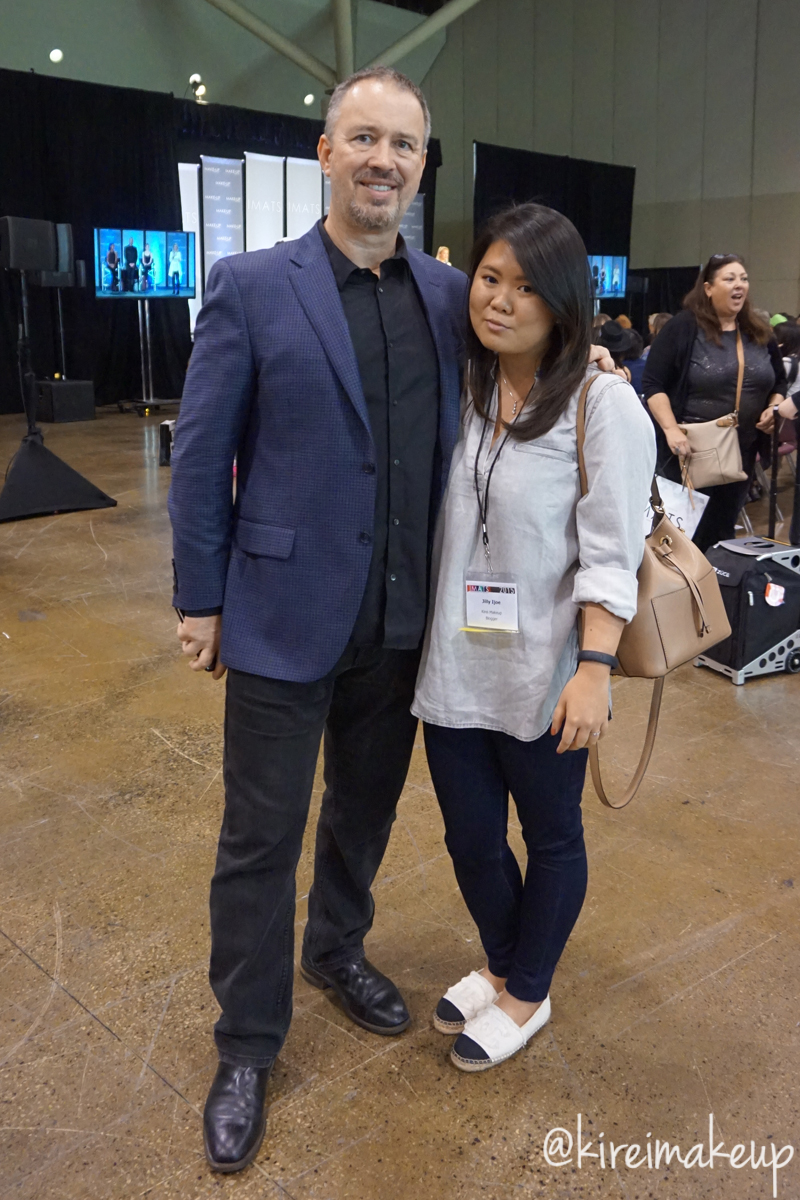
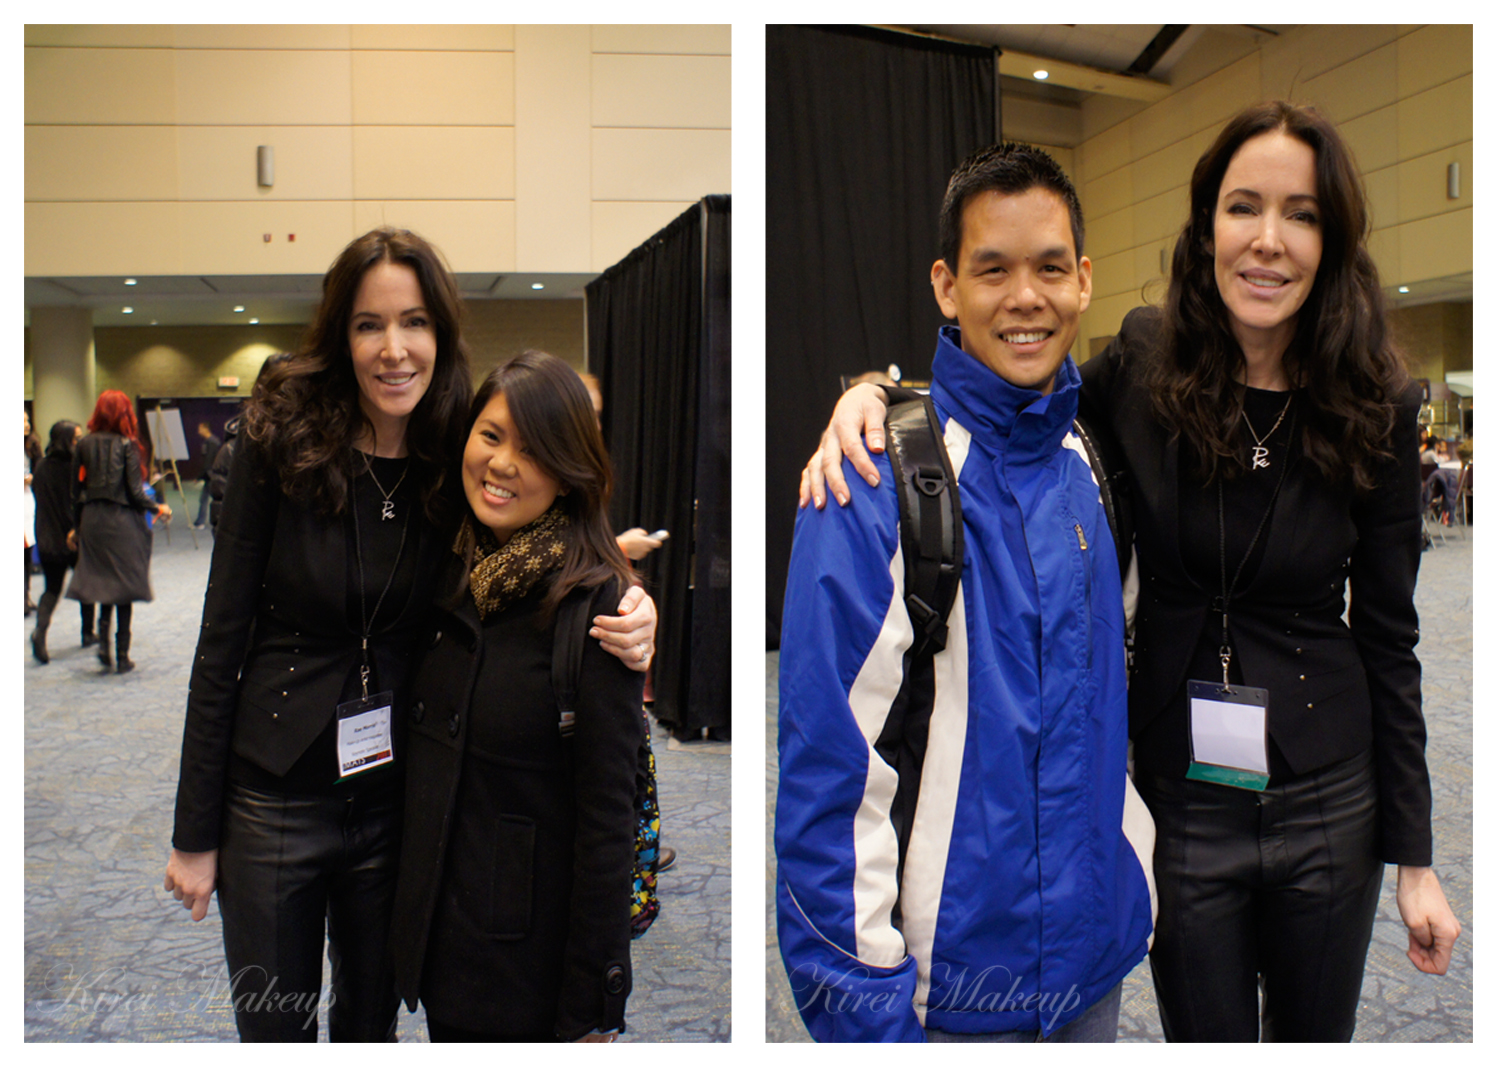
Anyways, this year when I posted a picture on Instagram regarding IMATS, Michael Key commented on the picture and I promised him that I would look for him. I managed to see him (more like hunting him), and took a picture with him! If you guys don’t know who Michael Key is, you should know! Michael Key is 2-time Emmy Winning makeup artist, executive of IMATS and Makeup Artist Magazine. He is the man behind IMATS, so of course I have to take a picture and say hi to him. Such a great guy, so friendly and humble.
Michael Key & me
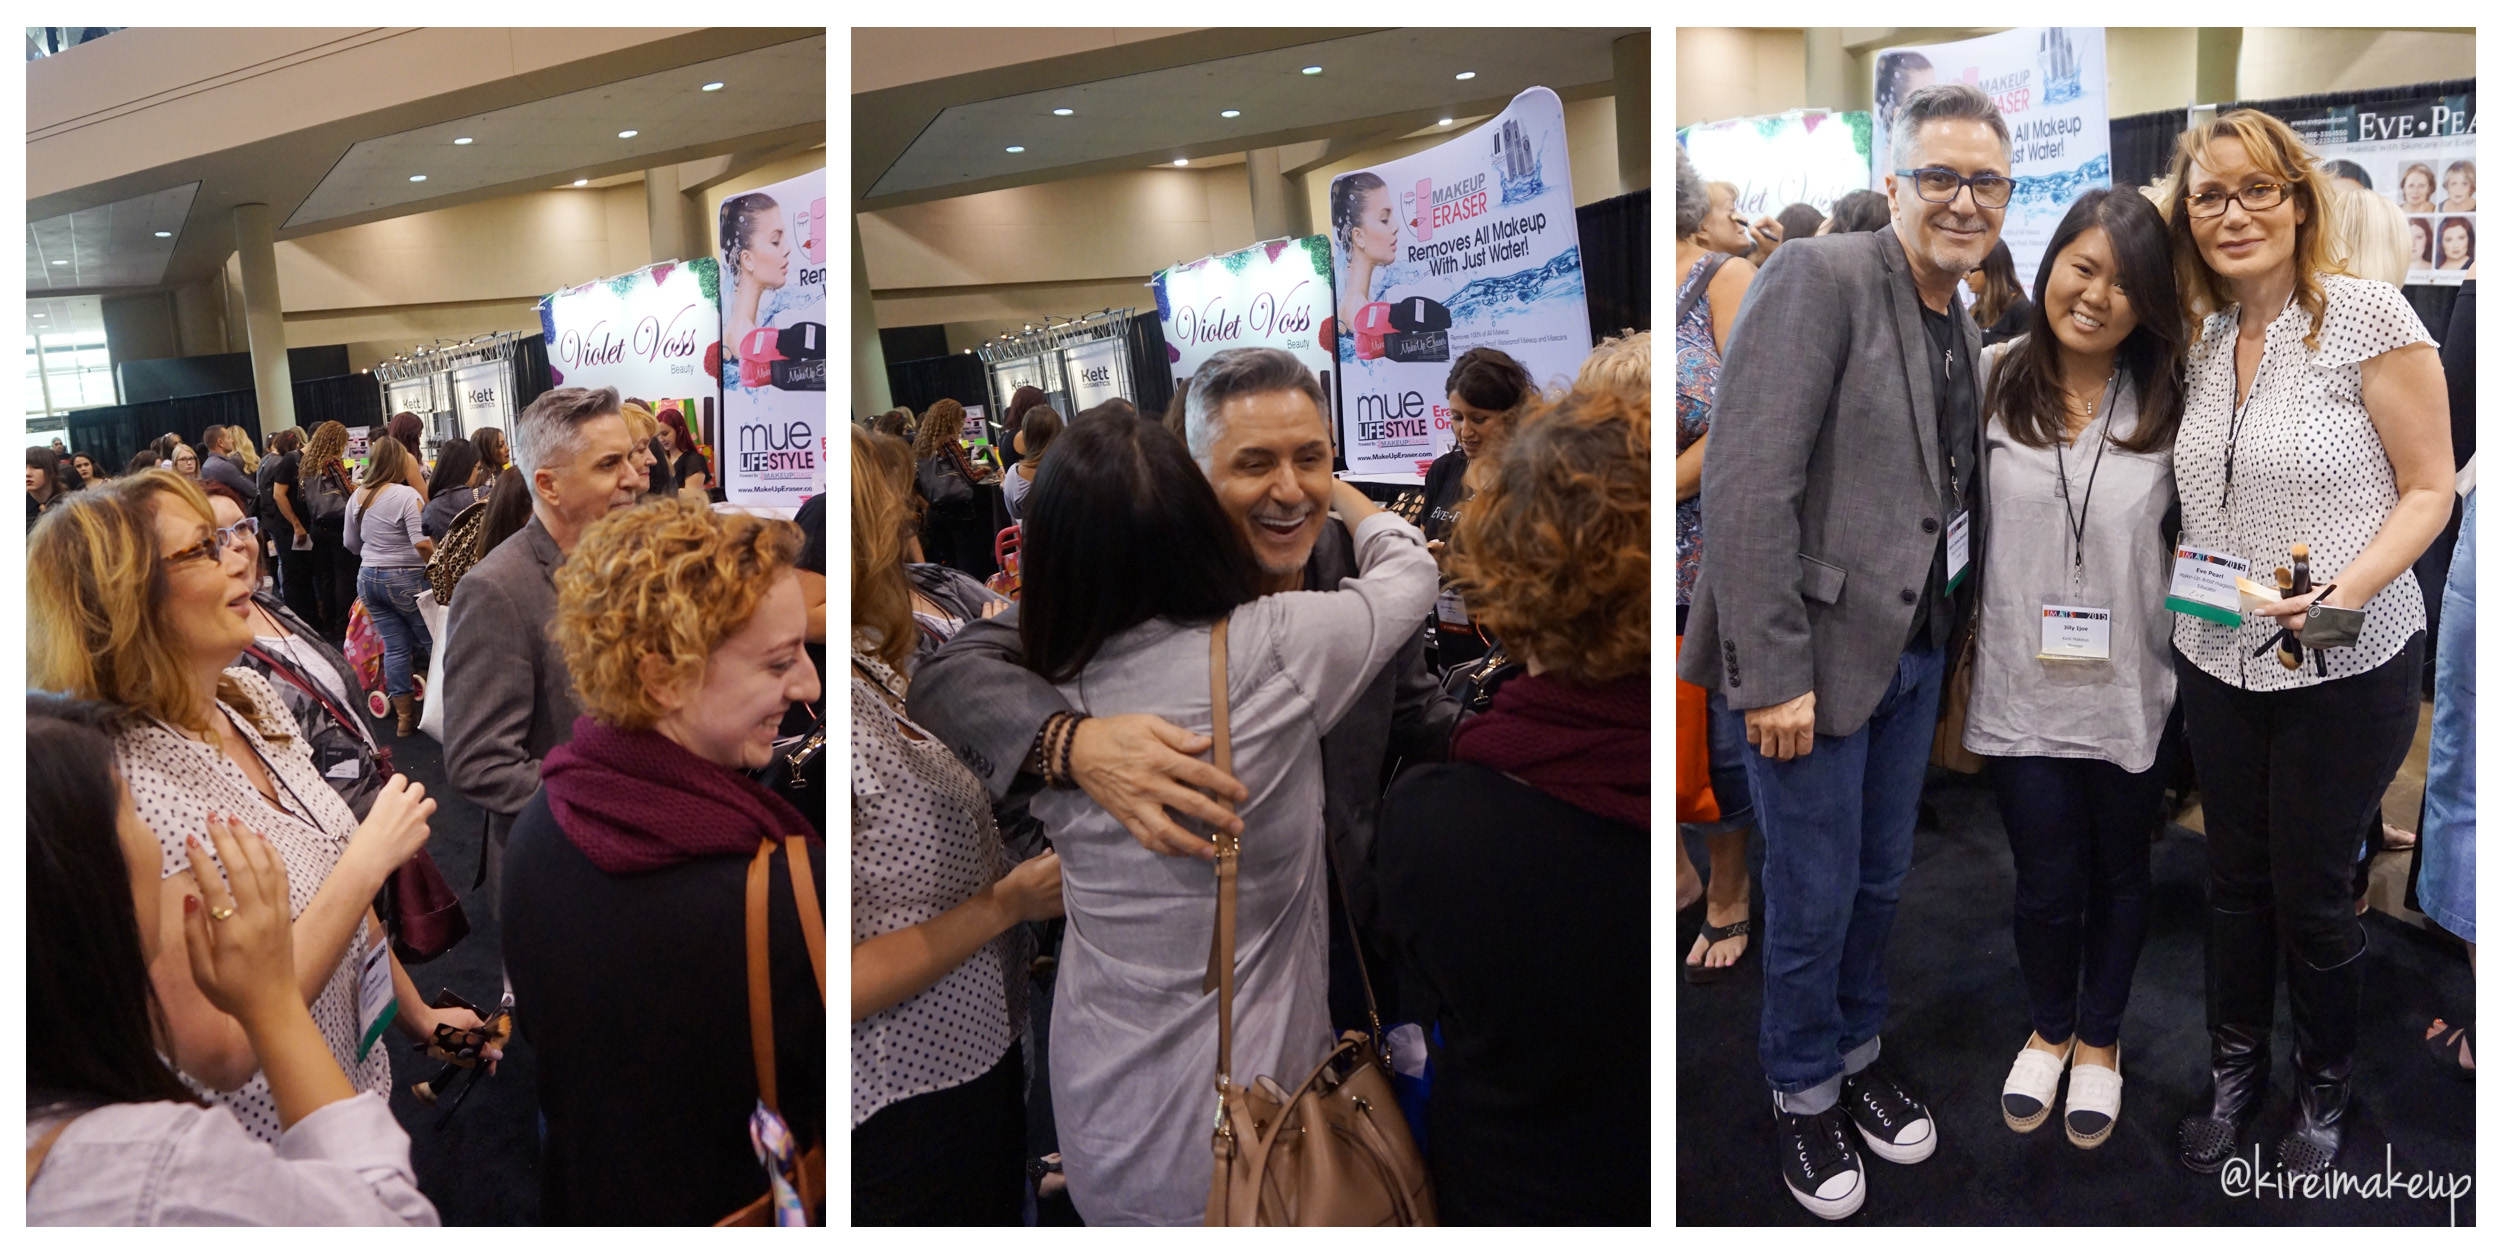
Then, I managed to see Kevin James Bennett while I was at Eve Pearl’s booth. As you can see on the photo collage below, I was fan girl-ing at KJB. I was like “I’m a big fan of your work!!!” *laughs* Eve Pearl was there and told him “she’s your fan!”. Unreal! I mean, KJB and Eve Pearl are like the big names in the beauty industry! I still can’t believe I managed to talk to them, and took pictures with them. It felt so surreal! They were giving out tips and tricks, chit chatting with the attendees.
Kevin James Bennett and Eve Pearl are always in the IMATS Toronto, so if you missed them this year don’t forget to look for them next year. KJB and Eve Pearl are Emmy Winning Makeup Artists, they KNOW what they are talking about! All of their classes are very informative, and they are so kind, always willing to answer questions.
Kevin James Benett & Eve Pearl
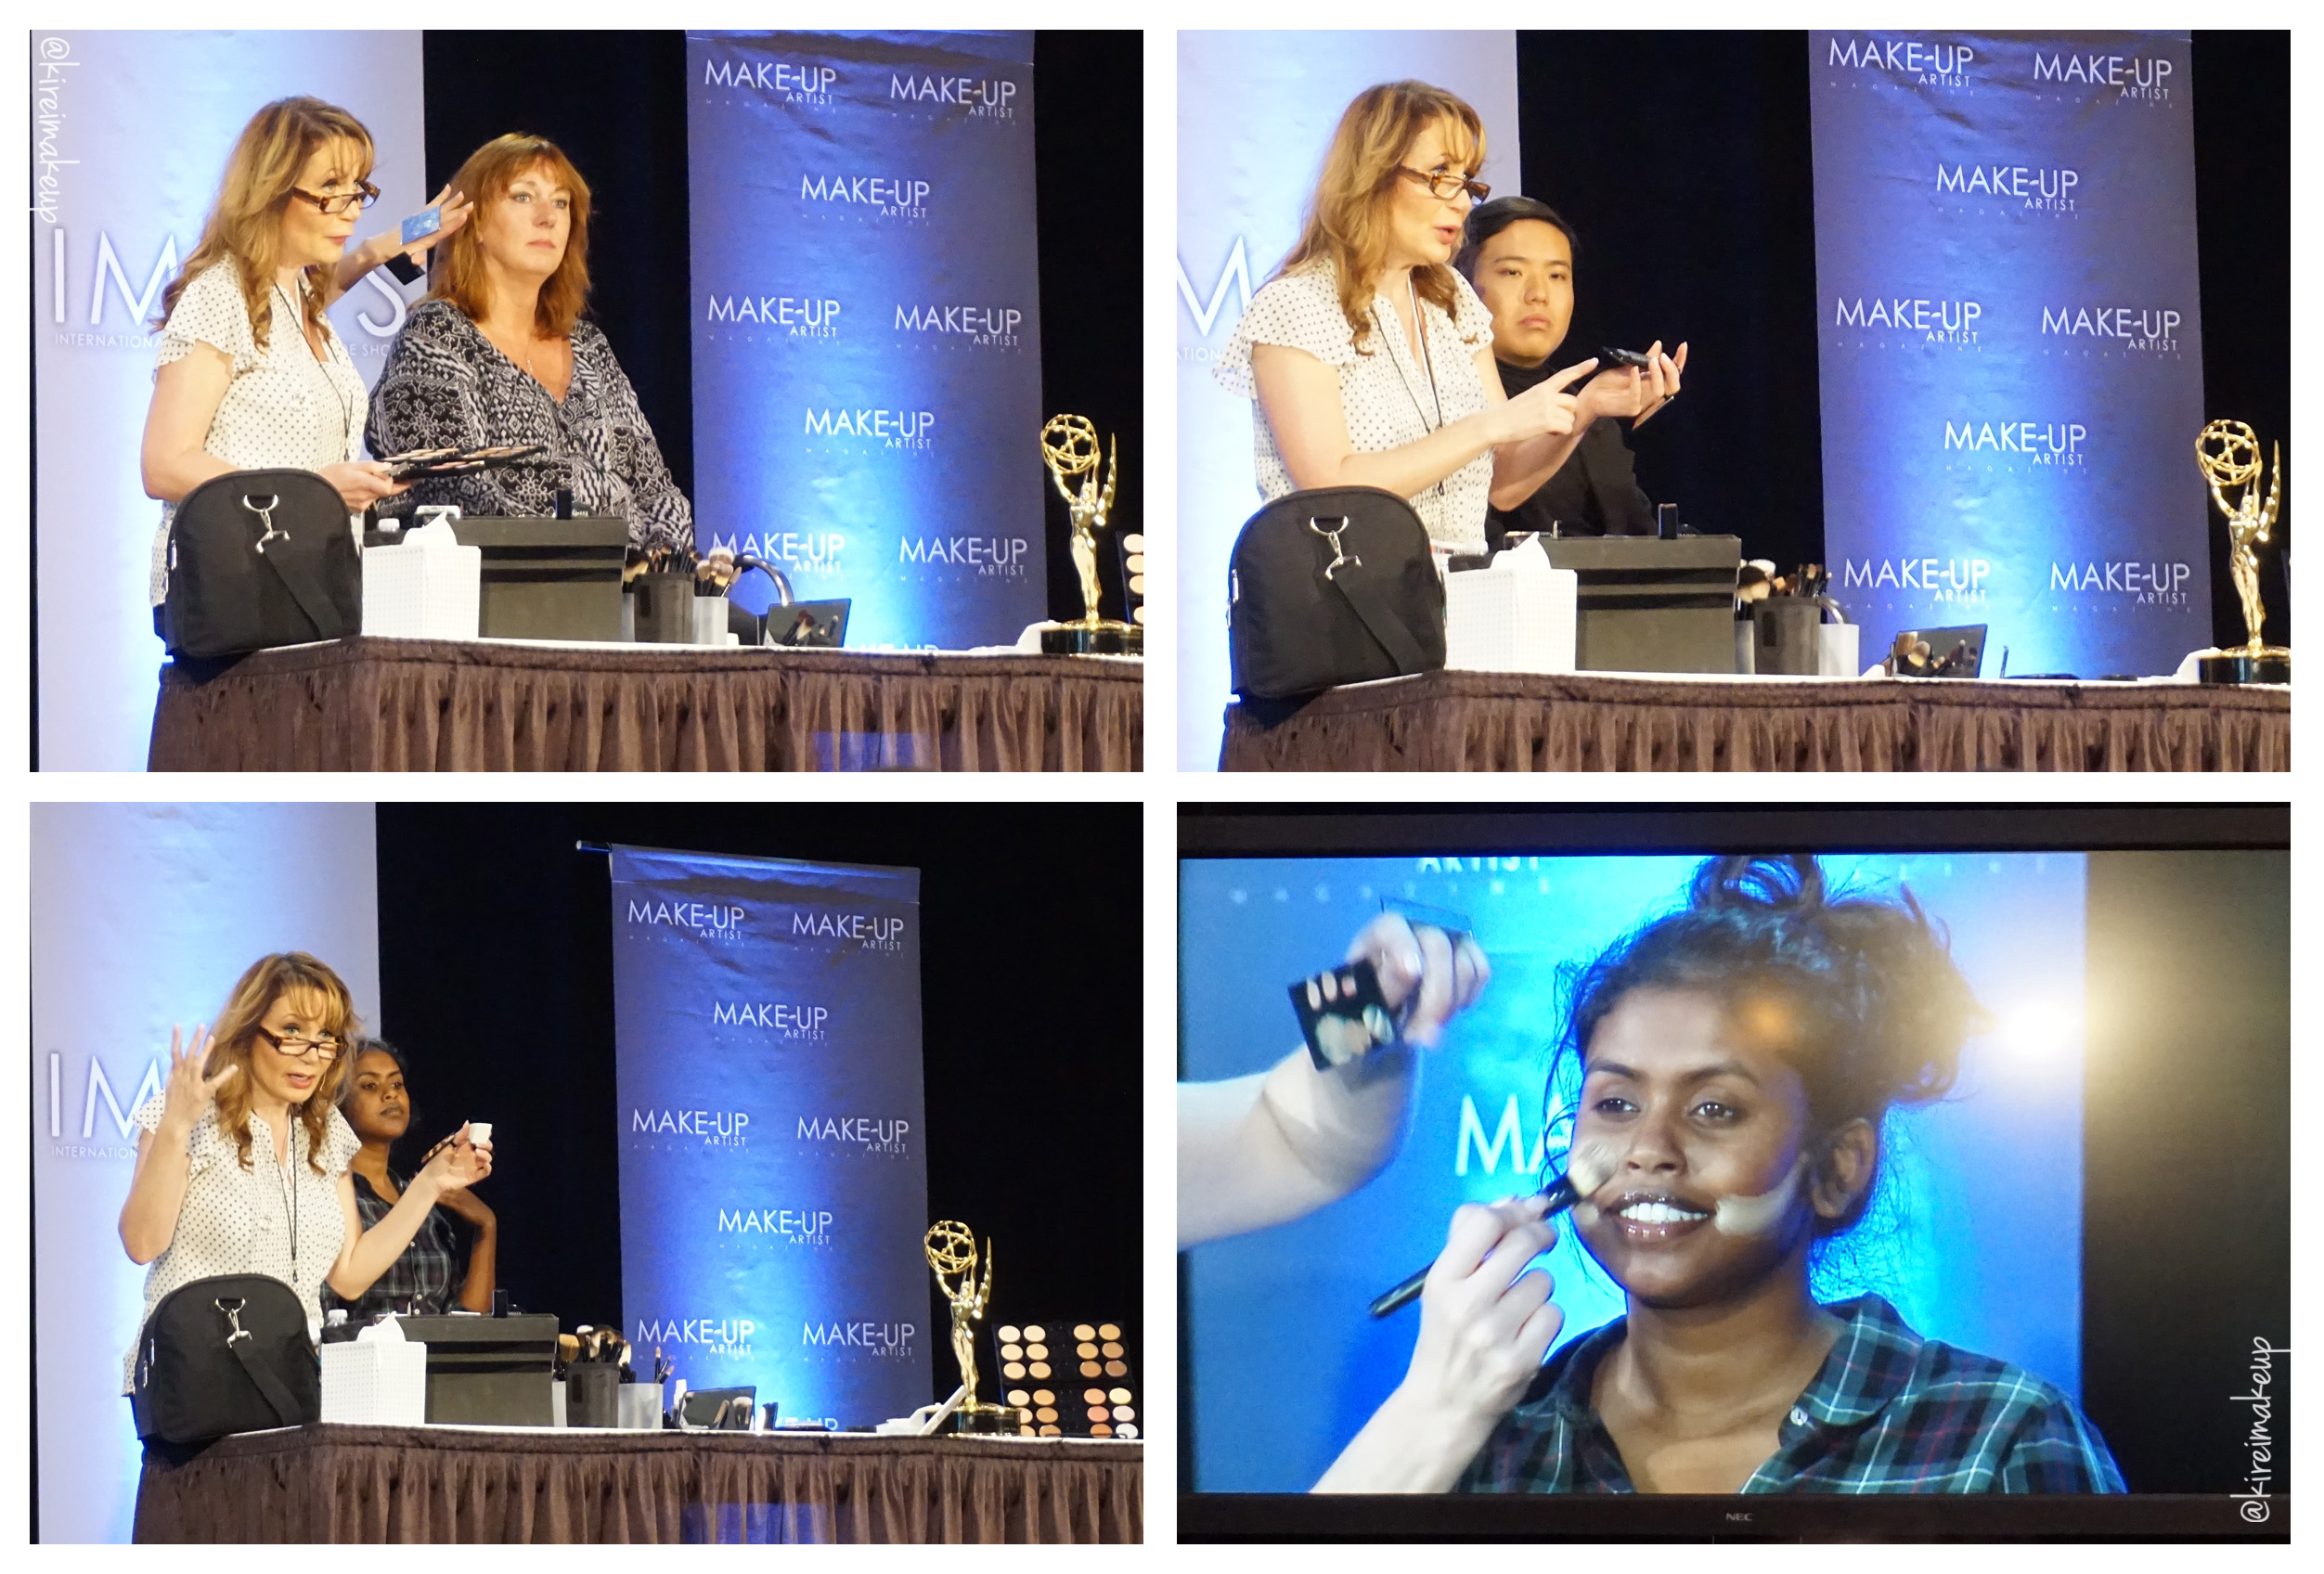
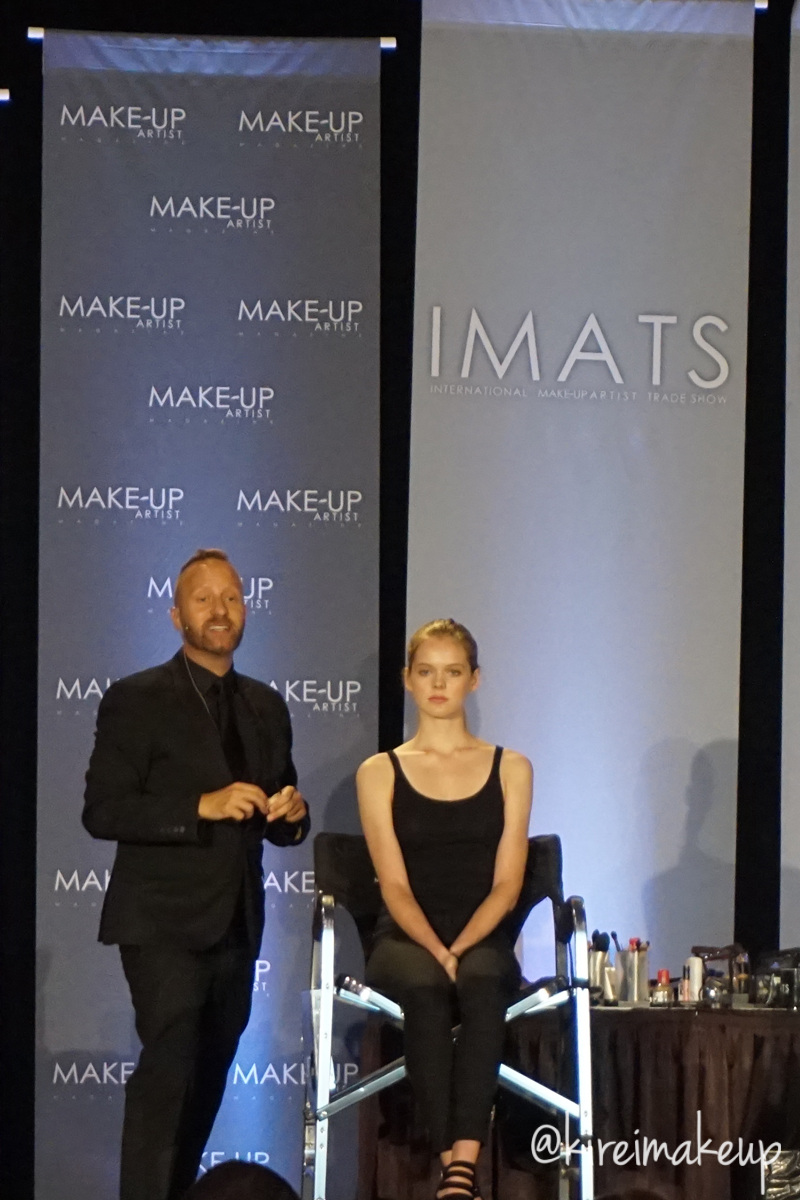
Eve Pearl Makeup Demo
All the makeup workshops were amazing! I cannot say enough about these classes. I only managed to sit in on 2 classes this time, but it was really fun and informative. For beauty, I went to Eve Pearl makeup demo. She started out by giving us tips on how to make it in the industry, how to pack our makeup kits and how to work on clients. Then, of course, she proceeded by showing us her famous “Reverse Contouring” technique. I live tweeted during the workshop, so check out my twitter!
Eve was given an hour for her class, and within 45mins she managed to do 4 makeup while talking to us and answering our questions. I only took pictures of 3 of the attendees, but there were actually 4 whose makeup was done by her. She showed us how to do her “Reverse Contouring” technique on all skintone, just by using her Pro kit. I’ll try to apply this technique on myself in the future, so wait for the post!
Gregory Arlt
I wanted to attend Gregory Arlt beauty class, but I didn’t manage to do so since I wanted to see The Strain demo. So, I do apologize for being unable to share any tips he shared. I know a couple other bloggers who attended this class, and they might have tips on their blogs! Anyways, I managed to snap this picture of his class moments after The Strain demo, and before I saw Michael Key walking around.
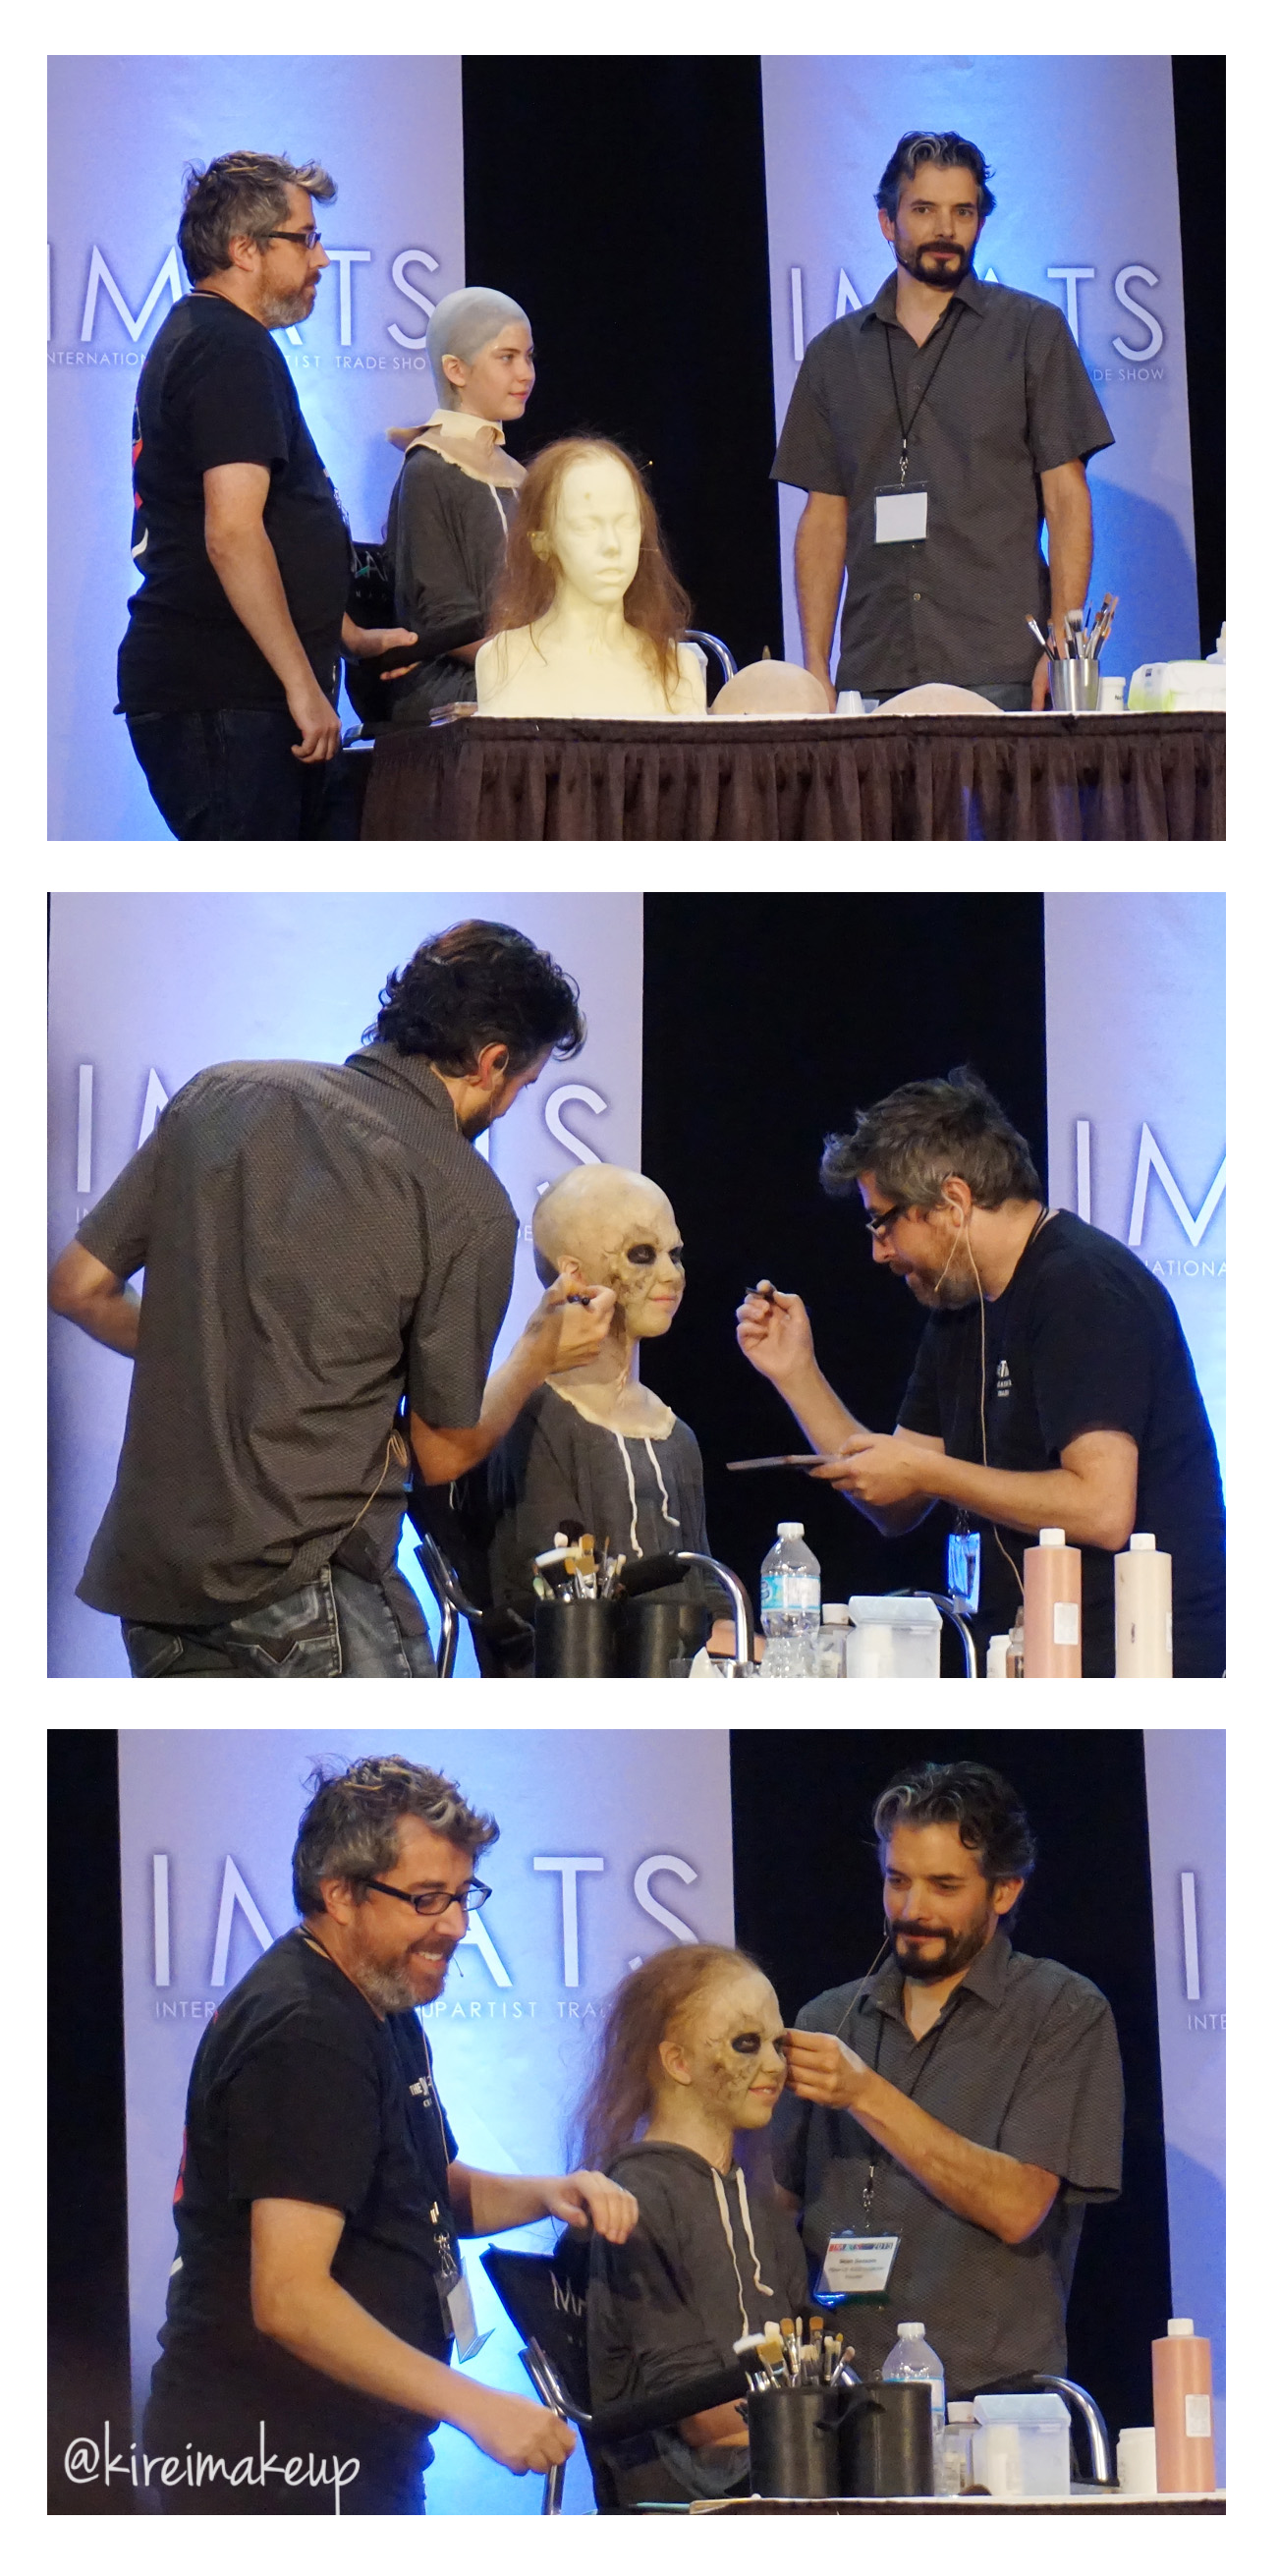
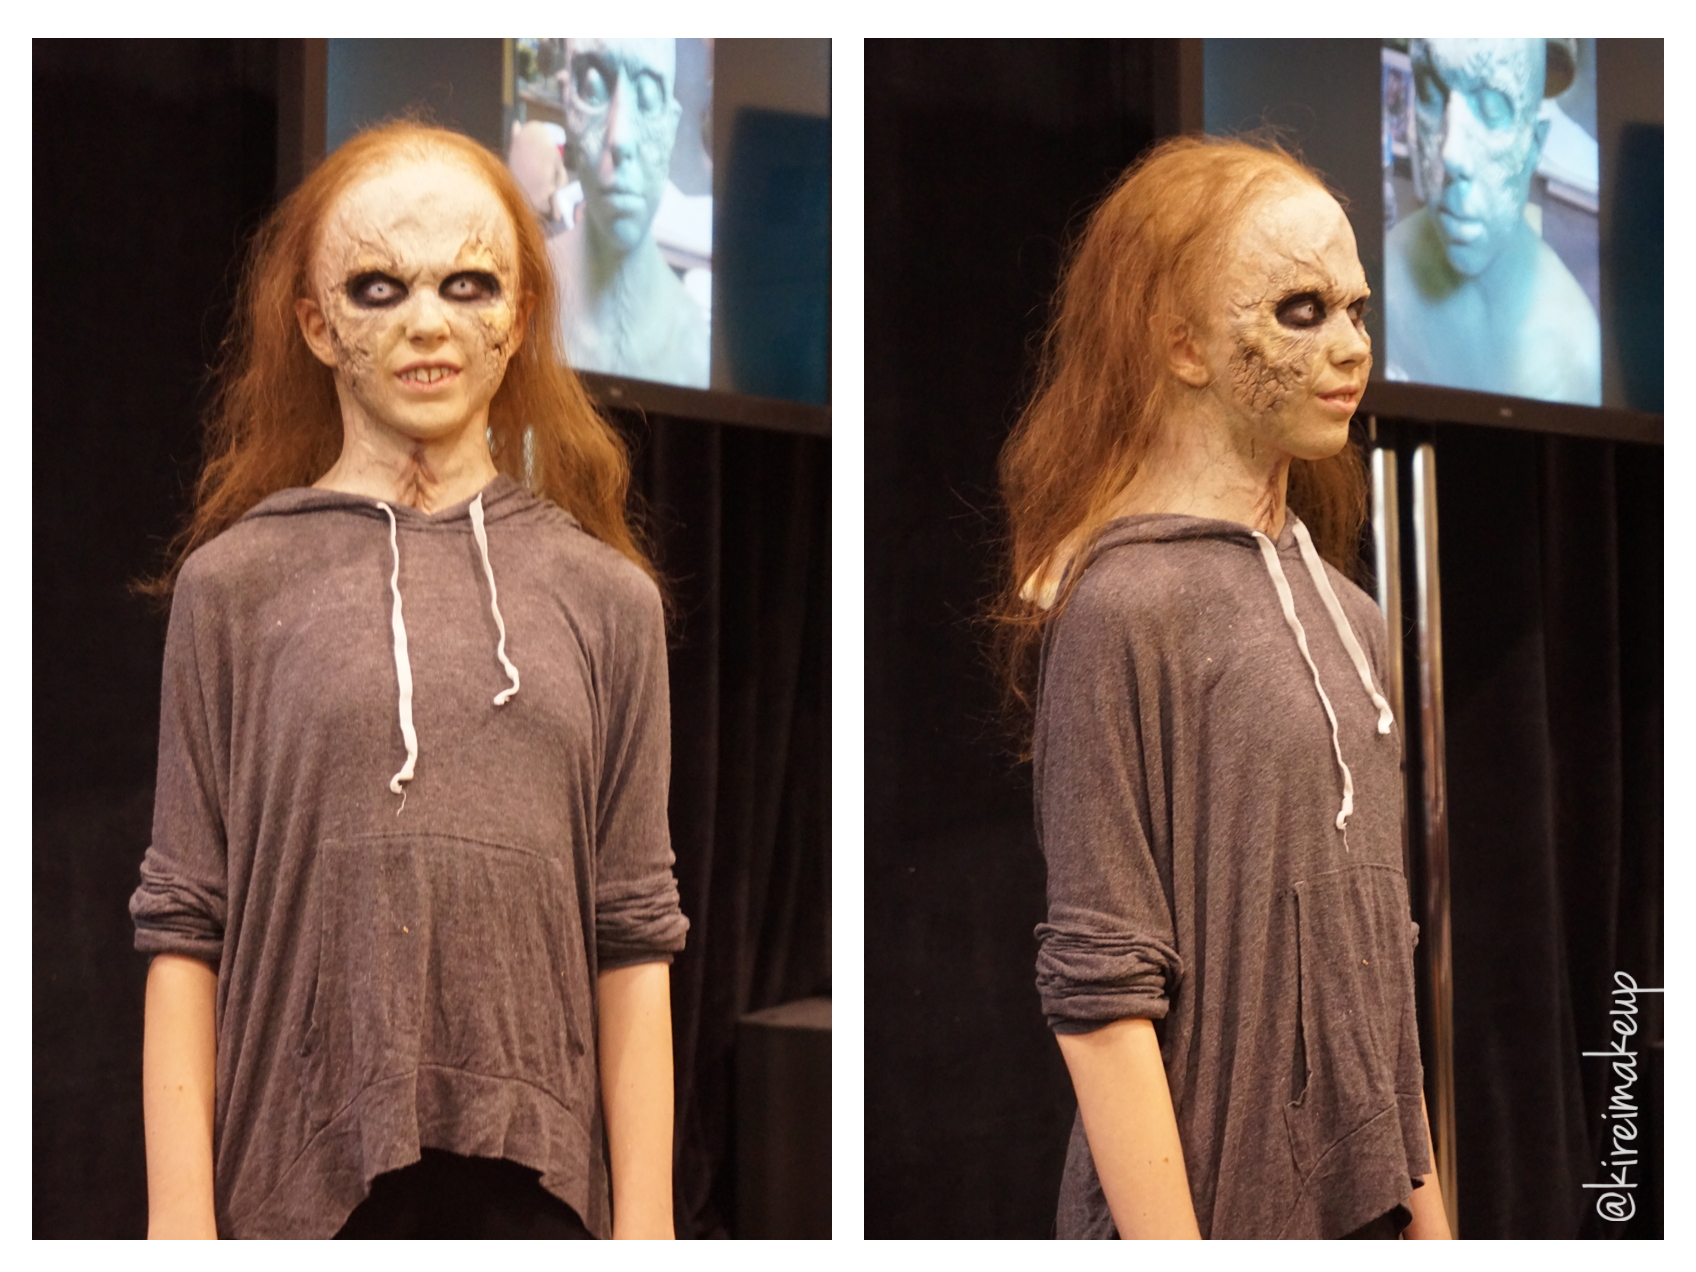
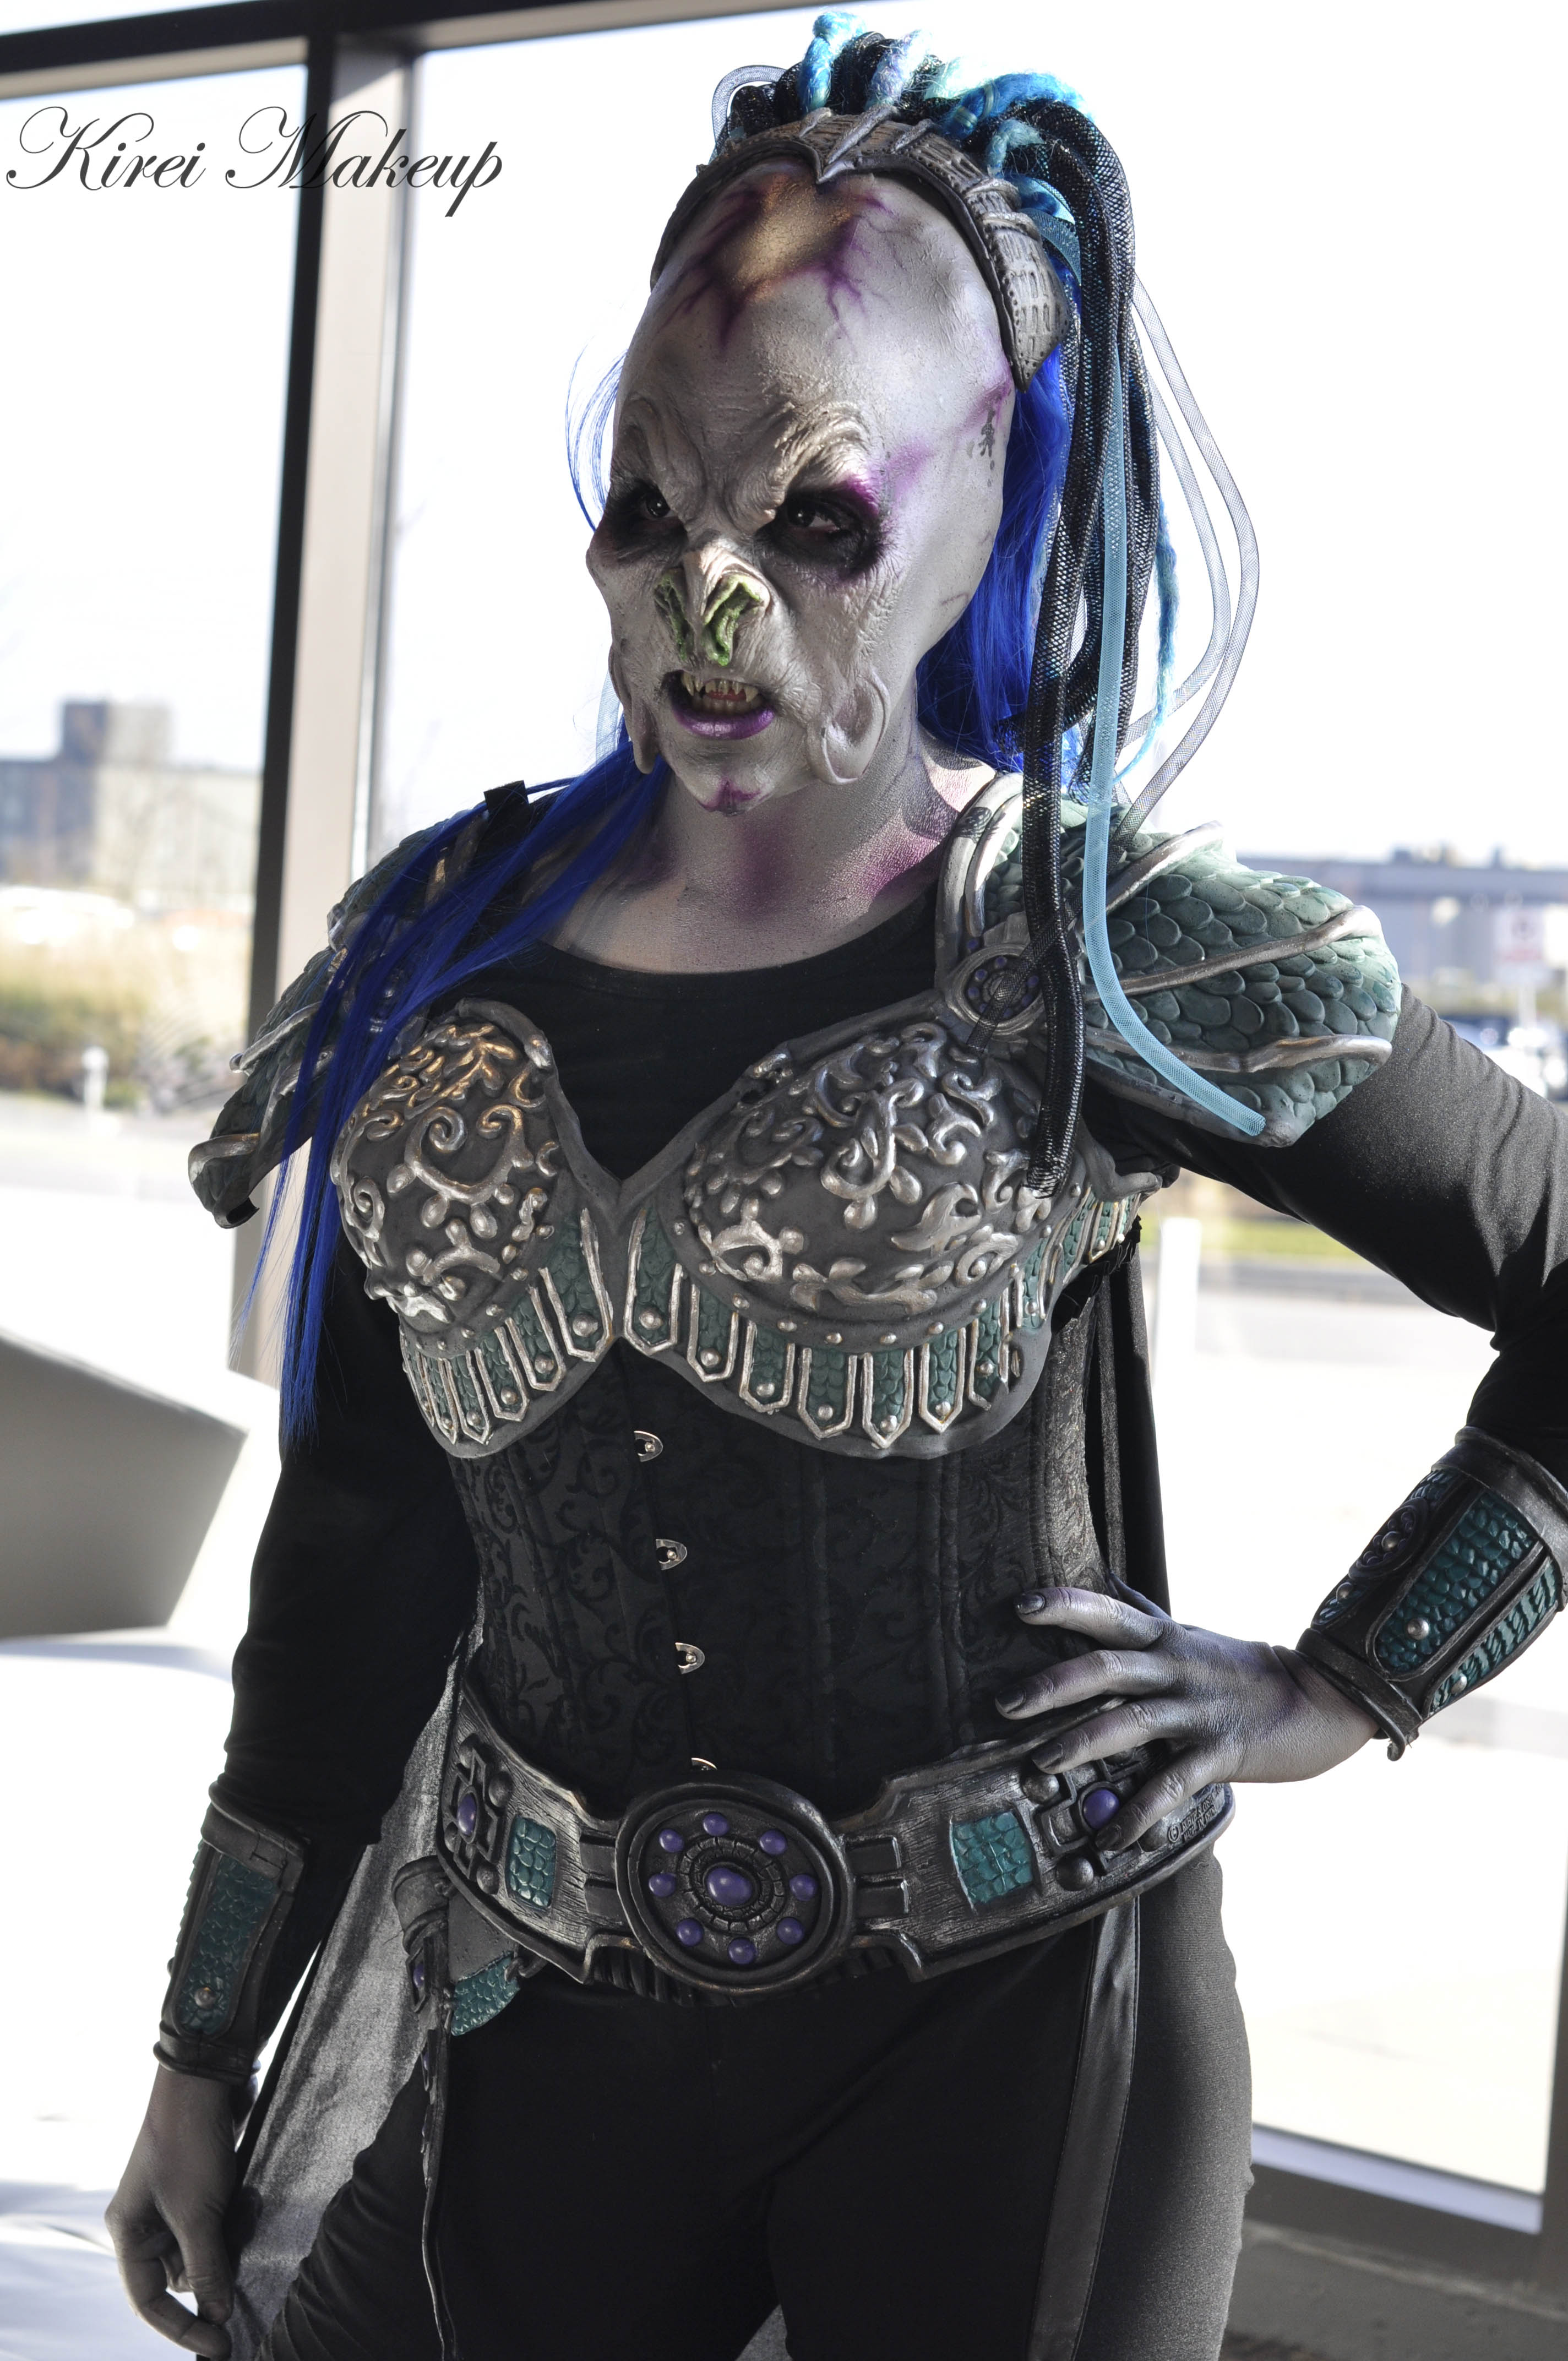
The workshop that I really wanted to attende to was “The Strain” Character Demo done by Sean Samson and Neil Morrill. This demo took 1.5hr. Sean and Neil showed us how they applied the Foam Latex pieces, they also demonstrated how they colored the pieces. It was pretty great since N and I loved the show, and we really enjoyed the demonstration. They told us that during the filming, these prosthetic pieces took around 3hr to be put on the talent.
The Strain DemoThe Strain Demo
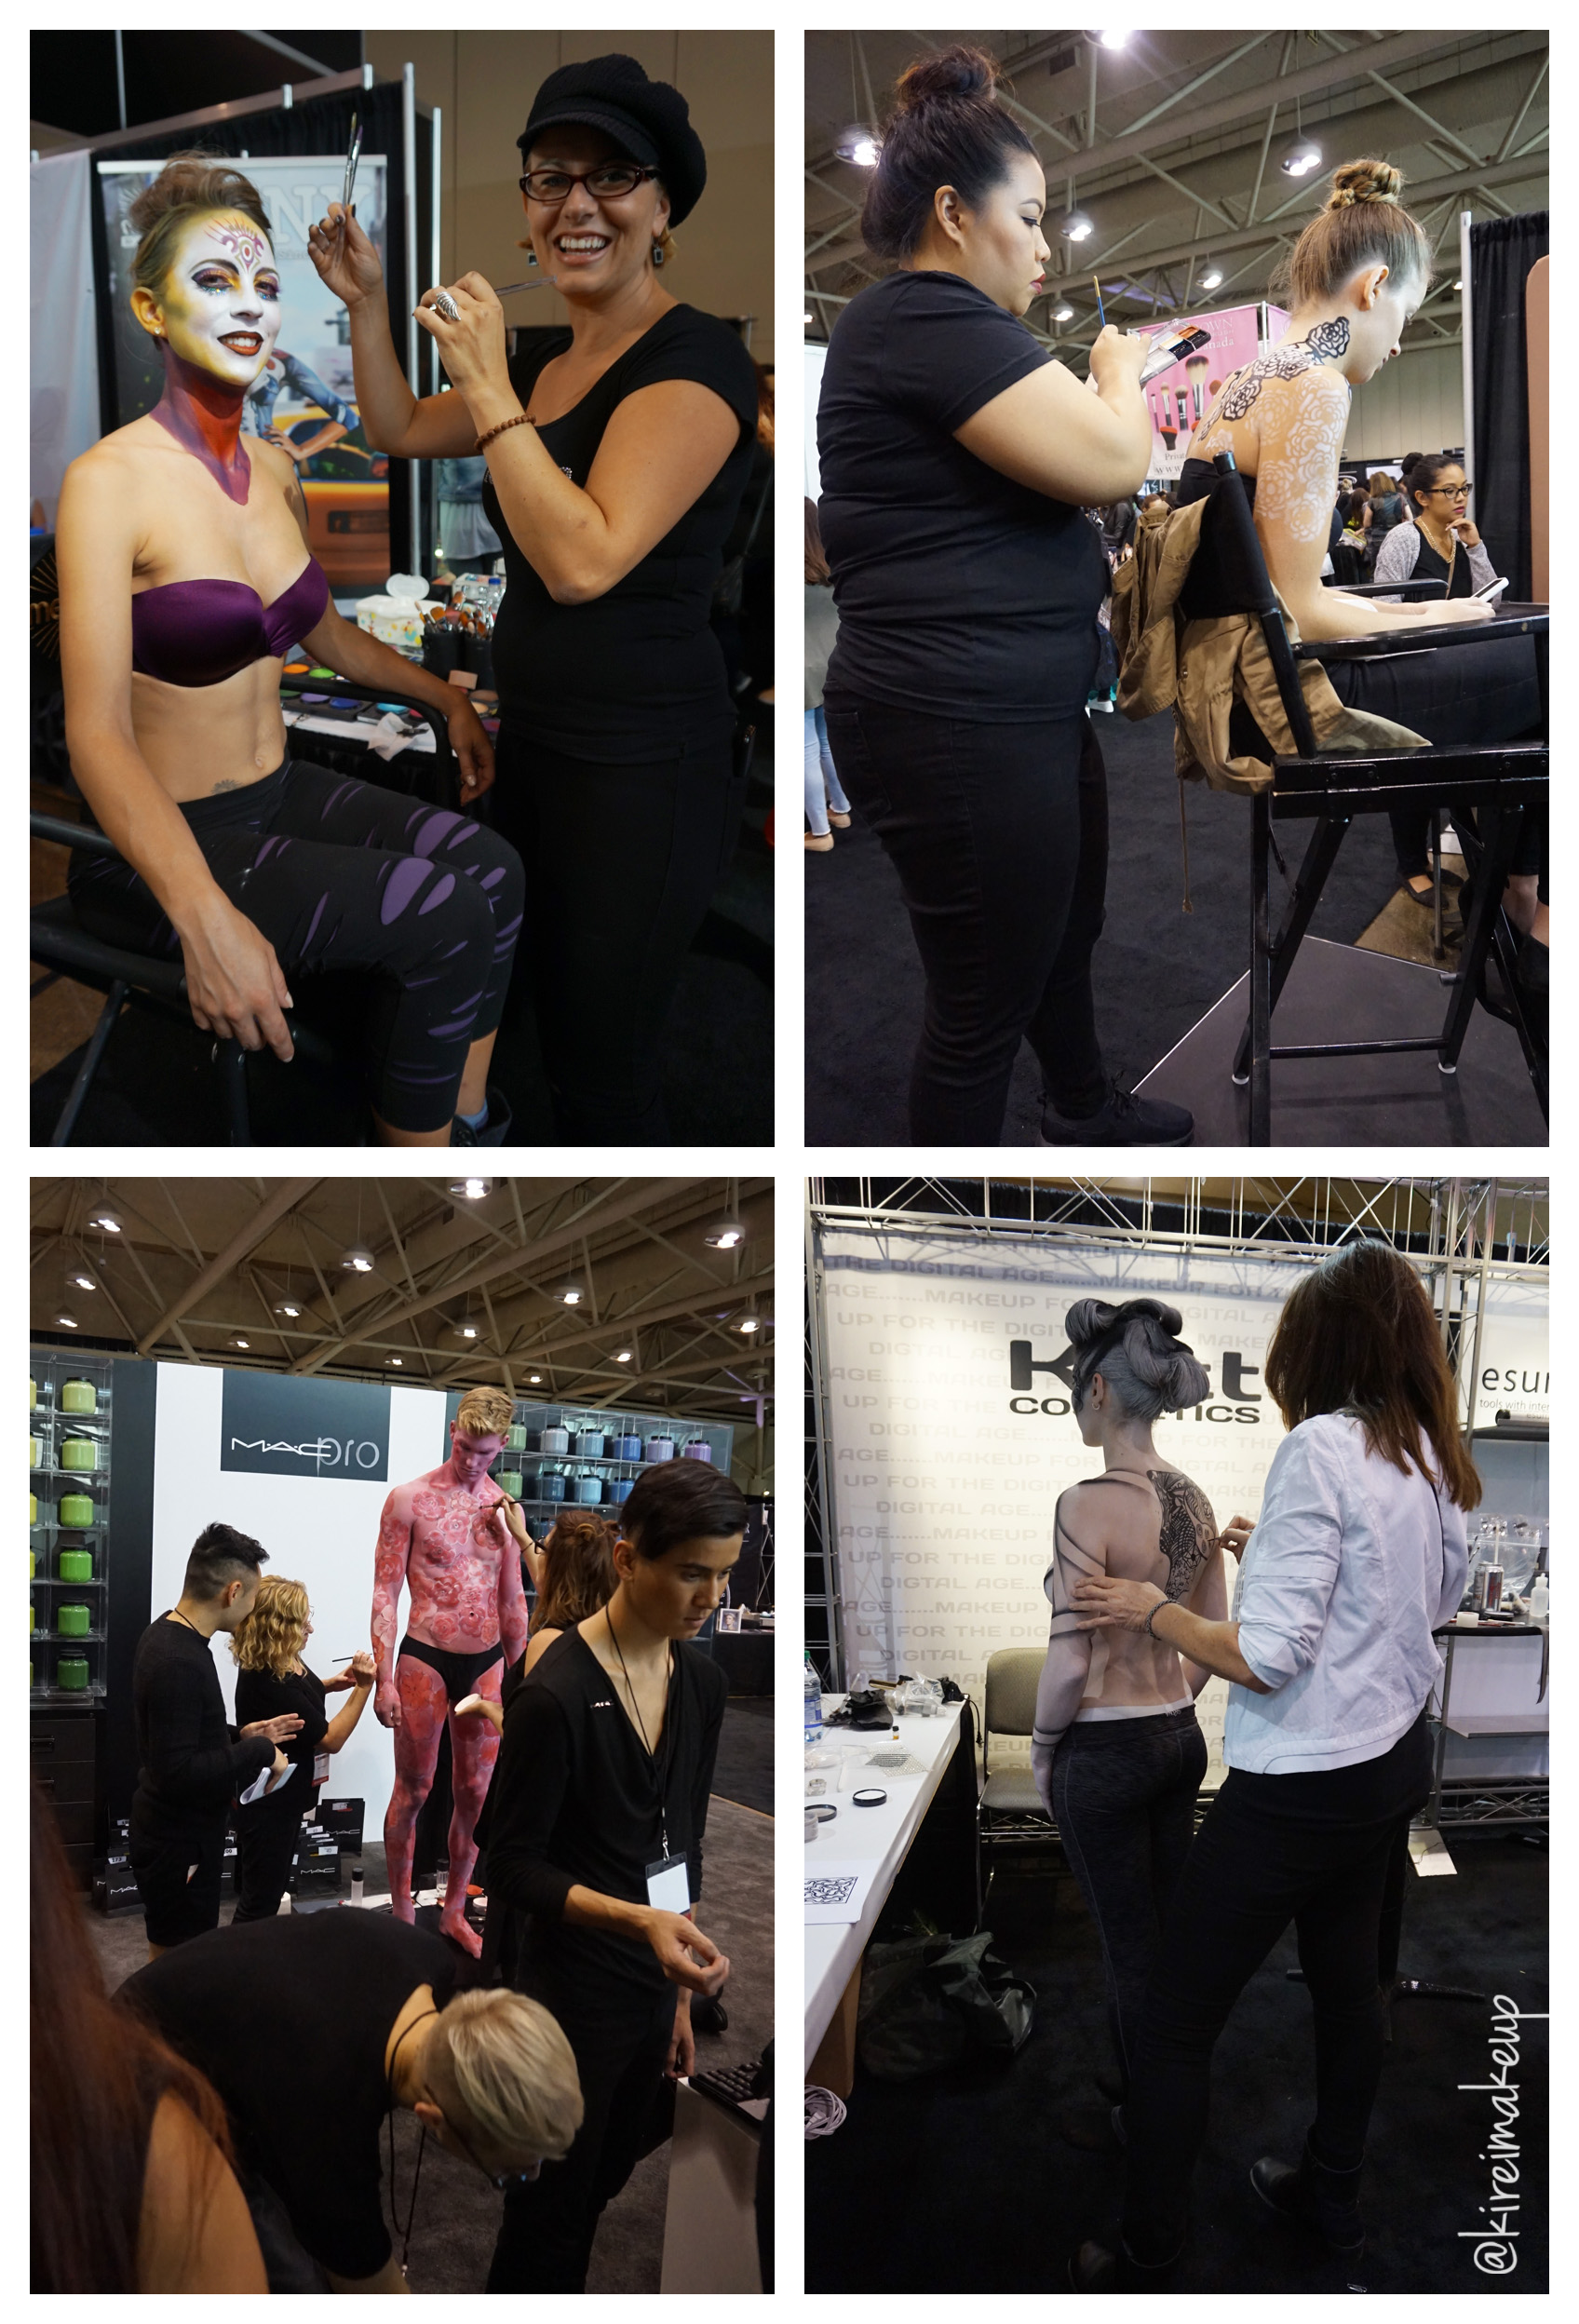
Besides the workshops and meeting all these amazing makeup artist, I walked around to take a look at what the booths offer. I absolutely love how some of these amazing makeup artists took their time to talk to the attendees. As you can see on the pictures below, Sebastien Tardif and Eve Pearl were showing attendees how to correctly apply their products to enhance their beauty!
Of course there would be lots of body painting around the IMATS. Pretty, colorful, and meticulous. These body paintings took hours to complete. There were some demo on how to cover tattoo, and prosthetic application as well in some of the booths.
Sebastien Tardif & Eve PearlBody Painting
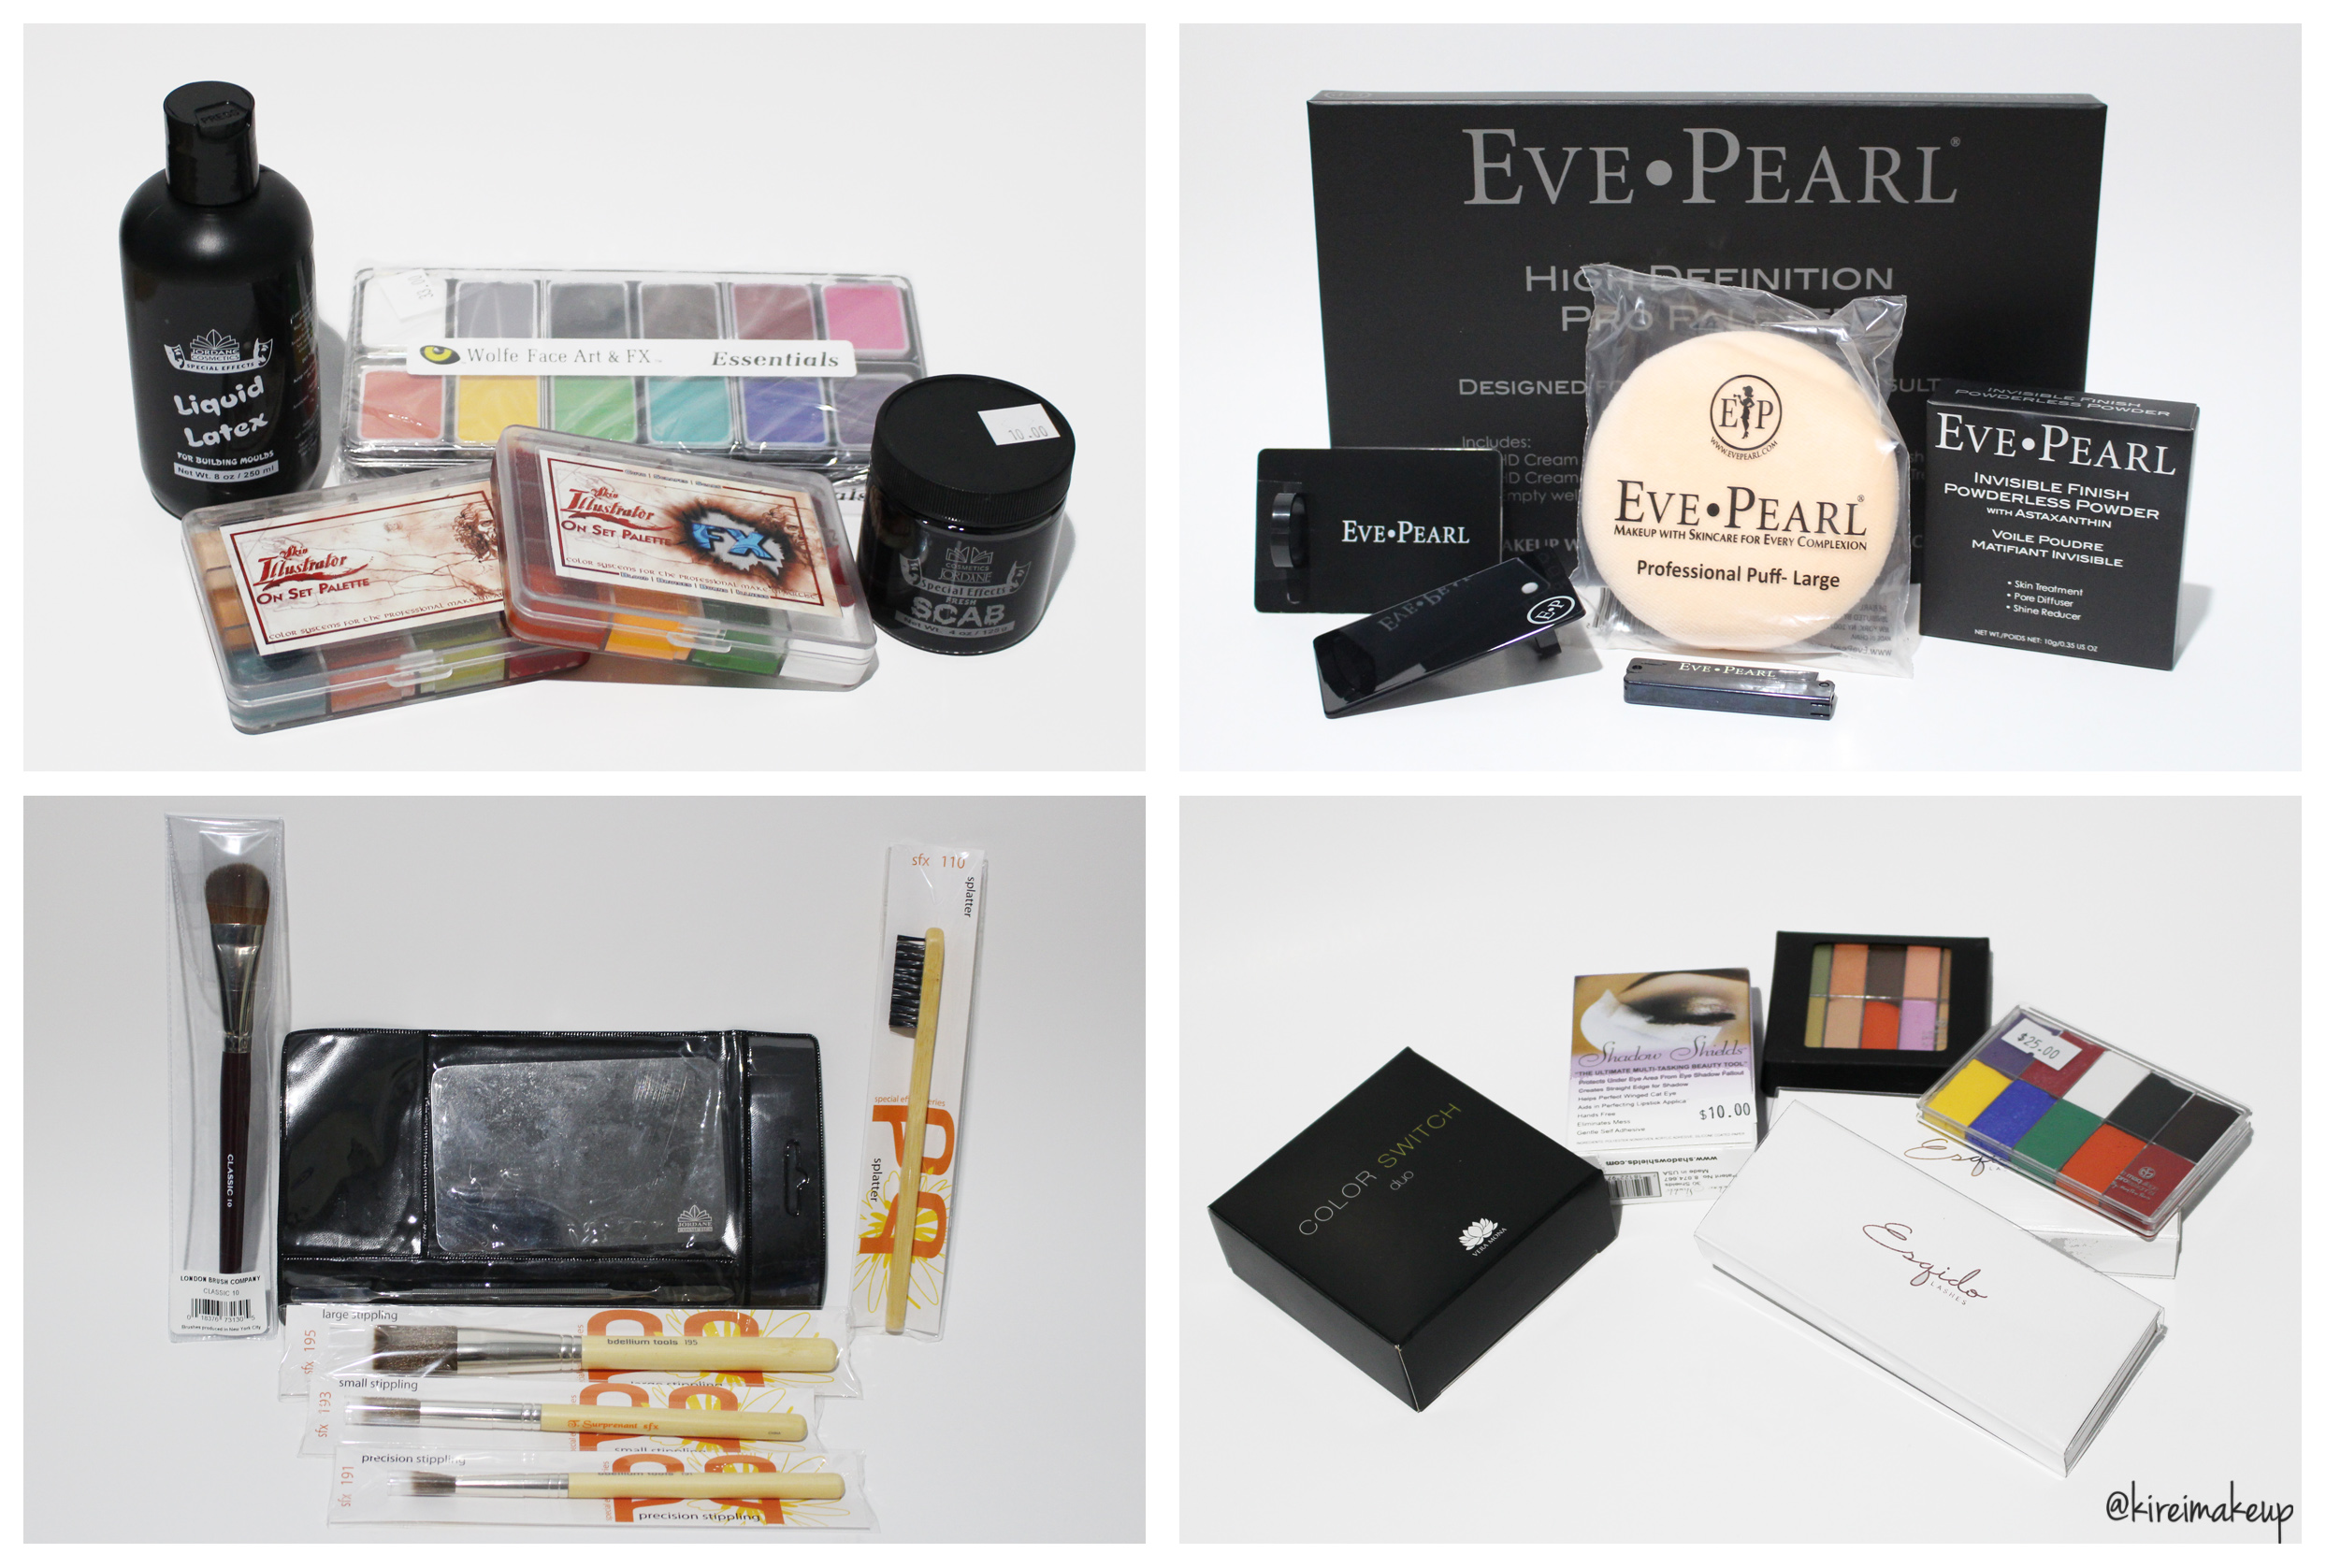
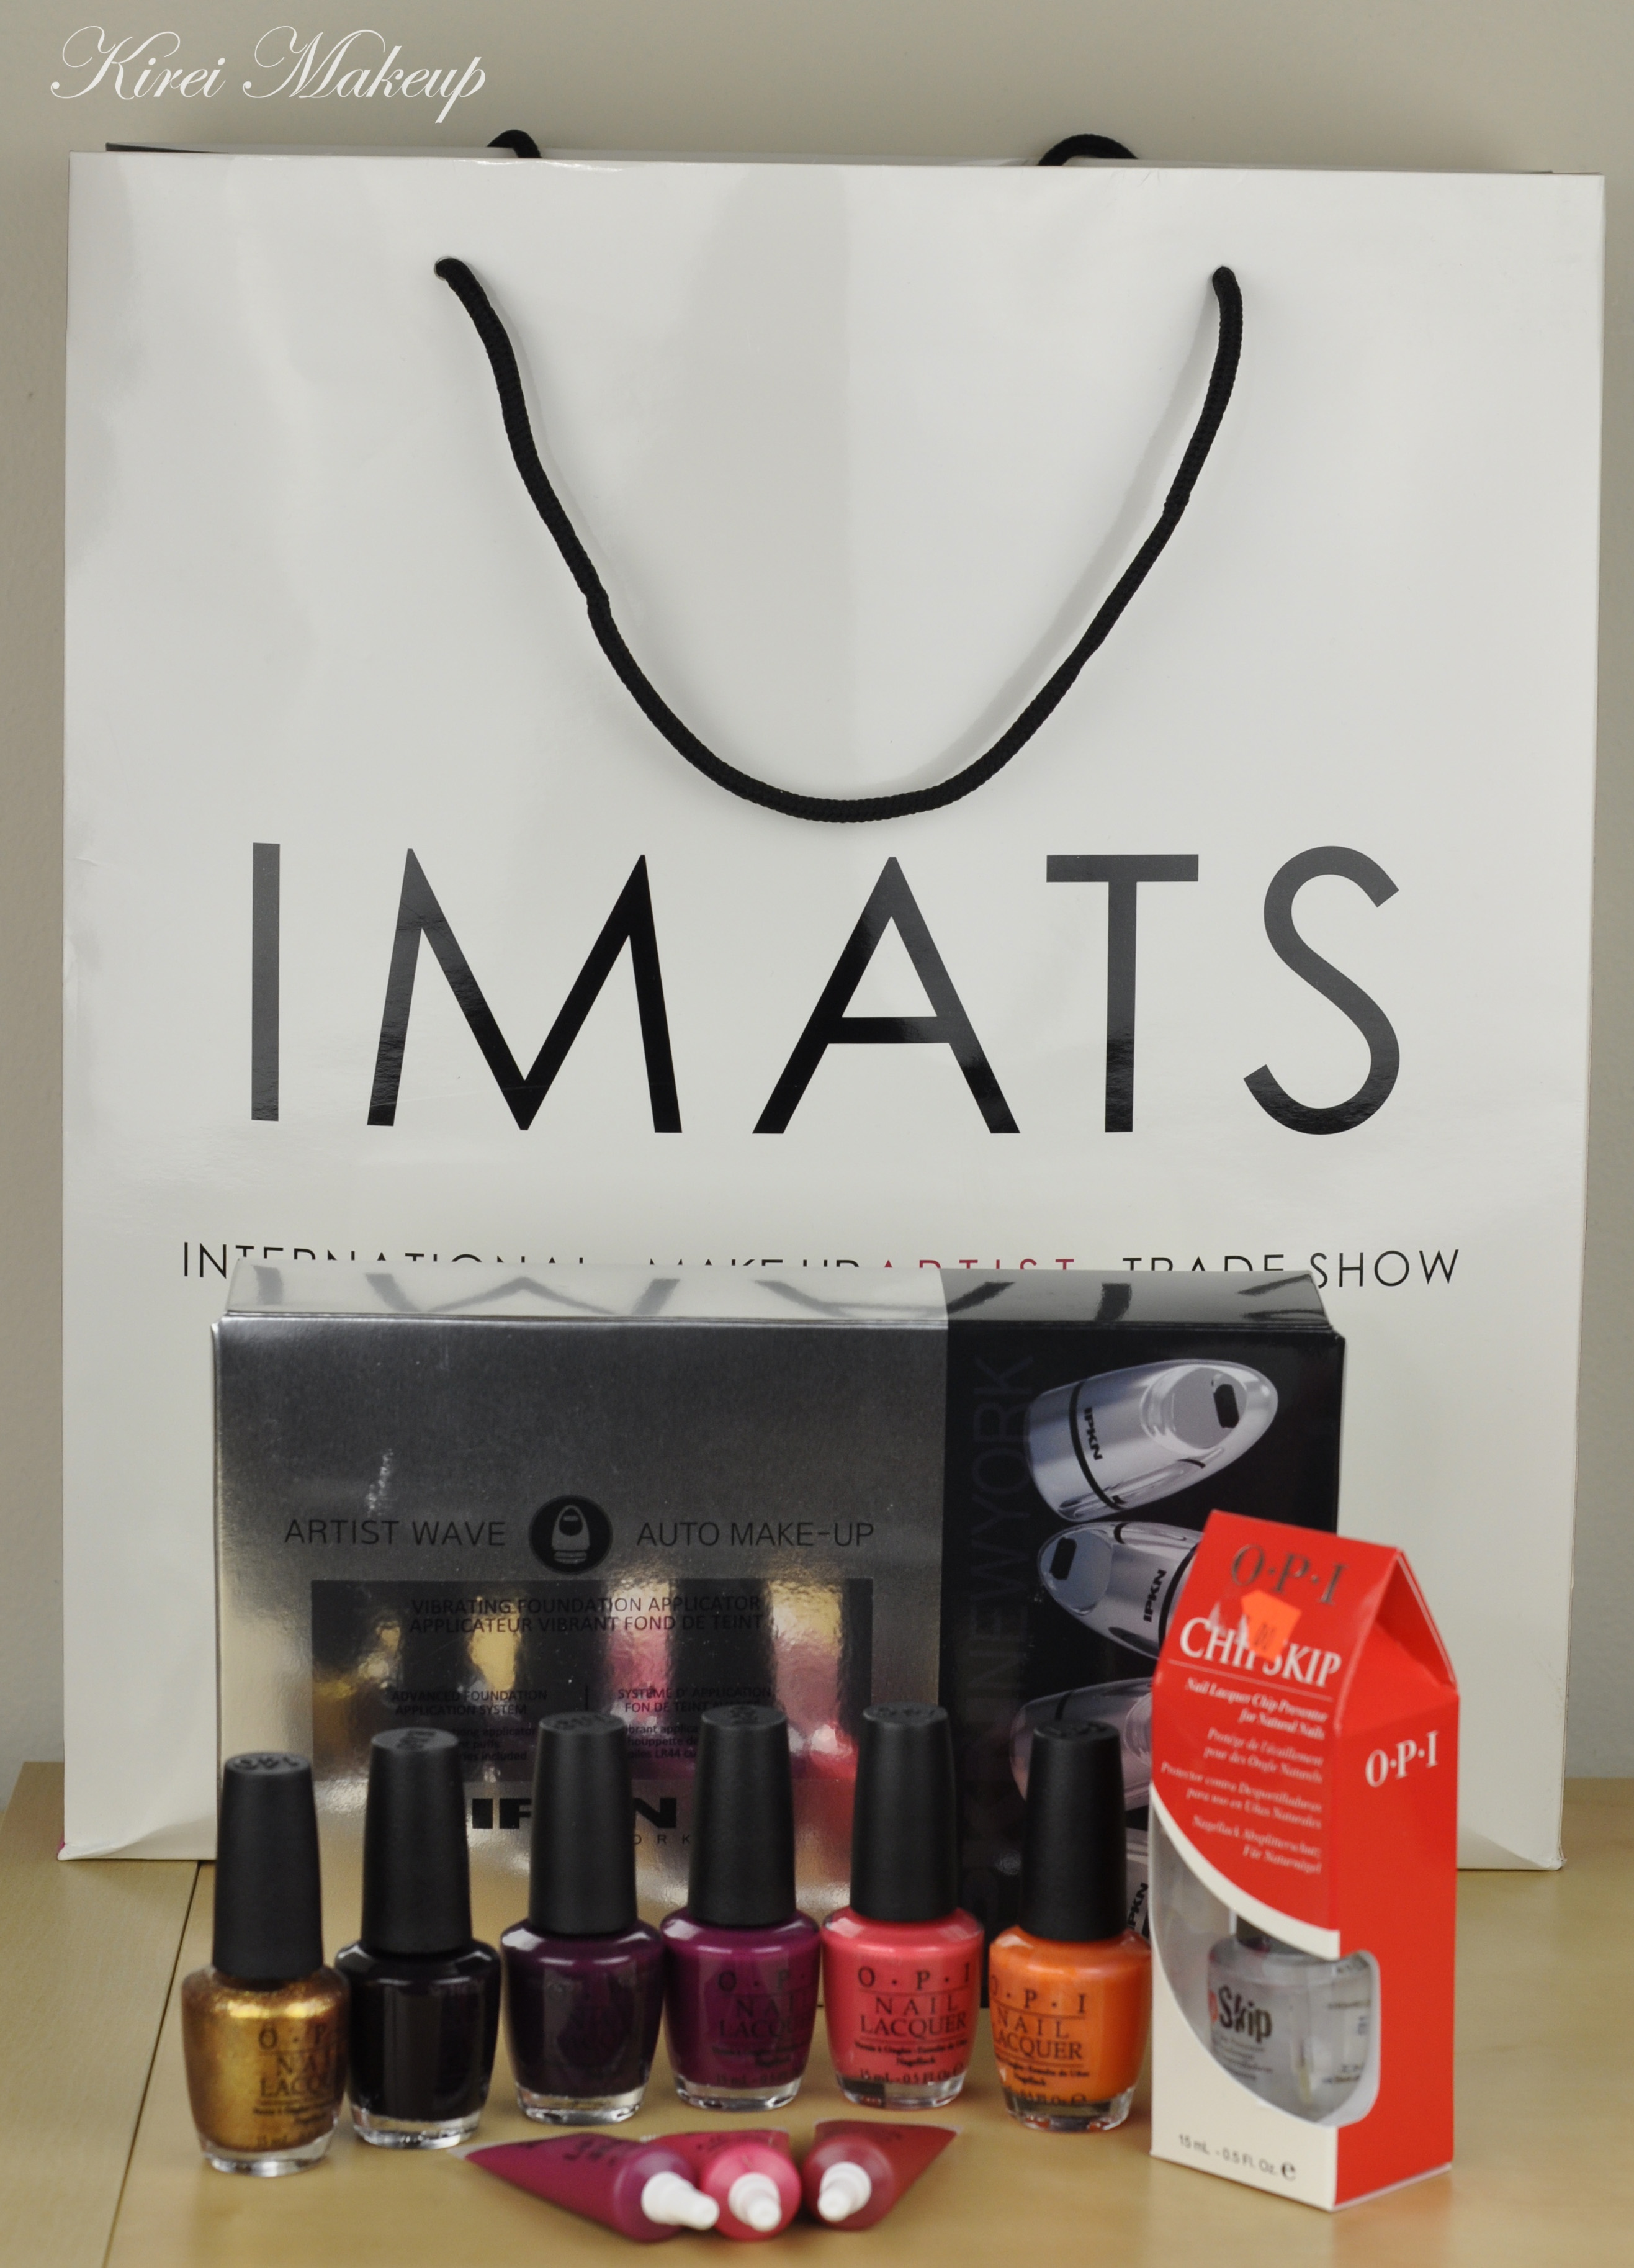
I, obviously, have to do some shopping around! There were some good deals on the products. I bought a smaller version of the illustrator palettes, scabs, liquid latex, and Wolfe face paint from Crown Brush/Jordane Cosmetics. I bought Eve Pearl’s Pro Kit, Invisible powder, powder puff, eyebrow razor, and finger palettes. Eve really gave great discounts! The powder puff was only $1, the Pro kit was only $100! What a steal!
Other than that, I bought a couple of spfx brushes from Bdellium, another palette from Crowne, and some other miscellaneous stuffs – MAQPro cream corrector and primary color from MUSST, mink lashes from Esquido, and color switch along with shadow shield from Nigel.
I think everyone is super excited about this palette, so here is my Kat Von D Mi Vida Loca Remix palette swatches! I will not be breaking it down like I usually do on my reviews, since I just got this palette. I’ve only used it once, so I can’t really say much about it. For reviews, I prefer to use the product several times first before actually posting a review. However, since a lot of my fellow beauty bloggers are as excited as I am to see this palette and its swatches, I’m posting this as a “First Impression” instead of a review.
*This palette is no longer on the Sephora website at the moment I’m writing this (Sept 17, 2015). Once it goes back up on the website, I will update this post with the link and KVD official description of all the shades. Currently, the description of the shades are based on my own opinion and experience.*
*Update (Sept 18, 2015): It’s back online in Sephora! Grab it while it lasts!*
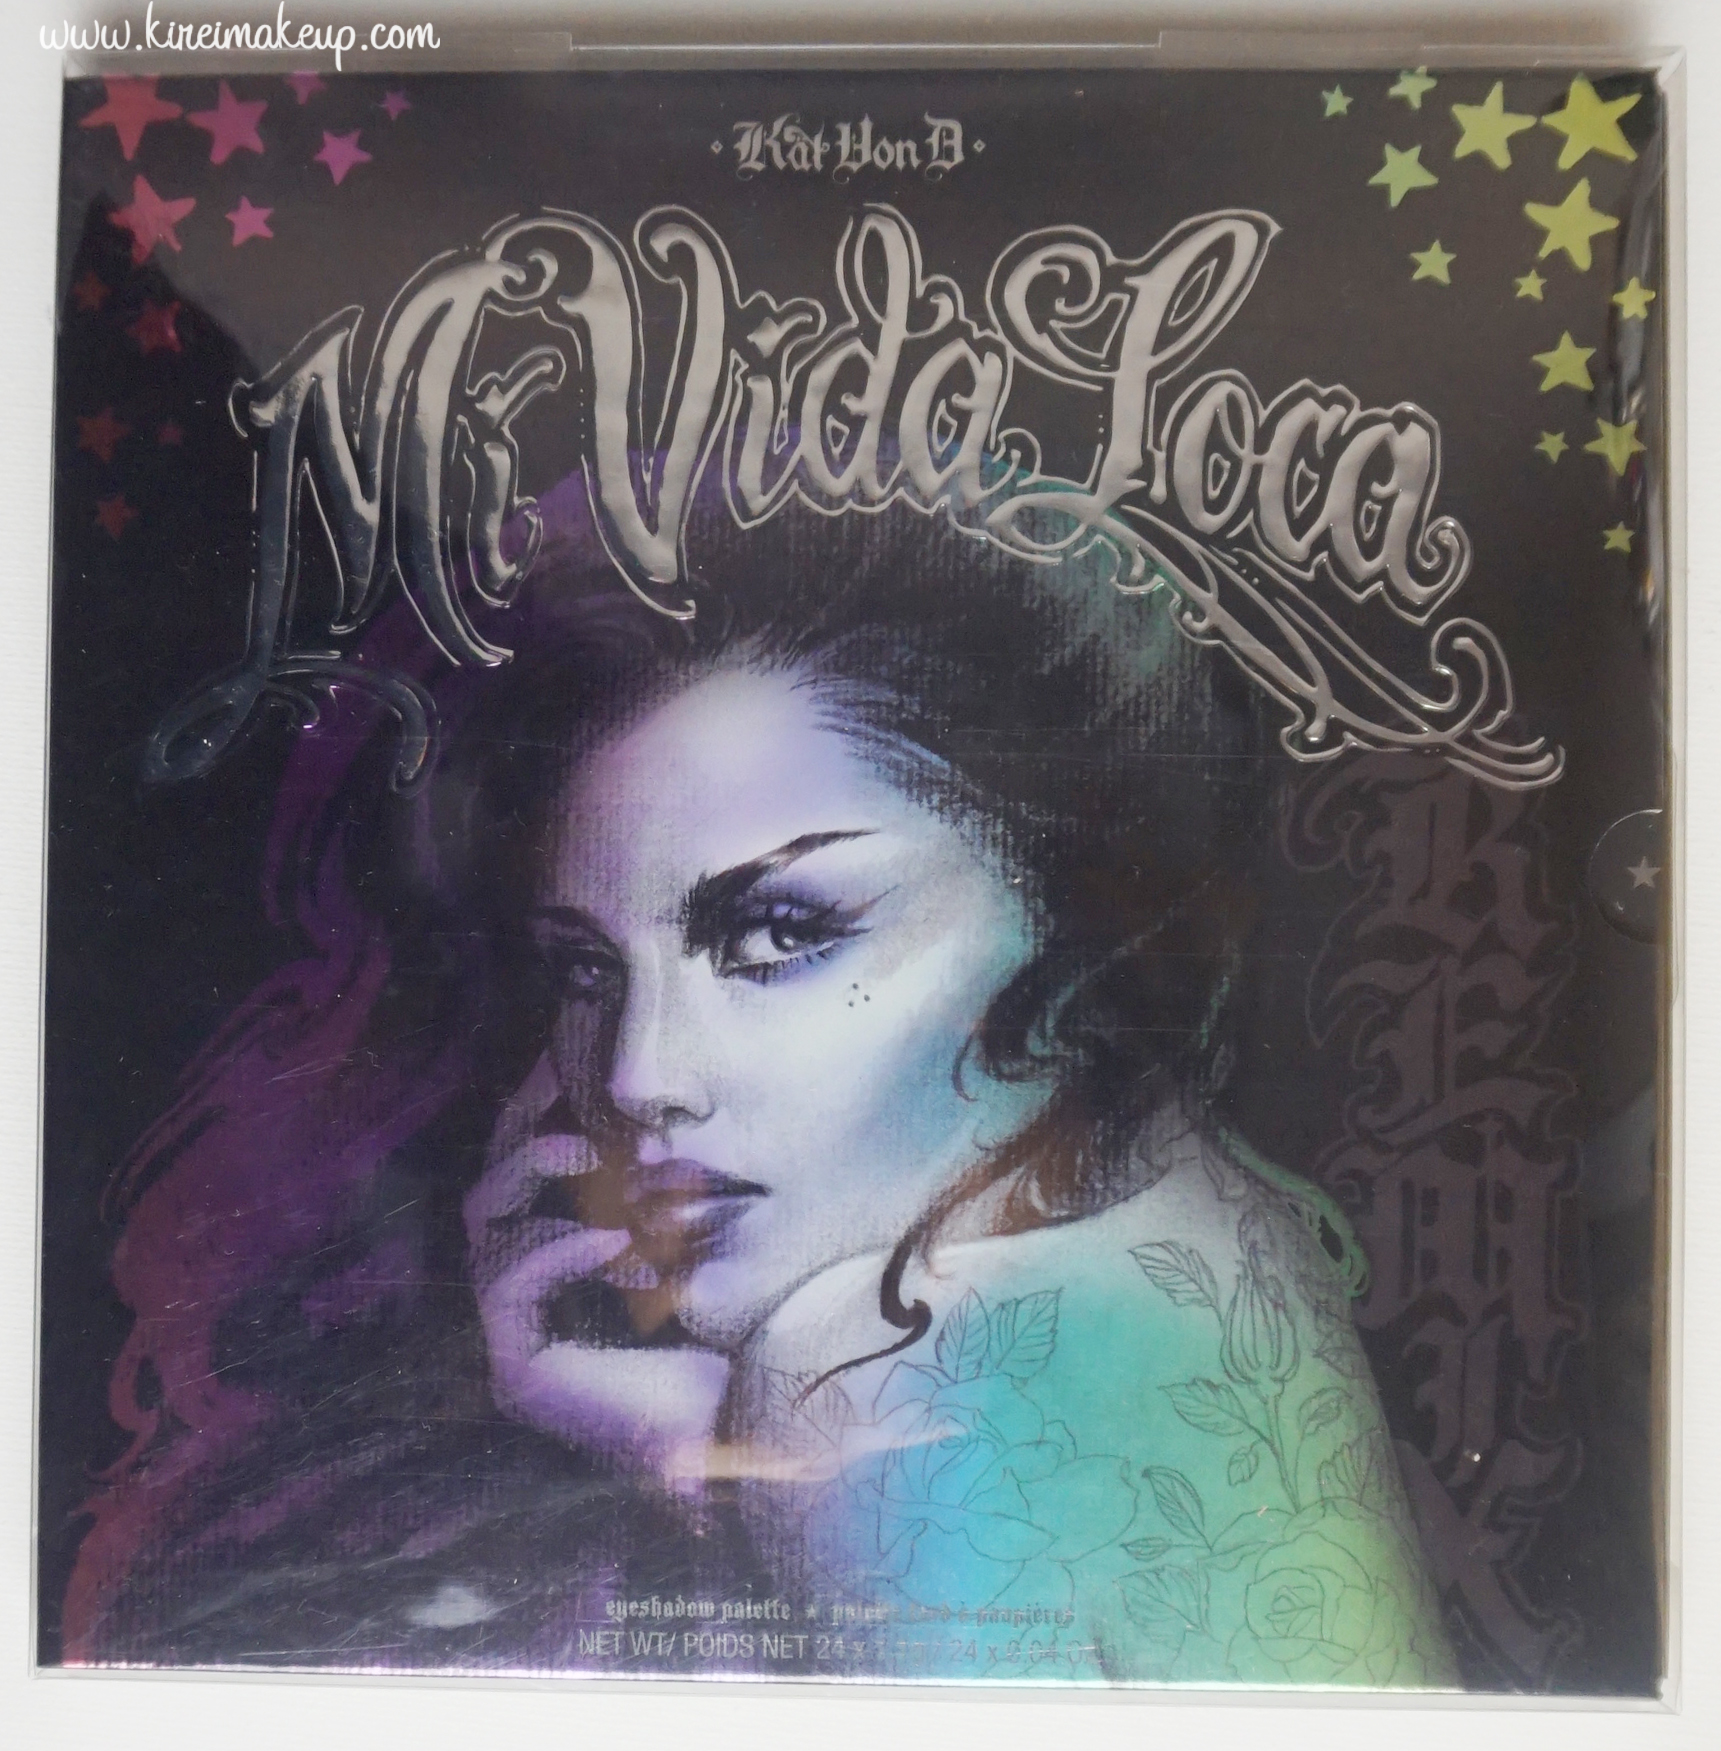
I’m not sure if you know this, but Kat Von D has released a Mi Vida Loca palette a while back if I’m not wrong. Her original Mi Vida Loca palette was part of her True Romance series collection and was way smaller (8 shades). This new palette, called the Kat Von D Mi Vida Loca REMIX palette, is a lot bigger with a whole loads of new shades (24 to be exact).
This Mi Vida Loca Remix palette has a gorgeous art cover. Most of Kat Von D’s products have beautiful packaging, but this palette has a breathtaking art cover. The palette also comes with an insert containing 3 looks you can replicate using the shadows from the palette. Since this palette was inspired by a vintage vinyl, the packaging comes in a sleeve-type cover, not her usual lid case.
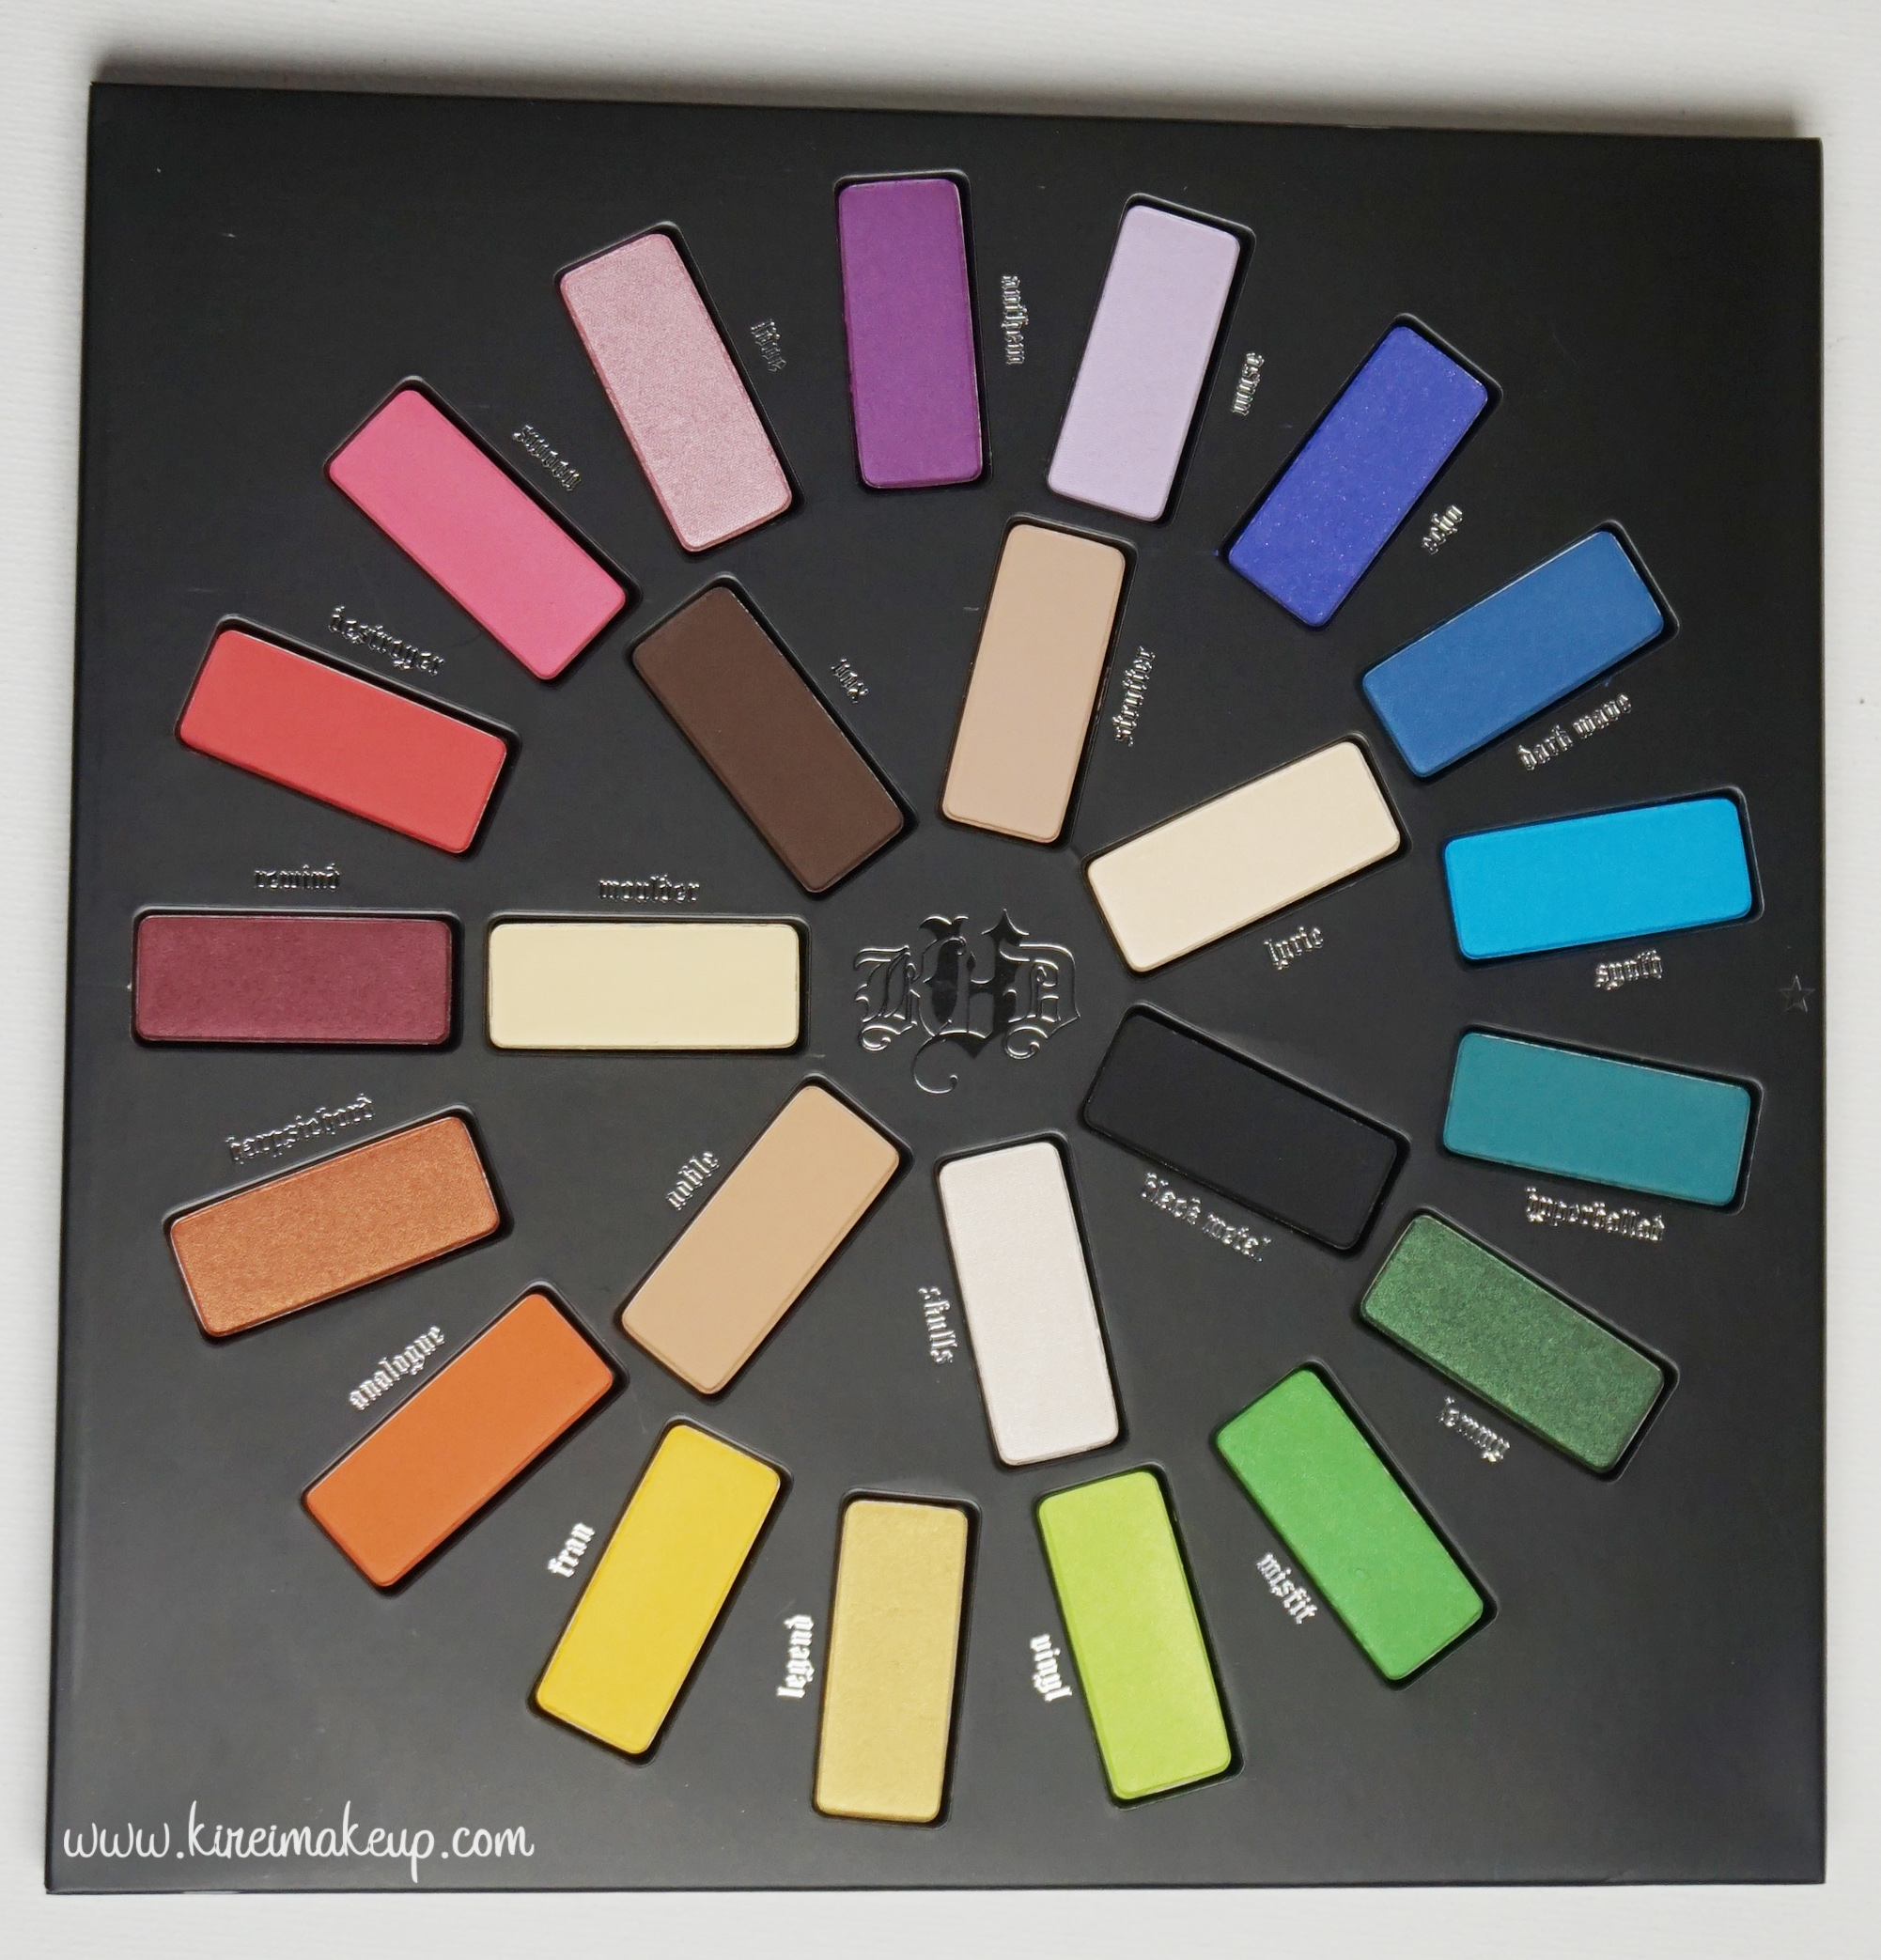
The palette comes with an amazing array of shades from neutral to colors, from matte to shimmers. A lot of people are having issues with the placement of the eyeshadows in this palette. Apparently because of the awkward placement of the inner circles in relation to the outer circles. The eyeshadow pans of the inner circle don’t match the ones on the outer circle! I don’t really mind it, for me what’s important is the quality of the eyshadows, so the misaligned circles don’t really bother me much.
As I’ve mentioned before, this palette comes with a whopping 24 shades of eyeshadows, 7 of which are neutral shades and the rest are colorful bright shades. The only 2 eyeshadow pans that align are Moulder (inner) and Rewind (outer), so on the list, I’m going to start from those 2 shades going clockwise (or up the circle). The description of the shades and finishes here are NOT the official description from Sephora/Kat Von D. Update – descriptions below are from Sephora’s website description box)
Neutral shades:
Moulder – butter yellow
Vox – chocolate brown
Strutter – taupe
Lyric– white pearl
Black Metal – matte black
Skulls– iridescent pearl
Noble – nude
Technicolor Vibrant shades:
Rewind – aubergine
Destroyer – bright strawberry
Swoon – fuchsia
Love – shimmery rose
Anthem –purple
Muse – lilac purple
Echo – purple glitter
Dark Wave – deep navy
Synth – electric blue
Hyperballad – sea blue
Lemmy – grass green
Misfit – kelly green
Vinyl– neon green
Legend – golden yellow
Fran – deep mustard yellow
Analogue – burnt orange
Harpsichord – metallic bronze
*This palette is no longer on the Sephora website at the moment I’m writing this (Sept 17, 2015). Once it goes back up on the website, I will update this post with the link and KVD official description of all the shades. Currently, the description of the shades are based on my own opinion and experience.*
*Update (Sept 18, 2015): It’s back online in Sephora! Grab it while it lasts!*
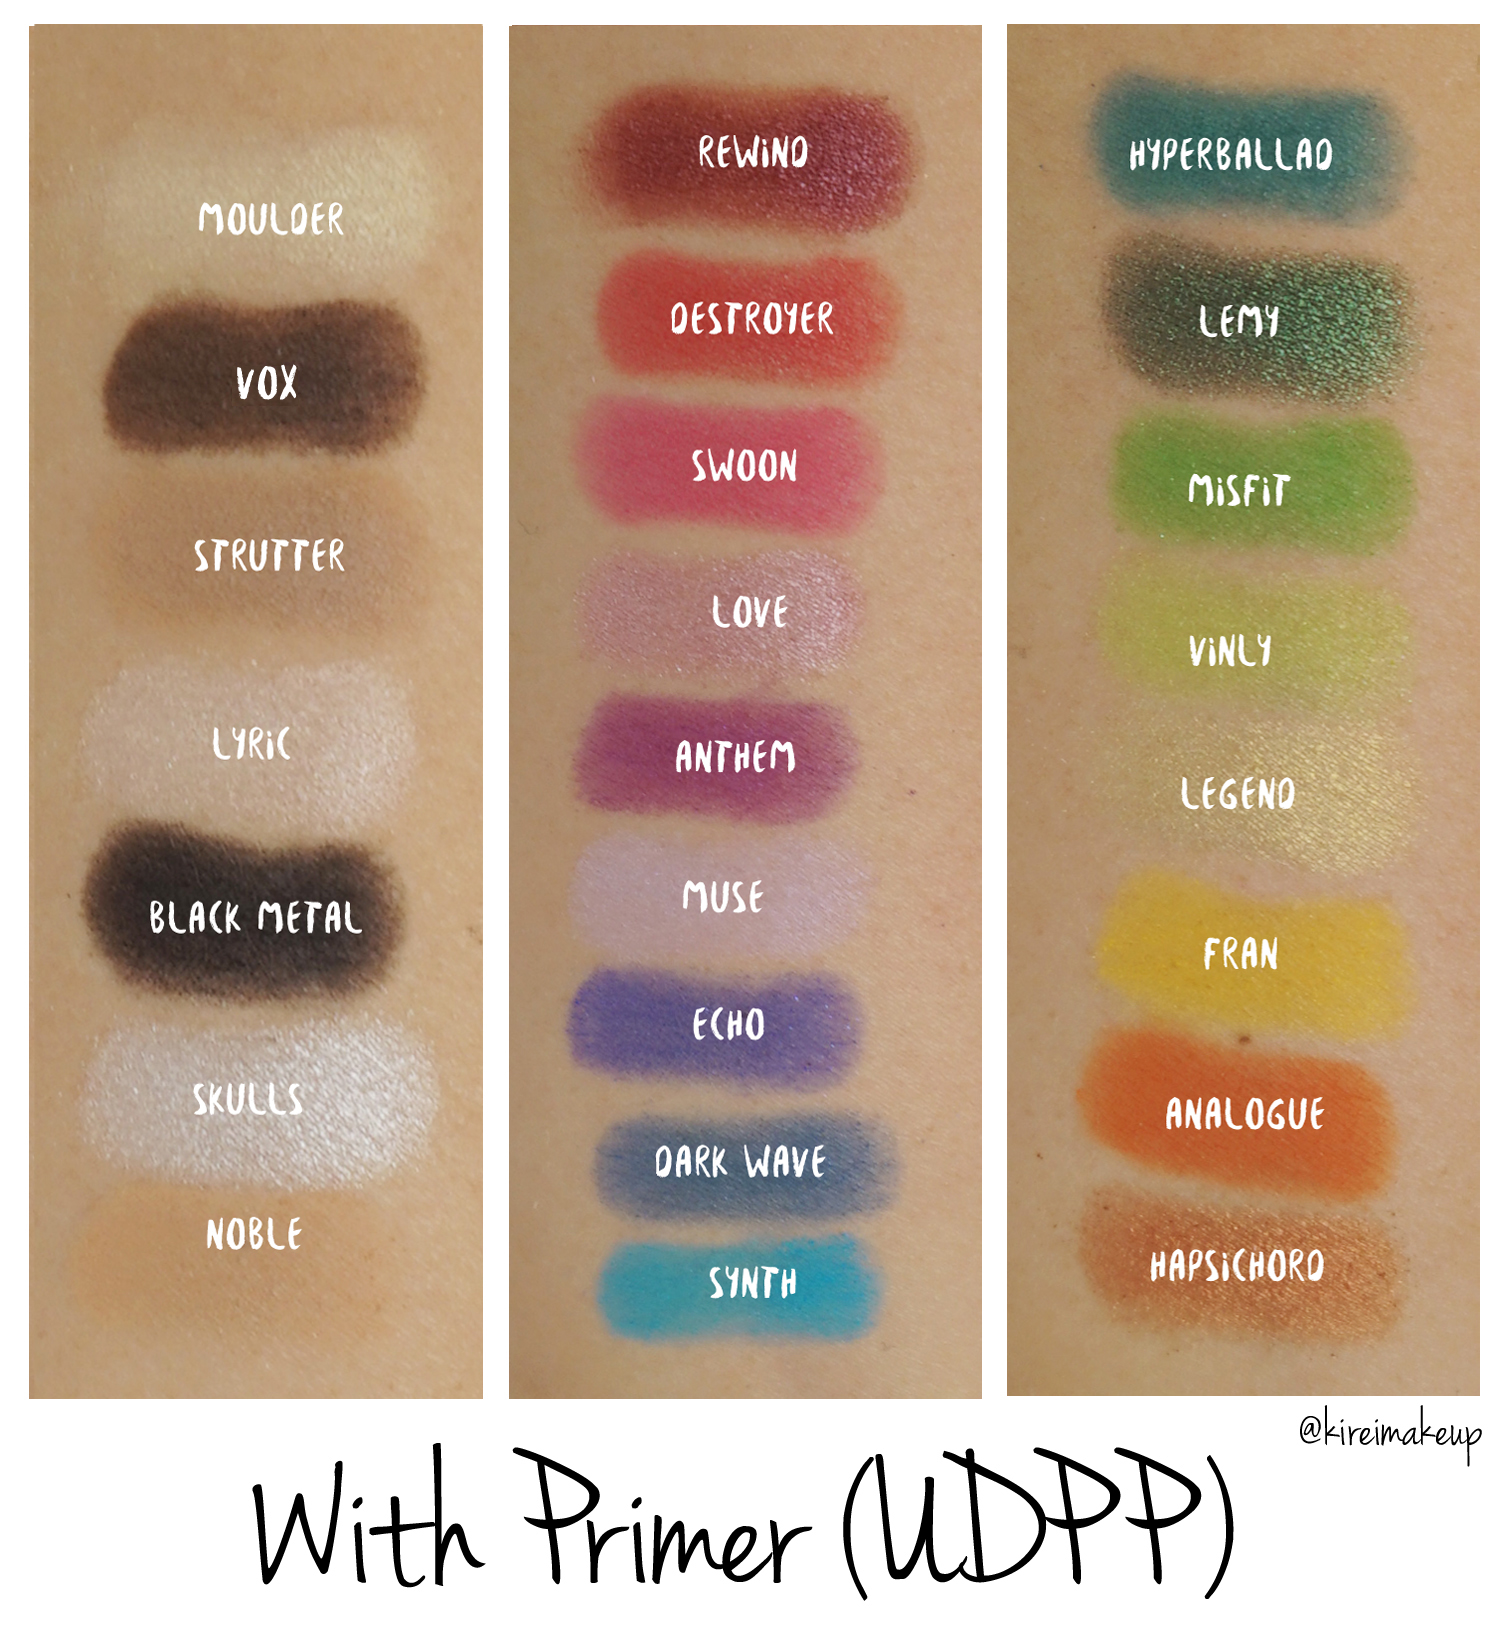
Obviously, everyone wears primer on their eyelids nowadays! However, I still want to show you how the swatches look with and without primer. On the “with primer” pictures, I used Urban Decay Primer Potion in Original. Also, just FYI, I applied the eyeshadows on my arm using a flat eyeshadow brush (MAC 242) – 1 swipe from the left and 1 swipe from the right. The reason why I used a brush to do my swatches is because I use a brush when applying my eyeshadow on the eyes, so this is the best representation of what I normally do on my eyes. Please keep in mind that my eyelids are lighter in shade than my arms.
Without a doubt, the primer allows the eyeshadows to be more intense and deeper in color. The one color that does not show much difference whether you use primer or not is “Lemy”. It’s very intense, dark and very metallic on its own. The shade “Echo” has glitters in them, but I can’t even see the glitters when doing the swatches. However, it might show up differently once I apply it on my eyes, so we’ll see.
I do have a tutorial coming up using some shades from this palette, mostly the blues and greens. I posted the look on Instagram, but I will post the pictorial soon, probably this weekend! If you want to know when the tutorial will be up, please subscribe to my blog (subscription box is on the right side bar) and follow me on Instagram!
In conclusion, I obviously love this palette. So bright and colorful, so much fun! I also light the fact that it has some neutral shades thrown in there for highlight/contour/liner. I wish it has more shimmers and metallics than the mattes, but I’m ok with it!
This palette is part of Kat Von D holiday palette, it is limited edition! I bought it from Sephora Canada for CA$71. It’s no longer on the website, I’m not sure why. It’s not even on the Kat Von D website for some reason! Hopefully the palettes will be back up soon!
Hi everyone! Today’s post is not a tutorial nor review. I want to talk about the IMATS (International Make-up Artist Trade Show)! Beauty lovers all around the world should know that IMATS is the biggest makeup trade show in the world. I have attended the IMATS Toronto since 2010, with the exception of 2014 when I was in Jakarta with my family. This year, the IMATS Toronto 2015 will be held at the Metro Convention Center, from September 26-27. Are you going to be there?
This year, I will be attending the IMATS again (on Saturday), and I can hardly wait! Let me tell you that (in my opinion) the best part about the IMATS is actually the workshops! Really and truly, for $45/day, you will learn so much from the workshops. The keynote speakers of these workshops are well-known celebrity makeup artists who will show you loads of tips and tricks. I met with Rae Morris in 2013, and that was totally surreal! She was so approachable and kind. In 2012, I sat in Gordon Smith session, where he talked a lot about his works and the future of prosthetics/animatronics. These workshops are a must to attend!
This year, the 2 keynote speakers are Adrien Morot and Gregory Arlt. I can’t wait to be sitting on their workshops and just absorb everything they have to say. Adrien Morot is an Oscar Nominee for his work in Barney’s Version. He will be doing a demo on stage on special effects makeup.
Gregory Arlt, everyone knows who he is right??? Gregory Arlt is MAC Pro’s Director of Makeup Artistry, and Katy Perry’s makeup artist! His works can be seen in the runways from Paris to New York. His list of celebrity clients include Dita Von Teese, Alicia Keys, Gwen Stefani, and Victoria Beckham. Gregory Arlt of Mac Pro will be showing attendees how to achieve a flawless skin without filter! This is a must to attend! I’ll be at the front seat, just you all wait and see.
Other speakers include the wizard of makeup Kevin James Bennett, master of reverse contouring Eve Pearl, makeup veteran Randy Daudlin, and many more! Check out the IMATS speaker’s biosto see who will be there, and their schedules.
Besides the workshops, of course there’s the shopping! There were deals everywhere you see, and these deals were awesome! I cannot wait to see which brands will show up this year. I’m definitely eyeing for new sets of lashes, perhaps more brushes, and nail polishes. I will do an IMATS Tips post next weekto prepare us (and our wallet) when we enter the show.
Lastly, one of the main events of the IMATS that I find very enjoyable is the Battle of the Brushes. Battle of the Brushes is IMATS makeup competitions, which are split into 2 groups – beauty/fantasy (2hr time limit) and character/prosthetics (3hr time limit). The competition yields amazing final results, and it is such an inspiring event to attend to. I, especially, love seeing the results from the character/prosthetics competition! Some of the pieces were mind blowing, and you wouldn’t know that they are all done by students or fresh graduates from makeup school!
Have you been on the IMATS before? What are your thoughts about it? If you have not, are you going to consider going to the show?
Today’s post is an Irresistible Me Hair Extensionreview! This is my first encounter with a hair extension on myself, so it was an interesting experience. I have had to put hair extension on clients, mostly brides, but never on myself, so I was looking forward to giving this extension a try. Have you guys try any hair extension before? What are your thoughts? Leave your comments below!
Anyways, back to this hair extension review. So, I was contacted by a rep from Irresistible Me to give their product a try. A big shout-out and thank you to Irresistible Me for sending me this hair extension. I was recommended by them to give their 22 inch Royal Remy hair extension a try.
The hair extension comes in a nice black box, and inside you’ll receive 2 pieces of hair extension – the big one (on the left) is the hair extension itself, the smaller one (on the right) is actually a sample for you to try on before opening the bigger one. If you try the sample and the color doesn’t match, you can return the hair extension and ask for an exchange. For their exchange policy, please refer to their website.
Anyways, so I received the 22inch Royal Remy hair extension, and as soon as I took it out of the box, I can see right away that this hair extension is of a pretty good quality. The hair was full and thick, and there was very little shedding. I’m very impressed with the quality.
To be honest, since I’m growing out my hair, I have a bit of color at the tips of my hair. The ends of my hair are more on the lighter brown side, but since I didn’t feel like coloring my hair anytime soon, I decided to go with Natural Black for when the hair all grown out and I trim the ends off in the future. Anyways, the color Natural Black matches my natural hair color perfectly. If you guys need help with finding the right shade for you, please check out their Youtube channel or Pinterest page. On their youtube channel, you can also find the video on how to wear your extension.
I’m very happy with this hair extension, and I can’t wait to give it a try after my hair grows out, and I can trim my ends. Funny story, just on Saturday when I was doing makeup on my Bridal client, she took out the same Irresistible Me hair extensions for the hair stylist to use! It looked really amazing, so if you are looking for a great quality hair extension, definitely check out Irresistible Me.
Left – current hair length (just slightly below collar bone); Right – with 22″ Irresistible Me Royal Remy hair extension
Disclaimer:
This product was sent to me by Irresistible Me Hair Extensions.
This review is based on my personal experience.
I do not gain any monetary profit from writing this review.
Links to Q-depot are NOT affiliated links.
I am not liable for any damage occurred to you while using this product.
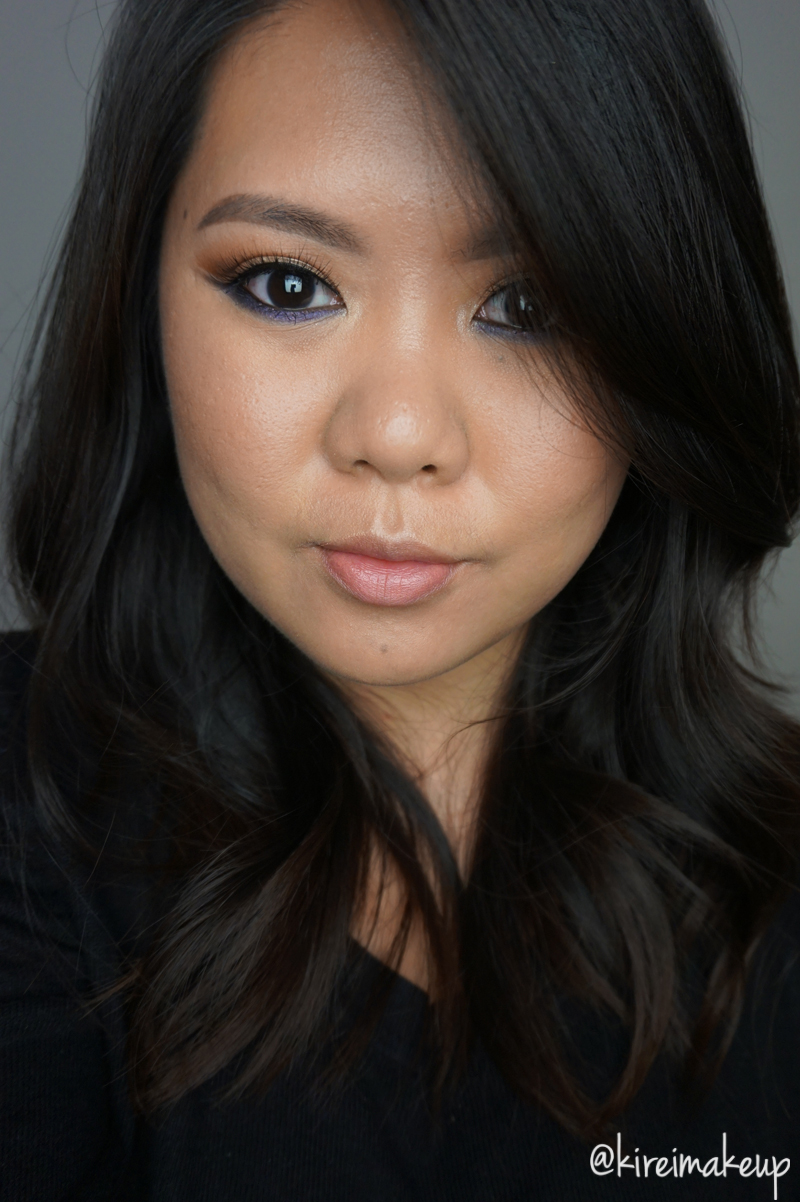
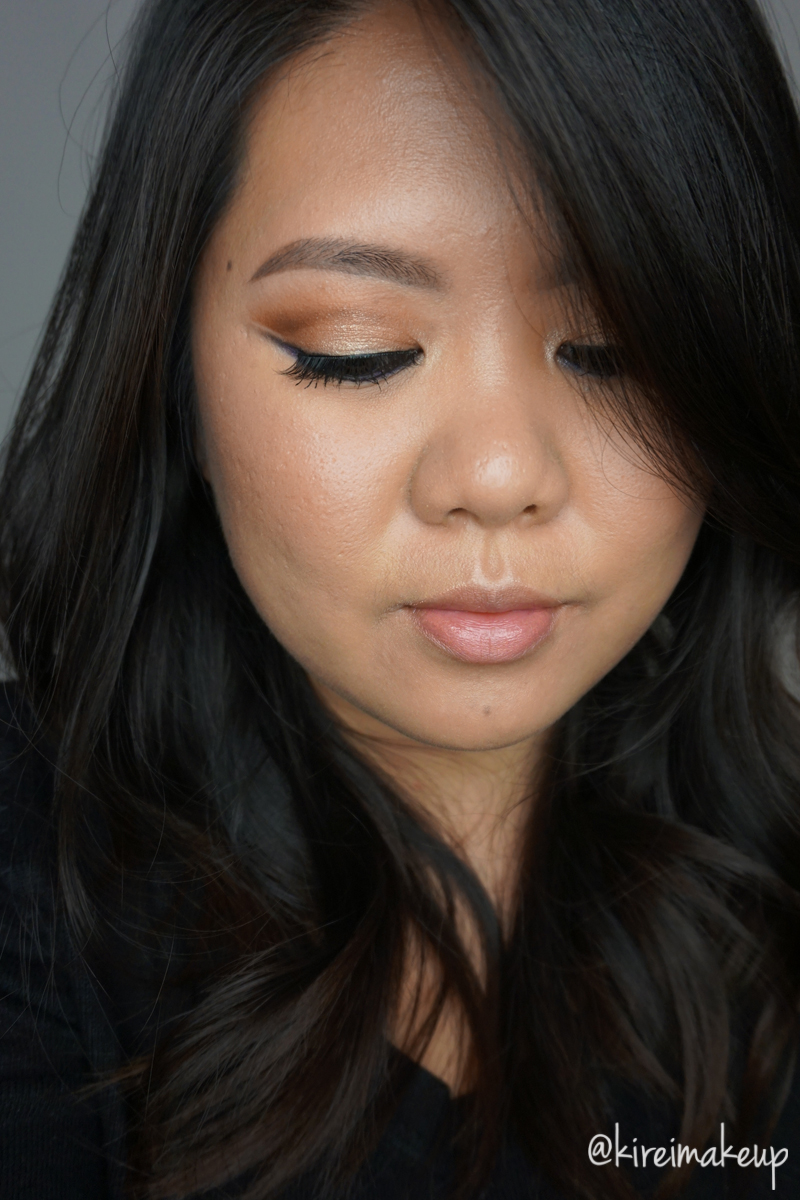
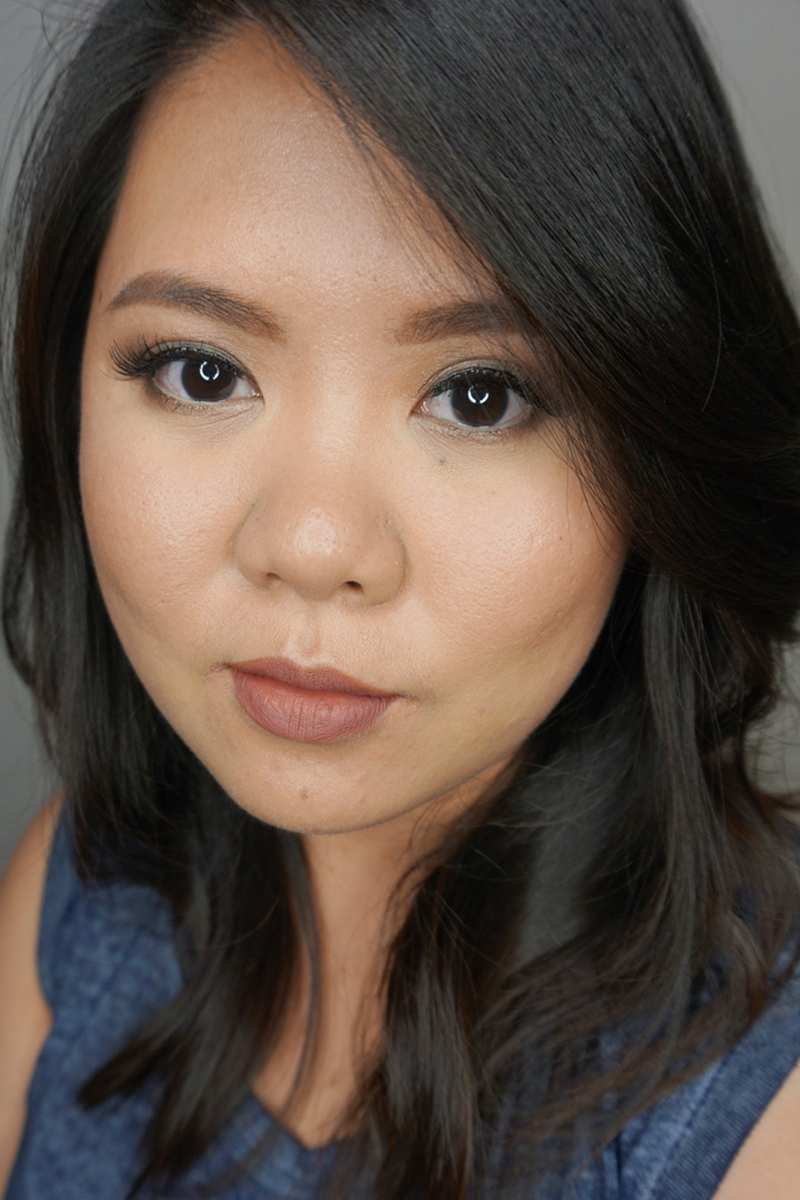
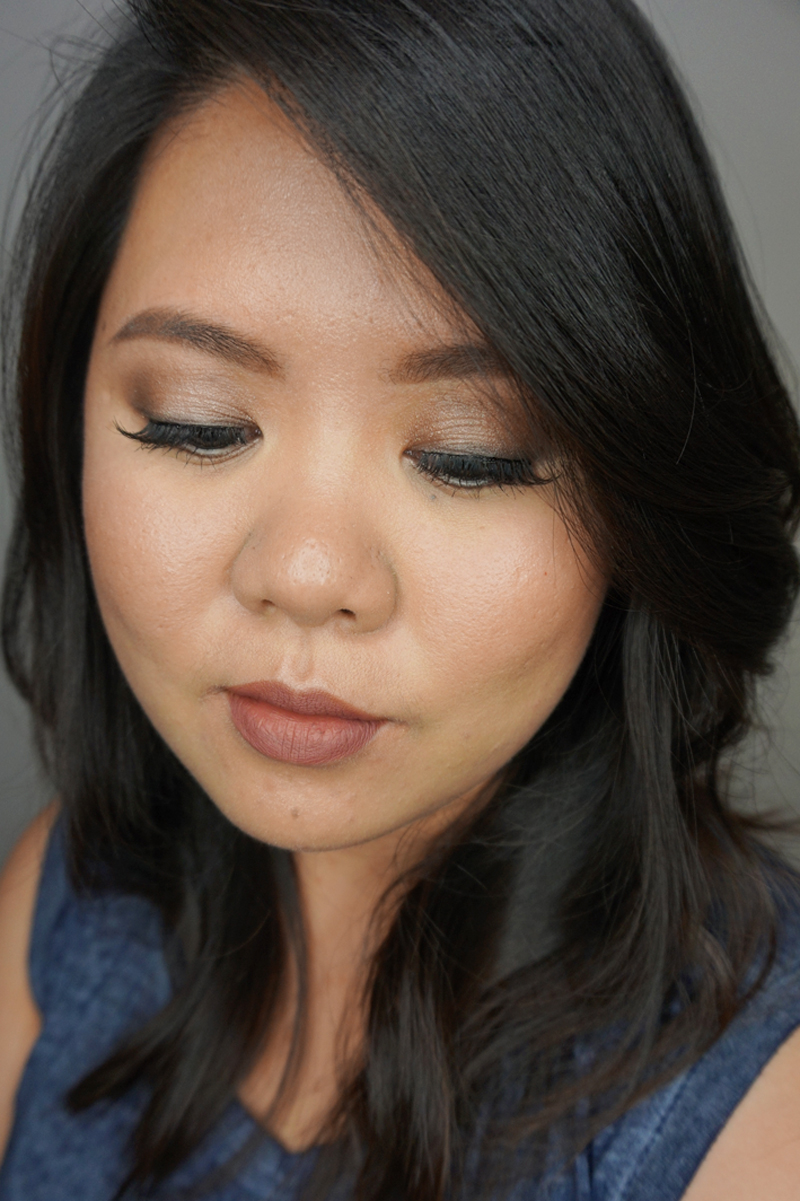
Today, I’m creating a light daytime look using UD Naked Smoky, and I’m pairing it with my new KVD Lolita liquid lipstick. The eyes are very light and simple, and obviously you can skip the false lashes altogether if you’re going to wear it as a daytime makeup.
The lips are quite different than what I’m usually used to. I usually like to pair a peachy or corally lips with this kind of eye look. However, I stepped out of my comfort zone, and decided to pair this with KVD Lolita liquid lipstick, which is a mauve color. I have had mauve lipstick before, but this KVD Lolita is slightly darker than what I’m used to. I didn’t mind it, I think it’s still a very pretty color. Just a word of warning, this liquid lipstick will dry to a darker shade than what you see on the tube.
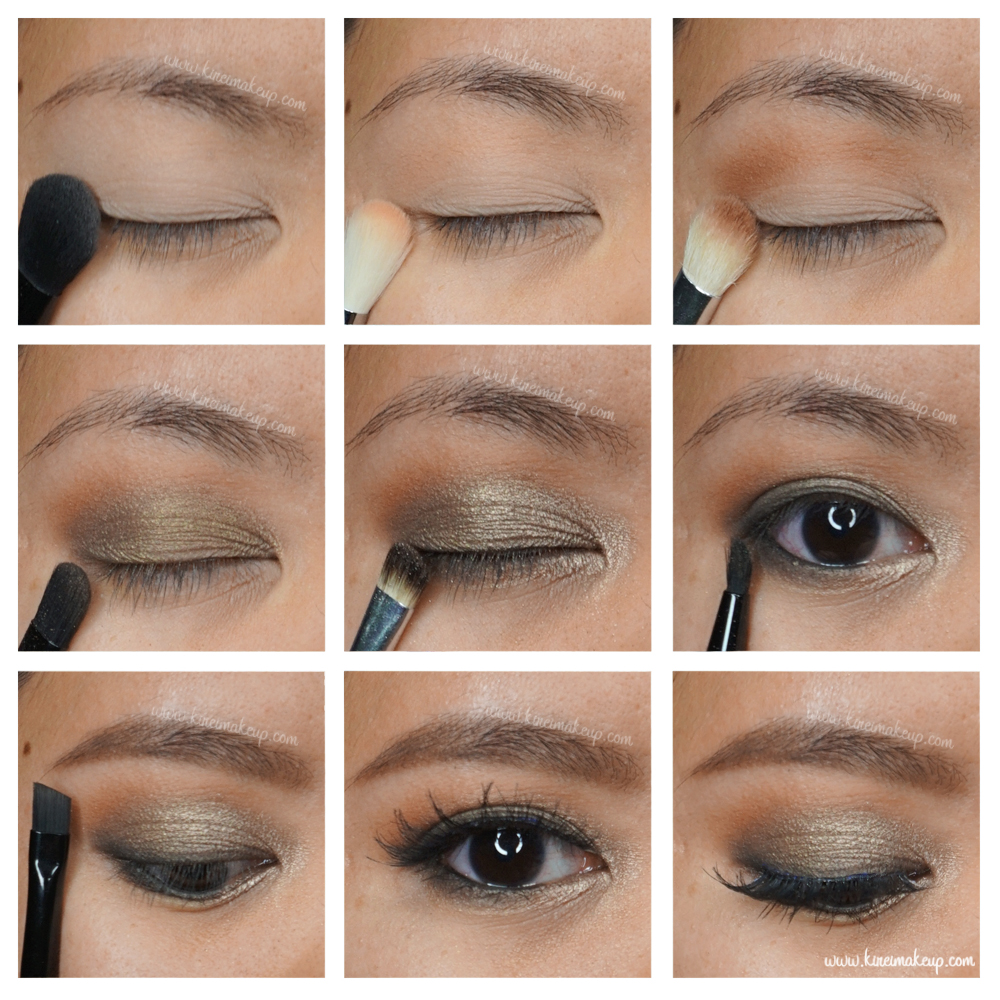
Again, I’m featuring Tweezerman Brush IQ brushes that were sent to me by Preen.me as part of their PreenMeVIP program. The brushes used in this tutorial are: “Blender“, “Shader“, “Line Glider“, and “Brow” brushes. Not in picture: Tweezerman ProMaster lash curler, used to curl the false lashes and my lashes.
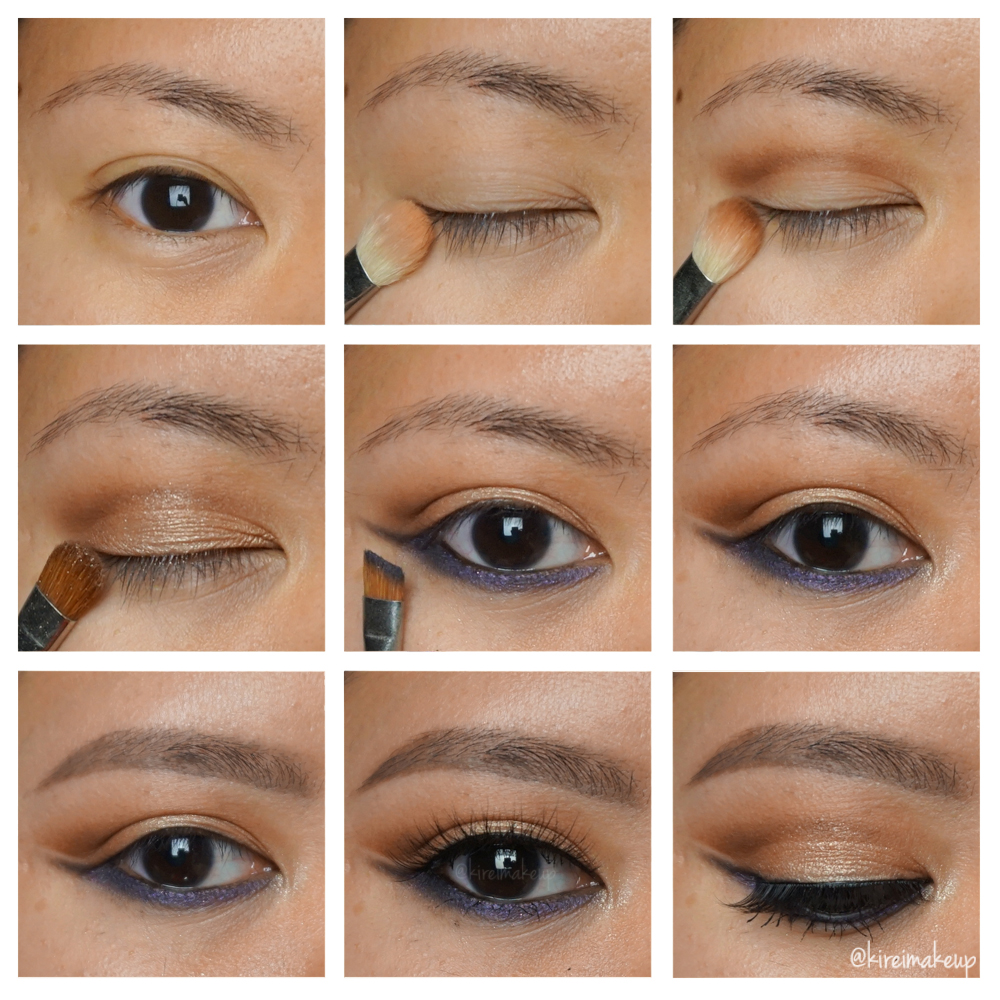
Today’s Tweezerman Brush IQtutorial feature the makeup brushes that were given to me as part of the PreenMe VIP program. Earlier this week I received the Tweezerman goodies (picture on Instagram), and today I’ve decided to do an easy Bronze smoky eyes look using mostly those brushes. A big THANK YOU to Preen.me for sending me the Tweezermanproducts!
Just a quick note on these brushes, they are amazing! I’m saying it not because I received it for free, but truly these brushes are on the best synthetic brushes I’ve ever used. The shader brush is very sturdy and really great for packing on the color on the eyelid. The liner glider brush is awesome in creating a soft diffused liner look. I’ll talk more about the brushes when I have the chance to review them. Until then, you’ll see these brushes popping on my tutorials!
Scroll all the way to the bottom to skip the how-to, and jump to the Product List.
How-to:
1. I primed my eyelids using Urban Decay Primer Potion “Original”. Using Tweezerman Blender Brush, I applied MAC Skinfinish “Medium Plus” powder all over my eyelid.
2. Using a blending brush, I applied KVD Shade + Light Eye palette in “Ludwin” as a transition shade.
3. Using another blending brush, I applied KVD Shade + Light eye palette in “Succubus” on my crease.
4. I applied L’oreal Infallible eyeshadow “Bronze Divine” on my eyelid using Tweezerman Shader brush. I also applied this eyeshadow along my lower lash line using Tweezerman Liner Glider brush.
5. Using a small shader brush, I applied L’oreal Infallible eyeshadow “Sahara Treasure” on the inner corner of my eyes.
6. Using Tweezerman Liner Glider brush, KVD Shade + Light Eye palette in “Shax” along my upper and lower lash line. I lined my waterline using L’oreal Voluminous Smoldering eyeliner.
7. I filled my brows using Tweezerman Brow brush and Anastasia Beverly Hills Brow Pomade “Medium Brown”.
8. I curled my lashes using Tweezerman Pro Lash Curler, and applied Dior Backstage mascara on both upper and lower lashes.
9. I applied Gwiyomi Boutique False lashes #3 on my upper lashes.
10. For my face, I applied NARS Luminous Weightless Foundation in “Punjab”.
11. I applied NARS Radiant concealer in “Custard” under my eyes and on my blemishes.
12. I set my face using CoverFX translucent powder.
13. I lightly contoured my face using Smashbox contour kit.
14. I applied Smashbox Halo Powder blush “In Bloom” on my cheeks.
15. I added a little bit of The Balm “Mary-Lou Manizer” highlighter on top of my cheekbones, on the bridge of my nose and on my cupid’s bow.
16. For my lips, I lined and filled it using L’oreal Color Riche lip liner “Beyond Pink”. Then, I applied YSL Pop Water Glossy Stain “Eau de Coral (203)”
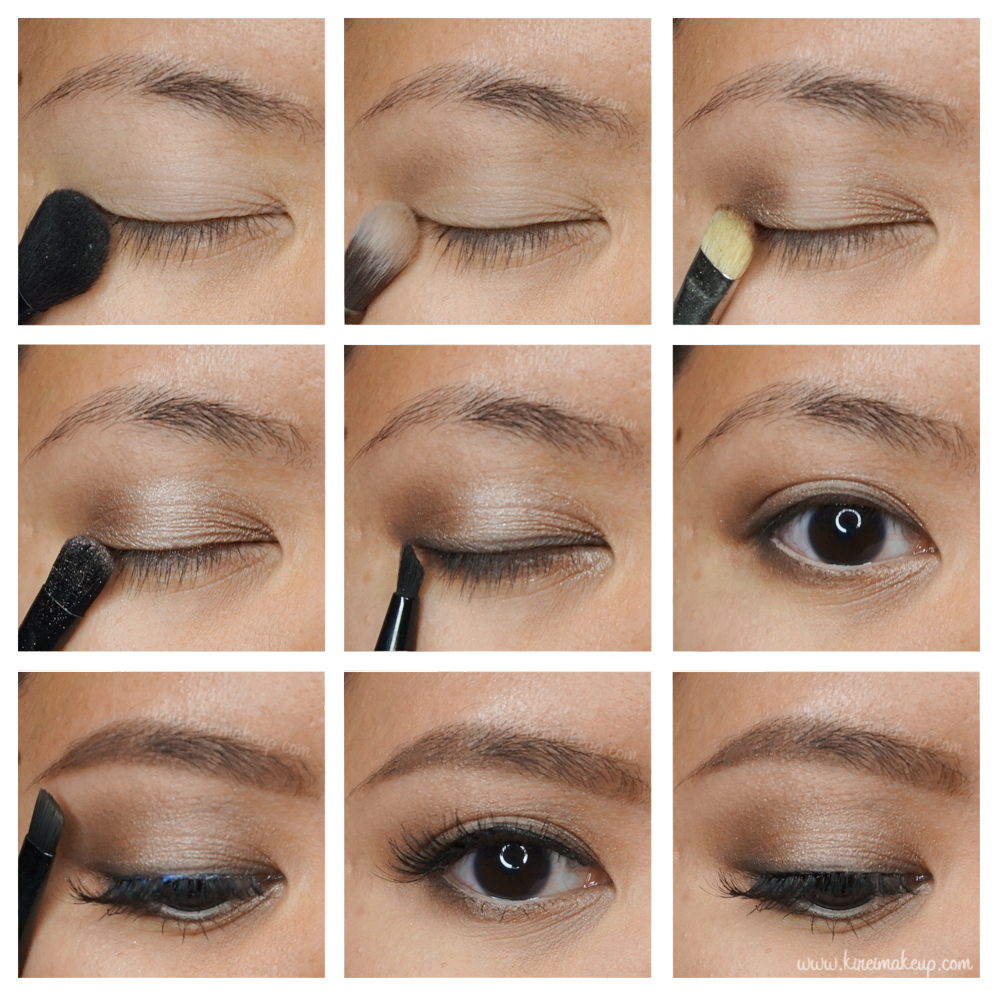
Hi ya’ll! Hope everyone is enjoying their Friday! Today, I’m back with an UD Naked Smoky tutorial. This time, I used mostly the greys in the palette to create this glamorous smoky eyes. I apologize for missing for almost a week, I’ve mentioned on my Instagram account that I was having an issue with my left eye. Anyways, now I’m back, and you can expect couple posts from me this upcoming week. I have a few products I’ll be featuring, and don’t forget to follow me on Instagram for my daily updates!
I’m still loving my Urban Decay Naked Smoky palette, and I’m planning to create more looks using this palette. I’ve done a review and swatches on my previous post, so don’t forget to check my UD Naked Smoky reviewout! So far, I’ve used 11 out of the 12 shades in the palette (hehehe). I’ll try to create more looks with this palette. This post is my 3rd look, if you want to check out my other posts using this palette, please check out my Iconic UD Smoky Eyespost, and MAC D for Danger post.
A quick note on step 3 (top right corner), I applied Combust using a blending brush to blend out the edge of my crease color. This is an easy way to blend out your smoky eyes to make a smooth transition from the eyeshadow to your skin.
Products used
Eyes
Primer – Urban Decay Primer Potion “Original”
Base/blending color – UD Naked Smoky “Combust”
Brow bone highlight – UD Naked Smoky “Thirteen”
Transition – UD Naked Smoky “Password”
Crease/lower lid – UD Naked Smoky “Dagger”
Eyelid – UD Naked Smoky “Armor”
Winged liner – Shu Uemura Calligraphy Ink eyeliner
Outer corner of lower lash line – UD Naked Smoky “Black Market”
 Disclaimer: