Kat Von D Mi Vida Loca Remix Tutorial #2

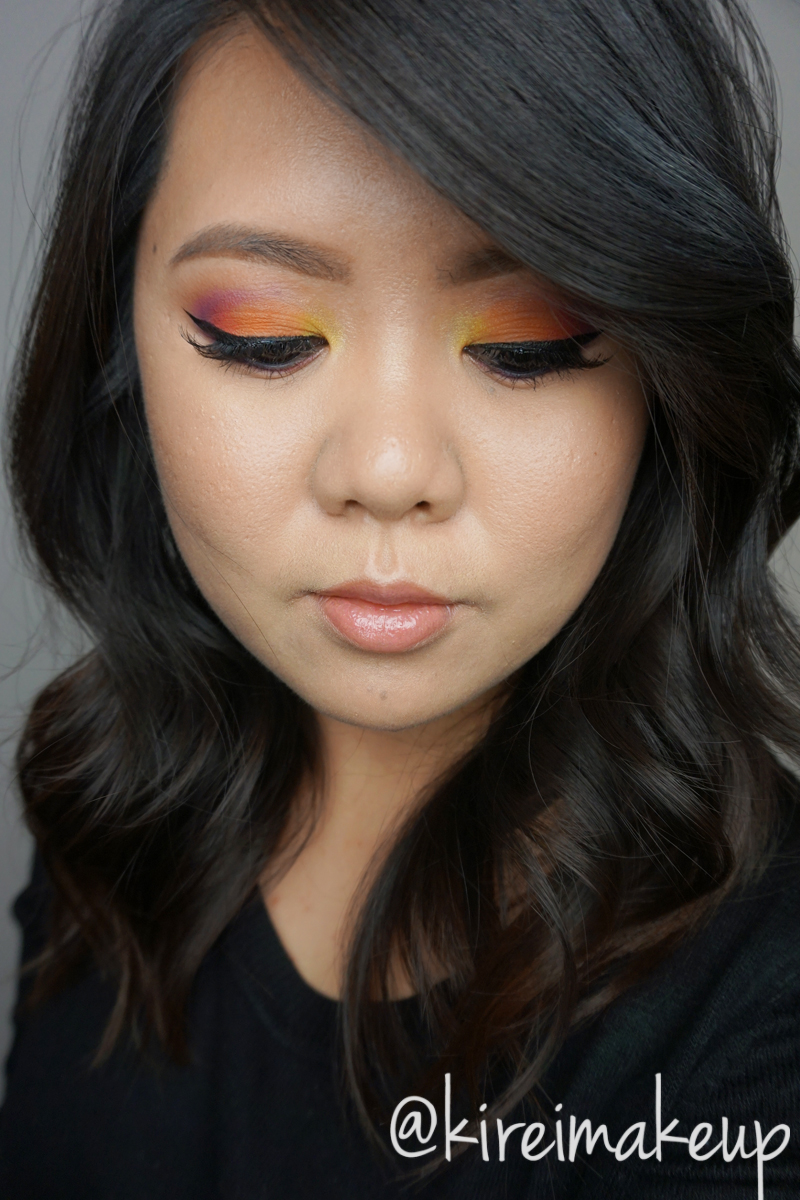
Last week, I did KVD Mi Vida Loca Remix swatches, as well as a tutorial using the greens and blues. This time, I decided to do another Kat Von D Mi Vida Loca Remix tutorial using the warmer shades! Have you guys grab this palette yet? If you haven’t take a look at my swatches’ post! I can assure you, you’ll love this palette! The colors are amazing, and I can’t rave enough about it. If you are a not a fan of colors, take a look at KVD Shade + Light eye palette, perhaps something more neutrals will suit your needs.

Since the eyes are very colorful, I have to pull the eye look together with black eyeliner. I don’t use white or beige on the waterline since it can look too clown-ish, in my opinion. I really like the contrast between the black and the colors, it makes it more wearable. It’s a very festive look, perhaps would be great for Carnivals!
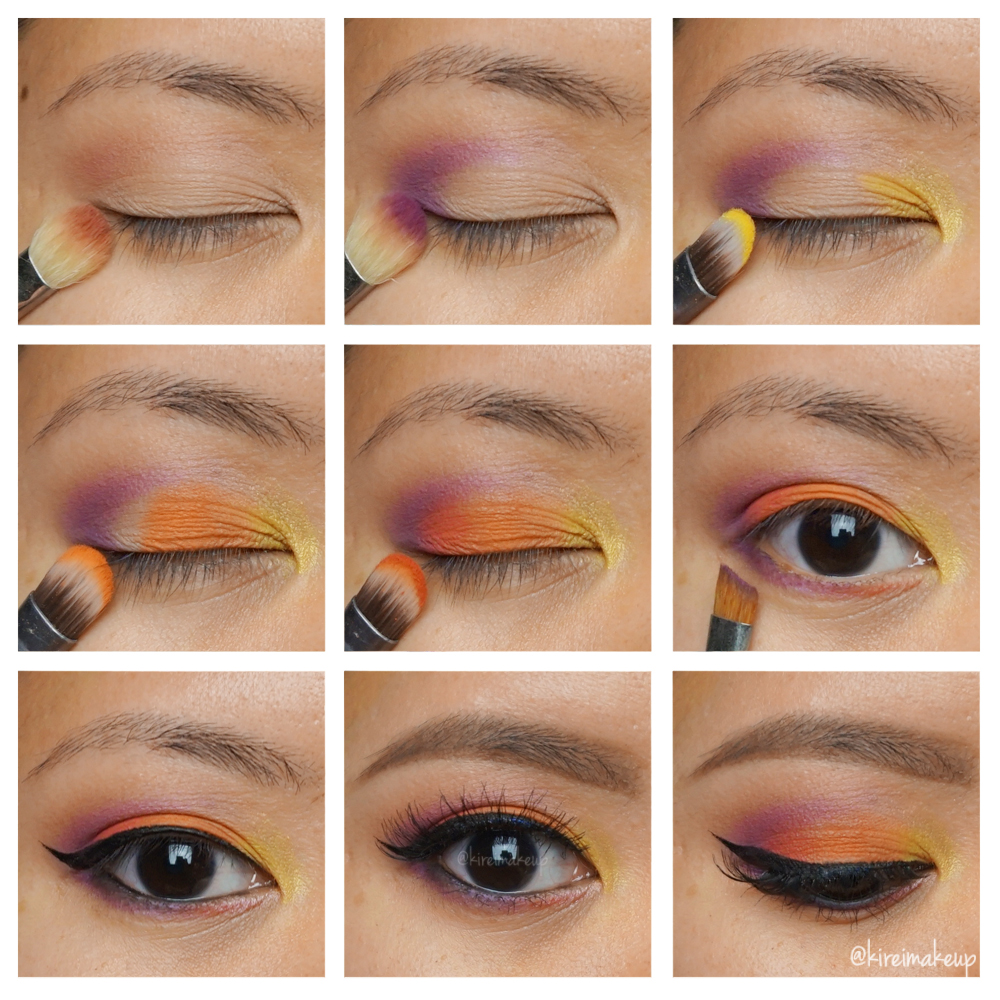
Mi Vida Loca Remix makeup tutorial

Products used

Eyes

  • Primer – Urban Decay Primer Potion “Anti Aging”
  • Transition – KVD Mi Vida Loca Remix “Swoon”
  • Outer V/Crease – KVD Mi Vida Loca Remix “Anthem”
  • Inner corner – KVD Mi Vida Loca Remix “Fran” + “Legend”
  • Center lid – KVD Mi Vida Loca Remix “Analogue”
  • Outer third – KVD Mi Vida Loca Remix “Destroyer”
  • Outer half of lower lash line – KVD Mi Vida Loca Remix “Anthem”
  • Inner half of lower lash line – KVD Mi Vida Loca Remix “Destroyer”
  • Waterline – L’oreal Voluminous Smoldering eyeliner
  • Winged liner – Kat Von D Tattoo Liner “Trooper’
  • Brows – Anastasia Brow Wiz “Medium Brown” + Kat Von D Brow Tattoo “Medium”
  • Falsies – Ardell “Demi Wispies”

Mi Vida Loca Remix lookFace

  • Primer – Kat Von D “Lock-it Featherweight” primer
  • Foundation – Kat Von D “Lock-it Tattoo Foundation”
  • Concealer – NARS Radiant Creamy Concealer “Custard”
  • Setting powder – CoverFX setting powder

Cheeks

Lips

  • Lip color – L’oreal Color Riche Extraordinaire “Blushing Harmony”

Mi Vida Loca Remix makeup tutorial

YSL Pure Chromatics no. 7

Finally, I get the chance to play with the Yves Saint Laurent Pure Chromatics quad that I bought during the YSL event a few weeks a go. As I’ve mentioned, I fell in love with the gold and reddish copper eyeshadows of the quad. On this tutorial, I’ll be using the eyeshadows dry. I also found out the names of each color: golden rose, golden pearl, golden orange and burnt red. The quad reminds me of sunset color.

Let me, first of all, mention that I love how the end result turned out. I was expecting a meeeeeh pigmentation since I’m applying the eyeshadow dry, but to be honest, I’ve to take my words back. The colors are amazing when you build them and they blend really nicely, applied very smoothly and very little fall-outs.

I’ve always find it difficult to wear this kind of reddish-copper (or as they call it – burnt red) eyeshadow since they always bring a lot of pinkish tone on my eyes, which make me look sick. However, this burnt red eyeshadow has hint of plum in it, and when I added the black, it shimmers beautifully (which, btw, the camera couldn’t pick up)

Anyhow! Let’s get the tutorial started!

(click on pictures to enlarge it)

YSL Pure Chromatics no. 7

1. I applied YSL Golden Rose eyeshadow from the quad on the inner corner of the eyes using a flat eyeshadow brush from Urban Decay.

2. Then, using another flat eyeshadow from Urban Decay, I applied the Golden Orange eyeshadow in the middle of the lid in a patting motion.

3. Taking a MAC 239 brush, I applied the Burnt Red eyeshadow on the outer V, blending it towards the crease.

3. Using a clean MAC 217 brush, I blended the edge of the shadow.

4. To add extra depth, I added a black eyeshadow just on the crease. I applied this with a very small shader brush (no brand).

5. I, then, picked up a little bit of the Burnt Red eyeshadow on my blending brush and applied the shadow on top of the Smashbox Blackout shadow. At this point, I added more of the Golden Orange and Golden Rose eyeshadows again.

6. Using a black kohl pencil liner like L’oreal Voluminous eyeliner, I lined my tightline and waterline.

7. I applied Burnt Red eyeshadow on the lower lid, leaving the inner 1/4 for the Golden Orange eyeshadow. I applied it using MAC 263 brush.

8. I curled my lashes and applied several coats of mascara on top and lower lashes.

9. I also filled in my brows by using Anastasia Brow Powder and MAC 266 brush.

10. I highlighted the brow bone by applying Golden Pearl eyeshadow from the quad using a clean blending brush from QUO.

YSL Summer 2012 eyeshadows

11. For the face, I applied MAC Face and Body foundation in C3 using a foundation brush from Cover FX. I also applied L’oreal Touche Magique concealer under my eyes to get rid of some of my dark circles.

12. Once the foundation dried, I applied YSL Cream Blush in no. 2 on my cheeks using a Sephora foundation brush.

13. I also applied L’oreal Magic Lumi using a clean foundation brush on my cheekbones, on the bridge of the nose and on my cupid’s bow.

14. I applied MAC Blot powder on my T-zone.

15. I also applied Benefit Hoola bronzer on the hollows of my cheeks and on my temples using an angled brush (similar to MAC 168 brush, but mine is no brand).

16. I completed the look by finishing it off with GOSH Nougat Lipstick and L’occitane clear lip balm.