Sunset Inspired

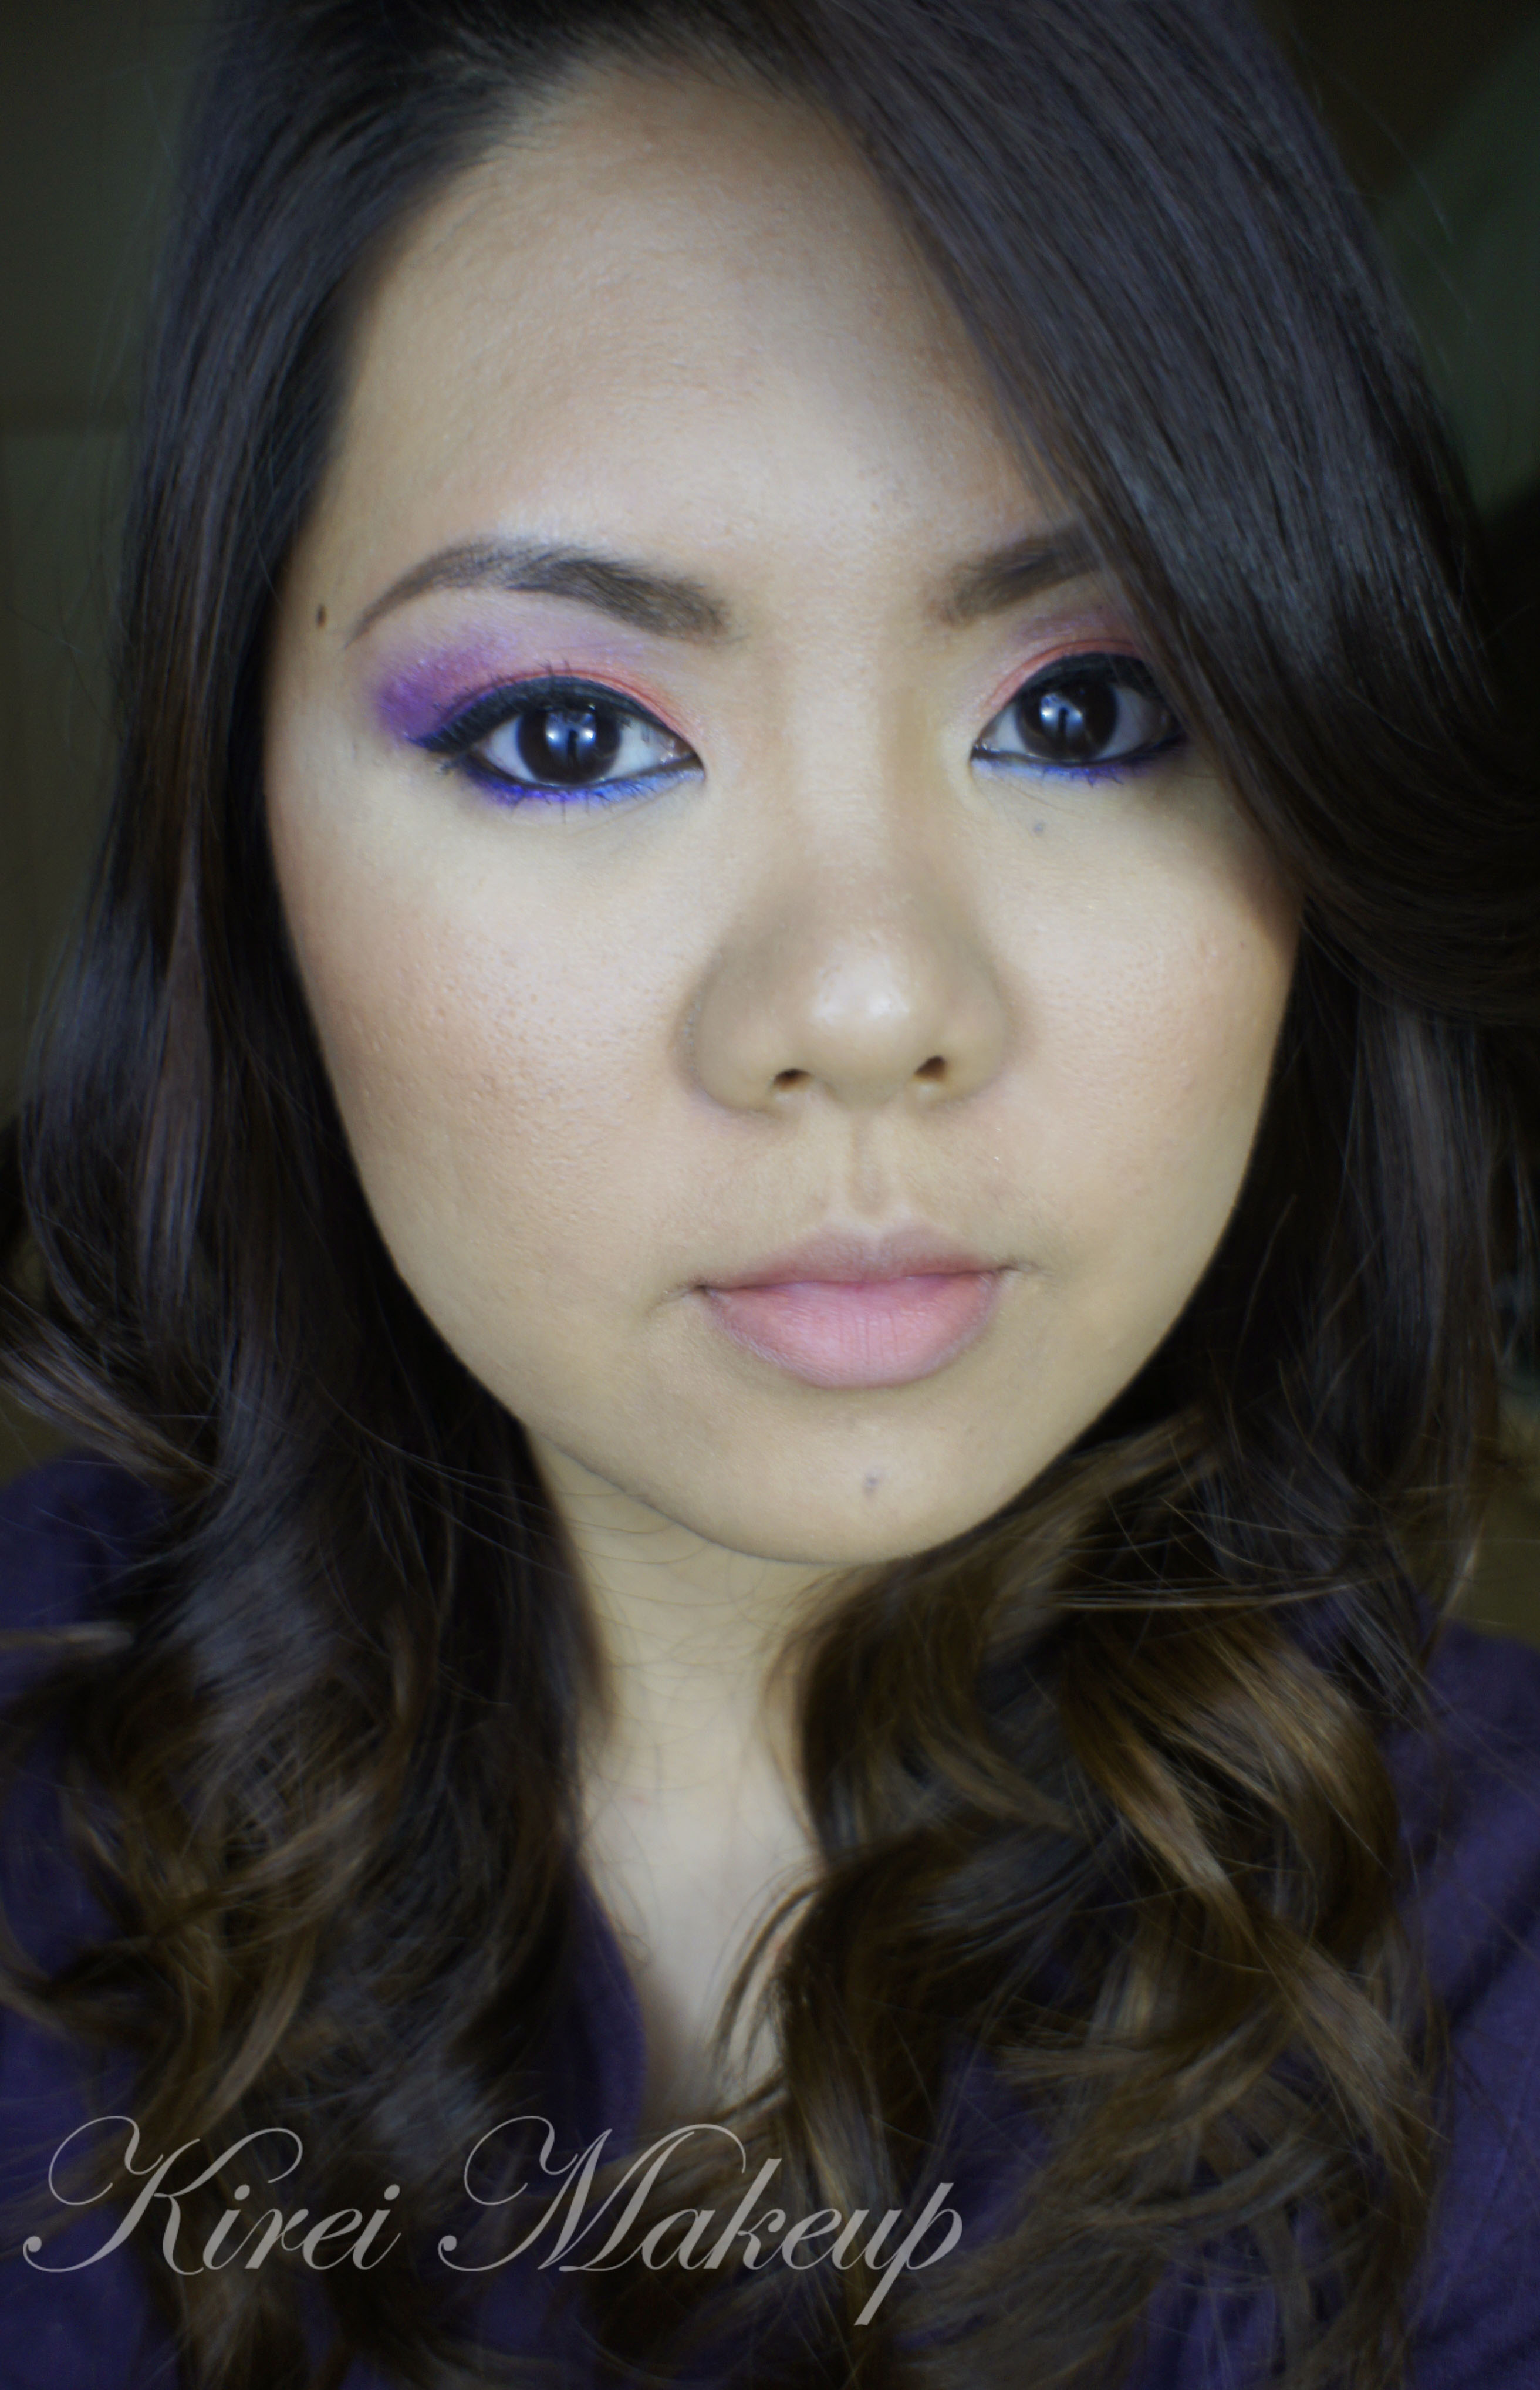
I’ve been wanting to do a sunset inspired makeup for a while, but couldn’t find the right colors to do it. Well, ever since I got my hands on that MUFE Aqua Cream no. 9, I couldn’t resist playing with that color. I think it’s probably one of my favorite colors so far. I just want to use it all the time!

If you see anything that’s underlined and bold in the sentences below, it means that I’ve link it to another tutorial/review that I’ve done in this blog. The links are not spam nor will it lead you to another site.
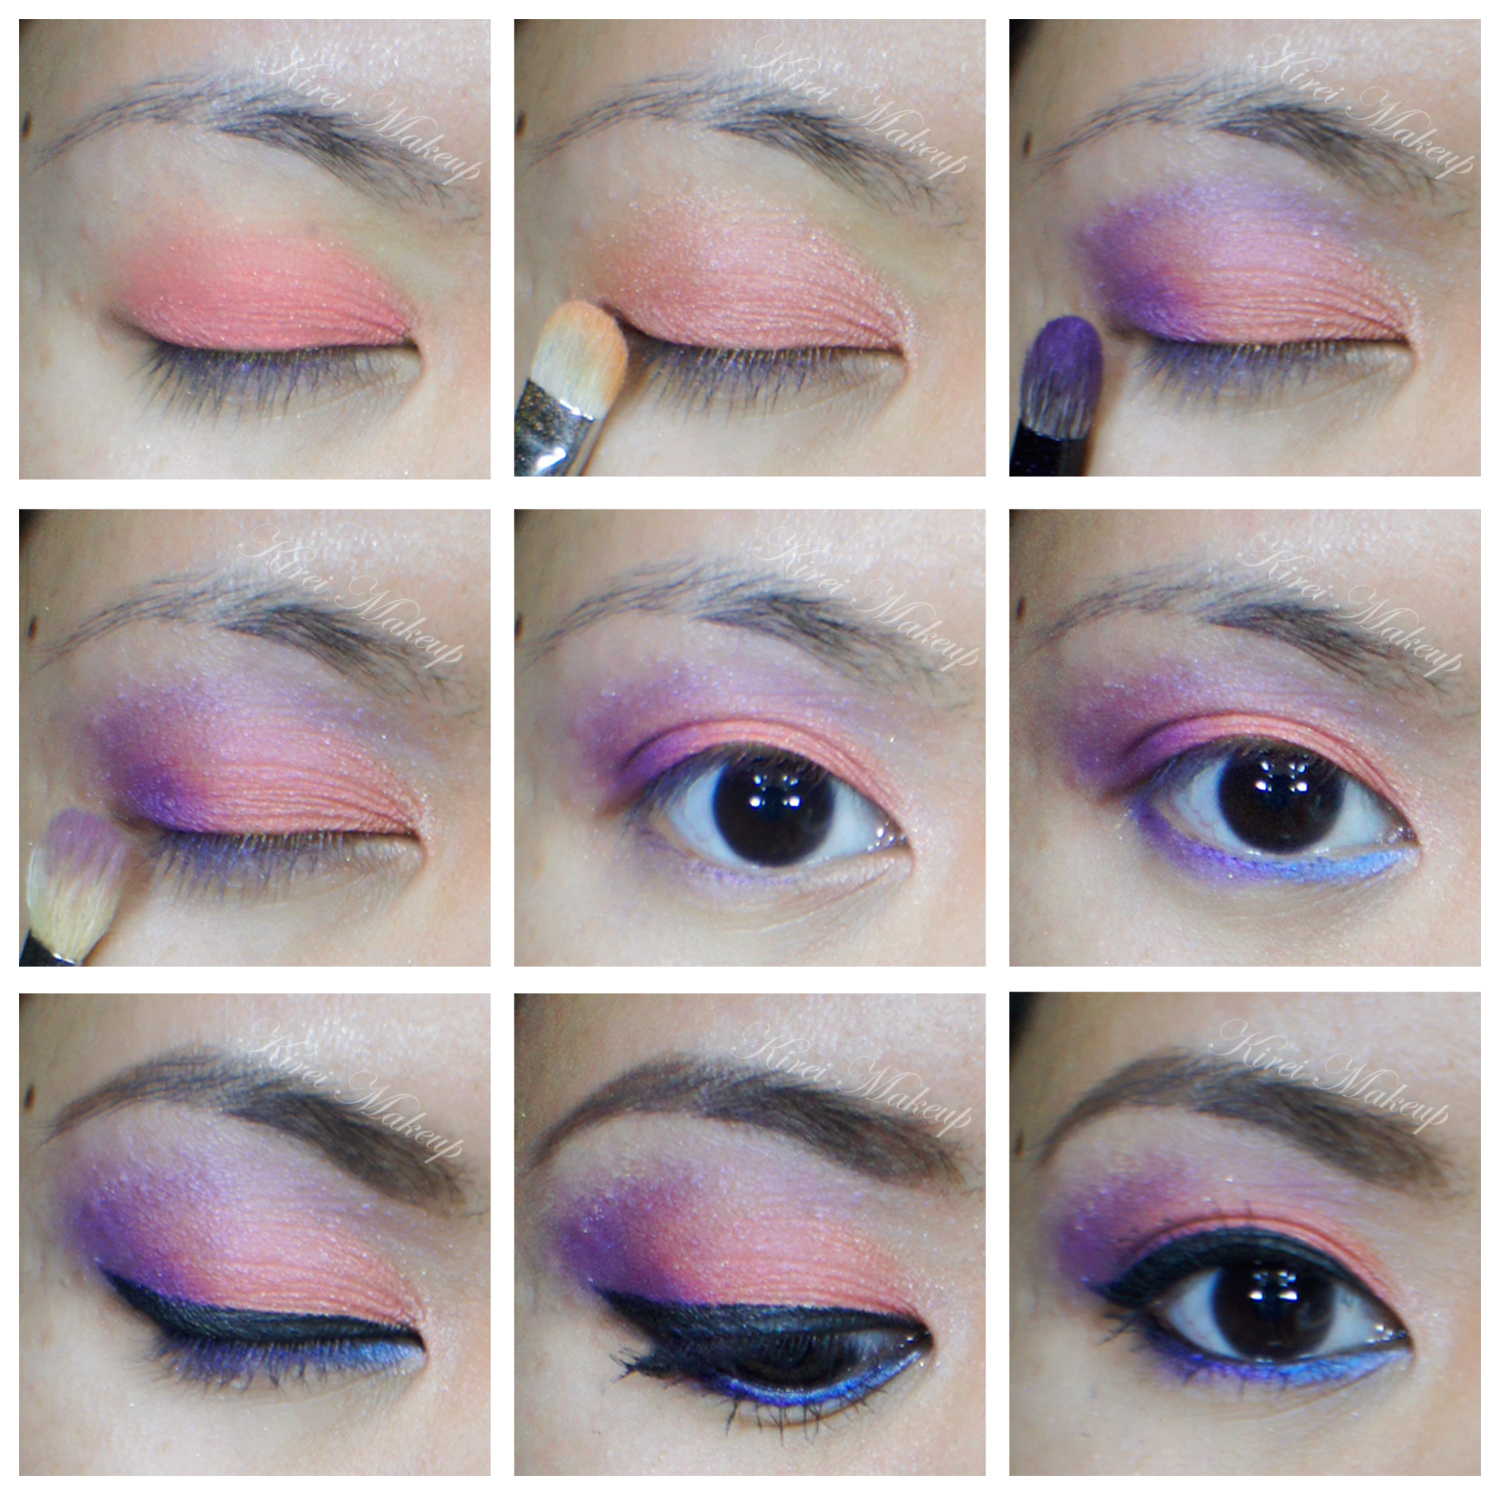
How-to:

1. I applied MUFE Aqua Cream Shadow no. 9 all over my lid using my finger. (for other tutorials using this color please refer to Coral and Blue, and Candiliscious)

2. Using a flat eyeshadow brush, I applied Smashbox Soft Shimmering Coral from the Admire Me palette on top of the aqua cream.

3. Using Smashbox bullet brush, I applied purple eyeshadow from Sariayu’s Karimunjawa palette.

4. I blended the edge of the shadow using a clean blending brush.

5. Using an angled eyebrow brush, I applied Lancome All Made Up eyeshadow on the inner corner of the lower lid, and the purple eyeshadow from step 3 on the outer half.

6. Using a Kate Super Sharp liquid eyeliner (bought from a Japanese drugstore during my trip), I created a winged liner along the upper lash line.

7. I lined the outer third of my lower lid using the same eyeliner and used an angled brush to smudge the liner slightly.

8. I filled my brows using a mixture of MAC Omega and MAC Brun using an angled eyeliner brush.

9. I curled my lashes and applied L’oreal Double Extender Curl mascara.

10. I applied my face powder right below my brows.

coral and purple makeup

11. Under the eyes, I applied the yellow corrector from MAC Pro Conceal/Correct palette in Medium.

12. On my face, I applied MUFE HD foundation using a Sigma Round Kabuki brush.

13. I powdered my face using Cinema Secret loose powder.

14. I applied MAC Shadowy to contour my face and MAC Peaches blush on my cheeks (for my contouring tutorial please refer to Subtle Contour/Highlight/Blush).

15. On my lips, I applied Revlon Mauve It Over lipstick.

sunset makeup

Candiliscious

Sooo, as you guys know, I posted a sneak preview of today’s tutorial on Instagram and Twitter. If you didn’t check it out, follow me on both account (handle name: @KireiMakeup). I also mentioned on my tweet that I went to Plaza Indonesia to shop at Make-Up For Ever. I bought this gorgeous aqua cream shadow in no. 9, which is a beautiful shimmery coral color. I knew the moment I laid my eyes on it, I wanted to do a bright look. Thus, I paired the deliciously bright coral with a minty green. I love how this look turns out! So very summer-y! Kinda looks like candies, no?

I think this MUFE Aqua Cream no. 9 is actually for the lips, so you might want to test it out first if there’s any reaction when you apply it to your eyes. I had no sensitivity or negative reaction towards it, so I proceeded to apply it to my eyes.

I also filled in my brows slightly different this time since I’m trying to grow my brows out so I can re-shape them again. Instead of the usual arch, I drew the brows slightly lower this time, which helped with the overall look. I think the softer, lower brows make the look more wearable and framed the face softer.

The key to this look is to quickly blend the cream shadows before they dry out. Once the creams dry, you might have a difficult time blending it. The look works with just the cream shadows alone, but I like to set it with eyeshadows to make it last longer and for the colors to look even brighter.

How-to:

1. Using a synthetic brush (mine is an art brush from a bookstore), I applied Maybelline Color Tattoo 24-hr in Edgy Emerald on the inner half of the lid.

2. Using a flat eyeshadow brush, I applied Make Up For Ever Aqua Cream Shadow in no. 9 on the outer half, blending it towards the Edgy Emerald and on the crease slightly. I used a clean fluffy blending brush from Urban Decay to blend the crease.

3. Using a clean flat eyeshadow brush, I applied a mint green eyeshadow from Gosh Spring Passion (limited ed.) on top of Maybelline Edgy Emerald.

4. I also applied L’oreal Pepsy Coral infallible eyeshadow on top of MUFE no. 9 aqua cream shadow. I blended the color towards the mint so there’s no harsh line separating the 2 shadows.

5. Using a small fluffy brush (mine was given by a chinese-based brush company), I mixed MAC Passionate and MAC Vibrant Grape at the back of my hand, then I applied it lightly on the crease.

6. I applied MUFE Aqua Cream no. 9 on the lower lid using a clean angled eyeliner brush.

7. On top of that, I also applied the same mix of MAC Passionate and MAC Vibrant Grape on the outer half of the lower lid. I also added L’oreal Pepsy Coral infallible eyeshadow on the inner corner of the lower lid.

8. Using an angled eyeliner brush, I created a thin winged liner along the upper lashline using MUFE Aqua Black gel liner. I lined my waterline using whatever that was left on the brush.

9. I filled in my brows using Dollywink brow pencil.

10. I curled my lashes, applied L’oreal Curl Impac Collagene mascara on the upper and lower lashes.

11. For some extra fun, I applied Ardell no. 110 false eyelashes and squeezed both fake and real lashes together so there’s no separation. At this time, I found that the liner on my waterline wasn’t black enough, so I applied Physician’s formula black eyeliner on it.

12. I applied MAC Brule eyeshadow under the brows.

coral and mint makeup

13. For the face, I applied MUFE HD Foundation using a Sigma Round Kabuki brush.

14. For concealer, I used L’oreal Magic Touche concealer under the eyes.

15. I applied Chanel Universal bronzer on the cheeks, temples and jawline.

16. For the cheeks, I applied MAC Cubic blush.

17. Lastly, I applied Tarte Lipsurgence in Hope on my lips.

mufe cream shadow