Inspired by one of the pictures on my Pinterest board, I decided to re-create this flower liner look using my NYX Vivid Brights liner. This was definitely fun to do, and I can see myself wearing this out for music festivals! I think the hair also makes the whole look complete (keep watching until the end for a short tutorial on how I create the texture waves).
Category: Eyeliners
Colourful Eye Makeup
Thus begins my season of everything bright and colourful! Today’s colourful eye makeup is probably not everyone’s cup’s of tea, but I am loving it! Fun and colourful eye makeup for the festival and carnival seasons. I think you’ll be seeing more and more colourful makeup for the next couple weeks.
How-to: Winged Liner (video)
A quick easy how-to winged liner video. Remember, practice makes perfect! Don’t worry about it if you don’t get it right away, keep practicing and you’ll be able to create the perfect winged liner every time!
Read More
Chinese New Year Makeup
Since the Lunar New Year is just around the corner, I’ve decided to create this Chinese New Year makeup inspired by the year of the Red Monkey! This look is filled with gold and red which represent wealth and luck! I know that there’s a lot of different cultures who celebrate the Lunar New Year, so I’ll be referring it as Lunar New Year instead of Chinese New Year. I wrote Chinese New Year on the title for SEO purposes. I hope that’s ok with everyone!
How-to: Smoky Winged Liner
I received a request by Dila who wanted me to do a video to show her how to create a smoky winged liner. She saw me back in 2014 when I was in Jakarta, and when we met I was wearing the day version of this smoky winged liner. Check out my Smokey Winged Liner post if you prefer a pictorial, or one which you can wear for a day look. This smoky winged liner tutorial is a darker, smokier version.
Urban Decay Gwen Stefani Tutorial #1
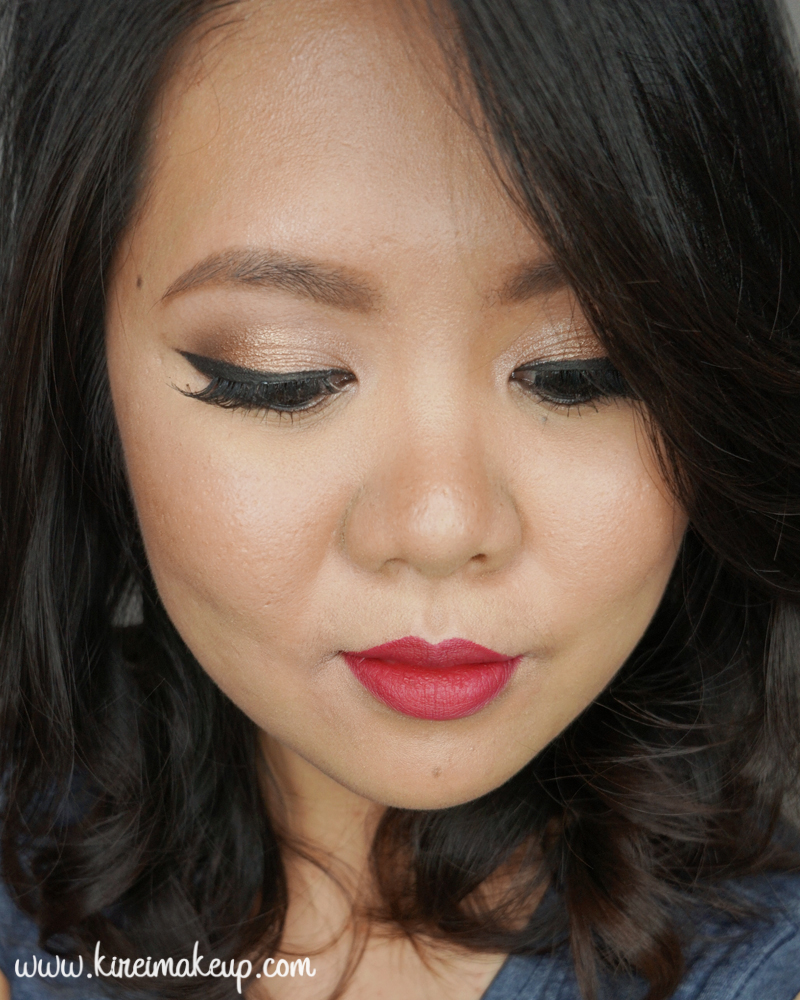
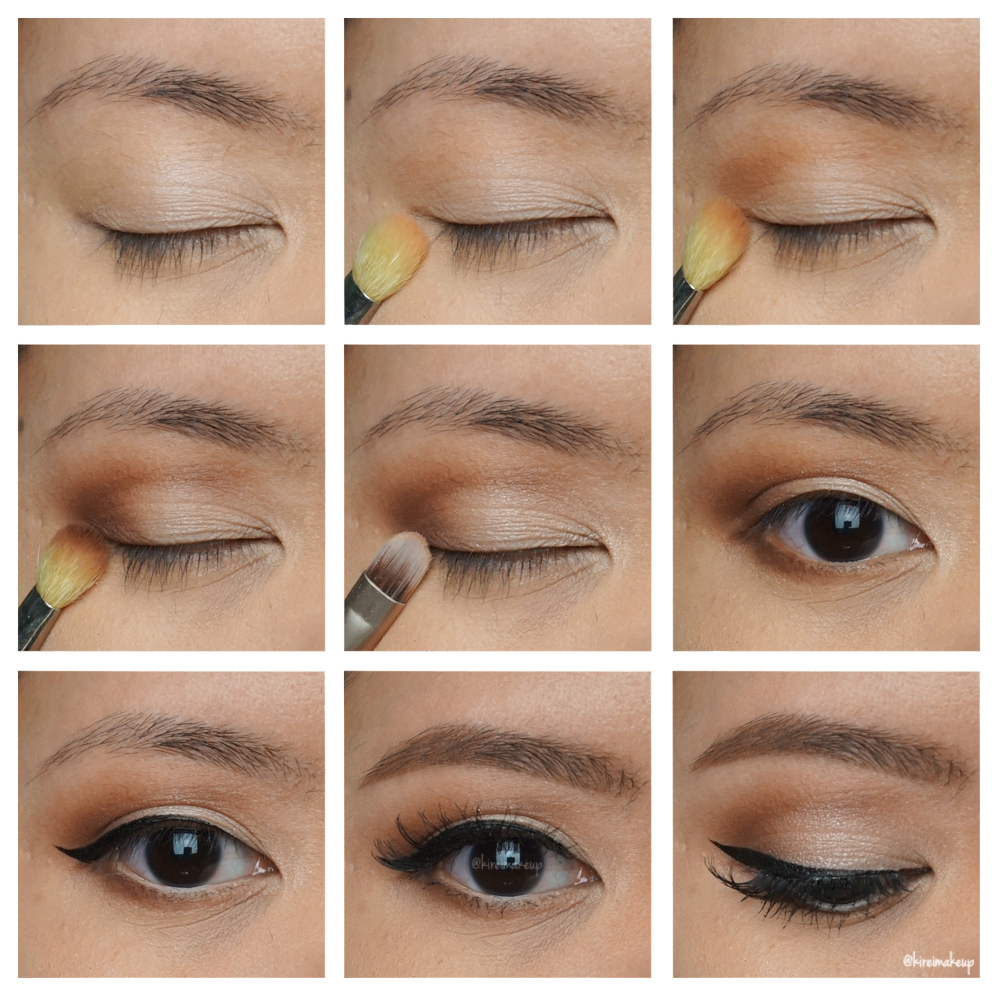
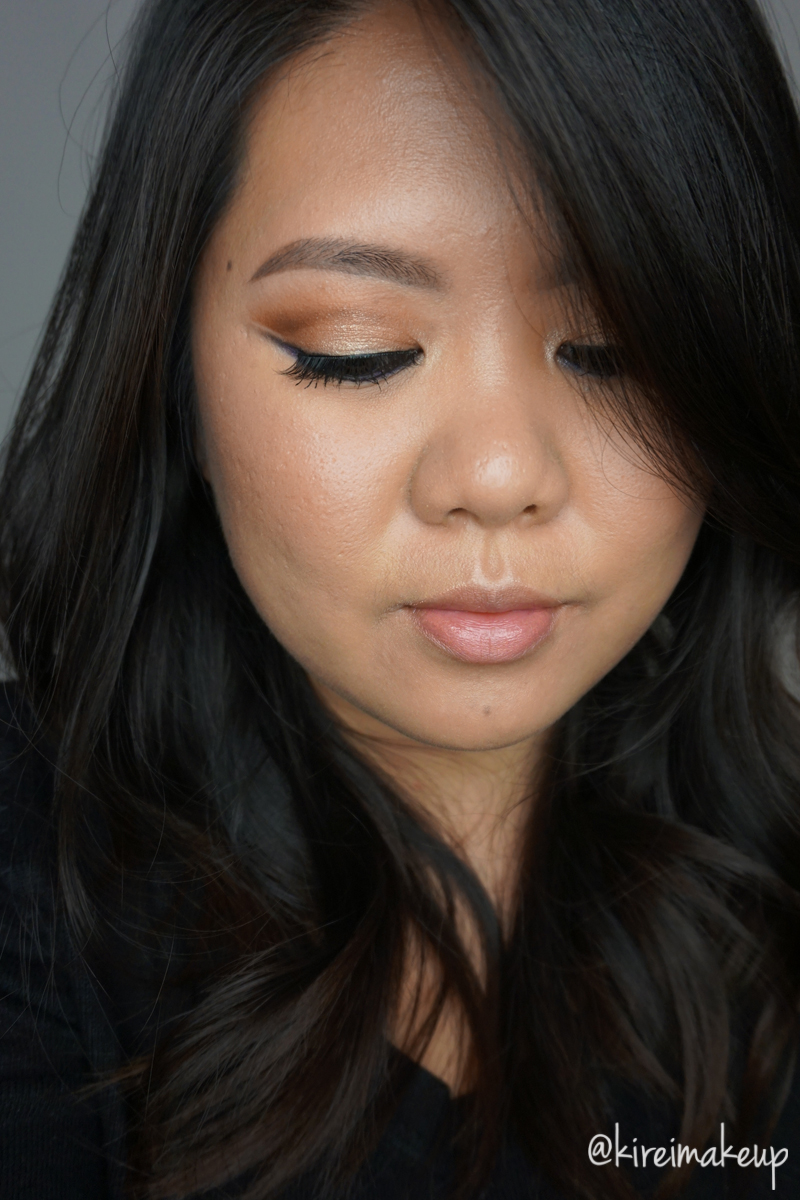
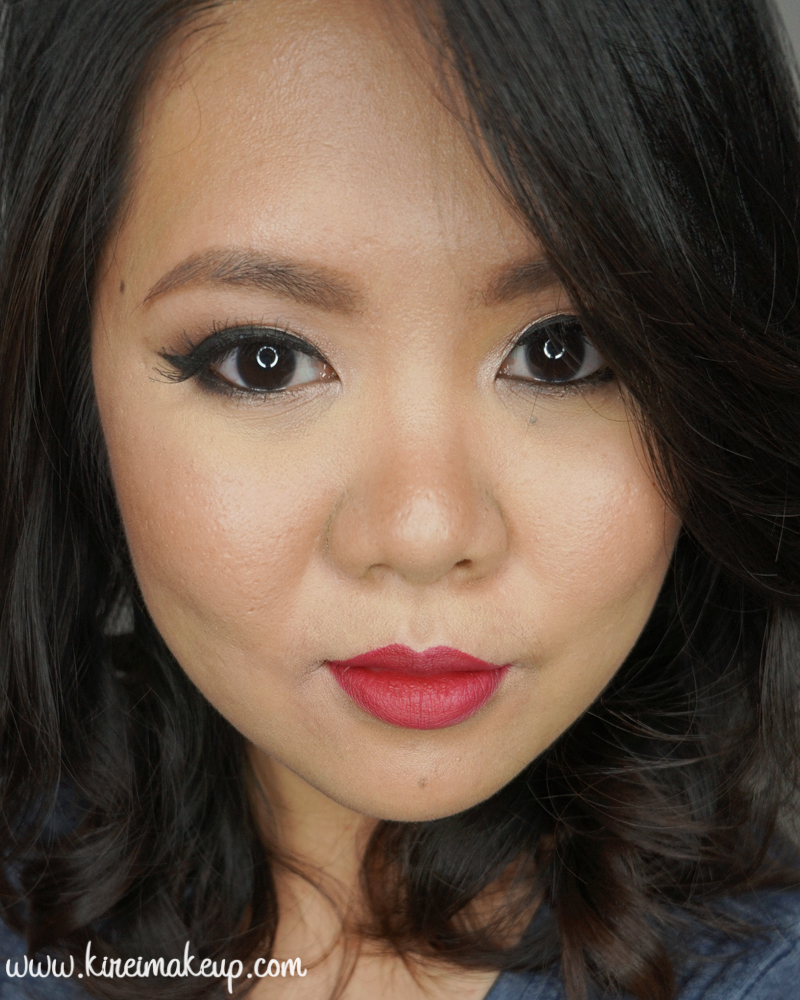
I did promise to post an Urban Decay Gwen Stefani tutorial in my previous post, and here it is! I did this pretty quickly since I was testing several products all at once. It’s very simple and easy to do. I pretty much only used 2 brushes for the eyes – blending and flat eyeshadow brushes, and this is just my regular go-to eye makeup look.
I’ll be posting more Urban Decay Gwen Stefani tutorials, so if you have any requests, feel free to leave a comment below! As you know, Gwen Stefani is no stranger to bold makeup look, so for this tutorial, I’ve decided to pair the eyes with red lips. Gwen Stefani does wear a lot of red lipstick paired with bold winged liner. I did a winged liner, but not as bold as her since I don’t have the “real estate” (aka enough space) on my eyelids to do so.
Check out my VLOG using this palette!
Have you guys check out my UD x Gwen Stefani swatches and first impression yet?! You should!
Products used
Eyes
- Primer – Urban Decay Primer Potion “Anti Aging”
- Base – Urban Decay Gwen Stefani “Skimp”
- Transition –Urban Decay Gwen Stefani Stefani “Anaheim”
- Crease – Urban Decay Gwen Stefani “Zone”
- Outer V/Lower Lash line – Urban Decay Gwen Stefani “Punk”
- Eyelid – Urban Decay Gwen Stefani “Blonde”
- Waterline – MAC Chromagraphic eyeliner NC30
- Winged liner – Kanebo Kate Super Sharp eyeliner
- Mascara – NARS “Audicious” mascara
- Falsies – Ardell “Demi Wispies”
- Brows – Anastasia Brow Pomade “Medium Brown”
Face
- Base – Bobbi Brown “Vitamin Enriched Face Base”
- Foundation – Shu Uemura Skin:Fit foundation
- Concealer – NARS Radiant Creamy Concealer “Custard”
- Setting powder – Laura Mercier “Invisible Loose Powder”
- Nose contour – Make Up Store “Smog” Micro Eyeshadow
Cheeks
- Blush – Eve Pearl “Bronzing Trio”
Lips
- Lip pencil – MAC “Brick” lip pencil
- Lipstick – MAC “Russian Red” lipstick
Shu Uemura x Maison Kitsune Look #3
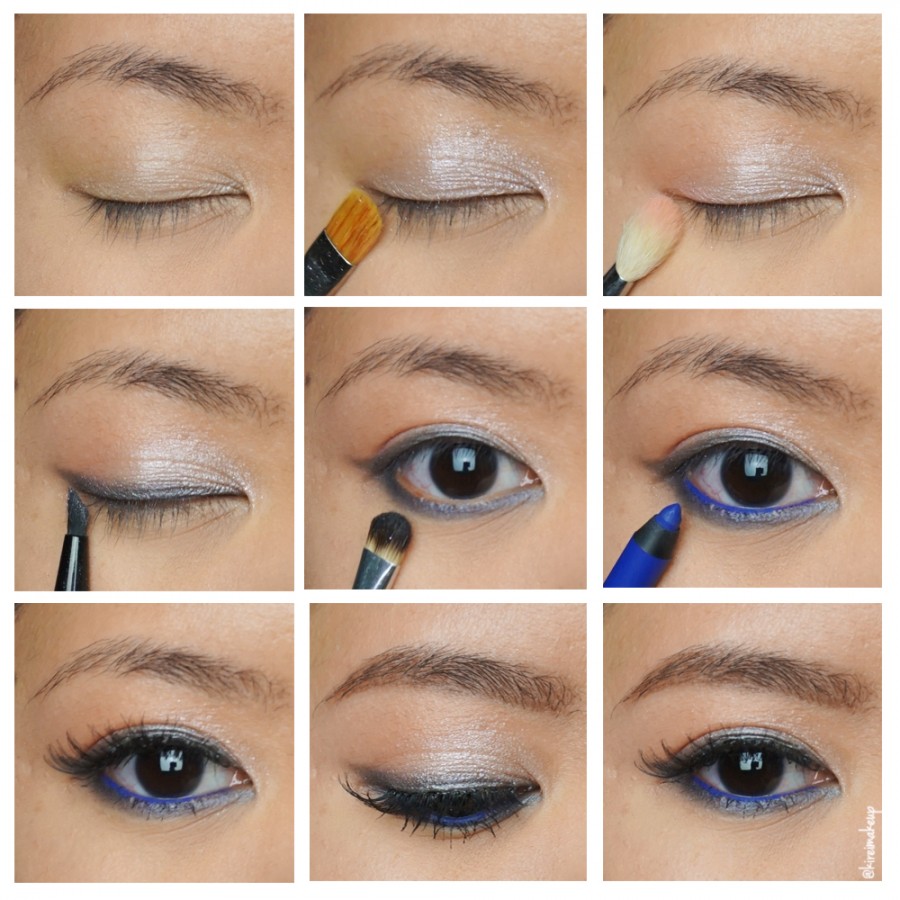
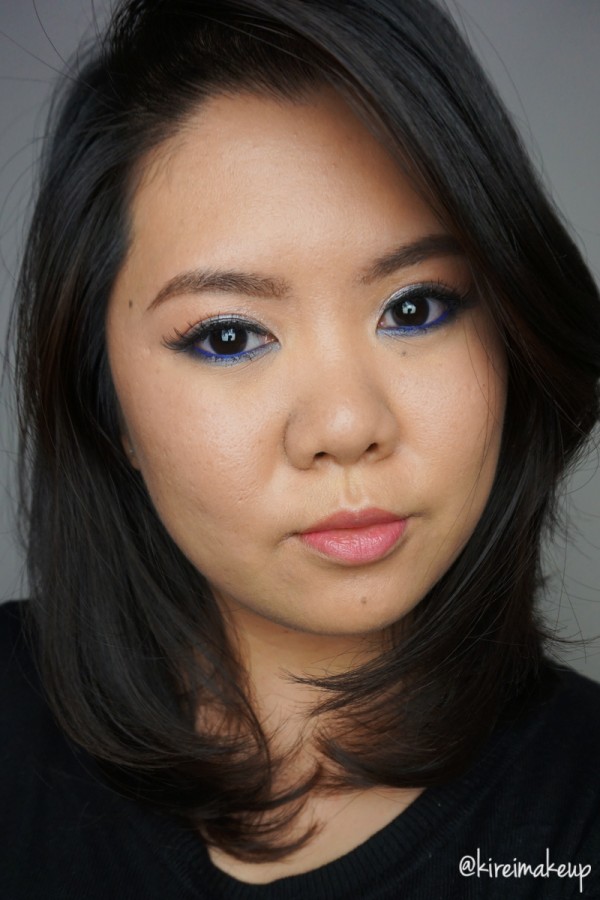
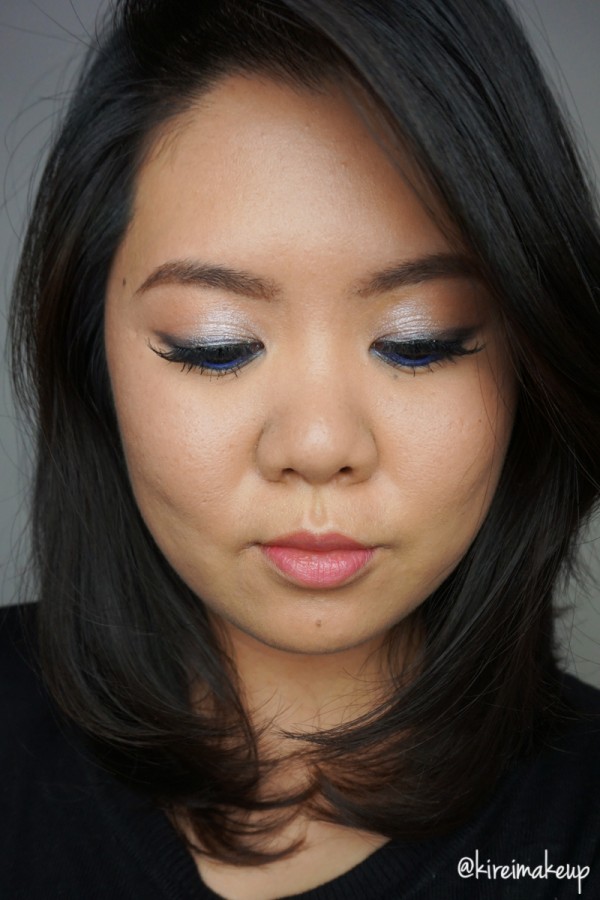
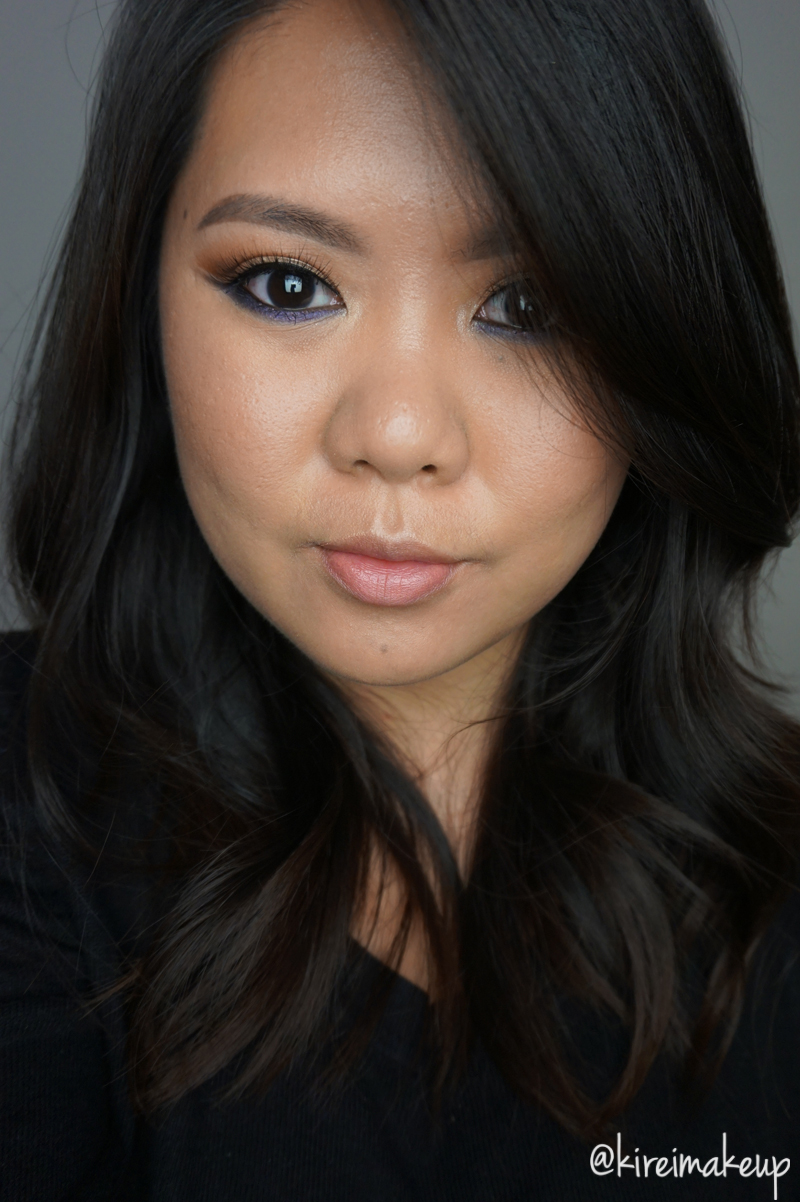
Another day, another look using Shu Uemura x Maison Kitsune Holiday collection 2015! I’ve done 2 smoky eyes using Shu Uemura x Maison Kitsune Indigo palette (Grey Smoky & Blue Smoky), and this will be my third look. I’ll try to do a review and swatches of the Indigo palette next week.
For this look, I wanted to create a simple soft smoky liner makeup, which is an alternative way to glam up your party makeup. If you are not comfortable doing smoky eyes, give this look a try. For the rest of my face, everything is simple, no contouring. Most of the products used are Shu Uemura products, which I’ve been loving lately. It’s a really great line, especially for Oriental skin. Anyways, please scroll down for more pictures and product details.
*Please check out my other Maison Kitsune for Shu Uemura tutorials*
Products used
Eyes
- Base – Shu Uemura cream eyeshadow “Ivory”
- Eyelid – Shu Uemura Maison Kitsune Indigo Palette “Deep Pink”
- Outer third/crease – Shu Uemura Maison Kitsune Indigo Palette “Glow On Blush Pink”
- Upper lash line – Shu Uemura Maison Kitsune Indigo Palette “Black”
- Lower lash line – Shu Uemura Maison Kitsune Indigo Palette “Navy”
- Waterline – Shu Uemura Maison Kitsune Play & Remix Drawing pencil “Indigo”
- Lashes – Ardell falsies “Demi Wispies”
- Brows – Shu Uemura Brow Sword
Face
- Base – Shu Uemura Tsuya Bouncy-Fine Cream
- Foundation – Shu Uemura Lightbulb foundation
- Concealer – NARS Radiant Creamy Foundation “Custard”
- Setting Powder – Laura Mercier “Invisible Setting Powder”
Cheeks
- Blush – Shu Uemura Maison Kitsune Indigo Palette “Glow On Blush Pink”
Lips
ABH Shadow Couture World Traveler Tutorial #2
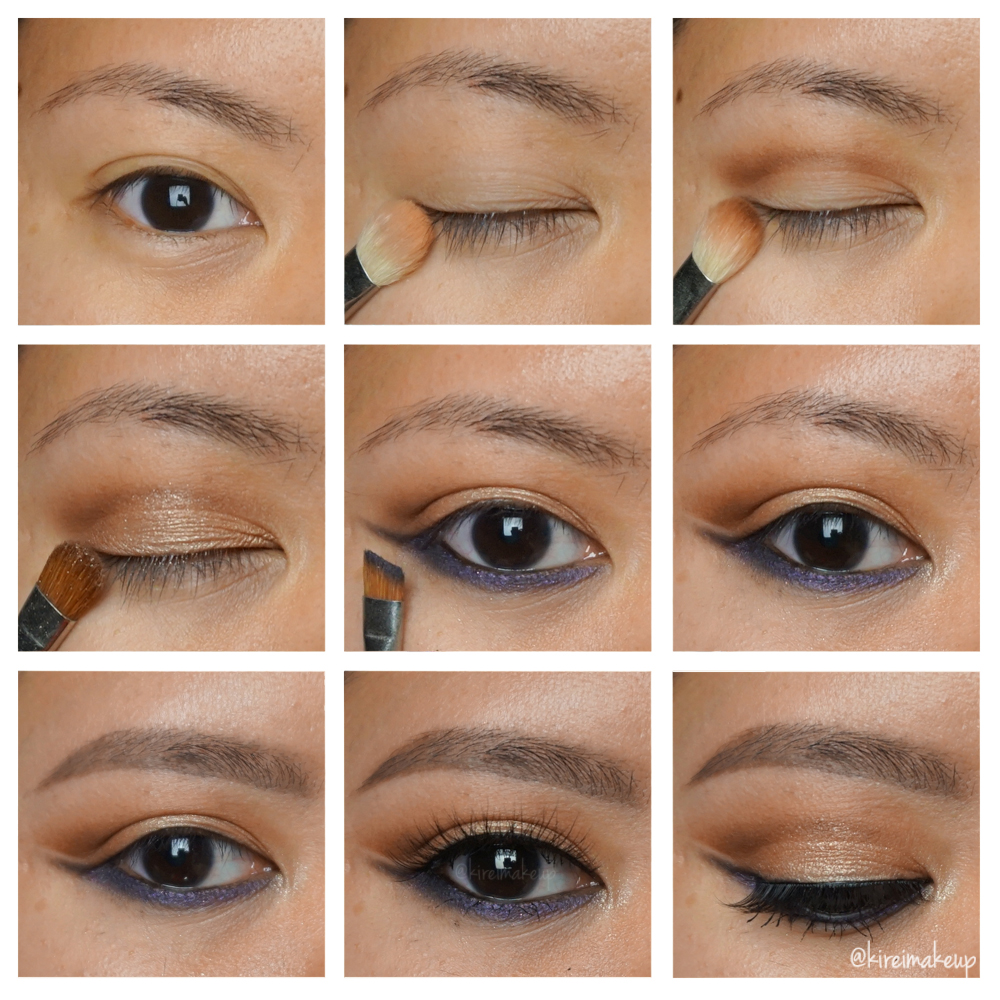
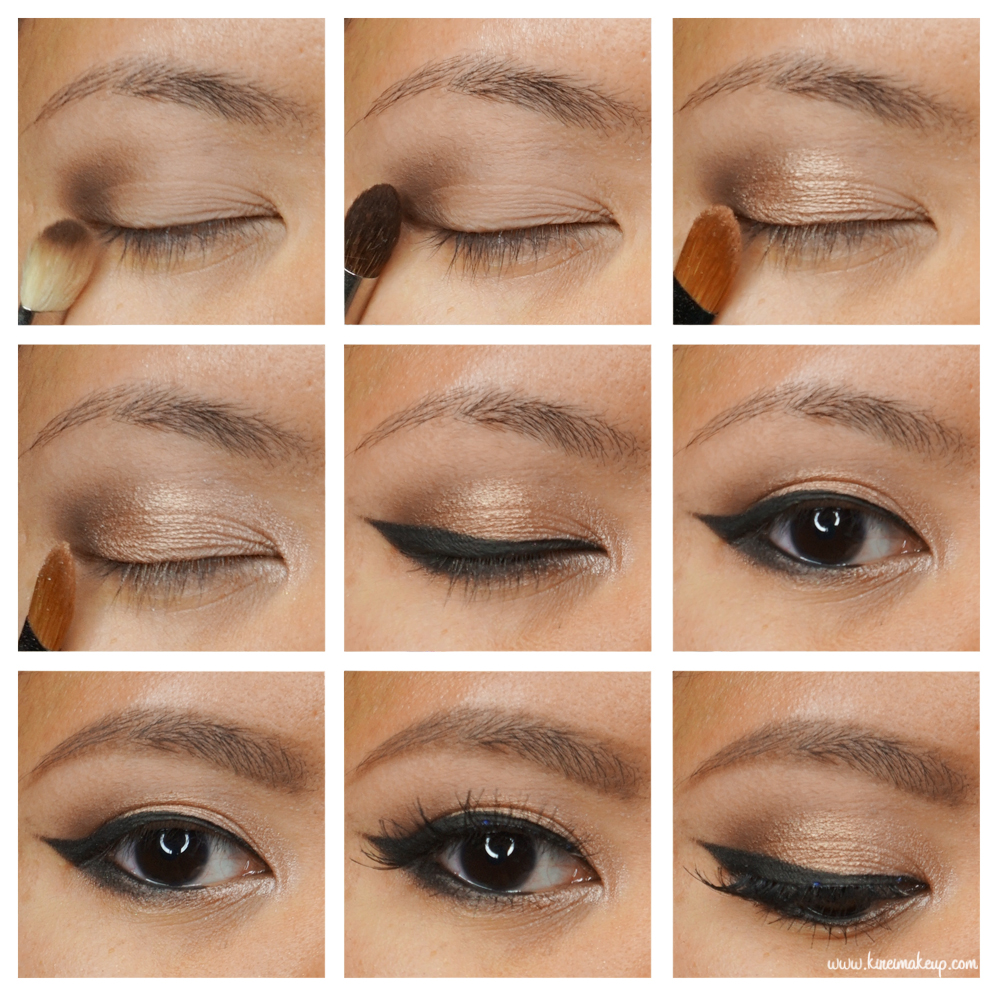
I hope everyone is having a great week! Today I’m going to do another ABH Shadow Couture World Traveler tutorial! I’ve been doing lots of colorful look, so this time around, I wanted to do a more neutral color with a little bit of purple. I have used this palette to do another look, which you can find in my ABH Shadow Couture World Traveler tutorial #1.
Anyways, I have family members over this whole week till next week, so I do apologize if I’m running low on blog posts since I’ve been busy and running around. I do want to line up several Halloween tutorials, so hopefully I’ll be able to post it next week. I’ll try to do a post at least 1 more before the Thanksgiving (Canada) weekend.
Anyhow, for this look, I wanted to do a little bit of a cut crease and reversed winged liner. I cleaned the line up in between the purple liner and the outer corner of the upper lid using MAC Chromagraphic eyeliner in NC30. You can use any beige eyeliner, or white. I don’t really like using white pencil since I thin it’s too stark, the beige liner looks more natural.
Products used
Eyes
- Primer – Urban Decay Primer Potion “Anti-aging”
- Transition – ABH Shadow Couture “Soft Peach”
- Crease – ABH Shadow Couture “Fudge”
- Eyelid – ABH Shadow Couture “Belini”
- Inner corner – ABH Shadow Couture “Chic”
- Lower lid – ABH Shadow Couture “Heirloom”
- Waterline/Tightline – L’oreal Voluminous Smoldering eyeliner
- Mascara – NARS “Audicious” mascara
- Falsies – Esqido “BFF”
Face
- Foundation – Diorskin Star foundation “31”
- Concealer – NARS Radiant Creamy Concealer “Custard”
- Setting powder – CoverFX setting powder
Cheeks
- Highlighter – The Balm “Mary-Lou Manizer”
- Blush – Smashbox Halo Powder Blush “In Bloom”
Lips
- Lipstick – Revlon Colorstay Ultimate Suede lipstick “Flashing Light”
Kat Von D Ink Liner Dali & Neruda
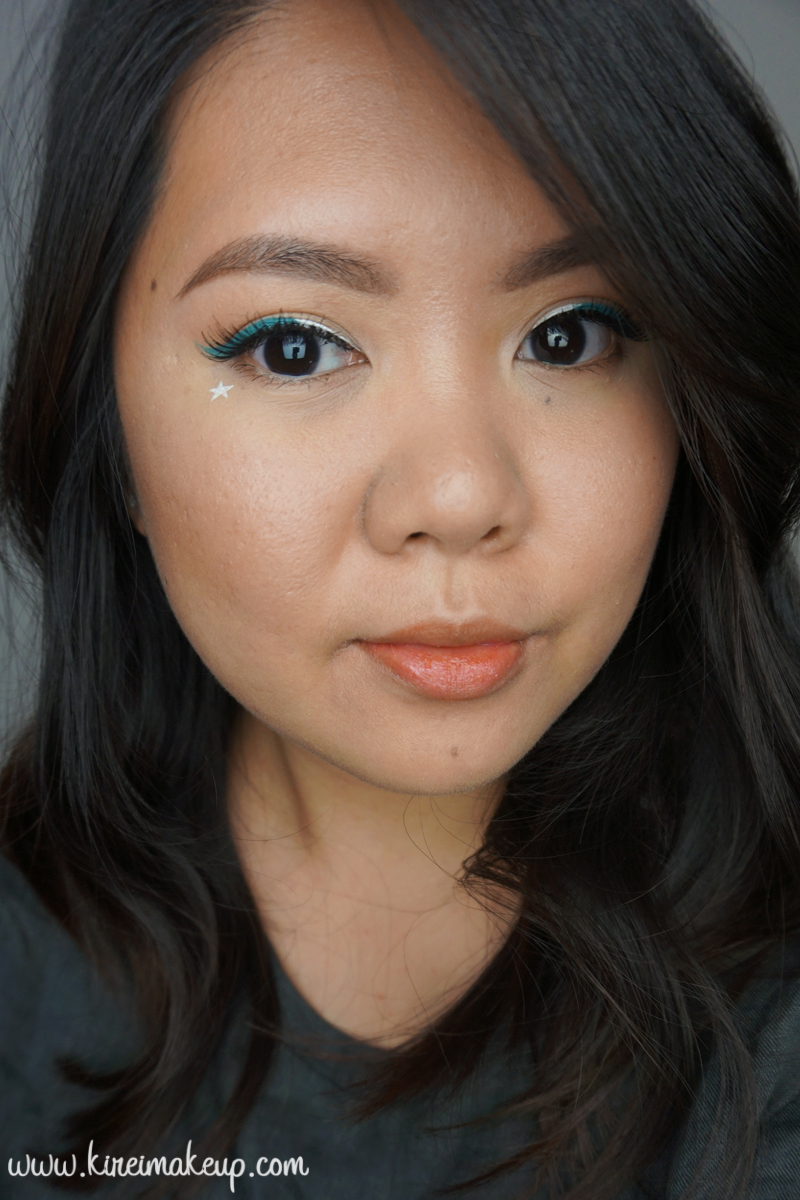
I recently bought the Kat Von D Ink Liner Dali & Neruda from Sephora, and I love the teal (Dali)! Obviously, you can’t go wrong with the white (Neruda), but this teal color is really pretty, yes? I have been holding this post back for a week since Kat Von D Mi Vida Loca Remix palette was stealing the spotlight. However, if you are not a fan of colorful eyeshadow, but still want to add colors into your makeup, this is one way of doing it – with liners! Nevertheless, don’t forget to check out my Kat Von D mi Vida Loca Remix look #1 for some colorful inspiration.
Anyways, I decided to do a color block liner with Dali and Neruda, just because I think it’s pretty fun. The last bit of Summer is almost over, so I decided to bring in more colors into my makeup before we transition into Fall. Would you still wear color in the Fall season? Let me know by commenting below!
For the rest of the eyes, I only apply very light shadows from my Kat Von D Shade + Light Eye contour palette. You can skip it altogether, I just apply it to add a little bit of shade to my eyes. You can barely see it on the pictorial, but it does make a little bit of difference for me.

Products used
Eyes
- Primer – Urban Decay Primer Potion “Anti-aging”
- Eyelid – KVD Shade+Light Eye contour palette “Latinus”
- Inner corner – KVD Shade+Light Eye contour palette “Lucius”
- Crease – KVD Shade+Light Eye contour palette “Samael”
- Upper lash line – Kat Von D Ink Liner “Dali” (outer half); Kat Von D Ink Liner “Neruda” (inner half)
- Lower lash line – KVD Shade+Light Eye contour palette “Sytry”
- Brows – Anastasia Beverly Hills Brow Wiz “Medium Brown”
- Mascara – Diorshow “Backstage” mascara
- Falsies – Ardell “Demi Wispies”
Face
- Primer – Bobbi Brown “Vitamin Enriched Face Base”
- Foundation – MAC Waterweight foundation “nc30”
- Concealer – MAC Pro Longwear Concealer “nc25”
- Powder – MAC Magically Cool Liquid Powder “Truth & Light” (apply lightly all over the face)
Cheeks
- Contour – Kat Von D Shade+Light Contour palette in “Shadowplay”
- Blush – Benefit “Hervana”
- Highlighter – Becca x Jaclyn Hill Shimmering Perfector
Lips
- Lipstain – YSL Pop Water Glossy Stain “Eau de Coral (203)”
MAC D for Danger
I have a new favorite lip color! MAC D for Danger lipstick is a gorgeous berry shade with a matte finish. I love it! I have been looking for a berry lip color for a while now, but usually it’s too purple, so I’m very excited when I found this shade. D for Danger is a permanent lipstick shade at MAC. I recently found it when I was browsing their Retro Matte collection.
Anyways, I paired UD Naked Smoky with this berry lips. I went with a winged liner, and bronze on the lids. Nothing too dark on the crease since I want the focus to be on the winged liner itself. This look is quite heavy on both eyes and lips, but I don’t quite mind it. I think this will look nice for a party. For a day look, I probably will leave the eyes bare, just mascara and groomed brows, leaving the lips to be the focus of the attention.
I have done a smoky eye look using UD Naked Smoky in my previous tutorial, please check it out!
Products used
Eyes
- Primer – Urban Decay Primer Potion “Original”
- Transition – UD Naked Smoky “Combust”
- Crease/outer lid – UD Naked Smoky “Whiskey”
- Middle lid – UD Naked Smoky “Dirtysweet”
- Inner corner – UD Naked Smoky “High”
- Winged liner/outer corner of lower lid – Maybelline “Eye Studio Lasting Drama Gel Liner in Black”
- Waterline – L’oreal “Voluminous Smoldering eyeliner”
- Brows – Anastasia Brow Wiz “Taupe” and “Medium Brown”
- Falsies – Gwiyomi Boutique false lashes “no. 3”
Face
- Primer – Becca “Ever Matte Poreless Priming Perfector”
- Foundation – NARS Luminous Weightless Foundation “Punjab”
- Concealer – NARS Radiant Creamy Concealer “Custard”
- Setting powder – CoverFX translucent setting powder
Cheeks
- Contour – Smashbox contour kit “contour” shade
- Cheeks – NARS “Mata Hari” blush
Lips
- Lipstick – MAC “D for Danger”