50s Inspired Makeup

This 50s inspired makeup is a modern take of the old Hollywood glam. It’s still pretty glamorous due to the falsies and eyeshadows, which make it suitable for wedding guests, and even brides! You can draw a thicker winged eyeliner if you have bigger eyes, but I kept mine pretty thin.

I wanted the focus to still be on the lips, since I think this Shu Uemura Diva Red lipstick is the perfect red lipstick for summer. It has an orange undertone, and it will look great especially on East Asian skintones.

I’ve done a more neutral eyes if you prefer non-winged liner look. Please take a look at my Kat Von D Shade + Light eye contour tutorial for a more neutral non-liner eyes.

natural eyes

Products used

Eyes

  • Primer – Urban Decay Primer Potion “Original”
  • Eyelid – Make Up For Ever Aqua Cream no. 13 “Warm Beige”
  • Transition – Makeup Geek Cosmetics “Peach Smoothie”
  • Crease/lower lid – L’oreal “La Palette Nude no. 6”
  • Winged liner – Kat Von D Tattoo Ink Eyeliner “Trooper”
  • Waterline – MAC Chromagraphic eyeliner “NC25”
  • Mascara – Maybelline Great Lash mascara
  • Falsies – Ardell false lashes #120 “Demi”
  • Eyebrows – Anastasia Beverly Hills Brow Wiz “Taupe” + “Medium Brown”

50s inspired makeup tutorial

Face

  • Foundation – MAC Pro Longwear Waterproof foundation “NC25”
  • Corrector – Bobbi Brown Corrector “Peach”
  • Concealer – MAC Pro Longwear Concealer “NC25”
  • Powder – MAC Mineralized Skinfinish “Medium Plus”

Cheeks

Lips

50s inspired makeup tutorial

Taylor Swift Bad Blood Makeup (Inspired)

Today’s tutorial is Taylor Swift Bad Blood makeup from her music video. Her costars and herself have such great makeup on the videos, it was hard to pick. However, I decided to choose this look where she has a smoky cat eye with red lipstick. I think she looks drop dead gorgeous!

At first, I wasn’t planning to do this look, but oh well why not, right?! For the lips, I chose MAC Viva Glam I lipstick, since I thought it looked dark enough. However, when editing the pictures, I just realized the lips looked pretty bright. I can assure you it’s not that bright in real life. Nevertheless, if you prefer a darker lips, MAC Diva lipstick would do just great. I should have used MAC Diva, but it’s in one of the unpacked boxes. Ah, the joy of moving right? Anyways, hopefully I’ll be able to unpack everything by next week!

taylor swift bad blood makeup

For this look, most of the products on the eyes are from Kat Von D Shade + Light Eye palette, but you can use any matte eyeshadow. You can skip the second step – putting a dark grey eyeshadow on the lash line. I did that part because I thought I was going to do a classic smoky eye, but then decided to do the cat eye after.

For the cat eye part, since I have hooded eyelid on my right eye (left in picture), I’ve to extend the inner corner area a bit more. The cat eye is shaped using a black matte eyeshadow and an angled eyeliner brush.

taylor swift bad blood makeup

Products used

Eyes

  • Primer – Urban Decay Primer Potion “Original”
  • Base – Kat Von D Shade + Light Eye Contour “Laetus”
  • Eyelid – Kat Von D Shade + Light Eye Contour “Lazarus”
  • Upper lash line – Kat Von D Shade + Light Eye Contour “Saleos”
  • Cat eyeliner/Lower Lashline – Kat Von D Shade + Light Eye Contour “Shax”
  • Waterline – L’oreal Voluminous Smoldering eyeliner
  • Mascara – Cover Girl Lash Blast “Very Black
  • Brows – Anastasia Beverly Hills Brow Wiz “Medium Brown”; L’oreal Stylist Brow Plumper
  • Falsies – Gwiyomi Boutique no. 3

Face

  • Primer – Kat Von D Lock-it Featherweight Primer
  • Foundation – Kat Von D Lock-it Tattoo Foundation
  • Concealer – NARS Radiant Creamy concealer “Custard”
  • Setting Powder – CoverFX setting powder

Cheeks

  • Contour – Kat Von D Shade + Light contour palette “Shadowplay” + “Subconscious”
  • Blush – Smashbox Halo powder blush “In Bloom”

Lips

taylor swift bad blood makeup

Summer Makeup – Mint Eyeliner

As the weather is getting warmer, I wanted a lighter, and more colorful Summer makeup. I think I still haven’t had enough of mint makeup. I know the reign of mint color is over, but I couldn’t stay away from it! There’s just something about this color that’s so refreshing. So I decided to create a mint eyeliner look.

You can change the mint liner to any color you want, I think turquoise and yellow would be a great alternative for something bright. I chose to use Stila Smudge stick liner since it gives me the color pay-off I was looking for. I did tried their mint liquid liner, but it wasn’t good at all. I also set the eyeliner using a light green eyeshadow to prevent smudging – this is not necessary unless you have oily lids, just to be safe. Setting the eyeliner with powder will make it smudge-proof especially in warmer weather.

I paired this mint eyeliner with a pink lips, but you don’t have to pair it with this lips. I would pair this with a peachy lips for an alternative. I just paired it with pink lips just because I wanted to use my new lipstick. I kept everything else very simple. No falsies with this look since I don’t want it to look too glam.

mint eyeliner

Products used

Eyes

  • Primer – Urban Decay Primer Potion “original”
  • Base – Makeup Geek Cosmetics “Shimma Shimma”
  • Eyeliner – Stila Cosmetics Smudge Stick Waterproof Eye Liner “Mint Julep”
  • Eyeshadow – Make Up For Ever Diamond e/s “D316 Crystalline Pinky Green”
  • Mascara – Cover Girl Lash Blast mascara “Very Black”
  • Brows – Anastasia Brow Wiz in “Taupe” and “Brunette”

Face/Cheeks

  • Foundation – Chanel CC Cream “32”
  • Under Eye – Bobbi Brown Tinted Eye Brightener “Light to Medium Peach”
  • Highlight – The Balm “Mary-Lou Manizer”
  • Blush – MAC powder blush “Cubic”

Lips

  • Lipstick – Shu Uemura Rouge Unlimited  My Dear Matte “Allure Fuchsia”

mint liner

Yaz Red Lipstick & Midnight Blue Liner

As mentioned in my Yaz Bukey for Shu Uemura post, I purchased Yaz Red lipstick during the event. I wanted to give it a try, so I decided to pair the red lipstick with this navy blue eyeliner. During the making of this tutorial, my eyes were so watery for no reason on the outer corner, and I couldn’t stop it even after wasting so much q-tips. I think my eyes were dry. Anyways, for that reason, you’ll see a bit of a mess on the bottom outer-corner part of my eye in the step-by-step picture.

For the eyeliner, I used the eyeshadow called Midnight from my Smashbox Double Exposure palette. I used the eyeshadow wet to create an intense and cleaner line. Talking about eyeliner, I posted a quick video on my Instagram on how I create my winged liner using liquid liner, so check it out! If you prefer a pictorial, I have 2 posts – Winged Liner tutorial (using Kat Von D Trooper liner) and How-to (gel/cream) winged liner (using brush and cream liner).

I’ve done other tutorials using Smashbox Double Exposure palette – Valentine’s Day makeup and Look #2.

navy blue winged liner

Products used

Eyes

  • Primer – Urban Decay Primer Potion “original”
  • Eyelid/Brow Bone – Smashbox Double Exposure Palette “Veiled” (applied dry)
  • Crease – Smashbox Double Exposure Palette “Espresso” (applied dry)
  • Winged Liner – Smashbox Double Exposure Palette “Midnight” (applied wet)
  • Lower lash line (inner corner) – Smashbox Double Exposure Palette “Blanc” (applied wet)
  • Waterline – MUFE Aqua Liner “0L  Matte Black”
  • Eyebrows – Stila All Day Waterproof Brow Colour
  • Mascara – Cover Girl Lash Blast “Very Black”
  • Falsies – Gwiyomi Boutique #3

Face/Cheeks

  • Primer – Kat Von D face primer
  • Foundation – NARS All Day Luminous Weightless Foundation “Punjab”
  • Concealer – MAC Pro Longwear concealer “NC25”
  • Highlight – Becca  Shimmering Skin Perfector “Moonstone”
  • Setting powder – CoverFX translucent powder “Light”
  • Contour – MAC “Sculpt” powder
  • Blush – Smashbox Halo Blush powder “In Passion”

Lips

  • Lipstick – Yaz Bukey for Shu Uemura “Yaz Red”

shu uemura yaz bukey red lipstick

Winged Eyeliner Tutorial

Hello everyone! I’m back with a new tutorial! Since the weather is nice and warm, I wanted to create an everyday Spring Makeup look, and give the new MAC Miley Cyrus Viva Glam lipstick a try. As you know, I’m one to pair very simple eye makeup with bold lips. I usually leave my eyes bare, but once in a while I’ll wear a winged liner. Since, I do get asked to create a winged eyeliner tutorial, I’m going to show you how I do it using a liquid eyeliner.

I’ve done a winged eyeliner tutorial post using gel/cream liner in my other how-to post. Between a liquid and gel/cream liner, at this moment, I prefer a liquid liner. For me, it’s faster, easier and more convenient to use a liquid eyeliner since it comes in a pen-like applicator. There’s no need to have a separate brush, unlike gel/cream liner. However, a liquid eyeliner dries out faster than a cream/gel liner. So, if you do make a mistake, it’s hard to correct it. For beginners, I suggest going with a cream/gel liner. Once you’re comfortable, then advanced to a liquid liner.

The one I’m using for this tutorial is Kat Von D Trooper Tattoo liner. It’s pretty much waterproof, smudge-proof and long lasting. My favorite of all time! Been using it since it was released couple years a go. Absolutely a must-have in your kit!

how to create feline flick

So, I think the pictures are pretty self explanatory. All you have to do is just create the “outline” first, and then fill in the rest. If you aren’t satisfied with the pictures and instructions below, leave comments below or on my Instagram page or Twitter page, and I’ll try my best to answer it. I’ll try to do like more videos in the future once I’m all settled down.

Instructions:

1. Mark where you want your wings to be.

2. Create a diagonal line from the tip of the wing to the center of your lash line.

3. Create a line from the inner corner of your eyelid to the center of the lid.

4. Fill in the “outline”. At this point you can extend your wings, or thicken the line more. I’m satisfied with mine, I like it where the wings are bigger and it gradually tapers towards the inner corner of my eyes.

5. Then, fill in your brows, and add lashes if needed.

mac miley cyrus

Products used

Eyes

  • Primer – Urban Decay Primer Potion “original”
  • Eyelid – Chanel Illusion d’Ombrea “Emerveille”
  • Crease – The Balm Meet Matt(e) Nudes “Matt Rosen”
  • Eyeliner – Kat Von D Tattoo Liner “Trooper”
  • Eyebrows – Anastasia Beverly Hills Dipbrow Pomade “Medium Brown”
  • Falsies – Gwiyomi False lashes #3

Face/Cheeks

  • Foundation – NARS All Day Luminous Weightless foundation “Punjab”
  • Concealer – MAC Pro Longwear concealer “NC25”
  • Highlight – Kat Von D Shade + Light contour palette “Lyric”
  • Contour – Kat Von D Shade + Light contour palette “Sombre”
  • Blush – Smashbox Halo blush powder “In Passion”

Lips

  • Lipstick – MAC Miley Cyrus Viva Glam

mac miley cyrus viva glam


Lime Crime Wicked Tutorial

It has been a rough week! How is everyone holding up? My week has been crazy so far, and today I finally have the chance to update my blog! Anyways, don’t forget to follow me on Instagram for daily updates! Anyways, I recently purchased Lime Crime Wicked Velvetine lipstick,  which I’m sure you’d have known from my 2 previous post a go. I absolutely love the color, and I wanted to create another tutorial with it.

Since Wicked is such a strong bold color, I felt that wearing too much on the eyes might take the attention away from it. I decided to play with different texture and finish for this look, what do you guys think? I actually was quite happy with how it turned out. The eyes has a brightening effect without going too overboard with the shine, the face was kept semi-matte, and the lips were the center of attention.

*Check out my other Kat Von D Monarch palette related tutorials*

silver eyeshadow tutorial

My eyelids were prepped using Urban Decay Primer Potion. My face was prepped using Benefit Porefessional primer.

How-to:

1. I applied Delaney from Kat Von D Monarch Palette all over my eyelid using a flat eyeshadow brush. I brought this color up above my crease but just below the brow bone.

2. Using Real Technique Shading brush, I applied Telepathy from Kat Von D Monarch palette on the inner corner of my eyelids.

3. I applied Delaney along the lower lash line using Real Technique Shading brush.

4. I created a winged liner using Kat Von D Trooper eyeliner along my upper lash line.

5. Using an angled eyebrow brush, I stamped Deadhead from Kat Von D Monarch palette on top of the liquid eyeliner. I did this to create a matte finish since the eyeliner dries slightly shiny.

6. I lined the outer half of my waterline using Revlon Photoready Kajal eyeliner in Carbon Cleopatra (the black end).

7. I filled my brows using Anastasia Brow Wiz in Taupe and Brunette.

8. I curled my lashes and applied Maybelline Volume Express Turbo Boost mascara.

9. I also applied Gwiyomi no. 3 false eyelashes.

SONY DSC

10. For the face, I applied MAC Pro Longwear foundation using my fingers.

11. I applied Bobbi Brown Peach corrector and MAC Pro Longwear concealer under my eyes.

12. I applied Benefit Moon Beam highlighter on the bridge of my nose, on top of my cheeks, and cupid’s bow.

13. I lightly contour my face using Smashbox contour kit and NARS Kabuki Ita brush.

14. On my cheeks, I applied MAC On a Mission beauty powder blush.

15. I set my face using Cover FX translucent setting powder.

16. I also lightly applied Hourglass Ambient Lighting powder all over using a powder brush.

17. On the lips, I applied Lime Crime Wicked.

SONY DSC

Products used

Eyes – Urban Decay Primer Potion (original); Kat Von D Monarch Palette (upper/lower lids: Delaney, inner corner: Telepathy; liner: Deadhead); Kat Von D Trooper eyeliner; Revlon Photoready Kajal eyeliner Carbon Cleopatra; Anastasia Brow Wiz in Taupe and Brunette; Maybelline Express Volume Turbo Boost mascara; Gwiyomi falsies #3.

Face – Benefit Porefessional face primer; MAC Pro Longwear foundation; Bobbi Brown Peach corrector; MAC Pro Longwear Concealer; Cover FX setting powder; Hourglass Ambient Lighting powder.

Cheeks – Benefit Moon Beam highlighter; Smashbox Contour Kit; MAC On A Mission beauty powder blush.

Lips – Lime Crime Velvetines Wicked.

Soft Romantic Makeup (Revisited)

I’ve done a lot of UD Naked 3 makeup tutorials, and though most of them are smoky eyes, I do have a few non-smoky eyes tutorials. I was looking back on those tutorials, and I’ve decided to revisit this Soft Romantic Makeup post. I actually liked how I did my makeup in that post, but I felt that I wanted to redo it, and added more intensity to the shadows. Which one do you prefer? This tutorial or the original one? Let me know on the comments below!

I’d also like to mention that I’ve changed the way I filled my brows for this tutorial – it’s thicker, and more natural looking. I think I prefer this brow, even though it might look “less polished” than the “carved out” brows (aka concealer on top and bottom of my brows), I do like how it looks more organic. What do you guys think?

I apologize if the photos are slightly too warm, I didn’t realize my camera’s white balance setting was on the “warming filter” option. I tried to neutralize it using photoshop, but this is all I can do for now (besides trying to neutralize the yellow shade, I did not do anything else – no airbrushing whatsoever). I’ll be more careful next time.

*Check out my other UD NAKED 3 TUTORIALS*

soft smokey eyes tutorial

How-to:

1. I applied MAC Perky paint pot all over my (mobile) eyelid using my ring finger.

2. Using a small blending brush, I applied UD Naked 3 Darkside on the outer V.

3. Using the blending brush that came with the palette, I applied Nooner on the crease. I used this shade to blend out the edge of Darkside.

4. I applied Trick on the eyelid, using the flat eyeshadow brush that came with the palette.

5. Using a small shader brush, I applied Burnout on the inner corner of the lower lid, and Darkside on the outer half.

6. I, very lightly, applied a teeeensy bit of Blackheart right on the roots of the lower lashes (just the outer half).

7. I lined my waterline using MAC Chromagraphic eyeliner in NW25/NC30. Along the upper lash line, I created a winged liner using L’oreal 24H Lacquer Liner and an angled eyeliner brush.

8. I filled my brows using Anastasia Brow Wiz in Taupe and Brunette.

9. Curled my lashes, and applied Gwiyomi False lashes no. 3.

ud naked 3 soft smoky tutorial

10. I applied Benefit Porefessional primer all over my face.

11. While letting the primer set, I applied Bobbi Brown Peach Corrector underneath my eyes (my dark circles are getting prominent lately!)

11. Then, I applied MUFE HD Foundation in 120 using Real Technique Expert Face brush.

12. I applied MAC Pro Longwear Concealer under my eyes, as well as on the bridge of my nose (just between the brows).

13. I also applied L’oreal Visible Lift blush in Rose Gold on my cheeks.

14. I set my face using NARS Setting Powder.

15. On my lips, I applied MAC Please Me lipstick and a few dabs of clear gloss.


Products used

Eyes – MAC Perky paint pot; Urban Decay Naked 3 palette (eyelid: Trick, outer V/lower lashline: Darkside, inner corner of lower lid: Burnout; roots of lashes: Blackheart); MAC Chromagraphic liner NW25/NC30; L’oreal 24H Lacquer Liner in Blackest Black; Anastasia Beverly Hills Brow Wiz in Taupe and Brunette; Gwiyomi False lashes no. 3

Face – Benefit Porefessional primer; MUFE HD Foundation in 120; Bobbi Brown Peach Corrector; MAC Pro Longwear concealer; NARS Setting Powder.

Cheeks – L’oreal Visible Lift Blush in Rose Gold.

Lips – MAC Please Me lipstick; L’occitane clear lip balm.

Holiday Party Makeup #4 – Glitter Liner Tutorial

Almost NEW YEAR! I wish everyone a great year ahead! 2014 was fun, it was a bit rocky for me, but nevertheless a good year. 2014 has passed, and here to a great 2015! Hopefully in 2015 everything will go even better! I cannot wait to start 2015, and I have a feeling it’ll be an awesome year! Anyways, since the New Year is almost here, this is my last post of 2014 – a glitter liner tutorial. Last year, for NYE, I did a silver smoky makeup, this time I opted for more glitter!

I wanted to do a slightly more silver glitter, but couldn’t find any, so I decided to do this neon green glitter. Keep in mind that some glitters are not meant for the eye area! The one that I used for this tutorial actually is NOT for the eye area. I decided to use it because I know it won’t irritate my eyes. If you are not sure whether to use glitter or not, please consult the makeup artist/sales person who’s selling you the glitter. Also please be careful if you’re wearing contacts and using glitter on your eyes!

As I said in my previous post, I will not be posting the step-by-step instruction, instead you’ll get the usual photos and product list only. This is a scheduled post, so for any questions, go to my Instagram if you need a quick response.

For the glitter, I applied it onto my eyes using a wet angled eyeliner brush. However, if you can find a mixing medium (e.g. MAC), that’d probably be better since I found that when the water evaporated from the glitter, it became apparent that the glitter started to fall all over my lashes and then to my face.

Another tip when using glitter and it falls on your face, use a tape to pick it up – just press it lightly to your face and it’ll pick up all the fallen glitters. If you have no tape around, use a CLEAN SPOOLY (aka mascara wand) to get rid of the glitter – just brush it in places where the glitter has fallen, use the tip of the wand if it is a stubborn one.

glitter new year makeup tutorialPlease check out my how-to winged eyeliner tutorial if you need help. I also have another glitter eyeliner tutorial that’s slightly easier and simpler.

If you prefer a full on glitter makeup, please check out my Christmas inspired makeup, and last year’s gold glitter makeup tutorial.

Products used

Eyes – Urban Decay Primer Potion; Make-Up Store Smog eyeshadow (crease), Make-Up Store Desert eyeshadow (transition color); Too Faced Chocolate Bar Palette (outer v – Triple Fudge); MUFE Aqua Black; L’oreal Voluminous Smoldering eyeliner; Make-Up Store Northern Lights glitter; Gwiyomi False Eyelashes; Chanel brow pencil

Face – MAC Pro Long-Wear foundation and concealer; MUFE Pro Finish powder.

Cheeks – Chanel Universal Bronzer; Smashbox Halo Blush in In Bloom.

Lips – MUFE Aqua lip pencil #18C

glitter eyeliner makeup tutorial


Holiday Party Makeup #3 – New Year

Since I’ll be away and busy, I won’t be posting the how-to for this tutorial and the next one. Instead, I’ll post the usual photos and just product list. I’ll be posting another Holiday Party Makeup tutorial in couple days, but this post and the next one are scheduled. So, if you have any questions and I don’t reply immediately I do apologize in advance!

For this look, I wanted to create a wearable smoky eyes for New Year party makeup. I was running out of idea and then I remembered I had barely touch my Too Faced Chocolate Bar Palette. It came with some instruction on how to create some of the looks, so I decided to replicate its Haute Cocoa look.

I’m not sure why for some reason the photos turned out more yellow than usual, but if you do decide to try this look, it really is a beautiful smokey eyes. It’s very warm, and golden. The plum in this look will suit every eye color and skin tone. If you want it darker, you can add black eyeshadow on your crease and lower lash line.

I skipped some steps, didn’t exactly follow the instruction. I added winged liner just because I felt like it. Made it into my own look 🙂

Check out my New Year makeup tutorial last year!

too faced chocolate bar palette makeup

Products list:

Eyes – Urban Decay Primer Potion; Too Faced Chocolate Bar palette (inner/outer third/lower lash line – Cherry Cordial; center – Creme Brulee; crease – Haute Chocolate); Kanebo Super Sharp Liner; L’oreal Voluminous Smoldering eyeliner; Gwiyomi false lashes; Anastasia Brow Wiz in Taupe and Brunette.

Face – MAC Pro Long-Wear foundation and concealer; Cover FX translucent setting powder.

Cheeks – Benefit Hervana.

Lips – MAC Whirl lip pencil; Kiehl’s mango lip balm

too faced chocolate bar palette tutorial

Christmas Makeup Tutorial

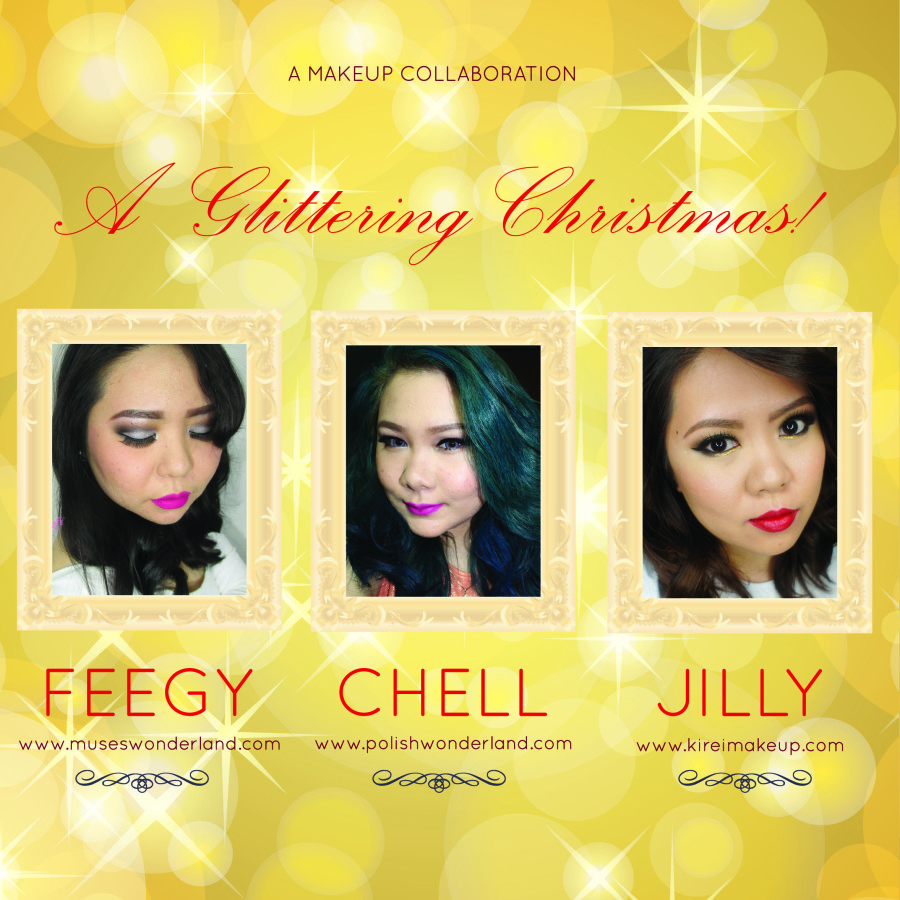
Are you guys ready for the Holiday season?! For those of you who are celebrating Christmas, I hope you’ll enjoy this Christmas Makeup tutorial! This is a makeup collaboration with fellow Indonesian Beauty Bloggers – Feegy from Muses Wonderland, Chell from Polish Wonderland, and myself (not from any wonderland *wink* hahaha). So, don’t forget to check their tutorial out!

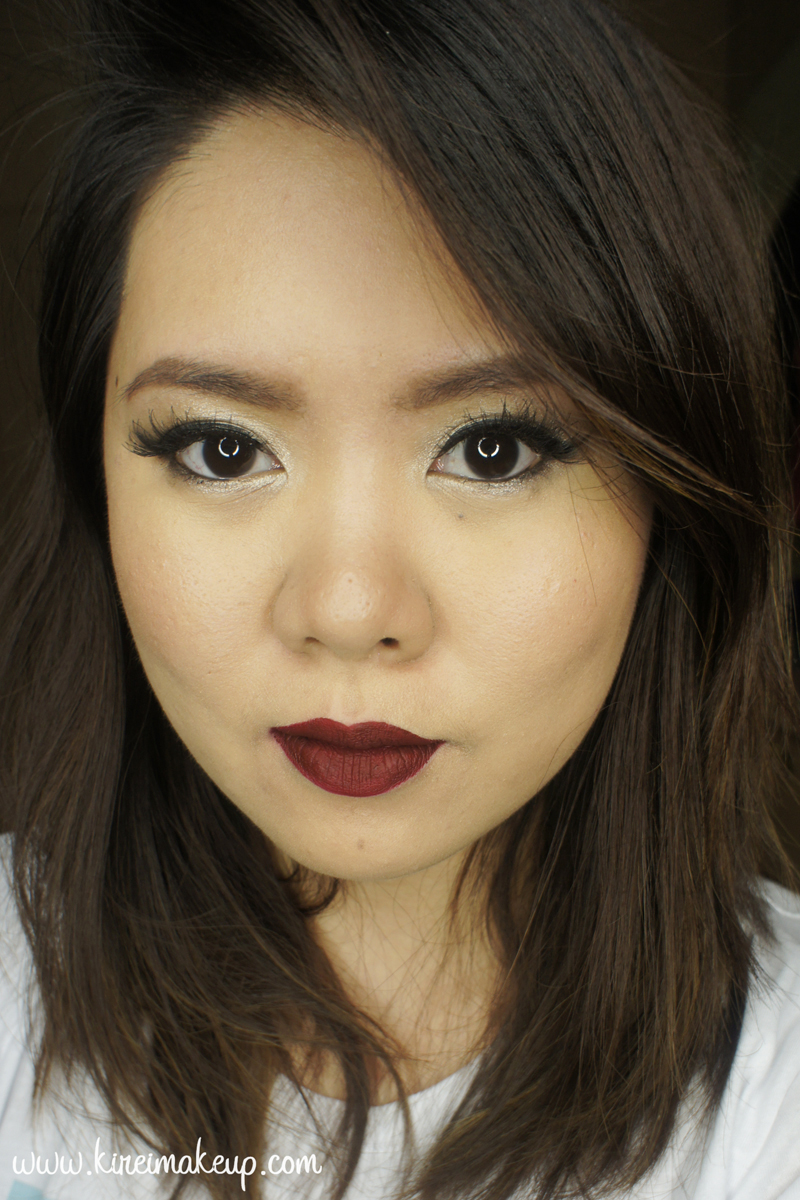
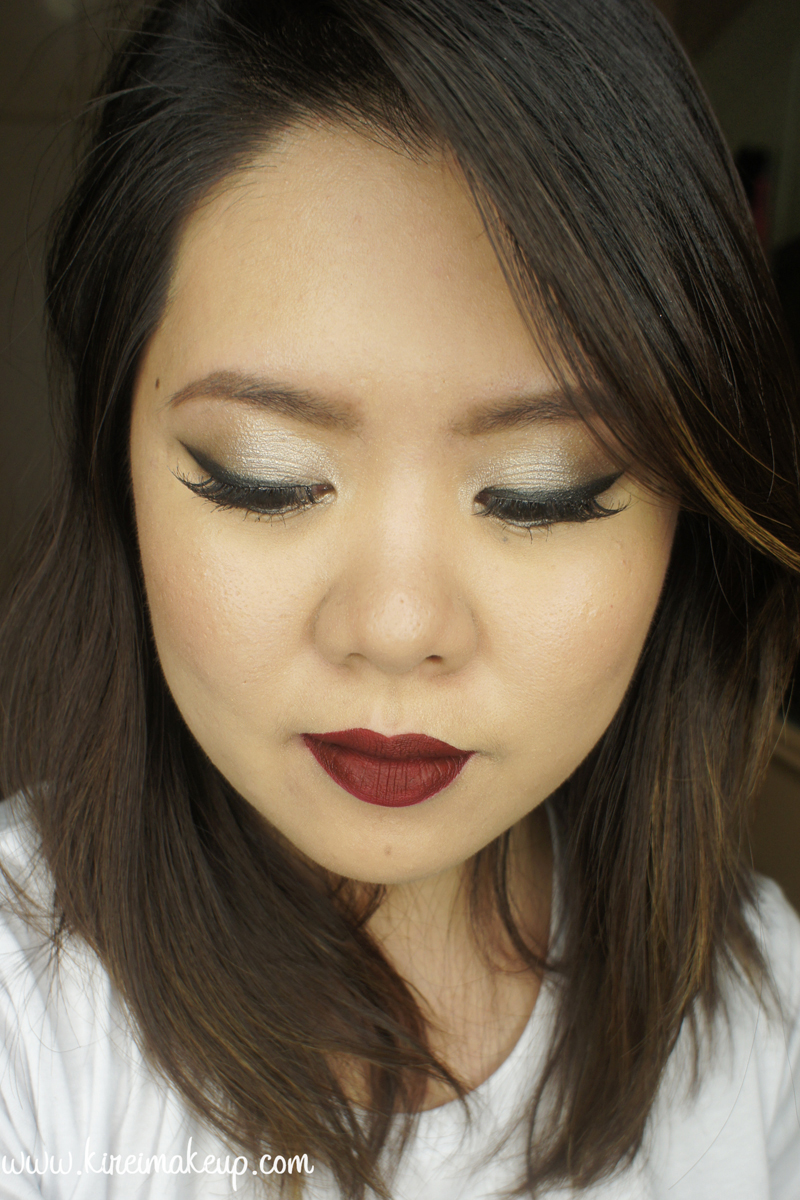
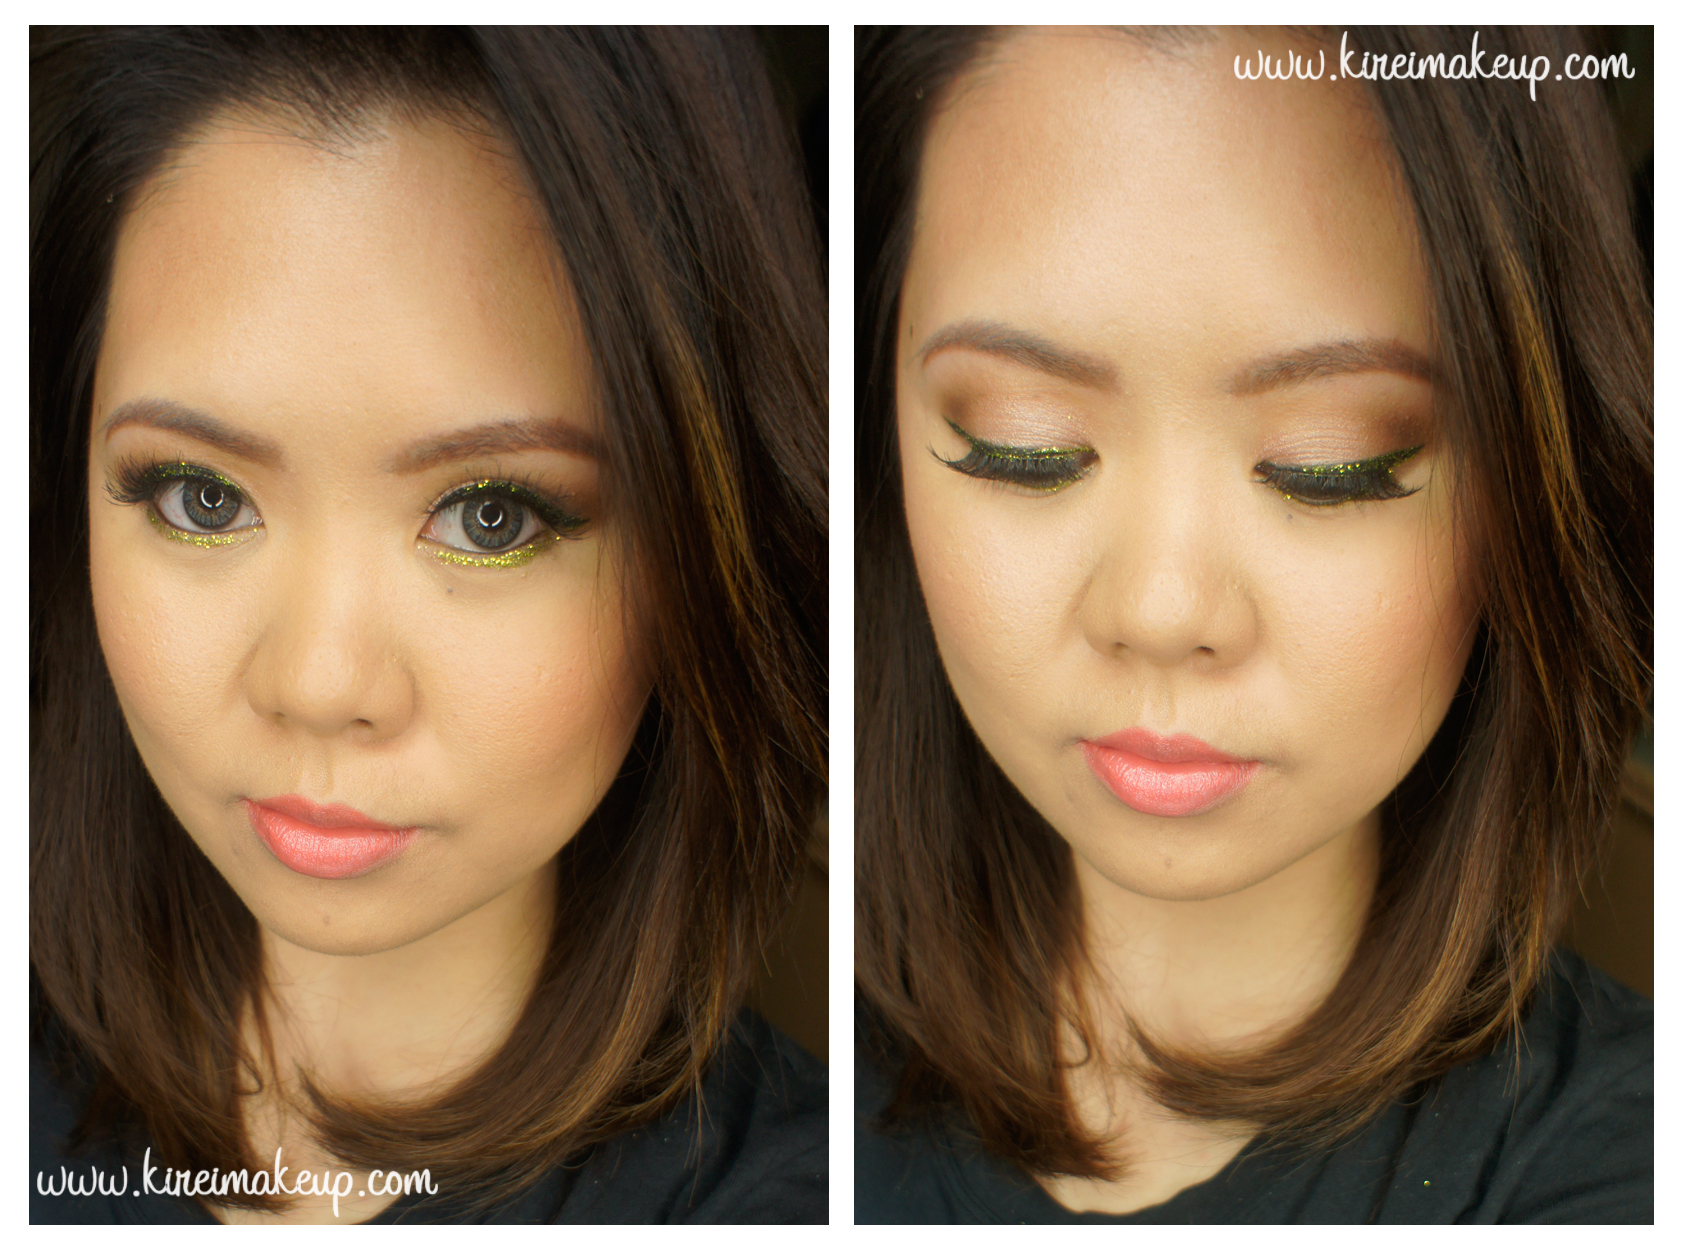
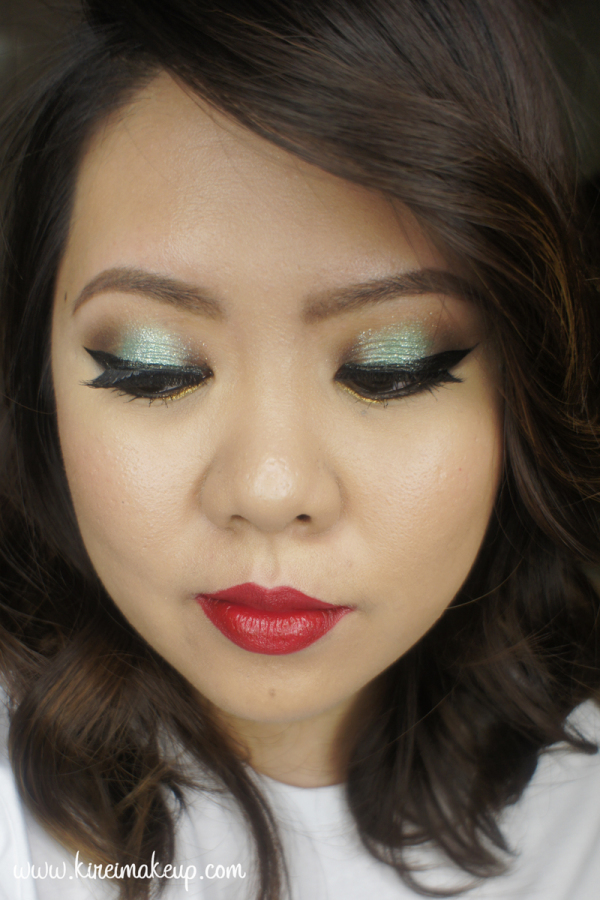
We collaborated in creating a Christmas look with a little bit of glitter ya’know, because it’s Christmas! We need glitters, hon! Sparkles everywhere! Feegy created a silver glitter smoky eyes, and Chell went on the nude glitter eyes. For me, I went all out with green, gold and glitters! Hey, it’s Christmas, I might as well make full use of all the Christmas colors!

makeup collaboration

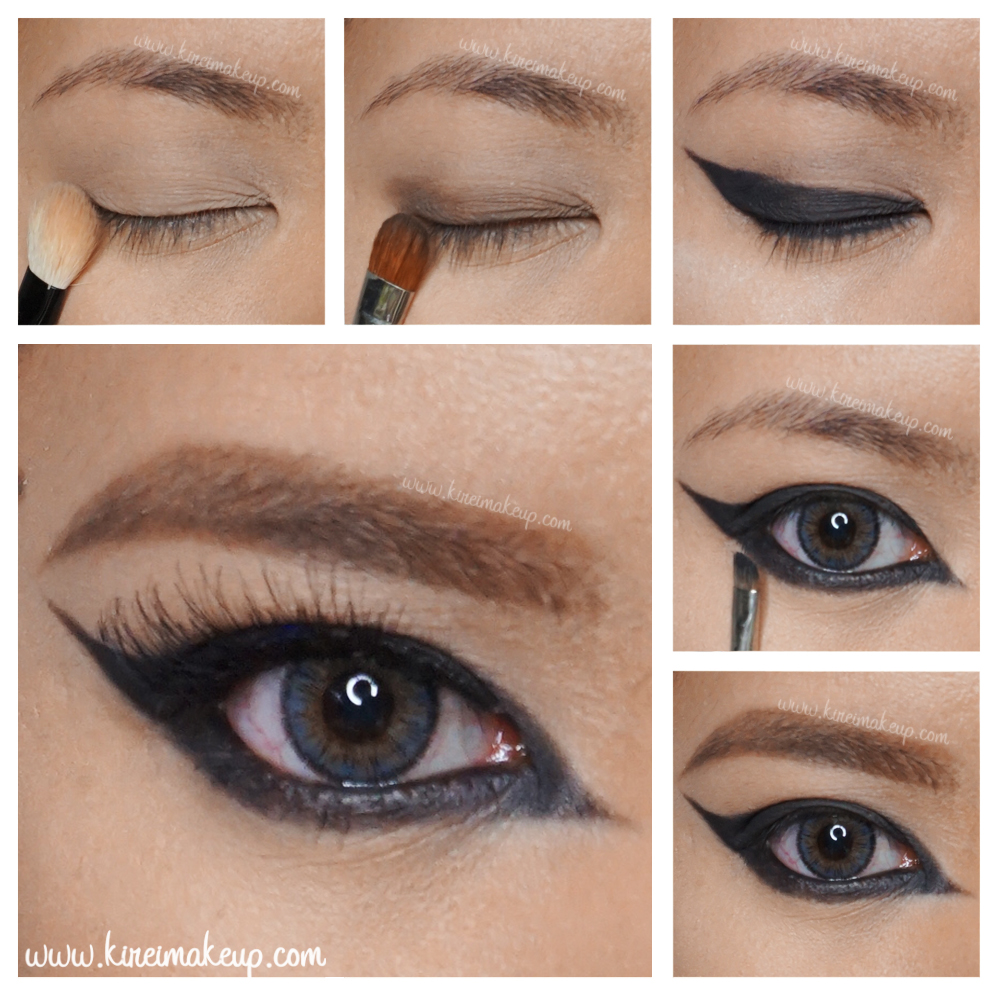
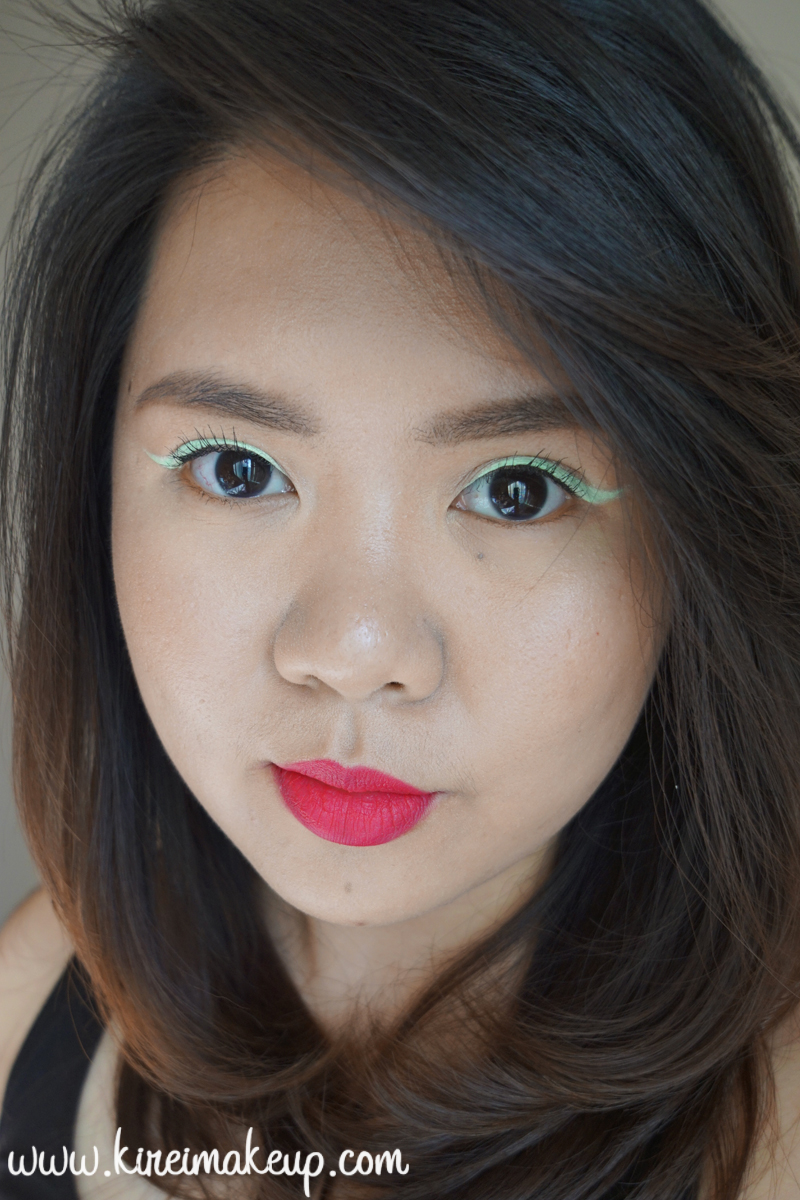
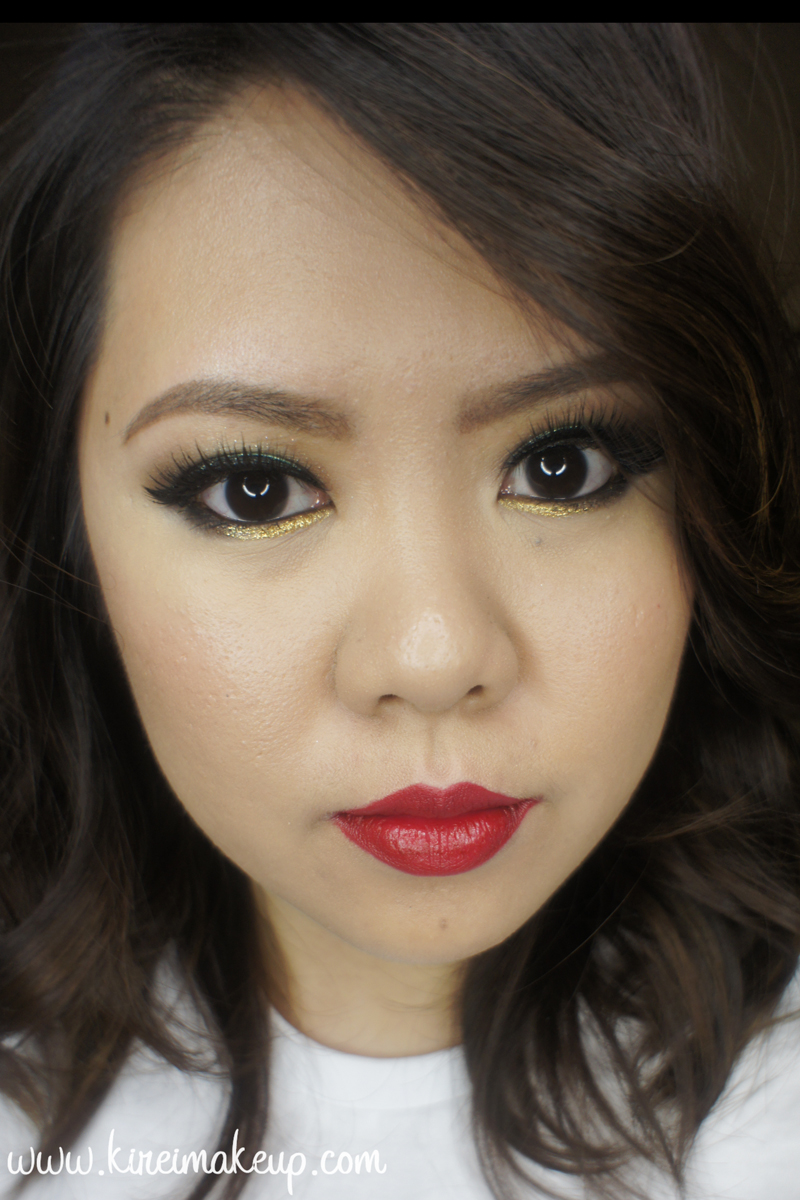
For my look, even though it’s pretty bold and colorful, it is still wearable if you aren’t afraid of colors. The placement of the colors are quite important so you don’t go looking all crazy, you get what I’m saying? Instead of green, gold and glitter everywhere, I focused these 3 products on specific location on my eyes. This way, the colors work well together, and you don’t look like a glittery mess.

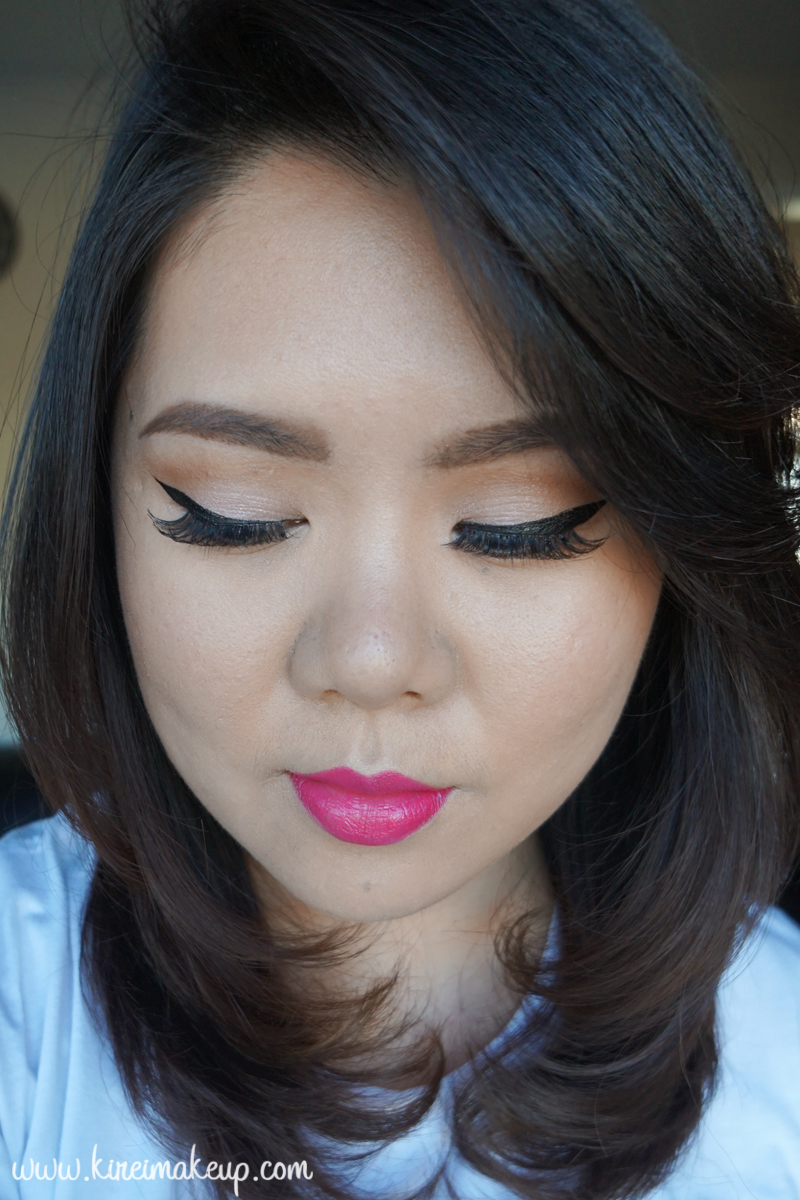
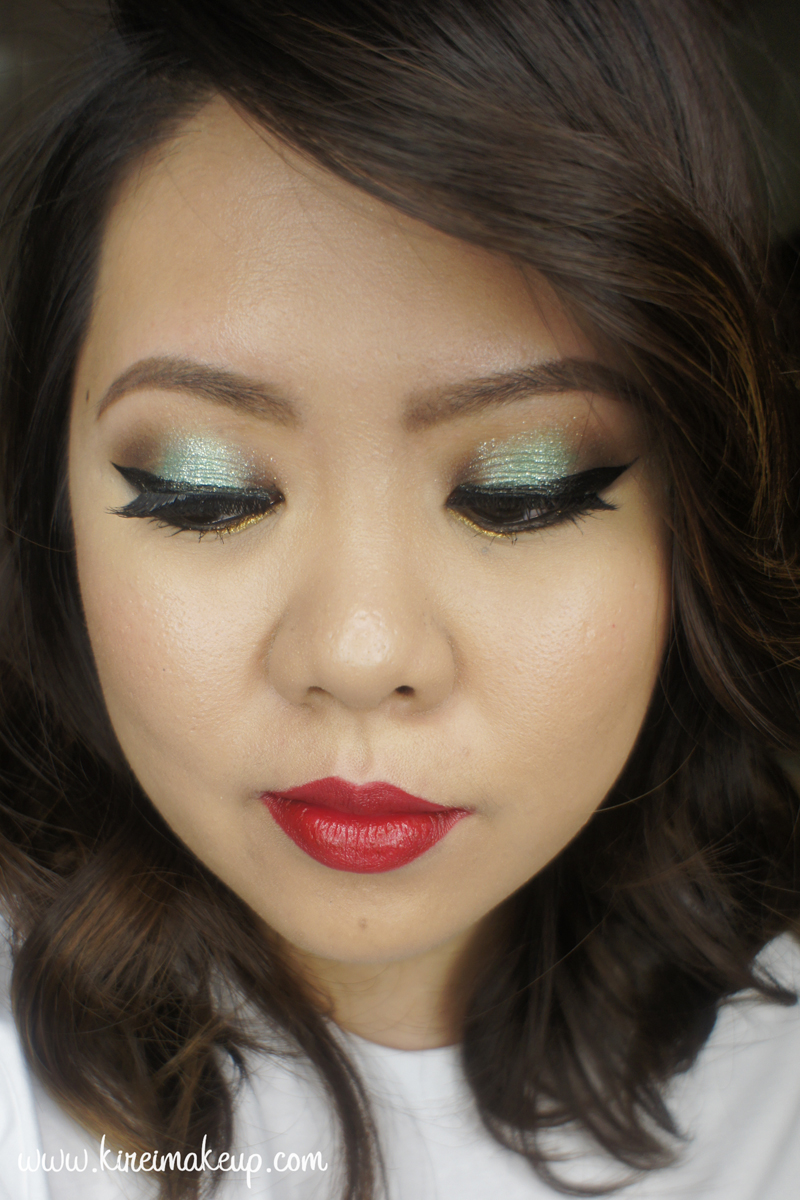
The green is located on the center of the eyelids only so that when you blink, that gorgeous color will pop along with a teensy bit of crushed metallic pigment. You can use glitter if you don’t have the crushed pigment. The gold glitter is on the inner half of the lower lid, this will brighten and open up your eyes.

The key is to apply the bright color and glitter lightly. Notice I used my finger to apply the green shade, I also use my finger just to press the crushed pigment very lightly all over my lid. This way, the colors and glitters aren’t all over the place. By combining bright colors with neutrals, your whole look will be pulled together.

holiday party makeup

My eyelids are prepped using Urban Decay Primer Potion.
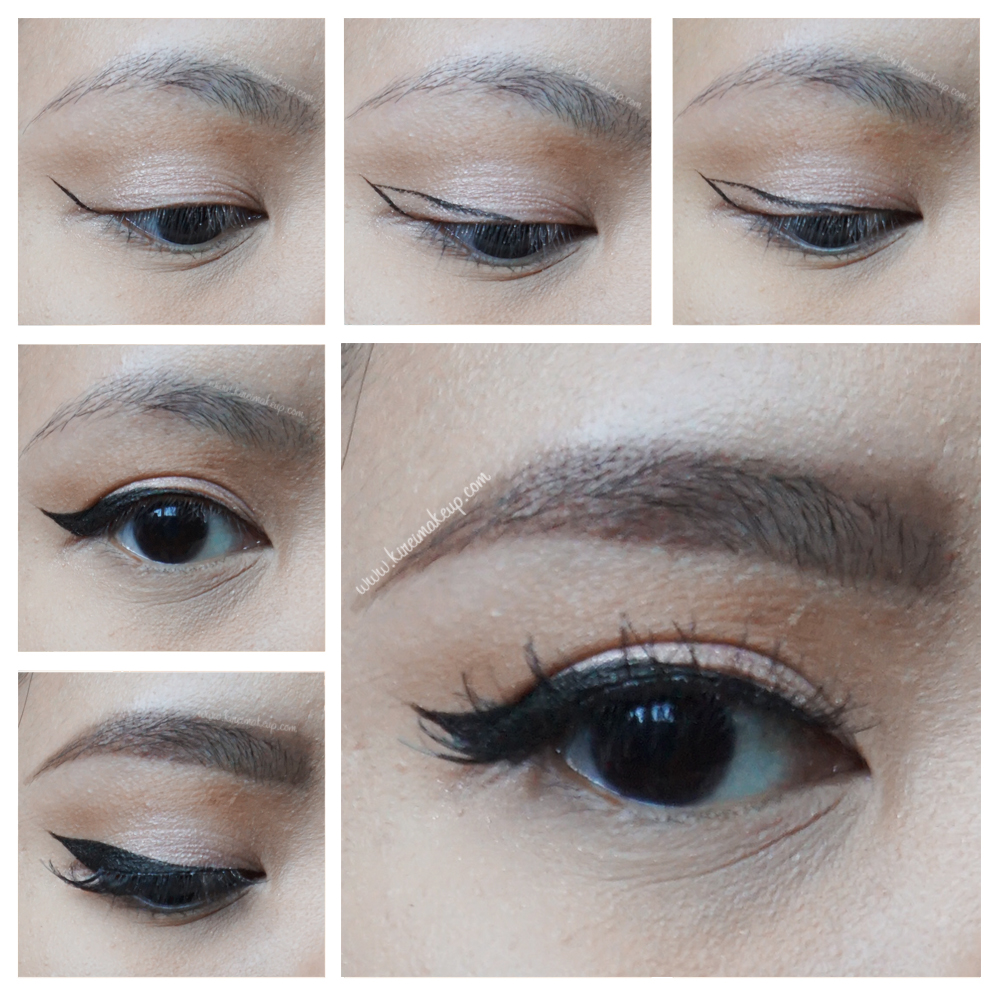
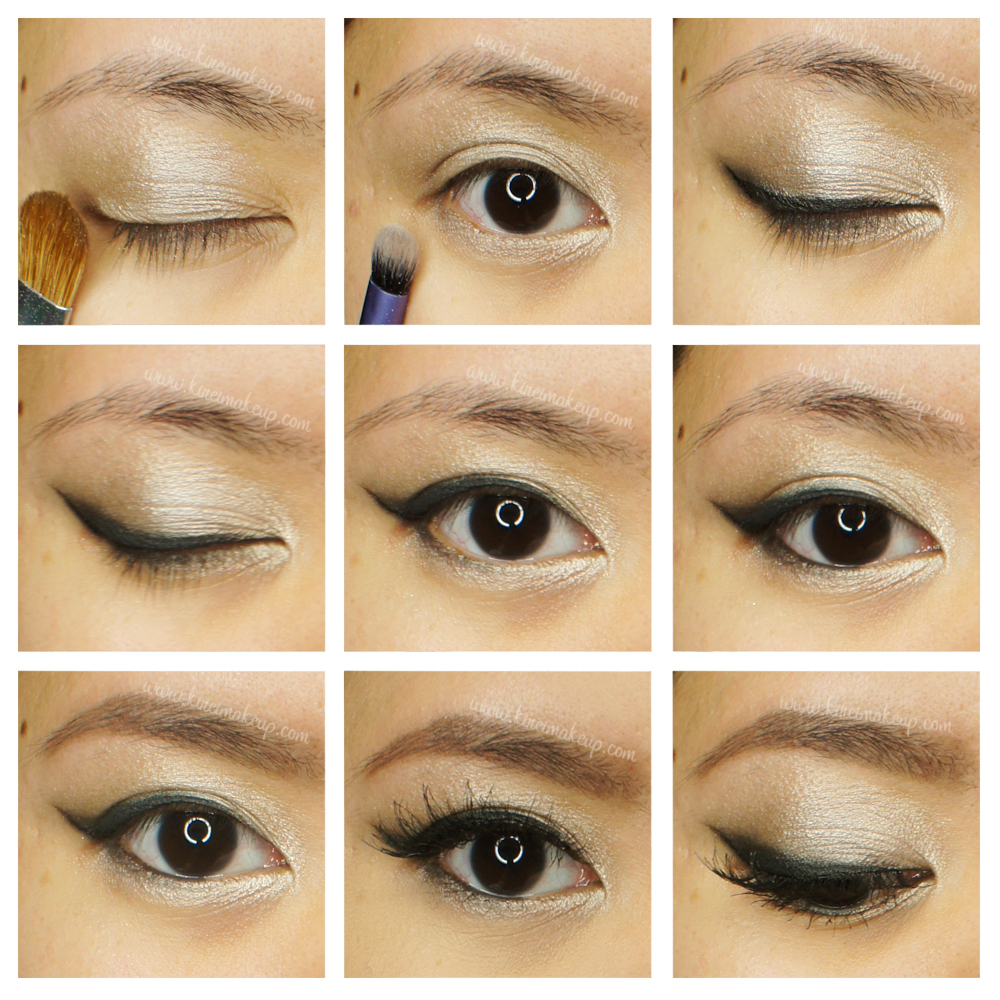
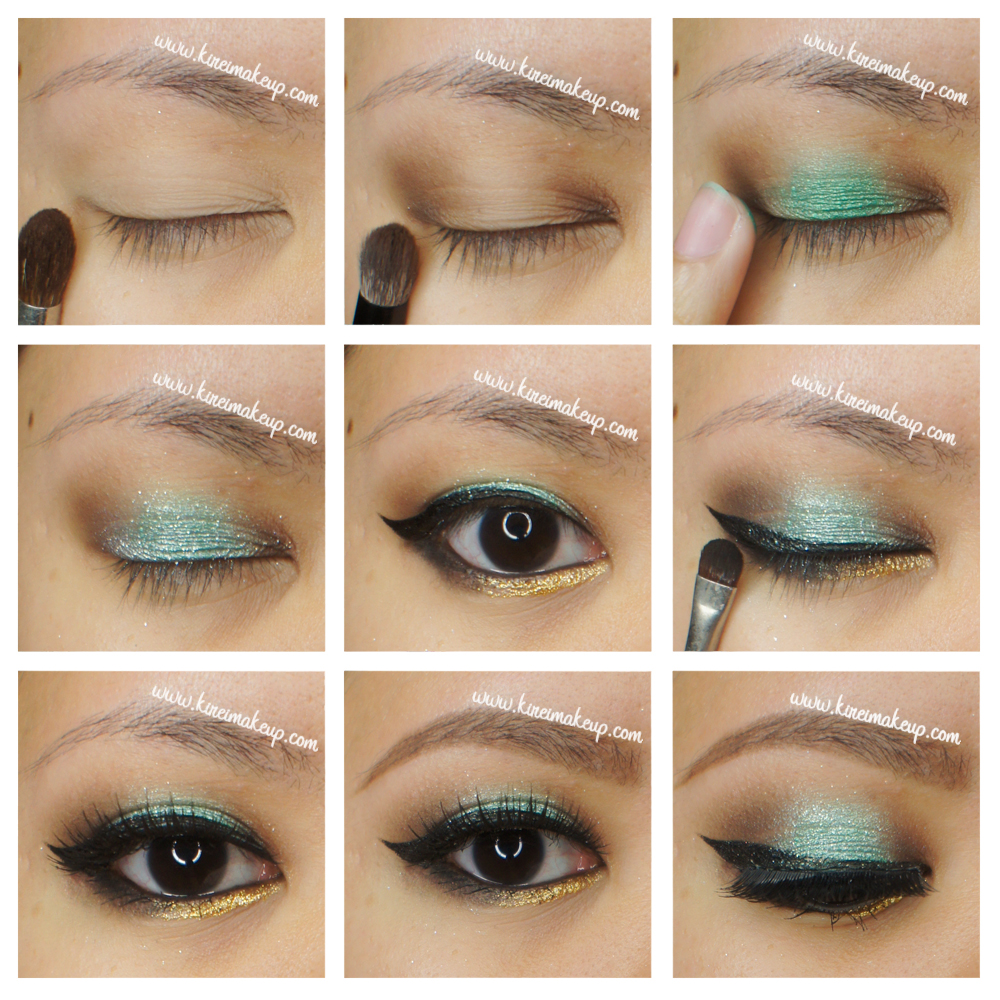
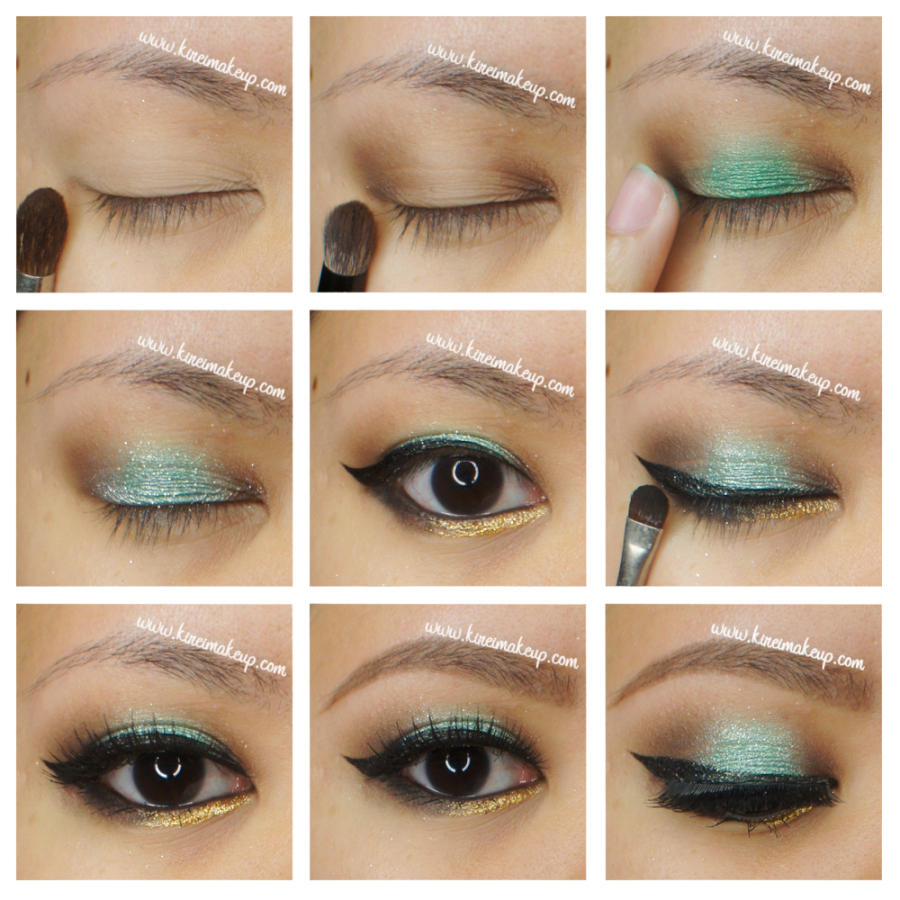
How-to:

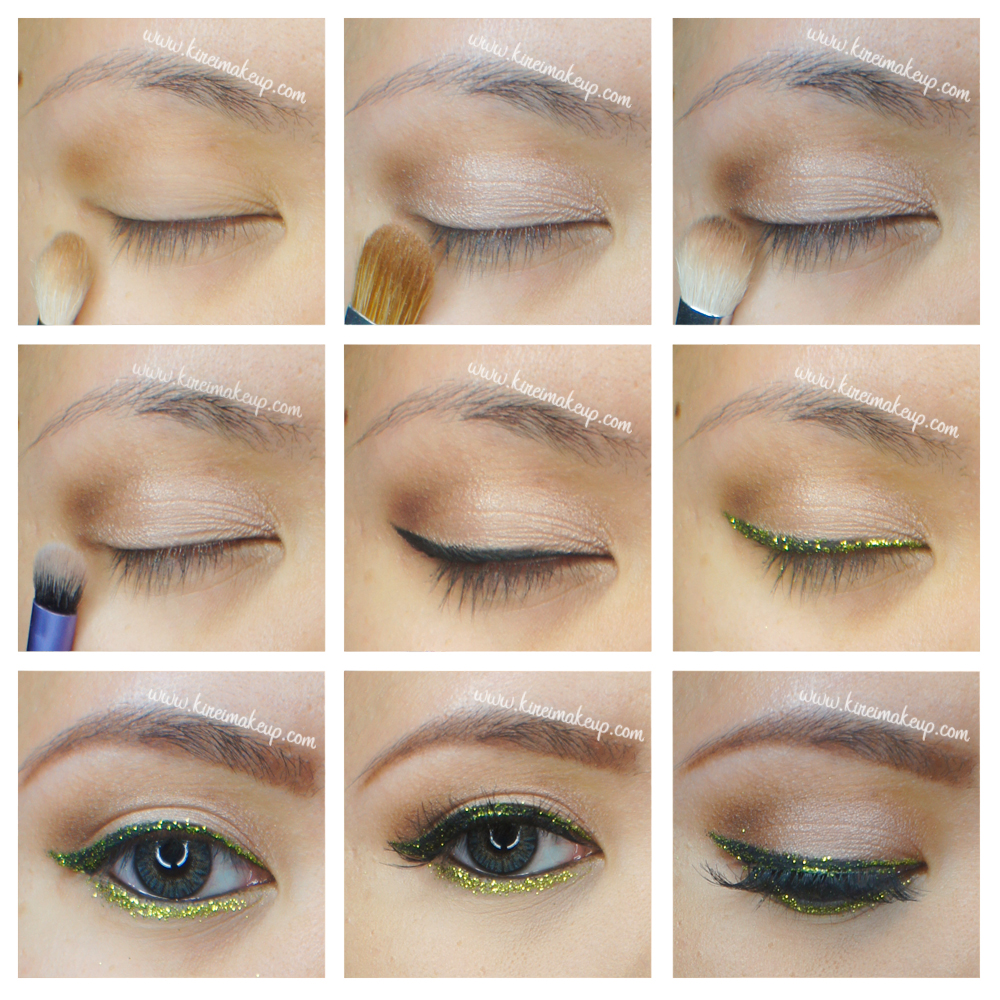
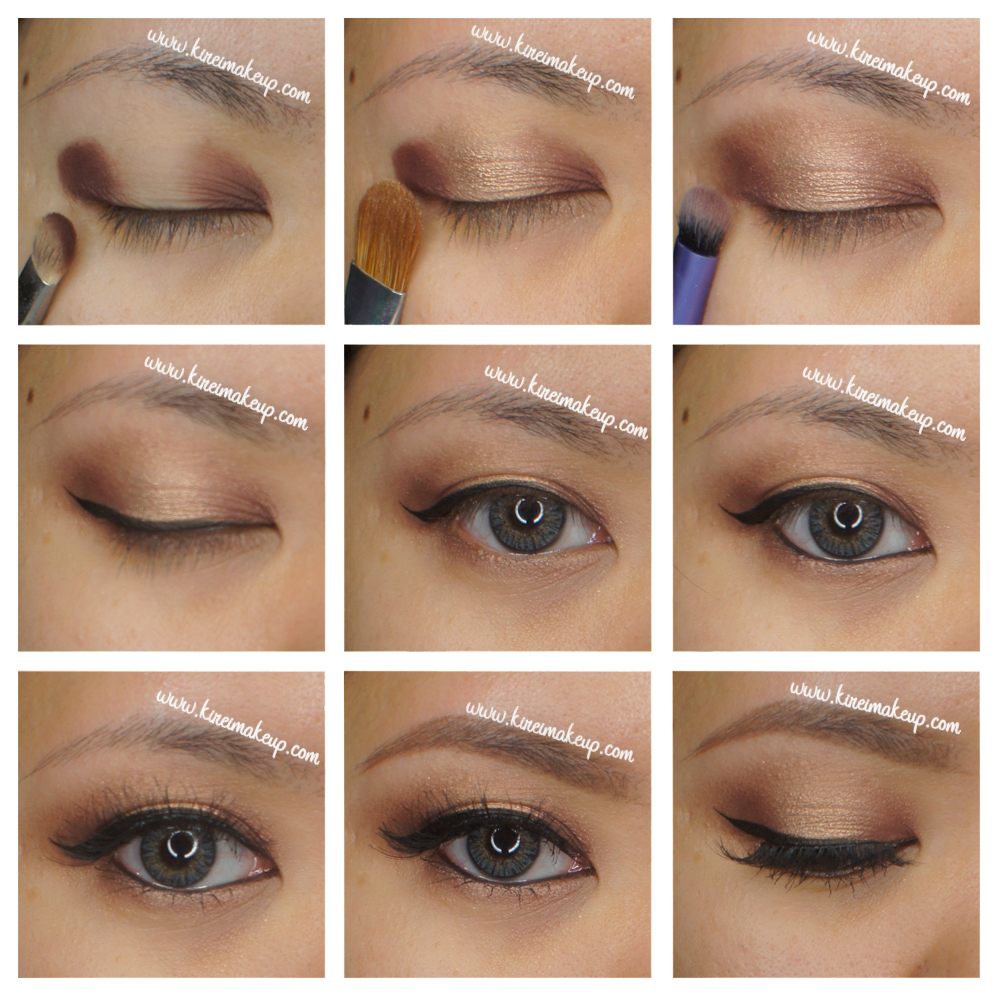
1. I applied Urban Decay Buck eyeshadow above my crease, as my transition color, using a crease blending brush.

2. Using Smashbox bullet crease brush, I applied Kat Von D Shadow Box (Monarch palette) on the outer and inner V of the eyes.

3. I applied MUFE Aqua Cream no. 52 on the center of my eyelid using my ring finger.

4. Using the same ring finger, I VERY lightly tapped MAC Metallic Crushed Pigment in Moss Garden all over my lid. I just want a little bit of the crushed metallic pigment for shine, not for the color.

5. I lined my upper lash line using Kat Von D Trooper eyeliner. On the waterline, I applied MAC Smolder kohl eyeliner.

6. On the lower lash line, I applied PAC eyeliner liquid in Bazaar Gold on the inner half. On the outer half, I applied Kat Von D Deadhead eyeshadow (Monarch palette) using a smudger brush.

7. Using the same smudger brush as step no. 5, I applied whatever was left on that brush on the outer and inner V of my eyes (on top of Shadow Box), just to add a bit of depth.

8. I applied Gwiyomi Annabelle lashes for extra drama.

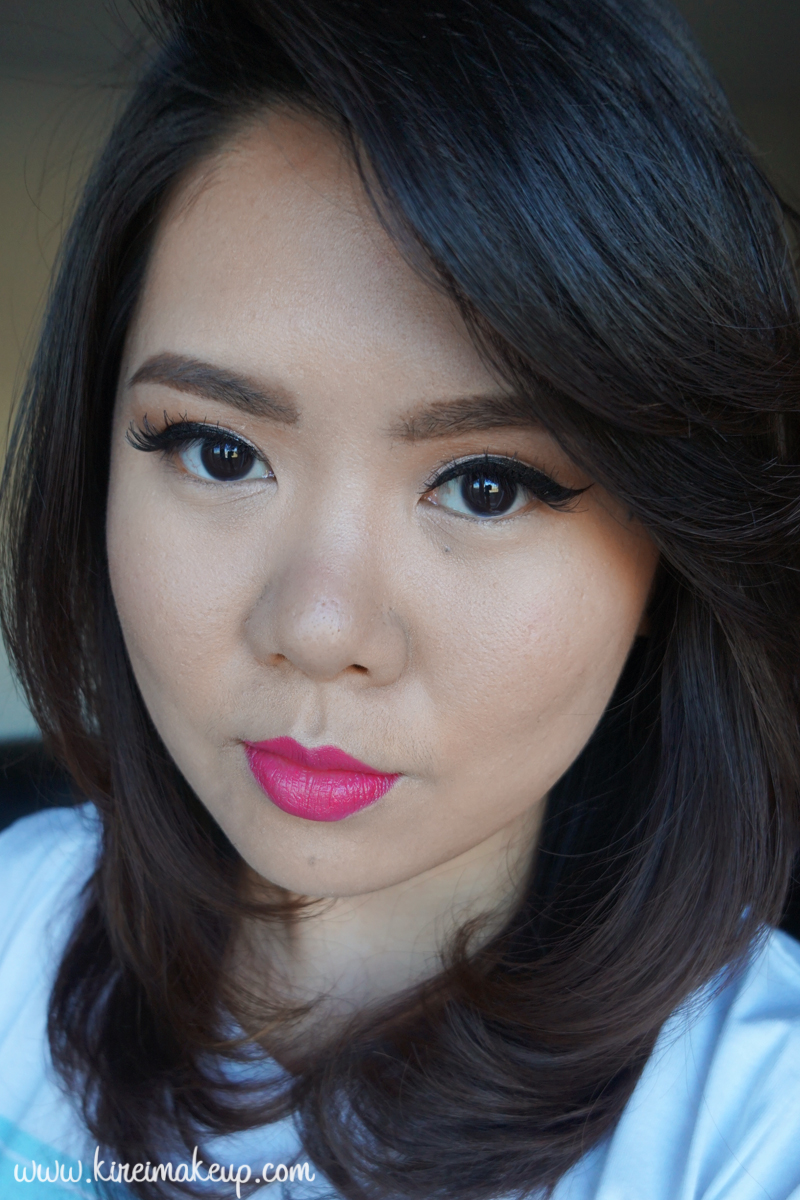
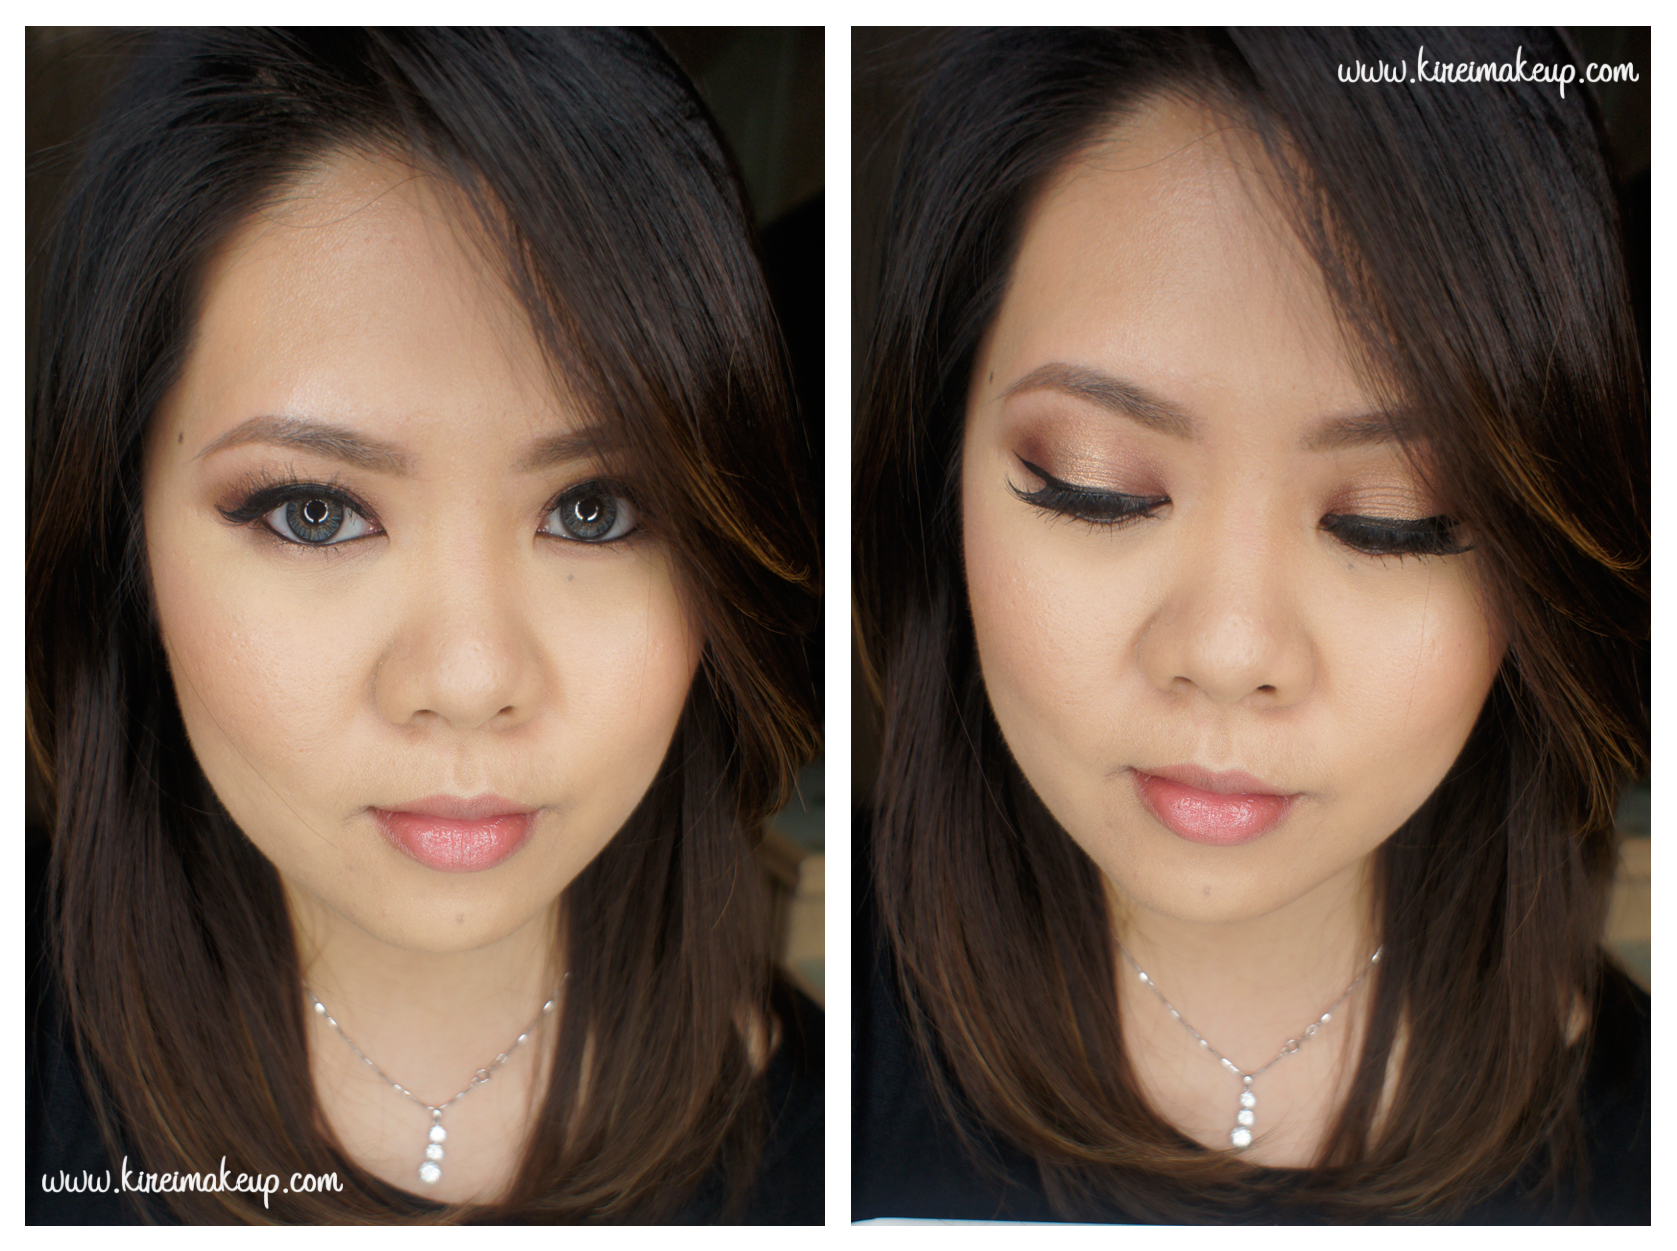
9. I filled my brows using Anastasia Beverly Hills Brow Wiz in Taupe and Brunette.

christmas party makeup

10. On my face, I applied Diorskin Star foundation using Real Technique foundation brush.

11. I also applied MAC Pro Long-Wear concealer under my eyes, and any areas I need to cover.

12. I set my face using CoverFX Translucent powder.

13. I applied Smashbox bronzing powder from the contour kit to warm my face up slightly. Then, I applied Chanel Blush de Horizon on my cheeks.

14. On my lips, I lined and filled it with MAC Brick lip pencil. Then, I applied OCC Vintage lip tar on top of it.

holiday party makeup

Products used

Eyes – Urban Decay Primer Potion; Kat Von D Monarch Palette (Shadow Box, Deadhead), Make Up For Ever Aqua Cream no. 52; Kat Von D Trooper eyeliner; PAC eyeliner liquid in Bazaar Gold; Gwiyomi falsies in Annabelle; Anastasia Beverly Hills Brow Wiz in Taupe and Brunette.

Face – Diorskin Star Foundation 030; MAC Pro Long-Wear concealer NC25; CoverFX translucent powder.

Cheeks – Smashbox contour kit (bronzer); Chanel Blush de Horizon.

Lips – MAC Brick lip pencil; OCC Vintage lip tar.