Prom Makeup Tutorial

It seems that Prom season is around the corner, and I wanted to create a prom makeup tutorial for this post. Recently, I just purchased my first ELF product, which is the baked eyeshadow palette in NYC, and I’m pretty impressed with this palette. This palette cost around $15 at Winners in Canada (USD$10 on their website), so it’s pretty affordable for (graduating) students. The pigment pay-off is so-so when applied dry, but applied wet, the eyeshadows are quite pretty. The champagne shade in this palette is applied wet, and it has a beautiful shimmer.

Anyways, I didn’t have a full face picture from my camera since the battery went died, but I did take a picture using the iphone, which I posted on Instagram. The eyes are very shimmery and defined, but not too dark. I think it’s a very pretty look for prom!

elf baked eyeshadow palette

Products used

Eyes

  • Primer – Urban Decay Primer Potion “Original”
  • Transition shade – MAC “Orange” + Makeup Geek “Peach Smoothie”
  • Outer V (or C) – brown shade in ELF Baked Eyeshadow Studio palette “NYC” (applied dry)
  • Eyelid/Inner corner – champagne shade in ELF Baked Eyeshadow Studio palette “NYC” (applied wet)
  • Upper/lower lash line – black shade in ELF Baked Eyeshadow Studio palette “NYC” (appied dry)
  • Brows – Anastasia Beverly Hills Brow Wiz “Taupe” and “Brunette”
  • Falsies – Gwiyomi falsies #3

Face/Cheeks

  • Base – Kat Von D foundation primer
  • Foundation – Kat Von D Lock-it Tattoo foundation
  • Blush – MAC blush powder “Apricot”
  • Highlighter – Becca Shimmering Perfector in “Moonstone” and The Balm “Mary-Lou Manizer”
  • Powder – CoverFX translucent setting powder

Lips

  • Lip color – YSL Glossy Stain in Pêche Cerra-Cola

prom makeup look


Tom Ford Outfit

5 Items of Tom Ford Clothing that Create a Full Tom Ford Outfit

Tom Ford is an American film director and fashion designer who was able to become famous all over the world, thanks to his work and his ability to turn Gucci, where he served as creative director, around with the creation of his own fashion label, the Tom Ford label. It is easier than ever to find Tom Ford products, thanks to his boutiques in Zurich, Toronto, and New York, as well as a variety of outlets now carrying his items.

If you want to create the most attractive Tom Ford outfit, below are five items that you can put together to make yourself look stylish, fashionable, and ready to head to your job or a night out on the town feeling and looking great.

A Pair of Tom Ford Casual Pants

A pair of casual pants by Tom Ford can be the perfect addition to your wardrobe if you are looking for a pair of pants that is comfortable yet professional looking at the same time. You can wear these when you go shopping, head out to dinner or visit a friend, or even at the office.

A Tom Ford Sweater

To complement your somewhat-casual-somewhat-professional casual pants, search for a Tom Ford sweater that you can use to add a pop of colour to your look. From lightweight options to turtlenecks, there are styles to keep you warm and looking stylish, whether there’s snow on the ground or the air is just a little cool.

A Pair of Boots

A pair of boots can be worn to complement the rest of your Tom Ford look, whether it is the fall or the winter. Sometimes you can even stretch these into the spring season if the weather is still cool enough. Look for a pair of booties if you want something more versatile through the seasons, or go for a sexier look with knee-high boots.

A Beautiful Handbag

Every woman needs to carry around a lovely handbag that she can be proud of, and Tom Ford has created a line of handbags that will not disappoint. From small crossbody bags that are perfect for times when you are travelling and you don’t want to have a bulky bag to carry around, to glamorous clutches that are perfect for a fancy night out on the town, and, of course, casual perfectly sized bags to carry your everyday items, you can choose one to suit your every need.

A Pair of Tom Ford Sunglasses

Finish off the look with a pair of stylish Tom Ford sunglasses. Not only will these make you look fabulous, but they will also protect your eyes from the sun’s harsh rays. From coloured lenses to black ones, plastic frames or wire ones, there are a variety of styles to choose from in the Tom Ford line, but you can purchase one that’s versatile enough to suit your many different looks. Just be sure to protect your skin as well with a product that has sunscreen in it.

Halloween #2 Jack-O-Lantern Makeup

Are you ready for Halloween?! I sure am! So, for the second installment of my Halloween series, I decided to do a Jack-O-Lantern makeup tutorial. WHY you ask? Well, that’s because Jack-O-Lantern aka pumpkin carving is very popular in Canada during Halloween month. My sister and I actually love carving pumpkins! We love the scary face ones!

JUST FYI – I am accepting Halloween makeup jobs! If you need a makeup artist to do your scary makeup, I’m available! Contact me through email jilly@kireimakeup.com, or line – KireiMakeup!

Anyways, for this tutorial, you need:

1. Orange face paint (water or cream) – I mixed red and yellow cream face paint to create the orange base. I used a local Indonesian brand called PAC.

2. Black water based face paint – you can use cream too if you prefer cream product, or even an eyeliner.  I used Snazaroo.

3. Eyeshadow – matte black, matte orange, matte yellow for highlight and contour.

4. Brushes – I used mostly synthetic artist brushes.

  • For large area, I used an angled brush (similar to MAC 263 but slightly bigger).
  • For details like the lines and contouring, I used the Rigger type (similar to MAC 209, but with longer bristles)
  • For highlight I used a blending brush, like MAC 217

5. Contacts (optional) – you don’t have to use contacts, or you can use a brighter one than mine. I could only find this honey colored ones from Fresh Kon, since it’s pretty hard to find specialty contact lenses here in Jakarta.

halloween tutorial

How-to:

1. I applied an orange cream-based face paint all over my face using a wedged sponge. Lightly stippled it all over my face, neck, and ears for an even coverage.

2. I outlined where I want the mouth, nose, eyes, wrinkles to be using black water-based face paint.

halloween makeup tutorial

3. I filled in the areas on step no. 2 with black face paint.

4. Then, using an eyeliner brush and a matte black eyeshadow, I lightly create lines all over the face to create the crease of the pumpkin. I also created some cracks near the mouth area.

pumpkin king makeup tutorial

5. Using a small blending brush, I blend out the edges of the lines. I also carefully added some shading on the areas where I want it to look like it’s receding.

6. On top of those black shadows, I applied a matte Orange eyeshadow (I used the orange from Sleek Makeup Ultra Mattes V1 palette).

7. In the area where I want it to pop out a bit more (to mimick the shape of pumpkin), I applied a matte Yellow eyeshadow (from Sleek makeup Ultra Mattes v1 palette) with a blending brush. I put it in the middle of the “squares” on my forehead, above the eyebrows, on my cheeks area. I really want to make these areas to poof out a bit more.

creepy jack-o-lantern face paint

Voila! You are done! Looks pretty cool in black and white, but looking more like a scary clown. I love how the orange/yellow contour/highlight really helps with the whole pumpkin look!


My First Kiehl’s Indonesia Haul

How is everyone doing???? I apologize for missing last week! I had to do a business trip to Medan for work. I posted some photos on Instagram from my trip, and also my skin condition. Anyways, as mentioned couple weeks a go, I went to Kiehl’s Indonesia Grand Opening at Emporium Pluit Mall. After the grand opening, I decided to go to the store couple days later to grab some stuff, mainly for my hair. So here’s what I bought at Kiehl’s! I don’t know if you can call this a haul since I didn’t buy much.

So, I went to the store with one thing in mind, and that’s to get products for my hair! Ever since 4 years a go, I have been having allergic reaction towards non-natural/organic shampoos and conditioners. I used to be able to use pantene, dove, or tre semme without any issues, but ever since 4 years a go, I’ve noticed itchy scalps, red tiny bumps, and significant hair loss when I continued using those non-organic or non-natural brands. The one brand that I somehow managed to continue using is actually L’oreal.

With those issues in mind, I was searching high and low for a somewhat more natural shampoos in Jakarta, and I decided to give Kiehl’s a try. I have used their Amino Acids shampoo way back when I was in Canada, and was happy with the result. However, the closest Kiehl’s from my place was 1-hr away, so I stopped using it. You can imagine how thrilled I was when Kiehl’s opened a store right around the corner from my house, just a 15min. drive from home and ta-daaaah it’s right there!

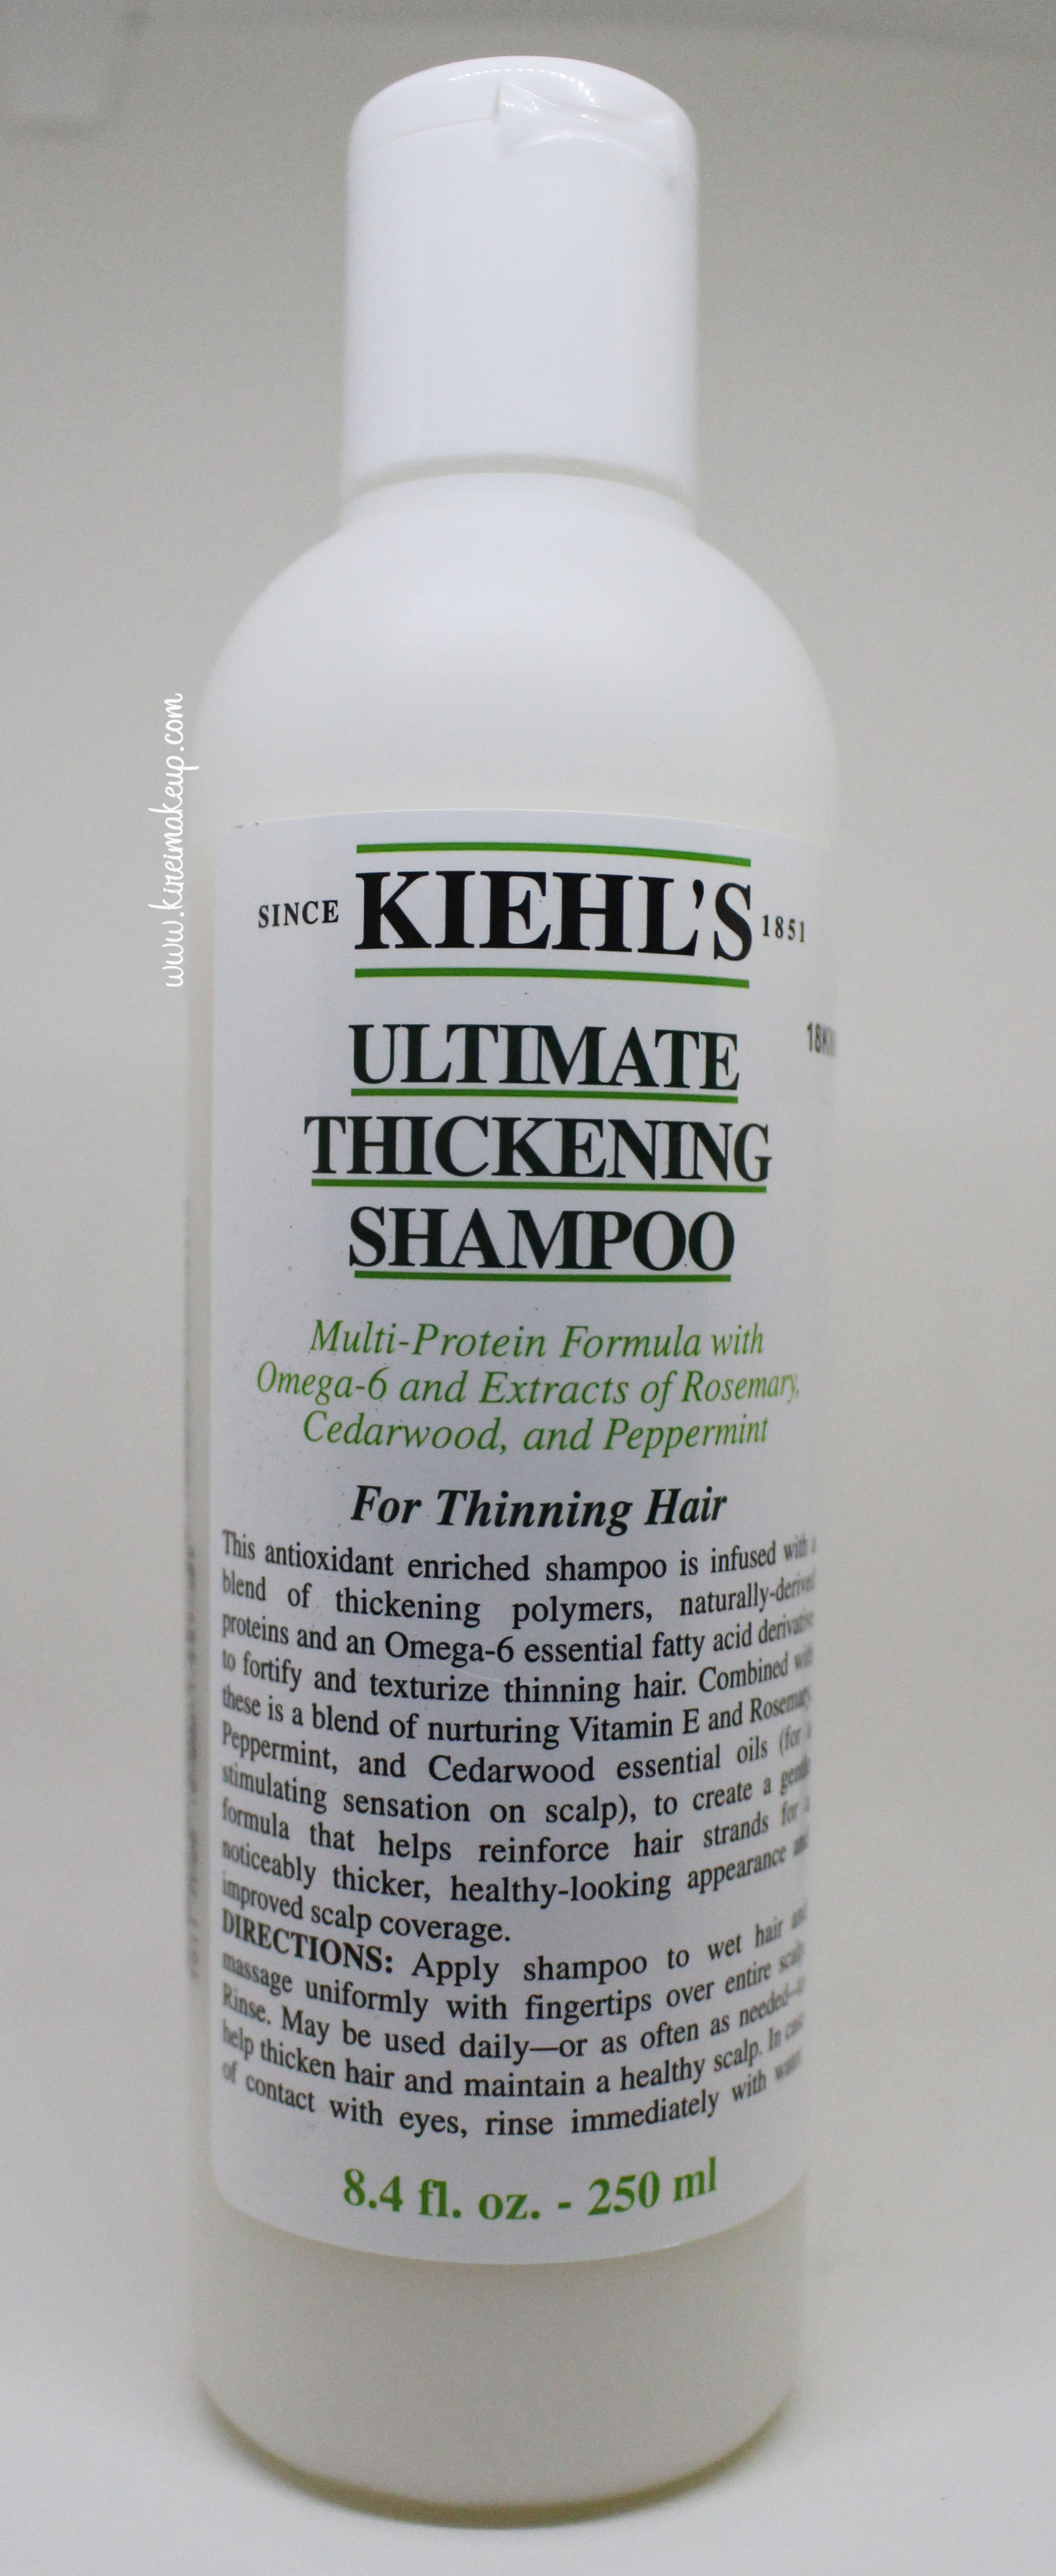
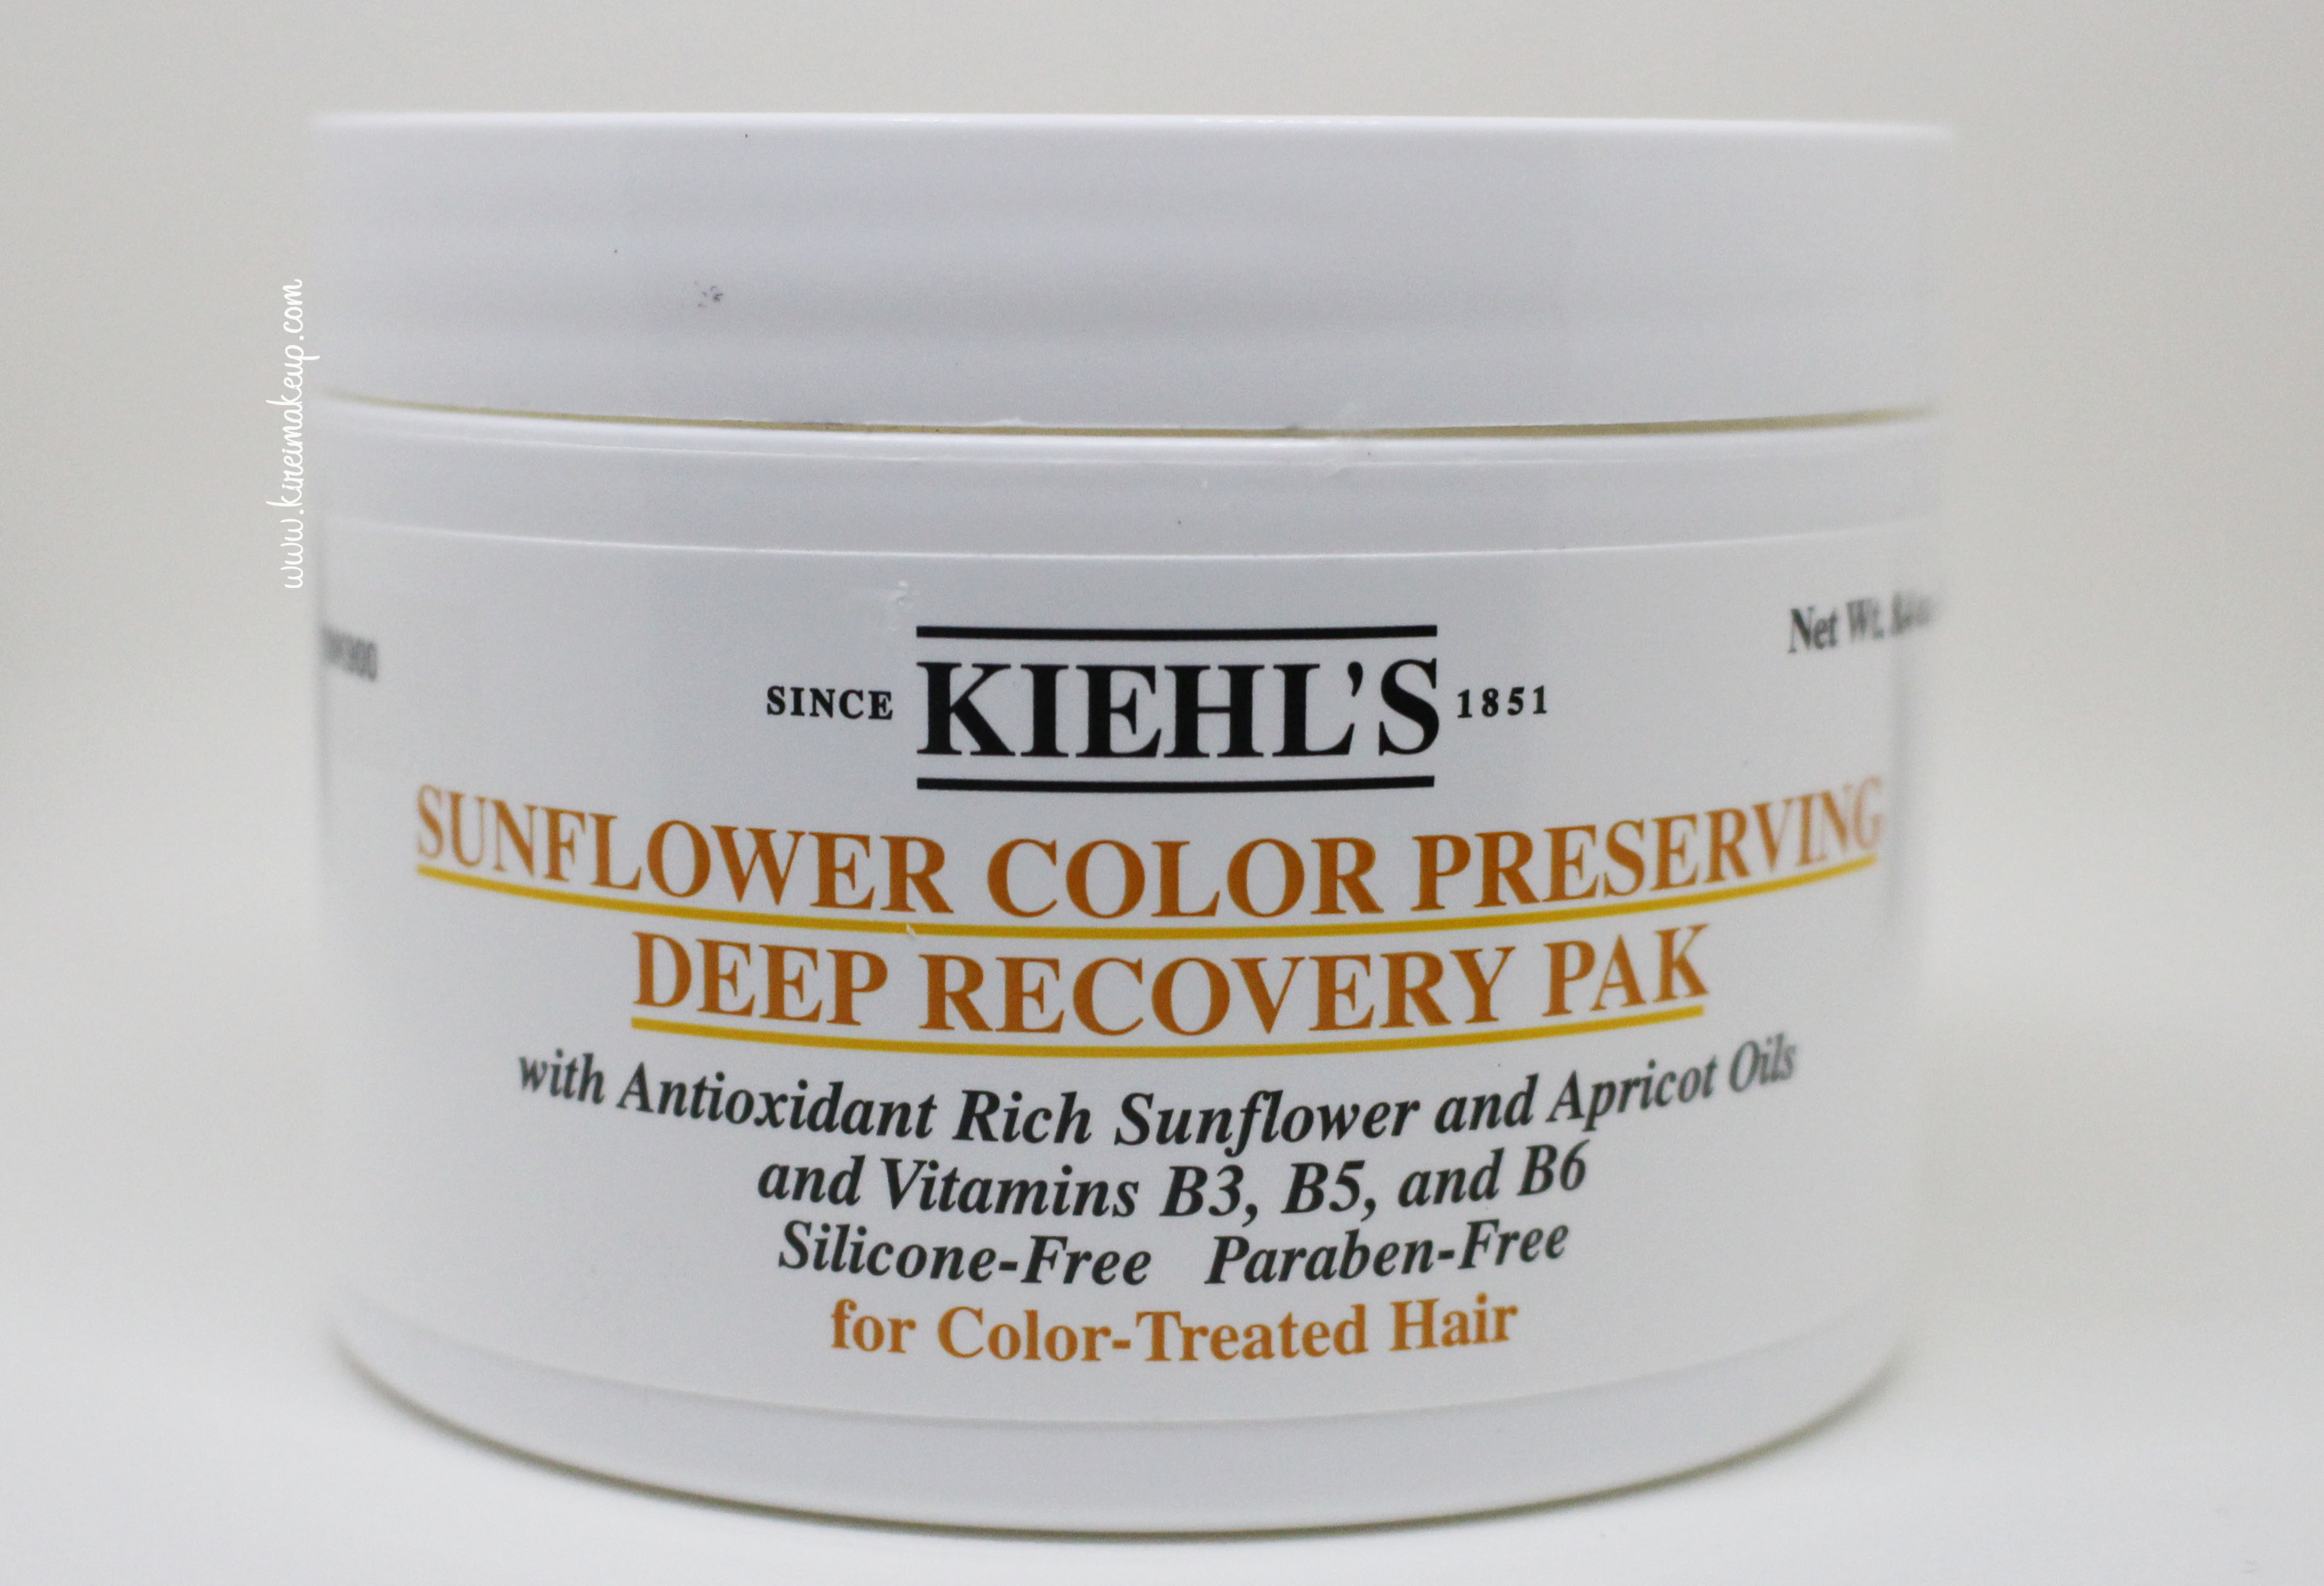
All I bought was a Magic Elixir, a Thickening Shampoo, and a Recovery Pak hair mask. As you might know, I have been coloring and bleaching my hair since beginning of the year, so I really want to take a good care of my hair again. I decided I need those 3 products to reset my hair.

Kiehl's Magic Elixir

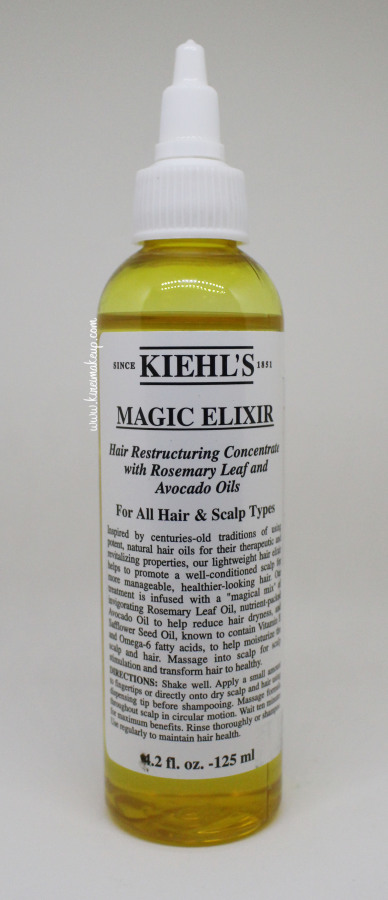
I’ve only started using these products for 1.5 weeks now, so I can’t really say what the results are, that’s why I didn’t put the title as review. First of all, I think I absolutely love the Magic Elixir! I ran out of Morrocan Oil, and can’t find one in Jakarta. So this Magic Elixir is a good alternative! I’ve only been using it every 2-3days for 5mins since it says to wash it off after applying it on the scalp. Next time, I’m going to try leaving it for a few hours. I noticed almost immediately after the wash, my scalp and my hair feel a lot lighter. It doesn’t leave any oily residue or cause your hair to be greasy. It washes off very easily!

Of course you can always mix your own oils, DIY hair masks are plenty on Pinterest, even I pinned them! But, I just find getting the Magic Elixir is a lot faster and simpler than making one your own. Less hassle for this career woman (hehehe)..Not to mention, I won’t be messing around and having to clean up. Just one bottle and everything is good!

The Magic Elixir costs Rp. 410,000 (125ml) in Jakarta, while it’s only CA$24 in Canada. It drives me crazy how beauty/skincare/cosmetic products are so much more expensive in Jakarta. That’s almost double of what I paid for in Canada. Anyways, I’ll rant some other time..may be I’ll rant on twitter instead…

Kiehl's Ultimate Thickening Shampoo

The Ultimate Thickening Shampoo is perfect for me since I have fine hair, and not much of it. I’m very conscious of my hair loss ever since 4 years a go. Seriously guys, I was so stressed out, I thought I was going bald *cries*. I think this shampoo works really well with the Magic Elixir since the combination of both products will promote hair growth and healthier scalp.

The shampoo lathers easily and you don’t need to use much. I think this shampoo doesn’t have that “clean” feel as strong as other brands since it’s more natural, however, you feel absolutely refreshed when you’re drying your hair. My hair feels stronger after a few wash (I wash my hair everyday – no, don’t tell me not to do it). I also felt that this shampoo gives my hair a bit more volume after the wash.

The Ultimate Thickening Shampoo costs Rp. 260,000 in Jakarta, CA$25.50 in Canada. So, not much difference in price for this product. I was happy to know that the price was similar.

Kiehl's Sunflower Color Preserving Deep Recovery Pak

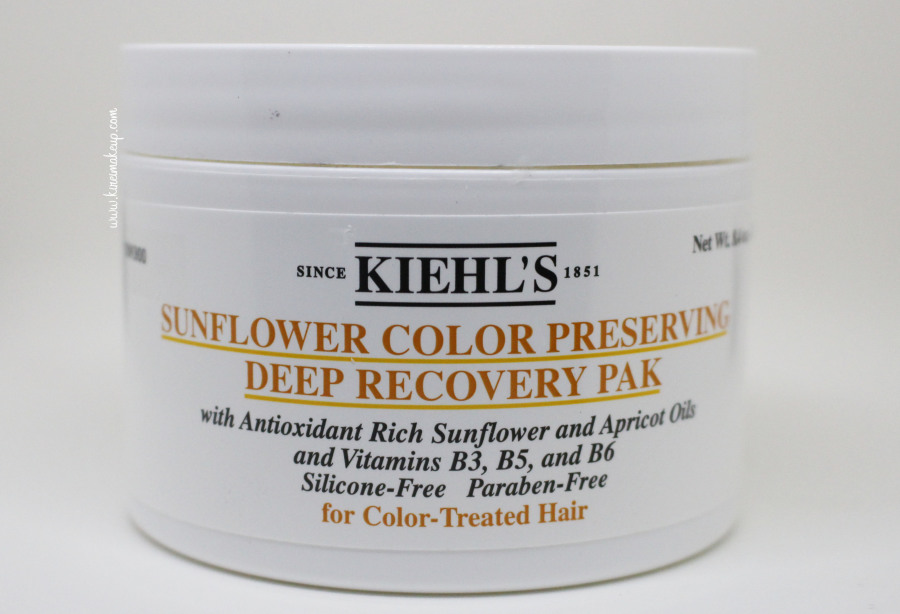
Last but not least, one of the best purchase in my whole life is this Kiehl’s Sunflower Color Preserving Deep Recovery Pak! Quite a mouthful, but SO WORTH IT! This is the best smelling product I’ve ever encountered. The smell is DIVINE. I will buy this just because it smells soooo goood!

Listen to me guys, like seriously!!! I deep conditioned my hair, dry it off, styled it, left my room. Came back 4 hours later and my room smells like my hair! My hair smells so awesome for the whole day, until the next morning. I mean, come on! You have to try this hair mask if you have colored your hair. Even if you don’t color your hair, I still think this hair mask will work too. Seriously, it smells like a fruit heaven. I can’t really put my finger in it, but it smells like a mixture of apricot, passion fruit and mango. Absolutely DIVINE!

This hair mask doesn’t weigh your hair down, it makes the hair feels so smooth and silky afterwards. My hair color looks shinier too, and did I mention it smells great?! Awesome product!

This hair mask costs Rp. 420,000 in Jakarta, and CA$35 in Canada.


Overall, I’m very happy with my purchase, and willing to fork out the money to buy these high quality natural products. My hair feels great and smells peachy! Love it!

Sleek Makeup Candy Palette Giveaway WINNER!

Hi guys! Thank you all for participating on my first ever Indonesian Giveaway! Although I only gave you guys a week to participate, I’m very happy to see quite a number of participants! Hopefully I can do more giveaway in the near future, perhaps one that involves Twitter and a makeup look? What do you guys think? Comment below!

Anyways, I’ve used a special plugin to RANDOMLY chose a winner for the Giveaway, and for this time, the Sleek Makeup iDivine Candy Palette Giveaway Winner is: NURINA! Nur, if you read this, please email me your mailing address within 24-hr. If not, I’ll have to pick a new winner. Funny enough, Nurina commented on my post that today is her birthday! I hope this will make your day, darling! Congrats! Again, let me reiterate that the winner was chosen at RANDOM.

Thank you again for everyone who has take their time to participate!

winner

ps: email address is partially shown for identity protection.


Air Optix Aqua Contact Lenses [Guest Post]

Air Optix Aqua Contact Lenses – The Best Contacts for Every Wearer

Air Optix Aqua Contact Lenses

Any individual, who wears contact lenses on the go, would always have the fear of forgetting to take them off at night. This negligence does not bring immediate effects to the eyes but if it becomes a habit then it can cause serious eye problems in both short run and long run. It won’t just lead to eye irritation but you can also get blinding infections.

Tired of taking off your contacts?

Honestly, it can be really tiresome to take off the lenses and then clean them every night before going to bed. Then in the morning, you have to wear them again. It’s because of the busy life style that people don’t want to bear the hassle of wearing the contact lenses and then taking them off every day. CIBA Vision contact lenses have tap onto this opportunity and they have come with Air Optix Aqua. It’s a product meant for every contact lenses wearer.

Why Air Optix Aqua?

The Air Optix Aqua are meant for the contact wearers, who don’t want to hurt their eyes and at the same time don’t want to care about taking off the contacts each night before sleep. Yes, you can wear these contacts round the clock. And best of all, you don’t have to worry about drifting off to sleep when you are actually wearing contacts. So you won’t have to worry about the cat naps that you take frequently.

Features of Air Optix Aqua

Here are some unique features of Air Optix Aqua that make them perfect for all contact wearers:

  • Breathability: The contacts have silicon hydrogel embedded. This material helps in increasing the amount of oxygen getting to the eyes. They offer 5 times more oxygen than ordinary lenses. This ensures reduced chances of infection and irritation. So, Air Optix Aqua can be worn throughout the day without any worry.

  • Softness and Comfort: These lenses are soft and comfort oriented. They have a significant amount of moisture in the surface, which ensures that the problem of protein deposits on the lenses surface does not appear. So, the vision will be 100 % clear coupled with decreased eye dehydration. You will not even realize that you are wearing contacts.

  • Eye Friendly and Healthy: The Aqua moisture system keeps your eyes hydrated. You will not feel any dryness throughout the day and your eyes will not have any itchy sensation. These healthy lenses will not even cause any harm to your eyes in the long run.

Every contact wearer has the right to treat his eyes with the best and Air Optix Aqua by CIBA Vision is surely the best choice here. It’s not just an ease for your eyes but also for your mind. There is no stress of remembering to take off the lenses, clean them, and to refrain yourself from taking short naps while wearing contacts.

Air Optix Aqua is a reasonable investment. They come in a pack of six. They are monthly disposable lenses. This means that you can wear a single pair for a month only and then dispose them off.

Summary

Wearing contact lenses 24/7 can be damaging for the eyes. They can cause irritation, make your eyes dry, and lead to several other problems that can appear in the long run. If you are a frequent wearer, you might be tired with the issue of taking off the lenses before going to sleep. The best product to treat your eyes with is Air Optix Aqua by CIBA Vision that can provide the comfort your eyes need.

Fun and Colorful Makeup using Urban Decay Electric

Hello, Jakarta! I’m home!!! How is everyone doing? Finally I’m able to post a new tutorial! Today’s tutorial is a fun, colorful, bright look using the new Urban Decay Electric palette! I bought this palette when I was in Toronto just last week, and I couldn’t wait to give it a try. Anyways, I’ll try to do a review of this palette next week.

Anyhooow, I just recently changed my camera to the Canon SL1, so I’m still trying to adjust the setting of the camera, and not to mention the way I take my selfie. So, if I do look awkward in the portrait photo, I do apologize. Not to mention, I’m not too happy with my haircut (my fringe especially), and have yet to go to my hairstylist here to get it fixed! If you are interested in the whole hair story please check my Instagram!

urban decay electric palette tutorial

How-to:

1. I prepped my lids using NYX Milk Jumbo Eyeshadow pencil. Then, using the brush that came with the palette, I applied  Chaos on the outer V and the crease.

2. Using a blending brush, I applied Savage just slightly above Chaos.

3. Using a flat eyeshadow brush, I applied Freak on the eyelid, and Thrash on the inner corner of the lid.

4. On the lower lid, I applied Urban using a the small shader brush that came with the palette.

5. I lined my waterline using L’oreal Voluminous Smoldering Eyeliner.

6. On the upper lash line, I applied a winged eyeliner using Kanebo Kate Super Sharp eyeliner.

7. I curled my lashes, and applied a sample mascara from Estee Lauder on both my upper and lower lashes.

8. I also applied Ardell Demi Wispies lashes.

9. I filled my brows using Anastasia Brow Wiz in Medium Ash.
urban decay electric palette

10. On my face, I applied Hourglass Immaculate foundation (not a big fan of this one..may be i shouldn’t have gotten the one for oily skin..lol)

11. I also applied a concealer from Motives Ice palette  below and above my eyebrows.

12. I lightly contoured my face using Motives Ice palette as well.

13. I applied MAC Dainty on my cheeks.

14. On my lips, I applied Revlon Flashing Lights colorstay ultimate suede lipstick.


Products used

Eyes – NYX Milk Jumbo Eyeshadow pencil; Urban Decay Electric palette (Outer V/crease – Chaos, above crease – Savage, lid – Freak, inner corner – Thrash, lower lid – Urban) ; Kanebo Kate Super Sharp eyeliner; L’oreal Voluminous Smoldering eyeliner; Ardell Demi Wispies false eyelashes; Anastasia Brow Wiz in Medium Ash.

Face – Hourglass Immaculate foundation; Motives Ice palette; MAC Dainty.

Lips – Revlon Flashing Lights lipstick.


My Easter Weekend

Hey guys!!! Ok, just a quick update since I know I haven’t post anything this week. I’ve mentioned on Twitter that I’m all packed and ready for another journey, and that I won’t be posting any tutorial this week (and probably next week). I just want to let you all know that I’ll be traveling and flying again this weekend to Toronto! Since I’m just going to do a layover there before my next flight to Asia, I doubt I’ll be able to do any makeup tutorials. However, if I do, you’ll know if you SUBSCRIBE to me!

I’ll try to post pictures on Instagram for the next couple days, and weeks, so please do follow me there. Don’t forget to #KIREIMAKEUP so I can feature your work on my page! If you want to chat, come over on Twitter and tweet me! I reply to every single one of your tweet.

Where to stay in Jamaica

I just want to share this lovely picture above from where I stayed during Easter Weekend. This gorgeous place is Jewel Paradise Cove Resort in Jamaica. Beautiful beach, crystal clear water, amazing view, and awesome service! I definitely recommend this for anyone who’s looking for a resort to stay in Jamaica.

Anyways, if you guys follow me on Instagram, I’ve put up a ton of pictures there! Oh, also I added an Instagram widget on my sidebar so you can just click on that, and it’ll link you directly to my Instagram page!

Below is just a picture of me being all Asian 😉

More updates on Instagram and Twitter!
Trip to Jamaica

The True Essence of Attraction Does Come in a Bottle [Guest Post]

There is a lot of research and studies pertaining to the natural attraction between people and what sensory experiences evoke which mood or mind-set. With these principles in mind, many fragrance manufacturers attempt to recreate or replicate some natural and chemical reactions found when individuals experience a particular scent, sound, or sensation.

One of the undisputed scents that seems to be an inherent magnet to the opposite sex is related to something biological, and is found with the pheromones. These are the chemicals that are released in the animal kingdom when one wants to convey a specific message to another. These are responsible also for the brief albeit productive courtships that many animals experience during mating season. Some inventive manufacturers have looked at bottling the pheromone fragrance in an effort to elicit the same reaction among human subjects.

One intriguing vendor found online offers a fragrance designed for women that has a fresh, inspiring scent with the underlying pheromones for an attraction and magnetism that is not found in simple perfumes or colognes. This company uses human pheromones that are lab tested and certified for quality in their product. This offers wearers the opportunity to sport a fresh and pleasant fragrance, while having a secret weapon of sorts that will attract those other individuals with a vulnerability toward this chemical reaction.


Neutral Smokey Eyes using Urban Decay Naked Palette

Another Urban Decay Naked palette post again?! Yes it is! I’ve been showcasing my love for the Urban Decay Naked 3, and I did a tutorial using the Naked 2, so I though that it was time to get in touch with the original Naked palette. For this tutorial, I wanted to do a neutral smokey eyes tutorial, which is perfect for any occasion from party, night-out, date (for Valentine’s) etc.

How-to:

1. I prepped my eyelids using Urban Decay Primer Potion in Sin.

2. Using a flat eyeshadow brush, I applied Sidecar all over the eyelid.

3. I applied Buck on my crease using Smashbox Bullet Crease brush.

4. Using a small shader brush, I applied Creep on the outer V and lightly dragging it to the crease.

5. Using the same Smashbox Bullet Crease brush that I used on step 3, I blended my crease.

6. I applied Naked lightly under the brow, and Sin on the inner corner of my eyes.

7. I applied Creep on the outer half of my lower lid, and Sidecar on the inner half using an angled eyeliner brush.

8. I created a winged eyeliner using Kanebo Kate Super Sharp eyeliner. On my waterline, I used MAC Chromagraphic eyeliner in NC15.

9. I filled my brows using Anastasia Duo Brow Powder in Brunette.

10. I curled my lashes, and applied Buxom Lash mascara on both top and bottom lashes.

11. I also applied Gwiyomi Gillian false eyelashes.

urban decay naked tutorial

12. For my face, I applied CoverFX Cream foundation in G40 using CoverFX cream foundation brush.

13. On my cheeks, I applied Chanel Blush de Horizon.

14. On my lips, I applied Revlon Socialite lipstick.

coverfx cream foundation review g40Products used

Eyes – Urban Decay Primer Potion Sin, Urban Decay Naked palette, Kanebo Kate Super Sharp eyeliner, Buxom Lash mascara, Anastasia Brow Powder Brunette, Gwiyomi Gillian false eyelashes.

Face – Cover FX Cream foundation, Chanel Blush de Horizon, Revlon Socialite lipstick.