Zombie Face Paint Halloween Makeup

Hello, hello, hello! It’s been a while! How is everyone doing? I hope you’ve been following my Instagram account & watching my Instagram stories! As you know, I’ve done a Neon/Blacklight Skull makeup on Instagram. Today, I’m going to share my with you a Zombie sorta makeup.

Read more below to check out the tutorial.

Click here to see my other Halloween tutorials

Read More

Infected!

Are you guys ready for Halloween?! I sure am! I’ve been posting a few pictures on my Instagram (follow me!), and decided that today I should do a Halloween tutorial. To continue the tradition that I’ve been doing these past 2 years, I shall do half-pretty half-ugly makeup for today.

This makeup will look even better if you have one of those zombie contact lenses! I currently do not have a pair, so I decided to just skip it. If you do have the time to look for one, you should really get it!

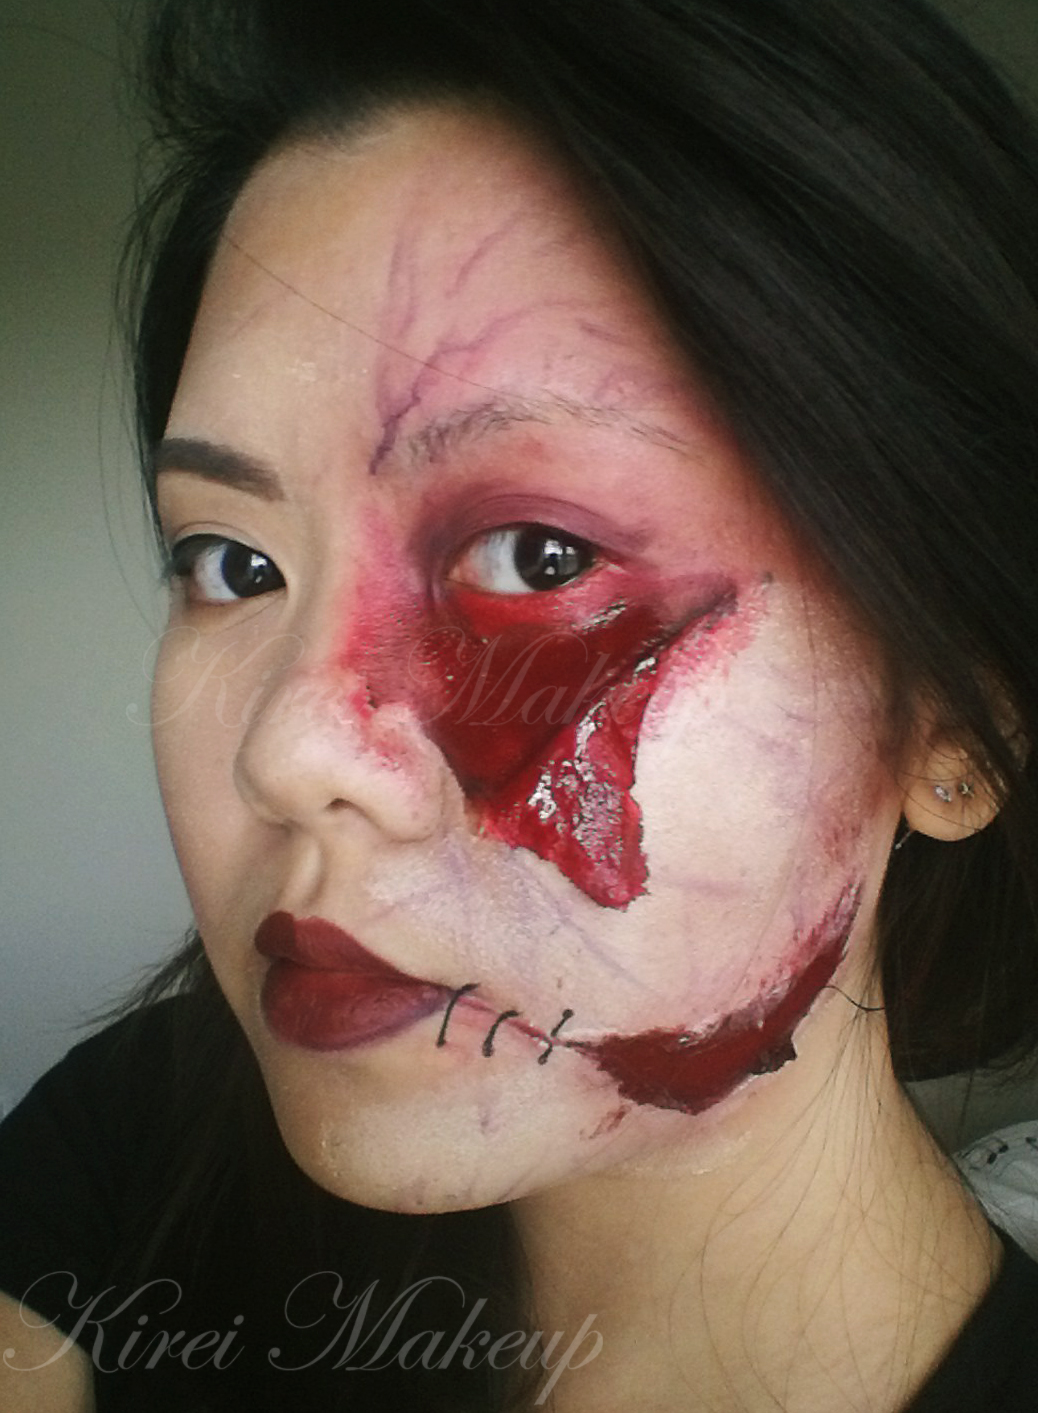
Also, I intended to have this look as the first stage of zombie infection, thus the flesh and skin are just starting to fall apart.

Just to keep in mind, obviously this isn’t how those amazing makeup artists did zombie makeup for TV shows and/or the big screen. They used certain products, which I know most of us would probably have a hard time getting (not to mention expensive!). However, if you’re interested in getting those products, you should look up Premiere Products Inc. (PPI). They have the best products to create zombie, infected, bruised makeup. PPI products are alcohol activated, so be very careful during application.

Anyways, for this tutorial, everything is affordable and hopefully can be found easily should you decide to replicate it. You need the products below to create the peeled skin and flesh:

  • Liquid Latex
  • Loose powder
  • Brushes – preferably synthetic and cheap from art store
  • Makeup sponges – 2 or 3
  • Snazaroo face paints – red, black (purple is optional)
  • Clear lipgloss
  • (optional) Kryolan Bruised wheel
  • (optional) Pen liquid eyeliner

For the “pretty” side, I used:

  • MUFE HD Foundation in 117 (a shade lighter than my skin)
  • NAKED Basics palette
  • Kanebo Kate Super Sharp eyeliner
  • Anastasia Brow Wiz in Brunette for the browszombie makeup using latex

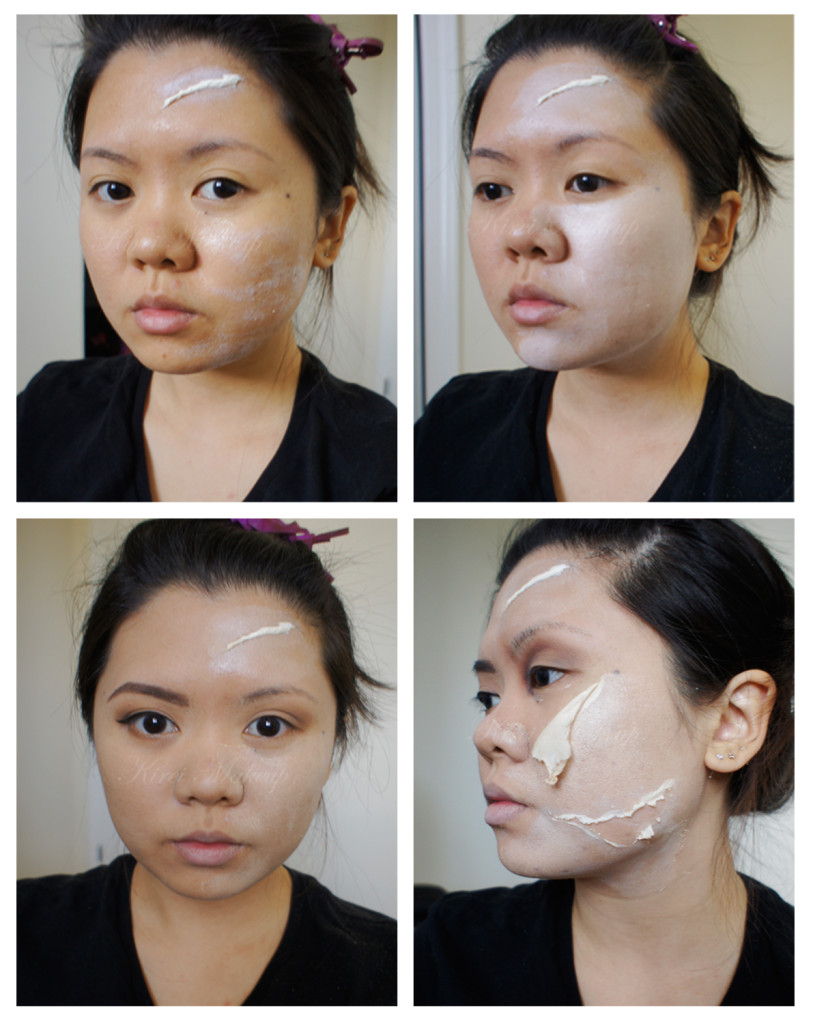
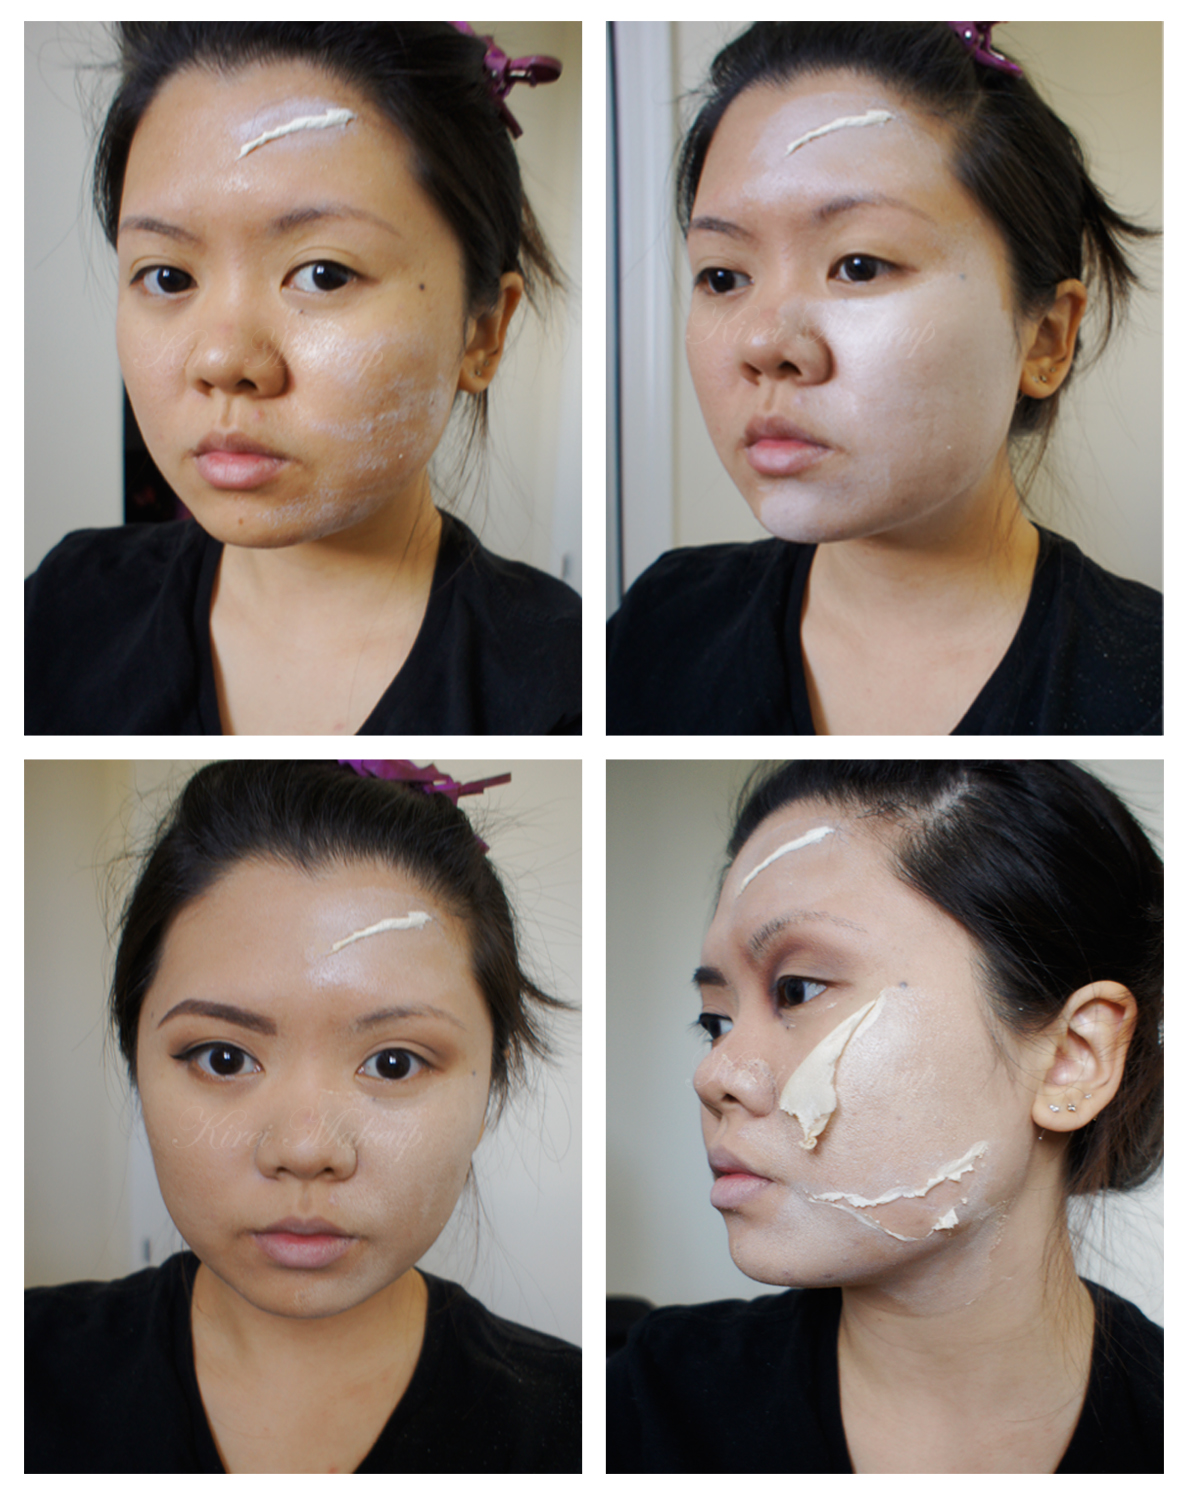
I decided to REMOVE the “Scar” on my forehead for the end result, so please ignore it.

How-to:

1. Using makeup sponge, I stippled Kryolan Liquid Latex on the area where I wanted the skin to rip. I applied it lightly to my skin, letting it dry and then applied a few more layers. I did about 3-4 layers.

2. You’ll know the latex is dried when it becomes transparent. Once it dried, I liberally applied translucent/transparent loose powder on the latex using a clean makeup sponge. This will prevent the latex from sticking to each other.

3. I applied MUFE HD Foundation all over my face, and did the pretty side first.

4. Next, for under my eyes, I pulled the latex and applied loose powder on the inside to prevent it from sticking to itself. You can be as creative as possible, don’t worry if it looks ugly! The uglier the better!

5. For the one near my mouth, I used a tweezer to rip the latex. This helped me to control the ripping better since I want very tiny small rip near the corner of my mouth.zombie makeup

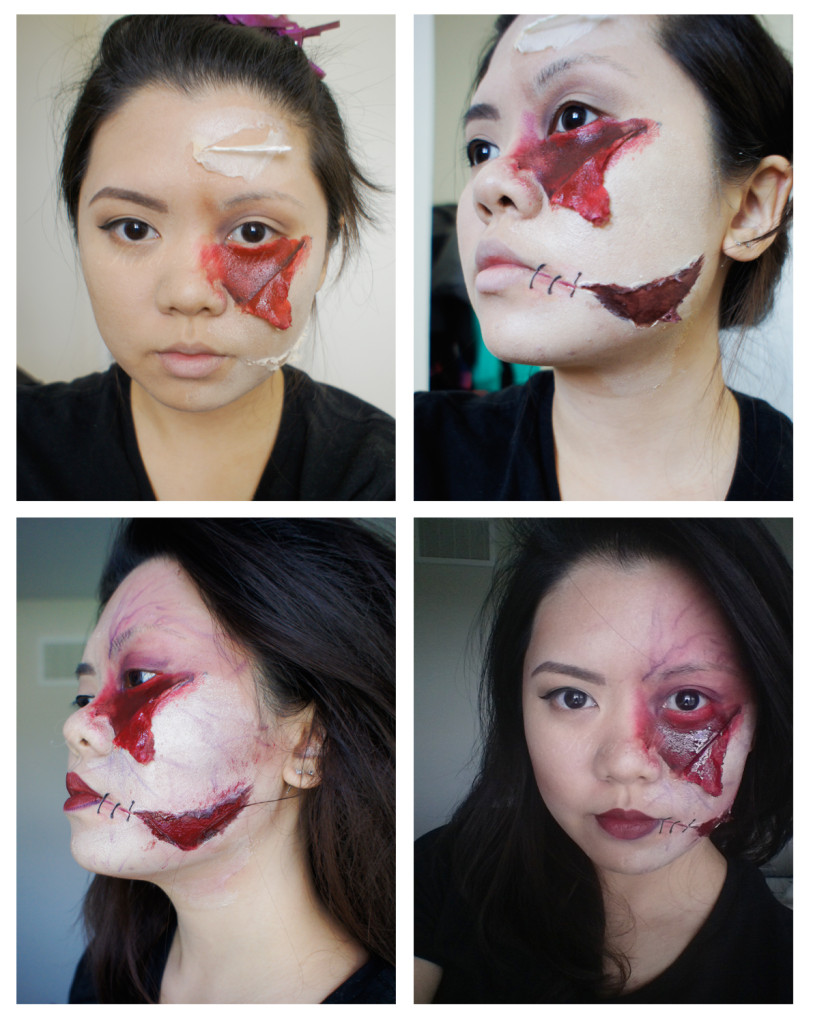
6. Now, be creative with your blood! Since Snazaroo face paints are activated using water, dip the tip of your brush very lightly into a clean water before dipping it to the face paint.

7. I mixed red and black face paint, and applied it to my face.

8. I applied black face paint using a smaller brush at the edge where the skin and the flesh meets.

9. I used Kanebo Kate Super Sharp eyeliner to create the “stitches” along the corner of my lips. You can use the black face paint and a tiny brush to create the stitches if you do not own a liquid liner.

10. Using Kryolan Bruised Wheel (or you can use the red and purple face paint), I created veins on my face to mimick zombie’s skin.

11. To make the flesh look wet and fresh, I applied clear lipgloss on the flesh area.

Just make it as ugly as possible and have fun doing it! The “infected” side is slightly lighter since it’s dying, and the veins are closer to the skin than the “pretty” side.

ripped skin makeup

HAVE FUN! xoxo


ps: I’m available for Halloween makeup! Contact me for details at jilly@kireimakeup.com

IMATS Toronto 2012

Hello Canada! Guess who’s back?! I managed to get into IMATS on its last day together with N. I thought I’d miss this year’s IMATS like last year, but I didn’t! yay! I’ve been to IMATS and volunteered a few years back. I’ve expected the usual exhibitors and was pumped to see this year’s classes and workshops! I’m quite surprised to see that this year’s IMATS weren’t as big as in the past. Less bloggers too, I feel. Anyways, I was quite happy I get to join this year’s IMATS :D

IMATS

There were obviously lots of exhibitors in the event. I went there knowing I was going to grab some stuffs from OCC. I love their lip tars and I couldn’t wait to get my hands on it!

OCC Lip Tars

Truly, we were there not to shop, but to actually sit on 2 of the classes – Gordon Smith and Iantha Goldberg. If you guys don’t know who Gordon Smith is, SHAME ON YOU! hahahaha..just kidding. Gordon Smith is like the Prosthetic god in the makeup world. He pioneered the use of Silicone in prosthetics makeup. He worked with celebrities and big Hollywood movies like X-men (that’s right, he’s the Mastermind behind Mystique), Platoon, Face Off, Mimic, Truman, Nixon and helloo my favorite tv show FRINGE, and many others! N and I are a big fan of the shows that he worked on and we were definitely uber excited when we get to see him in person, and to hear him talk about his work. Amazziiiing!

Gordon Smith

So after we sat in for Gordon’s, we had to rush to the other stage so we can get front row seat for Iantha Goldberg’s demo in doing Zombie Makeup! Iantha Goldberg is the makeup artist for Resident Evil, Scott Pilgrim vs The World, Saw V etc. Hmmm, amazing much?

Zombie Makeup

After the show, we walked around and shopped a bit more. Lots of body painting as usual, and of course the student’s competition is always great. I only managed to take pictures of 2 of the works, but as you can see, they are amazing!

IMATS Student Competition

IMATS Toronto 2012

IMATS Toronto

Make Up For Ever Body Painting

Body Painting

Alternative to Latex & Zombie

Okay! So, if you guys followed my twitter, you should know I’ve been looking for liquid latex in Jakarta. I went to the Chemical store and they don’t have any :( …I didn’t really want to use my eyelash glue since I only have so little left. So, I wanted to do my own gelatin pieces, but can’t find glycerine around my area, and my microwave is busted…Nevertheless, I didn’t want to give up and I throught may be I can use Elmer’s glue! Well, there’s no elmer’s brand in Jakarta, so I went to the bookstore and bought a white liquid glue…

I went home, tried it on myself and it worked! Not perfectly, but it worked!  Oh, let me just say that you can wash this off with water and soap, it comes out pretty easily.

So here comes my brother, James as zombie :) It’s not how I’d love to do it, but it’s cheap and easy..not gory enough, but we had to rush it cause we had to go..oh well..here goes! :)

How-to:

1. I applied a very light foundation on James’ face. He’s pretty tanned, and I used L’oreal Tru Match foundation in W2. It looked extra white on his face..hahaha..oh well..I applied the foundation using a dry sponge and applied it quite messily. I don’t think zombie needs to have a flawless base..

2. Using PAC Face Paints makeup, I mixed red and dark blue to make purple paint. I applied it lightly under his eyes, along his lid using a Laura Mercier concealer brush.

3. Using a clean blending brush, I applied PAC brown face paints lightly on the crease, under eyes, side of his nose and sides of his nostrils.Zombie makeup

4. Using PAC yellow face paint and a dry sponge, I stippled some yellow face paint on his face on random places.

5. Using another blending brush (and a face angled contour brush), I applied MAC Scene all over the face in places where I want his features to looked sunken in (crease, side of nose, cheekbones, jawline, jawal etc).

6. Now for the fun part, I applied white craft glue on his face using a cheap disposable paint brush. I applied a light cover, let it dry for a few seconds and randomly I tore out cotton balls and applied it on his face. Once I’m happy with the shape, I applied more glue on top of the cotton.

TIP: The messier the better!

Zombie makeup

7. I applied liquid foundation, add some grey eyeshadow, brown eyeshadow, Snazaroo face paints and just make a big mess :)

8. Since we were rushing and didn’t have the product, we didn’t add blood. HOWEVER, you can make your own blood by adding red/orange food coloring to corn syrup. Just make everything looks nasty, that’s how zombies are…Also, get white contacts if you can to add to the look, James is scared of wearing contacts, he never had to, so he didn’t want to…

Zombie makeup